|
Over the weekend I spent time doing what I like to call "general cleanup". This is basically just a free for all, I go around the grounds looking for shit to pick up or dispose of, maybe rearrange things, and just overall try to make things better without really doing anything too complicated. In this case it was dealing with all the scrap wood I had generated during the past projects I've worked on over the weeks.
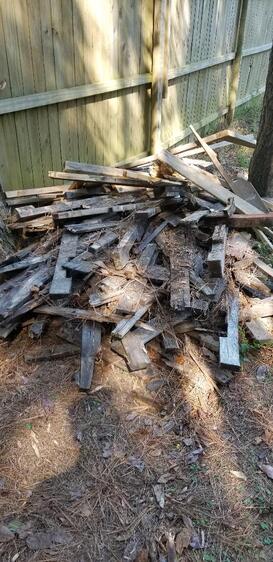
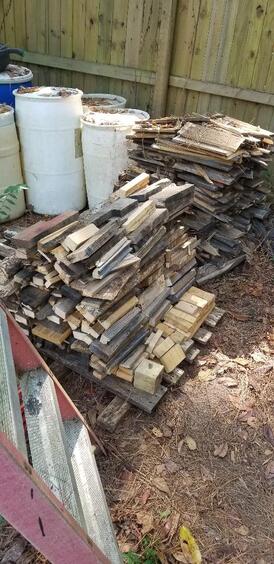
The first batch of wood I had to deal with was the stack of pallet boards I salvaged from the remnants of the old fuel shed. After I built the door and extra shelf for the new fuel shed using some of the 2x4's and pallet boards from the old fuel shed salvage, I was still left with a sizable amount of pallet boards and good lengths of 2x4's. I ended up making a small neat pile of pallet boards over where I have some other salvage wood stacked. Most of this wood is wood pulled from the old storage shed, and it includes a couple of pieces of OSB plywood and some corrugated sheet metal that's currently laying on the ground. I really wasn't too concerned with salvaging the OSB for actual use other than as a buffer from the ground for any wood I may lay on top of it. In this case the pallet boards in question, they were stacked neatly on top of the OSB to keep them protected from the ground. The extra 2x4's were already stacked along with the other 2x4 salvage, all of which is in front of the storage trailer. The next batch of wood in question is a batch of wood we got from one of our neighbors as refuse from a building project they had. This consisted of many 2x4's that they used in building a mold for pouring a concrete slab, among other things. Along with the neighbor's wood was some extra wood we picked up from curbside from some rando's house. This consisted of some odd pieces like 1x6's or some shit like that. Topping it off was multiple random cuts and ends that were mixed in the bunch. This wood was stacked on the opposite side of the main gravel drag, kinda in the way but not in the way. I separated the 2x4's and moved them to the 2x4 pile in front of the storage trailer while taking the smaller pieces and neatly stacking them in some crates for immediate use in the house or wherever when it comes time to burn. The remaining oddball sized pieces went to the large pile of scrap wood in front of the new fuel shed, which consisted of the remains of pallets I cut up when I pulled boards to clad the sides of the shed. After clearing the pile from along the driveway, we now have room to be able to maneuver when pulling in or out of the driveway. The last pile is that aforementioned pile by the new fuel shed. This is the pile that I planned on putting the saw to to make nice small pieces that can be used anywhere, in the house stove, outside in the work area burn can, or for any future projects or jobs that might require burning wood (wood gasifier anyone?). This morning I started on the cutting of that wood, neatly stacking it in front of another pile of wood that underwent the same treatment while I was building the new fuel shed. That pile is just the ends and extra wood that was cut from the pallet boards I nailed onto the shed, this stack I'm making now is a mixture of shitty pallet boards, shitty 2x4's and other odd pieces of wood, all cut up to pieces that are below a foot in length. I used a large pallet that was made from heavier gauge boards that I couldn't use to clad the sides of the shed as a base to stack the wood cuts onto. At some point in the future when this wood is exhausted the pallet will probably rot enough so that I can break it up easily and use it for firewood as well. At this point though I did manage to make a nice dent in the stack of scrap wood and get a nice stack growing on top of the pallet. Hopefully by the end of tomorrow I'll have all the wood cut up and stacked and another area cleaned up so I can move on to something else around the homestead.
0 Comments
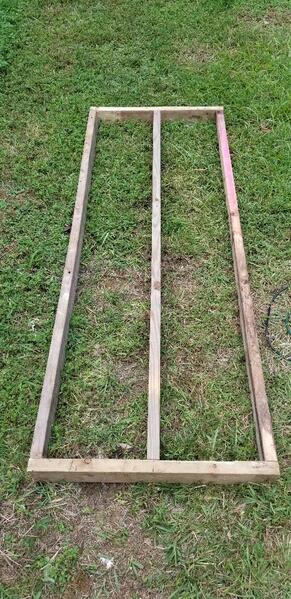
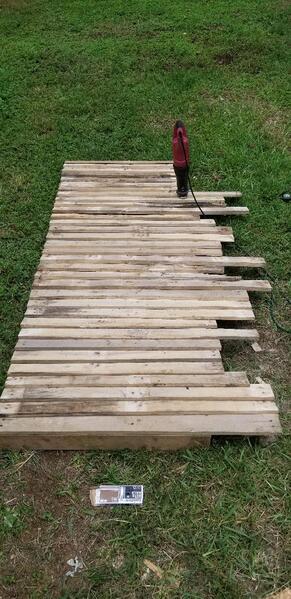
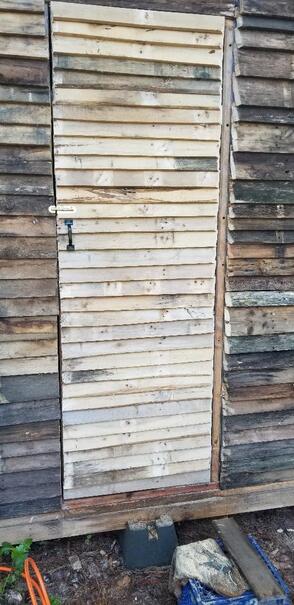
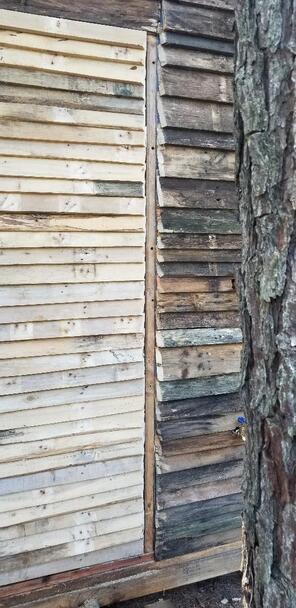
For this episode I've managed to make a door for the fuel shed the way I said I would. I took some of the 2x4's that I salvaged from the old fuel shed and nailed them together as a combination of three long boards and two end boards to link them together. This is to allow for a solid surface with which to tack the pallet boards solidly. I also managed to salvage a lot of pallet boards from the pallets that I salvaged from the old fuel shed as well, these boards are what was used for the shingles on the door. I was able to tack the boards on from their ends on one side of the door frame with the rest overhanging on the other side of the door. This allowed me to take the reciprocating saw and just do a straight cut along the board to remove the excess pallet board length so I have a flush edge on the opposite side from where the boards start. With this we have a complete door made.
With the door frame done the next thing I had to do was add another 2x4 to the opening on the shed. This board is bare, with no shingles on it, serving as a spacer between the door and the edge of the door frame and the shingles. The reason for this is because with the way the shingles are angled, the door would not be able to open easily without binding against the shingles. The hinges would go on the extra 2x4 and when the door swings open, the lack of shingles will allow the door to swing against that edge without binding. I used two hinges that are around 3" long, held in place with 2" wood screws to ensure they'll stay put. The next thing that I attached was a simple door handle, cheap walmart special of course. Lastly I attached a sliding latch above the the handle in order to secure the door when closed. With this we now have our new fuel shed secured from the elements.
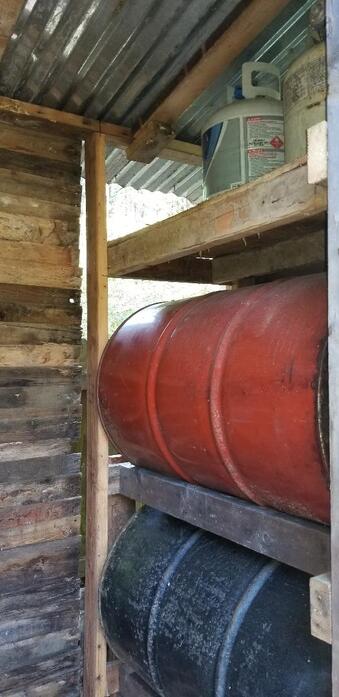
The last thing that I made for the new fuel shed was an extra shelf to add fuel cans. This was a pretty simple setup, again using salvaged 2x4s. The shelf consisted of only a few boards nailed together to make two legs, then nailed to the studs at the back of the shed for full support. With the frame in place I took some more pallet pickets and trimmed them to cover the width of the shelf then tacked them in place along the width of the shelf (left to right), butting them together to make a solid surface. I used my gas cans as a gauge to make sure I had the height correct to allow for easy removal of the cans. After finishing the setup I was able to put four more gas cans on the top in addition to the two cans on the bottom. I could probably turn the cans to put them side by side on the bottom and put four on the bottom as well with only minimal protrusion of the cans from under the front of the shelf. 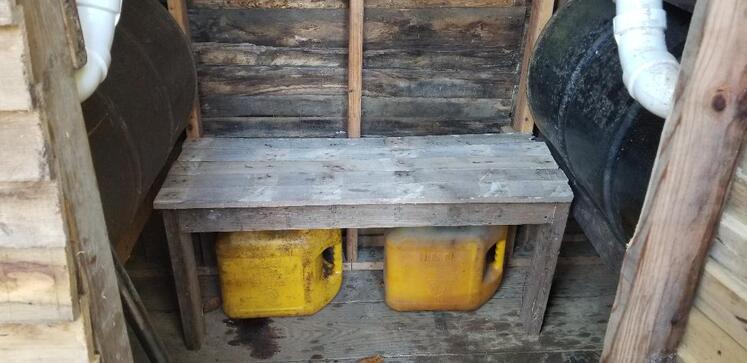
Fuel can shelf completed with two cans underneath for sizing up purposes.
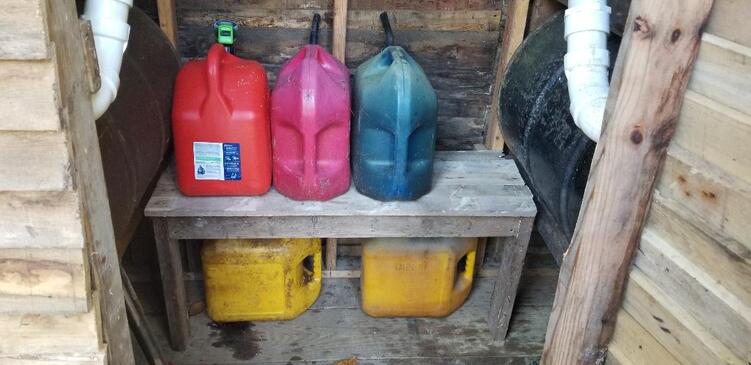
Fuel cans loaded on top of fuel shelf, have space for one more on top.
The reason that I didn't add another tier to the shelf to be able to add a lot more cans was this: I didn't want to extend the vertical legs at the front of the shelf up past the lower level drums because if I have to remove those drums for any reason, the shelf legs will be in the way and will have to be removed to facilitate drum removal. I could've nailed a horizontal 2x4 across the top level shelves but this would've best been done before putting drums in place. Besides I don't even have that many fuel cans to even require this much storage space. Worst case I might add some smaller shelves extending out from the back wall to hold things like fuel treatment or two cycle oil, basically light weight stuff that won't stress a shelf to the point of ripping it from the wall. For right now though, this setup is adequate. The last things I have to do for the fuel shed is to add some street elbows on the faucets and maybe put a reducer bushing with a length of pipe nipple that will allow me to put the end into the fuel can for dispensing fuel cleanly. If I don't do that I might even add hose nipples and use some lengths of hose secured to the wall in some way where I can just leave the fuel can on the ground and just put the hose into the can to refuel without having to hold the can up to the faucet. We'll see.
At this point in the series involving the old shed site, I've finally managed to finish the cleanup of the site. Within the boundaries that I set for myself with regard to how much area to clear, I've managed to cut down all weed trees and any saplings that were making any attempts at growing as well as grind up the pine mulch that was accumulated on the ground.
The burn pile also grew as a result of all this clearing since with every tree that was cleared I had two or three sections that were cut from the tree and stacked on the burn pile. Underneath that is remnants of the old fuel shed. The area that I visually marked off to clear is the area that will in no lesser terms be the future fence line that will link the end of the garden fence to an imaginary corner that will also link the end of the back fence from the old dog yard to that same corner. This extra wood fence will enclose a large piece of land that will be available for my use once I dismantle the old chain link fence that made up the dog yard. 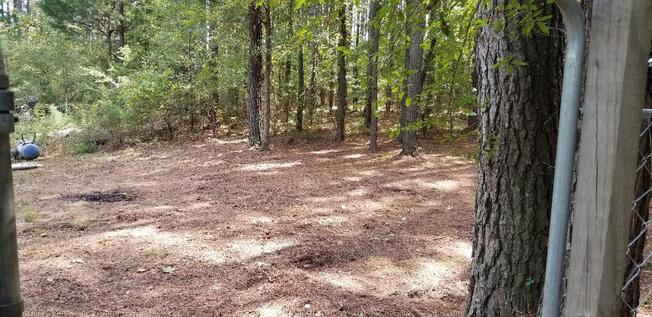
Shot of clearing from chain link gate at old dog yard.
Shot of clearing from dog yard, covering the section nearest the garden fence.
Shot of clearing from end of garden fence towards old dog yard chain link fence.
With the clearing done I was able to go ahead and start trying to burn up the brush pile. Ironically the day before I was able to fire the pile it rained pretty good, soaking everything enough that I had to pile trash that was somewhat moist under the pile along with a heavy dousing of a veggie oil/kerosene/diesel/solvent mixture I had in a gas can to try and get things started on the burn. I was able to get things going enough so that by the end of the day it did burn up all of the shed wood that was under the brush with a small amount of actual branches and tree parts. The following morning I ended up piling some new trash under the brush pile and using the shears to cut the branches and stuff them in more tightly packed to cover a smaller footprint so when the fire gets started it would be able to burn more material for every minute that the fire was going. I was able to burn a fair amount of material in that episode but not enough to fully consume everything. I'll have to repeat the same thing again until all the material is consumed. 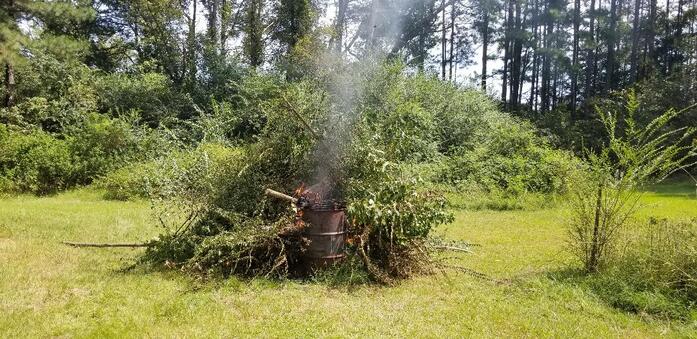
Brush pile starting to burn.
With the brush pile burning I also turned my attention to the stack of salvageable pallet wood that I pulled from the old fuel shed. Along with the pallet wood was sections of 2x4's that despite the nails and/or screws, were still usable boards. I spent the morning cutting through the tacks that hold the pallets together as well as using my drill/driver to remove the screws that were in the boards. I managed to get a good little pile of pallet pickets started along with several 2x4's. I will continue with this work the next day to see how far I can get, hopefully I can finish that shit. I've got other things I wanna get to .
As was supposed to be the case for this week, I continued to clean up the old fuel shed site, but at this time I focused on raking up old pine mulch and branches and other trash that accumulated on the ground over the years. I started burning up some of the mulch in the burn drum but because of the density of packed mulch, even with some veggie oil/diesel fuel mixture, that shit would not burn good or long for anything. Even when I finished I still had a drum 3/4 full of that shit.
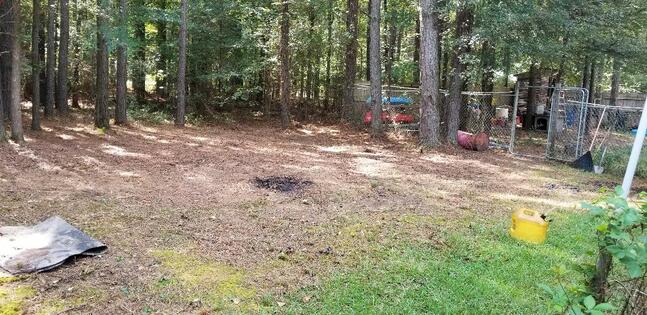
On the other hand I kept cutting weed trees and along with larger branches on the ground, built up a pretty large burn pile by the normal burn site. I added a wheel barrow full of mulch to the burn pile as well. I even started a smaller burn pile of mulch at a spot where I raked some mulch. I kept putting smaller branches on top of that burning pile of shit just to keep the whole disposal machine running. I also took the push mower and ran it over the ground to grind up the mixture of pine mulch and small branches and small saplings and other weedy plants so I didn't have to cut or otherwise pick up the material to stage it at the burn site. There's still several large trees to cut down within the area that I mapped out in my head and with my eyeballs. I wanna be able to have the area cleared so if I feel inclined to do so, I can start sinking fence posts along the imaginary fenceline to get things started with the perimeter fence and just focus on keeping that area trimmed clean. The work will continue. 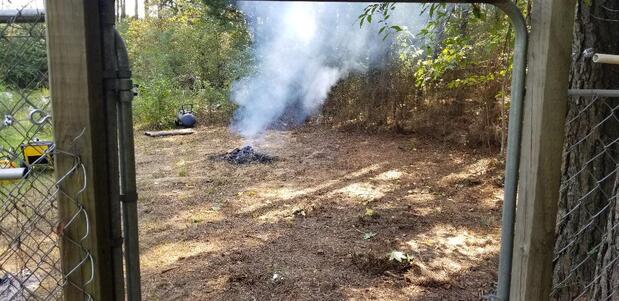
Work site being cleared, note small fire on ground in middle.
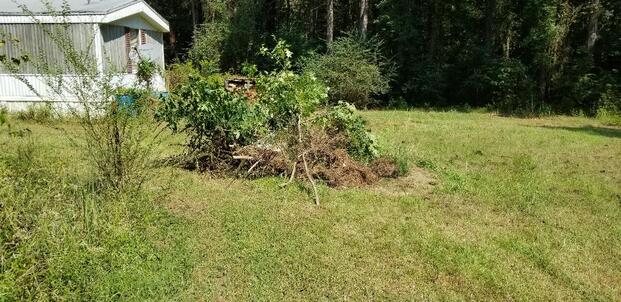
Burn/brush pile growing larger.
Well today was pretty much the same as yesterday, more continued demo of the old fuel shed. I managed to get the roof dismantled, salvaging the 2x4's as well as the corrugated sheet metal. Most of the burning that was done was of the old OSB plywood from the roof. The stuff was at least worn out enough that I was able to break the stuff into pieces small enough to stick into the burn can.
After getting the roof broken up I moved on to the rear wall. Again, more old OSB was removed and tossed into the burn can. The pallets that were used for the wall were separated and staged with the rest of the salvage wood. At this point with the walls down most of the work was breaking up the OSB to burn up. Near the end of this session I did start on the floor a little bit, breaking up some of the rotted material to be tossed in the burn can as it burned its way down. I ended up having to just form a pile of broken up OSB to throw into the burn can tomorrow morning when I try to wrap things up with the floor disassembly. If that goes pretty quick I may be able to start cutting up the pallet boards I have staged by the storage trailer, otherwise I'll continue with this on Thursday. 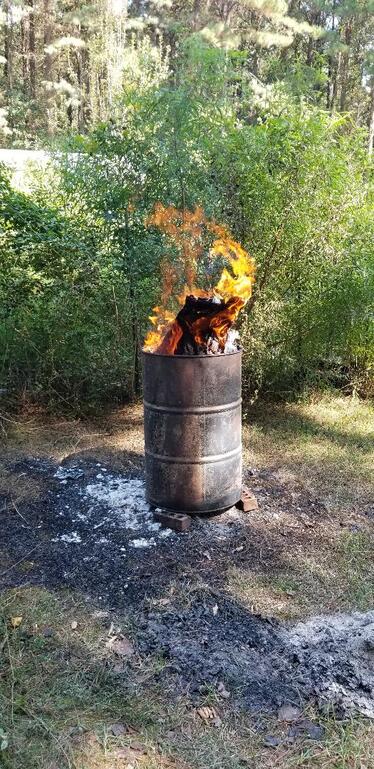
The burn can runs strong.
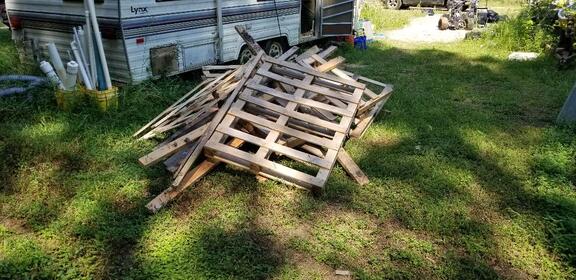
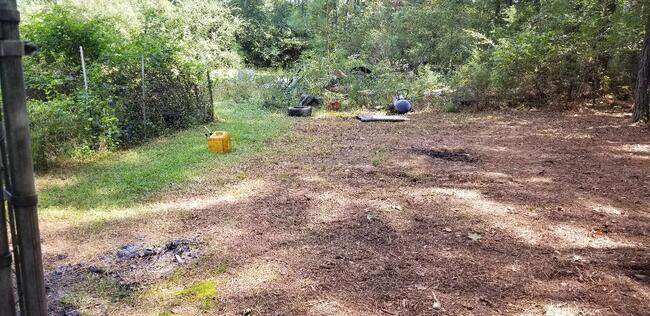
Pile of salvaged wood staged by storage trailer.

The floor section, all that remains of the old fuel shed. Note pile of broken up OSB in the left foreground.
Today the demolition continues. I had already brought down the roof for the most part, knocking out the front board and the side walls enough so that the roof came down at the front. I also started breaking up one of the side walls as well as picking up branches and other small brush and burning it up in the drum while dragging larger weed trees to the burn pile site. Today was no different, just a continuation of the same. I did manage to get one wall completely broken up with some boards taken to a staging spot next to the storage trailer for further breakup into usable boards.
The other side wall was split up board by board until I could get to where I could knock boards loose with the sledgehammer. Some of these boards were salvaged and staged with the rest while a lot was thrown into the burn can, keeping a nice little fire going, something that would've been welcome in the winter time. I continued to chop down large weed trees, dragging them to the burn pile and piling everything up. On top of that the old OSB board that came from the one side wall I took down today was tossed. I'll probably end up having the whole site cleaned up by the end of the week but will have the salvage pile to contend with going into next week. So far so good. 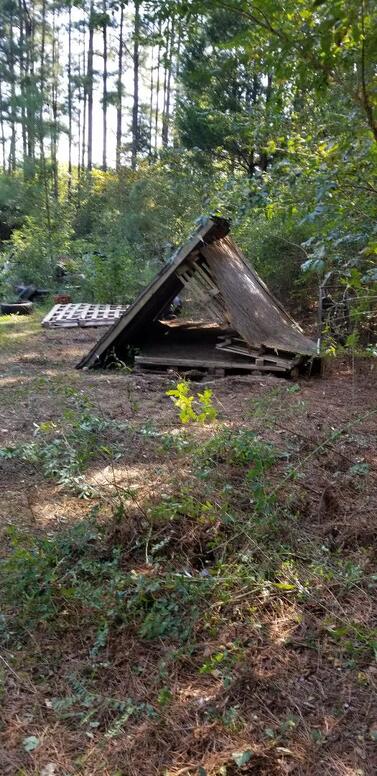
Side view of shed down, area surrounding shed cleared pretty good.
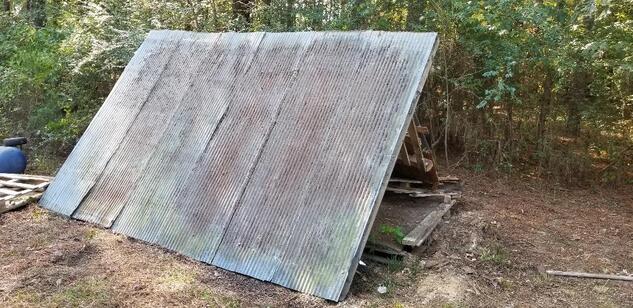
Roof of shed, plenty of salvageable metal and 2x4's in this section.

Burn pile with weed trees and old OSB plywood, still growing.
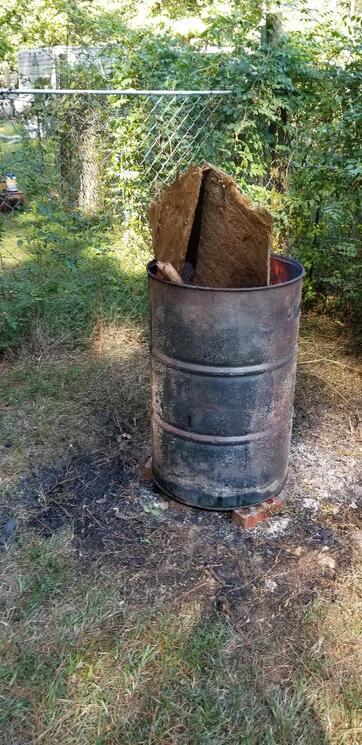
The burn can, country waste disposal unit, taking care of smaller trash at the site.
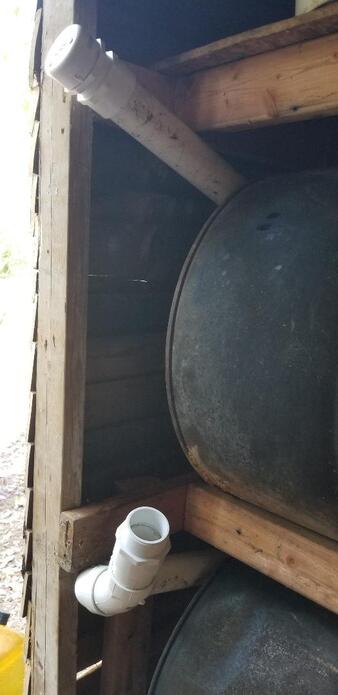
As of this writing I've managed to get the fuel shed in no lesser terms, open for business. I managed to install the filler tubes for the four drums. This consists of 2" NPT PVC pipe fittings and short lengths of pipe. Since the drums are installed in the shed in a way where its pretty tight in front of the large port at the "front" of the drums and the inner wall of the shed, I had to make up a simple combination of pipe fittings that would allow for the hook up to the filler port on the drums to be accessible from the inside of the shed.
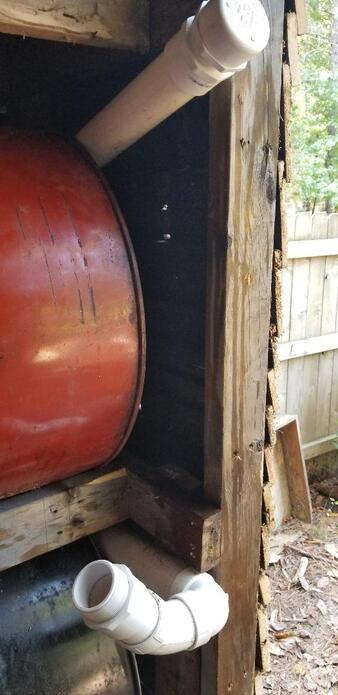
This involved using a 90 degree street elbow at the filler port on the drum itself. From there an 18" length of 2" PVC pipe was inserted into the elbow. Now for the top tier drums I was able to get away with just installing a female smooth to male threaded adapter to the end of the PVC pipe with which I was able to put a cap on. The positions of the drums relative to the wood framing that holds the top shelf allowed for the elbow to be angled at enough of an angle (approximately 15 degrees) so as to allow for fuel to flow smoothly into the drum without overflowing out of the end of the pipe. On the bottom tier drums I had to do things differently. Since the position of the framing wouldn't allow for the pipe to just come out at enough of an angle to allow for filling, I had to add a 90 degree elbow at the end of the 18" PVC pipe then add a 45 degree smooth street elbow to the other side of the 90 degree, then add a 3" length of pipe and finally the female smooth to male threaded adapter in order to put the cap on. This allows for enough height in the whole package so fuel can flow into the drum without overflowing. I will still have to pour slowly for all intents and based on the results of filling it up will probably find myself making some tweaks to the setup to facilitate clean quick filling of fuels into the bottom drums.
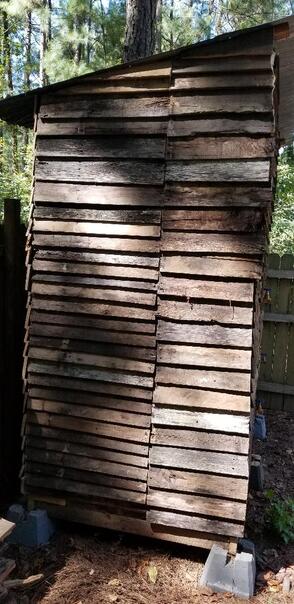
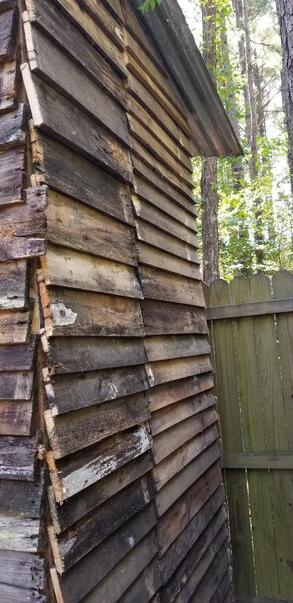
With the drums ready for filling in the new fuel shed, I was able to empty the remaining non ethanol gas from the drum in the old fuel shed and deposit it into the top drum on the left set of drums (facing the doorway from the outside). This obviously took a minute as I had to pump the fuel into a 5 gallon can then pour it into the filler tube. The newer gas cans have that sealed design that doesn't allow for air flow as fast as the old school gas cans that have the vent hole at the top of the can opposite the spout. With the gas transferred over I was able to move the drum out and stage it with the other drums near the new fuel shed. The next thing was to transfer the mixture of old veggie oil and diesel fuel and kerosene that I had in three other drums. There were two smaller 30 gallon drums, one that was half full, another about an eighth full, and a 2/3 full standard 55 gallon drum, which was still sitting in the old fuel shed. I emptied the two smaller drums which were already staged near the new fuel shed. I put all that fuel into the top drum opposite the gasoline drum. I ended up having to poke a vent hole into the old diesel can that I was using to transfer the thicker fuel since without it, it took a long time to get the can to belch enough to get more air inside to allow for the fuel to flow. This was especially apparent when I transferred the mostly waste veggie oil from the 55 gallon drum. Once the fuel mix was transferred I moved the last drum from the old fuel shed to the new site. Afterwards I moved the other gas cans and other shit that was on the ground in front of the old fuel shed in order to prep the area for clearing and for demolition of the old fuel shed. Fast forwarding to today, I started cutting the brush from around the old structure as well as the high grass around the front of the structure so as to make it more comfortable and less likely to get bugs on me. A lot of the larger weed trees and other shit were cut and dragged to a future burn pile site next to our burn can while a lot of the smaller refuse was thrown into another burn drum I had going right by the old fuel shed. I also started knocking down the two side walls, getting one wall almost all the way out, enough so that the front of the roof is now on the ground. I slowly pulled pieces of the old OSB from the wall as well as broke sections of the disposable pallets that i used to build the structure and tossed it all into the burn can for disposal. Tomorrow will be a continuation of this work, which will also involve trying to recycle the 2x4's and corrugated sheet metal from the roof for use in future projects. When done the whole area from the eastern edge of the garden fence (which is on one side of the old fuel shed) over to the other side where the old dog yard fence still stands, will be cleared of everything except dirt. 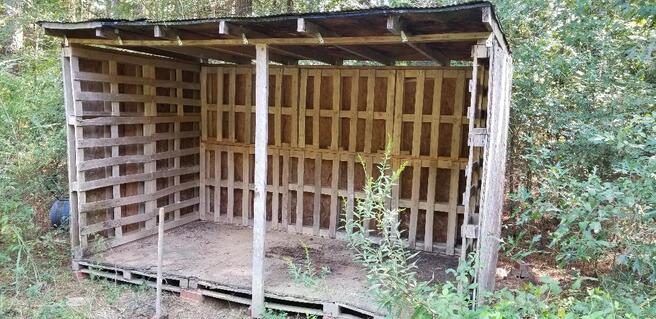
Old fuel shed, soon to be demolished
Continuing on with what I was doing on the dodge the day before, I had to take care of some more small crap. Its funny how some people think that they can restore a car by just dropping an engine in and hooking up a few basic things and instantly get a car on the road. There are a LOT of little things that need to be done when you're talking about what amounts to a full mechanical restoration.
In this case I was working on hooking up the TV (throttle valve) linkage after making a "new" linkage from the one that came with the engine and transmission. I had to hook the linkage up to the transmission and eyeball how the thing needed to to bend around to clear the firewall and back of the engine and still hook up to the carburetor throttle where everything will move in unison. I had to cut and weld the linkage in several places before I finally go the thing set up the way I needed it to be. 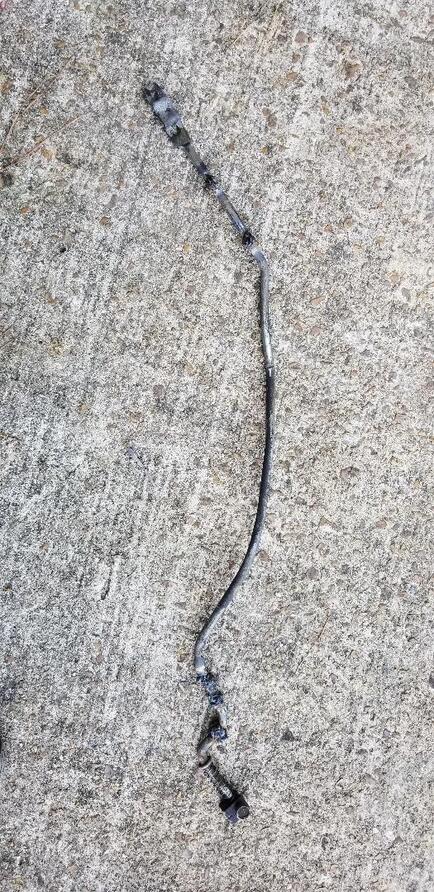
TV linkage after all the butchery, note all the welds along the unit.
In order to get everything hooked up I had to use a 1/4" bolt with a 5/16" nut for a spacer between the mount point on the TV linkage and the throttle on the carb. The way everything is made did not allow for a direct mating. A lock nut on the end of the 1/4" bolt will keep everything held together without risk of coming apart. I tested the throttle on the carb and it moved the TV lever on the transmission like I needed it to. Now whether things are adjusted good enough that the transmission will shift properly is a whole other argument. We will see on that one. The next thing I had to address is a bad freeze plug on the driver's side cylinder head. After putting the radiator hoses together I filled the radiator with water to check for leaks and besides the water pump gasket that particular freeze plug started leaking from some small rust holes. This was a pretty quick and cheap fix as freeze plugs are typically under a dollar and are easily tapped in place with something like an old piece of pipe and a hammer. The last thing I had to do in this episode was hook up the two wires for the sending units on the engine. The temperature and oil pressure sending units, both of which were borrowed from the 440, were installed and just needed the wires which I already ran when I rewired the car, hooked up with connectors. For the temp sender I was able to recycle the female bullet style connector from the old wiring harness. I soldered that end to the new wire and covered it with heat shrink tubing. The oil pressure sender has a small mushroom head that I was able to plug up to with a female spade terminal, which slid over the little head on the sending unit pretty snug. Crimping that terminal to the wire and sliding it on completed that task. 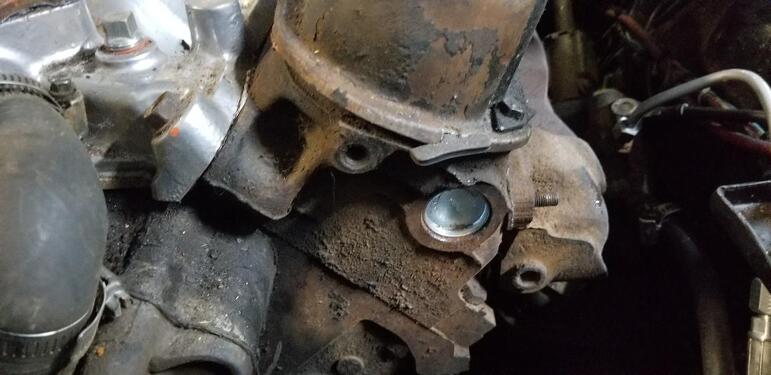
Freeze plug installed in cylinder head.
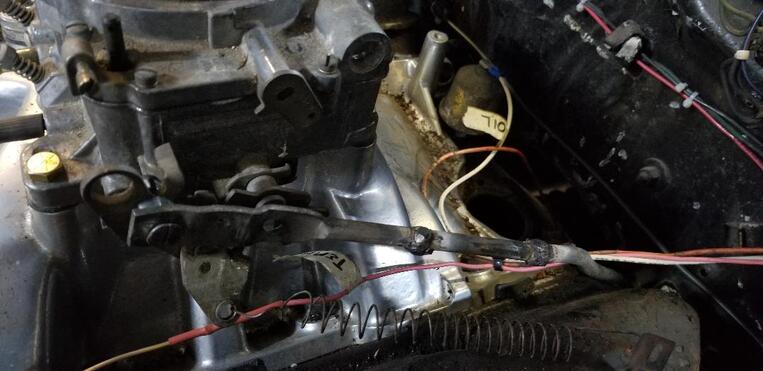
Shot of TV linkage hooked up to throttle on carb along with wires going to oil sending unit, visible in upper right and the other in the lower foreground of the pic to the sending unit to the left (out of view). Note "oil" tag on wire for that unit and red heat shrink tubing on the other wire.
On a lighter note I did change the oil on the S10 which was needing it after a few months of use. Best part about this was the idea that I was able to fill up one of my oil wood buckets with a good amount of oil. I'll be changing the oil in the Tracker in the morning which will further top off that bucket, along with a little gas to thin it out some. Gotta kill 2 birds with 1 stone when it comes to this self reliance/sufficiency shit!
Today I managed to finish up cutting up pallets and getting all the shingles on the sides of the fuel shed. I still had to finish putting pallet boards up on the final third of the back of the shed while having to cut angular cuts into a few boards to cover the part of the sides where the roof angles down. Surprisingly the four pallets that I moved to the work site a few days before were exactly enough to provide the boards necessary to finish things up on the shed. I have very respectable piles of fire wood stacked, between ready to use boards and the large pile of main boards and broken pickets that need to be further cut up. All of this wood will definitely feed me through the winter in outdoor firewood.
At this point I can move on to the plumbing as mentioned yesterday, assembling the 2" pipe assemblies that will screw into the large ports on the drums to allow for filling them with fuel, along with the final output faucet. I'll probably end up getting some of that expanding foam shit to spray into the gaps at the corners in order to close things in and fill in some gaps. Caulk will also help accomplish this as well. At a point later on I'll go ahead and buy the entry door to hang so I can close things in as well. With that I can finally move on to break down the old fuel shed and clean up that entire area around where the old shed sets. 
Complete back side of shed with shingles/pickets nailed all the way up to roof.
After finishing the latest work on the Dodge I turned my attention back to the fuel shed, especially since I got a new box of brads for the nailer as well as more reciprocating saw blades. I did have to cut up some more pallets for the necessary pickets to clad the back of the fuel shed. I did move four pallets earlier in the week so I didn't even have to waste time moving pallets so I went straight to cutting them up. I went ahead and continued to nail boards to the back of the shed until I made it to the top, covering up another third of the back of the shed. By the time I had to stop I managed to make it up a third of that portion of the wall. I had to trim some excess from some of the boards that were already nailed up on the ends along with the new boards I nailed up. Hopefully the next time I get back to work on the shed I'll finish with the pickets and can move on to finishing the plumbing on the drums.
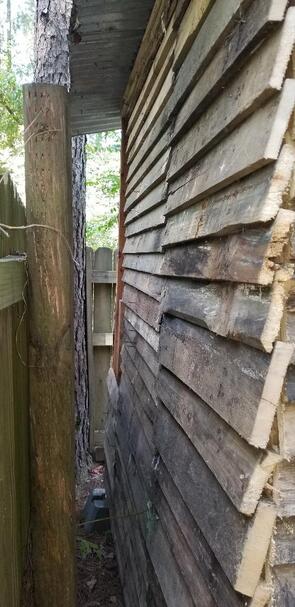
Shot of back of fuel shed with 2/3 of wall covered with pickets.
Inside view to remaining open wall behind drums.
Another little side project that I finally started working on was making fire starters. I'd been saving dryer lint for quite some time and was initially using it as is for starting fires in the wood stove, really novelty purposes using ferrocerium firestarters like the Blastmatch. I then thought of an idea where I can use some of the bulk paraffin candle wax I had stored in the storage trailer. I would take toilet paper/paper towel tubes, cut them into shorter pieces then stuff them with dryer lint and pour melted wax onto the lint, letting it soak in and harden up, making nice little firestarter blocks that should burn a long time between having the lint, cardboard tube and wax available as fuel.
Using a hot plate and an old cast iron pot, I melted wax (not the right way according to most, no double boiler here) and poured the wax into the short tubes stuffed full of lint which were resting on a large piece of cardboard. I had to do several pourings to allow enough wax to soak into the lint. This whole job was pretty messy and sorta wasteful since a lot of wax was spilled while trying to pour it out of the pot. I could've done it neater if I had a pot or beaker or something with a pour spout to direct the liquid out better. Maybe I can find something to dedicate to this duty later on. When the spilled wax dried up I just peeled it up from the cardboard and put it back into the pot to be remelted. In the end not too much wax was really wasted and I did manage to make several little firestarter blocks for use this winter in the wood stove. I still have plenty of dryer lint and blocks of wax, I just need more toilet paper tubes. When completed I'll be storing these things in cardboard boxes, most likely kept in the storage trailer along with other prepper/survival stuff in my continuous effort to keep things neat and organized. 
The batch of messy little firestarter blocks dried up and ready for packing away for use this winter.
|