|
It's long past time really that we started planting stuff, despite the quirky weather. I did start off with some of the basic stuff that we would typically plant. As usual, Lowe's has their share of different plants, despite the fact that the prices went up substantially. I only got a few things to fill in the opening spots in the raised beds that were available. Don't forget, I had to dismantle one litter bucket bed and emptied out the pair of old drum raised beds due to degradation. The remaining beds, which were still aplenty, had some stuff already planted. 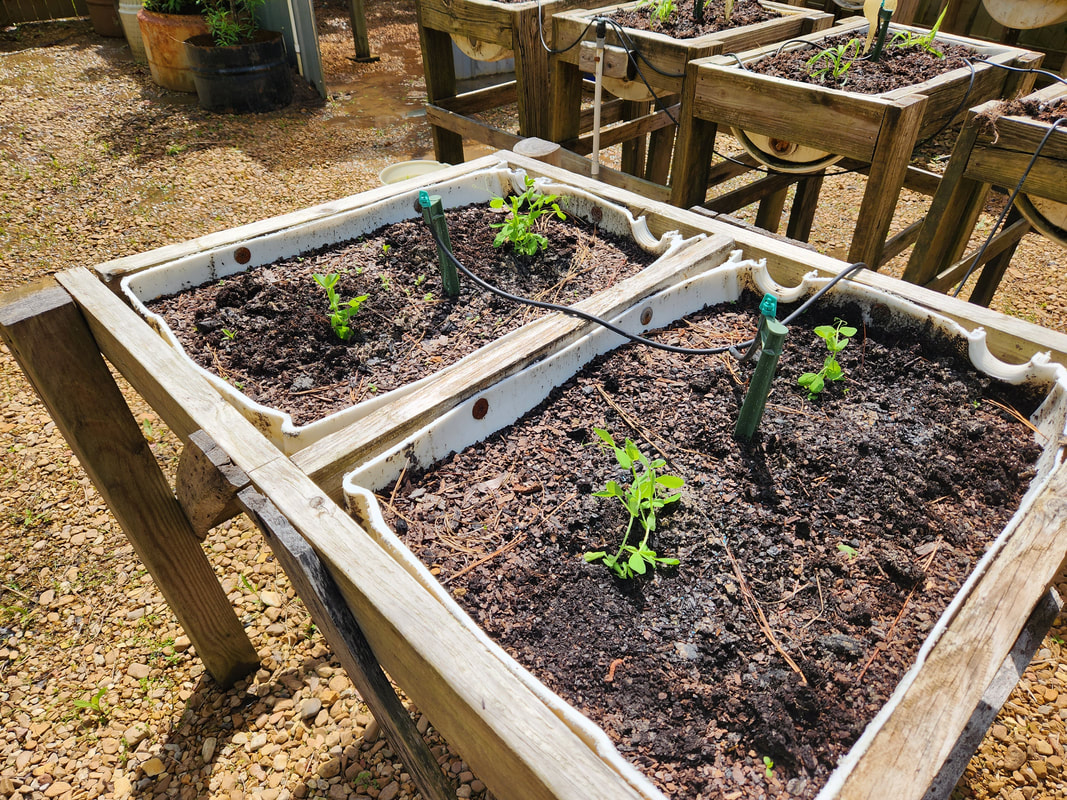 Some garden pea plants planted in a double drum raised bed, just across from the main row of drum raised beds, which are just in front of the Greenhouse. 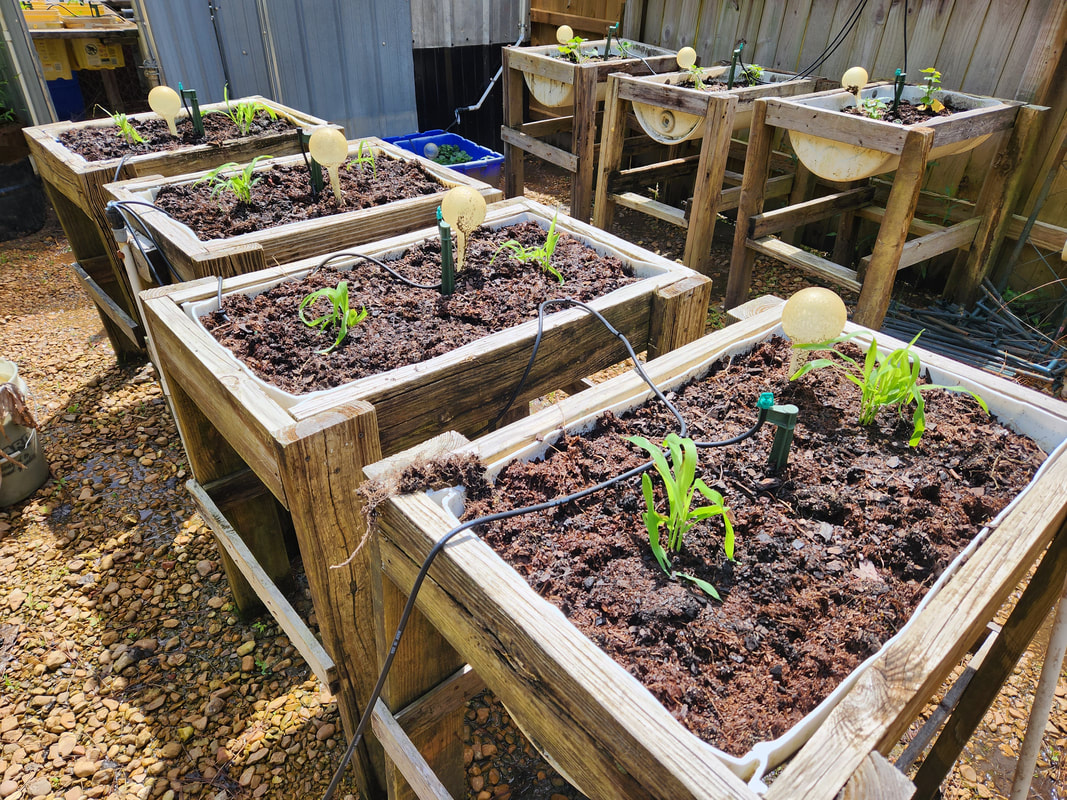 The main row of drum raised beds, planted with corn plants. These will need to be well fertilized to ensure they actually do something. Some of the planters already have some lettuce plants in place, along with several onion plants. I also planted several seed potato eyes in the larger raised beds. Some of the potatoes are already coming up, along with a small batch of potato eyes that were actually leftovers from last year which taken root. The number of planters were kind of limited. I got a flat of tomatoes, peppers, corn, garden peas, and sweet potatoes. The corn went in one row of drum raised beds near the middle of the garden, just in front of the Greenhouse. Some of the peas went into a new set of drum beds across from the larger row of drum beds. The rest of the peas went in the planters in the Greenhouse, along with the peppers. The sweet potatoes were planted in the same row of drum beds along the back fence, as they were last year. The tomatoes were planted in the one litter bucket bed, leaving two slots in that bed, since the tomato flat had six plants and the bed has eight buckets. 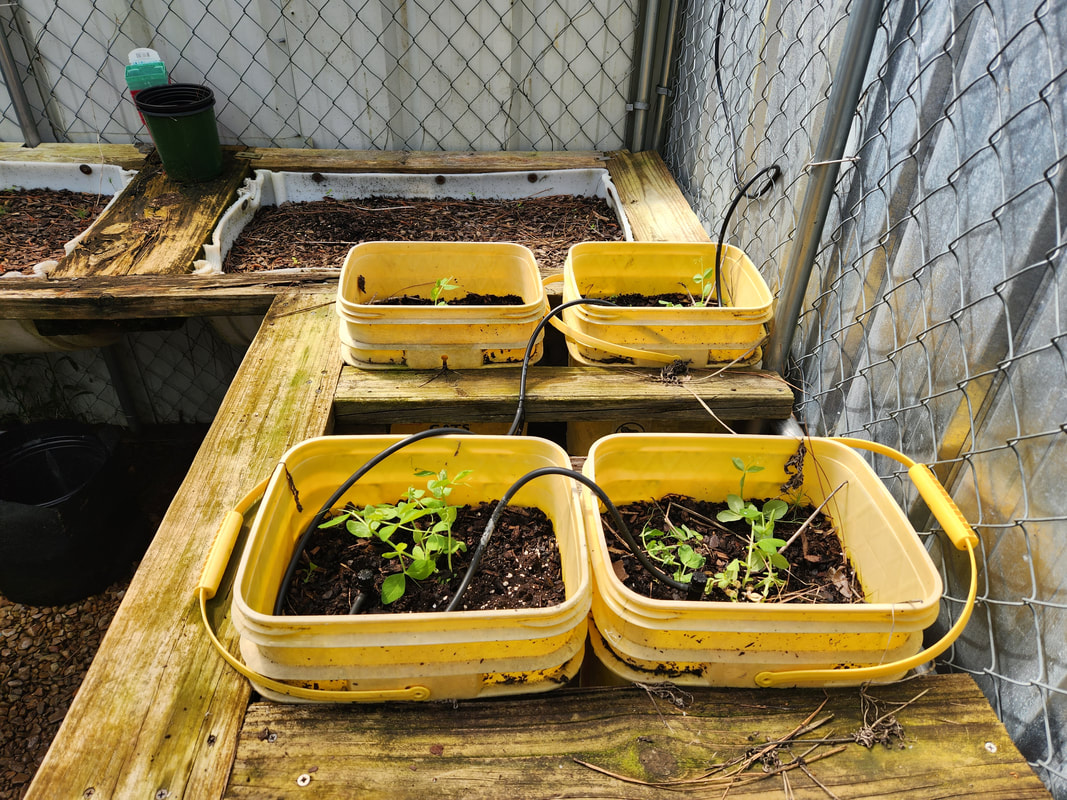 The rest of the garden pea plants planted in a set of litter buckets inside the Greenhouse. This set of buckets had okra plants last year. 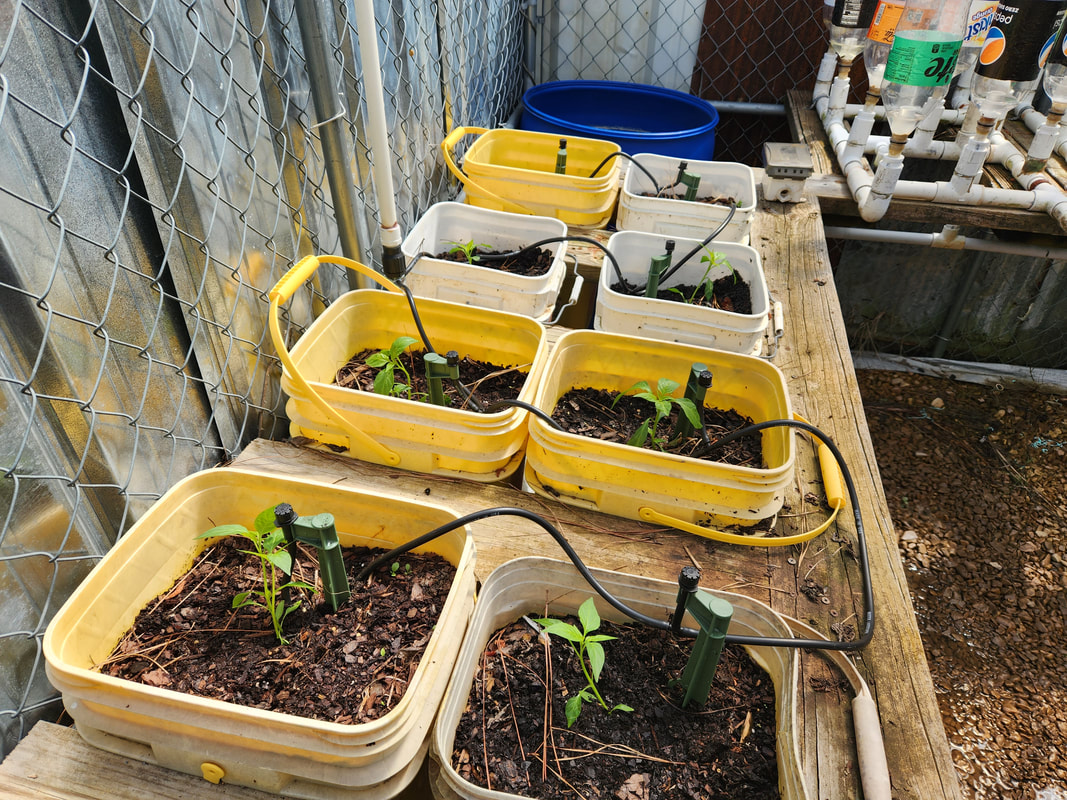 Hot pepper plants planted in six of the eight litter bucket beds on the other side of the Greenhouse. 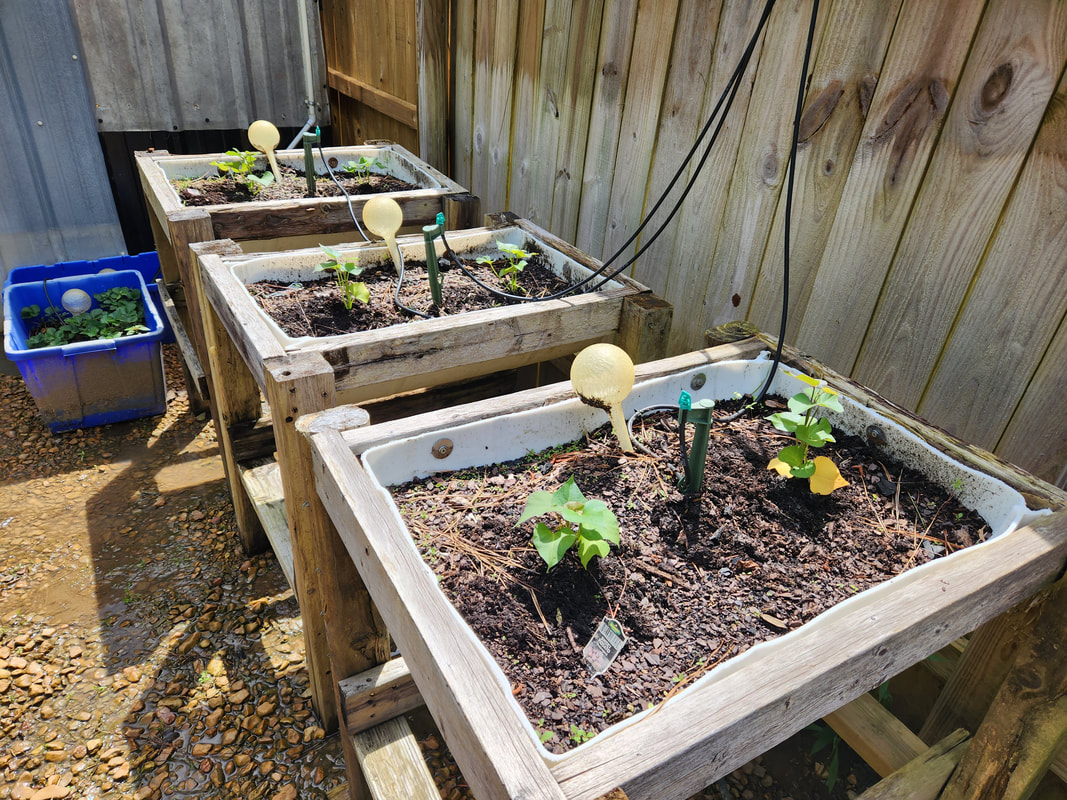 The back row of drum raised beds, accommodating sweet potatoes, as they did last year. 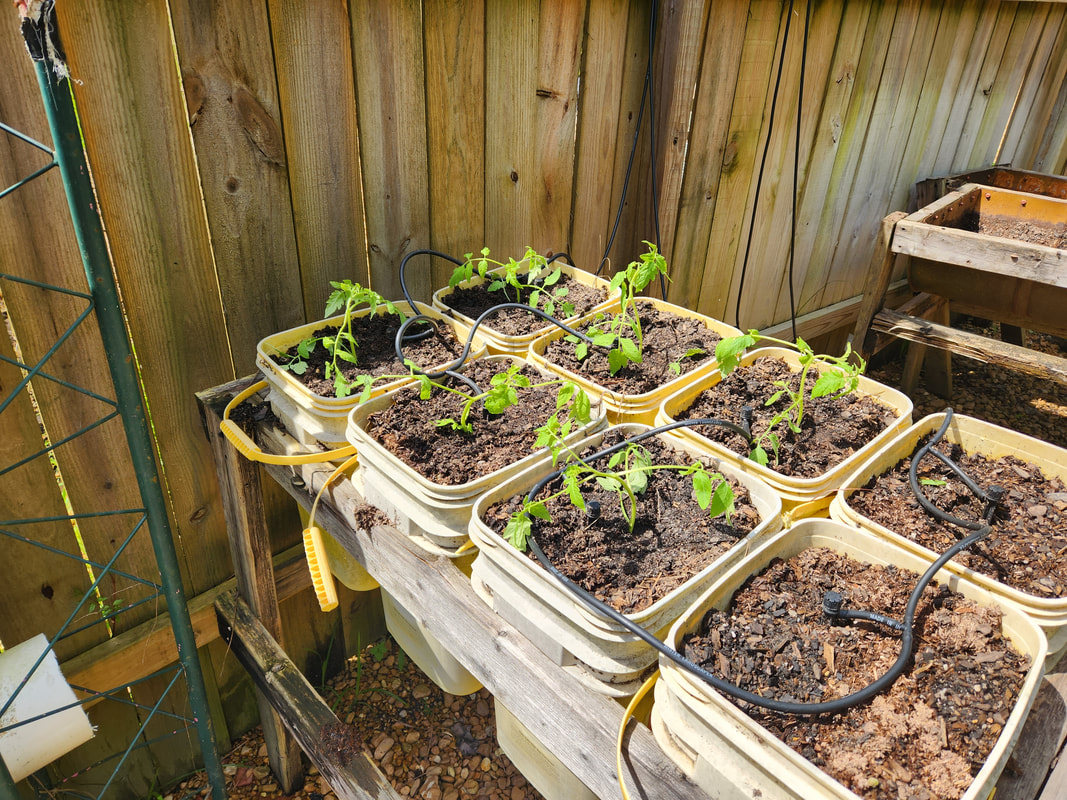 Tomato plants planted in the one litter bucket bed that remained after dismantling the other unit next to this one. After planting the seedlings, I moved on to another stage in the shed project. While getting the seedlings, I also got three 4x8 pressure treated plywood boards to cover the frame for the new storage shed I'm currently building. With that in hand, I tacked down the three boards, making things ready for me to start building the frame using the old portable garage frame pieces. 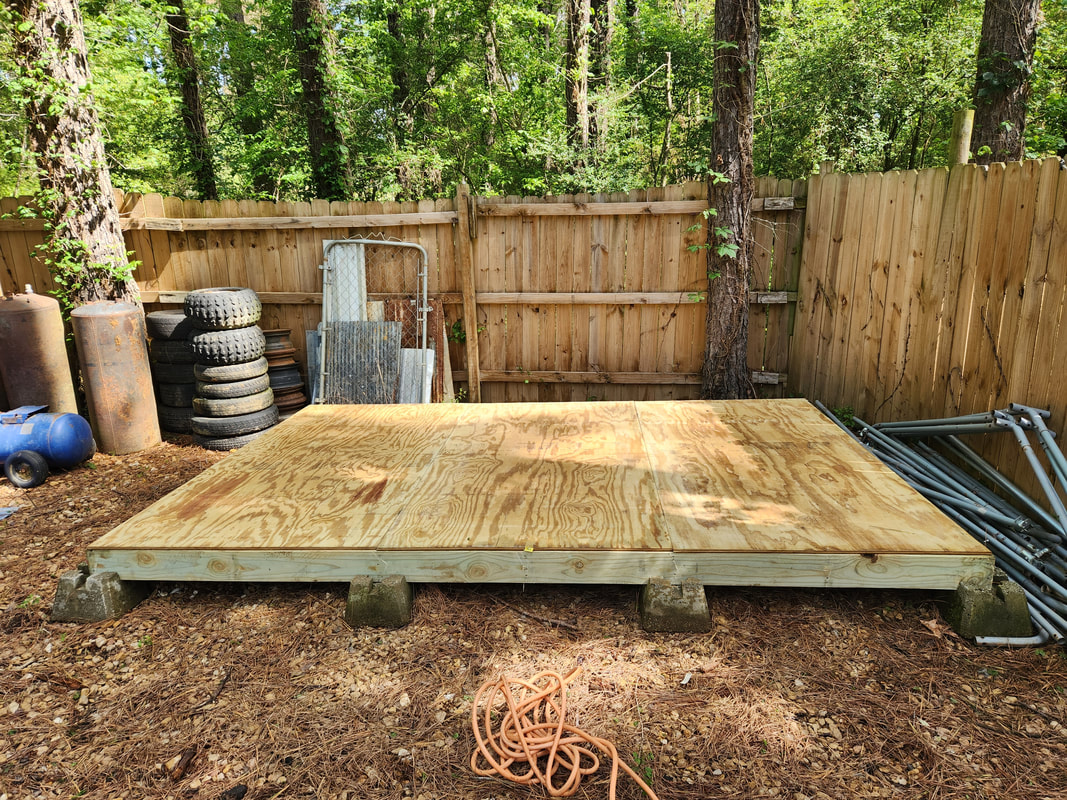 The three 4x8 plywood boards are tacked to the 8x12 frame made of 2x6 boards. Note to the far right next to the foundation frame the tubes from the garage structure. I managed to lay out the main pieces I would need to set up the roof frame pieces and vertical pieces for the walls. I will possibly have to shorten the roof frame tubes as the old structure was 10ft wide at the bottom base. Even with the taper that the structure had as it went up to the roof, the roof frame sections may still be a little bit wider than the 8ft of the frame. Either way, I'll tweak the lengths of the tubes and start bolting things together to get the frame erected. I have plenty of pieces of tubing that I can reinforce the whole frame, making it plenty sturdy to accommodate the sheet metal that will clad the frame, as well as be sturdy enough to withstand any winds that may whip up through the area. Things are coming together.
0 Comments
When I last left off in the Dog Kennel Greenhouse, I was reassembling the Double Barrel Hydroponic Garden due to the idea the other PVC pipes that were going to be used were not of the size to fit with the standard 6" Schedule 40 end caps that are available. It kind of worked out since I needed to find a place for the drain pipes that were used for the old DBHPG setup. After getting the assembly in place in the greenhouse, there were a couple things I had to dial in. One, the holes for the planter cups were a bit too small, originally used for some regular plastic cups, which don't really hold up to the sun in one season. I had some seedling planters that were a little more durable but they were wider than the drinking cups. A little work with the reciprocating saw and the holes were enlarged for the planter cups.
After a little slicing work with the saw, the larger diameter seedling cups fit into the pipes nicely enough that the contents will be saturated nicely when the system is in operation. Note the cut pieces of plastic in the foreground.
The other thing that had to be done was adding a coupling and a short piece of PVC pipe to the input pipe, which was installed at a cockeyed angle. With the extra PVC in place, I made the plumbing a little neater. With that, there's still a matter of the pump. 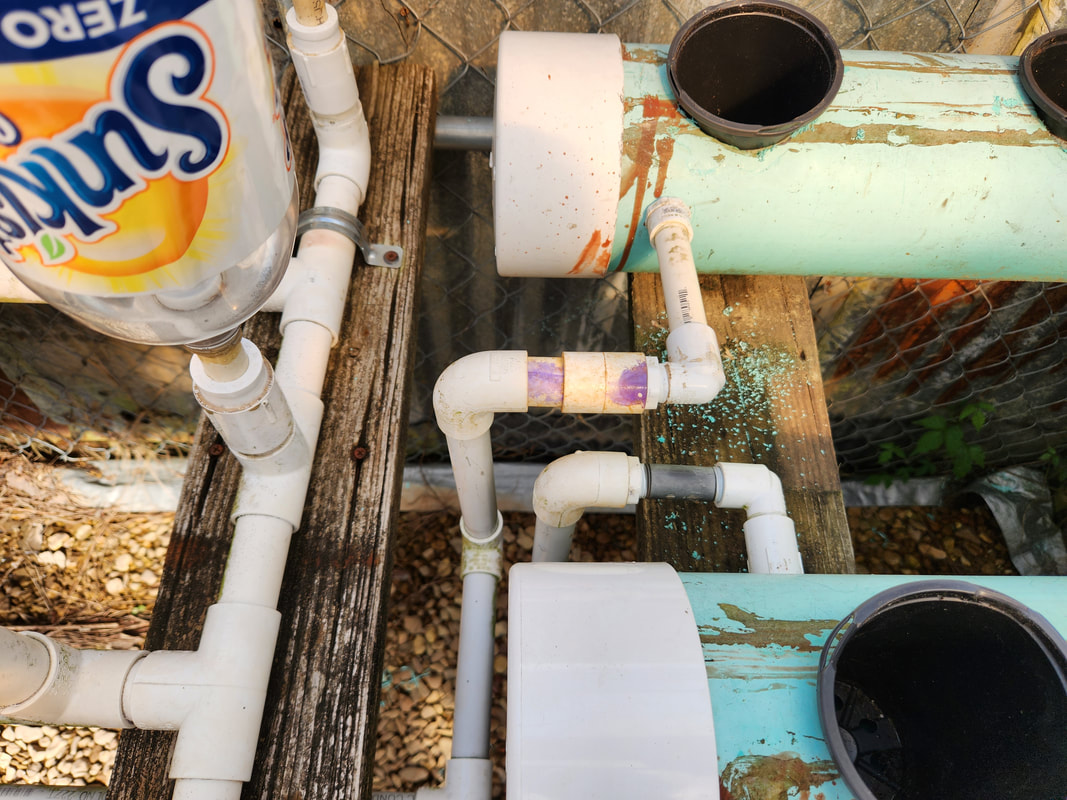
The simple addition of a coupling with a short piece of pipe allowed me to straighten out the input pipe connecting to the first of the two pipes in the DBHPG.
In the meantime, there was the matter of cleaning up the garden some. I had already had to dismantle some old raised beds due to the wood tables degrading to the point of falling in. The cat litter buckets that were in them were stacked up for use in a future raised bed, with some extra buckets staged along with the old buckets for another raised bed to be when I get around to constructing it. I had some small pots that were used for some catnip and other herb plants that unfortunately didn't make it through the winter, with even the roots not surviving. I ended up reusing the dirt in some of these pots to fill up one of the ground raised beds which needed more dirt anyway. 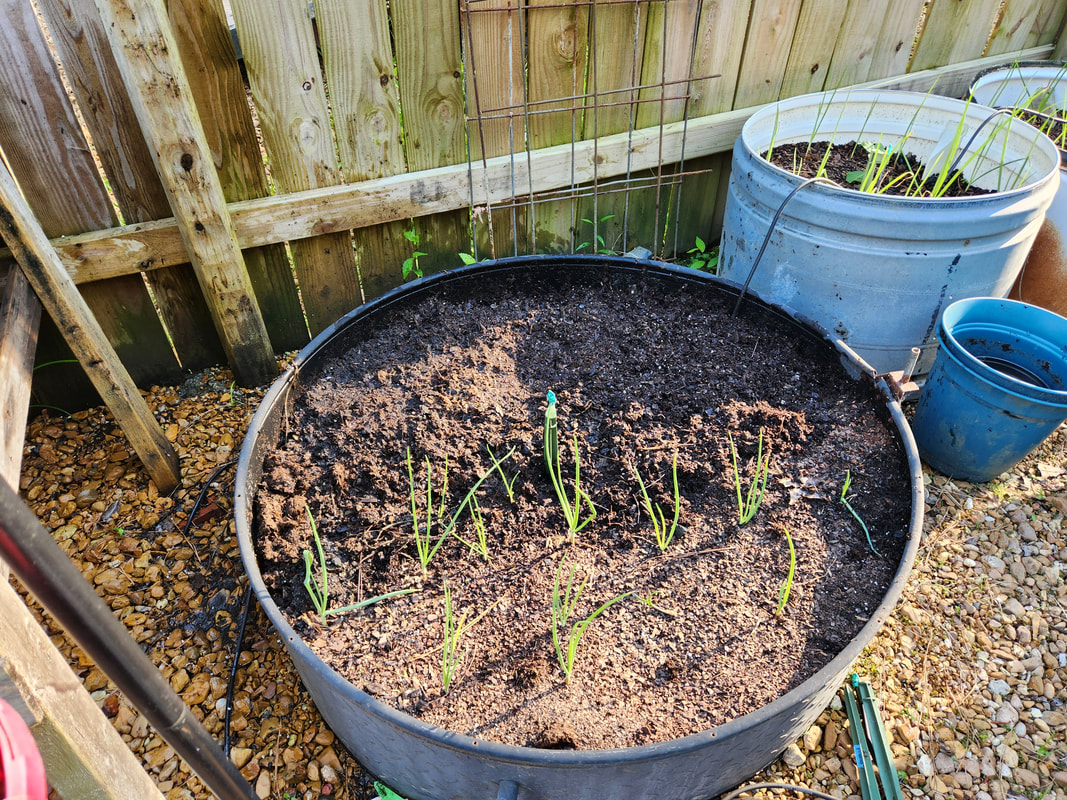
The ground level raised bed, accepting a bunch of dirt from the smaller pots that used to hold some plants that didn't make it through the winter.
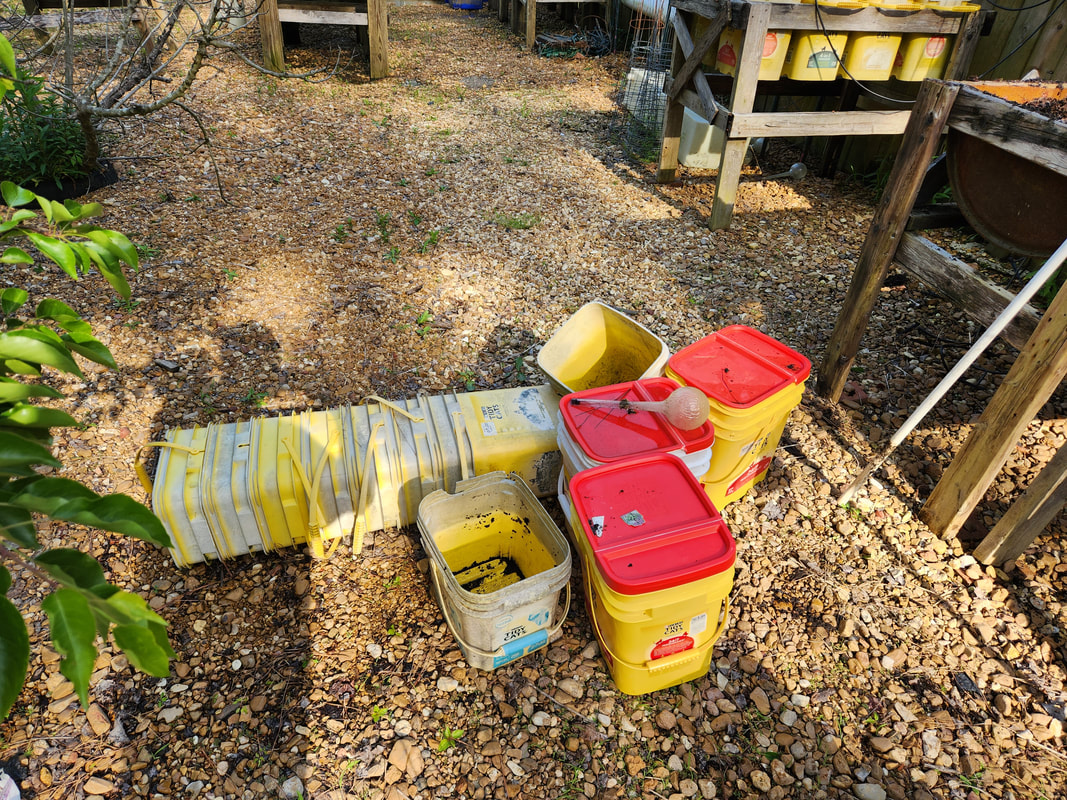
The cat litter buckets, along with some new ones added, that were salvaged from one of the old raised beds that had to be dismantled due to degradation of the table.
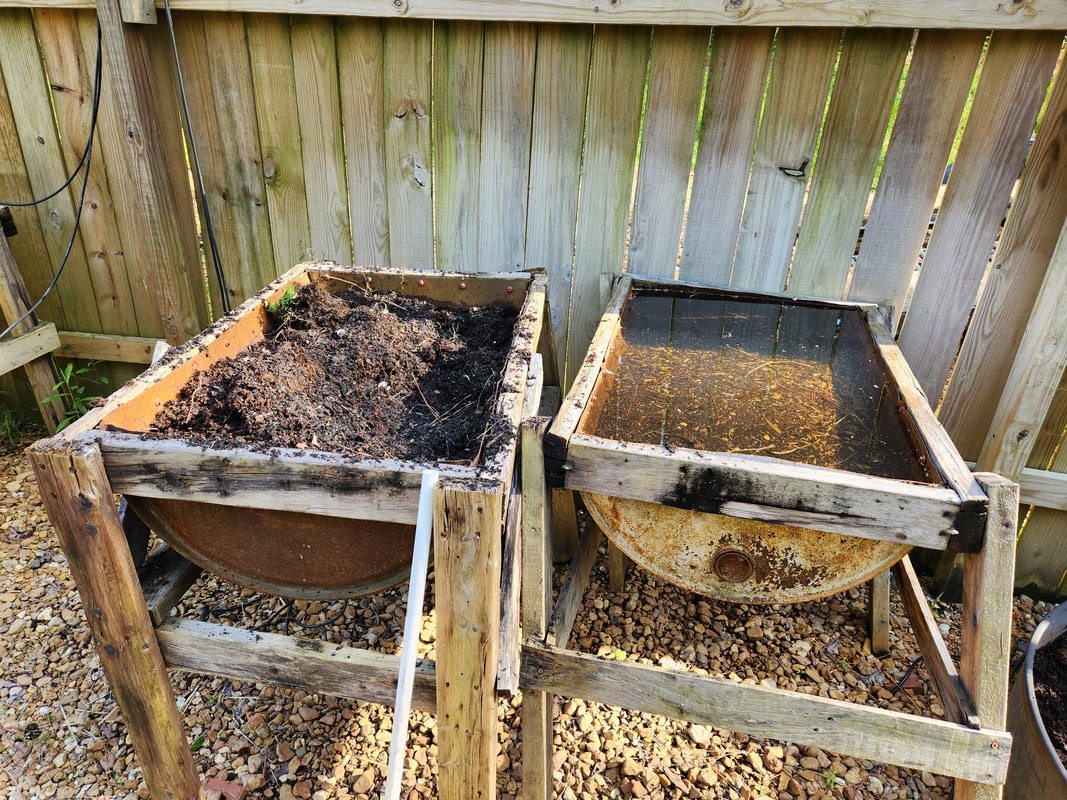
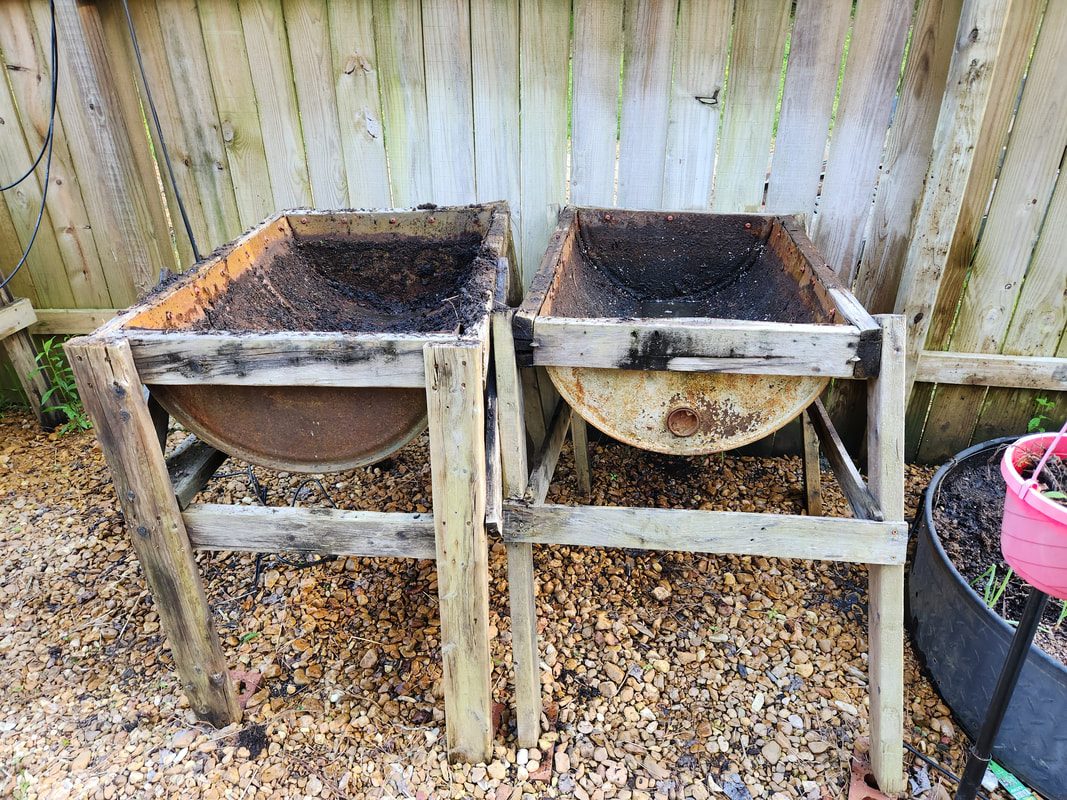
The two drum raised beds, using metal drum halves, with one flooded out due to poor drainage. Note the right bed which is leaning back against the fence. The other one is unstable just as well. Both of these will be emptied and dismantled.
There were still two more raised beds that needed to be dismantled for the same reasons as the cat litter bucket beds. These two beds are half drum beds, good for use with growing potatoes. As with the other beds, these beds degraded to the point that they're falling in on themselves. Besides, the metal drums have a finite life and will eventually rust away enough to further fall apart. Point is, these units pretty much need to be fully dismantled and the drums scrapped, to be replaced with raised beds using either cat litter buckets or plastic drum halves. One of the buckets had been full of water for a good while, so it definitely would be degrading even on the metal. I first had to remove the dirt from the flooded bed. But I had a solution, put that dirt in the remaining cat litter bucket bed, which needed more dirt in its buckets. 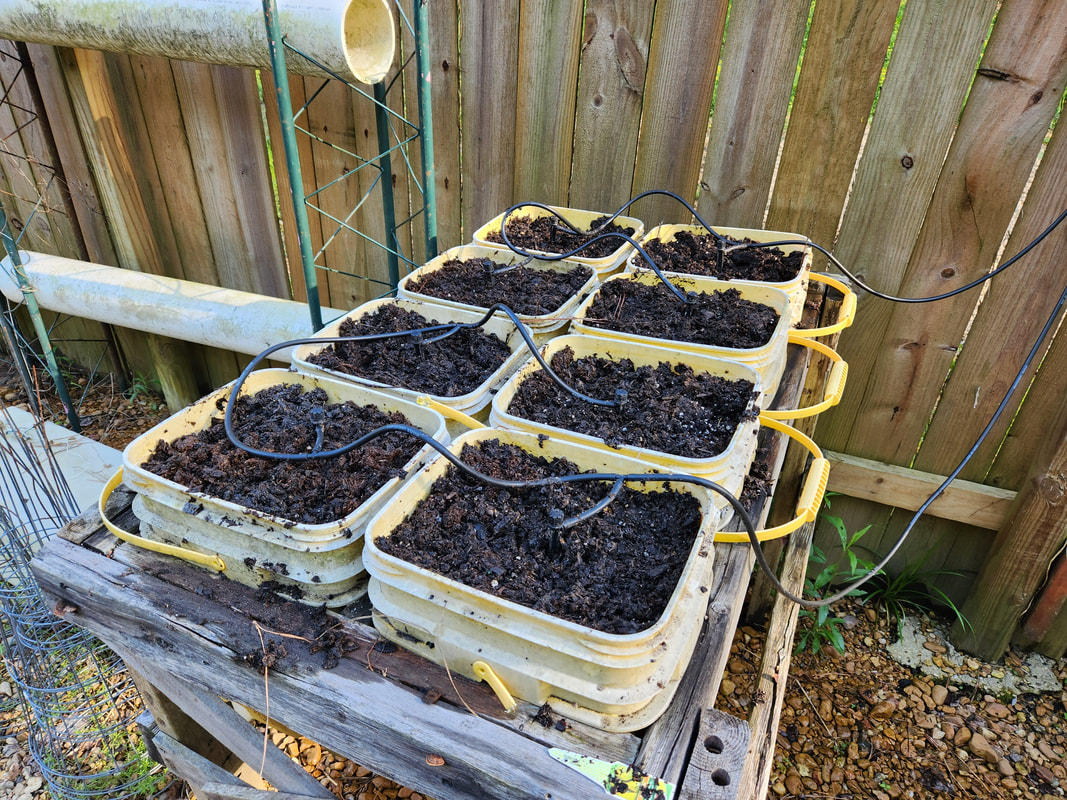
The other cat litter bucket raised bed, accepting a bunch of the dirt from the flooded raised bed to top them off to make the unit ready to accept plants soon.
After filling the litter bucket bed, I continued emptying dirt into one of the sets of drum raised beds, which uses plastic drums. After emptying the flooded drum, I emptied the other one that was last used to hold several herbs. With both beds emptied of all dirt and water, I can dismantle the units, salvaging what I can like screws. The wood will be cut into small pieces for use as firewood while the drum halves will be staged with the outgoing scrap. 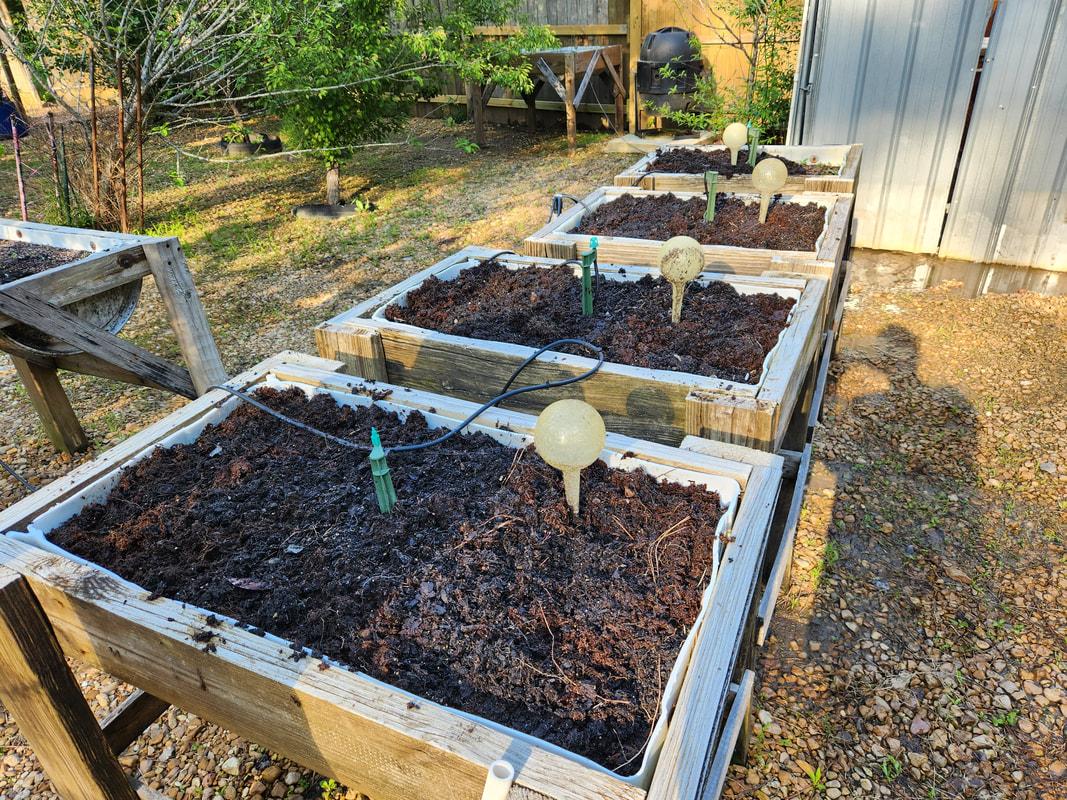
One row of drum raised beds, accepting the rest of the dirt from the two old drum beds, making them ready for new plants.
The two old drum beds emptied of dirt and water, ready for dismantling.
At some point, I'll need to start carting in a lot of lumber so I can build up the raised beds for the litter buckets, as well as future hydroponic garden assemblies. I do have a couple hydroponic setups using more 6" PVC pipe that have to be accommodated as well. One of the assemblies uses two standard Schedule 40 pipes, which I can get caps for. The pipes are mounted on a couple of trellis frames, one over the other for a vertical setup. The other one uses the same weird PVC that does not accommodate the 6" caps I can get my hands on. Just as before, this might mean that I'll be replacing this pipe with the blue drain pipe that the Double Barrel HPG is made of, if I can't source the correct caps, or they tend to be too pricey to justify even trying to keep these pipes. There's another small vertical PVC pipe hydroponic garden assembly that I have to revamp to make it better just as well, using more durable PVC hookups between the pipes holding the planter cups. There will be more on the new raised beds and HPG's in the future as we get around actually building this stuff.
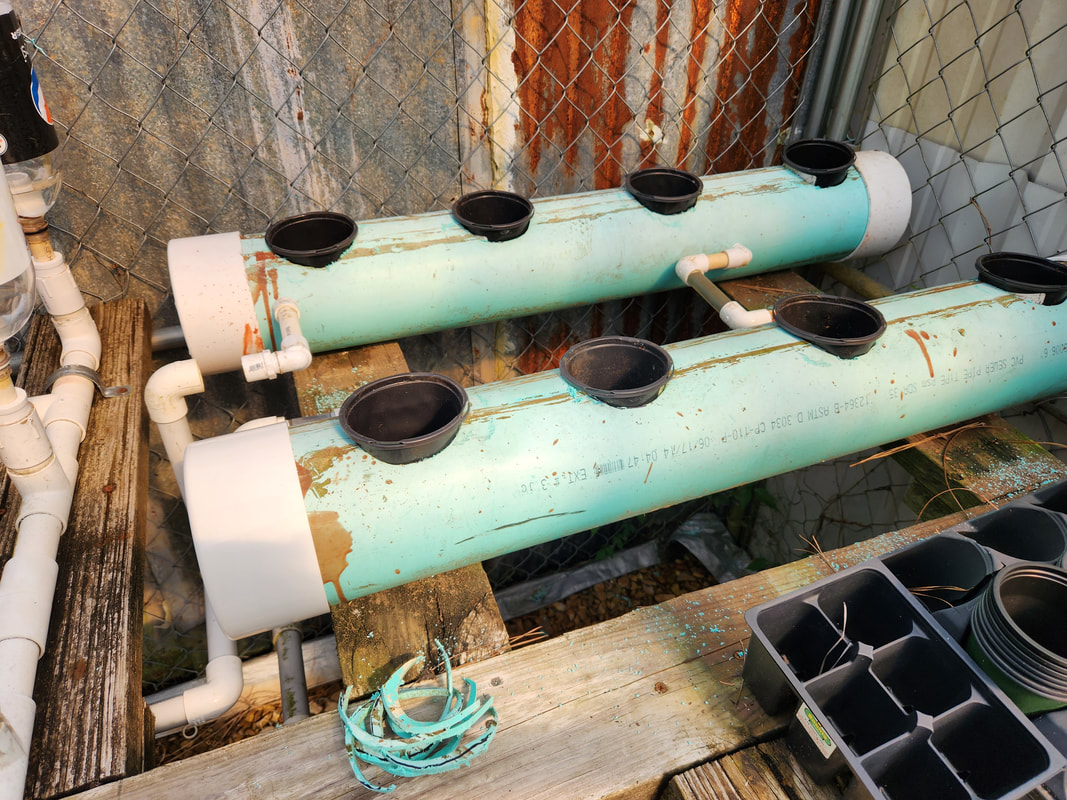
In the beginning, I had a couple large PVC pipes of the thick variety arranged and plumbed into the lines that will feed the greater hydroponic garden system. I still had to add end caps and cut holes in the pipes to accommodate planter cups. Unfortunately, these pipes are larger than the 6" I believed the pipes to be. I don't know if they're more like 8" or some other type of PVC pipe, but in either case, I can't use them for the hydroponic garden arrangement in the greenhouse. There was an alternative however. The old Double Barrel Hydroponic Garden tubes I still had laying around after dismantling the decaying wood table that held them would fit in this application perfectly.
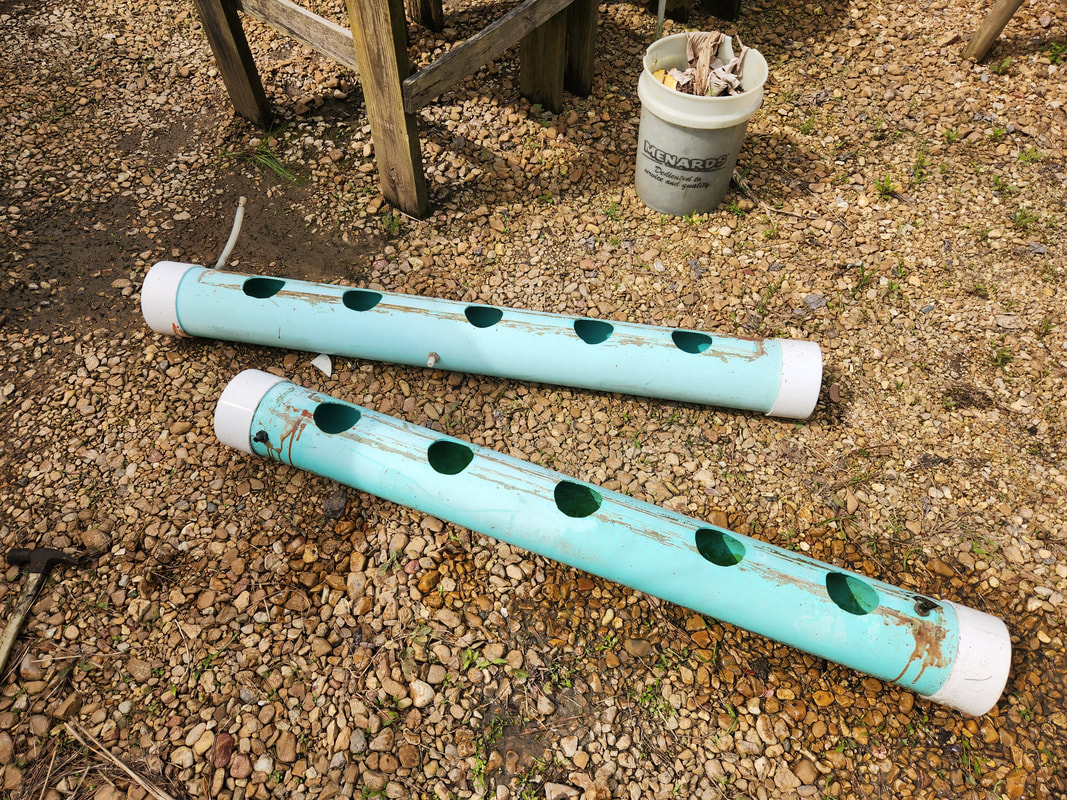
The old PVC tubes from the Double Barrel Hydroponic Garden, soon to be used to replace the odd PVC pipes that were in the greenhouse.
These PVC tubes were a little longer than the pipes I had in the greenhouse. I would have to cut the pipes down, taking away one of the holes in each pipe, leaving four spots for each pipe. I was able to remove the end caps on one pipe but the other was glued in place, probably due to leaking troubles I had with the pipes when the old garden setup was operational. I ended up cutting the capped ends off that pipe while just cutting the pipe on the other one, omitting one of the holes in each. 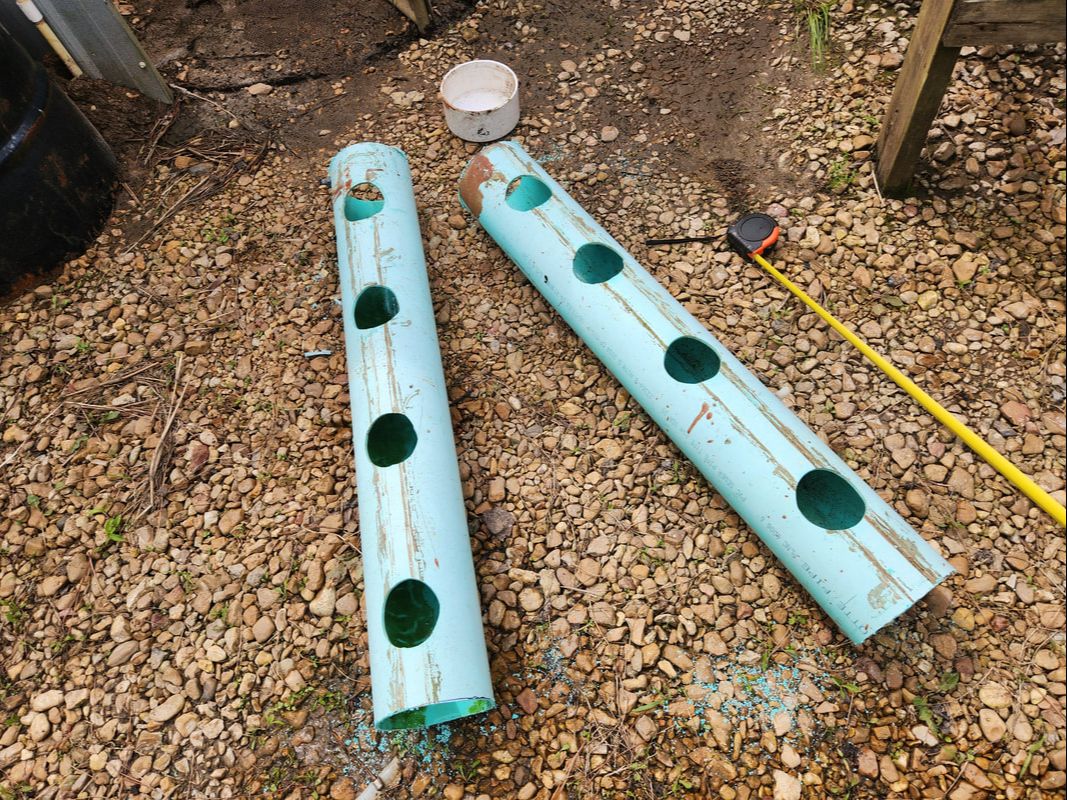
The PVC tubes after cutting them down to fit in the open space in the greenhouse. Note the remaining end cap in the background.
With the pipes cut up and ready for use, I had to arrange the connecting pipes that would drain the overflow from one pipe and dump it into the other pipe. Using the same fittings I used in the other PVC pipes, I eyeballed where the holes needed to go and drilled them out with a step bit. I then used a 1/2" NPT pipe tap to tap the holes to screw the fittings in place, but not after wrapping teflon tape around the threads first. With the piping that connects the two pipes done, I could move on to the input and output lines. 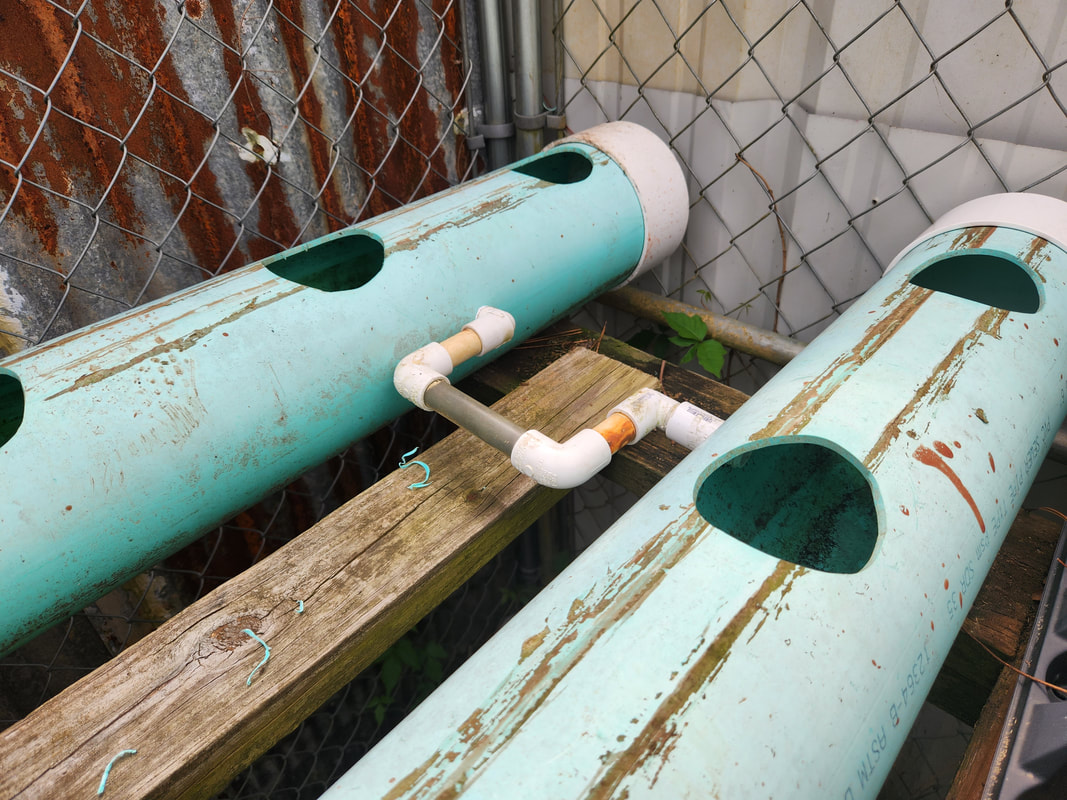
The same connecting pipes that were used to connect the other PVC pipes were used to connect our DBHPG pipes together in the greenhouse.
Since I pressed the pipes and fittings together, I was able to pull apart the end fittings on the two lines in order to trim the pipes down so I could get the end fittings to line up where I needed them to be. As before, I drilled and tapped holes near the ends of both pipes, then lined everything up so I could press together the pipes and connect to the ends to the fittings that were screwed into the holes. I did have to do some angling of the pipes to get them to line up where they would connect, which resulted in an awkward routing of the pipes. I might come back later and add some extra fittings and short cuts of pipe where they would bring the angles back to a more right angled appearance, just for aesthetics. 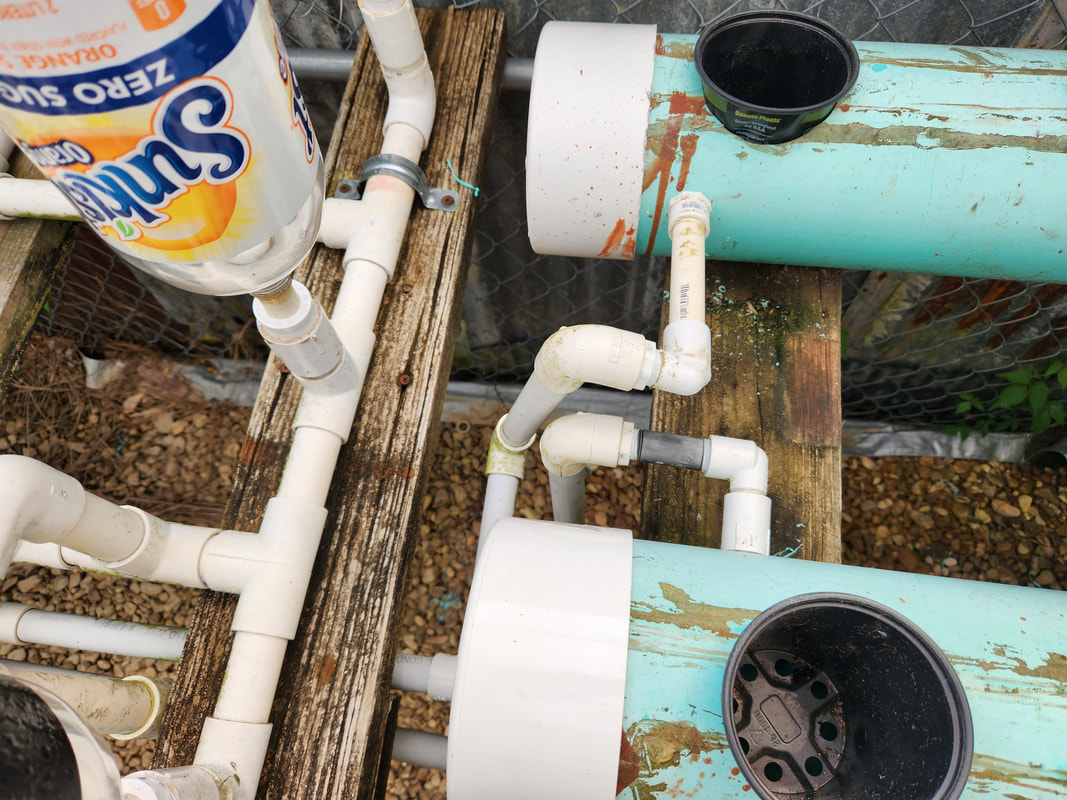
The wacky routing of the input line feeding the first pipe, along with the regular routing of the output/return line. I might remedy the angling by adding fittings or pipes as needed.
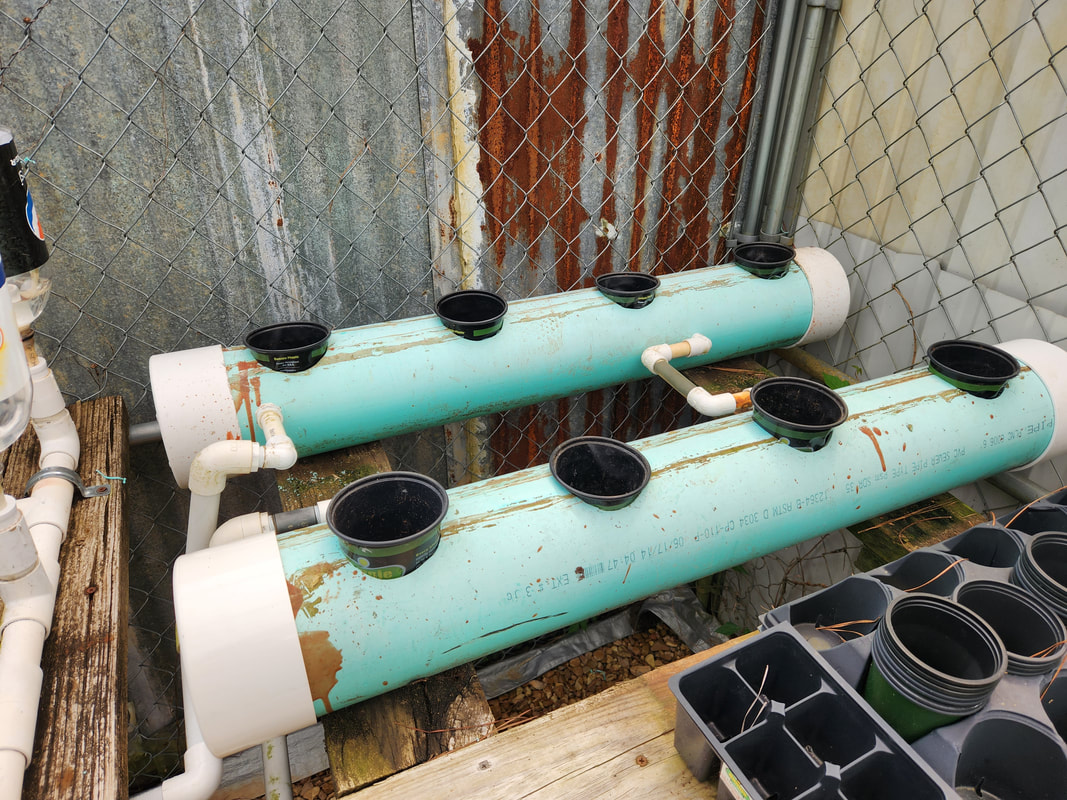
The Double Barrel Hydroponic Garden reborn in the Dog Kennel Greenhouse, with planter cups in place, as the system will be used.
With the plumbing done, I inserted some planter cups from some old seedlings which I saved specifically for this purpose. I will have to trim a couple of the holes to better accommodate the cups as they need to fit into the pipes at a low enough level to be immersed in the water when it floods the pipes, which is about halfway up. Lastly, I will need to add a submersible pump to the drum and have a timer ready so when I do get power to the greenhouse, I can press the HPG system into service all across the board, given the idea that everything is pretty much ready. I just need to add Perlite to the planters and well, plants. The ole lady did give me the idea of trying to set up some kind of rainwater catchment system to catch runoff from the roof and route it into the drum to refill it. It would actually be an excellent idea, I just have to rig up some kind of valve or cutoff that would close up the feed tube so when the drum is full no more water will be allowed to flow into the drum. This would definitely be a good supplement and another part to the self sufficiency of this setup. If the hydroponic gardens can be resupplied by rainwater, the main water lines won't have to refill the drum. Only other thing that would make this even better is powering the gardens off solar panels, which really isn't that hard. If I use grow lights, that's another story.
After having put it off for so long, I finally decided to get the heavy bumper mounted on the Elco. This bumper is a unit that has the integrated taillights, so it is indeed a necessary piece, otherwise I'd be forced to use universal taillights hung from brackets at the rear, which would look cheesy as hell. Anyway, factory bumper brackets for this generation of car seem to be almost impossible to locate. Luckily I had some scrap metal that was suitable to make a bracket intended to hold something as heavy as this bumper. I would also be using grade 8 bolts to hold the bracket in place, for obvious reasons. 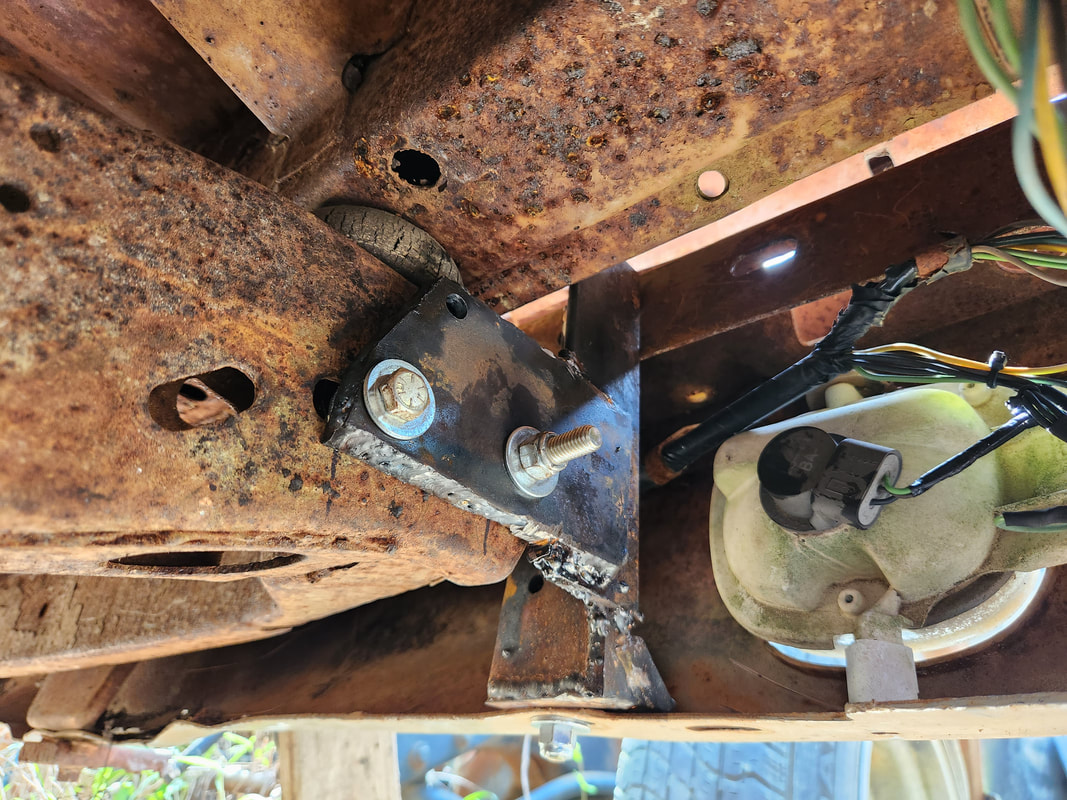 The left bumper mount bracket all reinforced and bolted in place, holding the left side of the bumper in place. After I measured and cut and drilled to get an assembly that would hold the bumper at the top and bottom of the bumper, as well as hold to the frame at two points, I did some light welds to hold the assemble together. I test fitted the piece to make sure all was well then did some reinforcement welds, along with the addition of extra metal to reinforce the bracket as a whole. From there I mounted up the bracket on the left side. The right side bracket was a mirror image of the left side, and would undergo the same treatment. 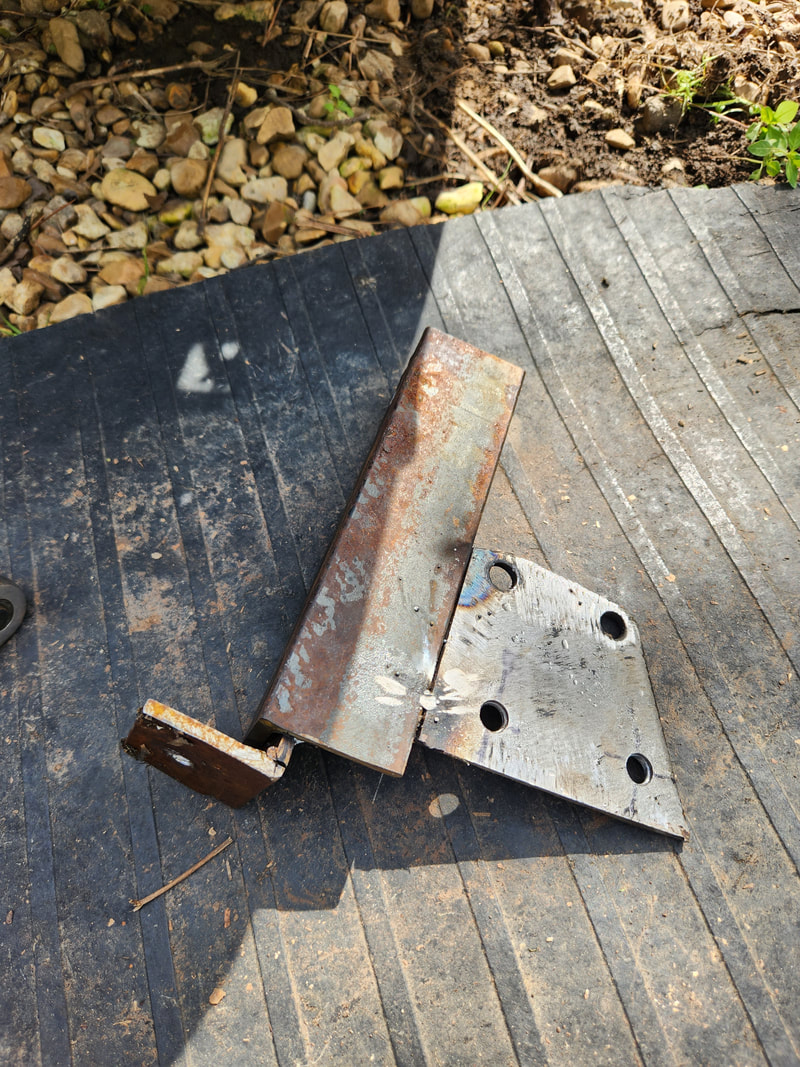 The right side bumper mount bracket with the light welds to hold the pieces of metal together to fit before I reinforce the whole unit. With the extra metal and welds in place, I had the right side bumper bracket done and ready to mount. Of course, after the first bumper bracket, the second one was done rather quickly. With the bracket in place, I could get the whole bumper done and finally integrated with the car. 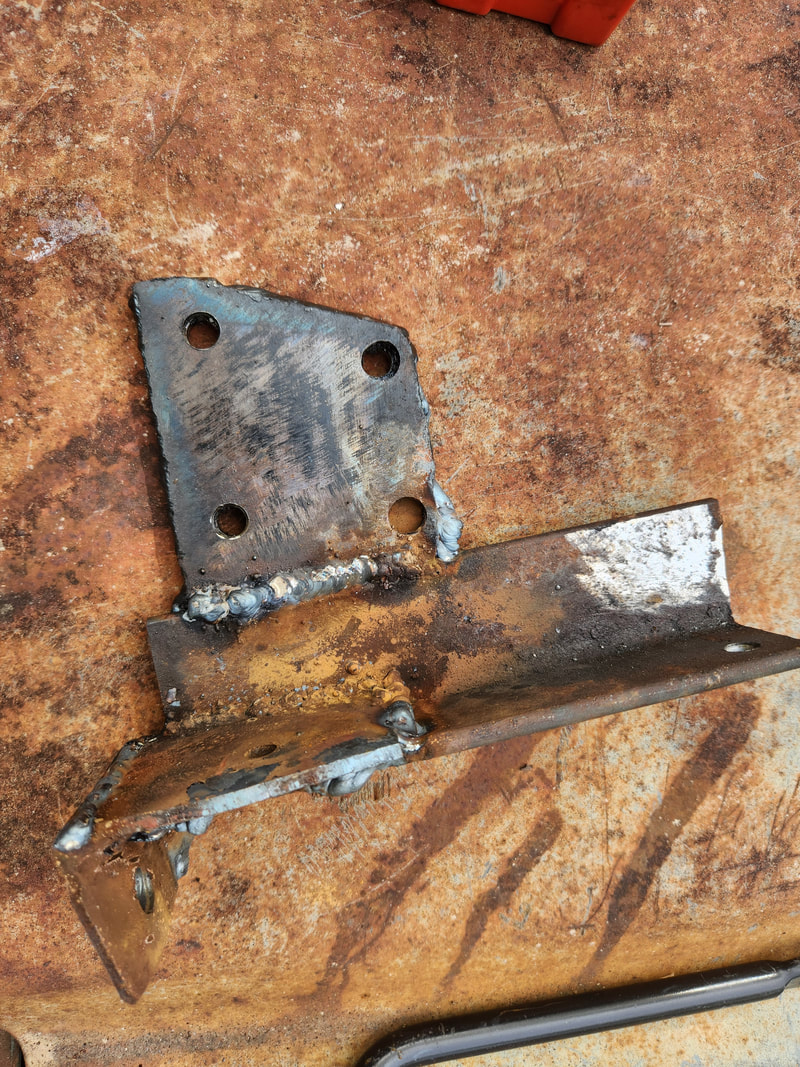 The inside of the bumper mount bracket showing the heavier welds to reinforce the assembly. 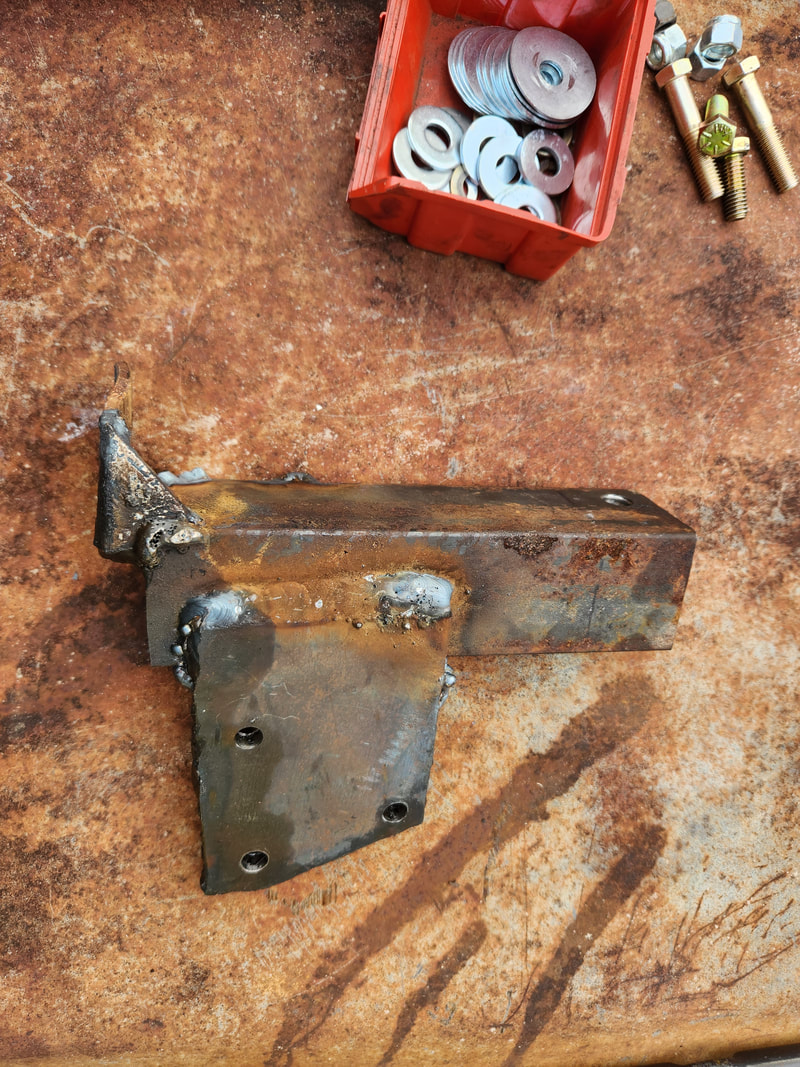 The outside of the bumper bracket showing the extra piece of metal welded in place for reinforcement. Holes were drilled through the extra metal to accommodate the mounting bolts. To get the brackets in place, I did have to line up the bumper to make sure it was even on both sides. Funny thing is, this bumper appears to be wider than the rear of the bed of the car, and would have one imagine that it doesn't belong on this car. From what I've seen on other Elcos, this bumper is apparently made to fit like this. I don't know, but either way, to get the unit on right, I had to make sure all was even left and right as well as leveled properly so it would look right. I used lock nuts and large fender washers in spots to ensure a tight hold between the brackets, frame, and bumper. 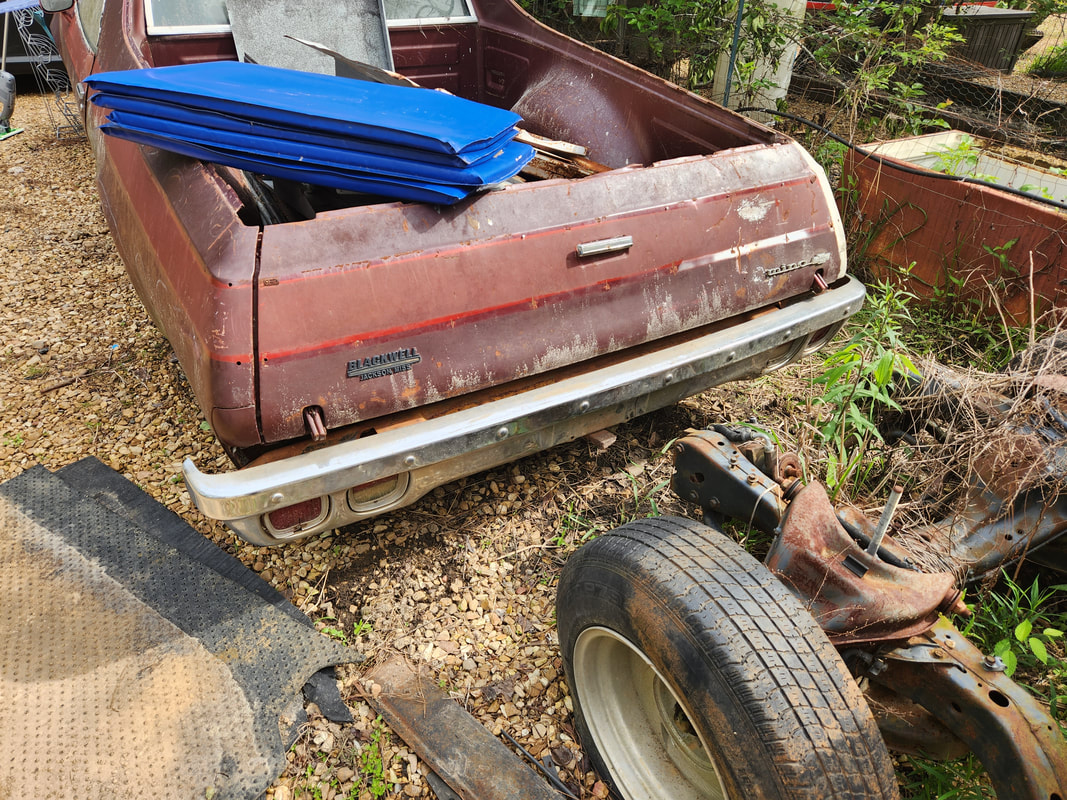 The huge and heavy bumper is finally hung after getting the homemade bumper brackets done and bolted in place. With the bumper hung up and lights plugged in, I can focus on getting the rest of the engine bay taken care of, as well as even start looking at getting the brakes addressed. I'll even do some of the suspension work prematurely, just to get these things done, even before the maiden voyage, so I won't have to worry about this stuff later on. The last big thing that would need to be done on this car is the driveshaft. Unless I can find a driveshaft from a 4 door car that I can possibly shorten, I'll have to resort to having a shop cut one from scratch, which will be a little pricey. Today was another one of those days where one will bounce around and put their hands on multiple things, trying to do a little bit of something on everything. There were a few things I had to address on three things during this session of work. One of the things was the battery on Stubby. I did get another battery to replace the unit that was in the truck as it was much smaller than what's in the full size Tracker, but it turned out to be too tall for Stubby's battery tray. One of the things I really did notice was that the terminals had the classic corrosion present around the posts and within the terminals. At first I had a couple episodes where the engine cranked slowly but still started. After a couple times the engine was cranking just fine so I figured the shitty terminals had to be affecting the conductivity so instead of worrying about changing the battery, I just pulled everything apart and cleaned the terminals off. The battery that I did get will be dedicated to the Dodge, since a 24 series battery is large enough to handle whatever load the Dodge has. 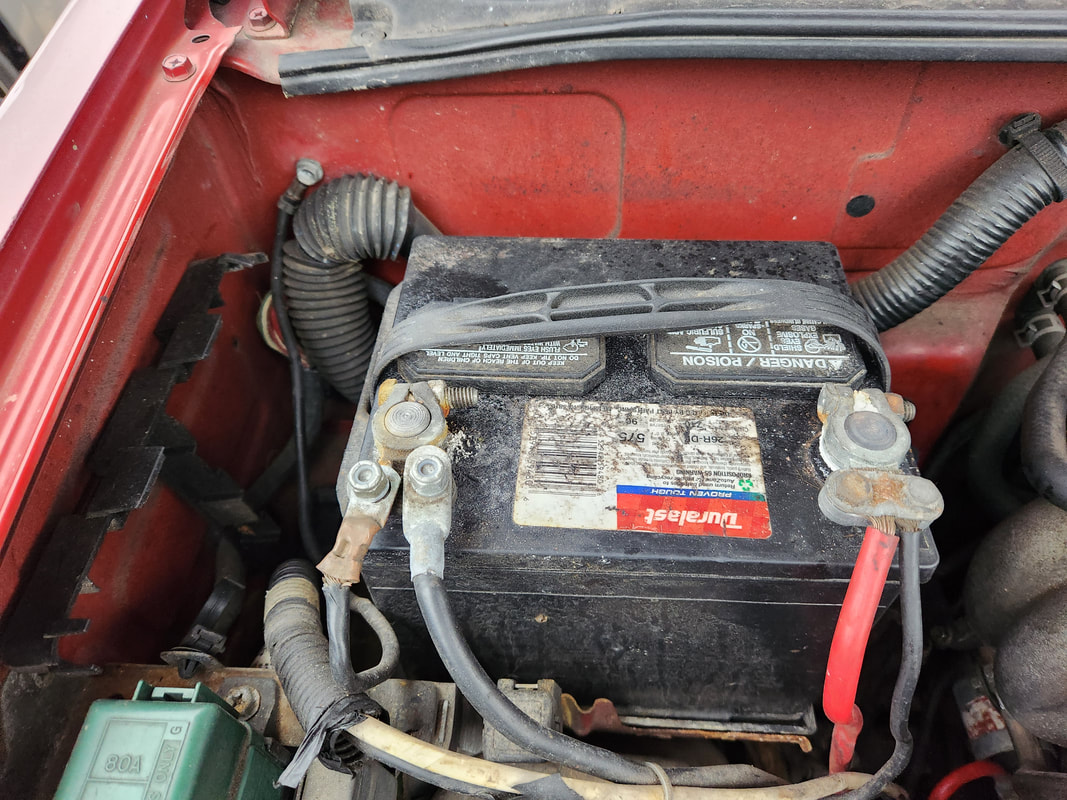 The smaller battery in Stubby that needed to be cleaned off to resolve the sporadic slow cranking issue. I'll still end up replacing this battery soon enough as this one is 3 years old. With the battery issue taken care of on Stubby, the next order of business was to finish up the wall on the Dog Kennel Greenhouse. I ran out of screws when all I had left was the short 2ft panel that would cover the rest of the wall. After measuring and cutting out the panel, only to have to trim the excess to get the panel to fit, I secured that panel in place and took a moment to add more screws all around to get the rest of the wall secured. With the other wall fully taken care of, the next move for the Dog Kennel Greenhouse will be to finish sealing everything, using the expanding foam and caulk. Once that's done, I'll move to the next phase of that project. 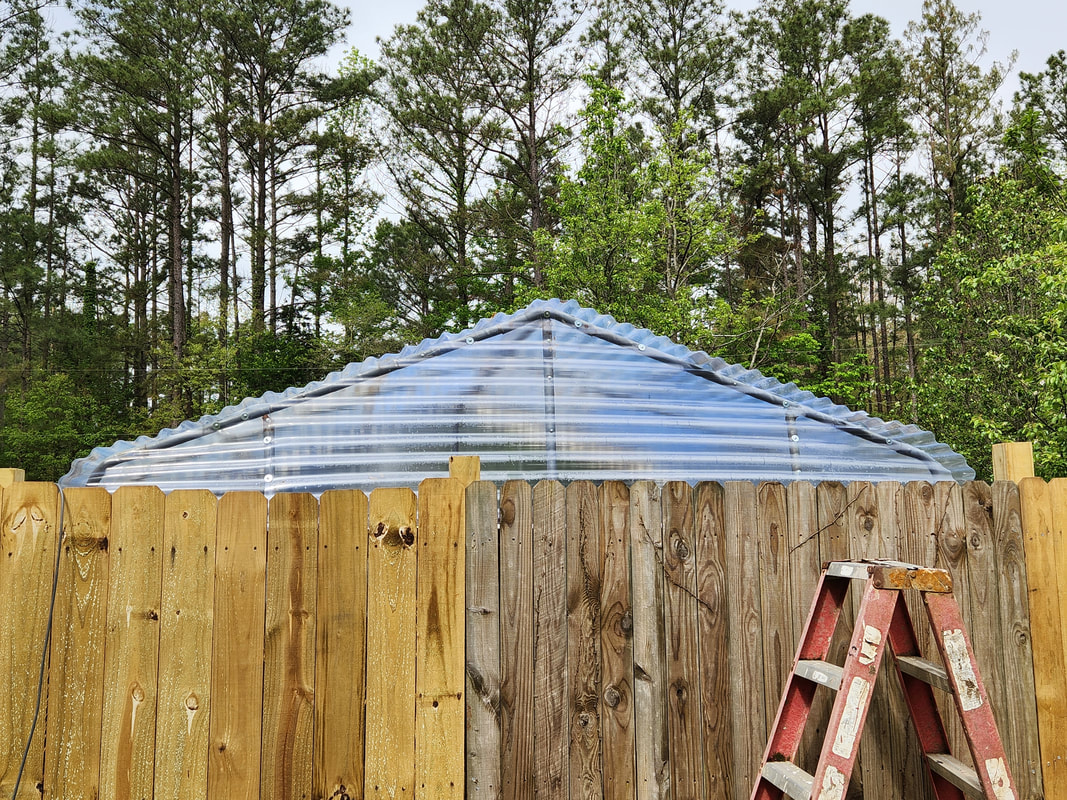 The east wall of the Greenhouse completed after finishing the application of the short 2ft piece of plastic on the left in the picture. Extra screws and washers were added around the rest of the wall to fully secure the paneling in place. 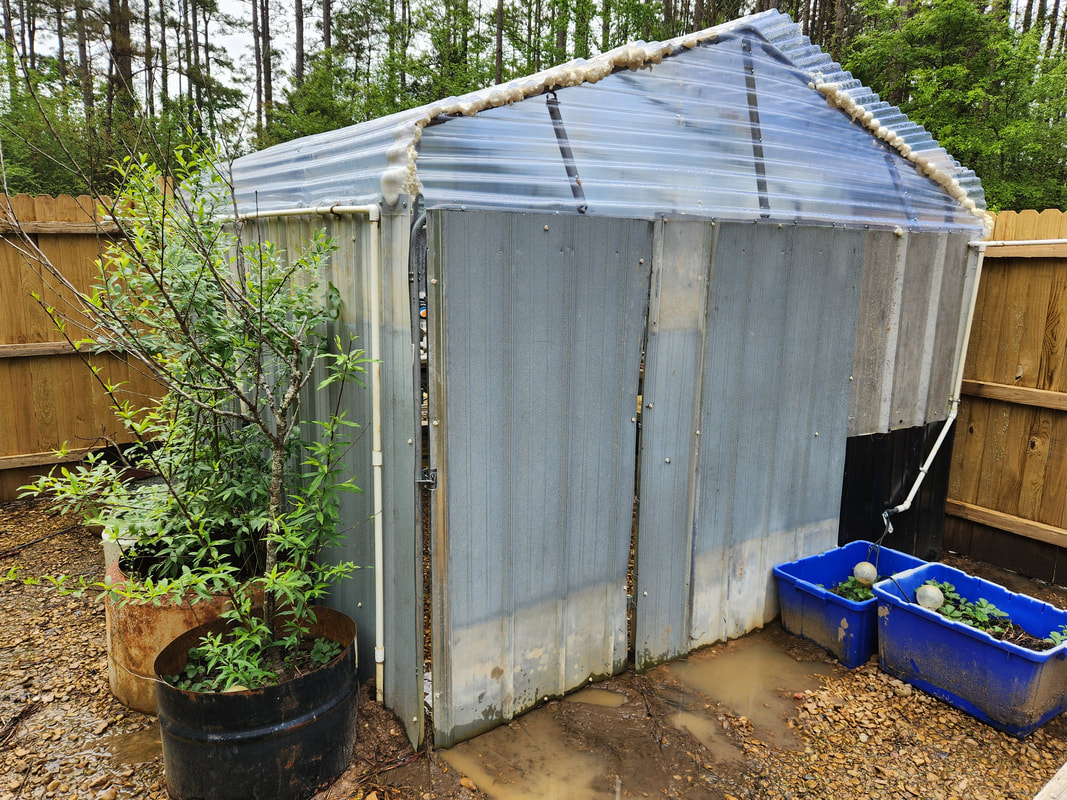 Another thing that I took care of on the Greenhouse was adjusting the door hinges and trimming the top edge of the sheet metal skin so the door can fully close. I will probably have to add some rubber sheet to the hinged side of the door to help in sealing the door along these edges. The last thing that I wanted to address was the hood on Truckstang. Since the hood is rusted underneath, the support frame or substructure under the hood skin was no longer supporting the hood, including where the latch portion is at. To help this problem out, I ground the medal down around the edges of the substructure where it would meet the underside of the hood skin, then welded three different beads around where the substructure makes direct contact with the underside of the hood. This held the latch portion more stationary compared to how it was initially. 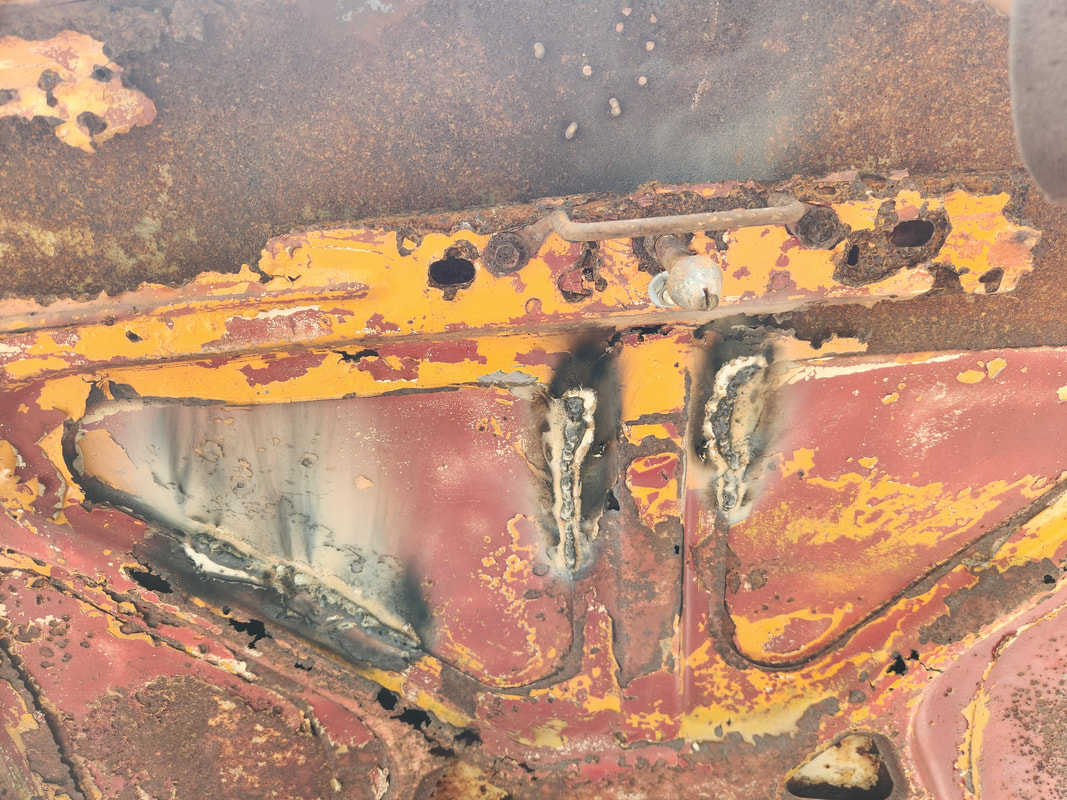 The three welds made along the edges of the substructure to hold things together under the hood. The immediate area where the latch was located was still floppy. There was no point where the substructure could make direct contact with the underside of the hood skin. The only option I could see was to drill a hole straight through the substructure, right behind where the latch is, up through the hood skin, then secure with a nut and bolt. The bolt I used was a regular slotted round head bolt, a little more flush than a hex bolt. With the bolt in place, I had to manipulate part of the latch so it would allow for the hood to close and fully latch. 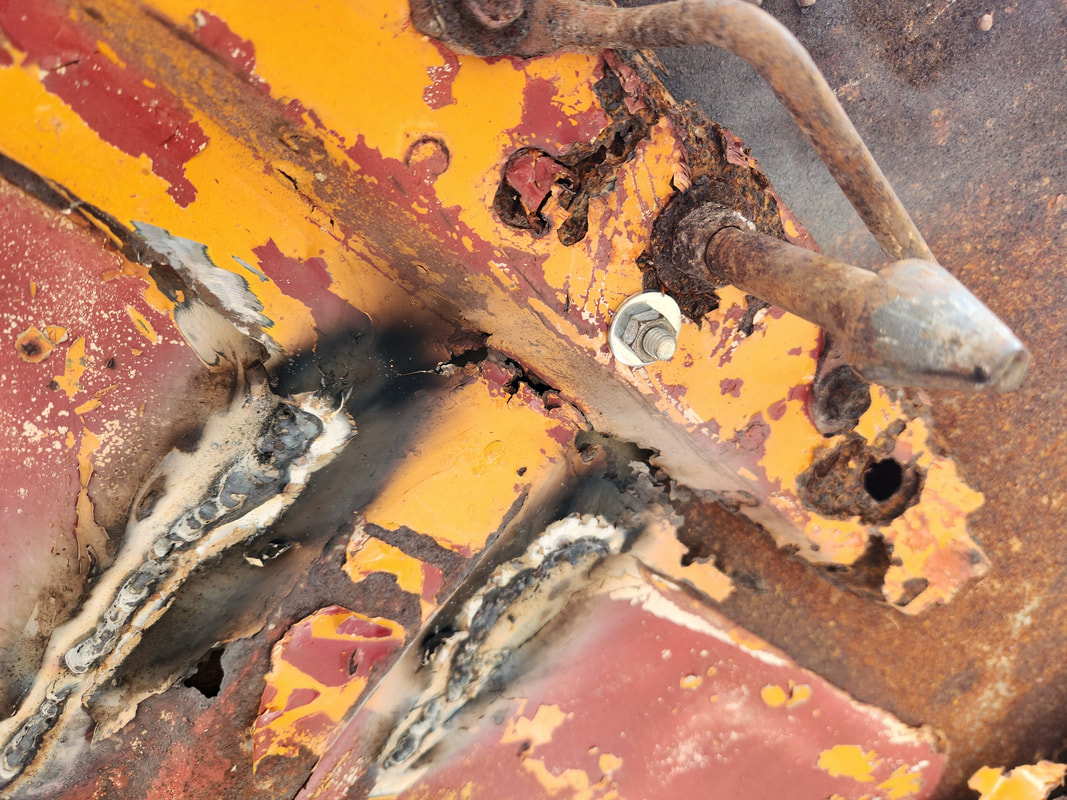 The round head bolt that is used to hold the latch portion of the hood substructure so the hood can be more firmly latched. 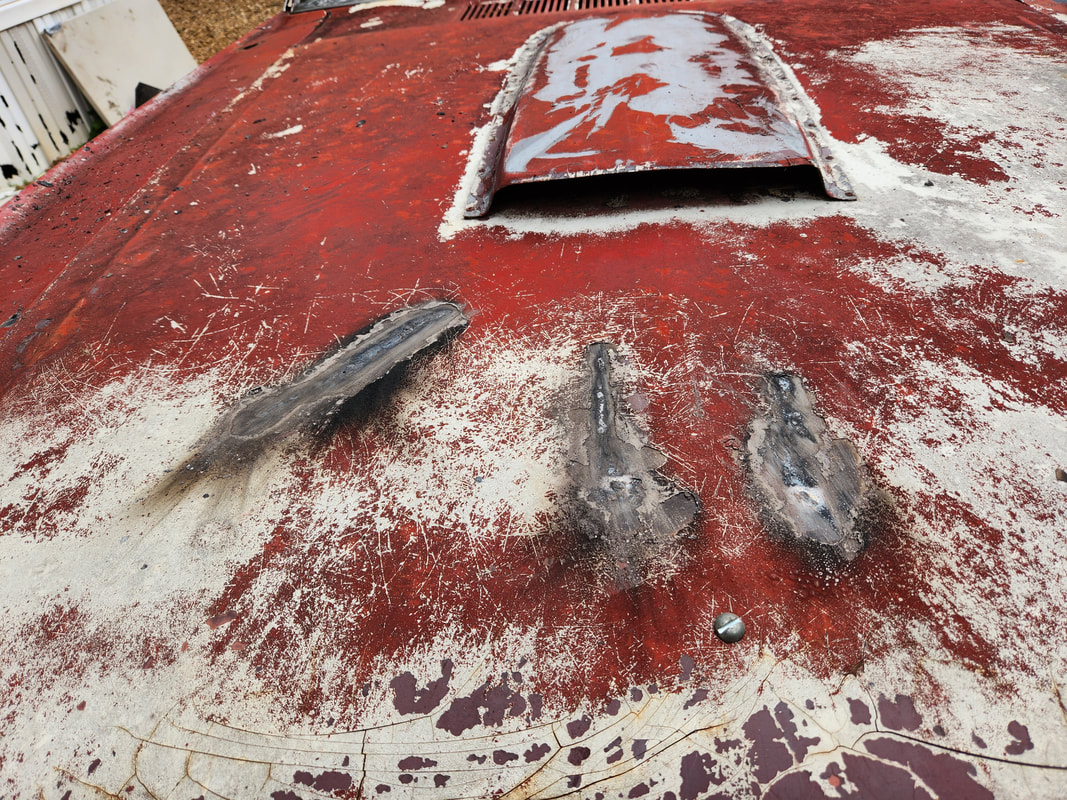 The top of the hood after the welding is done, showing how the weld heat made its way through to the top and burned the remaining paint on the outside surface of the hood. Note the round head bolt on the hood at the right foreground. With this little bit of work done, I still have to determine what my next move will be. I still have to test drive Truckstang to make sure the overheating issue is resolved while doing my recording for the rest of the video. I need to source some more expanding foam and caulk for the Greenhouse. Little by little I'll be getting these projects done.
During a drive back on night, we made note that the taillights on Stubby were doing some flaky shit. At one time the taillights blitzed out for a few minutes then came back. A couple times I noticed the dash lights flickering. I had to check the taillight housings to make sure there wasn't any kind of physical issue with the wiring or the plugs on the housings. Removing the driver's side housing, I noticed there were clamp wire couplings in place, clearly for a wired in trailer light harness. Further investigation turned up a length of wiring that was tucked under the body in the shell that protects the fuel tank. When I removed this wiring, I noticed that it did have the typical brown/yellow/white/green bundle at the end, which is typical for trailer wiring harnesses. The very end of the wire was all frayed and mixed up, clearly showing the potential for the wires to criss-cross and possible short out on either the fuel tank metal or the bottom of the metal body. It would fully explain how the anomaly could occur, if this bundle of wires bounced around, doing little scrapes against metal to short out, or even making contact with each other.
The length of wiring from the truck's wiring used for a trailer light harness, stripped back in preparation to wire in the new harness.
With this length of wire in place, there was a light at the end of the tunnel. It meant that someone did have a trailer light setup on the truck at one point. What probably happened was the end dragged on the ground and was damaged, and the previous owners just tucked the end under the fuel tank shell to keep it of the ground. Luckily I had a spare trailer light harness in stock, ready to wire in. 
The trailer light wiring harness dug out from the stock in the Storage Trailer, it finally came to use for this vehicle.
I cut back the old wiring to where the splice was made so I can match up the trailer wiring ends with the stock wiring. I also took the wire harness and trimmed back half the wiring, so once done, I wouldn't have so much wiring dangling. The last thing I need is to duplicate the same situation that caused this problem to begin with. I soldered the ends of the wire harness with the ends of the truck's wiring. 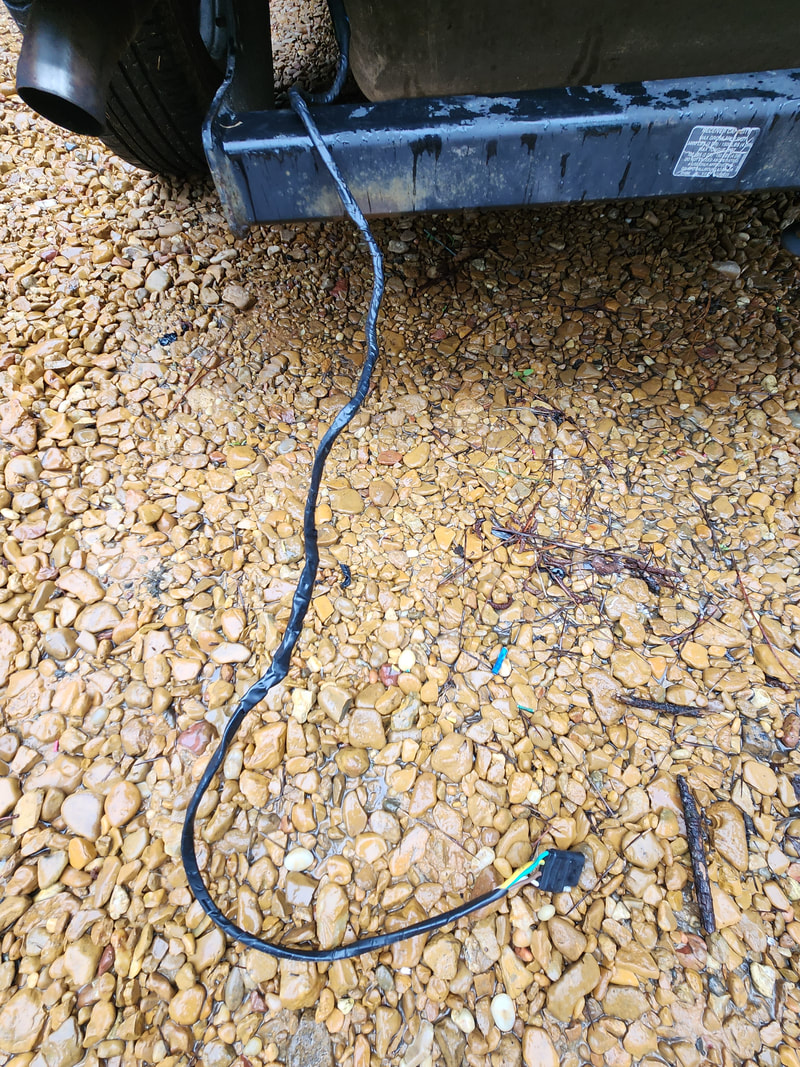
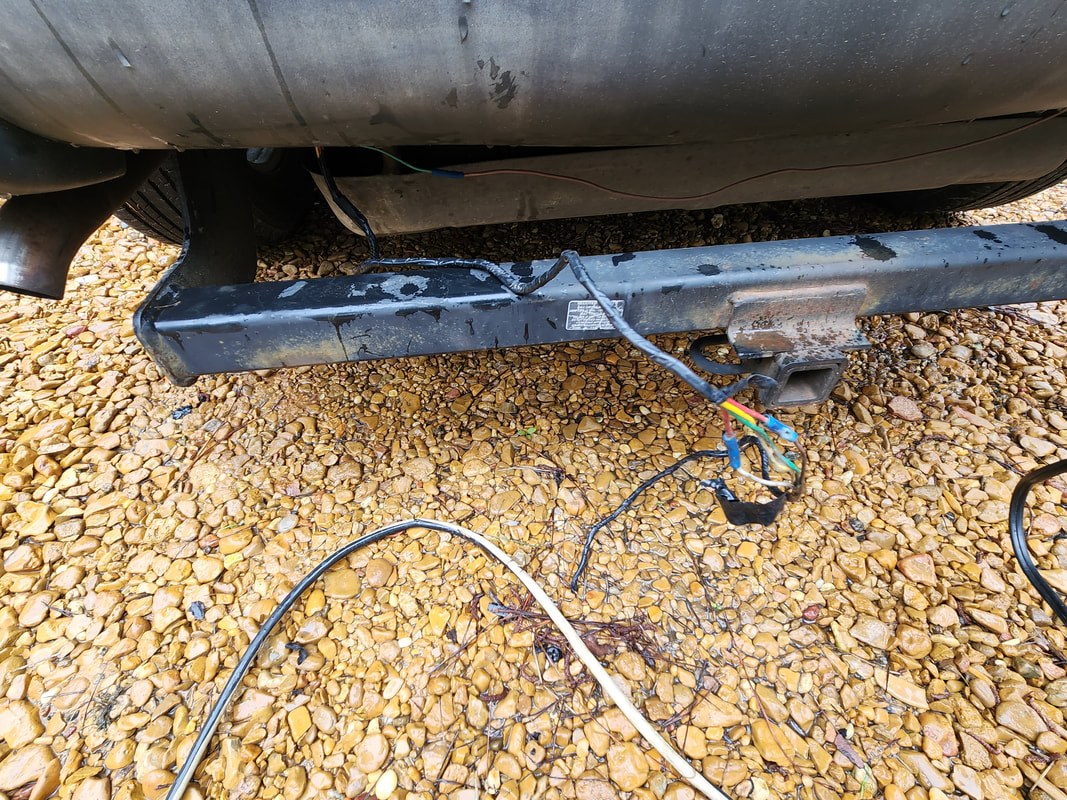
The trailer light wire harness wired in with solder joints, heat shrink tubing, and electrical tape to protect the wiring.
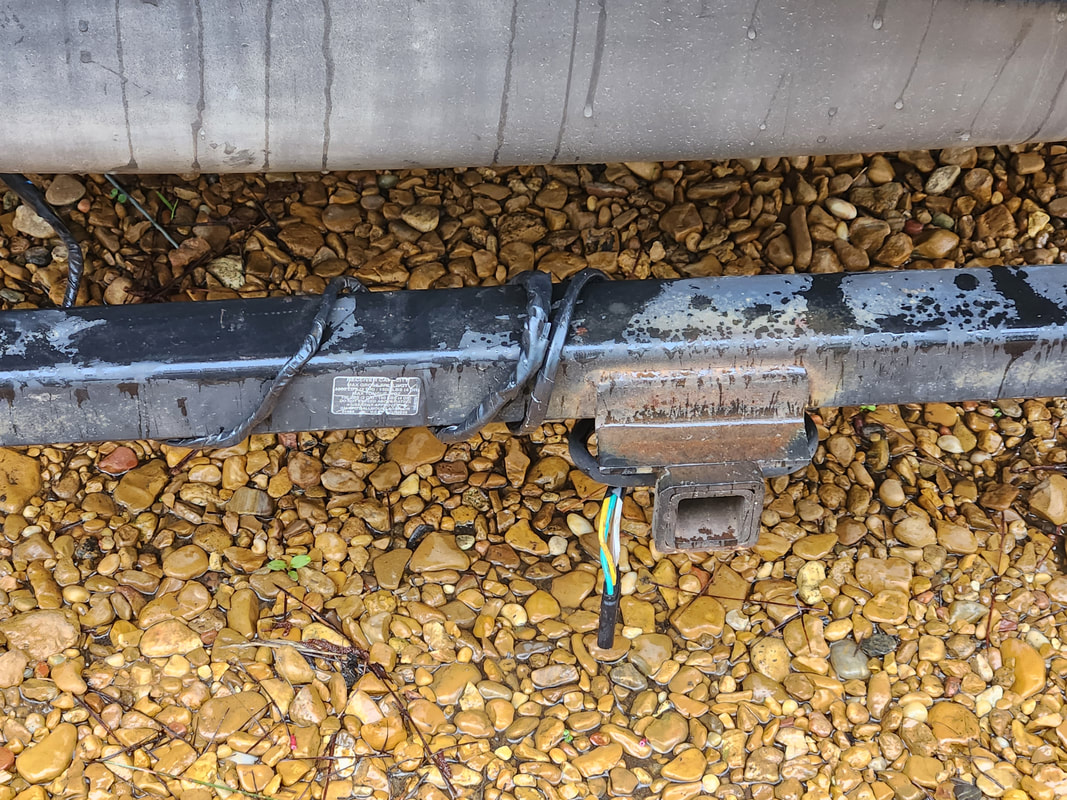
The excess wiring is wrapped around the hitch bar to keep the wiring contained. I still need to get a hitch ball though...
With the wire harness wired in, at least I don't have to worry about sourcing the dedicated wire harness for this vehicle. While I could've just done this the "right way" and not even bother with this, I feel I had to go ahead and recover this discovered part of the truck. At least this is one more feature I wanted to get established since the truck has a trailer hitch in place. Now, at least I can move on to other things on this vehicle, namely the locks on the doors and hatches. The ignition switch key only works for the ignition, nothing more. I had to order a lock set for the doors and tailgate. I'll have to source the shell hatch T-handle locks as well, so I can completely lock up the truck. I even sourced another glovebox lock so I can lock that down just as well. No stone left unturned.
With the larger part of the roof on the greenhouse completed, it was time to cut up the plastic in order to make the short sections to cover the last couple feet of roof. There's also the matter of making the side wall panels that will cover the upper sections of the front and back sides of the structure. After taking measurements, the amount of space to cover on the remaining roof was 30 inches. Since the panels are 8ft long, there was plenty of panel available for three pieces. I would only have to use two panels to cover the rest of the roof. After cutting the pieces, I started attaching, using the self tapping screws, as with the rest of the paneling. 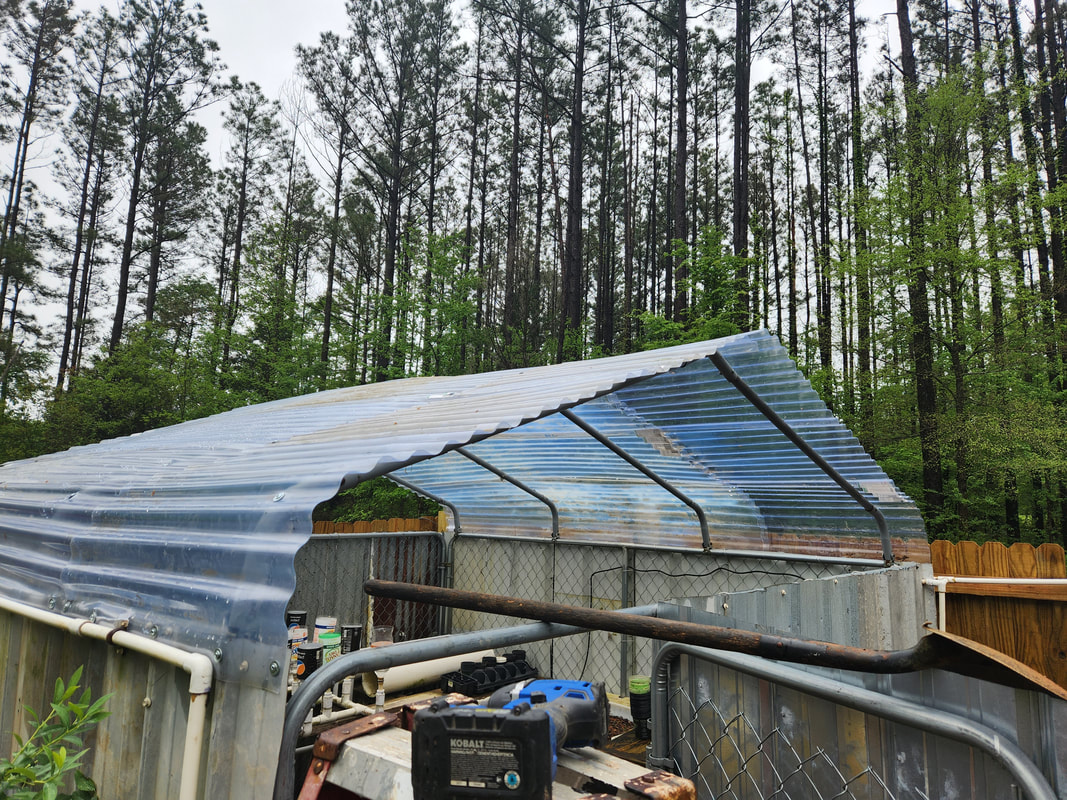 Short sections of panel cut and screwed to the roof, overlapping slightly with the ends of the longer panels, with the other ends overhanging enough to cover the sections where the panels will meet. 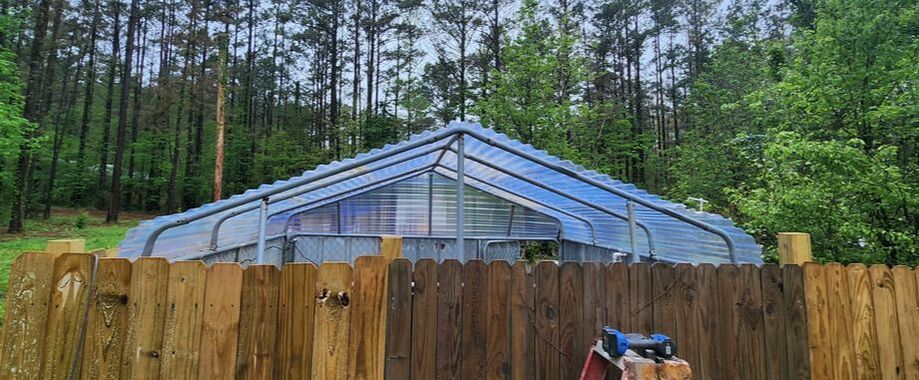 The tubes installed in a vertical position to support the panel that will be mounted to the walls. Conduit brackets are used to hold the ends of the tubes in place. 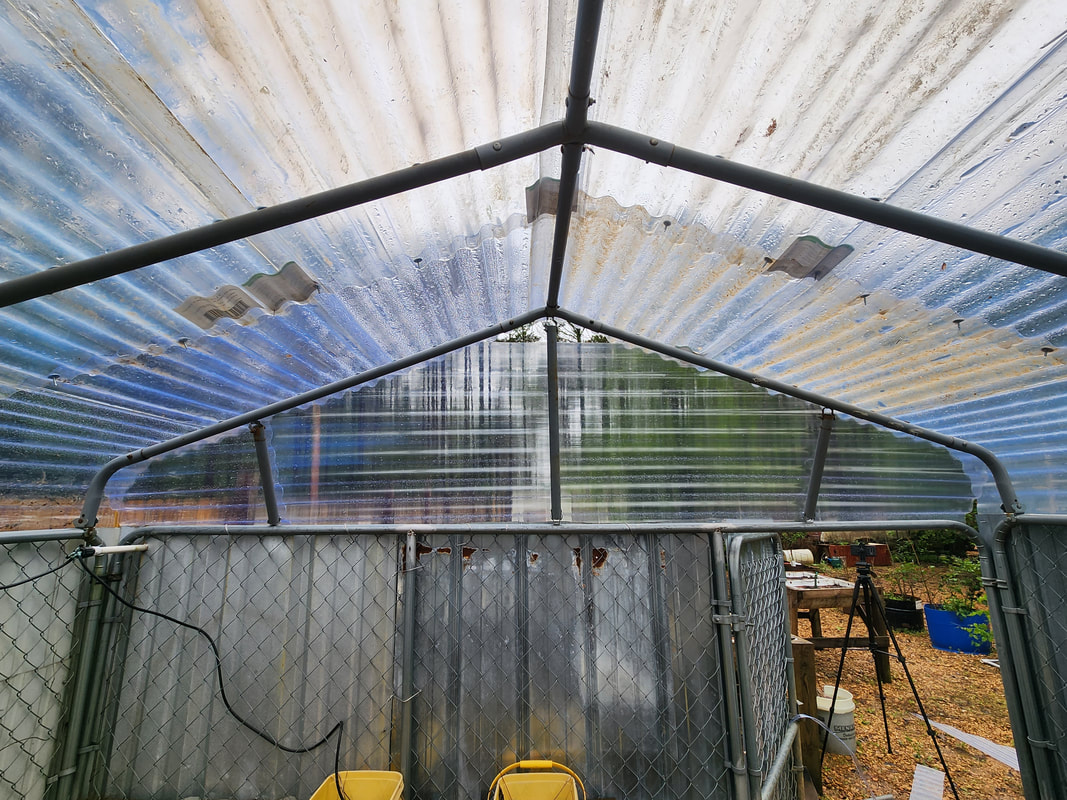 Inside shot of the vertical tubes holding up the plastic panel for the wall connecting to the roof. I had to hang the panel up with one screw to hold it in position while I eyeballed the angles that I would have to cut to get the panel to fit in place. The way the vertical posts are angled, these sections of wall are at an angle where they will lean in towards the roof frames. This made for some careful eyeballing to ensure that the panel will fit nicely. After some trimming I managed to get the 8ft panel in place. I had to cut a 2ft section of another panel to cover the last 2ft of open space. 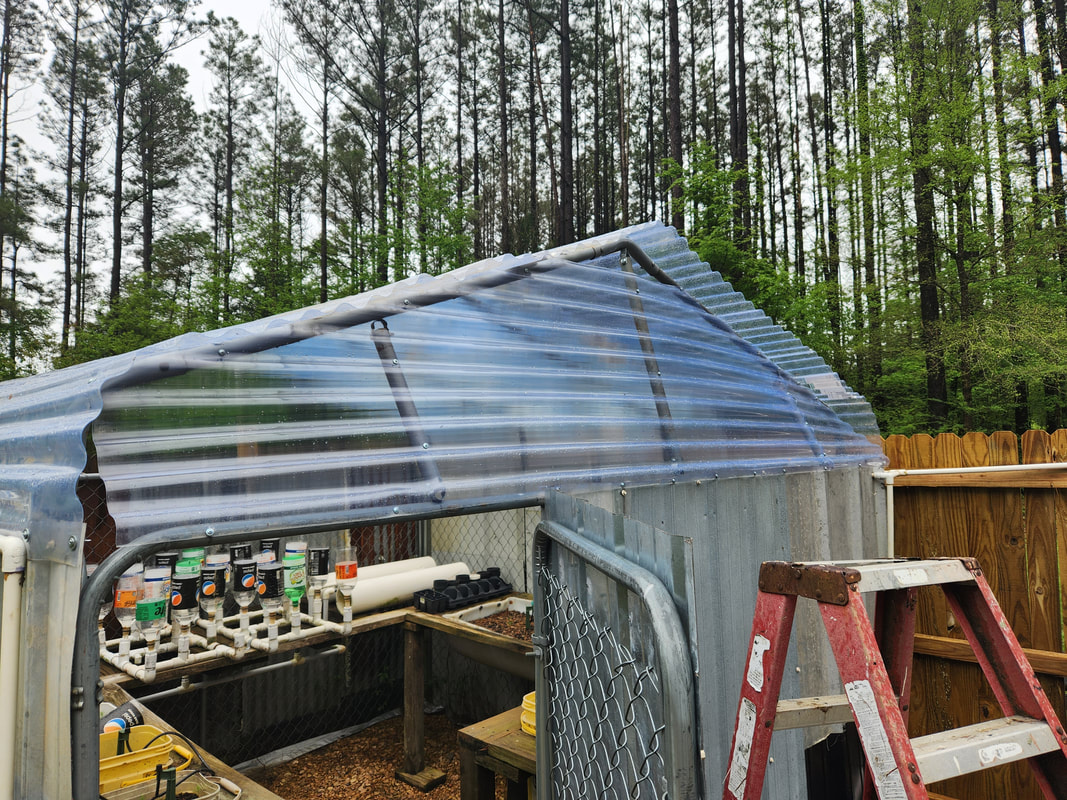 After installing the shorter two foot section of panel at the end to connect with the larger 8ft section, there was a small opening remaining at the top that will have to be filled in. After getting the larger sections of paneling up, there was still a small section left along the top of the middle of the wall. This small section is at the peak of the wall and would more or less be another triangular panel. At first I would've left this spot open as a means of venting the accumulated heat that will build up in the summer, but if it rains sideways, then the inside of the greenhouse will get soaked. So, I went ahead and took a couple of sections cut off from the larger panels and trimmed two half sections to cover the opening. Things were done neatly enough that it didn't look too cheesy. 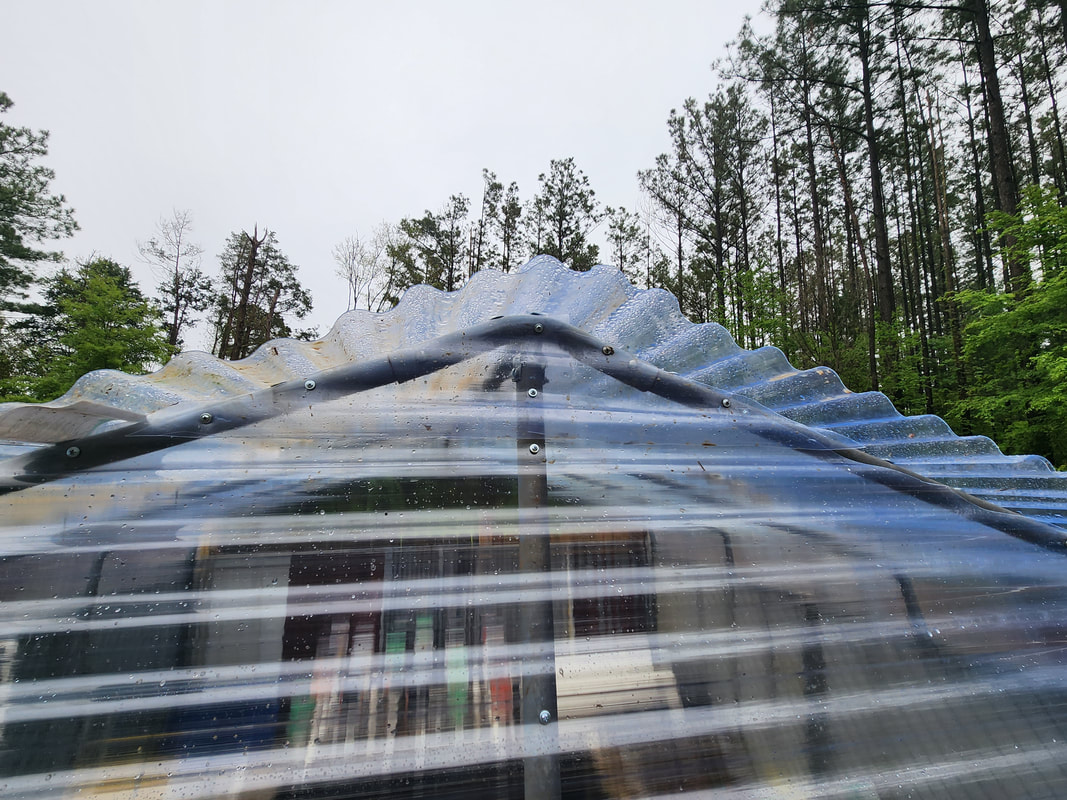 Two small pieces of plastic cut and screwed in place at the middle to cover the gap that was remaining after installing the larger sections of panels. With one side done, I repeated things on the other side, but unfortunately, I ran out of screws. I still had the one 2ft section left to install on the other side. I did get the two sections of triangular plastic at the top taken care of just as well. One of the things that I'll have to do with these walls, just like with the seams where the roof panels meet is to seal everything up. Between using caulk to seal the surfaces where the ends of the panels meet and using expandable foam to close in the larger gaps, such as where the walls meet the roof. 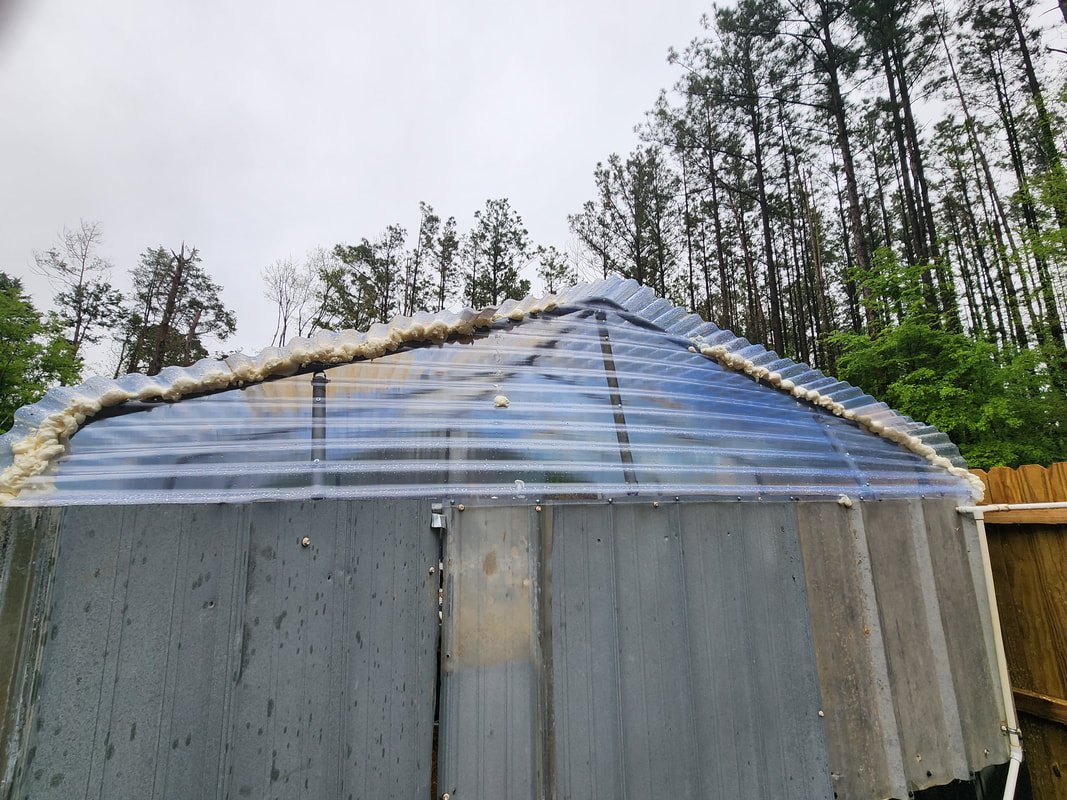 Expanding foam applied around the tops of the wall where it meets the wall, sealing the openings created by the corrugated panels. I used up a can of expanding foam covering the line of the wall along the top, leaving maybe a quarter of the line left before I ran out of foam. On one end I may have to add a small irregular piece of plastic to cover a remaining gap that I did not account for. Now, I still need to do the caulking but that will be after I get the remaining wall taken care of. With all this taken care of, I can then move on to getting the other things done on the structure and the gardens. This is a large-scale project that will finally get done in its entirety more sooner than later. With the two soda bottle hydroponic garden manifolds bolted back down, I decided to move forward with the installation of the corrugated plastic panels on the roof. This would be a series of panels installed from the bottom up, with the next one overlapping the last one to allow for proper water shedding. Self tapping screws with washers will be used to hold the panels to the metal tubing of the roof. Since the panels are 8ft long, there would be a section of about 2 ft that will have to be covered by short pieces. 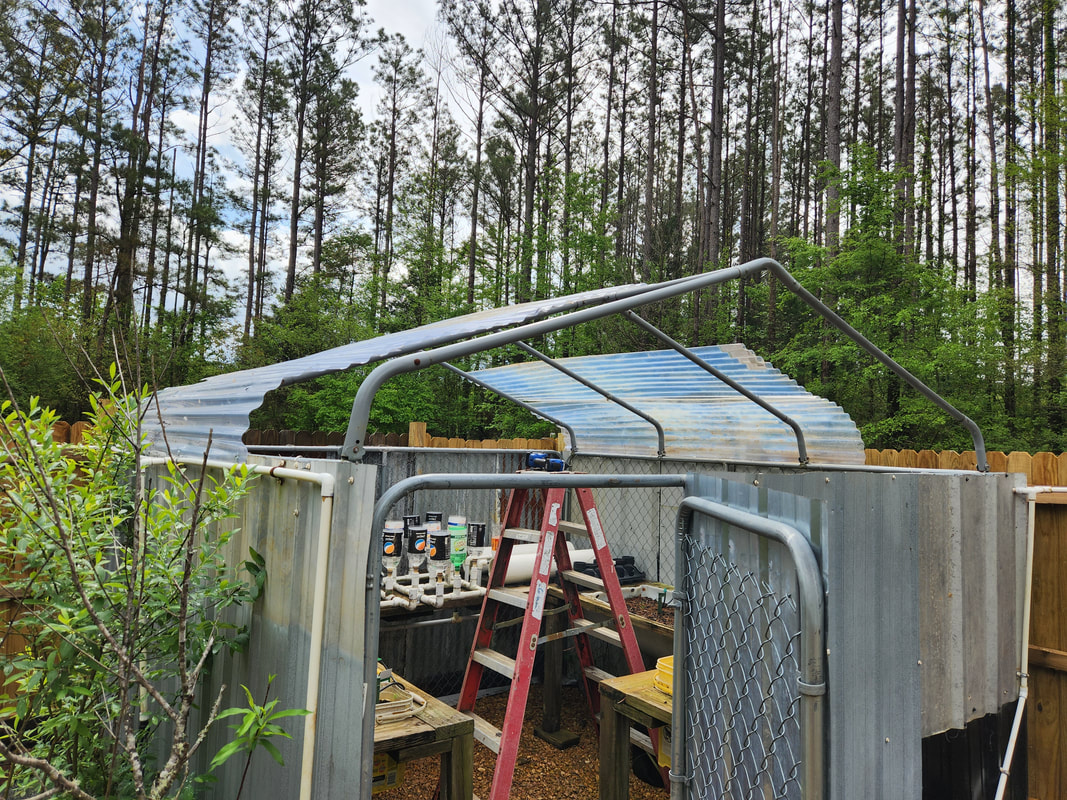 Starting the installation of the corrugated panels, starting from the bottom on one side, then going to the other side to work up from the bottom as well. I installed three panels on one side, which covered the whole side up to the peak of the roof. I left the outer end unsecured, as I would have to move my ladder to the outside of the fence where I can lean over to secure the screws on that section of roofing. After I did one side I moved to the other side to install two panels, then the last panel had to be installed in a way where I was able to get up from the open side where the 2ft gap is located to secure the last panel at the roof peak. I moved the ladder to the outside to get all the panels on the outer tube of the roof framing, as well as the last panel, which couldn't be reached from the inside of the greenhouse. 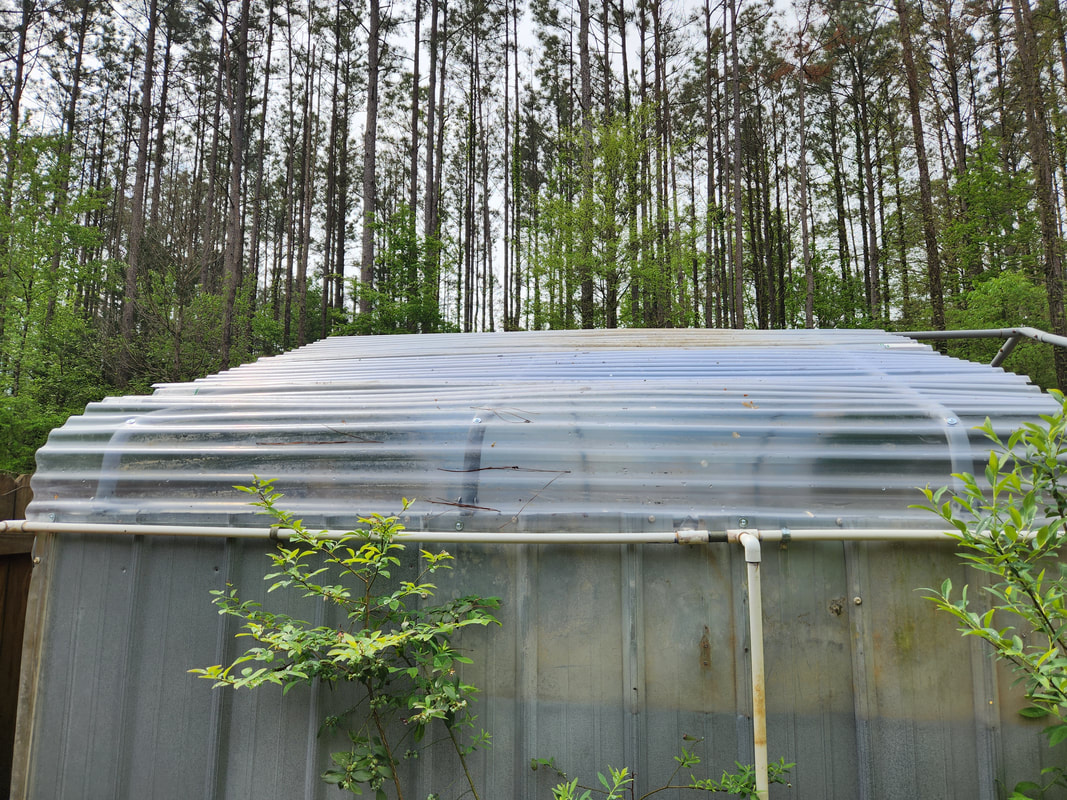 The very bottom of the panels are secured with self tapping screws and washers along the top of the sheet metal wall. The rest of the attachments are done to the roof frame tubes. At the peak of the roof the last panel was able to overlap the other side at the peak by several inches. I had to climb on the top of the fence post and the top rail of the chain link wall of the greenhouse to allow myself to lean over enough to reach the middle roof frame tube to be able to secure the screws for the panel. With that all done, I can write off that section of the roof. I can start cutting the panel sections for the last two feet of roof so I can finish up the roof. 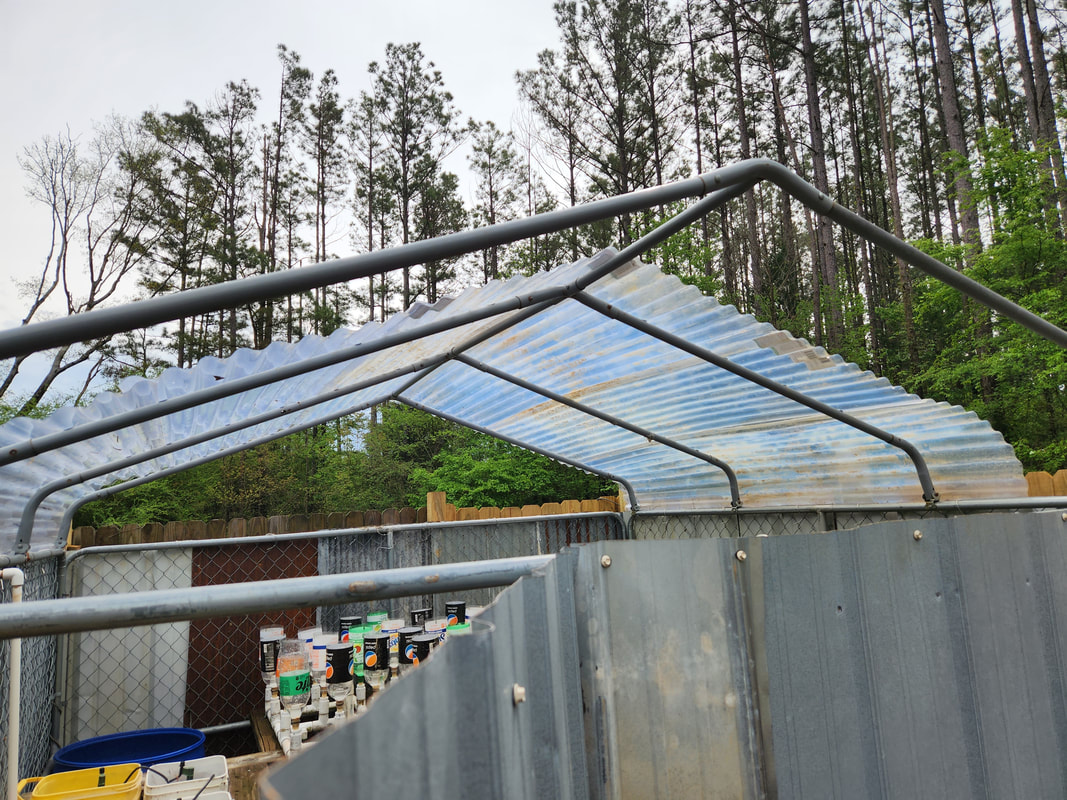 Another shot of the roof with all the panels in place. There's enough overlap to ensure the roof sheds water properly during rains. Once the last section of roof is done, I'll have to figure out how to do the two sides. More than likely I'll have to install some more tubing vertically to provide added support. The panels will have to be trimmed to create triangular sections, with the added bonus of having to account for 2ft since the sides are also 10ft wide. Once the sides are installed, I can apply some expanding foam in spots to fill the gaps so the roof will be sealed all around where the ends of the panels meet. The greenhouse is coming together rather fast. Today ended up being a day of addressing some things on multiple fronts. As is always the case, there's something that needs to be worked on, whether it's bringing it back to working condition or touching up on something so it can be pressed in to service. Such is the case with the three subject areas I'll visit today. The first area is where I left off the previous day, and that is the Dog Kennel Greenhouse, more specifically the hydroponic gardens I had to restore to useable condition. I restored one of the HPG manifolds by changing up the fittings that the soda bottles would attach to, as well as the soda bottles themselves to make for a more sturdy coupling for the assembly. I still had one more of the manifolds to redo, so I can have both assemblies done and secured on the framework in the greenhouse. I did the same, but made a mistake with the gathering of PVC fittings and came up short for one of the reducer bushings, due to my grabbing of the wrong bushing, so the second manifold is complete, save for one of the ports. I still mounted the unit down on the framework next to the other HPG manifold anyway, as this repair will be as simple as applying glue and pressing the fitting into the port and letting it set overnight before I put the soda bottle planter in place. 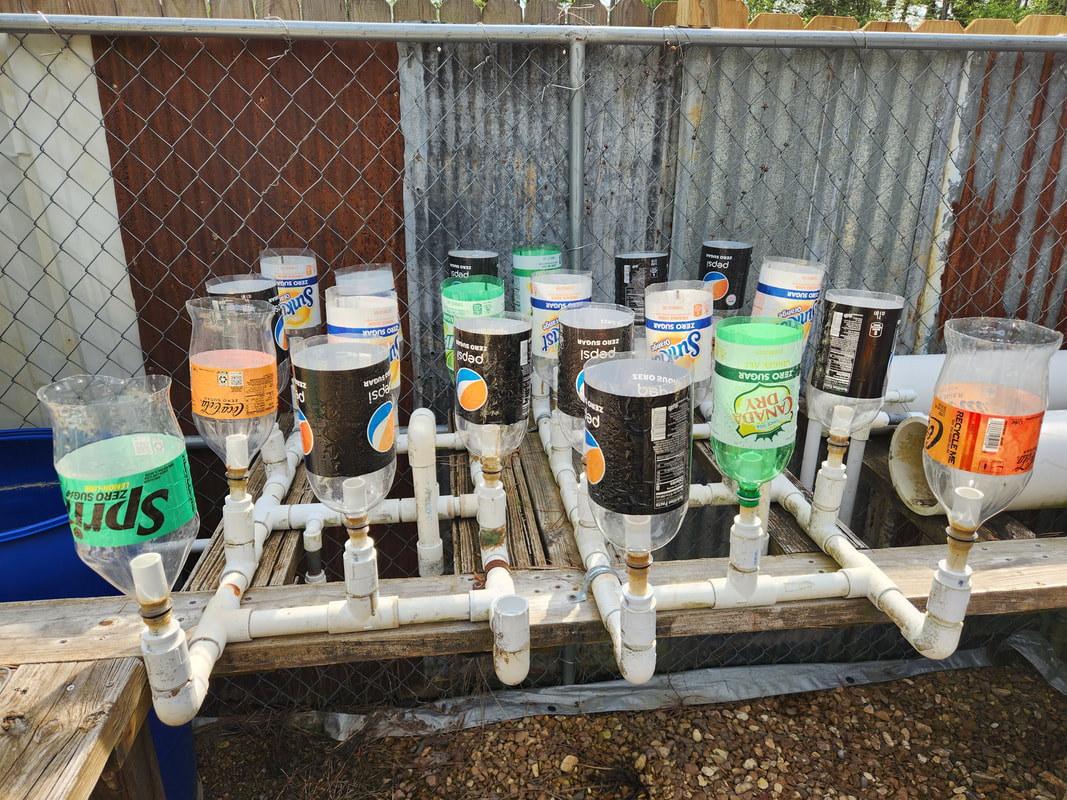 Both hydroponic gardens are in place, bolted down to the framework in the greenhouse structure. Note the missing fitting and bottle on the right side of the left manifold. With that little order of business taken care of, until I can get the reducer bushing and start the greater work on the greenhouse, which is installing the roof, I moved on to the John Deere Tractor. A good while ago, I converted this thing from a regular lawn mower to a utility tractor by removing the cutting deck and installing several new parts on the engine to restore operation. Of course, I had some issues with the steering that needed correction, and after making those corrections, the tractor ended up not being used for the following year afterward. In the meantime, sitting outside is never a good thing for any kind of machine. As is the case, the carburetor became scummed up, not allowing fuel to flow, even the old fuel that was still in the fuel tank. I pulled the carburetor and broke it down, cleaning it out as thoroughly as possible. I had to clean out the jet as well as the solenoid due to the idea there was some form of algae and scum in the float bowl. After running the internals through a parts washing and reassembling, I put the carburetor back on the engine. 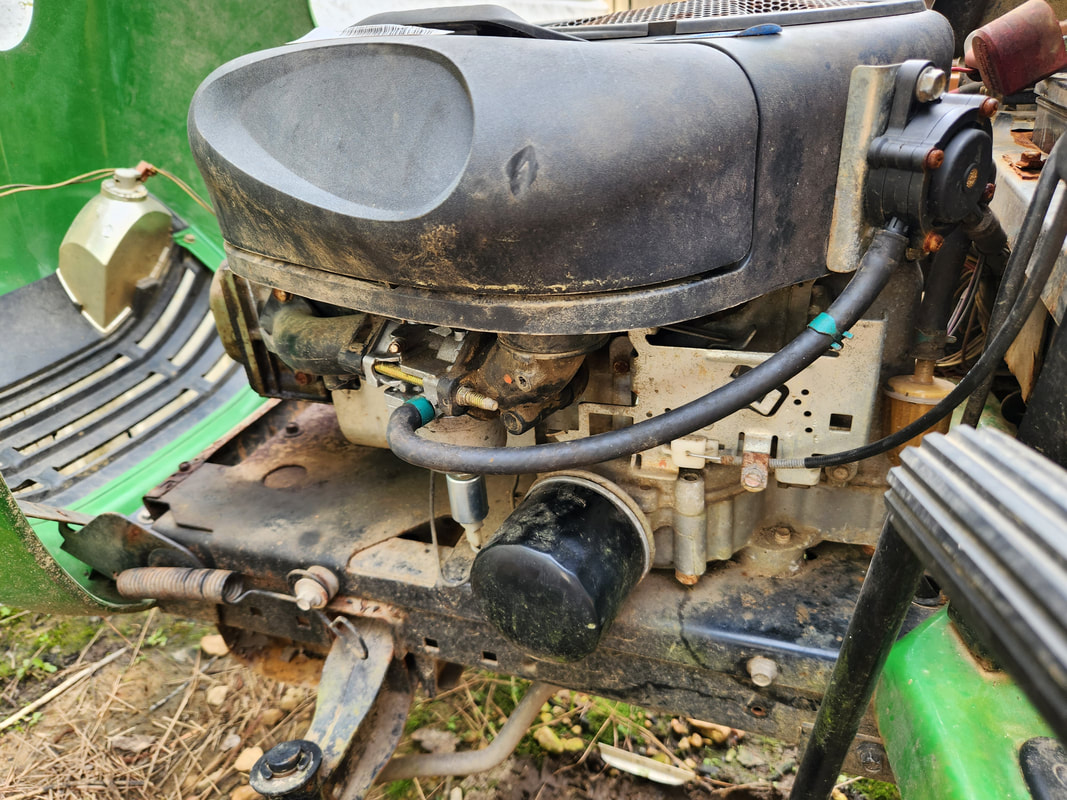 After cleaning the carburetor and reinstalling the unit, it didn't take much to get the engine back up and running again. With a little fuel poured into the intake tube, the engine started right up on full choke. Fuel was obviously flowing freely as the engine kept running. When I opened the choke, the engine wanted to act rather erratically. After letting the engine run at partial choke for a while, it started to level off some. Of course I had to dump another gallon of fresh fuel into the tank to dilute the old fuel so hopefully that would help things along. At this point the engine seemed most happy at partial choke. I was able to drive the tractor around like normal, but if I tried to open the choke all the way, the engine would act a little stupid, enough so that I wouldn't trust it under load. We'll see how things work after running the old fuel through. Worst case I'll have to replace the carburetor, again. The last thing that needed addressing was Stubby. Well just a few things needed to be looked at. One was the functionality of the radio. It turned out the radio worked, but the tuning feature would sometimes have the frequency bounce around, a common thing I notice on old car radios. Other than that, the radio worked just fine. I normally use a bluetooth module to connect my phone to the radio so I'm listening to things from the phone through the radio. The next thing I had to check were the locks. The ignition key apparently doesn't work with any of the other locks on the vehicle, so I will have to replace the lock cylinders on all three doors. The next thing was tightening up the molding pieces for the door levers so they wouldn't be bouncing around when the levers are operated to open the doors. The last thing that I had to check out for functionality was the AC system. Turning the unit on yielded nothing. I hooked up the refrigerant hose and dumped a can of stop leak into the system, and didn't get anything yet. I started adding refrigerant and not even a half can was needed before the compressor engaged. I dumped a little more until the operating pressure was within the middle range. Even at a standstill, the system was blowing rather cool. I let the thing run a while to determine that there weren't any leaks anywhere and that the engine wouldn't start overheating for any reason. Once everything looked good I shut the truck down, confident that the vehicle was ready for the road.  AC refrigerant hose hooked up to the system on Stubby to recharge the system. With these things addressed, I can now move on to other things. For one, I can start on the final phase of the Dog Kennel Greenhouse construction. At the same time, I can finish things up on the hydroponic gardens, by installing a pump so when I get power to the structure, I can get that system operational. The John Deere will be seeing more use as a utility tractor for going up to the garage, as it was intended to be used before. One of the bigger reasons for this is to allow the ole lady to ferry a pack of 60v batteries up to the garage for installation in the new electric zero turn tractor we recently picked up. There will be more on that in the very near future. And with the checks made on Stubby, I can start driving the vehicle in the normal capacity as with the full-sized Tracker. At the same time, I'll also be ordering the locks so I can get the vehicle to the point of being able to be locked down properly so we can drive around anywhere safely, being able to lock the truck down. I did have some more things to address around the yard and lot, pertaining to Truckstang and the Dog Kennel Greenhouse. First of all, on Truckstang, the Ranger rear end was missing the speed sensor that was used on Rangers since like '89. When I did some test drives, the rear end spat out water and grease. Of course, the rear end would need plenty of oil to allow for the gears to spin with the least amount of resistance, as well as minimize wear. Solution to that problem was to replace the speed sensor. A visit to the junkyard yielded a replacement speed sensor. It didn't even matter if the thing works or not, I just need to plug the hole. 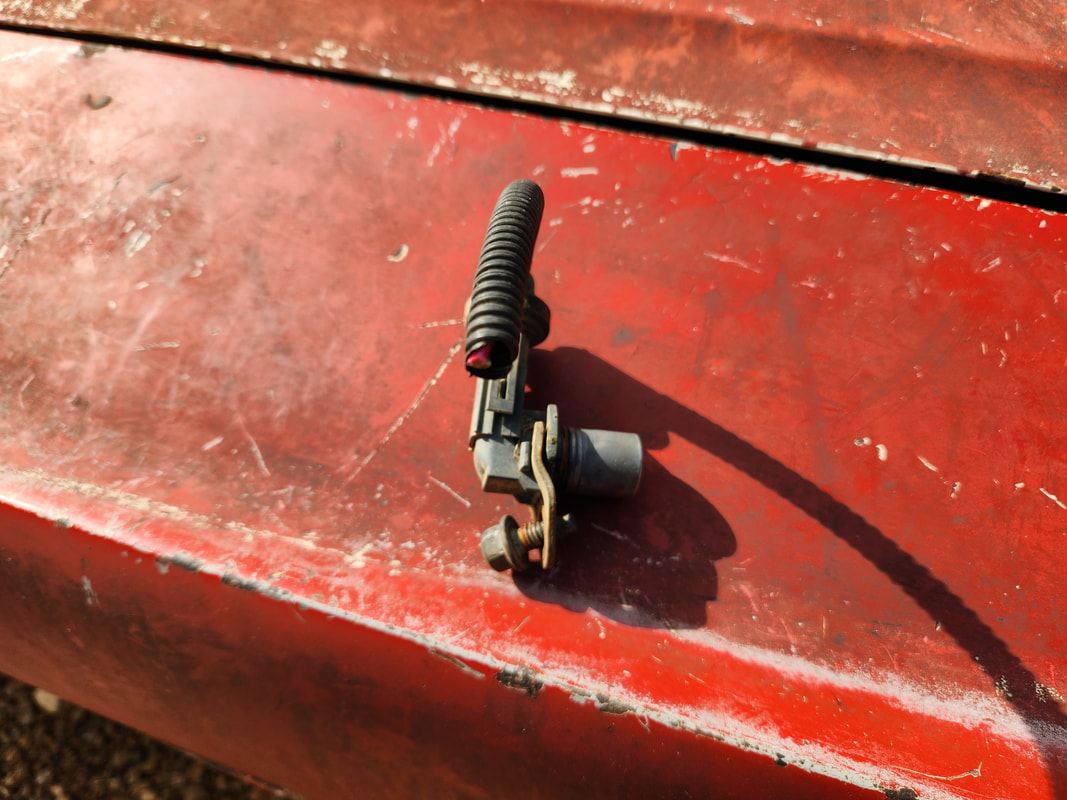 The junkyard speed sensor and bolt for Truckstang's rear end. I had to get the bolt that holds the sensor in place just as well. This was one of those issues where I would have to slide underneath and fill the rear end with gear oil and install the sensor. I couldn't exactly drain the assembly in case there was any water still in place, since there isn't a drain plug in place. I wasn't about to pop open the cap to do this as I would need to replace the gasket afterward. In this case, I just used an oil can to dump three cans worth of oil into the rear end before installing the sensor. I will probably end up having to open the rear end up anyway in the future when I get around to replacing the gears with a lower ratio rear end since this one is for a vehicle with an overdrive transmission. 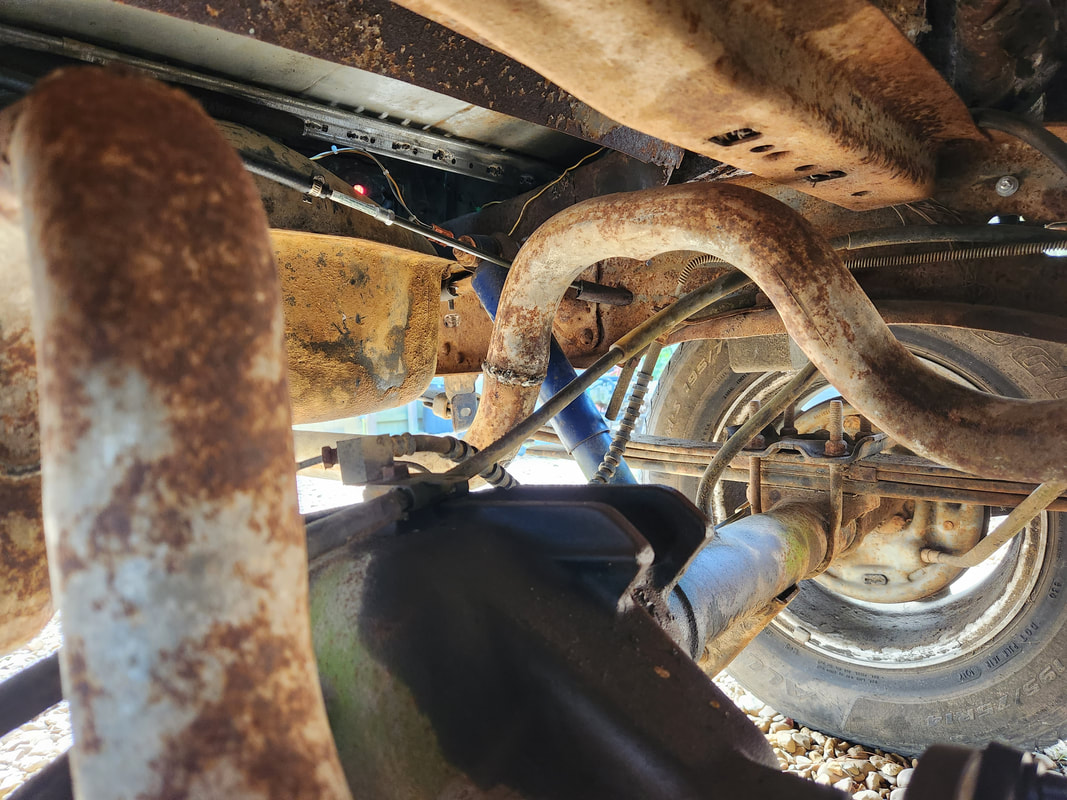 The Ranger rear end missing the speed sensor that will keep the gear oil in place when the powertrain is spinning around at high speed. 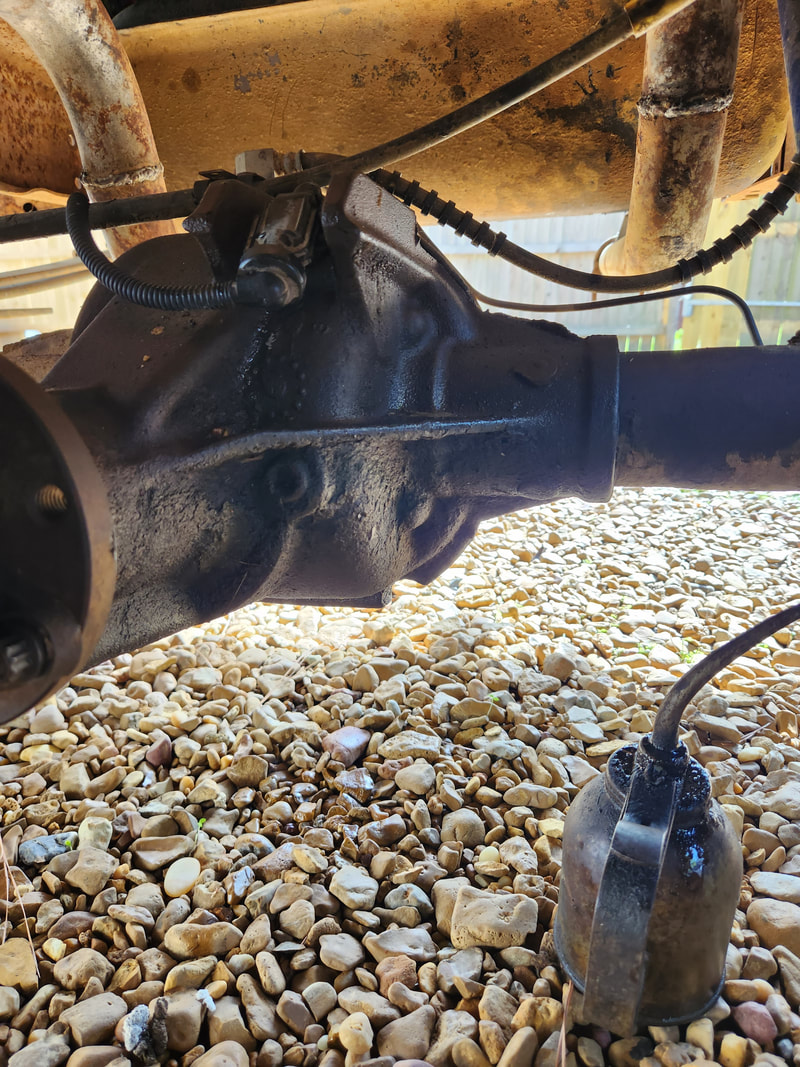 The speed sensor is bolted in place on the rear end after dumping three oil cans full of gear oil into the rear end. As far as the Dog Kennel Greenhouse is concerned, before I start on the roofing portion of the project, I wanted to get the hydroponic garden pipe manifolds fixed up and ready for use. After I get the greenhouse fully completed, I can bring the HP gardens online along with the raised beds. I started with the soda bottle gardens. I still have two sewer pipes that I have to cap off and cut holes to create another version of the Double Barrel Hydroponic Gardens. I had to change how the pipe manifold is set up, since the old version had bottle caps glued in place. I wanted to change this up and do something that was a little more durable. 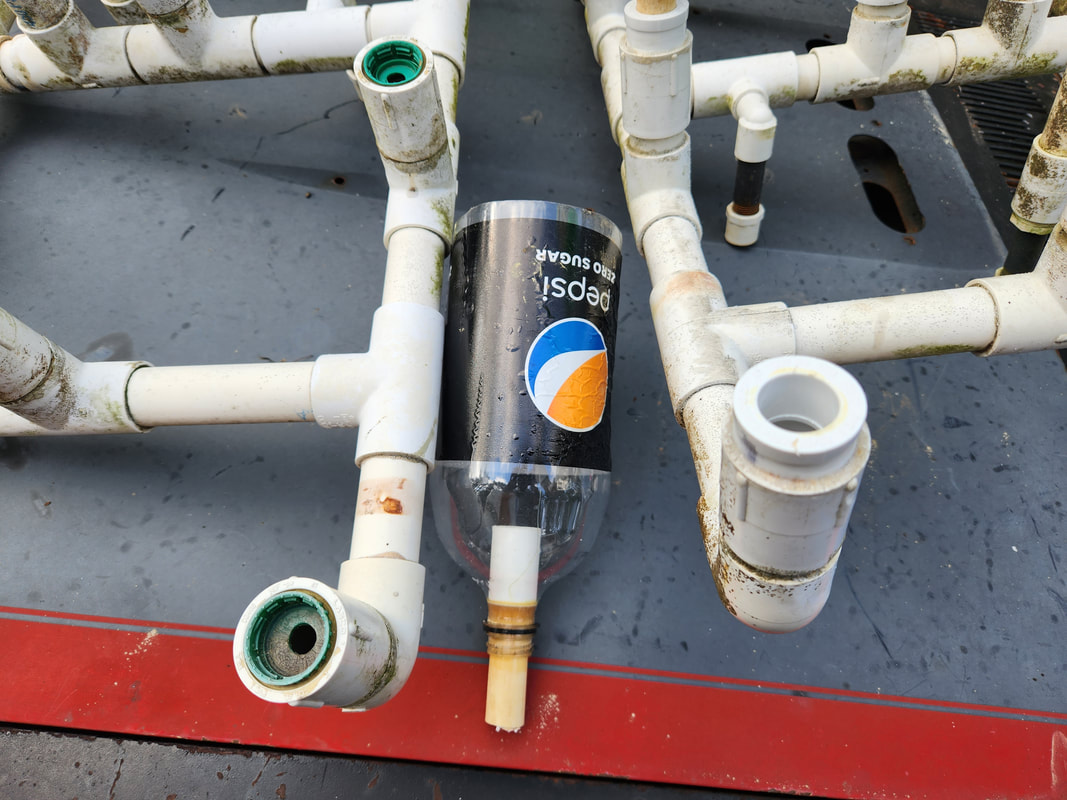 The old configuration on one manifold compared to the new configuration, with the 1"-1/2" reducer bushings installed in place of the bottle caps. Note the pipe setup in the bottle to coincide with the reducer bushing setup on the other manifold. 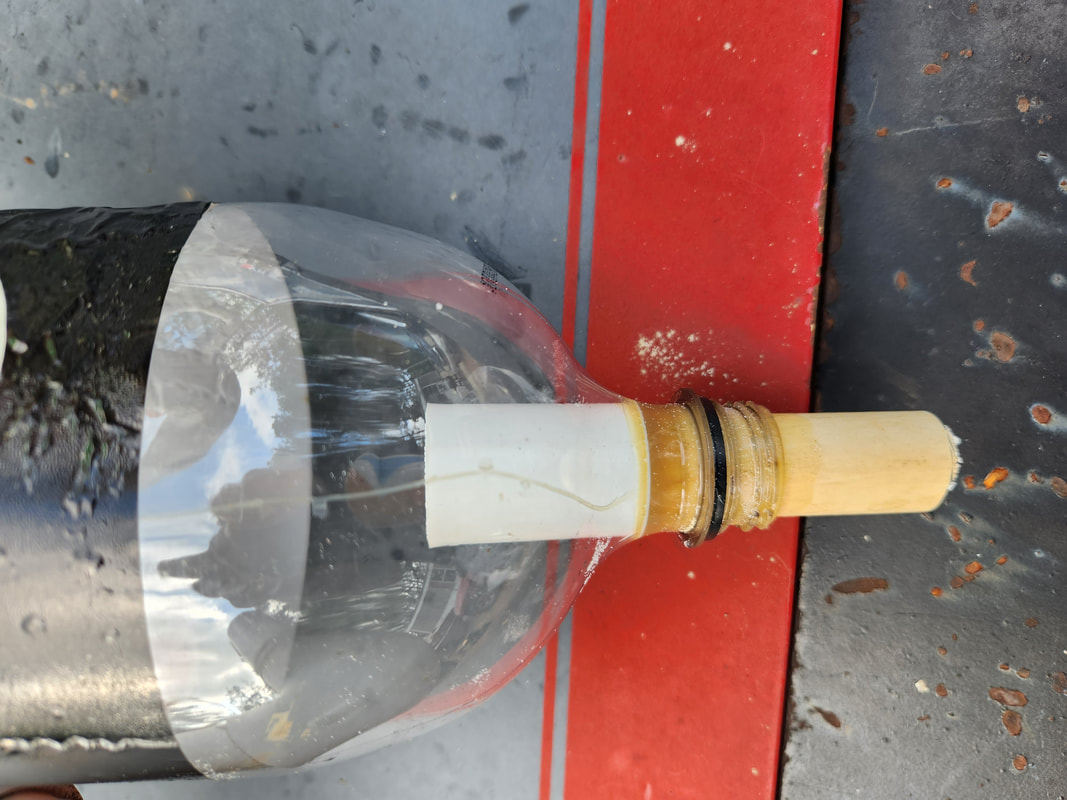 The new configuration on the bottle hoppers, involving a 1/2" pipe with a coupling on it to help hold the pipe in place. Note the glue spread around in the neck. I might add another coupling on the outside that would further hold the assembly in place, and just cut the excess off, installing that piece on the other end of the outer coupling, making for a bottle assembly that is sturdy and easily removable. After removing the bottle caps and using a grinding wheel to ream out the openings to allow for the installation of 1"-1/2" reducer bushings, I took short pieces of 1/2" pipe, added a coupling to one end, then added glue to the pipe right at the coupling. I slid the pipe from the inside of the bottle into the neck, allowing the glue to spread around in the neck area. I applied a little bit of glue around the edge of the pipe and neck to further top off. With this setup, I can slide the 1/2" pipe end into the reducer bushings to complete the garden setup. These bottle assemblies can be easily removed for cleaning. Once these two manifolds are done, I can get the stuff to finish off the larger pipes so they can be ready as well. Lastly I will need to source a high powered submersible pump to install on the tube feeding the HP gardens. Once the roof gets installed, I can run power to the greenhouse and add the timer for the HP gardens. Last thing I would need is a tap on the sprinkler system line that would dump water into the HP garden hopper drum to top it off. I'll probably add a float valve that will at least shut off the water flow to the drum when it does get full. 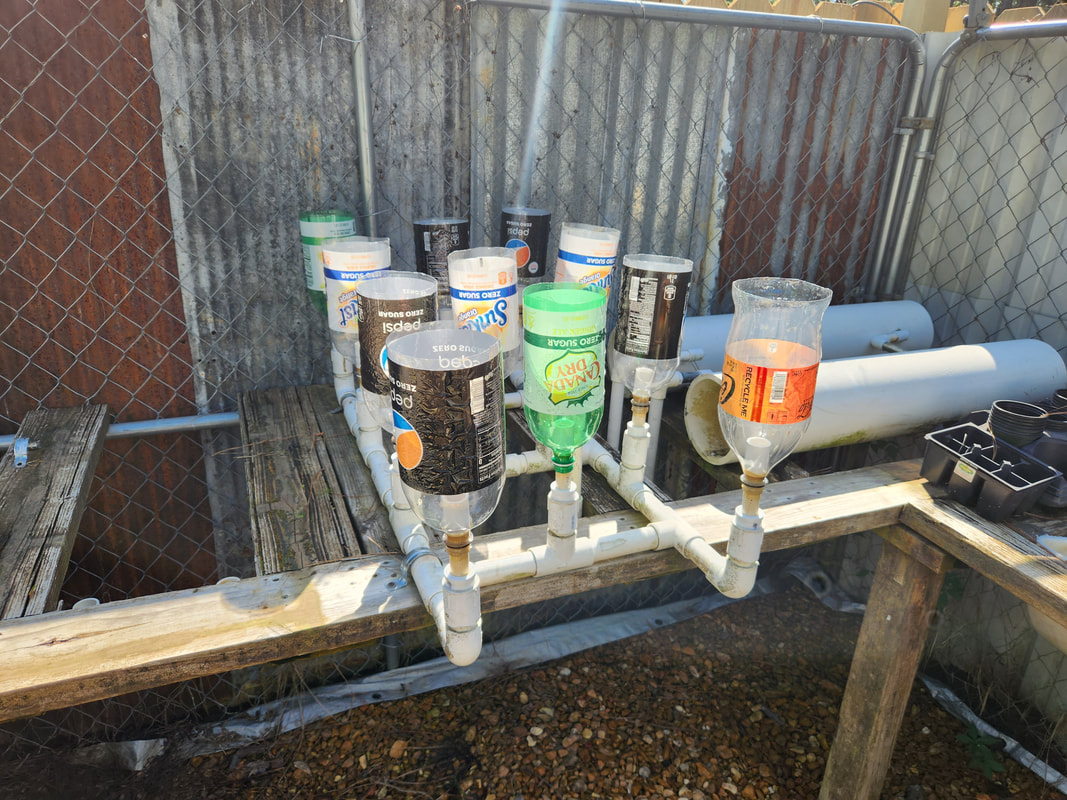 One of the soda bottle hydroponic garden pipe manifolds completed and bolted back down. Pipes are hooked back up for the input and output lines for the water supply drum. The Dog Kennel Greenhouse is one of those projects that has been on the back burner for way too long and its long past time to finish this project up so I can close it on the books and be able to move on to other things. It would be nice to not have to worry about this project in this capacity anymore as it would be completed and fully operational, unlike some of the other projects that are still open. |
