|
When you get a new car, you always have the tendency to want to do things, even little things, to make the car better in some way, shape, or form. In the case of the Scion, those improvements are for all intents, restoring certain parts of the car back to how they were when the car was new. Since this car has varying states of body degradation from normal use and wear/tear, we decided to do what we can to fix those little flaws. Case in point is replacing the lower valance grille that was missing from the car when we got it. The car technically comes with two grilles, the primary grille where the emblem is that is sandwiched between the headlights, and a lower grille that is in what we normally know of as a valance panel. The lower grille again, is what's missing. This piece from what I figured would be a plastic piece since the way the valance/bumper is made, the grille piece snaps in. We did find a replacement on Ebay, well more accurately the ole lady found it. It's an aluminum grille that I later learned when I attempted to install it that its really a decorative grille that is installed over the stock grille to give the front end a different look. The aluminum grille isn't a replacement grille. Since it didn't make sense to try and send the grille back for a refund as a good chunk of the refund will be eaten up in return shipping I decided to make this grille work.. The grille is held in by four bolts and special clips that secure the metal grille to the stock grille. After looking at everything and doing some thinking, the only option I could really come up with was to attach some angle braces at four different spots at the top and bottom of the opening in the bumper to secure the grille. In order to do this I had to line the angle braces up with where the bolt holes in the grille were, then drill a hole for each angle brace. Afterward I used a screw and nut/washer to secure the angle brace to the plastic bumper around the opening. The screw heads are indeed visible but not standing out. A little paint would further cover that up. With the angle braces in place I was able to use the screws and nuts that came with the grille to secure the unit to the angle braces using the bolt holes that were made into the unit. This worked out nicely, securing the grille nice and tight in the opening of the plastic bumper. With that, I was able to accomplish the goal of replacing this body art without having to go through the hassle of returning and trying to find a stock grille. We can now check off another box in the list of different things that we wanted to do to improve the Scion.  Grille mounts made from angle braces, note them in the four corners of the opening in the bumper. 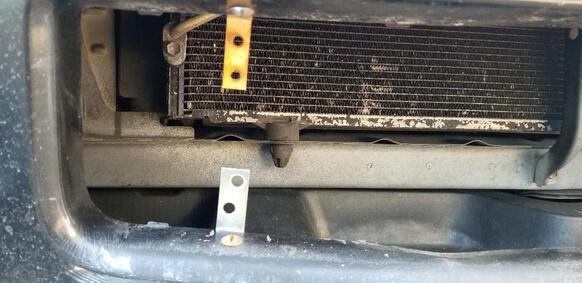 Closeup of grille mount angle braces. 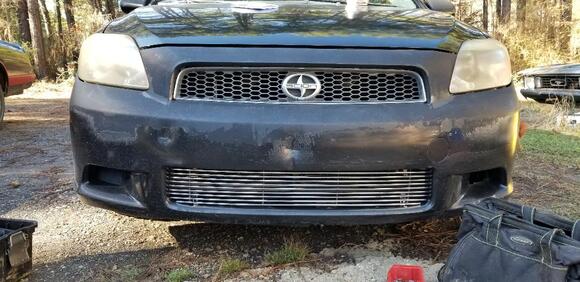 Lower grille installed in Scion
0 Comments
It's been so long since I did some work on the Dodge, well, really just a few months, but still, too long of a pause when I was working on the car on and off for the greater part of the year with only brief pauses while I waited for parts. Well after having stopped working on the car for the last few months, keeping in my mind the few things I still need to get to finish the car enough to get it running and driving, I finally had a chance to get some more parts.
After scrapping the Grand Prix, I had enough money to get a few parts for the Dodge. I focused on the remaining brake parts and the ignition parts. This included the set of brake calipers and pads (hopefully I won't need a master cylinder), and the distributor, spark plugs and wires. Some stuff was bought on Ebay while some stuff was bought at auto zone since the prices were close enough or better at auto zone. I had to order the calipers and the distributor from Ebay. The brake pads, spark plugs and wires came from auto zone. With that I went ahead and installed the spark plugs and the wires, situating them in a way where they should be able to be plugged right to the distributor when I do drop it in. Along with that little bit I did go ahead and install the battery that was in the Explorer, since for all intents I'm probably not going to really be continuing to work on that vehicle. The other thing that I did after the battery was install a conduit clamp to the fender apron right by the electric fuel pump in order to cradle the fuel pump. The clamp is for 2" diameter pipe. I had to drill a 5/16" hole in the metal right above the frame to secure the clamp with a single 5/16" bolt. I also had to cut a couple of pieces of old hose to use as insulators for the fuel pump body. After cutting 2" lengths of hose I cut the pieces the long way then opened the pieces up a wrapped them around the fuel pump prior to clamping the pipe clamp around the unit. This made everything be nice and tight and secure. With that I just need to get the distributor and calipers so I can assemble those items and hopefully when I bleed the brakes I won't discover that the master cylinder is shot. We'll see. 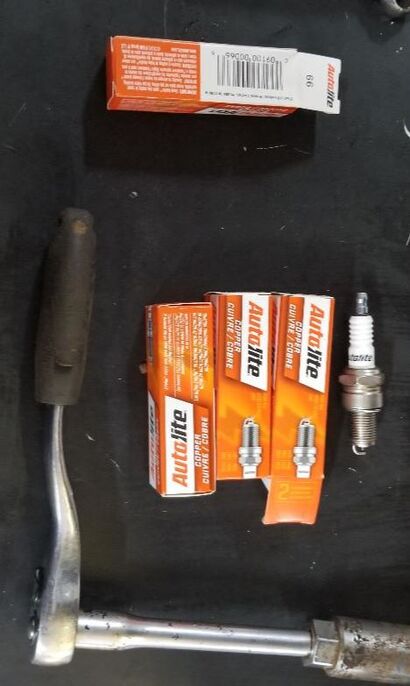
Spark plugs for Dodge 318 V8
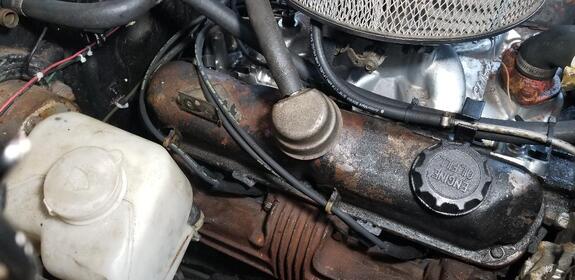
Right side spark plug wires installed on engine.
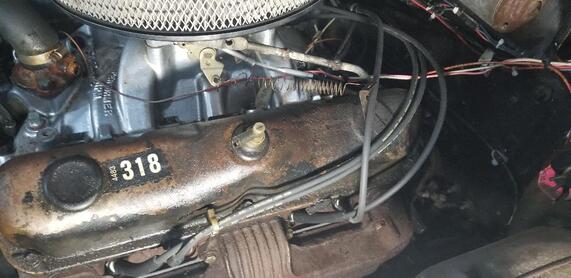
Left side spark plug wires installed on engine. Wires are routed to rear of engine where distributor goes.
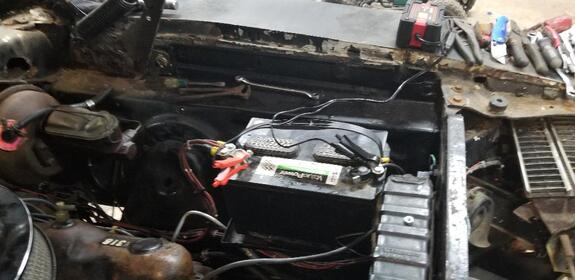
Battery installed and ready to go, charger installed to keep battery topped off.
The other thing I did was clean up a small mess that was on the Scion's driver's side door. Apparently someone glued the mirror or something on the mirror and must've gotten carried away with the glue to the point that glue ran down the door. Of course once the shit dried it wasn't going anywhere. I tried using some shit remover geared for automotive paint and that really didn't do shit. I tried using a steel wool pad and even that didn't help and I didn't want to just keep scrubbing to the point that I mess up the finish. I ended up using a razor scraper and just carefully scraped the surface at the glue to get the glue removed with minimum damage to the paint finish. All in all I was pretty successful with removing the glue from the door. The only spot I couldn't get was on the plastic trim at the bottom of the door as the razor immediately dug into the plastic. I'll probably have to sand that off whenever I come around to finishing the bodywork and going ahead and painting the car. Otherwise, everything looks pretty good. 
Glue shit all over driver's side door of Scion.

Scion door after scraping the glue off, there is minimal residue on the door but overall the glue is gone.
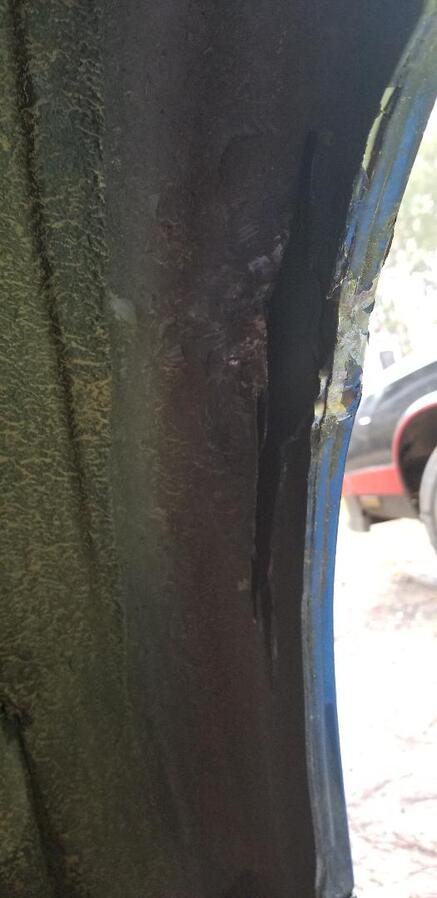
After taking the Scion for its first real drive on Friday I found that the body damage to the right rear quarter panel was enough that it caused some rubbing of the tire whenever hitting a fair bump at certain speeds. Of course this was remedied by just being careful over certain bumps but that still meant that the panel damage needed to be fixed or at least straightened out enough that it won't be a problem.
I had to take the tire off and remove the interior panel on the right side so I can hit those areas with the hammers. I tried pounding the panel from the inside as well as the outside part of the inner fender. After a little while I ended up making a couple of cuts along the inner fender/fender apron . This allowed for the metal to end and move, opening up the gap as the panel straightened back out The cut went along about a foot at the front and the back of the fender well. With this I was able to go back to pounding the panel. I had to keep test fitting the plastic piece that hooks up to the right side of the rear bumper because as I pounded out the dents I had to make sure that the bumper will attach to the quarter with no gaps or at least minimal gaps. 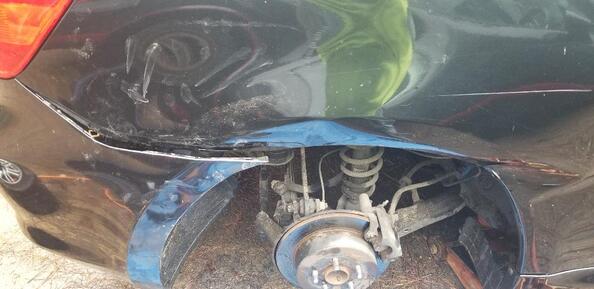
Rear quarter panel damage that needs to get straightened out.
Front end of rear quarter inner fender well showing cut that I made.
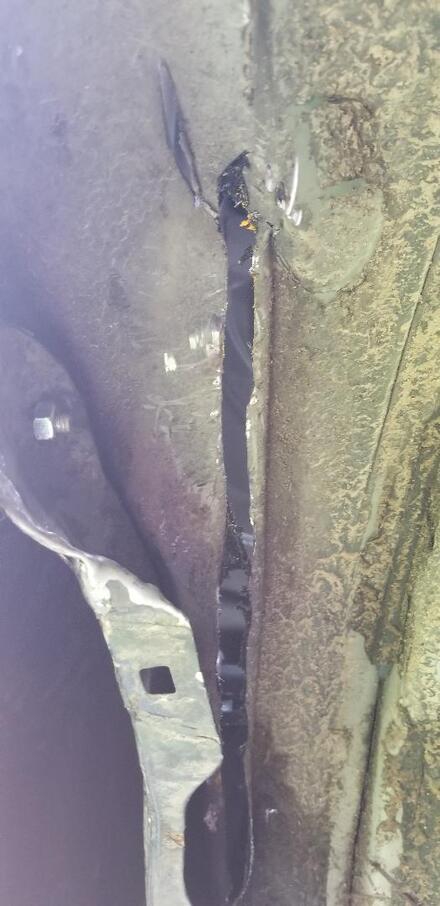
Rear side of rear quarter fender apron showing cut that was made along that side.
With multiple bouts of pounding sheet metal and then test fitting shit, I was able to get things to line up pretty good. There was still a slight gap along with the edge of the rear bumper not matching perfectly. I also had to replace the one screw that holds the plastic piece to the sheet metal of the rear quarter. With everything beaten on and straightened out I was able to finally install everything and fit the bumper corner back into the fender well . I had to use two different hammers, a power drill, power saw, and a die grinder to get the sheet metal manipulated like I wanted. 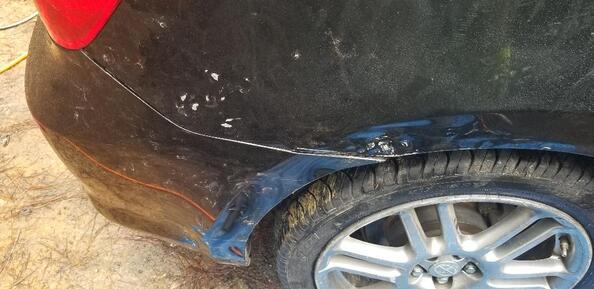
Panel knocked out and straight as best as can be done, note bumper corner is able to be snapped in place once again.
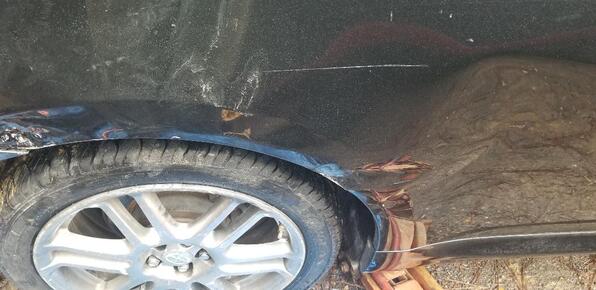
Front side of rear quarter damage straightened out as best as I could get it.
Even though it might not look like much to some, the dents and crinkling have been knocked out quite a bit, enough to allow for the bumper to be reattached right and for the tire to not scrape anymore when driving. At a future date I may feel compelled to put bondo on the panel to smooth things out then put some flat black primer on it to make it at least blend in with the rest of the body color. I would have to have the Tracker back online prior to being able to do something like paint the car since we're talking about putting the car down so I can sand the finish off the paint, mask the car, spray the base coat and clear coat, letting it cure for a little while then wet sanding and buffing the new finish to get things finalized. Only time will tell on that one, but the main thing is that the functionality of the car is restored to the level where we don't have to worry about little quirks or other little things that would interfere with driving the car. Another thing that irked me was the fact that the driver's seat would not recline. The passenger seat worked just fine but not the driver's side. The lever at the top of the seat for moving the seat back forward in order to get to the back seat worked fine but not the damn reclining portion. I did a rough glance at the levers and blindly felt under at the mechanism to see if I could feel something out of place but didn't feel anything out of the ordinary. I had to pull the cover from the mechanism to inspect the linkages to see what's not working . I ended up finding a couple of cables that go to God knows what under the seat that were connected to a couple of rotating mechanisms that keep the reclining lever from being able to be pulled fully back to recline the seat. After seeing that there was no way to make these cables or those rotating cams move to release the lever I ended up disconnecting the cables altogether from the rotating cams, which allowed the things to rotate to where the recliner lever can pull all the way enough to recline the seat. I made sure that disconnecting those cables didn't disable some other part of the seat's operation, which luckily it didn't. With that I tucked the cables under the seat and put the cover back on and relished in the idea that the driver's seat now has the ability to recline once again. Now whenever I do drive and want to lay back, I can! 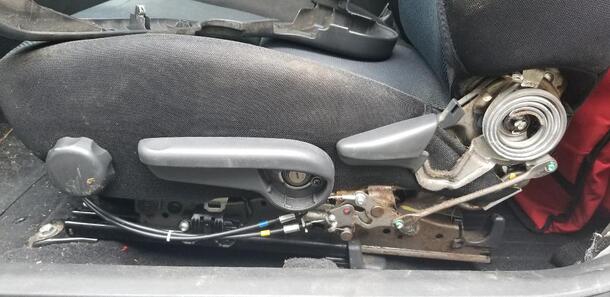
Scion driver's seat mechanism, note two cables going to mechanism at middle of pic.
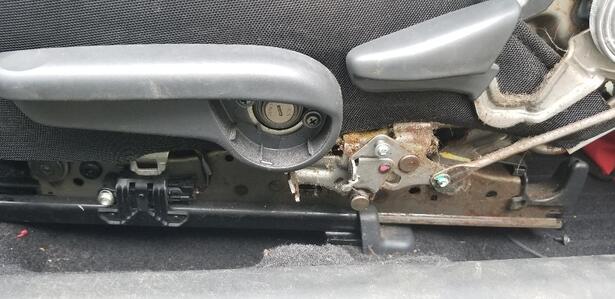
Scion driver's seat fixed, note absence of two cables.
The next thing that I decided to work on is getting the heat back online on the Monte Carlo. I had removed the old heater valve on the hose going to the heater core in the past and replaced it with a regular ball valve thinking this is what's necessary to get hot antifreeze moving through the heater core to deliver heat as hoped for. This was also due to the fact that I wasn't getting vacuum to the line that normally feeds the heater valve. Still I wasn't getting any heat when the temps really dropped. Something had to be done about this.
I ended up getting a replacement heater valve from auto zone, which turned out to be really cheap, I had to ask myself why I didn't just get this shit sooner. The first thing I checked out was how this thing operated. I found that in the standby mode with no vacuum on it the heater valve is open. This pretty much means that when the heater is turned on, vacuum is applied to the valve and it probably closes, not all the way, but enough to restrict the flow of antifreeze so the heater core can release more heat into the car. I installed the new heater valve and then moved on to the vacuum manifold behind the HVAC control panel since there was no vacuum going to the heater control valve. After some close inspection I found that the linkage between the lever and the little vacuum control valve wasn't moving the way it was supposed to and opening the thing to let vacuum pull to the heater control valve. After finally disassembling and reassembling things right so the valve will open and pull vacuum, I put everything back together and had vacuum pulling when the lever was moved over to the heat side. Heat appeared to be flowing from the vents but I really couldn't tell if it was going to be a significant amount of heat since the temps were pretty high for the winter. I'll have to wait until the temps drop enough to where I would legitimately need heat. Now if the heat still doesn't flow the next thing I will be doing is checking out the thermostat on the engine since it might be stuck open and not letting the engine heat up to operating temperature. When its pretty cool out the engine temp doesn't even get above 130 on the gauge. 
Monte Carlo heater control panel vacuum manifold.
The next thing that I did was get the Grand Prix body loaded up on the trailer and strapped down for its final ride to the junk yard. After getting the Scion off the trailer the past weekend I had attached the trailer to the F250 and staged the whole rig next to the driveway. My plan was to use the S10 to pull the car out from its parking spot into the main driveway then pull around the back and pull the car up past the trailer. Next I'd stage the ramps and give the car a push and roll downhill and turn the car at the last minute and hit the ramps and hopefully go up on the ramps. Since the Grand Prix was angled away down the driveway I had to pull the car out and away from the truck and trailer. Since the brakes were no longer functioning I had to put an old tire in front of the car's tire to stop it as I kept slowly pulling it into the driveway. After getting it staged straight in the driveway I was able to drive the S10 around facing up the driveway so I can chain up to the rear of the car and drag it up the driveway. After carefully moving up the driveway, having to stop to correct the steering angle so the car continued to stay straight on the driveway I then got the ramps ready. I put a milk crate in the car to sit on and had the ole lady give me a slight push since the driveway is already on a grade and I started rolling. I quickly turned the car at the last minute and got lined up with the ramps and went up enough to get the front wheels onto the trailer. I ended up hitting the parking brake to stop the car so it wouldn't roll back off the trailer. The next thing I did was move the S10 down next to the F250 and attach the chain to the front of the Grand Prix at an angle. The idea was to pull the car the rest of the way onto the trailer with the S10 so I don't have to winch the car the rest of the way manually. With the ole lady working the S10 and me in the Grand Prix on the parking brake we commenced with the operation. At first the S10 started spinning its tires some but finally got enough grip to finally get the GP rolling the rest of the way onto the trailer. The parking brake did its job of stopping the car once I was all the way on the trailer. With the body finally on the trailer I secured it with the two ratchet straps I have with the trailer. The car's now ready to go to its final resting place. 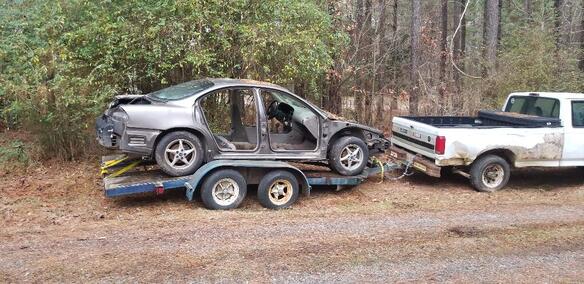
Grand Prix staged on trailer ready to head to its grave.
At least today has been better weather-wise that it allowed me to be able to get a little more work done on the Scion with regard to getting the body stuff fixed up. I already had the door installed from the other day so it was all downhill from there with regard to getting the body wrapped up, well at least the most critical stuff. The fender needed to go on for me to be able to prop up the hood due to the hood rod being in place on the fender, plus the bumper and rocker panel need the fender to attach to in order to keep them secured.
At least this didn't take much effort to accomplish, it was just a matter of securing some bolts, lining things up then securing other bolts to ensure the fender was secured and lined up compared to the door so there would be no binding when the door is opened. I was even able to get the plastic bolt retainers secured and a few other clips secured to get the right corner of the front bumper snapped in place along with the rocker panel. Along with a couple other small panels that needed to be snapped in place, everything went on fast and lined up good too. 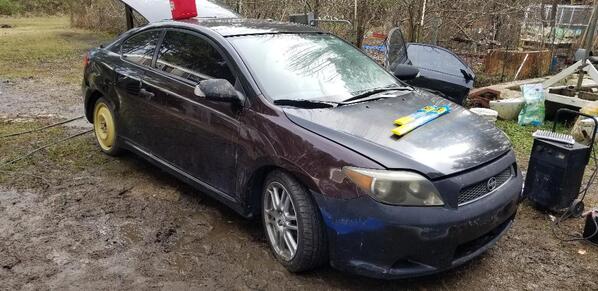
Scion with fender and door installed, everything else fastened up.
With the body panels installed now we turned our attention to the interior, more accurately cleaning up the interior. The ole lady did a good part of this, vacuuming the floors and around and under the seats and anywhere the vacuum wands can reach. Any small amounts of trash that were present were removed. Panels and dash were wiped clean with car interior wipes. Even leaves and other trash were removed from the hatch/door jambs. The whole purpose at this point was to get the car ready to rock and roll the next day. The only thing that I was waiting for at this point was the hatch shocks that we were waiting for from Ebay and we needed to get a replacement tire installed on the rim that was currently off. We plan on using the car to do our food delivery run on Friday as the car is intended to be the Tracker's replacement for the foreseeable future, while I work on getting the Tracker right again. Of course this isn't the only car that will be getting attention as there are some other things that need to get done, one being some work on the Monte Carlo's heating to try and see if I can get that working once again plus I have to get the Grand Prix body loaded up so we can haul it to the junkyard and out of our way. Work is never done around here. 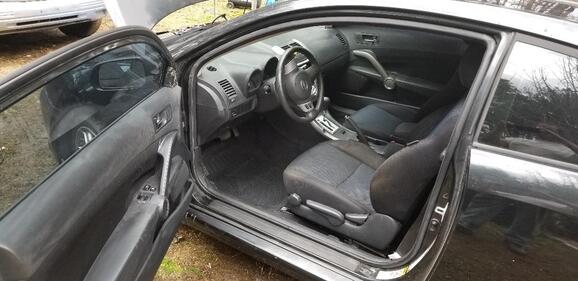
Cleaned out interior of Scion.
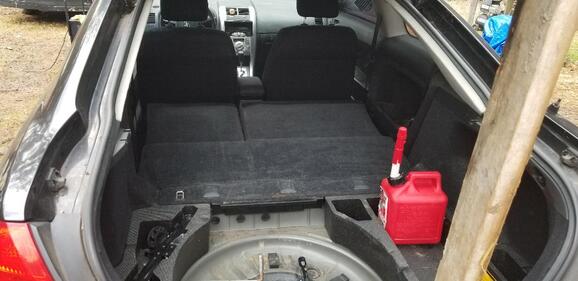
Cleaned up rear section of interior.
One thing that you would notice at the Improvisation center Homefront is that we are into cars. Whether its old cars or even regular newer cars that are for basic utility but have certain features that make them unique or attractive in some form, we do fuck with cars. Well while I primarily mess with "old school" cars, the ole lady is pretty much relegated to modern shit. Not so much because she couldn't drive something that is old school but has the features of a modern car but because its just easier at the moment to just put her in a regular car. Of course my philosophy when it comes to buying a regular car is #1: Pick something you really like. #2: Have a list of criteria a car needs to meet before you pull the trigger. #3: Don't buy a car when you need one. First off, #1. We've all bought cars at the spur of the moment because we needed one for any number of reasons. When that happens, we end up with something that we usually regret getting shortly after. You have to pick something that every time you look at it, it makes you smile because its just what you was looking for. #2, you want to have some criteria in mind for the chosen car to meet before you get it. If the prospects don't meet these criteria then you don't buy that car. Doesn't make sense buying a car that isn't going to give you what you want. #3, if you can buy a car when you don't need one, you will be in a more sound mind to not make rash decisions that cause you to buy something you don't want. That brings us to the new addition to the fleet. Since the ole lady has been using the Tracker to do her food delivery hustle, that poor truck has had many miles put on it and its falling into a state of disrepair that will require it to have to be put down for a prolonged amount of time to do the work. It's not quite there yet which is why I decided to start hunting down another vehicle now so we can get that one in the works to hit the street so she can be able to seamlessly move over to that one in order for me to do the work I need to do to the Tracker and have it back up to a state of readiness that will allow it to continue to serve our needs and wants for the foreseeable future. My criteria for a car this time are that it has to be a 4 cyl, no V6 or V8's, when it comes to FWD cars, V6 and V8 setups are more of a pain to work on. Also a 4 cyl will save on fuel, which is my next thing, the car's gotta get somewhere north of 25 mpg on the fuel economy. Next thing is the car can't have beau coup miles. No 200k+ mile cars make the cut. Lastly I wanted something in a hatchback, since like the Tracker, the hatchback coupled with the ability to put the rear seats down, allows the car to be used almost like a truck where you can carry cargo that may stick out of the rear of the car or is otherwise bulky. A secondary bullet point is that it has to be a 2 door, not a requirement but a preference. I hit up facebook marketplace to start the hunt. I found a Kia 4dr hatchback/station wagon that was a 4 cyl, had a good price on it. I figured if I had to I would just take a cash advance out on one of our spare credit cards to get this car and we'd be able to get it paid down pretty fast. Of course by the time we got around to this past Thursday, the car was gone, so back to the hunt. I then found a Hyundai accent 2dr hatchback, 4 cyl, excellent fuel economy, low 100k miles. I contacted the owner, got some info on it, everything sounded good. Since the car was over 2hrs away from us, rather than drive the car back I just rent a 3/4 truck and drag our trailer with to fetch cars like this. There's a few things I wanna do to any car I get before I really put them on the road so hauling them back allows for me to do this without pressing the car into service before I can really go through it. Anyhoo, on Friday morning I contact the owner to check to see if all is still on for the day, it was. We go rent the truck, contact her again, nothing. This bitch didn't even respond. At this point I had the ole lady searching more cars that I had on my saved list for backups while we picked up our trailer. Kept trying to contact the bitch, no luck. We started heading to New Orleans since there were some cars we wanted to check out there. Still kept trying to contact the bitch, no response. At this point I inquired about a car I saw that said it was local to us, about 45 min from the house (which for us isn't really that far). The car had superficial body damage on the right front fender and the front of the door but the guy had a replacement fender and door that came with the car. When I talked to the guy about the car, everything sounded good about it and I was definitely interested in checking it out. Only problem was the car wasn't in the city where the ad said, it was WAY over in the other city where the Hyundai was located, about 2 hrs from our house. The only solace I took from this was the idea that our location at the time of the inquiry was about an hour from the guy so I set up a time to meet him and we went to that city and found a local eatery and had a good BBQ meat salad and BBQ pizza. From there we went to meet the guy. Since everything was in the dark we had to use flashlights but even then what we seen was very satisfactory. The car's a 2007 Scion (Toyota) TC, 4 cyl, 2dr hatchback with 114k miles. After looking over everything, we found that the heat and AC worked, it has a sunroof, stereo works, seats go down, spare tire compartment has these cubbies that go on either side of the tire to hold different shit and a cover goes over that to cover it all up so we can safely contain spare fluids, tools, etc. and not have them visible. Seats/interior are nice and comfortable. The damage was limited to the outer sheet metal, no structural damage. One of the tires needed to be replaced but the rim was still good, the car was on the spare/donut. It ran good and smooth, had decent pickup, didn't run hot, didn't appear to be leaking shit and smoking, all was good. Obviously we grabbed this fucker. We got the spare body parts and loaded everything up and made the drive back to the house. After returning the truck the rest of the work began. One thing that I later discovered that made me even happier was the fact that this variant of 4 cyl engine actually uses a timing chain versus a belt, which means I didn't have to worry about replacing that as I typically do since I don't know what the maintenance was like beforehand. Timing chains rarely go out so that was a definite plus. Even though the battery had a shitload of corrosion on the top, there was another battery in the back that we need to see if its any good, otherwise Walmart has us covered. The hatchback shocks need replacing, no biggie. Of course I'll do shit like change the oil and air filter, inspect the suspension, tires, all that. 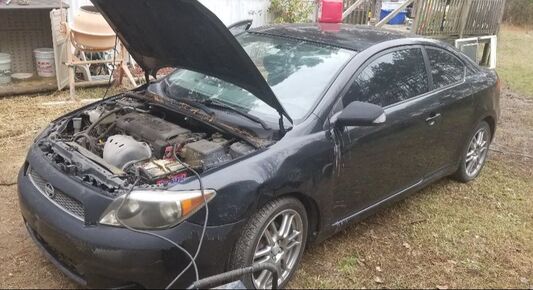 2007 Scion TC 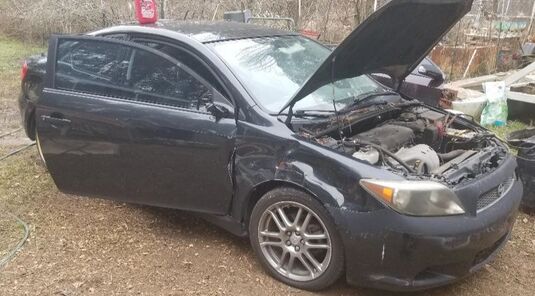 Fender/door damage on right side 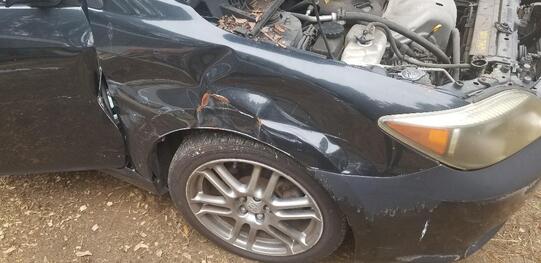 Closeup of damaged fender and door. I immediately started pulling off the fender to replace it. I had to be careful since the front bumper and other objects have clips that attach to the fender to secure them and I don't want to damage anything plastic that will either be hard to replace or will render a large part unusable due to the damage where a retaining clip goes. After a short amount of time I managed to get the fender off all the way. This was gonna be necessary anyway in order for me to get to the door hinge bolts later on. The next go around (since its been raining for 2 days straight) was to go behind a panel and disconnect the wire harness for the door and fish those cables through the body than prop up the door while I pulled the bolts. After removing the door I enlisted the ole lady's help to put the new door on. Even though the new door is a different color, its still dark enough not to contrast too much with the car's black finish (another plus! I like black cars!) After getting the door on and confirming that it lined up with the body, I tested to make sure the electrical shit worked and closed up shop since it was time to get ready to go to the regular job. At least now the new door is in and I can go ahead and put the fender on next and get the rest of the body buttoned back up so I can move on to the other shit that needs to be gone over before putting this car on the road. Soon..... 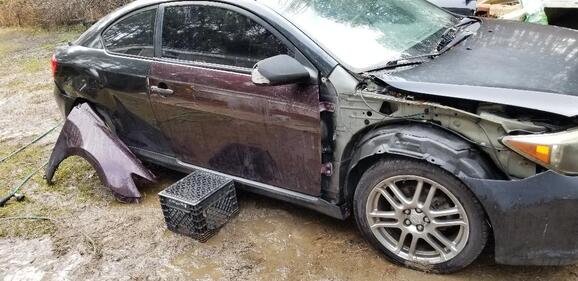 New used door hung in place.
As time progresses I find myself addressing little issues that we have on the cars and things around the house and yard. At this time I addressed a small issue on the Tracker which even though it's a small issue, has caused some rather inconvenient issues. In this case the small issue is the fact that the fuel pressure regulator is bad on this vehicle. How do I know? Well when I try to start the car, instead of it cranking a couple of times and coming to life, the thing will crank and crank and crank until it finally gets the pressure up in the fuel line to allow for enough fuel to spray from the injectors. One of the tricks we've adopted was to turn the key on and let the system sit a few seconds, allowing the fuel pump to cycle on a few seconds and prime the system enough to allow for the quicker start we seek. Sometimes we have to cycle the key off then on again to get another fuel pump cycle on to get some more prime before the engine will start. This is due to the fuel pressure regulator failing open, its not allowing for fuel pressure to stay in the fuel line when the system is off.
Well then its obvious to just go to auto zone and get a replacement fuel pressure regulator right? Wrong! At auto zone that motherfucker was over $100! How the hell does something so small and simple in its design and construction cost so much? I have no idea! Well when we see stuff like this we go to our favorite standby, Ebay! I found one on Ebay for $13. Now that is way better than over $100! Its obvious that I ordered that thing immediately. Well after a week of waiting it finally came. And because it was so simple in its design, only being held in by two bolts and having a vacuum line going to it and the fuel return line clamped to it. The thing literally took me a total of 5 minutes to put in. After putting it in I cranked the thing over and it started right up after a few cranks, not after 15 seconds + of cranking like it would when you just turn the key on and try to start it. With that it looked like it was a success. Hopefully this replacement part will help out with some of the other problems that we've had with how this thing has acted in the past. We will surely see. 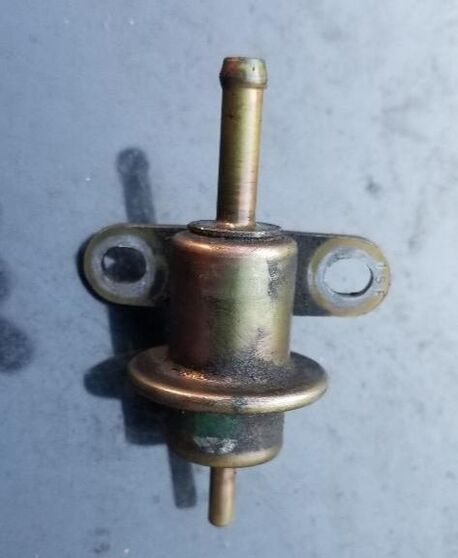
Old fuel pressure regulator, simple little part to be so expensive from one place cause some serious issues.

New fuel pressure regulator mounted in place on fuel rail, ready to rock and roll.
Another thing that I decided to address was the idea that the hood on the car has an issue with fluttering at the left front corner of the thing and catches enough air as to make us nervous at times. This is all because of some cracks in the structural member on the inside of the hood. After having to make repairs from a past deer strike, bending the hood to straighten it out, that structural member got weak at a couple of spots and cracked enough that the sheet metal of the hood is no longer supported like it needs to be to keep it from just fluttering when driving. The next little job was to weld these areas up. This was simple enough in its own right since all it involved was just grinding the areas to knock the paint off then just go ahead and weld it up. Since this metal is relatively thin all around, I had to use the lowest setting on the welder to keep from burning right through the metal. With that I donned the mask and welded everything up quick and easy. I had to use the grinder again to knock a little slag off in one spot but other than that, it was all done. Now in addition to the new fuel pressure regulator helping the engine to start up and run better the hood is patched up so it doesn't look like it's going to fly open on us. As time progresses I will be addressing some other issue on this vehicle so as to make it be a more effective car and hopefully last us a lot longer. 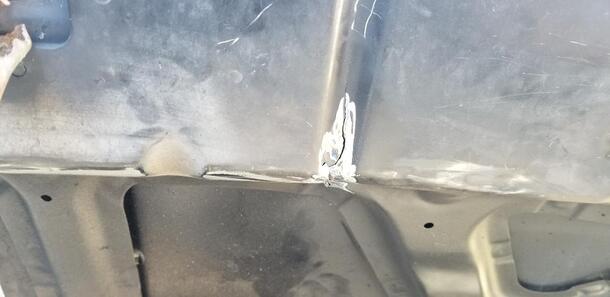
One of the hood cracks that needed to be welded.
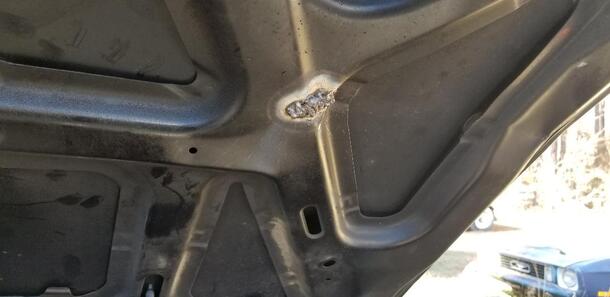
Other hood crack that was welded up. Note how crack is in structural member under hood sheet metal.
This time I decided to work on this area of the house that I started working on before we went on vacation. I started off with cutting out a bunch of rotted out wood and patching the floor to fill in the area that was removed since it would not help us any for a dumb ass cat to find his way into the area under the floor where the insulation is at.
Even with the floor patching there was still the area around the wall that needed to be repaired. This involved cutting a section of drywall at the floor level and putting in some pieces of 2x4's to fill in the areas where rotted wall stud boards were cut out. Since these patches won't be load bearing, I was able to do cheesy patches that are really geared towards providing a solid surface with which to attach replacement drywall panels and a decorative outer panel for the interior of the house. Since the dimensions of the wood used in making the walls of trailer houses don't seem to follow normal dimensions, I had to trim the old wood enough to allow for the best mating of the 2x4's to the old wall studs and boards, especially under the window. The bottom board in the window frame is rotted badly and can only be replaced by removing the entire window from the wall. With the unpredictable weather and temps that can get low enough to make things uncomfortable inside, I'm not going to try to pull the window right now, plus its got a fucking AC unit secured in place and sealed up with caulk. I will probably make this repair when I pull the AC unit once and for all after installing the wall mount AC unit that I plan on using in the near future. I managed to get things patched up enough that the opening going under the floor has been patched all the way up and the wall studs have been reinforced so the wall doesn't move in this area. With the outlet box secured, the next thing will be to replace the patch of drywall that was cut out to open the area up for the repairs. The final plan is to put wall paneling on the walls to cover the drywall and the seams that will result from these patches being installed. The other part of that plan is to install laminated flooring to cover up the raw plywood floor and the patches in this area so none of these repairs will be obvious to someone who sees this area for the first time. 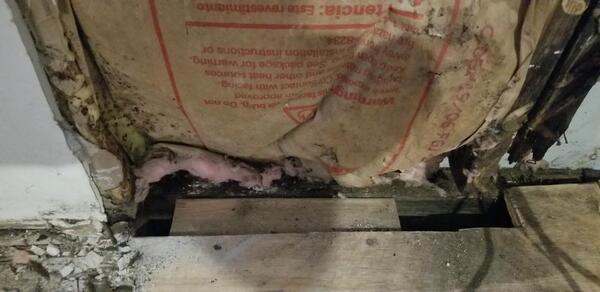
2x4 added under floor patch after cutting out rotted bottom stud from wall. Extra plywood will be attached over this to bridge the gap from the floor patch to the outer wall.

Vertical stud supports, note under outlet short 2x4's added to bridge gap from bottom of stud to bottom 2x4 board, also added to replace rotted board that was removed.
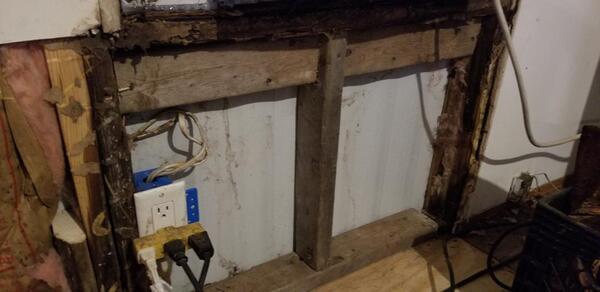
Window frame support studs, note how top board had to be mounted vertically and notches cut at top to fit boards in place. Also note unevenness of bottom 2x4 relative to original wall stud boards.
Another lost cause that needed addressing was the dead Grand Prix. This was a car that we had hopes of resurrecting but later on found out the engine was seized, apparently from a blown head gasket that caused water to get into places where water doesn't belong inside the engine, eventually causing it to rust together internally. Part of me wanted to just hitch the thing up and haul it to the junkyard and write it off but another part of me wanted to try and part it out to try and see if I can recoup the initial $200 I spent on the car. Now for all intents I did get a few things from this car that I can at least say added to the recovering of my money. One was an aftermarket car radio which I will definitely put to use, probably in the Dodge since it needs a radio. I found a Samsung 2 amp phone charger, one of the better charging heads. I pulled a shitload of ATM fuses and some of the larger high amp fuses from both fuse boxes along with the different relays that were in the fuse boxes. I pulled the radiator hoses and a couple of other hoses and clamps as well, which can be used for patching cooling systems in other cars where a custom rad hose may need to be made. Now fast forwarding a little bit, if I really wanted to, I could actually use the front seats in the car for another car. It wouldn't take much to weld mounts to the frame if needed to secure it to a car floor and even after giving the seat a scrub down I can either spray them down with fabric paint or just get a set of seat covers that have any number of designs to simulate certain materials. Of course I would have to include the wire harness plug in order to wire the seat up in order to move it forward and backward. This would save me $200 by itself if I was trying to put a pair of seats in a car project due to the fact that even some simple generic racing seats off Ebay cost $200 minimum. Anyway, I stripped the car down over the course of a few hours, pulling the doors, seats, gauge cluster and interior molding/body pieces, several engine compartment parts (ABS module, master cyl, AC hoses, starter, alternator). I photographed all of these parts along with the other parts I already pulled off a while back so I can list all this shit online. I ended up storing everything inside the portable garage since there's no other suitable spot to store the parts, even for the long term, can't really just leave shit outside to get damaged by the rain. Now what I'm left with is a stripped shell that still has the powertrain, steering, and wheels. I obviously left these components in place because the body can't be moved without wheels (duh) or steered without a steering column. The engine is useless and if I did manage to pull the transmission, the missing CV axles would possibly compromise the integrity of the wheel bearing hubs, which could cause them to disassemble, don't need that happening when trying to tow the car on a dolly. At least I can say I left a little meat on the bones for the junkyard. The next phase in this project will be to pull the body into a staging position where I can then stage the dolly in front of it, back the truck up to the dolly and hook the dolly up then winch the car body onto the dolly, really with the intent of immediately pulling the car to the junkyard. I will need to requisition the use of our neighbor's tractor to pull the body into a spot where I can get things hooked up without the truck being in the way of the main driveway. It's not a super rush but I do wanna get this thing outta here since there are other things we need to get ready to do with the area. 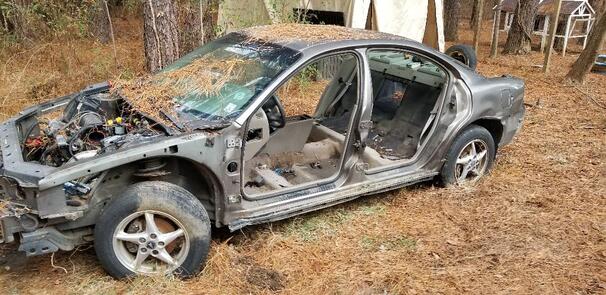 Stripped down Grand Prix awaiting disposal. 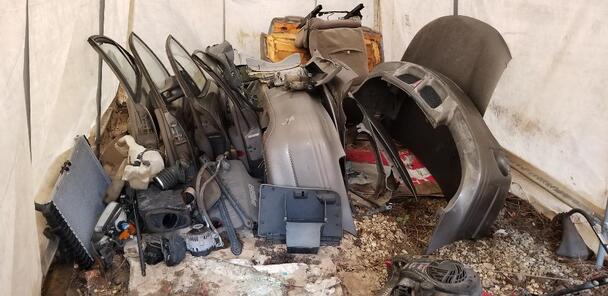 Stash of Grand Prix Parts stowed away in portable garage.
After taking a little vacation for a week, its been kind of slow getting back into the swing of things when it comes to work around the stead. I did pretty good as far as being caught up for the most part, I didn't exactly have a shitload of stuff piled up to immediately tend to upon our return. Adding to that the idea that we were both sick with severe sinus issues that bordered on the verge of being a cold/upper respiratory issue, I wasn't really doing much of anything for a few days after we returned.
Anyway, I started working on some stuff again, slowly but surely, first starting off with some routine cleanup and organization in the house along with some picking up of things outside the house. I then started to turn my attention to the bigger stuff around here that always needs attention in this case, cars. Or more accurately, a truck, the S10. I recently picked up a replacement transmission for the S10 from a local guy who was parting out a blazer SUV. He turned out to have a replacement grille that was intact for the truck, which would fit mine. I of course had to have it and got it for pretty cheap. I figured now was as good a time as ever to go ahead and swap the grilles out since it really isn't much work. The old grille was partially damaged after the ole lady did a poor job of parking somewhere and ran the right side of the front into something, damaging the grille, among other things. I had already replaced the headlights with some aftermarket headlights since the right unit was damaged plus I replaced the bumper with a junkyard replacement unit that I ended up having to spray paint white since it came off of a red blazer SUV. The grille was the last thing to replace and this was going to have to be found either new or from someone stripping a truck down. I had the old grille partially wire tied in spots where it was cracked plus had to have the signal light tied in place as well due to its not being able to snap in place. Not anymore! After removing the old grille I swapped out the signal lights since the replacement grille did come with some stock amber signal lights, which I didn't need since I got a pair of signal lights with the headlights, complete set. I had to pop out the Chevy emblem on the replacement grille since it was faded and just shitty looking overall. I tried to remove the emblem from the old grille, which was still in surprisingly good shape, but the studs weren't having it and being plastic, snapped immediately. No big deal, I'll be gluing that emblem in place on the new grille. It appeared that someone glued in the old emblem that I had removed as well since I had to sit there and pick away at pieces of it to get it free from its cavity in the middle of the grille. Anyway, the new used grille snapped in place with no issue, nice and tight, nothing flopping around, nothing misaligned. Signal lights are all secured no problem. Emblem glued in place, no problem. Now its just a matter of getting myself staged to replace the transmission in the truck..... 
Old S10 grille, note faded plastic and wire tie just under right signal light.
New grille in place, note difference in plastic finish.
|
