|
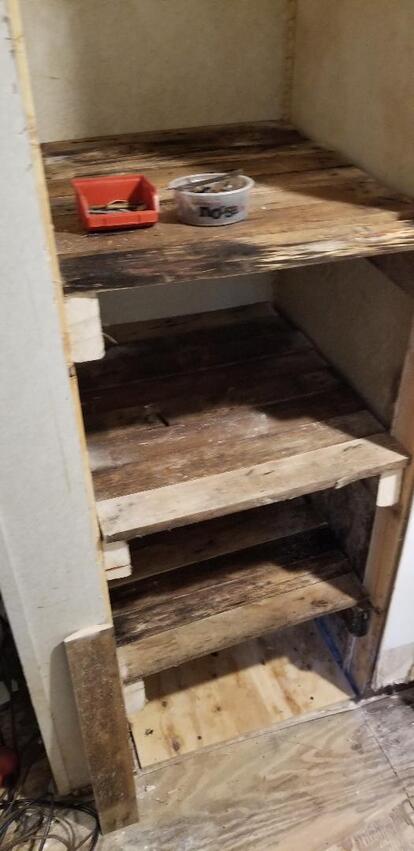
As of now I've gotten the pantry shelves done. After test fitting the pallet boards for the individual shelves I tacked them down with the brad nail gun fast and easy. Afterwards I got the motivation to start transferring shit from the old pantry shelf over to the new pantry shelf.
I started first with the #10 cans of foods. These were put in the back of a couple of shelves as we don't really have a large stock of these yet. After moving the #10 cans I then moved the can racks I had already set up on the shelves. With those set up I still had room on one side of each of the three racks I staged on three of the shelves. It was here that I stored some of the canned goods based on type. One shelf had cans of the good soup we started getting. Another shelf had several cans of tomato paste, sauce and whole tomatoes. These were cans we normally use for homemade chili. The other shelf, including the space behind the can rack, was used for some home canned hot peppers I also had on the old pantry shelf. These jars were stacked two high from the back of the can rack around the side a little. In front of that were a couple of large cans of pumpkin puree. One one of the above shelves I stacked all of the canned fruit, which included fruit cocktail, peaches, cranberry sauce and apple sauce. Next to the fruit I put some bags of powdered milk and some cartons of sealed milk. Behind all that several cans of salmon and tuna were stacked. These were used as cat and dog food on occasion. On the opposite side of the shelf all the pasta went. On the bottom level (the floor) went all of the cans of condensed soup and veggies. A lot of this stuff is old and while its still edible, it will more than likely be used for chicken food and dog food. Any cans that are still relatively "new" (a couple years old or so) may still get used in some stew or something that incorporates several items in the dish so any possible off taste will be masked. More than likely all the expired shit will become animal food and the money saved from not having to get any animal feed will go towards fresh cans. On the very top went a couple of plastic storage containers that had some dried prune bits that were made up like raisins and a bunch of MRE's and other long term storage food. These Containers were large enough that with two of them stacked up they filled most of the top shelf. Along side these I put some containers of salt and some boxes of kitchen matches I had on the old shelf. I also stored some cans of pork and beans and baked beans at the front on one of the shelves as well. My future plans for this shelf are to get some can racks that are for a single row of canned goods but are long to extend back into the shelf, like the units I'm working with now. This will allow me to situate two or three of these racks side by side on several shelves while I put the #10 cans on a shelf of their own. Basically by using the right racks for the setup I have I can store just as much or more canned goods on the new pantry shelf than I may have on the old unit. Another plan is to put some type of door over the opening in order to cover the whole shelf up so as to hide the shelf and not allow it to be a focal point to anyone in the room. This may be accomplished by a sliding door or even a decorative homemade door. Whatever I find/use/build its going to have to extend almost 8' to the ceiling to cover the entire opening of the pantry. As for the old shelf outside, this will be an extension of the auto parts rack that's situated at the back of the compound. The shelf was set up next to the auto parts rack on bricks to keep it off the ground. I'll store some more of the auto parts that are still in the garage. Obviously the parts to be stored outside will be items that will be safe for outdoor storage, no sensitive parts or anything where rust would compromise their usefulness. 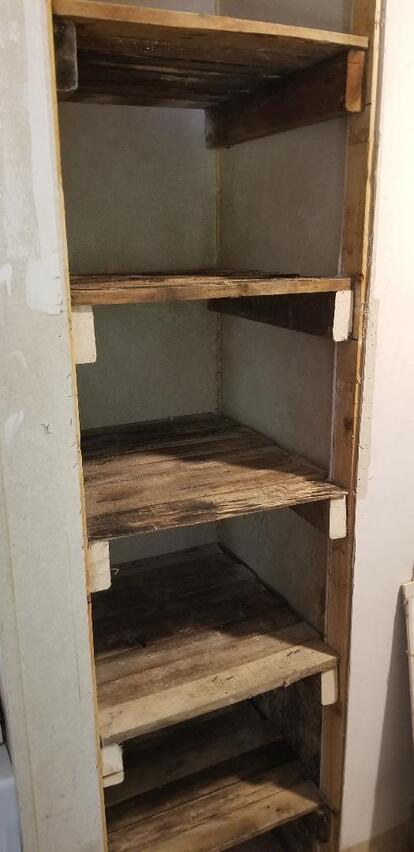
Pantry shelves done, pallet boards tacked in place, awaiting food items.
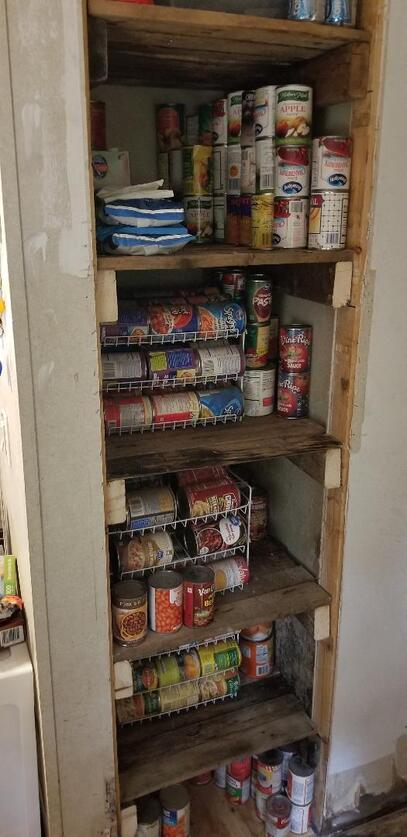
Food items stacked on shelves. Note can racks.
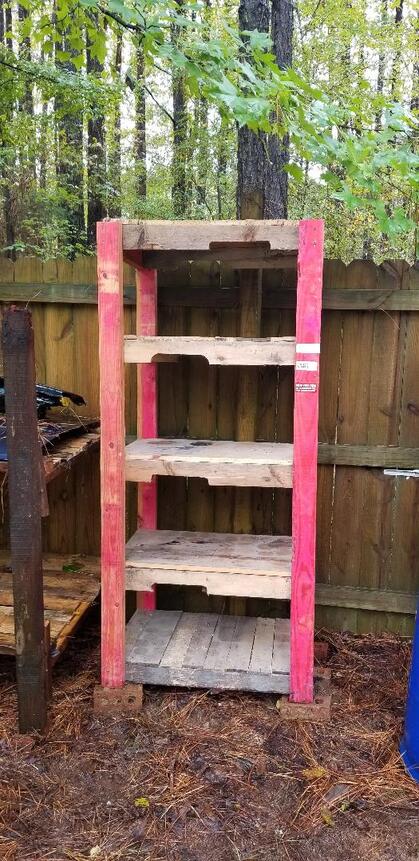
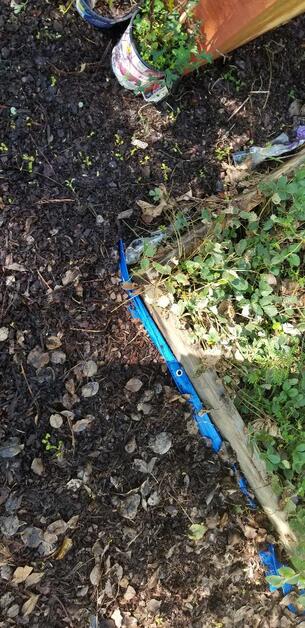
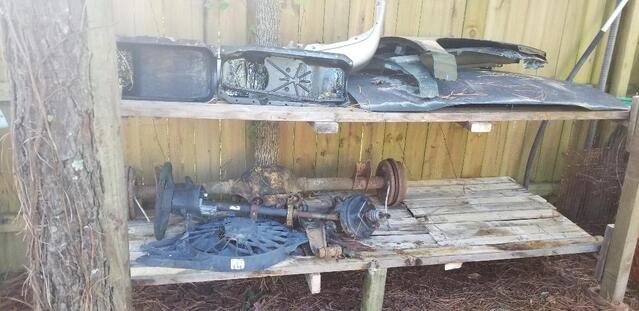
Old pantry shelf staged outside next to auto parts rack.
0 Comments
Over the last couple of days I've been working on a new project inside the house that was really in the planning stages on and off over the course of a couple of years. It all starts off with the central HVAC system in the house. This system had been malfunctioning upwards of 7-10 years ago, shortly after really getting the house set up. At first it was the AC side of the system, always needing recharging and when it was running it would somehow condense ridiculous amounts of water to the point that the drainage tray couldn't handle it. It was almost like the thing was sucking moisture off the coils and depositing them all on the floor. Eventually it started making the floor weak in spots so the system had to be taken offline. On the heating side it had started tripping breakers after running a few minutes. None of this made me comfortable enough to keep messing with the system so we ended up abandoning it instead for using window AC units to cool only those parts of the house we're occupying and using the wood stove and portable (yet safe) electric heaters for heating. I've been looking at this piece of real estate inside the house with hungry eyes as I can use that area for many things.
A couple of years ago I ended up making a large shelf using some 2x4's and pallet wood. This thing is four levels plus the very top and very large by shelving standards. It is currently being used for our pantry/food stock shelf. Canned goods and other non perishable foods are stored on the shelves. Between #10 cans and smaller can organizers there is plenty of food stocked up to last a good while for us. Only problem is with the small footprint of the house, even a useful piece of furniture such as this takes up precious room. In comes the HVAC nook. I've been looking at the idea of pulling the central HVAC system from its nook and re-doing the small cavity with shelves to serve as a new pantry. This would allow me to eliminate the pantry shelf from the kitchen/living room area and tuck it out of the way and out of sight while still being able to maintain a food stockpile as before. Deleting the large shelf would also allow for us to move the china cabinet that is currently next to the large shelf in order to open up more space around the wood stove and clear a section of wall next to the window that is by the stove. This window currently has the large window AC unit installed. My plan afterward is to get one of those easy DIY wall HVAC units where the evaporator unit mounts on the wall and two holes drilled through the wall accommodate the refrigerant hoses going to the compressor that is mounted outside. These units come pretty cheap by HVAC standards and some even work as heat pumps where they can pull double duty as a heater in the winter. Point is I need to clear some wall space in order to be able to install the unit so I can then remove the window AC unit. But first we have to be able to eliminate the large pantry shelf. Well first day I went ahead and disconnected the copper lines from the A-coil that makes up the evaporator of the AC system. This went pretty easy. The next thing was the furnace part. After confirming all power was cut to the system I disconnected all the wiring from the unit then found all retaining screws that held the unit in the nook. I was able to wrest the unit free and pull it away from the opening that resulted. At this point I pulled away some shitty drywall that was breaking up along with the accumulated dirt that was around the unit. I also had to cut some drywall out from the front wall that extended above the furnace unit up to the ceiling. With this I had a 7' tall x 2' deep x 2' wide opening to work with. The next thing I did was buy a 2'x2' piece of 3/8" plywood. I had to trim a few inches from one side to give me a side that was just narrow enough to fit in the nook on the floor to cover the opening to the duct work and the opening where the AC drain tube and refrigerant lines went out under the house and to the compressor. With these openings covered I then cut a couple of 2x4's and secured them with wood screws to the back corners of the nook. 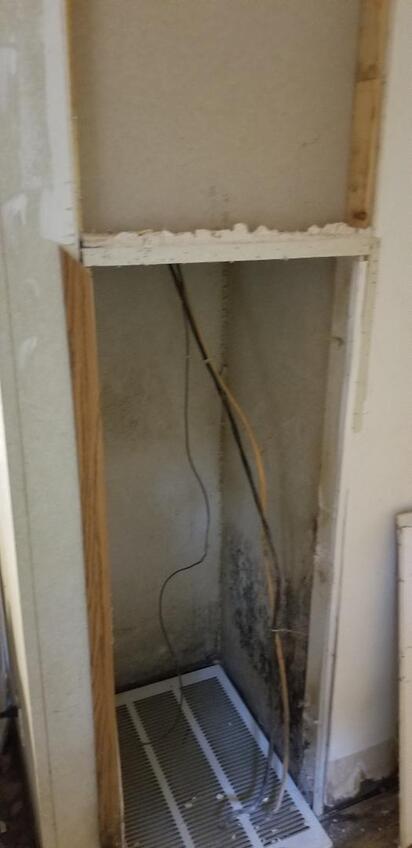
Post HVAC nook, note wires and shitty drywall from moisture. Had to use outer covers for duct opening so stupid cat doesn't try to go into the ductwork....
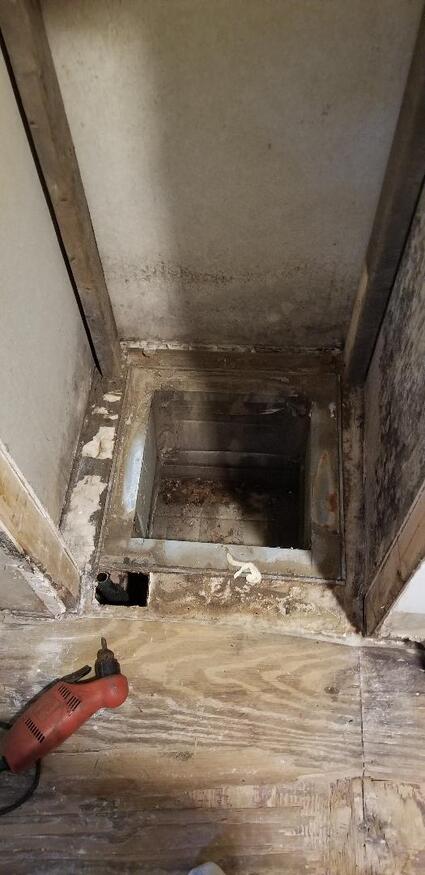
Open duct, note opening for refrigerant lines in front of opening.

Test fitting plywood duct cover. Note two 2x4's in back corners.
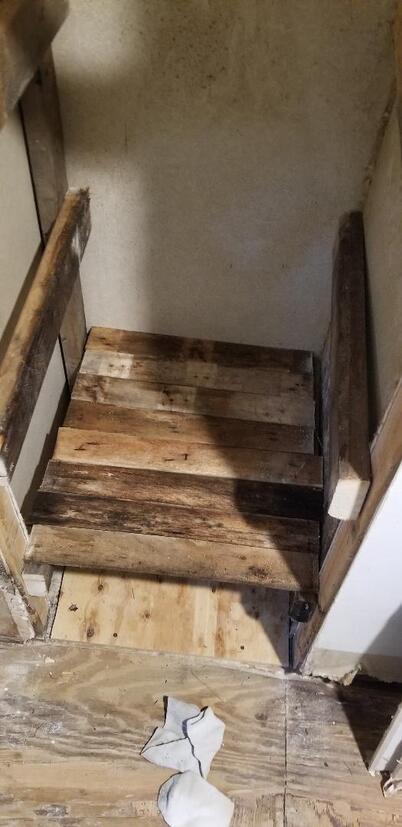
After fitting some 2x4's against the back boards to the front, I found that the board to the right in the back was not going to allow the shelf board to sit perpendicular to the back wall. I didn't want anything looking any more cockeyed than it may end up since the interior of the walls in the nook weren't at perfect 90 degree angles to begin with. I removed the right back board then test fitted the shelf 2x4 again and found it to rest much better. At this point I secured the duct cover board then measured up a foot from the floor and marked that point on both the front boards of the opening and the back left board and the wall on the right. I secured the first set of shelf 2x4's to the sides with wood screws. I cut three pairs of these boards, measuring 2' in length. I measured up another foot and marked those points so I can repeat with the next set of boards to get the next shelf. I did the same for the third tier. I ended up having to cut out the board that was in the front that helped secure the furnace framework at the top since this board wasn't going to be needed. The next thing I did was bring in a bunch of pallet boards, which were stored neatly on the salvage wood rack that was built a little while back near the new fuel shed. I measured a span of 20 3/4" to cover the span between the shelf mounting boards to the left and right. I cut a bunch of pallet boards with this length and test fitted them just to get a good idea of how everything will look. My next move will be to make a couple more tiers of shelf mounts and cut a bunch more pallet boards for those shelves. I also need to bring in the pancake compressor and hose and brad nail gun so I can secure all the pallet boards. At that point I can start moving canned goods and other shit from the large shelf over to the new pantry nook. 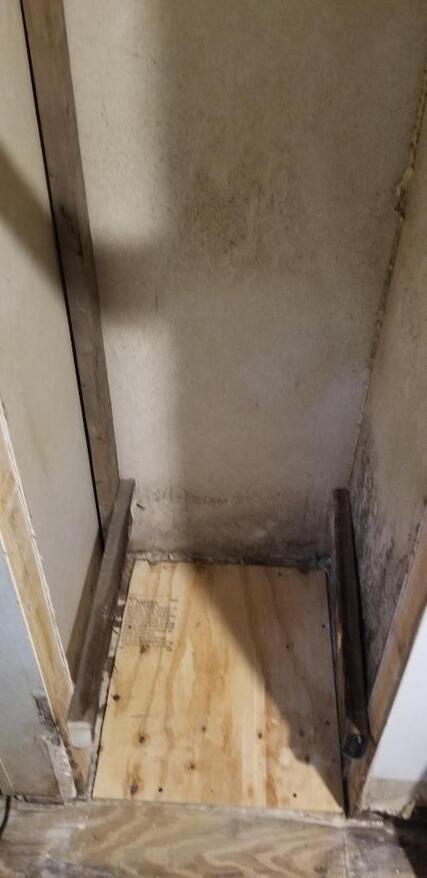
Secured duct cover and first level shelf boards, note absence of right back 2x4.
First level shelf pallet board test fit.
Test fitting pallet boards for three tiers of shelving.
Since I'm pretty much stuck at a point where I really can't do anything else on any cars until I buy something I had to find something else that was free that I needed to do. This time it was some work on the garden. But first I took the push mower and cut some high grass in the central drag that goes between the house and garden. After getting that done I made my way into the garden.
I started at the first two raised beds right by the gate. These two beds were made to adopt a food forest concept where fruit trees are at the center, berry bushes are right at the bases of the trees and strawberries cover the ground around the outskirts. In one of the raised beds the strawberries were sending out runners that were taking root in the mulch walkways. My first job was to pull up all the runners and separate them into individual plants so I can replant them. I ended up replanting these baby strawberries in the neighboring raised bed by the gate since that one was getting kind of thin on the strawberries. At least by planting now it'll give the plants time to take root before cold weather sets in. The hot weather won't be a factor at all in this case. Even the cold weather is better for these baby plants than the hot weather. After pulling up all the runners I could find I went ahead and planted them in the other raised bed, covering a good portion of the garden. With that done I turned my attention to pulling up weeds and other trash. In the mulch beds there were many little weeds that I had to pull up.
I made my way over to a centrally located raised bed in my weed picking endeavors as this bed was overrun with mint plants and other invasive weed plants. After pulling up weeds from the mulch up to this raised bed I went nuts pulling up everything in the bed that wasn't a fruit tree, errant strawberry or berry bush. I really wasn't too concerned with pulling up the mint plants as the root system is probably all through the raised bed and the neighboring ground so this shit will be back with a vengeance later. My only chance of stifling this damned plant is going to be to put some type of ground cover on the raised bed and accommodate the fruit trees and berry bushes by poking holes or cutting the plastic I'll probably end up using to place it around the trees. The few strawberries that are present will probably have to be uprooted and planted through holes in the plastic then a mulch cover put on top of the plastic afterwards. We'll have to see on that one. But with that bed done I made my way over to the raised bed I used for tomatoes and peppers. 
Cleared raised bed, note the only plants in this thing are a couple of fruit trees, a couple of thin berry bushes and a hosta that I just left alone since the damned thing was doing good.
In the tomato bed were a bunch of tomato stands, those wire things that look like an ice cream cone, to this day I still don't really know what those damned things are officially called. Anyway I pulled up all of the tomato plants as they were pretty much done for the year regardless of how much greenery may have still be present. I placed the tomato stands inside each other for storage and pulled up any errant weeds that were present in the garden as well. I also had to come through with the shears to cut some weed trees that were starting to grow around this raised bed as well as a couple other beds as well. After getting the tomato bed done, I moved on to the final harvest.
The last thing that I did for the day was harvest the jalapeno peppers that were still on the vine on the pepper plants that I had in the tomato bed and the raised beds I made from some oil drum halves. I got a good handful of the peppers, which I figure is probably going to be the last harvest of the year. Even though I didn't pull up the plants as they were still full of foliage, I really don't expect the plants to really do much else, between the temps dropping and the lessening sunlight these summer plants are pretty much done. I will probably end up pulling the peppers up in the next couple of days. At this point though I pretty much have to just go full frontal assault on the garden as I neglected the thing through the summer in exchange for working on other projects. I'll have to cut and trim a lot of the fruit trees and berry bushes as well as pull up weeds galore. I'll have to cut high grass through walkway areas and continue to lay down plastic and mulch to establish walkways and repair/rebuild raised beds. Even the raised beds are going to be open to redesign as I decide on how to situate the beds around any given fruit trees in order to keep up the whole food forest concept. I also have my future hydroponic gardens to set up throughout the garden as well and this will add to the mix the plumbing and electrical hookups for the equipment to run the gardens as well. I will probably end up pulling some things up and moving them around or even outright eliminating them. We will surely see as time progresses and I continue to clean up the gardens. 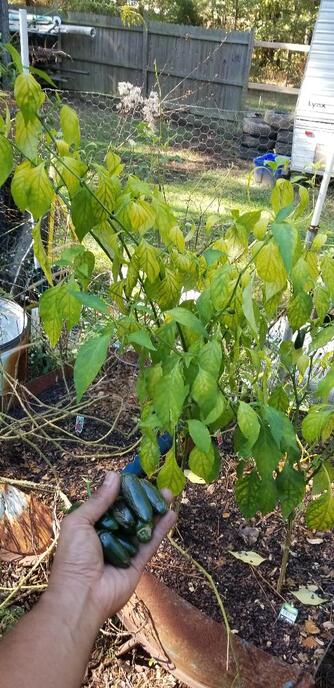
The final pepper harvest, note the half drum raised beds in foreground and pepper plants held within.
Today I did some focusing on the Explorer, partly so I can move it to another spot where I would prefer to work on it plus so I can just get the damned thing straightened out. As usual the thing took a little persuading to get started but once started the thing leveled off and ran smoothly. One thing I did keep noticing was how manipulating the accelerator seemed to make the thing respond better to starting up. Once the thing was running I did a little examination to see if there might've been anything I could do to maybe adjust the throttle so maybe the thing will be in a different position where the ECU will respond better, who knows. Normally you don't adjust the throttle since all of that shit is fixed from the factory but when it comes to super old shit like this, all bets are off.
Anyway, upon looking at the throttle cable I did notice that the mounting lug that holds the cable to the bracket was partially pulled from its slotted bracket. I had to disconnect the cable mounting lug and reseat the thing in the bracket so I can at least rule out that as a problem. Of course there wasn't really any noticeable difference since the idle screw keeps the throttle plate at a fixed position. I ended up turning the screw a little bit until the idle went up slightly then backed off a slight bit. At this point I went ahead to move the truck around to the spot in front of the storage trailer. After moving the Tracker out of the way, I went ahead and backed out and pulled the Explorer around and into the spot. When I put the thing in park and the RPM's changed, the thing started acting stupid again and stalled. I had to fight the thing to get started again as usual until it finally came back to life with constant cranking and manipulating the accelerator. One thing I did notice was when the thing was barely running and acting like it wanted to stall despite me pumping on the pedal, when the tach should've been moving up a little bit with the initial shot of fuel that the ECU tried to inject, the tach kept acting like it wanted to drop down instead. I had to theorize if either the crank or cam sensor were to start failing and either one controls the tach, it would respond in kind by not reading while also killing the engine since that critical signal is sporadic and the ECU no longer has any real clue as to the conditions of the engine in order to operate it. After a search online, it turns out the crank sensor controls the tach and a search on auto zone's website shows they have them for a reasonable price so I might just go ahead and take a shot and get the part to put it in. Worst case I'll be out of a couple bucks but best case is I fix this gremlin and put this truck back into a state where it'll be perfectly operable and most importantly salable. 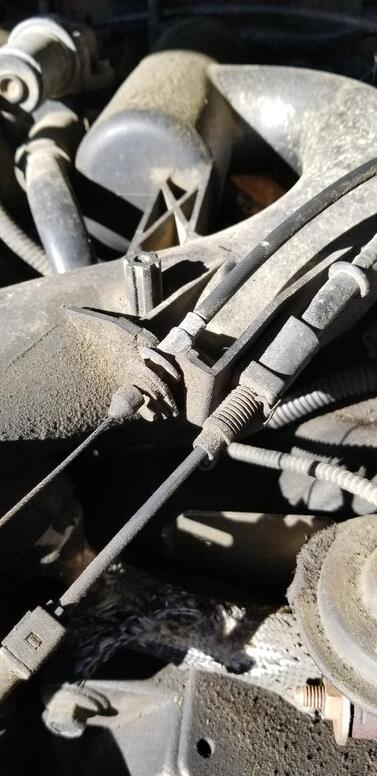
Throttle cable dismounted from bracket.
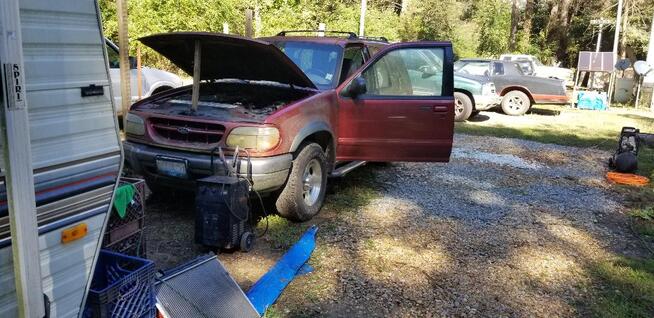
Explorer relocated in front of storage trailer.
After playing around with the Explorer, I started wandering around looking for more shit to do. I did go ahead and decide on walking up to the garage to grab a few larger auto parts from the garage to bring down. Just before that though I did pile up some more trash into the burn can and fire that to get it going. While that was going I went up and grabbed two oil pans, both of which had old oil and sludge in them. I came down and dumped that into the burning garbage can then arranged the pans on the auto parts rack, then went back up to the garage to retrieve a fender and headlight assembly and set them on the rack as well. Still plenty more shit in the garage to figure out what to do with though. I walked around and picked up a few more little odds and ends that were burnable and tossed them in the can then looked at the drum I had by the trailer's door and decided to go ahead and cut that out. Using a step bit I drilled a 1" hole in the bottom of the drum to serve as a starting point for the reciprocating saw to start its cut around the rim of the can. The other end with its open ports will serve as drain holes for any water that enters the can. I went ahead and cut along the rim of the bottom and took the resulting disc out and dumped it over on the scrap pile for future use/disposal. I took the can and staged it with the other scrap can next to the deck but out of the way and out of sight so we can easily dump scrap into either/or but not have it be visible and otherwise be unsightly. I took the small bucket of scrap I already started yesterday and dumped that into one drum and fished out some partially buried scrap from around the burn can site and dumped that into the drum as well. With that it was pretty much time to come in, but not before doing a visual assessment to determine what I might wanna do the next day. I decided on doing some grass cutting to knock down some high points of grass in the central driveway going between the house and garden. These areas were covered by the F250 and the 88 mustang wreck while I was awaiting the chance to haul it to the scrap yard, so now that it's gone I can knock that high grass down and get that central area looking better. I will probably start working on the garden area as well. I'll probably start trimming some of the fruit trees and pulling up any large weed trees or other shit that I feel doesn't belong and start clearing some areas for development later. I have plans to make a bunch of hydroponic garden setups as well as lay down some new raised beds in place of the decaying beds I have now. I also have a dog kennel I still have to set up in a back corner of the garden that I will develop into a greenhouse in the future as well. I might as well get started on this stuff as well so maybe by next spring I will actually be able to get a decent garden going that I can have a good production from throughout next summer. 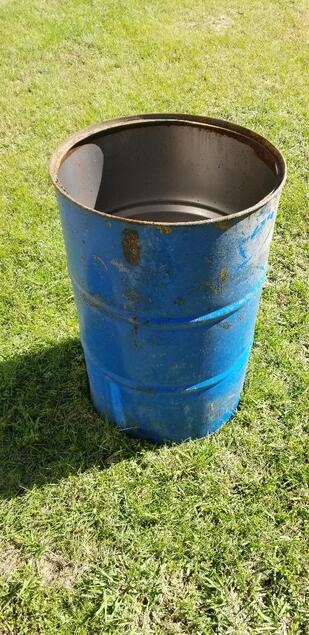
Oil drum with bottom cut out ready to serve as a scrap metal drum.
Parts rack with oil pans, fender and headlight assembly stacked in place.
Today I reserved my time for doing a little playing around with a couple of the buckets in the yard, the 2001 Ford Explorer which belongs to my mom but is no longer driven due to the extremely high miles, and a 2001 Pontiac Grand Prix that I picked up from an old boss of mine for $200. These two vehicles fall into the "bucket" status, something you'd buy when in high school or college on a limited budget, or if you're just too poor to be able to do a car loan. I'm on a quest to get these two vehicles straight and give them a clean bill of health so I can put them up for sale and make a few bucks off of them as well as clear the yard of yet more shit.
Another thing that I was doing was also doing some basic tidying up, as usual since there's always some shit around that needs picking up. One of the things I had to do was get the old drum out of the back of the F250 and place it back over by the deck where I had it so I can more easily dump soda cans into it without leaving the porch. I have to fix another drum to use for regular scrap metal as well since the old one was rotted out and I left it at the scrap yard when we made a scrap haul this past Friday. I dragged one of the spare drums I had over by the new fuel shed over to the storage trailer. This drum was already opened up and emptied out, but it was turned upside down so the output was on the ground. I had to turn the thing right side up so it can vent out any vapors that may still be present since it did contain some hydrocarbon substances and we can't have those igniting when I'm trying to cut the top out of the drum. As for right now I did take a bucket that I had still in the aluminum drum after returning from the scrap yard and used it as my temporary scrap metal bucket. The other buckets that were in the drum were set back aside out of the way. They were really 5 gallon planter buckets so they're currently setting aside with some other planter shit awaiting use or disposal. Anyway, in the meantime I had to put the battery charger on the explorer's battery to juice it up some and give me some extra kick when I attempt to start it. I had to fight the thing to get it started but it seemed like once I pumped the pedal it made the ECU start firing the fuel injectors and eventually with some manipulation the engine finally started. I was able to do a little more manipulation to get the thing to level off and hold an idle. At that point it took the throttle pretty good without issue. The bizarre thing is the truck does not have a check engine light, ever. No matter what kind of gremlins I get that keep this thing from starting up fast every time, this thing will never generate a CEL to tell me if anything is going on. Those are the worst situations since that can mean any number of things that go wrong but are unable to generate a code due to it not being directly related to a faulty sensor or monitored component. Sometimes these old vehicles will have a faulty component but because the engine's ability to run at all depends on the component's function, the ECU will sometimes miss a fault. If a camshaft sensor decides to fuck up when you try to start it the ECU won't catch that fault condition. Same goes for crank sensors. Even a TPS (throttle position sensor) can skip triggering a code for the same reasons, or the variations in voltage when the TPS is manipulated are just enough to not trigger a fault but are enough to make the engine perform shitty. I will have to continue to investigate on this thing as time progresses. While the explorer was running, I started cleaning out the grand prix. I got a couple of bags and pulled out all of the burnable trash (which really wasn't much), which filled one bag, and the regular non burnable trash filled up another bag. Some scrap items found their way into that bucket I mentioned earlier for the scrap metal. There were a few usable items like hose clamps and a few tools as well. Under the hood I did find a 1/2" drive ratchet with an extension that has a ball tip to allow for the socket to angle a little for when you have to get into spots where you can't get a straight shot at the bolt or nut you're trying to remove. Score for me. The two back windows were always a problem for me because they were 2/3 of the way down, and all this time any rain and pine needles and bugs were able to get into the interior to make a mess. I had to remove a lot of pine needles and leaves from the floors because of this. The one thing that I noticed that kind of pissed me off were the small wedges of wood that were in the windows. Apparently these windows have broken free from their regulators a long time ago and my boss or whoever was driving the car used these wedges to keep the windows up while driving. After they parked the car the windows probably worked their way down and were never put back up since the car was technically junk. At least I was able to just remove the wedges and pull the windows back up and reapply the wedges to keep the windows up. I dodged a bullet with not having to pull the back door panels off to get into the regulators to do exactly this shit - disconnect the windows from the mechanisms to slide them up and wedge them in the up position. I pulled the protective cover from the top of the engine to make sure no rats made any nests under the cover on top of the engine, which usually means chewed wires. So far so good. My boss did mention that the radiator had an issue where it was leaking from the tranny lines going into the unit. I checked these out and didn't see any physical breakage, but because of how these fittings are not like the typical old school compression fittings, these things are probably just worn out. I will end up checking this shit out to see if I can remove these special fittings from the radiator and just replace them or have to replace the whole radiator. I'm going to have to make a list of shit to get for this car-filters, oils, a battery, some fuel, even some tires. I might first try to see if I can spray fix a flat into the tires to get them to hold air. I just need to be able to roll the car around the yard or if I can get it running, be able to drive it around the yard. I will also have to put a battery in the car because I will disconnect the fuel line from the fuel filter and bypass the fuel pump relay to manually cycle on the fuel pump and pump out any shitty fuel and/or water that may be in the tank. I really do NOT wanna remove the fuel tank if I don't have to. I have no problem replacing fuel filters a couple of times after allowing one or two of them to catch all the trash in the bottom of the fuel tank. In the meantime I will keep working on these things as opportunities present themselves. I will be planning on replacing the starter on the Chevy Tracker first chance since it's been sticking at times. I'd rather get that thing out while the car's at the house than to keep pushing until the unit fails completely and we end up having to have the car towed back to the house. I have a throttle cable en route for the Dodge Charger plus I got my blower motor relay for the Monte Carlo, which I put in in like one minute, literally. As I said before, this fall is going to be the work on cars season. 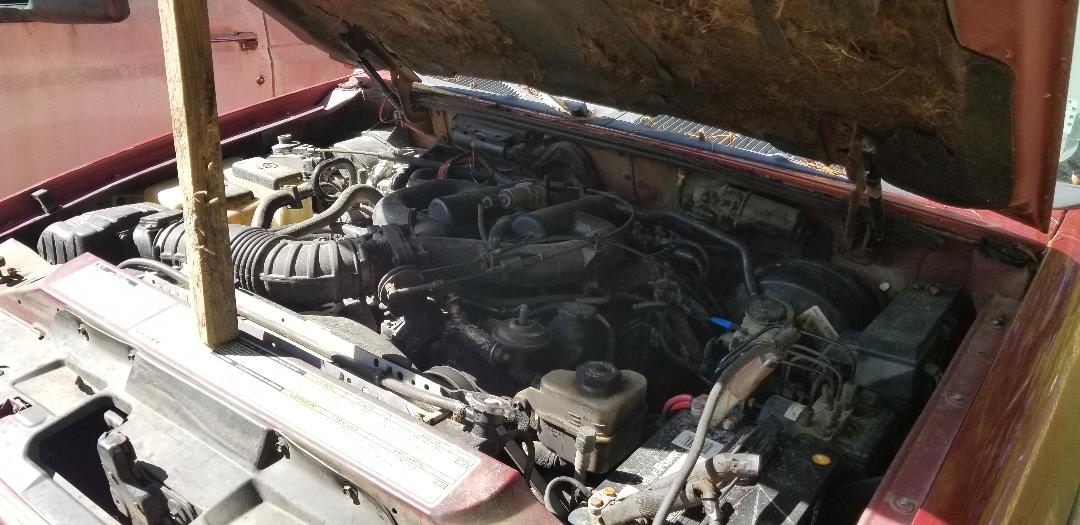
Explorer engine bay, what a fucking nightmare to work on! Too much shit in close quarters, nothing like the Monte Carlo or any of the old school cars.
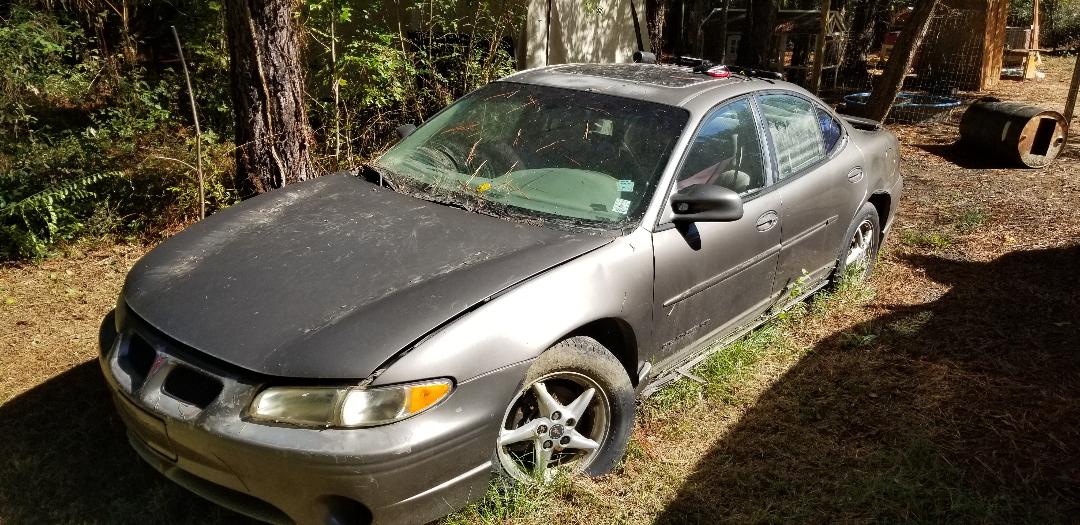
The grand prix, a common and otherwise disposable family vehicle, too bad it wasn't a newer one with a 5.3L V8....
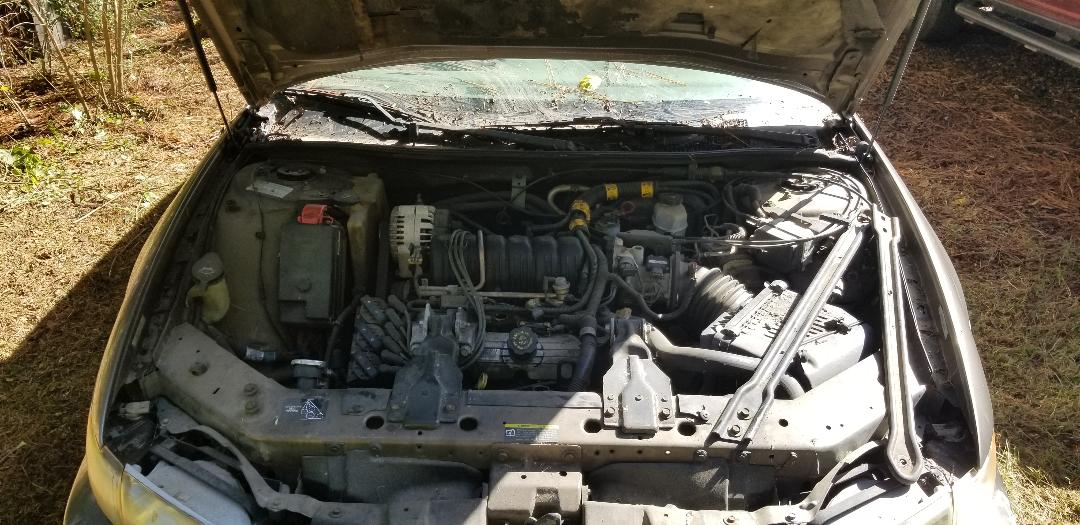
The grand prix engine bay with its 3.8L V6, known to have issues with overheating when they get past a certain point, we'll see what happens with this grenade....
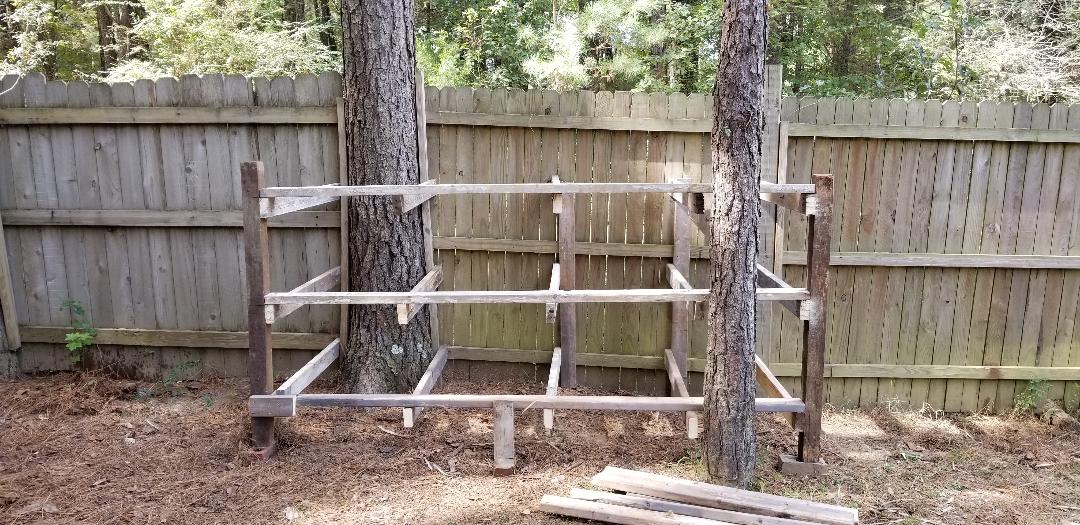
The reason behind clearing the area between the kayak rack and the wood pile was for the construction of another storage rack like the one that is currently holding all of the salvage wood and PVC pipe. This rack is for storing the salvage auto parts that are were sitting on the ground on the other side of the kayak rack, along with some larger auto parts that are still stored in the garage. This will of course get these parts off the ground and out of the garage and more organized by storing them in a central spot until they can either be sold or used. The rack of course was going to be made from the salvage wood just like the other storage rack.
This rack is like the other one in that I used 4x4 posts, salvaged from the old dog yard fence, for the main supports at the front of the rack. 2x4's make up the rest of the shelf structure, using the main fence as extra support along with one tree. This rack currently has two shelves instead of the three like the other rack. Because of the heavy weight that will be on the bottom shelf, I had to use another piece of 4x4 to support the middle of the shelf. All 4x4 posts are sitting on salvaged bricks so as to protect the bottoms of the posts from rotting on the ground. The main difference with this rack is the idea that the shelves have extra 2x4s linking the front front boards to the rear boards of the fence. Over these boards are pallet boards that are tacked down between the 2x4s like flooring. There is spacing to allow for rain to wash down instead of pooling up. This will allow for the storage of smaller auto parts that would otherwise not be able to be stored on the rack. Since I have all this usable material, it only makes sense to use it. There's one thing about storing stuff for future use but another thing when you just hoard shit with no intention of using it. The stuff that's stored, its gonna get used, if I need more, I can always work to salvage more or find an alternative. After two days of working in the rain to cut and nail wood together to get this rack done I've finally got the two shelf unit put together. I managed to put the old fox body mustang rear end on the bottom shelf along with some other fox body parts: a brake master cylinder/booster combo, some steering column support pieces, a tranny crossmember. After finishing the pallet boards on the top shelf I put the hood, fender and bumper from our Chevy Tracker up there. The fox body steering column went on the bottom shelf in front of the rear end. There are more parts in the garage that I mentioned that'll go on the shelves. The best part about these racks is the idea that if I need to I can always add another tier by just tacking some more 2x4's to the existing boards and over to the fence to add another tier. When it comes to this type of stuff there really are no rules, other than the rules of physics. As long as the shit is able to hold weight it can be made as ugly and bulky as necessary. 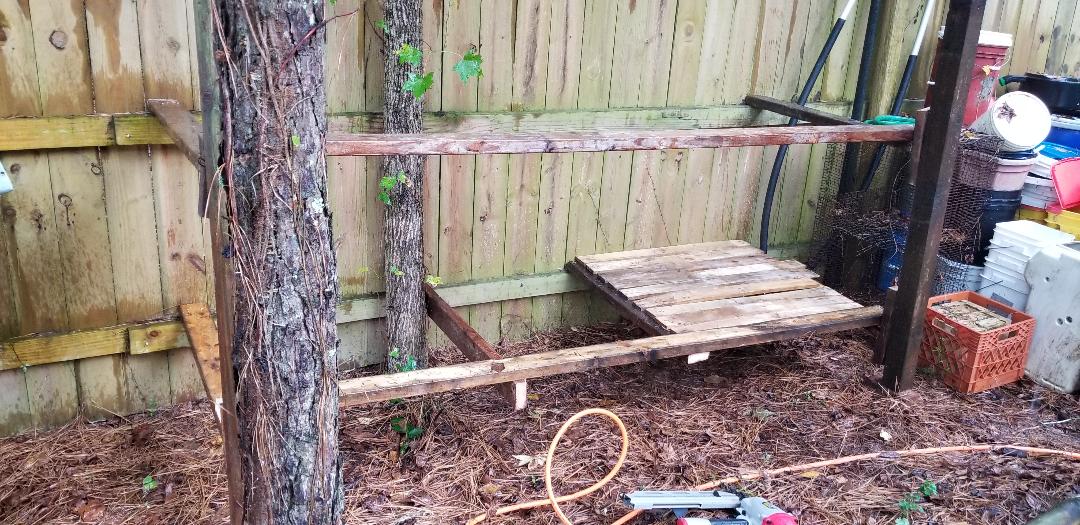
Auto parts rack under construction, note 2x4 boards spanning front and back of rack with some pallet boards already in place.
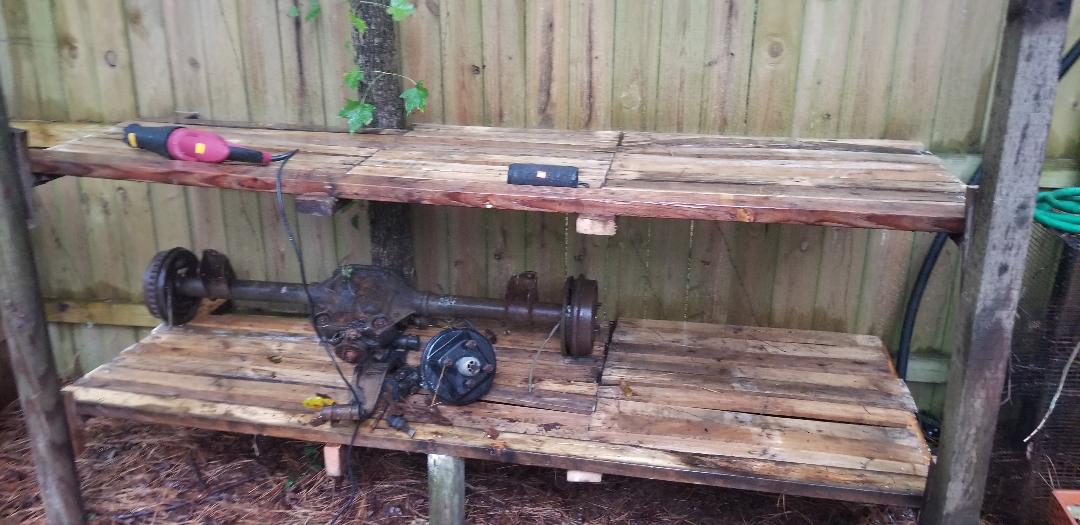
Auto parts rack completed, note pallet boards all in place, and rear end already situated on bottom shelf among other parts.
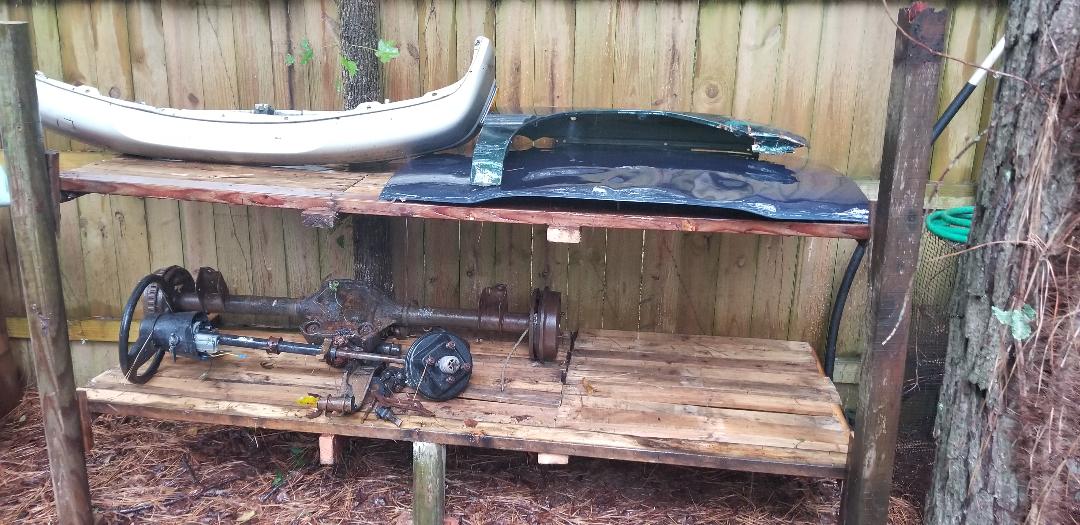
More parts stored on top shelf of auto parts rack.
Normally on Saturday I'll be out in the yard or in the work zone working on some project, I have some immediate projects I have to be working on right now as a matter of fact, but this past Saturday was the Scarecrow car show. This is a car show that is held around the same time every year, the 3rd weekend of October. Most of the cars are local but there are people who come out from farther out than the tri-county area to attend the event. We always come check out the show just to put our eyes on cars that are in different stages of restoration. The show will have everything from resto-mods, rat rods, hot rods, stock muscle cars, some exotic cars, some late model or otherwise new but still unique vehicles, trucks of different kinds, even some military vehicles. Local vendors set up tents to promote their products or services, usually handing out free swag for the taking. For a few hours you and the family can have a good ole time checking out cool cars and even conversing with like minded enthusiasts about anything automotive. We did drive in with the 84 Monte Carlo SS just to keep up with the theme of driving old cars. We didn't enter the car into the show, my main thing is just the idea I didn't really care to pay to show my daily driver beater classic car. Even though there were some vehicles that fell into the category of "beater", I would rather show something that looks a little better than a daily driver. I would really prefer to enter a car that I'm trying to sell, really with the intent of promoting a brand or model. I would really wanna be able to build cars that are eccentric and unique and don't fit into any normal mold. These cars would be what I would enter so when people walk up to it and see just how unique these cars are then see they're for sale, it may pique the interest of someone who's looking for a cool car to add to their collection or to just enjoy. 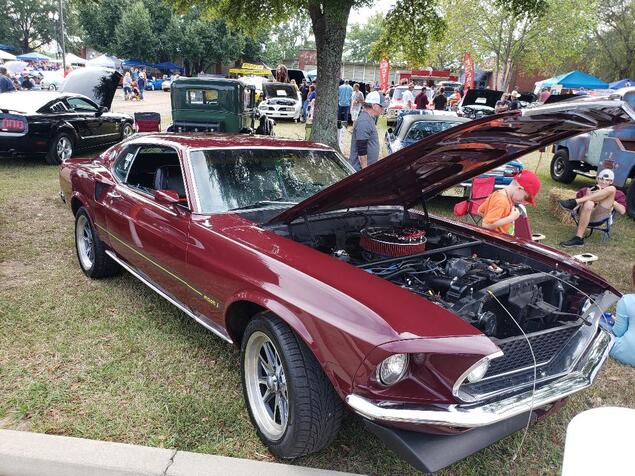 A nice 69 mustang specimen, motivation to get my rig done, in some way. 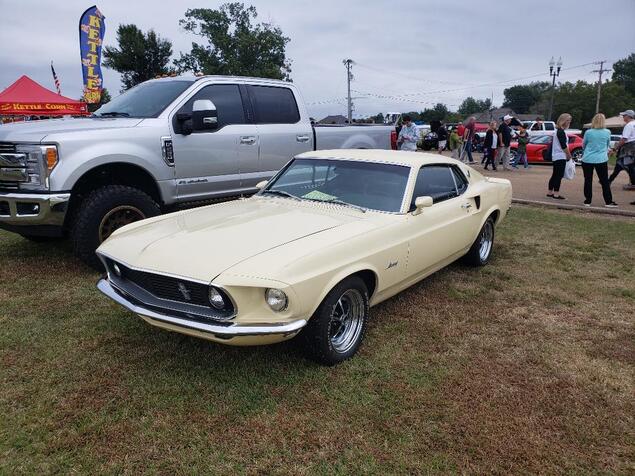 Another nice 69 stang....gotta get mine done.... 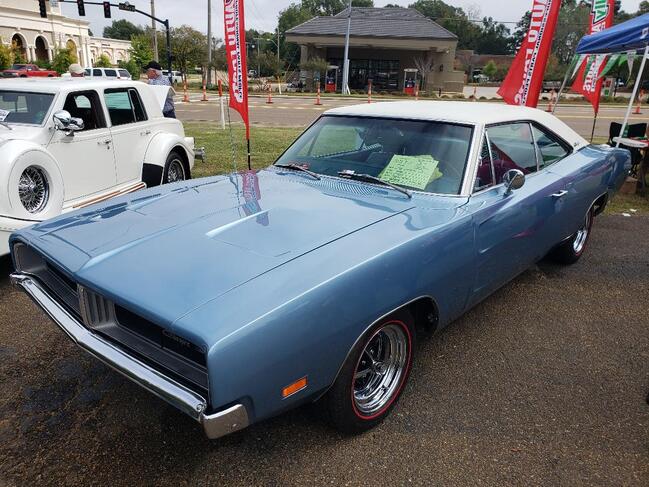 A clean 69 Charger, definite motivation to get the 70 charger on the road.... 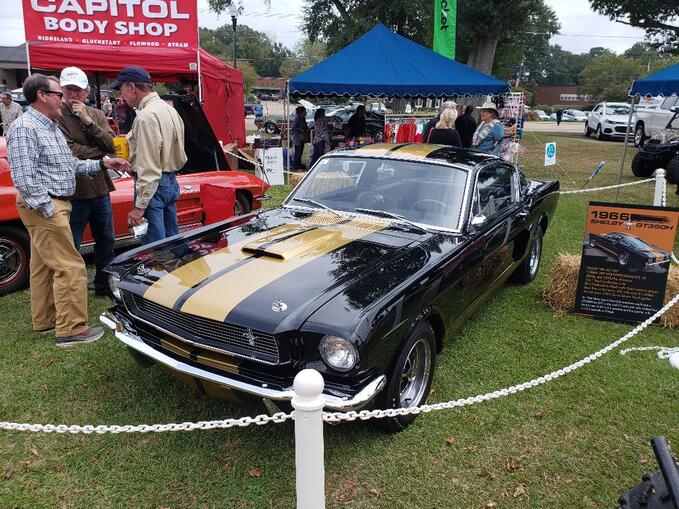 Even our 65 mustang has the potential to be a hot number like this one! While I love looking at some of the immaculately restored cars and even some of the rather clean yet "average" restorations, one thing I will still hold on to is the idea that I really can't have my cars as "perfect" as these vehicles, lest I never drive them on the count that I'll be afraid of something happening, an errant rock cracking the windshield, or hitting the paint, or some rust starting due to driving in the rain repeatedly, or gasp, an actual accident that because of the cost of restoring the car in the beginning will end up costing a shit load to restore back to the way it was. If I do have a fender bender in a car that for all intents is a beater, or better yet, an average daily driver, other than the cost of replacing the fender and matching the paint and spraying the panel and being back in play, I won't be out of a lot of money, even with insurance coverage. Think about it, how pissed off would you be at some asshole causing the accident that fucked up your $60 resto and will end up costing $5k to repair versus spending $300 for a fender and another $200 for the paint and supplies to spray that fender and be back in play? 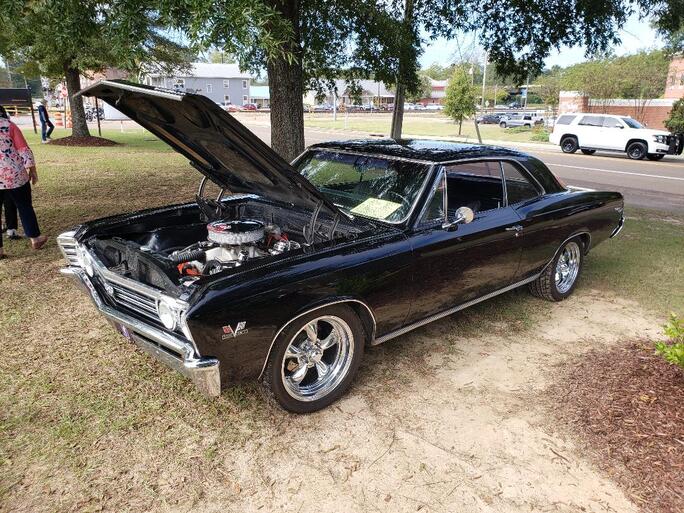 I've always liked this generation of chevelle, looks to be a 66... 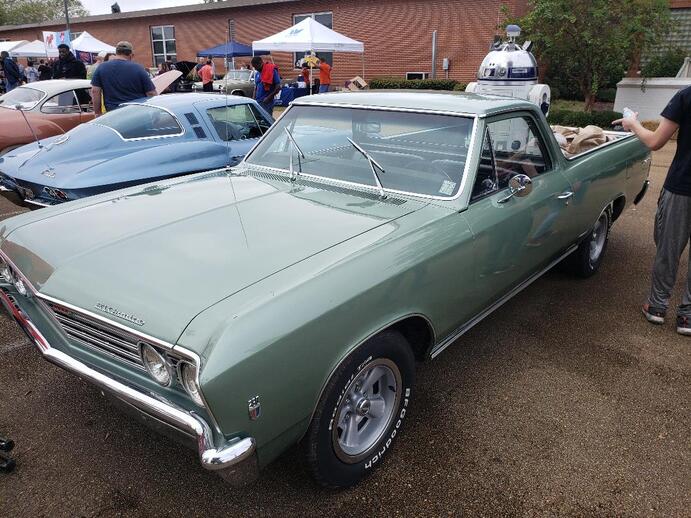 The same goes for this 66 el camino as well... 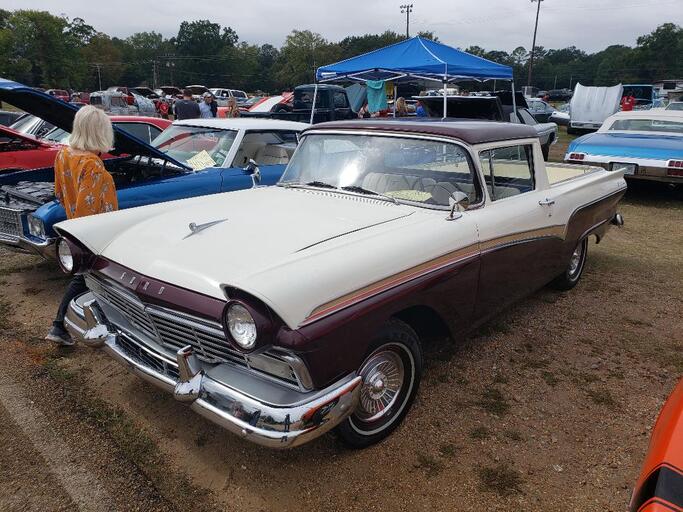 Can you see pulling up to a home improvement store to pick up supplies in this Ranchero? 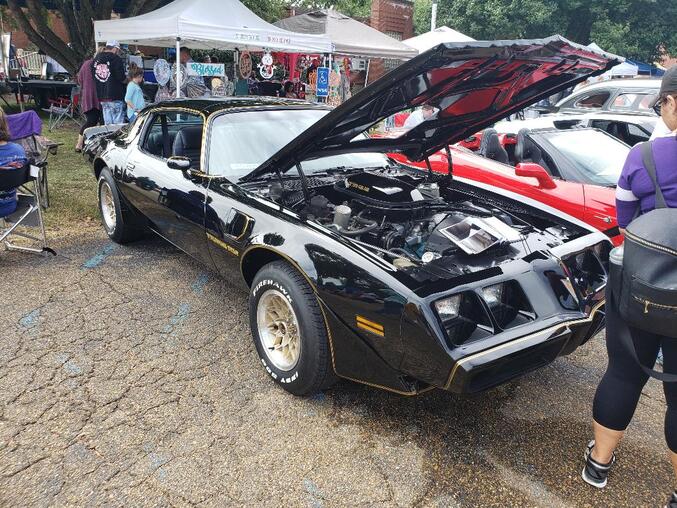 Who doesn't like a Smokey and the Bandit trans am? Me, I've always been one for cars that look like they've been pieced together from junk and random parts to build something that is just as much a work of art as it is a motor vehicle. Even if the builders spend ridiculous amounts of time and money building the car, its still a one of a kind car that cannot be duplicated, even if you try. Plus, there's just something about one taking different junk to build something, usable such as a rat rod. Something from nothing, it takes one back to their roots when they built cars with limited resources, using what they had available. They didn't follow any rules, in their book there were no rules. Use whatever engine you had available (or choose), use whole frames or chassis components from different vehicles while using the body from something else. When its all said and done, you could literally have a mutt, a Frankenstein of a car that is made up from multiple brands of cars. One of the unique things about this concept too is the idea that by building the car from readily available parts, when it comes time to do work on the vehicle, you can at least rest easy in knowing that parts will be easily accessible. 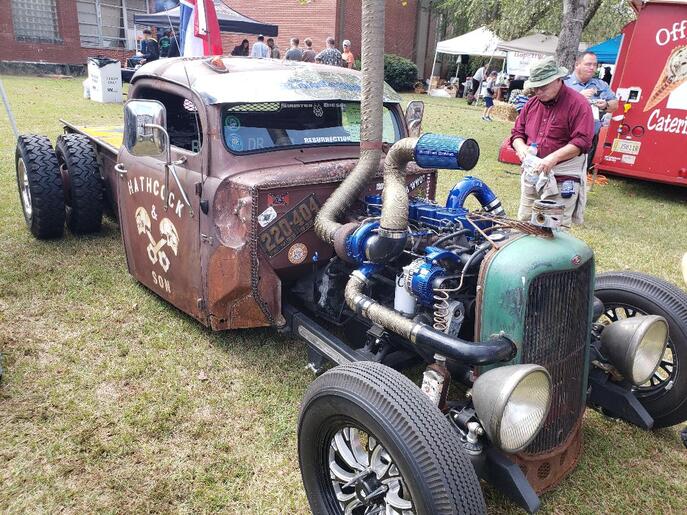 A real Franken-car, a rat rod using a dually rear end and a cummins turbo diesel powerplant. 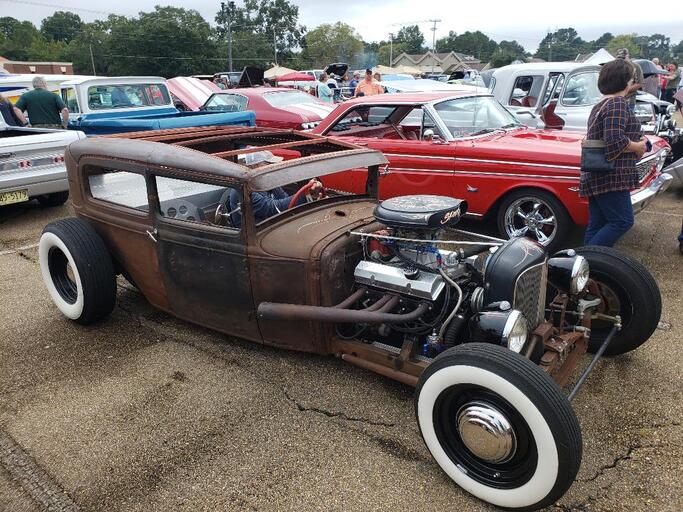 Another rat rod, custom chassis, SBC V8 and old body that was chopped. 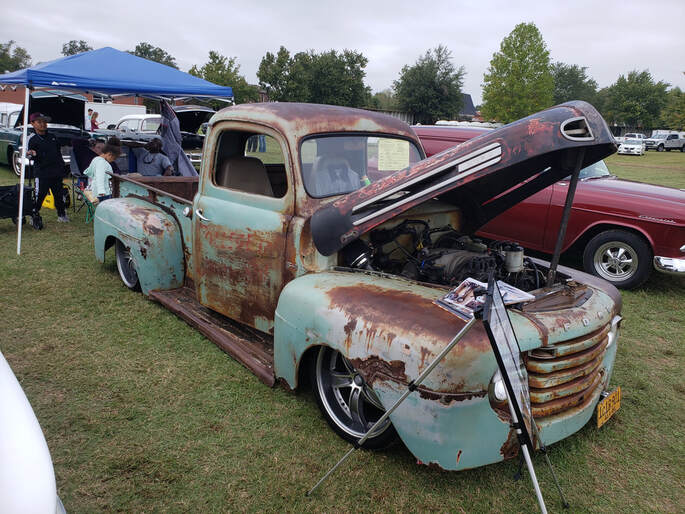 Old Ford truck built on a 99 explorer chassis, retaining the explorer's original V8 powertrain. My personal preference is that I stay away from a lot of what I would look at as exotic or even "sports" cars. I do love corvettes and ferraris but I would not want to work on them let alone pay for the components to fix them, as would be the case for a car like a Ferrari. While vettes use the same powertrain as every muscle car in the GM lineup, their tight quarters engine compartments make for a mechanics nightmare. Still it's always nice to eyeball these cars up close and maybe dream of a world where you have the money that would allow you to just drive one of these cars to the nearest exotic car mechanic and be ready to max a credit card for some service. Until then I'll be sticking to my old bucket mustangs and chargers and monte carlos. 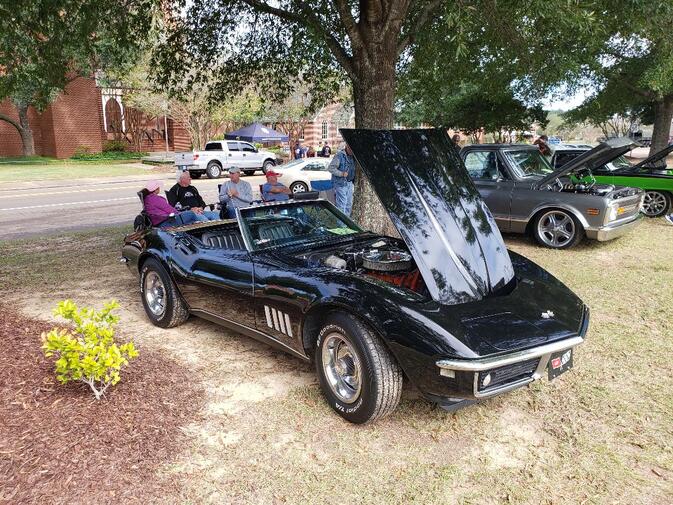 Look at this hot 69 vette convertible 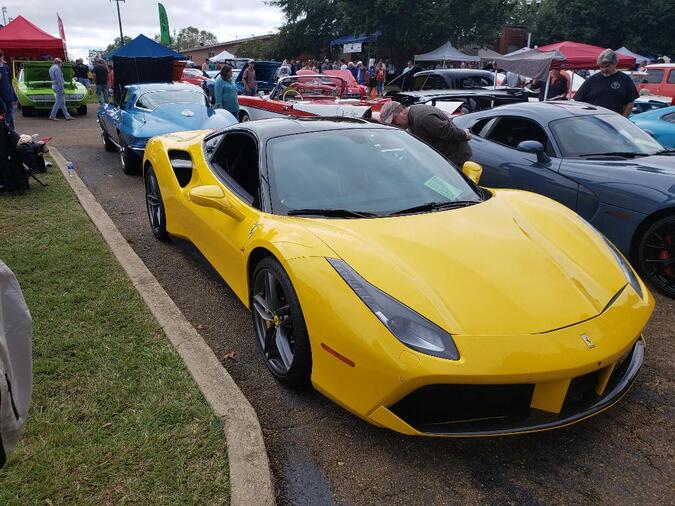 Newer (2015?) Ferrari, expensive, but nice. 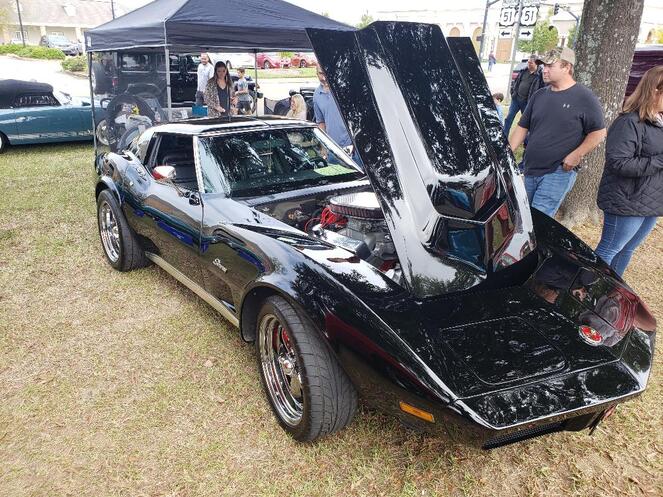 A nice 74 vette, jet black, nice. 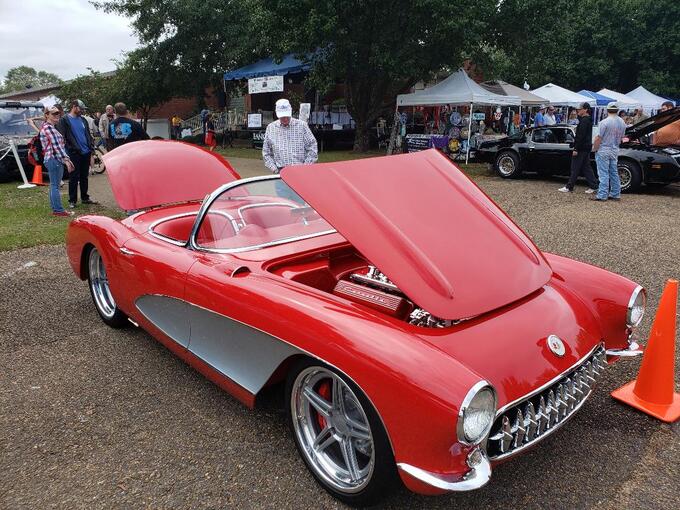 No way I'd be able to get my hand on one of these 57 vettes... 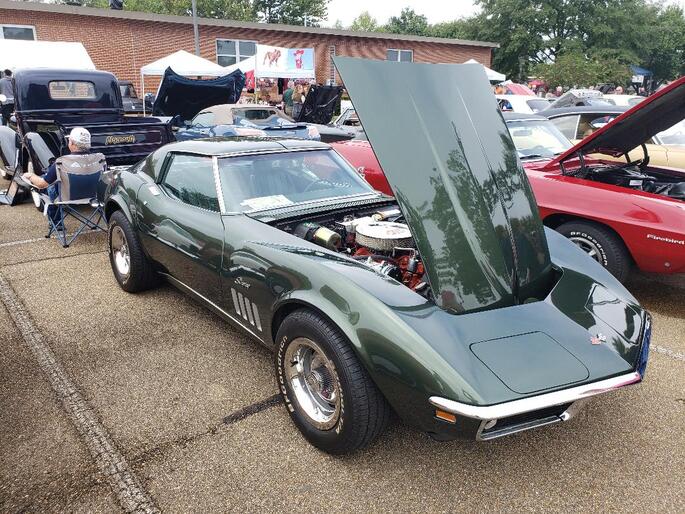 A nice 70 vette, clean as hell  A nice 2015 Lamborghini, hot shit, too rich for my blood... There are a lot of cars out there that even as soon as ten years ago many people never really gave a second thought about. Whether it was because they were still "too new" or just common enough that the supply was still saturated, these cars didn't really get the fanfare that they are getting now. Just like our 84 monte carlo, many of these cars are finally getting the new shine that the 60s and early 70s muscle cars once had 15-20 years ago. Really the models of these vehicles that get the most attention are those that had limited production runs or were a special edition model in a production line that spanned many years, which again still kind of puts it in that limited production run. These vehicles do provide a low cost option for those who are getting their feet wet in the classic/collector car hobby. Just like our monte carlo, many of these cars are still roaming the streets as daily drivers and beaters that are just waiting for someone to swoop them up and turn them into one of these beauties like what we've seen at Scarecrow. 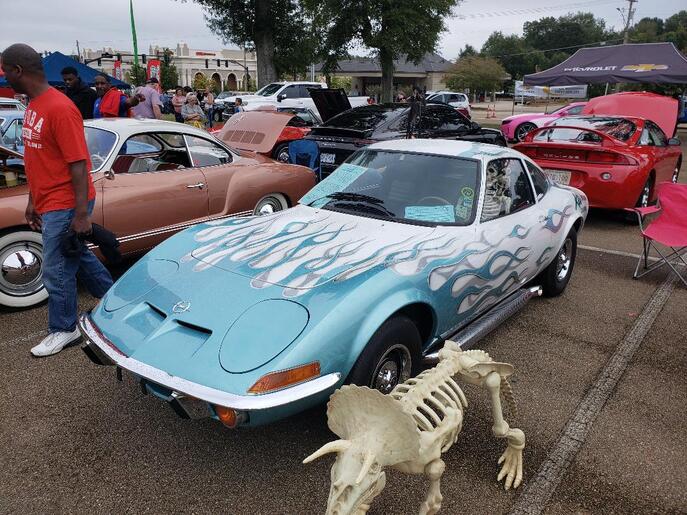 Nobody would give this 70's opel a second glance 20 years ago, but now, yeah, try finding a cleaner specimen than this without signing away your firstborn... 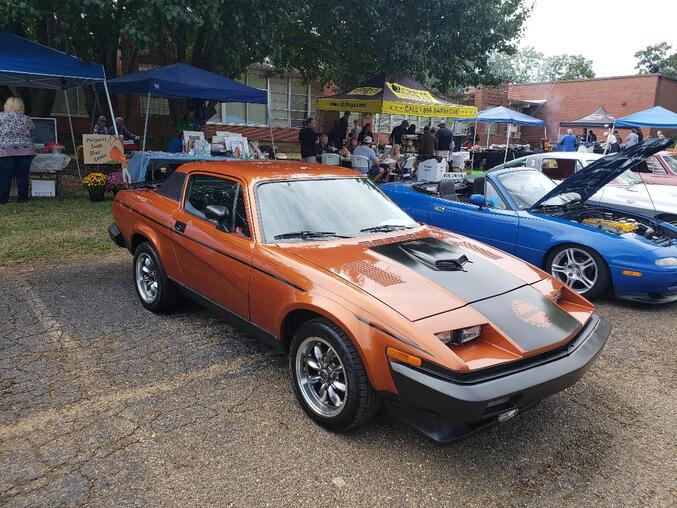 This early 80's triumph is another one of those underdogs now coming into the spotlight, I personally like the design, nice and sleek and still small. 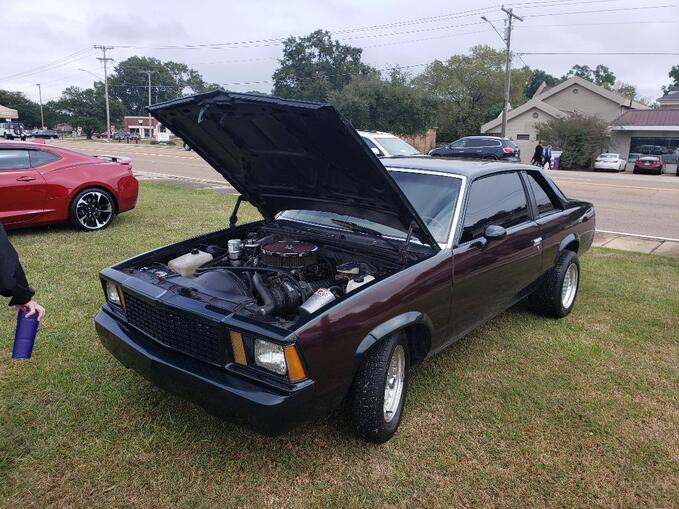 You'll be more likely to find a G body monte carlo ss than you would this malibu, especially in this clean a shape. 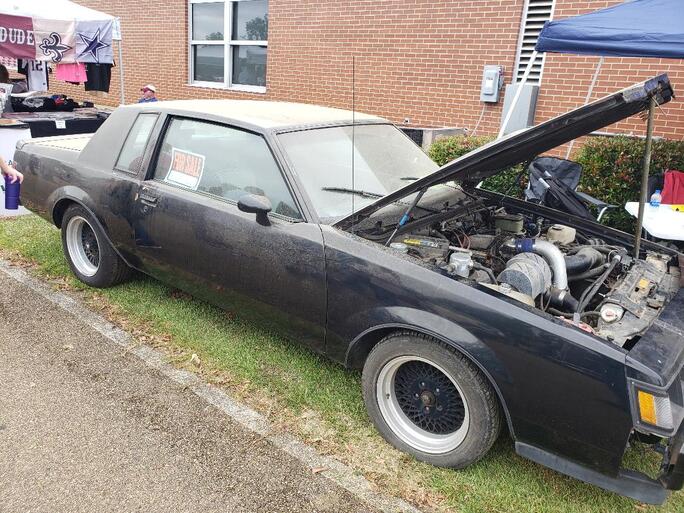 This dusty specimen of a grand national was for sale, but with no price on the placard, which means this guy prob wanted an arm and a leg for this car, which is in about the same condition as our monte ss. 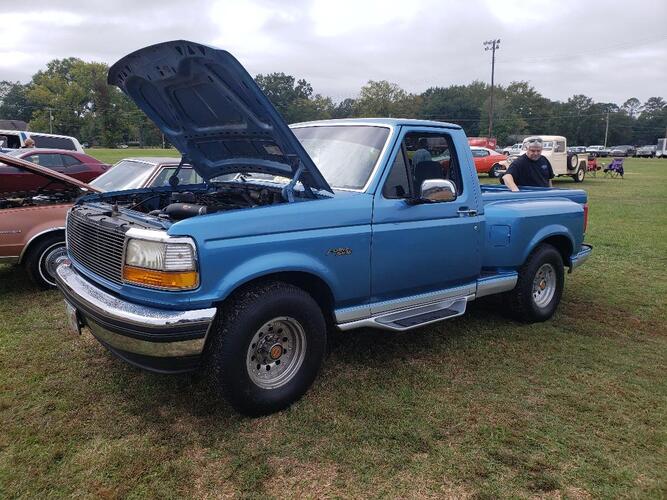 This stil common early 90s F150 flareside is starting to find a place in the collector car arena next to the F150 lightning. I do have prospects for eventually trading our F250 long bed for one of these at some point, or even building a clone in the case of the lightning. There are some definite honorable mentions here, those that fall even deeper than the limited production models as well as those that for whatever reason or another are just cult classics that stood the test of time to hold their status among newcomers. Again, these are going to be cars that for most of us are untouchable because of their status. Even if I did have the money I'd still be a little scared to have one of these due to the idea that anything that happens to the car will make me wanna kill the fucker that hurt the car. Regular road conditions would piss me off just as much since there wouldn't be any target I could take my anger out on. I'd have to just settle for the insurance paying for its repair, and this means paying ridiculous premiums because of the idea that anything that happens to the car is going to be expensive to resolve.  Who doesn't love the classic 57 chevy belair 2 door?  Even though its based on the super common VW beetle, you will be hard pressed to find a karman ghia anywhere and not expect to pay a chunk for it.  I'd be more likely to find a clean specimen of our 70 charger for cheap than I would this 70 superbird  I'd have to settle for my other preferred caddy, a 77 eldorado before I can get this 54 caddy into my stable. 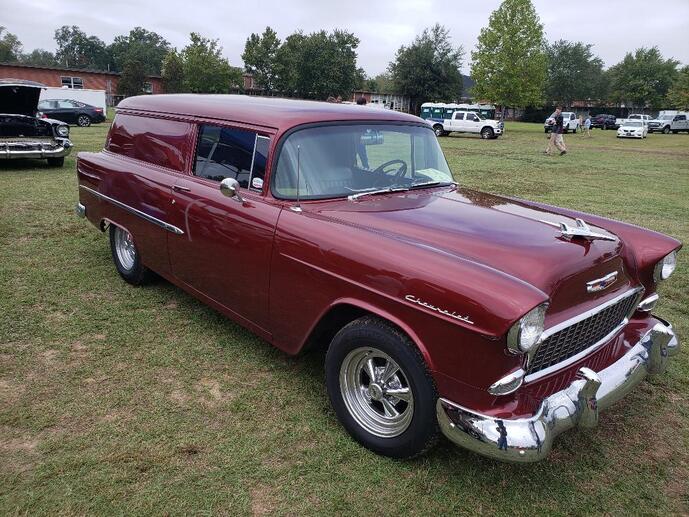 This 55 nomad holds the same status as the 57 belair, cult classic. 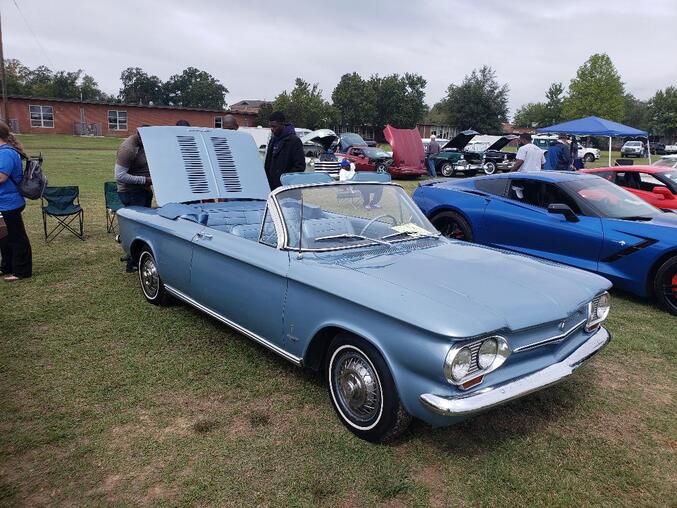 Even the lowly corvair now holds a place next to other timeless classics from the early 60's. There is also a cult following for classic military vehicles, whether they actually use them in their normal travels or even just bring them out for Veteran's Day and Memorial Day parades. Some of these find favor with every day driving while others are really limited to just parade use, or if modified from stripped down platforms, equipped with tooling to allow them to do specialized work like what you may see on construction sites. Either way these vehicles do hold a place in the hearts of collectors and the hobby of collector/classic cars/trucks. 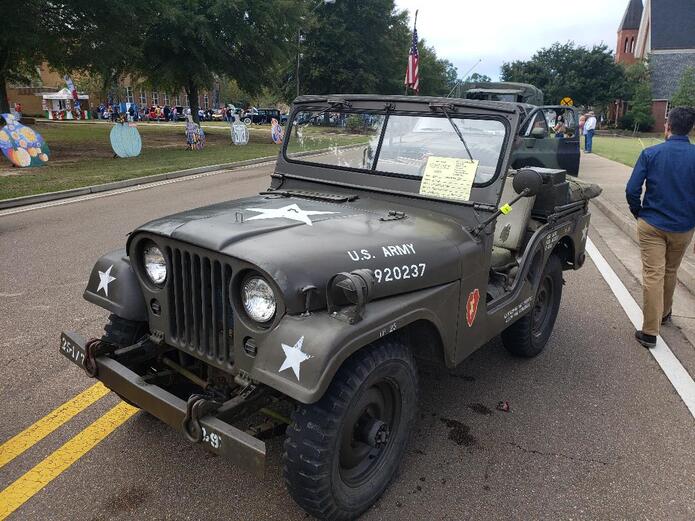 This old jeep would make a fun little vehicle to drive around town in where speeds keep you below 50 mph, long as you have a top for it, weather wouldn't be a problem. 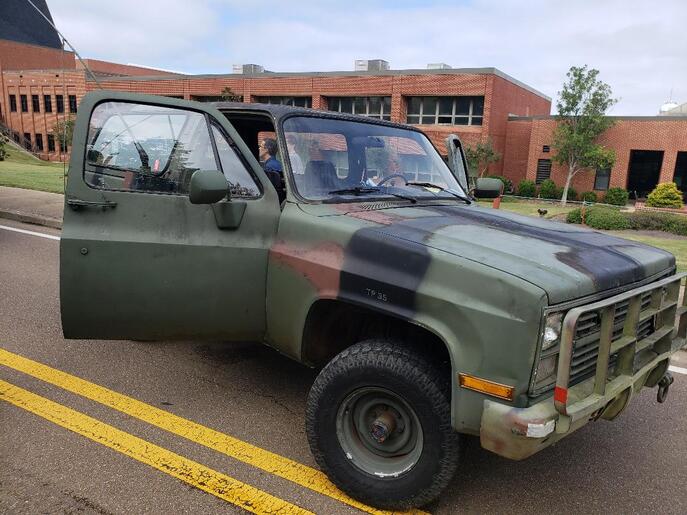 This K5 blazer would be a more likely candidate for a normal use vehicle since it is based off of a civilian vehicle. 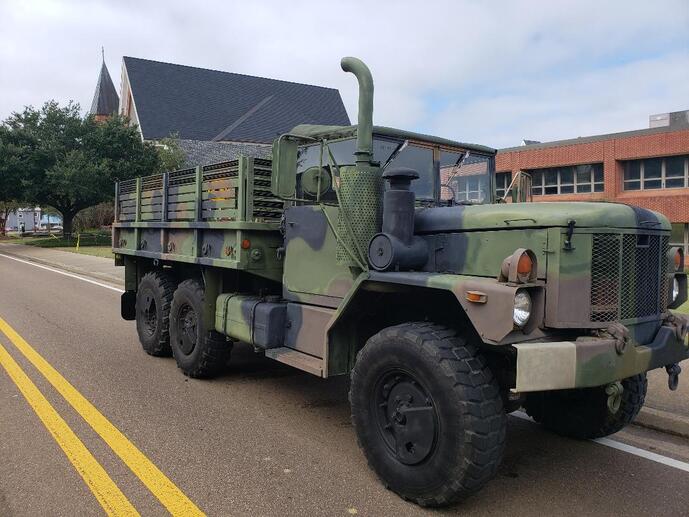 Unless you plan on hauling troops to war or have a stripped down platform to mount a backhoe or crane, this deuce and a half is really limited to parade duty, this is just too much vehicle for regular use. I've managed to get all of the scrap/salvaged wood that I had stacked in front of the storage trailer stacked onto the rack neatly. I put the 2x4's and 4x4 boards on the bottom level of the rack. On the 2nd level I stacked the pallet boards and any remaining dimensional lumber I still had on the ground. On the 3rd level I stacked all of the PVC pipe of various sizes and some metal conduit pipes as well. In order to squeeze the maximum amount of storage I had to put smaller PVC pipes inside larger pipes. With all of that I managed to clear two areas within the compound/worksite area. The area in front of the storage trailer was fully cleared when I moved some spare tires I had for our car hauler trailer as well as some wiring and a few other miscellaneous items that were on the ground right in front of the trailer and ultimately under the scrap wood. Lastly I cut the grass around the area in front of the storage trailer to fully clean that zone for future use. Other than covering the area with some gravel in order to make it a more solid location, the area is otherwise ready for use. I will probably be moving one of the project cars over there to work on it in the very near future. The other area that was cleared was the small area between the kayak rack and the stack of buckets and drums, which is also next to the outdoor use wood pile, which is next to the new fuel shed. This small area had all of the PVC pipe stacked in place but is now clear and ready for development. My plans are to build another storage rack, this one a little different in that it will be used to store some automotive parts that are on the ground on the other side of the kayak rack. There's a few other auto parts that can also take residence on the rack but of course the unit has to be completed first. The best part about this, besides organizing loose auto parts is the idea that it will put to use some more of the stored wood that's on the first storage rack. That is the initial reason for the storage rack, to temporarily store usable lumber for future projects. Of course this means that shit will get used and replenished as time progresses and opportunities present themselves in the form of free usable wood. Even though my end goal would be to have a uniform stash of wood stacked on the rack for more organized projects, for the time being I will continue to make use of the salvaged wood that I currently have stacked on the shelf. I will continue to work on projects that will use up the salvaged PVC pipe that is stacked on the rack as well. In the end the rack is really just the means to an end. It gets usable materials off of the ground and organized for short term future use so other ground can be used for other productive purposes. Besides, it looks a lot better when things are stacked and neatly organized versus scattered all over the place, allowing grass and other shit to grow up around it as well as serving as a safe haven for rats and snakes. We will continue to get things in order so my end goal of a worksite compound will finally become a reality. 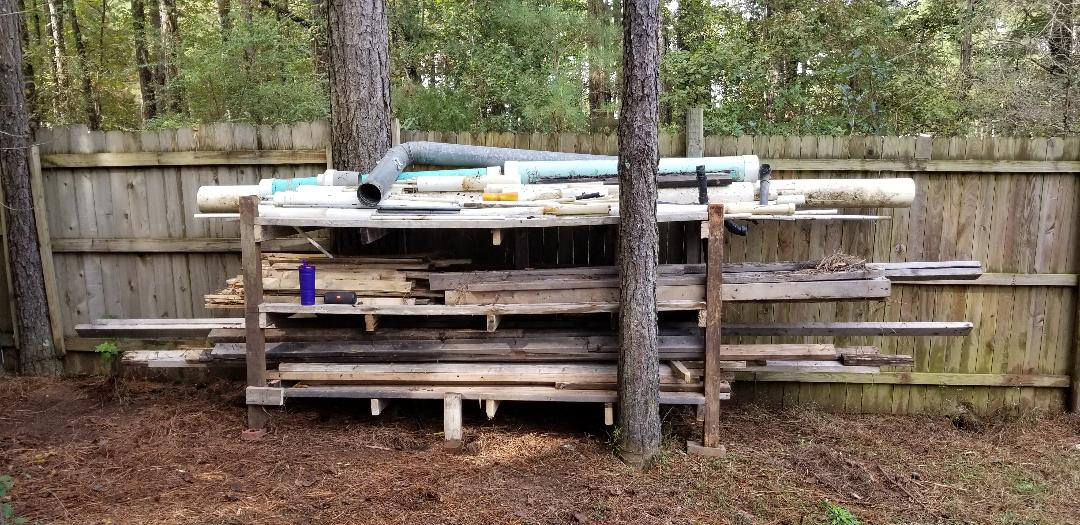 Completed storage area stacked full of wood and pipe 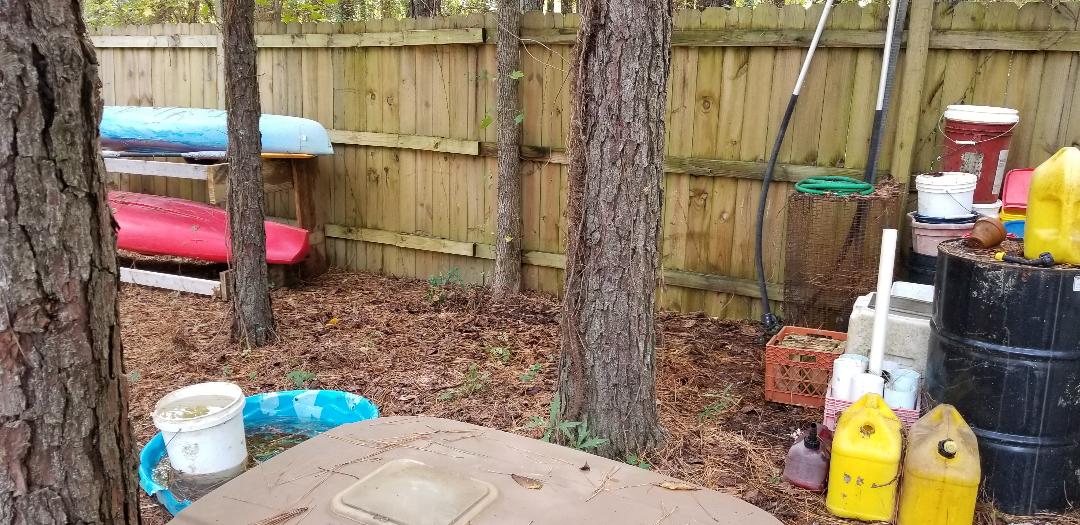 Previous PVC pipe storage area cleared and ready for future car parts rack construction.
Another idea that I had was to build a multi tier rack using the scrap wood I had stored in front of the storage trailer. This rack would be used to store some of the very wood used to make it, along with the batch of miscellaneous PVC pipe that I have stored next to the kayak rack. With all the salvaged wood stored on the rack it will clear the area in front of the storage trailer to be used as a semi-permanent work site for long term car projects. The area cleared when I store the PVC will also be available to be used for making another multi tier rack in the future for storing salvaged car parts for future sale or use.
This rack wasn't built off of any specific design, it was more of a "shoot from the hip" kind of project. I eyeballed the area where I wanted to build the thing and just started nailing boards to the inside of the main fence at the posts, as well as the horizontal boards. I used some 4x4 cedar posts for the outer support posts, with the boards sitting on bricks so they won't rot as fast at the ground level. I did use a level to make sure the boards that were nailed between the posts to make the outer frame were level so the whole thing doesn't look goofy. I attached boards on the inside that go from the outer frame to the back at the fence to serve as "ribs" for better support of any boards or pipes, especially shorter pieces. The whole project really didn't take that much time despite being built on the fly. The next step of course will be to put all the materials on the rack so I can move on to the next step of organization and cleaning up of things. I did consider getting a load of crushed asphalt to fill the area in front of the storage trailer and next to the gravel bed afterwards to help build up my overall work area. That will obviously go a long ways towards being able to do some work more comfortably and efficiently. 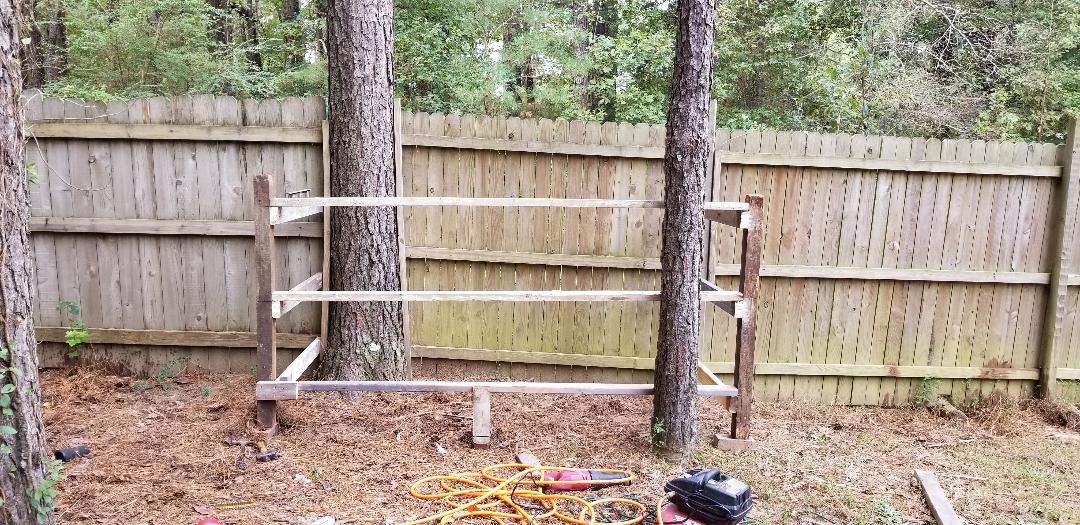
3 tier rack in the building stages, note how main fence isn't level compared to rack due to slope in ground.
Completed 3 tier rack, note "rib" boards going back towards fence.
Over the weekend I really didn't have a whole lot to do that was specific, no car projects or building projects. The whole weekend was really about some of that "general cleanup" that I talk about when it comes to filling in time outside. One of the things in this field was clearing some grounds around the house and around the back of the garden area.
Earlier I spoke about the idea of using the grounds around the garden as a turnaround for vehicles when moving cars into the work zone. If I pull a dead car into the work zone, the truck would be within the compound zone between the back of the storage trailer and fuel shed. In order to get the truck out I would have to be able to drive it around the back of the garden and around to the east end of the central driveway between the house and garden. The main thing standing in the way of this was a small patch of ground at the south east corner of the garden, right by the edge of the junk pile. The gap was too small for a vehicle to be able to pull around, between junk and overgrown blackberry vines, the space needed to be cleared. The first thing I did was move some of the junk, which is some usable car parts, over to a temporary spot on the other side of the kayak rack. With those items moved there was some other junk on the ground I also had to clear, some flexible conduit and other small items which for the time being were tossed further into the junk pile just to get them out of the way. With the ground hazards cleared, I was able to take the push mower and go over the area, chopping up the vines and high grass and other green trash and opening up the area more than enough to be able to move the biggest truck in our fleet when needed. Of course this is only the beginning, more stuff will be cleared and more ground will be clear cut to open it up that much more. The end goal is to really clear all the junk from that area, scrapping what I can, utilizing what I can and neatly staging the remaining on makeshift racks or shelves. Other grounds clearing involved clearing the area around the solar area light and the west side of the house. There was a lot of high grass around this area that has been neglected through the summer and now finally got the attention it should've gotten but didn't due to the other projects that were worked on. I had to clear some extension cords and some paint cans that were stacked behind the solar area light that were supposed to be going to the trash after being cleared from the garage earlier this year. Some viney weeds were pulled from around the framework of the solar area light before I went through the area with the push mower, clearing the greenery from the area, making things nice and neat so we can move about without dealing with high grass. This clearing will also hopefully persuade me to maybe work on the water catchment system that was supposed to be hooked up to the output line from the drainpipe that was run from the bathroom shower and sink. On a lighter note, we received a device that we ordered after seeing an ad on facebook. One thing I will say about this, whenever we see a new item on a facebook ad we always go to ebay to see who has the same item, we NEVER buy shit from those facebook advertisers, half the time they're scammers and facebook never vets these assholes before allowing their ads to run. Be warned, if you see some new item on facebook you wanna get, go to amazon or ebay to look for the same item and I guarantee you that you'll find the same item on one of those platforms, most of the time cheaper than that ad is charging. Anyway, the item was this automatic smartphone inductive charger that has arms that automatically grab the phone when you place it in the cradle so you don't have to manually squeeze the arms closed. A sensor on the back of the cradle senses your hand when you want to retrieve your phone and will automatically open the arms so you can grab the phone. Again its an inductive charger, no plugging to the phone is required. It's pretty slick, but the only thing is this device only comes with a vent clamp, which is fine in the summer when the A/C is on helping to keep your phone cool but in the winter you may have to go with floor heat otherwise the heat blowing from your vent may cause your phone and the cradle to overheat and malfunction. All in all I am impressed with the device but will probably be trying to see how I can adapt the cradle to a window mount as well as the vent mount. I will be sure to document that little project on here when that happens. 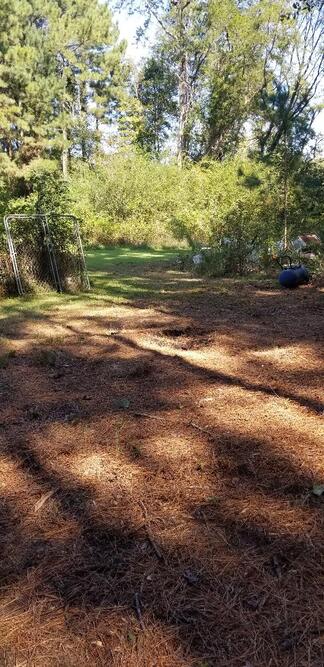
Area by back garden corner and junk pile opened up via clearing greenery.
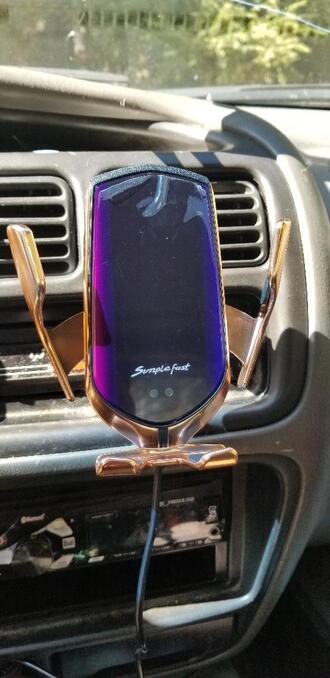
Automatic smartphone inductive charging cradle mounted in place.
|