|
After getting the Scion's rear suspension taken care of, I immediately turned my attention back to the Truckstang. Since I'm so close to finishing up the interior restoration on the car, I decided to do some preparatory work. The first thing I had to do was remove the door panels and the window cranks and door release levers to leave just the door shells. From there I sanded down the door shells all around to ready the surface for painting. This is really only temporary, as these doors have rusted out areas along the bottoms that pretty much make these doors junk. Until then though, they'll be painted in order to make the interior at least look a lot better than it did before even doing anything on this car. 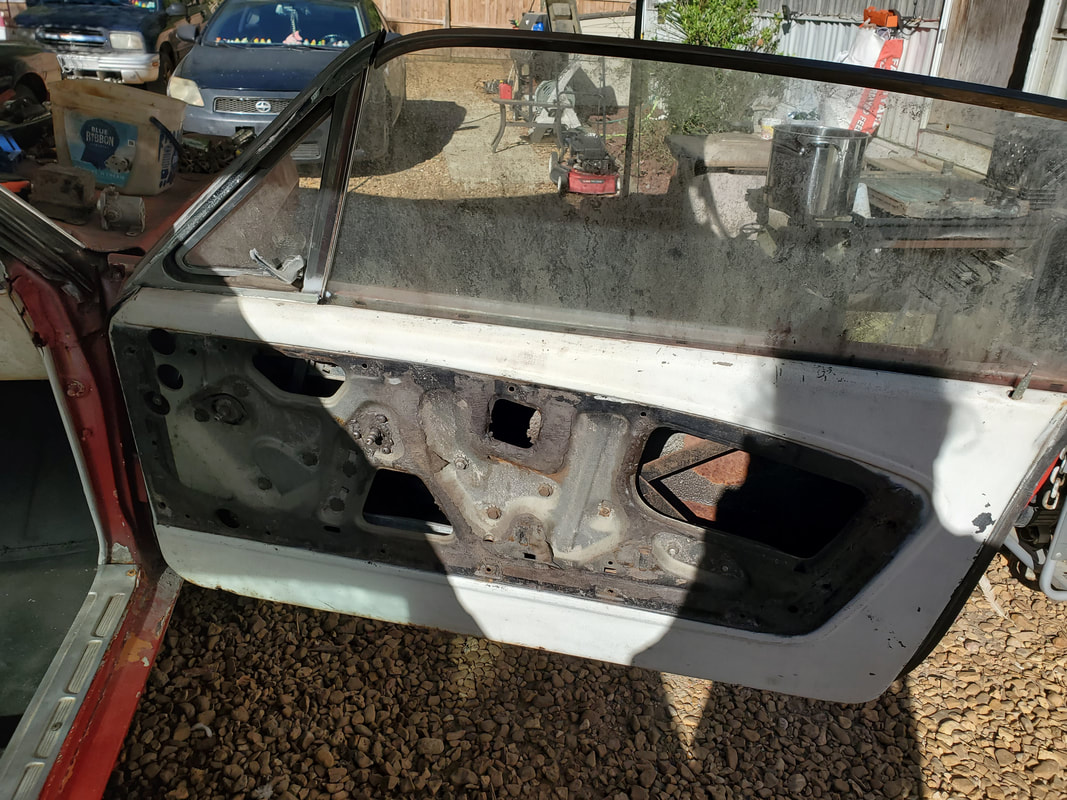 Passenger side door after removing the panel and other components and sanding the surface down. These doors really need to be replaced, but not right now. 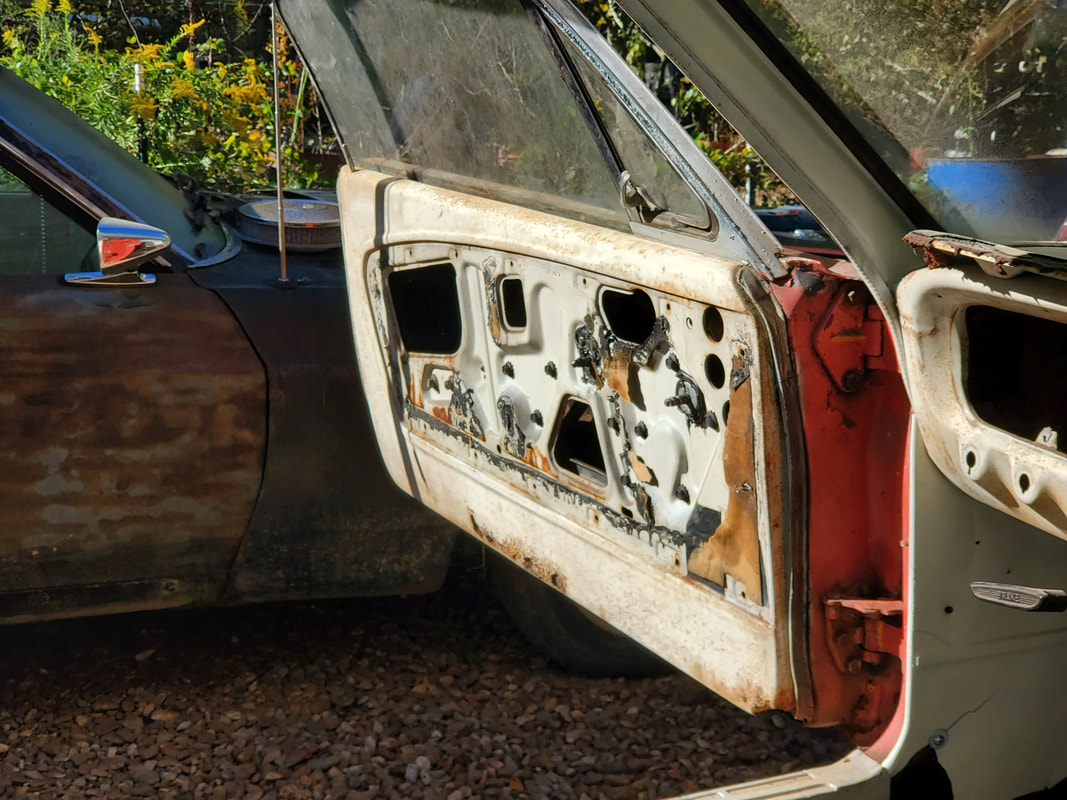 Driver's side door after removing the door panel and sanding the metal surface down. Along with the raggedy door shells are the door panels. Even though the skins aren't really bad, the particle board underneath the skins is degraded heavily. I could attempt to do a project like I did with the Chevy LUV's door panels where I removed the door panels' skins then carved out a replacement base out of some thin Lauan particle board that I recovered with the old skin. This might be an option even though I can get replacement door panels for a little better than $100. Only thing is, I might have to paint the surface if the white doesn't match up to the Ivory Bisque shade of white I used on the interior panels.  The door panels removed from the doors. These things will need to be cleaned off good and the trim masked off before they can be painted. Preferably they would be replaced, but not right now. In the meantime these panels will need to be cleaned off before I can spray them down. I also have to mask off the chrome plated trim that runs around the middle of the panel. I don't want to just cover this up with paint so I'll have to mask this off before painting the panels. I'll also have to mask off the tops of the doors to keep paint off the vent windows and side windows. At this point, the interior will be almost done.
0 Comments
With the parts in hand to get the Scion's rear suspension done, I got the party started with the disassembly of the left side spindle/knuckle. This involved pulling the brake caliper and bracket off first and foremost. Once that was off, the rotor/drum had to come off. I had to remove the wheel bearing in order to give me the clearance to allow me to remove the brake shoes and other associated hardware on the system prior to removing the spindle. The wheel bearing is held in place with four bolts, no problem compared to the front wheel bearings, which are both pressed in. The wheel bearing also has a built in speed sensor that had to be unplugged before the unit could be removed.
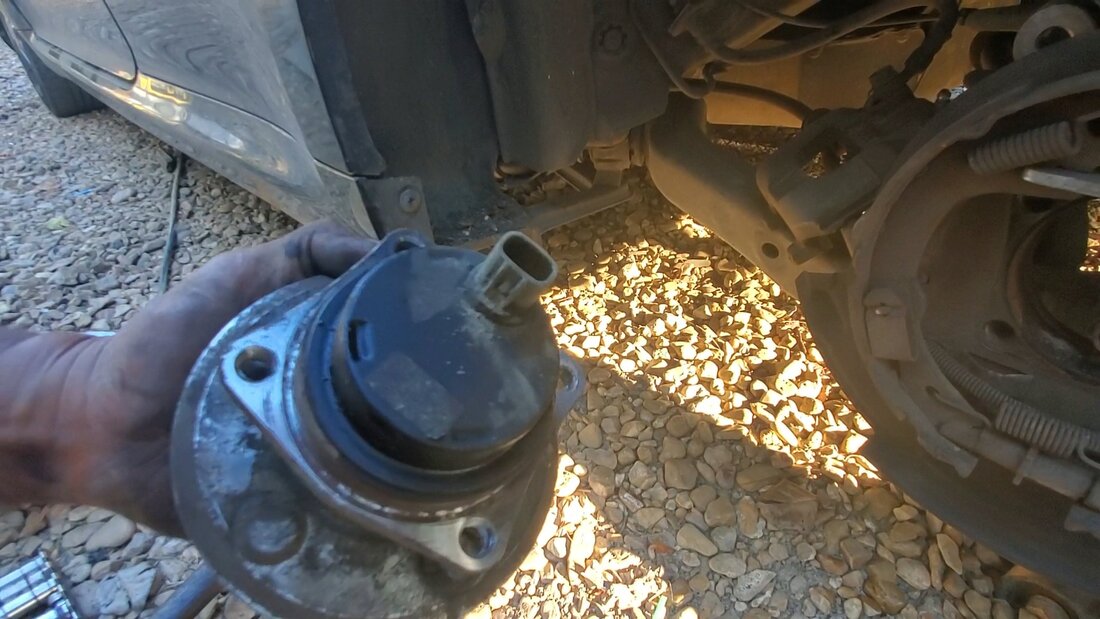
The wheel bearing after its extraction from the spindle assembly.
With the wheel bearing off, I was able to remove the shoes and other brake hardware inside the drum. There's two clips holding two pegs that hold the shoes. Once these were removed, I had to unhook one spring which allowed me to work that shoe off, which in turn allowed me to remove the pair of shoes with most of the hardware still in place. This will at least make reassembly of the drum brake system easier than trying to piece everything back together. There were a couple pieces that did pop free but a couple pieces is a lot better than all the pieces. 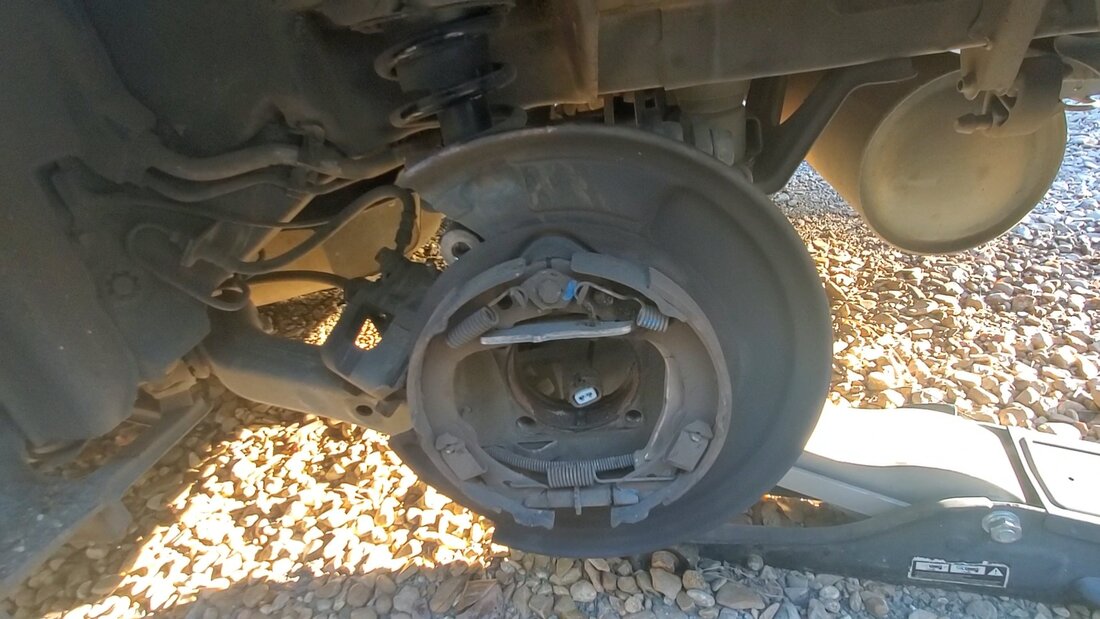
The parking drum brake shoes and other hardware exposed after the removal of the rotor/drum and wheel bearing.
Next I had to disconnect the parking brake cable, which involved removing a 10mm bolt holding the bracket to the back of the spindle and working the cable free from a bracket that then allowed me to pull the cable out from the back of the spindle. With this stuff out of the way, I moved on to the camber arm. This piece was nestled in a spot just in front of the muffler that made it difficult to get to and more difficult to remove. I had to make note of the cam bolt's position so I could put it back in the same way to try and restore the camber position for that spindle and hence that wheel. With some "creative" tool play, I was able to get the nut off then work the bolt out in its entirety. 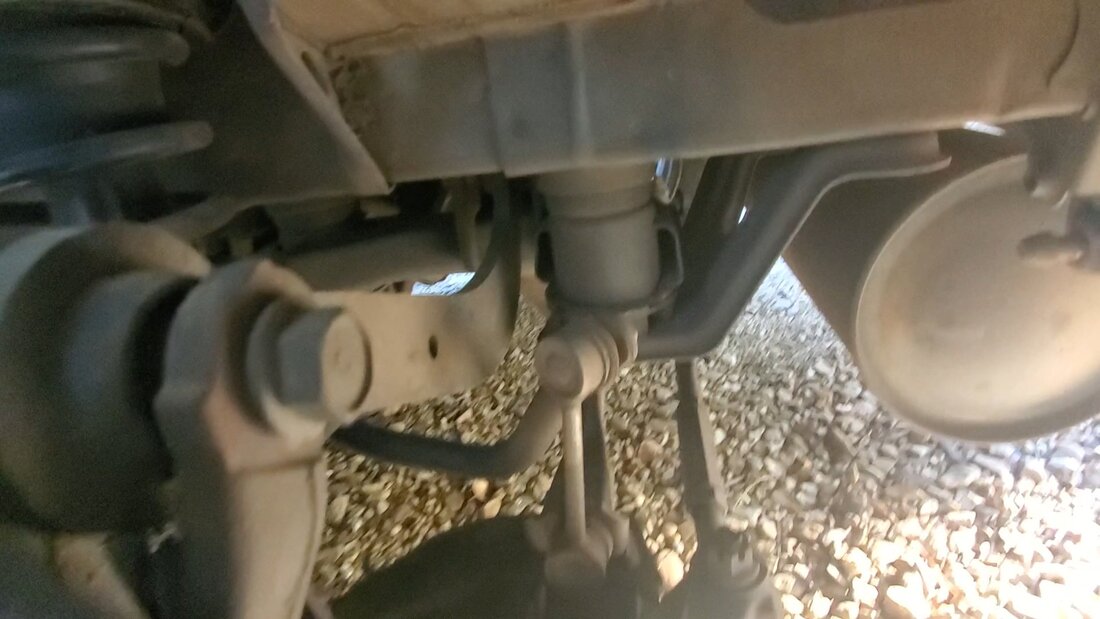
Closeup of the camber arm on the top of the spindle.
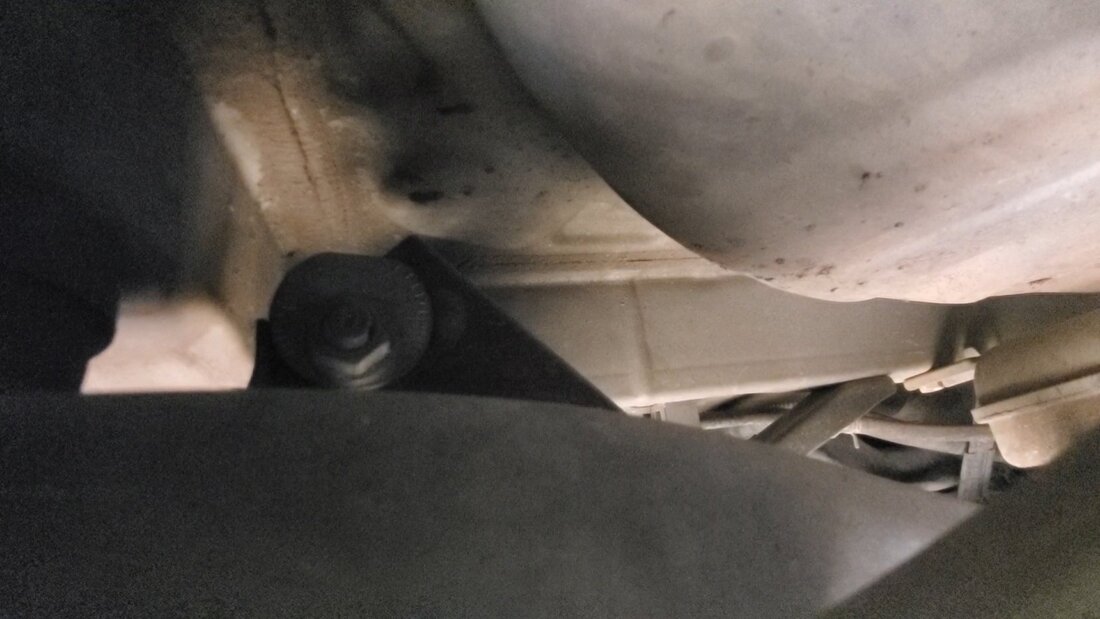
Closeup of the cam bolt on the inside end of the camber arm, prior to removal.
I removed the retaining pins for the ball joint and tie rod end next, then removed the castle nuts for both. I had one more nut and bolt that had to come out, to which I then used the baby sledgehammer to tap the sides of the knuckles that hold the tie rod end and ball joint shafts to pop free those components. I ended up having to use the castle nut on the tie rod end as a hammer point to pop the tie rod end free and the ball joint, since it'll be replaced anyway, was just hammered on the top of the shaft to pop it free. Of course the ball joint is useless at this point but again, it'll be replaced. The castle nut will have to be replaced, since it was mushroomed some. Luckily I did grab the castle nuts from the junkyard car so this isn't a big deal. 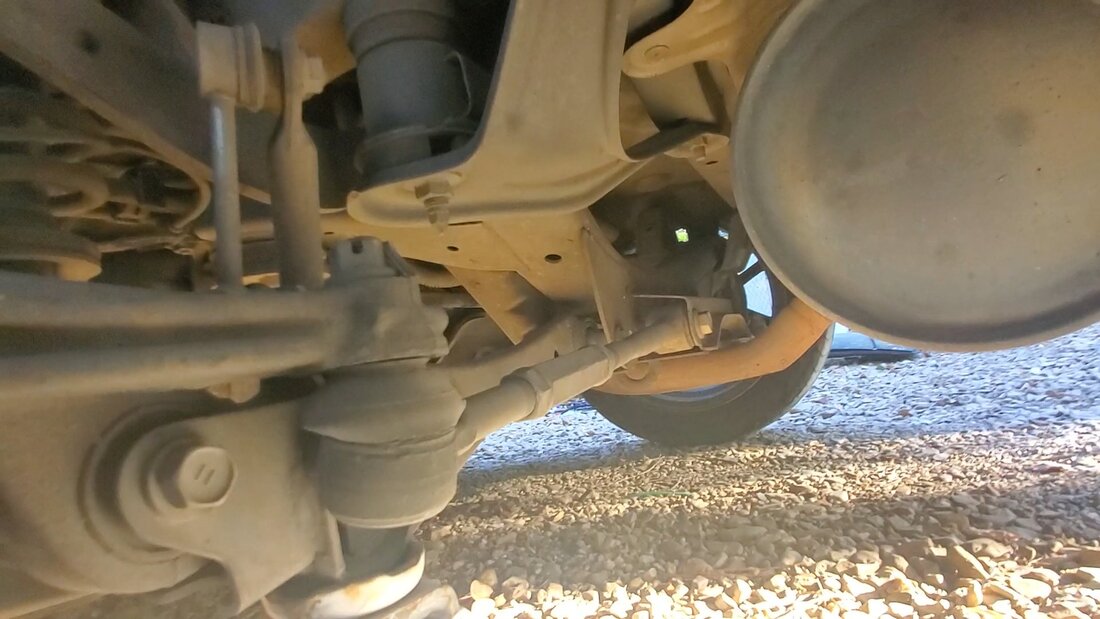
Closeup of the tie rod end where its connected to the spindle with the castle nut still in place.
After getting the ball joint and tie rod ends popped free I was able to work the spindle out completely. I was able to inspect the camber arm, finding the bushing at the cam bolt end was broken inside. The ball joint had play just as well. Unfortunately the tie rod end was also very playful but I will have to reuse that part until I can get replacement parts, which will have to be a lot sooner than later. 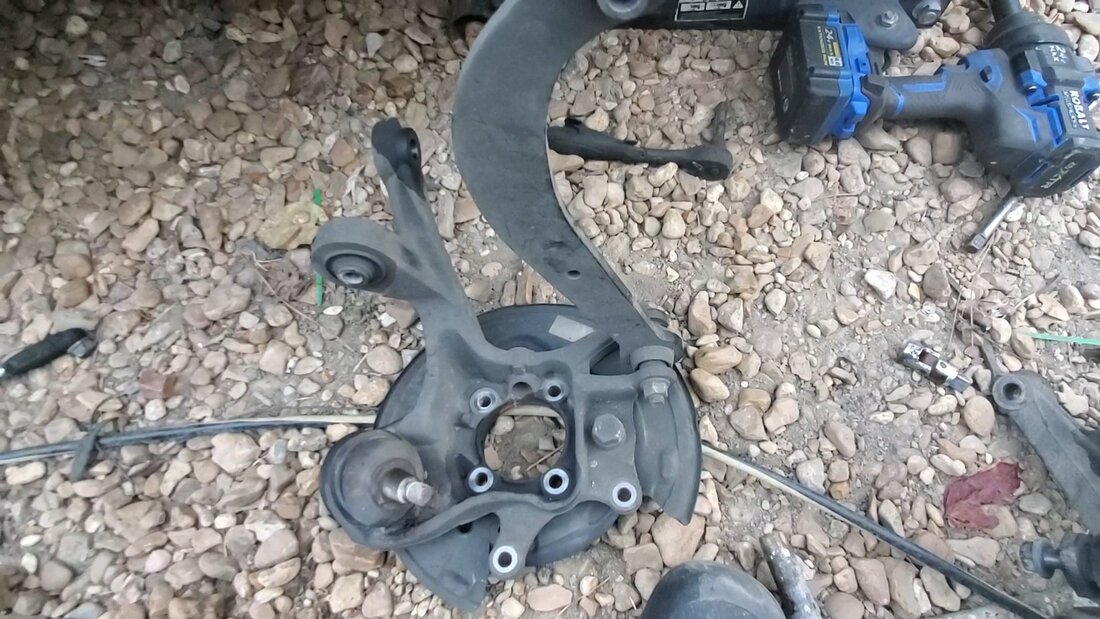
The old spindle assembly with the old camber arm and ball joint removed from the car.
With the old spindle out, I can now install the new junkyard spindle and get the other side done just the same. I'll be sourcing those tie rod ends so hopefully in a week I can get those swapped out. Unfortunately, even if I take the time to make sure the tie rod ends are adjusted to match the old units before installation, I'll probably end up having to take the car in for a rear end alignment, especially since the camber arm is probably not going to be at the stock settings either. During this time the tires are probably going to have extra wear but that's ok because these tires are close to the end of their useful life anyway. The work continues....
After making the junkyard run to grab some parts for both the Scion and the Truckstang, I took a short moment to do a couple things. Since the rear suspension work on the Scion may take a minute, I decided to get these smaller things out of the way. One of the things involves the Scion, which is the replacement of the front motor mount. This is the one that mounts to the "front" of the block and to the lateral member that is in the middle of the main K-member. This thing was already patched once before, as a temporary measure. I had ordered a replacement mount and right when the new unit came, that was when the car had the rear end collision. Since I wasn't too sure what the future of the car would be, I put off the replacement of the part, despite the car still being used. Well obviously, with the mount only being temporarily patched, it didn't last too long before it finally wallowed itself out completely. I finally took the short moment that it took to replace this critical part. 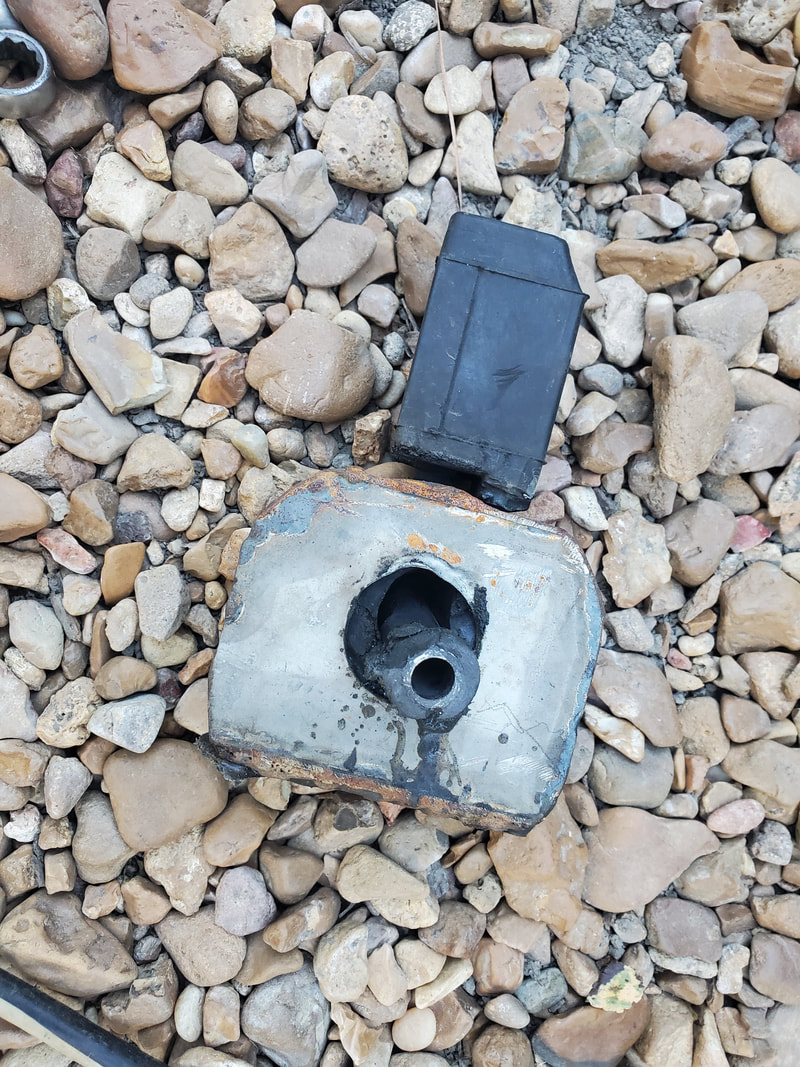 The ratty wallowed out motor mount removed from the Scion, the core portion is completely trashed. At least I can rest a little easier knowing the engine won't be able to continue on its quest to tear everything apart around it due to the bucking it does when a motor mount is bad. Another thing I wanted to finish up was the painting of the Truckstang's seats. I already started the painting of one seat but ran out of paint and had to try and source more of this specific color as the store I had been grabbing this paint from was out. 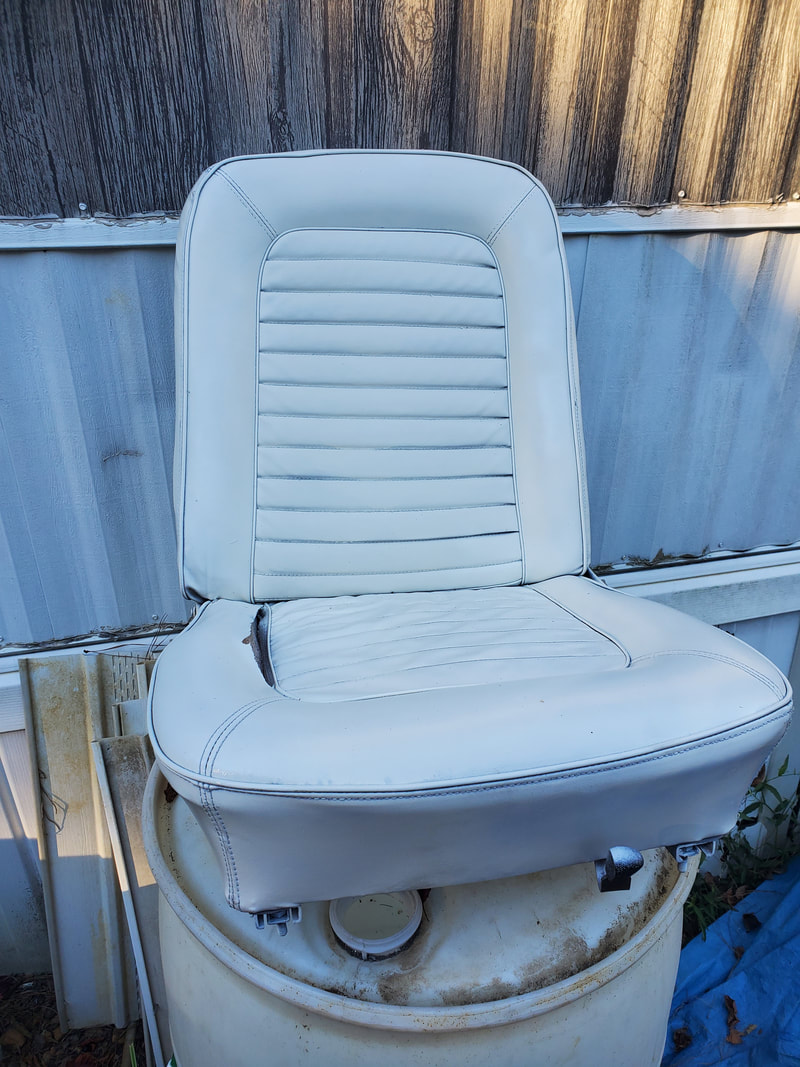 Even though the driver's seat has a tear in the base, I still painted the seat to at least try to make it look decent compared to the rest of the interior, at least up to the point I can float a reupholstering job for both seats. After cleaning both seats and sourcing more of the spray paint, I was able to finish up the painting of the seats. There's a little problem however. Even though the paint specifies that it's good for plastic as well as wood, metal and other materials, the old vinyl that covers these seats doesn't seem to just absorb the paint quickly. After spraying the seats down, the paint sat for the rest of the day and still had a tackiness to it that makes them unable to be handled safely, much less installed in the car. The paint isn't wet, but its tacky enough that the paint can peel or scrap off easily. When I've had this happen with paints and certain materials, I found I had to just let the painted item sit for a long time before the paint finally just dried up enough to be able to be handled safely, then still allowed to sit longer, in the case of the seats, where its would be safe to sit on without paint coming off easily. 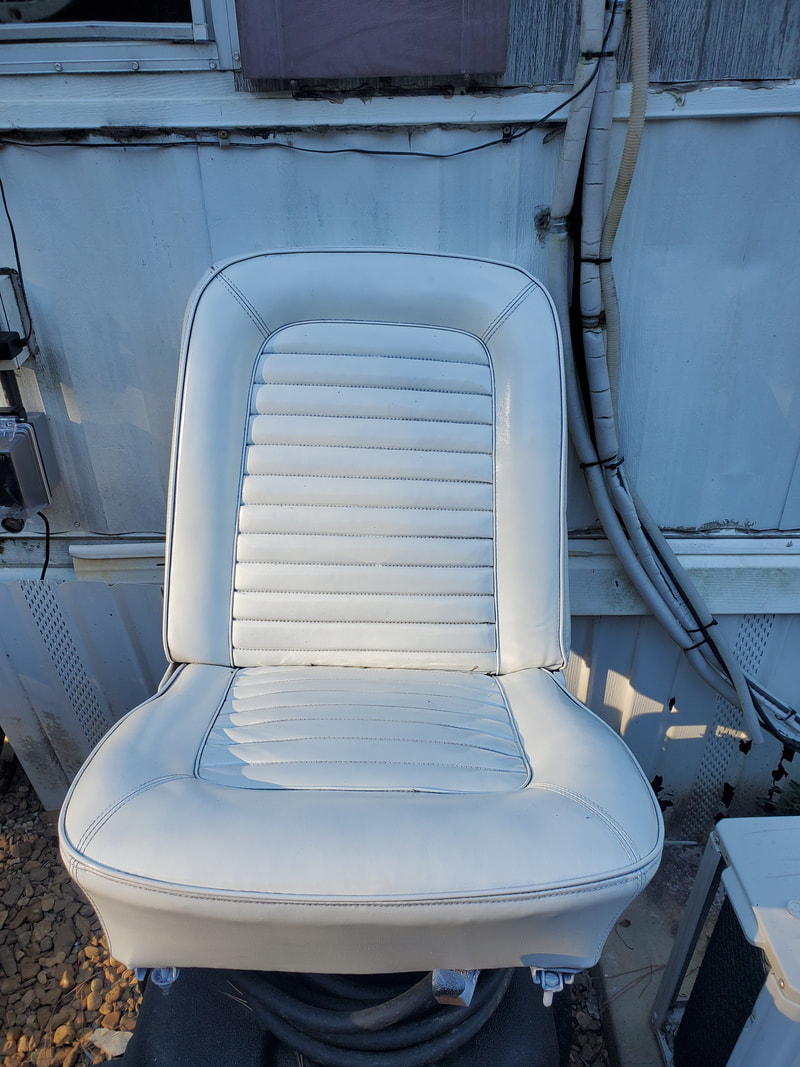 The passenger seat, staged in a safe area to allow the paint to fully cure to allow the seat to be handled safely. Hopefully these seats will cure more sooner than later so I can move forward and finish up the interior work on the Truckstang. I do still have to spray down the dash frame and the doors as these areas are the last to be hit before I can say I'm done with the painting of the interior. Maybe by the time I get the Scion's rear suspension work done and the mentioned spraying of the dash, the seats will be ready for handling and installation. There really isn't many options here as the seats were already ratty looking on the color of the material and nothing else would be able to be done to make the seats match up to the rest of the interior short of painting them.
We had to hit the junkyard once again for more parts for a couple projects. One of them being the Scion, which has some serious suspension issues requiring some replacement parts from said junkyard. Since I had to get these parts, I decided to grab some other parts for the Truckstang project in order to help me get further along there.
On the Scion, which happened to be the same car we've stripped for all the repair parts we used so far, I had to pull the rear spindle/knuckles. These knuckles have a pressed in ball joint making up an integral part of the rear suspension. Along with this, there's a camber arm that connects the top of the spindle to the subframe. This arm is adjustable at that contact point and allows for the camber alignment of each spindle, for racing purposes, if so desired. Well the bushing on this camber arm on each spindle is worn out along with the pressed in ball joint. Both of these components are critical because if they break, the wheel goes left, or right, neither of which is desired. 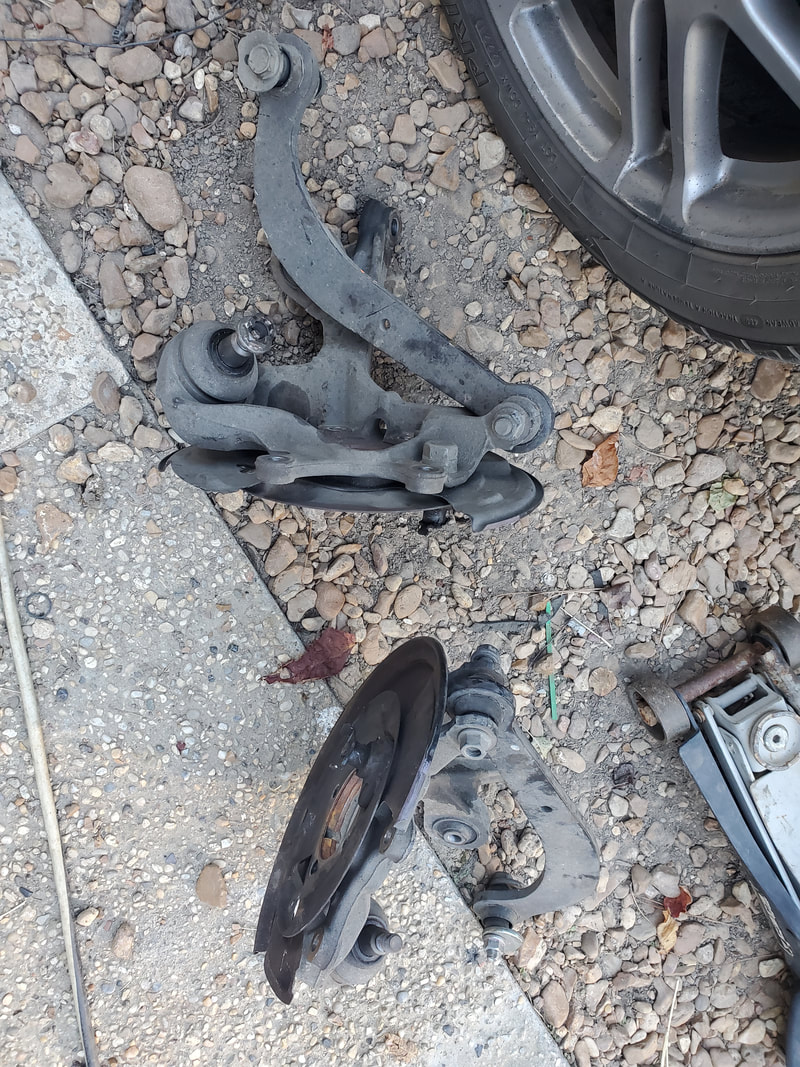
Pair of rear knuckle/spindles removed from a junkyard Scion to replace our old ones since they have the pressed in ball joint and camber arm that are bad on our old units.
Since the pressed in ball joint isn't available anywhere locally or even domestically from what I can see so far, I decided to just grab a set of spindles from the junkyard car. The only other way to fix this problem would've involved having to buy an entire spindle new, with the ball joint, for $250, which isn't happening when I need two. I did find the replacement ball joint from a vendor located in Australia, so worse comes to worst, I'll have to get the ball joints from this source. Otherwise the plan will be to take the old spindles after swapping them out, press out the old ball joints and try to match them up to another ball joint available locally. The next order of business was getting parts for the Truckstang, which involved stripping a Ranger. I needed to get a couple brake lines for the front brakes since one of the lines was clogged with crap and possibly rusted inside. I also decided to complete the brake system on the Truckstang with a Ranger brake booster and master cylinder. I could get a replacement pair made specifically for the Mustang but rather than do this, I can use all Ranger parts and adapt them to the Truckstang. Besides, it would be easier to mate Ranger parts to Ranger parts versus trying to adapt the standard size Mustang brake parts to the metric Ranger parts. 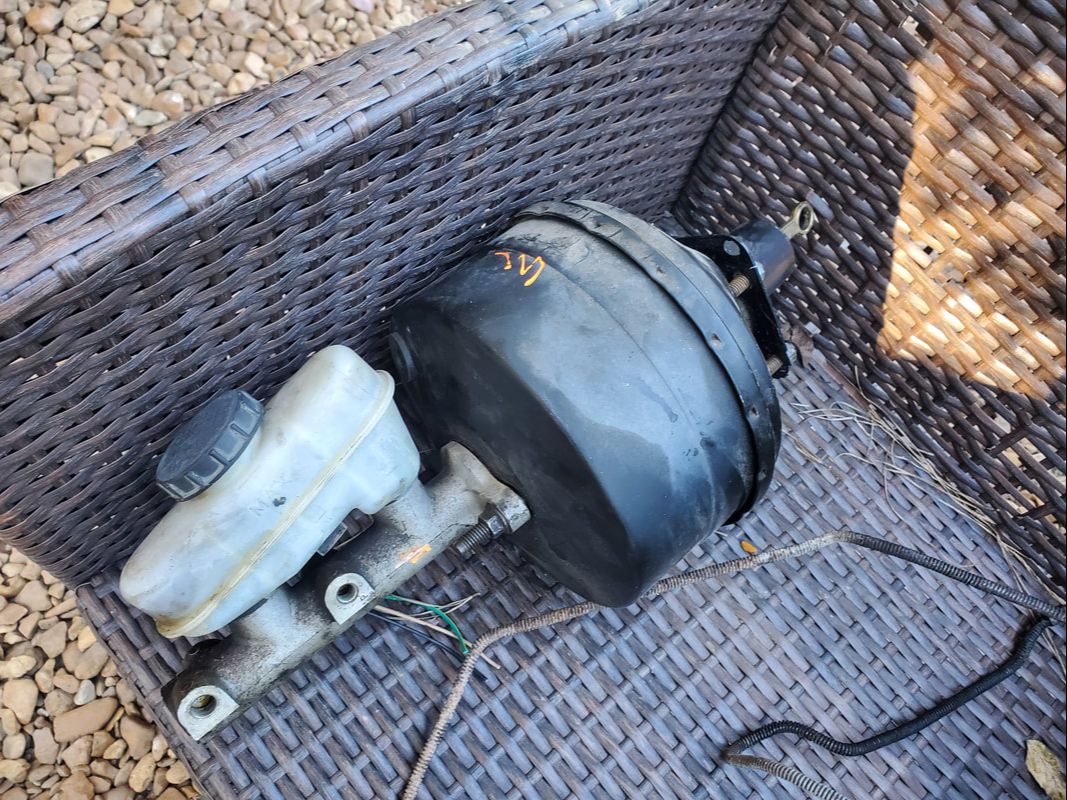
Brake master cylinder and booster that will be adapted to fit in the Truckstang's firewall so it can all be connected to the Ranger brake hardware on the frame. Note the brake lines setting with the booster/master cylinder.
Along with the brake lines and master cylinder/booster, I also grabbed the steering intermediate link which couples the steering gearbox to the steering column shaft. I needed this obviously to hook up the Ranger steering box and adapt the steering shaft from the Mustang's old steering column to be able to hook up to the Ranger's intermediate link. 
Intermediate link removed from Ranger to be used to couple the Ranger frame's steering box to the Truckstang's old steering column shaft after some adapting.
With these parts, I should be able to complete the assembly of the Truckstang's brake system, along with the steering system. These two critical systems will put me far ahead of the curve on the fitting out of the Truckstang. Once the engine related components are in and the car's rewired, a driveshaft and fuel system will be the only two major items left to complete the car.
With the second Scarecrow car show going on since the pandemic, we of course had to come back out so we can get our fill of classic/antique cars and just enjoy the atmosphere that makes up the car world. Getting to see the myriad specimens of automotive art, ranging from 100 year old automotive pioneers all the way to one of a kind and limited production run modern cars helps to fuel the creative furnace that exists in all of us who are car nuts, giving us the inspiration to continue with our own builds, with the hopes of one day being able to show off our own creativity. For some of us who are into building cars it is also an opportunity to possibly profit from this hobby, either in the form of flipping a build or maybe even being able to contract out a build for someone who is impressed with the nature of the build. This is the kind of case I hope to have with the Truckstang, as this type of build is something you don't see everyday, enough so to pique the interest of some automotive enthusiast who just has to have a one of a kind build such as that one. Also for those of us with specific cars that are also common in car shows such as this one, it gives us a vision of what our own builds can become when they're done. 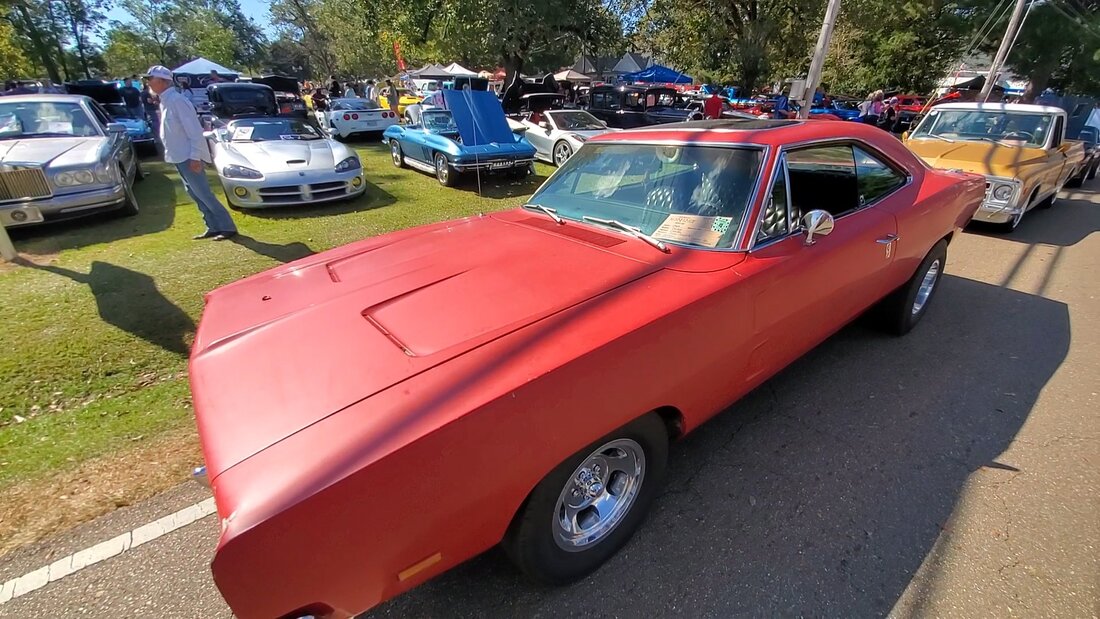 A cool daily driver looking 69 Charger owned by a body shop mechanic whom I bought a spare window from for the our 70 Charger some 10 years ago. 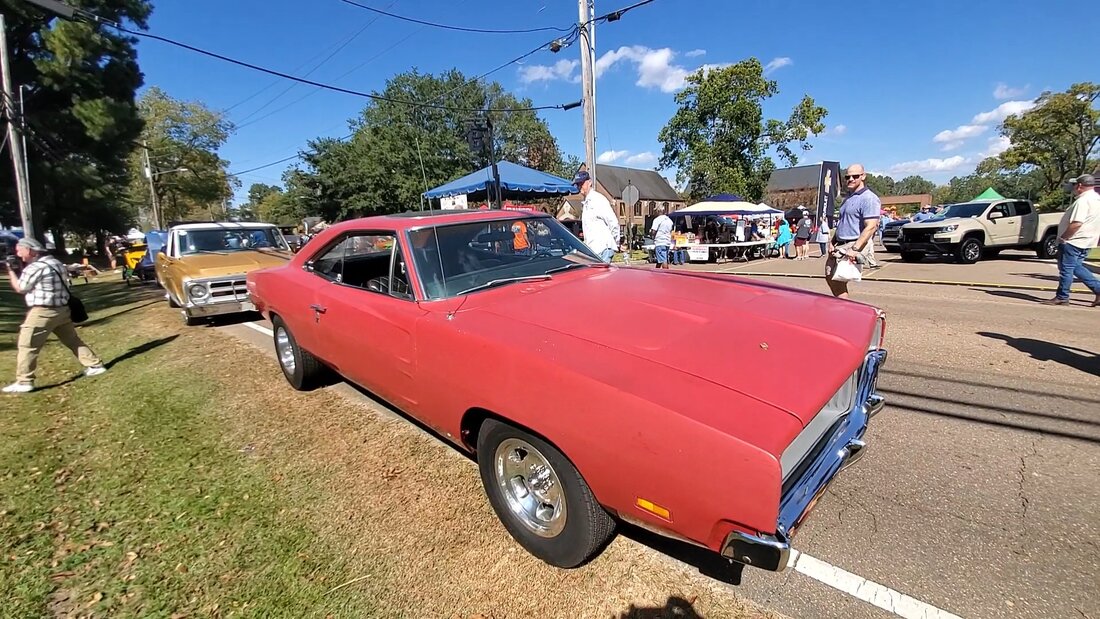 I just had to give this car a good looking over since I can visualize our Dodge reaching this point where it may not be cherry but is more than presentable for the street and show. 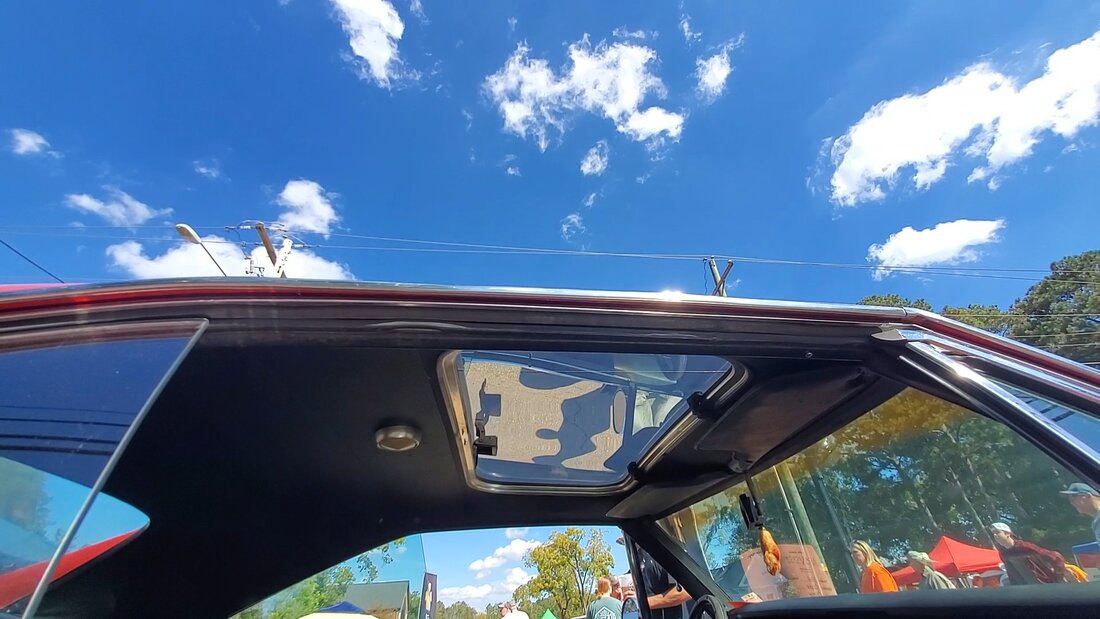 The guy even managed to adapt a moonroof into the Charger's roof, probably due to these cars having roof rust problems if they originally had vinyl tops on them, such as ours. Speaking of one of a kind cars, any time we go to car shows, I always look forward to seeing those one of a kind cars that someone like myself felt inclined to build just because they could. These are the guys who choose not to listen to skeptics and criticisms and the flat out insults when one presents their project to their peers. They just shrug their shoulders and say, "whatever" and build the car anyway, and when the project is done and turns out to be better than what was even visualized, then even the skeptics end up with egg on their face for doubting the ability and creativity of the artist who brought their creation to fruition. 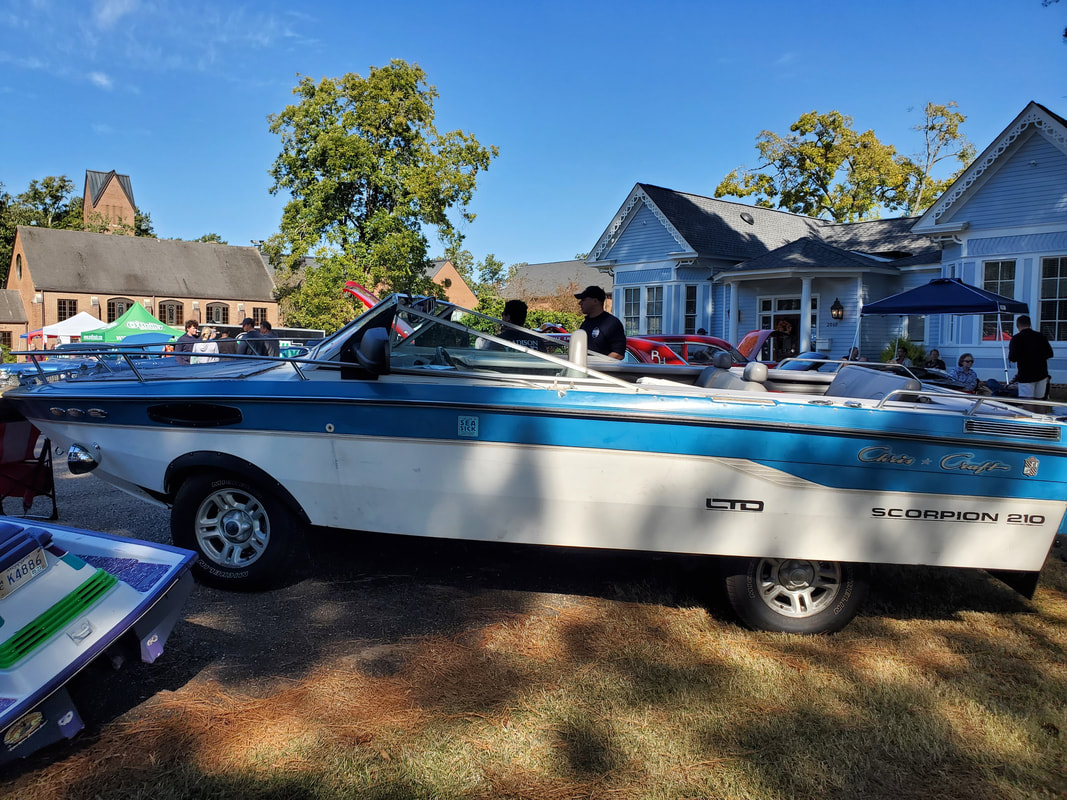 Some enterprising individual managed to take a Ford Expedition chassis and put a boat body over it to make this one of a kind creation. 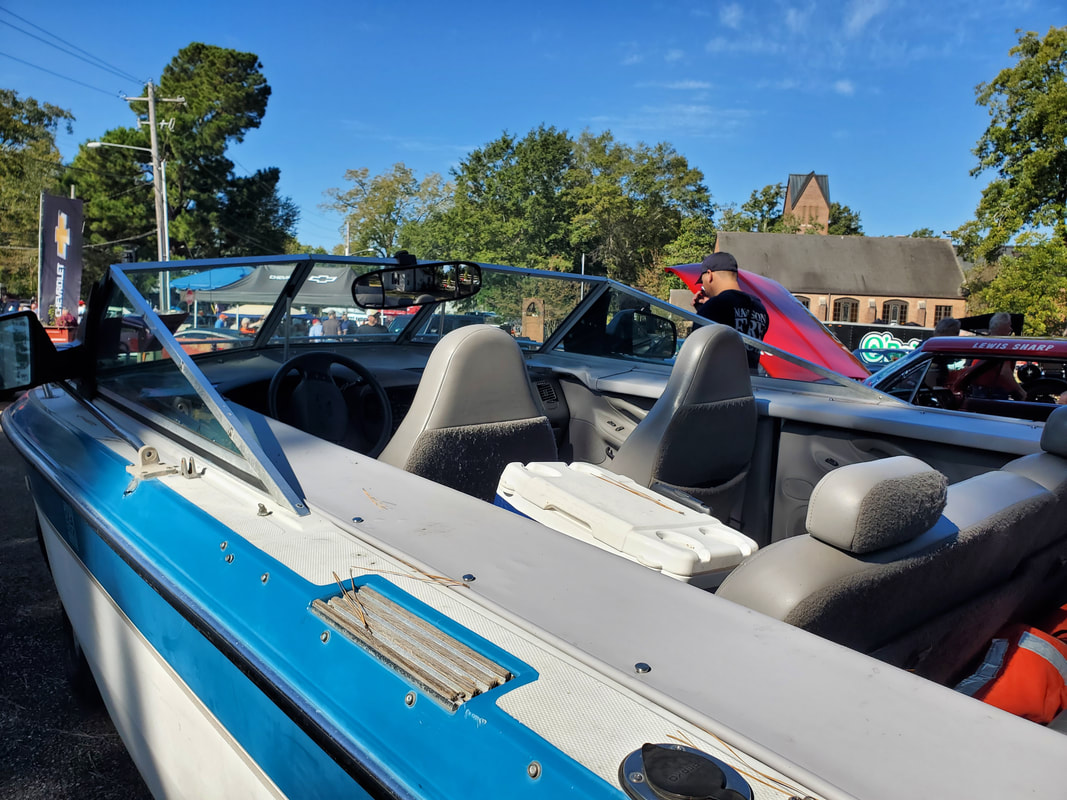 Inside shows the interior of the SUV is totally intact, incuding door panels, etc. What would've been cool is if this thing was made to be amphibious? Possible project idea for TIC maybe?? 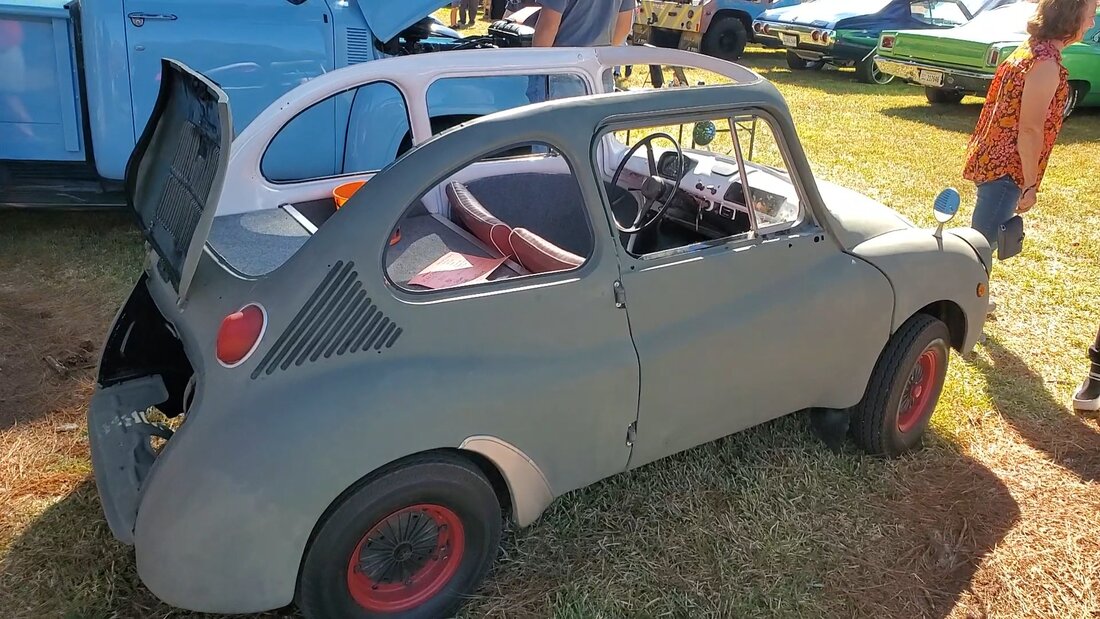 Another enterprising individual took this 67 Subaru and electrified it. This little car would be of the class of cars optimized for electric conversion, as its super light. 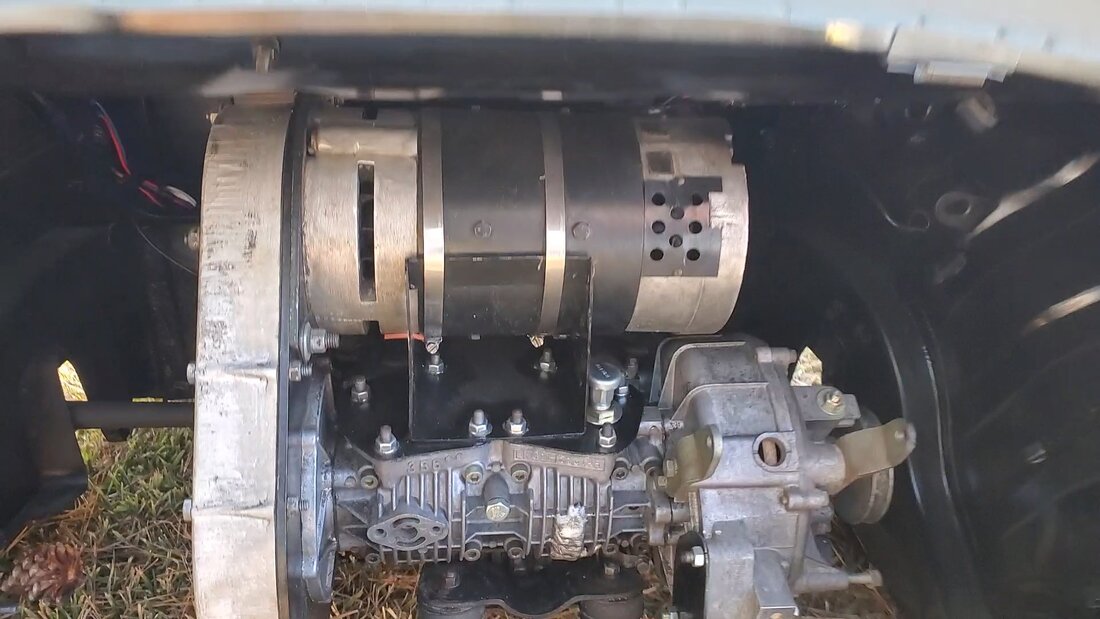 The rear mounted powerplant has an electric motor attached to the gearbox in place of the gas engine. 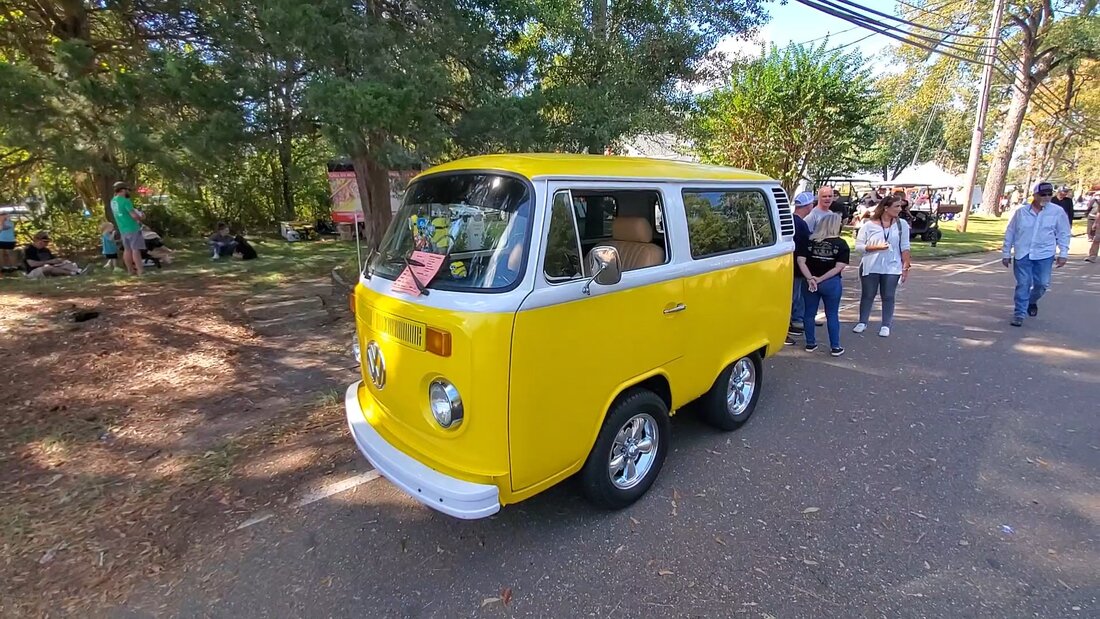 This VW Microbus is definitely micro, after it was chopped down and turned into this funny looking piece. 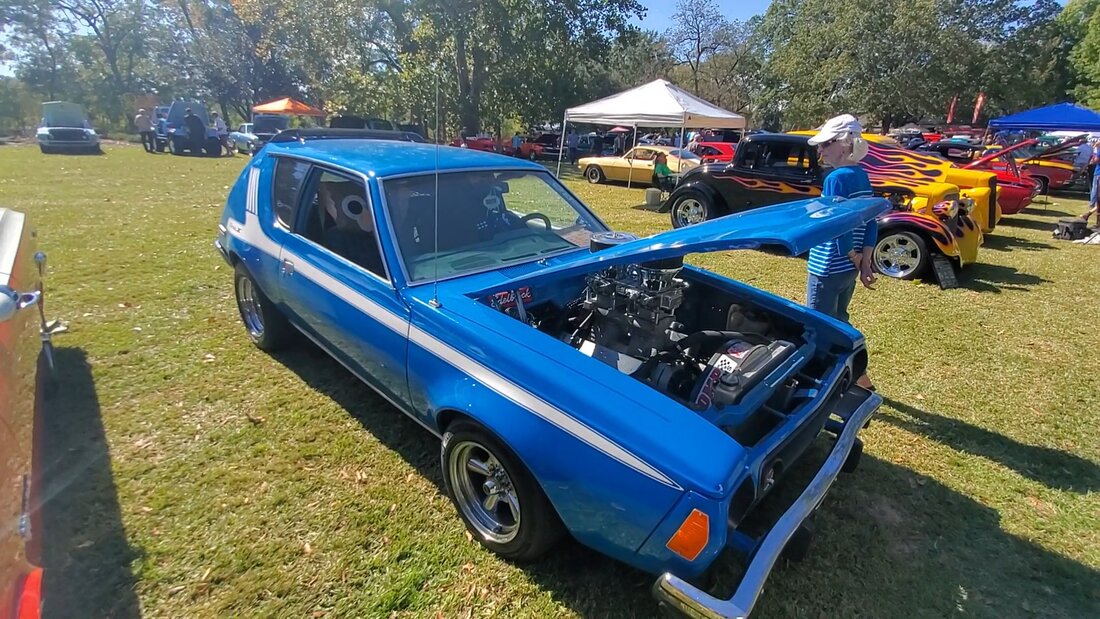 This Gremmie is definitely not skimping on the HP with a BB V8 on board. 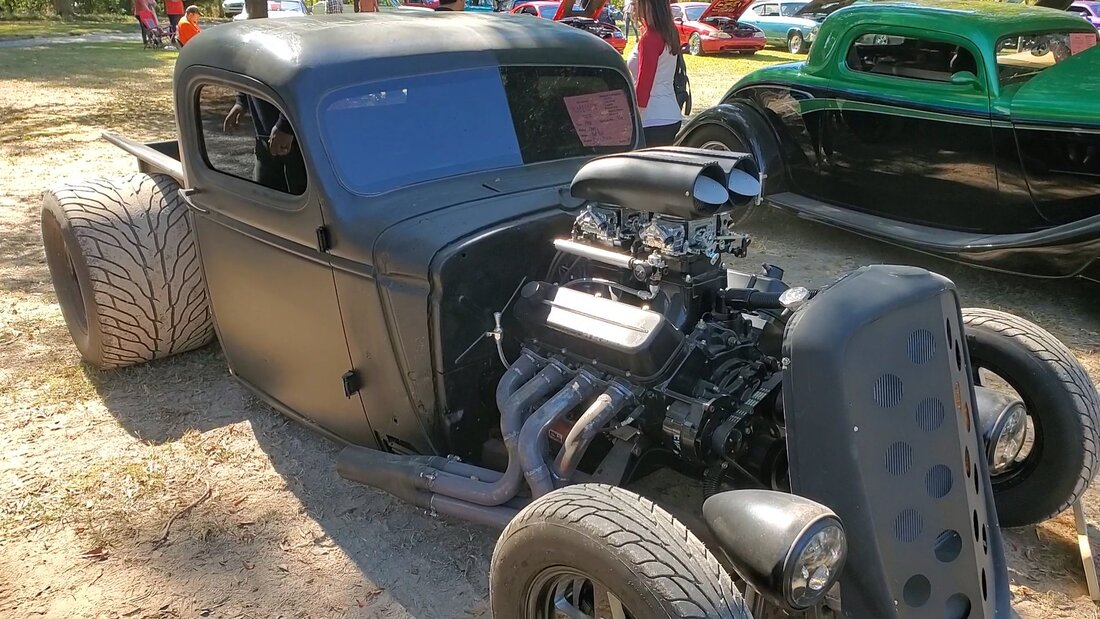 This rat rod definitely falls into a custom category with the car being built from several different parts - body from one car, frame from another, powerplant from another, just make a car from whatever is available. While this car was built to mimic this concept, hotrodders from yesteryear literally threw together a car from whatever was available. 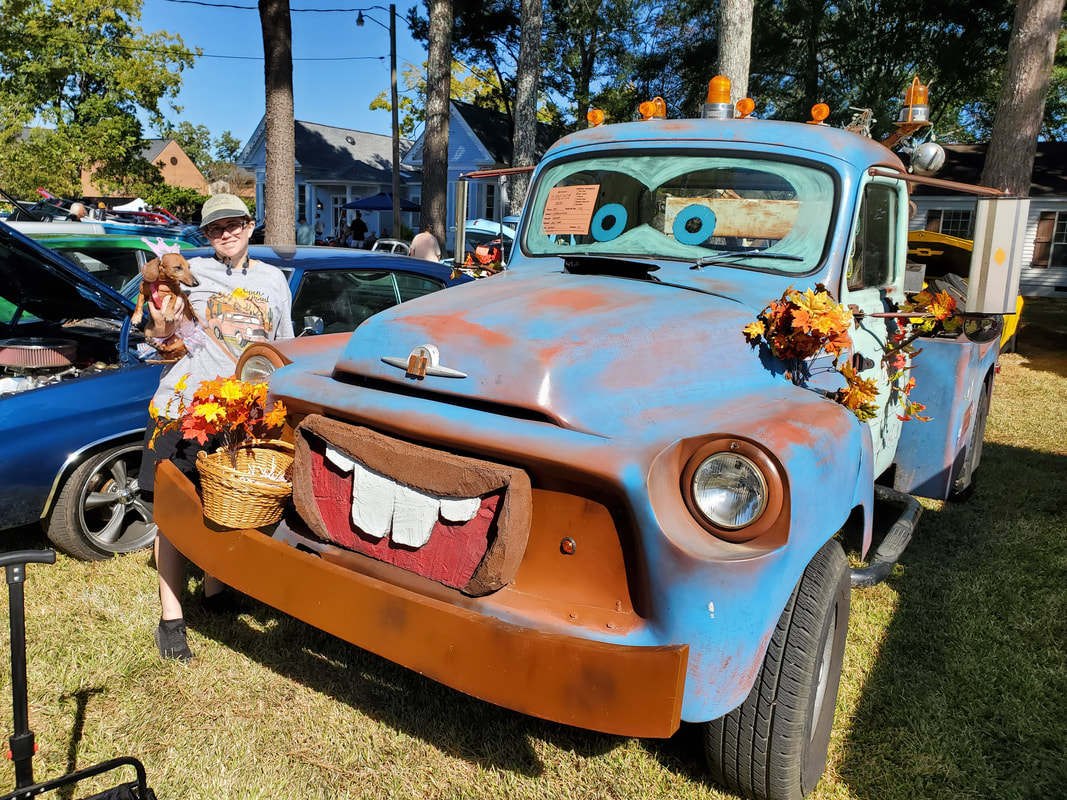 Even this comical cartoon truck took some time to build. Even some critics will question the reason you would "choose" to cut up a "perfectly good classic" to create some oddball Frankenstein car versus just restoring it back to its original glory. These are the people who have no idea what is involved with building a car whether under normal circumstances or under a shoot from the hip mindset. They don't understand the time and money it takes to put new pieces back where old pieces are and get things right where the car will pass the inspection of those who know how these cars go together. Also these are the same people who will write off the same classic car because its too rusted out or is missing too many parts to warrant their time. People can be funny and confusing when it comes to being involved with the automotive hobby. 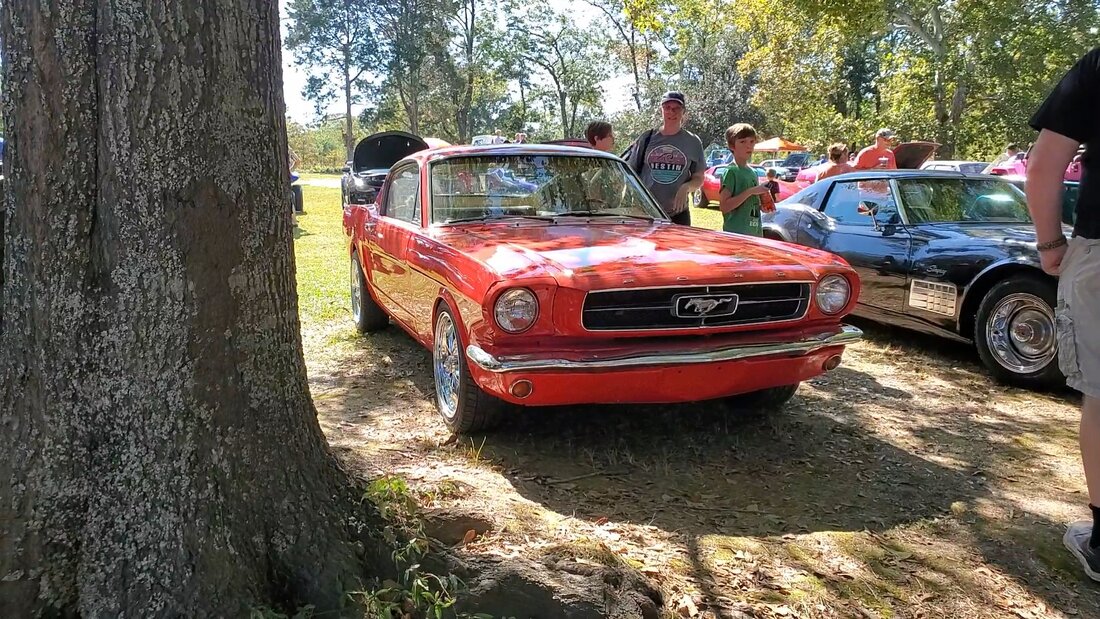 This nice 65 Mustang Fastback immediately puts me in the mind of what the Truckstang used to be 30+ years ago. 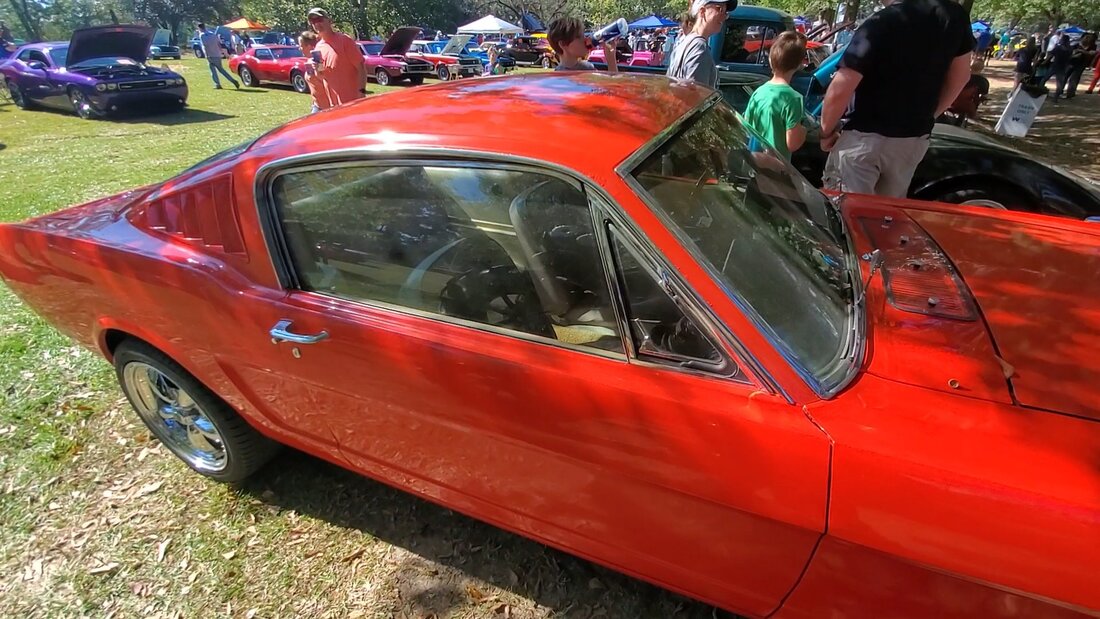 Of course if the Truckstang was kept in a sterile garage environment, it could've been brought back to a condition similar to this specimen but instead it will be reincarnated into an all new creation. 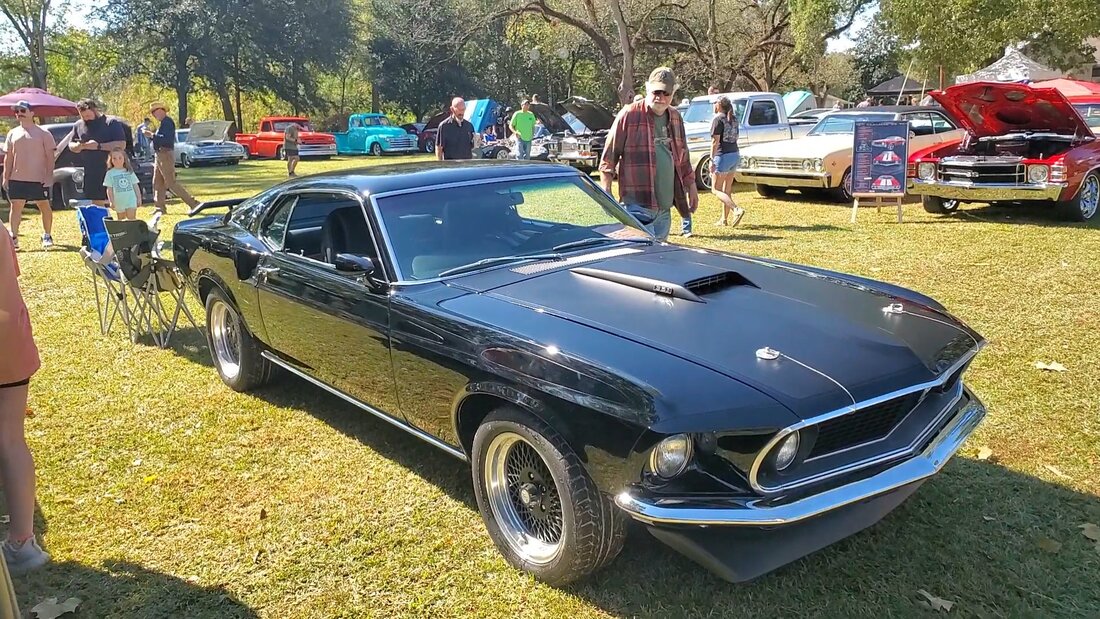 Even this 69 Mustang Fastback immediately puts me in the mind of what the Rustang would've been in an alternate universe where the body was able to be fixed up and the frame wasn't too rusted away to allow its saving. It too will more than likely get the truck frame treatment but will more than likely get some body treatment to make it look like this car, except on a truck frame. 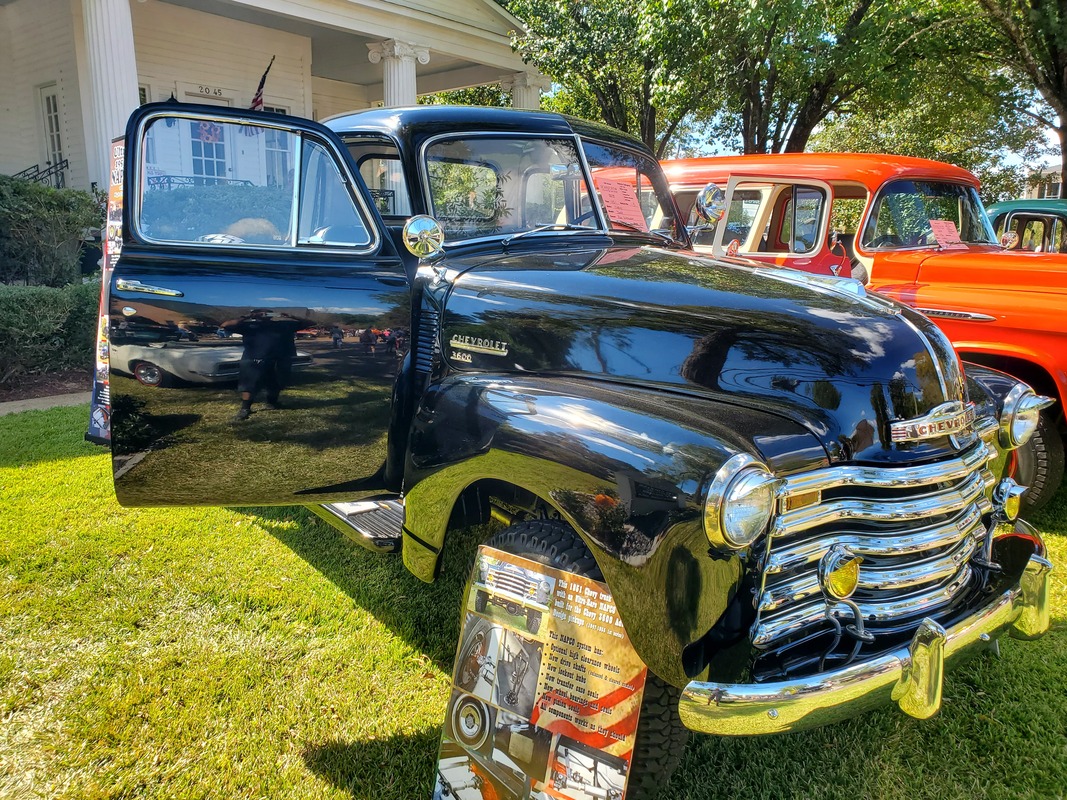 This 51 Chevy truck is a very clean specimen that would make me see the vision of what our 51 Chevy panel truck could become. 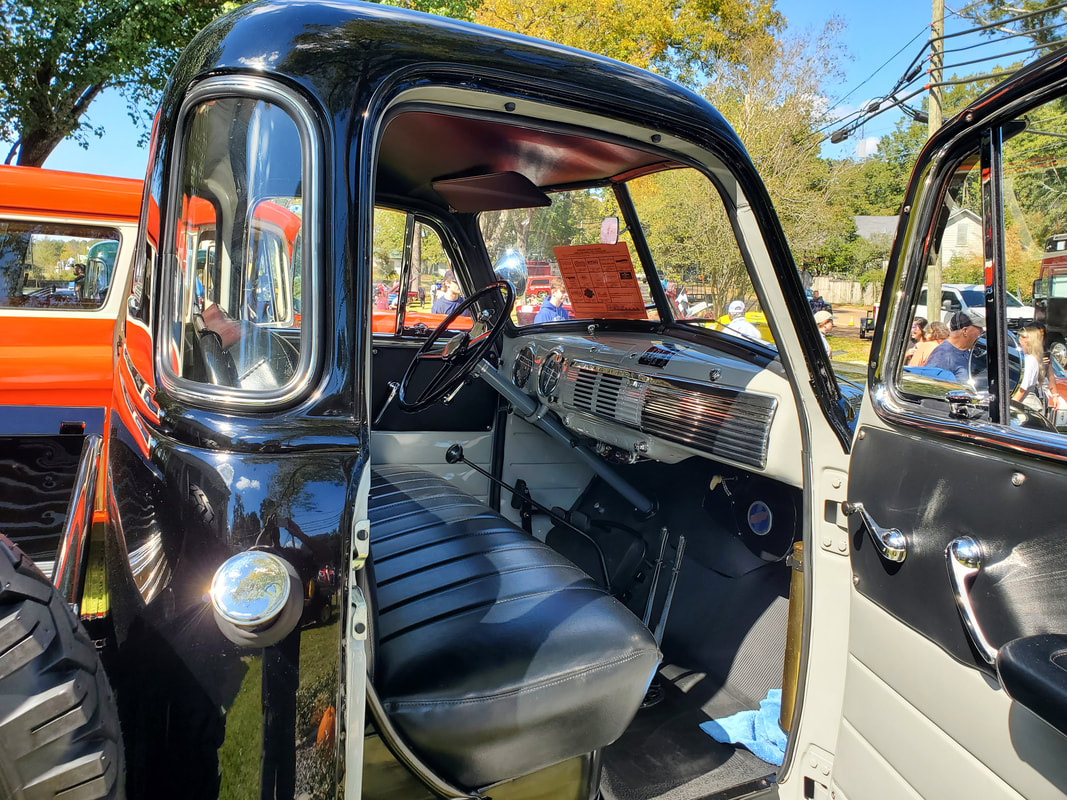 Even the interior of this truck helps give me the motivation to get ready for this build once we complete other vehicles in the queue. 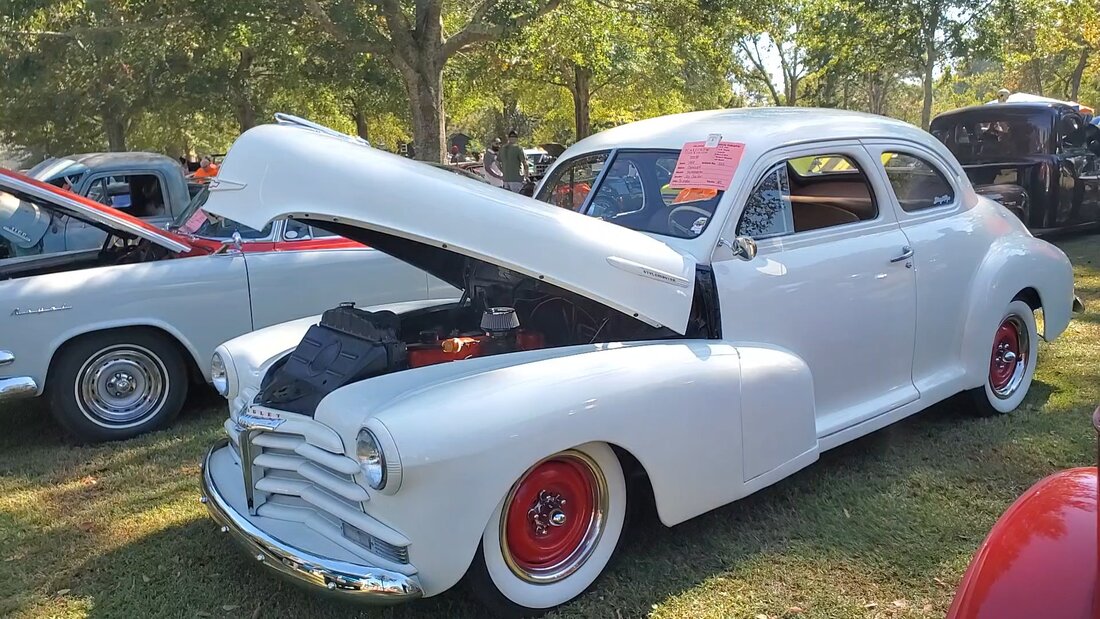 This 40's Chevy helps me see the vision of what I want to make the 46 Ford become when we start work on that build. Along with the one of a kind builds and painstakingly assembled builds at these car shows, its nice being able to see the vehicles one may not typically see every day at a car show. In a sea of Camaros, Chevelles, Chargers, 442's and other Detroit iron, one gets to see cars that even if they don't fall into the antique or "classic" status, they're unique enough to deserve a place at the dinner table in the car world. 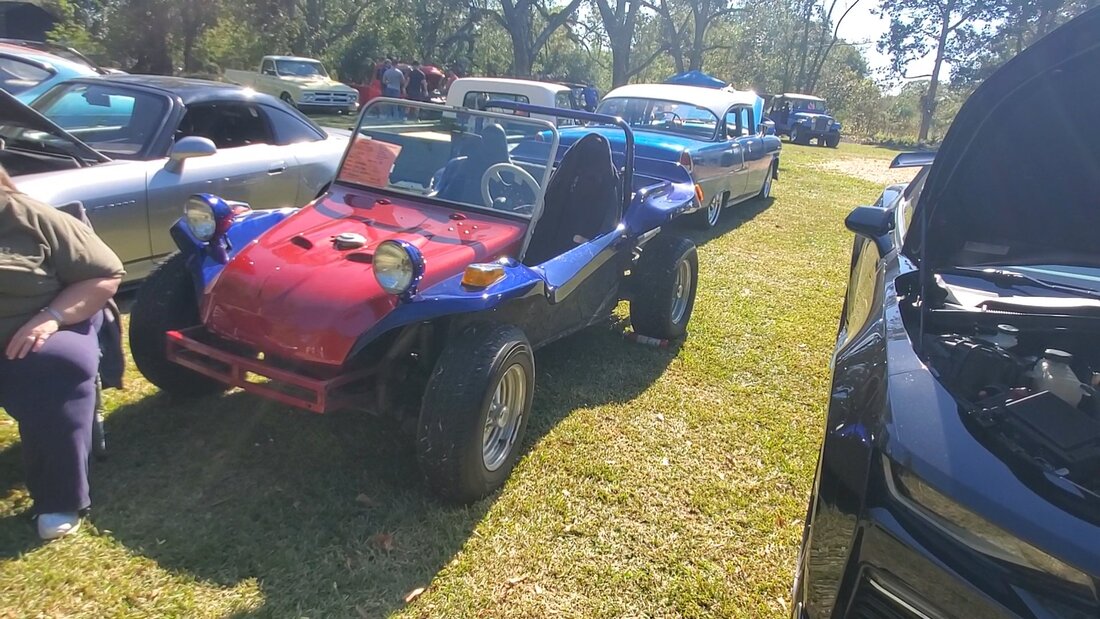 I always loved these VW dune buggies, built on the same chassis as a VW Beetle, nowhere near as ugly but twice as fun. 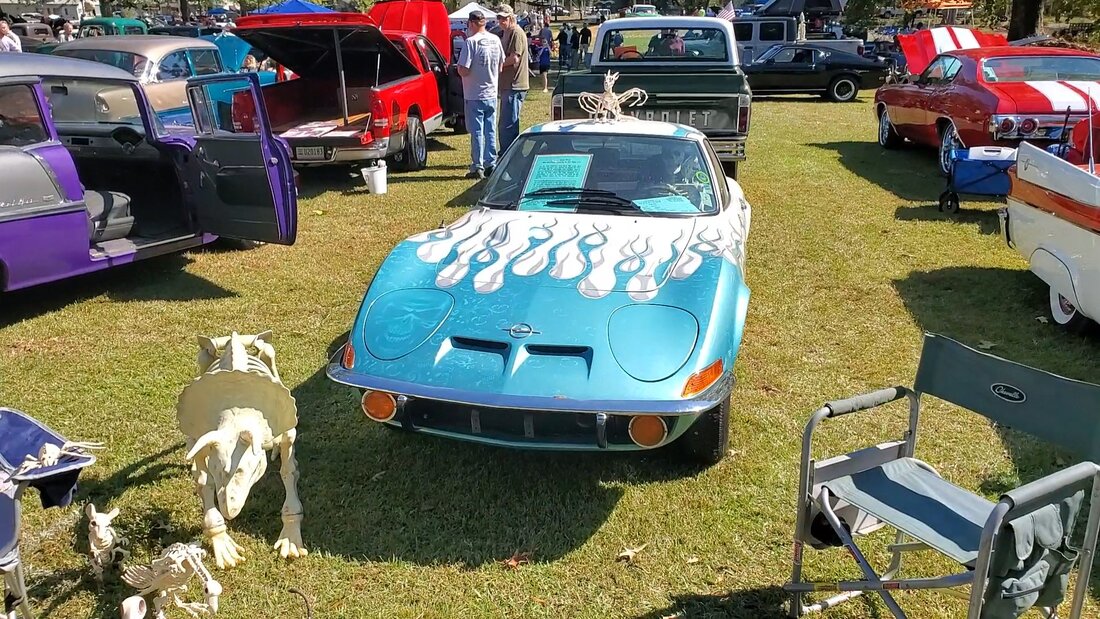 An Opel has always been an intriguing little car with a touch of Corvette with the economy of a Toyota and the agility of a Lotus. 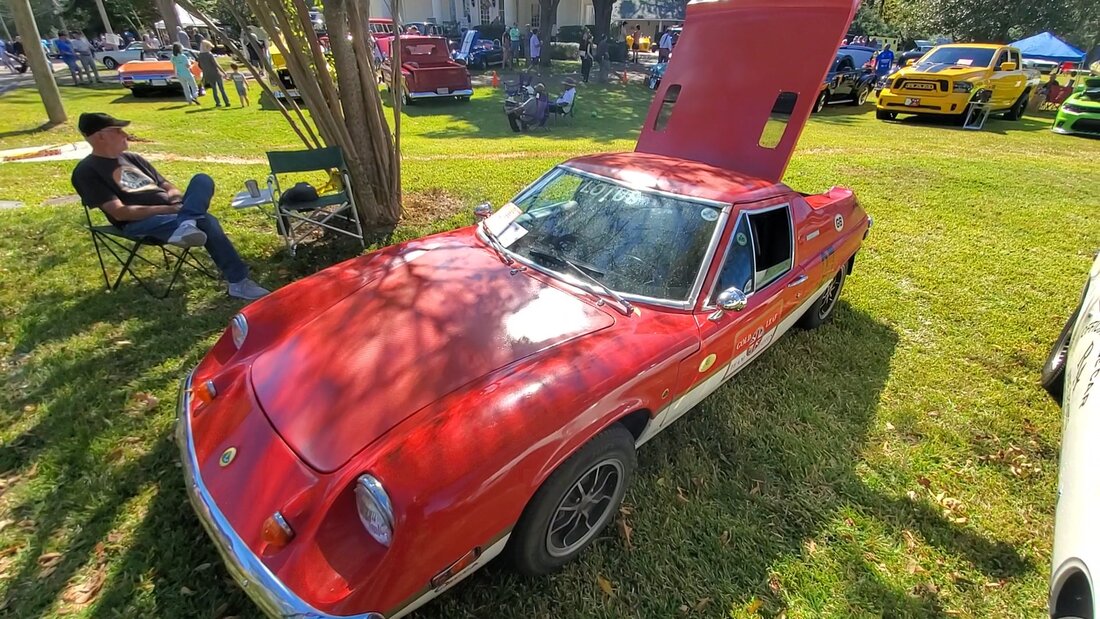 And speaking of a Lotus, to see one is always a treat as these little cars took economy and performance and made a nice little automotive marriage that anyone can enjoy. 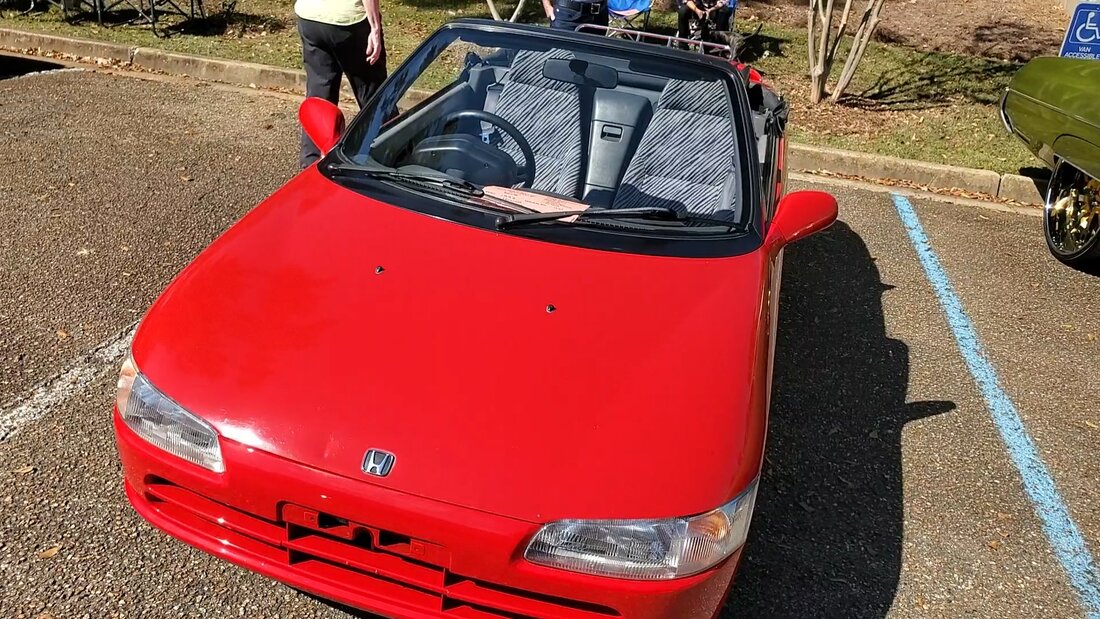 This tiny right hand drive Honda, clearly from overseas also takes economy to the next step with a car that probably weighs as much as a golf cart and gives one a fun little convertible that can take one for many miles without having to fill up. 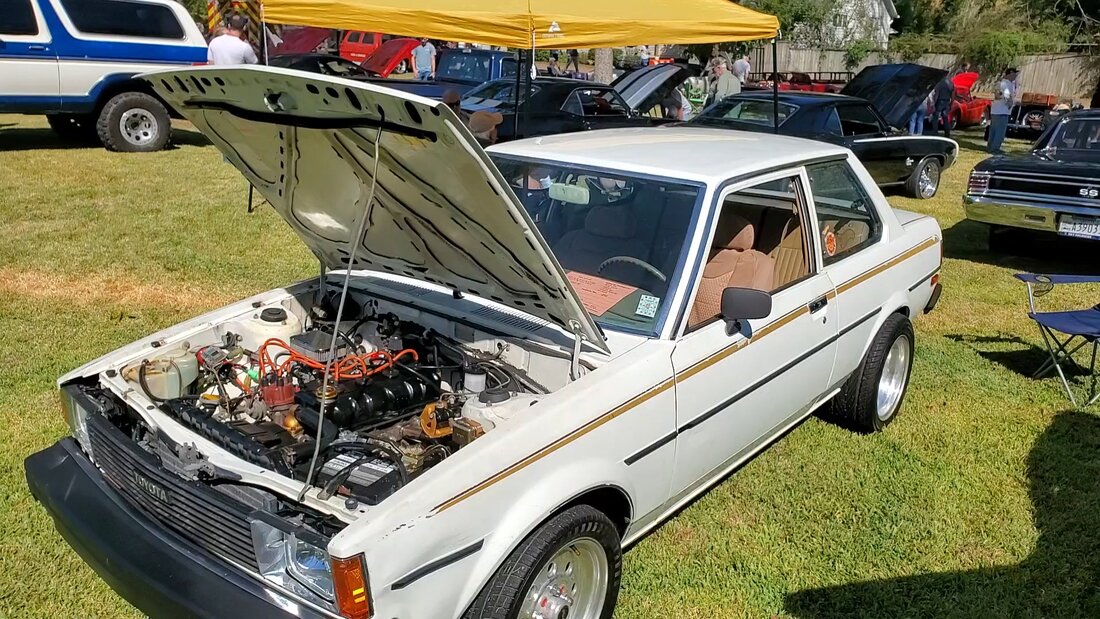 Remember mentioning Toyota economy? These RWD 70's and early 80's Toyotas like this little number would make a fine little addition to any collection or even just be a cool little daily driver that gives one their dose of classico without burning a lot of gas. As was already noted, I have a deep respect for cars that could fall into the daily driver category or are fixed up to the point where they are drivable. Functionality takes precedence over flashy chrome and glossy paint or even interior panels in some cases. Being of the mindset where the owner chooses to be able to enjoy the classic/antique car anytime anywhere under any circumstance allows one to better enjoy the car compared to if the spectre of doom hangs over one's head of whether the paint will get chipped or a door dinged in a parking lot or even a windshield cracked from an errant stone. 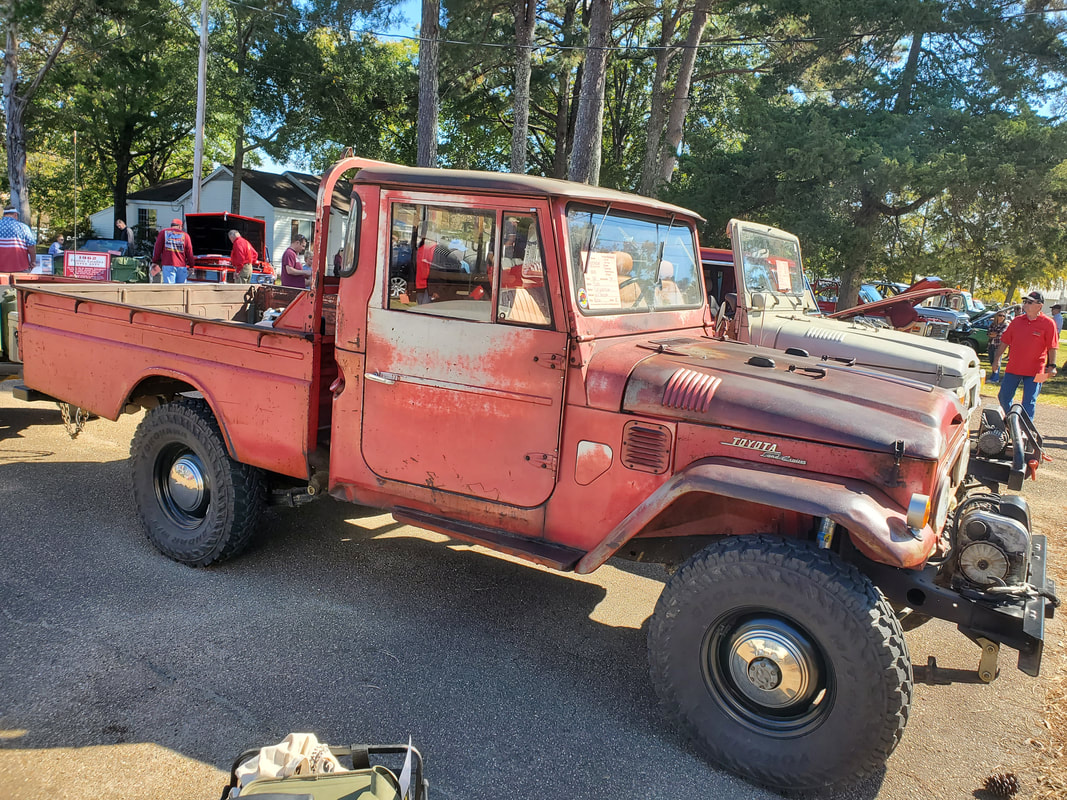 This 70's Toyota Landcruiser is definitely wearing a skin of practicality for the field versus just being a trailer queen. 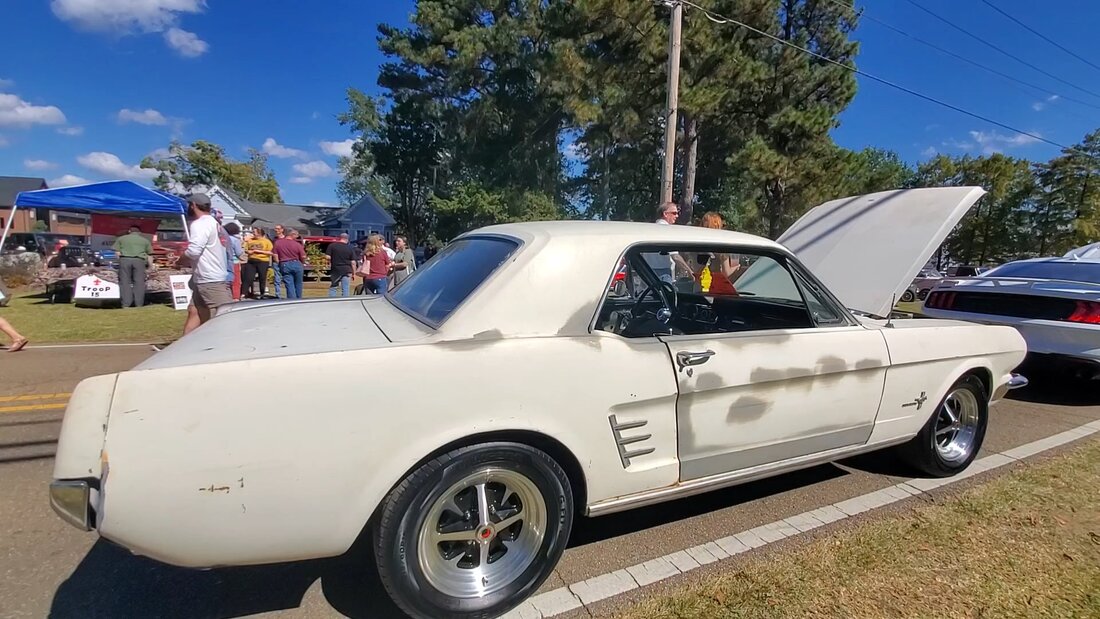 This Mustang coupe is definitely a daily driver that holds my respect with the car being similar to the Rustang in its patina finish. This car even had a door panel missing and a 6 cyl engine on board, just like Rustang. 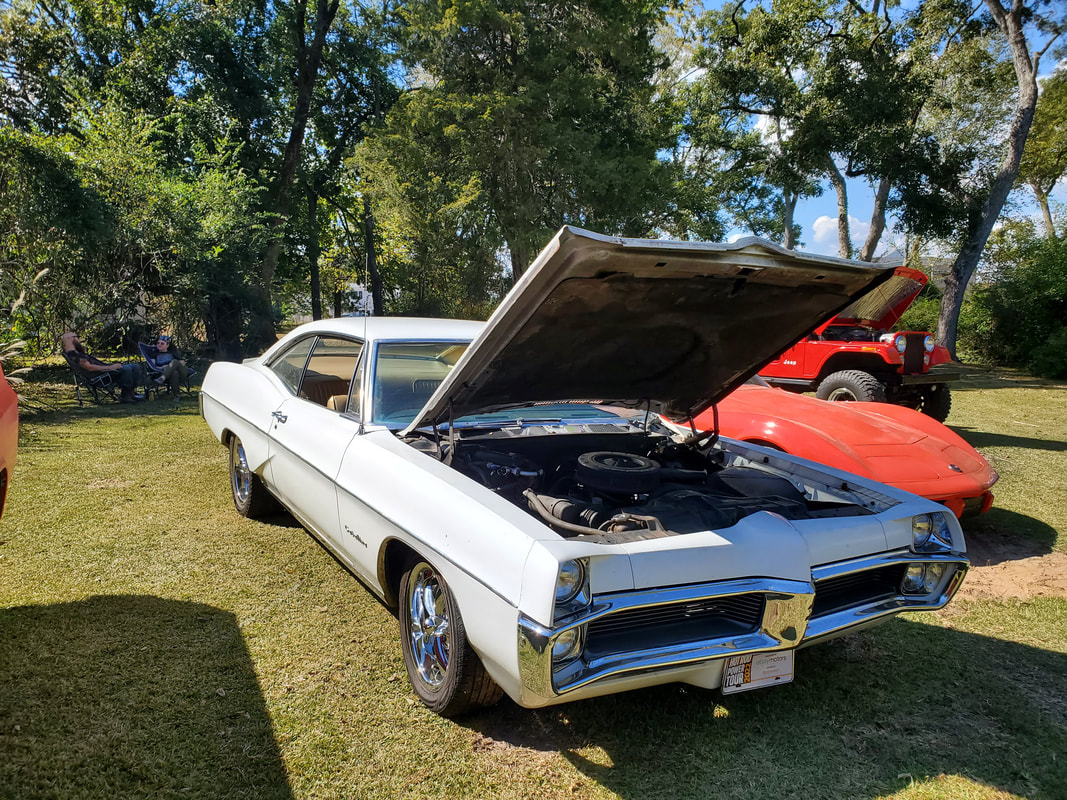 This Pontiac Catalina is on the high end of what could fall into the daily driver category. The car isn't as flashy as others but is cleaner than some of the others that would be considered daily drivers. 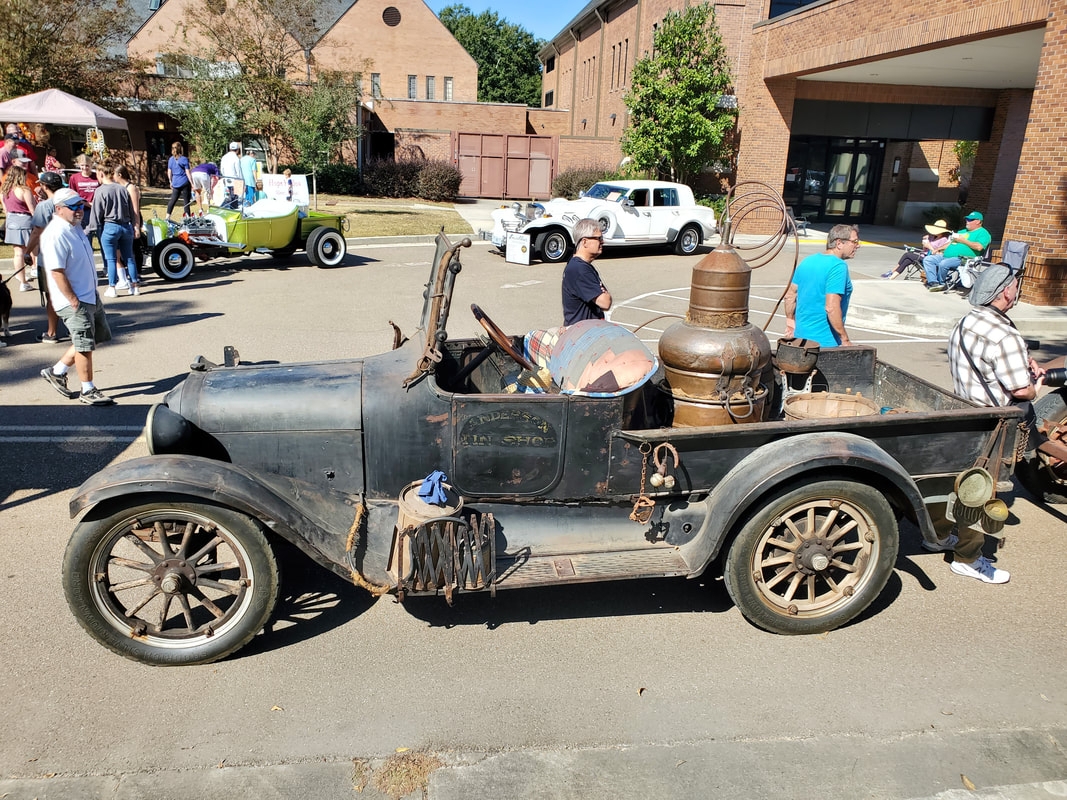 This old car was assembled to mimic an old dusty hillbilly car, complete with the moonshine still. This was in lieu of having shiny paint and chrome and a clean interior like other antique cars at the show. 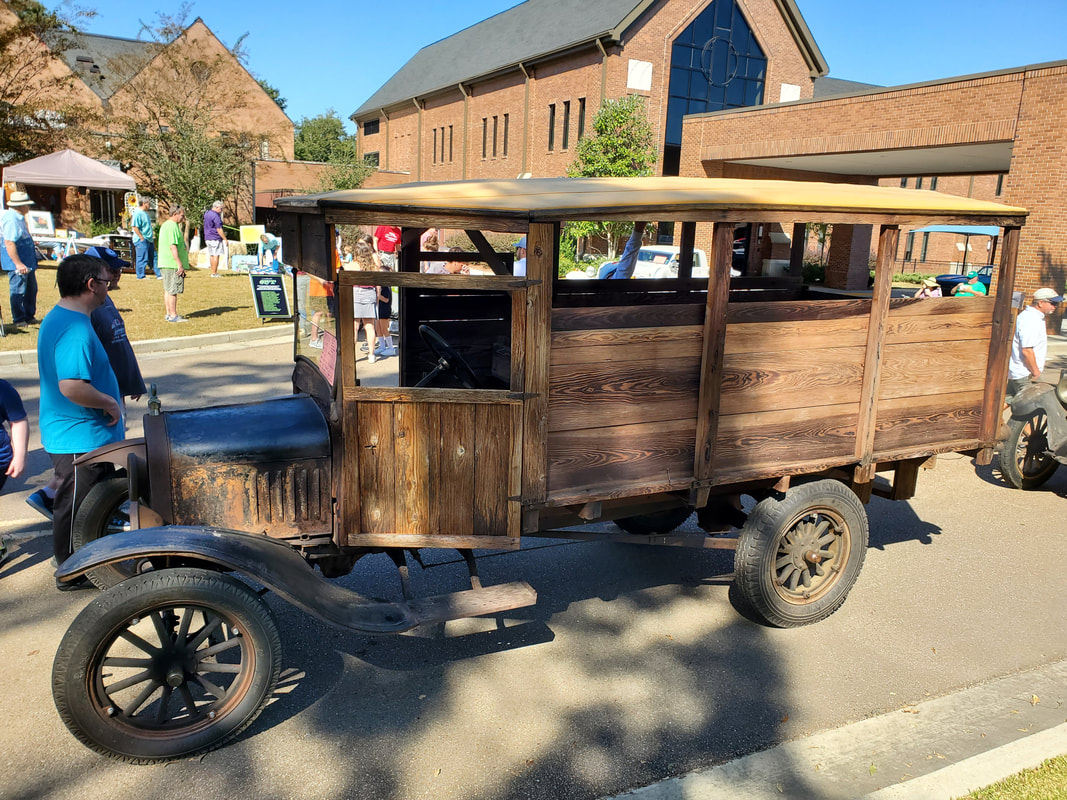 The same goes for this utility wagon, looks like something that would've been around in the 40's after most people would've cast this car aside in exchange for a "newer" model. 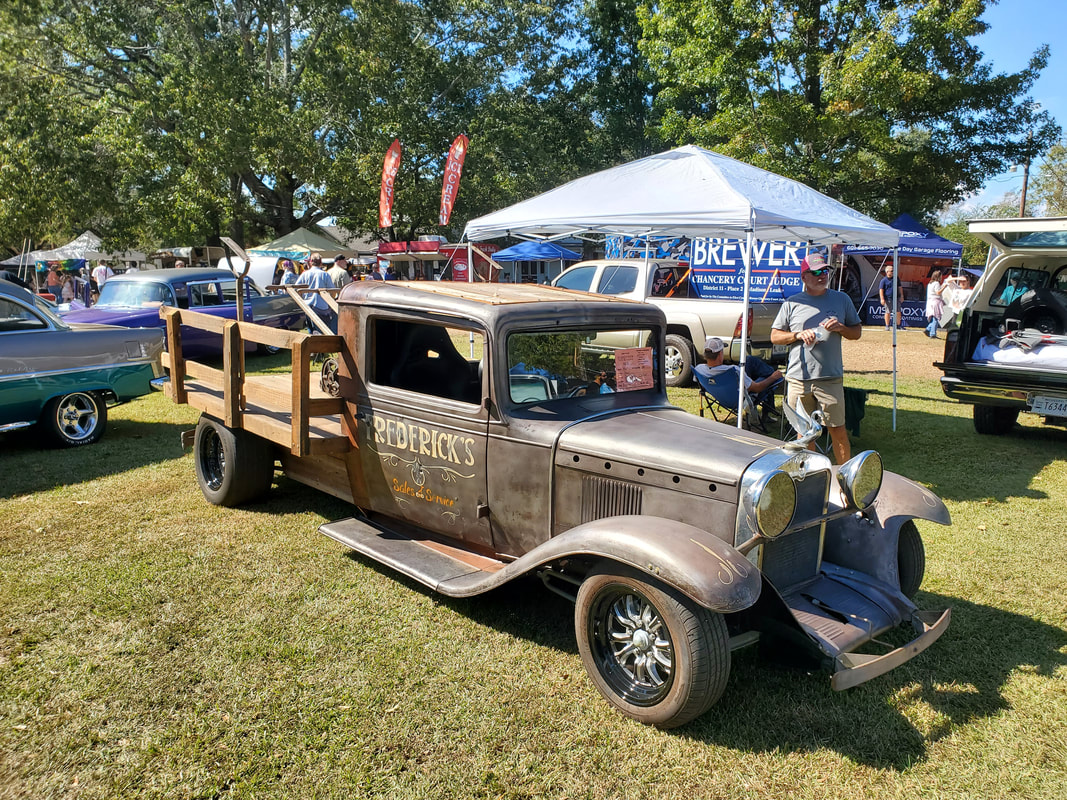 This 20's or 30's utility truck looks just like one from the 40's or 50's, a 20+ year old truck used by a small business in a small town, enough to get the job done, not flashy and new but practical. 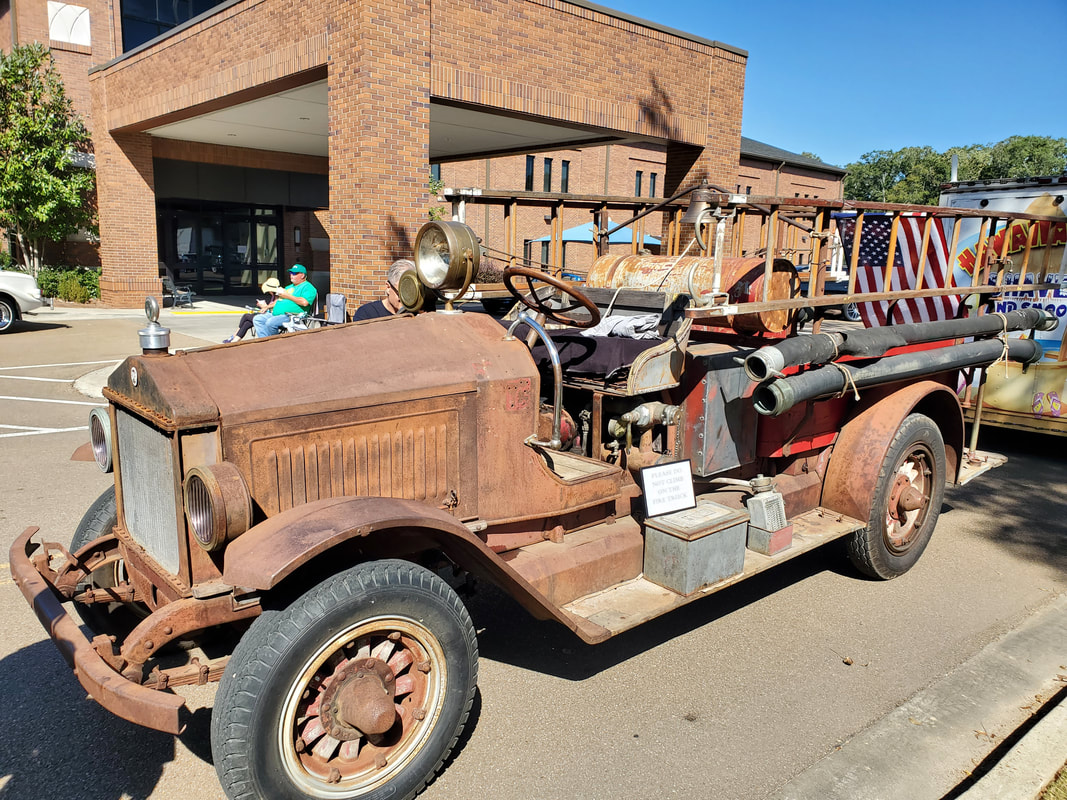 This old fire truck looks like something one would pick up an a state auction to turn into a utility truck for roofers or another trade where those ladders and carrying capacity would come in handy. Not to discredit the nicely restored classics we're all used to seeing at any car show, we had to pick some nice specimens that we like, due to what they are. Of course certain cars tend to be more prolific than others, with multiples of the same car littering the grounds. Of course these cars to their owners are a focal point of their hobbies as they put all their time and money into bringing them to fruition. 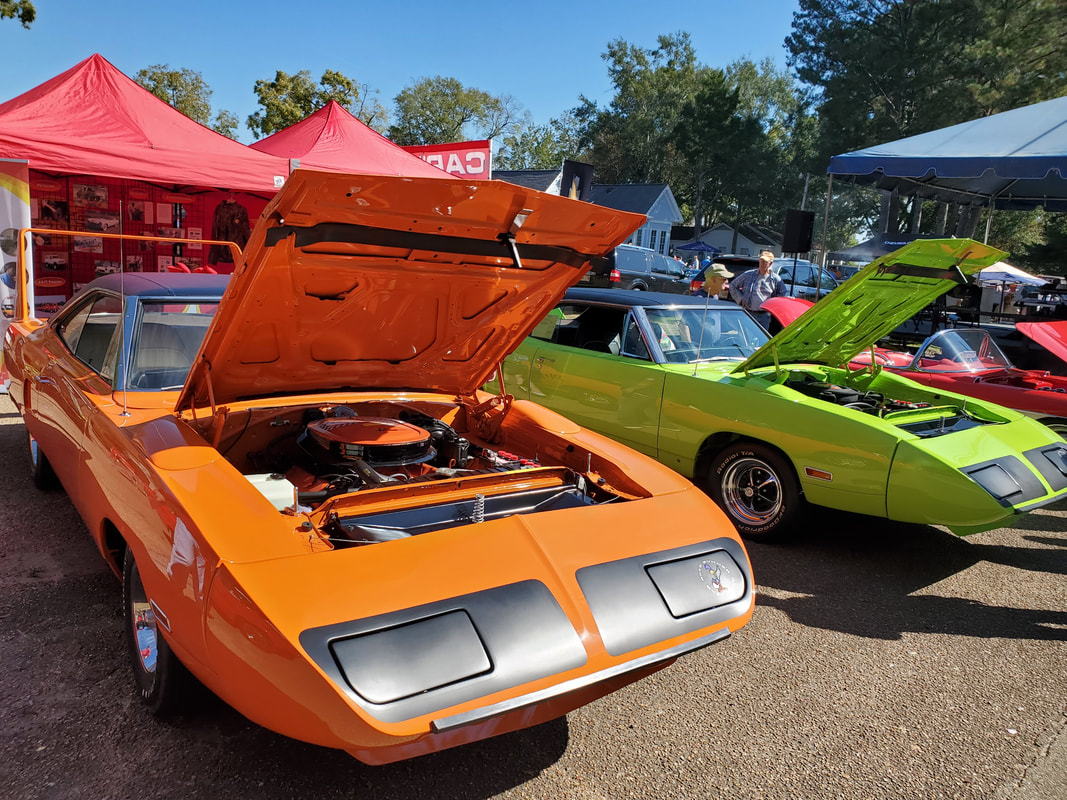 These Superbirds always get my attention as they are the Holy Grail of team Mopar. 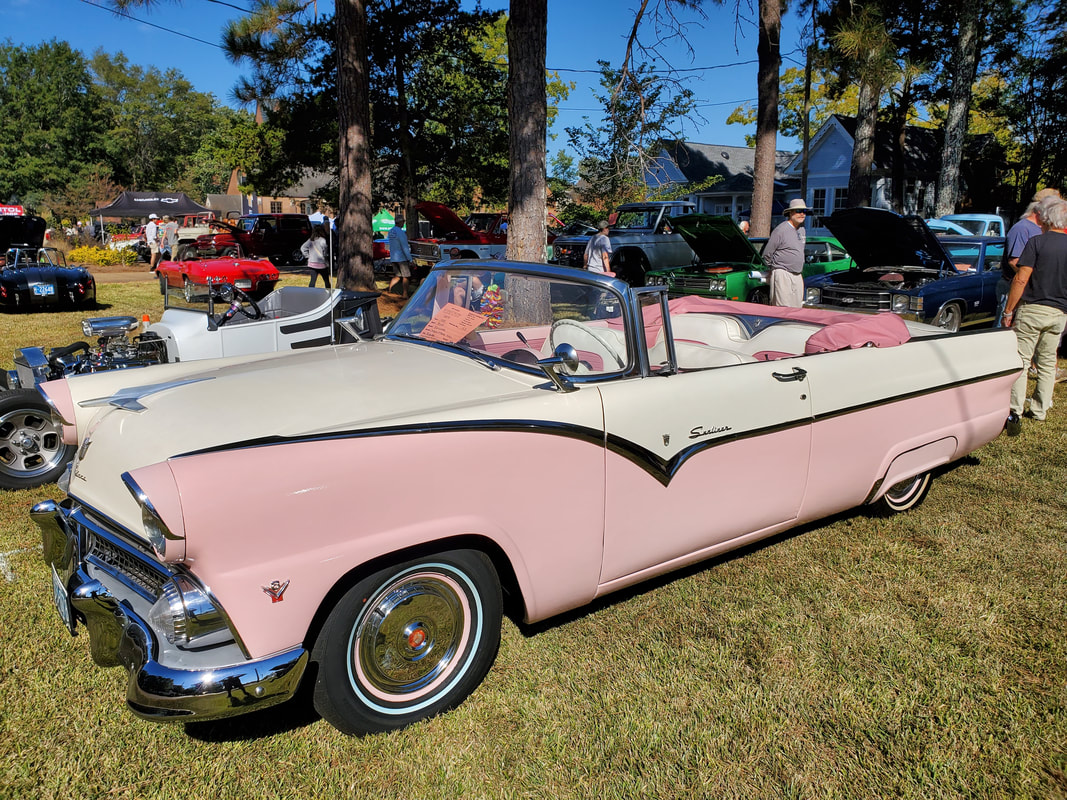 This Ford Sunliner is flashy and has a paint finish that would be similar to what was used back then, not super glossy but definitely not dull. 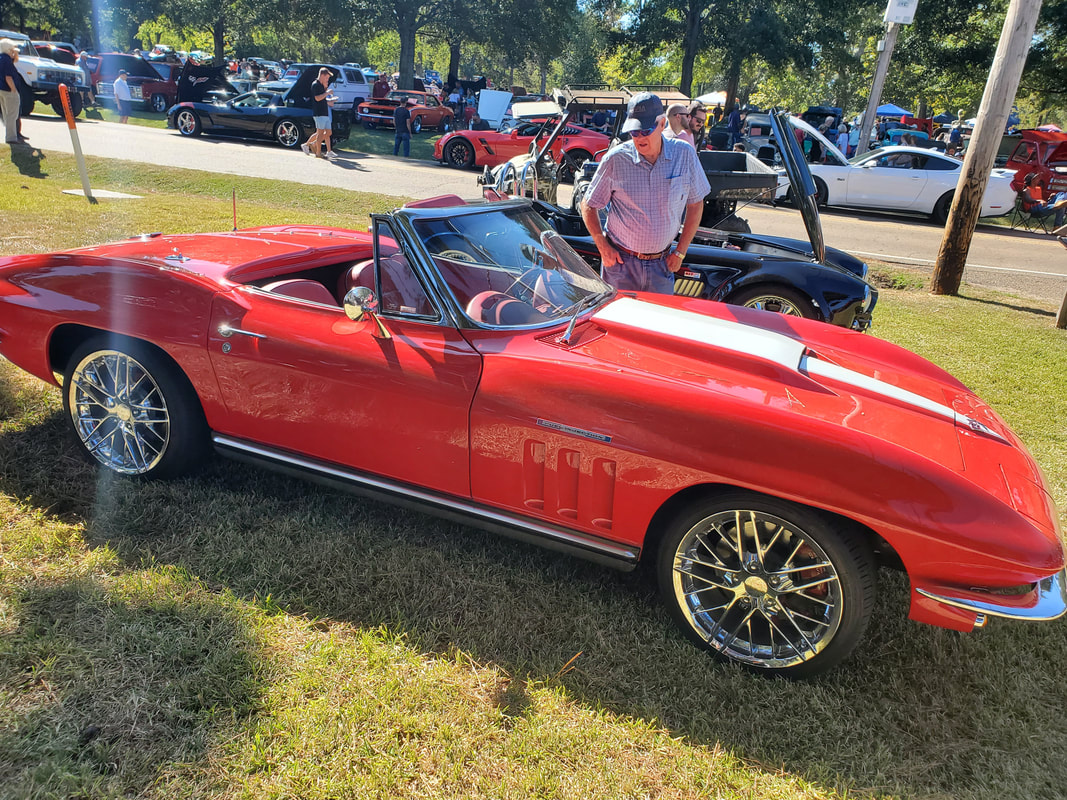 This old Vette is all dressed for bling.  Another flashy specimen - 1935 Ford Cabriolet. 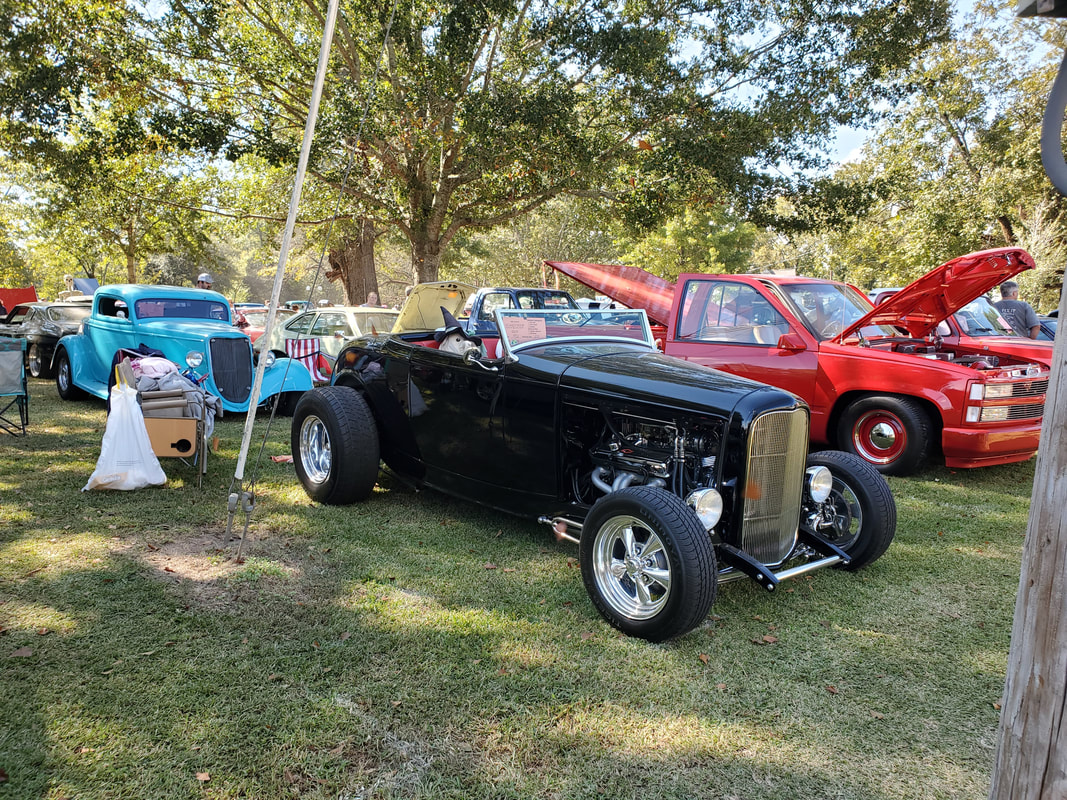 This hot rod coupe puts you in the mind of Grease. 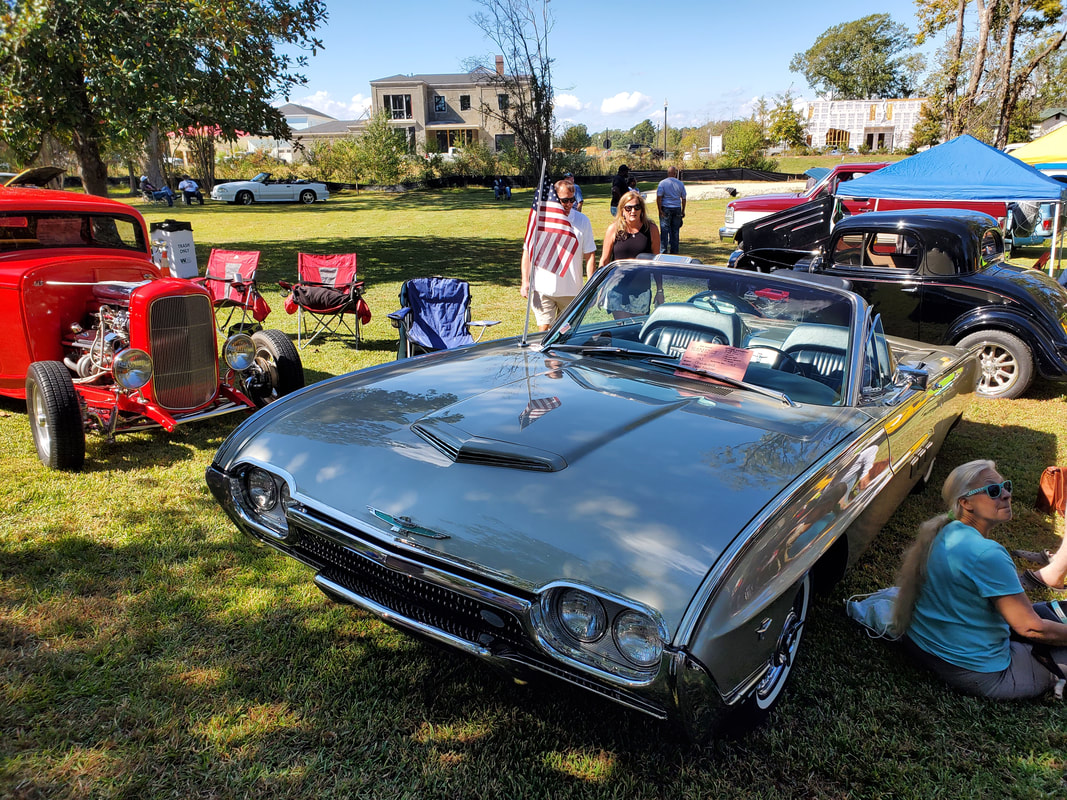 This T-Bird convertible has a lot of chrome and shine to catch one's eye. 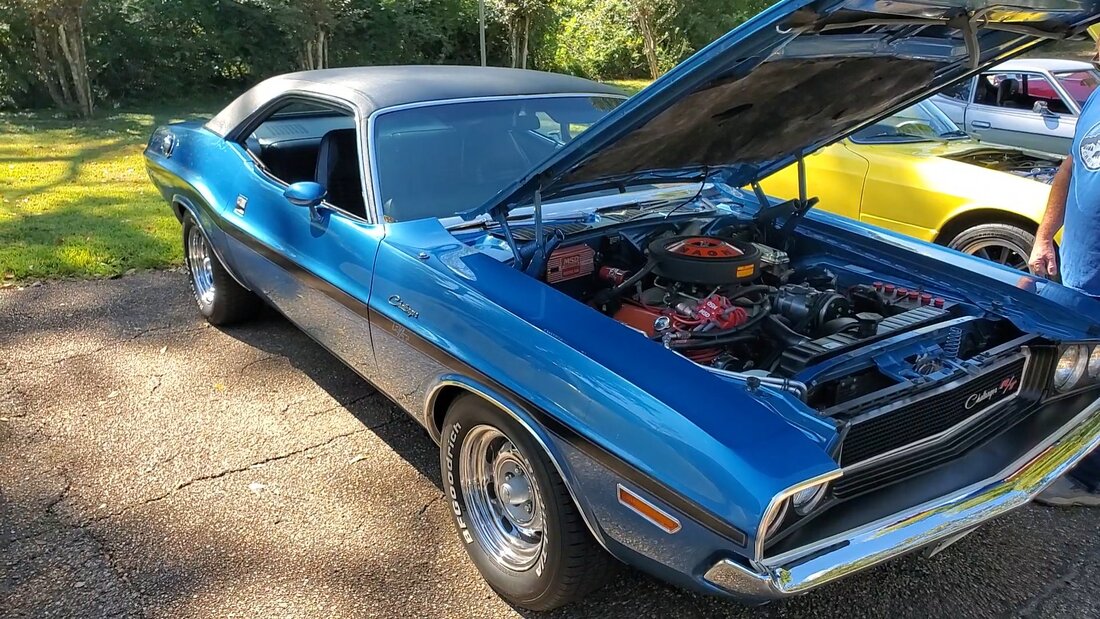 Team Mopar all the way! Gotta love this nice Challenger! 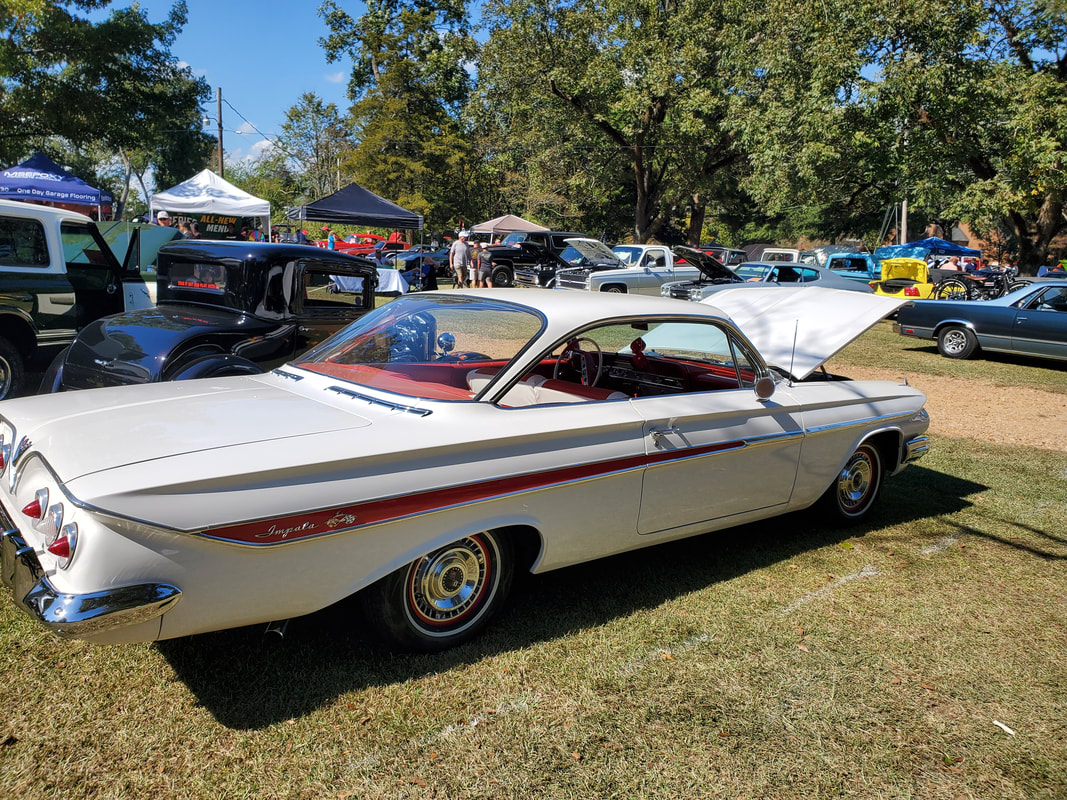 This battleship of an Impala can really hold some junk in the trunk! 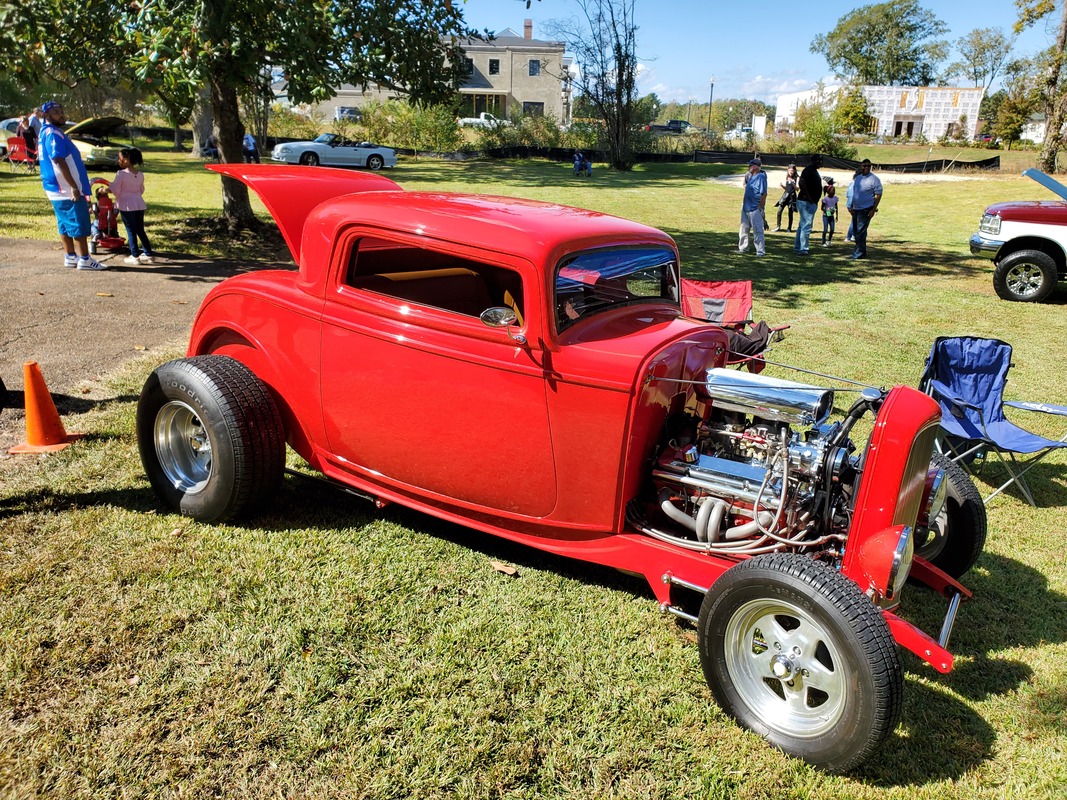 Another cool hotrod coupe with a little off the top. Again, the cool thing about these car shows is that there is something for everybody to enjoy. There's the typical muscle car, there's the classic pre-war automobile, the modern limited production piece, the custom hot rod or just custom whatever, you name it you can typically find it at a car show. Car shows always serve as a means to motivate us to further complete our own projects, even if we never plan on showing our creations off in a car show. So, until then, it's back to work so we can get our own classics on the road. With most of the interior assembled, I've come to the point where I have to work on some of the more annoying aspects of the interior job. That would be the dash and the seats. First the seats. One seat needed all the studs replaced and the other just needed one stud replaced. In order to do this, I ground around the edges of the stud base which allowed me to tap out the base with a hammer. This left a square hole where the stud base was on each end of the seat tracks. I used regular 5/16" bolts that I welded around the necks of each bolt to make new mounting studs for the seats. I ground around the necks to smooth out the welding slag but since the holes in the seat mount panels are slightly wider than the studs, the little bit of weld slag won't keep the seats from sitting flush with those panels. The other thing that needed to be addressed is cleaning the seats. Since these seats sat for 15+ years, accumulating grime and dirt, these once off-white seats weren't exactly that color anymore. I took the time to scrub the seats with some household cleaner and a rag then hosed them down to get as much dirt as I could from the seat material. From there I decided to make an attempt to try and paint the seats with the same paint I used for the other interior panels.  The square hole left after grinding around and tapping out the broken stud bases.  Seat tracks showing the welded on bolts that are now the mounting studs, note the weld slag around the necks of the bolts. 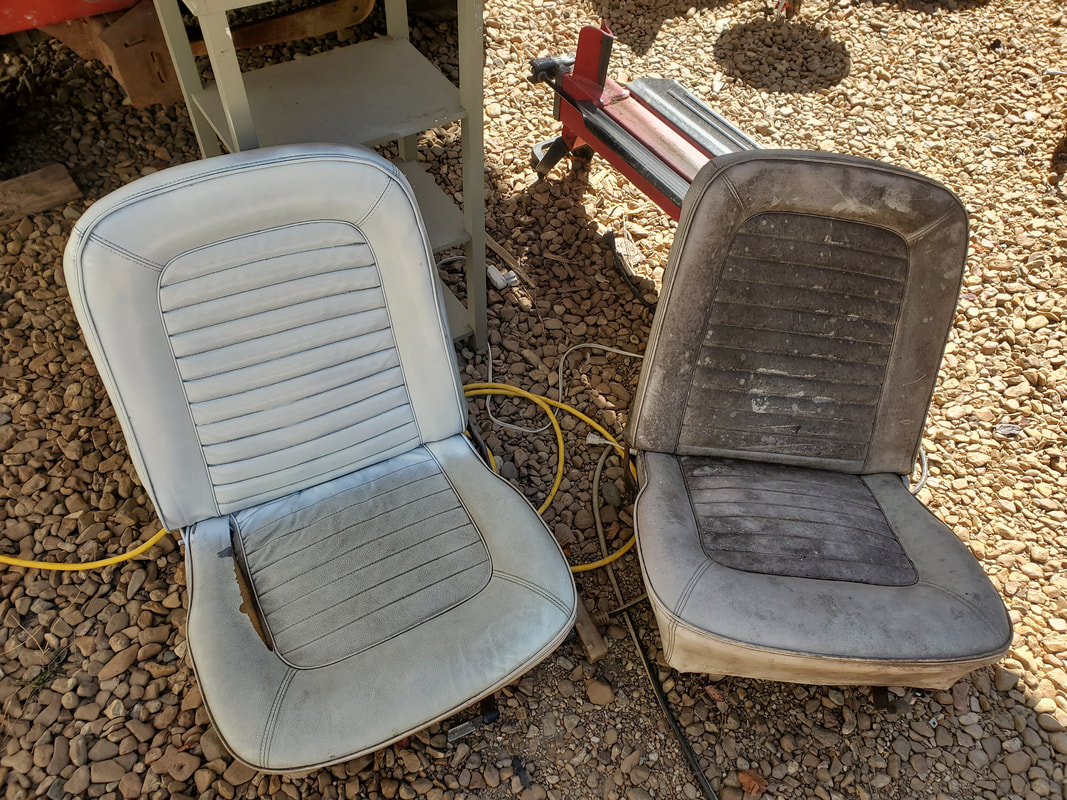 Pair of seats after welding stud bolts in place. Note the dirt on the right seat and the cleaned surface of the left seat, which is also partially painted. I ran out of paint but will be getting more to finish the seats. Also I'll need the paint to take care of the dash, which is the next thing I'm getting to. I ended up having to remove the different switches and HVAC panel around the driver's side dash, along with the glove box door. Once I removed all these switches, which I had to take a minute to figure out how they came apart in order to remove, I sanded down the surface of the dash in preparation to spray that surface down when I get more paint. 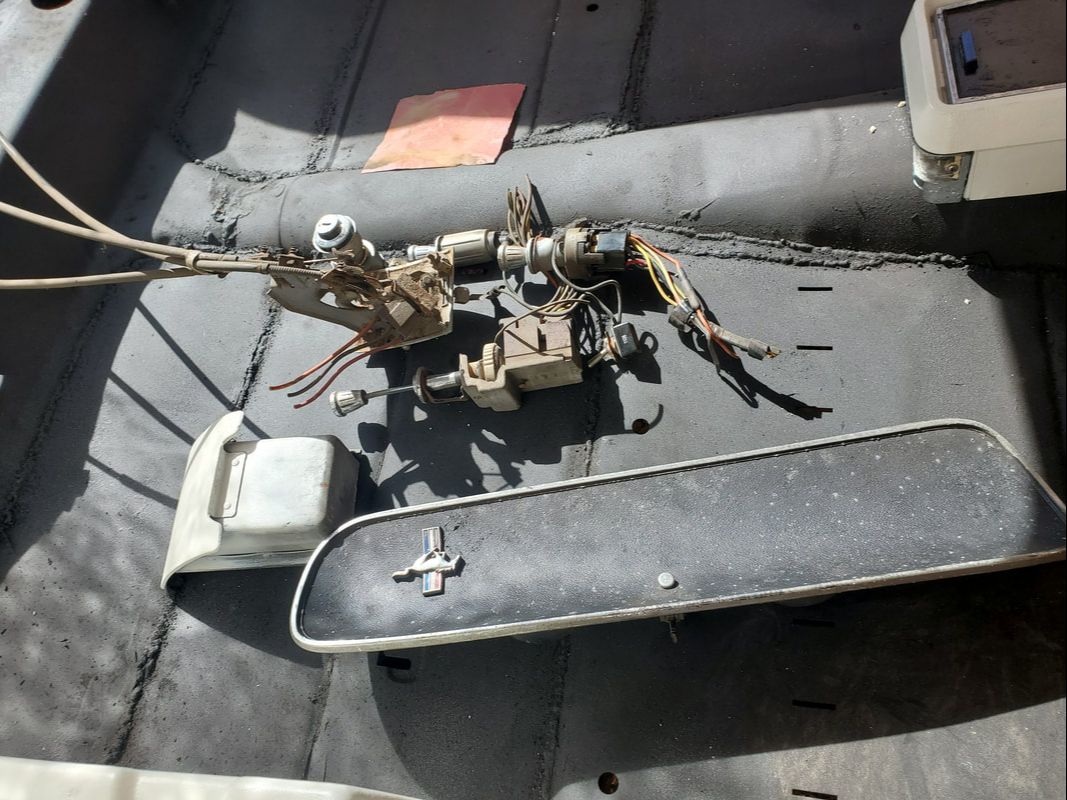 The switches, HVAC control panel and glove box after removing from the dash. 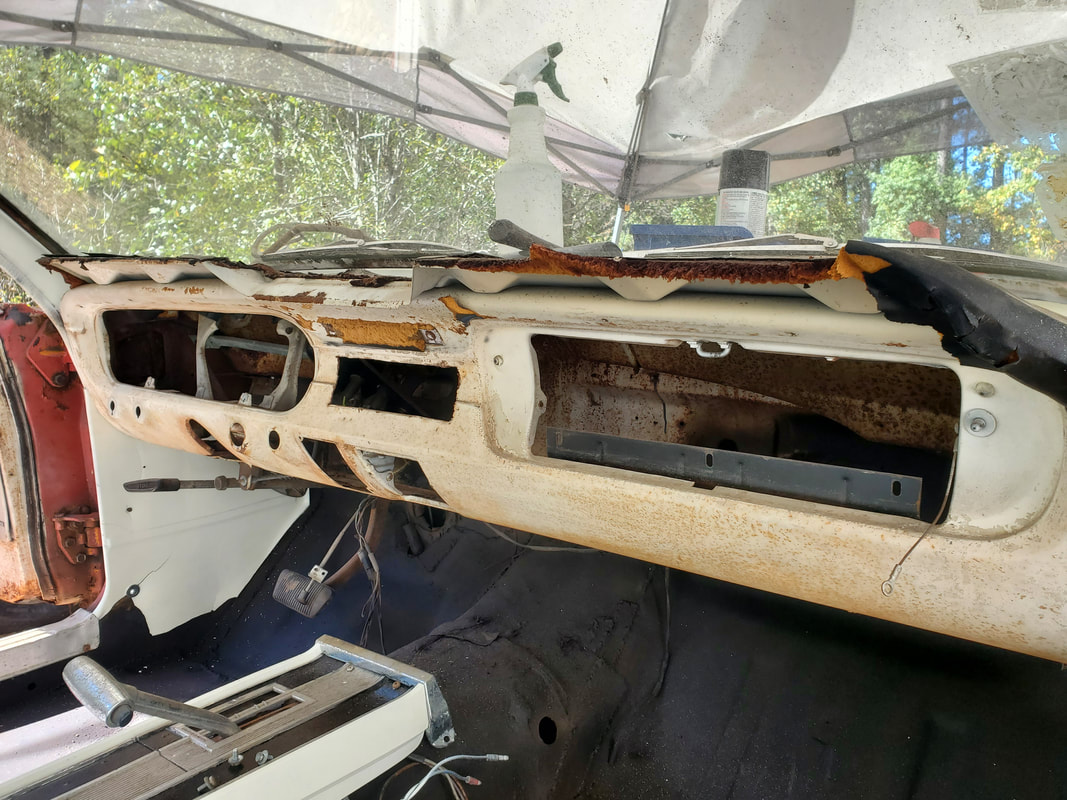 The dash after removing everything. Sanding and spraying will obviously be a lot easier. Once everything is sprayed down, seats included, I can finish up the assembly of the interior. I'll still have to stage the gauge panel and HVAC box in and behind the dash so they can be rewired when I get to that phase, also just to get those parts out of the way. The only other thing left to do will be to sand the doors, even though they're rusty along with the door panels, and spray them down to finish up the interior in its entirety. The time has fully come to start making the Truckstang's interior whole again. With the floors covered and the greater interior covered, I can start bolting up the fully covered panels. I started in the rear with the two rear seat side panels, then moving up to the panels that go directly above them. From there I installed the corner pieces, following with the trim moldings that cover the seams between the larger pieces. Funny thing is, I ended up with two trim moldings that I can't quite pinpoint where they're supposed to go yet. I tried fitting them up to all the known areas I can see that look like they would accept some kind of trim and these pieces don't seem to fit anywhere. Hopefully I'll figure out where these pieces go before I end up just setting them aside, never to install them at all. In the meantime the rear most section is assembled, sans speaker panel. 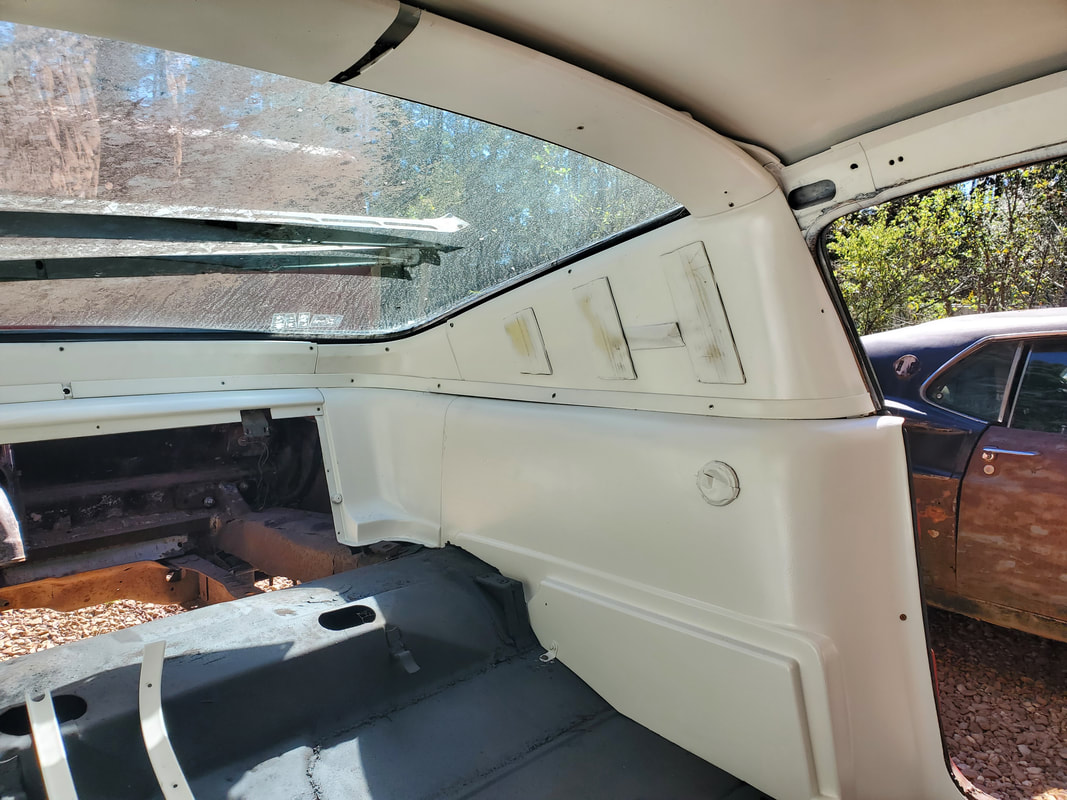 Left side rear seat panel and upper panel installed. Note the masking tape still on the light on the lower panel and the tap on the upper panel. 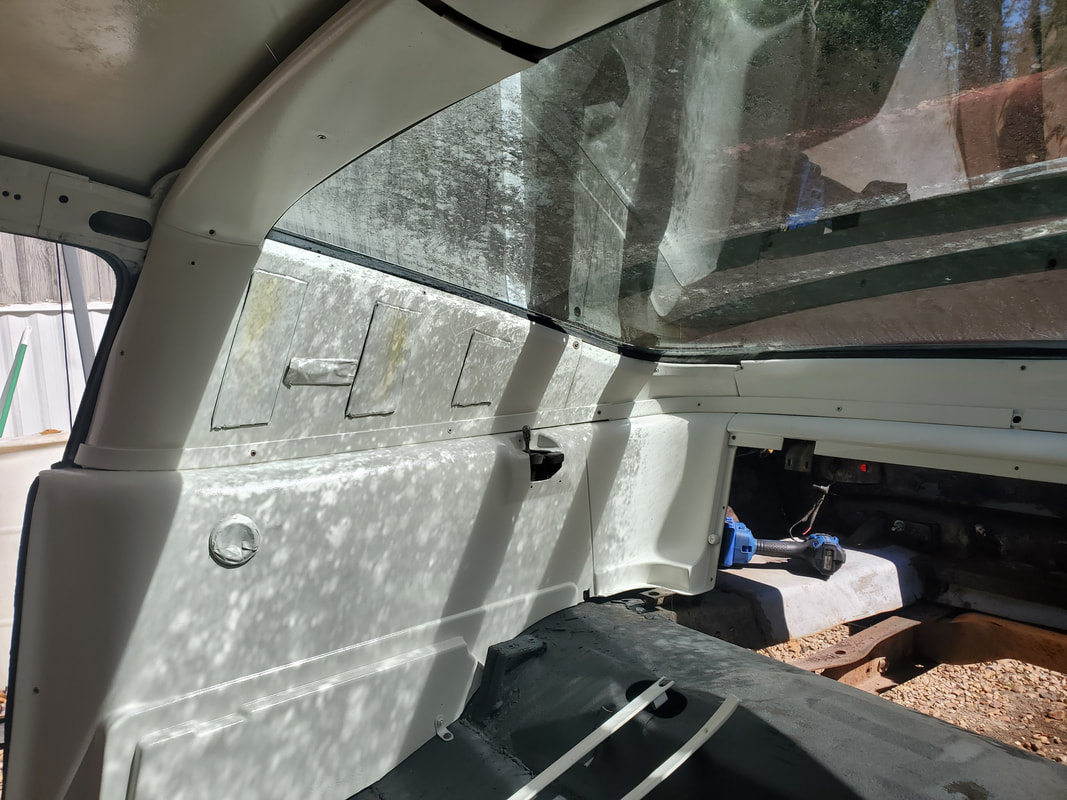 Right side panels in place, also with masking tape still in place. Note the trim pieces also bolted in place around the middle line of the interior. 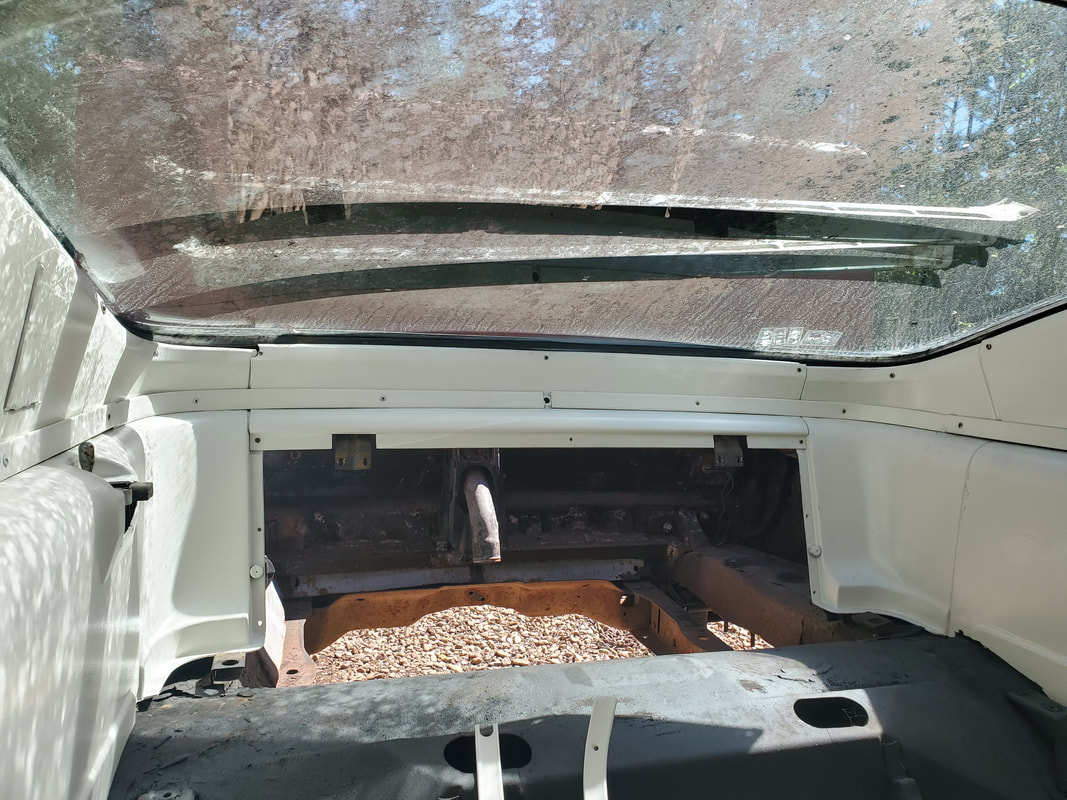 Rear of interior with its panels installed, along with the trim molding pieces reaching around from one side to the other. The speaker panel will be next. On the speaker panel I had to remove the speakers in order to fully cover the panel with paint. It's just as well since these speakers are old and their cones are brittle. They probably won't even work anyway so its just as well these speakers come out and stay out, only to be replaced with new speakers at a later time. In the meantime, the speaker panel was fully painted with a few coats and bolted up to the hinges on the rear interior body. This panel originally allowed for access to the trunk from the rear seat area, for being able to store long items from the trunk into the rear seat area. Until I figure out the rear seat situation, this panel will just be a simple movable hatch covering nothing. The bottom of the panel is wide open and will need to be filled in, either with the rear seat body or scrap sheet metal made into some type of interior body paneling to blend in with the rest of the interior body structure. 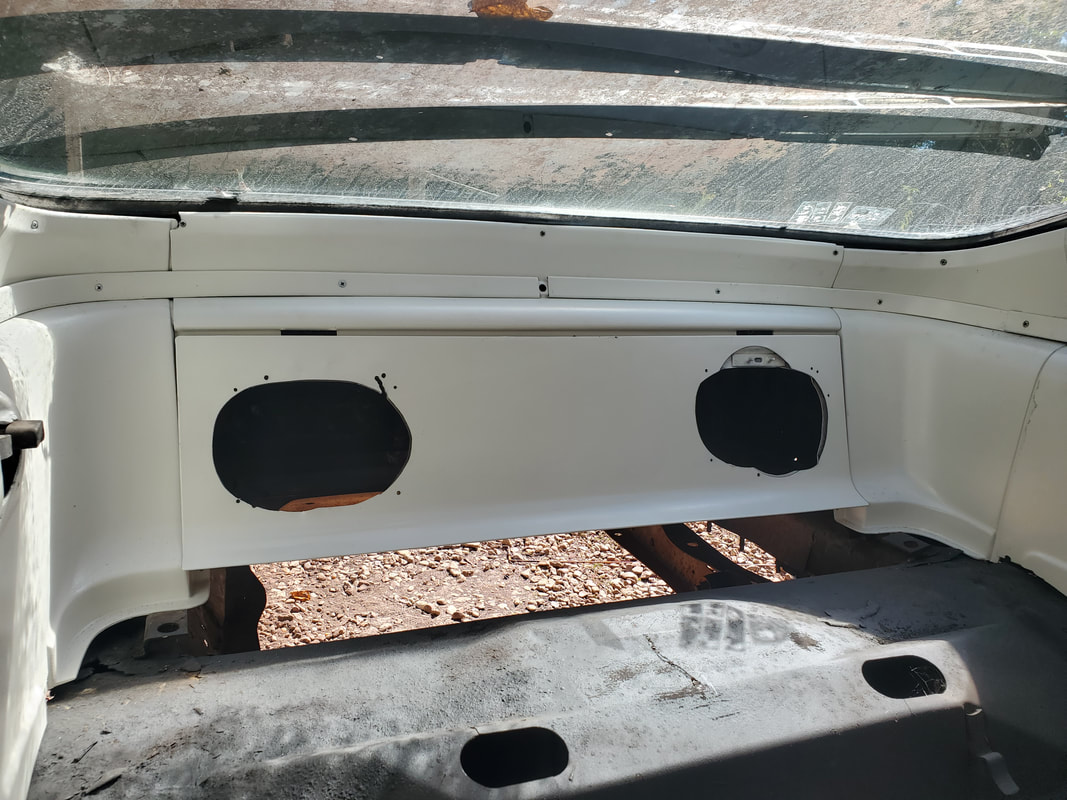 Speaker panel installed in place, hanging from its hinges. Note the large open space underneath the panel, either to be covered by the rear seat body or a sheet metal patch to cover everything to blend in with the rest of the interior body. With all of the rear interior panels and pieces installed, I move into the home stretch with the interior assembly. I'll take the time to spray down the sun visors, since the paint I'm using is good for multiple surfaces, not just metal. I'll also disassemble the center console in order to spray the white plastic body as well as the black surfaces on the top piece. I also need to make some cuts to the door sill trim pieces, since the floor patches going to the rear don't follow the same lines as the old flooring and hence may not allow these pieces to fit properly. I also have the rearview mirror which also includes the hooks for the sun visors. This used to be chrome plated but due to rust, I decided to just sand it down best I could and spray it with a metallic silver paint to at least try to make it look somewhat decent, better than rust and flaked out chrome material. More on that in the next session... After starting off the interior with the spraying of the ceiling and other areas of the cab where panels wouldn't be covering, I managed to get all the interior panels sprayed down nicely. Little by little, I'll start the assembly, going to the rear area, reinstalling the two panels I initially cut down to fit on the sides where the rear seat area is. These two panels have to go on first in order to put the two upper panels on the sides. Of course, with these panels being sprayed a shade of white, I would have to be extra careful in the handling of the panels so as to not get any dirty prints and marks on the surface. Even though the paint is dry to the touch, it's not fully cured all the way through. The surface is still capable of having marks pressed into the paint, making it hard to clean these marks off and requiring a spray down to cover up those areas. 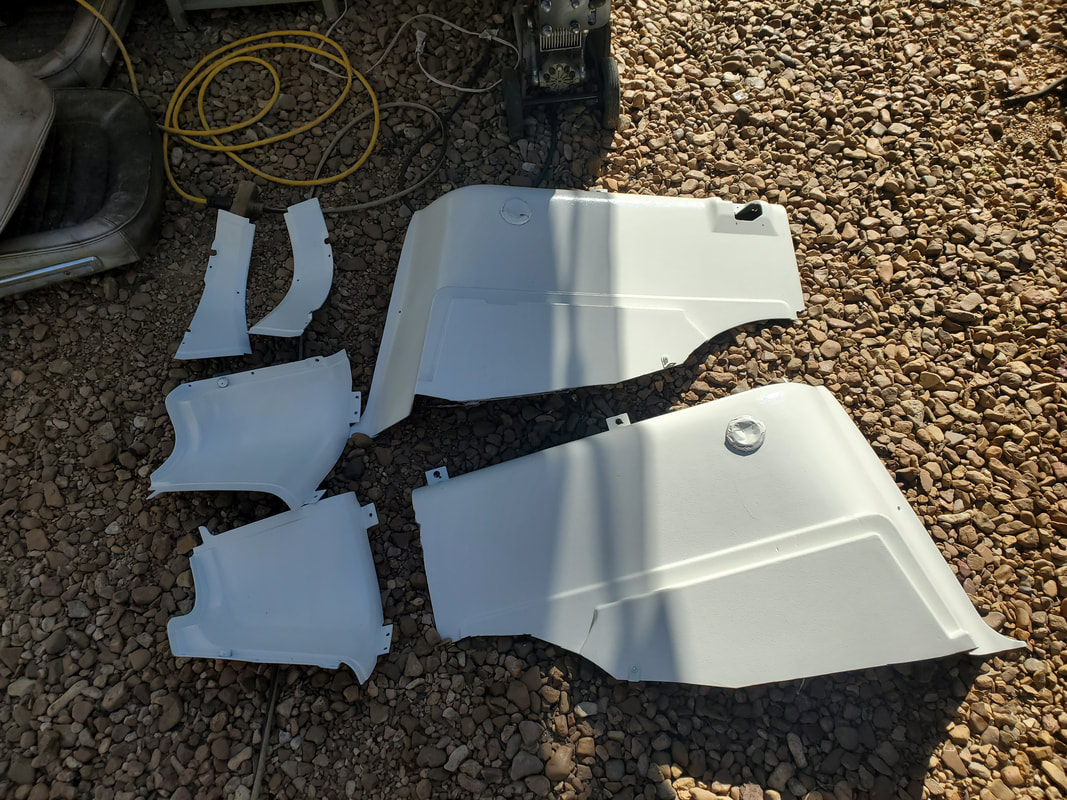 The whole batch of interior panels staged on the ground prior to installation. Everything needs to fully cure to ensure minimum marring of the paint surface during handling. 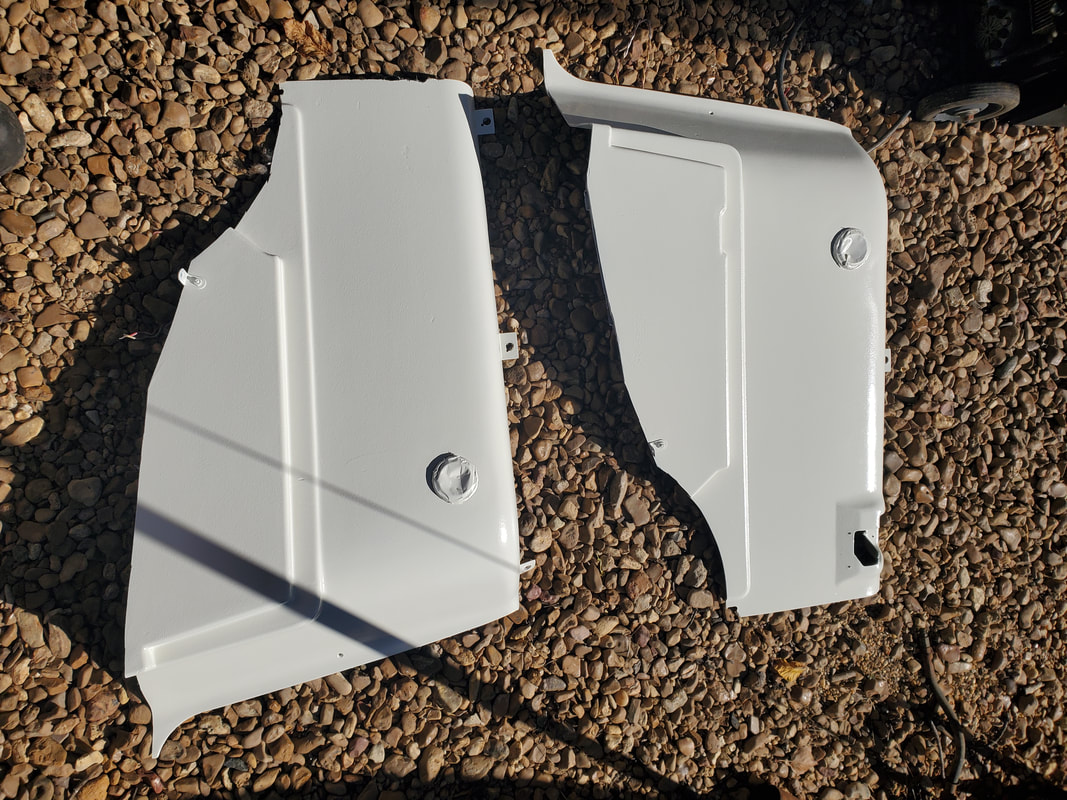 Both rear seat area side panels, sprayed down nicely with a few coats, ready for installation. 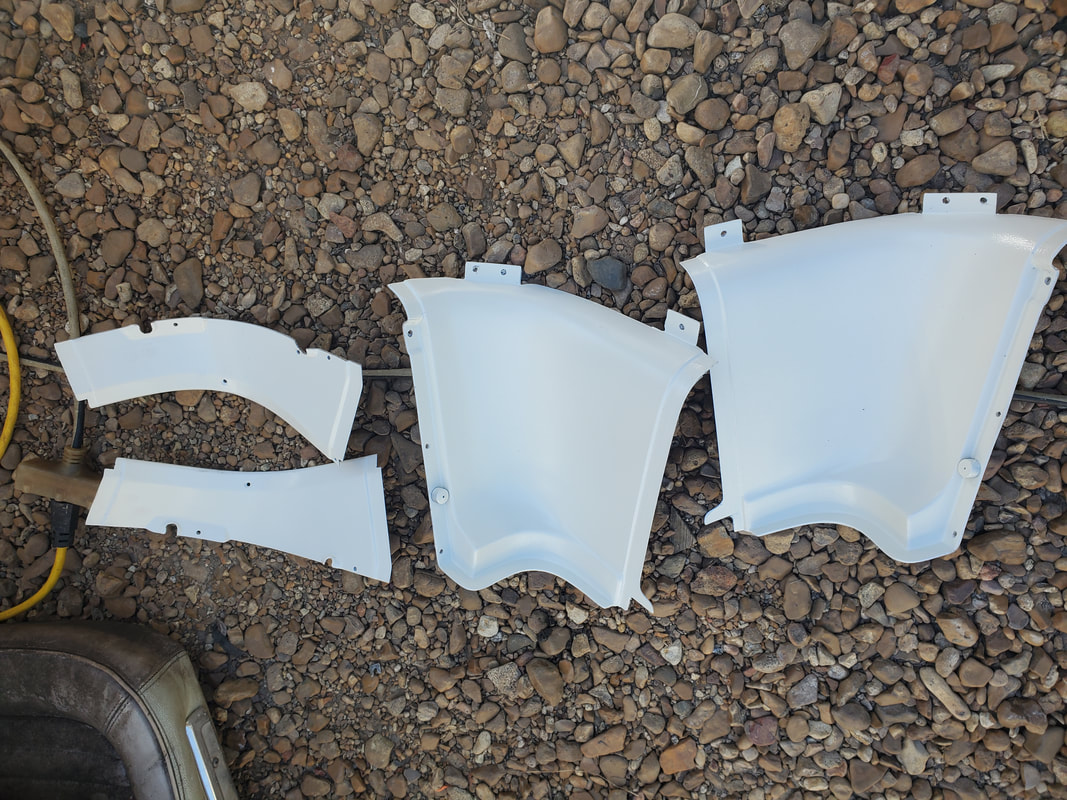 Rear corner panels that cover the area around the speaker panel and rearmost portion of the seat area, sprayed down. I had to get some extra undercoating and ivory spray paint to finish up the floors all the way to the back, which includes a second coating to fully ensure coverage of the floor sheet metal. I had to fully cover the ceiling and other areas with a second coating of paint so I wouldn't have to try to come back over these areas after I've installed the panels, making for a difficult touch up. Anyway, with everything said and done, we can start the full assembly of the interior, minus the seats. Even with all the panels and trim pieces spray painted to make them look better, since we're not installing a headliner and most likely not even the rear seat, there will be a lot of areas around the interior that are exposing the bare metal surfaces that would've been covered by said components. Because of this, to make things look better, it's only right to spray paint these as well. Because I couldn't find the enamel brush on black paint, I normally use for painting floors, I went with rubber undercoating. This may have the added benefit of insulating the interior along with protecting the surface from moisture intrusion and subsequent rust. I ended up having to remove panels in order to do this so to some degree, the past actions of installing the panels I did was fruitless, but its ok. Knowing where and what needs to be painted is worth removing and reinstalling panels. I did have to mask off the windshield since I had to spray the A-pillars and the area around the edges of the ceiling, which also included the sun visors. After removing and masking everything, I used up a can of spray paint spraying the A-pillars, the sides around the edges of the ceiling and the entire ceiling. I will have to spray a second coat to ensure a uniform covering, but we are off to a good start. 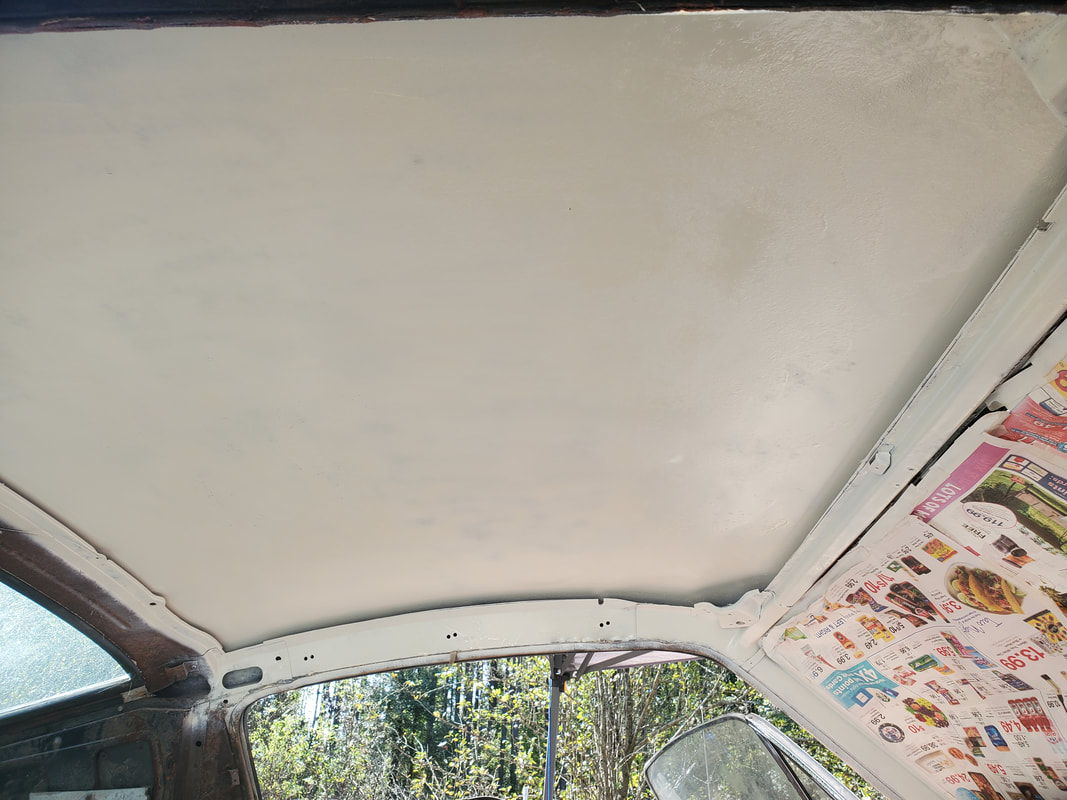 Freshly sprayed ceiling, A-pillars and roof structure. All of these areas are areas that would've otherwise been covered with a headliner. After using up the remaining spray paint I had, I took a moment to use up the couple cans of undercoating and an extra can I dug out from an old stash of spray paints. After vacuuming dust and crust from the floors and removing the two interior panels I had to trim down in an earlier session, I sprayed 2/3 of the floors with undercoating. Just like with the ceiling, I will have to apply a second coat to the areas that were covered, along with the areas I didn't cover. Since I removed those two side panels, I'll be sanding and spraying those panels down just the same as the others so we can have a nice uniformly painted interior, complete from top to bottom, front to back. If I'm feeling froggy, I might even use some of this spray paint on the sun visors since I may not successfully be able to clean them to the point of making them look like the newly painted panels. We'll see. 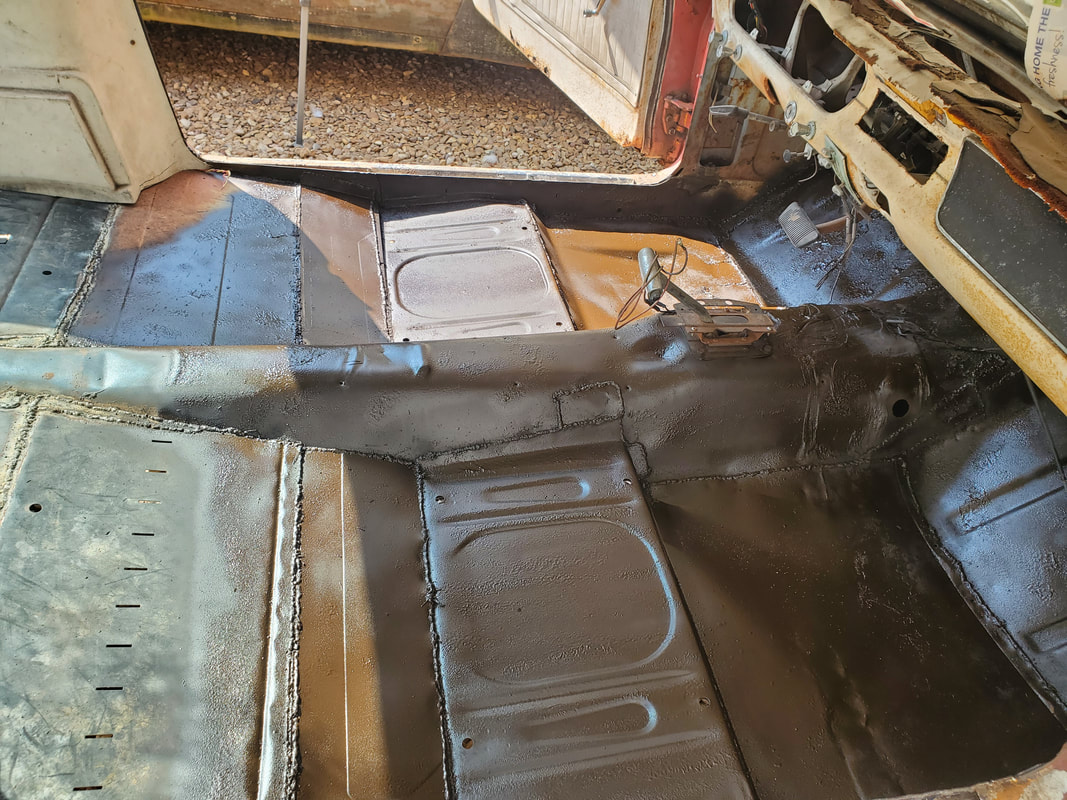 Freshly spray undercoated floors going back to a point behind the seat mount panel and around the edges of the rear floors. Once I get the second coats applied to all the surfaces that need painting, we can then start installing interior panels. Of course I can also reinstall those two rear panels once they're painted, and get the interior reassembly completed, up to and including the seats, which will be their own little endeavor since I have to repair the broken studs on the bases. Stay tuned. As part of the greater interior work on the Truckstang, I planned on spray painting the different interior pieces as part of making the car look a lot better than it would've otherwise if I just threw everything together. If I'm going to do body patching on the outside after welding the crude sheet metal patches on the quarter panels and fenders, I may as well do the simple act of spray painting these panels. Of course a lot of these trim pieces were used for helping to hold the headliner up but since I won't be installing one of those right now, the trim pieces will just be screwed in place. I plan on spray painting the ceiling and other areas of the interior.  Trim panels and other pieces spray painted and curing. I may install a headliner in the future, who knows. In the meantime the panels and other surfaces will also be sprayed with this same ivory spray paint, covering all surfaces of the car to make the interior look as aesthetically pleasing as possible. 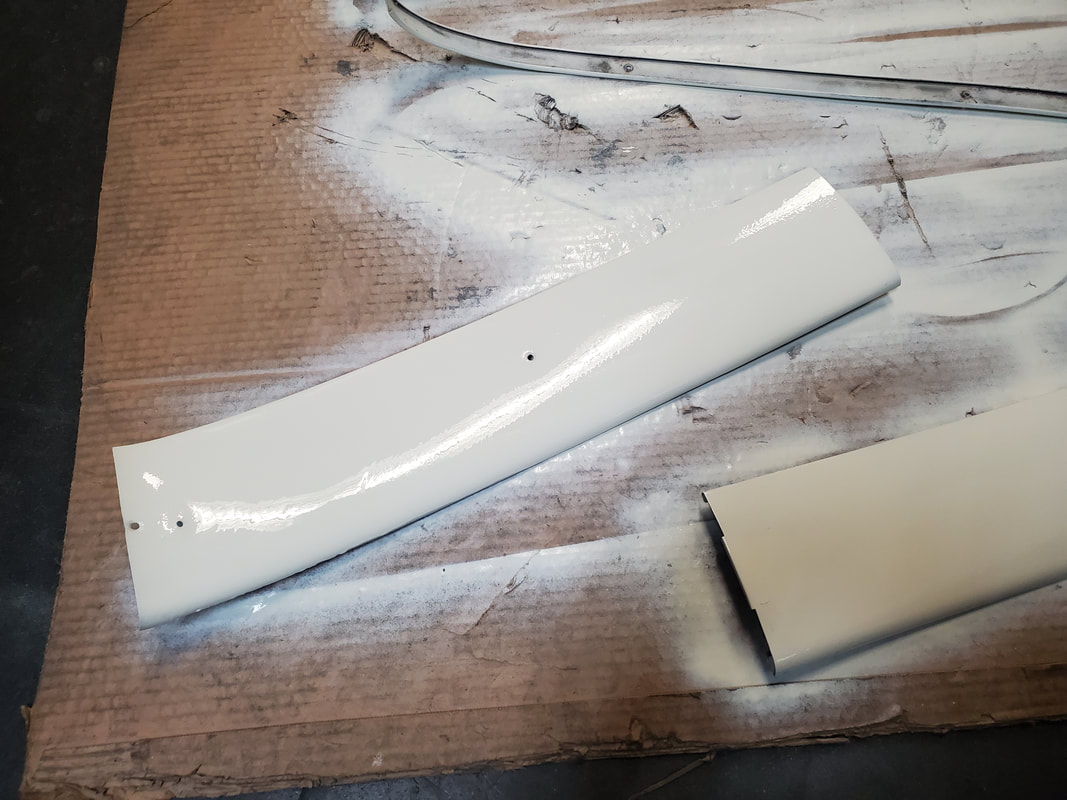 Closeup of pair of interior panels after spray painting a couple coats. Even a couple plastic panels that mount under the dash on either side were spray painted. Even though these panels are degraded, I still took the time to spray paint them. As with all the panels, I took the time to sand the pieces down with 200 grit sandpaper to clean the surfaces of the surface rust and faded paint so the new spray paint will adhere to the panels appropriately. The spray paint is good for multiple surfaces so everything is all good, plastic or metal. 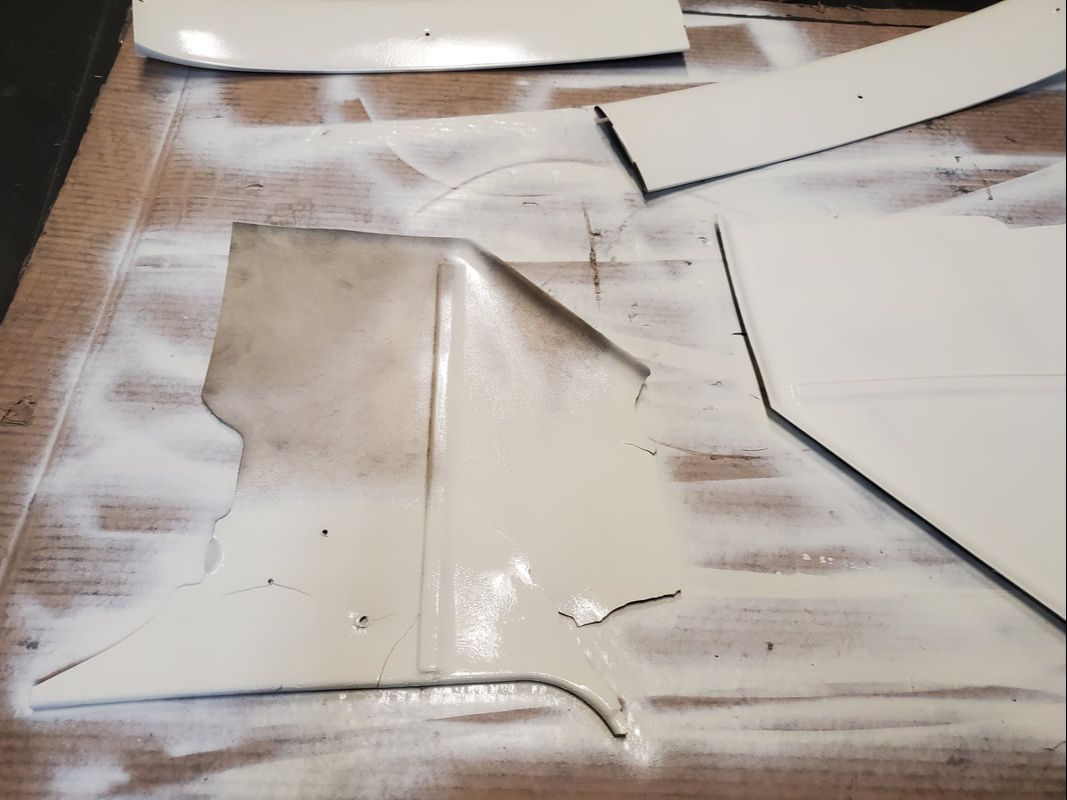 Front interior panel in process of spray painting. These plastic panels are old and kind of brittle but still whole enough to be used so it warrants their painting. 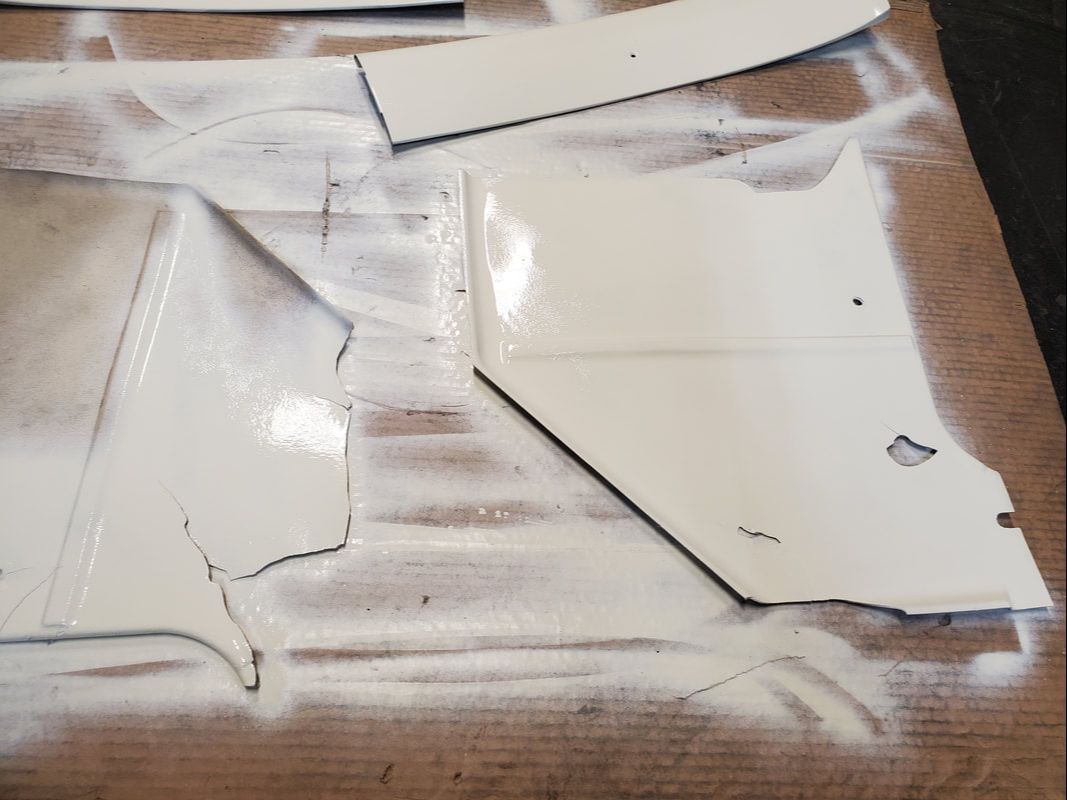 Other panel after spray painting completely. The panels I really wanted to make look new were the two triangular panels that go on the sides just above the rear seat panels. These panels cover up the vents on the sides and are the most noticeable panels out of all the panels, so painting these would go a long ways towards making the interior look awesome. 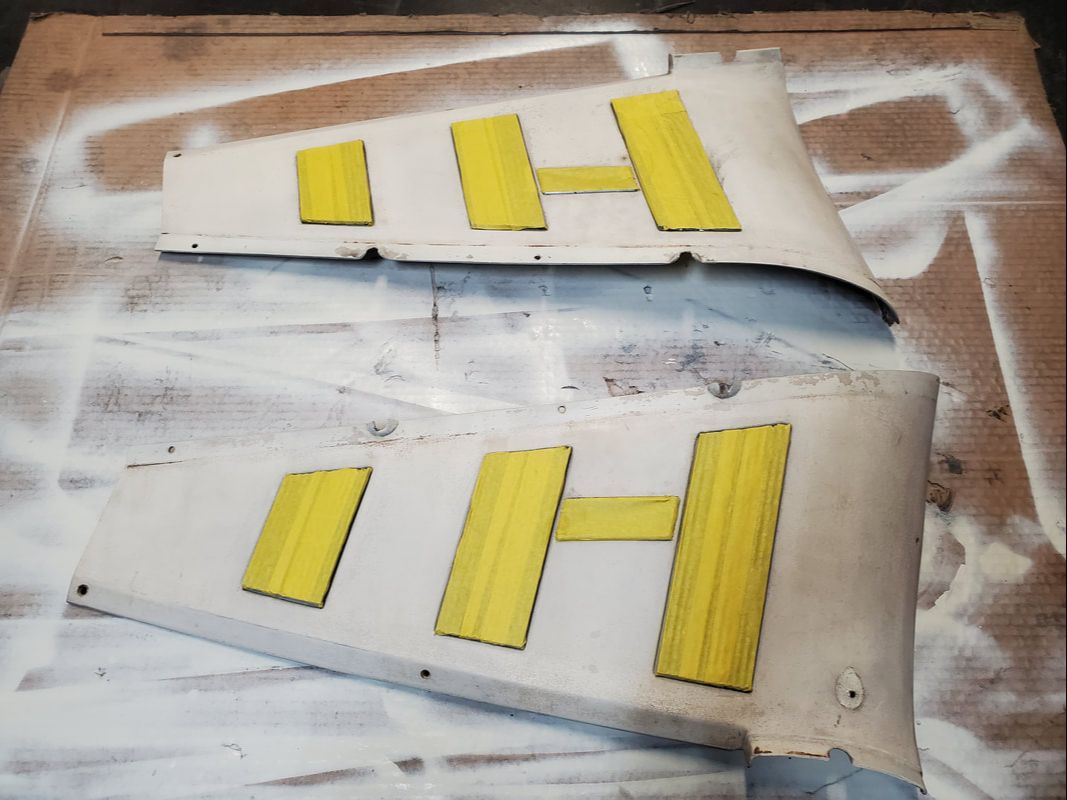 Interior panels masked off with tape to cover the vent covers prior to painting. 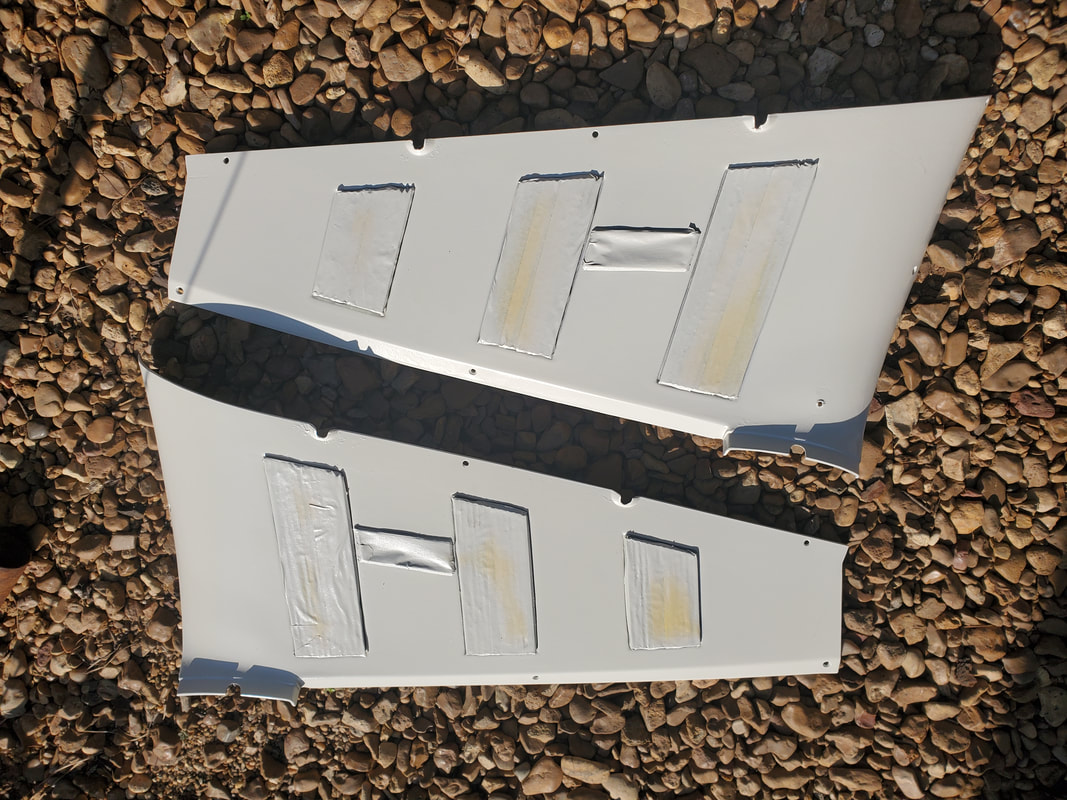 Spray painted rear side interior panels. 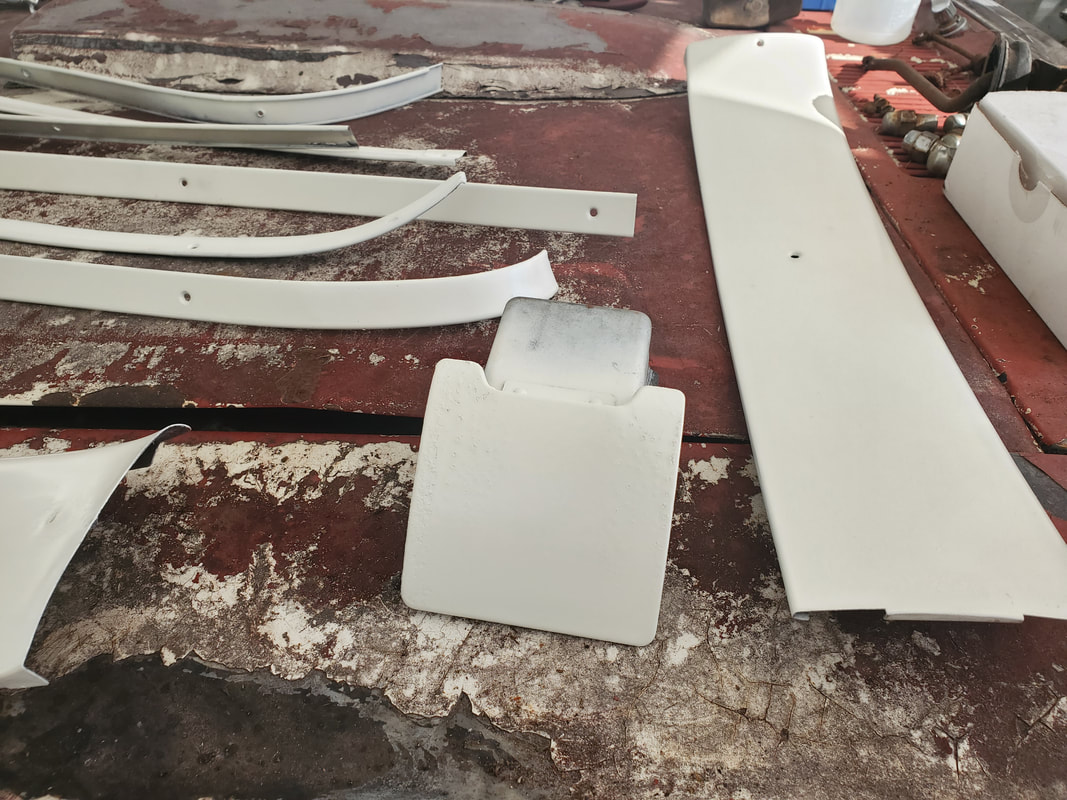 Ash tray and other interior panels and trim pieces staged on the hood of the car pending installation. With all the panels spray painted, I'm able to proceed with the reassembly of the interior. I did grab some undercoating since I was unable to find the can of enamel black paint I normally used to paint floors after I welded up patches. The undercoating is fine, as the rubber material may go a long ways towards a slight insulative property that may go a ways towards keeping the inside cooler when the heat of the exhaust and powertrain is radiating all over the underside. |
