|
Even with the specialized jobs that we have going on around here, there are times when a day is spent just doing what I like to call "general cleanup". This usually involves moving things around and picking up things that should've been disposed of a long time ago but we never got around to it. Sometimes the general cleanup might involve organizing things that have been staged somewhere and not addressed, like firewood. Sometimes, like in this most recent case, it involves moving vehicles around after moving something else out of the way. In this case I was working on a beater car for a friend's cousin and even though it was a job I should've never taken on due to the fact that it was a lose/lose situation or a zero-sum game because the car is not worth the amount of money that would be spent to do the work and in the case of this particular car, the deeper I dig in during the repairs I can see immediately, I end up finding even more things that need addressing. By the time things are said and done the customer would've ended up spending over $2500 on a car worth $700. Anyway, after I did the small batch of things that I spotted I finally got to the point where I was able to get off this car as it was in the way and I wasn't about to do any more work to it because the customer would start questioning the charges I would've put on the whole job. I digress, the main point was the idea that with this POS out of the way, I was able to move the Monte Carlo out of the way, which was parked right next to the other car, both behind the small trailer we have. After having moved the trailer back up to behind the garage and getting the other car out of my hair, I moved the Monte over to the east end of the midway in order to clear up the area of the yard along the western fence since I will be moving the F150 eventually and had to open the area up to get our old tow dolly out. 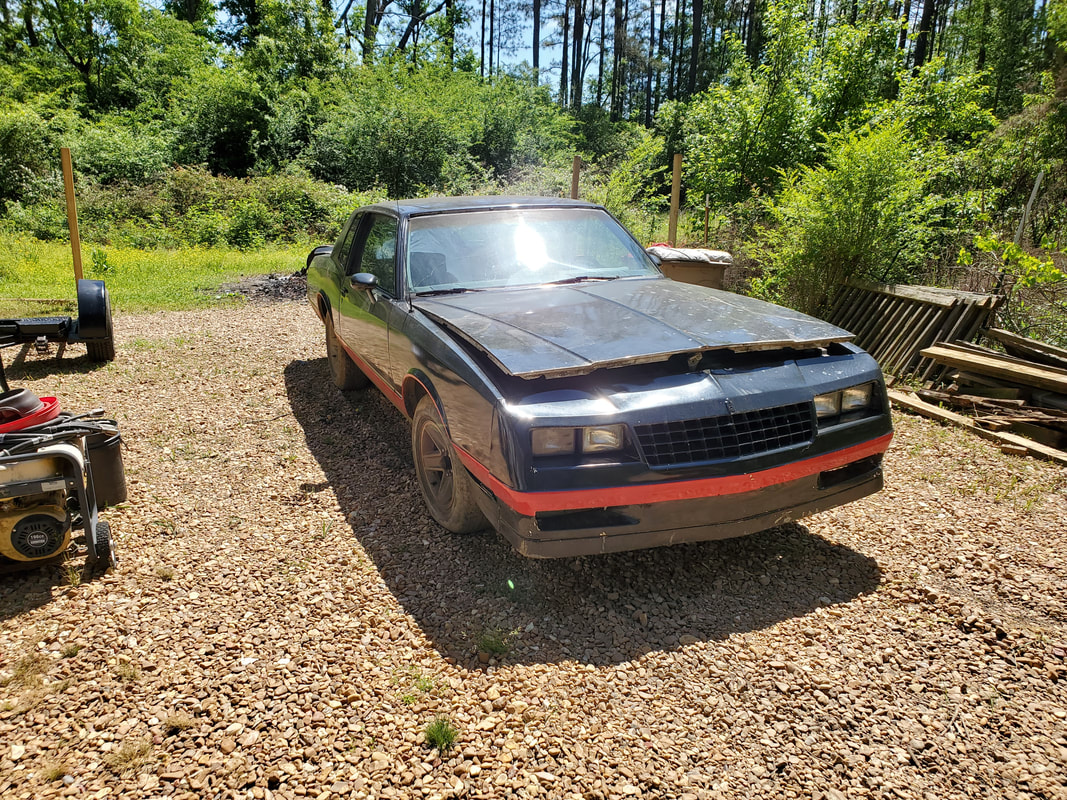 Monte Carlo relocated to new parking spot. Another little treat that I was able to partake in was harvesting a few strawberries from a couple of the plants in the garden. Last year I uprooted multiple strawberry plants and their runners from some old areas where I pulled up some fruit trees and transplanted the plants into various containers. I planted strawberries in a couple of old recycling bins and planted many in some drum planters around some fruit trees I planted in each drum. Since the drums are small I would plant one tree or large blueberry bush then plant several strawberry plants around the tree/bush to make a mini food forest setup in the drum. Anyway I was able to grab a few small berries from the plants to claim first harvest in the garden this year. 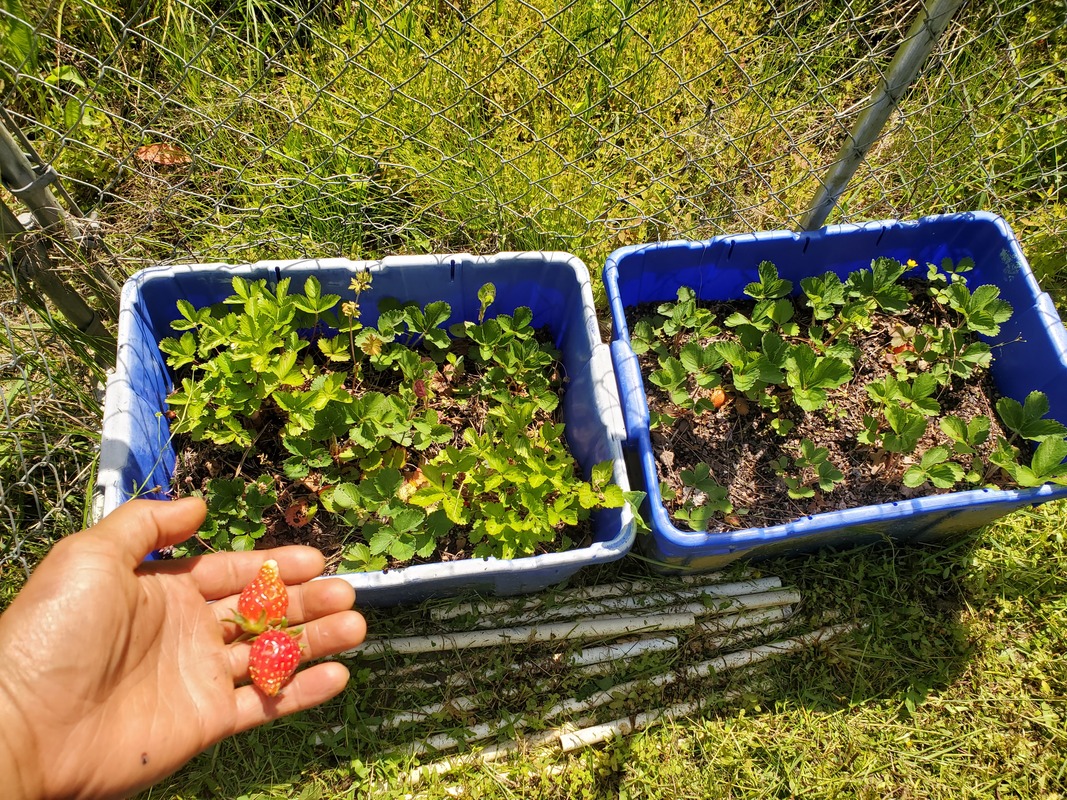 Strawberries harvested from plants in two container beds. The other thing that I want to talk about is the new used tow dolly that we picked up. This piece of equipment was picked up just after we returned from the TX trip. I found this thing on FB marketplace and after immediately contacting the guy and convincing him to meet up later that evening we hauled ass over to his place and picked the thing up. This unit has a swivel base where the platform that the car sits on turns independent of the dolly itself, making for a more tighter turning radius when towing a car. The dolly has built on ramps that are attached with springy plates that allow the ramps to flex down when pressure from a car's tires meets up with the edges of the ramps. Once the car's on the platform the ramps spring back up some to keep them off the ground. It's not the best design but its a lot better than the old dolly that we have. I will have to check out the mounting of the ramps to ensure everything is solid and more than likely reinforce the mounting of the ramps. I like going over things prior to pressing something into service so I know beyond a shadow of a doubt that the piece of equipment or vehicle is going to be ready for use. I could probably use this thing right now but will not until I give it my seal of approval. The dolly did come with the straps for each side as well so I would be ready to use this thing now for all intents. 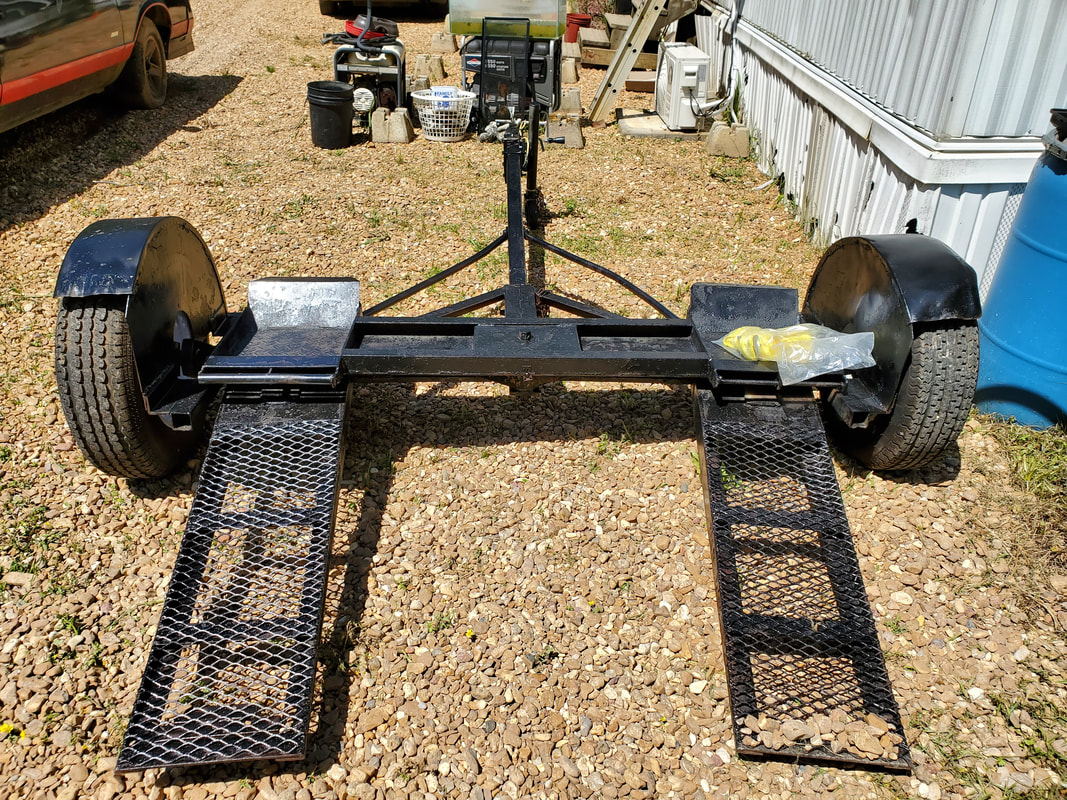 New used tow dolly just recently picked off. Having a decent tow dolly is part of my plan to set myself up to be able to retrieve cars without having to drag a heavy car trailer around, much less maneuver one behind the F250. With just a dolly I would be able to tow a car with a lesser sized truck which will open up the door to more options as I can use certain vehicles that are more geared for long distance runs but don't burn as much fuel or are as large. Just having multiple means of doing the same job only make sense. I'll plan on getting more plants in the ground or in beds in the following moments as well so we will be able to get more harvest from other plants as well as the strawberries. Also, moving the Monte where I did will give me a better spot to start work on it, the first thing being a camshaft swap to try and see if I can remedy the loping sound this engine makes when running which also causes the engine to be rather weak. As one can see, this year, like last year, will be a very busy year.
0 Comments
Regardless of what we have going on around here, one thing that I always have to make sure to have set up is the garden. Now last year I had been setting up hydroponic gardens and various raised bed garden concepts that for all intents were a success with the plants that were grown in them. This year with all the car stuff going on its a tad difficult to just jump head first into the garden but not impossible.
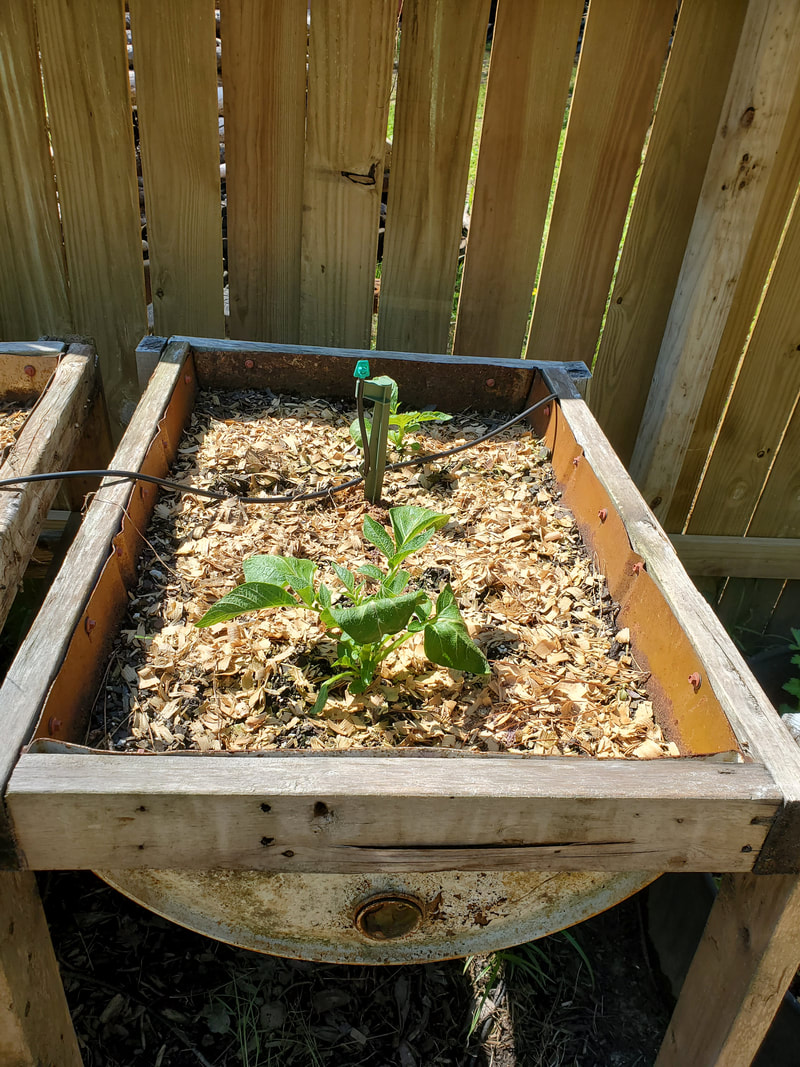
I will have to do some maintenance work, really just cleaning up, on the hydroponic systems before planting something in them and the raised beds are going to need some fresh compost and fertilizer along with a little more fresh dirt. One of the older raised beds that I made from a drum half fell apart at the legs so its pretty much trash because the legs broke at the welds going into the drum skin, its rusted away, no need to try and patch more metal onto something that's just going to rust even more as time progresses. It'll just be better to scrap that and make room for a newer better raised bed setup. One of the plants that I did get planted first was potatoes. Potatoes are funny in that they kind of like cooler weather and will in fact thrive very well when the temps hover around the 70's during the day and the 50's at night. Once the plants grow very large, they'll become more heat tolerant but not resistant. As the summer temps climb into the 90's the plants will eventually start to taper off and get to the tail end of their lives, while hopefully having grown plenty of spuds underground before the plants die off. I planted a few spud plants in the old fridge raised bed, in one of the newer half drum beds and in the shop fan shell raised bed. 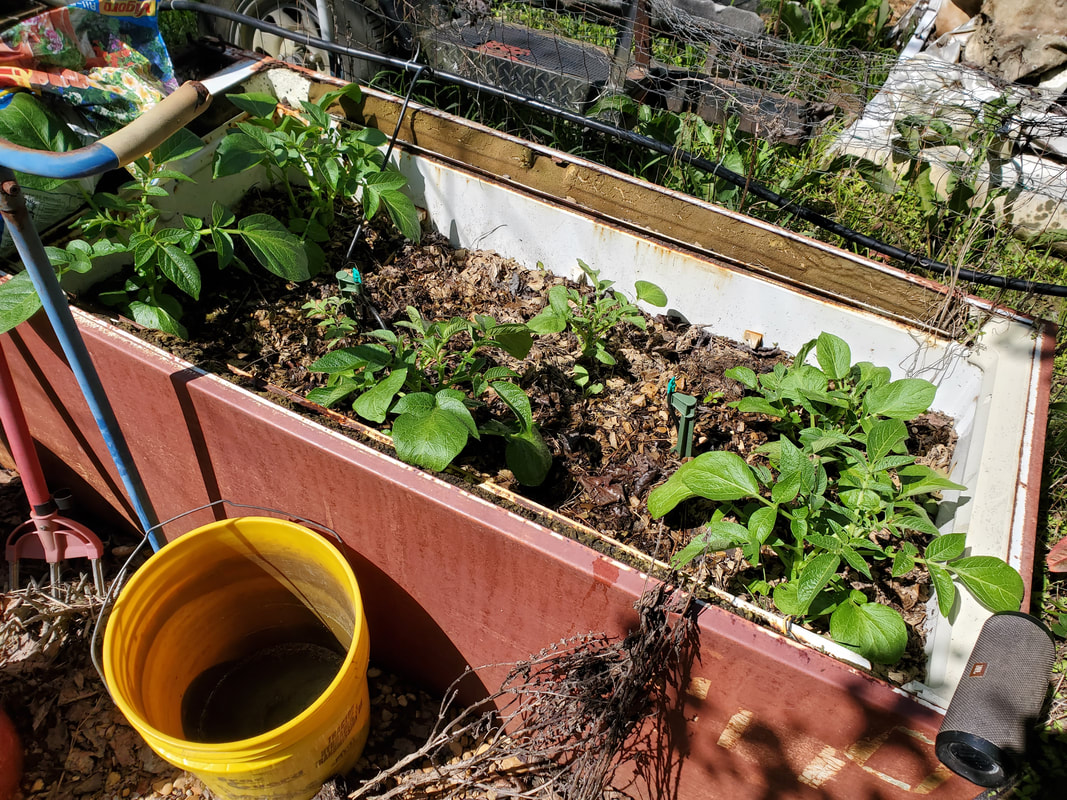
Fledgling potato plants growing in fridge bed.
Potato plants growing in half drum bed.
Another thing that I planted in the shop fan shell raised bed was some salad greens. Several lettuce plants were planted among the spud eyes, and among the already growing greens that I forgot what they were but they were still growing strong through the winter and now into the spring. This raised bed will be a mixture of salad greens and herbs and potato plants. 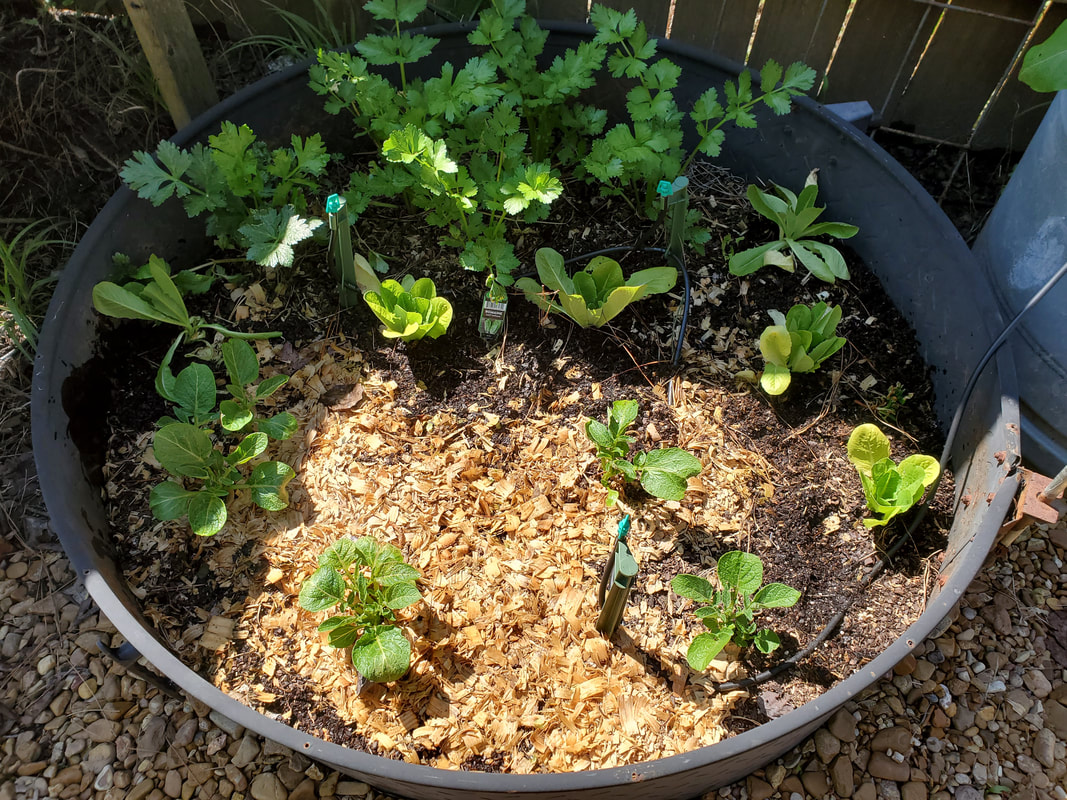
Potato and Lettuce plants growing among other old herb plants in the shop fan shell raised bed.
I also threw some potato plants in one of the washer drums in the same area as the shop fan bed. These plants have this drum bed all to themselves but with the expectation that during the summer when they do die off I'll do like I did last year, I'll pull the spuds and their dead plants up and replace them with seeds for lettuce and other salad greens so I can have a fall crop. I might throw some other form of cool weather/fall plantings in there like carrots or what not, but the point is, after harvesting one type of plant during the height of the grow season, you replant with something that will reach its peak at the extreme end of the grow season, before the frost sets in. 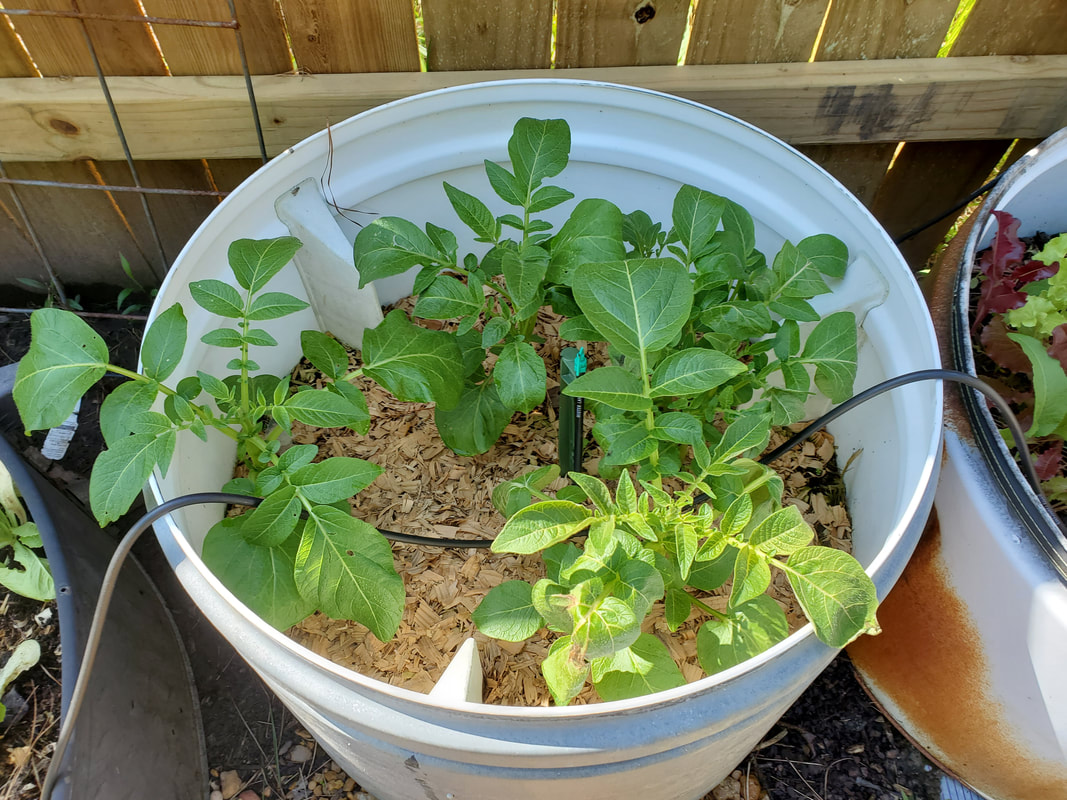
Potato plants in washer drum growing very well.
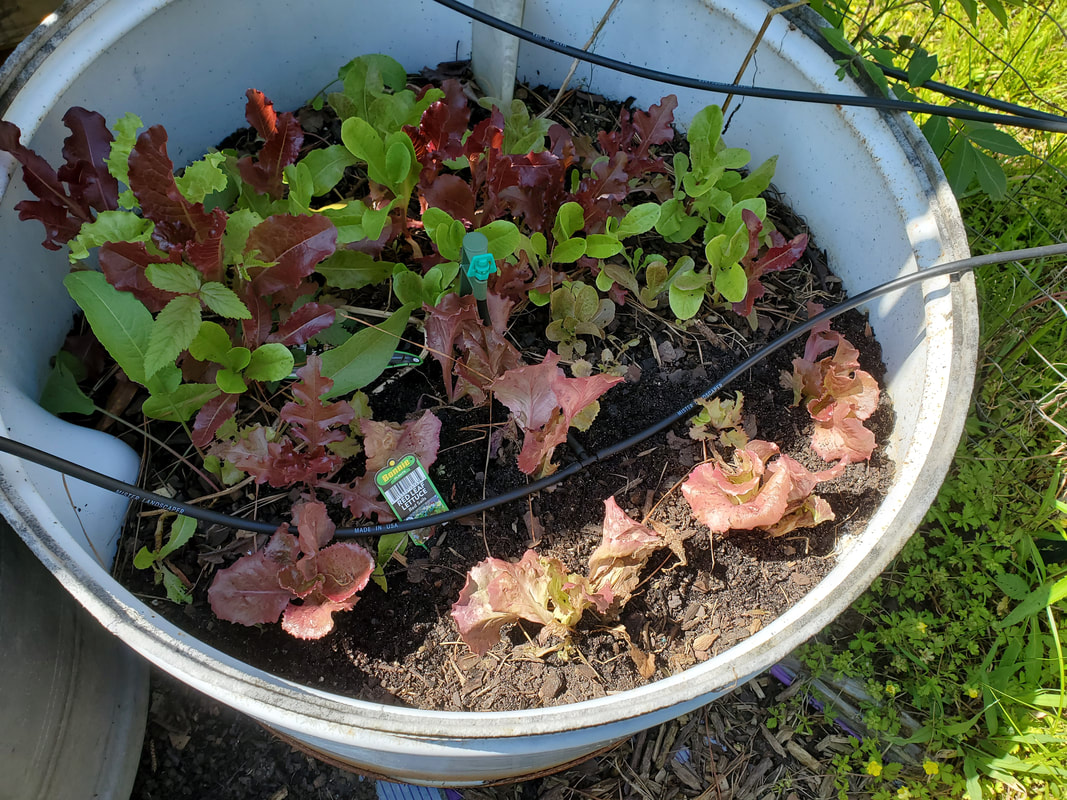
Lettuce plant survivors from last year's planting, still growing strong.
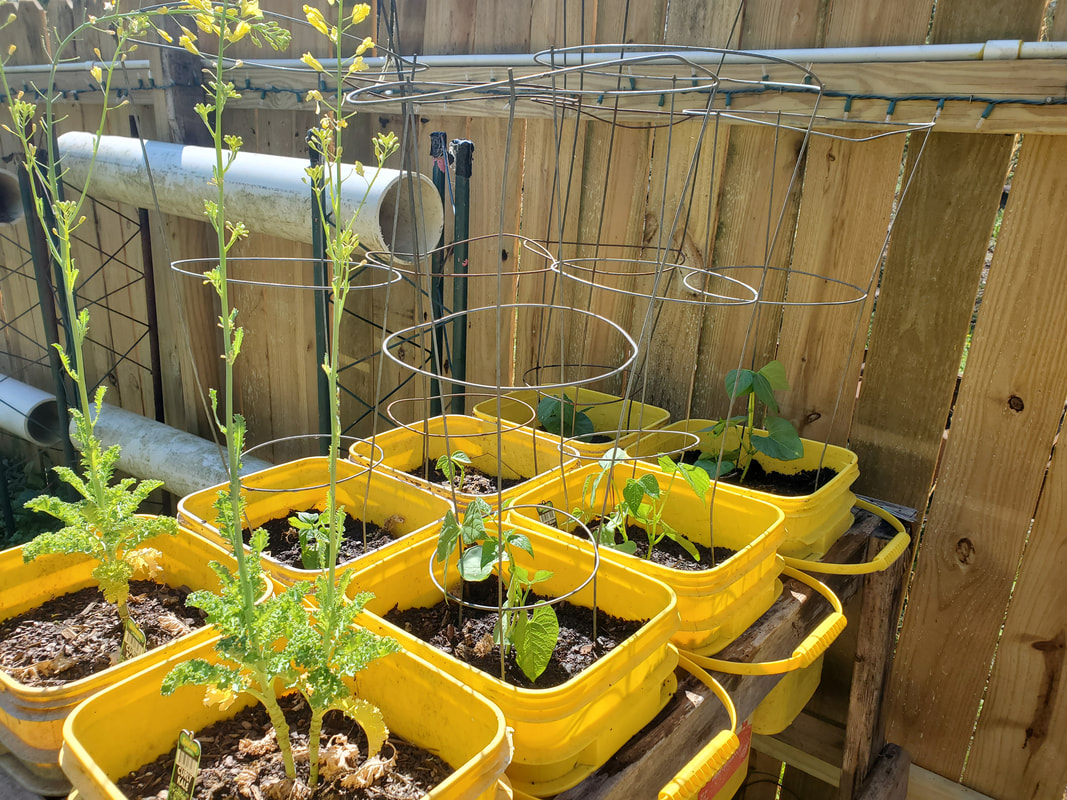
Bean plants in the back six bucket beds with some old kale plants that went to seed and haven't been removed yet. Note tomato cages around bean plants.
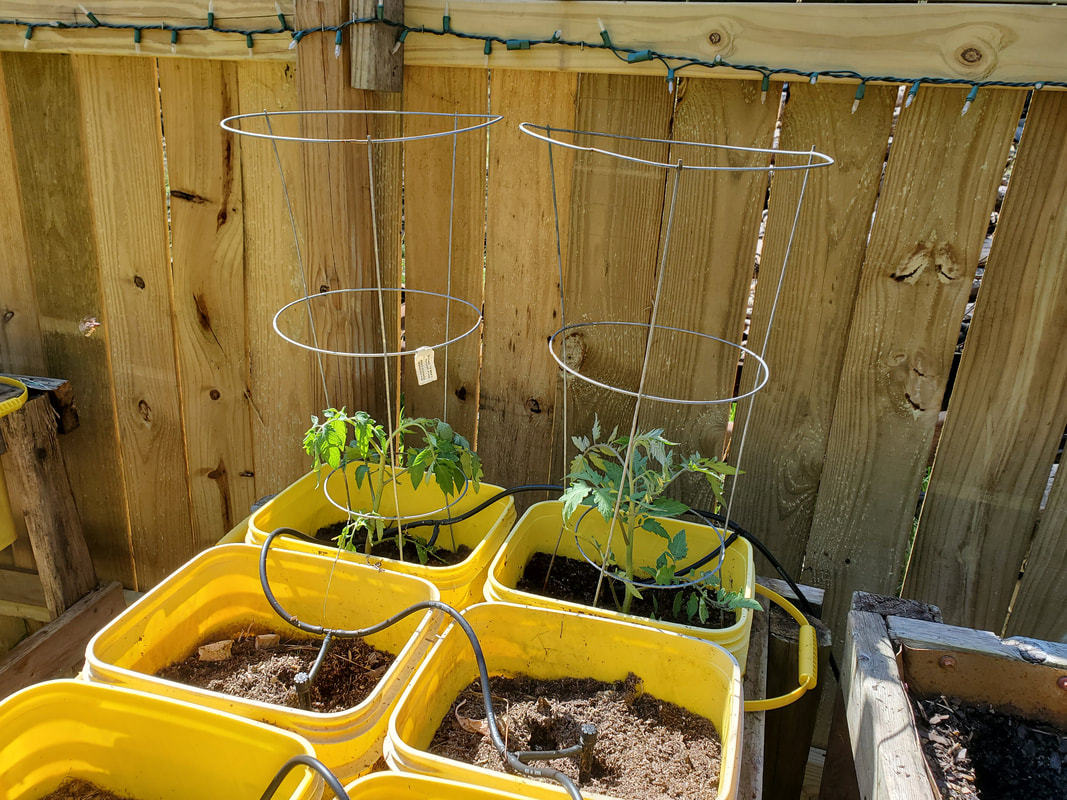
Tomato plants in buckets with cages.
This of course isn't the end all to the planting. Even with the automotive work that's going on, I will be getting my one main hydroponic system back online and planting some pepper plants within it like I did last year, along with more tomato plants in the other bucket beds. I will be trying to get my other hydroponic systems completed and operational so I can get salad greens growing within those while at the same time trying to get some more raised beds put together for more tomato plants and perhaps some greens. It's going to be too late to get other plants like squash and cucumbers in the ground as they should've been in the ground a month ago so they could get a good head start but the weather went kind of stupid which could've jeopardized the young plantings had I put them in the ground at that time. Either way, whatever I don't get in the ground this year will be replaced by multiples of other plants that are more tolerant of late plantings.
If you've been following my last post you'll know that we picked up a 1951 Chevy Suburban panel truck during our trip to Texas. This truck is an obvious project as its quite rusty in spots with cancer all over. It will need a total restoration for it to be of a quality that would make people turn their heads in an impressive manner versus looking with disgust. The unique thing about this truck is that its complete. It still has its straight 6 engine with the 3 speed manual transmission in the "3 on the tree" configuration where the shifter is on the steering column like many auto tranny shifters were in late model trucks. The truck does not come with any seats however, it was most likely a bench seat but that's ok. The floors inside are quite rusty with large gaping holes all over the floor pans. Many of the windows are either cracked or completely broken or missing. We're going to have to do some hunting to find these parts for this truck but I'm sure the parts are plenty available as you see these trucks and their pickup versions all over the place in car shows all the time. Somebody's gotta be making parts for these things otherwise nobody would be able to restore them. And unlike a 65 Mustang or similar car, these cars are plenty old enough that if its not restored or in the rare case, in a controlled environment of a garage or enclosed barn on a concrete or gravel floor in a relatively dry environment, the vehicles are going to be rusted out. Because of that, there has to be a large aftermarket catering to these vehicles to allow for restoration and maintenance after the fact as many people will use these vehicles in varying states. 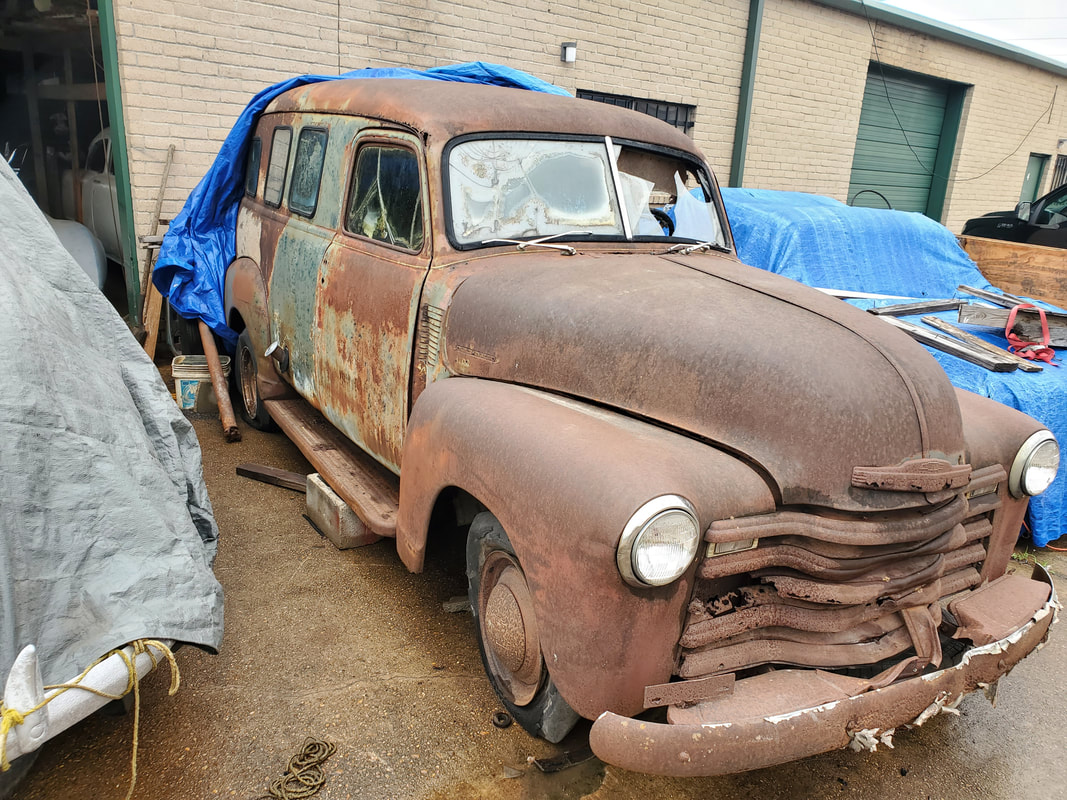 The 51 Chevy at the shop where we got it from, at least it had a tarp over it to help protect it from further decay. 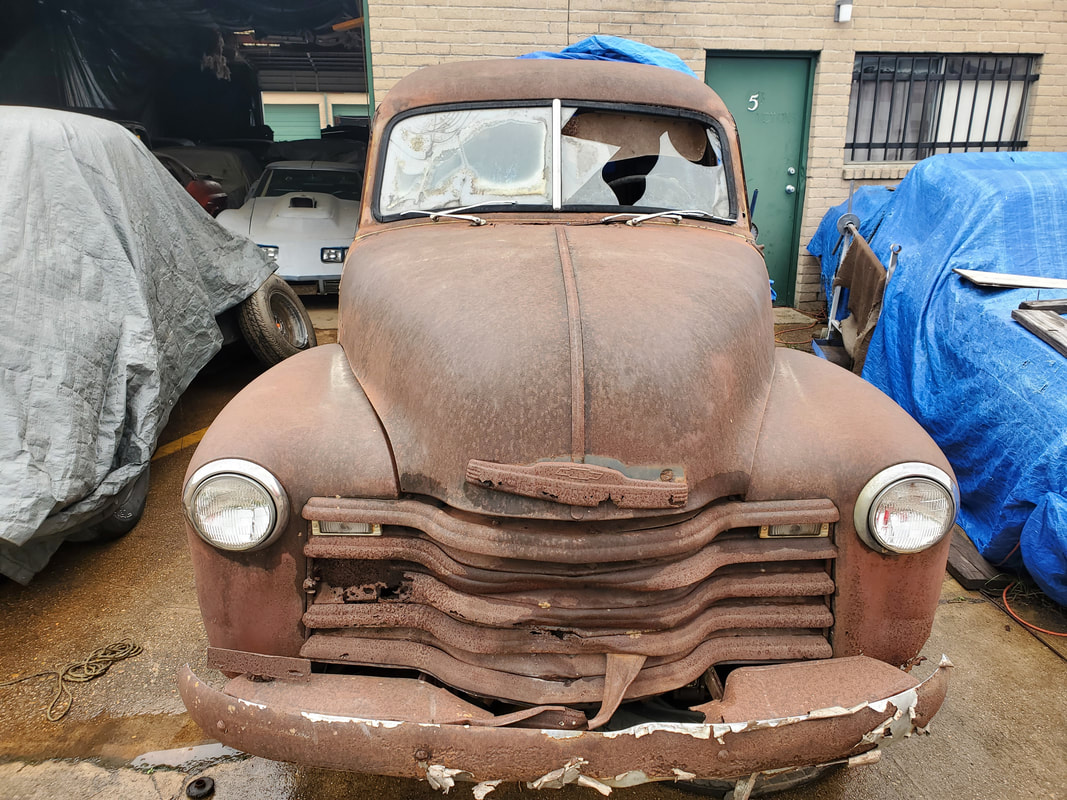 One can see the level of decay as the grille of the car looks like old foil crinkled up and one of the windshields are broken. 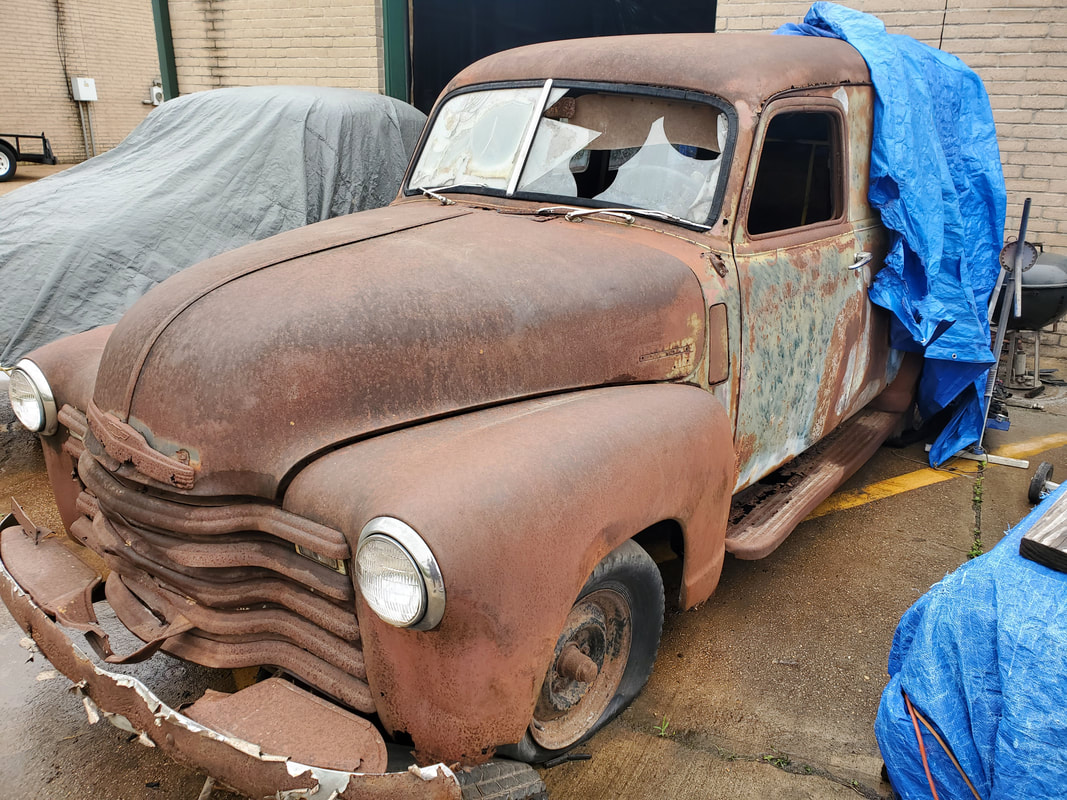 The interior of this truck is pretty basic, even by old car standards. There's just a couple of gauges in the dash, of course on this truck one of the gauges are missing. There isn't a bunch of idiot lights or switches for all kinds of gadgets. There is no fancy sound system with a bunch of controls. Now of course with vehicles like this the sky's the limit on what you can do. You can add all kinds of gauges based on what you're trying to build. You can add fancy sound systems and backup monitors or whatever. When there's a barebones basic dash, cutting holes to accommodate extra gauges or switches or whatever is pretty easy. Plus with the interior being super basic, there isn't a bunch of interior trim and panels that you have to take into account when adding anything on the inside. Even the steering column is basic, just a simple shaft with the hook up for the column shifter in place. This thing doesn't even have a turn signal, even though there are aftermarket additions for these late add-ons. 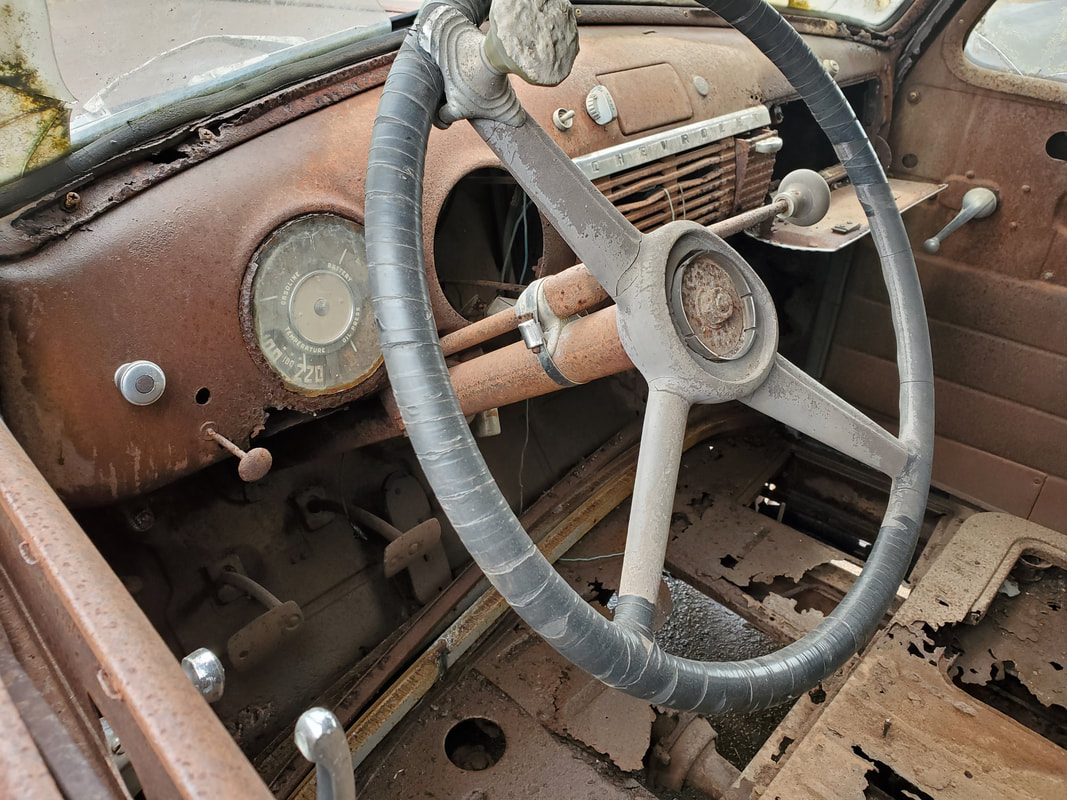 The basic interior of the truck showing just how spartan the dash and interior is. The rear of the interior was basic as well. Since these trucks were really more of a utility vehicle, they incorporated the same design as the pickup which was to have a wooden bed. Well the bed is made up of dividers with wood boards between them to make up the whole bed. This truck most likely had a bench seat, as previously mentioned, while the rear was set up for use in carrying cargo. With no need to climb into the back from the inside, a bench was more than adequate. These were the kinds of trucks that most likely had a single driver anyway since they were most likely used as delivery trucks or work trucks. 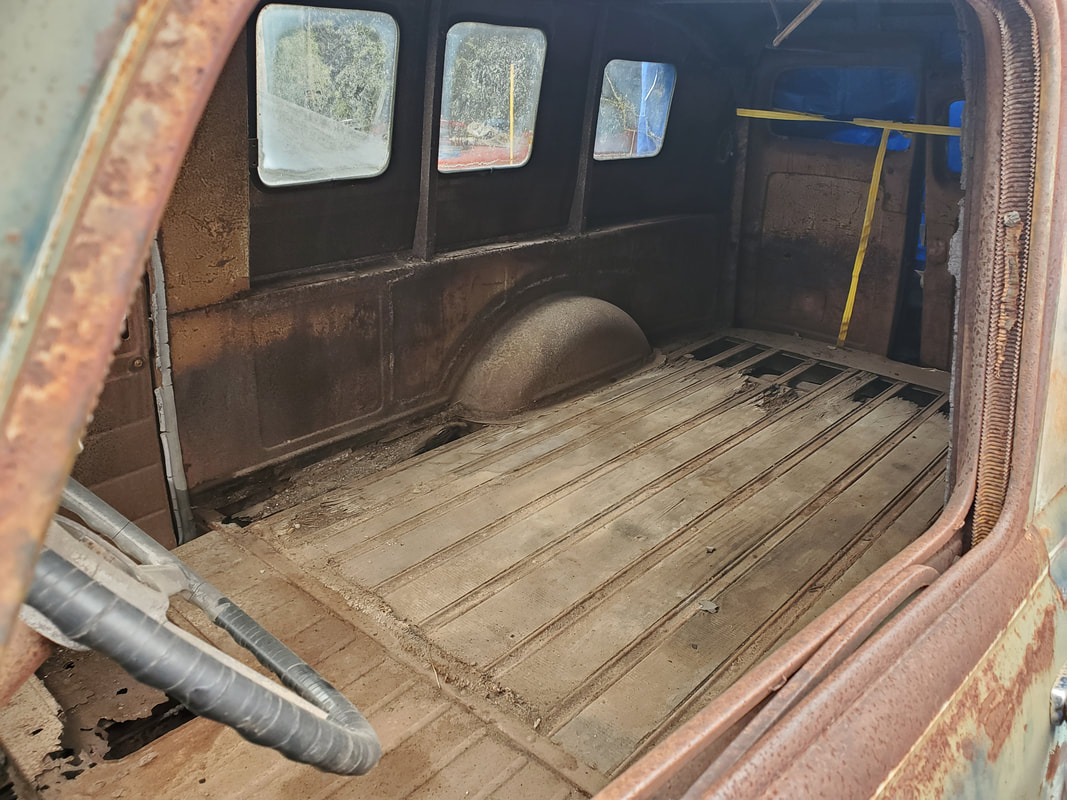 Wood board bed/floor of rear interior inside truck. Now this truck doesn't have any headliner as I'm sure it disintegrated a long time ago. The support rods are still there but that's about it. I'll have to see about how the headliner/ceiling is put together to determine if I might omit the headliner and its support rods all together as sometimes just painting a ceiling is enough to make the interior look decent. We'll see, however if the kits are available I may go ahead and install a headliner along with other interior components like replacement door panels and what not. 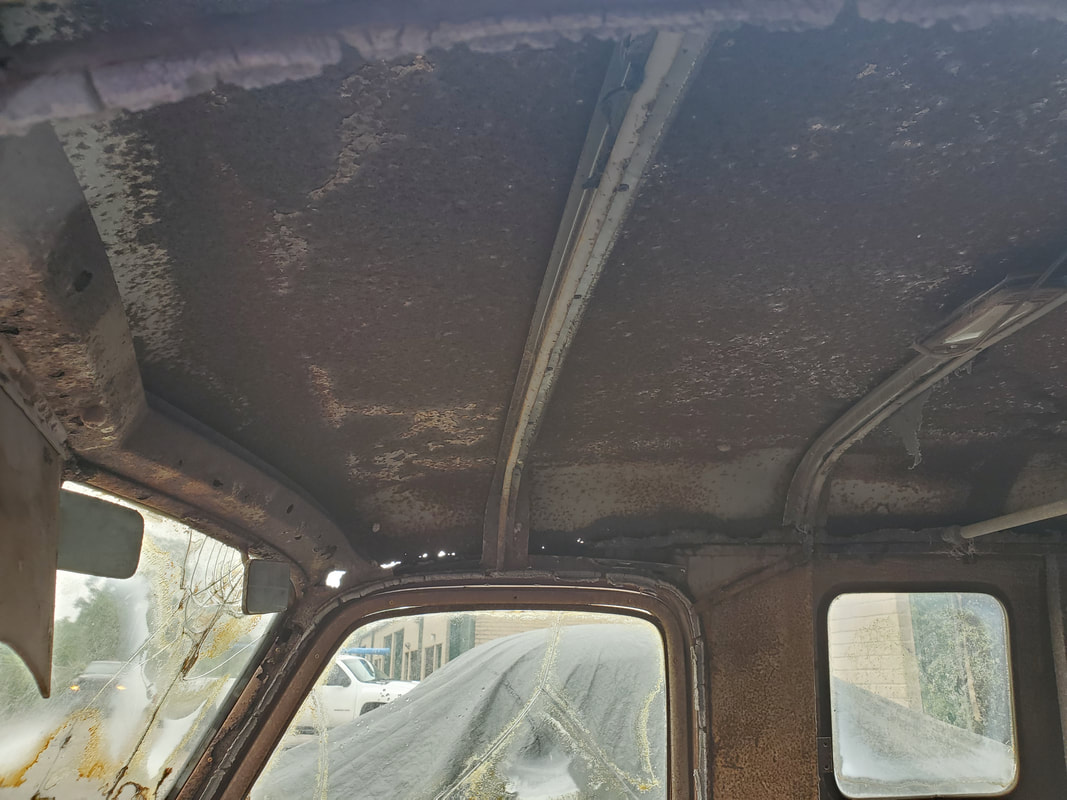 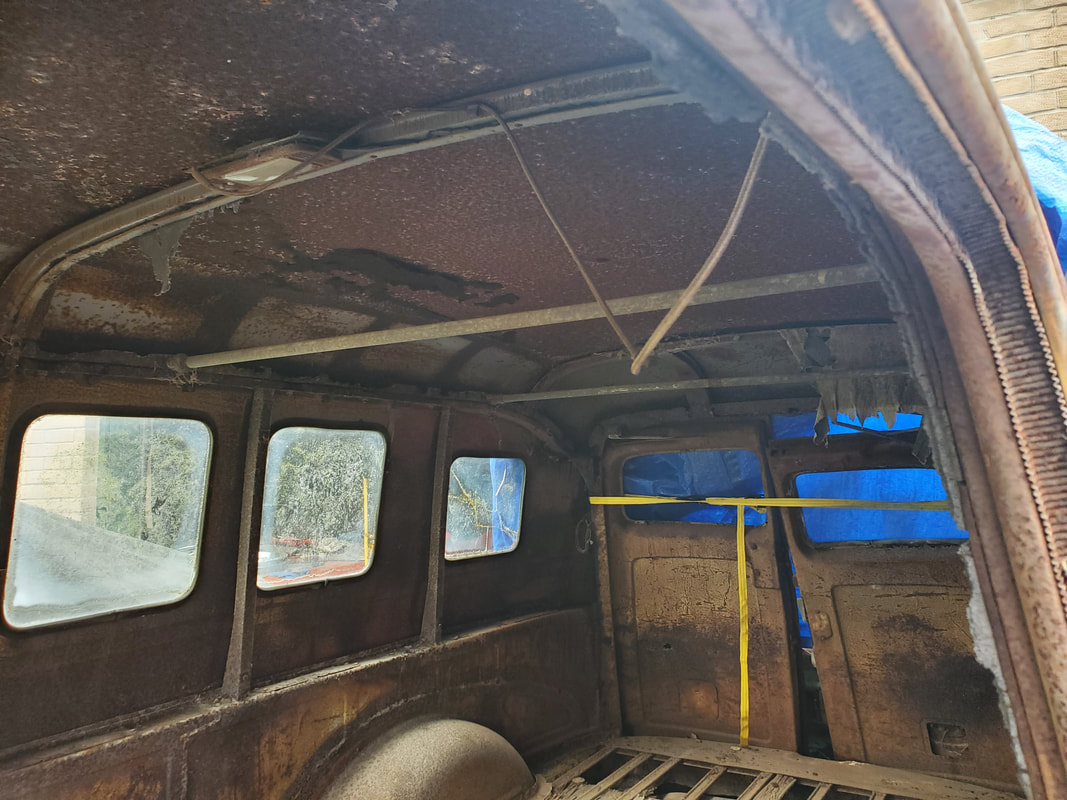 Rear ceiling of interior showing support rods and dome light. As for the rest of the interior, with the internal framework set up the way it is, it opens the door to a number of possibilities as to how I may redo the interior. One thing I do plan on doing that I would recommend is to research what others have done as it will give you a good idea as to how to set up your build. Depending on what you may use your vehicle for, you may choose to really build up the interior. Since we plan on using this truck in a combination recreational and utility stance, we want to have the interior be comfortable. While this would involve having full HVAC, it will also include things like soundproofing. This would incorporate sound deadening padding placed between dead spots along the inside of the body then be covered up with some type of interior panel to make it look more "homey" inside the truck. We may just ride around in this thing on the weekend or to get some things done and bring back materials for projects, or we may press this thing into service as an interstate traveler, going to bring back automotive parts or even a whole car with the use of a tow dolly since this truck has a hitch on it. 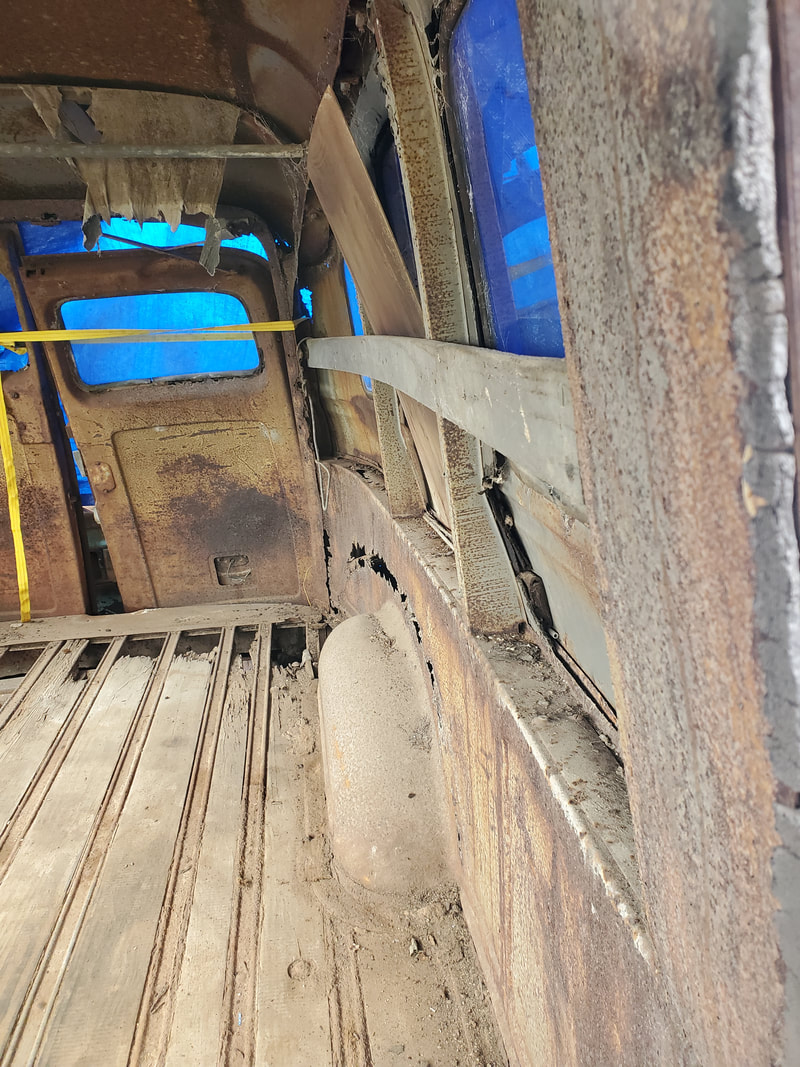 Rear interior showing how framework is situated inside. Now after doing some brainstorming I did think about the idea of removing the whole body of the truck from its old frame and installing it on an S10 pickup frame. Ironically we have a long bed single cab S10 that currently has a high mileage engine and a worn out transmission. The bed on the truck has already been crushed by a tree and patched up crudely. If the wheelbases are exact or at least super similar, then I will probably go ahead and utilize this truck's chassis as a donor to do a frame swap. The unique idea I had was one that involved keeping the EFI V6 powertrain in the S10 so even after the body swap, the 51 Chevy would underneath be a modern truck, using the modern powertrain and brakes/suspension. This would make the vehicle be even more desirable as an interstate traveler since replacing parts in the field would be much easier when parts can be had from local auto parts stores quick and easy. Even if I didn't want to keep the V6, especially in its EFI configuration, I could swap to a carbed intake for the V6 and either get a trans controller for the 4L60 tranny or just swap it out with a 700R4. I could also swap out to a SBC V8 instead of the V6. The accessory drive system on the V6 will bolt right up to the V8 so there wouldn't be much of a difference. Of course the only difference would be having to re-do the engine and transmission mounts if I go the V8 route. What's also funny is the idea that the I-6 engine originally in this truck probably has the power of a weaker V6 or even a 4 cyl, using only a dinky 1bbl carb. A 4.3L V6 with a 4bbl on it and a modern 4 spd overdrive tranny with lockup would probably surpass the old I-6/3spd manual powertrain greatly. Even if I swap out to a 5 spd that was also equipped in the S10, that would still put it ahead of the game. With the modern hardware that would allow this truck to get the decent fuel economy that would warrant its being used as an interstate runner. There will be more to come about this truck and our plans for it after we go pick it up and bring it back home. We recently returned from our trip to TX after taking time to enjoy a little vacation time for anniversary's sake as well as take advantage of the vast supply of automotive hardware that is littered all over the TX landscape. Our first destination was to Galveston Island in southern TX. We rented a pickup truck specifically for this trip due to the idea that I was ready to bring back a number of large items that would need to be hauled back in the bed of a truck versus in the trunk or floor of a van or SUV. Driving to Galveston was fun as most road trips tend to be since we get to see the landscape from the windows of a vehicle and get to stop in various places along the way, even if it is just to refuel, eat and go to the can. While in Galveston we took time to check out some tourist spots that offered something for the both of us. For me mostly I was interested in the Railroad Museum and Seawolf Park as these involve some tech, even if it is old tech. For the ole lady she was interested in checking out some of the old historic houses in Galveston, along with an aquarium and some other things. Really all of the stuff we checked out was of shared interest but for the sake of this techie oriented page we're going to focus on the tech oriented aspects of the trip. The first of these is the Railroad Museum. At this location there are all sorts of old railroad hardware ranging from locomotives and various rolling stock as well as some railroad oriented artifacts, staged inside a miniature museum built within and between a couple of rail cars. 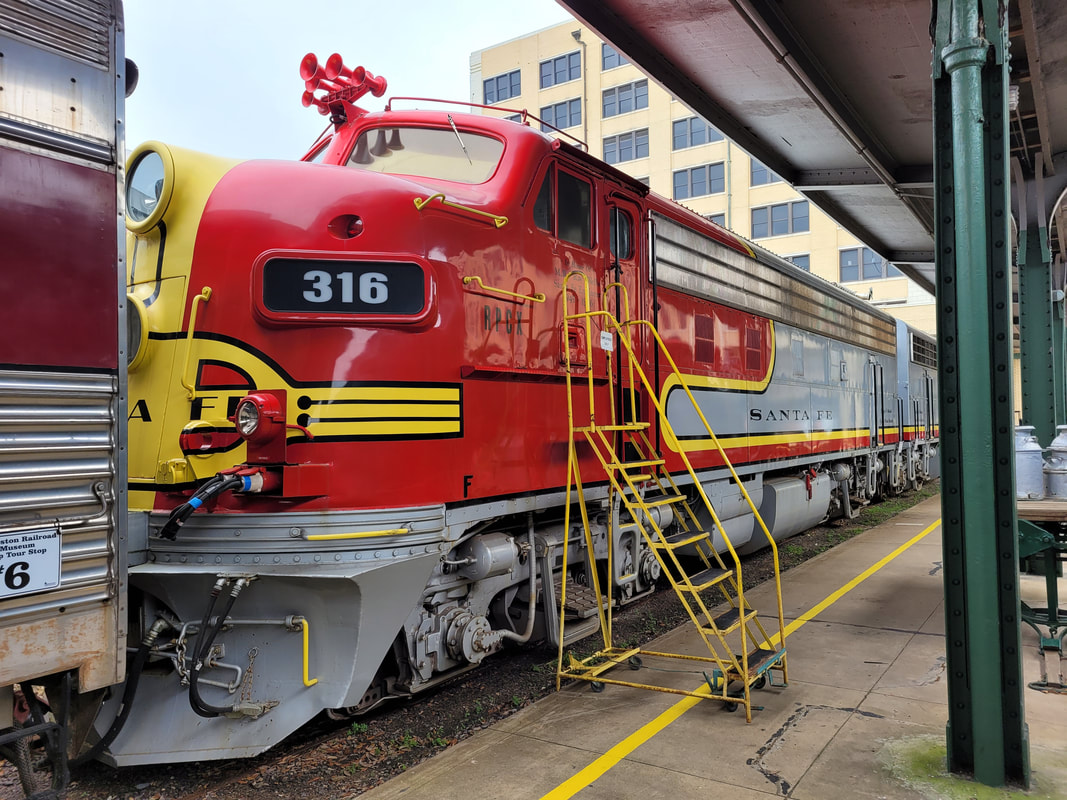 Old Santa Fe Diesel Electric Locomotive, around the 40's-50's vintage. Walking through these rail cars and looking at these items they had takes you back in time to how this means of transportation and the industry that depends on this technology. Looking at the styles of the locomotives and the rolling stock like the passenger cars and comparing them to the modern tech of today is interesting since it shows how things evolved as the tech evolves and tastes evolve. 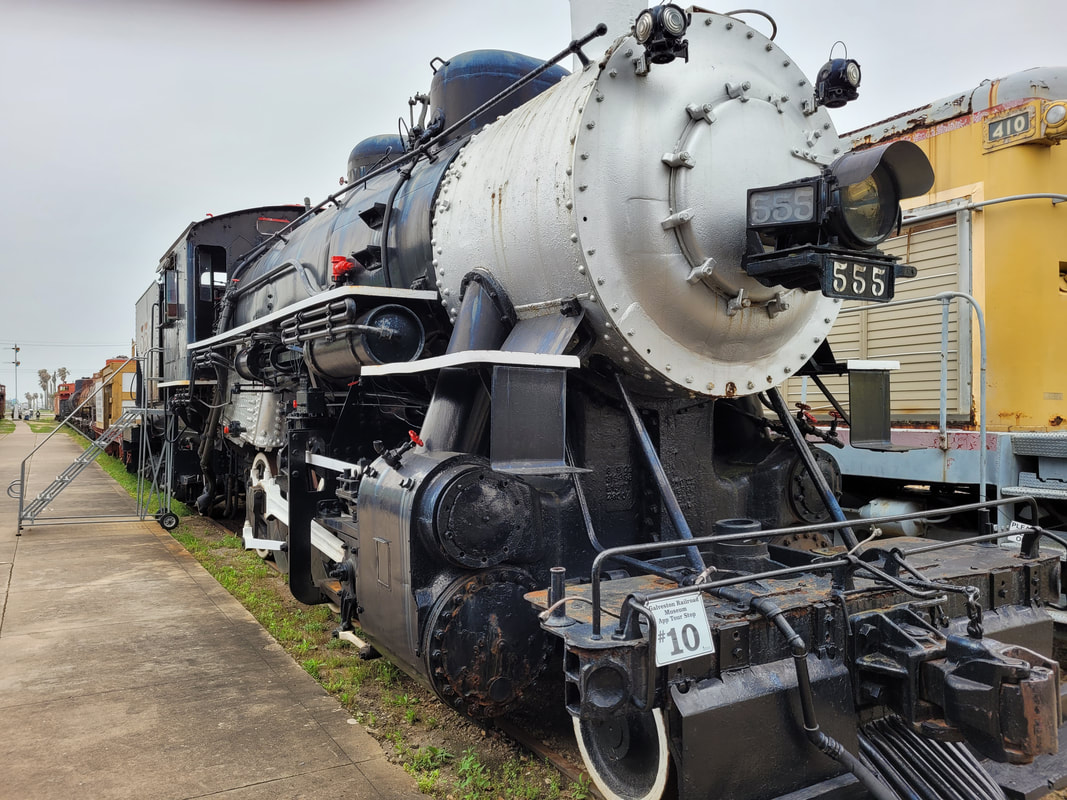 Old steam locomotive 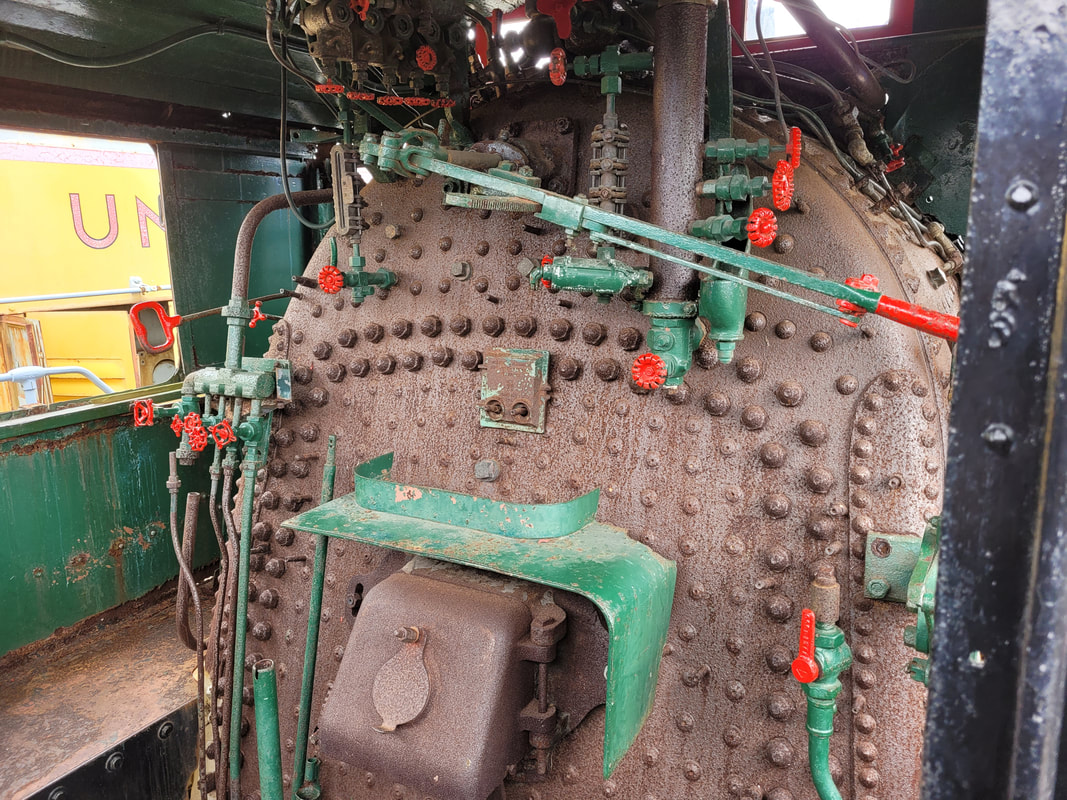 Firebox/boiler of steam locomotive. What was cool about this place was the idea that you can go inside many of the locomotives and rolling stock. Being able to walk through a caboose and seeing how they were set up inside for the railroad crew that rode on those trains back then was interesting. Seeing how the passenger cars were set up and the styles used for the interior as well as the accommodations even for those distant times was interesting as it gave you a feel of how a passenger 30, 40, 50 years ago rode across the country. 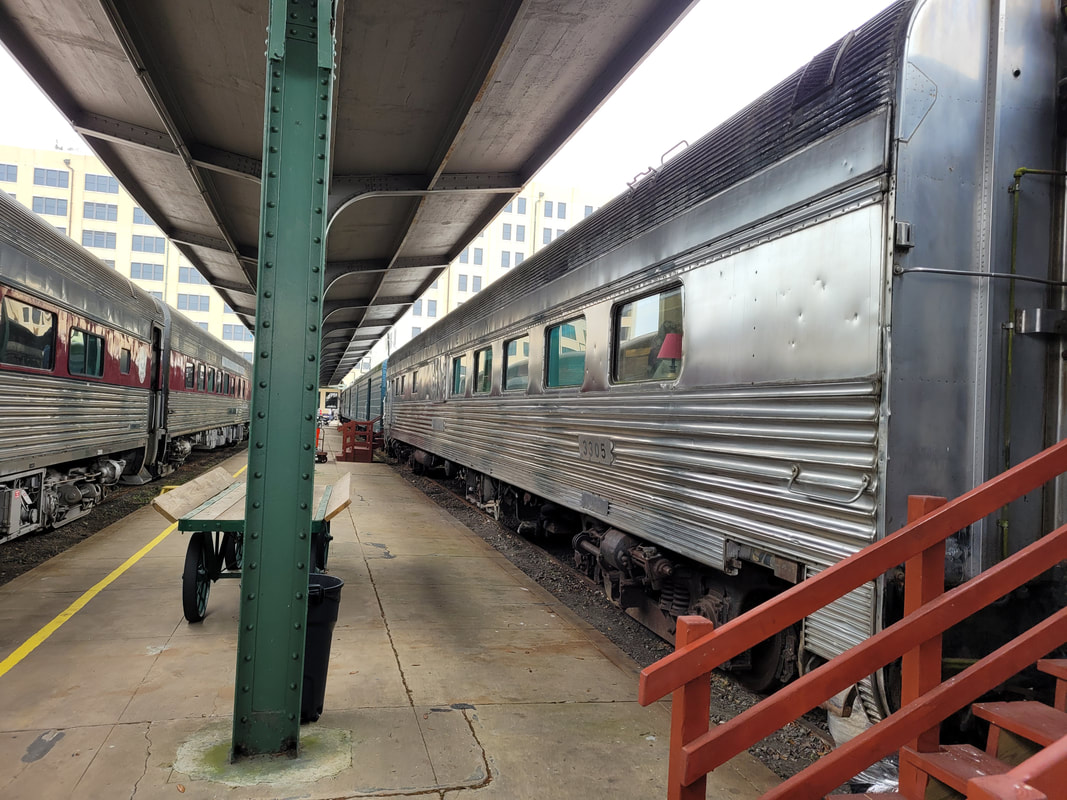 Later model passenger cars, most likely 70s, parked along the old rail terminal that this museum is built around. 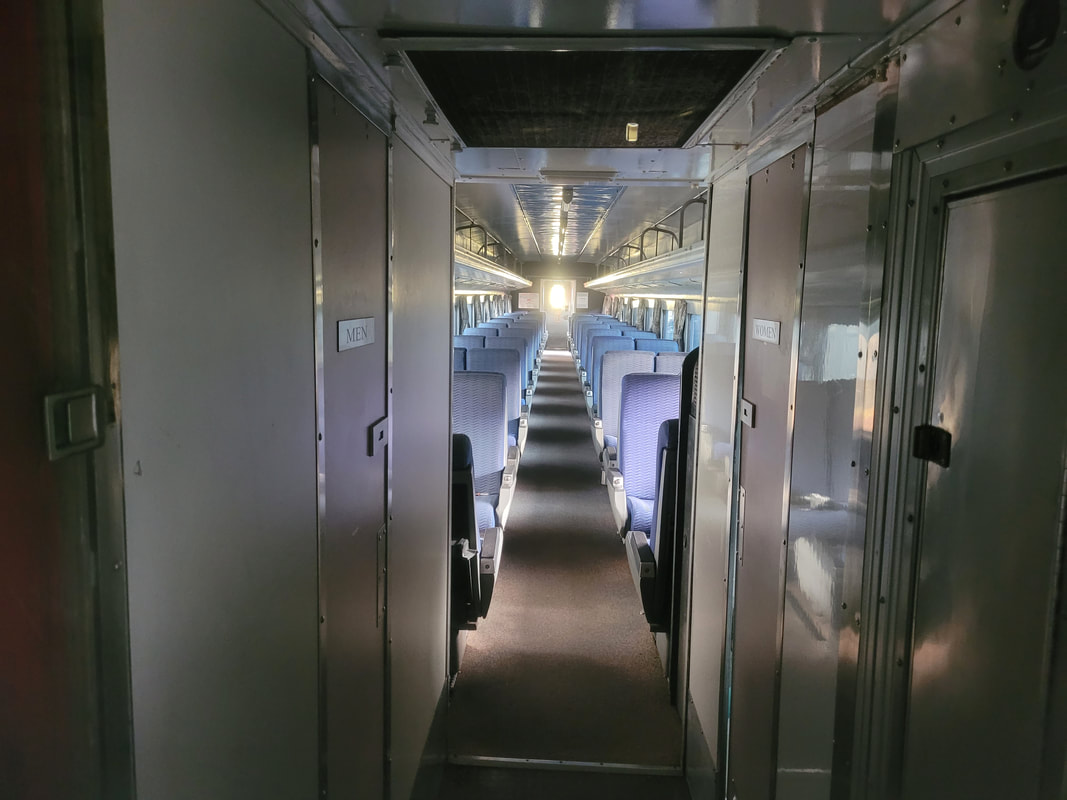 Shot of a later model passenger car from the entryway inside. 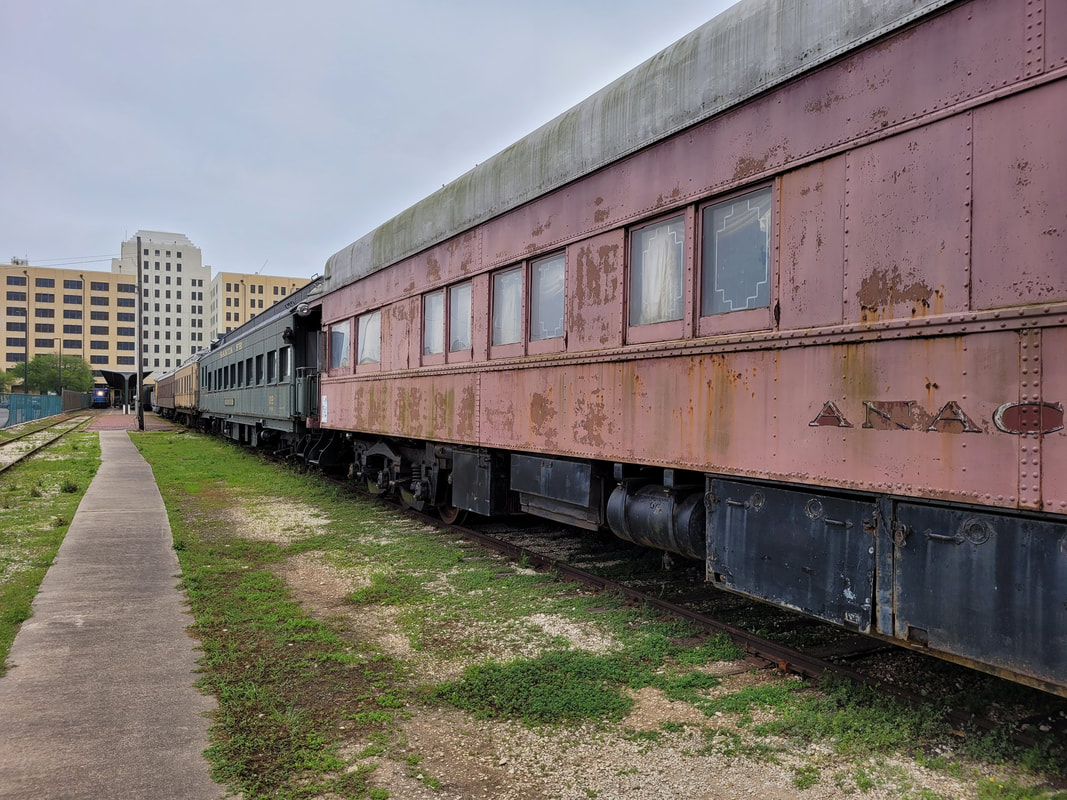 Older passenger cars from the middle 1900s to earlier, possibly pre-WW2. We weren't able to go inside these as they are super old and in a state of decay. Climbing inside the later model locomotives, and being able to take a look inside the panels at the machinery opens one's eyes at how these huge machines are built and would operate. The huge diesel engines inside power electric generators that power high torque electric motors to help pull the long trains that we typically see crossing the rails every day. Seeing how the engineer's cab is set up also helps one to understand what these people typically do and have to endure when they're piloting a train cross country for what amounts to hours and hours. These guys are much like our truck drivers, with the exception that they are stuck on the rails unlike truckers who can take different routes and stop in various spots along the way. 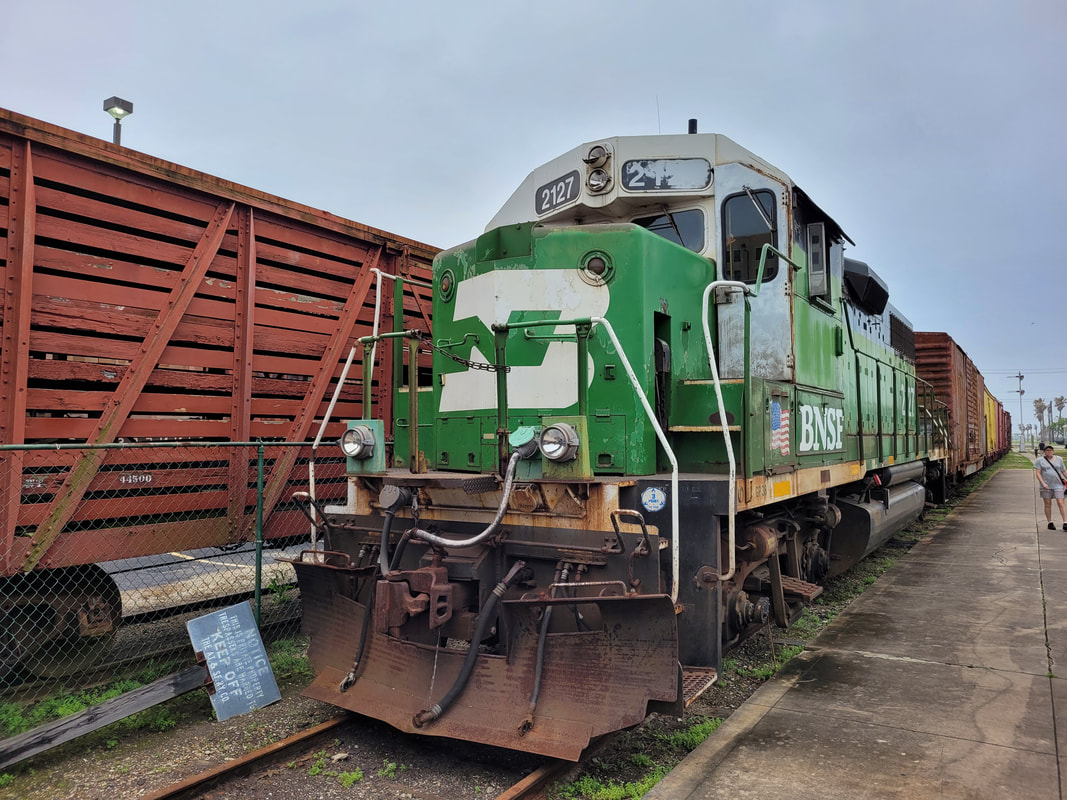 Late model locomotive typically used on freight lines, retired and now a museum piece. 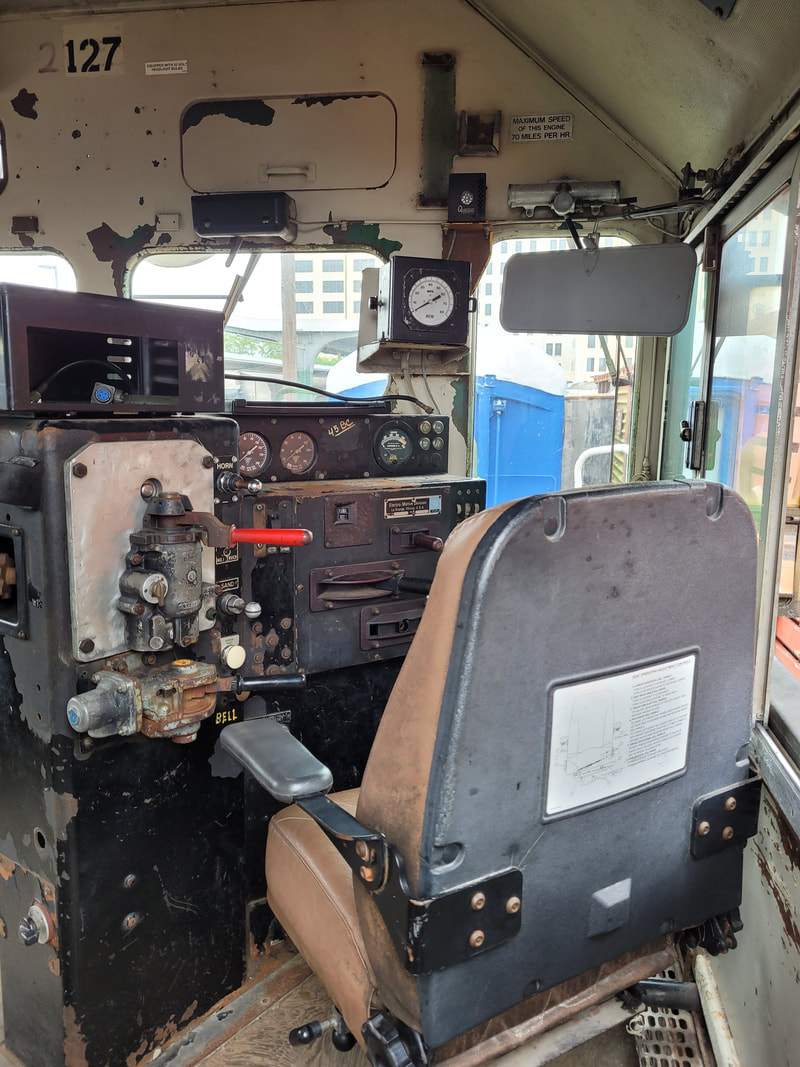 Engineer's seat and controls of same locomotive.  Some of the machinery of the locomotive. For anyone who likes trains and railroad history this would be a place to check out. As stated, being able to go inside these machines to see how they're set up is a good educational experience that kids and adults alike will enjoy. 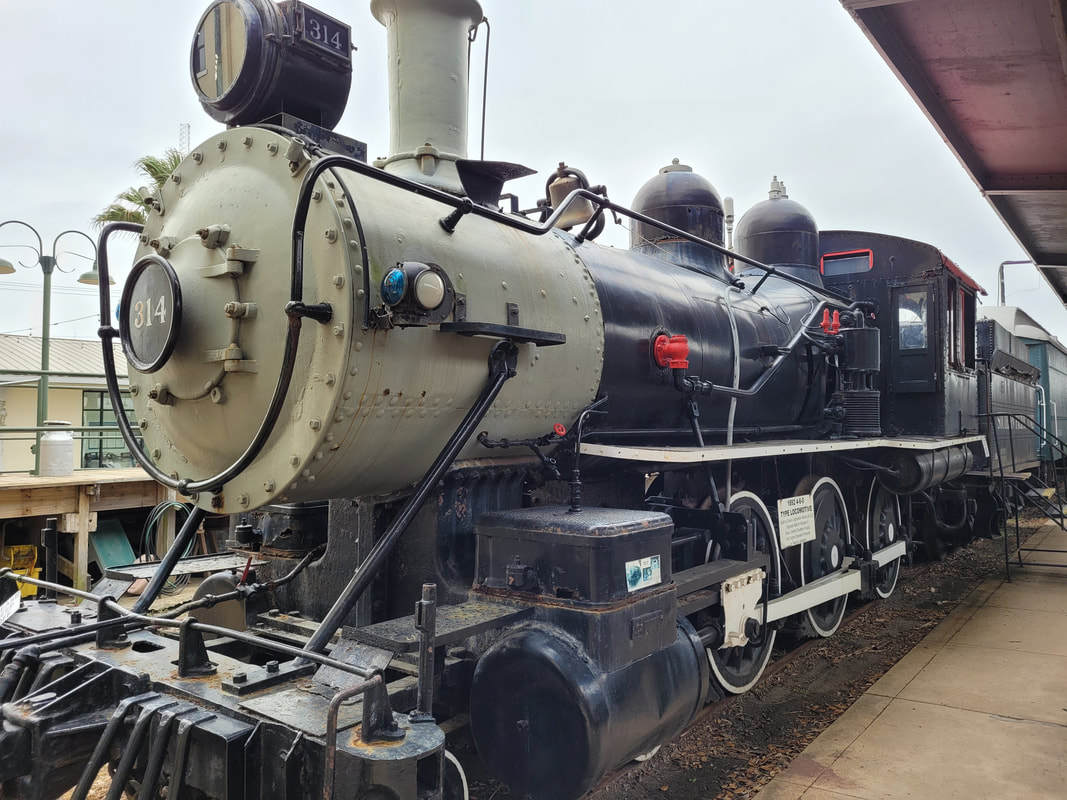 Another old steam locomotive, but an oil burner. 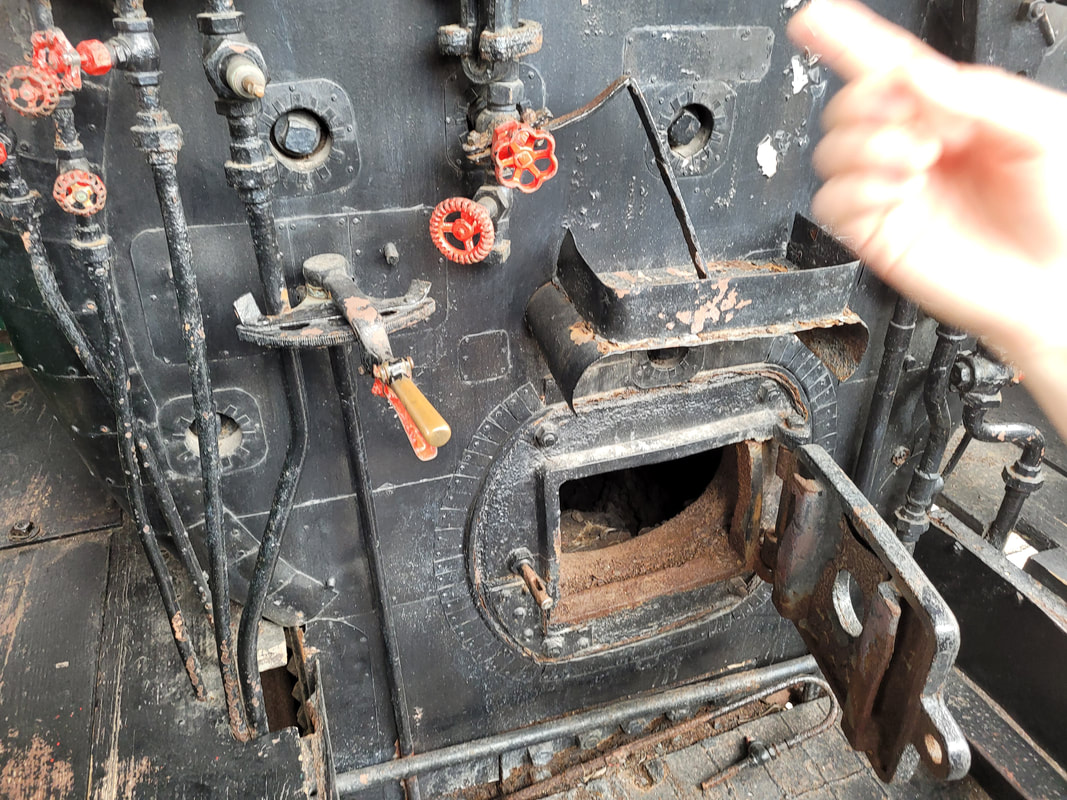 Firebox where oil fire would be ignited and checked during locomotive's operation. 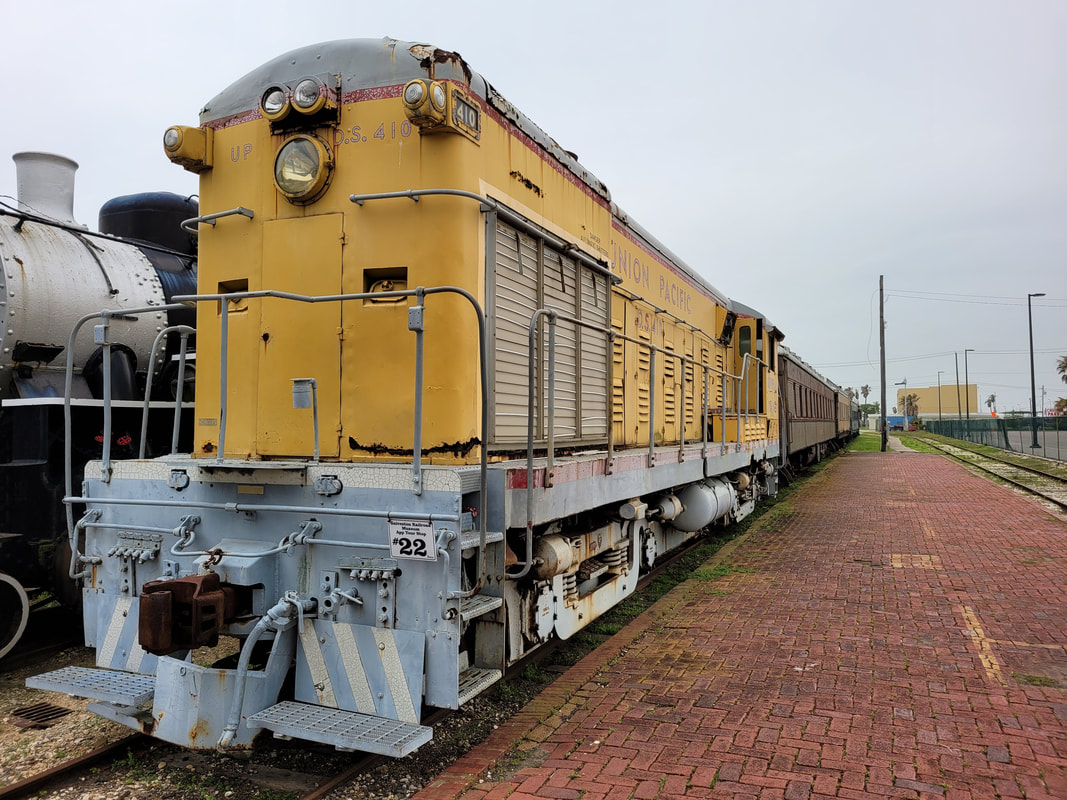 A mid size locomotive, one that might be used for short distance freight runs with lesser rail stock, or used in staging multiple cars in a marshalling yard. Another thing that was cool about this museum is that they offered a short ride on a train that leaves the station where the museum is located, goes about a mile up a spur line from the station just before it gets to a commercial line that's still in use, then returns to the station. The locomotive is a small switching locomotive towing a caboose set up with benches and some outside standing areas. Few select riders get to ride in the locomotive to watch the engineer operate the locomotive while the "conductor" talks about some of the railroad history and points out some things along the route that we passed by. We of course were blessed enough to be able to ride in the cab with the engineer and conductor so that was a little extra treat during this excursion into history. 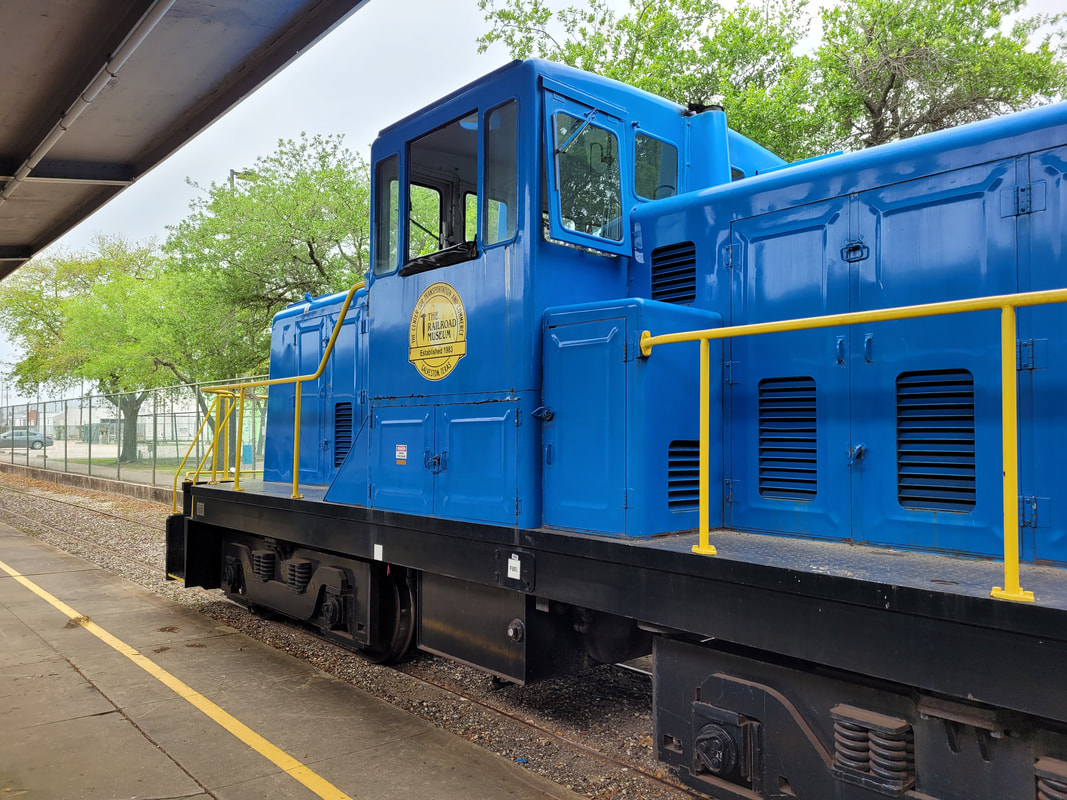 Switching locomotive used for train ride at museum. 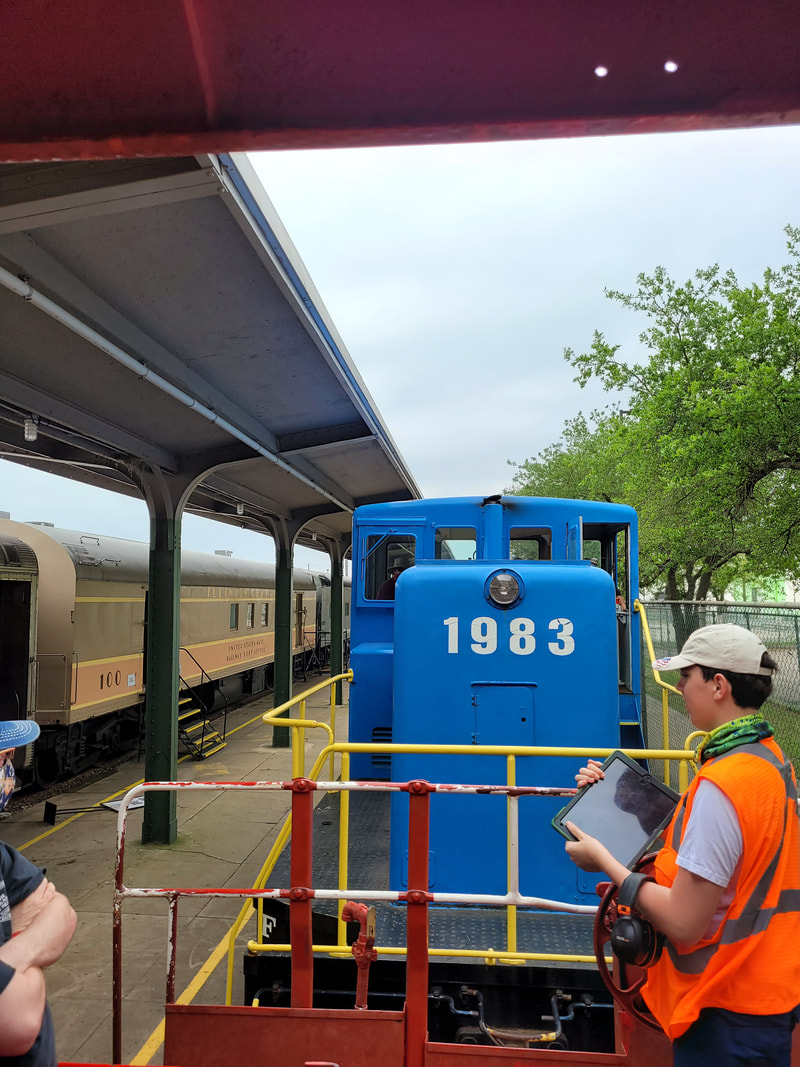 Shot from balcony of caboose before train left station. 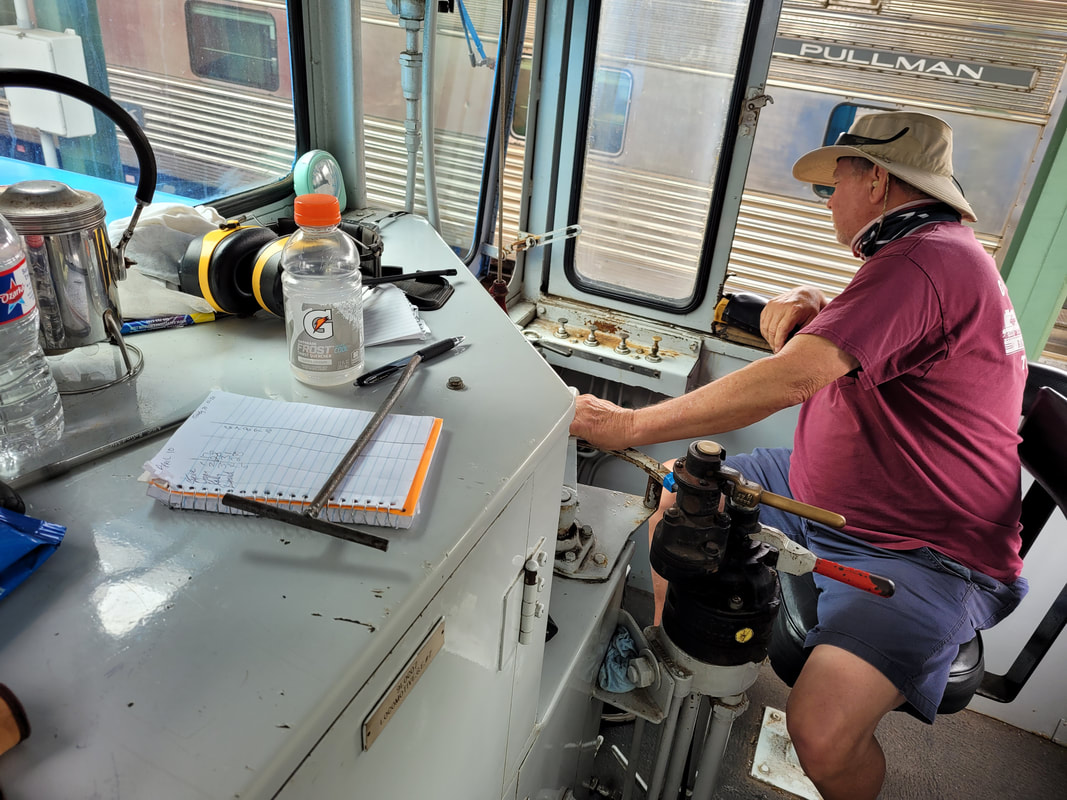 Shot of engineer operating train. The other tourist spot in Galveston that we checked out was Seawolf park. Here there are two WW2 ships set up here on the ground. One is the submarine USS Cavalla and the other is the Destroyer Escort USS Stewart. Of course you're able to go inside these two ships to see how they're set up inside and get a glimpse into how the sailors lived and operated during WW2 and beyond as these ships served during their time in the Navy. 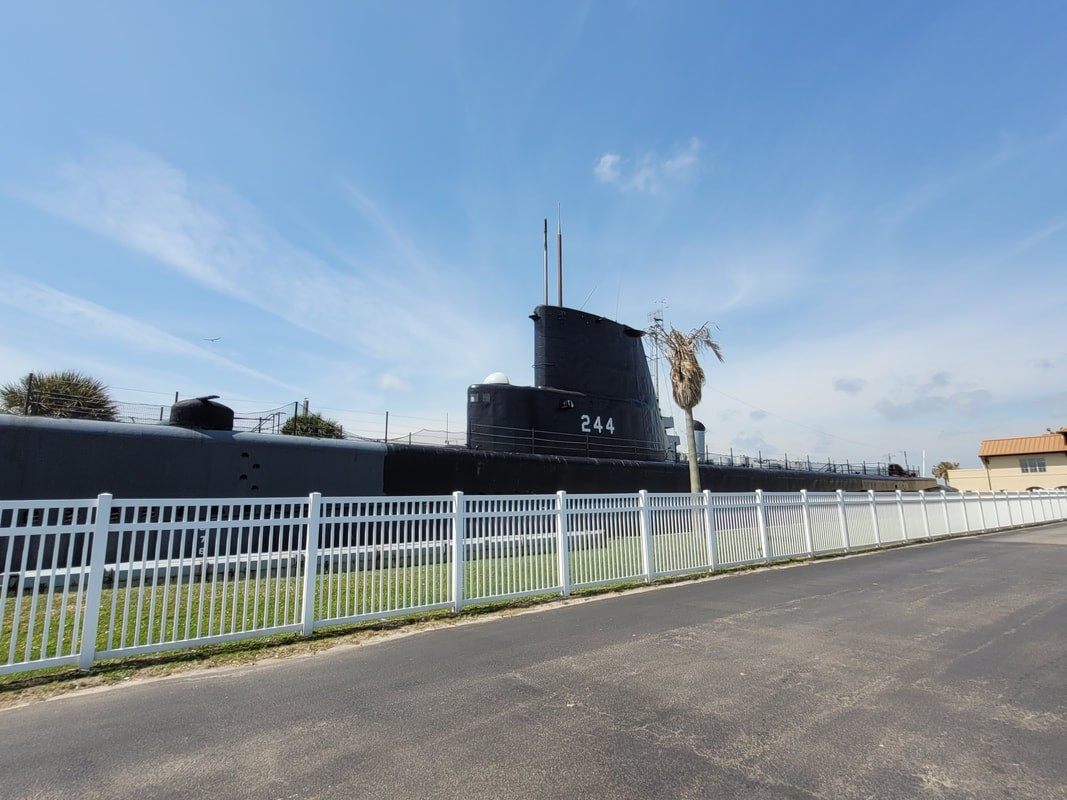 USS Cavalla at Seawolf Park. 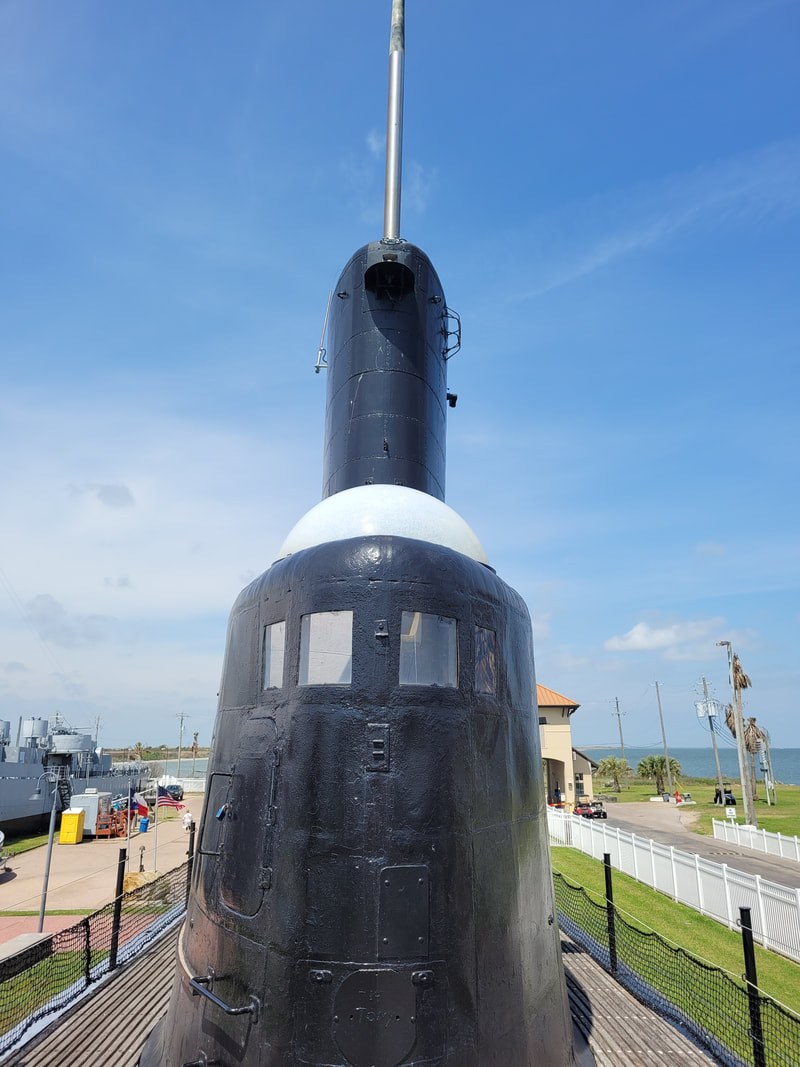 The conning tower, or sail, as this structure was known on the Cavalla, after being upgraded to the GUPPY configuration post war. Going inside the Cavalla shows what nerve one would have had to have during WW2 as the quarters are very tight in this ship. Since this sub was home for many for weeks to months on end, one would have to be used to tight quarters, not claustrophobic as they would be sharing quarters with many dudes, no matter where they are in the ship. Even the officers were not exempt from having to deal with the tight quarters of this ship. 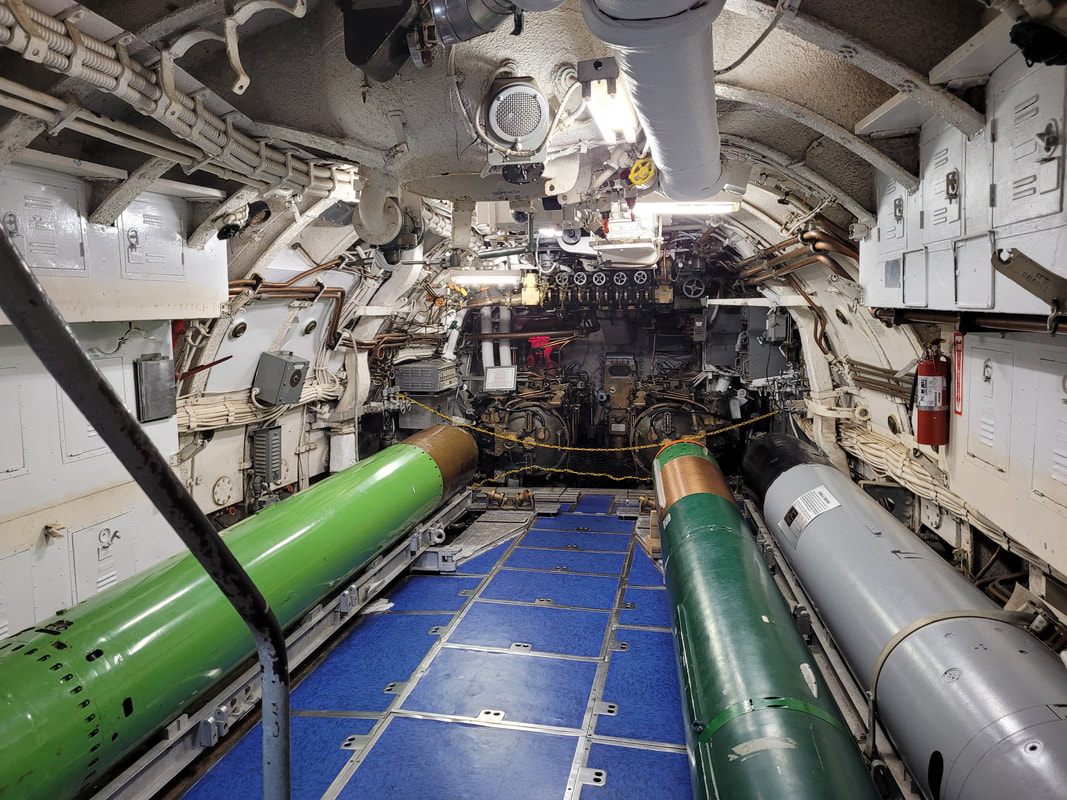 Forward torpedo room. 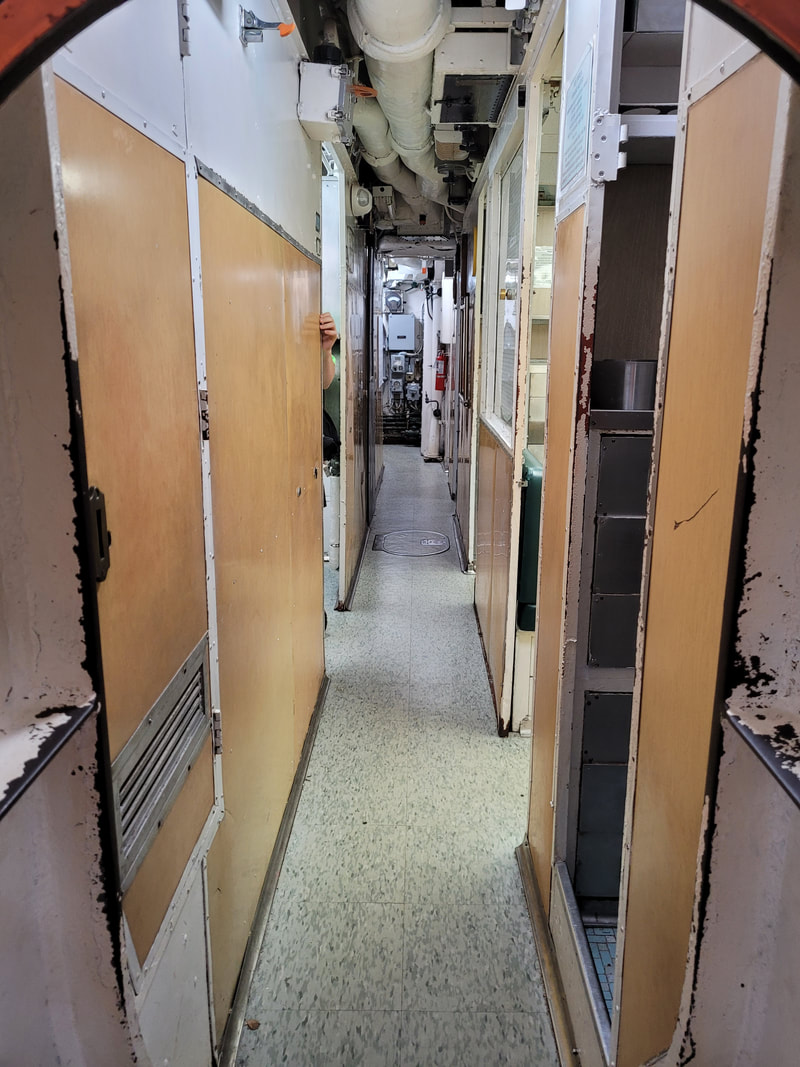 Central corridor through sub, showing how tight the quarters are. On either side are the different facilities of the boat. 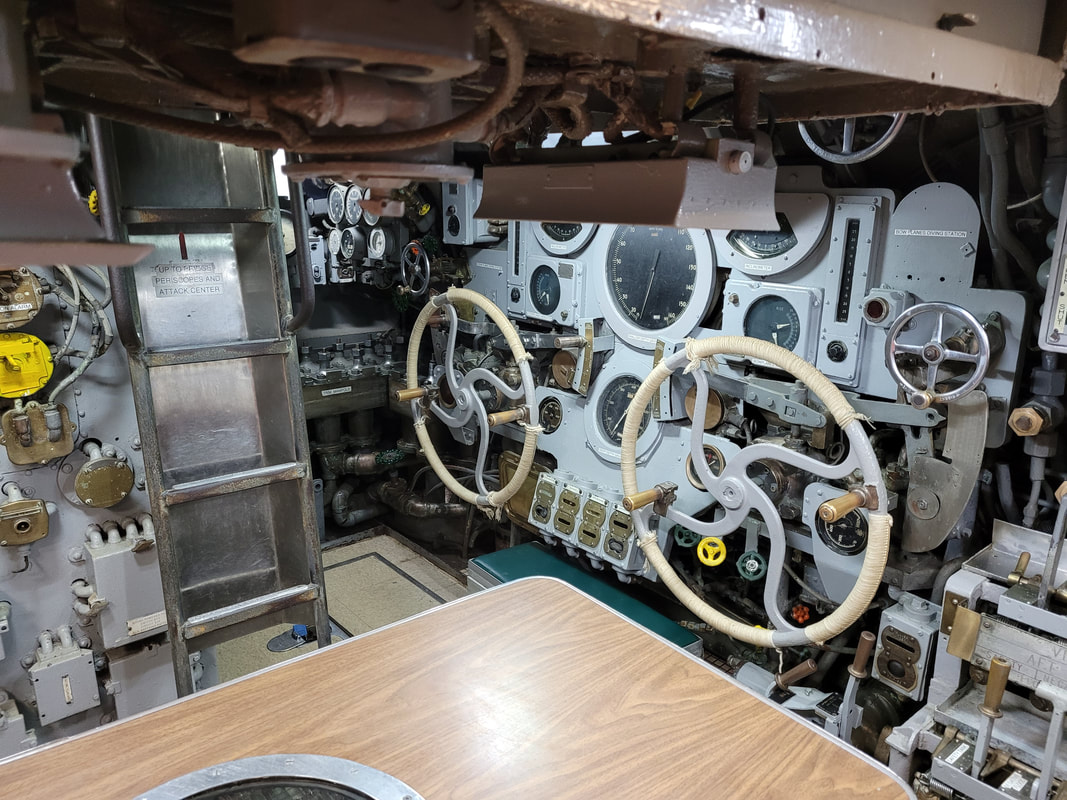 Steering controls in control room of sub with chart/compass/map table in foreground. What also fascinates me was the idea that the tech used in this ship, a ship that would go underwater and chase down other ships to destroy them, tasks that you would think require a lot, are rather primitive compared to what is used in running machines today. If we were able to tour a sub of today, it would make this sub look like a wooden sailing vessel being compared to a metal battleship. 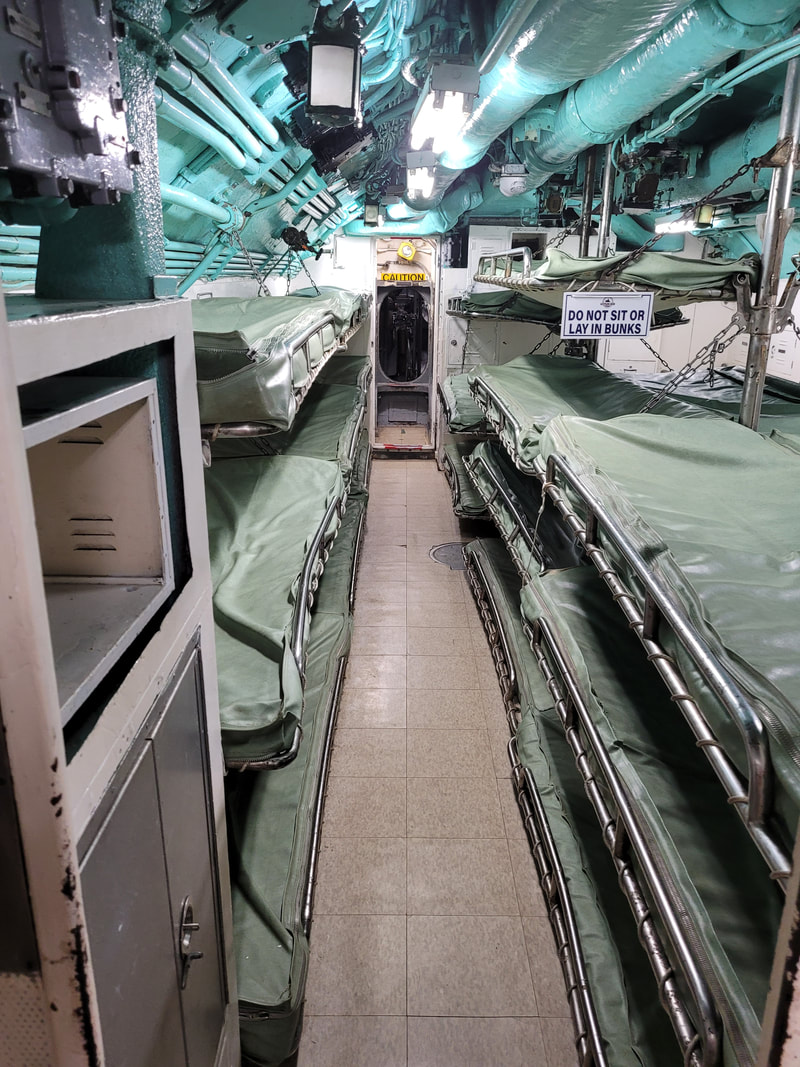 Bunks inside sub, showing just how tight things are, even when sleeping.  Proceeding into the machine shop and other powered equipment inside rear half of sub. 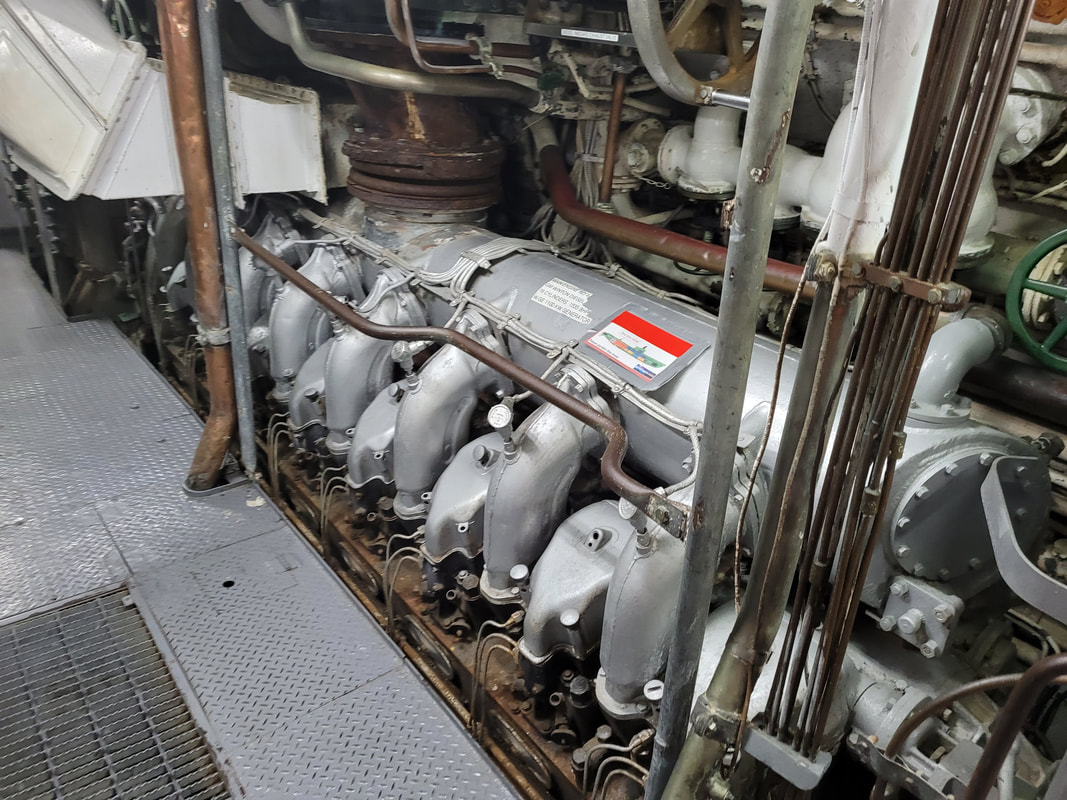 One of the four diesel engines used to spin the electric generators that powered the electric motors that propelled the sub through the water. 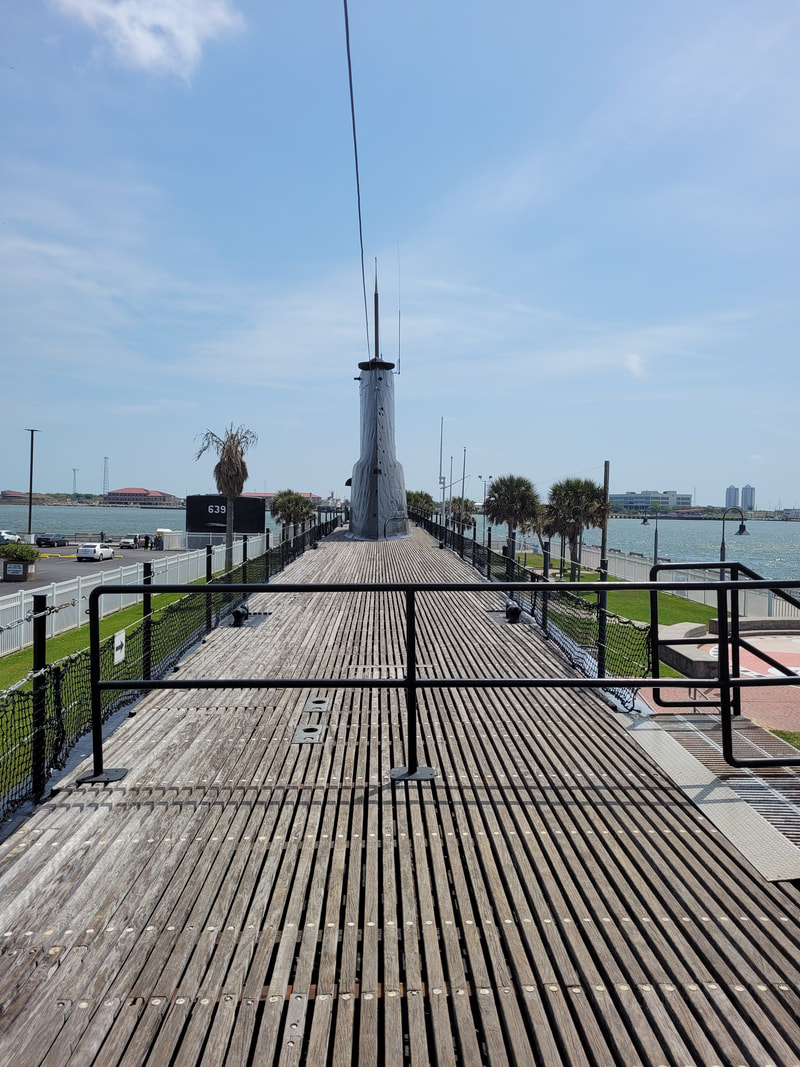 Leaving the Cavalla from the rear part of the deck. After leaving the Cavalla we proceeded to the Stewart, climbing on board to check out what the life was like on the ship that was the submarine's worst enemy. This ship was of course larger than the Cavalla but still tight for all intents as this ship was built for speed and carrying enough ordnance to ensure that any sub that fell prey to it would not resurface. This ship has weapons to ensure a sub's destruction as well as ensure that any aircraft that may attempt to attack will also be in for a rude awakening. 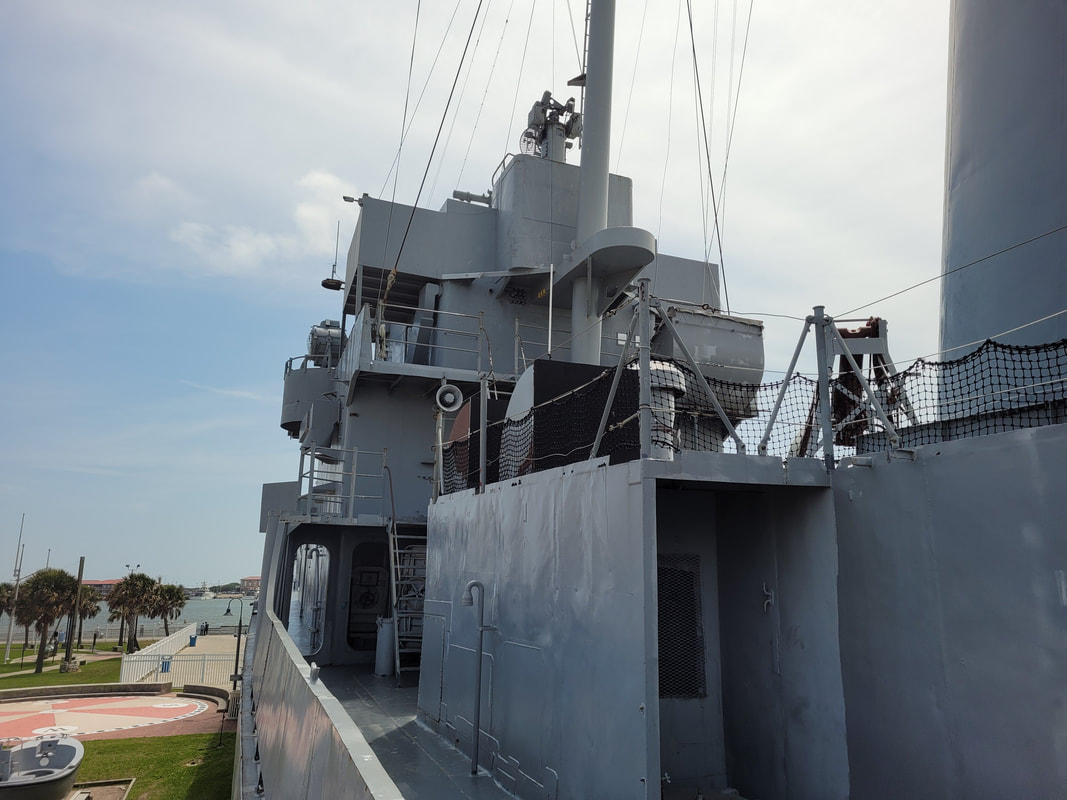 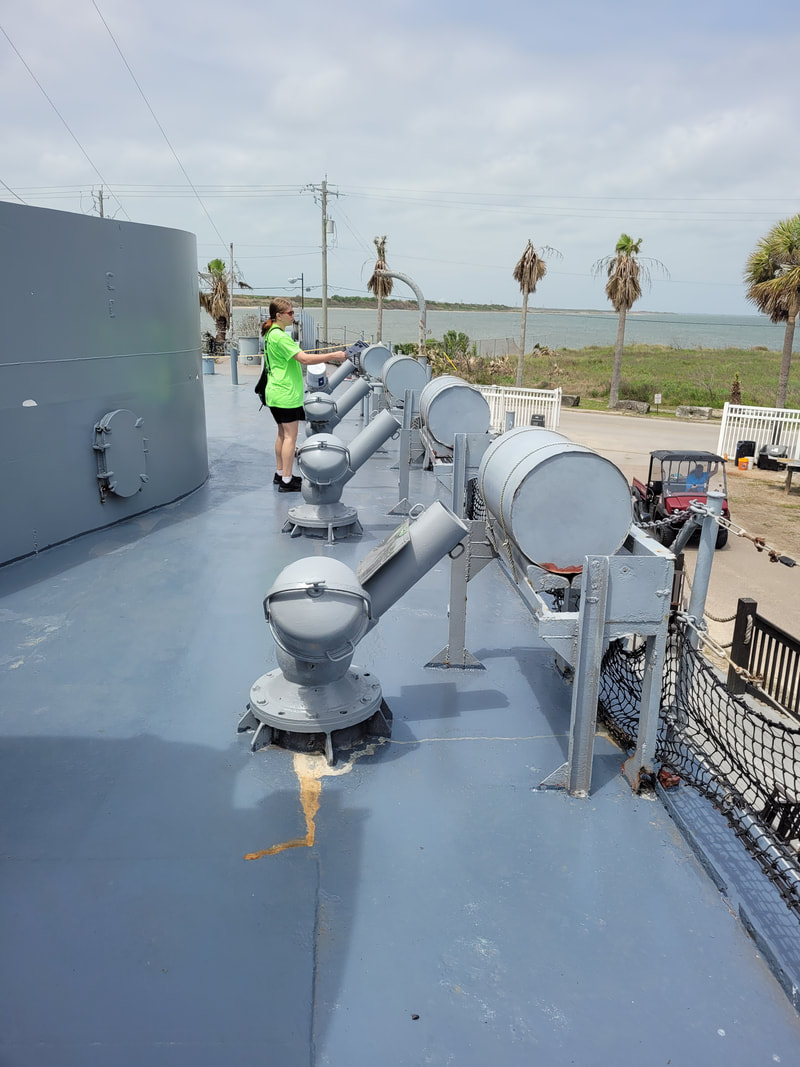 Depth charge projectors along the sides of ship for allowing destroyer to gain a wider coverage of surrounding waters to blanket submerged submarine with charges.  Depth charge rails at rear of ship for dumping a mass of charges behind the ship as it passes over presumed location of submarine. 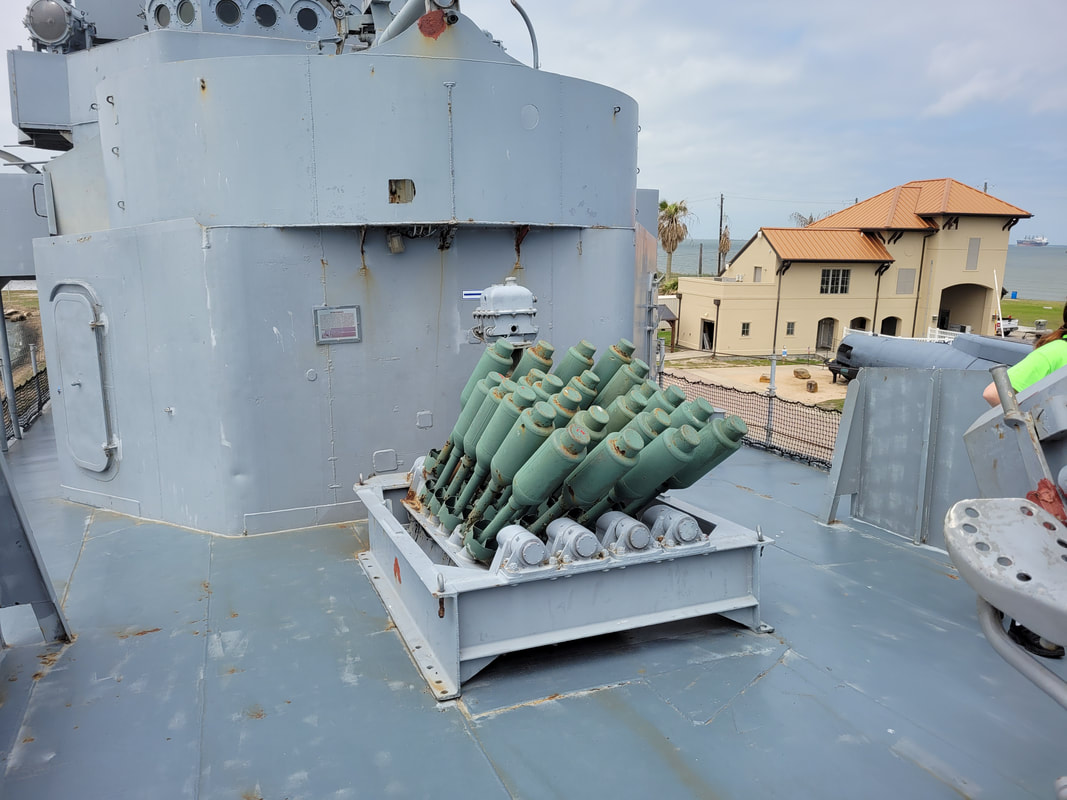 Hedgehog anti submarine mortar projector for blanketing an area with small bombs for killing a submarine. 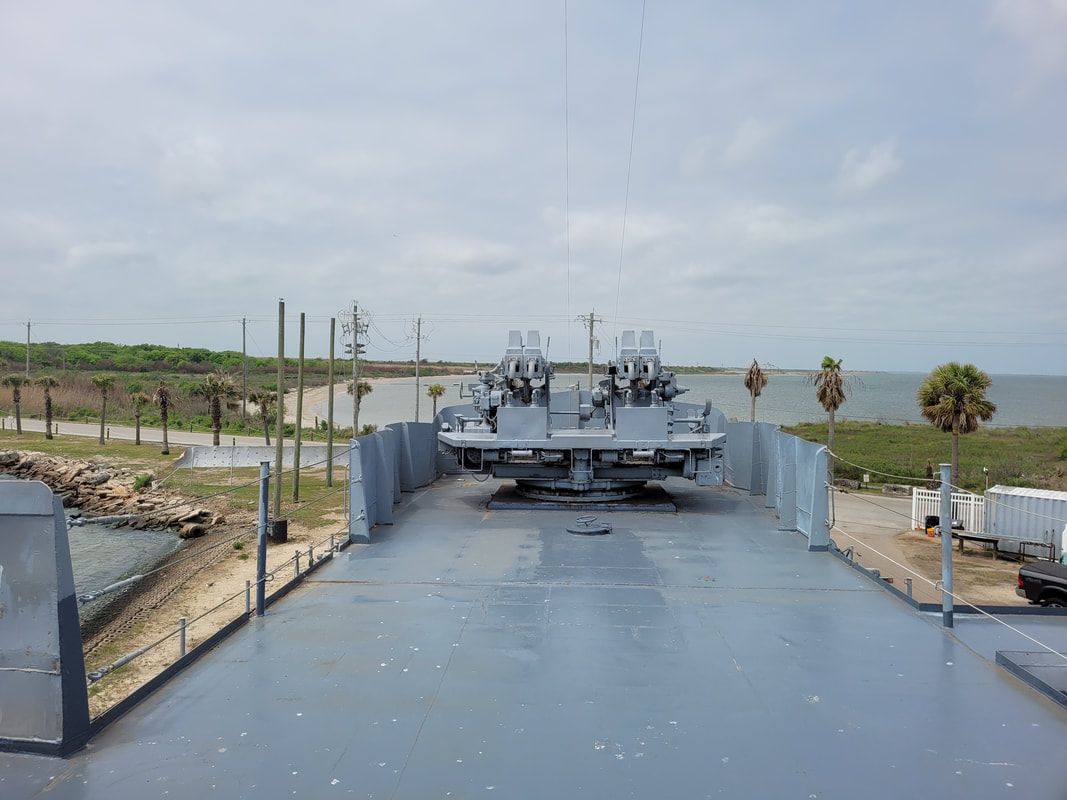 Twin 40mm AA guns at rear of superstructure upper deck. At least on the Stewart the accommodations are a little wider allowing for more freedom on the ship unlike the sub. The bridge has plenty of wiggle room as well as some of the quarters and equipment rooms on the vessel. Even the recreation/dining areas are more spacious than the sub. Of course what that means is it takes a unique kind of dude to be a submariner. 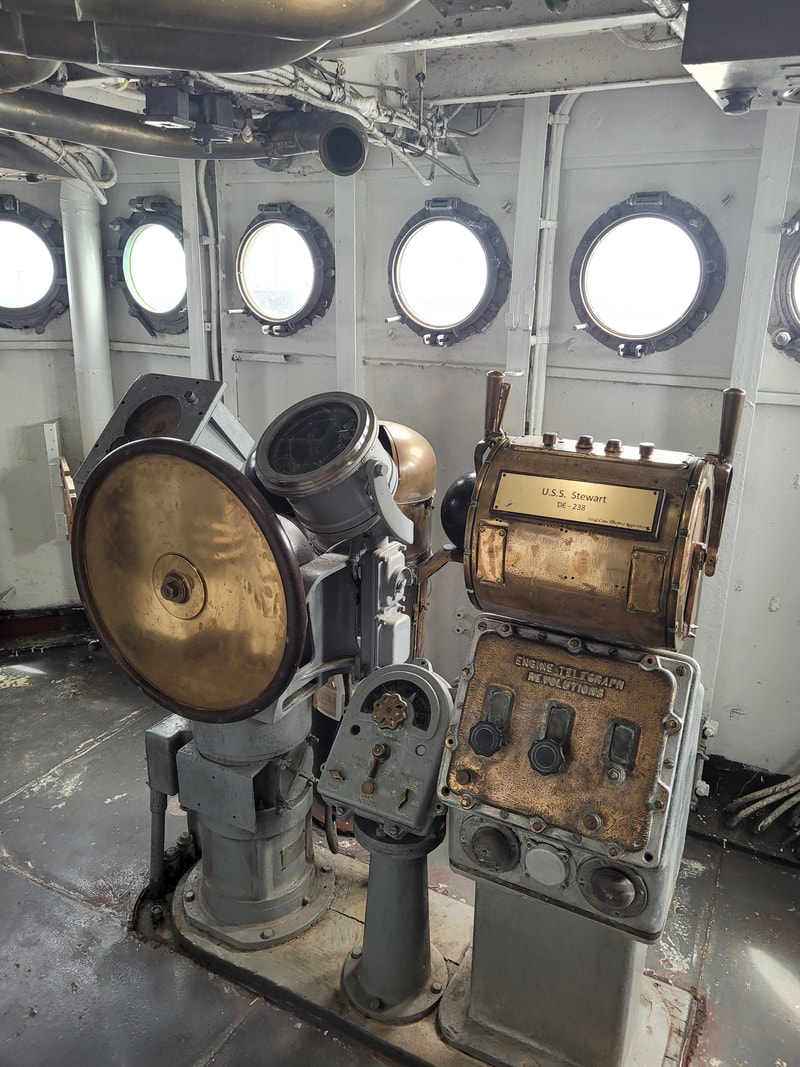 The bridge with the steering and speed control telegraph. 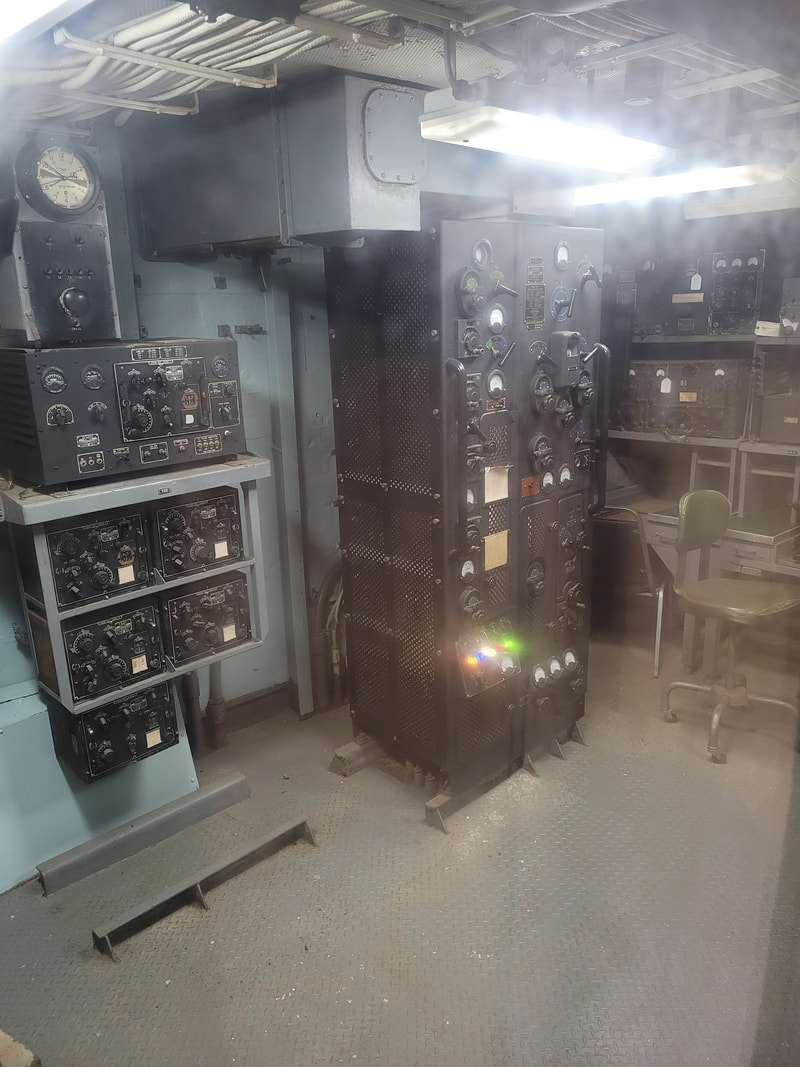 Radio room and its associated equipment.  Small portion officer's quarters, way more room. 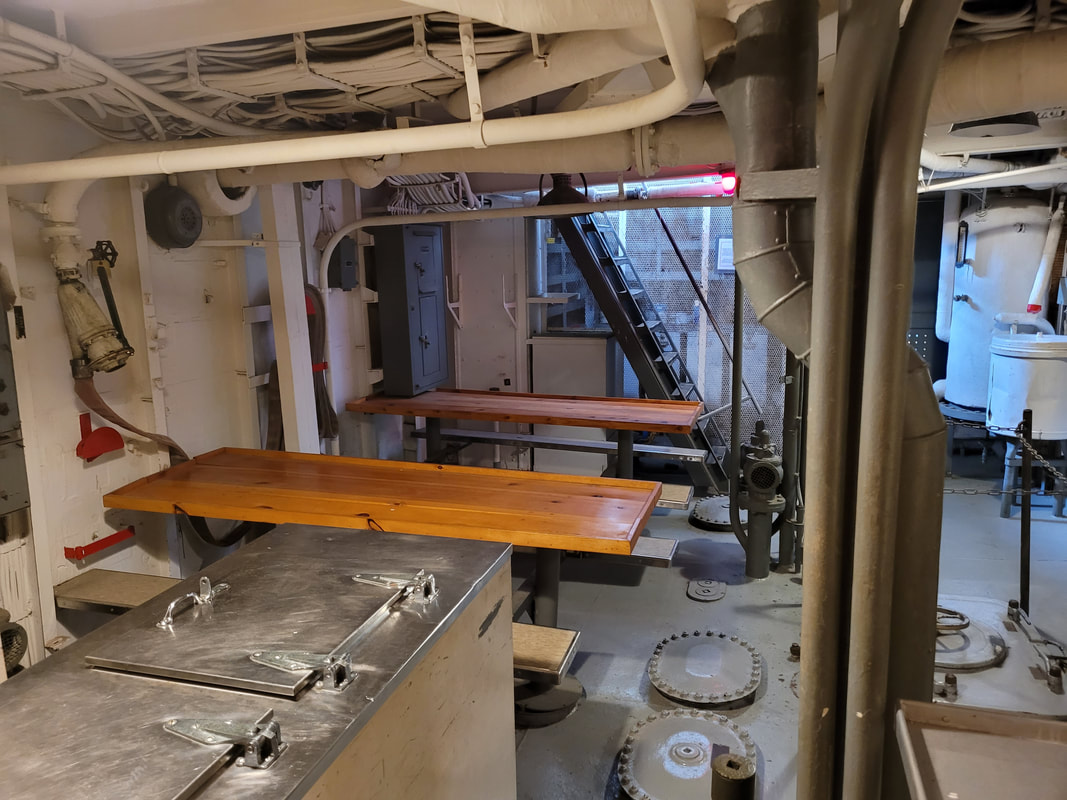 Part of the lunchroom of the ship, way more room to move about. Even though the destroyer was way more spacious, I still have a fascination with submarines and the idea of being able to go underwater despite the tight quarters of the old subs. To each his own I guess. But with that it was time to get down to business. The first place we checked out was a local salvage yard in Galveston, where they pull the parts. They just so happened to have one 5spd M5OD manual transmission for an early 90s Ford F150 with a V8 engine. I'm in the process of building our own FMT (Fort Muscle Truck) and wanted to convert it to manual transmission so as to be able to take transmission problems out of the equation when it comes to long distance driving and hauling. The guy had the tranny, flywheel and whole clutch for $450. We grabbed that and came back the following day to pick it up after they pulled it from the truck. That was round one. Round two took us into Houston after checking out of the B&B to look at an old 1951 Chevy Suburban panel truck a guy had. This is a rust bucket of a car but a diamond in the rough because, well its a 51 Chevy!. Well after looking at it and talking to the guy, $800 less in my pocket and we're now the proud owners of a 1951 Chevy Panel Truck. Since we didn't have any provisions to pull the truck back, we will have to come back later on to retrieve our new prize. 1951 Chevy Suburban Shot of dash and steering. Shot of wood paneled floor From here we crossed over to the west of Houston to meet up with another fellow car guy who had some 65 Mustang floor pans for sale cheap. Since we have to replace those pieces of sheet metal this was an easy buy. Meeting that dude was a pleasant experience as he moved up to restoring the exact old trucks like the one we purchased. He had three of them in his garage/driveway. One was a daily driver, one was a truck he actually rents out just for photo shoots where it isn't even driven but merely parked and staged for said photo shoots, then the other was a work in progress. He also had several super old motorcycles he had built or was working on. These aren't the motorcycles you might've seen on "Happy Days" but the motorcycles that would put you in the mind of a heavy duty bicycle with a small engine on it, when motorcycles were literally in their infancy. All cool stuff. So after chatting it up about cars and stuff for a minute we had to hit the road and head on up to Dallas, the next leg of the journey. Once we made it to Dallas and checked into the hotel for the night with some food from one of the chain truck stop gas station novelty stores that are common in Texas, Buc-ee's, we planned out the next day's runs. This would involve going to check out an engine/tranny combo that a guy had that he pulled from an old RV. This was a mopar 413 big block with a 727 Torqueflite transmission. The RV had 44k miles on it, and was shown since the guy pulled the gauge panel from the RV with the odo reading on it. He even had the powertrain set up on the ground resting on a tire but wired up to a battery and a hose from the fuel pump going to a bottle full of gas to allow him to start the thing up to demonstrate that it does run. Even without mufflers and a leaky carb, the engine ran very smooth and quiet. So $600 less and a few minutes with a front end loader and some chain, we were now 800 lbs heavier with the mopar powertrain on board. Next and our final stop was a dude north of Dallas that had a rear bumper and transmission crossmember for our 1976 El Camino. These are the bumpers with the taillights built in, very hard to find. Plus our car was missing the crossmember. Both parts when found command a pretty penny. This guy let these two parts go for $120. That was a no-brainer. So into the truck those parts went. With our parts supply run complete, we went back to Dallas and checked out a 2nd hand store to grab a couple articles of clothing for ourselves, then went to the Gas Monkey bar and grill plus went to their gift shop to get some T shirts and get a look at their operation from the outside in before hitting the road to head home. After getting home we unloaded everything, staging the engine and transmissions in the garage where they will be installed in their respective vehicles whenever. The mopar powertrain may or may not enter the Dodge's engine bay, but if it does, it will be documented here. If not, then it will be a powertrain that is available for us to drop into another mopar project we may find ourselves getting our hands on in the future. Of course the F150 will be dragged up to the garage to install the engine and transmission when the time comes to do that phase of that project. The Elco parts were staged in the bed of the car where we will obviously need them when the time comes to work on that project and get the body put back together. 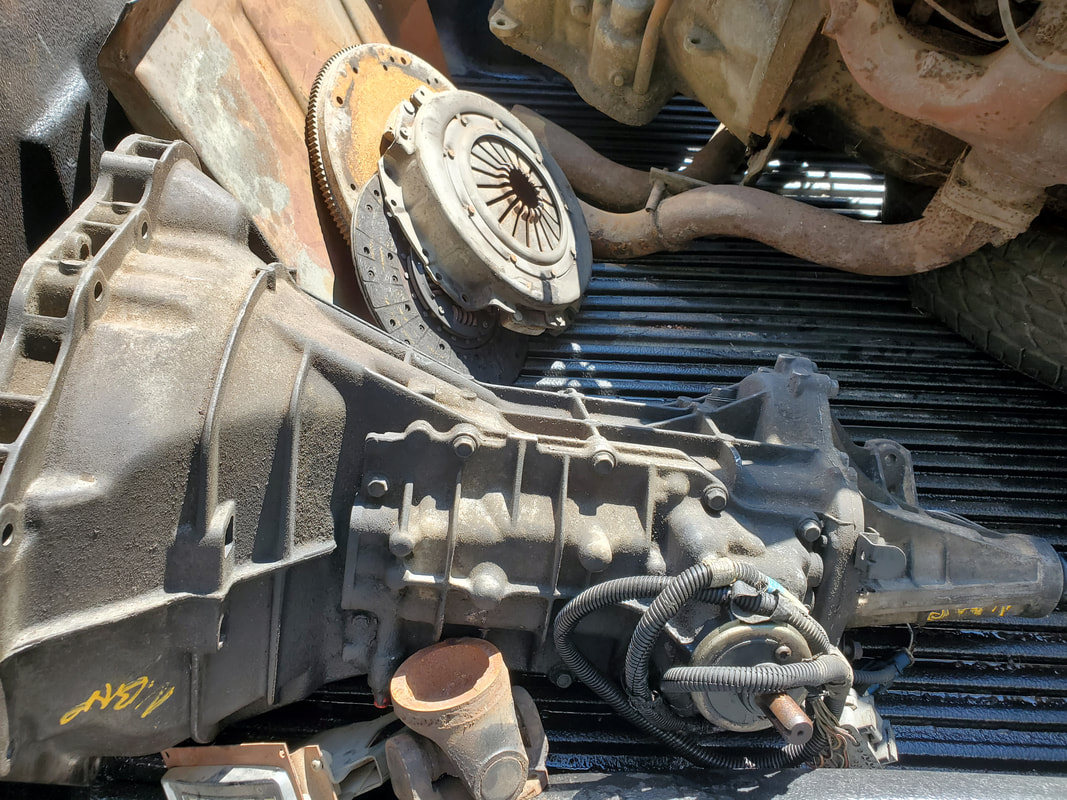 M5OD tranny and other small parts gathered during TX trip. 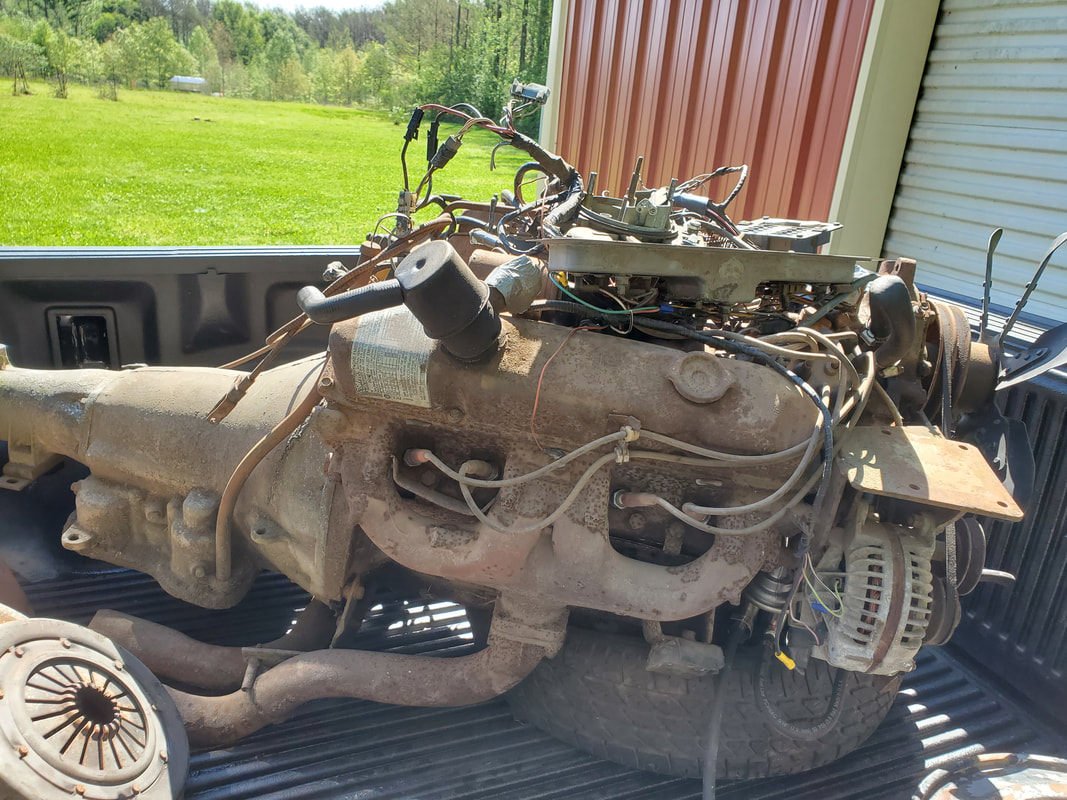 Of course after returning and getting settled in from the trip we had to immediately reserve another truck so we can make the run to go pick up the 51 Chevy. We will end up needing to get a 3/4 ton diesel truck like we rented a few times before to make car pickups as the truck we used for this trip did not come with a class 3 hitch nor was the truck capable of towing a car trailer with a car on board. That trip will for all intents be a condensed/watered down version of this past trip as we won't be doing any really touristy stuff but will get to partake of some TX food fare while picking up this truck plus we are planning on following up on a lead for another vehicle that we didn't have a chance to check out due to not being able to meet up with the guy as he was only available on Saturday and we were already home by then. That's ok, if its meant to be its meant to be. Until then, its back to work time.
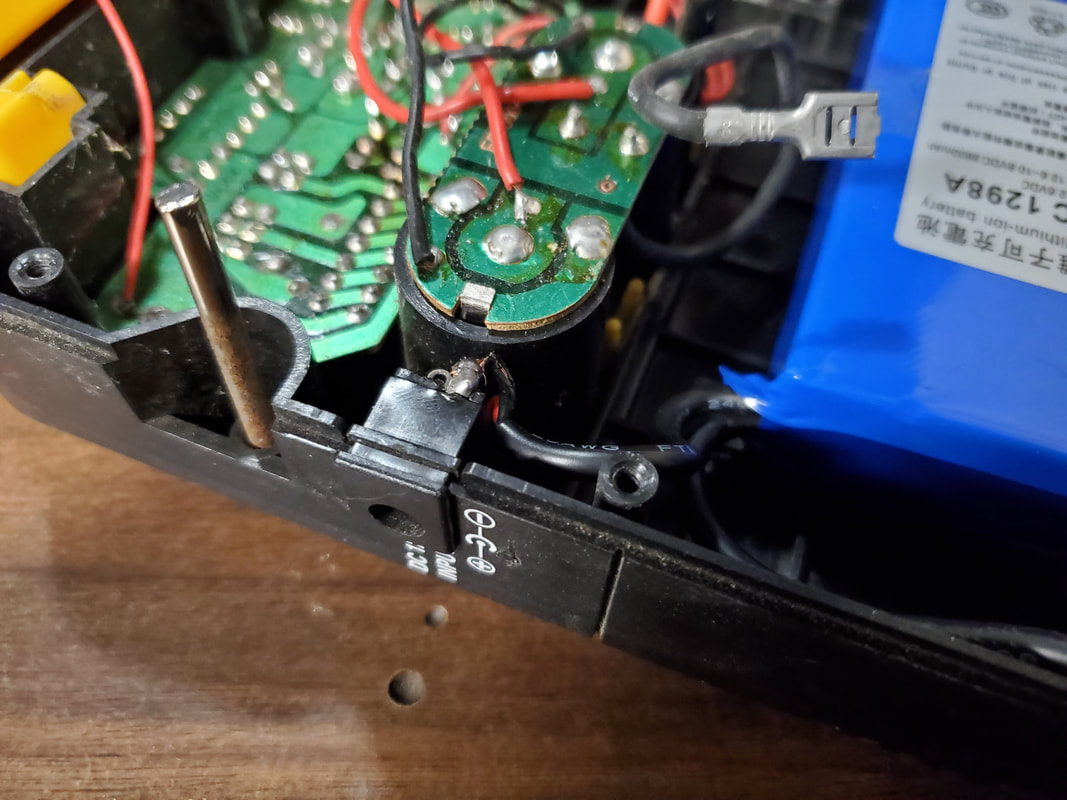
A while back I took an old fluorescent lantern I had stuffed in a box of junk and converted it to a lithium battery powered lantern after removing the D battery clips that I installed in the unit not too long ago in order to resurrect the light since it was indeed over 35 years old. Now, I have another old item that has been defunct for a while due to the battery having long since died. This device is a simple power supply box. It started life off as a box with a couple of 6v lead acid batteries inside and two cigarette lighter/12v receptacles. One delivered a constant 12v at 15 amps max and the other jack delivered a variable 3/6/9/12v at 1 amp max, and included a plug that had multiple plugs for devices that would normally be plugged up to an AC adapter that came with said device.
This power supply box has had batteries replaced in it a couple of times already and after the 2nd time I never replaced the batteries but instead stuck the box in a corner in our junk room among other junk until I finally decided to do something with the box. After making the lantern using a simple lithium battery pack that was a fraction of the size of the 12v lead acid batteries of equivalent power output, I bought another of the same battery pack and commenced to remake the power supply with this newer battery. 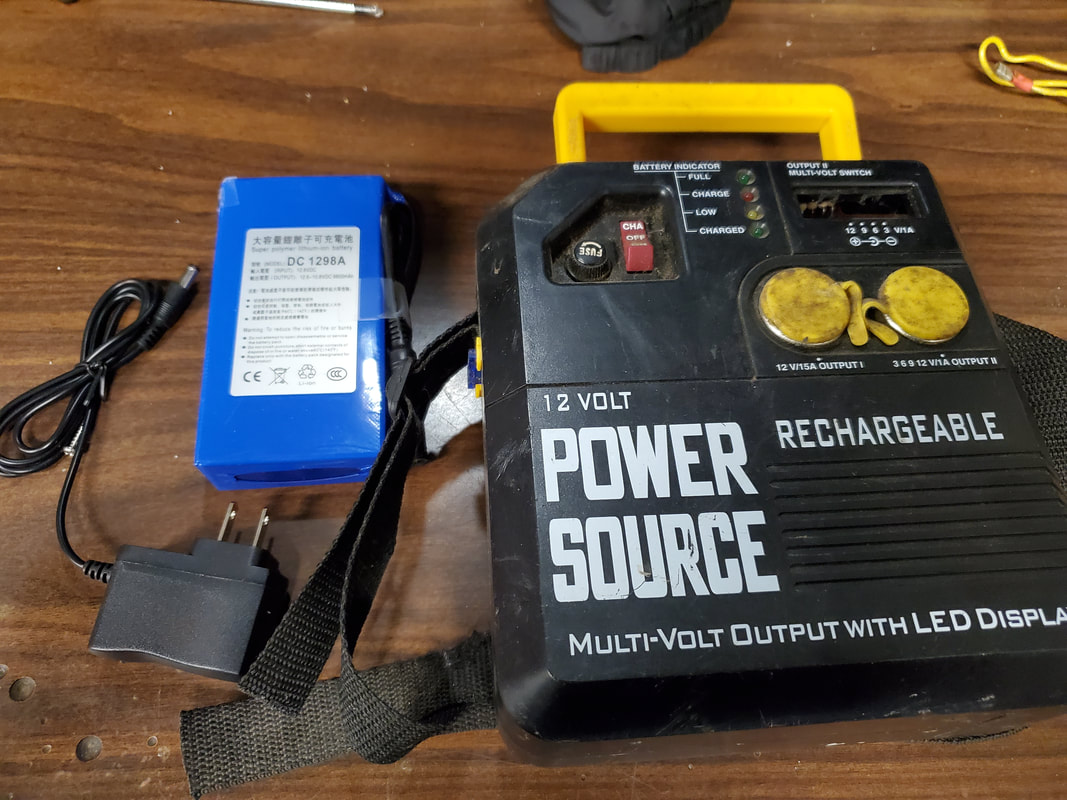
Power supply box with new lithium battery and charger.
The first thing I had to do was open up the box to see what I was working with. The box comes with a circuit board that regulates the charging power for the old batteries as well as the regulator for the 3/6/9/12 socket on the unit. For all intents and purposes we won't be using this circuit board but at this time I won't remove it just in case I do decide to resurrect that multi-voltage part of the power supply. Instead I wanted to utilize the charging port on the box. Conveniently, the charging plug that came with the battery fits the socket on the power supply box. As a result, instead of trying to adapt the female plug on the battery to the box, I just cut that plug off and wired the box's charging port into the wire coming from the battery, allowing me to keep the flush original charging port of the power supply. 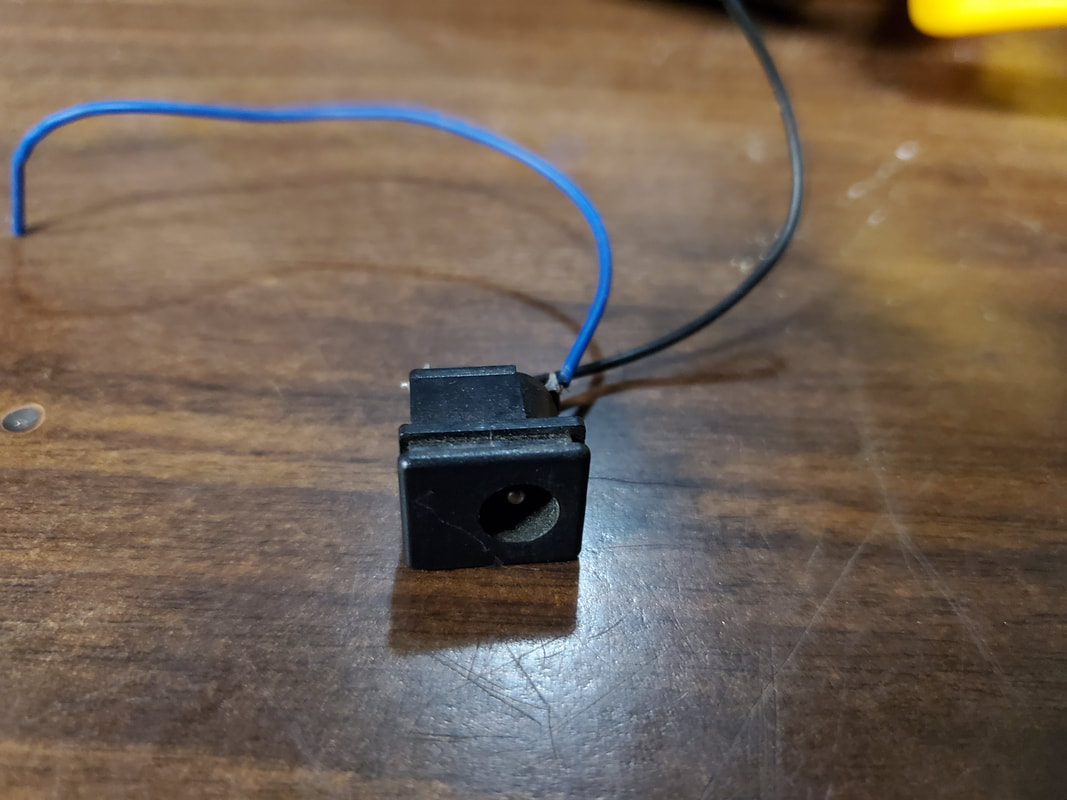
Original charging port removed from box prior to wiring up to battery pack.
Original charging port resting in its cavity after being wired to the battery pack.
With the battery wired into the box's charging port the next thing was to hook the power output cable to the two 12v sockets on the box. This was pretty simple as I just cut the male plug from the battery and using some male/female crimp terminals, wired the battery's wires into the wires coming from the 12v receptacles on the box. At this point the power supply will have two constant 12v outlets on board for powering multiple items/devices. 
Power output wires hooked up to battery pack using male/female terminals.
With the battery fully wired up to the power supply box, the next thing was to hot glue the battery pack to the base inside the box so I can wrap things up. Since I want to be able to easily remove the battery pack if/when it dies for replacement, I didn't use a lot of glue, just enough to ensure that the pack was anchored in the cavity where the original lead acid batteries rested. 
One of the glue points on the battery pack, note how light the application of glue is.
Glue applied to other side of battery pack, again showing how light the application is.
With the battery pack glued in place the next thing I had to do was cut a little access port on the box to allow me to access the built in rocker switch that turns power on to the battery pack's output cable. This was as simple as using a rotary tool and cut off wheel to cut the plastic away to make it big enough to stick a finger inside to flip the switch when necessary. 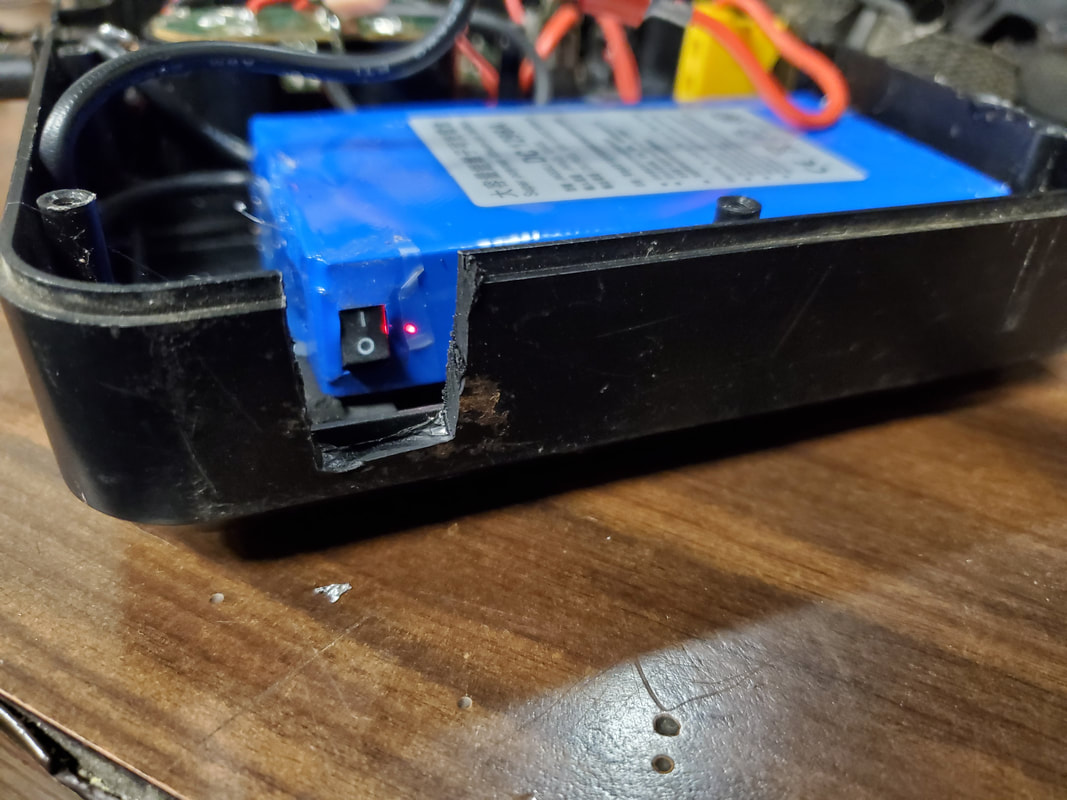
Port cut out from the bottom of the power supply box to allow access to the rocker switch on the battery pack.
With the battery completely situated in the box, I was able to put the other half of the box back on, closing things up and securing with the screws I had available with the box. Plugging the charger up to the port on the box allowed for charging of the battery pack but because power is not going through the original charging circuit, there is no way to know that the battery is taking power other than the LED light on the rocker switch, which means looking at the switch under the box to confirm power is going into the battery. When the switch is turned out to allow power out from the battery to the sockets, a light on the LED display on the box will come on indicating the charge state since the 12v receptacles are still wired into the circuit board. 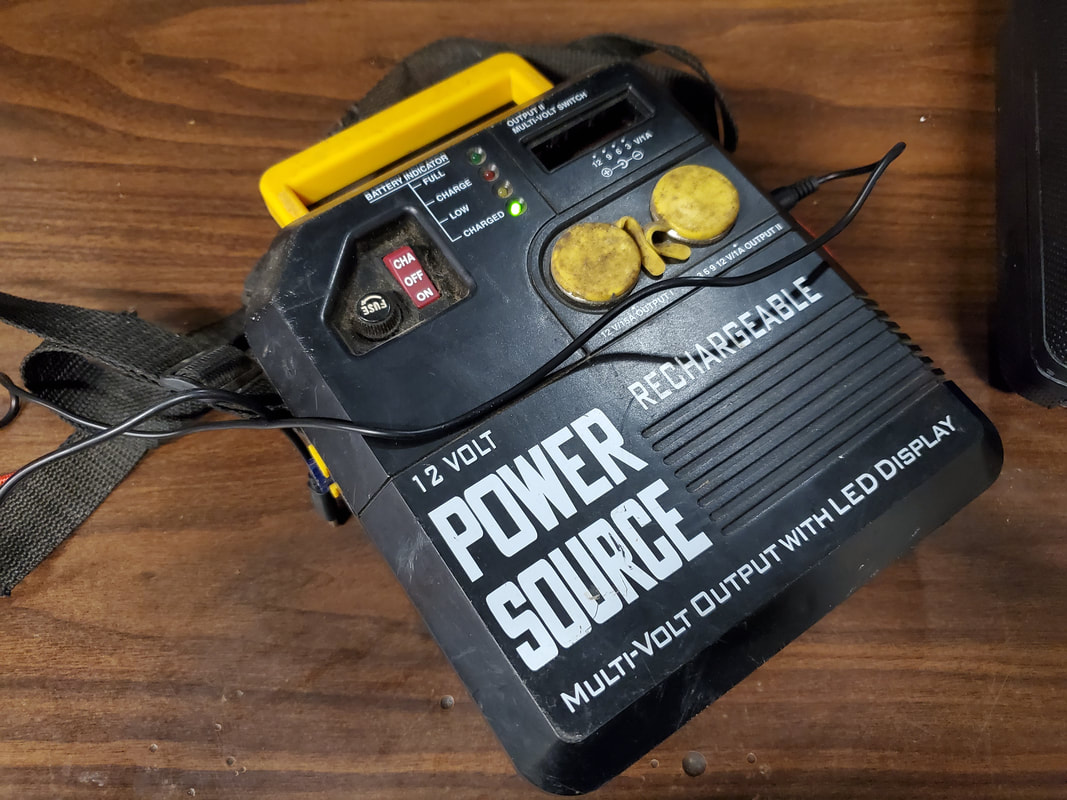
Reassembled power supply with charger plugged up to top off battery pack.
Another little feature of this power supply is an area light built into the back of the box. This light is a simple incandescent lamp, showing just how old this unit is. I bought this unit back in the middle 90's well before LED lights became mainstream. Now, this light does work like its supposed to, but after being exposed to so many super bright LED lights, the weak incandescent lamp in this unit needs to be replaced. 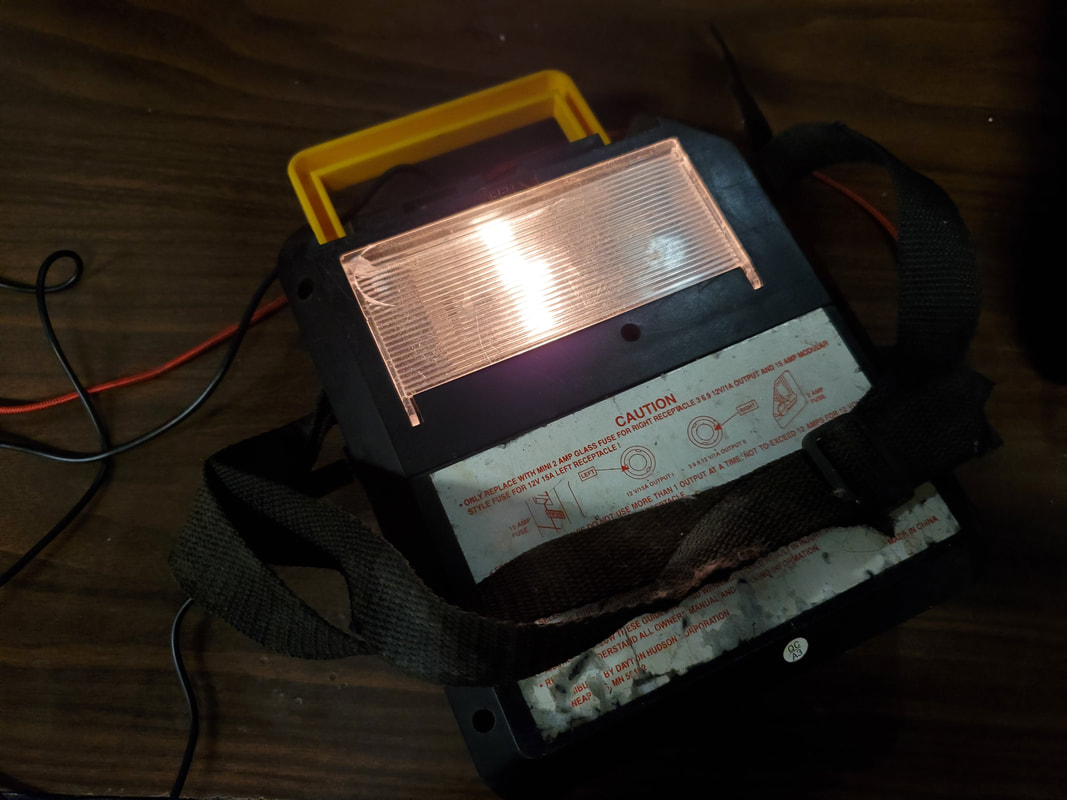
Incandescent lamp on the back of the power supply, illuminated with the power from the lithium battery pack.
There are generic LED lamps that have adapters for different plugs in 12v/automotive applications that will literally blow this little weak bulb out of the water. I'll be upgrading to an LED lamp in this unit first thing. Another thing I may add to this unit to bring this thing up to date is a small power inverter unit to allow this power supply the ability to deliver limited 110vac power in the field from the small package. Also I have the ability to charge USB/5v devices is easy with a simple little plug in flush phone charger that I can plug into one of the 12v receptacles and just leave it there. Of course it would be even more unique to just get a 12v-5v circuit, or just install the right resistor on the 12v output line from the battery pack and hot glue a USB plug into a spot somewhere on the box to allow the box to keep its two 12v receptacles AND have a USB power port on board. A USB plug can be had from any adapter that has a female USB end on it, or salvaged from any old phone charger that went bad and I have plenty of resistors from my early electronics hobby days. A small inverter like the little units that plug directly to a 12v receptacle will probably yield a circuit board that is small enough to glue in place somewhere inside the box and the outlet glued in another suitable spot. Most of these items are small and low profile enough to allow for cramming into the small spaces of this power supply's casing. When I make those upgrades they will be posted here.
After putting it off for so long we finally took the plunge and decided to set up some wireless security cameras to cover a couple of main areas of the compound. We started off by buying a system from Harbor Freight that included two wireless cameras and a 4 channel monitor. The system has an app that allowed you to access the system remotely like most of the wireless cameras out there nowadays. I mounted the cameras and commenced to set up the cameras on our wireless network, only to be let down when the system would not connect no matter what I tried. After fighting this thing all night I took everything down and packed it back up, returning it, let down by Harbor Freight again.
Next we went to Walmart and checked out their wares. They had a wireless standalone camera by the brand "Night Owl". These cameras were around $70 and had all the features of any decent wireless camera. They have the option to be a standalone unit, not needing a DVR, but can be set up with a cloud server to record footage. They utilize an app that allows remote viewing and initiation of recording as well as an intercom feature and two way audio. The cameras also have motion detection and facial recognition detection where the app will notify you whether it detected motion or detected a face or figure. When it detects a face it will take a still shot for you to look at before you actually bring up the cameras for live viewing. All in all these looked like some winners. And for two cameras it was cheaper than the two camera system from HFT. 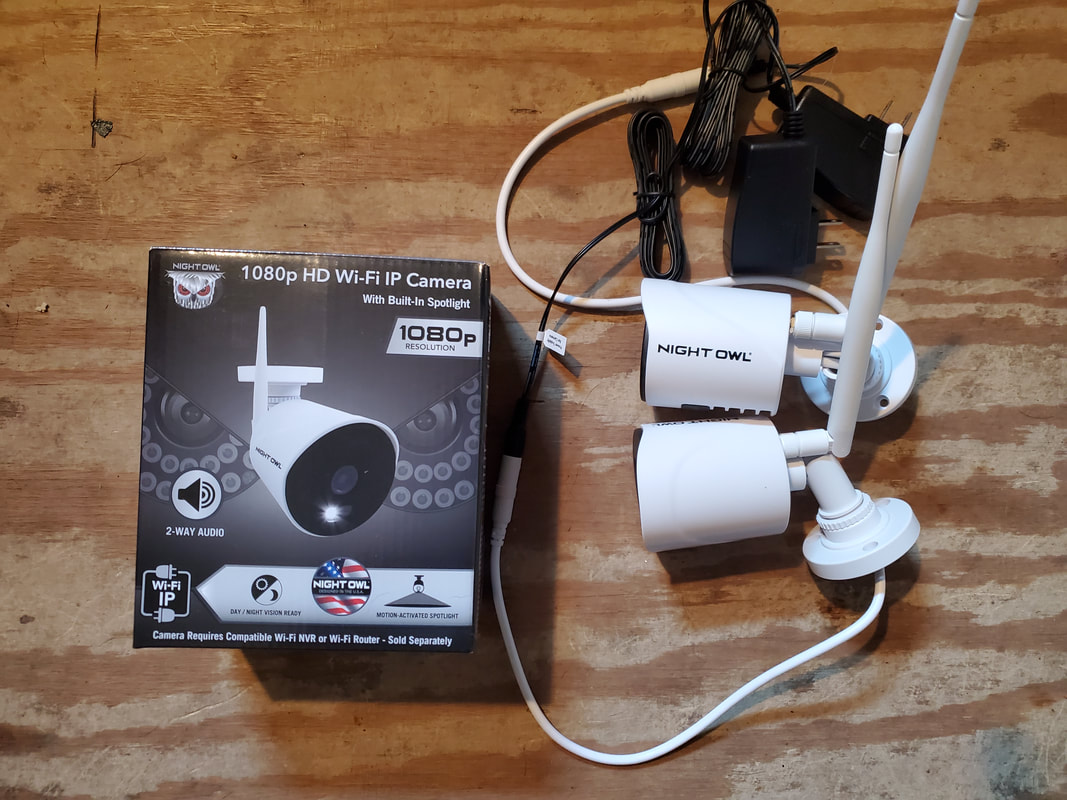
So as to not have a repeat of the HFT camera incident I set everything up on the floor and did the network side of the setup first. I downloaded the app on our phones and went through the procedure for the setup. I clicked on standalone camera and scanned the QR code on the back of each camera that ID's the camera on the app. After the cameras were set up on the app, I picked the wireless network I wanted everything to connect to and logged in. After logging in then naming the cameras, the app and the cameras were established on our network and ready to go. The setup took only a few minutes to do, easy peasy. Next was the setting up of the actual cameras. Since we're starting off with two cameras, I wanted to cover the front yard/driveway up to the main entry gate and the backyard/rear gate. Both of these cameras were mounted by our front door, aiming at their respective target areas. For the front yard camera I had an outdoor outlet already setup when we still had the porch and the dog house on the porch with the heater in it. Since all of that has been removed, the outlet was pressed into service as the power supply point for the front yard camera. I used wire straps to secure the wire from the camera down to the outlet, trying to keep everything nice and neat. The camera itself was mounted high on the wall above the front door and sealed with caulk. 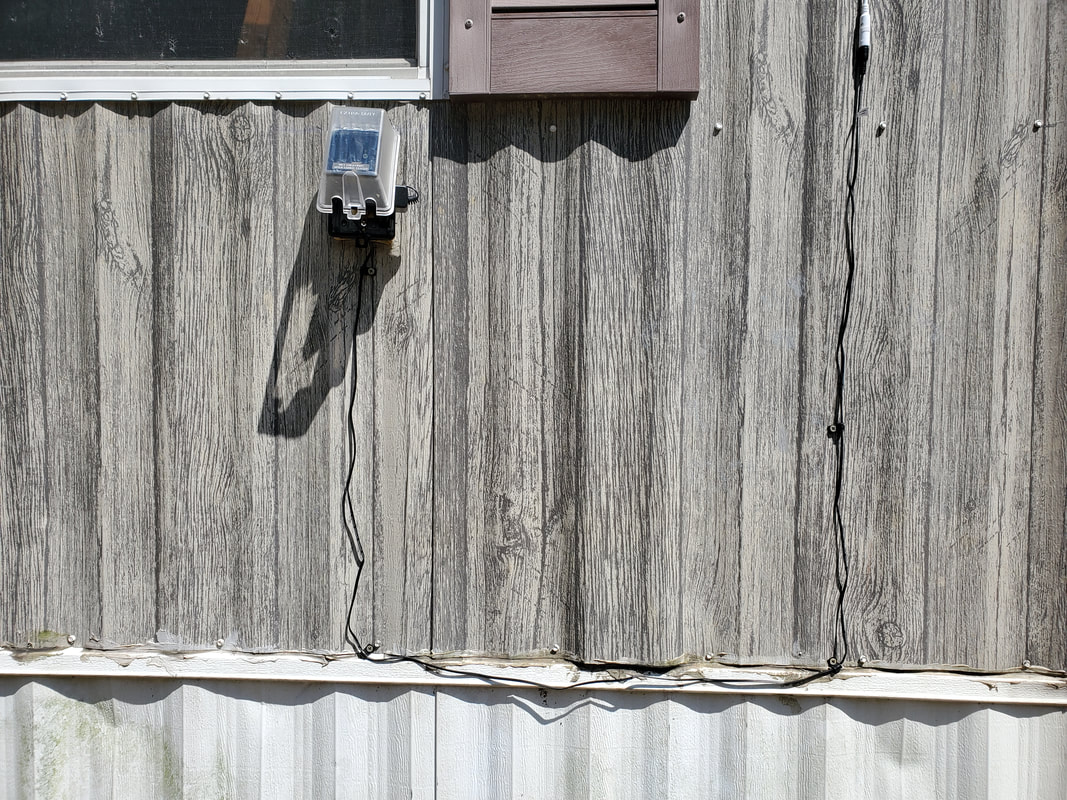
Outdoor outlet under kitchen window with power cables routed and secured with wire straps.
Front yard camera mounted on wall and aimed to target area.
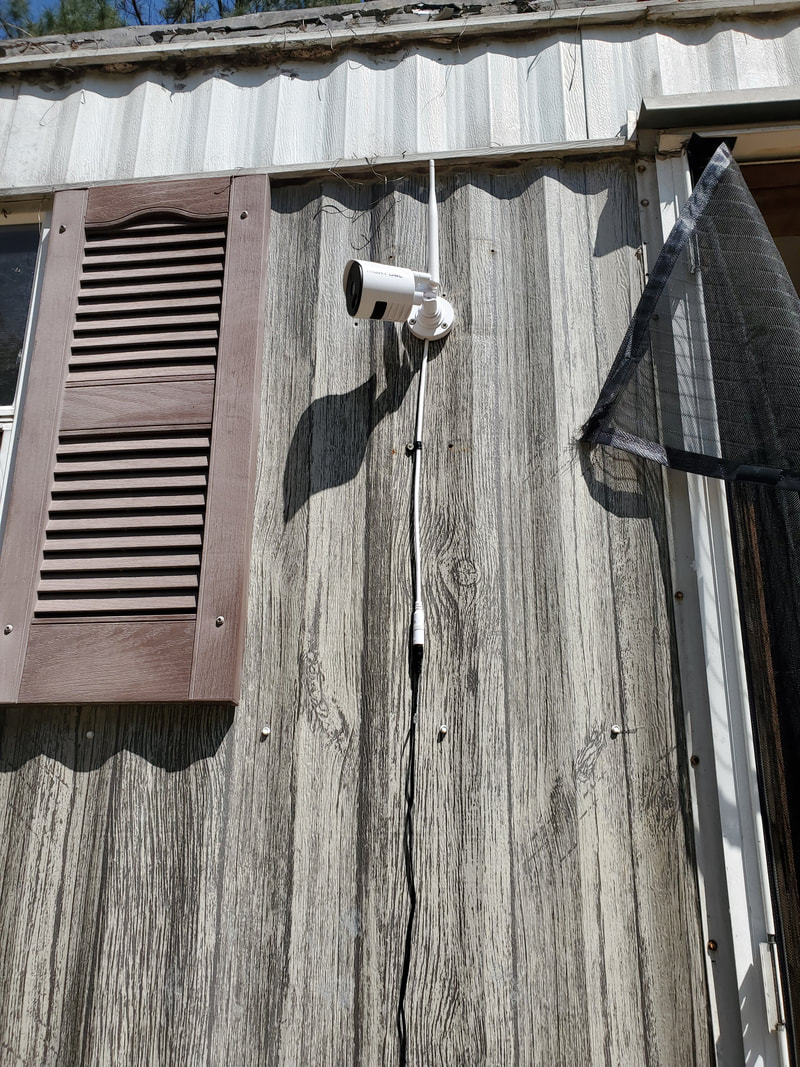
As for the rear camera I took advantage of the AC lines from the ductless AC system to help route the power cable to the camera. I mounted the camera above the point where the AC lines come from the wall and routed the power cable through the bundle of tubes and cables from the AC system down to a point below the living room window. Using wire straps I secured the wire along the bottom of the molding and routed the cable over to another outdoor outlet that I installed specifically for use in powering an outdoor camera. After getting the mounting taken care of on the cameras I aimed the cameras using the app and testing the units out, adjusting the settings in the app for sensitivity so as to prevent false alarms since at higher sensitivity the app would ping us more often than not, identifying tires and other objects as a face or figure. 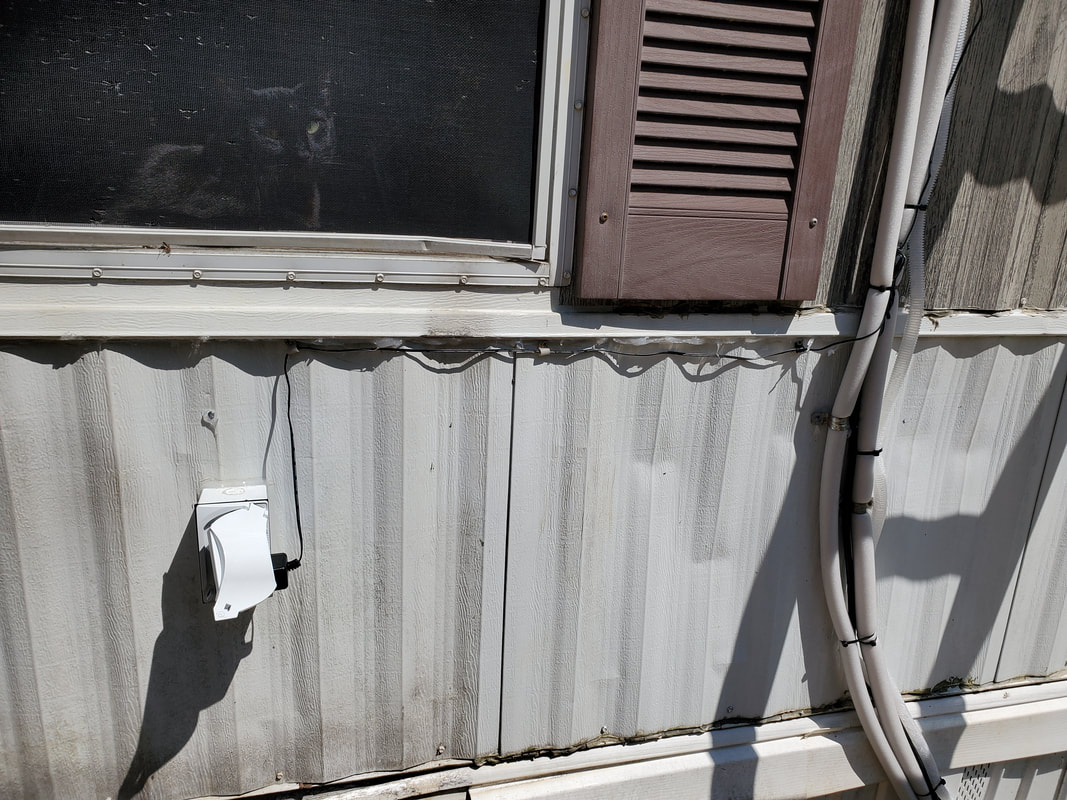
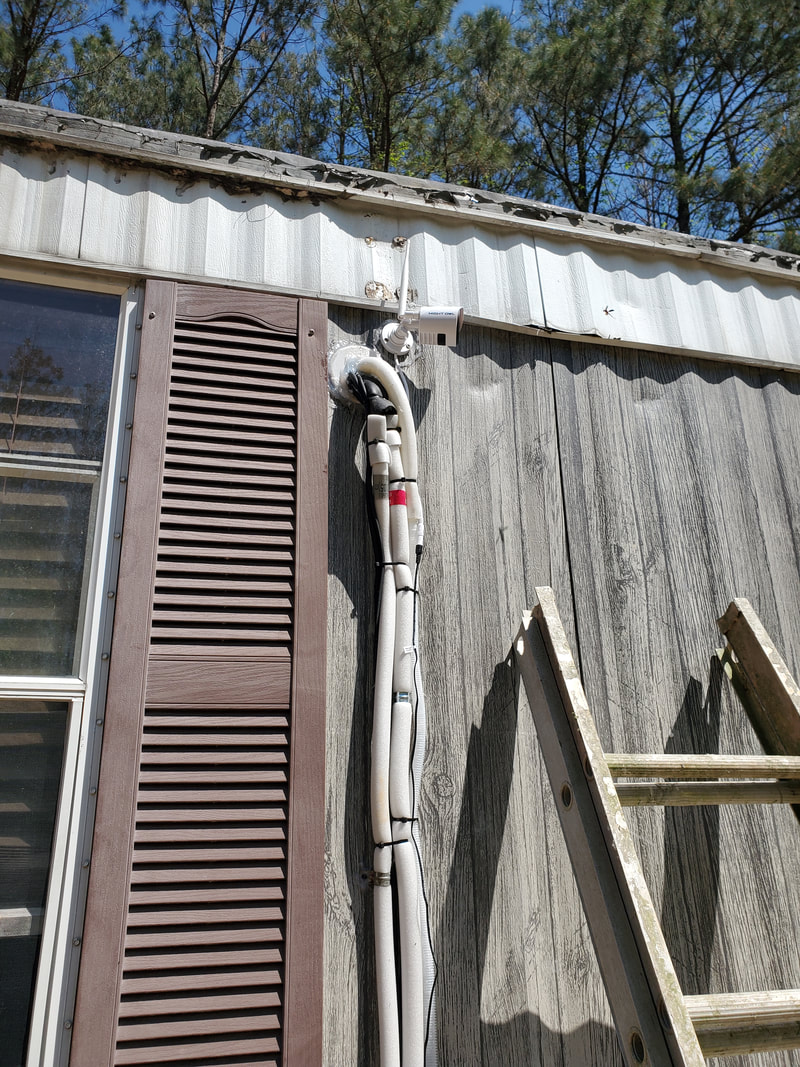
Backyard camera mounted over AC lines with power cables routed through AC line bundle.
With both cameras set up and online, we can now rest a little easier knowing we can monitor the compound and be able to see when people come up to the door, be it delivery people or someone with other intentions. We can also monitor if any critters show up that may be a problem since we have the chicken yard full of birds. Eventually we will get more outdoor cameras to use for covering the chicken yard, outside the compound aiming at the driveway on either side of the entry gate, and other areas of the compound that cover entry points into the compound. We also plan on installing an indoor camera in order to monitor the dog and cat in the house when we're out and so as to make sure nothing is going on in the house that may require us to notify someone to check it out while we're away. We will set these cameras up on a cloud server that way we don't have to worry about securing a DVR and will be able to record footage as needed and be able to view footage at any time. All in all, these cameras were an astounding success.
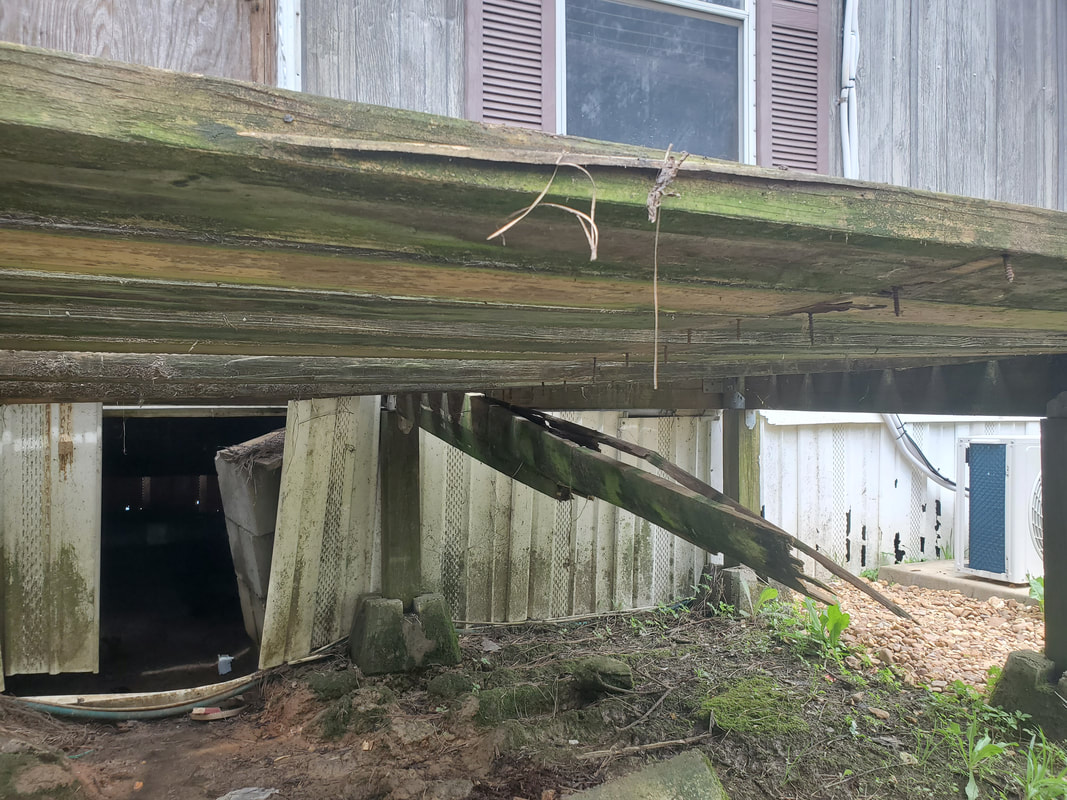
When I last covered the area of the yard by the front door I was in the process of dismantling the old porch that had been up for over 10 odd years and was finally in such a bad state of decay that there was no saving it. After removing the old porch I built a staircase using the steps from the porch so as to have a path of egress from the house without spending any money. The whole staircase was built using salvaged materials from the old porch. In the process I also had to build up the ground under where the porch was since erosion caused a lot of dirt to run out from the area, under the house and out the other side into the chicken yard. This ground erosion needed to be corrected so as to prevent further erosion that would eventually lead to the ground around the block posts holding up the house eroding away and possibly causing the posts to fall over which would be a whole other world of problems. I had already started laying some bags of concrete as well as some masonry blocks I had around where the staircase would have to go in order to build up the ground in order to hold up the staircase. I temporarily used some of the longer boards to create a makeshift walkway from the concrete sidewalk over to where the staircase sits so as to have a safe path for us to walk on since the ground underneath was still full of huge ruts. I needed more blocks. I had picked up a few 4x8x16 masonry blocks, the half blocks to the regular 8x8x16's most people are used to seeing. These blocks were narrow enough to set in the ruts and be almost flush with the rest of the surrounding ground. Thing is, I ended up not having enough blocks to cover all the area that I needed to cover so I ended up turning to a bunch of surplus bricks I had sitting under the storage trailer. I moved these bricks over to the work site and laid them out between the larger blocks, creating a solid filler of bricks and blocks.  Bricks and blocks laid out in ruts where erosion wore dirt from the area. With the blocks and bricks laid out the next thing I did was come in on top of all of this with a load of gravel. Unlike other areas where I would cover a large area with a truck load of gravel, I dedicated the whole load to just this area. I wanted to ensure that i had complete coverage over all of the bricks and blocks as well as the surrounding area, enough so that everything blended in to the midway driveway and surrounding ground, making it look like there was never anything here other than the staircase. This helped to serve as another safety feature since we can't have delivery people or other outsiders walking through here, leaving a trip hazard such as the ruts or even the bricks and blocks. By covering everything with gravel we covered up the hazards, and effectively laid a foundation for us to build the next porch over the area. 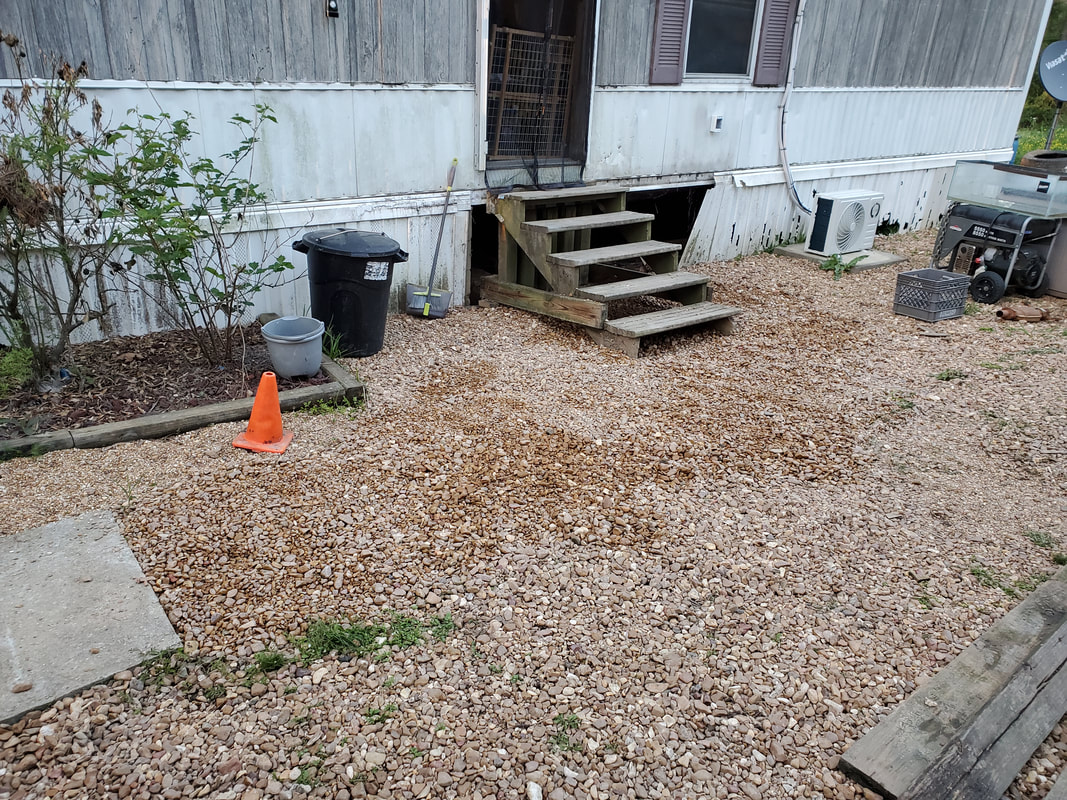 Gravel laid out over bricks and blocks and dirt covering everything up and blending it in with the driveway. With the gravel laid over the area, I did decide to take the post blocks salvaged from the old porch and lay them out to get a rough idea of how I will build the next porch. I plan on building the porch a little larger than the older one, extending across the living room window a ways while still keeping the same width from the driveway. I also plan on building the porch with a roof so as to be able to get more utility from the porch during the summer or even during the rainy season. Since I plan on putting the grill back on the new porch, having a roof over the porch and having it larger will create a food prep and lounging area that would allow us to hang out in the outdoors without having to create a whole other area away from the house for this purpose. Also by laying out the blocks I can get a good idea of how many more blocks I would need to set up the larger porch, and even plot out the dimensions of the porch to where I can make a list of the sizes of boards i would need to build the porch. While the design of the porch is literally in my head and would be planned along the way to a degree, laying the blocks out will give me a rough idea of the coverage when the porch is done. Also with the blocks on the ground, it'll keep us from moving anything over this area inadvertently. 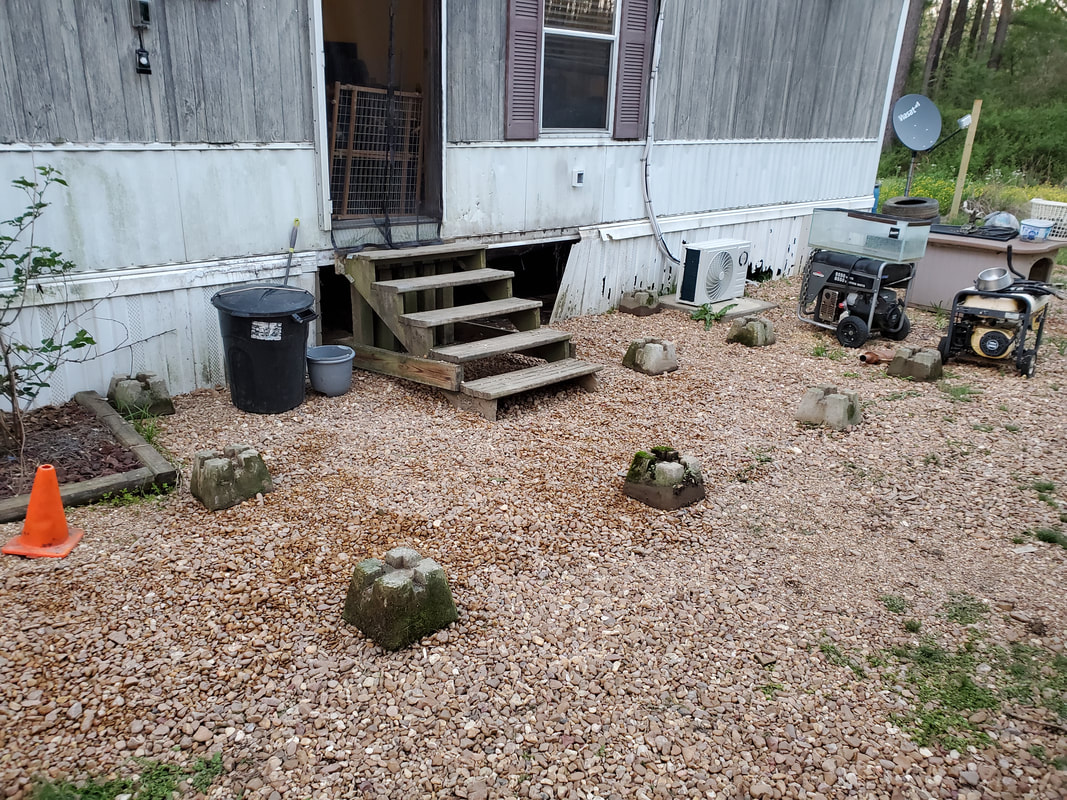 Post blocks laid out over area to mark the area where the porch will be built. With the blocks laid out I continued on with another load of gravel to blend in the grounds from the house out into the driveway further, getting closer to the east end of the perimeter fence. There's a few things i have to do under the house as well that are easier to do now that the porch is gone, one of them being the filling in of ruts from the erosion under the house. I will have to be able to move blocks and gravel under the house and with the old porch there, this was next to impossible. In the meantime I'll be able to take care of all business under the house.  Gravel coverage in midway extending along the house due east. As with many other large projects around here, I won't start the build until I have most or all of the wood that I need to get the base porch set up. I don't want to just start getting a little bit here and there and end up having a project stretch for months. After mapping out the size of the porch and what boards and materials I'll need I can gather all this stuff and set it aside then start the build only when everything is in hand that way the build will only take a few days versus a few months. After having the 318 V8 in the Dodge show signs of being pretty much shot, I had to turn my attention to the extra 318 V8 that I picked up under the idea that it was a rebuilt short block only to find out it was a poorly rebuilt short block. They reassembled everything using oversized bearings despite having a standard sized crank and connecting rods. I ended up gathering parts over a few months, slowly but surely since I pretty much needed everything in order for me to assemble a complete engine, minus a few things here or there. With most of the main components gathered I started work on the engine. I had the engine stand that came with the engine, which would help greatly since I won't have to worry about suspending this thing under the engine crane while trying to work on it. With it on the engine stand the first thing I had to do was obviously disassemble the rest of the engine, which was the rest of the pistons and connecting rods and the crank itself. I had to borrow a piston and rod from this engine when I was trying to repair the other 318 a while back and had since replaced the borrowed piston/rod with the old rod from the other engine topped with a new piston. 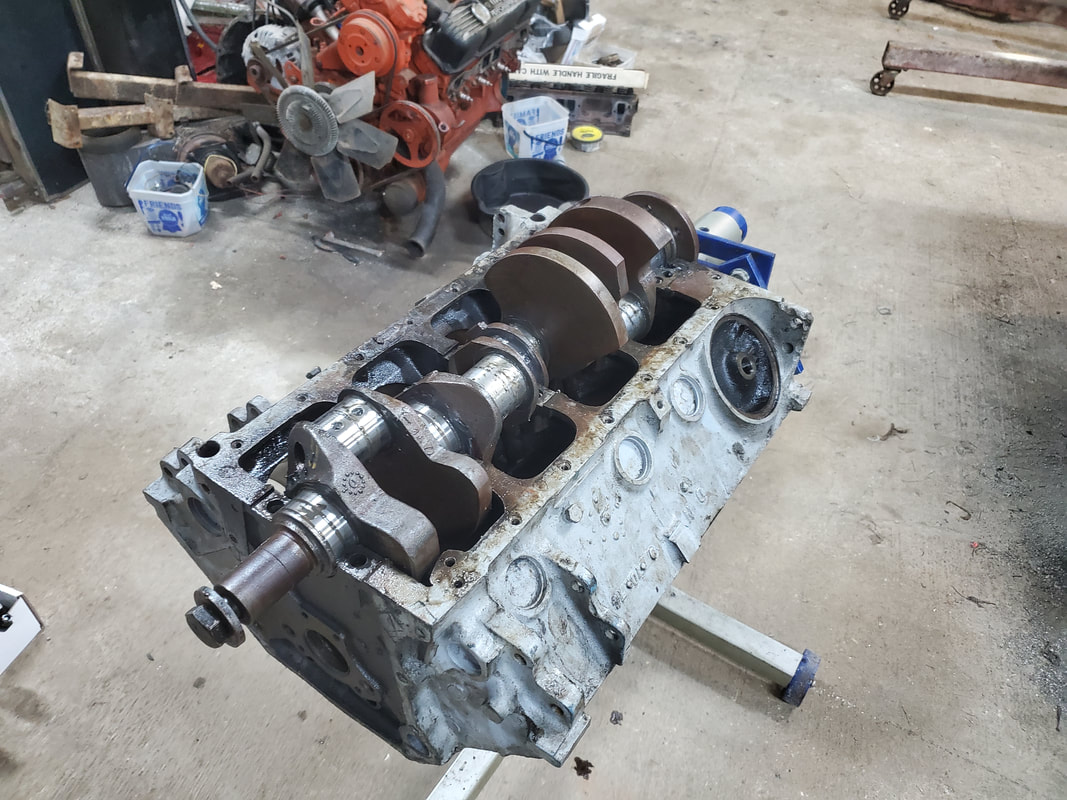 Short block on engine stand, ready for disassembly. Of course it didn't take long to disassemble everything as I had already loosened up the main bearing caps and the connecting rod caps in the troubleshooting process. The main thing was keeping everything in order, making sure the main bearing caps were in order and the pistons were in order corresponding to the cylinders they came from. All of this stuff went in a box off to the side so they won't be disturbed. 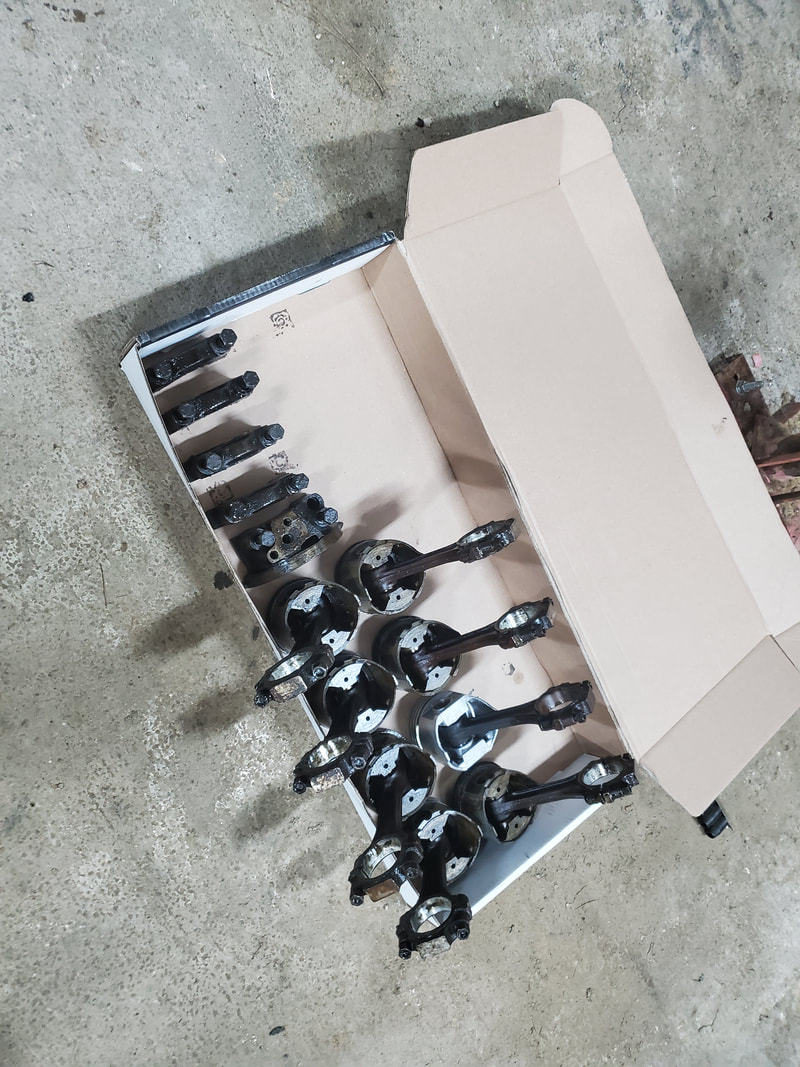 Pistons/rods and main bearing caps all in order in a box. One of the things I did want to do was paint the engine just to make it look nice, since this was going to be a fresh rebuild. It would be nice to have a nicely painted engine ready to go as I have new valve covers, an oil pan and even a replacement timing cover. I had to de-grease the engine block to prep it for painting but the new panels, minus the timing cover, just needed to be cleaned of dirt prior to painting. I laid out the valve covers and oil pan and sprayed them down good, ensuring good even coverage over all of the metal. As for the timing cover I had to soak it in a parts cleaner to break up the collected deposits of grime and grease from whatever car engine this piece came from. After a good soaking and scrubbing to get as much dirt as possible from the metal piece I was finally able to paint the piece. I painted the piece with multiple coats to ensure a good even coverage with no thin spots or missed spots. To do the job right I had to mask off the area of the timing cover where the water pump would be mounted as that section of the cover would be behind the water pump and not need paint on it. Any paint on it would be in the path of the coolant being circulated through the engine and the last thing I need is paint chips getting into the cooling system.  Timing cover after cleaning the grease and grime from the piece. 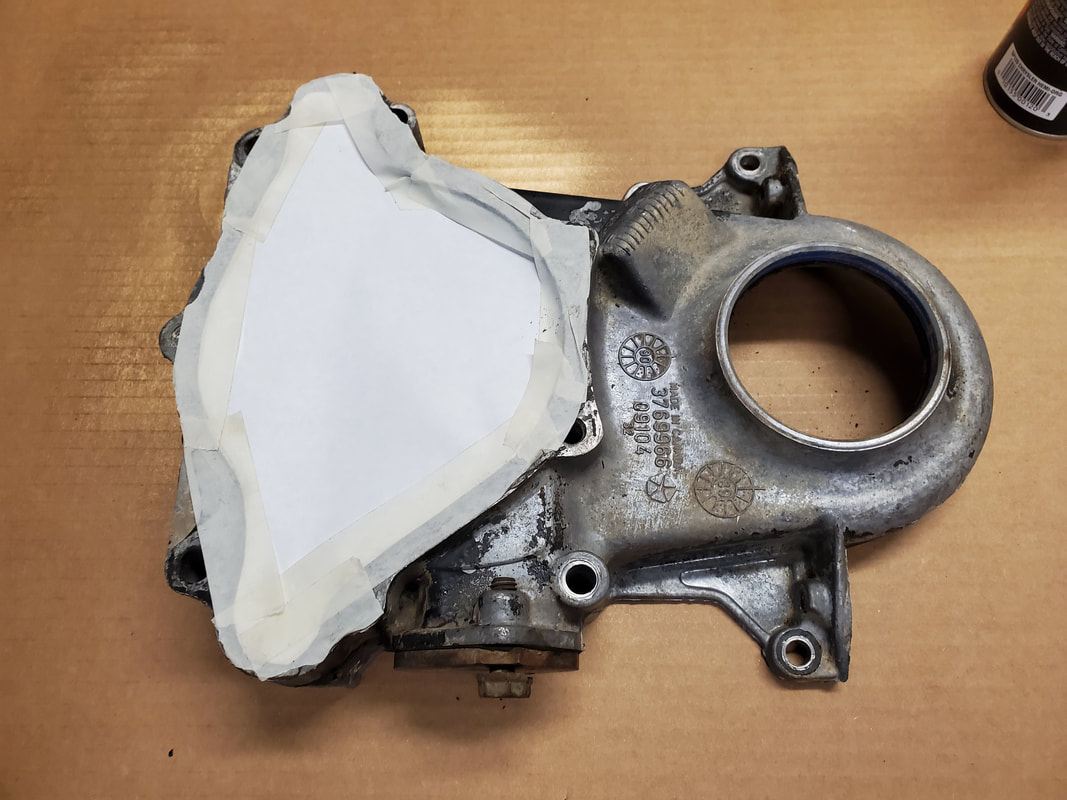 Water pump mounting surface covered with tape and paper prior to painting. 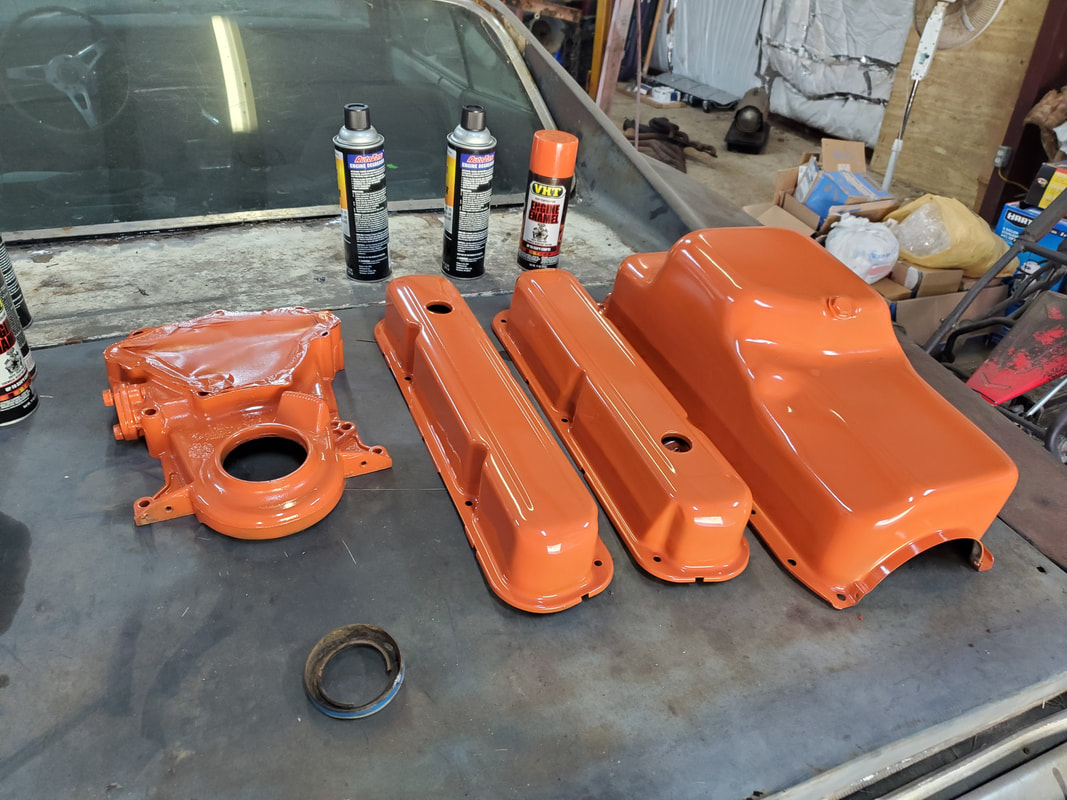 Covers and pans freshly painted and dried, staged on Dodge's trunk. 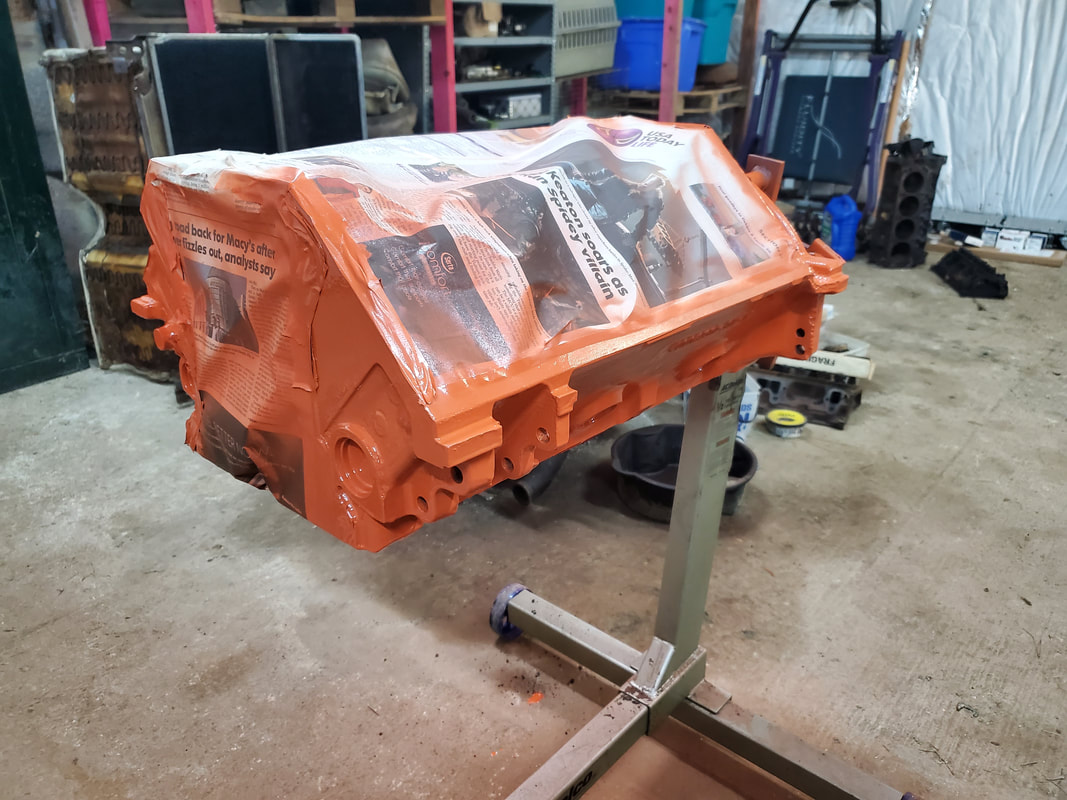 Engine block masked off with newspaper and painted on engine stand. As with the other pieces, I blasted the engine block with enough coats of paint to ensure complete coverage all over every surface. I moved over the engine, then came back to where I started, going on the idea that the paint at the starting point had time to dry some before I started hitting it with the next coat. Apparently I did something right because I didn't have any runs on the surface of the engine. The engine block just like the rest of the pieces, will be left to sit a while so as to ensure that the thick layer of paint will be completely dried before I start reassembly. From there we will start getting our new powerplant ready to go. After dismantling the old porch and getting the temporary staircase set up along with a temporary walkway, I started laying gravel down over the area to start filling in some of the more leveled off areas. I had already set some blocks and a bag of concrete down over the area where the staircase went as well as filled in some of the lighter depressions on the ground with some dirt I moved around to make better room for the blocks when I did lay them down. I started dumping gravel over the areas to start blending in the grounds to the driveway, otherwise known as the midway. 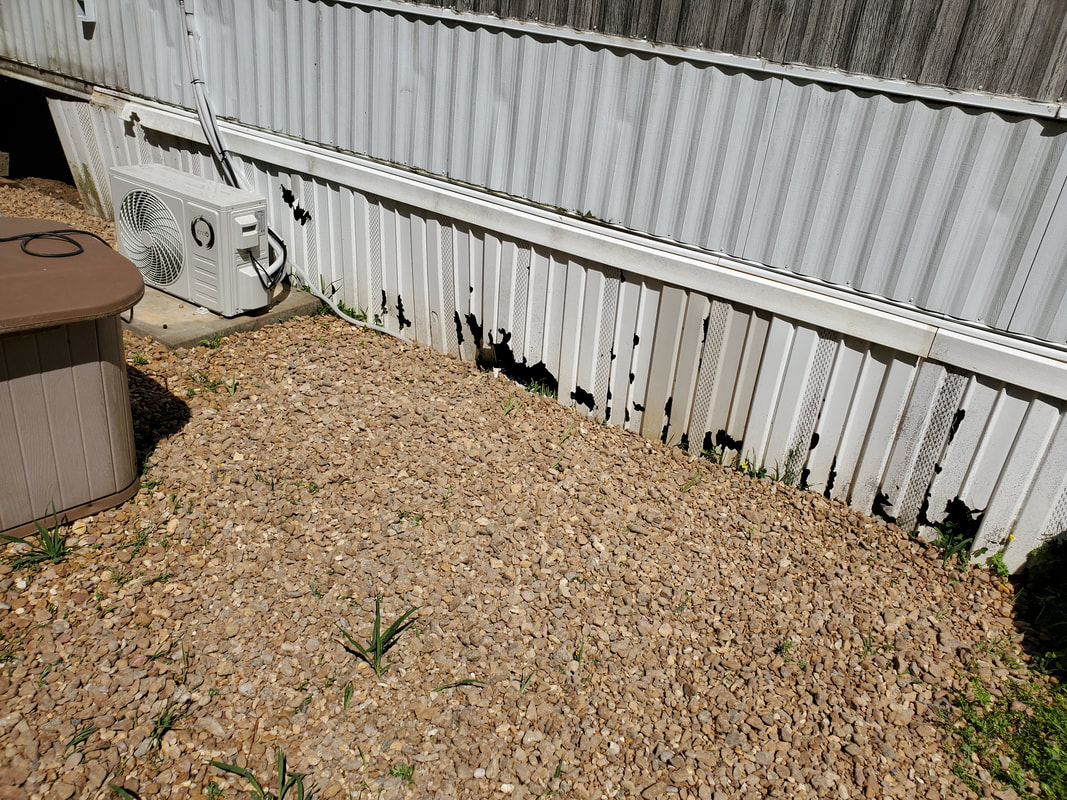 Gravel laid down around the AC unit and the ground right up against the house skirting, working my way back to the east end of the midway. I filled in ground up to the skirting of the house and made sure to have a good covering of the ground around where the AC unit is sitting, as well as covering more of the midway grounds as I wanted all of this ground to have a solid covering with no mush to any of the ground since this area is going to be supporting the weight of the new porch eventually. I have to make sure all of this ground is going to stay where it needs to stay. Not to mention just having it solid will allow us to traverse this ground without worrying about pushing up mud through the rocks when it does get very wet.  Ground along house blending into midway covered in gravel. The more of this ground that gets covered up thoroughly will allow me to be able to move vehicular traffic over more of this area as I get things set up with the fences and how I want to situate the vehicles around here. I want to be able to just drive a car all the way through the compound out the east gate and around to the back side of the compound where there will be another gate along the east fence line towards the southeast corner and be able to pull back around past the storage trailer and out into the midway again. Getting a solid layer of gravel established that has been mashed into the mud and covered with more gravel only to be further mashed in the mud will eventually create a ground that is solid enough even during wet conditions to withstand the weight of any vehicle we have on the grounds.  Midway grounds covered in gravel extending closer to eastern fence line. I had enough gravel on the truck this time to even start covering the ground around the staircase. I wanted to get as much of the ground around the staircase and even the walkway boards covered prior to me moving the walkway boards to arrange more bricks and blocks to get a complete foundation laid out that will accept a good layer of gravel without any depressions forming from not having an even layer under the gravel. I got as much ground covered, right up to the side of the staircase and right to the end of where the boards lay. All I have to do now is get the rest of the bricks and blocks I need to fill in everything. 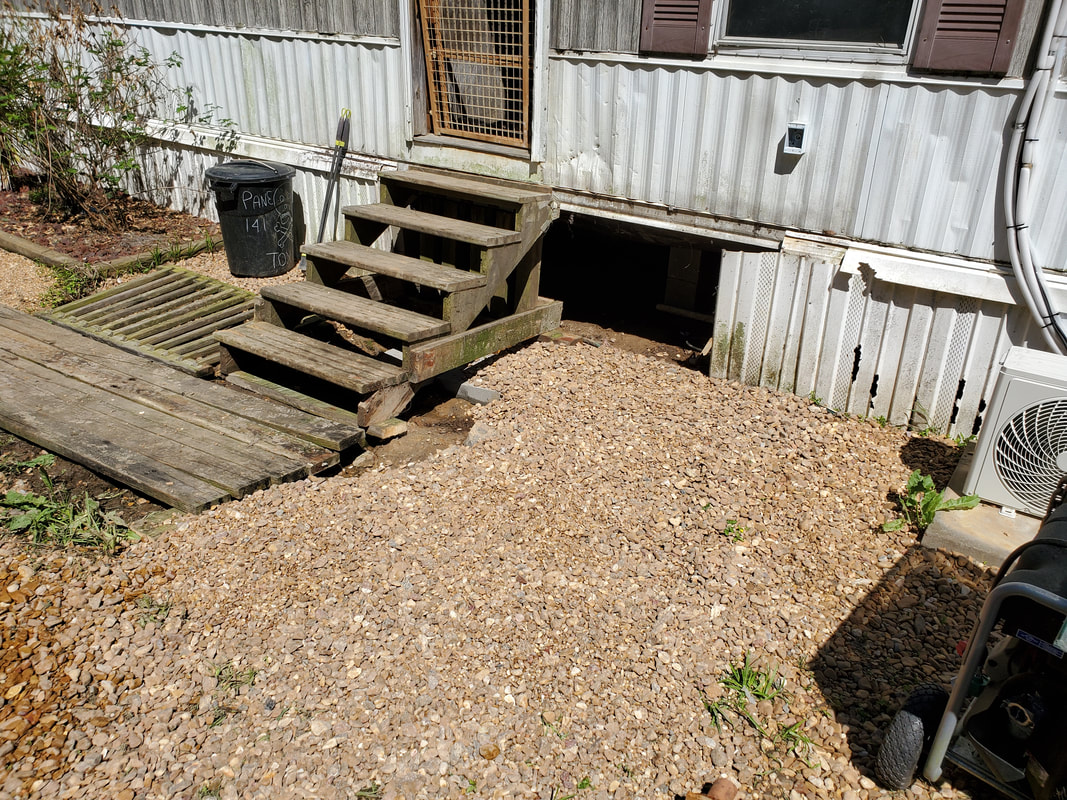 Gravel laid right up to the staircase and the end of the boardwalk. I will be buying more masonry blocks first and laying them out and using the surplus bricks we have to fill in areas that are either too small for a whole masonry block or because of how the blocks are situated, will only require a single row of bricks or a few bricks in different spots to fill in cavities between the larger blocks. By getting the ground more or less even all around, it will allow the gravel to sit in a way where even with foot traffic it won't cause the rock to push out of the way exposing the depressions between the blocks or in other areas. Even though all of this area will be under a porch, in the meantime I don't want the area that is susceptible to any foot traffic to be dangerous in any way possible. Once the porch does go up it won't really matter if the gravel does move somehow, as long as the ground doesn't erode to the degree that rock starts washing away and taking along with it, more dirt.
After having been up for a good 15 years, the front porch to the house has finally degraded to the point that it was becoming dangerous to walk across. Boards were sagging in the middle due to the main support boards underneath having rotted away and crumbling under the weight of repeated foot traffic. I had to replace a couple of boards in the past but at that time the support/foundation boards were still intact enough to not need any attention. I also had to replace a couple of steps and side railings as well but now, its gone too far into a state of decay that it would not even make sense to try and replace the individual boards, just tear it down and rebuild the whole thing, bigger and better.
But first to tear things down, I would like to be able to salvage as much as possible, whether its the screws used to secure the boards together, or the brackets used to tie the boards together with the screws, or some of the wood itself. This meant taking time with the power tools to dismantle things a little at a time and stack things out of the way as the porch comes apart. 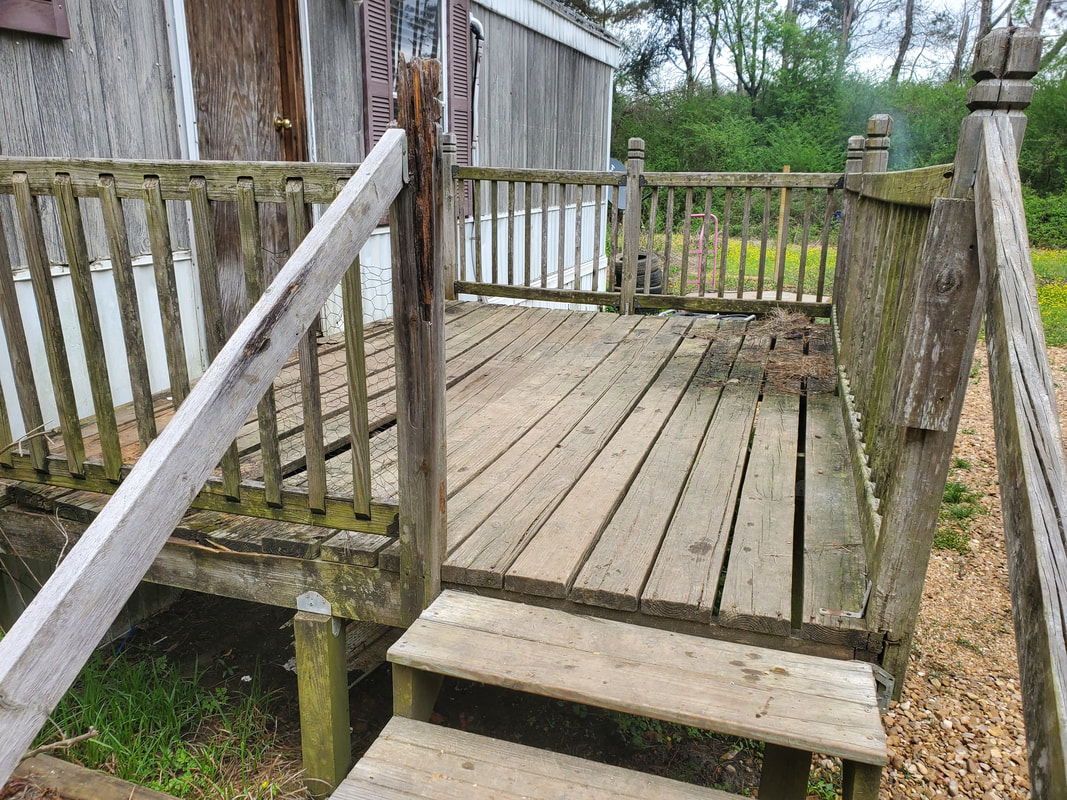
The old porch prior to dismantling. You can tell the state of the once pressure treated wood as it went from the green/yellow it started as to the dull gray that wood turns as it advances into its decay.
Support/foundation boards under middle of porch that are rotted out, causing the sag in the middle of the porch floor.

Porch floor boards, sagging and distorted due to rotted boards underneath.
I started dismantling the porch starting at the rails. I wanted to get the rail sections off first, then remove the brackets from the posts then finish off with the posts, stacking everything up separately. Separating the screws and the brackets, I then stacked the rail sections out of the way in a staging area. The posts were stacked up, possibly to be used to help in reinforcing the stairs since I would have to make a standalone staircase for the door after removing the porch. 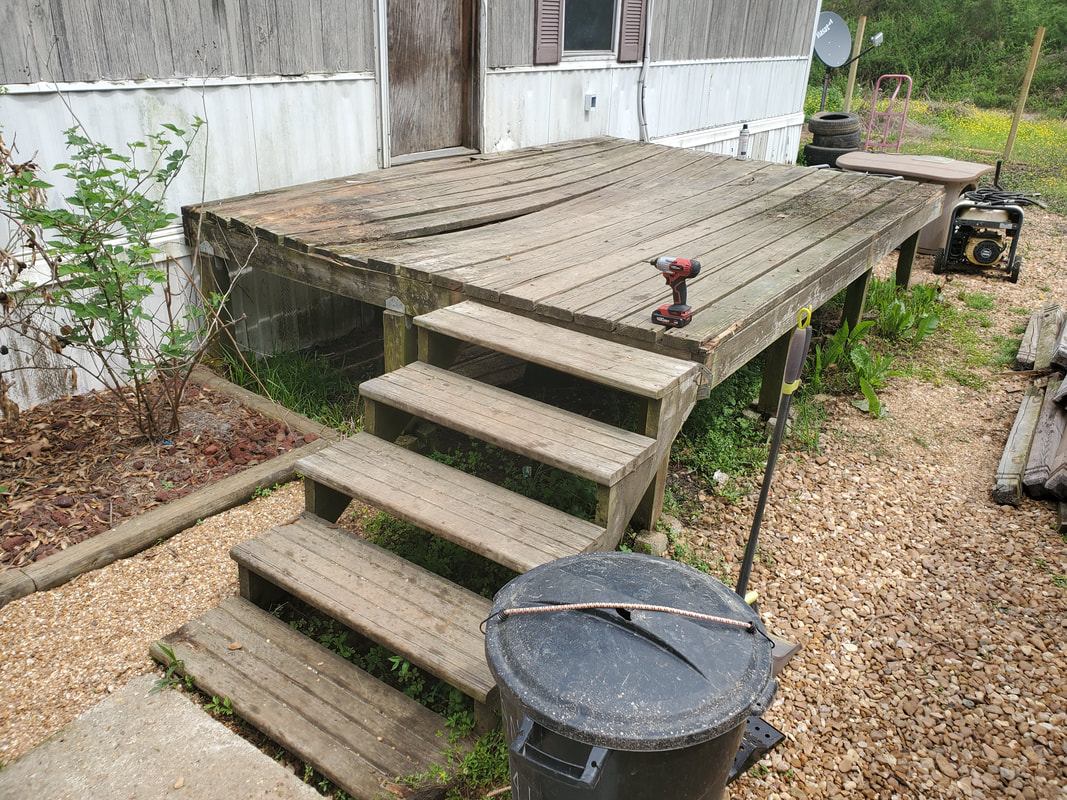
Porch after removing the railings and posts. Note the sag in the middle floor boards.
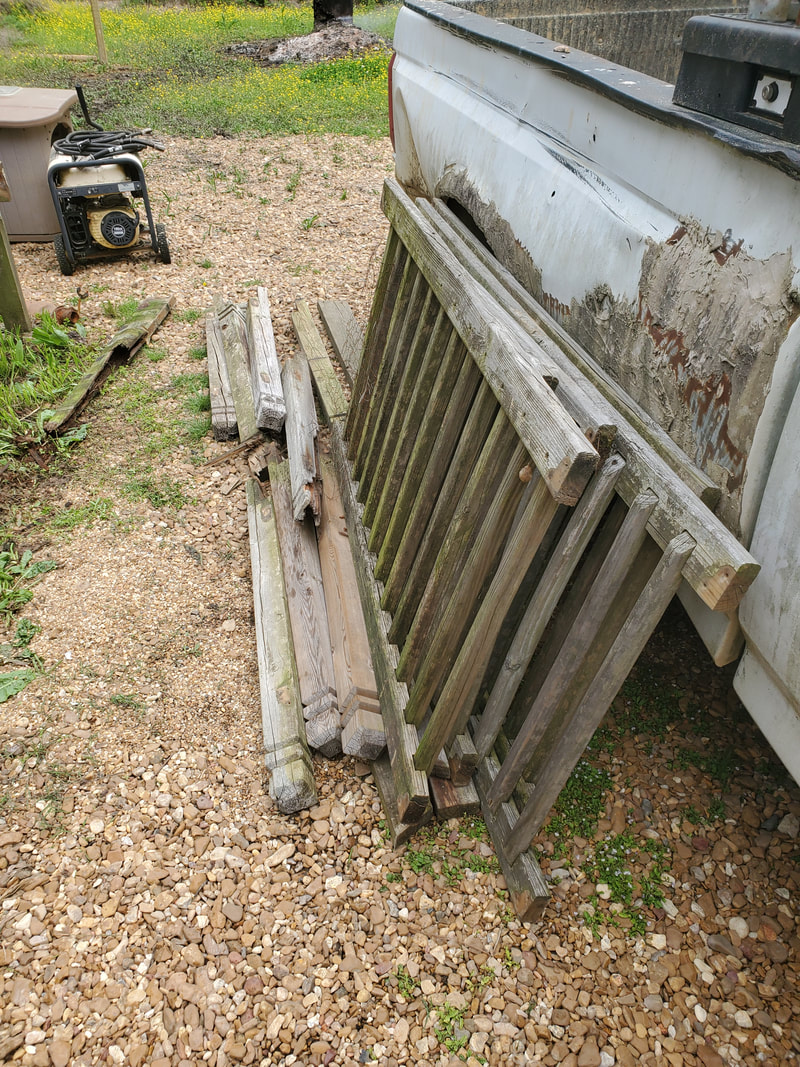
Railings and posts before staging away from the porch. Note how some of the posts are rotted as well.
Next is the removal of the long 2x8 boards that make up the floor of the porch. Again, I wanted to save as much as possible so I can have some decent material to make my reinforced staircase. Even with some of the boards being in bad shape, I can still cut a short section from the 12ft long boards to make reinforcement braces for the staircase. The posts will serve as extra legs for building up the staircase. 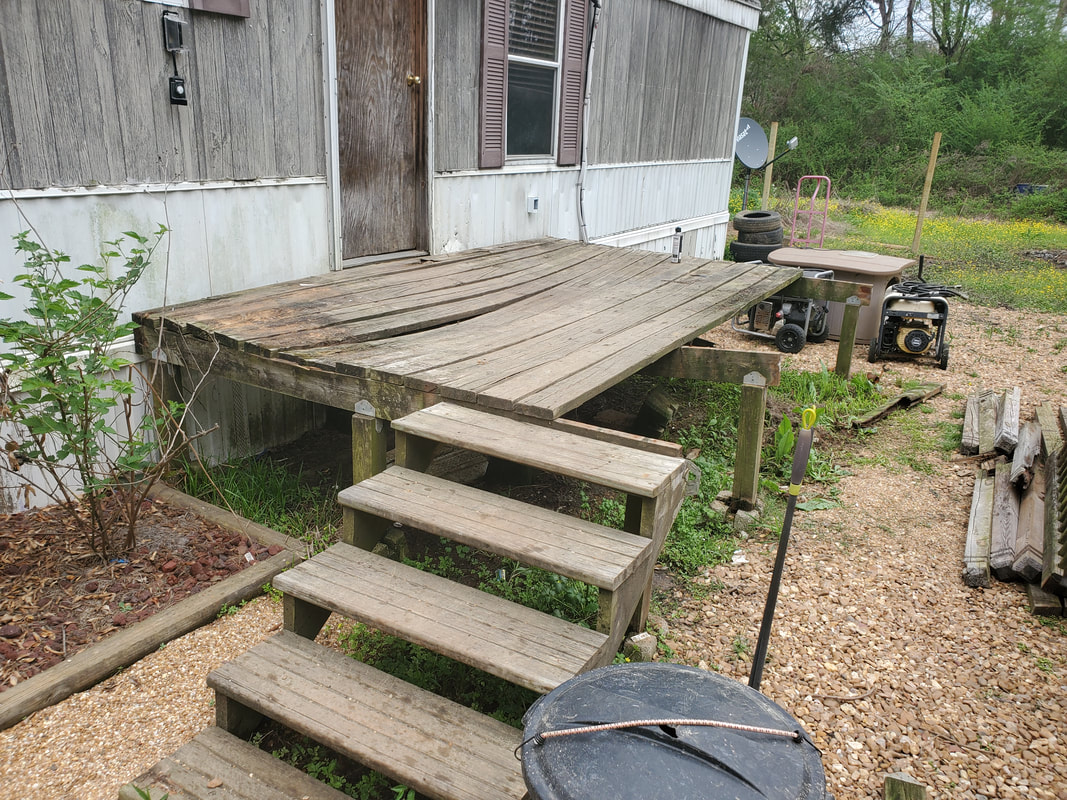
Pulling boards from the top of the porch.
As boards get pulled free, the rotted support boards come apart that much more.
As I pulled the boards off the support boards came apart that much more, allowing me to remove the detritus from the area. I also started removing the support posts, 4x4's, from the area along with the concrete blocks used to support the posts and the porch as a whole. After doing a review of all of the posts, I separated the candidates from the pack that would be used to make my standalone staircase. 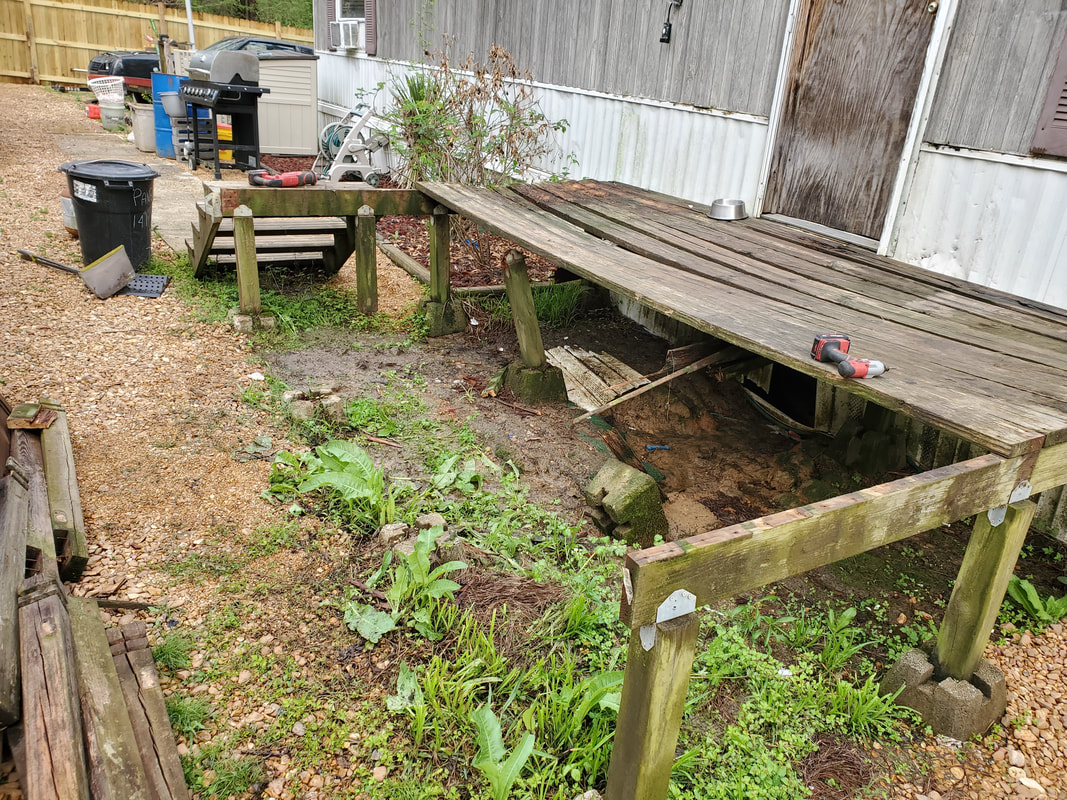
More boards and support posts and blocks removed from porch area.
At this point I started building my standalone staircase since I was far enough along in the dismantling of the porch that I would have to separate the stairs from the rest of the porch body. I went ahead and took some brackets salvaged from the porch itself, along with some screws, and measured and cut some posts to attach to the back of the staircase so they could support the unit properly. These posts allowed me to cut the back board which was an extension of the end support board to free the stairs from the rest of the end support board on the porch. 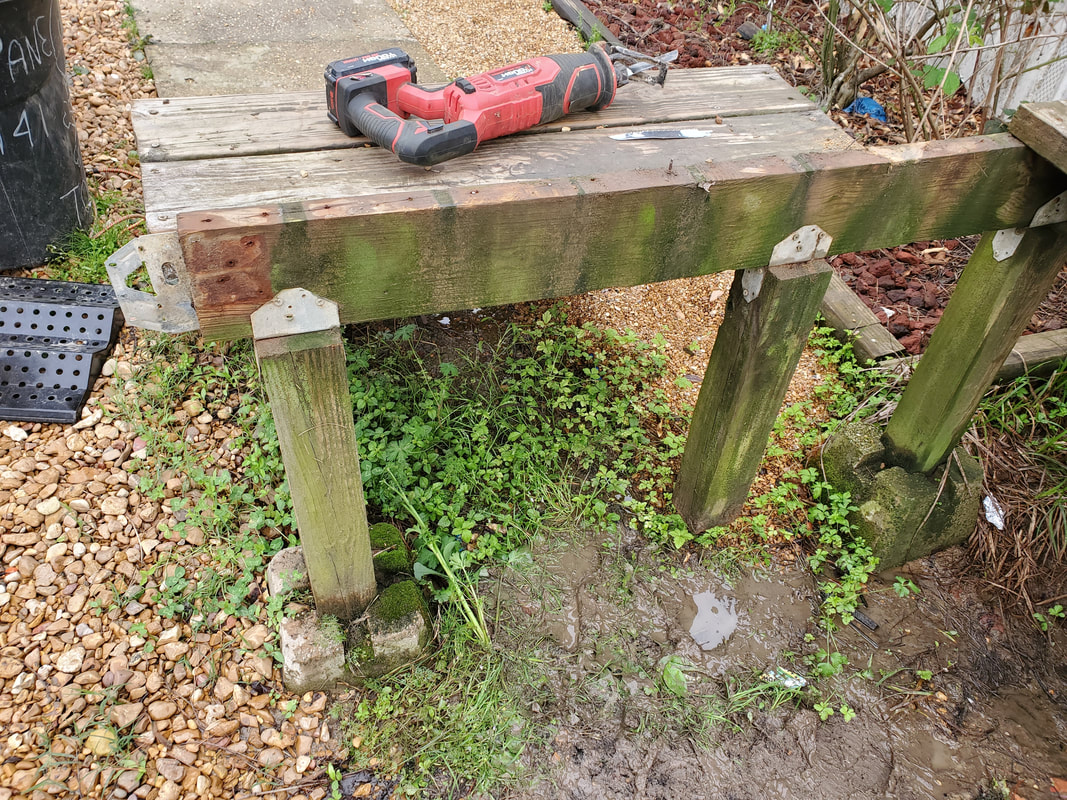
Posts attached to the back of the staircase prior to cutting board to clear stairs from the rest of the porch.
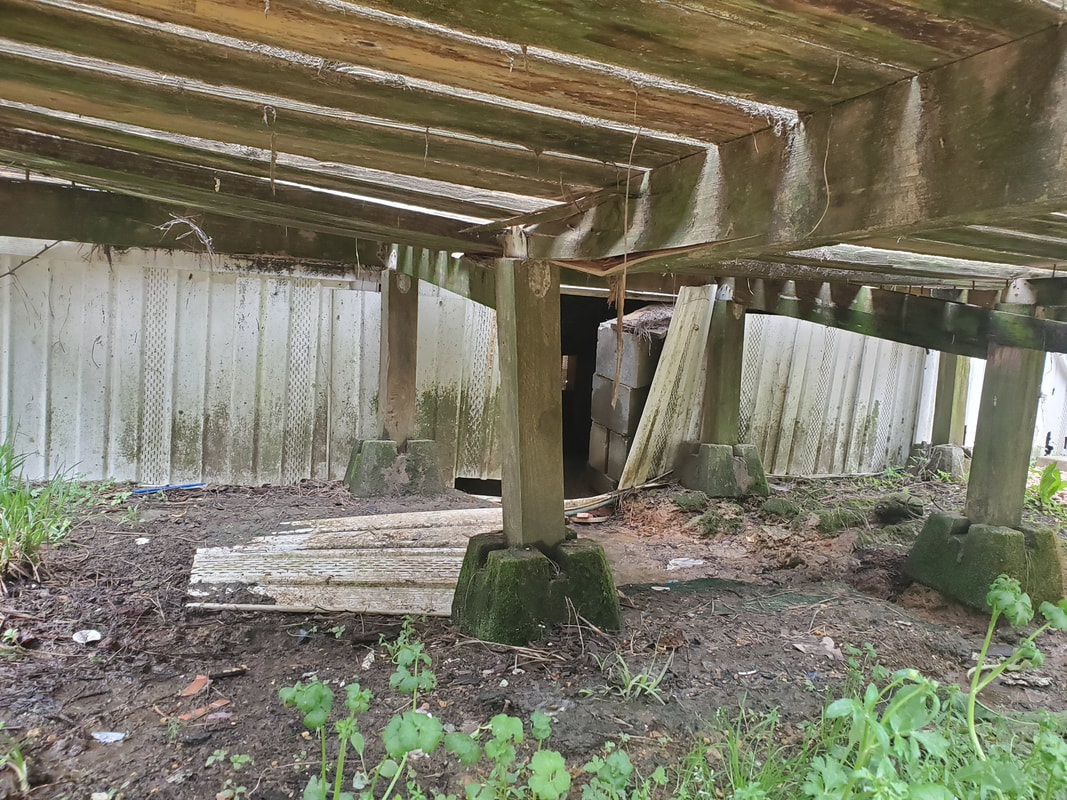
With the staircase pretty much "made" I was able to finish the dismantling of the rest of the porch and the clearing of the rest of the materials from the area. Now there was a bit of a problem though. Because of erosion, the ground under the porch had worn away, leaving deep cavities that needed to be filled in prior to me even setting up my temporary staircase, much less before I set up the new porch. 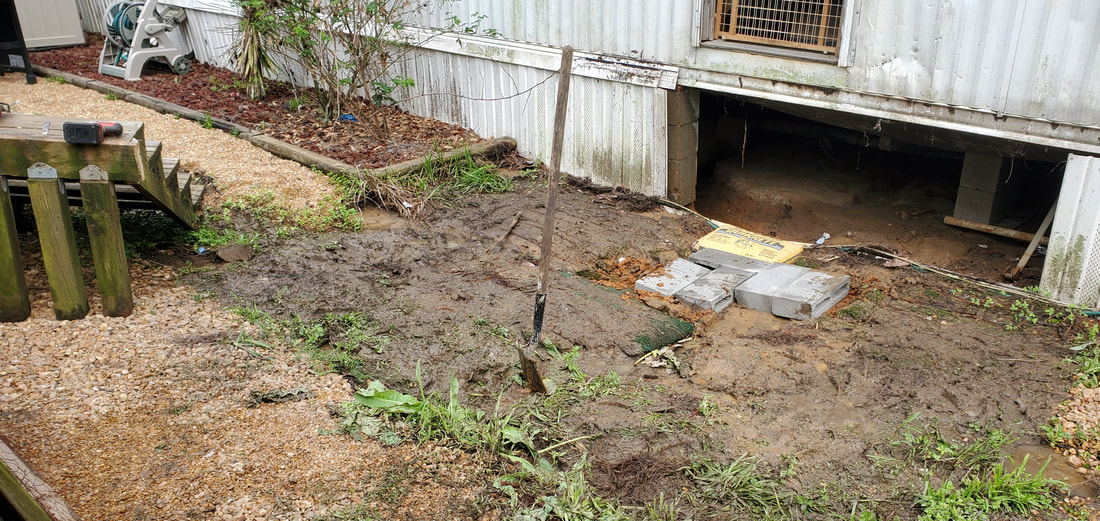
Area cleared of porch and cavities filled in with blocks and concrete. Note staircase to far left with posts attached.
As can be noted in the previous picture, I had to fill in the cavities in the ground with some masonry blocks I had laying around along with a bag of concrete I had left over from sinking posts to the fence. This will be just the beginning as I will dig out extra dirt in spots to lay more blocks as well as a bunch of surplus bricks I have laying around to get the ground leveled as possible. This will at least allow me to get the staircase level and sturdy on the ground so it won't tip and move under our weight. Later on I plan on laying gravel down over all this area after getting it prepped up so it will blend in with the rest of the driveway and grounds where I'm laying gravel so I can set up the foundation blocks for the porch without having to do any extra building up to separate the driveway from the rest of the grounds under the porch. 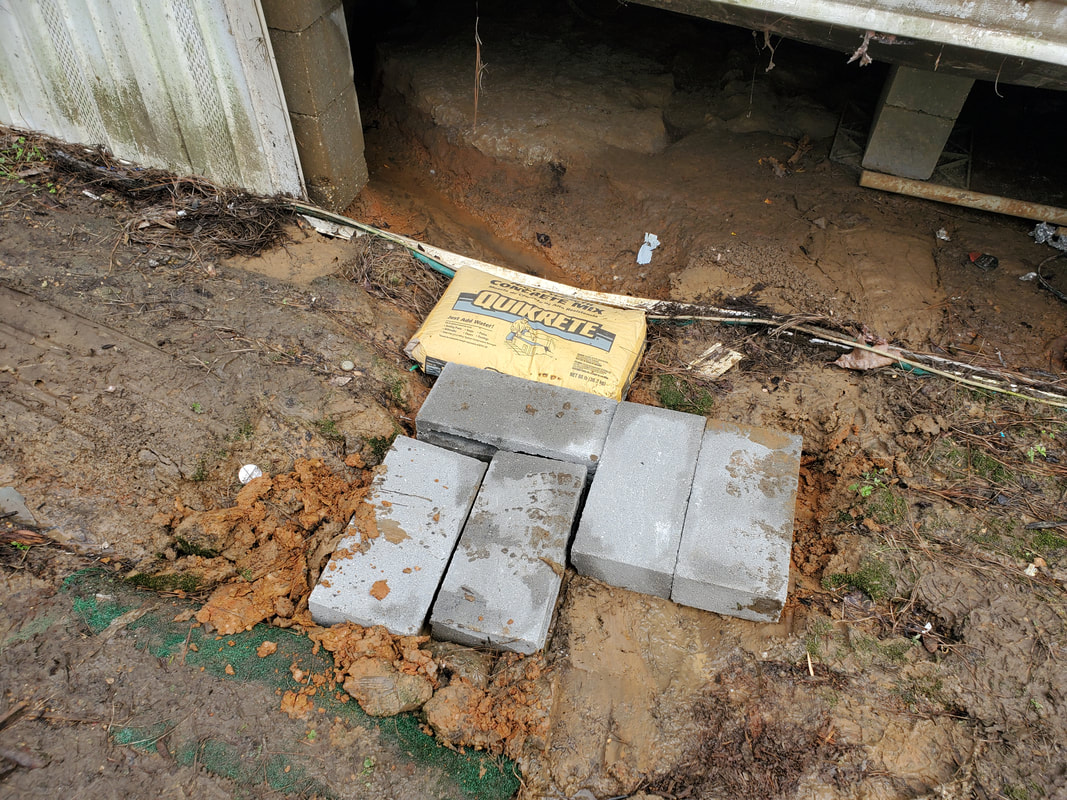
Closeup of blocks and bag of concrete laid in ground and filled in with some extra dirt to help level things off.
Also noted in the pic was the staircase. I added a couple more posts and brackets to the rear of the unit to add to the strength of the stairs. I ended up also using a couple of cuts from one of the floor boards to make braces for the sides and the rear of the staircase and the bottom of the posts to finish up the reinforcement of the overall staircase before setting it up against the house under the doorway. 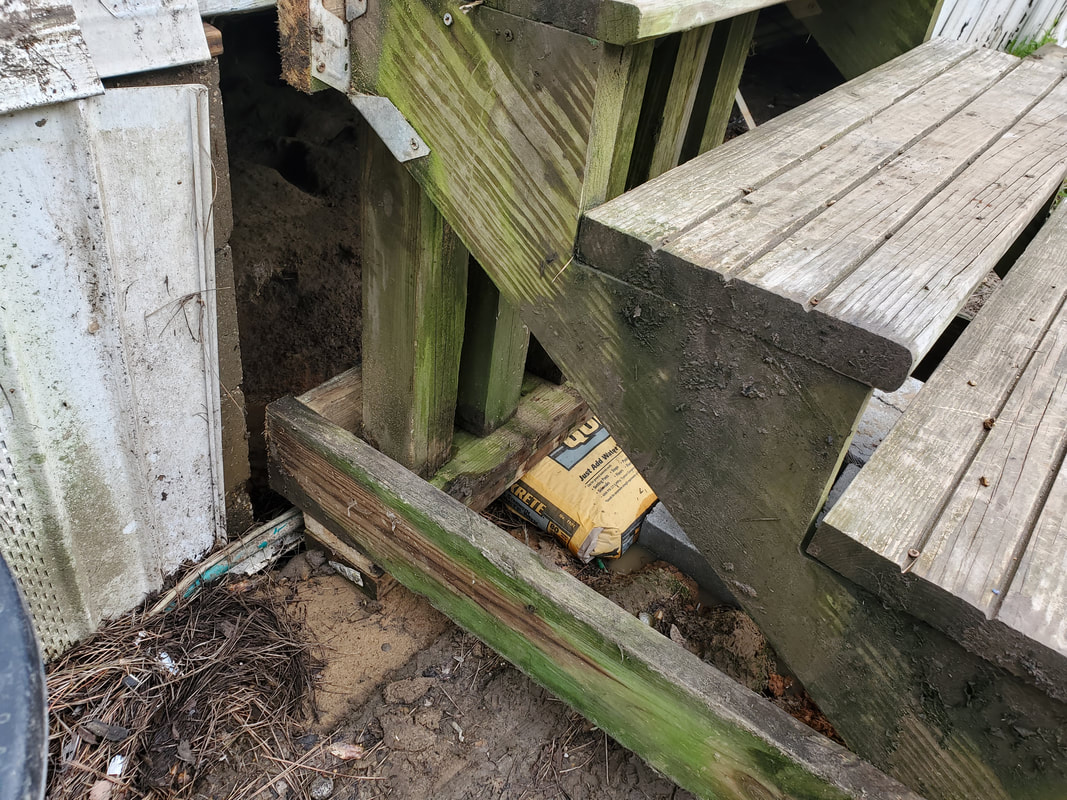
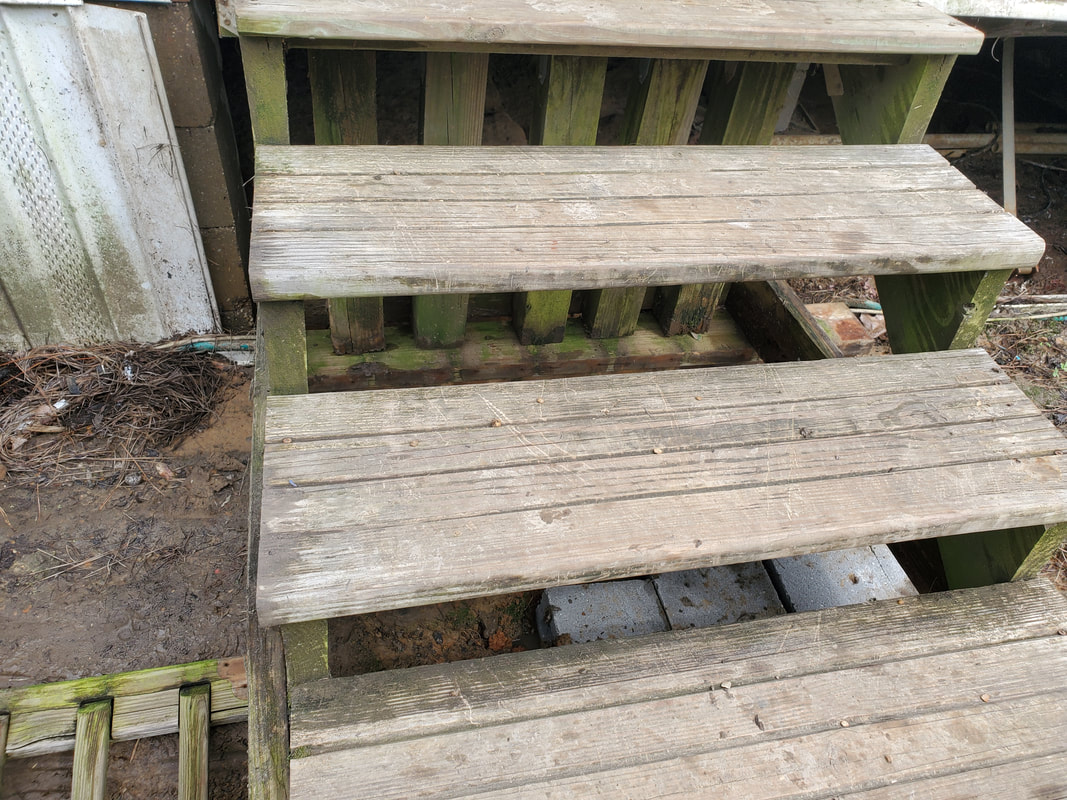
Closeup of the staircase in place with the support boards attached to the side and rear. Also note how staircase is setting on top of blocks and concrete while against the house.
Shot through the stairs showing the posts at the back of the staircase.
With the boards attached to the staircase along with the posts, the whole unit is pretty strong and able to withstand our weight and the heavy traffic that it will sustain during the time it will take for me to gather the materials we need to build the new porch. Even the bottom of the posts were secured to a board to add to the reinforcement. Another thing I had to do in the meantime since I had extra cavities in the ground leading up to the walkway was lay down the some of the boards that I removed from the porch. This was to cover up the cavities and other dangers on the ground from anyone tripping over them. I dug spots to lay more blocks down but because all the blocks and bricks I laid down were uneven, the boards help make things even and safe enough to walk on until I can get some gravel down. 
Boards laid down after laying down bricks and blocks in the ground. Note how staircase is set up over everything on the ground to have it sturdy against the house.
As stated before I will be laying down gravel over all of this area, pretty thick so I can blend all of the grounds together into one great area prior to starting construction of the new porch. I want all of this area covered equally so there will be no need to do any kind of decorative dividers or anything like trying to extend the lava rock garden under the new porch. This all will work out well and will allow me to eventually build up the ground under the house to prevent further erosion since the trenches and cavities extend to under the house and out the other side. These grounds will have to be built up all the way out to the chicken yard where the area around the back door will also have to be shored up and filled in to create a base with which to start the construction of the porch I plan on building for the chicken yard. It won't be as big as the porch for the front door but it will be sufficient enough that multiple people will be able to stand on it without being crammed together. Until then, the front door area is set up and ready for use.
|
