|
The building of the Mustang Chicken Coupe finally begins. After gathering the first batch of scrap metal for the build I decided to start with the windshield. In this case it's literally going to be a wind-shield. Instead of putting any kind of glass, the windshield frame is going to be covered with a sheet metal skin.
The first thing that I have to do since the sheet metal to be used is smaller pieces, all salvage pieces, is weld in some reinforcement posts in the windshield frame. These posts will conveniently be some electrical conduit that was on the scrap pile. I decided to use three pieces of pipe, spaced evenly to divide the windshield frame into quarters. This way I can manage to cut pieces that will fit in the sections and with the posts in place this part should stay nice and rigid even if a branch falls on it. I had to cut one end of the pipe at an angle so it will mate nicely with the bottom of the windshield frame while resting in the groove of the top of the windshield frame. The exception is on the passenger quarter at the top of the frame. Since this section was straightened out after being severely damaged by the tree that fell on it, the large indentation made it difficult to just put the one pipe in the groove at the top without the whole thing looking lopsided. I ended up cutting that piece of pipe a little longer so it can overlap past the groove of the windshield frame and rest on the actual roof. The intent will be to of course cut the sheet metal for these two quarters a little longer so they can be welded on the roof instead of just on the groove of the windshield. 
Windshield frame posts welded in place. Note passenger side post overlapping roof where frame was bent.
With the posts welded in place, evenly spaced, it was time to start cutting a piece of sheet metal for the first quarter. The piece of scrap metal I used was an old dryer panel for the door. I was able to cut a large enough piece of metal from the section of the panel under the door opening that I can use on the passenger quarter of the windshield frame. Of course the rest of the metal panel went into the outgoing scrap pile since there wasn't really much else big enough to salvage from the piece. I traced around the edges of the panel where the curvature of the windshield frame had to be taken into account. After trimming the excess I started welding the panel in place. Starting with the outer edges I got the metal welded in, including the roof section where the frame was dented in. Lastly I did welds along the inner side, along the length of the pipe to fully secure the sheet metal in place. When I start the next panel I'll just weld a bead that will join the two quarters together on the pipe. I have to ensure the sheet metal is fully welded in place around the windshield since this area needs to be watertight. 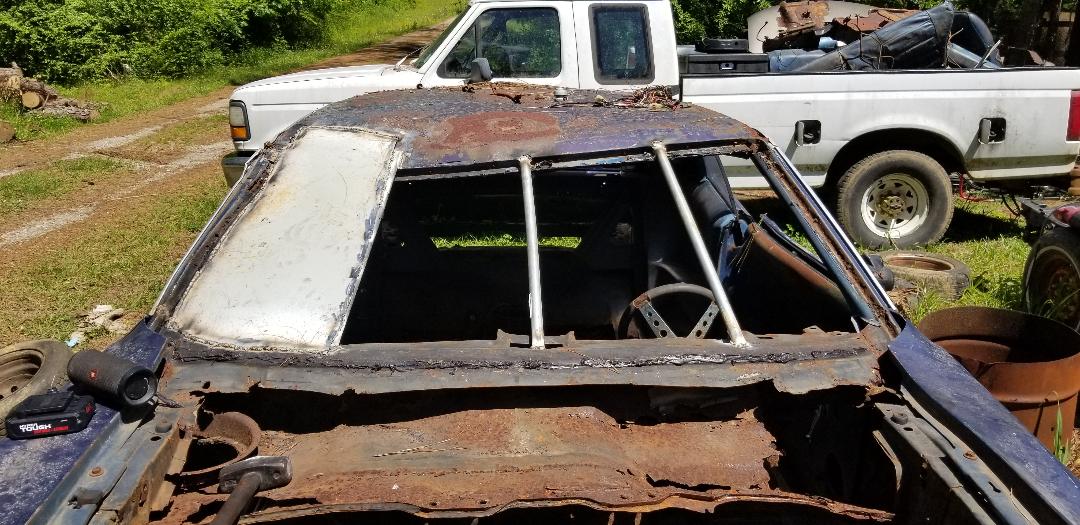
Passenger side panel welded in place over pipe. Note how panel overlaps onto roof.
0 Comments
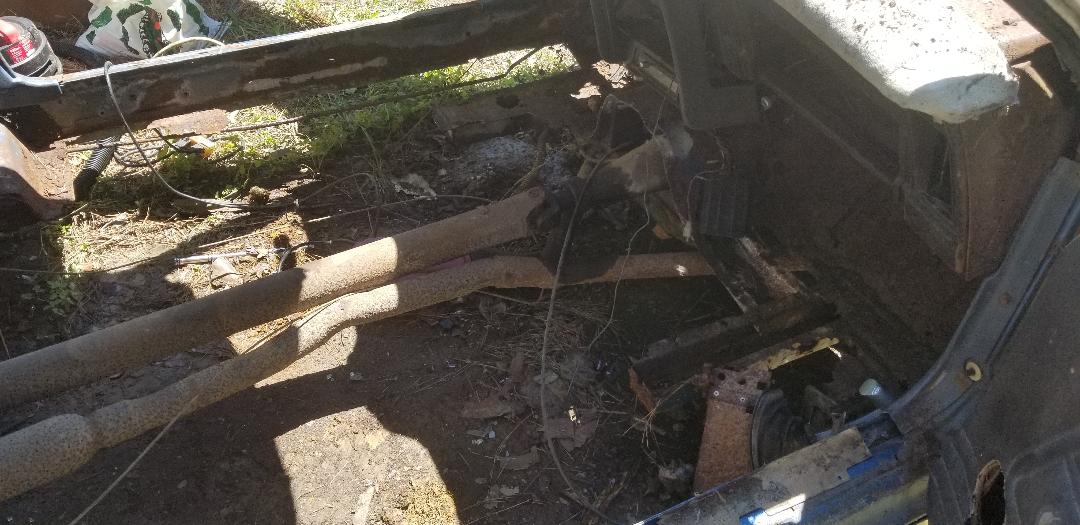
As mentioned before the Mustang's old engine and transmission needed to be dealt with before I start the actual work on the Mustang Chicken Coop. I thought I would get the engine prepared for rebuilding so I can maybe start working on the F150 after finishing up the Mustang. This of course will involve breaking down the engine so I can get it ready for the machine shop work that will need to be done as well as get the transmission staged in a safe spot until I can put it to use later. I continued from where I left off the day before by getting the old distributor removed then getting the intake off. I had to beat on the dizzy to get it to free itself from the hole in the block but at least I didn't destroy the thing. I had one odd bolt left to remove to get the intake off before turning my attention to the cylinder heads. Using the impact wrench I got all the bolts pulled and was able to get the heads pulled. After some inspection it turned out that the heads were in pretty good shape body wise, probably just needing a freshening up versus a complete overhaul. I also found out that the engine was still freed up and able to turn over rather easy. When I first played with this engine and found it was kind of seized up I filled the cylinders with WD40 and kept working the thing until the engine freed up. Apparently even after the initial free-up that WD40 and some other penetrating oils I sprayed in the cylinders had plenty of time to work its way through the rings and cylinder walls, lubing everything up so well that the engine couldn't help but turn over. I went ahead and removed the old starter, breaking a bolt off in the bell housing, which will need attention in the future when I do go to use the tranny again. The starter was completely trashed so it went on the outgoing scrap pile. I was able to turn the engine over to remove the torque converter bolts then went ahead pulled the bellhousing bolts in order to separate the tranny from the engine. With the engine by itself, I pulled the flywheel then flipped the block over and pulled the oil pan. Since the engine was able to be turned over, by hand, I was able to turn the crankshaft in order to remove the nuts for the connecting rods, along with the bolts for the main bearing caps. The bearings were showing a lot of copper, so this would be indicative of serious wear, probably part of the reason for the engine seizing up at some point, probably had low oil pressure or something, who knows. All it says is that the engine is going to be overhauled, fresh bearings, including cam bearings, and rings and all that other shit. I finished removing the pistons and laying them out in order so they are identified for the cylinder they came from. Each piston has a mark that identifies the forward point. The main bearing caps are also marked for which number they are as well. the last thing to do at this point is get the harmonic balancer removed so I can fully get the crank out, along with the old timing chain set and camshaft. With that I'll be able to take the block to the machine shop so it can be cleaned up and have the cam bearings replaced. The crankshaft will be sent off to be ground as well. 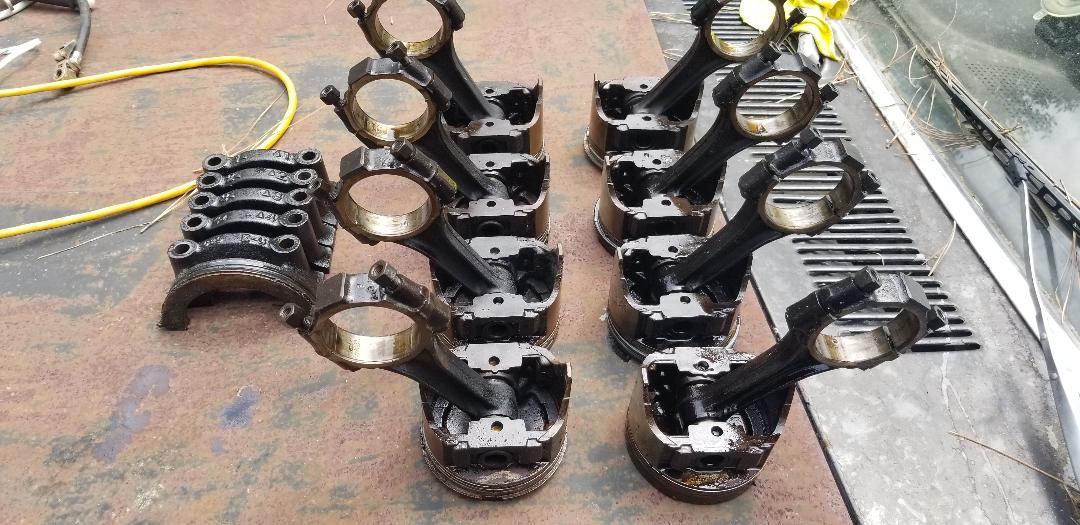 Pistons with their connecting rods staged according to their respective cylinders. Also main bearing caps staged in order. 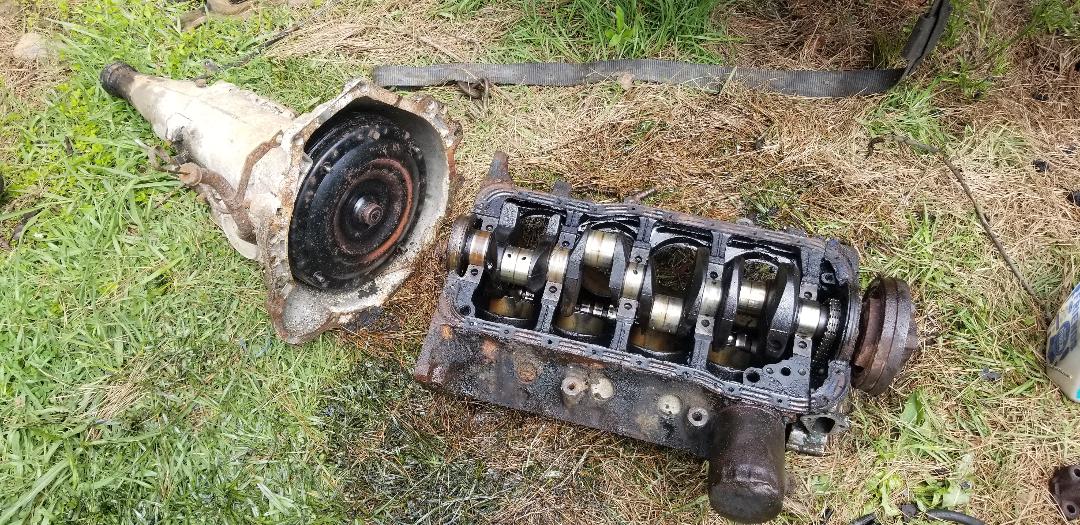 C4 transmission and block with crank and few other components still in. I moved some parts around, taking the parts that were shitty and putting them on the scrap pile outbound. Some of the other parts were temporarily moved to the auto parts rack in the dog yard, staged until their potential use in the future. The exhaust manifolds, flywheel, plate, intake manifold were staged on or around the rack. Other parts I'm still deciding on what to do with em or where to put em but the main thing is getting that crank separated so I can finalize that disassembly and ultimately getting the block in a safe place until I can move on to the next phase with THAT project. As stated before, I'm moving pretty fast on these projects and will be continuing to find myself overlapping projects as the situation presents itself. The next move with the chicken coop is going to be the staging of all the scrap metal I plan on using to make the floors and other parts of the chicken coop in the Mustang body. The work continues. 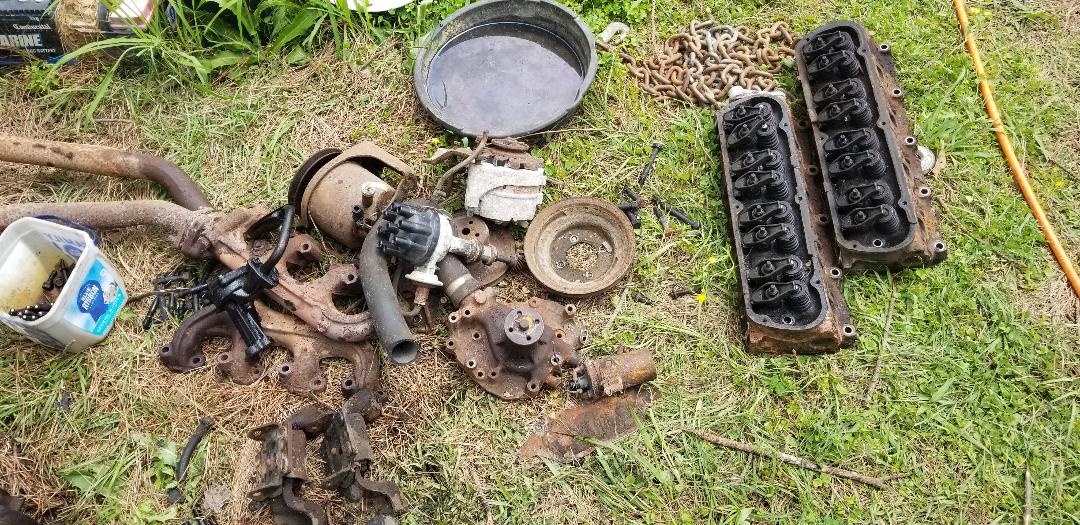 Cylinder heads and other external engine parts removed from the engine. As stated in the previous post, the next move was going to be the removal of the powertrain. As with most of the other parts of this project the powertrain removal actually went pretty painlessly. The first thing we did was pull the car forward a few feet to give me some space to pull it back again when we got the crane staged in front of the car. This was done using the Tracker and a tow strap, quick and easy. From there we got the engine crane staged in front of the car and lucky to find, the engine actually had loops bolted to the exhaust manifolds of the engine, allowing me to just secure the chains from the engine balancer right to those points. From there I went to the cab of the car and unbolted the driveshaft, which since the floor was gone was rather fast. After getting the driveshaft taken care of I went to the transmission crossmember and removed the bolts from that. Again, since the floor was gone, the bolts were fast to remove and the added icing on the cake was that the transmission mount was shot, so the crossmember just dropped free from the transmission, no need to remove the bolts holding it all together. From there out came the trusty battery reciprocating saw. This time its target was the exhaust system. Since I didn't want to just completely trash the system since it could be put to use I chose to make cuts at two points just before the pipes merge into one pipe, so the exhaust manifolds will have a good length of pipe that can be extended into two separate exhaust pipes in a true dual exhaust system. The single pipe heading to the rear consisted of the merge pipe, a short length of pipe going into a glass pack or cherry bomb muffler and a short piece terminating just in front of the rear end. The short piece between the muffler and the merge/Y pipe was actually fractured but instead of breaking the pipe I kept it intact since this pipe could still be used, such as for a 4 cyl or straight 6 engine such as the 6 cyl in the 69 Mustang. The last thing to remove was the shifter, which was an aftermarket unit with a cable that was mounted to the side of the transmission with two bolts. Again with the missing floor, this went fast and the shifter was on the ground in a few minutes. 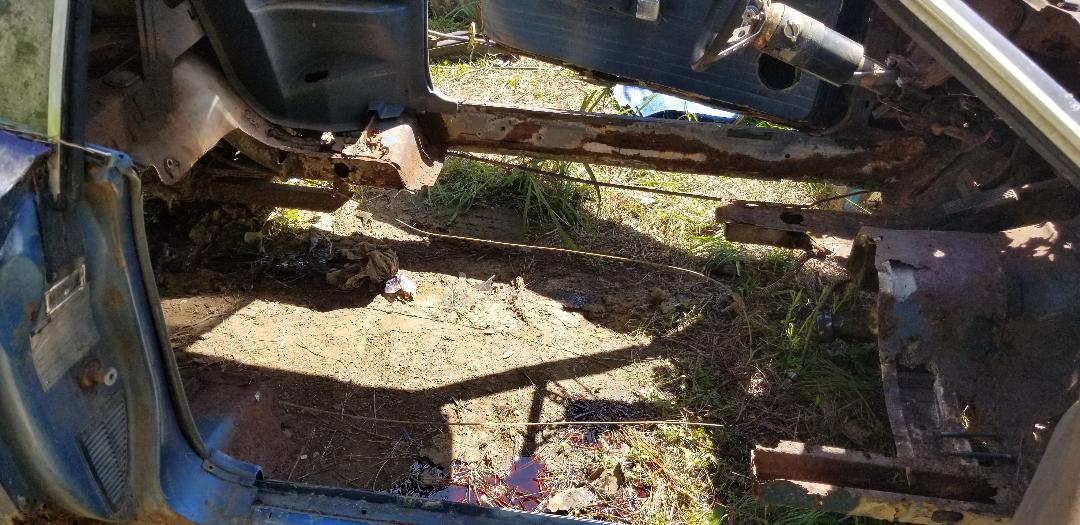 Mustang interior after removing the driveshaft, exhaust and shifter. From here I went to the engine compartment and used the impact wrench to remove the bolts holding the engine mounts. With everything disconnected from the powertrain nothing was stopping us from pulling the stuff from the car. I started jacking the engine up and as I did that we started pushing the car back. Since the car was already on a slight grade, it rolled back pretty easily. I had to put a tire behind the car to allow for incremental movements so the car don't just run away from us and hit the F250 which was right behind the Mustang. In a few minutes we managed to get the engine and transmission swinging in the air over the Mustang's now voided engine bay. 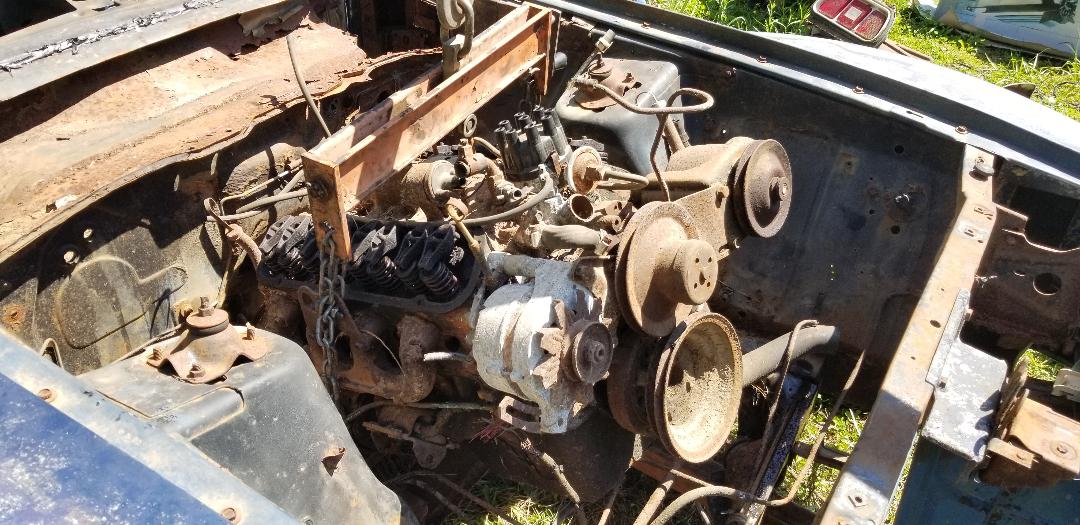 Engine and transmission hanging from engine crane, ready to come out. With the engine free of the Mustang we was able to push the car back enough to give us space under the unit and the crane so we can lower everything to the ground. It is those few minutes that almost 1000 lbs of metal are swinging in the air that stress me out the most. It is this time when I try to expedite getting the engine and tranny on the ground, which we did. At this point I disconnected the crane from the powertrain and moved it out of my way so I can start pulling things apart on the engine as part of another side project. 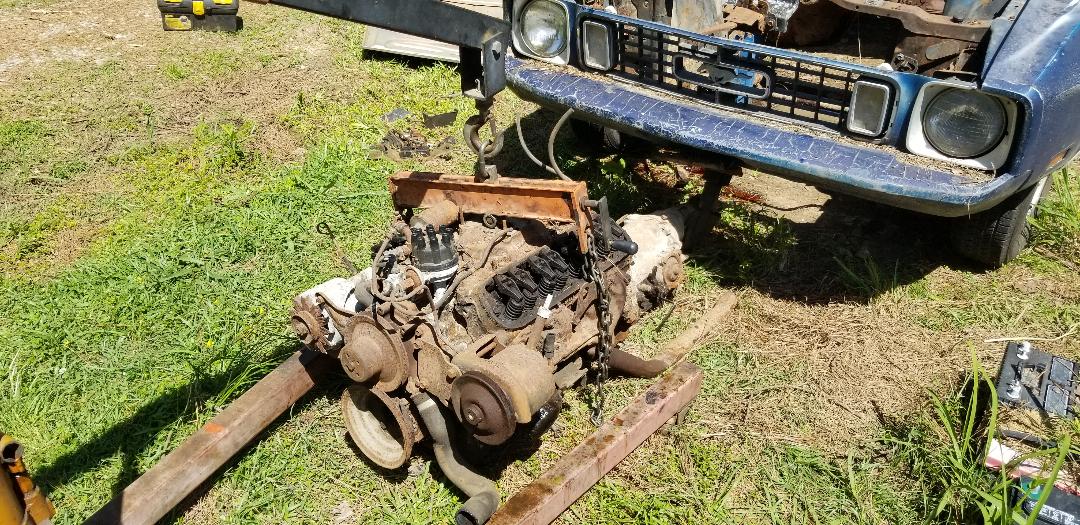 Engine and transmission on the ground shortly after removing from the engine bay. 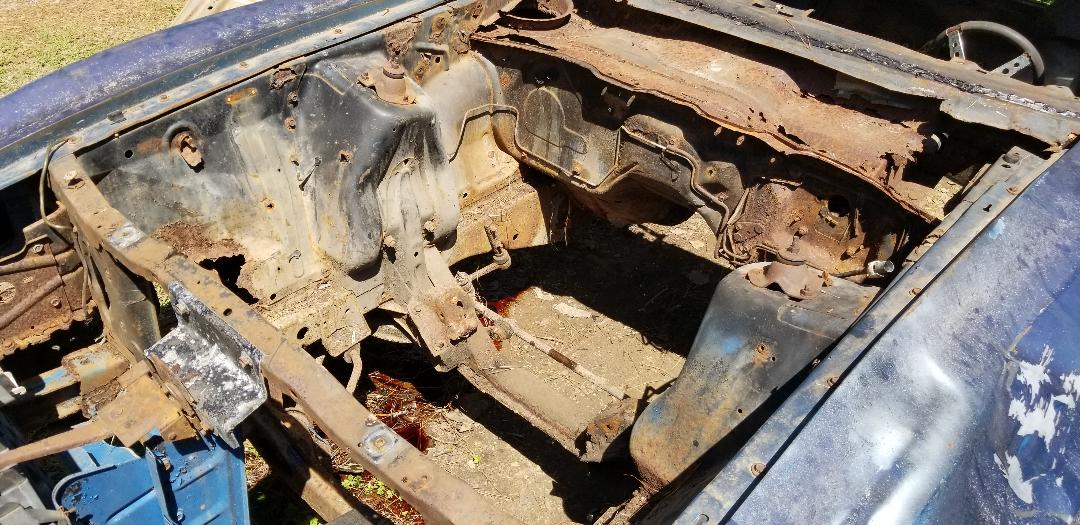 Engine bay voided of the old powertrain. The side project with the engine and transmission is that I plan on rebuilding the engine, using the cylinder heads from the newly acquired F150 truck that has a dead engine. I plan on installing this rebuilt engine into the F150 in order to get that truck rolling once again. As for the C4 transmission, there is a probability that the unit is good, so this transmission can possibly be used in the future truck frame swap for the 69 Mustang. If I find another V8 I could then install it on the C4 and just drop all of this in the truck frame that I would drop the 69 Mustang body onto. Either way, old school Ford transmissions are harder to come by than GM units. I have to save this thing. With the powertrain free of the Mustang, at least now I can start on the next phase of the project, actually turning the car into a chicken coop. I have plenty of other plans for building up this chicken coop to be something way beyond anything any backyard poultry farmer ever had. This time my attention was turned to the trunk of the car. This went rather easily and quickly, thanks to the battery reciprocating saw. I have to stop to say I love that fucking tool! Anyway, The first thing I did was put the sledgehammer to the left quarter panel to straighten that out. That went easily due to the thin sheet metal, compared to the hard A pillar at the front. I was able to straighten out the panel enough to allow it to line up with the trunk lid. With that going quickly I put the saw to the metal. The first thing I cut was the remaining taillight panel. Since this was already pretty rusted, the saw ate through the metal fast, removing that bit of material from the trunk area. Next I started cutting through the trunk floor, with the intent that I'll be able to remove the fuel tank at the same time, killing two birds with one stone. There were several rust holes that allowed me to start cutting along the perimeter of the trunk floor. I cut along the back to each of the subframes and over to the front at the rear shock tower panel. After getting the trunk floor pulled out I was able to pull the fuel tank out as well, almost in one whole chunk of rusted shit. I did some extra trimming of the back support where the taillight panel used to be attached. This was mainly to clean up the metal in preparation to weld in new metal in the process of making the trunk area a nesting box. Lastly I took the 15" rimmed wheel that I dug up from the junk pile that has the same bolt pattern as the Mustang's and hung the tire on the right rear hub. I then took the 69 Mustang's spare tire which was somewhat smaller but still able to fit and hung it on the left rear hub, finally putting the car body on four good wheels, ready to roll. The next thing will be to get the crane staged over the engine compartment and disconnect everything from the powertrain in preparation for its removal.  Trunk area cut out up to the subframes, leaving the rear support section, subframes and some floor up to the quarters. Also note the left quarter straightened out but still with a dent at the top.  Trunk scrap removed from car, note different panel sections that made up the whole trunk area. 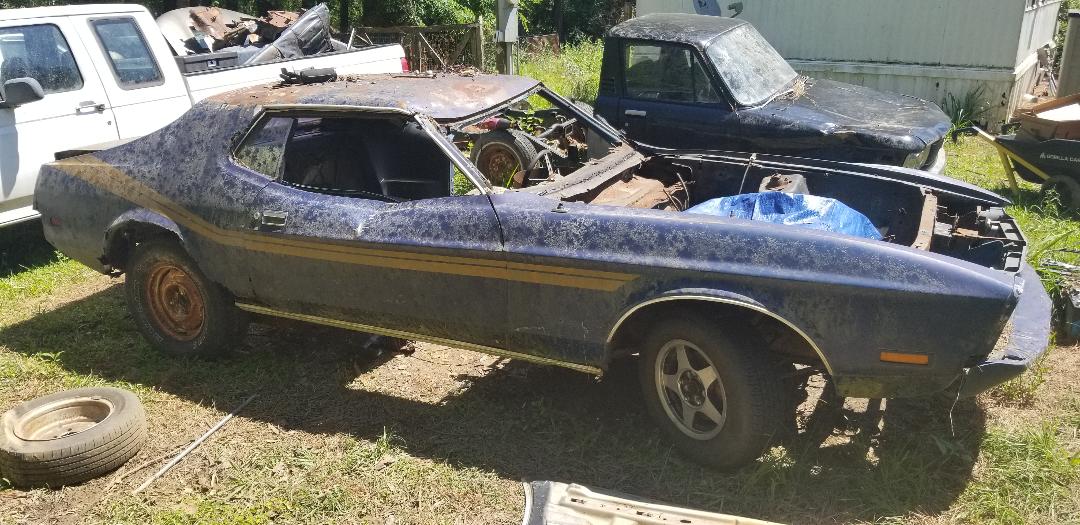 Car on all four good wheels, note different rims.
One of the side jobs that I had to work on was swapping out the AC compressor on the Tracker. The old compressor was working after I charged the system and then it stopped one day when we made a short road trip to pick up some engine parts. Later on it turned out that the clutch had finally crapped out on the compressor. So I quickly swapped out the bad compressor with the spare that was pulled from the dead engine that I pulled from the Tracker in the beginning. I got the system charged up and tested and was getting nice cool air coming from the system. Then upon doing a test drive the damn system started getting warm again. At first I thought the system may have needed a little more refrigerant so I went ahead and charged the thing up a little more. The whole time the compressor was running but it wasn't cooling. The system finally took on too much refrigerant that it reached overpressure and shut the compressor off.
I then went ahead and started to bleed off some of the refrigerant to get the compressor to kick back on. This worked and made the compressor clutch engage. And it made the engine stall. I shut the AC off and started the engine again and tried to start the AC again and when the compressor engaged it bogged the engine down and killed the engine again. This could only mean one thing: The compressor is shot. So that's it, no need to continue to work on the Tracker's AC, I need to replace the compressor. So that ends the work on the AC system. The next thing of course was to go back to the Mustang Chicken Coupe. This time I worked on removing the dash frame assembly and HVAC box. This ended up being rather easy, only eight bolts all together that needed to come out. I did have to remove a couple of plastic side panels to expose some of the bolts and a couple of small screws to separate the defroster duct and a small cover panel, but once all the bolts were out, the whole frame came out quick and easy. 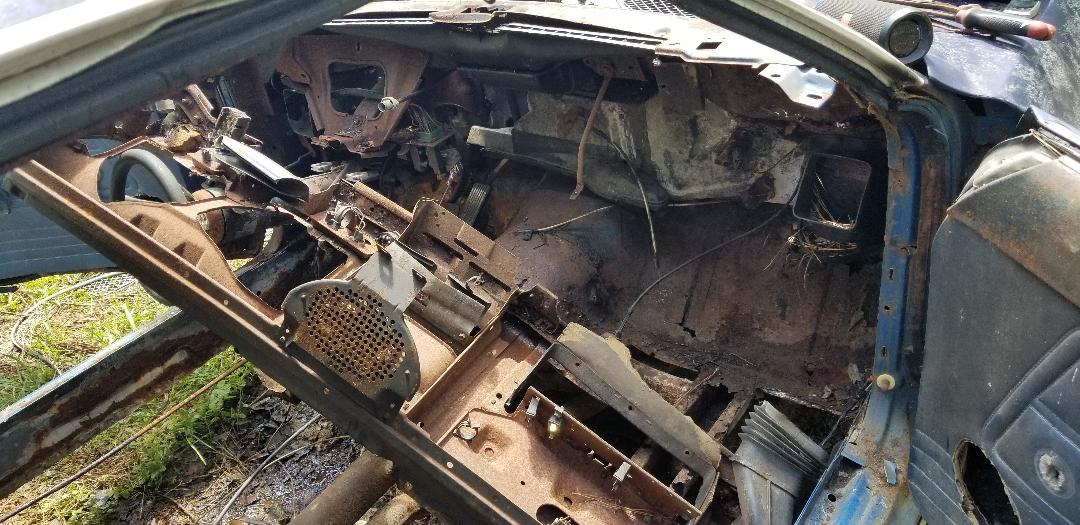
Removing the dash frame from the front of the cab.

Dash frame is out, now for HVAC box.
Now was the time for me to try out my new toy, a lithium battery powered reciprocating saw. I picked up this little specimen from Walmart for $50. The saw came with a 1.5 AH battery and charger but is able to use the larger capacity batteries that power the smaller battery chainsaw. This little wonder made me forget about the corded recip saw as it chopped through everything I needed it to without skipping a beat. I cut the bracket that held the fuse box and remove the remaining wiring that was under the dash as well as running through the driver's side rocker panel trough. With that gone I pulled the nuts from the studs holding the HVAC box to the back of the firewall. Since the box was already rusty one of the studs broke free and once everything was removed, the box separated some as well. All in all, this was not a salvageable component of the car. The next couple of things I removed were the outside air vents that mount on either side of the dash. These only required a couple of screws to be removed before they came out. I also pulled the throttle cable out and pulled the speedometer cable through the firewall to the engine compartment. With the HVAC box removed I then put the saw to the remaining panel that held the wiper arms and extended out from the edge of the windshield frame. With the removal of that section of metal, I secured the steering column back to its mount and vacuumed any remaining glass shards and dirt from all around the remaining areas behind the firewall. 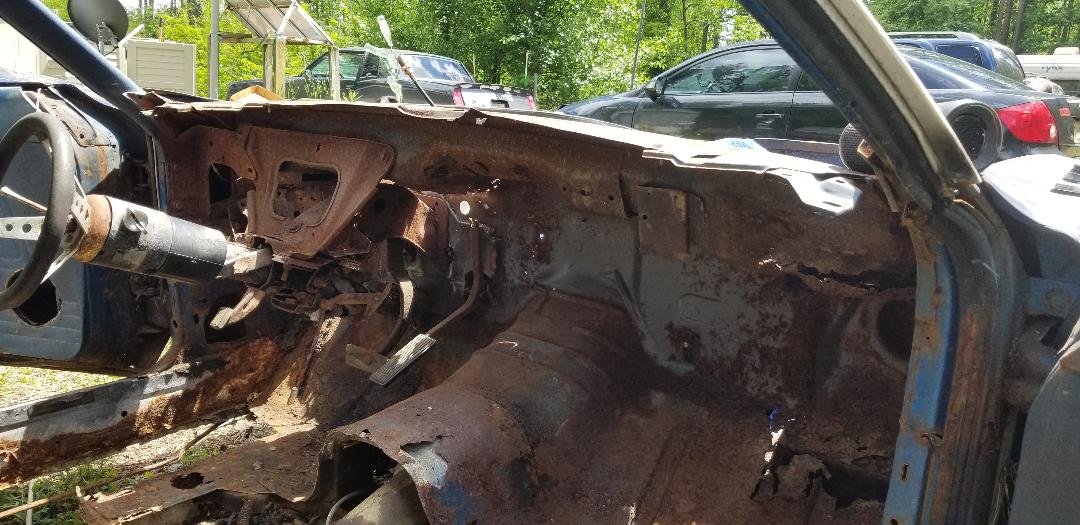
Front area of cab behind firewall sans dash frame and HVAC box.
Wiper arm panel cut free from top of firewall.
With that I can turn my attention to the trunk. I need to cut the rusted out sheet metal from the trunk floor then remove the fuel tank to get that unnecessary metal from the car. I also have to cut the taillight panel, or what's left of it, from the body and straighten out the left quarter. I will have to look at working out some kind of latch or something to allow the trunk lid to be closed to seal the trunk area which will become the nesting box area of the chicken coupe. I also need to look at installing an old spare tire that I have amongst my spare parts and the spare tire from the 69 Mustang. This will allow me to move on to the next phase which is removing the powertrain.
The work continues on the Mustang in its conversion into a chicken coop. I had already cut a patch from the middle floor. At this point I continued to hack into the floors, starting with the rear section of the floor pan. First I had to remove all the seatbelts and buckles to get them out of the way. After removing and setting aside that stuff (for later resale), I put the saw to the rear floor pan. Cutting all the way across from left to right I cut back to where the floor pan started angling upwards towards the trunk. With the rear section of the floor pan gone, I turned my attention to the front portion of the floor pan.
With the front subframe rails in place, I had to cut the sheet metal around these. While this wasn't difficult, I did have to terminate the cutting at the crossmember, which was straight under the dash. With the good amount of cutting I managed to get the majority of the floor pans cut out from the cab of the car. I did continue to vacuum up broken glass from the ground just to eliminate that little thing that would linger even after moving the car from the spot it sits. Because of all the heavy cutting that I did I ended up stripping the drive gears in my Harbor Freight reciprocating saw. Luckily I was done though! I then turned my attention to the dash and gauge cluster. 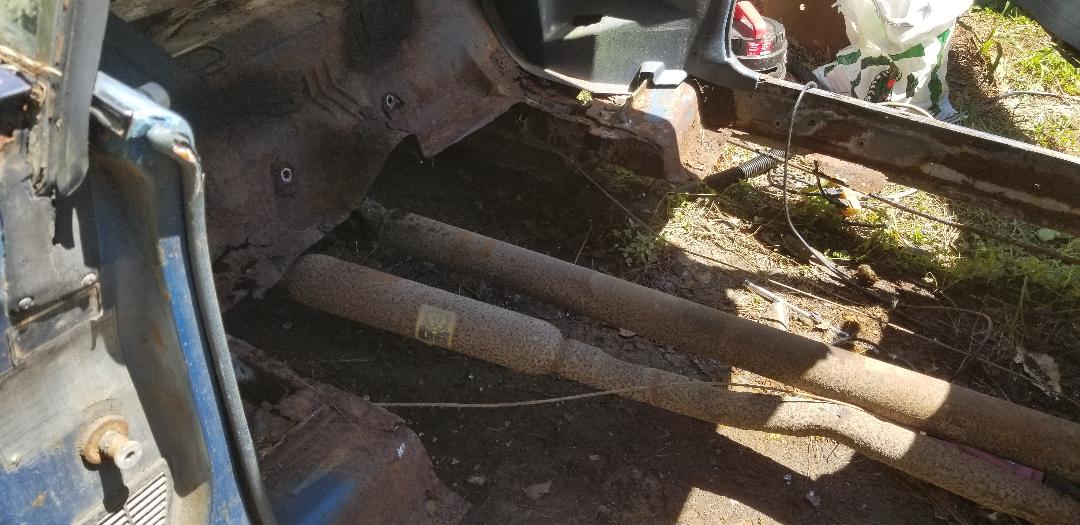
Rear section of floor pan cut out from interior. Note lack of seatbelt buckles on sides and rear.
Fore section of floor pans cut out, note subframe rails and transmission crossmembers just under the dash to the right.
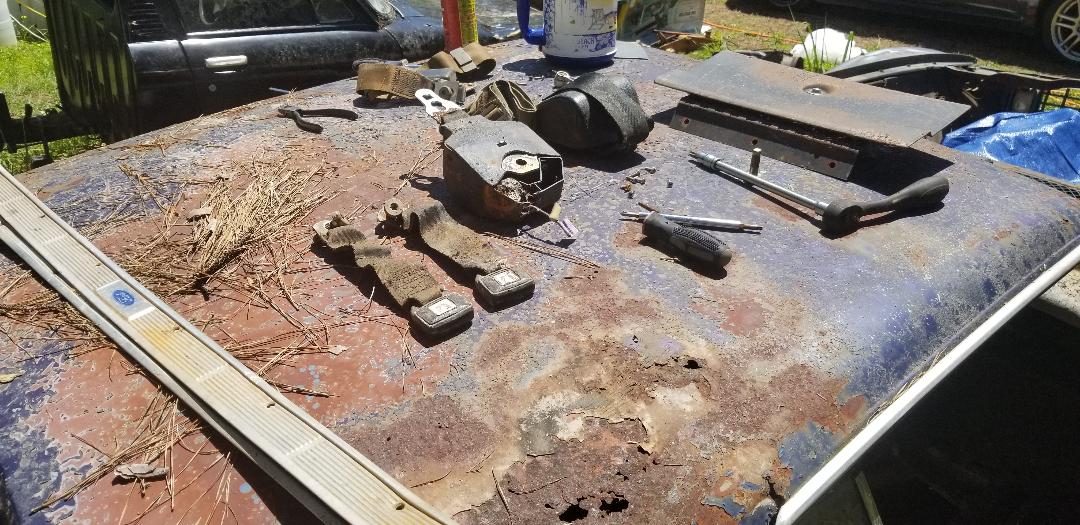
Seatbelts and other interior parts removed and set aside pending marketing for resale.
After removing the bolts from the steering column and the screws from the gauge cluster panel I was able to remove the gauge cluster, panel, an HVAC duct, and another plastic panel. With those large components removed, I then cut out large sections of wiring to add to the pile of old wiring to be processed later on. I was then able to remove the actual dash panel in its entirety. This will definitely be marketed as a whole original dash for a Mustang is typically hard to find and expensive when found, even if they need to be restored. I will probably end up putting the saw to the dash frame to remove that metal in order to get to the HVAC box. The main goal is to clear all metal and other material from the front of the cab up to the firewall in order to make the space be wide open for adding other components to the main chicken coop, such as roosting posts or shelves. The work is moving pretty fast on this project and will continue; this is one that needs to get done fast as we have some baby birds that are getting rather large and need to get outside so they can continue to grow and start producing as intended. Also with the brooder box section being worked into the engine compartment of the car, we will be able to acquire more baby chickens and more effectively raise them in an environment that will be larger and more able to comfortably handle a large number of birds without putting them at risks that are present in overcrowded conditions. The work will continue.
The next thing that I had to do to the Mustang was clean off the remaining windshield glass and crud from the border where the tar was still at, along with the tar, in preparation to try and straighten out the roof. After scraping the tar and glass and crud from the top of the windshield frame I brought out the sledge hammer.
I commenced to hammering a point right behind the A pillar to try and get things straight. That didn't pan out too well. The A pillar is actually pretty damn tough and wasn't really giving like I thought it might. I ended up having to cut the A pillar out then pounding the roof up. I had to actually wedge a piece of pipe under the roof to hold it straight prior to welding the A pillar piece back in. I did have to pound the piece to straighten it out since it was still bent some, which was no big deal. With that I went ahead and welded the A pillar back in place. The weld was relatively shitty, it was only necessary to hold things in place, no weight bearing no real stresses would be applied to this section of the car body. With that I moved on to the "interior". 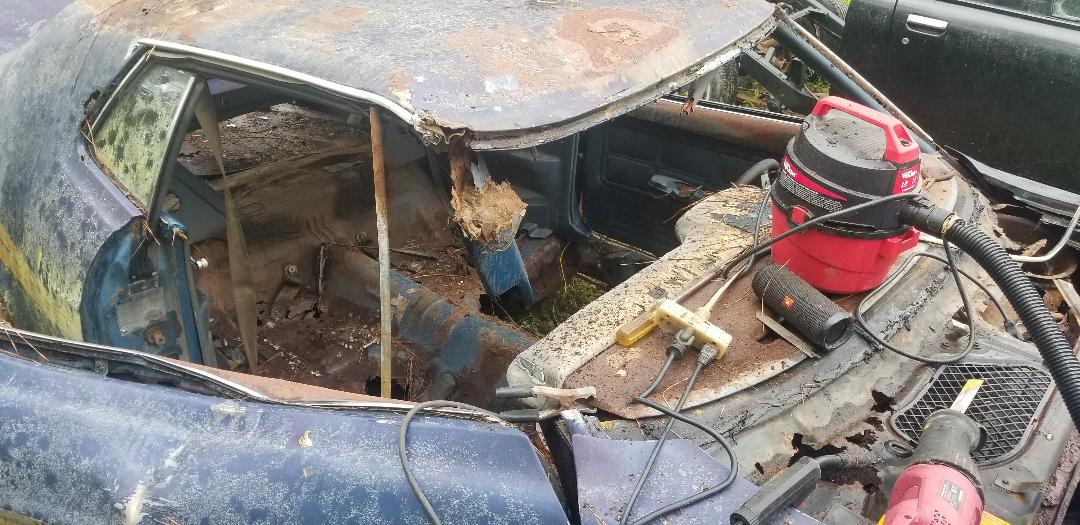
Mustang roof with A pillar section cut out and pipe holding roof back leveled.
Cut out A pillar piece.
Mustang with roof and A pillar welded back up and straightened out. Note big dent on top part of windshield frame where roof was dented in.
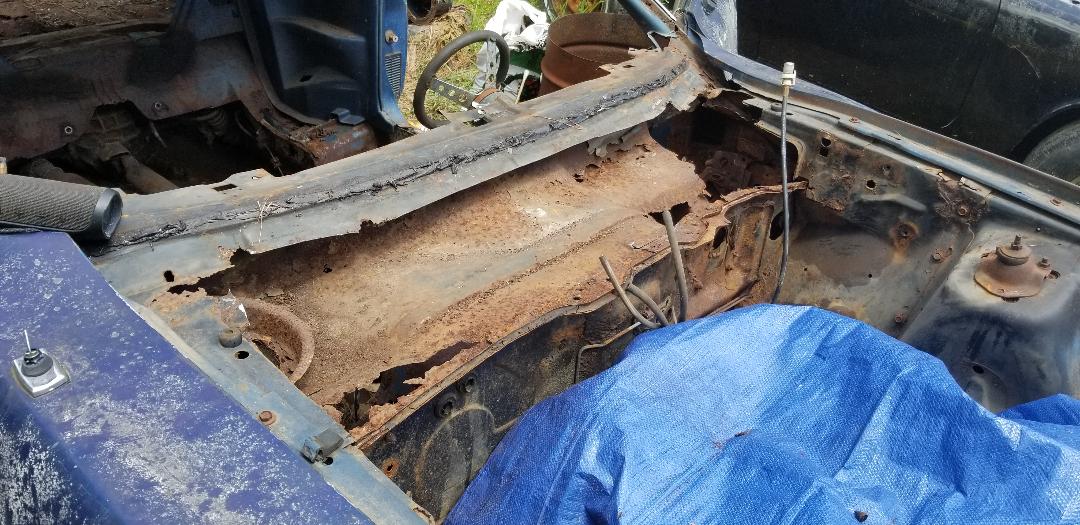
As the picture shows, the roof was dented right above the windshield. While I could've tried to pound out this dent, I figured it wasn't really necessary to try to straighten out since I will be welding sheet metal over the windshield opening anyway. The dent is really just a cosmetic thing for all intents. On the inside though, the first thing I wanted to do was try to remove the broken glass from what's left of the floor and while I was at it from the ground underneath the body too since the glass will need to come up at some point. I spent a good amount of time just vacuuming up glass and picking out larger pieces to throw in the trash bag and picking out pine needles and other shit that didn't need to go in the trash. After getting most of the glass from the small section of the floor and the large opening where the floor is gone I pulled the reciprocating saw to cut a section of the floor out. I cut the floor from the beginning of the back seat area forward to where the back of the front seats would've been at. A section the length of the width of the body and about a foot or so in width front to back was removed. I'll be cutting the floor out in sections, especially since I have the front subframe and the crossmember to contend with. I really don't need to worry about the crossmember since there isn't going to be an engine or tranny in the car, but it would be nice to be able to keep these structural supports to help in making the floor to the coop nice and strong and rigid later. The work continues. 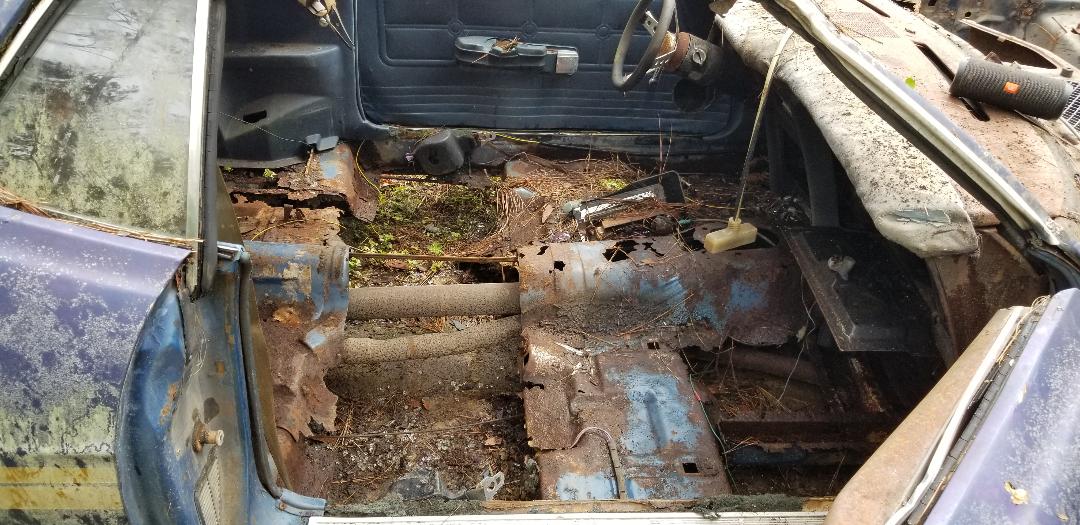
Cut out section of floor in Mustang.
We currently have a car in our fleet that is really like an oddball in the group. This car is the 73 Mustang, a car we got a couple years back as a project. It turned out to be more than what I really wanted to put into it due to the excessive rust and the simple fact that the cost to restore the car would far exceed what I can get if I tried to sell the car as a B grade resto. So the car sat. And sat. And sat. I had a couple of other plans and ideas for it that after really thinking it over, I said fuck it. I even tried to sell the thing and no one wanted to give me anything for it, most wanted the damn powertrain and not the car, fuck them too. I finally came up with a plan where I would benefit the way I'm supposed to with my shit. That plan was to pull the powertrain and use it in a planned restomod project for the 69 Mustang and then use the body as the basis of a chicken coop. I've seen versions of chicken coops that utilized old car bodies and thought it would be an appropriate use of the body as there was really no future for this body other than a date with the crusher since there was really nothing left worth salvaging from the body. Then the storm came through and put a couple of trees on the body. This definitely sealed the deal with what to do with the body. With the roof and rear crushed by tree, even if I straighten the crushed areas, there is no way to recover the body from the damage. So that definitely sealed the deal with the coop project. The first stage of the project is to start stripping everything from the body, up to and including pulling the powertrain. 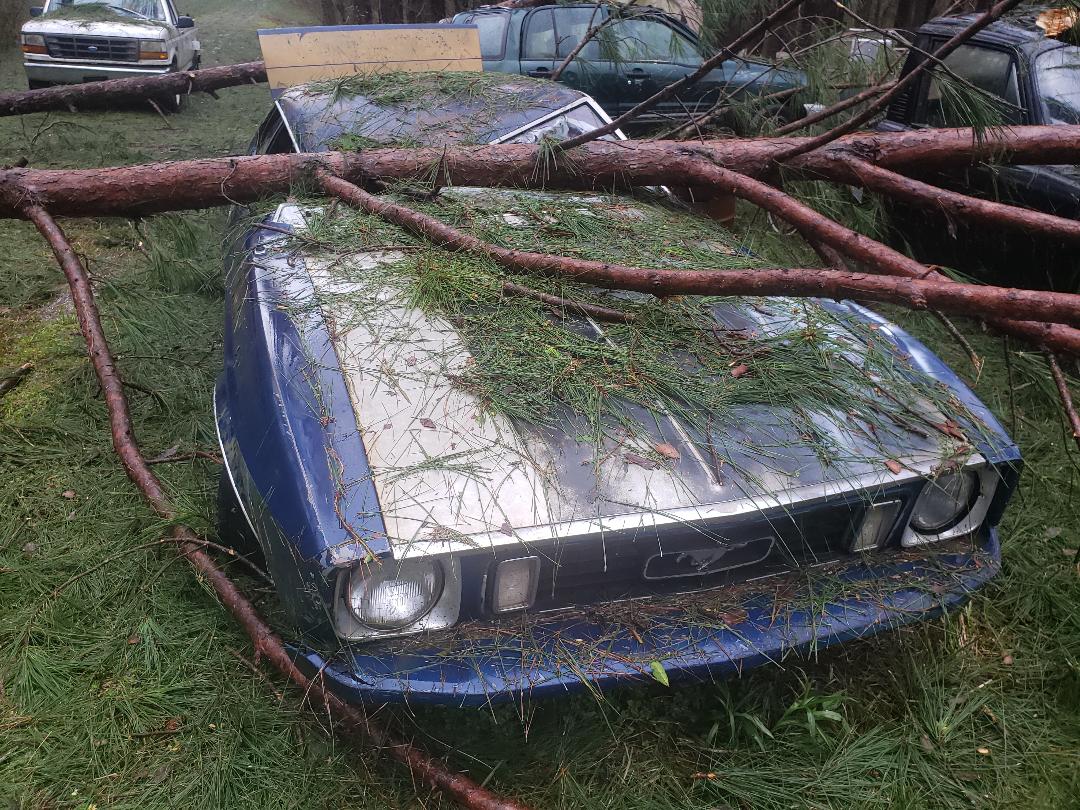 Mustang after trees fell on body, note tree across rear. 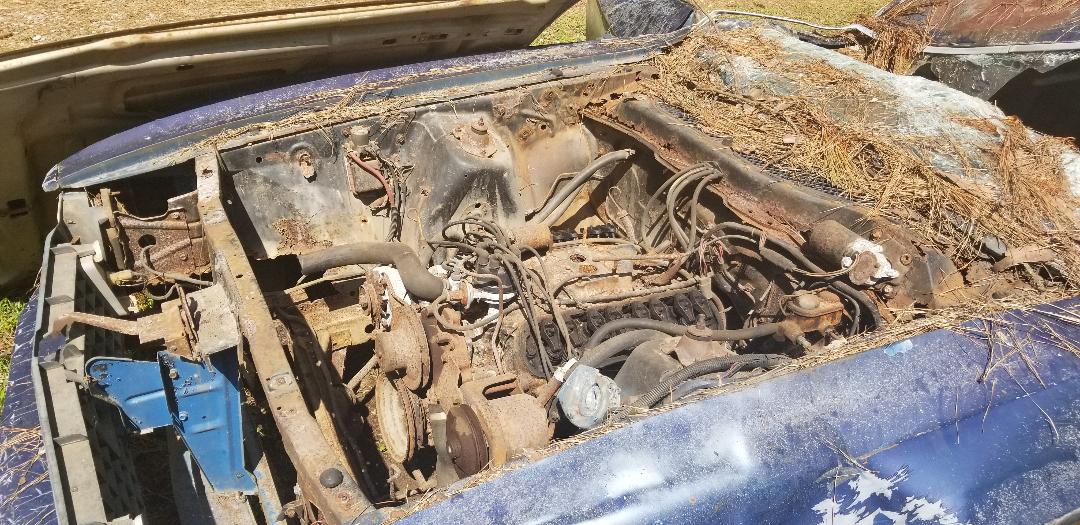 Mustang engine bay. 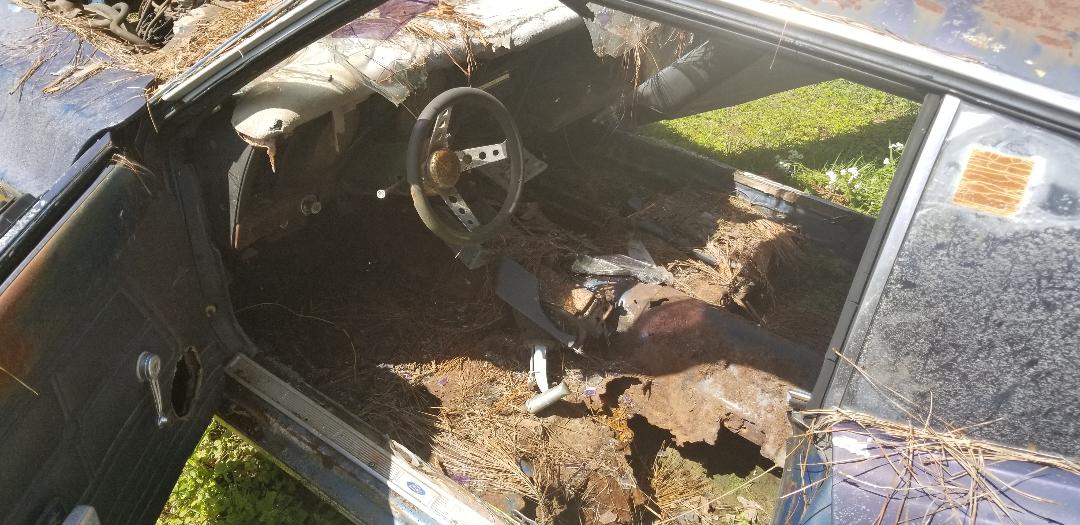 Mustang interior, note lack of floor, among other things. 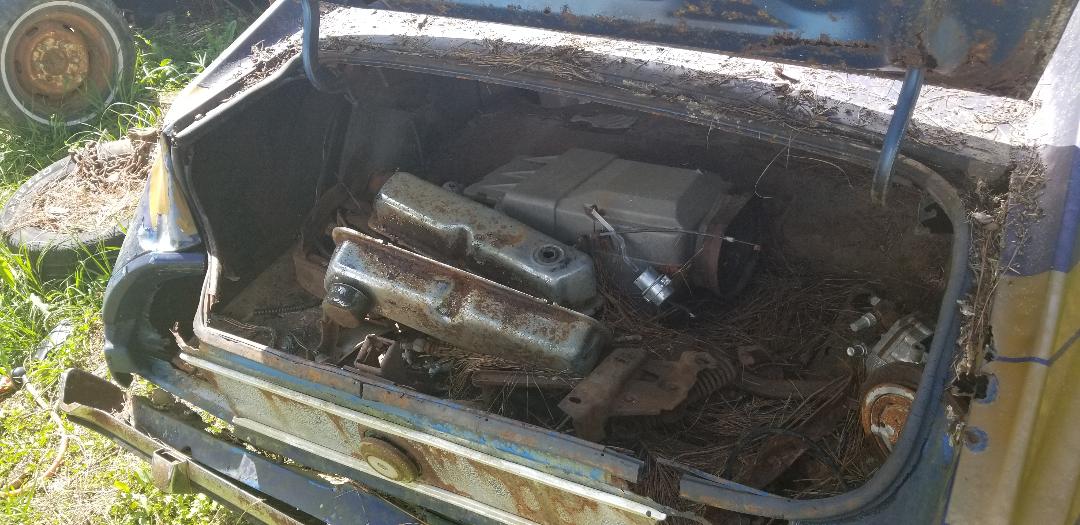 Mustang trunk, note damage to rear area and junk in the trunk. The first thing I did was pull the hood from the car so I can start removing things from the engine bay. I started removing hoses and cutting tubes from things like brake lines and cooling hoses and what not. Some other items were removed as well. Voltage regulator, master cylinder, wiper motor, etc were removed. Along with removing some of the easier stuff from the engine bay I removed all the loose crap from the trunk. I started a pile for the items removed so I can sort that shit out later. I pulled the taillights out as well since they were technically "loose" at this point. After clearing the trunk I turned my attention to a rather messy part of the project, the broken windshield. Since the windshield was broken and crushed from the roof being crushed by the tree, there was a broken mess of glass and some kind of thin plastic sheeting that I guess was to act as an anti-shatter skin to keep windshield glass from fragging a driver in an accident. The plastic was kind of a mixed blessing as it could've been easier to remove the glass by just vacuuming the fragments versus having to carefully peel the plastic and glass to remove the bulk of the mess. Another issue I had was that the plastic and glass was also sticking to the tar shit that goes around the window frame to hold the windshield in. That shit added another obstacle as I had to carefully pry the tar away little by little to help remove the plastic and glass and tar simultaneously. I was able to vacuum a lot of shards of glass that did free itself up from the plastic but I did have to spend a lot of time picking up individual pieces of broken glass as I worked to clean things up. Eventually I was able to get the bulk of the broken glass and plastic sheeting, leaving a small amount of plastic and glass along the top of the window frame, which will probably be removed with the scraping of the tar to free everything up. 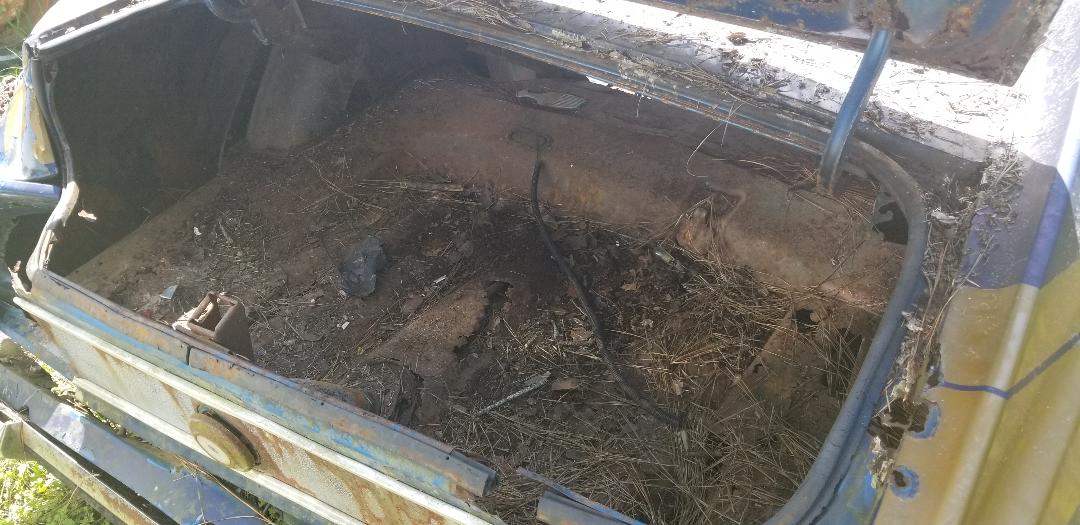 Trunk cleared of loose junk and taillights.  Engine bay as stuff begins to disappear. 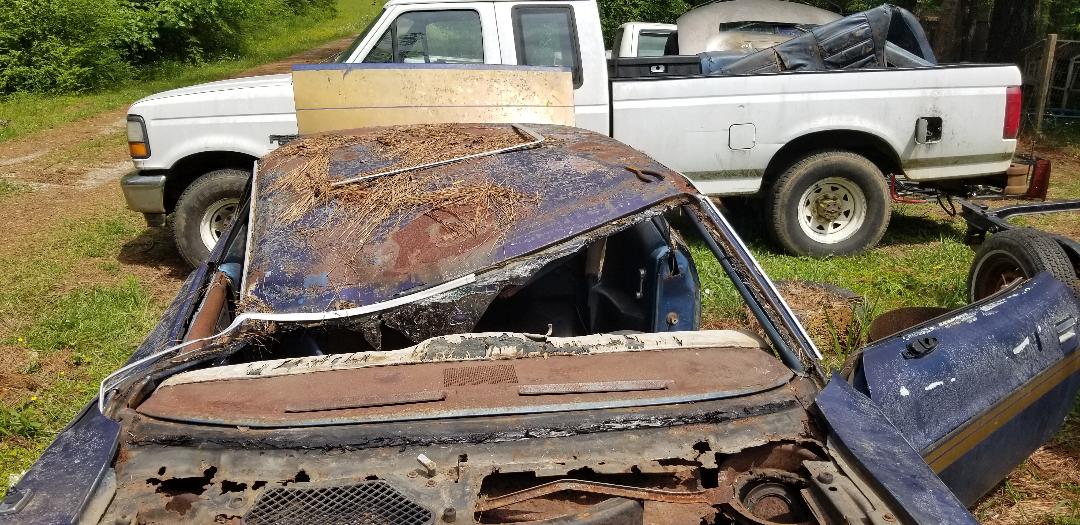 Windshield area with majority of glass removed. After finishing the right side of the S10 bed I moved on to the left side. As the previous post shows, the patchwork on the right side was shitty at best, fucked up at worst. But because this was merely a temporary fix to somewhat straighten out the bed so the truck can be used in a normal capacity, I really didn't care how the damned thing looked as long as its somewhat straight, especially if I end up putting a camper shell on the thing. Anyway, on to the left side. As with the right side, I had to start off with a bunch of cutting to remove a large portion of the side. I did have to stay clear of the fuel filler tube and door, since well, it leads to the fuel tank and sparky grinder cutting and welding is a NO NO around gasoline fumes. I did some initial pounding of the side with the sledge but when that didn't pan out I started cutting some, then pounding, then cutting some more, and pounding, until I managed to get things somewhat straightened out to allow me to cut the rest of the way where I can remove the section of metal so I can further straighten things out prior to welding things back up.  Crushed left side of S10 bed.  Cut out plug of metal from left side of bed, note numerous dents after beating the side with a sledgehammer. Just like with the right side, after cutting out the plug of metal I further cut the section separating the inside and outside halves of the piece. Out came the baby sledgehammer to beat the shit out of the metal to straighten it out some more. The same was also done with the rest of the bed around the hole as well. After getting the bed straightened out as much as I can and getting the outside half of the patch straightened out I pulled out the welder to start with the outside metal. I started welding that patch all the way around and after getting that section done moved on to the inside half. I had to beat the metal some more to get things to fit as close as possible prior to the initial welds. I found myself having to manipulate the metal as I welded it more until I finally got the section secured but not fully welded all the way around. Because I had to cut sections of metal to get things to somewhat fit, I had a lot of gaps that were in need of filling in with welding slag to close things up. In addition to filling in one section of gaps I had to take a piece of cut metal to fill in a larger gap before finally finishing the whole patch. With that, the left side is all done, and looking plenty shitty, just like the right side. Later on I will probably clean up the burned paint and other residue from the metal and get some cheapo spray paint to cover the unsightly burnt and welded metal to at least try to make it look somewhat acceptable. 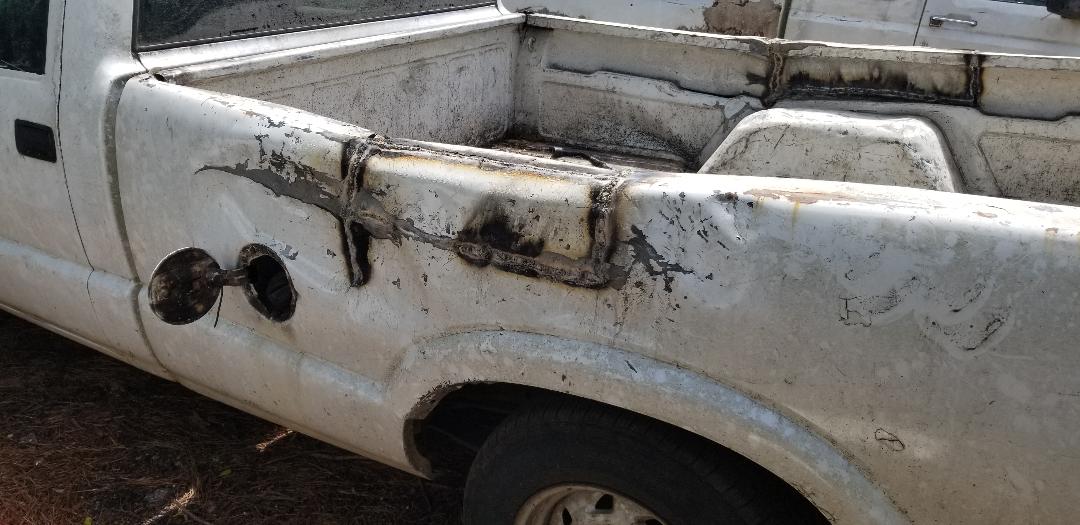 Left side patch completed, note welds where metal was cut. 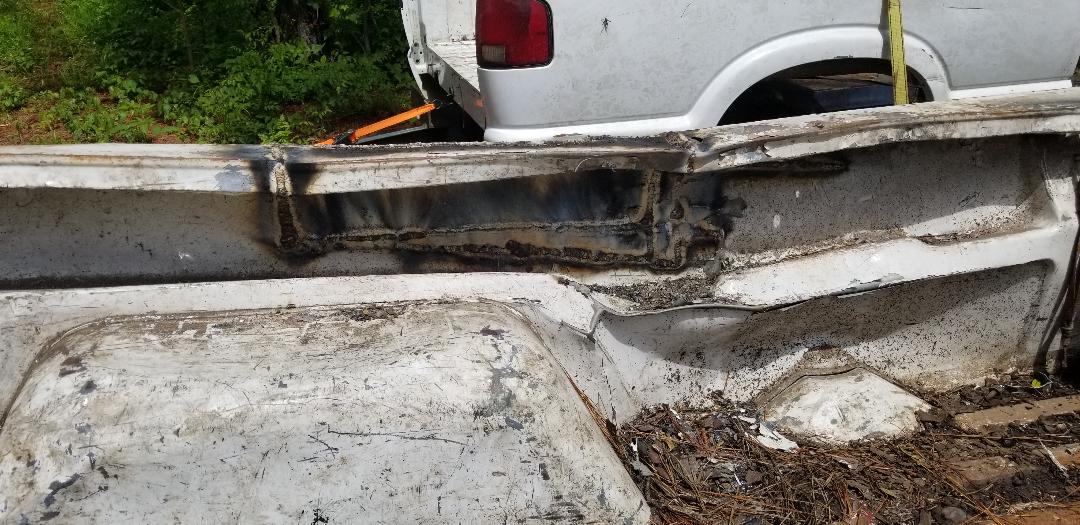 Inside of left side patch, note all the welds where metal was cut.
After cutting out the large patch of metal from the S10 bed and analyzing everything about it I had to come to a realization about the whole thing. One, there is no real way to fix this bed where its going to come out clean, there is too much crushed metal on the inside and outside of the bed. Second, it doesn't make any sense to destroy a perfectly good short bed cutting patches out of it to try and fix the crushed long bed on this truck as the repair will still be shitty. I decided to not touch the short bed but to try and trade it for a long bed, or worse case, sell it and use the money to buy a replacement long bed if I find one. In the meantime I figured I'll just try to straighten out the metal that I cut from the bed and weld it back in to try and somewhat restore the bed to a "normal" state instead of the crushed state that we started with.
This started out by taking the section of metal I cut out and cutting it at what was the top of the side of the bed where the top and the side meet. Separating the inside wall of the patch from the outside allowed me to first straighten the inside portion so I can weld it back in. I had to straighten out the areas around the hole as well so as I kept test fitting the inside portion I made adjustments to the rest of the bed around the hole until I got things to a straight enough place where I could go ahead and weld the inside piece of the patch in place. I also had to beat the fender well straight as it was bent down some and wouldn't line up the rest of the bed as well as allow the top to be somewhat straightened out. Of course I had to grind the paint off the edges in order to prep the metal for welding. With things all set I went ahead and welded in the inside patch. 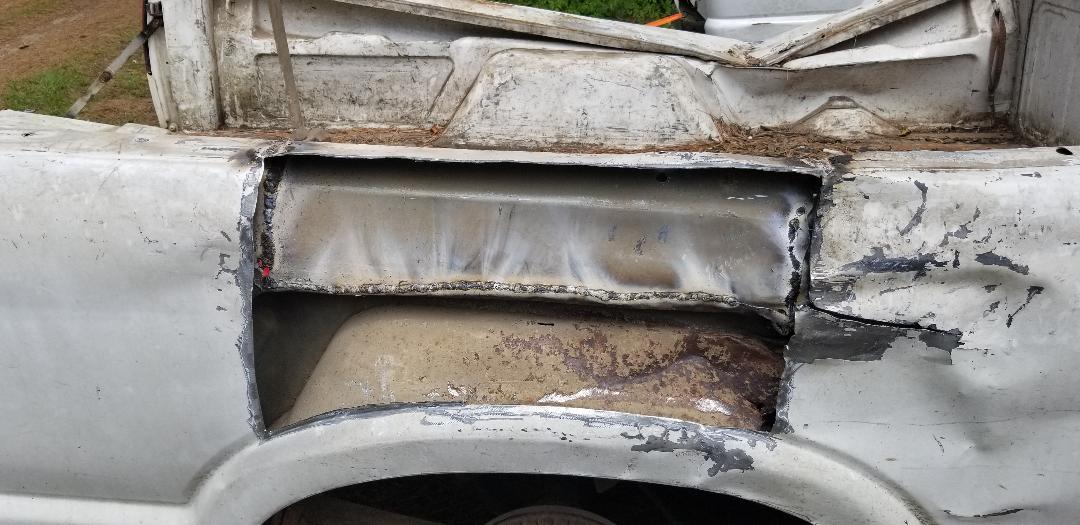
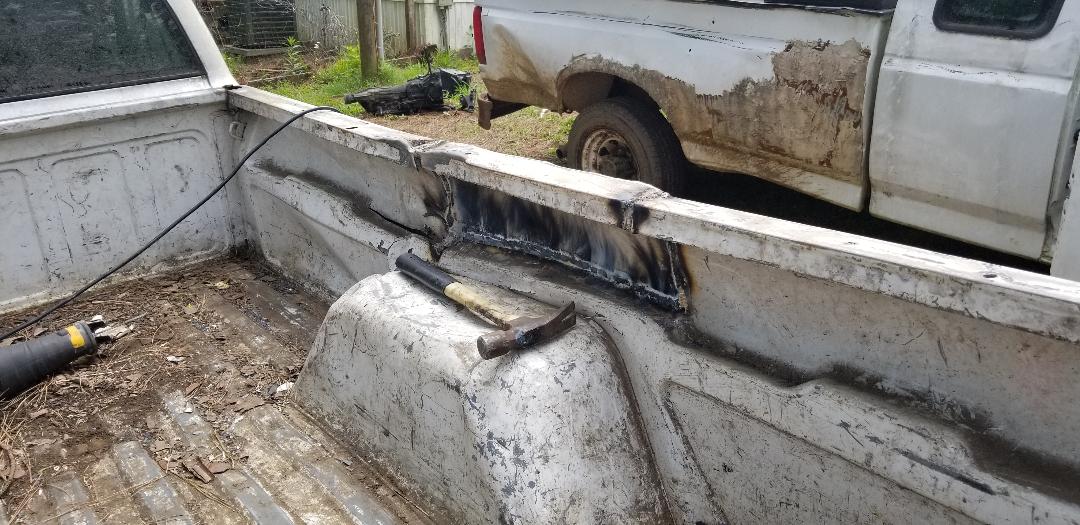
Inside half of patch welded in place, note crude straightening of top of bed, nowhere near perfect.
With the inside half of the patch welded in I moved on to the outer half, the one that really matters. Since there were a couple of other cuts made in the skin I had to weld all of this back after straightening out the sheet metal. Of course there was a lot of hammer play involved where straightening things out is concerned. I had to test fit the metal several times as I hammered the piece to make sure that I get the metal to fit as closely as possible. I had to trim some of the edges as well to get the piece to fit without overlapping. Even when I got to the point where I started welding one side, I had to stop to make adjustments before continuing to weld the rest of the sides. After finally finishing the welding I had to stand back and take a long look and laugh. This whole repair looks like pure dee shit! But again, the thing is, if I can find a replacement bed, this shit really won't matter as this bed will come off anyway. At first I thought about using bondo to try and patch the shitty surface to try and level everything out smooth but even if I do that there's still a matter of the top that's not level. Even the two halves of the bed show the downward angle indicative of a tree falling across the middle of the bed. There is no way to fix this short of replacing the damn thing. Because of this, it makes no real sense to expend too much energy trying to make this fuckery look pretty. Worst case all I'll do is clean the surface up some by grinding the welds down and maybe spray some cheapo white paint over the shit. Maybe by covering it up with white paint it'll sorta be like camouflage and not put the focus directly on the welds and the uneven crinkly nature of the sheet metal. 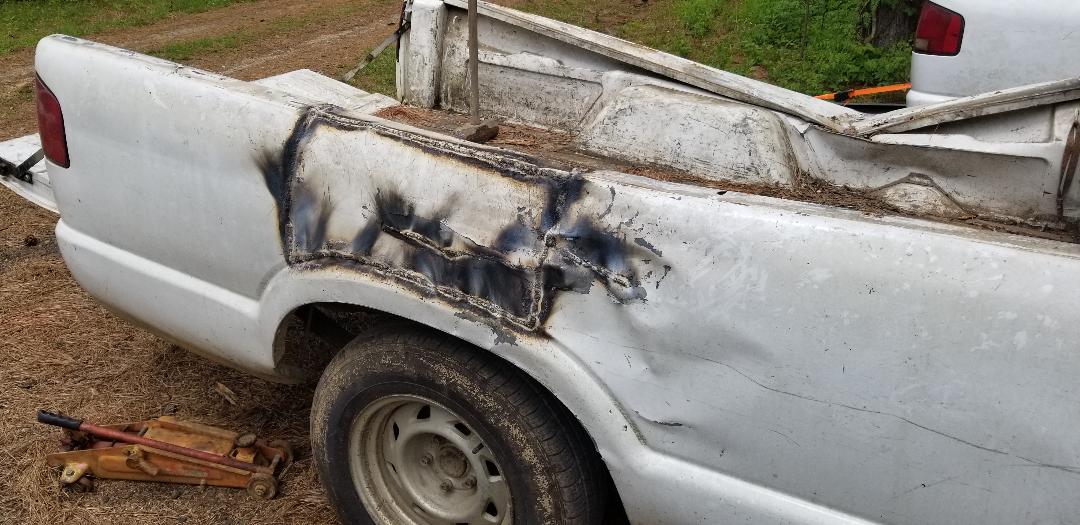
Crude patch welded up on side of S10 bed, note how top is still indented where the initial damage occurred, as well as all the welds where I made cuts in the process of trying to straighten out the sheet metal.
Inside view of welded up patch on S10 bed.
It would've been possible to just drive the truck with the crushed bed but that would be even more unsightly than the shitty weld up patch job. At least the bed is somewhat straight so it can be able to hold things without it spilling out over the crushed sides. Again, if I can find a camper shell to replace the crushed one it can further take the focus off the shitty patch. I just have the other side to do, which unfortunately will be harder since the fuel filler door is right in that area. It's not going to be a straightforward "cut the metal out and beat it straight then re-weld it". That side will take a bit more time. I'll get it though, might be shittier but I'll get it.
|
