|
When I got the HEI hybrid distributor for the Dodge, I wasn't 100% sure what wires I would have to get to go to the cap on the unit. The terminals on the cap are male terminals and the only wires that were available for the Dodge were for female terminal distributor caps. I thought about getting a set of wires for a GM HEI setup but they don't have a coil wire. I ended up getting a set of wires that would've gone for the regular 318 distributor with the female cap as I found a cap at the junkyard and wanted to see if it would fit right on the distributor but alas, it did not. The distributor body is literally a fish out of water, nothing stock seems to fit it. At this rate I figured the only alternative would be to make some custom wires. Since I already had the regular set of wires for the 318, I set out to get some 90 degree terminals for the HEI style cap along with the spark plug wire crimping tool that I would need to make these things.
I ended up finding a set of 9 terminals since I needed one for the coil wire as well. The terminals came with the boots as well. Along with the crimp tool I set out to turn these stock wires into custom wires for my bastard distributor and its cap. First thing I had to do was remove the old boots from the wires. With that I clipped the old terminals off. For each wire I had to take a razor blade and carefully cut the insulation around the first inch of wire so I can strip the insulation and expose the core conductor. Next I took the terminal, folded the conductor back over the insulation, then inserted the terminal over the wire end. I used the crimp tool to pinch the jaws of the terminal a little bit to hold itself on the end of the wire, making sure the conductor stayed folded back tightly. I then put the terminal in the spot on the crimper with the jaws of the terminal facing the closing end of the tool so when I squeezed the tool it would fold the jaws over and into the insulation locking them in place in the insulation as well as putting a crimp on the other side to hold the "bottom" of the terminal in place. Lastly I put some grease on the terminal, making sure not to get any inside the cup where it'll fit over the distributor cap terminal, and some grease on the boot where the wire is inserted. Lastly I pushed the terminal into the boot, carefully but firmly working the terminal and wire into the boot until the cup was seated in the boot and visible from the end of the boot that goes over the cap terminal. Repeating this with the rest of the wires I managed to make a set of wires custom for this distributor cap. After seeing just how easy this was, I've decided to invest in a roll of wire and the different terminals for both ends along with the boots so I can make custom length wires that are made to fit so I can actually have a nice neat wire run where each wire is just right for each plug and each terminal on the distributor cap. No more stock wire sets where some wires are too long and others are just barely long enough. The pictorial will show how things were done, very simple. 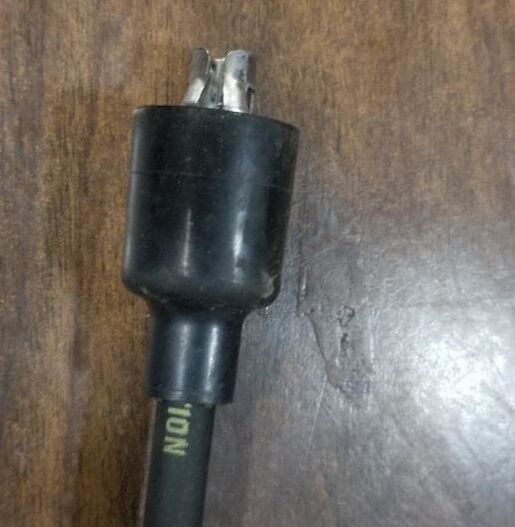
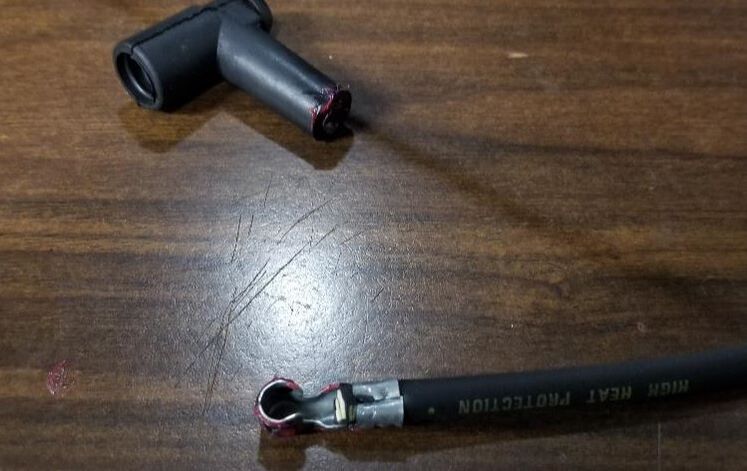
Starting wire terminal, this is for female distributor cap.
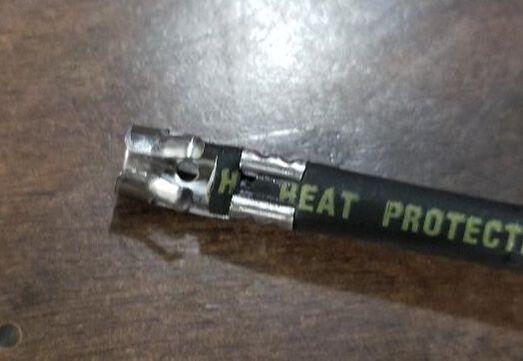
Old terminal after pulling boot from end.
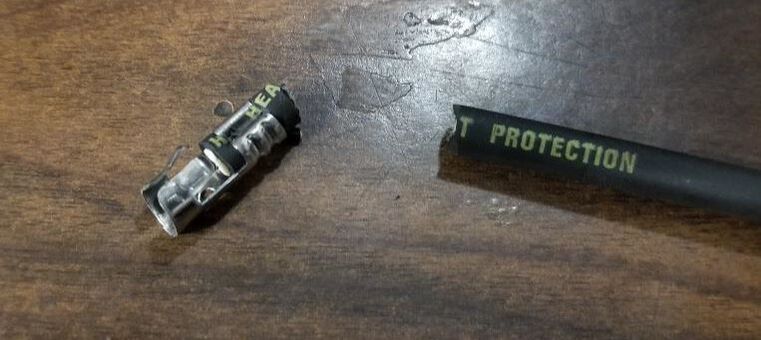
Cutting old terminal from wire.
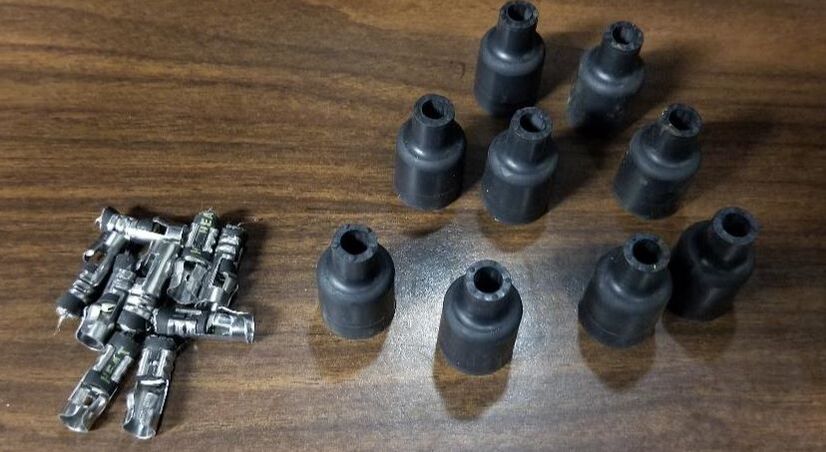
Old terminals and boots removed from wires.
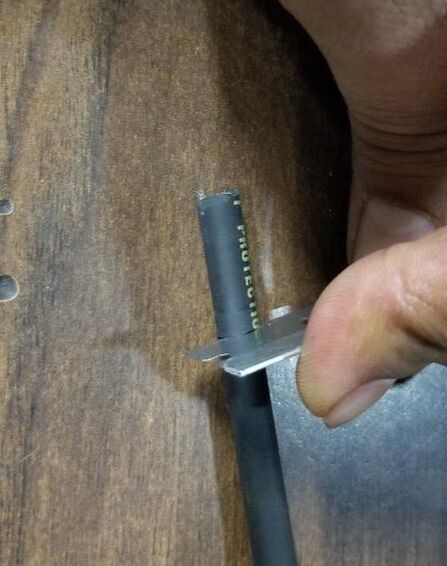
Razor cutting insulation by cutting into material then rolling wire back and forth letting the razor cut all the way around.
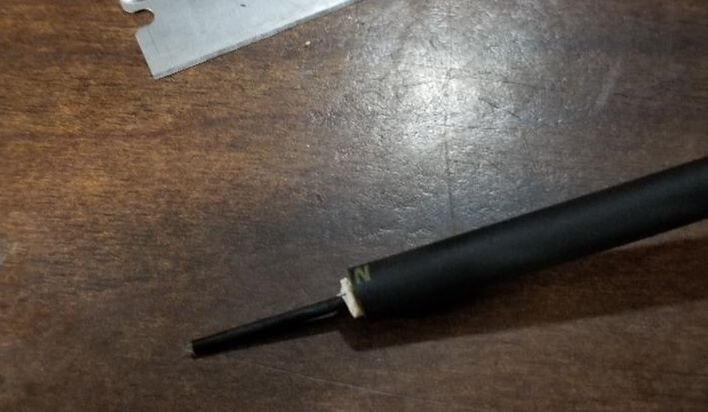
Conductor core of wire exposed after cutting insulation free.
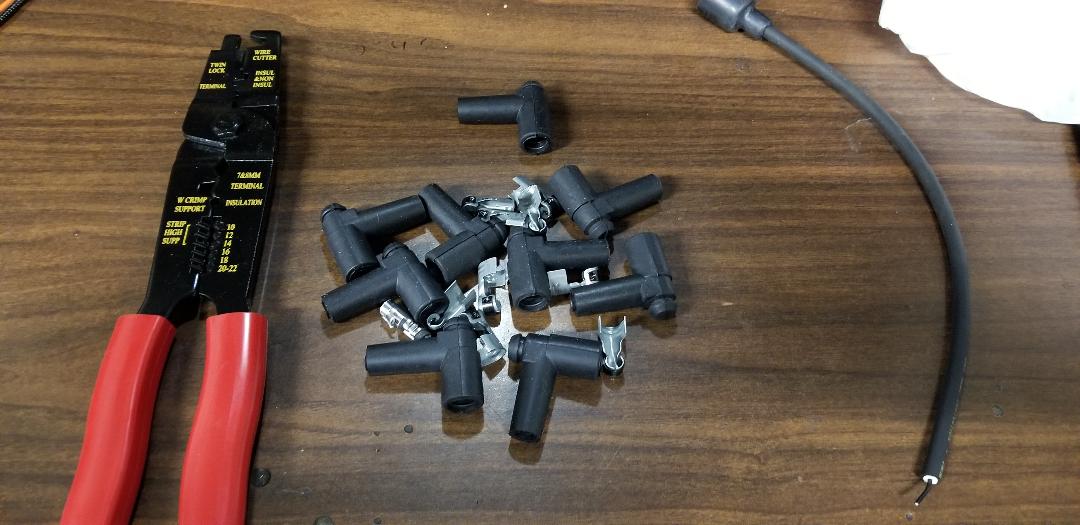
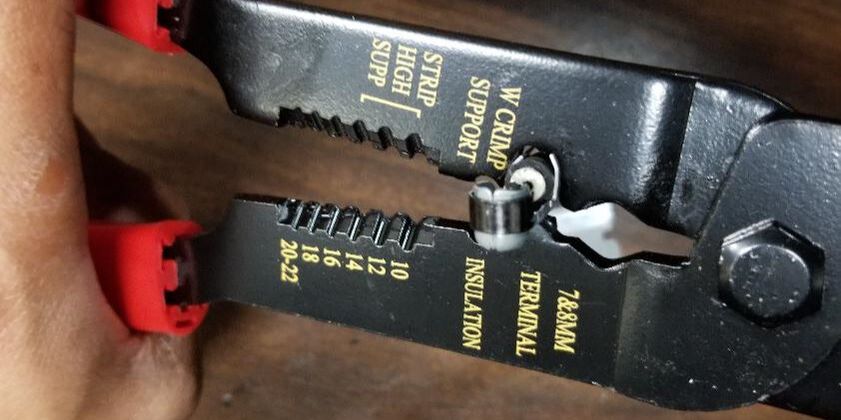
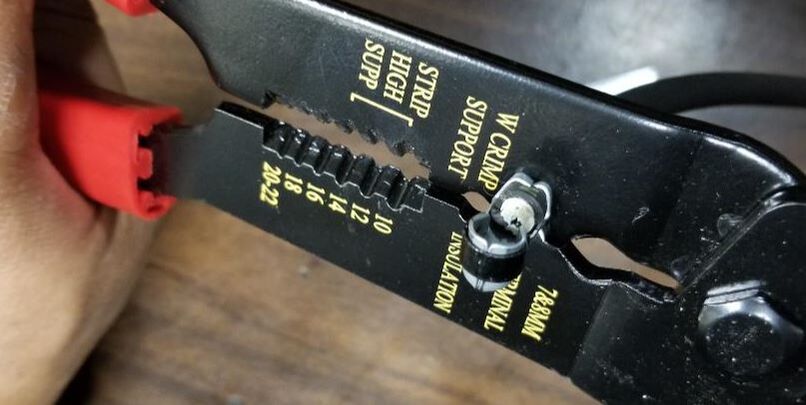
Set of terminals, boots, and crimping tool with stripped wire to right.
Placing new terminal over wire end after folding conductor back over wire. Note tip of conductor poking out from back of terminal.
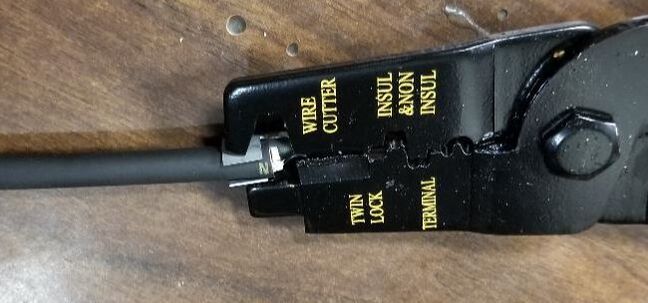
Closing jaws of terminal around wire insulation using end of crimping tool.
Seating terminal in crimping tool, note how jaws of terminal are seated in end to close them up around wire.
Closing crimping tool onto terminal, note how jaws are folded in around wire insulation to ensure a firm grip.
Greased up terminal and boot, note red shit on both.

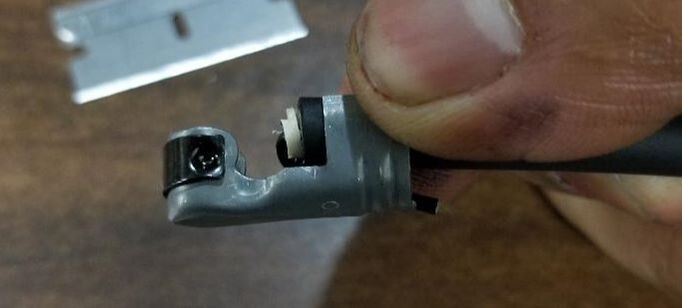
New terminal and wire seated in new boot. Note terminal cup centered inside boot.
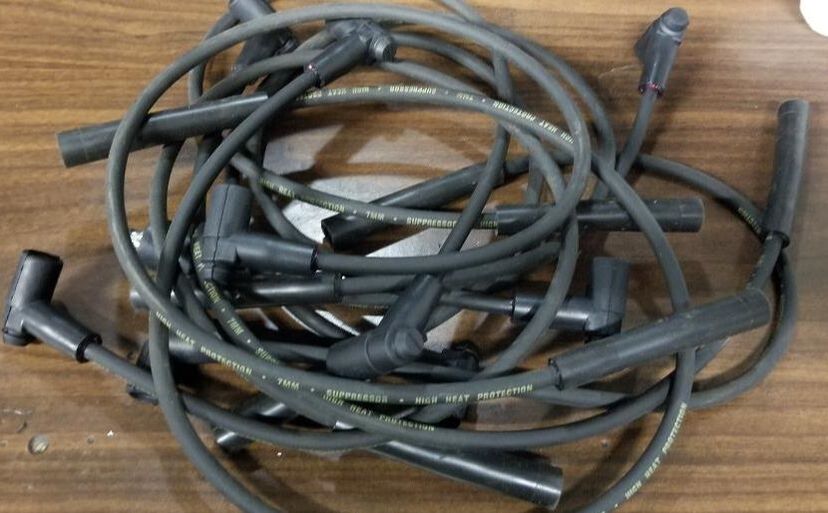
Finished set of wires.
0 Comments
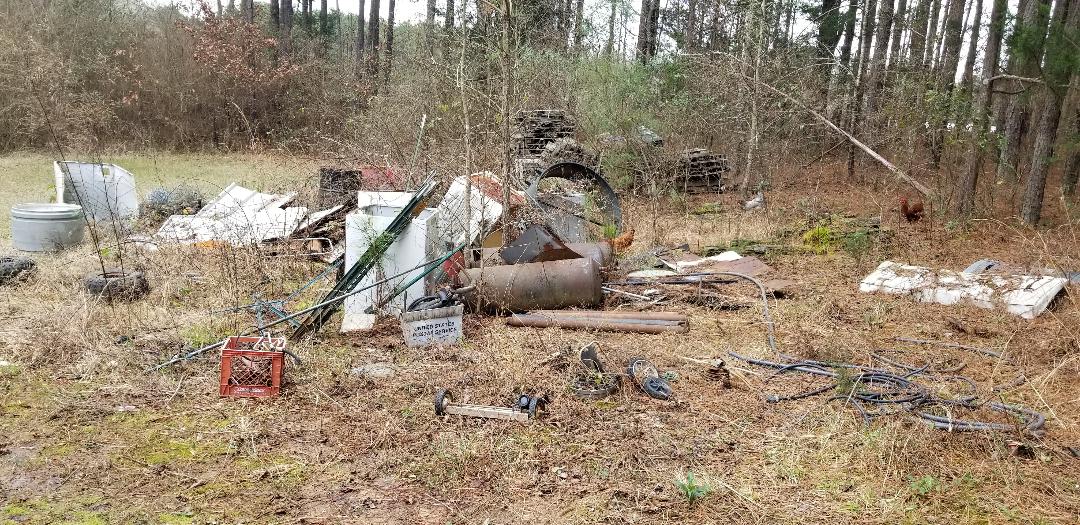
Today I continued the work on the work on the kennel garden area, working on clearing the fence from behind the kennel. This is necessary since the fence is in the way of me being able to install any panels around the side and back of the kennel. Also it will look neater not having this decrepit fence around the kennel. Part of the purpose of this work is to make things look better, neater, and more organized. I had to unscrew the clamps that were used to hold the rotted wood posts from an old fence to the newer metal posts I pounded in the ground next to them. Also there were some eye bolts that I had in place for the wire/tubing setup I had installed on the old dog yard fence to try to keep the dog from climbing the fence. This stuff had to come off the wood posts so I can put said posts on the rack with the salvage wood for use later on, even if its just or future firewood. The metal fenceposts came up and went into the scrap pile that consists of angle iron and piping/tubing. The pipe straps and screws and eye bolts went to their respective bins in the storage trailer hardware racks. The chain link was stored with the salvaged chain link fencing rolls I had from the scrap pile. Some small lengths of chicken wire were folded up into small bundles to be staged with the outgoing scrap metal. I removed the entire remaining chain link fence section, which extended about 10ft past the edge of the kennel, along with the posts as mentioned previously. The chicken wire fence that is the actual garden fence, was removed up to the edge of the kennel, leaving the remaining garden fence in place, butting up to the kennel so the garden remains contained. I also cut the old weed growth from the area around the back of the kennel so the back is free and clear, no shit to get in my way when I do start installing panels around the kennel. 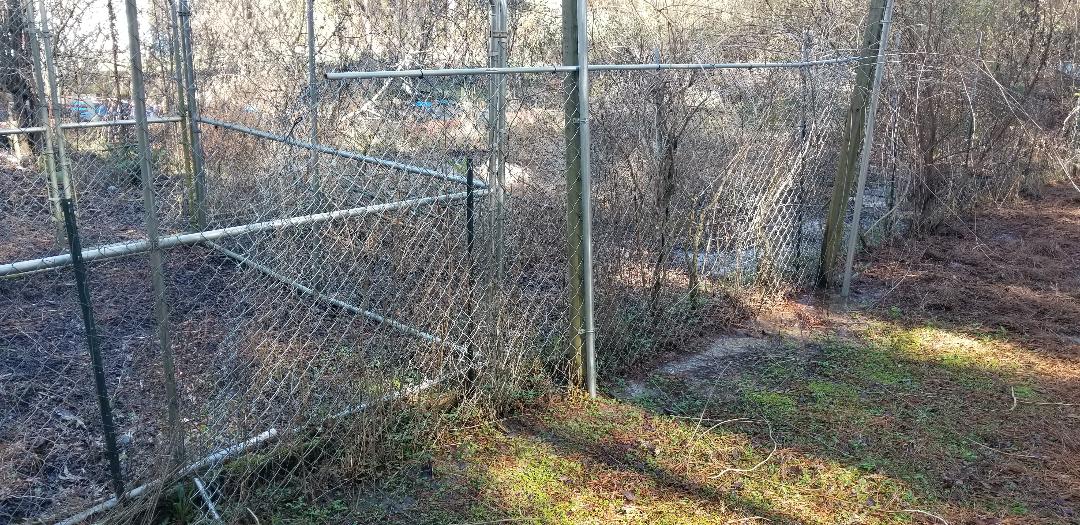 Back of kennel greenhouse with old fencing still in place, what an unsightly thing! 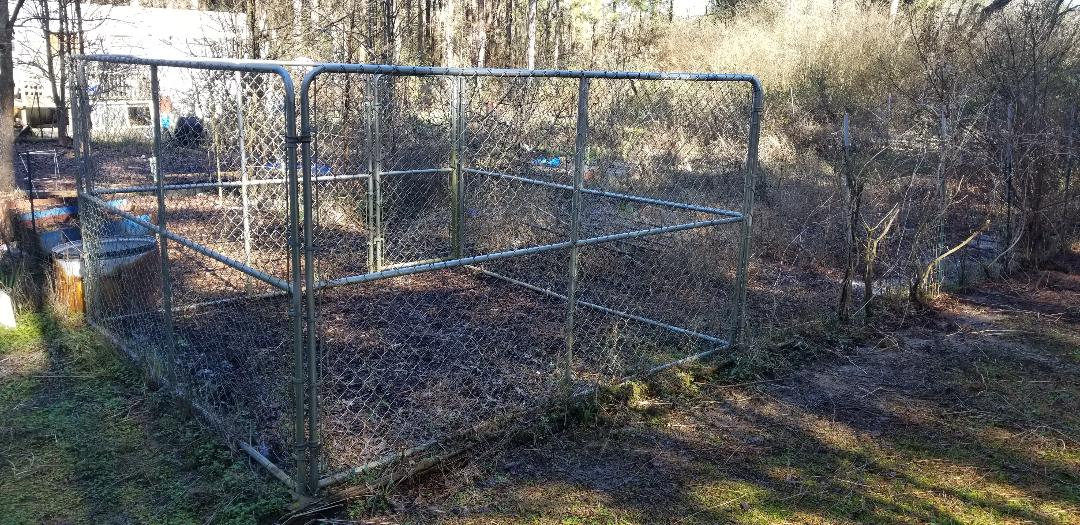 Back and side of kennel after removing old fencing, much better! I mentioned the chain link fencing that I had staged in another area after removing them from the scrap yard and the back of the kennel greenhouse. At first I was going to put this stuff up for sale to get something for it, same way I did with a bunch of T posts I also dug out from the scrap yard, but I thought of a novel idea, using the chain link to cover the sloppy muddy ground in the area between the house and the garden. This area retains water every time it rains heavily and ends up being a slop pit for a long time after. I wanted to put gravel down but know that it'll take a lot of gravel to get this area filled in enough where I can drive a vehicle over it without it getting stuck. I thought to use the chain link the same way one puts mesh in a concrete slab to reinforce the slab. I figured that by spreading the chain link on the muddy ground then repeatedly walking over the mesh, mushing it into the mud will help build a solid foundation that will take the gravel a lot better when I do spread some out. In the end this will hopefully allow me to get away with less gravel used to fill the grounds in this area. 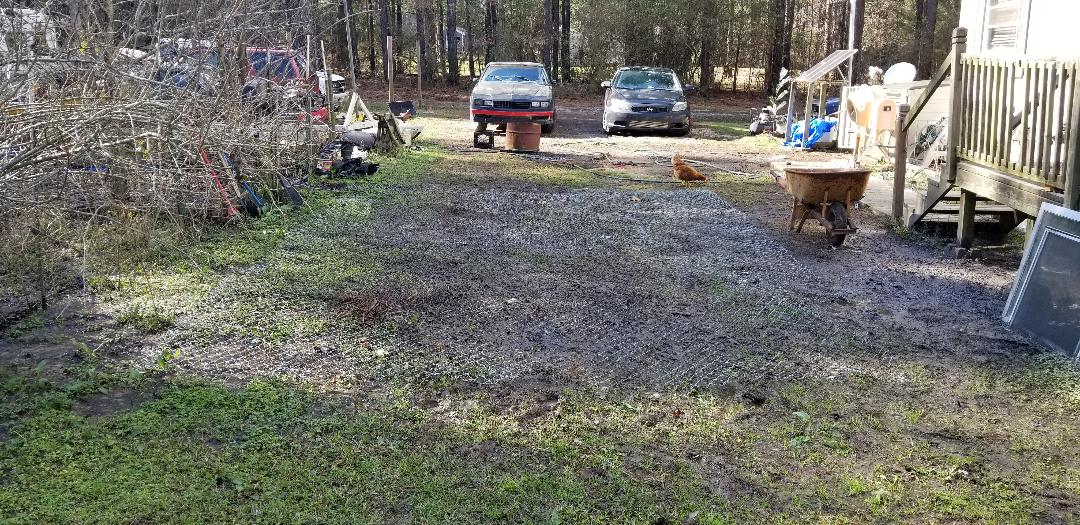 Chain link ground cover laid out over muddy ground. With the chain link taken care of I moved back to the scrap pile. I moved the appliance skins over to the storage trailer and took the reciprocating saw with a metal blade and cut up the skins, making several large sheets of metal that I was able to stack against one of the trees along with other sheet metal and flat sections of metal I removed from the old scrap yard. This included tops from drums, other sheet pieces that were cut from old cabinets, appliance doors, etc. All of this material took up a lot of ground space in the old scrap pile but now take up nothing more than two sides of one tree in the small area that is being used for staging my future scrap. I also moved several other large scrap items and other smaller pieces that I determined to be useless to me. My outgoing scrap pile is growing much bigger and very soon will be plenty big enough for me to fill both the bed of the F250 and the trailer to net the maximum volume of scrap material. As of right now the old scrap yard is thinning out really well. 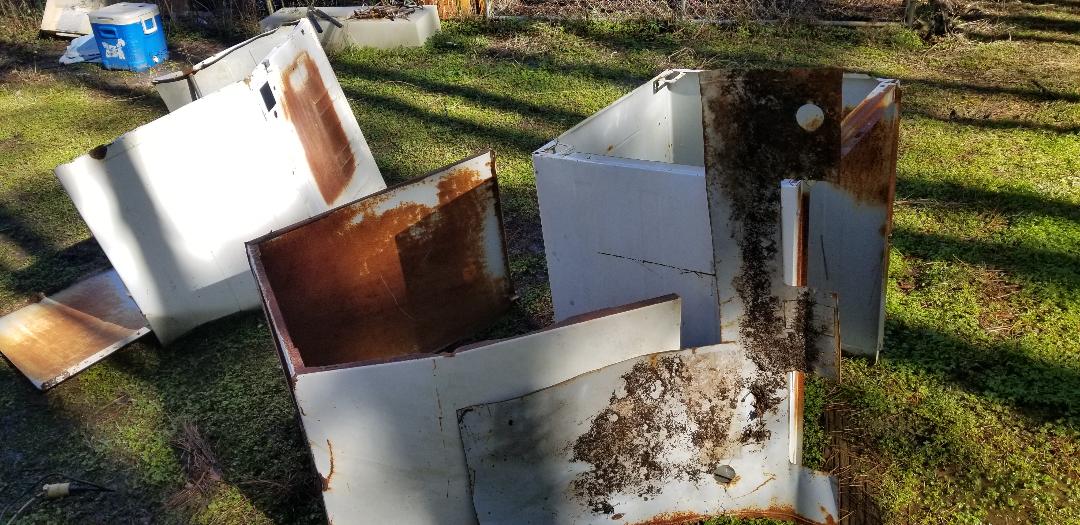 Appliance skins waiting to be cut into manageable sheets. 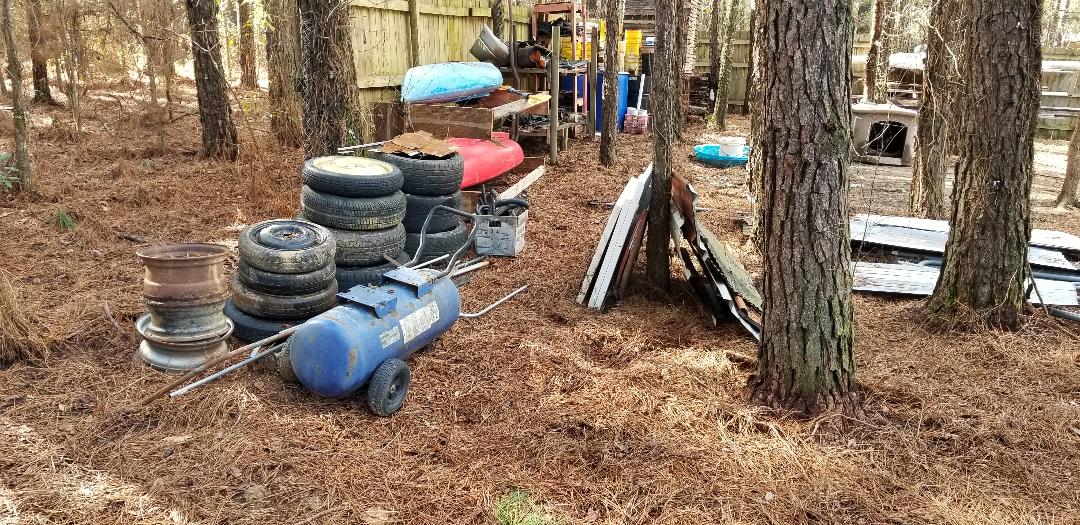 Growing scrap pile, as you can see it covers much less ground space than the old scrap pile. Note tree with sheet metal stacked on both sides of it. 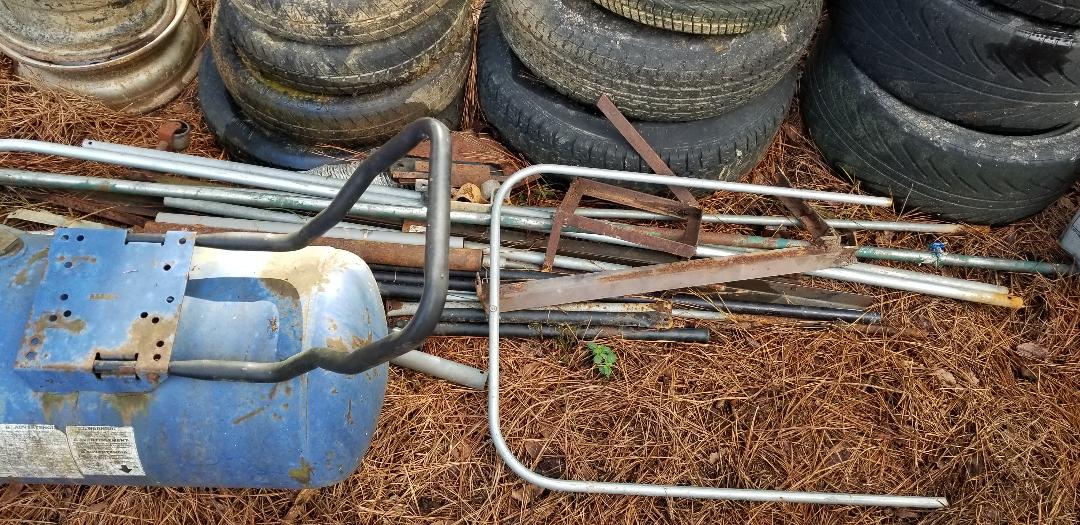 Closeup of pipes and angle iron separated from other scrap, more easily able to find what I need this way.  Closeup of sheet metal pile. 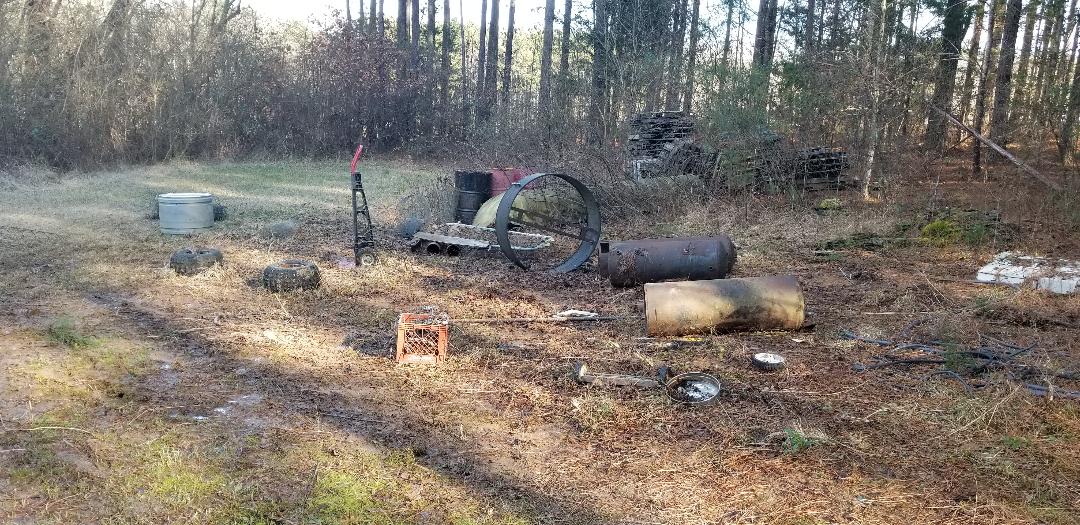 Old scrap pile thinning out nicely. I continue with my campaign of cleaning up the grounds around the farmstead. This main focus is on the scrap yard, a large area near the back of the lot where I've tossed random scrap materials and old shit for possible future use in projects where I might need something metal, whether its sheet metal, tubing, angle iron, etc. Only problem here is 80% of the shit that ends up here never gets used and just rusts away or gets overgrown, and in my case, the overgrowth is fucking blackberry briars. My plans have been to clear up the scrap pile and in vague terms, process the scrap into more usable stuff. I split things up based on type of scrap, whether its sheet metal, tubing/pipe, angle iron, and corrugated sheet metal (roofing). There are scrap items that either don't fit in any of these categories or need to be processed into one of these materials. One of the things that I had to address was the growing pile of copper wire that I've made as I cleared the scrap pile. I dug up a lot of old wiring from the scrap yard, some of it old car wiring, others just large sections of wiring that ended up here for future use. Over time the copper corrodes or tarnishes, making it hard or impossible to solder, even with the use of flux. Problem is the scrap yard we sell our scrap to won't take copper wire, its gotta be bare wire, or at least bare enough so the weight of the copper isn't diluted with insulation. The easiest way to accomplish this, which the guy at the yard even said, was to just burn up the wire to get the insulation off. I had to figure out how to do this and the way I came up with was to take a protective grate from a large shop fan I scrapped and set it over my half drum burn can that I use for heat when I'm working on a car in the yard. I got a fire going with some oil wood and other scrap wood I keep outside for this purpose. As the fire got going pretty good I piled a bunch of wire onto the grate then set the whole thing on top of the burning drum. As the wire burned, I moved it around and continued to add more wire to it, letting it burn until there was nothing left on the copper. I dumped off the burned wire and started over again, repeating the same process until there was no wire left. At that point I let everything cool down so I can stuff the processed copper into a couple of 5 gallon buckets, staging these by the F250 for loading up later when we get ready to do a scrap haul. 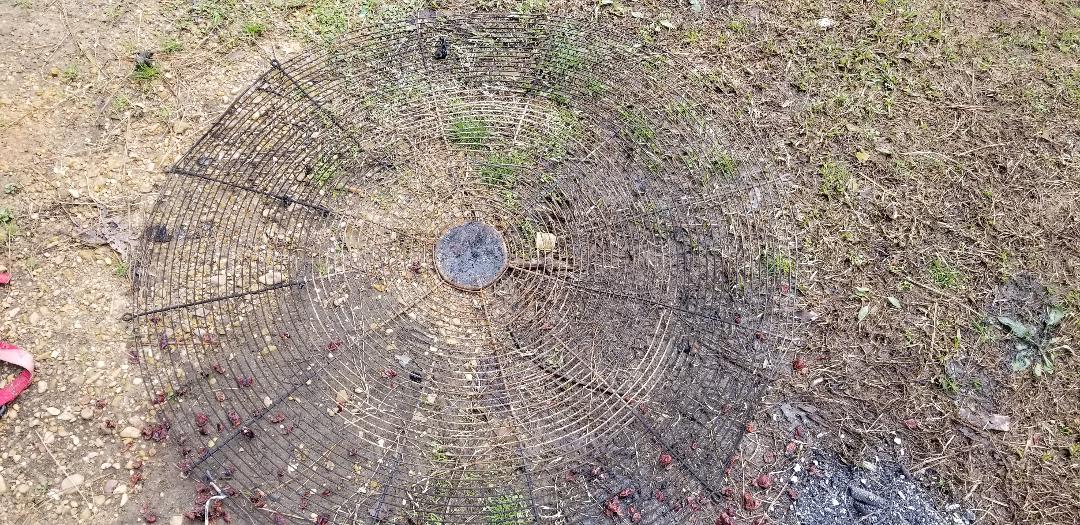 Metal fan grate used for burning copper. 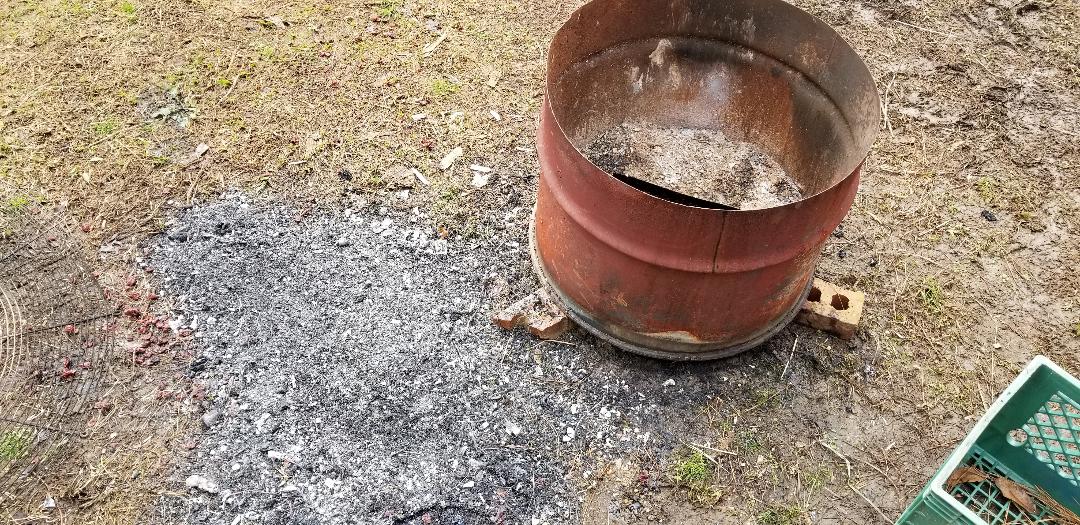 Burn drum used for burning wire, note ash pile next to drum, where wire was laid to cool, ash being what was left of the insulation that was burned off. 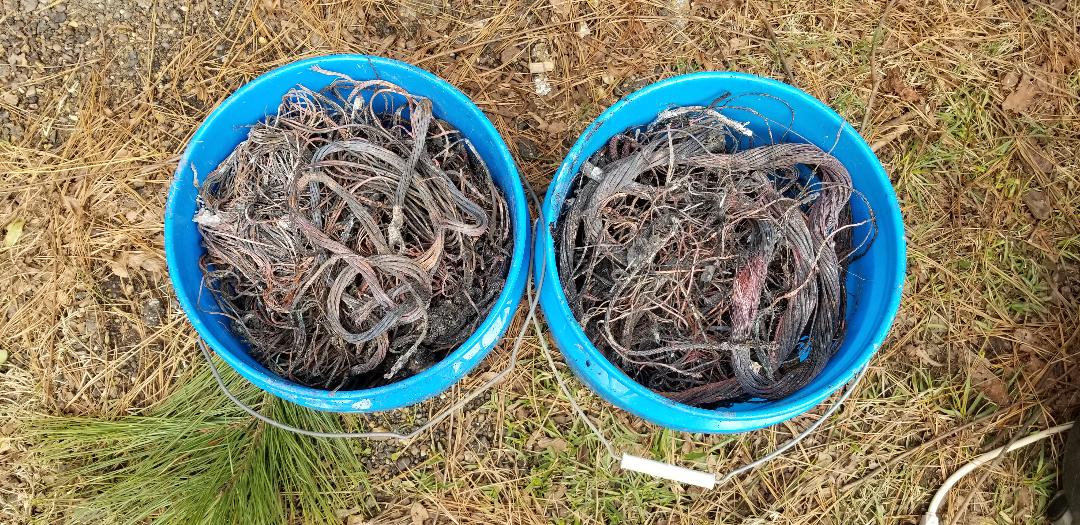 Buckets of processed/burned copper wire, ready for transport to the scrap yard with other outgoing scrap. With this I can continue to clean up the old scrap yard, moving materials to their respective spots in the new scrap staging area and outgoing piles. The next thing that I want to do is move the appliance skins over near the storage trailer so I can cut them down into sheets that can be stacked up neatly and have a much smaller footprint than what they have now. Also I have to continue cutting through the blackberry briars to help clean the grounds more to help in moving more metal out of the area. The end goal is to have the grounds completely cleared where we can go over the grounds with the lawn tractor whenever we need to. Clearing the scrap yard will make it easier to manage the grounds, no more shit growing up around all of the scattered scrap. The scrap that I keep will be neatly stacked in the area under the trees over where the kayak rack and the dog yard area is at where nothing grows due to lack of sunlight and the thick layer of pine mulch that is on the grounds. It'll also make it easier to find what scrap I may need for a project when everything is organized neatly. 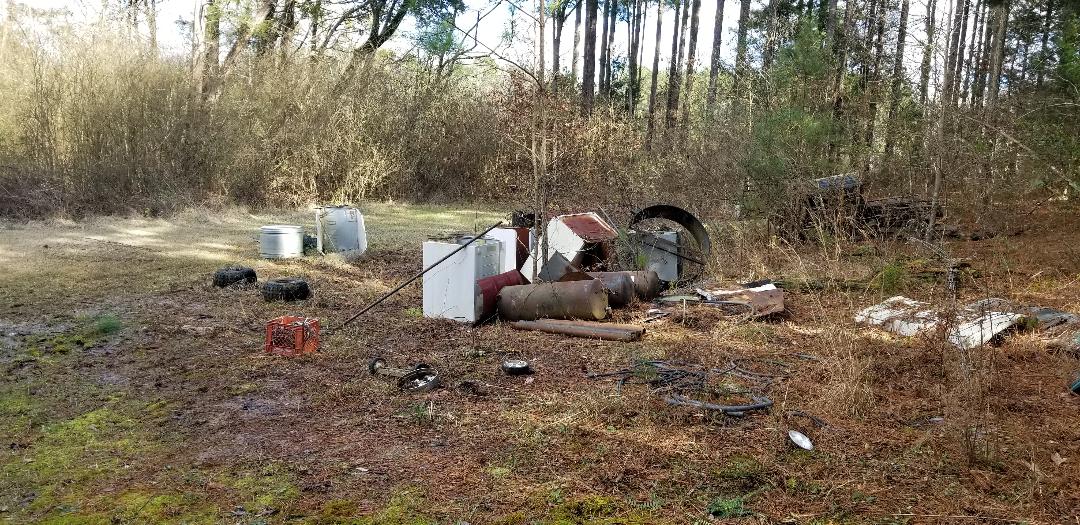 Scrap yard thinning out, note appliance skins that need to be processed.
Life around here is not all about fixing cars everyday. There is other stuff that needs work around here too, namely the garden. I haven't been putting much attention into the garden over the winter and now that it's well into January it's high time to get to work on the garden. I even concluded that I won't get a large portion of the garden ready by spring, I just need to get a small area ready so I can get some basic veggies planted. I can work on the fruit plots through the summer as well as rebuilding raised beds. Other plans involve making a large hydroponic operation using a lot of PVC and a network of pipes and water feed reservoirs to feed the hydroponics. Even the idea of aquaponics is on the table in a limited capacity.
At this moment one of the bigger projects for the garden that I wanted to get started on is taking an old chain link dog kennel that is 10x10 feet and using it as the basis of a small greenhouse. The plan is to build a roof truss setup that will attach to the top of the kennel, using some metal brackets that are used to hold 2x4's in normal wood construction. Those brackets will most likely be welded to the metal frame of the kennel and the 2x4's used for the roof trusses attached like usual with wood screws. Afterward the roof and sides will be clad with corrugated clear plastic sheeting which will complete the whole greenhouse. Extras like ventilation fans or even thermostatically controlled dampers with fans for temperature control will be added afterward. Other extras like thermal piles such as black plastic buckets of water can be added for heat retention in the winter, all the way up to electric heaters that can be used or keeping the temperatures in the greenhouse during the winter at a reasonable level to sustain plant growth. Smaller hydroponic systems and even LED grow lights may be added to give the plants the extra light needed for the shorter winter days. Well the area that I planned on using for the kennel greenhouse is a back corner of the garden near some small half oil drum raised beds I set up and a ground level raised bed. A washer drum is also used as a raised bed in this small area of the garden. The main problem is that the grounds in the back are overgrown with weeds and other floral trash that I never addressed even during the previous summer. First this shit had to go. 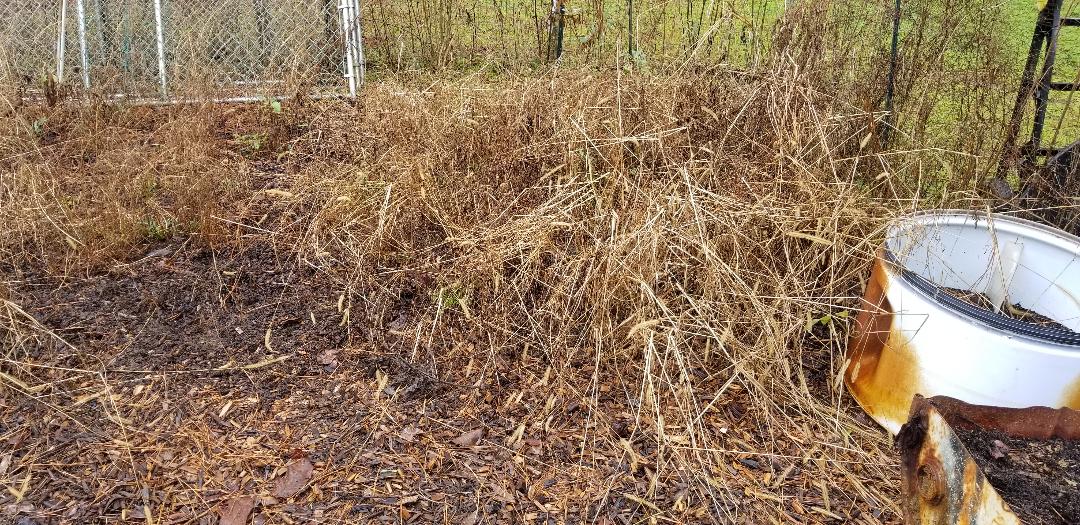
Corner of garden overgrown with old weed growth. Note washer drum raised bed and part of oil drum bed in lower right corner.
Obviously clearing the grounds was just a simple matter of pulling up all the old weed growth and clipping the heavier shit that was more "tree" like. Only problem was there was a lot of this shit. It got done though, enough so that I was able to start setting up the kennel right in the corner of the garden. I cleared as much old growth from the back fences prior to setting up the kennel but then I decided that since the kennel is right in the corner, I can really just remove the fence that is right behind and beside the kennel and use the structure itself as part of the garden barrier along with the fence. 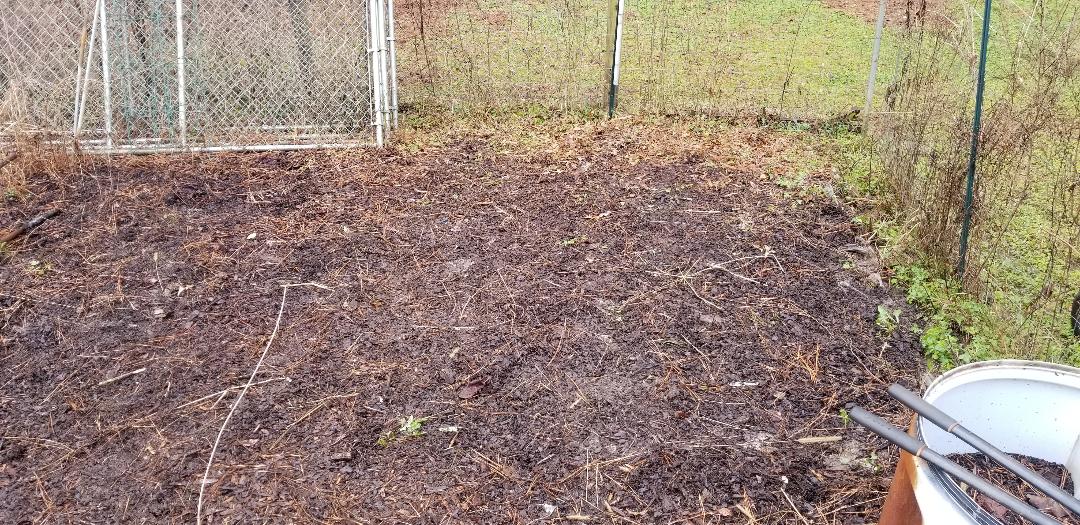
Same garden corner after clearing all of the old weed trash from the grounds and fence.
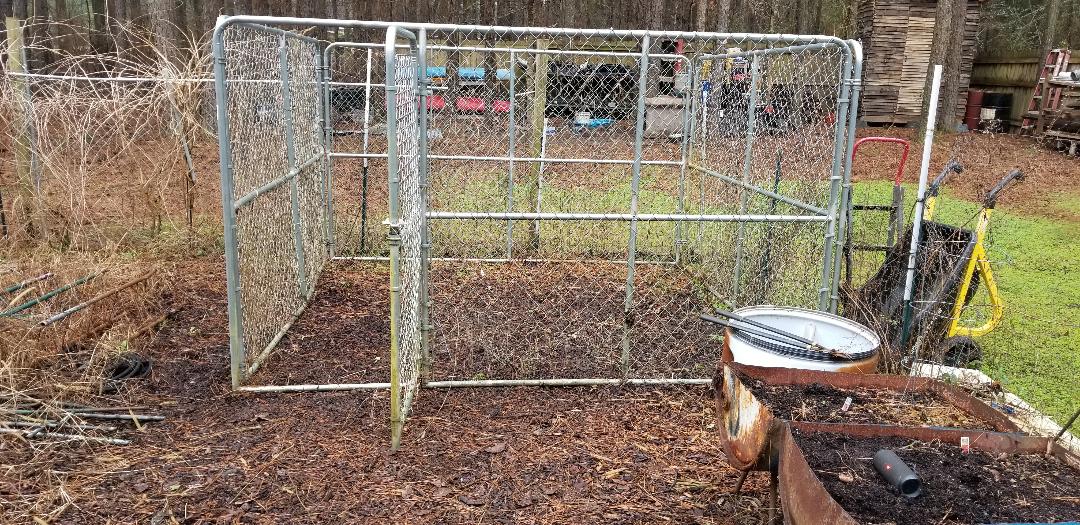
Kennel set up in corner of garden. Note raised beds in lower right foreground along the fence line.
With the kennel set up, I decided to clear the oil drum raised beds and the one ground level wood raised bed that I used last summer for growing. There were still a few dead plants in place that needed to get pulled which I hadn't gotten to over the winter. This refuse went into a brush pile with the other trash that was pulled from the kennel greenhouse plot, destined for a larger brush pile which I will build on so I can fire it at a later date. I also slowly started pulling the chicken wire fence from the side of the kennel and folding that metal up or staging with the scrap metal that will be going out the door in the very near future. The back of the kennel has some old chain link fencing and wood posts that are supported by metal fence posts, all of which will come down next. 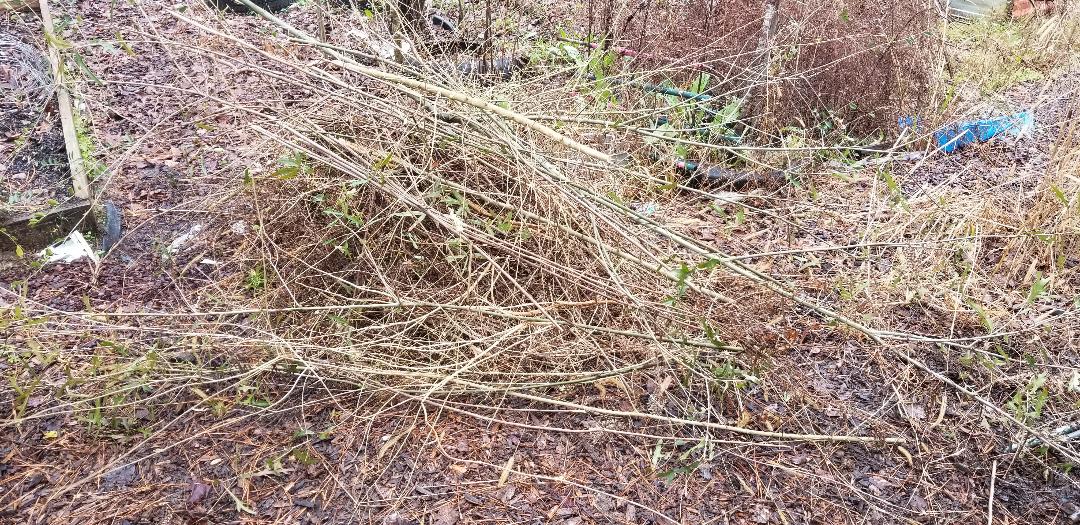
Brush pile from refuse pulled up from kennel greenhouse plot and raised beds.
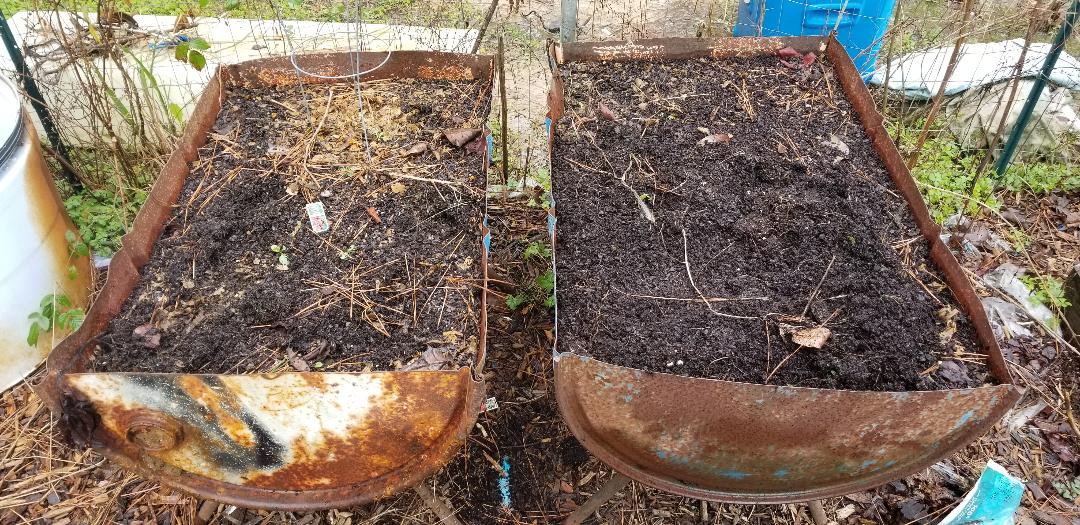
Oil drum raised beds cleared and ready for planting.
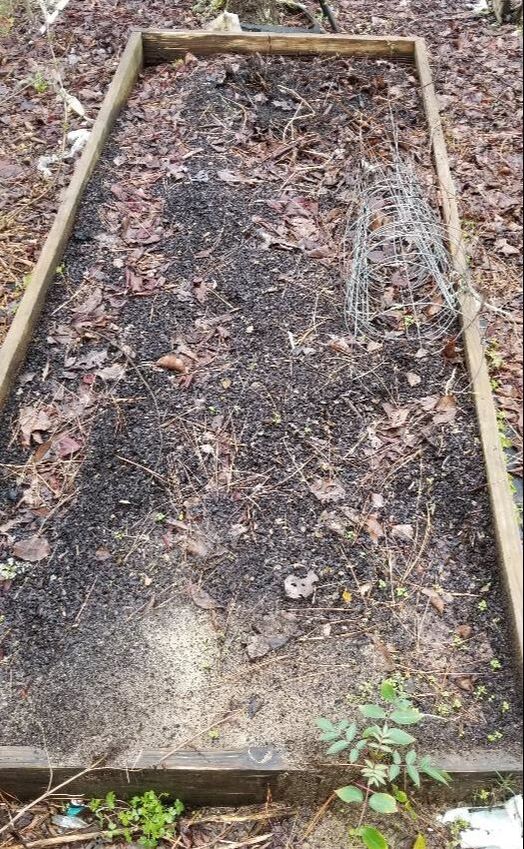
Wood ground level raised bed cleared and ready for planting.
The next thing that I managed to do for the Dodge was install some cooling fans on the radiator since I didn't want to include the meat grinder fan that was on the 318 that I installed. Also since the engine was a newer engine its fan came with a fan clutch that brought the fan out farther, making it hit the radiator if I was to install it. Obvious choice was to get a couple of aftermarket cooling fans and install those.
The fans were purchased online as usual. The fans are 12" fans, which as a pair would completely cover the span of the radiator width-wise. The fans use these retainers that are inserted through the eye loops on the corners of the fan, through the fins of the radiator then a retaining disk is inserted on the probe on the other side of the radiator to hold the unit in place. Foam pads are included to put on the eye loops so the plastic isn't making direct contact with the radiator coils where possible damage can occur from vibrations. The installation of the fan went pretty fast with the retainers making quick work of everything. The biggest part was going to be the wire run from the fuse box over to the fans. Since these fans only use a little more than 6 amps each, I figured I can plug them directly to a separate 20 amp fuse circuit on the fuse box. I spliced the grounds together and ran a short length of wire over to a grounding point that is used by an automotive relay. This left a single red power wire to be routed from the fuse box under the dash, through the firewall and over the left side fender apron over to the front and to the positive wires of the fans. The wire run followed other wires where I was able to wire tie the single wire to the bundle of wires running along the same path, keeping things neat. I spliced the positive wires together and soldered the power wire to these, completing the circuit. Only thing left was to install a fuse and test the circuit out. 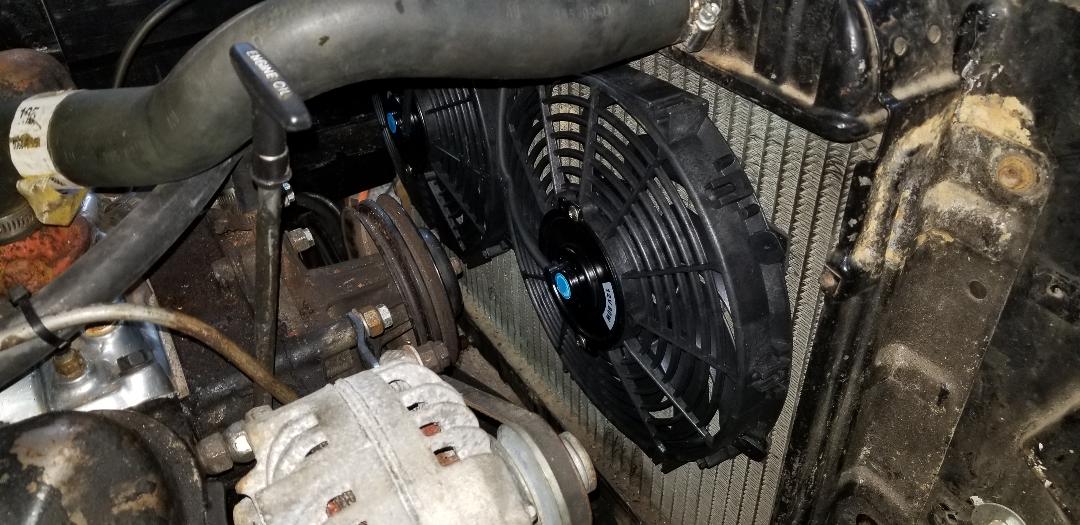
Pair of 12" cooling fans installed on radiator.

Cooling fan retainers protruding from front side of radiator, note retaining washers holding probes in place.
After turning the key on, the fans came on with no problems whatsoever. With that part of the project completed I moved on with some general cleanup in the garage then started on another little side project, which is going through my scrap pile and weeding out a lot of scrap that I haven't been doing anything with nor really have any immediate prospects for doing anything with. The scrap ranges from stuff as small as pieces of scrap metal remaining after cutting up larger scrap, includes large batches of old wiring pulled from various sources, all the way up to large stuff like washer skins and water heater tanks. I want to try to clean the area up and in no lesser terms process the scrap, only keeping the stuff I know I will be putting to use in the immediate future. One of the things that I pulled from the scrap pile first was the Dodge's center console. This thing has seen better days but because of the scarcity of this interior component and the high cost of aftermarket replacements, I will be trying to restore this piece to be reused in the Dodge. I pulled it from the ground and got all the mulch and other organic trash off of it and took it up to the garage and laid it out so I can see just how I will need to patch and repair this thing so I can install it back in the Dodge at a later date. 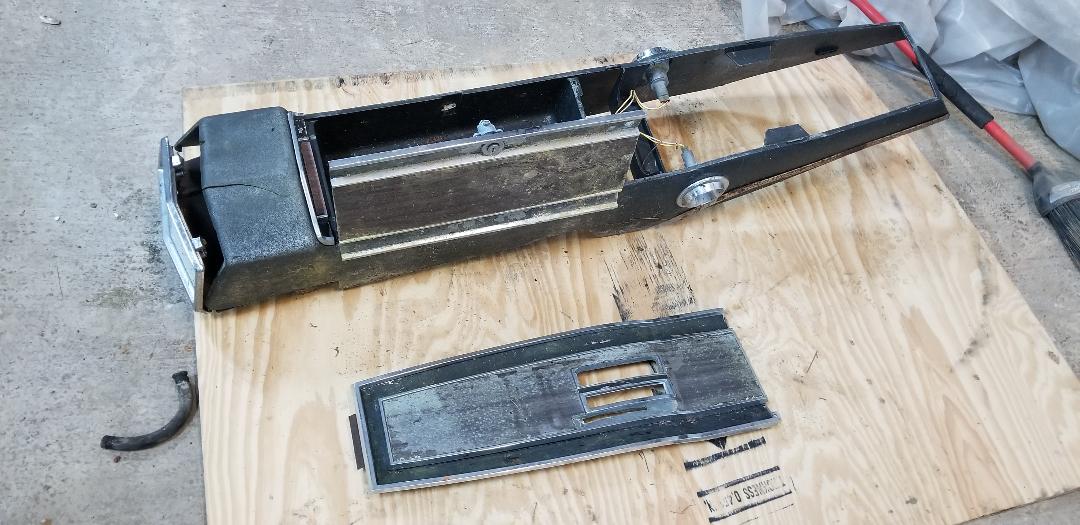
Dodges old center console, as can be seen its well worn, wood grain is faded and shitty looking. Plastic is cracked in spots.
The scrap yard, as can be seen is getting overgrown and needs serious attention.
My next little project was to install a rear mount backup camera in the Scion. The reasoning behind this was due to the fact that the tint on the rear window was starting to bubble along the rear defroster lines and as a result making the view out of the rear window be distorted, especially at night. This obviously makes backing up a bit of a chore since the tint already makes it harder to see at night without the distortion of the bubbling tint material. My solution since I didn't want to go through the hassle of removing the tint - add a rear mounted backup camera.
At first I had to figure how I would mount a monitor somewhere on the dash or somewhere around the center console. When I started looking for these cameras on Ebay I ended up finding something that really killed two birds with one stone and solved the problem regarding the monitor. I found a combo dash cam/backup cam with the dash cam portion being a mirror mounted unit that covers the original rear view mirror but serves as a mirror and a monitor for the dash cam that's on the unit. Of course the back up cam is mounted in the rear over the license plate and wired up to the dash cam, which means routing 20 ft of cable through the car over to the front to link up to the dash cam. The first part was to install the rear cam. Since the license pate is mounted on the hatch and there's nowhere else to mount the cam since the only thing in the rear is the bumper (which I'm not gonna mount it there), this meant that I'll be mounting the cam on the hatch. The cam mounted with a couple of small sheet metal screws. Since there was no real way to get the pigtail into the hatch I ended up having to drill a hole just above the license plate to route the pigtail then drill two small holes for the sheet metal screws in order to secure the cam in place over the license plate. I had to remove the emblem panel in order to gain access to the sheet metal in order to drill the holes without damaging said panel. With the cam mounted I was able to reattach the emblem panel and move on to routing the cabling. 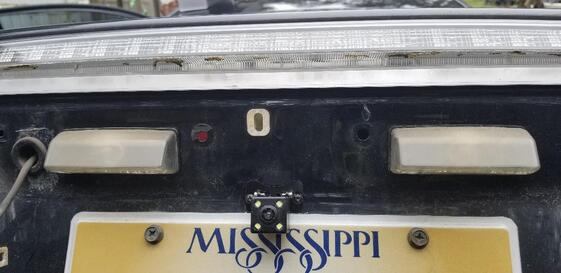
Rear cam mounted on hatch, emblem panel removed to facilitate installation.
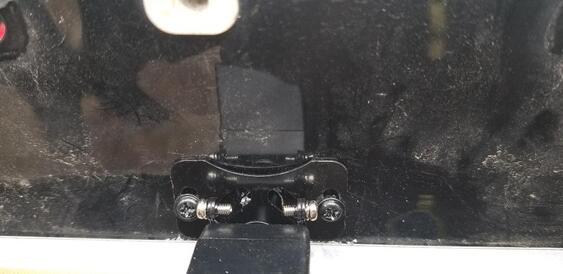
Closeup of rear cam mounted, can see drilled hole behind camera mount.
I had to pull the side trim from the inside of the hatch in order to route the cable along the hatch up to the ceiling of the car. Since the hatch is totally independent from the rest of the interior paneling I had to drill a small hole to feed the video and power wires out from the inside of the hatch. From there I had to split the power wire and the video wire. For the power wire I had to add another length of wire to extend back to the backup light fixture on the right side. Since the backup light wasn't mounted in the hatch I had to add wire to get there. I had to pull the interior panel out along the trunk area to hide the power wire until I got to the backup light. Since there was an access panel behind the backup light I was able to bring the wire right to the wire harness without removing any more trim or paneling. I used a 2 way splice connector to pinch the power wire to the backup light to connect the added power wire for the cam. With that done I could move on to the video wire. I had to pull the side airbag panel out a little bit to tuck the video wire into it, then continue by tucking the wire under the ceiling panel around the sunroof all the way to the front and around to the top of the rear view mirror. After tucking the wire I reseated all moldings and panels so everything is back to the way it was, leaving just a few inches of the video cable hanging out from the panel right above the rear view mirror. The next thing was to hang the dashcam/mirror in place. This was accomplished using a couple of rubber straps that came with the kit. I hooked up the power cable and fed it down to one of the USB sockets in the 12v receptacle in the center console. I hooked up the video cable, tucking the excess back inside the panel so no cable is sagging unnecessarily. Lastly I turned on the ignition so the camera would power up. I put the shifter into reverse and verified the camera was on when I saw the four LEDs light up. By this time the ole lady came out to check on my progress and was able to sit in the car while adjusted the camera after getting the rear camera to come up on the mirror screen. Once we got the rear camera adjusted good enough to see the road as well as the environment around the rear of the car. With that the whole setup was complete and ready to go, minus adding a micro SD card for recording purposes. That was taken care of later in the day so now the whole package is complete. Besides having the ability to see out of the ass end of the car we can now record shit in front of us as well. This hardware will definitely be added to the other vehicles in the near future. 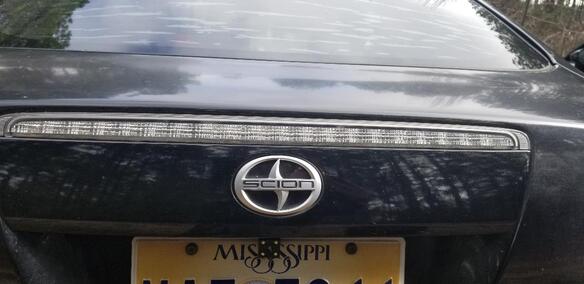
Rear camera mounted with emblem trim installed in place.
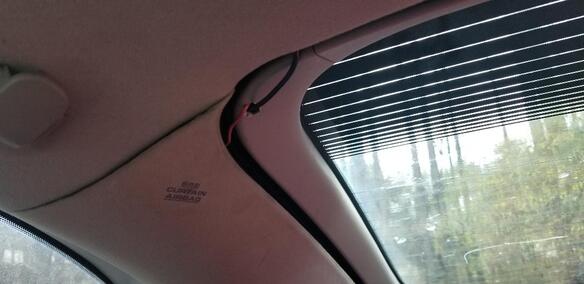
Hole in hatch molding for wires, note how wires split and go under other trim to their respective destinations.
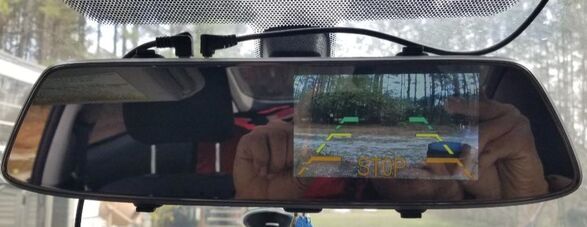
Backup camera activated, note mirror is still usable.
In this installment I have two different projects that I worked on. The first is a pretty simple thing, which is just installing a new radar detector I bought off of Ebay into the Monte Carlo. Unlike past radar detector installations, this radar detector is intended to sit on the long flush dashes of modern cars. It doesn't come with the mount that allows you to hang the unit from a suction cup to the windshield, or like I always do, attach it somewhere high like in the upper left corner of the windshield, at the A pillar.
Since this radar detector came with a sticky pad to allow the unit to stay stationary on a car's dash, I figured for the time being it'll do for the Monte, which does not have the long flush dash of a newer car. There was enough room to set the unit but in the case of this one, its temporary, until I acquire a unit that does have a hanger that I can use to suspend it from the upper A pillar. One thing that is cool about this radar detector, especially in the temporary sense, is that its power plug has a push button switch to turn the thing on and off so if its plugged into an "always on" 12v receptacle, you can at least turn the thing off so its not constantly drawing power from the car's battery. In my case that feature is necessary since the only cigarette lighter outlet (when they used to actually have a cig lighter in them) is always on. Well the installation was quick and straightforward, 5 minutes and everything was ready to go. I used a two way 12v receptacle to give me two outlets since I already had a Bluetooth radio adapter plugged in to allow me to Bluetooth my phone to the radio. That device just transmits to the radio on a dead station and connects to the phone via Bluetooth so I can use the radio like a newer radio where I can play shit from my phone to the radio. One thing that I would really appreciate is for manufacturers to make radar detectors that are 5v powered so they can be powered from a USB receptacle versus a 12v/cigarette lighter receptacle. It would make things a lot easier since a standard micro USB cable can be used to hook the unit up to power. But until then the Monte has this temporary radar detector in place ready to sniff out piggies hiding in the distance up ahead. 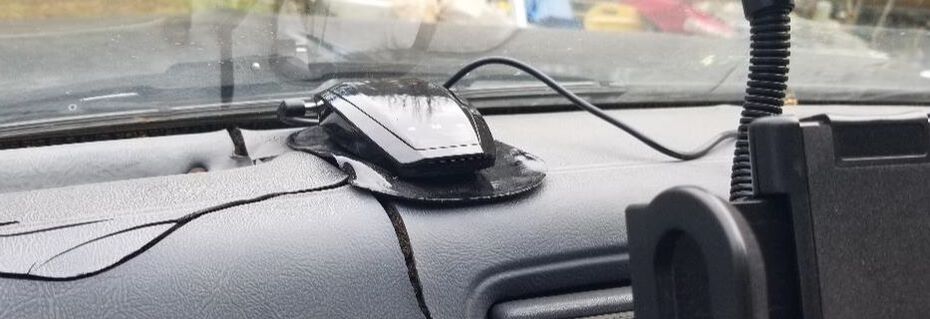
Radar detector setting on Monte's dash, note small amount of surface area on dash, compared to newer cars.
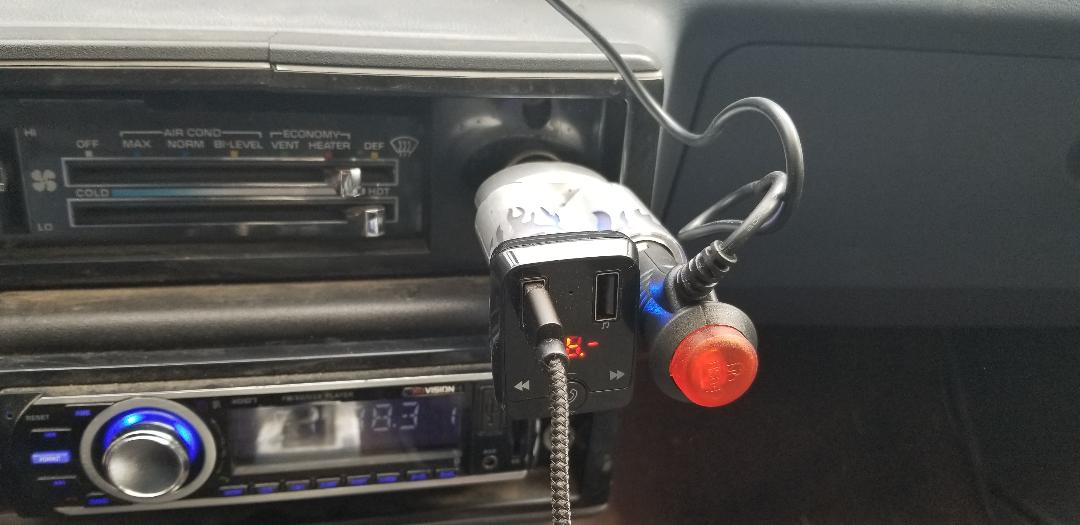
Dual outlet 12v receptacle with Bluetooth radio adapter and radar detector plug in place, note red pushbutton for switch.
The next order of business was to install a Bluetooth radio that I salvaged from the Grand Prix that we scrapped recently. Now you may ask, "why not install it into the Monte?" To answer that, the Monte already has a radio, the Dodge does not. I sure as shit ain't about to swap radios to put this Bluetooth radio into the Monte then install the Monte's old radio in the Dodge, only to replace it later on with a better radio, so the Dodge gets the Bluetooth and the Monte will get a new Bluetooth radio in the near future or when this radio finally craps out. Anyway, to install the radio I had to fabricate a mounting bracket for the radio, which is a single DIN radio. I had to take the plate that held the Dodge's old radio, along with a single DIN radio mount and put the two together to make a mount that would go into the Dodge with minimum headache and minimum or no butchering on the Dodge's dash panel. With this done I moved to the wiring. Since the radio needs two power points, one a constant 12v and one a switched 12v, I had to get an inline fuse to use for the constant 12v. For the switched 12v I just used one of the extra fuse terminals on the fuse block that I used for the Dodge's rewiring in the past. With the power portion done I had to do the speaker wire. Of course this is all new since I pulled all the old wiring out when I rewired the car. Since I only had one little bullshit speaker, which was gonna be used for testing purposes, I elected to do just one speaker wire run just to confirm the radio was going to work. Instead of routing the pair of wires along the driver's side rocker panel with the other wiring that goes to the rear of the car, I chose the passenger side. I routed everything as neatly as possible with a minimum of wire ties, since I'll have to add another pair of wires for a second speaker in the future. I ran the wires up along the side where the rear window regulator is at and terminated at the back panel (or the area where the back panel will go) and used the speaker's magnet to secure it in place on the metal. With the wires hooked to the speaker I went to the antenna. Since all of that was still in place it was a simple matter of just hooking the antenna to the radio and wire tying the cable in a neat manner under the dash so its not in the way of the fuse box or other wiring or HVAC hardware. With that I turned the key on and got the radio to come on. I tuned into a station and even though it was staticky, it worked. I synced my phone to the radio successfully and played a Iheartradio station successfully and clear, which told me the radio was just fine. Now I just need to get some speakers for the thing and make a rear panel to hang them from. Another project for another day... 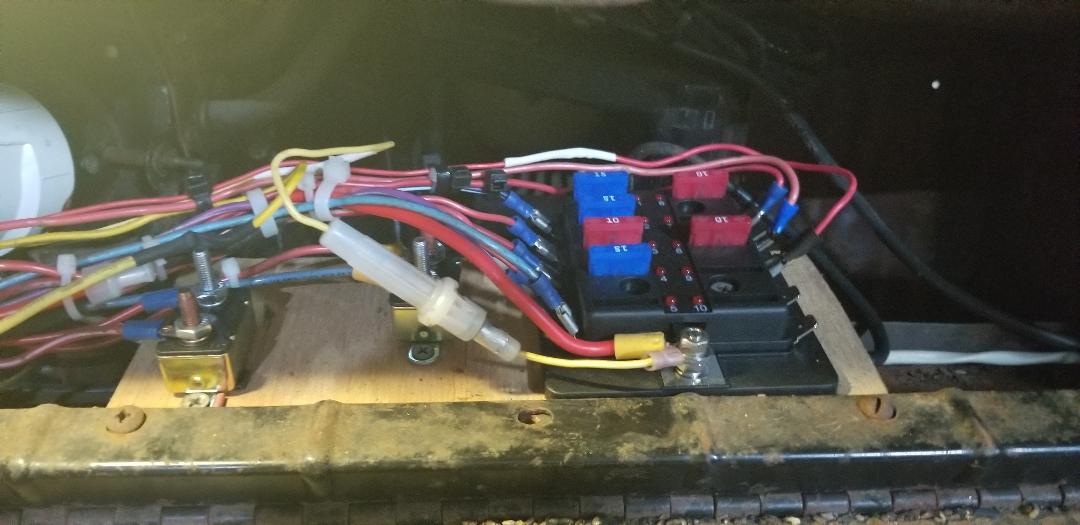
Dodge fuse box mounted in glove box area, note inline fuse hooked up to 12v power into fuse box, feeding constant 12v line.
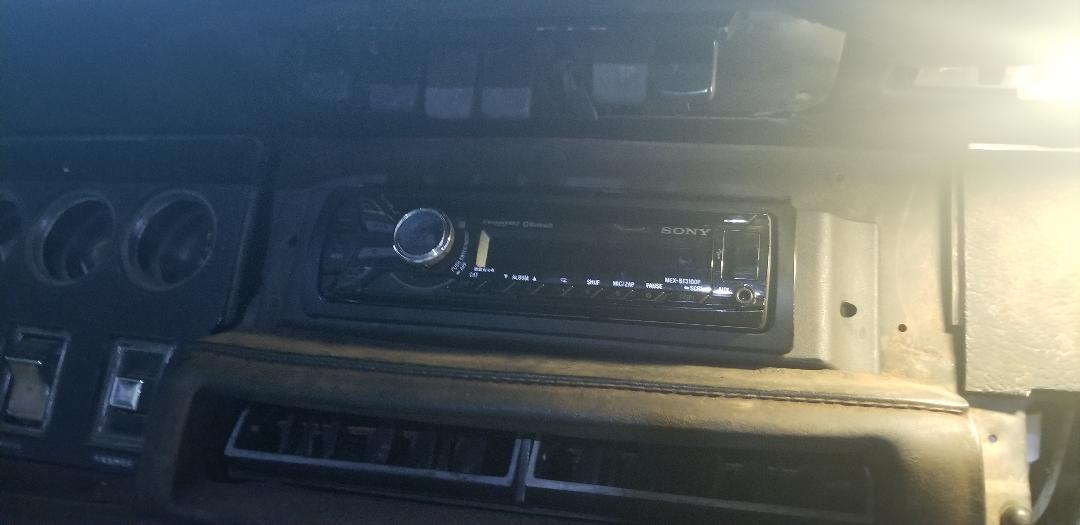
Dodge radio installed, using old radio base.
After installing the LED headlight bulbs in the Scion the next thing was to restore the headlight housings to their former clearness. I had a couple of headlight restore kits in the storage trailer that I hadn't gotten around to using so I figured now would be as good a time as ever to bring them out and give them a try.
The first kit was one that we got from a regular auto parts store some time ago. It consisted of a couple of pieces of sandpaper, one of a rough grit around 500 or so and a fine grit of around 3000. Also included was a polishing cloth and a little bottle of polish. I tried this one first since it was the oldest but soon found out this was fruitless as the polish was almost like water. Plus since this required elbow grease, getting the desired effect would be rather difficult. I moved on to the newer and more "modern" kit. This kit came from Harbor Freight (Don't you just love this place?) and includes a sanding head that goes in a power drill and three different sets of sanding discs; 500, 800, nd 3000 grit. A small roll of masking tape is included for masking around he headlight so the sanding doesn't hit the car's paint. There's also a buffing pad and a tube of polish for the finish work. 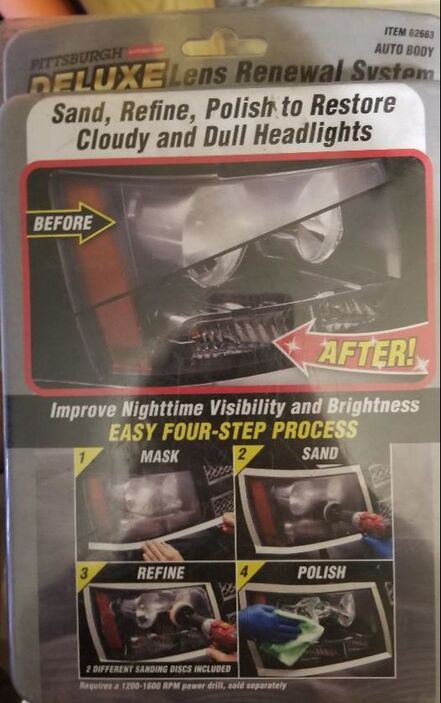
Harbor Freight headlight restore kit.
I followed the instructions, masking the headlight and taking my time with the drill speed and wetting the sandpaper by dunking the head into a bucket of water every few seconds as I sanded the headlight, going through all three sanding wheels in the process. The kit includes enough sanding wheels to ensure you get your headlights done. I wet the buffing head then applied some polish and commenced to polishing the headlight body. After a few passes the surface came out pretty good. It's not exactly like a brand new out of the box headlight housing but it's a hell of a lot better than how it was before I touched it. With the whole process down in my head I was able to quickly get the other side done. Of course with the polishing came cleanup work since there was splattered polish all over the car's body, nothing the hose couldn't handle. All in all this process is almost the same as finishing a new paint job. Instead of sanding orange peel from the clear coat and buffing and polishing to a shine I'm sanding the faded outer layer of plastic then sanding the micro scratches and buffing everything to a shine. If you have faded headlights you definitely have to try this and save yourself the hassle of paying someone an arm and a leg to do exactly this same work or replacing the headlight housings completely. 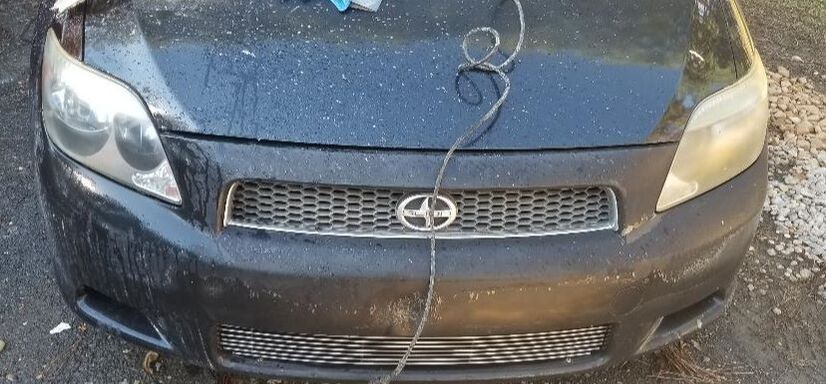
Passenger side headlight done, compared to driver's side which is undone. Notice the difference.
Restored headlights, you an actually see the reflectors now.
After getting some parts that I ordered in the mail from Ebay, I was able to get back to work on the Dodge. I ordered the brake calipers for the front and the HEI hybrid distributor that I wanted to have on this engine. A little on the distributor. The stock distributor that I would've used, a first gen electronic unit is just a simple dizzy that sends a signal to an external electronic module which then sends a voltage shot to an external coil to fire the spark plugs. The HEI units incorporate a small module into the dizzy and if its like the GM HEI unit, also incorporates the coil into the cap so its a self contained unit. The hybrid unit that I have incorporates the HEI module into the Dizzy's body but still requires the use of an external coil to fire the plugs. This is better than the stock setup as it eliminates the extra wiring that would be required with the external module. Since I already had the brake pads and spark plugs and wires, all I had to do was install the calipers and bolt the hoses to them. The calipers came with the copper washers required to seal the bolts to the body of the caliper. Unfortunately I was unable to find the hardware that is used to secure the caliper to the spindles so I had to hunt them down on Ebay and luckily I found a set with everything I need to secure the calipers for $13. I did still attempt to bleed the brakes or at least see if things were going to work given the age of the master cylinder. When I pumped the pedal the thing was stuck a little then broke free, allowing me to pump the pedal, making the brake booster hiss with each pump. I opened the bleeders on the calipers and attached a vacuum pump to pull the oil from the master cylinder. When I did that and still got nothing from the system, that just told me one thing, I'll be needing a master cylinder. With that I moved on to the dizzy. 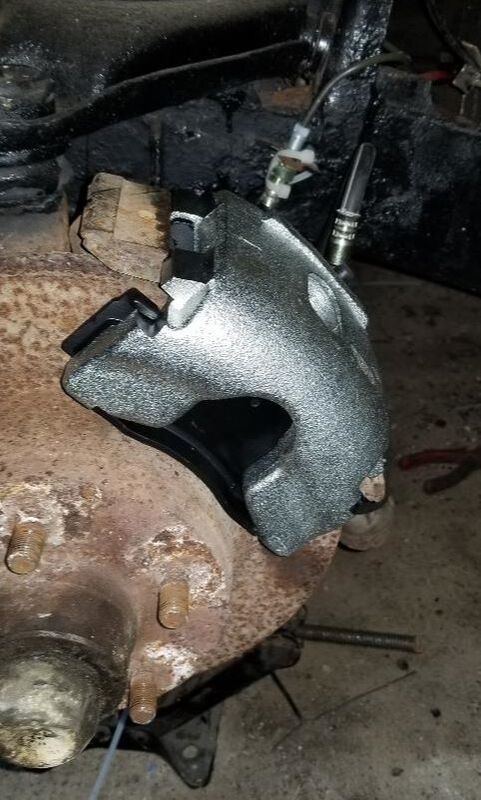 Caliper and pads installed on rotor/spindle. In order to install the dizzy I had to clean the hole on the engine block to free it of dirt and grime that would make it hard to seat the unit into place. Even with that I still oiled up the rubber O ring and base of the dizzy to aid in seating the unit. I had to rotate the rotor so the tab on the bottom of the shaft will seat itself in the distributor drive shaft inside the engine. Even with that I still had to tap town the unit a little to get the thing fully seated. The dizzy shaft is engaged with the driveshaft so I was able to move on to the next thing, which was installing the coil. 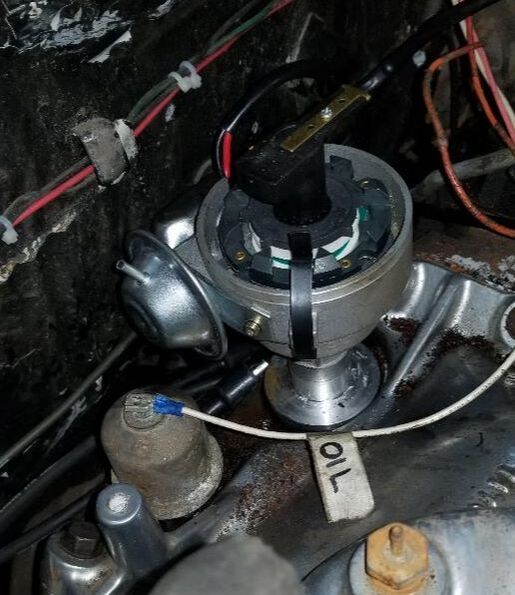 Distributor installed into engine block. In order to install the coil I was going to need some type of bracket or mount to hold the thing. The coil is an old school soda can coil that is typically bolted on the engine close to the distributor unlike the GM HEI unit or the Ford units that mount on the firewall. I ended up using the coil from the 440 engine that's currently on the ground. That coil has a mount already on it. Now, since the spot that I found on the intake to mount the unit has bolt holes that are offset height-wise, I had to install a spacer on the shorter bolt hole. I ended up securing the side that was higher and taking a thick rubber bushing and using it as a spacer to support the other side of the coil mount. After mounting the coil I took the wire that is supposed to go to ground and attached a crimp terminal to slip under the bolt that secures the mount directly to the intake. The other side of the coil received the eye terminal from the dizzy that sends the signal straight to the coil. I already had a wire run from the fuse box inside the cab to feed 12v to the dizzy so all I had to do there was crimp a male terminal to that wire so I can plug it to the female terminal on the dizzy to complete that electrical connection. The last thing that I was able to do was to set the engine to TDC (Top Dead Center) on cylinder #1. Since nothing was hooked up to really allow me to crank the engine via the starter, I had to turn the engine manually with a breaker bar an socket on the crank pulley bolt. I also had to pull the valve cover on the driver's side of the engine to expose the rocker arms so I can watch them move as I rotated the engine. When I got to the point where both the intake and exhaust valves were closed I counted how many quarter turns it took before the exhaust valve started opening, which signified that the cylinder had fired and was going into the exhaust cycle. I counted 4 quarter turns, meaning that the engine goes one full revolution between the valves closing and the exhaust valve opening. Split this in half and the engine turns halfway before the piston hits TDC then another half turn after the cylinder fires and commences the exhaust cycle. Once I got the engine set at that point I looked at where the rotor was pointing then went to put the cap back on and hook up the plug wires. 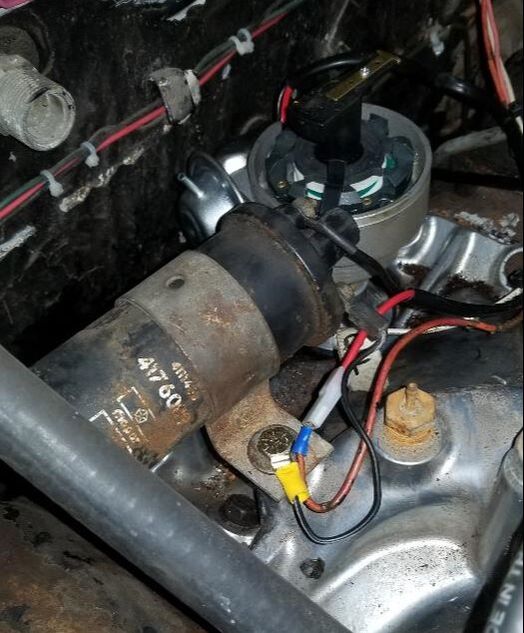 Ignition coil installed and hooked up, note crimp terminals in place where needed. The only problem I had with this next step is that the distributor cap is of a different variant of distributor, probably the "newer" variants that had electronic ignition. I got the spark plug wires that came up for a 70 charger, which would've still had a breaker point distributor and different plug ends on the wires where they hook up to the cap. The terminals on the cap were the male version where the conductors were protrusions pointing out from their bases versus the female version where the terminals were recessed inside the sockets on the cap. Since the box for the wires is already gone, my only option is to find the right distributor cap to put on the dizzy and be able to hook up these wires to. From my quick research it turns out all I needed is a 70 charger distributor cap for the 318 engine. I removed the cap and rotor from the HEI dizzy to take with me to auto zone when I go to get the cap. If they look compatible with one another then we're in business, otherwise then its back to trying to find a cap to match the one that came with the HEI but is able to accommodate the current set of plug wires. So as it stands, I need to get the front disc brake hardware kit to complete that installation and
Even the trailers around here aren't immune from needing work! Well really what's going on is some past work that I will have to say was kinda shitty due to the idea of rushing things trying to get the trailers into play sooner. There are two trailers in question. One is a homemade tow dolly we picked up earlier this year and a homemade all metal car trailer that we got a couple of years ago. We will start with the tow dolly.
Since the tow dolly was homemade it didn't have lights on it, let alone ratchets for the straps that are normally present on dollies. I documented adding ratchets for some straps along with some trailer lights. In order to add the lights I had to weld on a couple of angle iron mounts in an L configuration to hold the lights. Well, the first time we used the dolly to haul a junk to the junkyard the angle iron being relatively weak fluttered around when driving at highway speeds. Well since the dolly didn't have fenders, the fluttering L mount moved enough for the arm holding one of the lights to get grabbed by the tire on that side and snatched off. Completely. So now I had to either get another set of lights and figure out a better way to attach them and end up with one trailer light lingering around that I can't really use. OR, implement a new idea I thought about. Now I will move to the other trailer before disclosing that new idea. The car trailer has lights on it but the wiring needed to be looked at and for all intents, redone. I'm not even sure of the condition of the lights for that matter. Which brings me to the idea. That idea was to get a set of magnetic trailer lights. These things are basically the same as what would go on the trailer except they can be attached via magnets to whatever vehicle is getting towed. They have a long string of wire with the same 4 prong plug that goes into the back of the tow vehicle. Perfect. Instead of worrying about keeping up with lights on two different trailers along with the plugs that tend to get damaged during towing or corroded from the trailer sitting outside, the magnetic lights can be stored and kept out of the elements and swapped to whatever trailer they're needed on. These are even LED units so no replacing bulbs. Again, perfect. 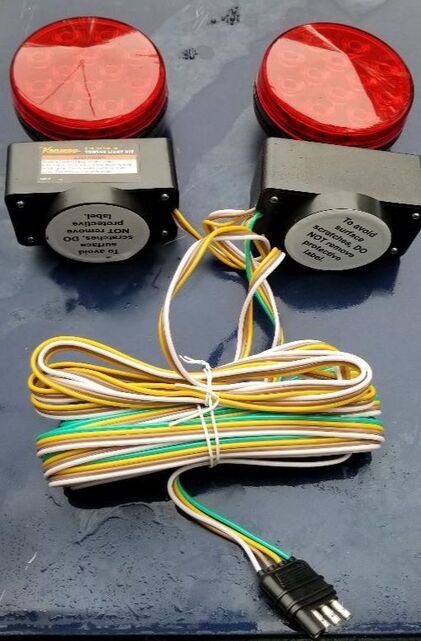
Magnetic trailer lights from Harbor Freight.

Remaining tow dolly light on unit, it was a bad design really, given the materials that were available.

The nub that's remaining on the other side of the dolly after the angle iron light mount was snatched off. Again, bad design.
So with the magnetic trailer lights, I didn't even have to worry about fixing the lights on the car trailer and I definitely didn't need that remaining light and mount on the tow dolly. Of course that meant on the dolly I cut the angle iron mount completely off and while I was at it I removed the wiring that I wire tied to the dolly's frame for the lights. I removed the light fixture itself and gave it to a friend who needed just one trailer light after he loaned his trailer to another person and they fucked it up resulting in breaking one of his lights off. Killed two birds with one stone. I also cut the shitty plug on the car trailer close to where the wires were fed inside the frame to the rear of the unit. I'll probably end up removing those lights at a later date but it wasn't a critical task at this time. What I did want to do was prep the F250 for its new duty as a tow vehicle. Since the S10 is pretty much in mothballs since the transmission is going out, the F250 has been pressed into service as the main hauler now. The truck has a toolbox that was used for holding all the typical shit you'd find inside a work truck toolbox, and then some. I wanted to reorganize the toolbox to accommodate all the shit that I have for hauling stuff on the trailers or even just in the truck. When I looked at the toolbox I had a few truck parts (ignition module, MAP sensor, coil, starter solenoids, flasher relay) along with a couple of bottles of fluid and some small ratchet straps for general tying down of cargo along with a small box of heavy duty chain. There was a 12v tire compressor as well as an L-lug wrench. I went ahead and resituated the car parts and fluids and tire compressor and lug wrench on one side of the toolbox. I took the ratchet tie downs and chain and put that on the other side of the toolbox. I also took the two heavy duty car tie downs I had with the trailer and included them in the toolbox. The magnetic trailer lights went in with this hardware too. The trailer/towing/hauling shit went on one side and the general maintenance shit went on the other side. 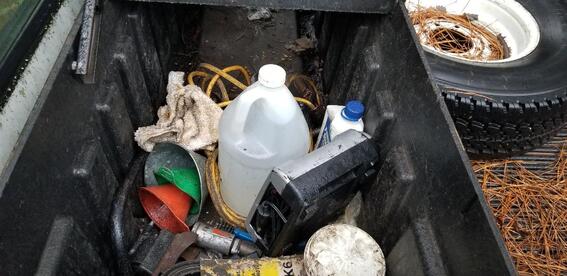
Toolbox side with truck maintenance shit stored in place.

Toolbox side with trailer/hauling hardware inside.
With the truck ready for its duty as a hauler my next task was to address the old toolbox that was on the trailer for holding the ratchet straps as well as the ratchet wrench and socket for changing tires on the trailer. The toolbox, which was an old ammo can was smashed when I pulled out of a driveway at a junkyard where the ground angled at a little sharper of an angle than was safe for the height of the trailer. That was another poor design flaw on my part. Instead of finding a spot to weld the box where it wouldn't even come close to the ground if the whole rig is angled more than usual, I had to weld the thing to the side of the frame where if that happened, that's exactly what will happen, it will make contact with the ground if I pull out of a steep driveway. 
Smashed up toolbox/ammo box.
Since this smashed toolbox is useless to me, it had to go. This was simple enough, a die grinder made pretty quick work of the welds and a sledgehammer helped finish off the box. The last thing was grinding down the jagged edges where the box was and remove the section of box sheet metal that was within the weld zone on the side of the frame. With that, the car trailer is ready to rock and roll. The ramps are in the back of the truck as well. I will be able to haul with the car trailer. As for the tow dolly the only thing I need to do is order another set of dolly straps since they were damaged by the wheels on the junker we towed since the steering was not hooked up and the wheels were able to move around enough to allow them to scrape against the wheels on the dolly. I will have to look at the idea of adding some kind of fender to each side to help protect the zone where the car's tires go so the rolling wheels of the dolly will be separated from the cradles of the dolly. But in the meantime, the car trailer is definitely ready to go.
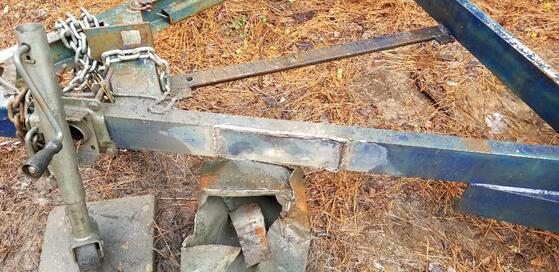
Frame rail of car trailer with toolbox cut and welds ground down.
|
