|
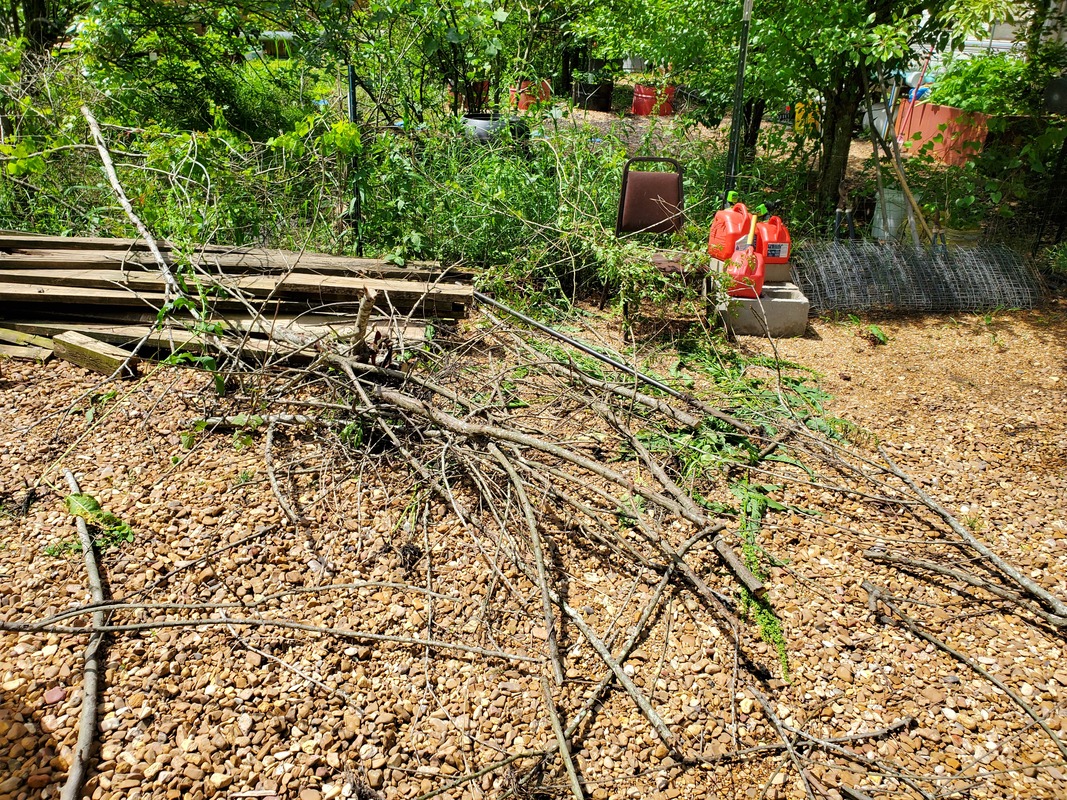
Since I was running low on some of the wood supplies I was using from my scrap pile for making these barrel raised beds, I had to change the design again to take advantage of other wood I had available. I couldn't spare any more 2x4's or 4x4 posts or landscape timbers but what I did have plenty of are 2x6 boards, long boards salvaged from the porch dismantling. I figured I could use these boards as I did with the 2x4's to make the cradles for the beds and use them for the legs as well. Since they are 2x6's I wouldn't have to worry about doubling up the boards like in the first change to the design. I would still use pallet pickets for the stabilizer boards to hold everything together. I had four beds to make with the two drums I had.  2x6 cradle made for drum half. Since most of the wood being used was from the 2x6's, things were pretty easy in the sense that I had to just cut all the pieces I was going to need to assemble the bed before installing the stabilizer boards. I was able to just screw the wood screws in place, no drilling of pilot holes through 4x4's or doubling up boards.  2x6 legs attached to cradle, ready for stabilizer boards. With the legs screwed in place using three deck screws each, I was able to move on to the stabilizer boards. After gathering the boards I secured them with two screws each side. I trimmed the excess and drilled the drainage holes, five total. With that I had the bed ready to rock and roll. I moved it to the back of the garden, right across from the trio of beds that were made just recently. I cut some more 2x6 boards to use as feet for the bottoms of the legs to keep them from having direct contact with the ground. I filled the unit with dirt and planted a couple more sweet potatoes within.  Raised bed ready for setting up.  Fig tree drum planter moved next to trio of older drum planters. Older planters are on gravel, new planter is on dirt until gravel can be brought in.  Spot cleared in garden to accommodate new raised beds. Note bare spot next to drum planter in foreground where one was moved from. After getting this bed set up, I did the same with the other barrel half and the other two after chopping the drum in half. The design stayed the same for all of the raised beds, using up a good amount of the 2x6 boards I had on hand, along with some pallet boards. I set them all up aside one another, across from the three beds that are against the fence. I planted the remaining sweet potatoes in these along with two tomatoes in the last bed. At this point I still need to make beds to accommodate the remaining tomatoes. That will be a story for another time as I need to follow up on a lead for a couple more plastic barrels. 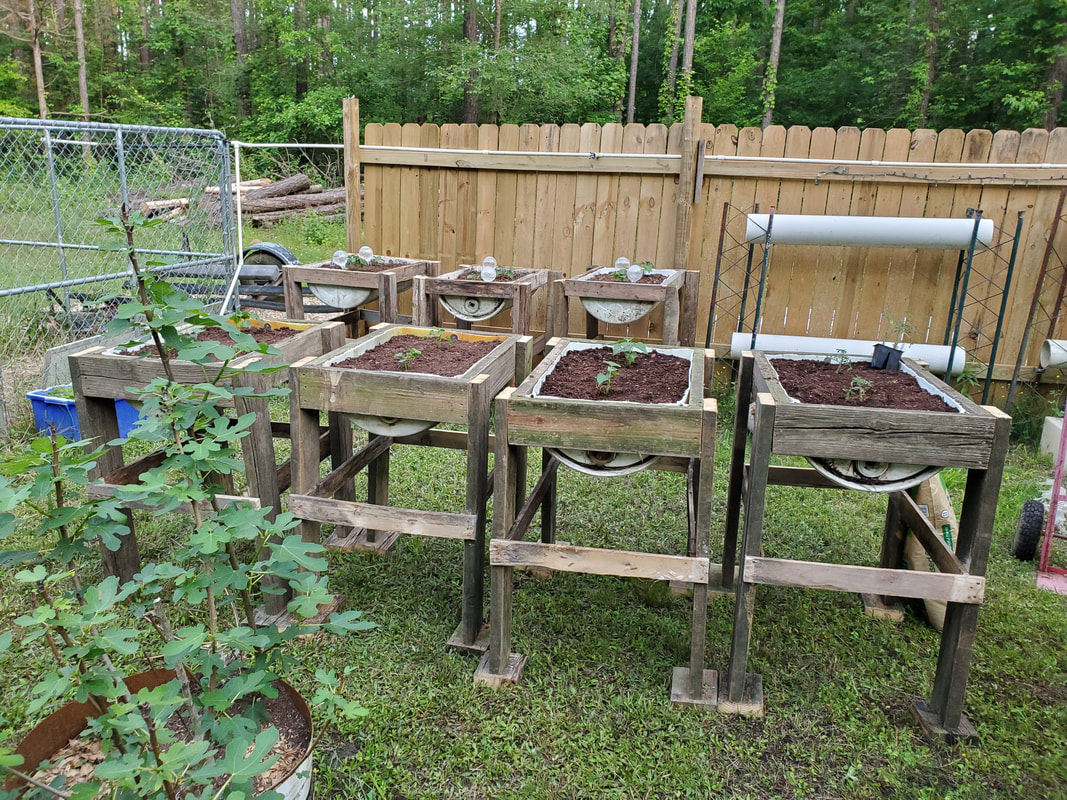 New raised beds set up in garden. Prior to setting up the other beds I had to cut the grass over this area and move one of the older drum raised beds that has a fig tree and blueberry plant in it. In order to do this I had to dig up the tire that was the bed for the old apple tree that I pulled up that was next to the other set of drum beds so I could smooth out the area for the fig tree drum bed so I can relocate it next to the trio of drum beds in the middle of the garden. This will help clear up room around the four beds I just set up. I do still need to find a spot for the other fig tree drum bed that is still right by the barrel raised beds. I want to get things organized within the garden so we can maneuver around everything easily and so things can be set for when these trees do grow bigger so they'll have room to expand without overshooting onto some other setups, as can happen if I leave this fig tree if I leave it where it currently sits. The garden work continues...
0 Comments
The plan after moving the catamaran and boat trailer from the 2nd half of the side car park area was to move the El Camino and the 51 Chevy to that spot, lining them up behind one another, leaving the middle section open for movement of vehicles or equipment. After cutting the grass over the area I come to find that this area was muddy as hell. This area will end up taking a lot of gravel to mush into the mud to make the ground solid enough to handle vehicular traffic, much like the problem i had with the midway, the deeper in I got.  Bare area ready to be covered, note tip of tailgate on right hand side. After getting a load of gravel I started spreading the gravel over the area, starting at the edge of the midway driveway. As I moved in I had to back the truck in more. As a result the tires would mash into the mud/gravel combination. Luckily I was able to back in where one tire was on solid ground and the other was on the middle of the newly covered section where it was somewhat stable. As I backed in I had to add gravel to the rut that was created by the truck's tire as it mashed into the muddy gravel. I spread enough gravel to create a long enough section to handle the El Camino but more than likely will need more gravel spread and the truck rolled over the ground to mash the gravel in more. After spreading the gravel I then went to pull the truck out to stage it in front of the El Camino to pull it into the compound and get it ready to see if I could be able to pull it in and park it in the newly graveled spot. 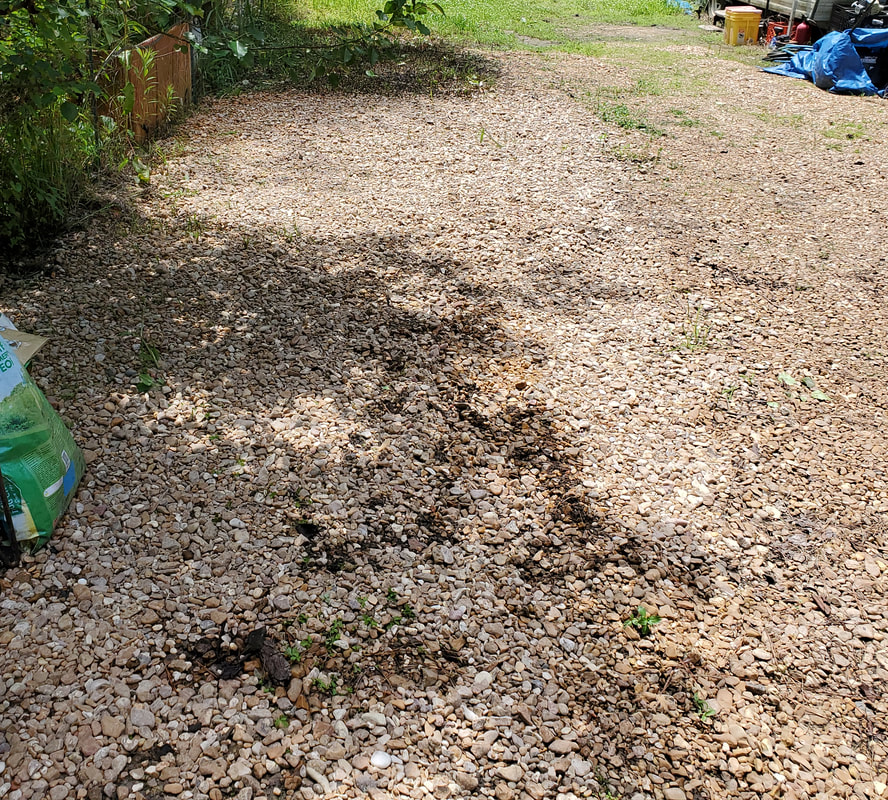 Newly laid gravel patch on 2nd half of side path. Since I was doing this job solo, I had to prop something in front of the tires of the car to catch it as I pulled it along. I aired up the tires and hooked up the chain and started pulling the car from its resting spot of several years. Now as I pulled the car along I ended up finding that because of the slight downward grade of the land, I was able to push the car along after I got it on the graveled driveway. I ended up just turning the wheel to just steer and push the car into the compound nose first, then steer it over to the opposite side of the midway where I had moved the 65 Mustang and Ranger frame. From there I would move the truck onto the side path and hook up to the back of the Elco and pull it onto the ground, turning the wheel to help park the car onto the newly graveled spot. 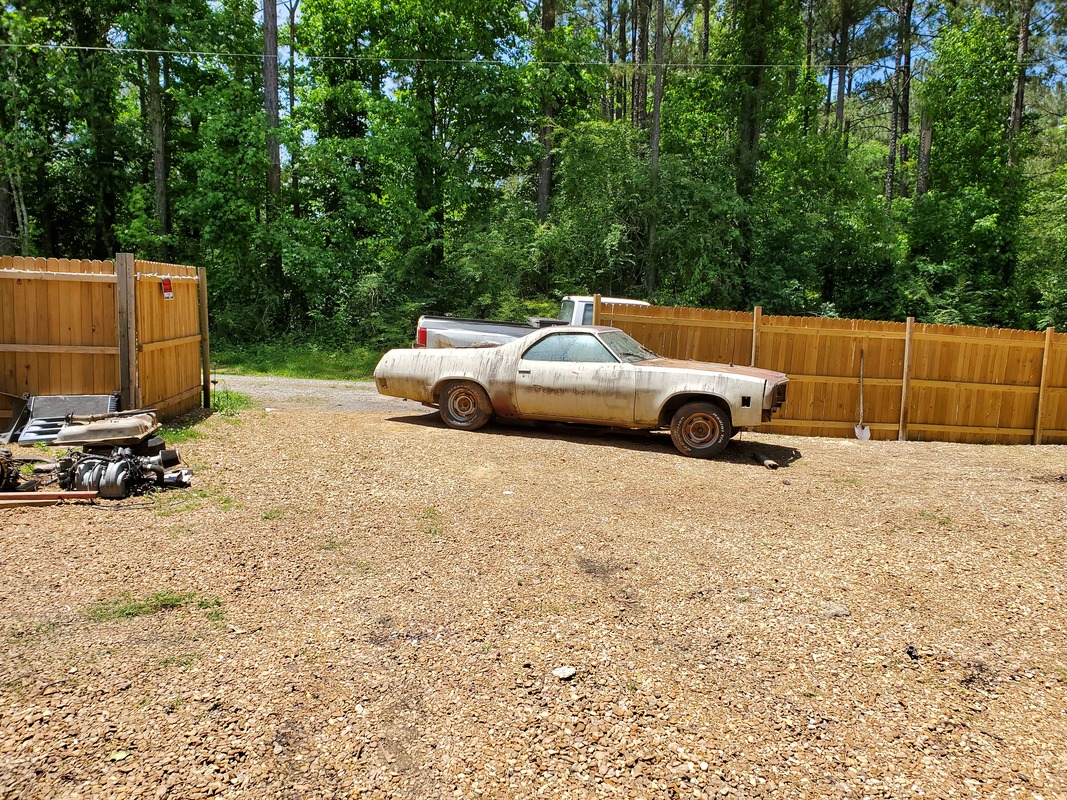 Moving the El Camino into its temporary parking spot just behind the Ranger frame, not seen to the right. And this is where my worst fears were realized. When I staged the truck on the side path to get ready to hook up the Elco, the left front tire of the truck was on the new patch, right in one of the mushiest spots of the whole patch. I wasn't so far in that I would've gotten stuck but I was far enough in to create a ridiculous rut in the ground. I backed the truck out of the rut and tried in vain to push the gravel and mud back in but even when I tried to just step on the slop it just pushed around more and allowed my boot to sink in. I had to pull the plug on the plan to move the Elco to this spot. I would need to add more gravel, probably even some concrete to the rut area to fill this worst spot in so when I come back over the area with more gravel, it will be less likely to push out under the weight of a car. 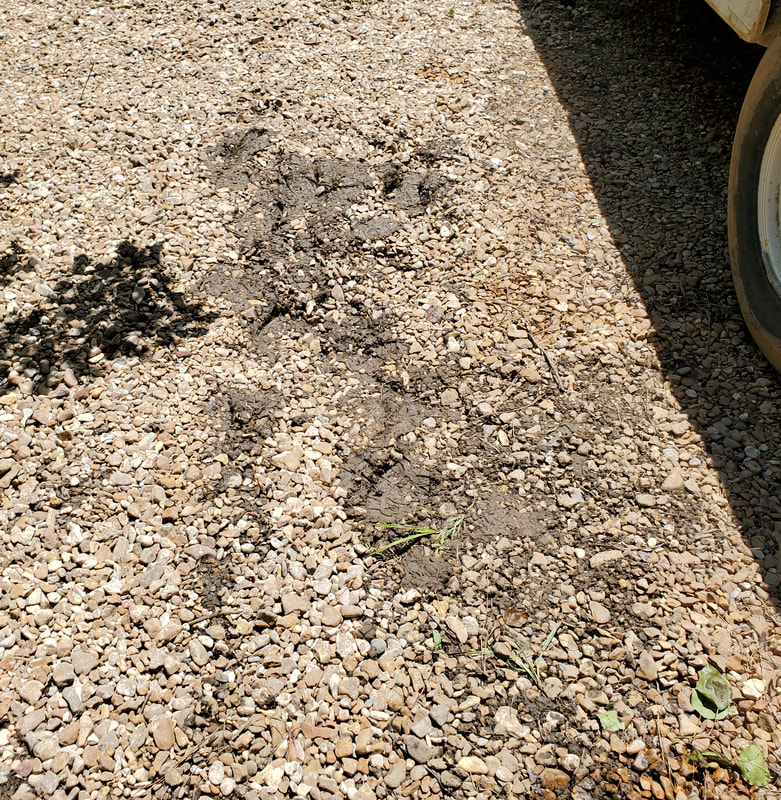 The muddy rutty area on the new patch after having pushed everything back into the rut. Any footsteps on this mush will still cause the rut to return. In the meantime the Elco is still parked off to the side out of the way. Of course since its there, the F250 will have to be parked on the side path where the 69 Mustang used to be parked at. The ground is plenty solid for the big truck but of course I will have to get another load of gravel over this area and concrete the rutty area before making any further moves with any vehicles. I will definitely have to dump a couple of loads over the rest of the side path area to accommodate the 51 Chevy when I do get around to moving it to the spot behind the Elco. Since we're talking about some tight maneuvers, I can't afford to have the ground be the obstacle that stops me from moving any further with any of these moves I'm making.
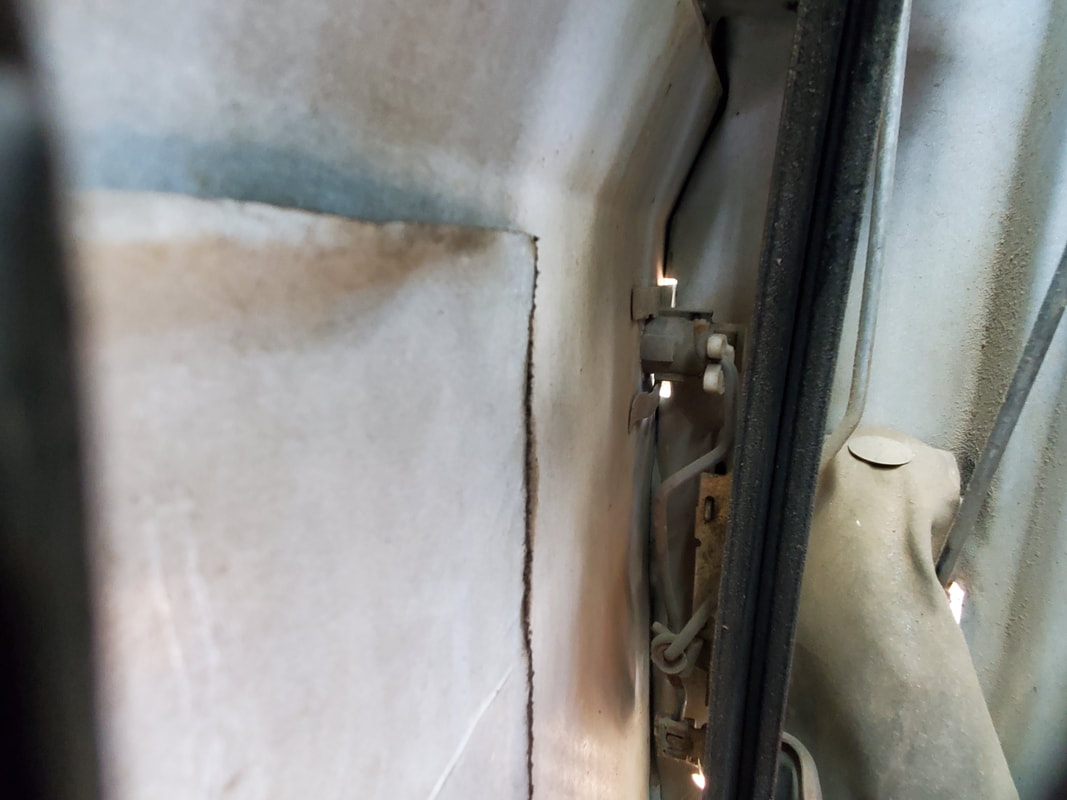
I managed to get the pair of door locks for the FMT in the mail so the first thing I did today was install those. It turned out to be way easier than one would expect. The lock mechanism is held in by a U-shaped clip and snaps to a linkage that hooks to the rest of the lock mechanism. Funny thing when I went to open the doors I found out the damned things were both locked! Luckily the vent window was open on one door so I was able to open the door. But anyway, I went ahead and worked the passenger side door, pulling the clip out.
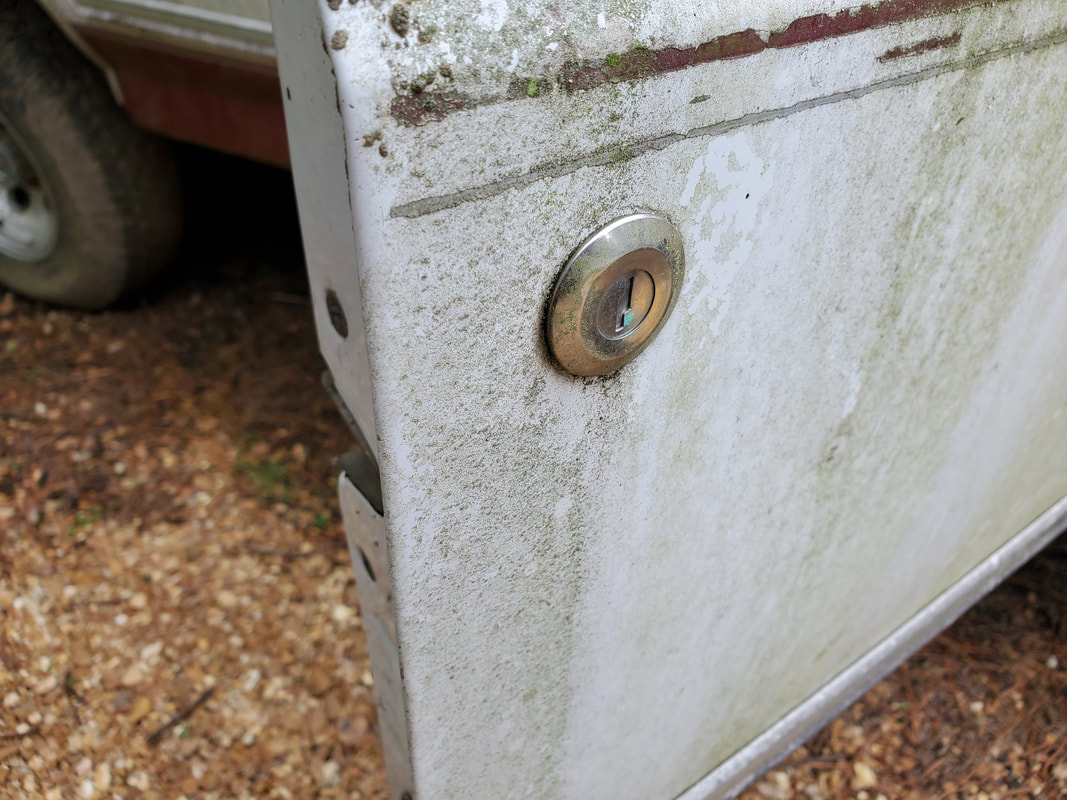
Old lock mechanism in passenger door.
Clip used to hold lock mechanism in place.
After pulling the clip, I worked the lock mechanism out, snapping it free of the linkage rod. Quick. From there I took the new lock and put the gasket on the piece and worked it in the hole in the door then snapped the linkage on from the inside since it was easier to do things this way. From there I snapped in the clip to finish things up. I tested the lock successfully, then moved on to do the same on the driver's door. 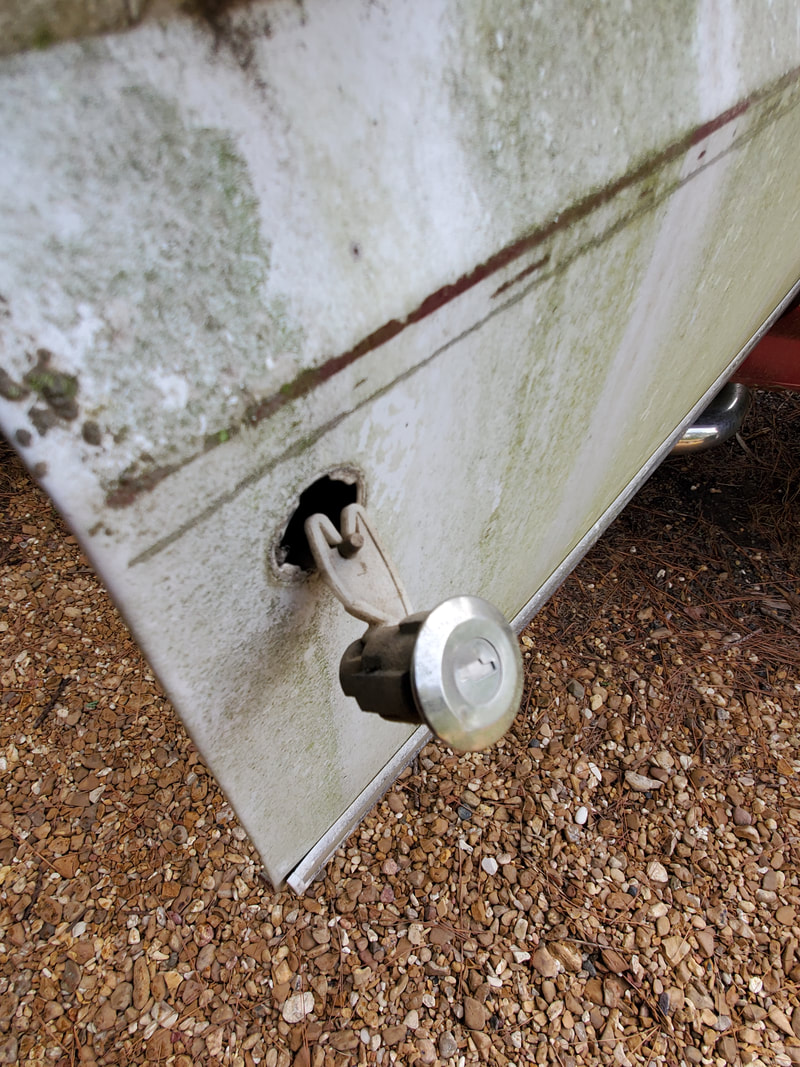
Old lock still snapped on linkage after removing from door.
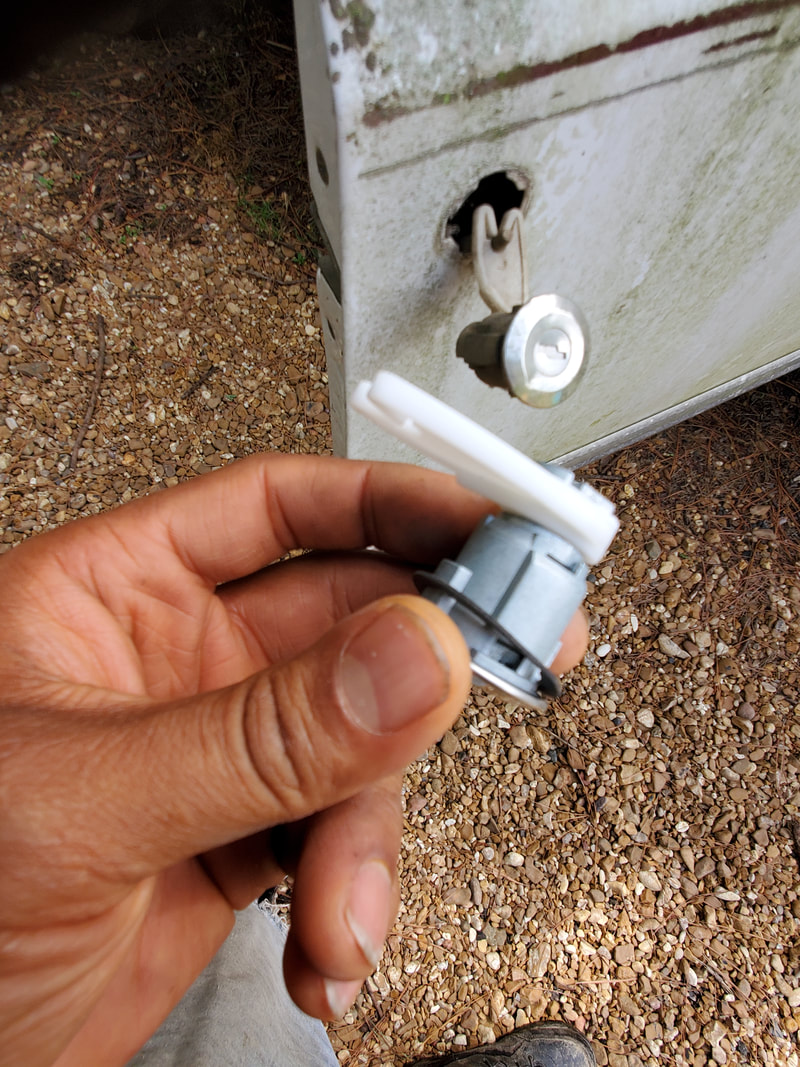
New lock with gasket.
New lock in place with linkage snapped in as seen from inside door.
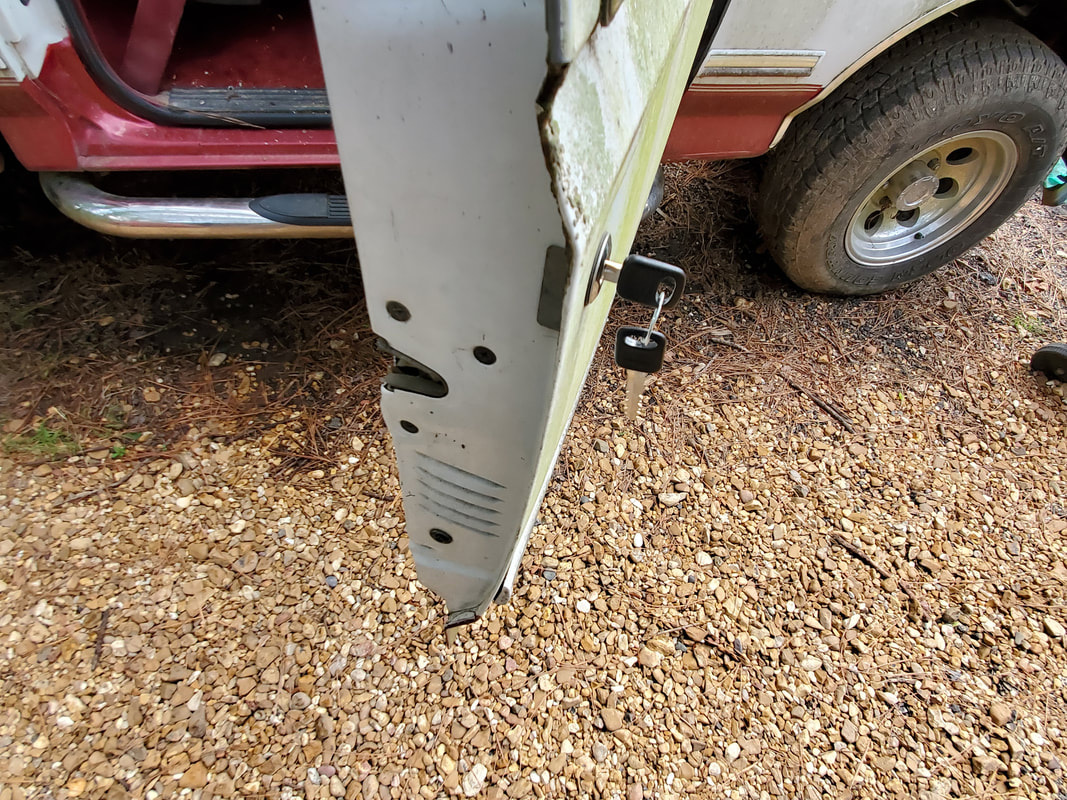
Testing lock with key set to verify unit works.
With the FMT's door locks done, I moved on to the garden. There was an old apple tree that had leaned over a long time ago but was still alive. Well as time progressed the tree started getting to the point where more and more of it was dying off, which would show how these trees are actually a grafting of several branches on a parent plant. Well after cutting off all the dead branches and pulling up some weeds that intertwined with the branches, I was left with a former shell of a tree with only three living branches remaining on the tree. There's a good probability that this tree will end up being pulled up later in the year or next spring if it doesn't come back enough. 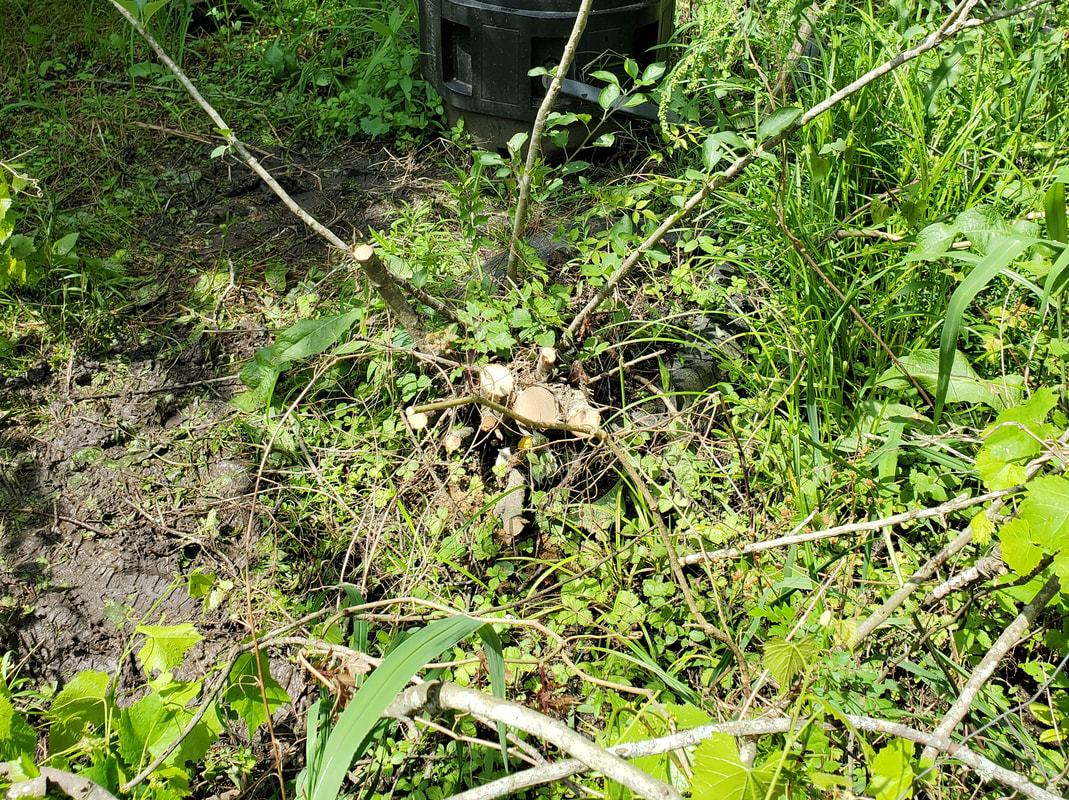
Branches cut from apple tree.
A new mindset that I've had lately with plants in the garden is the idea that I won't save plants just because they're alive. If they aren't producing or are so far gone as to not look like they would have a chance of coming back then I'll pull them up. This includes trees. As is the case with this apple tree, if those few branches don't show signs of coming back then I'll pull the rest of the tree up more likely next spring. Until then I'll give this tree a chance to possibly come back. Another little thing that we did was set up a hanging basket with some strawberry plants inside. Since the porch is currently gone, the ole lady planted a hook in the ground next to the staircase that can accommodate two hanging baskets. She hung the strawberry basket on the hook then installed a self watering globe that holds approximately 10 oz of water. The unit is supposed to allow water to trickle out into the soil, keeping the soil moist for several days, maybe up to a week, depends on the temperature and level of humidity. The unique thing about that small piece of apparatus is that if it works pretty good for this hanging basket, I may consider adding several of these things or maybe something of a larger size that can accommodate a larger quantity of water, for things like the bucket or barrel raised beds where I don't currently have the micro irrigation system running to yet. This would allow us to keep all of the raised beds hydrated in our absence despite not having many of the beds hooked up to the irrigation grid yet. 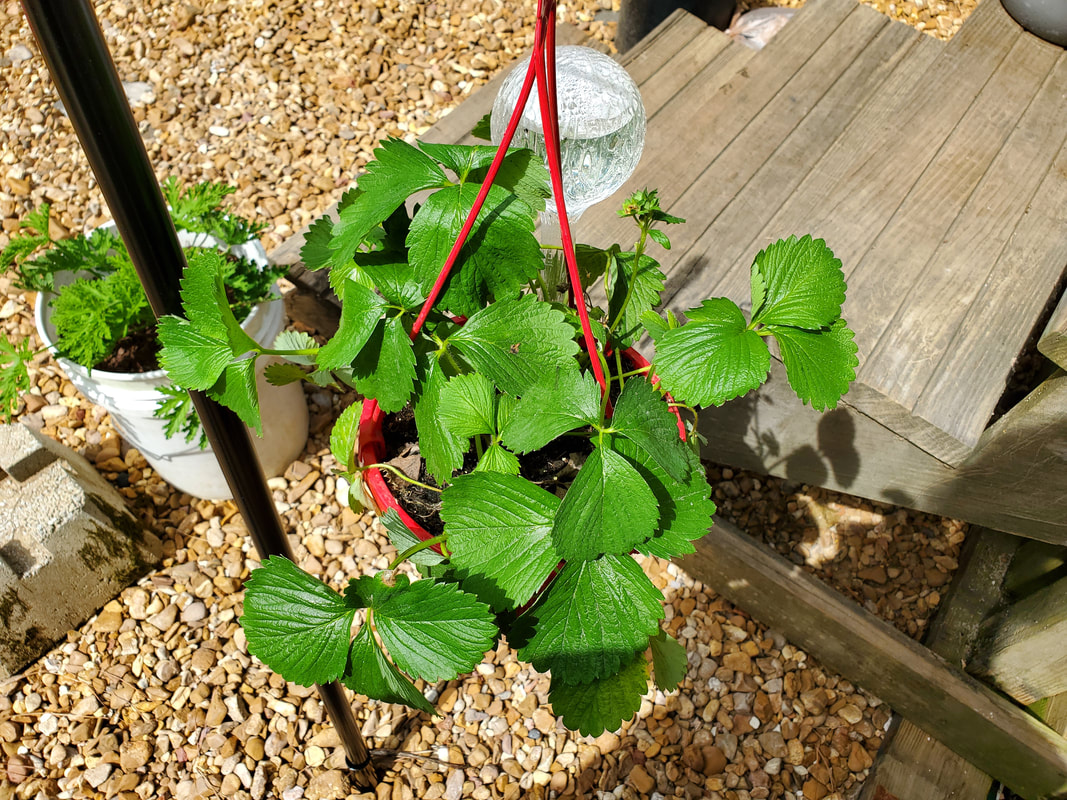
Hanging strawberry basket with self watering globe inside.
With that the last order of business in the garden was to finish filling up the last barrel raised bed that I made last time. I only had about a half a bag of dirt within so I only needed to put one full bag to top the drum off. After putting the dirt within I was able to plant the last two sweet potatoes that I had in one of the flats we recently picked up. With that I have three barrel raised beds next to one another with sweet potatoes in some grade-A dirt. Hopefully they'll produce good with the investment in quality soil. 
Trio of barrel raised beds in place with sweet potatoes planted.
As we continue to get more done in the garden, I can start looking at things to do in the garden that are more infrastructure related, such as expanding the micro irrigation or making the concrete foundation for the compost bin, which is by the apple tree I just cut up. These are the things that will make the garden a more functional system just the same. Even finishing up the dog kennel greenhouse will add to that functionality. The more we get done in the garden and elsewhere around here, the more you will see here. Until the next time....
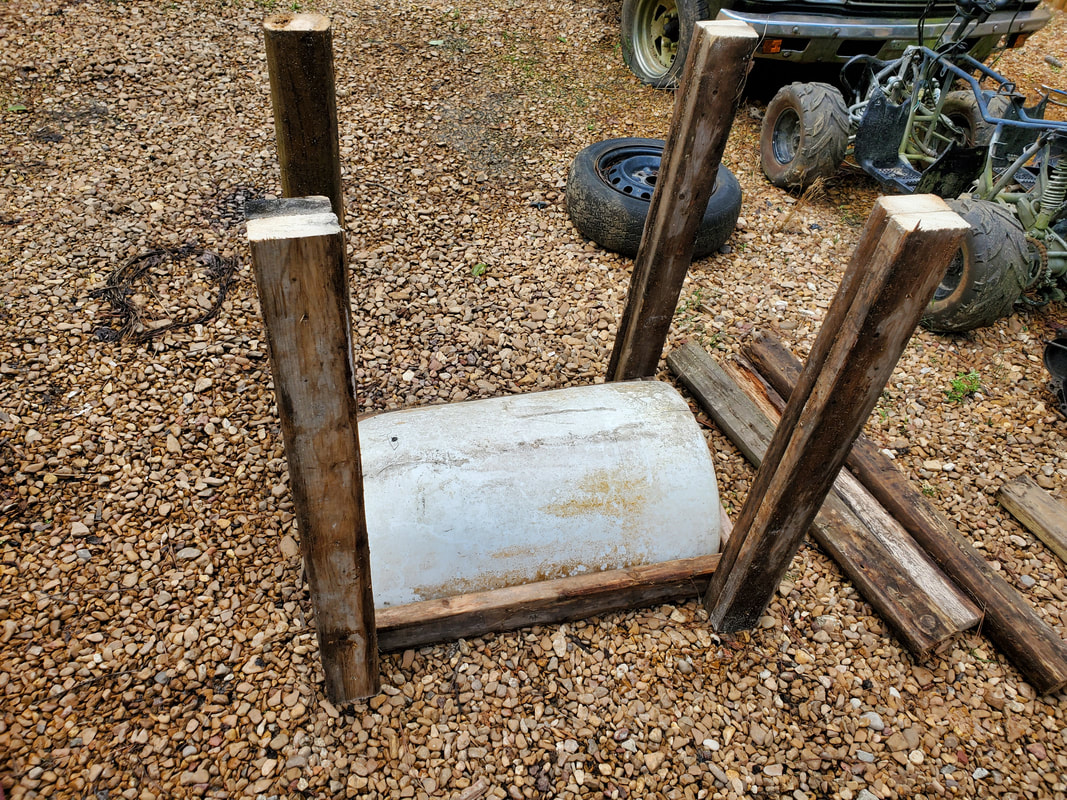
After using up a bunch of scrap wood in the last few raised beds, I had to think of an alternative. I didn't have enough posts to cut up to use for this next raised bed I'm setting up so I got to thinking. The last bed I took two 2x4's and screwed them together to make a 4x4 post. Of course then I ended up having to drill large pilot holes through the top 2x4 so I could drive wood screws into the bottom 2x4 to secure them on the cradle. But first, I had to make the cradle and get the drum half secured to the inside of the cradle.
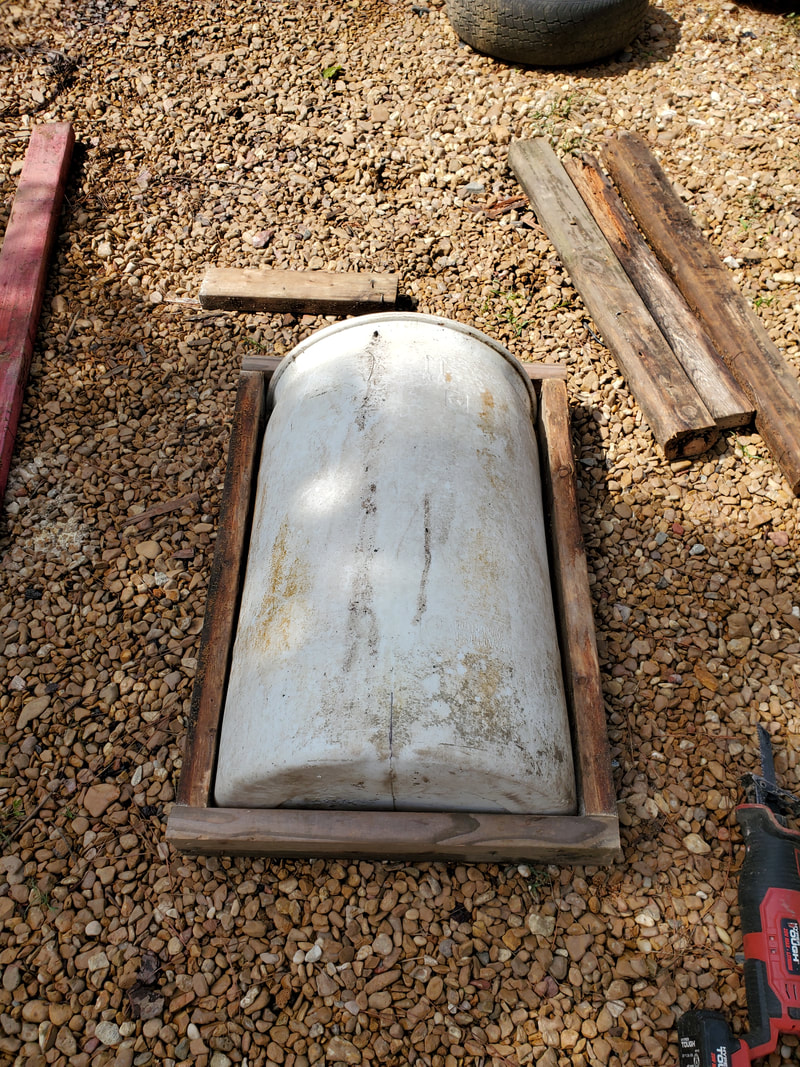
Assembling the 2x4 cradle for the drum half.
Now I did manage to scrape one section of landscape timber from under some scrap wood on the pile. I did my same routine of drilling pilot holes but because this board was a little more compromised than other boards I used, I went ahead and drilled a third pilot hole to add that extra screw to hold the post in place. After securing the post to one corner of the cradle I moved on to my new plan which was to directly screw one 2x4 to each corner of the cradle then screw a 2nd 2x4 on top of those boards already secured to the cradle. This turned out to actually work a lot better and take less time as I didn't have to drill pilot holes into boards. 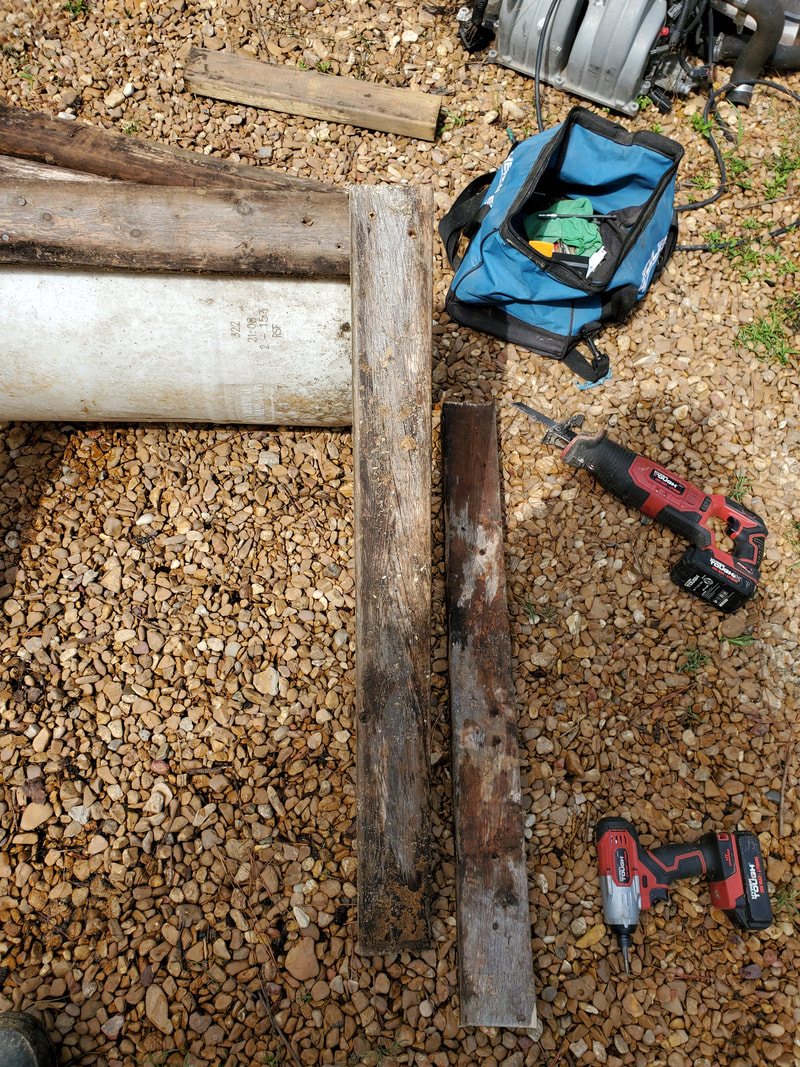
First 2x4 screwed into corner of cradle. Note 2nd 2x4 staged on ground next to cradle.
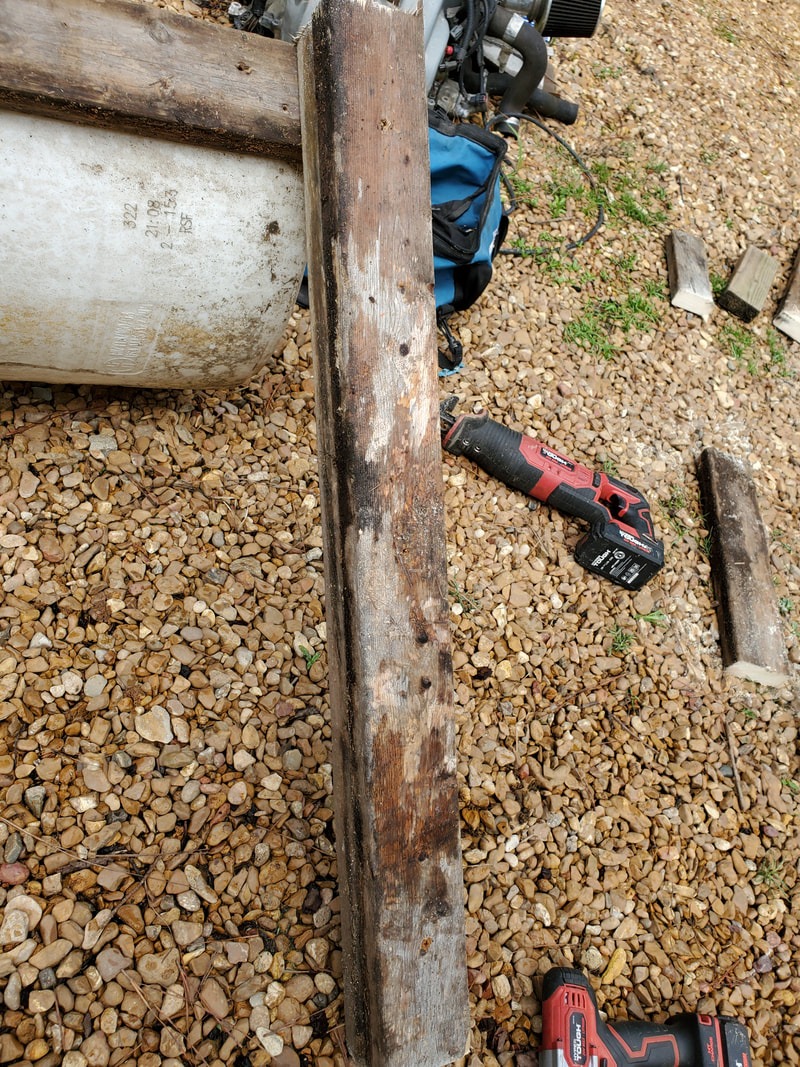
Second 2x4 screwed on top of first with three wood screws.
After doing this first twin 2x4 post, I duplicated the same thing with the other two corners, getting all four posts done on the raised bed. That was the first change I made in the design of the raised bed was instead of using 2x4s for stabilizer boards, I would use some of the salvaged thick pickets I removed from some pallets and added to the scrap wood pile. 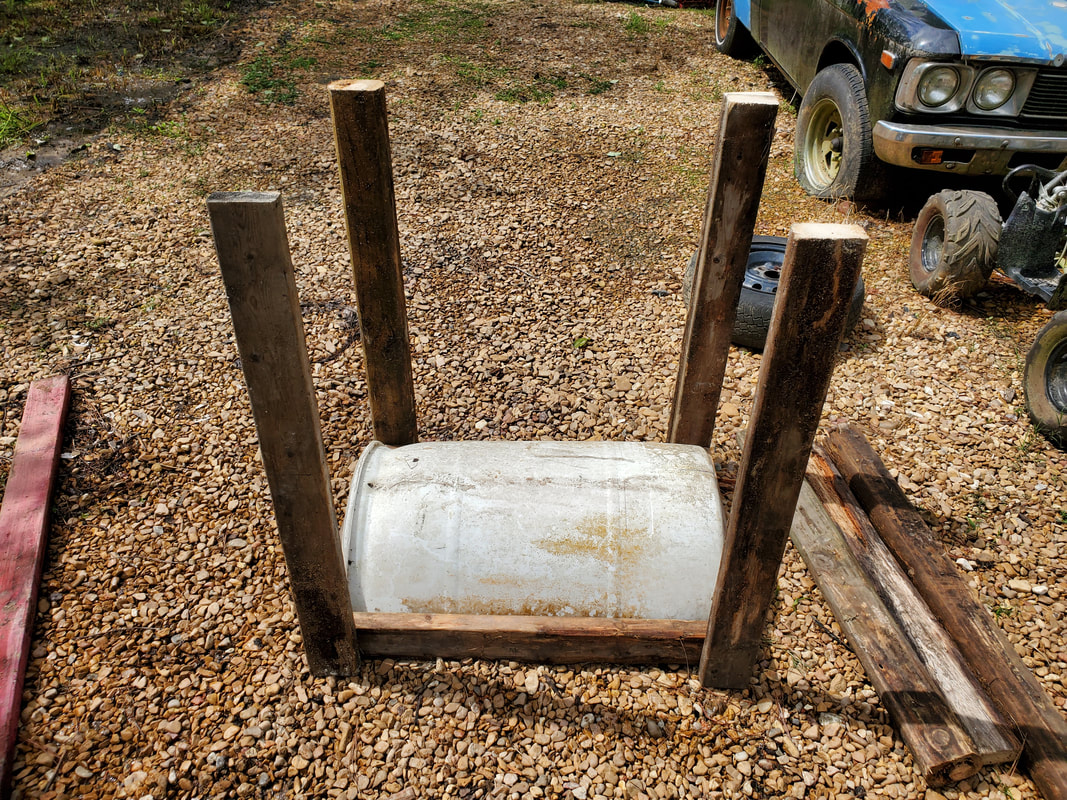
Single 2x4's screwed to corners of cradle prior to securing 2nd 2x4 in place.
2nd set of 2x4s screwed to first set to complete the overall posts.
Instead of using nails to nail the pickets in place since they were thinner than the 2x4's I used wood screws again to secure them in place. I screwed the boards from the inside as I did with the 2x4's on the other beds. From there I screwed two more picket boards from the outside, attaching to the posts to stabilize the spacing of the posts. With that all that was left was the drilling of the drainage holes to complete the raised bed. 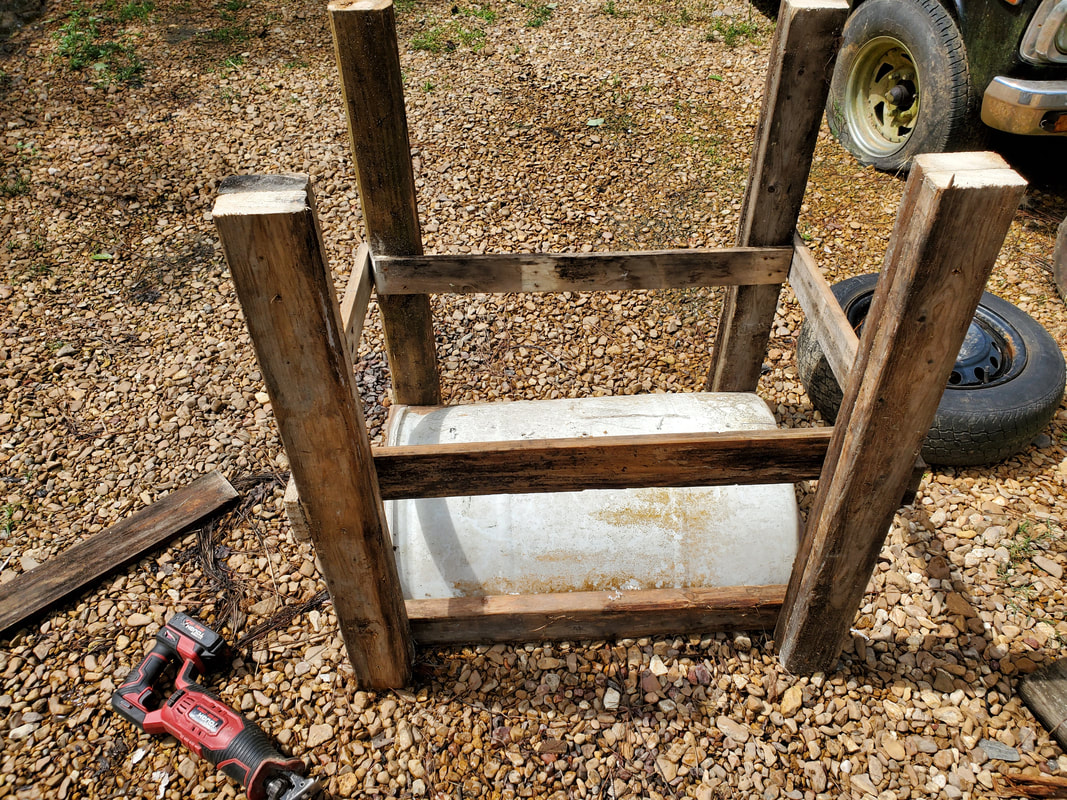
Pallet picket boards secured between posts. Note other pallet pickets screwed to outside ends of posts to further hold everything together.
Another angle showing the end boards mounted from the outside holding everything together.
From there we moved the completed raised bed to the back of the garden, parking it next to the other two beds I completed just recently. I cut some scrap 2x6 boards and a couple of 1x6 boards to help level the raised bed on the uneven ground and so the bottoms of the posts will be further protected from rot due to direct contact with the moist ground. 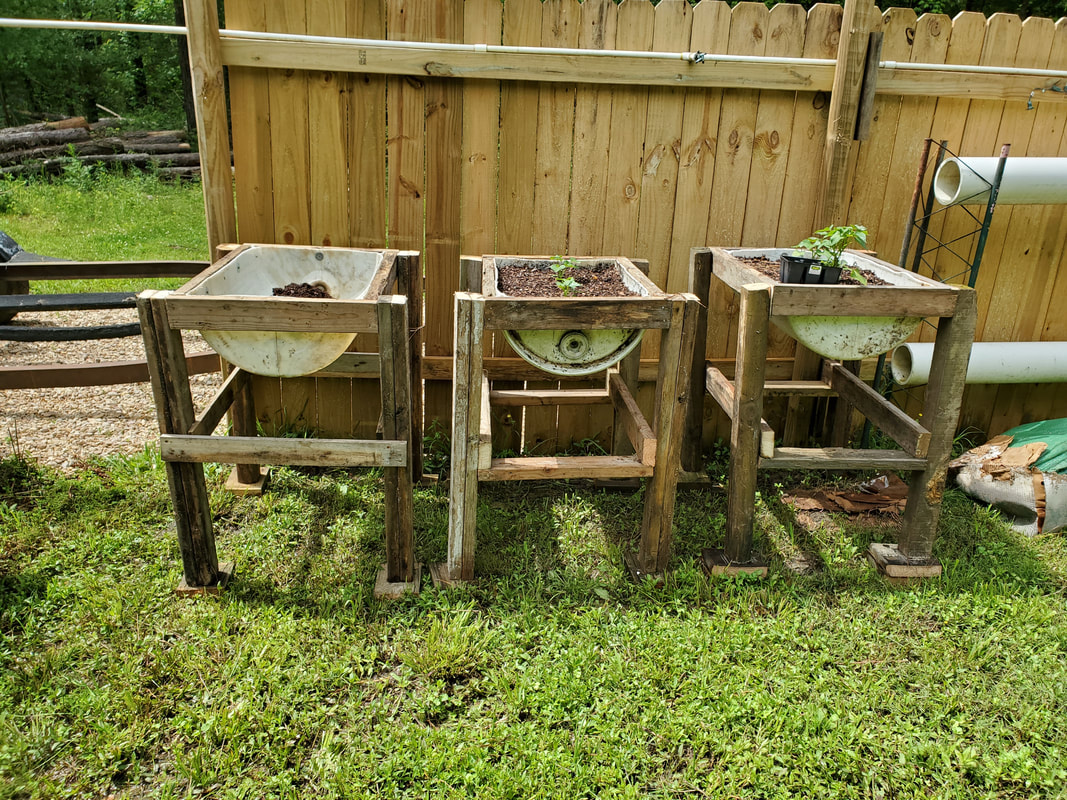
New raised bed staged next to other two raised beds in the back of the garden. I still need dirt to fill this latest bed.
I still have two whole drums to use to allow me to make four more raised beds so far. With the plants I still have I will actually need to acquire another drum to make another raised bed so I can accommodate the tomatoes I have. I'll have one more tomato plant left but I have a lead on a large clay pot that I can commandeer for use in the garden for this one lone plant. Now I do still have some potato eyes that I hadn't planted yet that are still alive. I'm waiting for the other potatoes to mature so I can dig them up and clear the beds they're all planted in so I could plant these reserves to try and get a fall harvest of potatoes this year. When the other plants mature and get to the point that they will need to be dug up I'll start planting salad greens for the fall harvest.
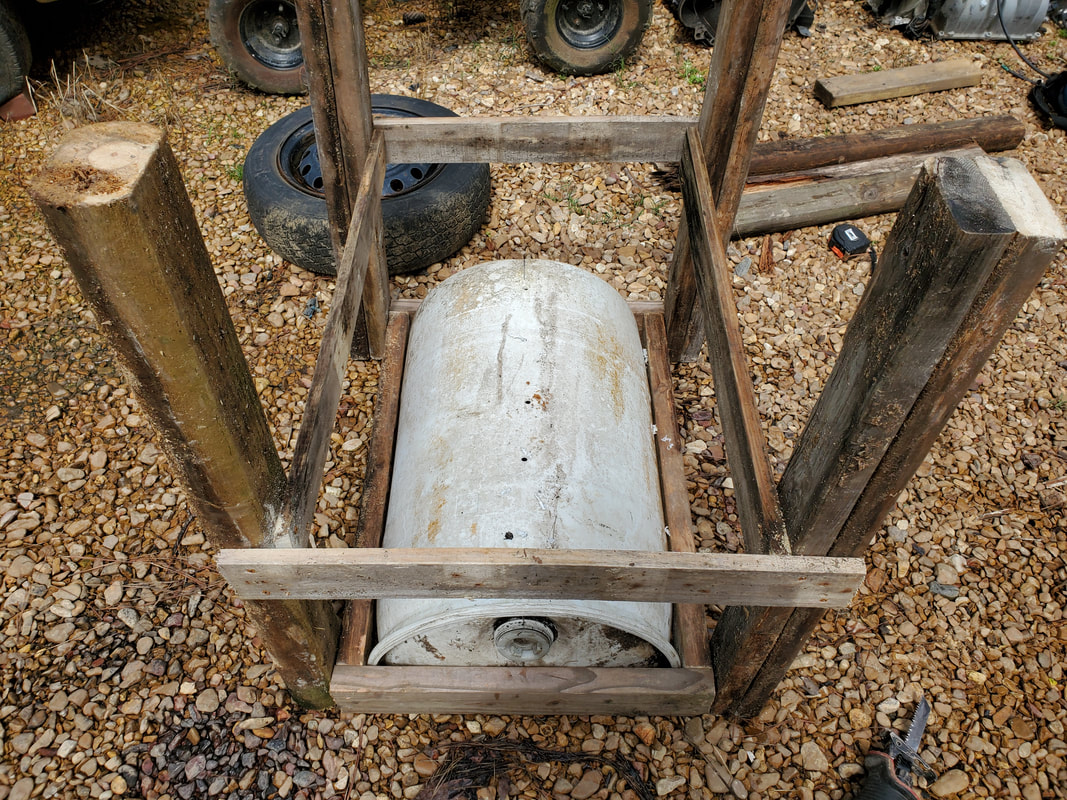
After buildig the 2nd half of the first barrel raised bed the other day, I had decided to use the other plastic drums/barrels for more raised beds. I dragged another one to the worksite to chop in half to do the exact same thing as I had did with the last drum. I also had to drag more wood over to the site just as well. At this point I actually am running out of 4x4's and landscape timbers to use for posts. I was able to salvage enough of a 4x4 to make two 3ft lengths. The last landscape timber I had was infested with carpenter ants so they had holes eaten all through the length of the post. After cutting the timber in half for a 3ft length I found that one end was eaten up badly enough that I couldn't use it in any circumstance. If the eaten end was on the bottom it would rot away that much faster and at the top I wouldn't have any material for the wood screws to bite into to hold it to the cradle. My only other alternative was to cut a pair of 3ft long 2x4's and screw them together to make a 4x4 post. I drilled pilot holes through the first 2x4 on each of the two posts so I can just drive the wood screw through the 2nd 2x4 when I secure them. 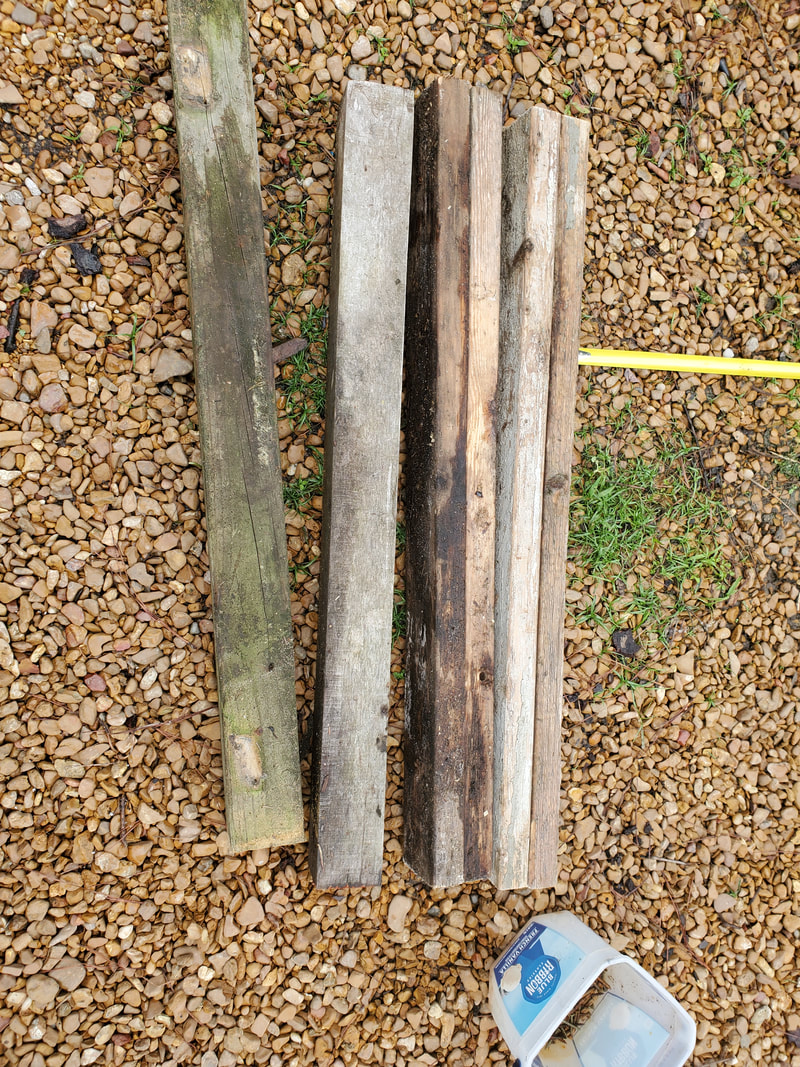 Posts laid out, two are pairs of 2x4's screwed together. 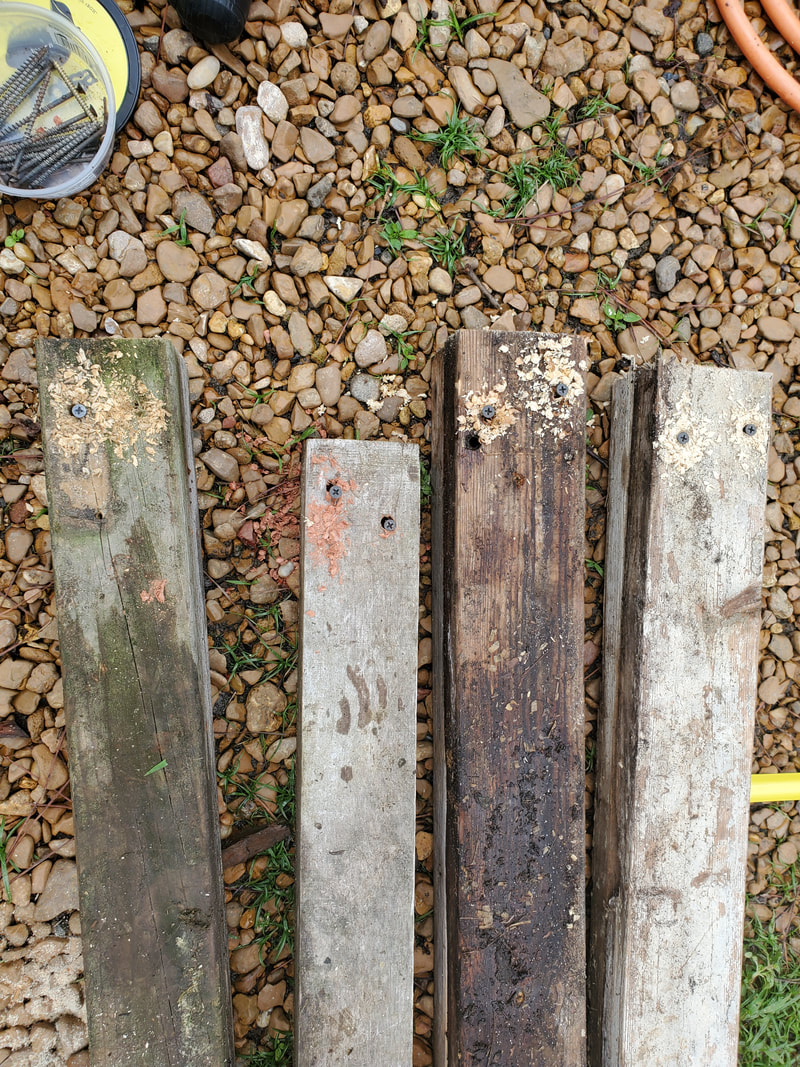 As for the drum, I had to mark the thing and chop it in half with the recip saw. I did have to clean out the drum some since there was still residue from the veggie oil that was in the drum at the time. After cleaning it out I did the same routine as before with the 2x4's making the cradle and securing the drum half to the cradle with screws and washers. 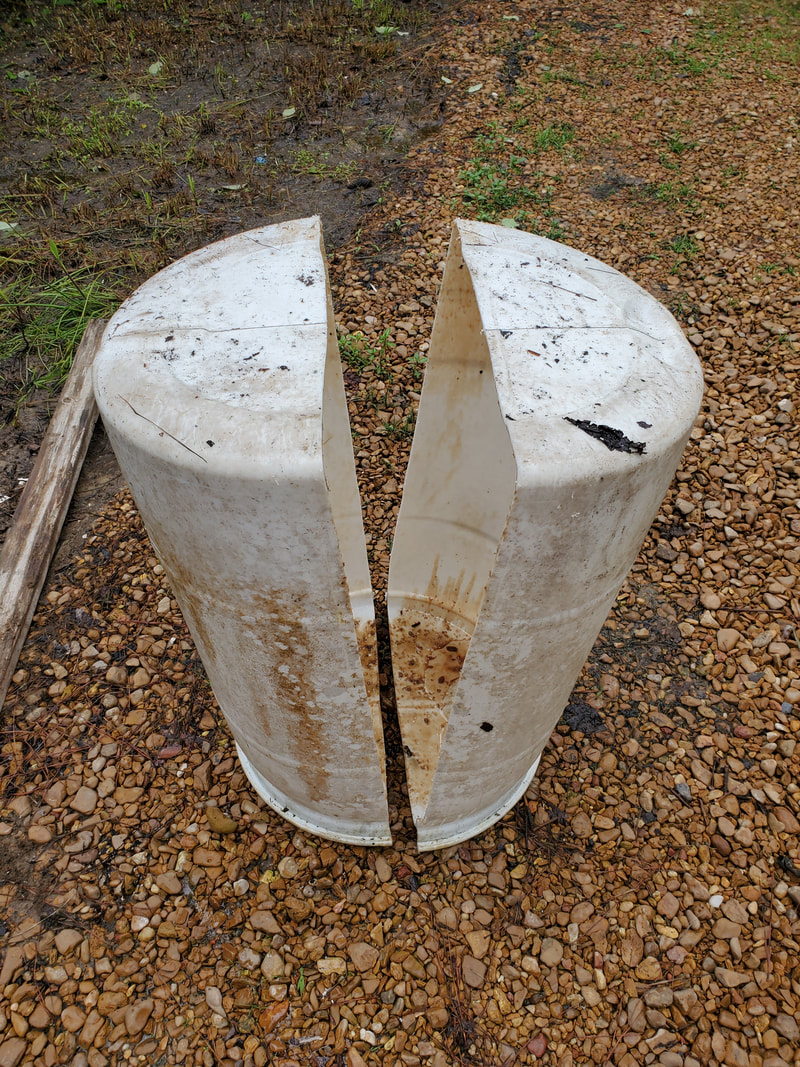 Plastic drum cut in half. 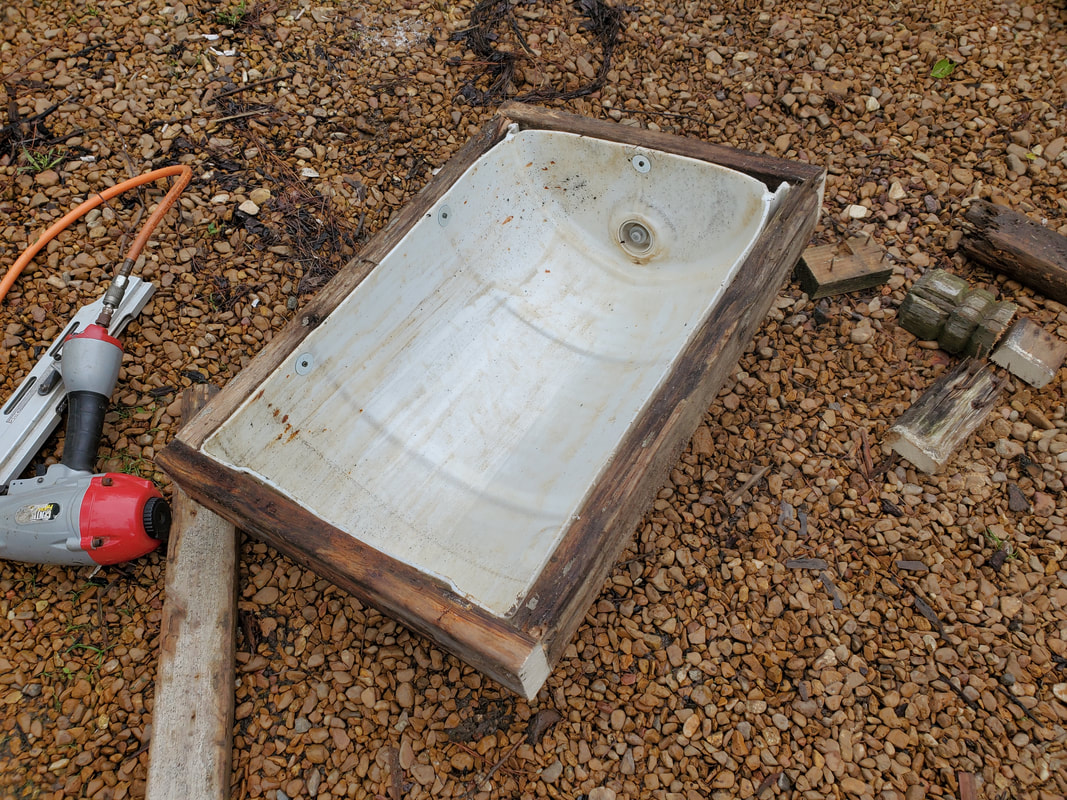 2x4 cradle secured to barrel half, ready for posts. Because some of this wood was sorta questionable, I had to drill an extra pilot hole and add a third screw on a couple of the posts to ensure that there was proper mounting of the posts so they won't somehow work free under the weight of the moist soil in the barrel. I continued on with the stabilizer boards, nailing them in place. With the stabilizer boards in place I finished things off with the five drainage holes in the bottom of the barrel. 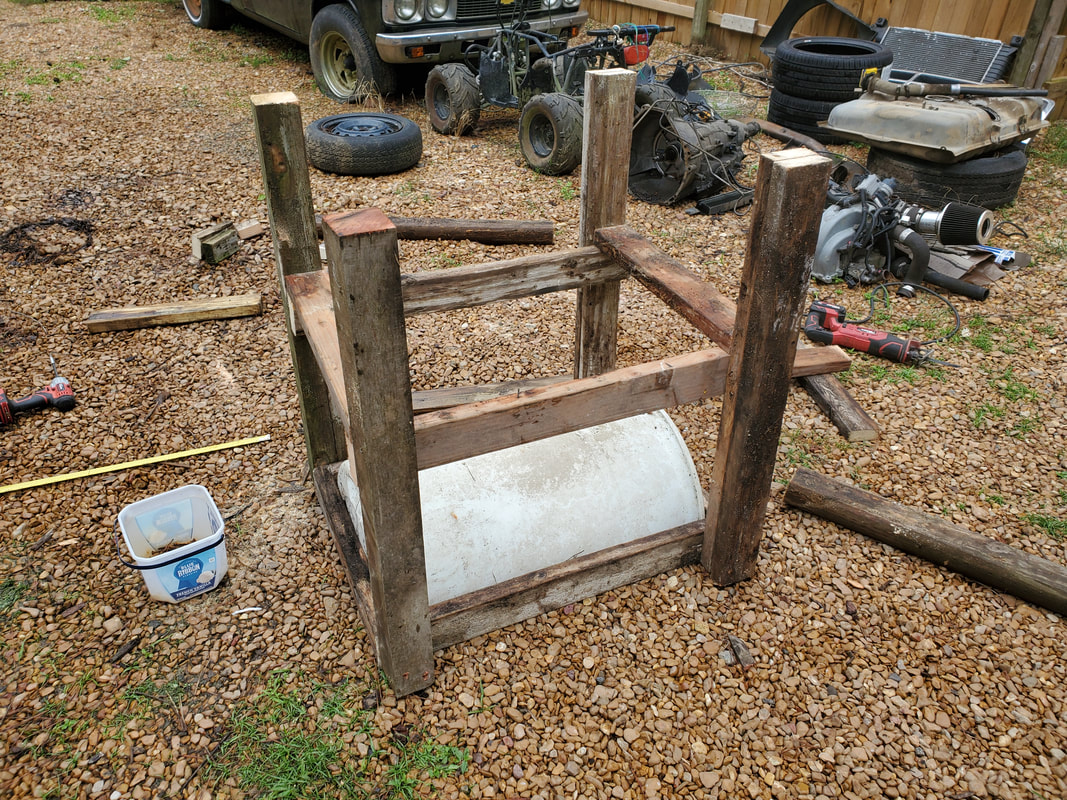 Setup all done with stabilizer boards and drainage holes in bottom of barrel. With the garden setup done we moved the unit into the garden, setting it up in the back next to the last barrel raised bed I built. I cut some 2x6 board pieces to use as bases to put the posts on so the bottoms of the posts aren't in direct contact with the moist ground. I added the dirt in both beds and planted two sweet potato plants in each barrel garden so they would have over 6 gallons of dirt a piece to share. I still have one more barrel half to make into a bed so I can plant the other two sweet potatoes in the flat that I have. Of course I still have one more flat of six sweet potatoes and another two flats with four tomatoes and one tomato between the two. That means I'm going to have to make five more drum raised beds for the sweet potatoes and tomatoes. 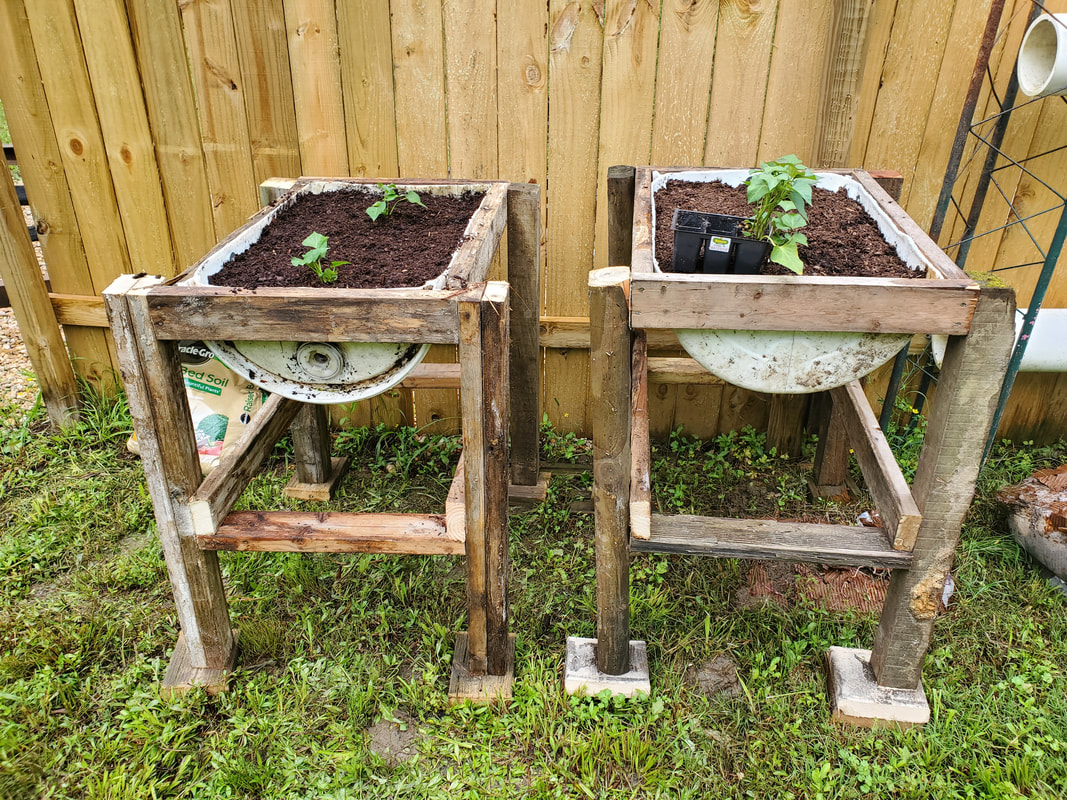 As you can see, this particular model of raised bed is an easy to build, cheap, easily mass produced unit that can equip any garden with plenty of planting space for just about any kind of plant you may choose to plant in your garden. And with the use of micro irrigation systems, can be easily linked up with a water source to ensure that all the plants stay hydrated through the growing season. Today was kind of unique because the day was not centered around building the other raised bed like I did the other day. We originally spent the greater part of the day getting another load of gravel from the gravel place, not to spread over any area in the compound but to patch up some ruts on a neighbor's driveway and fill some ruts in our main driveway going to the side road which comes from the main road (yeah we're that far out in the country). After taking care of that business we came back up and parked the F250 and from there I had my original plan of trying to at least get some of the boards for the next raised bed cut so I could go ahead and build the other half of the plastic drum up. Funny thing was, I had about 45 minutes to do whatever I was going to do, so I went into a zone and just started lining up boards and getting boards cut in bulk, starting with the cradle portion of the raised bed, the part that actually holds the barrel half, I cut all those boards first then nailed everything together quick. 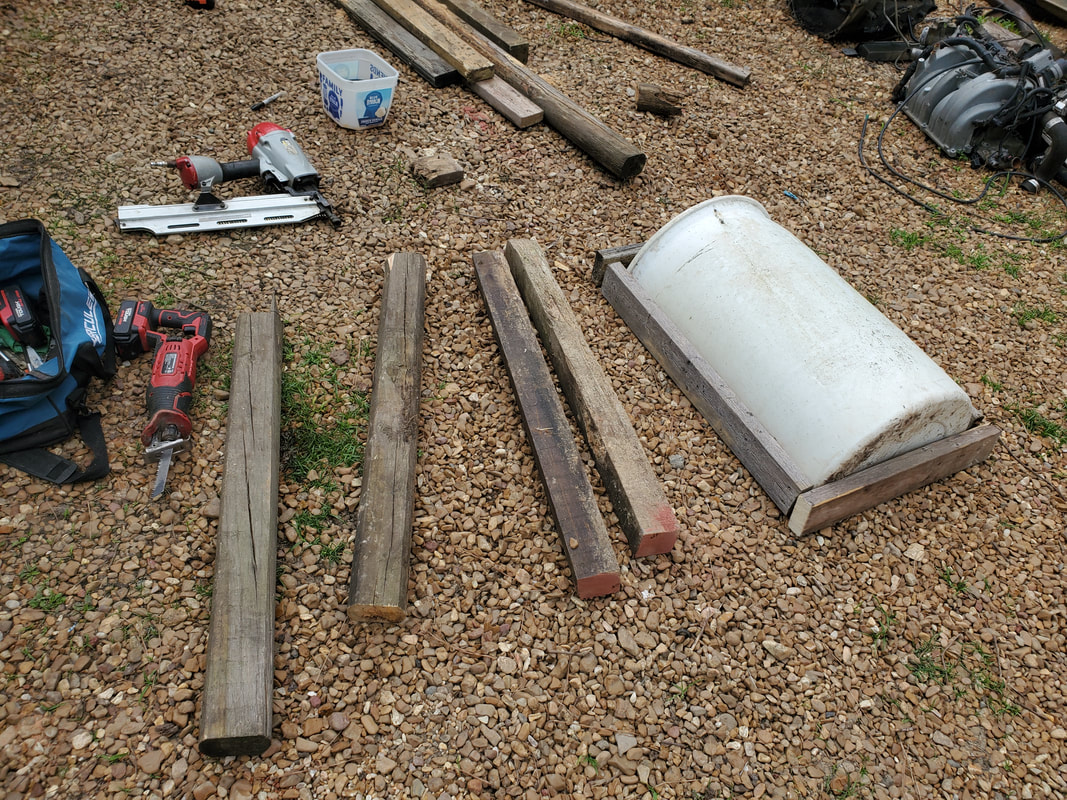 Posts and cradle boards already cut before any assembly began. After getting the cradle nailed together the next thing I did was grab some washers and wood screws and quickly secured the top of the barrel half to the cradle, getting it ready to accept the posts. I was on a roll, hardly a few minutes passed up to this point. 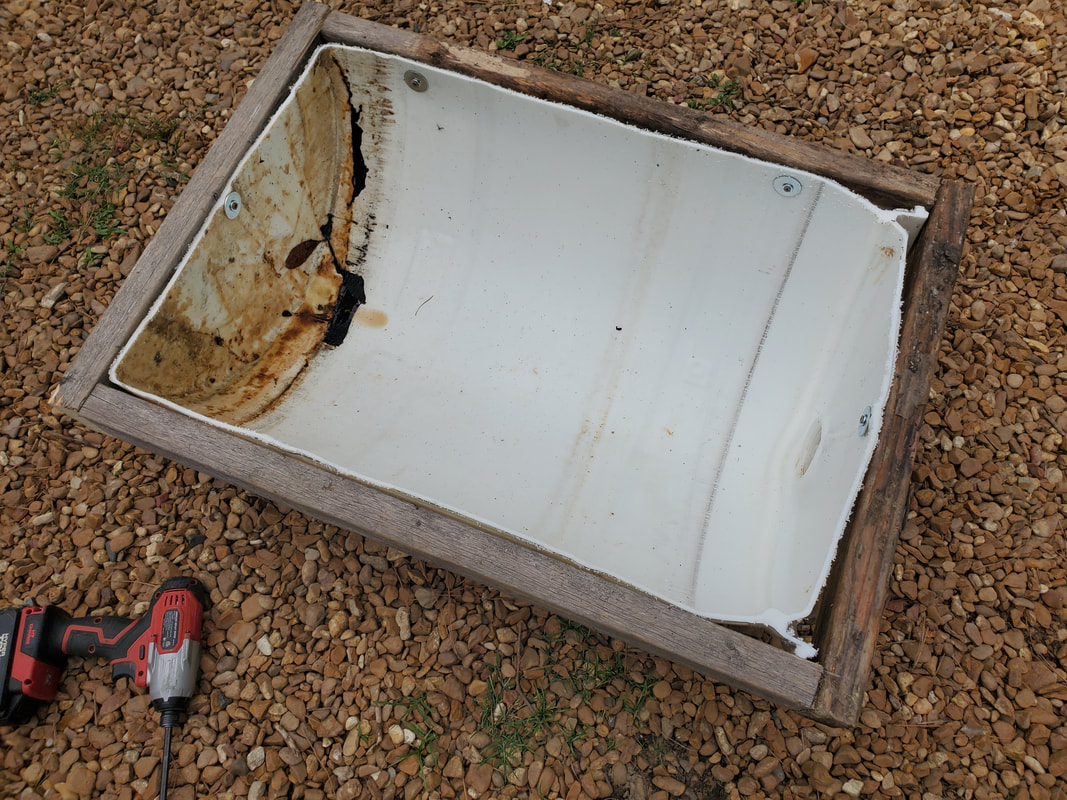 As before, I had to drill pilot holes in the posts so I can drill in the long wood screws where they'll bottom out and allow more thread to stick out. I drilled all four posts first then sank the screws into all the holes. I then did each post, taking time to make sure they were straight before drilling home the second screw. Once all four posts were secured to the cradle I moved on to the stabilizer boards. 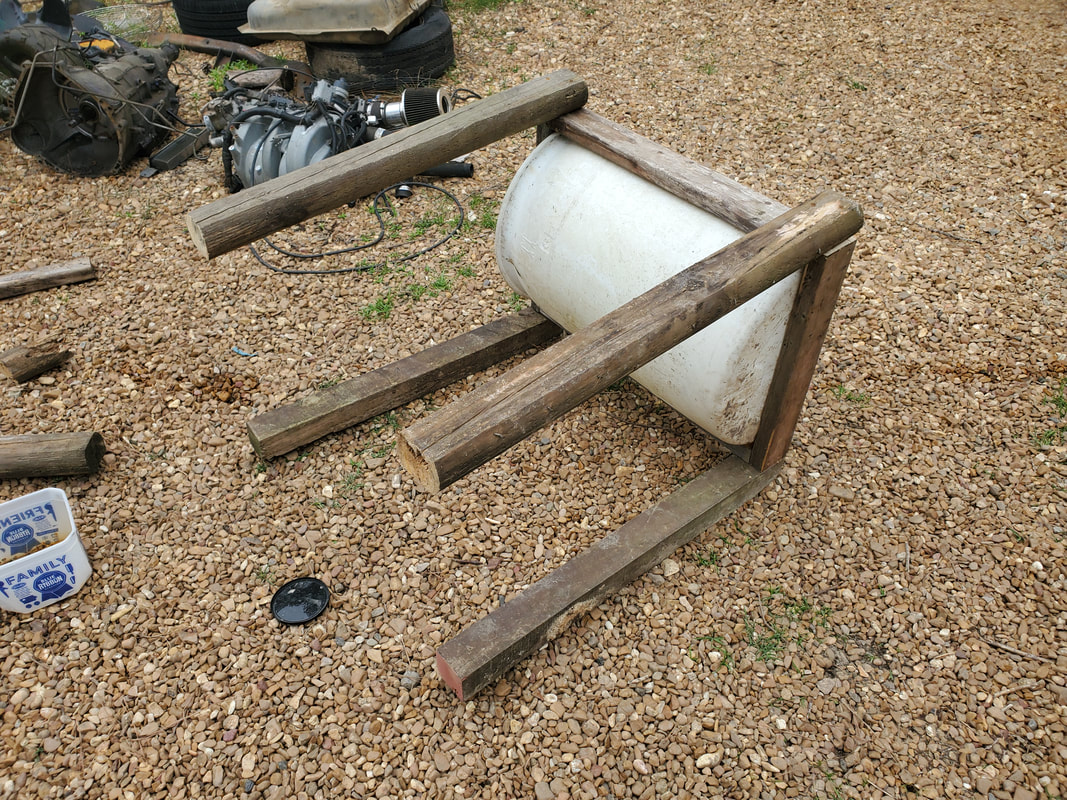 I set the bar by nailing one board to a midway point on between the first set of posts then cutting the excess off afterward. I measured the distance from the cradle to the board then marked those measurements on the other side and nailed the second board on the other side. I cut the excess off from that board then flipped the assembly upside down to allow me to place the other stabilizer boards on the ends. I stretched the posts to ensure their straightness then marked the point on the first board so I could cut it. After cutting that board I used it to mark the 2nd board so I could get it cut to the same measurements. From there I nailed the two boards to the bottoms of the first set of stabilizer boards, securing the two sets of posts together straight. 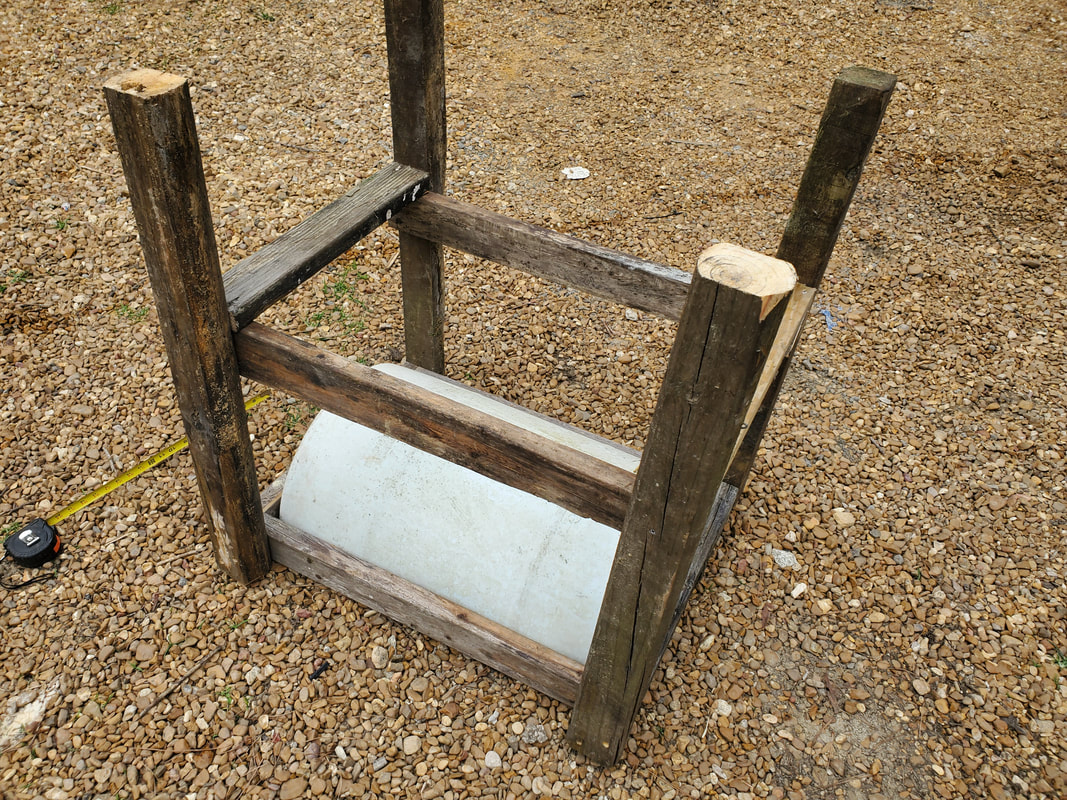 After that the last thing for me to do was drill the drainage holes in the bottom of the barrel. As before, I used the same drill bit that was used for drilling the pilot holes in the posts. After drilling the five drainage holes that pretty much concluded the construction of the barrel raised bed. We moved the assembly to the back of the garden, setting it up next to an unfinished hydroponic garden assembly I started working on last year. I will finish up on the next session with some boards underneath to level off the assembly on the uneven ground and keep the bottoms of the posts off the moist ground, then fill with dirt and plants to finish things up in its entirety.  Surprisingly I managed to get this all done including tool cleanup in that 45 minute span, which was a record for me building these beds. Granted the drum was already cut but still, this shows that I could crank these things out in fast order if I really wanted to. The measurements were true enough that everything was straight and sturdy. If I can gather enough materials I'll probably start on another pair of barrel raised beds since I did drag out another unused plastic drum. Since I do need more planting space for the plants I still have, it would only make sense to keep building these things so I can handle those plants as well as establish the planting capacity of the overall garden. Since there is plenty of area I still have to develop in the garden, making more raised beds, and hydroponic gardens to boot, will allow me to capitalize on all the available space within so I can have a garden that will be able to produce way more than I could ever imagine. Even though we already have some plants established in the garden for the year, we ended up getting some more that turned up late. Now even with that, I still have a few tomatoes I haven't found homes for yet as I hadn't had a chance to really build any more raised bed gardens or hydroponics. The ole lady came home with some squash and sweet potatoes that had turned up. With all available planting space tied up, I pretty much had to go the route I had been, building more drum or bucket raised bed gardens. In this case since I had some unused plastic drums in the back of the compound by the fuel shed, I decided I may as well put these unused items to use. That'll kill two birds with one stone, I'll clean up some more area by using up the barrels along with the bulk lumber stored in the back, and establish some more raised beds in the garden. First thing I did was gather a barrel and some 4x4 boards and a landscape timber from the scrap wood pile along with some lengths of salvaged 2x4's. After that I had to take the barrel and mark it all the way around, the long way so I can cut the barrel in half, making two long halves for two garden assemblies. 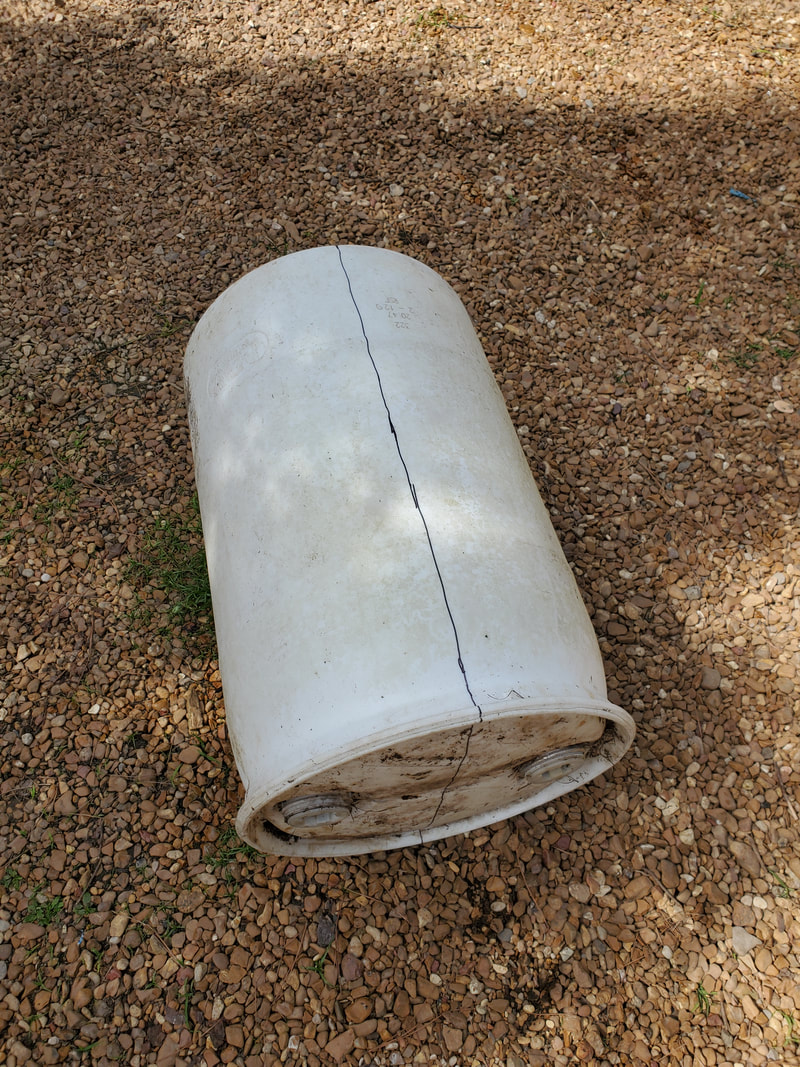 Plastic barrel marked with a permanent marker so it can be cut in half.  Drum cut in half, the sludge inside was from some old waste veggie oil from my biodiesel days. I started measuring out the 2x4s, cutting two lengths to span the length of the barrel half on either side, then measured the width across the middle of the drum, which would be the top of the garden when turned right side up, adding three inches since I would have to nail two more boards on either side of the assembly. I cut those two boards then nailed the works together to make a base that would cradle the barrel half within. I then used some wood screws and fender washers to hold the cut middle of the drum to the wood cradle. 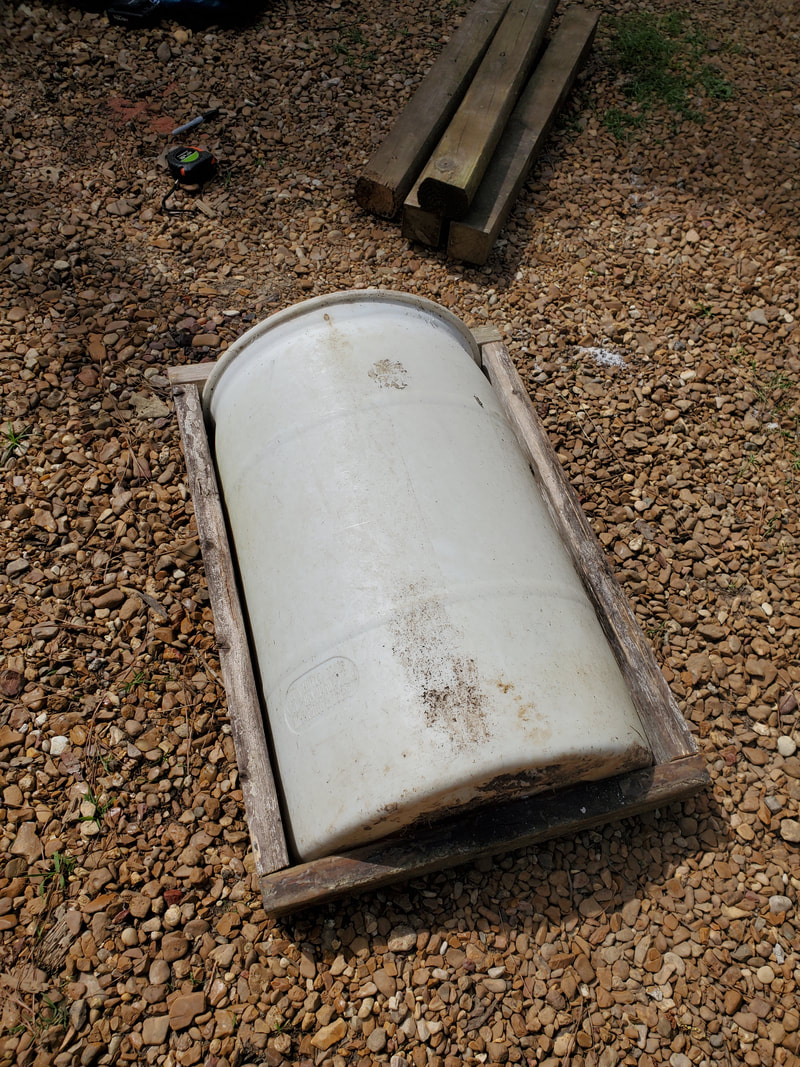 2x4 cradle made to hold the cut side of the barrel, acting as a cradle for the barrel half. 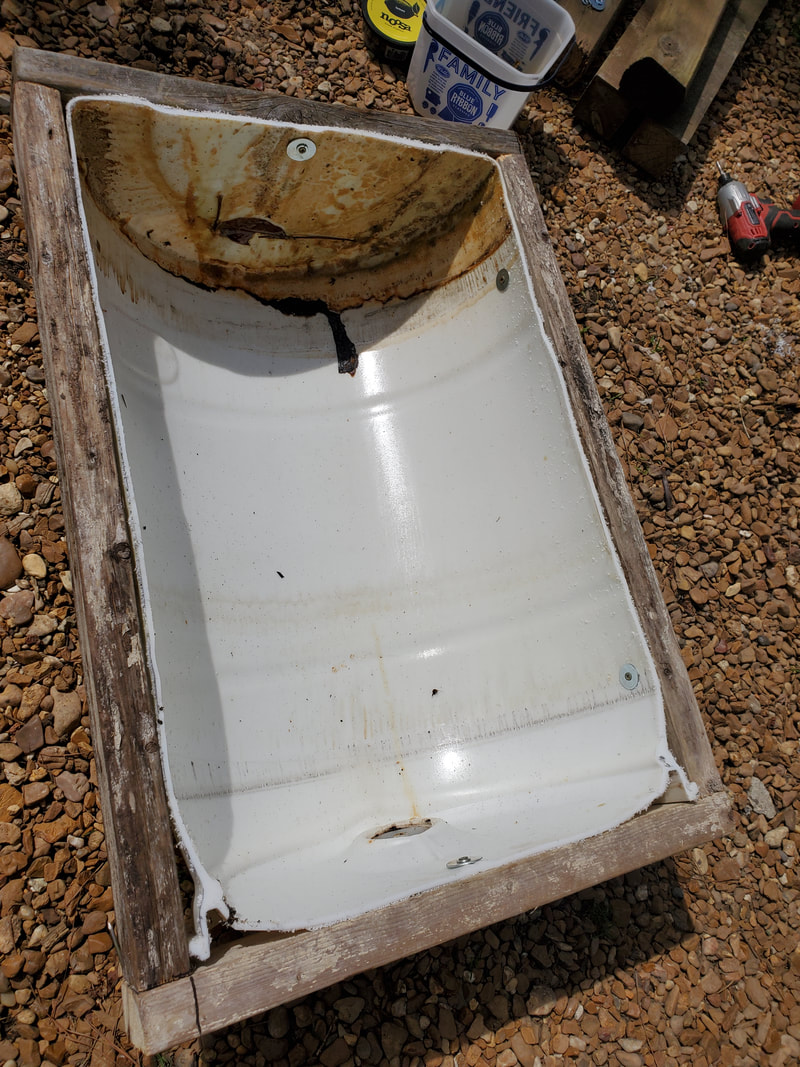 2x4 cradle secured with wood screws and fender washers. Camera angle has the unit looking weird. Now for the large boards. I measured and cut four 3ft lengths of 4x4 and landscape timber boards to serve as the legs of the cradle. Now since I don't have any nails or wood screws that are over four inches long to ensure a good attachment to the cradle, I had to drill some pilot holes in the posts so when I screwed the wood screws in, they would go all the way into the posts and bottom out around 3 inches, giving me enough thread to grab into the 2x4 boards of the cradle. I got the two posts done on one side. Before I moved to the other side I wanted to put some reinforcement on these two posts. I straightened the two posts to ensure they were pretty straight and measured and cut another 2x4 then nailed it in place about half way up the posts in order to keep them held straight when I flip the assembly over to do the other two posts. 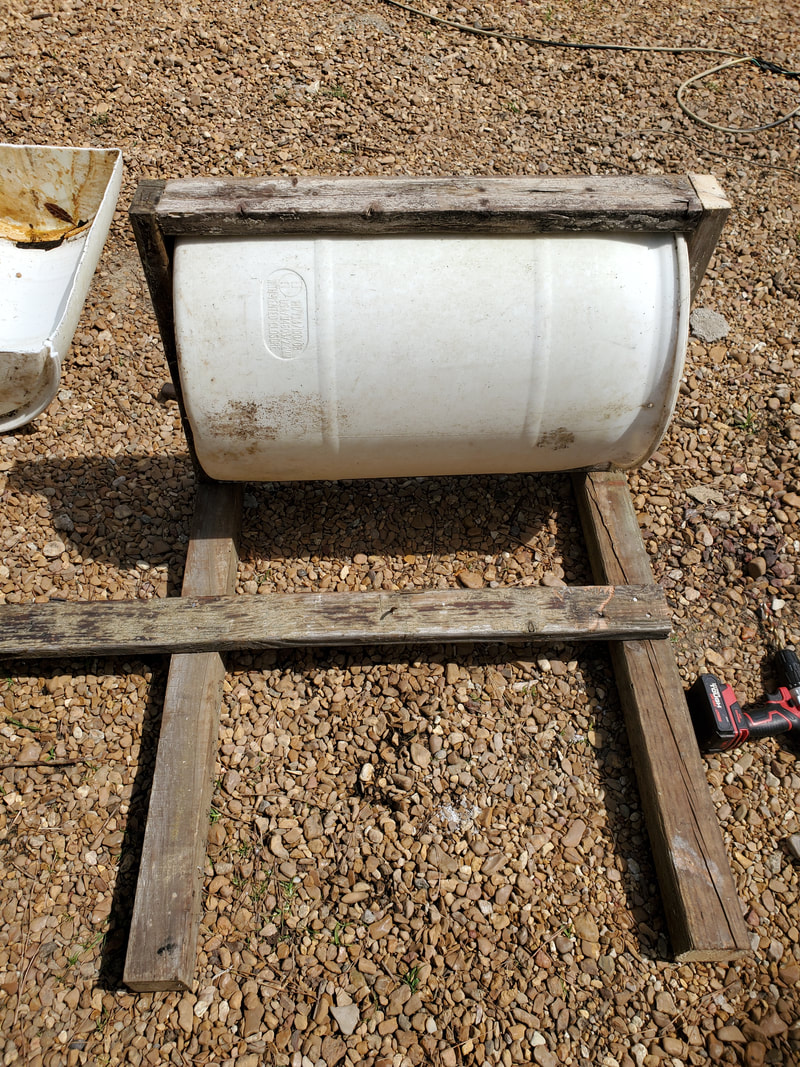 Two posts in place with stabilizer board laid across and nailed on one side while finalizing the position on the other board prior to cutting it down. After that I repeated the same thing on the other side of the assembly, doing all the same things to ensure that all the posts were sturdy and straight. After having all four posts done I then measured and cut two more 2x4 boards to nail in place on the ends of the barrel, to keep the two sides evenly spaced apart so underneath there are four support boards holding the legs straight and sturdy. Since this thing is going to hold a bunch of moist dirt, it needs to be as strong as possible. 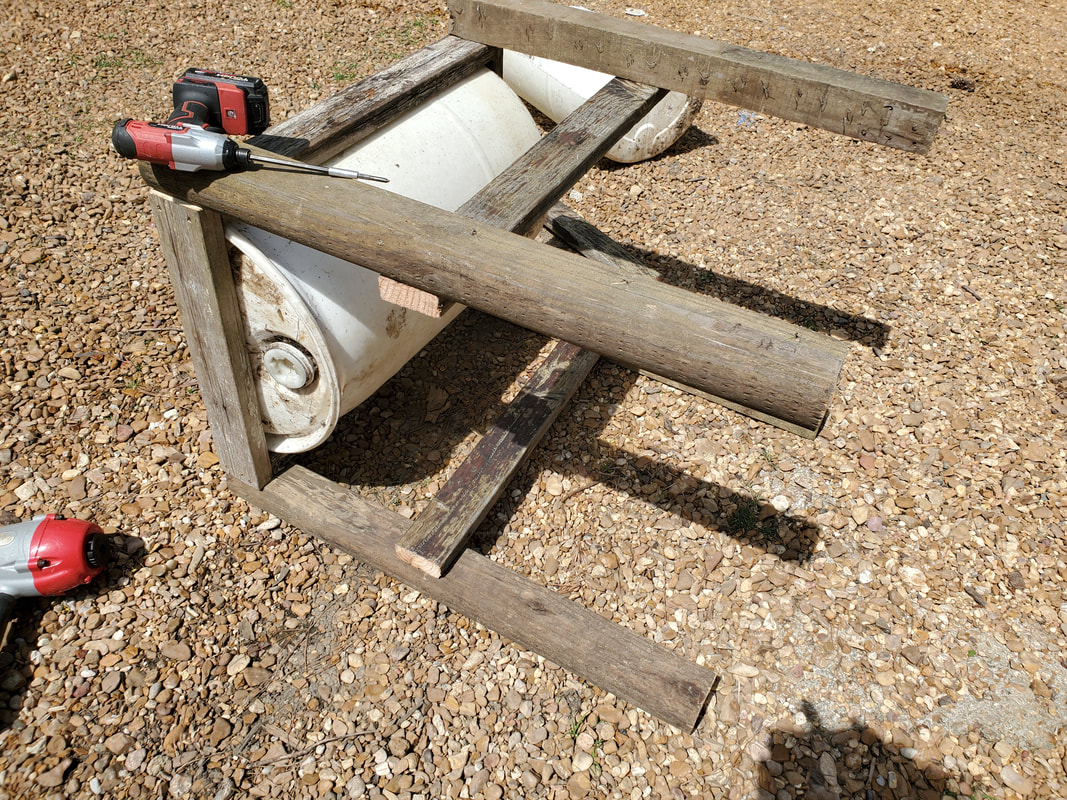 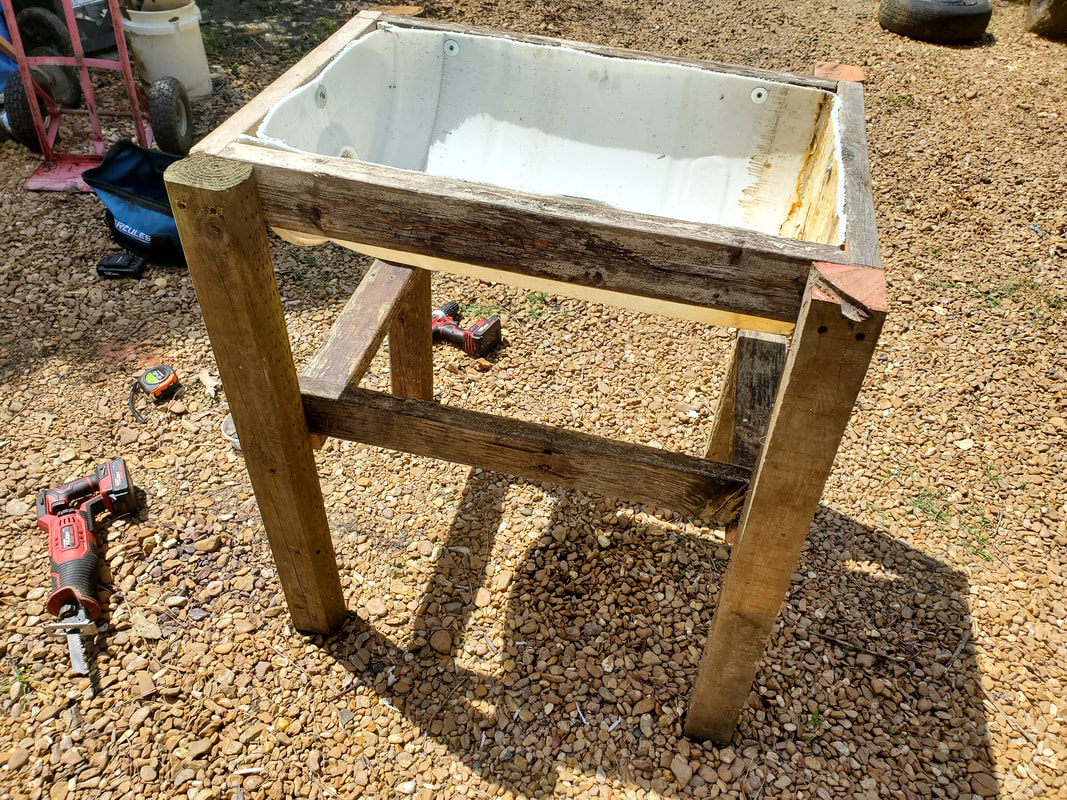 Barrel raised bed with all legs and stabilizer boards in place. After flipping the garden assembly right side up I drilled 5 3/8" holes in place using the same drill bit that I used to drill the pilot holes in the posts. With that it was ready to move to the garden spot. The spot in question already had one of my old generation drum raised beds but time and rust caused the pipe legs to pull free as the drum rusted so the thing was laying on the ground. I emptied the dirt into 5 gallon buckets and set those aside then pulled the legs completely free from the drum. The legs got tossed into the scrap metal pile to hopefully be used in a future project while the drum with large rust holes where the legs were, got staged with the outgoing scrap metal. I was hoping to be able to recycle this drum in a new gen drum raised bed but nope, not with this one, its going to scrap. After we moved the new garden assembly in place where the old gen unit sat, I had to cut a couple of 2x8 boards into 8" lengths to act as feet to rest the bottoms of the posts on due to the unevenness of the ground where the old drum bed sat. With the assembly even on the ground I filled it up half with the old dirt from the old raised bed and the rest with a bad of raised bed soil. The old dirt already had some chicken litter mulch mixed up so this combination of planting medium should be real good for the plants going in there. The plants I chose were the two squash plants the ole lady got. Since there was only two of them it only seemed fit to use these since I already had a bunch of tomatoes planted. Also since the old drum bed also had a micro irrigation line and sprinker planted within, all I had to do was take that stake and plant it in the new garden so it has instant water access.  Drainage holes drilled into bottom of drum bed. 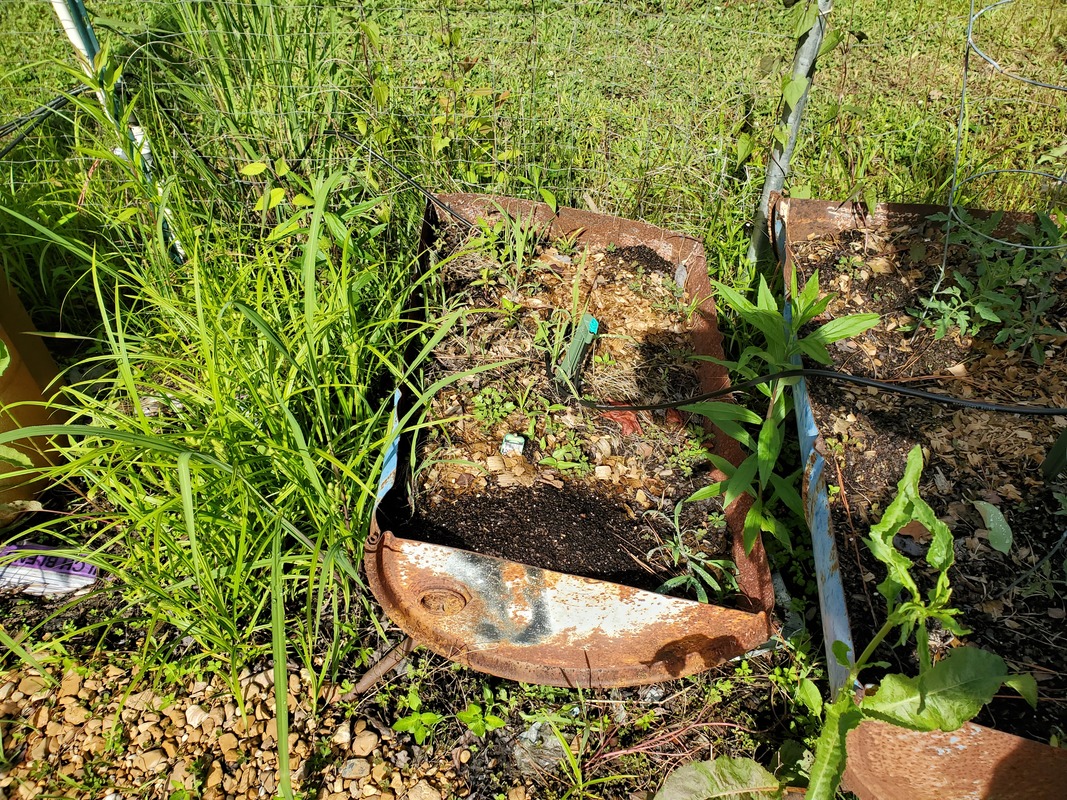 Old generation drum raised bed fallen down from rusted legs on drum. 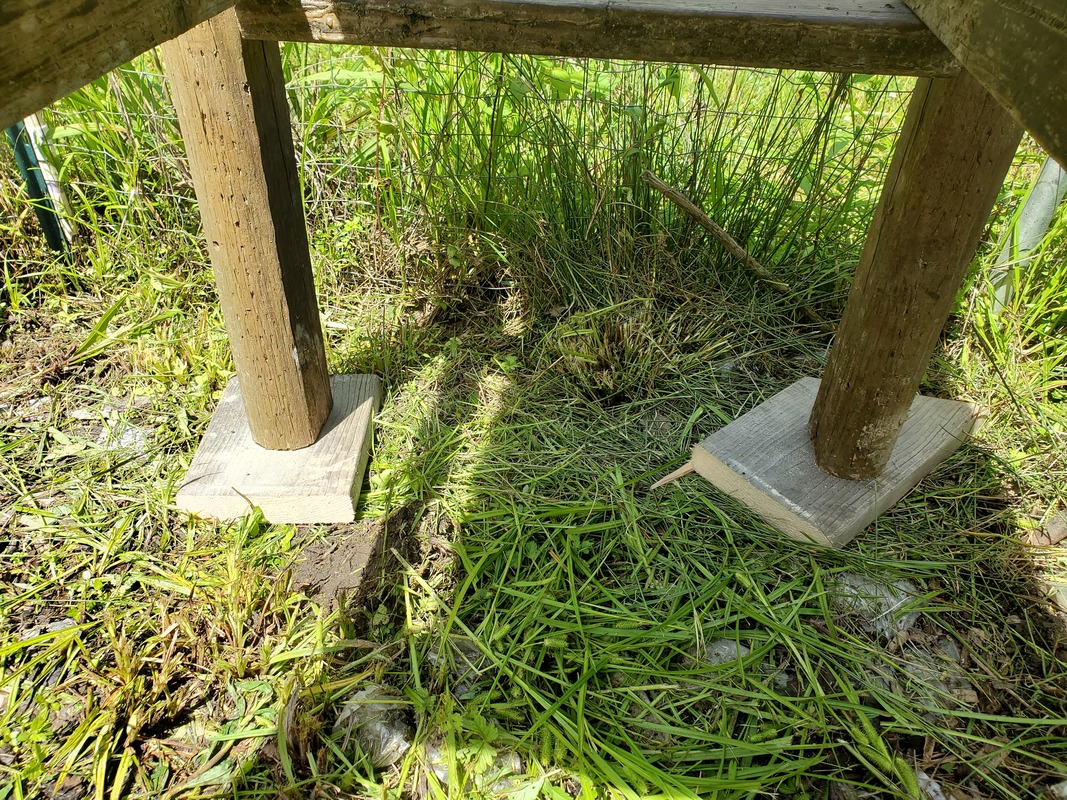 Boards used to stabilize bed on uneven ground, as well as protect the bottoms of the posts from rot due to direct contact with the ground. 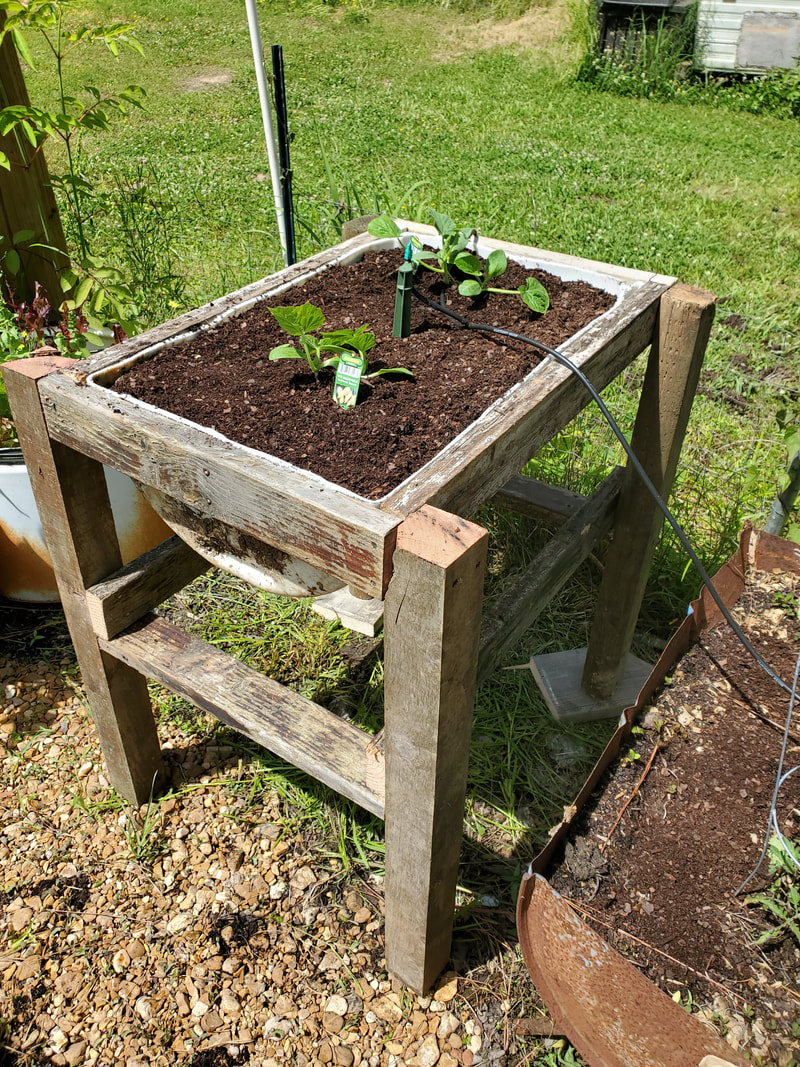 Barrel raised bed set up with plants in place and micro irrigation sprinkler staked in place. I'm still in the process of expanding the micro irrigation system by running PVC lines around the garden so I can tap into them to feed lines over to the other established drum and barrel gardens that have plants within them. Aside from that, I do still have another barrel/drum garden to build since I still have the other half to the drum. Not to mention I still have three more drums stacked in the back by the fuel shed. I probably won't use all three for drum beds, but who knows, I might say screw it and just build them up, I can always get more plastic drums if I need them. As it stands, this particular model of raised bed is the easiest to build and allows me a good planting medium for two plants. The bucket planters are good but require more fertilizer due to the small amount of soil within. These drum halves hold about 13 gallons of dirt so for the two plants that's 6.5 gallons of dirt per plant versus the 4-5 gallons in the bucket bed per plant. Of course for the same foot print the bucket beds hold eight buckets for eight plants versus two plants in the barrel/drum bed. Either way, these raised bed assemblies allow me to get more plants into play over a lesser area than when they're in the ground.
After pulling the transmission and rear fuel tank from the FMT, I turned my attention to the interior. Not necessarily the seats or carpet or dash but the doors as well as the gauge cluster and some miscellaneous hardware. The doors are currently missing the interior handles used to open the doors, with one replaced by an angle brace but for some reason was still unable to release the latch. The window regulator on the driver's door is damaged where it doesn't hold the glass up. I still didn't know if either window worked since there was no power on the truck's electrical system. Then there's a matter of the steering column and gauge cluster. There's no key for the ignition switch so I would have to somehow remove the tumbler assembly. The shifter handle needed to be removed along with the gear indicator in the gauge cluster. I also needed to remove a couple of indicator light bulbs so those lights won't be constantly on when the truck is running. Of course I still need to trace wires for the gauges so I can isolate those lines in the engine bay in order to properly hook them up to the engine.
The first thing I had to do before going inside was check and see if the wire harness from the old E4OD transmission was a separate section of the overall wiring harness where I could unplug it intact where I could sell it off versus cutting it and having a bundle of bare wires somewhere under the floor that would've needed capping. Luckily I found that the wiring harness was terminated at a plug just under the brake master cylinder. Once I unplugged that, I was able to remove the whole wire harness for the transmission without any butchery. 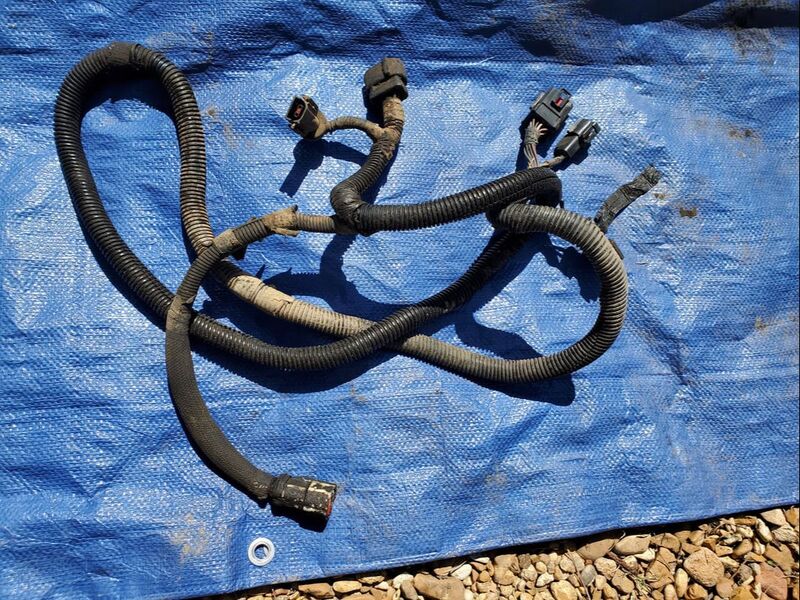
Transmission wire harness removed from under truck.

Plug junction where tranny wire harness plugged up to.
At this point I made my way inside the truck. I removed the door panel so I could access the hardware in the door, starting with the door handle. After looking at the mechanism for the lever, I seen that everything was still hooked up despite it not releasing the latch. After doing a little test it turned out that the cable wasn't pulling enough to pop the latch. I also found that the lever mechanism was moving some, which if I could solve that problem then the cable would have the extra pull necessary to release the latch. After removing the lever mechanism I found that the mounting surface where the bolt went through was actually cracked, allowing the mechanism to pull free some and move like it did. I had to straighten out the bent out metal around the bolt hole then remove the threaded clip in the hole and replace it with a nut and fender washer underneath the bolt hole so everything when tightened up would hold against the damaged mount of the door frame and not move. After doing this, the lever was able to release the latch, finally. 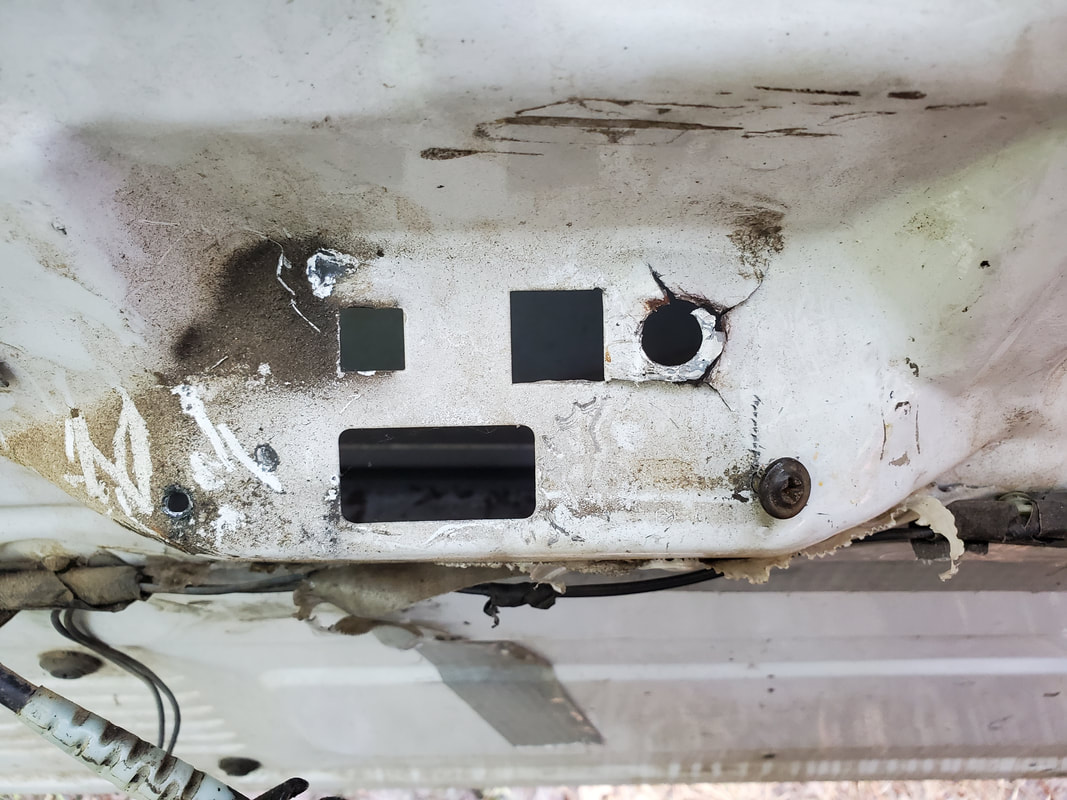
Mounting point from lever mechanism, note damage around round hole to right.
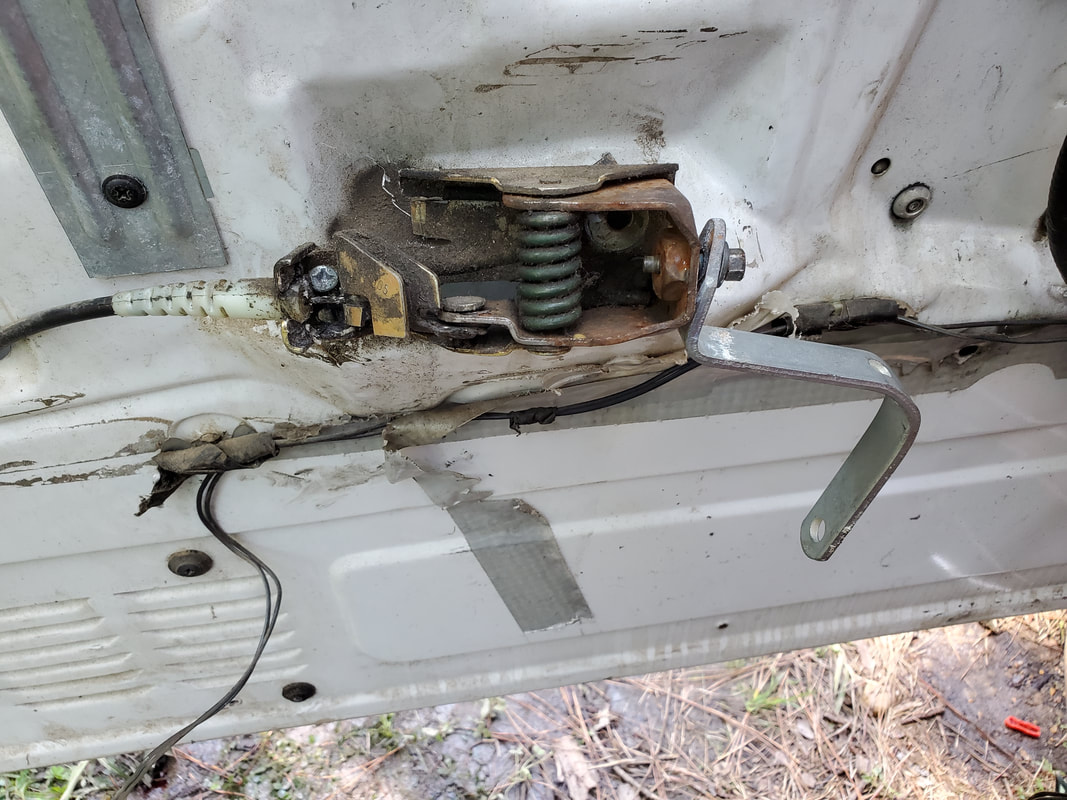
Lever mechanism bolted back down after adding washer and nut underneath.
The next order of business was the window regulator. The window was able to slide up and down with minimum effort but still have resistance. I did take time to charge up a battery and hook it up. Now going on a tangent, on the ignition switch was in the on position with the key removed, as is common with these trucks. I was able to switch the key on to put power on the door windows. After trying the window, I found that the regulator had stripped gears inside. The motor would run but you could hear the grinding of the plastic gears inside the gearbox. I had to remove the regulator. Problem is, Ford in their infinite wisdom, took time to use rivets to attach the regulator mechanism to the door. I had to grind the damned rivet heads off to free the regulator. 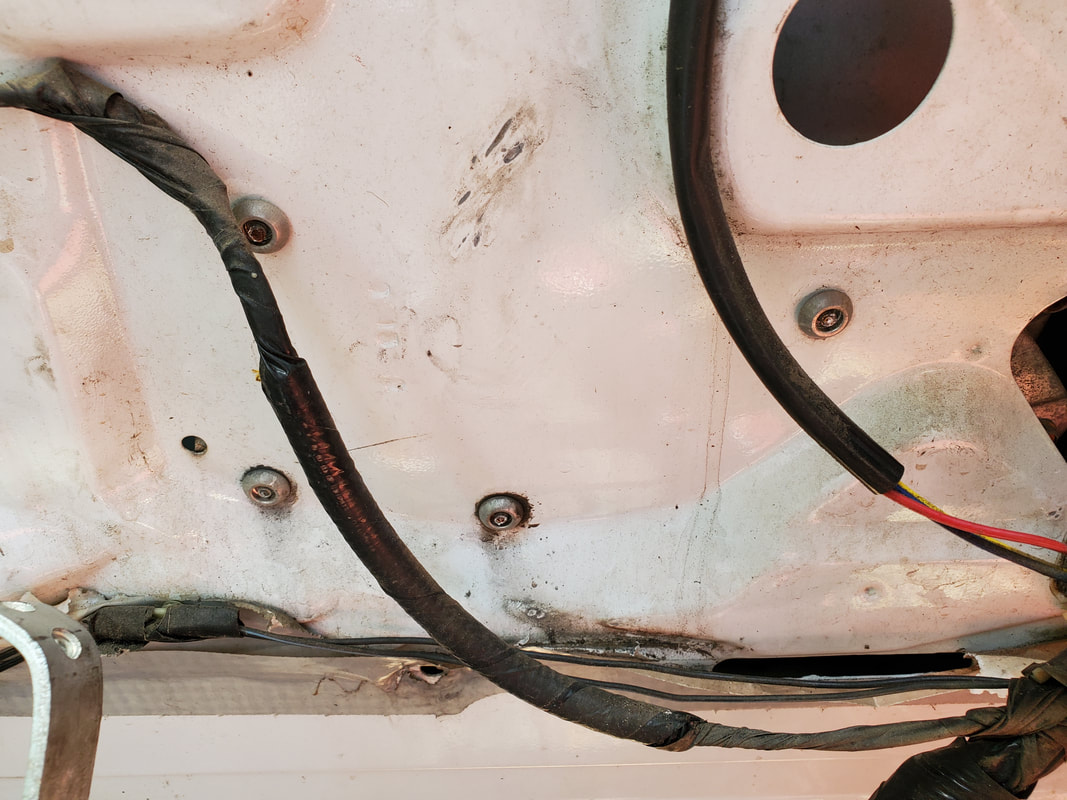
Rivets holding window regulator in place in door.
After grinding the rivets out I pulled the window regulator free but had to use a 2x4 to prop up the window so it would stay up, can't have rain getting inside the truck mucking up anything. Now, I will go back to the ignition switch. Thinking that the switch was just broken, I turned the switch to the off position with the outer knob piece spinning freely as it did. This is where the fun part began. Since these switches have this flaw, you can still lock the switch if you return it to the off position, and it will stay there. This one did exactly that. It wasn't broken, just had the flaw where it'll release the key in the on position. And I didn't have the regular key. And the key for the F250 wouldn't work. So now the switch is stuck in the off position. And the steering wheel locked. This cylinder assembly would have to come out by hook or crook. There is a locking peg that holds the cylinder in but will only release when the key is in the first position. That won't happen without the key. So out came the tools. For the next hour I drilled at the peg and pounded a center punch into the thing. I pried into cylinder breaking pieces off the cylinder body, allowing me to move and manipulate the assembly more, with the hope of being able to get that locking peg clear of the housing so I could pull the cylinder free. After enough working and beating and working and beating some more I was finally able to get the mangled cylinder assembly removed from the housing in the steering column. 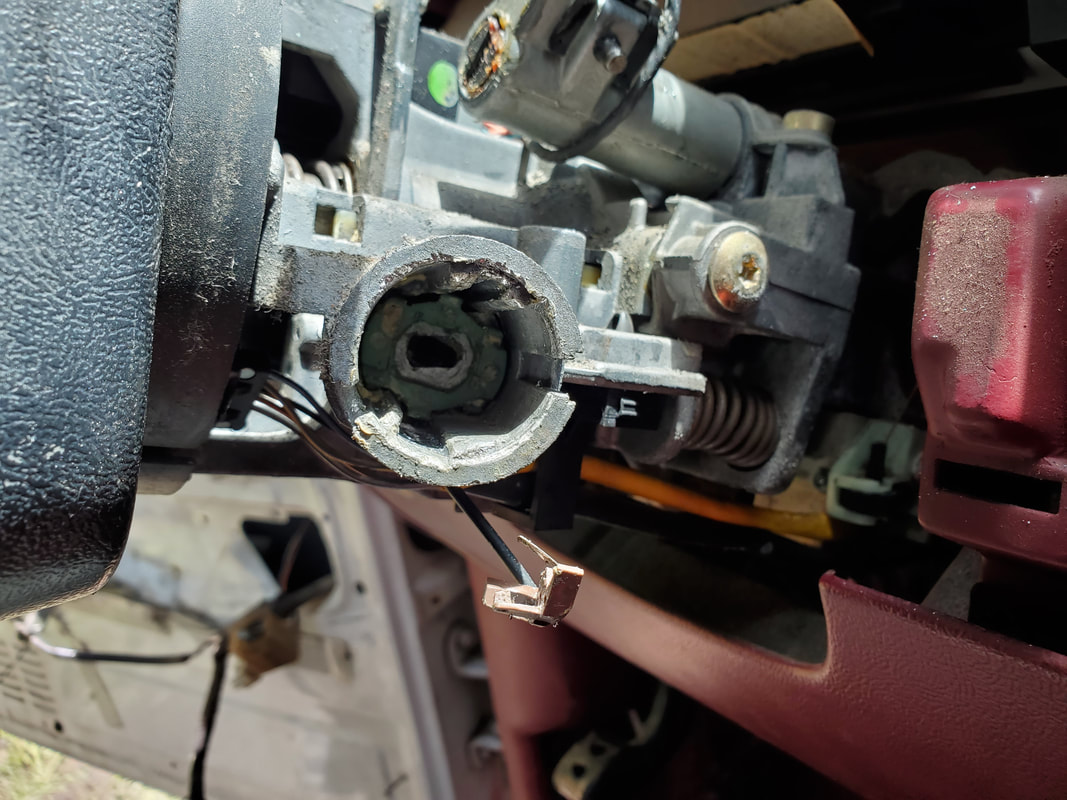
Housing where cylinder rested showing gear mechanism inside that activates the switches within.
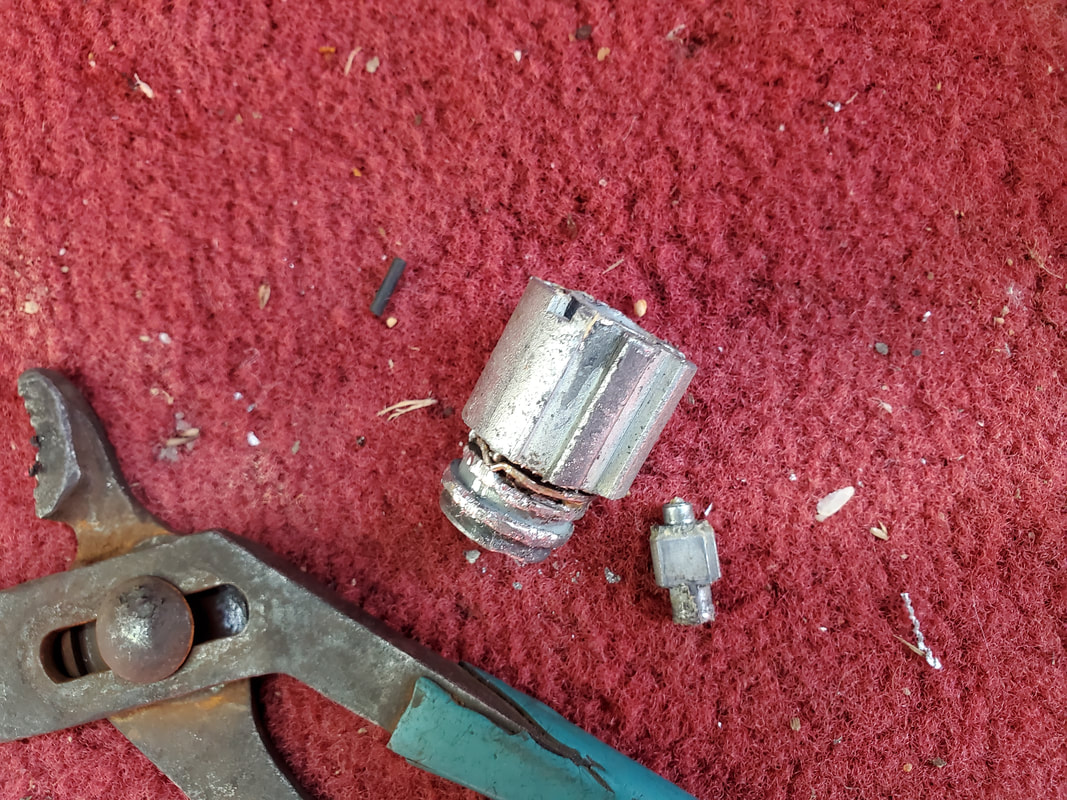
Remnants of ignition cylinder assembly after removing it.
With the ignition switch taken care of I moved on to the gauge cluster and the shifter. I removed the molding covers from around the gauge cluster. That plastic piece will need to be replaced since it was in a couple of pieces. I ended up having to drop the steering column in order to have access to the top of the unit to remove the clips holding the shifter in place as well as open up the space to pull the gauge cluster free. 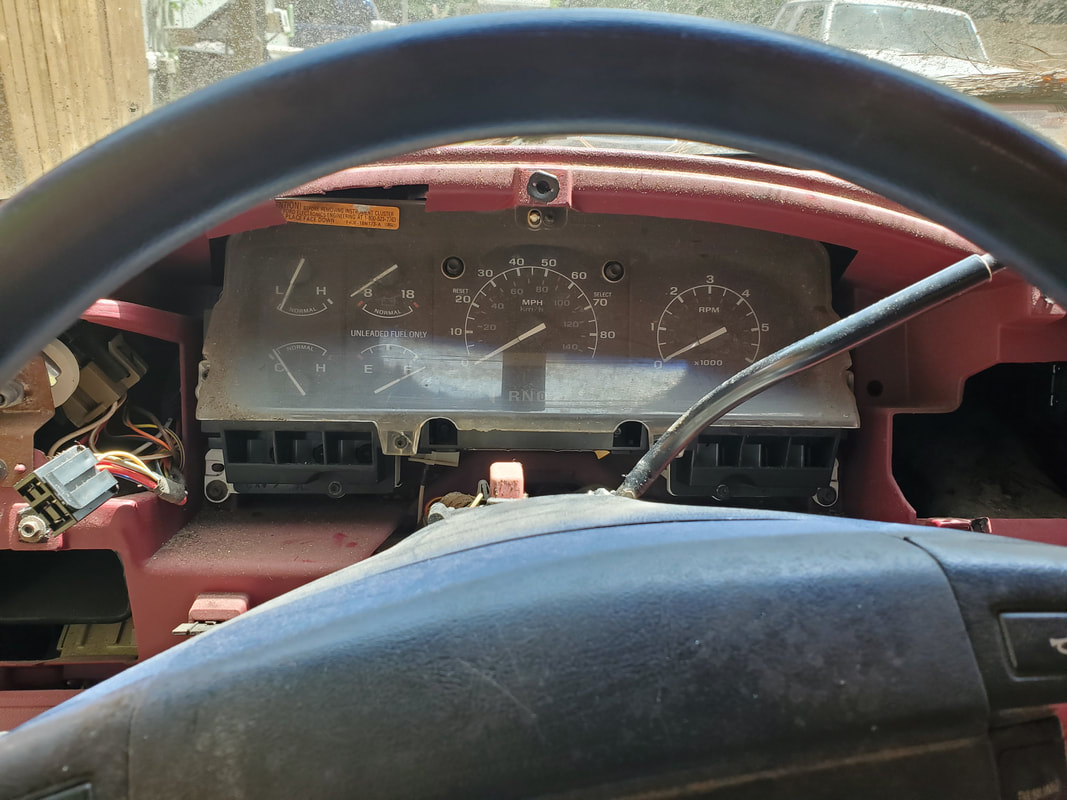
Cover molding removed from around gauge cluster. Also note cover pieces removed from steering column as well.
After pulling the gauge cluster out, I had to disconnect the little cable that attached to the shifter and linked up to the indicator in the gauge cluster. At the same time I removed the retaining clips that held the shifter handle in place, After popping the cable free from the shifter handle and removing the indicator from the gauge cluster (which was held in with a couple of screws), I was able to free all of these unneeded things from the truck. 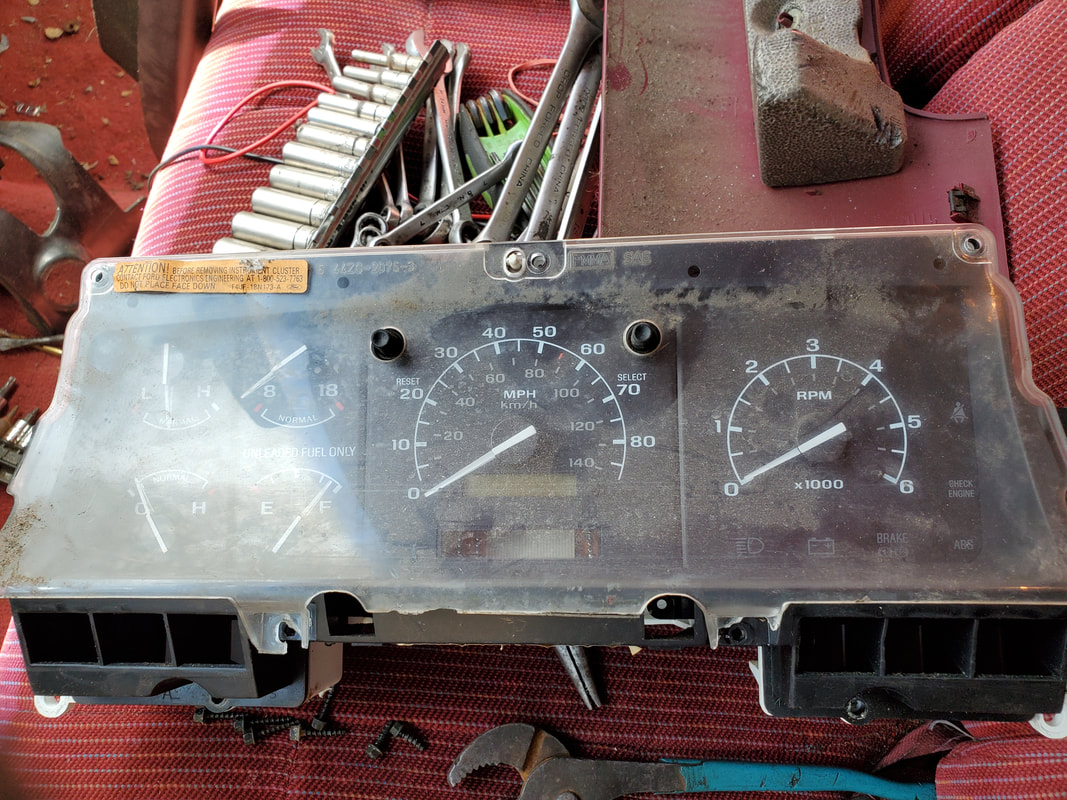
Gauge cluster after removing the indicator from underneath.
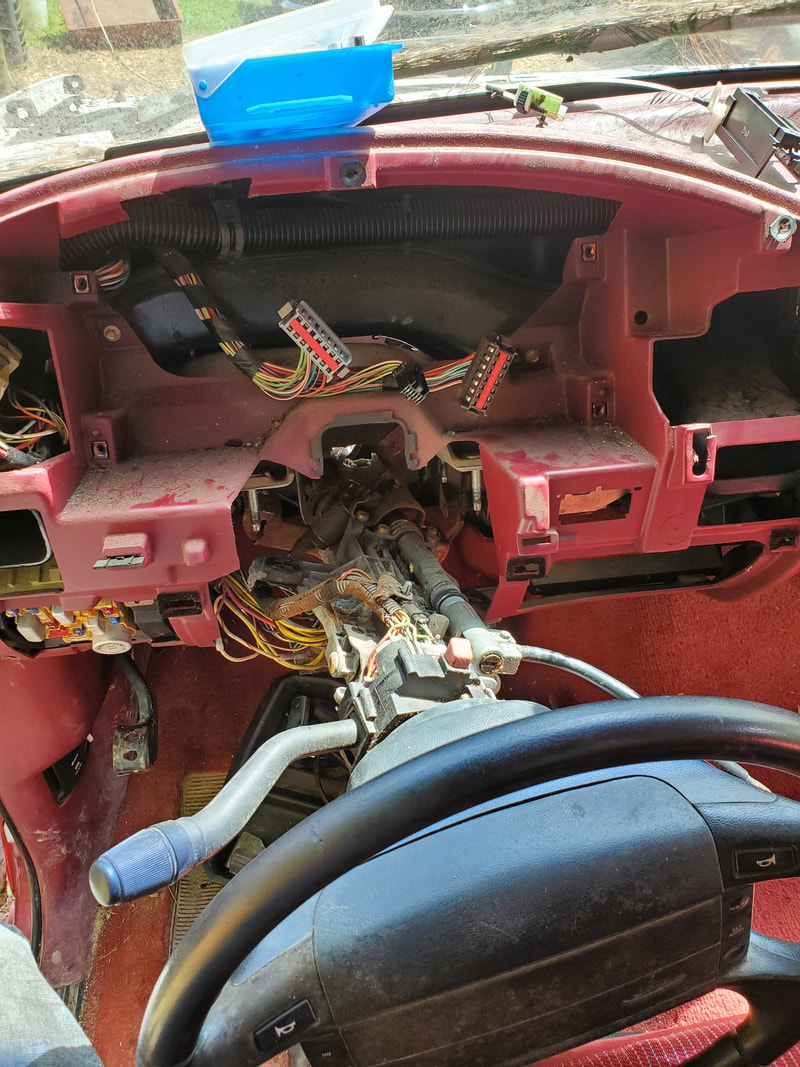
Steering column with shifter still in place.
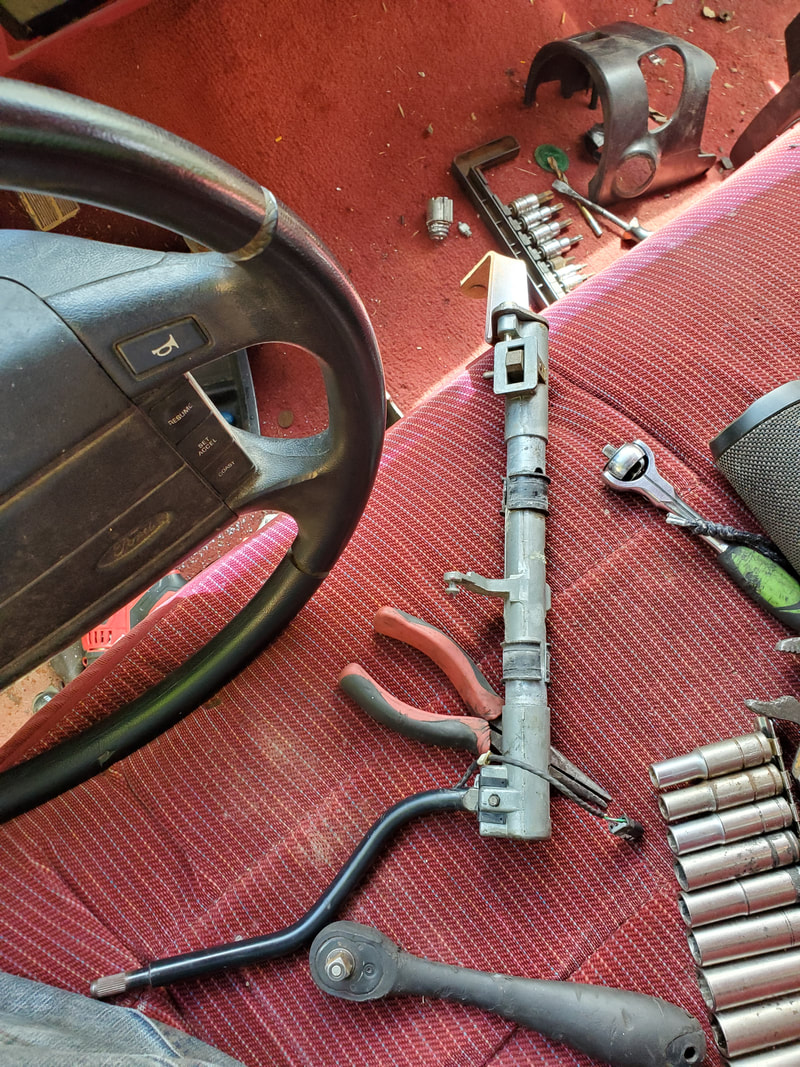
Shifter handle removed from steering column.
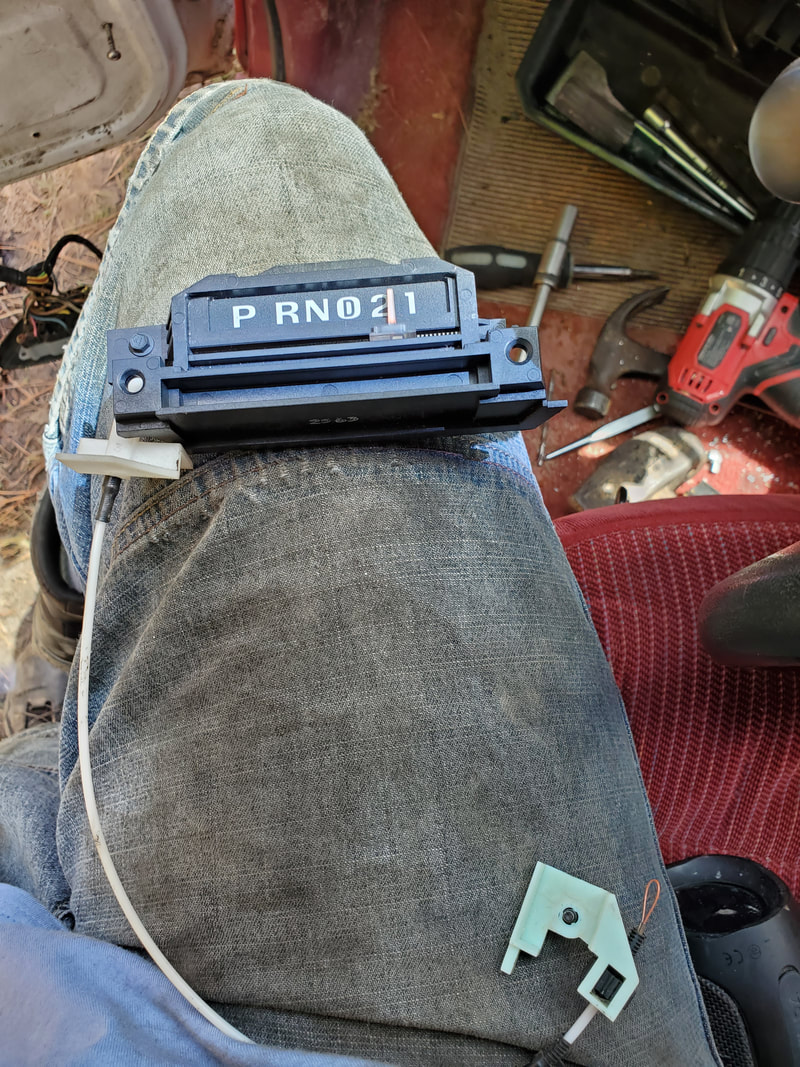
Indicator assembly removed from gauge cluster.
The last order of business was the passenger side door. Since the interior lever was alredy broken off there was no need to worry about that, I'll have to buy another one of those just like the driver's side. After pulling the door panel free I tried to work the regulator and had no action. I metered the lines going to the regulator motor and had power on them when I cycled the switches, so that pretty much told me what I needed to know, the regulator was dead. Just like with the driver's side, I had to grind out the rivets to remove the assembly, as well as propping up the window with a board. 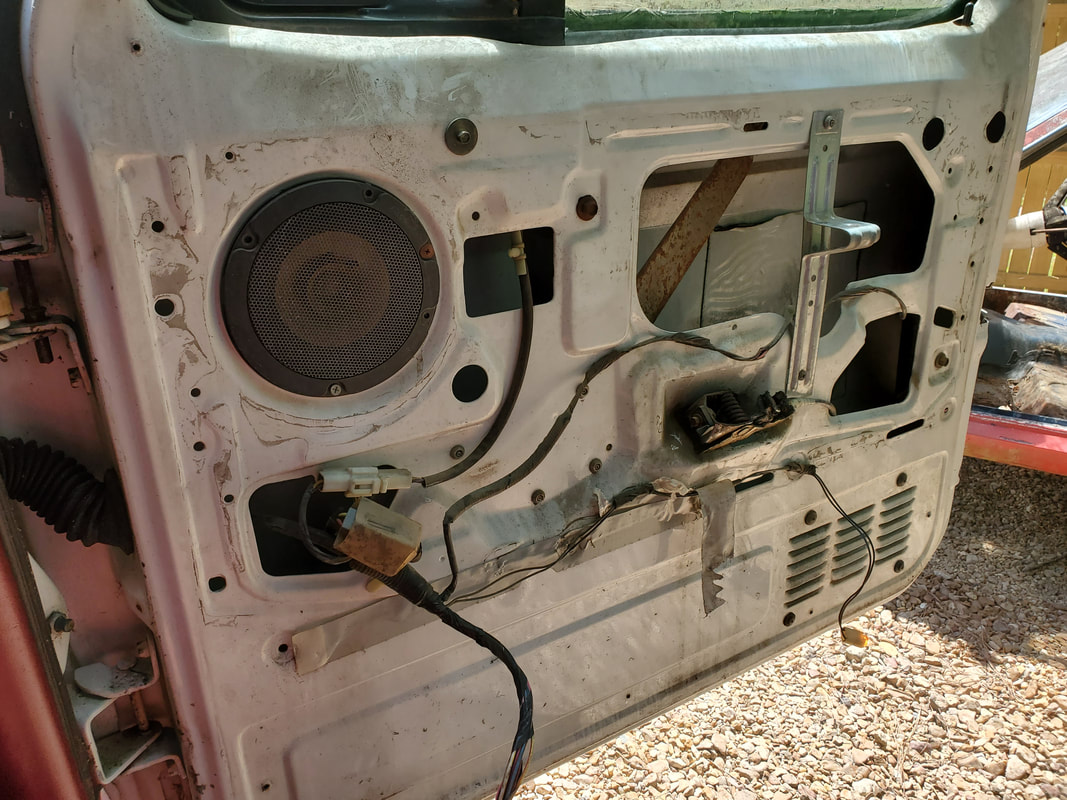
With that I was pretty much done for now. I have to pick up motor gearboxes for the regulators on both doors, I need to get handles for the lever mechanisms on both doors. While I'm at it I need to get new key latch cylinders for both doors, since I don't have the keys. And of course I need to get a replacement ignition switch cylinder. Once I get those parts i can reassemble the doors and write those off as complete. Also I still need to get to the bottom of the locating of the specific wires for the gauges so I can have them ready for when I reinstall the powerplant so I can have everything hooked up and properly working without having to run aftermarket gauges, especially when I have an entire gauge assembly. I would love to be able to keep this truck looking somewhat original, even with the changes being made to the type of powerplant going in. At least we are making progress.
After having pulled the old fuel system out from the FMT, I was able to recycle a piece of metal tubing that went for the evaporative fuel recirculation system. This line was plenty long enough to go from where the front fuel tank is located over to the front of the engine compartment at the left side where the mechanical fuel pump is on the engine block. Also since I pulled the old lines from the frame rail, there was a good spot to put the new line since the brake line was the only thing up there along the rail. I took time to straighten the line as much as possible and went ahead and slid the tubing in, making sure to have it routed right along the frame rail, going under any metal supports then snapping the tubing in place where I could while using zip ties to secure the tubing to the brake line. From there I bent the tubing to terminate above the fuel tank, well where the fuel tank would be located when I reinstall it. I topped things off by cutting the excess tubing off. I bent the front end of the tubing to have the nipple terminate along the spot where the fuel pump will be. All I have to do is add a short piece of rubber hose to link the two. 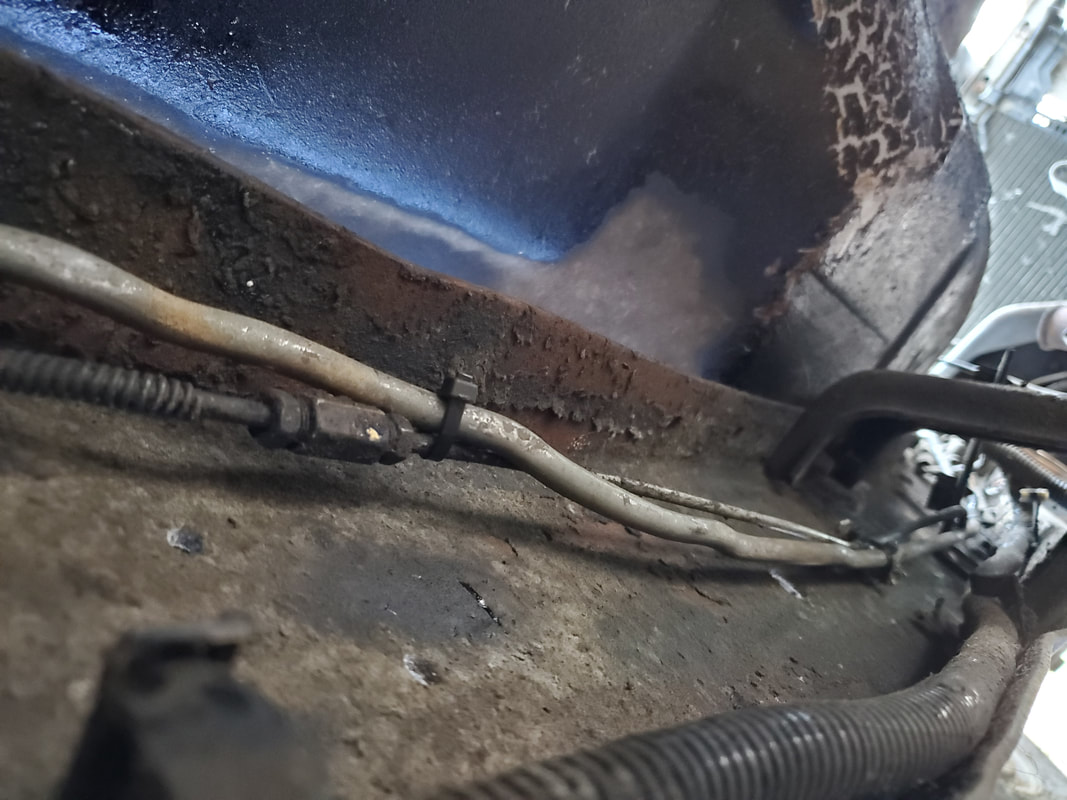 Fuel line routed along frame rail and secured to brake line with zip ties. 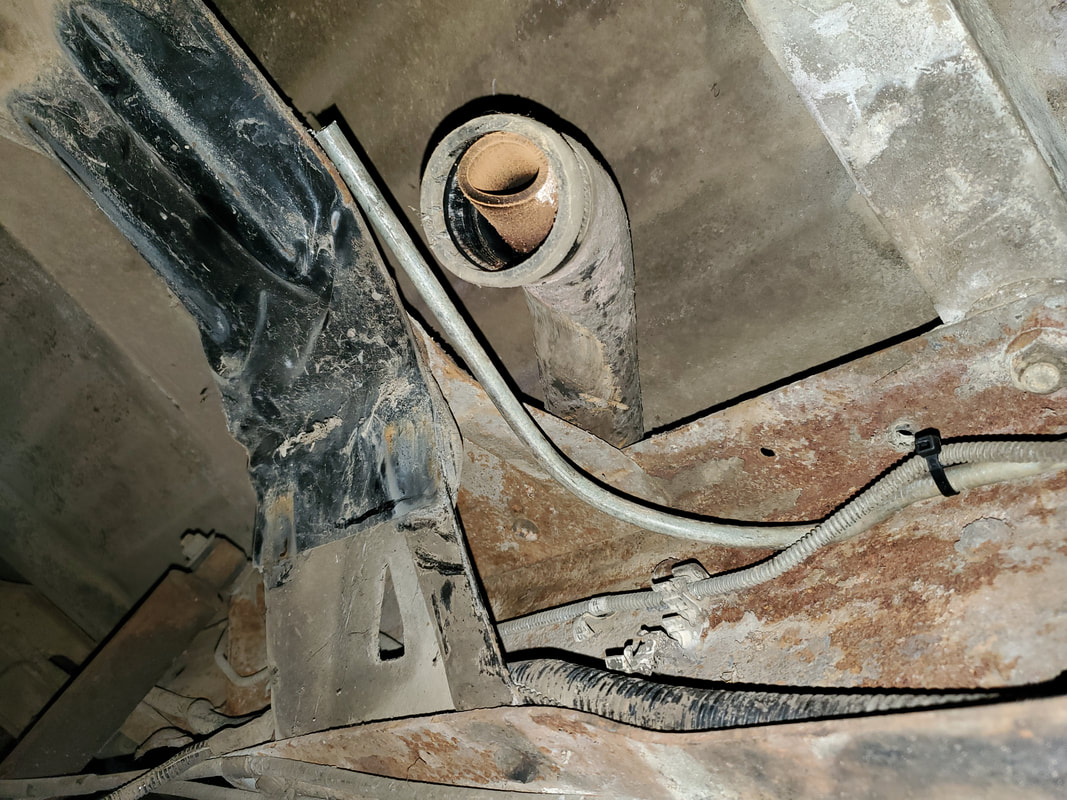 Back end of fuel line bent to terminate over the top of the fuel tank when its reinstalled. 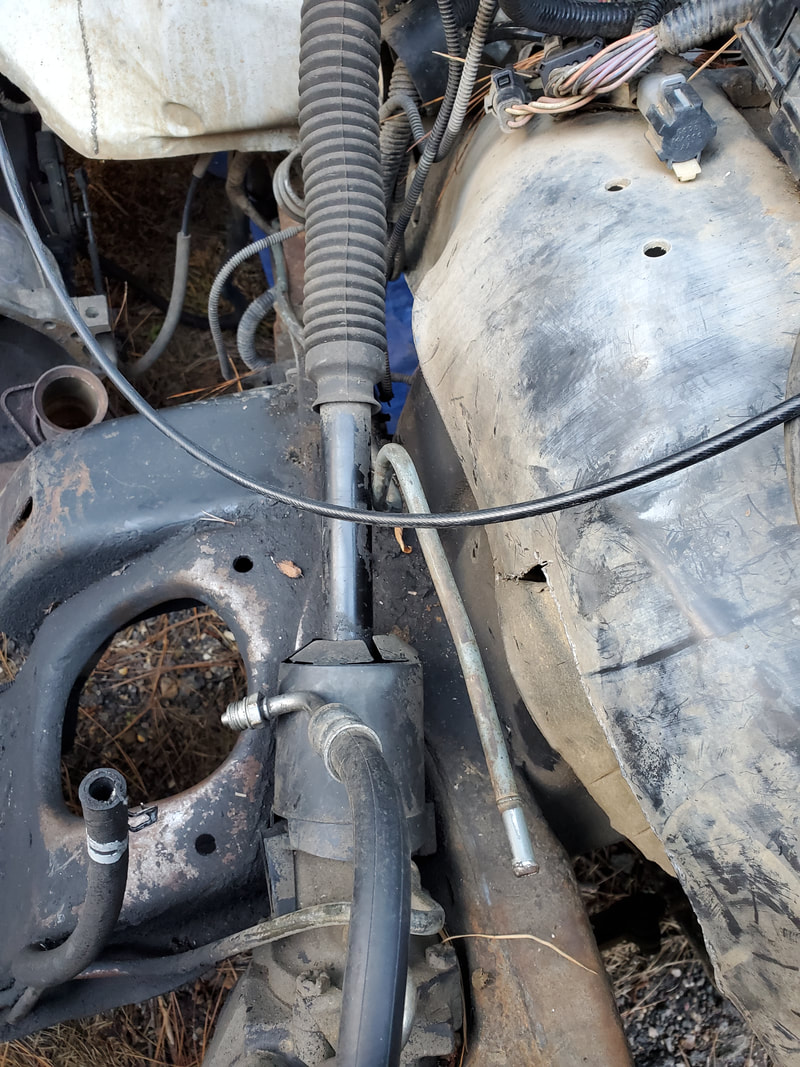 Front end of fuel line bent and situated at a position to be close to the block mounted fuel pump. The next order of business was to remove the E4OD transmission that was still in the truck. It was still mounted to the crossmember and had the shifter linkage still hooked up. The oil lines were still present as well. The first thing I had to do was disconnect the crossmember from both the transmission and from the frame rails before I could be able to get the tranny to the ground.  I had to fight the bolts that held the crossmember in place. There was a single bolt that held either side of the main crossmember in place to the frame rail. Those bolts came loose easily. Then there was a secondary crossmember that went from the main crossmember up to the top of the frame rail. The two bolts at the top of the frame rail were a PITA since I couldn't get to the bolts with the impact wrench, I had to use the regular socket and ratchet. That took a minute and since I couldn't get the bolts out (thanks Ford for the stupid design) I just loosened the bolts up enough to be able to move the secondary crossmembers from the main so I could move the main out of the way. I had to jack up the transmission first to clear it of the crossmember after I pulled the nuts free from the tranny mount. With the crossmember out of the way I was able so slide the tranny to the ground. After that I removed the oil lines and the shifter linkage from the transmission and unplugged the wire harness from the unit. I slid the tranny forward enough to pull the driveshaft yoke free. Once everything was free I slid the transmission towards the back where the frame rail angles up, allowing me to work the transmission out from under the truck. 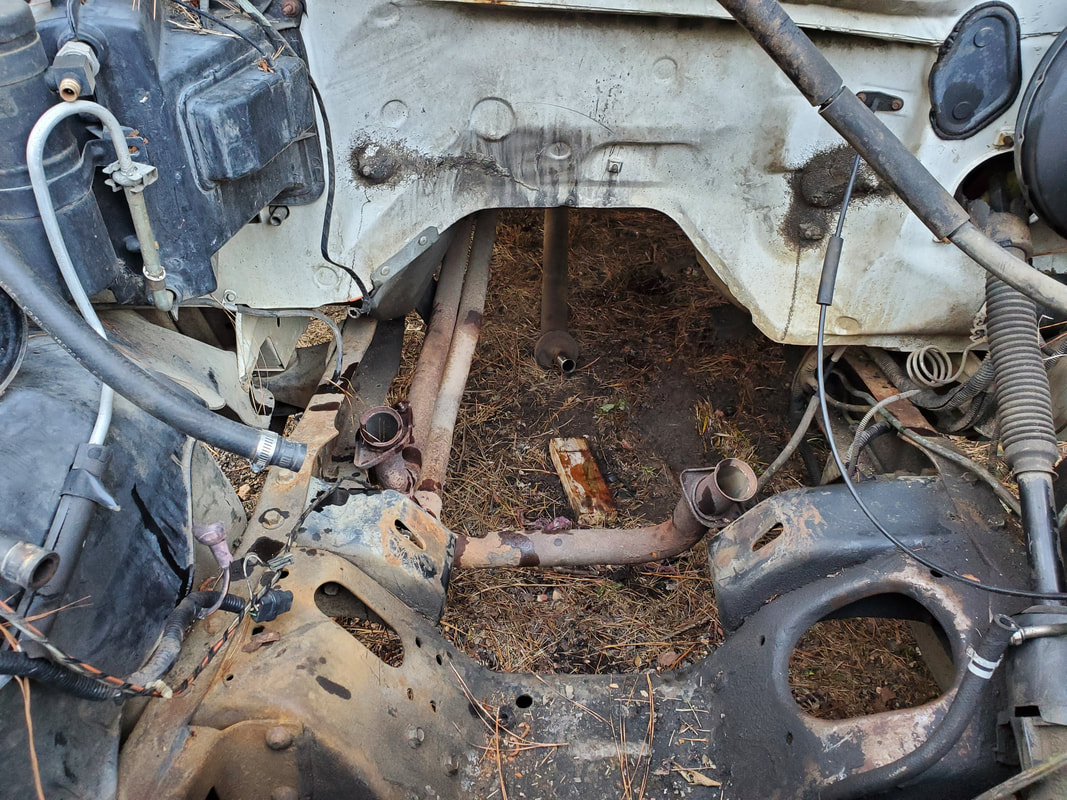 After pulling the transmission free of the truck I slid it over to the staging area where I had the other engine parts from the truck staged at. I took the fuel lines over there and even removed the extra tranny cooler from the front of the AC condenser since it wouldn't be needed anymore. Of course I'll be putting all this up for sale to recoup some of the money that had been spent on the project. 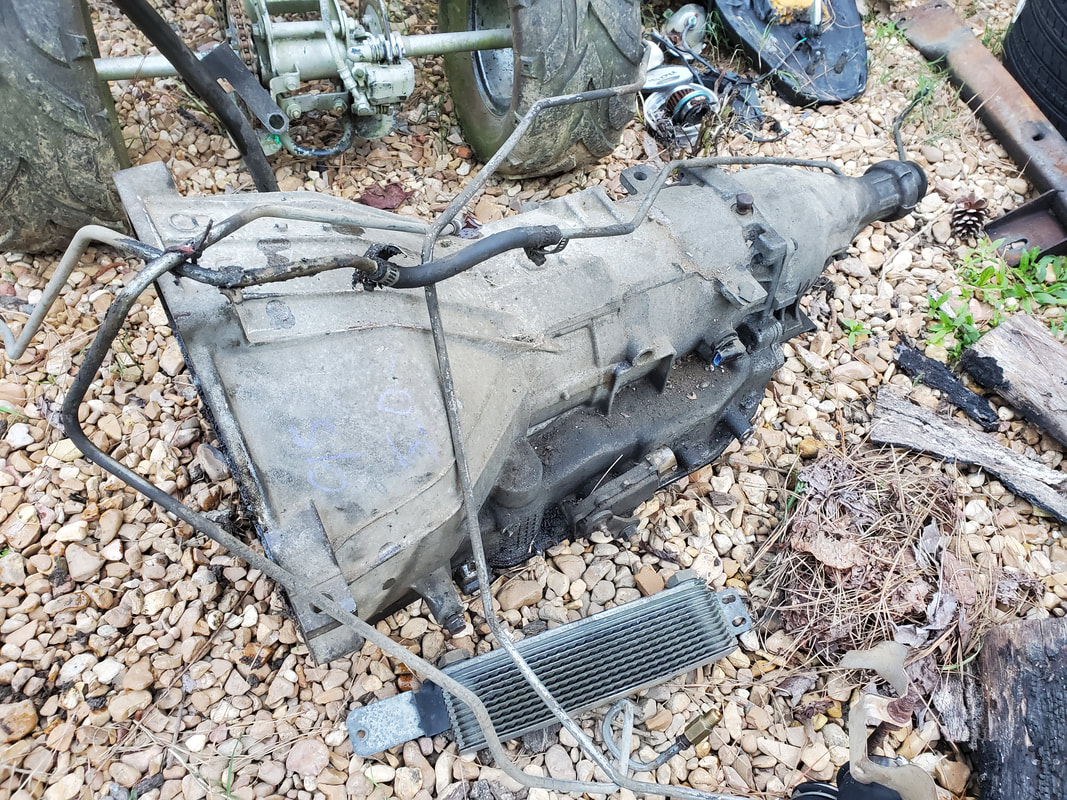 E4OD transmission with oil lines and cooler staged with other parts. Anyone need a transmission? With the transmission and the crossmember free, the next thing I need to do is study the wire harness to see if I can unplug the portion of the harness that fed the transmission. I'd hate to cut the wiring like that but if I have to I will. I won't need the wiring so either way it has to go. Along with the wiring I still need to trace the wires for the alternator, ignition, oil and temp sensors. I also have to fix the door handle linkage and window regulator in the doors so I can be able to get out of the truck as I did get stuck in the thing when we first got the truck. Luckily the window wasn't secured to the track or regulator as I was able to slide it down enough to be able to open the door from the outside. Progress on the FMT is coming along pretty good. After moving the 65 Mustang and the Ranger over to spots within the fenced in area I made another plan to move the two remaining cars to the area within the fenced in compound. The El Camino and the 51 Chevy are all that's left to be moved inside the fences. The area that I had in question was the area that I dubbed the side road, that runs along side the storage trailer heading into the back yard area by the fuel shed. Currently I have the LUV parked against the fence and had the 69 Mustang parked next to it. Next to the Mustang and along side the garden fence was an old boat trailer and a small catamaran sailboat. My plan was to move the catamaran and the boat trailer out from the side road over to the back of the yard, behind the garden fence. This wide open area would be perfect as an area to put the two things but the only problem is the ground is covered in grass and is somewhat muddy at times when it rains heavily. I would have to spread gravel over the area I want to park the trailer since I don't want grass growing up through the trailer. I won't be able cut the grass as easily so the gravel will help eliminate that. So obviously, the first thing was to get a load of gravel. After spreading the gravel along a path about 10ft wide and about 20 ft long right along side the back of the garden fence, I went to move the F250 out of the way to get ready to hook up to the trailer. And would you know it, the damned truck got stuck on the only patch of soft ground in the whole damned area. After a failed attempt using boards to try to get the truck off the mud, I had to call for help. After getting the ole lady to hurry back home with the Tracker, I staged the little truck right in front of the big truck and hooked the chain up and with a little tug got the big truck off the muddy spot. From there I took the Tracker and staged it in front of the boat trailer, hooking it up and dragging the trailer around to the eastern clearing of the yard then backed up to allow me to pull the trailer back into the area within the soon to be fenced in area with the trailer tongue pointing into the yard versus having the tongue against the fence line. This way when I do fix the trailer all I have to do is just hook up and pull the thing out. 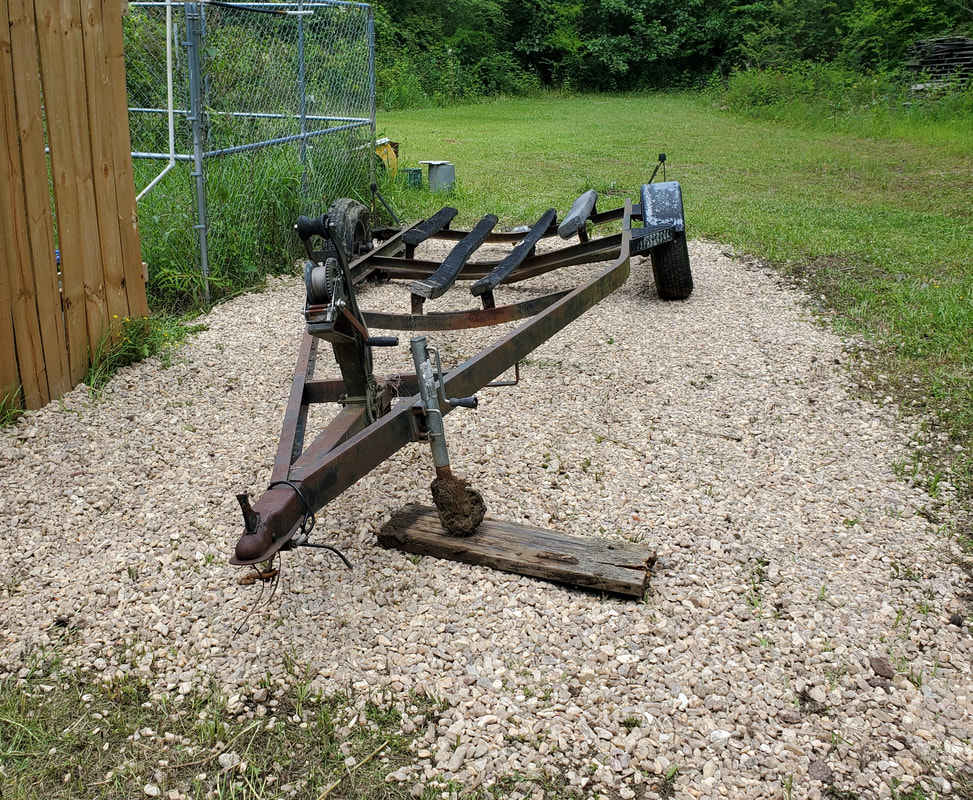 Boat trailer staged in new graveled spot behind garden fence. 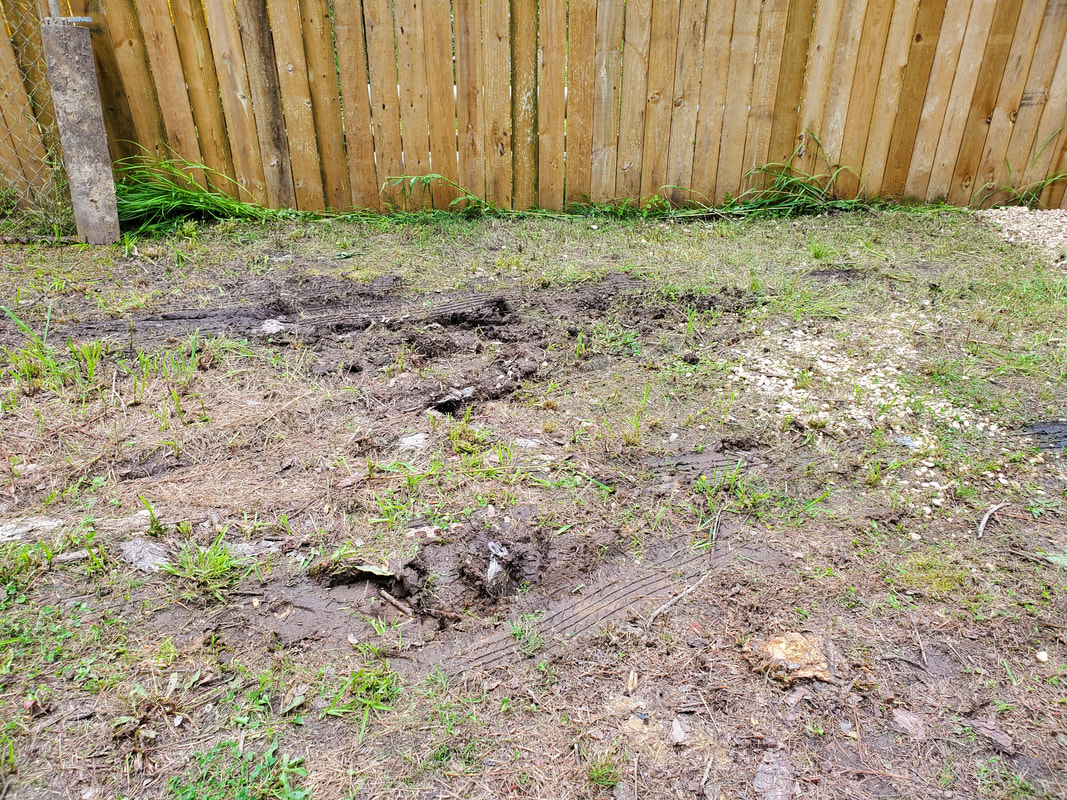 Area where F250 got stuck, the only soft area in the back yard area and I had to get stuck on it. With the boat trailer moved, I was able to cut the grass around that area to get it clear. The ground was soft and mushy just as well so it'll need plenty of gravel over it before I can ever move anything as heavy as the F250 and another vehicle over it. The next order of business would be to move the catamaran boat, but this would take a minute just the same since it had a wood body on top of it as part of an old project I was doing with the boat, not to mention there's probably some water in the hulls too. 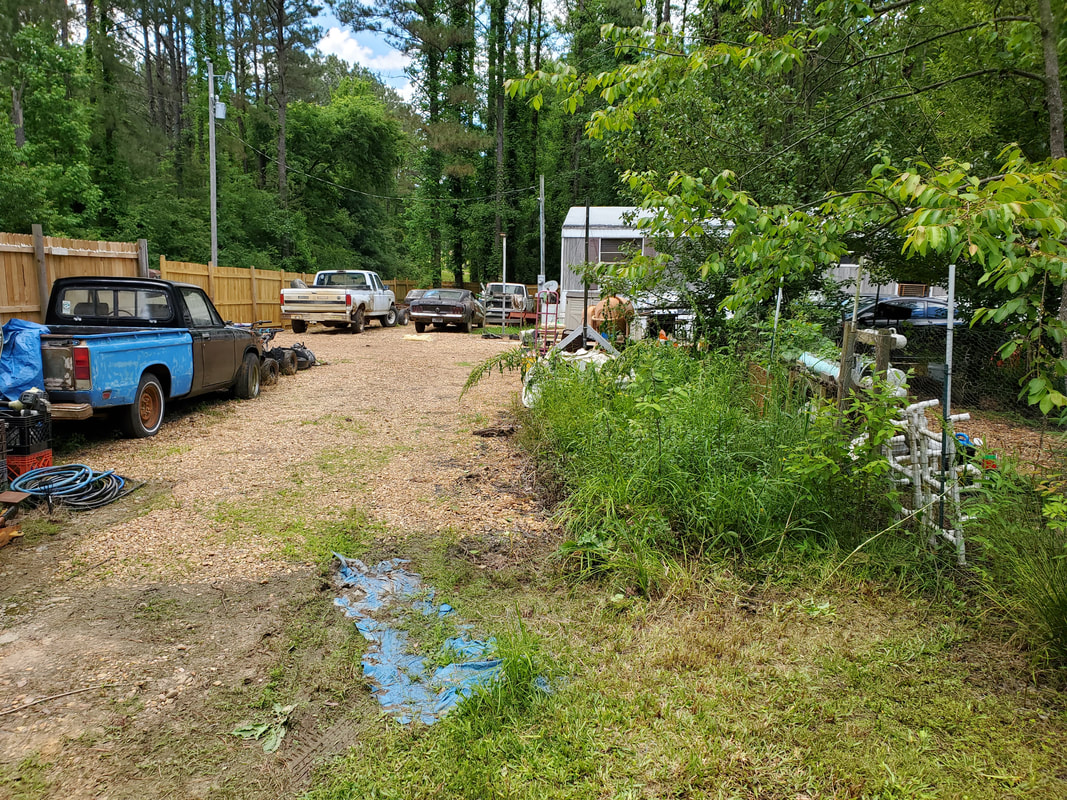 Side road area after moving the boat trailer, before cutting the grass.  Area behind catamaran after cutting the grass over the area. The past project on the catamaran was to build up a deck of sorts that I could sit on as well as hold up a mast for the sail I would use on the boat. Even though I did try to clad the wood with fiberglass and epoxy resin, water still made its way to the wood, rotting most of it to the point that I couldn't do anything with the boat in that state. I decided to just rip off all of that old wood and just go back to the raw boat I started with. In the process of doing this I salvaged some parts from the deck and staged them with the other boats at the back of the yard. I will rebuild this new and improved catamaran in the future, along with the other boat projects.  Remains from the homemade deck of the catamaran. After pulling the wood from the catamaran, I managed to salvage some hardware along with some 2x4's that were still in decent shape for later use. I took the remains and dumped them on the burn pile which was still smoldering from a recently burnt garbage pile. After throwing some old oil gas mixture on the stuff I was able to get the trash to fire up, With the catamaran stripped down I opened up the access caps in the two hulls and we tipped the boat upside down so the water could drain out. With the water out, I was able to slide the boat along the ground over to a spot just in front of the boat trailer along the back of the garden fence. 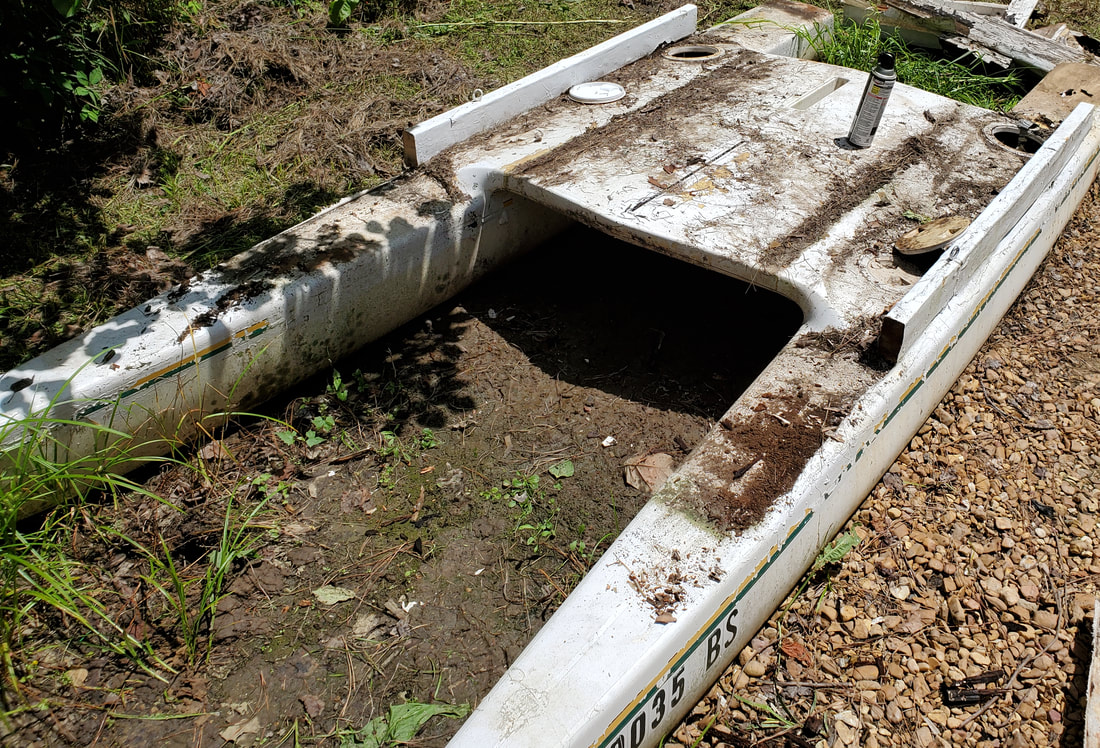 Catamaran stripped of old decking and back down to its bare self. With the catamaran moved to its new spot I took time to do some other cleanup work around the front of the side road. I cut up some scrap wood and put it all in a couple of buckets I'll fill with oil and gas later to make fire starters. I moved some other items around to more suitable spots, out of the way and took time to cut a little more grass to help clean the area up some more. Eventually I'll have to get everything removed from this area since I will have to be able to stage the F250 to spread the gravel and especially when we go to move the cars over to the new spot. The area will more than likely need a good thick layer of gravel to ensure that no vehicle will sink into the ground along with the thin layer of gravel that would've otherwise been spread. Either way, we did manage to get some big moves done around the yard. |
