|
One day while driving home from the job, the Monte started making some odd noises that appeared to be coming from the front wheels, mostly from the right front wheel. The noise didn't change when I applied the brakes but it seemed to become more pronounced when I drove at higher speeds. I figured that this noise was caused by a bad wheel bearing. This was my first choice too since I never changed the wheel bearings on the car since I had it. With that I parked the car in the work spot by the storage trailer in preparation for the work I will have to do soon. The wheel bearings were cheap enough at Auto Zone that it didn't make any sense to try and find cheap ones online and since I wanted to get the parts replaced more sooner than later so I can get the car back on the road more sooner than later. Another thing I picked up was a replacement pulley for the tensioner assembly since the old pulley was squealing more and more. The entire tensioner cost way too much at Auto Zone but the pulley itself was pretty cheap so I figured I'll get that and just replace the pulley. The next day I started the job by jacking up the car and pulling off the tire. I had to pull the brake caliper off in order to remove the rotor then pull the retaining nut to pull the whole rotor and the wheel bearings free. I started on the left side. When I pulled the rotor the wheel bearings came out intact, not looking too bad, but still old and since I'm not gonna half-ass the job I replace them with the fresh grease packed bearings and reassembled the assembly. After buttoning up the left side I moved on to the right side. When I pulled the rotor free the outer wheel bearing came out fine but the inner wheel bearing was nothing but a bunch of roller bearings that fell out onto the ground. The outer bearing race was scored enough that it needed to be replaced, unlike the left side. The inner bearing was stuck on the spindle and needed to be tapped off. After replacing the outer race I was able to repack and reassemble the wheel bearings and the rotor and the rest of the wheel assembly. 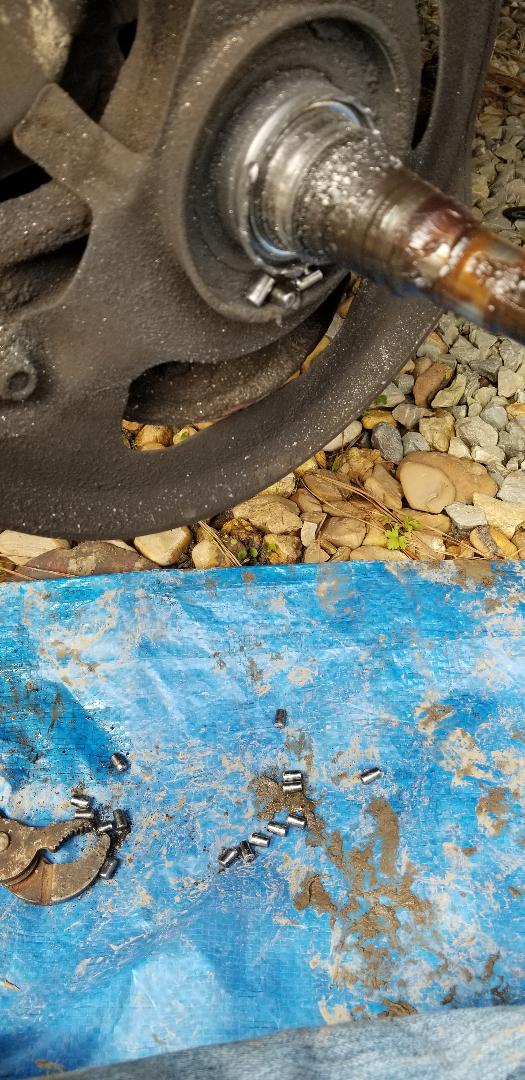 Remains of inner bearing, note roller bearings on ground and inner bearing race and metal shavings on spindle. 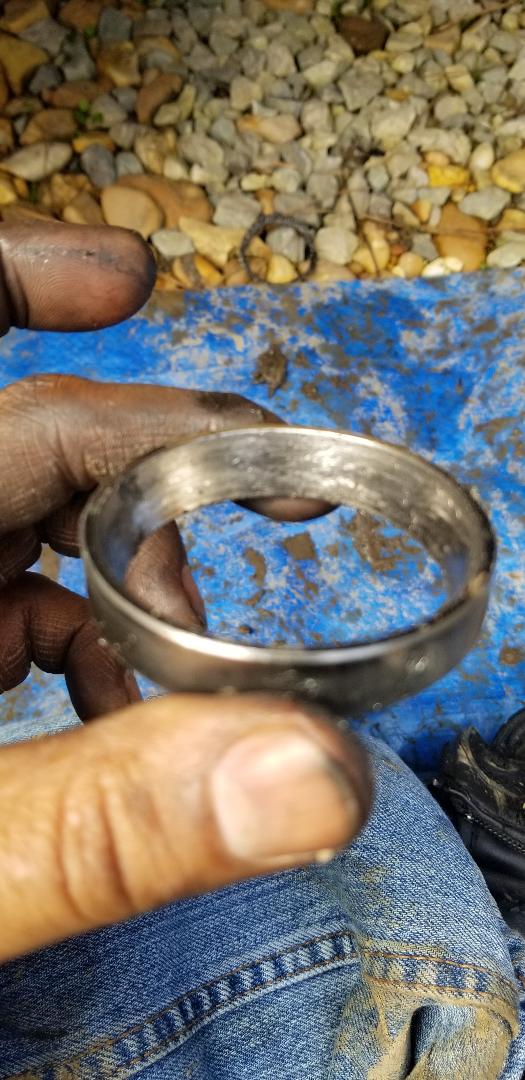 Outer bearing race after removing from rotor, note scoring on the inside.
0 Comments
In the process of trying to get all the small pieces re-installed on the Dodge, I continued with the window moldings that I had. While I omitted the moldings that went around the sail planes on the sides where there used to be a vinyl top, since I won't be installing another vinyl top, I still had to install the windshield moldings as well as the rear window moldings. I can't do the rear window moldings until I weld up the trunk panel and the interior subframe and glue the window back in. I put the windshield moldings in place, except for one piece, the one on the passenger side, since its missing. I'll have to try and source another piece, where I don't know. At least I have more stuff back on the car instead of on the floor.  Dodge windshield moldings in place. While putting things back together I also noticed that the fuel tank had a small leak, not enough that it was a fire hazard but enough that it still needed attention. I decided to get some JB steel weld to patch the fuel tank. In the process I went to use a wire brush to clean the surface around the pin holes. When I did this I opened up one hole enough that the seep turned into a steady stream. While this might've been a setback, it kind of worked out since it allowed me to quickly drain the tank and gave a nice little hole with which to press the goop into for a better grab. After getting the patches made I went to look at the fuel that was in the oil pan. Apparently the fuel that was in the tank cleaned the varnish that used to be old fuel in the tank, tainting the fuel with dark shit that I don't want clogging the fuel filter on the fuel pump. This fuel ended up going into a container to be used for fire fuel. 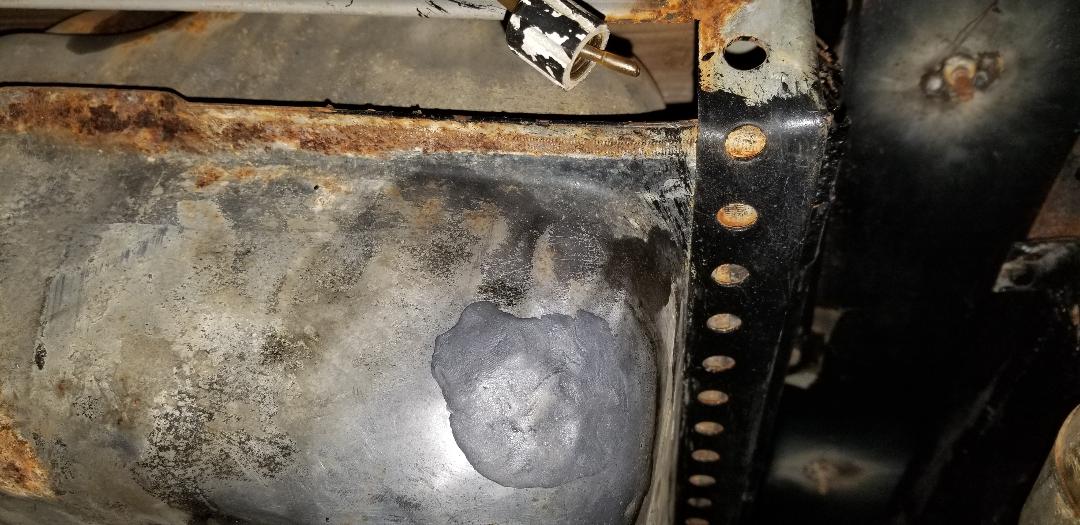 Fuel tank patch #1.  Fuel tank patches # 2 and #3. After getting the engine running I decided to do some work installing the interior components and some exterior components. One of the little side jobs on this car is getting all of the small components put back on the car so there will no longer be a bunch of small parts scattered around the garage and/or in the car itself. Its those little things that lend to the feeling of completion in such a large project. The first thing that I put back up was the pair of sun visors and the rear view mirror. These were held up with a few screws each. Of course I had to dig out some screws from my stash to secure the pieces but once done, that was one less thing to worry about. The next thing I wanted to do was install the interior panels that go right under the side windows. This involved installing a base piece that screws to the interior structuring and the panel snaps in place with clips. Before I can secure the base panel I had to secure the molding at the bottom of the side window first, since it involved putting screws into the molding from the inside, at a slight angle since the side window, even when fully lowered, was in the way. With that, I ended up doing the moldings around the windows first then finishing up with the base panel and the interior top panel. I will more than likely fabricate some lower panels with some surplus paneling that I will use for a base and some type of material most likely for the skin.  Sun visors and rear view mirror in place. 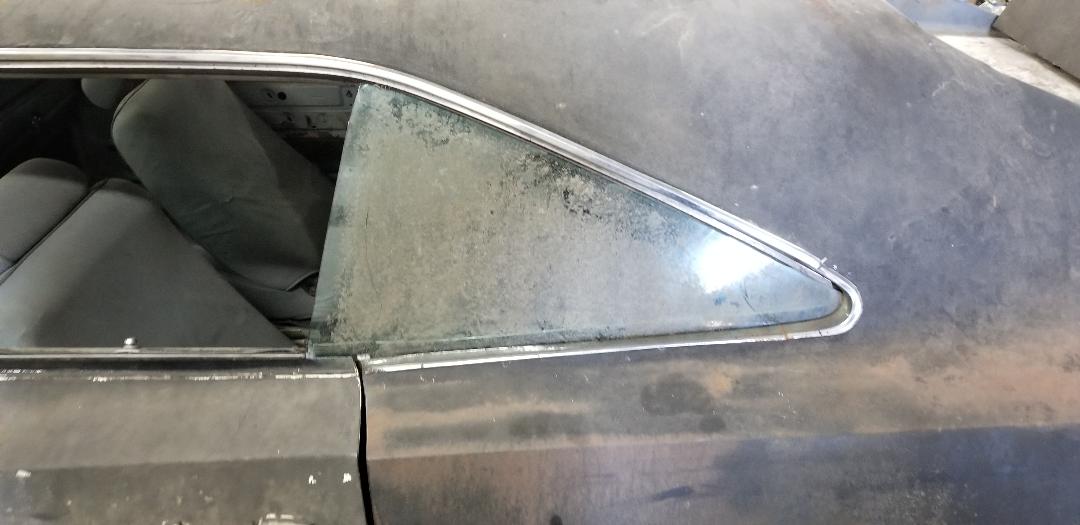 Side window molding mounted around windows. 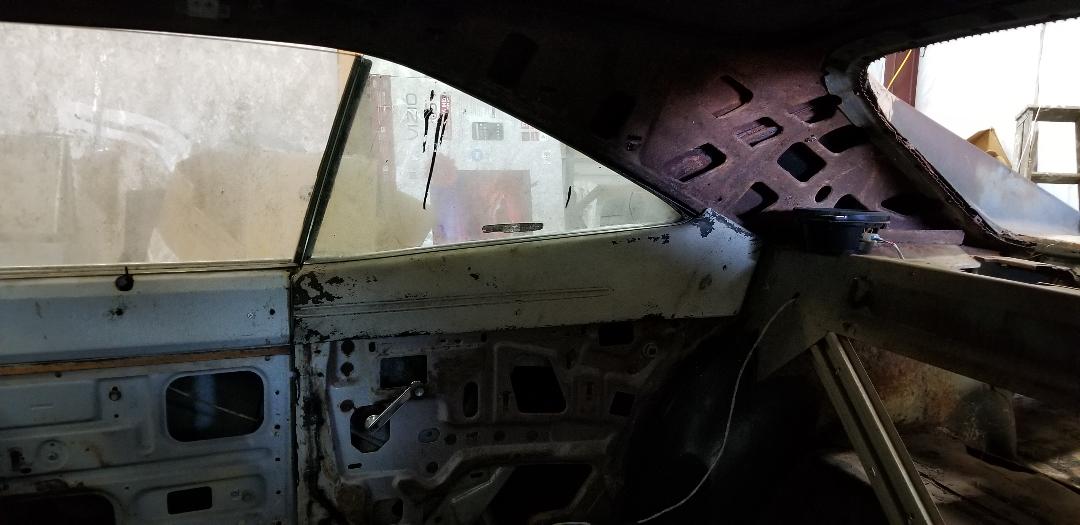 Interior top panel installed in place.
The time has finally arrived, after so long I finally got to the point where I was able to crank up and start the Dodge. I wanted to get the driveshaft made so I can put the yoke in the transmission and be able to fill the unit with transmission oil so it won't be spinning dry when the engine does start up. When I got the driveshaft back and went to secure the back end to the differential, I ended up finding out that one of the straps that holds the U joint cap to the differential yoke was missing. I was only able to secure one U joint cap to the rear end. While this meant that I couldn't attempt to put the car in gear, it still meant that I could start the engine at least, since I was able to put oil in the transmission without it leaking out of the tail.
Driveshaft installed on rear end.
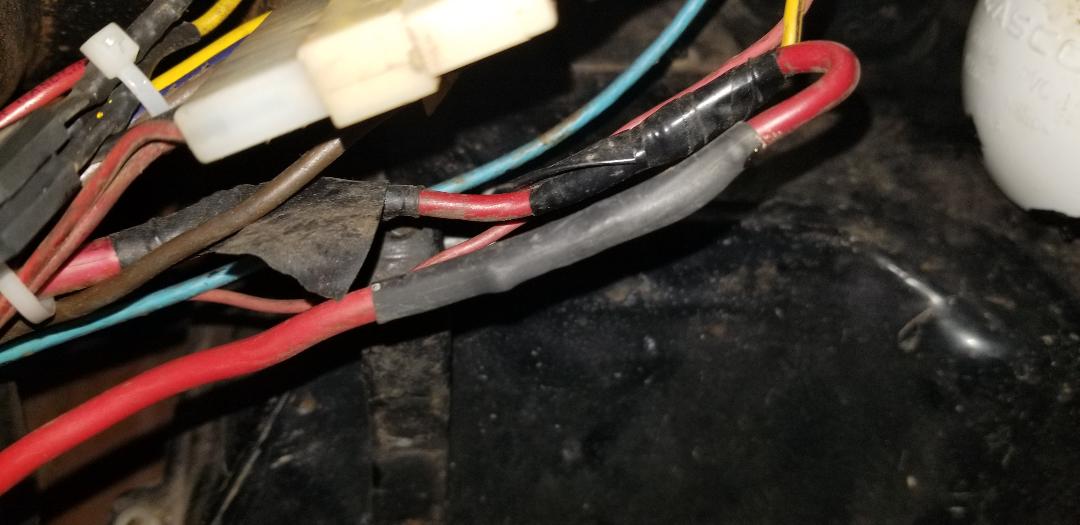
Since I didn't have much fuel to use I ended up taking the fuel can and situating it under the frame where the electric fuel pump is and attached a short length of hose to the pump and inserted it into the fuel can. The first attempt to start the car had some mishaps, sputters, backfires. I had to check the firing order of the spark plugs again since the way the thing was running had the signs of a couple of wires being crisscrossed. Which turned out to be the case. Also the carb that I had on the engine was a shitty unit. I ended up swapping out carbs with a fresh one. The old one was overflowing when the pump was on, and it was missing the lever for the accelerator pump. Once I put one of the other carbs I had in the storage trailer onto the car and cranked it, the thing fired up pretty good, running pretty smooth. For the time I was able to get the thing to run for short bursts but every now and then the thing would shut off like it lost power. I put the timing light on the engine and when the engine shut off the timing light stopped flashing just before the engine died. If the engine was sputtering out for another reason, the timing light would've still flashed a couple of times as the engine ramped down to zero RPM. I put my meter on the wire feeding the distributor and got a low voltage of 9.6 volts. The battery still read 13 volts. I metered the fuse box and got the same 9 volts at the power feed into the fuse box. This meant that either the connections at the ammeter gauge or at the ignition switch were shitty. When I attempted to meter both I ended up looking right at a multi wire plug that separates the steering column switches from the rest of the wire harness due to the idea that when I touched the plug the fuel pump and cooling fans started flaking out. Further inspection showed that one wire looked like it had heat damage, not necessarily burning but had some kind of crust on the conductor going into the plug. Also the plug itself was melting some at that particular conductor, I couldn't pull the plug apart because of that. So, I ended up just cutting the wires on either side of the plug and just soldered the two together and covered the solder joint with heat shrink tubing. Once I did that, everything came on just fine and voltage readings at the fuse box were closer to what was coming right out of the battery. 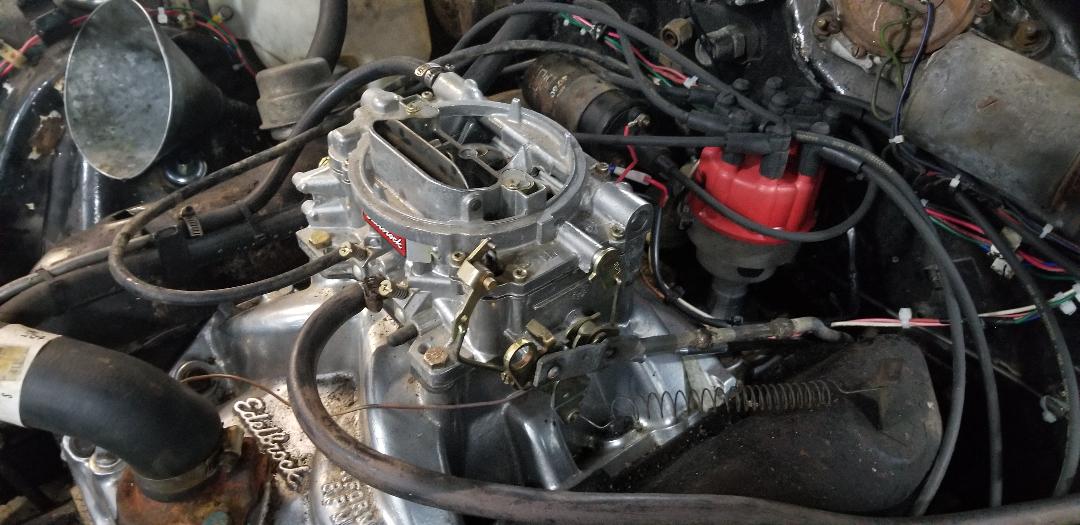
Fresh carb mounted on engine.
Fixed power wire under dash. Note plug just above wires.
With these little issues corrected, I went back to cranking the engine over and starting up once again. Once the engine was running I discovered a few little issues that will need addressing. First thing was the idea that there's a small hole in the timing cover right where the timing marks are at. This hole is allowing crankcase vapors to spit out while the engine is running. As of yet no oil came spitting out but I will still have to plug this hole so that will not become a problem. I will more than likely use some JB Weld to plug the small hole. The next problem was the idea that I seen a little more smoke than usual coming from the left exhaust pipe, whiter than usual. Not good. Along side that, looking at the rocker arm through the valve cover cap showed some lighter colored oil sitting on the rocker arm. The sign of water mixing with the oil. The other problem is the idea that the exhaust manifold gasket right at cylinder #1 was poofing smoke out under the exhaust manifold. While this would've been relatively insignificant, the idea that the poof of vapor was also depositing that light colored oil in a mist onto the top of the power steering gearbox. Another sign showing that the head gasket on the left side is compromised. While the engine was running I did make note of the oil pressure and the temperature. Both gauges appeared to be working. The oil pressure was actually pretty good given this engine is well worn. During the whole time the engine was running and warmed up the temp gauge went up somewhat but leveled of somewhere around 160 or so. Even with a shitty radiator cap on the radiator didn't overpressure and blow through the spout at the top of the radiator. Another good sign at least that the engine wasn't overheating. At this point I'll probably be trying some head gasket in a can to see if I can prolong the inevitable and put off having to pull the engine apart to replace the head gasket. With that being all I can do as far as running the engine and waiting for the replacement U joint straps to come in the mail, I went on to some other side jobs on the car so I can at least say I got more done. The first thing I moved on to is getting the rest of the headlights situated. I only had two bulbs in and one headlight ring installed. I dug out the other three headlight rings plus managed to scrounge up a couple more old bulbs that were laying around. I had to straighten out the tabs on one of the rings plus had to add some long screws to the extra tabs on the rings to further secure them to the headlight buckets. After getting the headlight bulbs installed an securing the rings like I wanted I turned them on and cycle through the low and high beams, successfully powering the lights. Things are certainly coming back together. Hopefully the driveshaft parts will get here more sooner than later so I can at least try to see if the car actually drives. I did do some light tuning of the carb and distributor to try and get things to the point where the engine idles at a reasonable speed. Despite that, the engine still put a little more smoke than it should, along with the milky oil at the rocker arm and the lighter than usual oil on the dipstick and the milky oil mist on the steering gearbox so yeah, head gasket. But hopefully between some head gasket in a can and just running the engine and changing the oil in the process of breaking the engine back in, hopefully I'll be able to put off having to pull the engine apart till sometime after actually finishing the assembly of the car and actually being able to drive the damn thing. 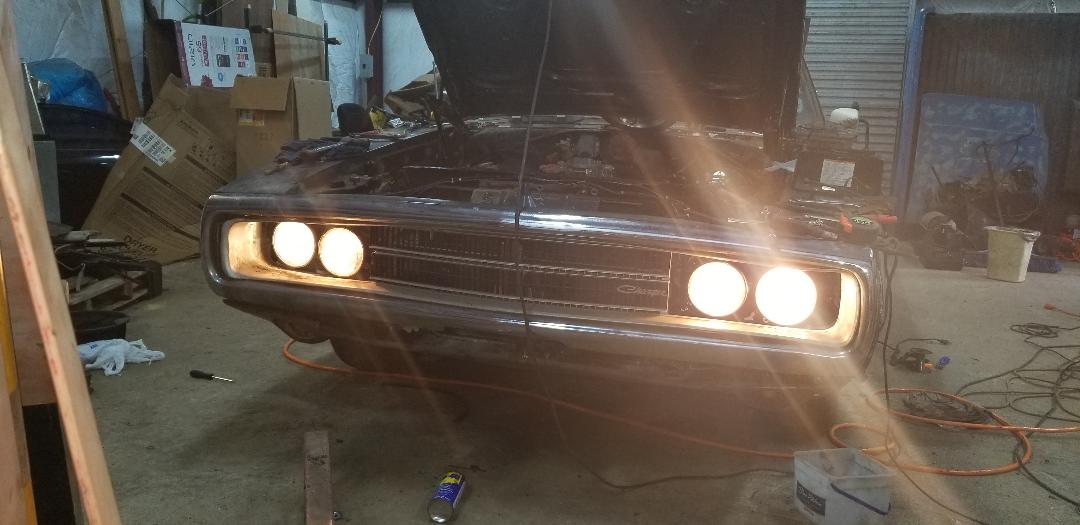
All four headlights lit up.
I'm in the final stage before being able to fire up the Dodge for a test run and drive at this point. I managed to get the set of shocks that I ordered from online. Installing these things went pretty smoothly up until I got to the rear shocks. The bolts that held the shocks at the top were pretty rusted in as well as the nuts that held them at the bottom. I ended up having to use the impact wrench to break the top bolts loose. In the process I smashed my thumb with the jumping wrench that I used to hold the other end of the bolt when the impact wrench was trying to drive the bolt loose. That bolt still wouldn't budge, I ended up having to use the reciprocating saw to cut the thing in half to free the old shock. After that piss off moment I had to fight the bottom bolts, one of which came loose with some ease but still was tough. The other bottom bolt was a real motherfucker. That thing wouldn't come loose even with the impact driver. I ended up using the die grinder to cut a couple of slits into the nut which helped free up the thing enough for the impact driver to bust the nut loose. At that point I had to use the shitty nut to gauge what size it was so I can get a replacement nut for the bottom of the shock.
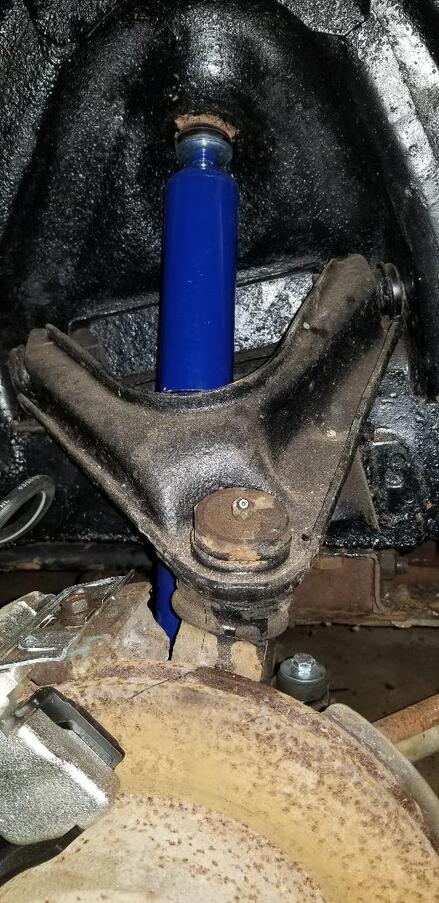
Front shock installed in place.
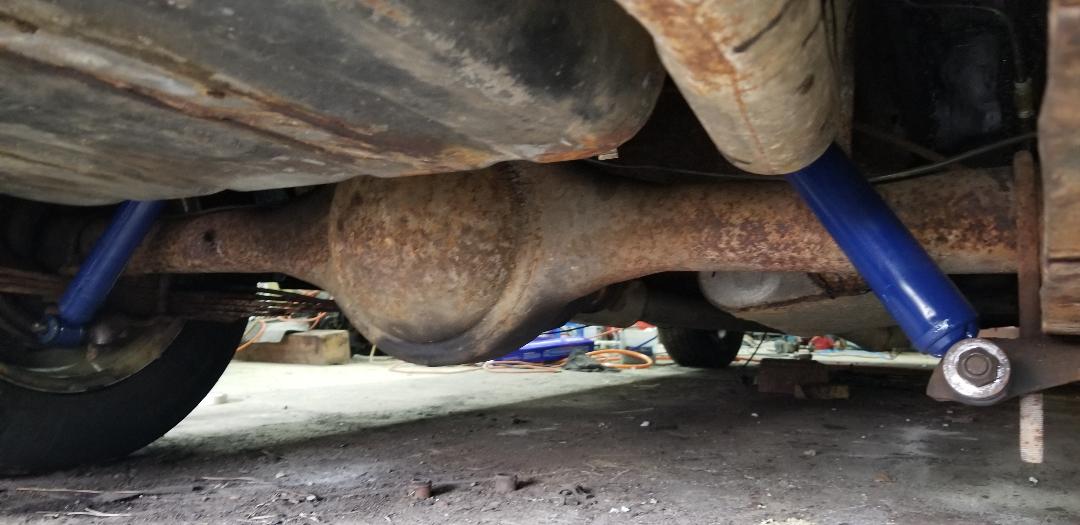
Rear shocks installed in place.
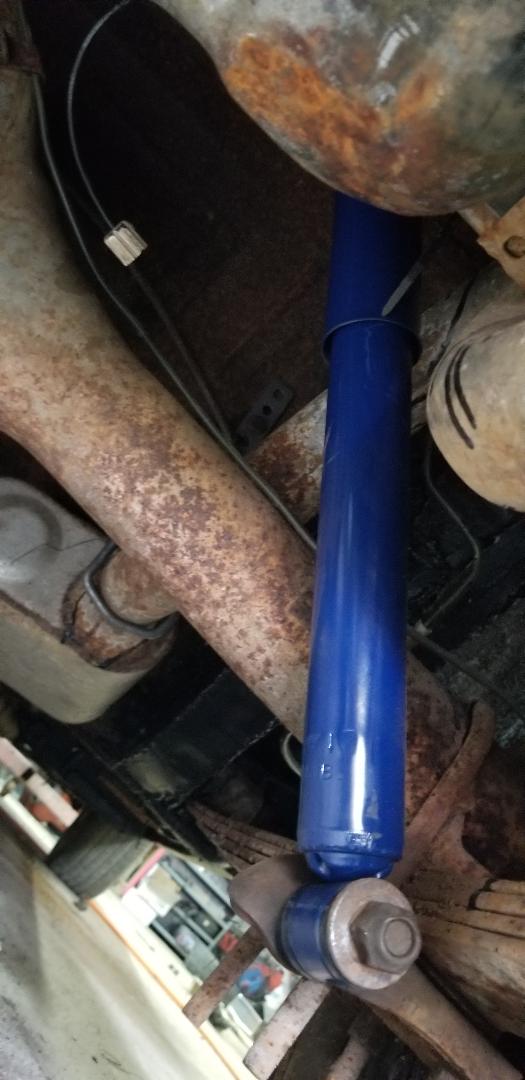
Closeup of rear shock in place.
With the shocks in place I moved on to the last big thing I had to take care of, which was hooking up the alternator. This really wasn't much to worry about, the voltage regulator was never removed when I pulled a lot of other hardware and old wiring from the car. The alternator that I used was the old unit from the 440 engine. The voltage regulator has only two wires coming from it and the alternator has two field coil connections. According to the schematic I found, one field connection gets straight power and the other one gets the regulated power from the voltage regulator. The voltage regulator gets straight power on its other connection. It didn't take long to hook the wires up, it was more trying to run the wires along the same channels that other wires are directed in order to keep them neat. Even the wire feeding power from the alternator back to the battery was routed along the main paths that I routed other wires. Of course it took a lot of wire in order to accomplish this but in the end its a lot better than having random wires routed all over the top of the engine and over and under things in one big mess. I used a good number of wire ties and some soldering and heat shrink tubing to connect shorter lengths of wire together to make the entire run on each circuit. Since I trimmed all of the bulk wire into manageable pieces I had to use the pieces from my new stock instead of grabbing a regular roll and cutting from that. I'd rather use my scrap stock first before cutting from bulk rolls. Anyway, I got the whole circuit done so the alternator should be ready to go. 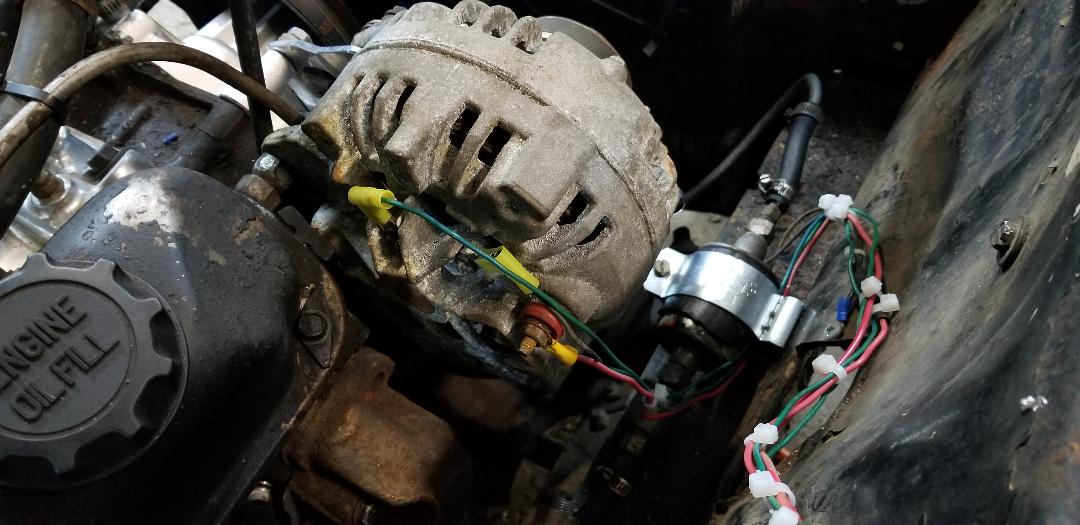
Field coil wires and output wires hooked up to back of alternator and routed along same path as fuel pump wiring. Note all the wire ties along the bundle of wires at the right.
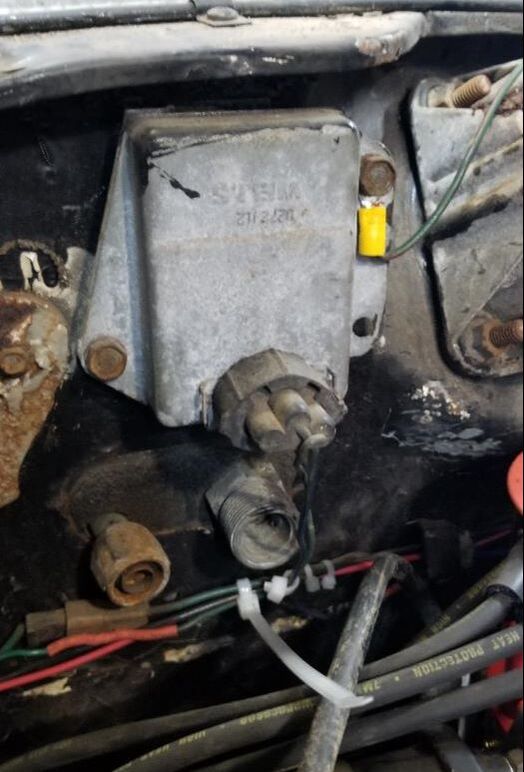
Voltage regulator mounted on firewall with two wire plug. Note bundle of wires just under regulator, which includes the charging circuit wires.
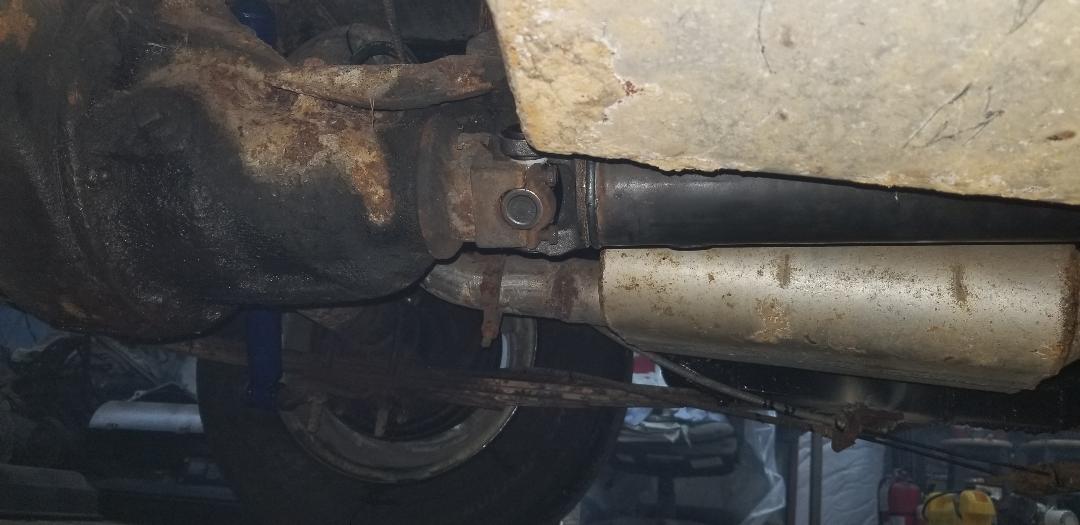
Since I'm so close I decided to take the driveshaft to one of the local driveline shops so they can lengthen the shaft to accommodate the Dodge's powertrain. They should be done with the thing sometime earlier this week. With that, I should be able to hook everything up and put transmission oil into the transmission. I'll end up getting a few gallons of gas to check the tank and make sure it doesn't leak then at that point I will be able to crank the engine over. Barring any mistake I've made in hooking everything up or a malfunctioning device, the engine should start up. We shall soon see.
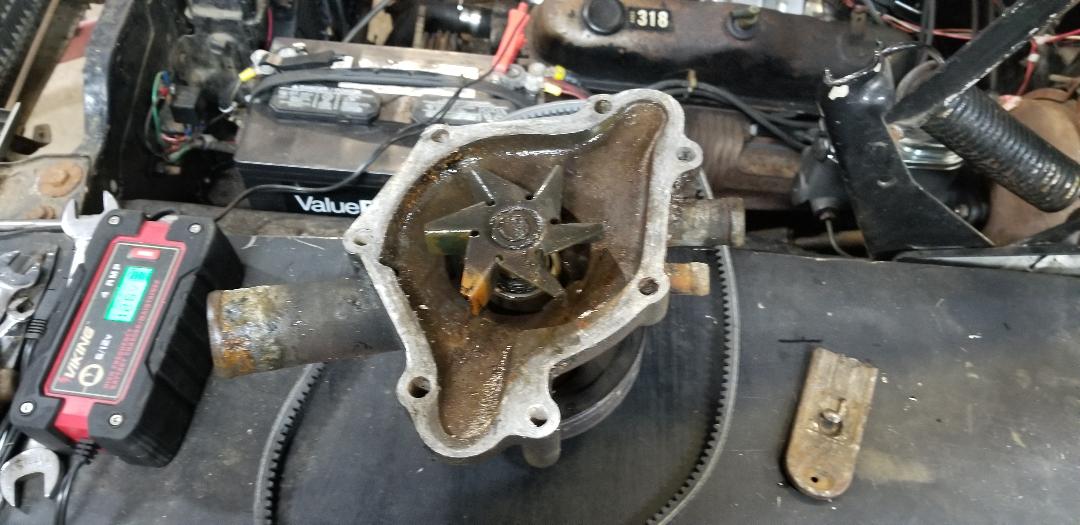
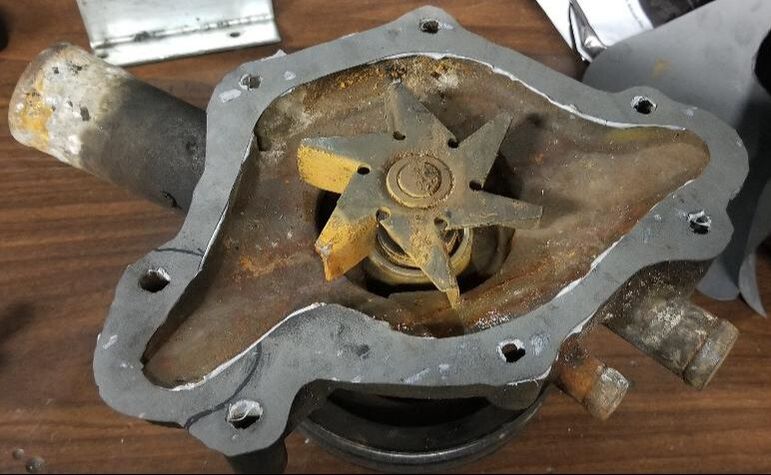
Over the last several days I've been working on various little things around the homestead. Mostly cleanup tasks with some organization thrown in, I managed to build up my outgoing scrap pile even more so in preparation for the grand haul. Part of this scrap build up was the "processing" of more wire that I cleared up from a pile of wires that was composed of the LUV's old wire harness, among other wires. I spent the day cutting the wires up and rolling up the individual wires into nice rolls to add to the box of already rolled up wire. Afterward I had a nice pile of scrap wire ready for burning. I fired up the can once again to burn off the insulation so I can add this wire to the buckets of already burnt wires I already have. At this moment I have only a little bit of wire left that I scrounged up from the garage in the process of cleaning up. Once I get this remaining wire done I'll be good on the wire and should be able to have more control over scraps, I'll be able to put any newly generated scraps into a bucket in order to burn it up when enough is produced, rather than having random piles of wire all over the place. 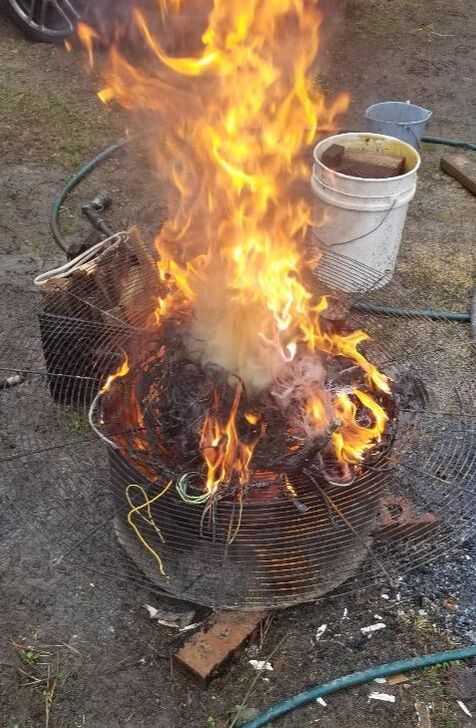 Burning half drum with grate on top holding burning wire. The next thing that I ended up having to do was replace the water pump on the Dodge. After making a gasket for the old water pump and putting the thing together, putting coolant into the radiator ended in disappointment when I saw coolant dribbling out from the weep hole at the bottom of the pump. Luckily I was able to get a new water pump from Auto Zone for $30 with no core charge. After a day I was able to pick the unit up and install it that night. At this point everything is now together on the engine. Another thing I did was replace one of the old tires on the car. One of the tires was so old and dry rotted that the tread started peeling and bulging to the point that the tire was no longer usable in any capacity. We went to one of the local used tire shops to get a tire for $30. The other tires aren't bulging and distorted so I might be able to get some miles on the other tires before I need to replace them. At least I can be able to test drive the car some before I decide to replace the tires, which at that point I'll just put brand new tires on all around. I also have some shocks on order for the car too, so once those get here and I get those installed, the only thing left will be a driveshaft, to which I'll be able to attempt to start the car and hopefully be able to get it tuned and verify everything is good hopefully and I'll be able to move the Dodge out of the garage, under its own power for the first time in 14 years. 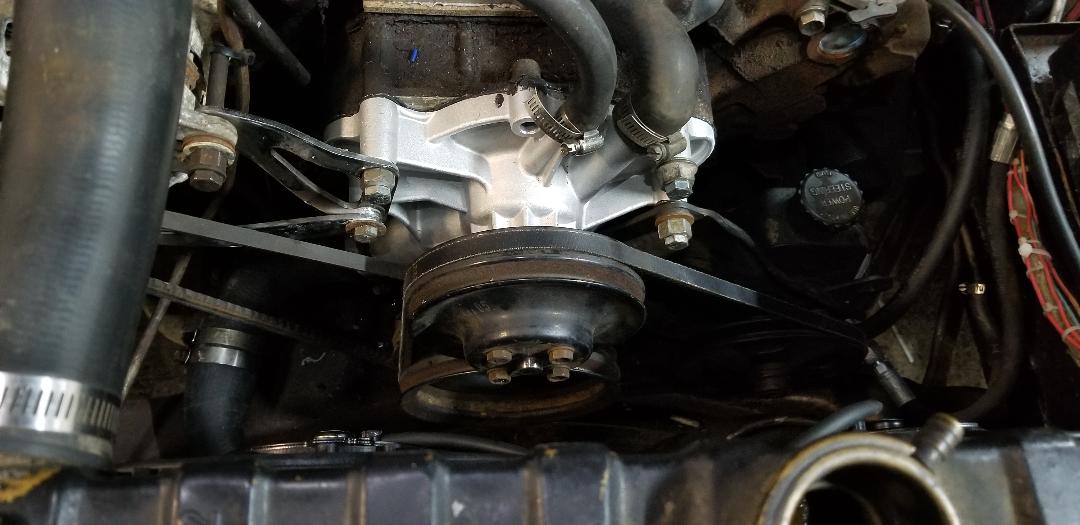 New water pump installed on the Dodge with everything hooked up. The last thing I did that was worth mentioning was doing another piece of the walkway that I've been working on for some time. I've been slowly but surely doing the walkway one slab at a time over the course of the last 6 months. I took the 2x4's that I used for a mold and resituated them in front of the walkway over the depression that I dug in the recent past. This way all I had to do was pour the gravel down and spread it out for the base layer, then, because it had rained earlier that morning, just pour the concrete right into the mold area. Normally I would've premixed the concrete in the mixer but because there was already an inch of water in the depression, pouring the loose concrete into the depression within the mold soaked up the water enough that I just had to smooth the top off with a piece of wood. This little process went pretty easy and fast because of the water in the hole and because it was due to rain some more, I had to put a tarp over the slab so none of the concrete got washed out or oversaturated that it wouldn't cure properly. I'm planning on trying to get this walkway done way more sooner than later, really so I can guiltlessly move on to another large project without leaving this incomplete. 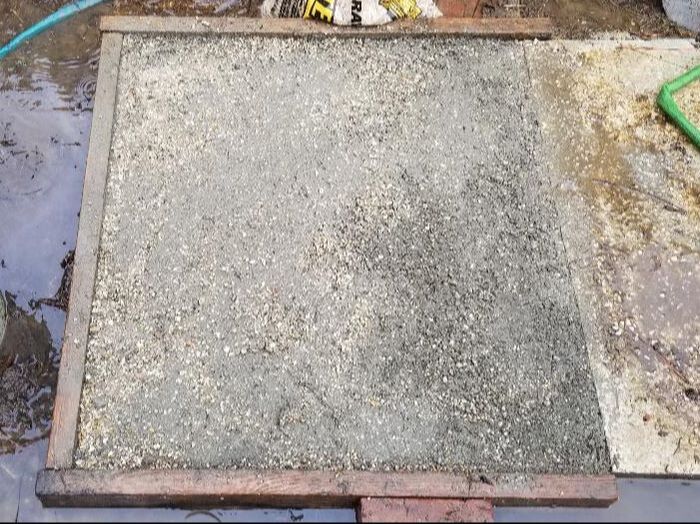 Walkway slab poured into mold. After making the water pump gasket and gluing it in place with gasket maker, today I was able to install the water pump on the Dodge's engine. Of course I took care to make sure that I put some gasket maker on some of the bolts that appeared to pass through the water jacket so hopefully everything is sealed. With the water pump in place I was able to install the belts, since the alternator and power steering pump brackets had to be taken loose from their mounting points which incorporate some of the water pump's bolts. I'll be leaving the gasket maker that I applied today to cure before I go back tonight to add some coolant to the radiator to see if everything is sealed. Hopefully with that I'll be in the home stretch, which is adding some motor oil to the engine, installing a set of shocks and tires, and a driveshaft. Other than some cosmetic stuff, this will be all that's needed (plus some fuel for the engine) for me to get the car started and drivable. As far as the driveshaft I've even contemplated taking the driveshafts that I have and blending them together myself, cutting off the yoke mounts and shortening the tube and welding the whole unit together to make my own custom driveshaft then using an old school balancing method that involves using hose clamps and a bunch of trial and error to get the shaft balanced on the car. I saw a video that walked me through the whole process. But in condensed terms you support the rear wheels of the car off the ground, make a little cradle out of some somewhat springy flat stock metal that will support a small cup of water to the differential. You run the car in gear up to highway speed with the wheels off the ground and put a piece of chalk barely close enough that the wobbly driveshaft starts making contact with the chalk. The points where the chalk touches are the "heavy" points where the driveshaft wobbles out of balance. From here you put a couple of hose clamps on with the screw point 180 degrees from those chalk marks then "drive" the car again, see how much the water bounces in the cup. You move the hose clamps a little at a time in either direction together or opposite each other and test to see just how "smooth" you can get the cup of water. Once you get to the point where the driveshaft is able to run at highway speed without making the cup of water bounce or bounce minimally, your driveshaft is in balance. I would like to attempt this as it would be another one of those trade techniques that I would love to have under my belt along with the other stuff I've learned in the automotive hobby/craft/trade. 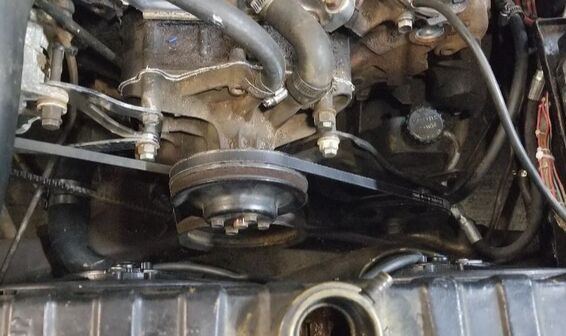 Water pump in place with belts on. Another little side project that I've been working on was "processing" the scrap wires from old wire harnesses and other bundles that I've saved from the past to make a more organized collection of wires. Since the wire harnesses are bulky and trying to get a length of wire on the fly is sometimes troublesome when it involves cutting through tape and clipping terminals and solder links and other shit from the length of wire I might need, plus just the idea that it was just more clutter, I decided to organize this crap. This involved literally cutting every single wire, removing terminals and cutting at points where multiple wires were fused together to a junction or what not and rolling up that length of wire and taping it to make a nice little neat roll that can be stored in a box or other container for future use. This did take some time as one can figure, a car wire harness has a LOT of wires of various lengths. I did cull pieces that were less than 2ft long as such pieces are rarely used and wouldn't make much sense to hang on to so many of these pieces. Only exceptions were if the wires were of a heavy gauge or if they had a terminal that could actually come in use, like a female terminal where it can accommodate a male crimp terminal on another wire. Another thing I saved were some of those junctions I mentioned earlier where one wire was soldered to a junction that spit into two or three other wires, good for when you have a power wire feeding multiple loads/circuits. Another thing I saved were plugs that had both the male and female sides together. Whether it was just one wire or a plug with ten wires, I figured these would be good for when I make a wire harness and need to be able to unplug a part of the circuit, such as wiring a steering column. I can wire the turn signals and ignition switch and horn to this multi circuit plug and if I ever need to remove the steering column, I can just unplug the unit and not have to worry about cutting and marking wires for reconnection later. These plug sets will come in handy for many electrical projects later on. Wires with an eye loop end are obviously useful as ground straps or even as a power feed that is hooked up to a stud terminal. I made sure to save these useful pieces from the wire harness for future use. Well after a few sessions of cutting and rolling up wire, I finished with all of the wire that I had stored in the garage, leaving me with a nice pile of individual rolls and plug sets that I can store away in a smaller container than what the original wire harness could ever be stored in, plus some more scraps that will be piled with the remaining scrap copper wire to be burned free of its insulation prior to storing in buckets to be placed with the outgoing scrap for my next haul. This is just another small step in my quest to get things organized in the shop/garage/yard so my future projects can go smoother without the hassles of having to try and look for key components. Until the next time.... 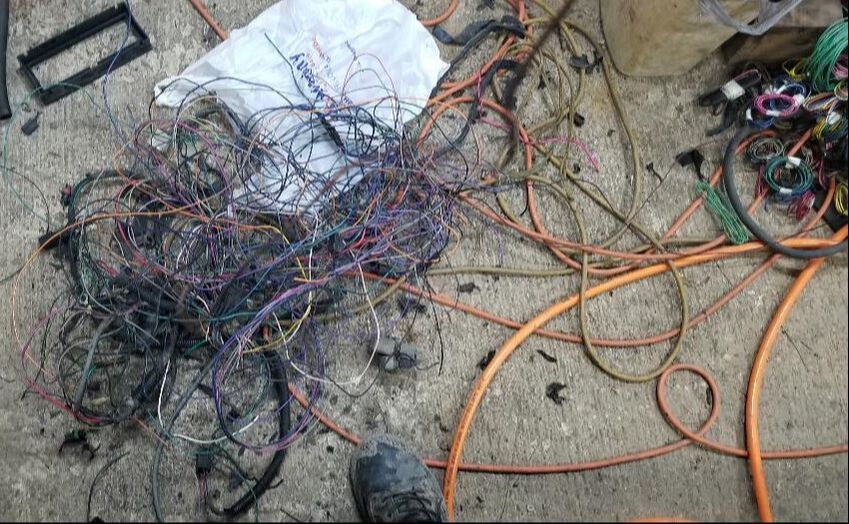 Pile of wires from old car wire harness, its actually smaller than what I started with, just to give you an idea of the scope of how much there was. Note the bundle of wire rolls to the right. 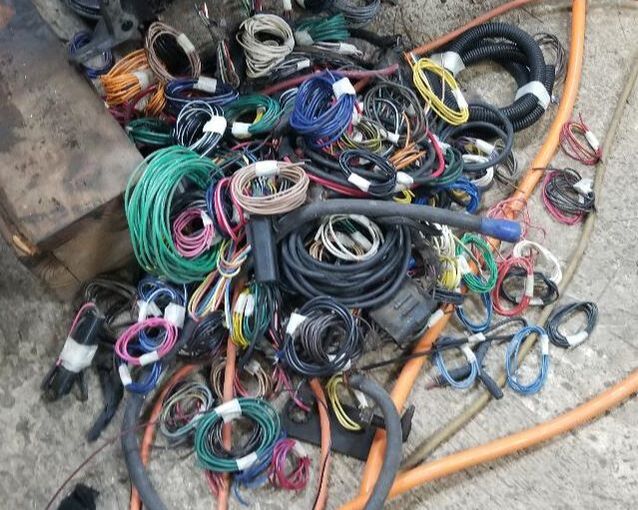 Wires all bundled into individual rolls secured with tape, one can see how a large bulky wire harness can be processed into a small bundle of immediate use rolls of wire.
At this point I'm continuing to advance in the home stretch on finishing the Dodge. I managed to install the new master cylinder and in the process of trying to bleed the brakes had to seal multiple leaks in the brake lines, which amounted to tightening brake line fittings that were still a little loose. I did manage to get the rear brakes bled enough that no more air came from the wheel cylinders, but the front brakes were not taking to bleeding. Even when it seemed that no more air came from the wheel cylinders, they still didn't move when the pedal was pressed, not even enough to remotely drag the front wheels. That was until I thought of trying something.
On the calipers the bleeder valve is not at the topmost point on the caliper body when its mounted in place. I took one caliper loose and turned it up while still keeping the brake pads in place enough that it was still between the piston and the body of the caliper, basically turning it 90% of the way off, enough to get the bleeder valve to the topmost point. When the bleeder was opened after pumping the pedal, a big fart of air came from the caliper. After reinstalling everything, the caliper grabbed hard. After doing the other side, the front brakes were grabbing just as they were supposed to. That at least closed the chapter on the brake system. 
Master cylinder installed on brake booster.
With the brake system completed I was fixing to install the last belt on the front of the engine when I started seeing water slowing dribbling from under the engine. Kinda pissed off that this would suddenly occur when I'm coming so close to the end. After a little investigating I seen that the water or actually, coolant, was coming from the water pump gasket. Guess this thing was pretty old since as soon as I started taking the bolts loose more coolant started coming out. After removing the water pump the gasket was all but dust, there was really nothing left to seal the unit. I got the surface of the timing cover cleaned off along with the back of the water pump but still needed a gasket. I had some gasket paper in the storage trailer so I was able to trace out and cut out a new gasket from the gasket paper. I glued the gasket down so it can cure and be ready for installation soon. Once I secure the water pump to the engine I can install the other belt and have that phase of the project done. 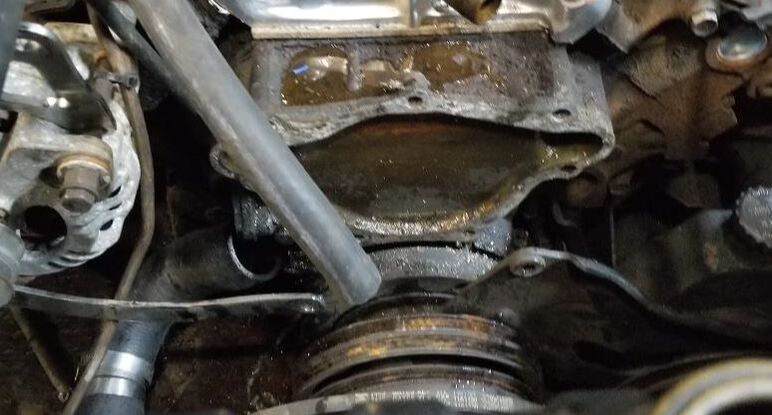
Timing cover surface cleaned and ready for water pump installation.
Water pump cleaned and ready for gasket to be glued down.
Water pump with new gasket glued down, note roughness of it, showing that its homemade.
On a lighter note, I managed to move more scrap around and cull even more scrap from the old scrap pile, enough so that I managed to clear just about everything from the area short of a few drums and a drum boat hull that I made with the intent of using it as the basis of a trimaran boat build that I aborted long ago. The drums will be moved and staged in the new area, awaiting use as burn drums more than likely, while the hull will be cut up and added to the outgoing scrap pile. With the remaining metal removed from the old area, I can run over the grounds with the push mower to clear it more, then make my way over to the pallet pile and start clearing that area. I'll save a few pallets for other uses but cut the rest of them up into boards for future project use, the same way I did when I build the fuel shed. 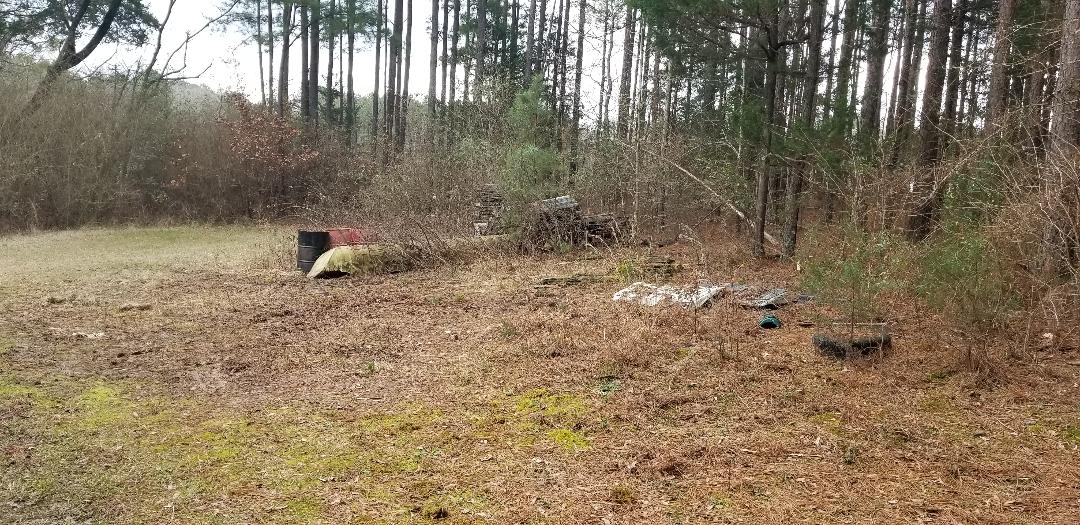
Scrap area pretty much cleared short of the drums and the drum hull, and a bunch of old plant growth.
|
