|
The next installment in the Mustang Chicken Coupe project is getting the power online in the car as well as getting the air circulation fan in the brooder section hooked up. I had to repair the power cable that was pulled free when I moved the car into the chicken yard in the days past. I also had to dig up a power supply to hook up to the fan in the brooder. Starting with the power cable, I ended up just splicing a length of cable with a plug back into the short length of cable coming from the outlet box in the cab. Some solder and electrical tape made this repair pretty fast and in no time I had the plug routed out through the hole in the floor where the water line is also routed. Wire ties secure the cable in place to keep things nice and neat.  Coupe power hooked up to cable coming from the trench. Excess cord is stashed under the car. As for the brooder fan, I ran into an interesting issue. The heater that I was planning on using in the brooder section was a little larger than I took into account and if I plug it up to the outlet, it would have to be plugged up to the top outlet, and even then it would still make contact with the floor due to its size. Because of this, I ended up having to plug the power supply to the inside outlet, in the cab. At least until I can resolve the heater issue in the brooder. Hopefully I'll be able to find a smaller heater that will plug into the lower outlet in the brooder while still allowing me to plug the power supply into the top outlet. I routed a little extra wire from the power supply through the firewall to the fan, hooking everything up. With the two fan power supplies hooked up in the cab, I was able to get the brooder fan online as intended. But now another issue was brought to light. The idea that the fan has no screen or cover will be a problem for the dumb little baby birds that will be just as likely to get decapitated by sticking their beaks into the whirring fan being nosy as some other foreign object would end up getting stuck in the fan. I had to figure out something with this. 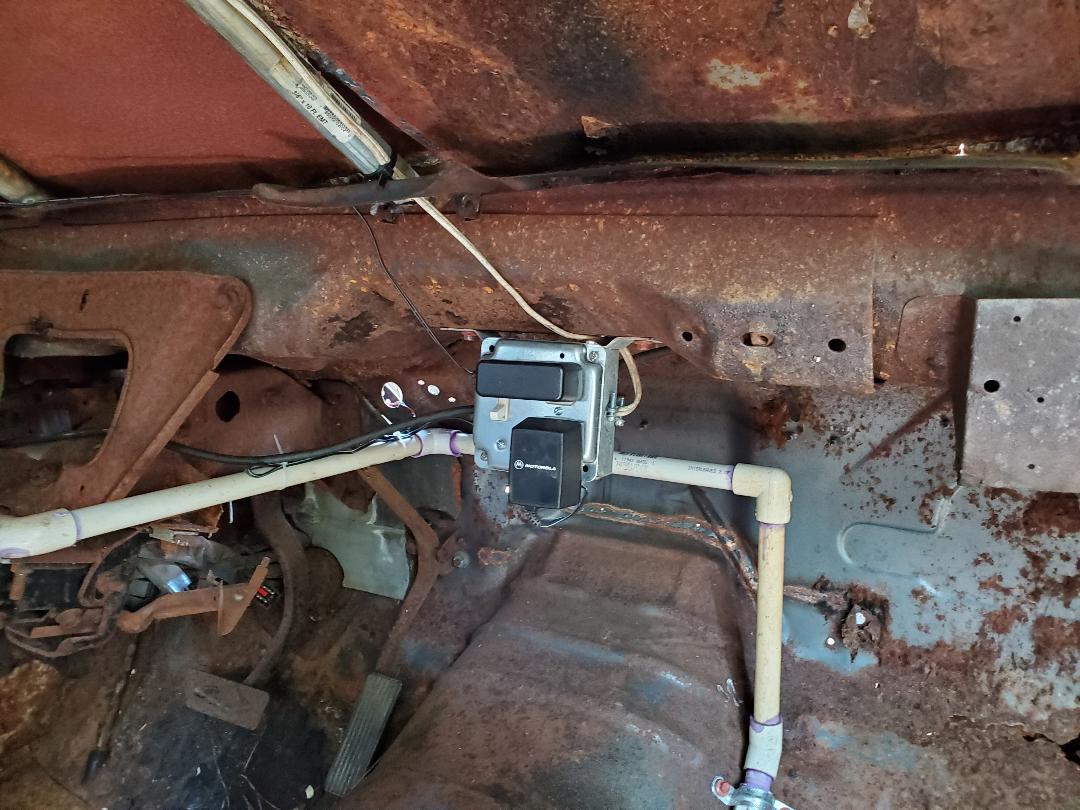 Fan power supplies plugged up to cab outlet box. Note power cable wire tied to water line at center left. I had to figure out what to put in front of the fan to keep it shielded from the baby birds while still allowing proper airflow. After looking around the shop and scrap piles I found the most unlikely thing to use for this problem. The dashboard from the same 73 Mustang that is now a chicken coop had a speaker cover on it that with the way it was made, looked like the perfect fit for a cover for the fan. The cover/panel is perforated with holes and has four mounting tabs that would allow me to mount the panel over the fan close enough to keep anything or any bird from accessing the fan while still allowing proper airflow. I was able to use two of the tabs to mount the panel at the top of the fan and one of the bottom tabs met with the firewall just right to allow for mounting. Self tapping screws made sure the whole piece was securely mounted. With that, the fan was ready for service so the baby birds can have proper ventilation during these hot days. 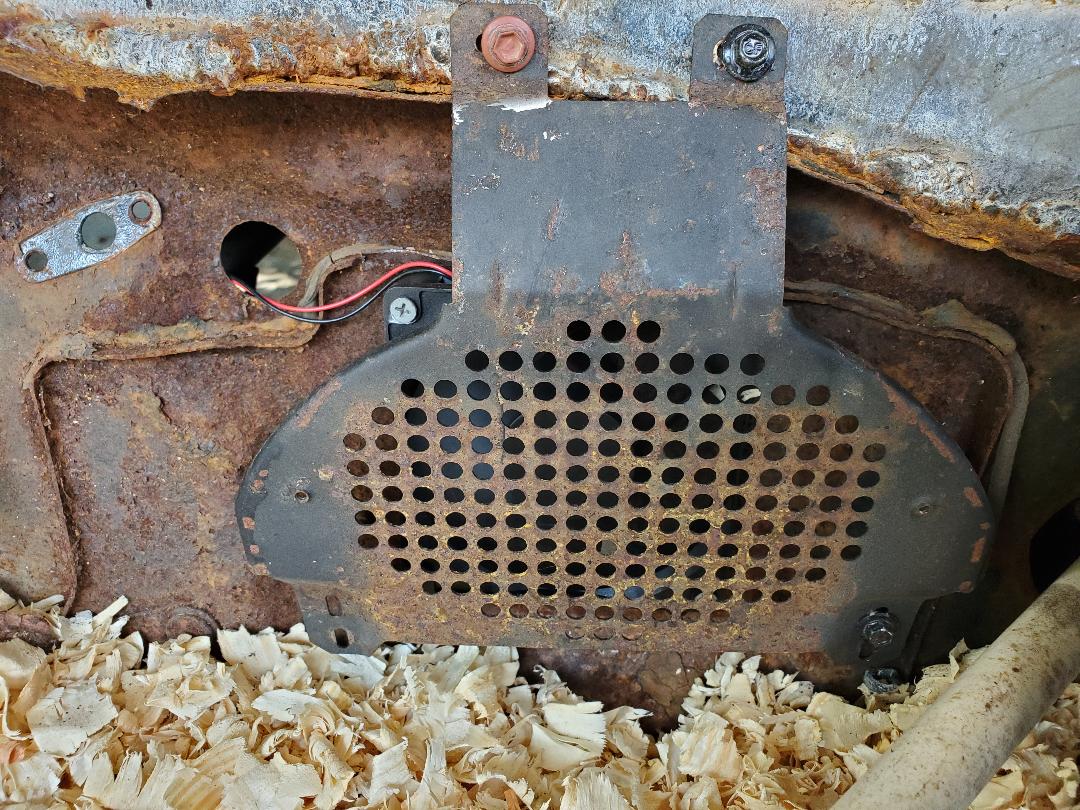 Speaker cover used for fan cover, note how tabs made for perfect mounting of unit to firewall. 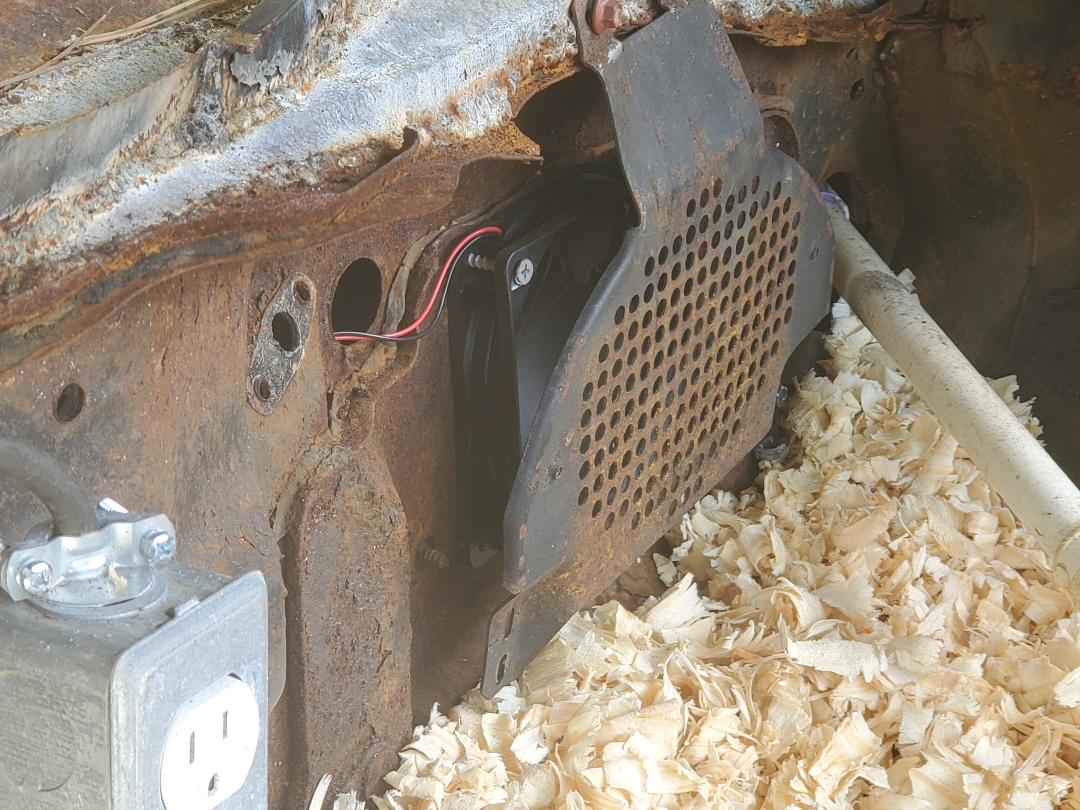 Side shot of fan cover showing how its situated in front of fan. Note how power wires are routed into firewall. The last things to do to the car is to make a ramp for the nesting area and set up a roosting post for the cab area. I also have to make a window cover that I can move up and down when it rains to keep water from getting blown into the cab. With that, we can move in its first set of residents, some almost fully grown birds that are currently in the chicken tractors which are now crowded due to their increasing size.
0 Comments
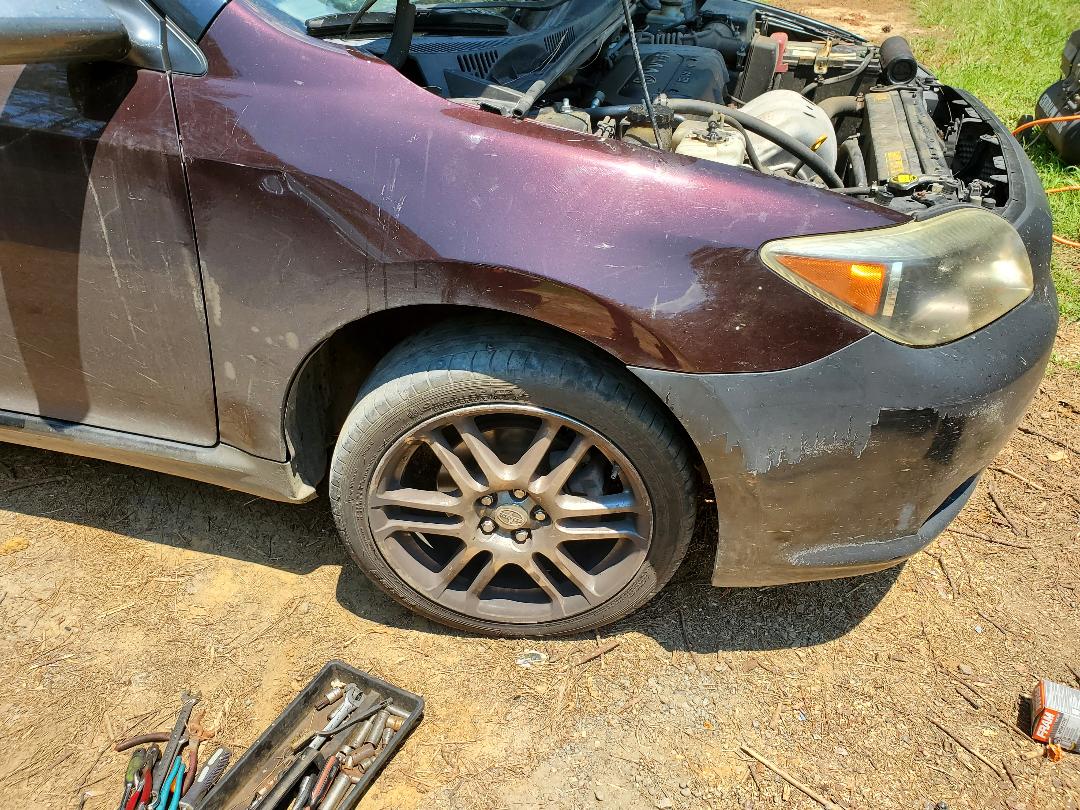
After its being used, heavily for the last half a year, the Scion is a little worse for wear when it comes to the suspension. When you put two year's worth of miles on a car in 6 months, shit's gonna be worn out. Anyway, the car's been doubling as a low rider for a while and driving had to be a little careful on certain roads due to the car's desire to bottom out. The suspension is in need of an overhaul. The first place I'm starting is with the struts.
I managed to order a set of struts online for $200. Since we are talking about replacing struts, I had to pick a time where I would have several uninterrupted hours to work on this thing since there's no telling what I might encounter, especially with the rear struts. I figured the fronts would be relatively easy. I was correct, the fronts were easy. three nuts on top and two large bolts at the bottom plus a bolt for the brake line/speed sensor wire and the sway bar link and the strut was out, super easy. I was able to get the front struts in and out pretty fast. 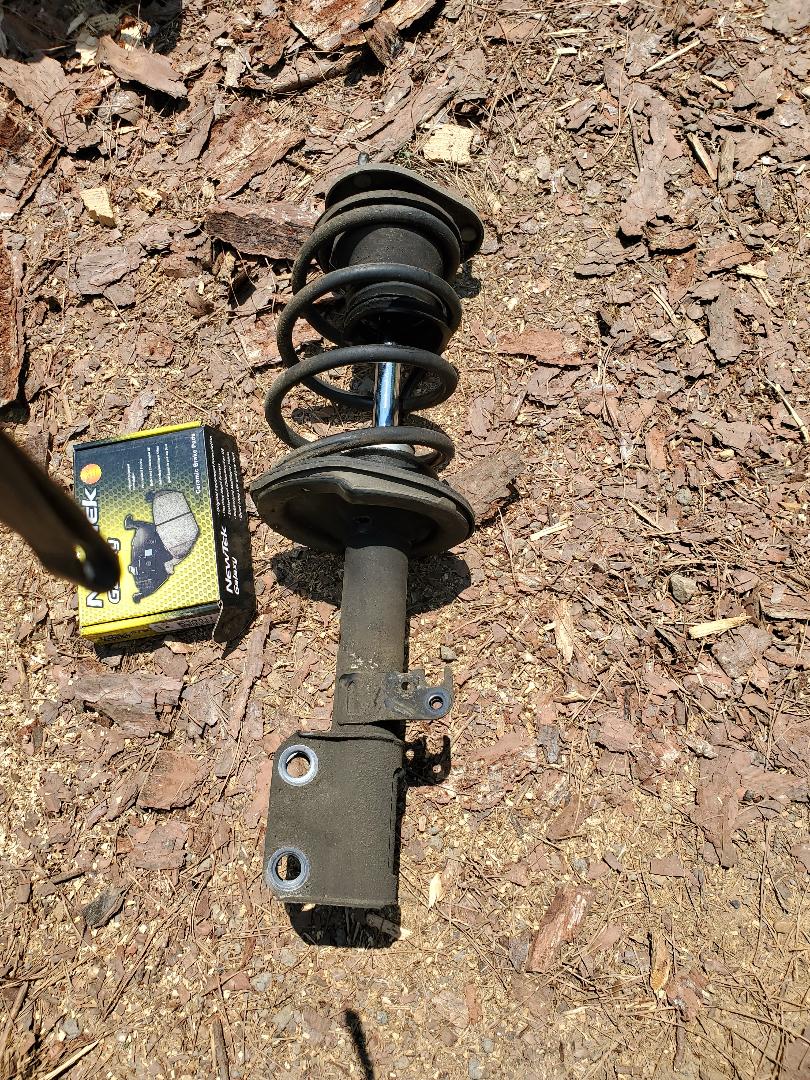
Old front strut removed, note worn out shock boot and grease all over unit.
The old struts were worn out, obviously since the front of the car was riding low to begin with and the shock boots were worn out and had grease all over the place. After putting the new struts on and lowering the car to the ground, the ride height was vastly improved from the way it was. The top of the wheels almost touch the bottom of the fender, now, there's a good inch or two gap between the wheel and fender. 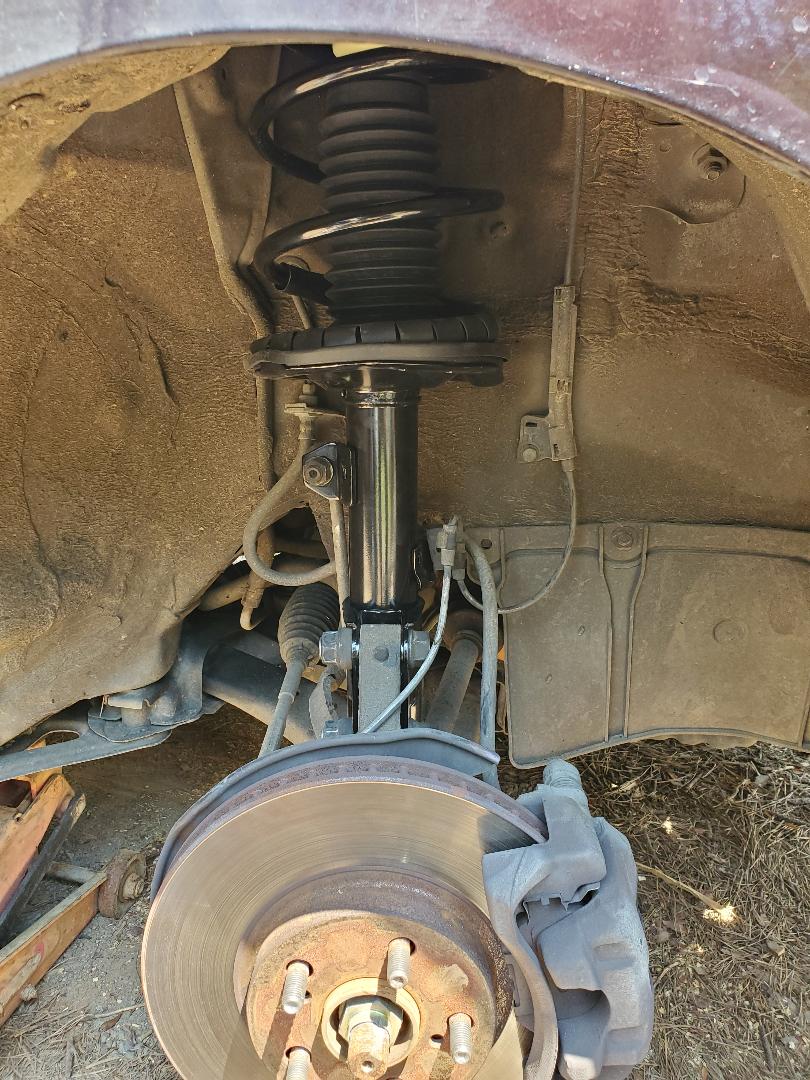
New front strut installed
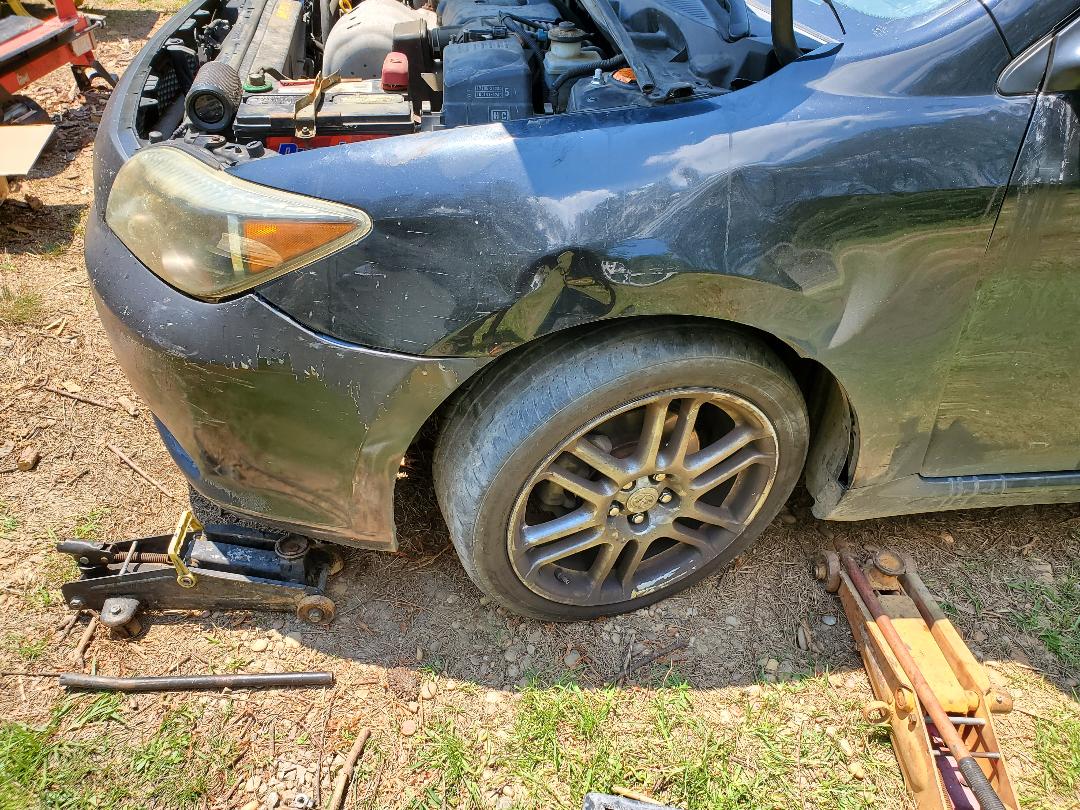
Front left side showing improved ride height after replacing strut.
Same goes for right side.
Now on to the back. Oh yeah, the back. After pulling the wheel off of the left side I saw that I was in for a treat. The bottom of the strut was held with one large bolt and nothing else was hooked up to the unit but the top, it was held with three studs/nuts that were hidden under some interior paneling. For the helluva it I pulled up a YouTube video on the rear strut removal to confirm what I figured. That was the fact that I would have to remove the "trunk" interior paneling, including the sides, in order to access the trio of nuts for each strut. Now while this appeared to be problematic, it ended up actually being pretty easy. A couple of retaining brackets and some snap clips and removing the cubby inserts and spare tire and I had the side panels and "floor" from the car to open up the area so I can get to the hardware. 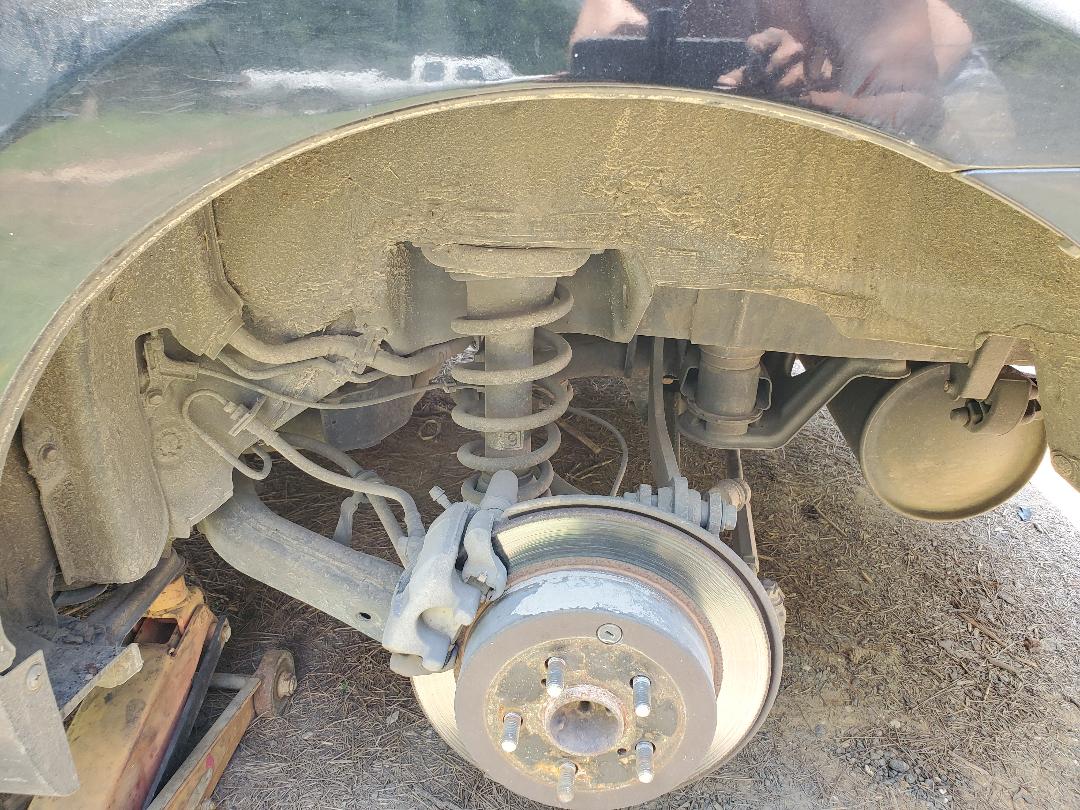
Rear strut ….
Rear/trunk section gutted in preparation for strut job
After pulling the nuts loose, it was time for the bottom bolt on the each strut. This turned out to be very troublesome as these bolts were probably never removed in the life of the car. I ended up having to put a cheater pipe on a breaker bar with a socket to break the nut enough to be able to remove the hardware. THEN, even after getting the bottom bolt off, I ended up having to use the cheater pipe to pry the lower suspension down enough to clear up some space to be able to remove the strut. I even had to twist the thing to get the studs and bottom mount in a position to be able to work it free from its prison. Of course I had to do the same thing in reverse to get the new units in. 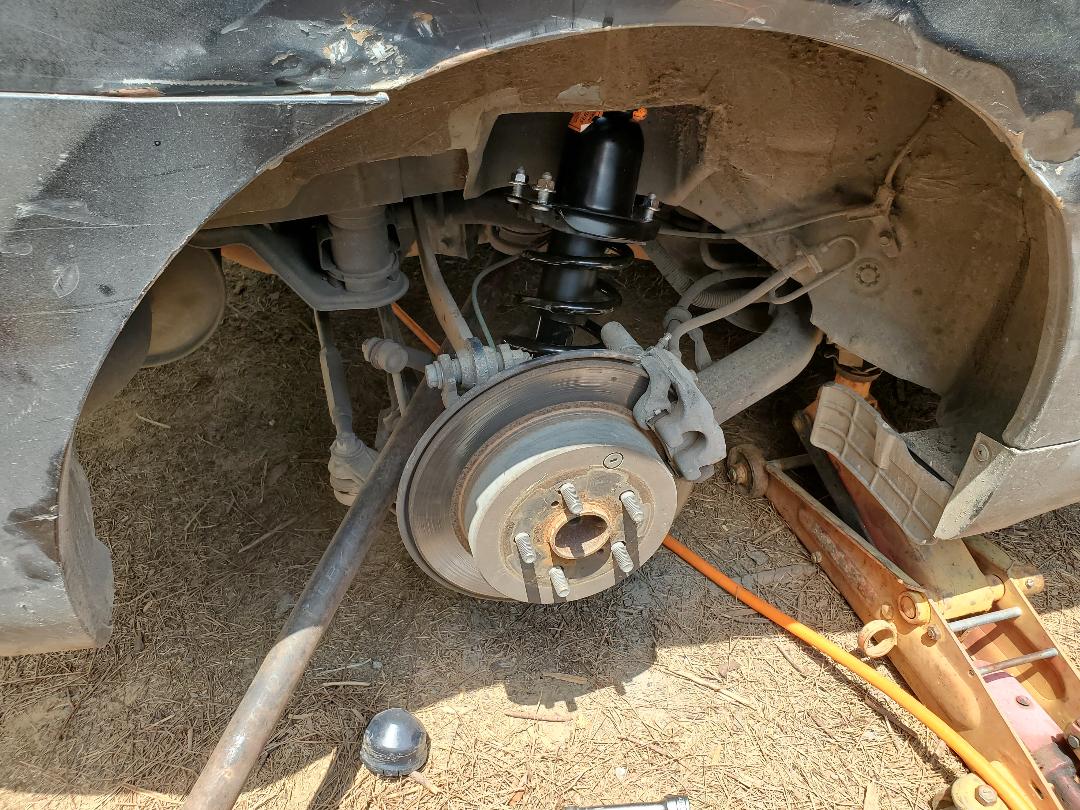
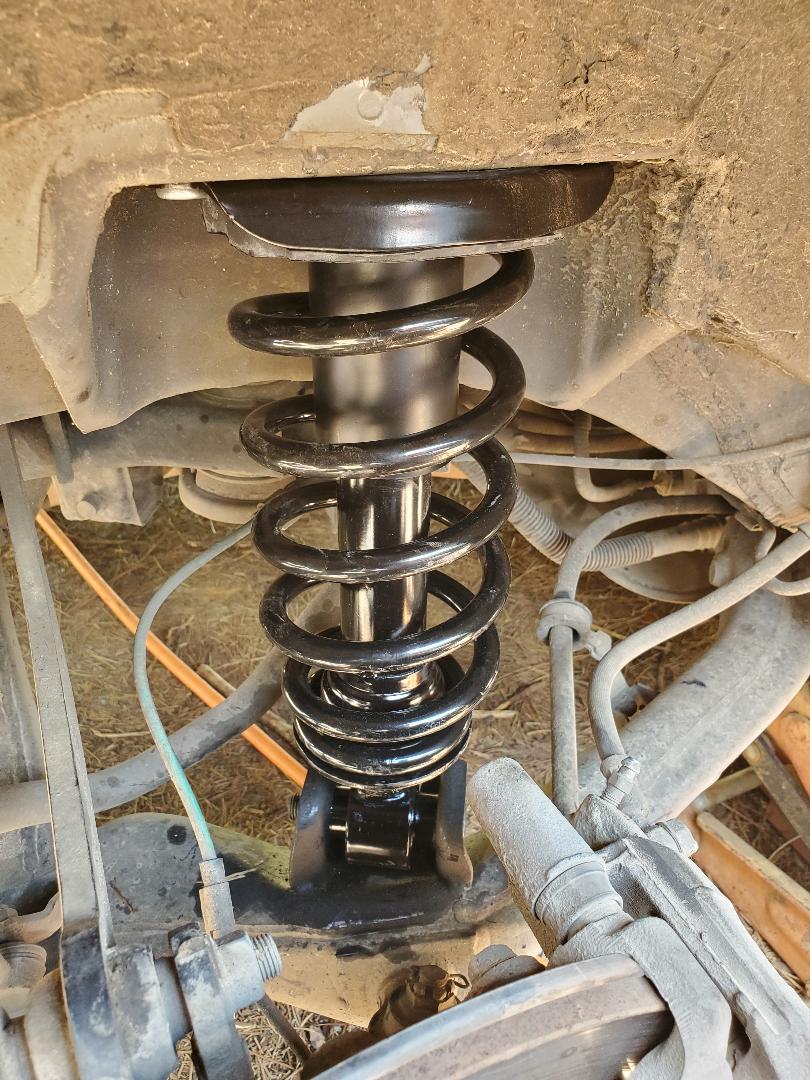
New rear strut being installed, note cheater pipe to lower left and the odd angle the strut is in.
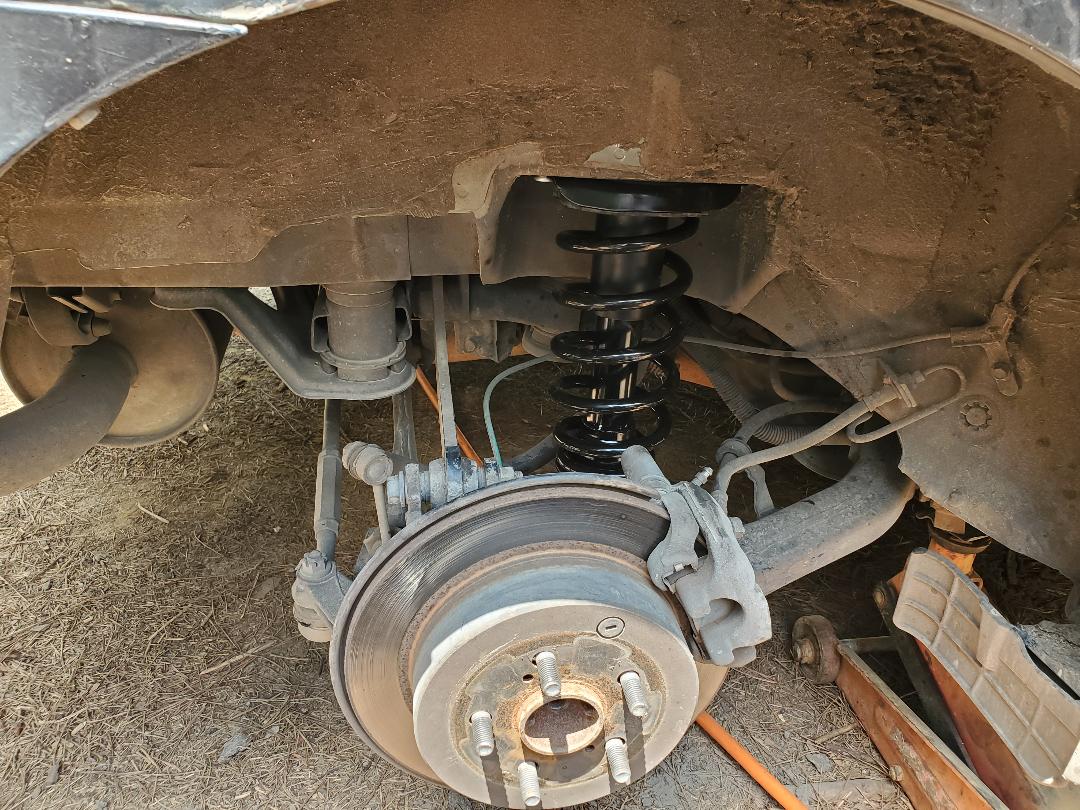
New rear strut mounted in place.
Bottom mount for rear strut. Note layout of area, showing how it can be problematic to get tools in at the right angles.
With the new struts in I was able to drop the car down, with the same results as the front, nice ride height, sturdy suspension. I quickly reassembled the rear interior and had everything back in order. To clean things up I changed the oil so now the car's all ready to rock and roll. I was going to change the brake pads but they turned out to be good still, apparently cheap brakes have a habit of making noise more than usual. At least now the car is heading on the right track. The next thing to be replaced will be the lower control arms and sway bar links.
I had to move up the timetable for getting the utilities hooked up in the Mustang Chicken Coupe due to the idea that the hatchery we normally order baby chickens from had moved up the ship date for a small order of chickens we had from July to NOW. So even though the car was in position in the chicken yard I still needed to get water and power hooked up. I took care of the water with a simple garden hose but still had to get power to the car. Since it is warm I wasn't really too concerned with power. I brought the chickens home and we got them set up in the brooder area of the car and showed them the drinker cups so they can get used to where to find water. We put a small bulk feeder in the brooder so they can have a fair amount of chicken feed. Even though things were straight, I wanted to get things permanently set up. This means digging a trench to set up the PVC water line as intended to replace the hose. I also wanted to put an extension cord in to run along with the pipe. 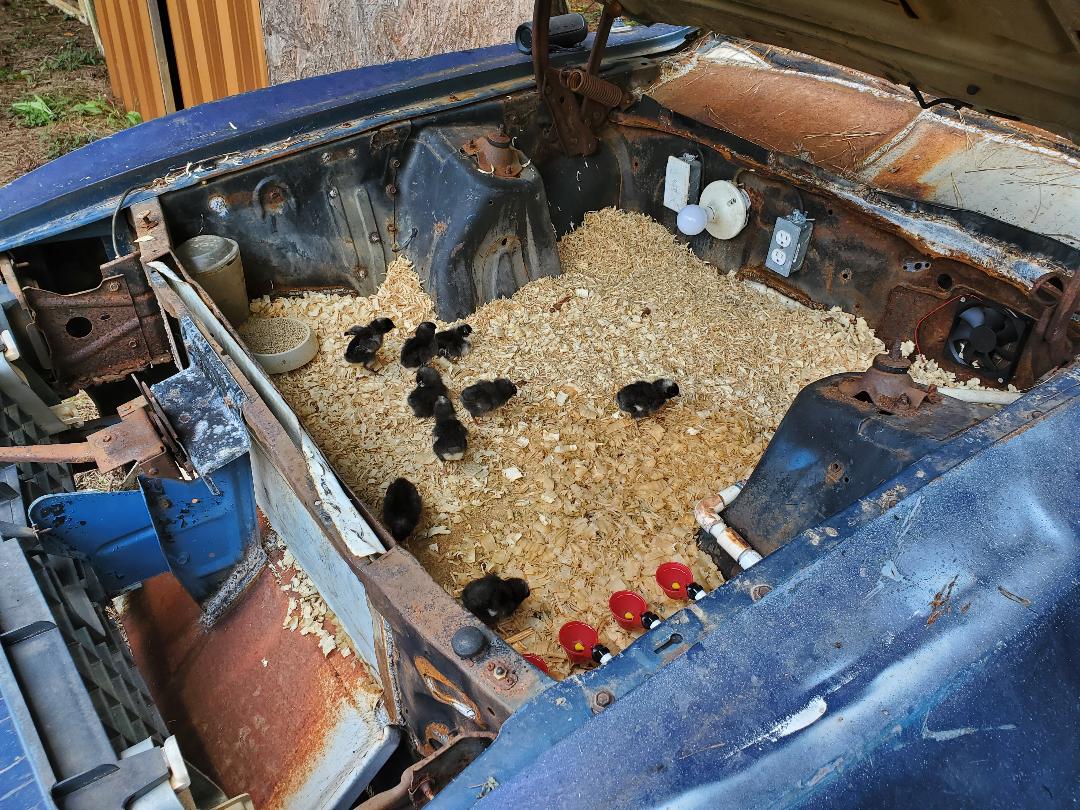 Baby chickens in brooder compartment of Mustang Chicken Coupe. The first thing I did was start digging the trench. I dug a line from the spigot on the house, past the old AC unit then turned at a 45 degree angle towards the car. Once at the car I did another turn to go along side the front left tire of the car where the pipe will end and the spigot will go. I also added a spur from the power pole to connect to the main trench so I can run the extension cord as well. 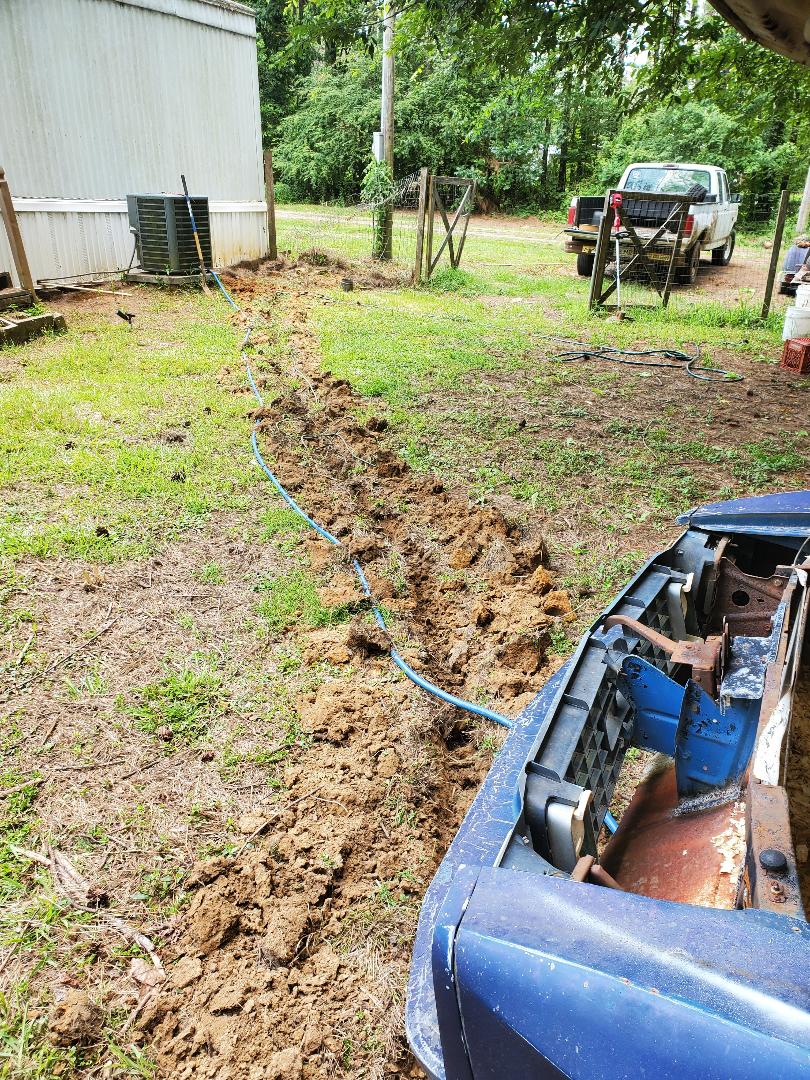 Trench dug from house and power pole over to car I had to pull the section of skirting rom the house to access the water line where the spigot is at. I had to cut the spigot off so I can install a tee in the line. After installing the tee I put a length of pipe in going straight down into the trench where a 90 degree elbow was installed and another length of PVC glued in place. From there I put a 45 degree elbow on and started my main pipe run to the car. I needed three 10ft sections of 1/2" PVC pipe to get to the last section of trench at the car. Another 45 degree elbow was installed and a final length of pipe put in with a 90 degree. A short piece of pipe was put in and a few fittings used to couple the spigot to the end of the 1/2" pipe. With the pipe and spigot in I went ahead and moved on to the extension cord. I grabbed an older cord I had that was 50 ft long and plugged it up to the external power box that I put in for the power run to the dog yard. I ran the cord along the other cord to the ground then routed the cord into the trench. Once in the trench I was able to run the cord and kick dirt into the trench as the cord was dropped. I killed two birds with one stone getting the cord in and the trench filled in. This of course didn't take long but I did come up short on the cord and had to grab another old and short extension cord to plug up to the 50 ft cord. I wrapped the plugs in electrical tape to help keep things sealed prior to burying the cord and the plugs. Once at the spigot I was able to finish filling in the trench and route the cord to the underside of the car. 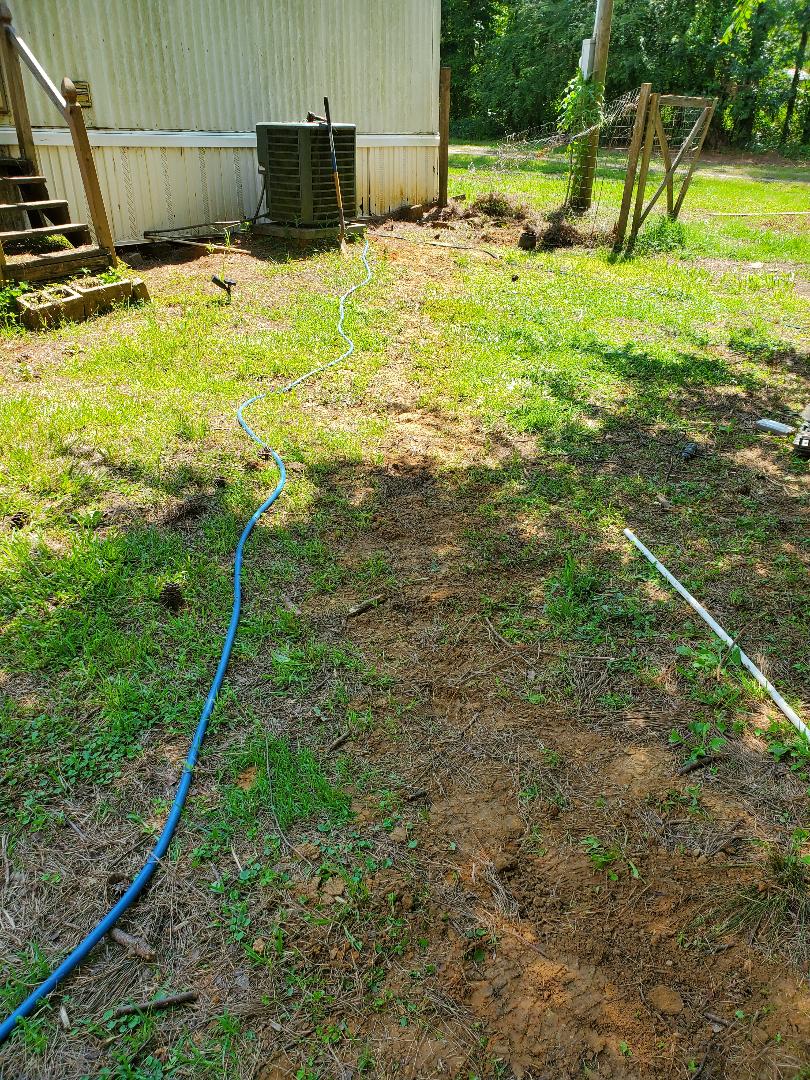 Trench covered up after laying pipe and cord. 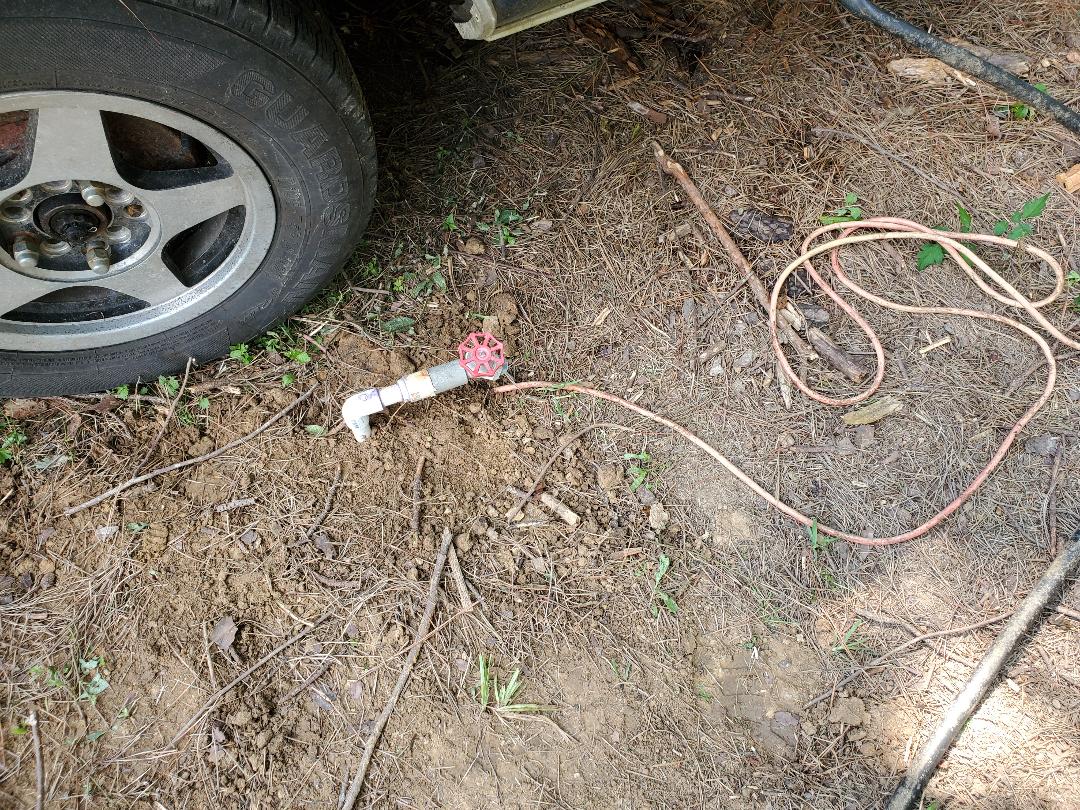 Spigot and extension cord at end of trench next to car. I had a short length of hose that was on an old automatic watering dish that was in the chicken yard that I pressed into service for the Mustang Chicken Coupe. Once hooked up I fired up the water once again and bled the air from the lines and had water online for the baby chickens but this time through PVC pipe instead of a hose. 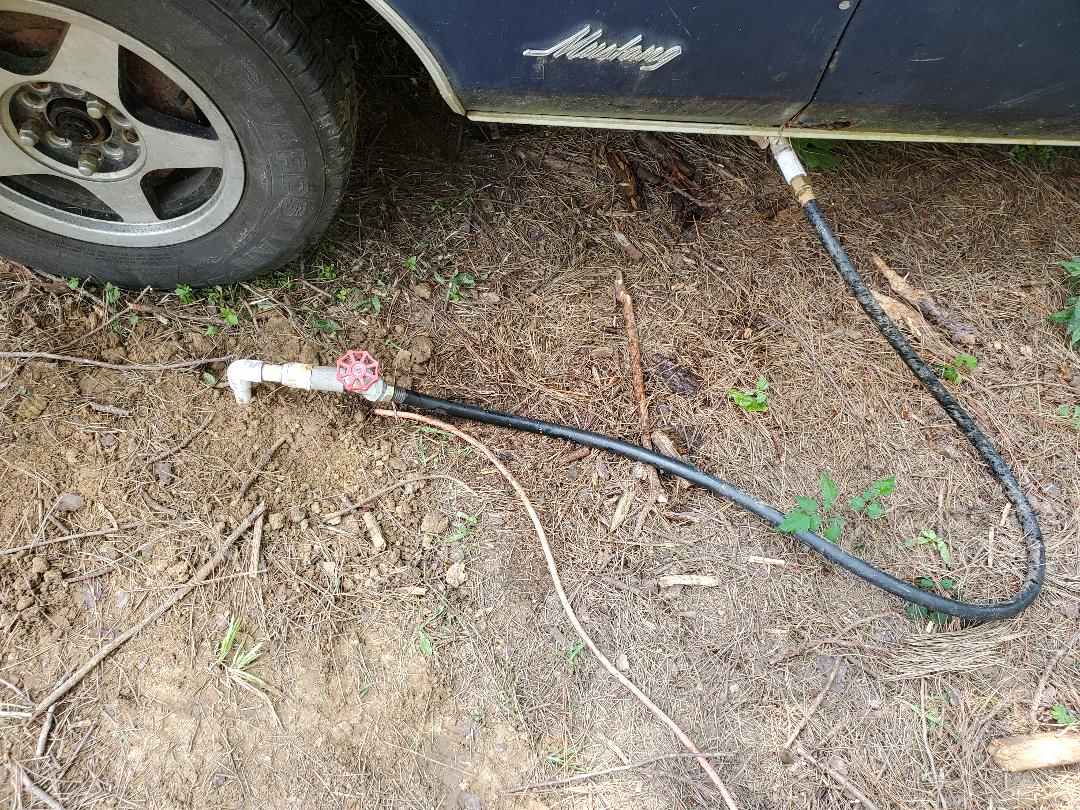 Spigot with short length of hose hooked up to car. I do still need to repair the power cord where it broke off during the move of the car. I could install a plug on the end of the cable that is coming from the power box in the car and run the rest of the extension cord up into the car to plug it up where its protected from the elements or just dig out a short length of cable with a plug on it to hook up to the power cable and just plug the ends up outside of the car. I'm still debating that one but in the meantime the car has running water and the baby chickens have a lot of space to themselves. After cutting and stacking firewood for so long I took some time to do a little landscaping in the chicken yard. Other than some removing of sticks and other small detritus, the biggest thing was running the lawn mower over the high grass that was taking over the yard. Since the ground had plenty of time to dry real good, I felt like it was as good a time as ever to move the Mustang Chicken Coupe into its new home. Since the car was moved earlier to a temporary spot along the driveway when we had to remove the tree that fell, I had to move the car somewhere since it couldn't keep sitting there along the driveway at the edge of the clearing. So in an impulsive push I got started, using the F250 truck to pull the car up the driveway some to get it staged. Since the driveway moves down at a slight grade, I figured that pulling upstream will allow me to use gravity to push the car over into the chicken yard.  Using the F250 to pull the Mustang Chicken Coupe up the driveway. After pulling the car upstream I went ahead and started pushing, again, using gravity to help me out. I wanted to back the car into the yard so the nose of the car is showing where its kind of more decorative than having the ass end of the car showing. That actually worked out pretty well, I was able to get the car rolling with little effort around to the fence into the chicken yard. Now while the car was kind of perpendicular to the downward angle of the land, I would have to use a little more push to get the car into the yard completely.  Backing Mustang Chicken Coupe into chicken yard. With a little extra kick I was able to push the car further into the yard. Turning the wheel as needed I was able to back the car in perfectly where I wanted it to be. After docking the car in its spot, I found that the car didn't even need to be chocked to keep it from rolling away. Ground was level enough to keep it where I wanted it. The spot where the car's docked is right between a couple of trees with plenty of room on either side to maneuver around when its time to clean the car out. The passenger door can be opened as needed and there's more than enough room in the back as I didn't back the car against the fence line.  Mustang Chicken Coupe docked next to old coop structure and between two pine trees.  Other shot of car parked next to old coop structure and between two trees For the last couple of days I decided to just go to work on the pile of cut logs and other tree refuse I had stacked along the driveway. I wanted to try and get as much of this crap cut, split and stacked as I can. Of course this incorporated more use of the chainsaws and the log splitter. Some of the logs were 3 ft + long sections that still needed cutting into the shorter sections. There were also narrower branches of a couple inches thick that needed to be cut down into small pieces, these would serve as kindling for the larger pieces of wood. With enough sweaty hours I was able to process so much wood that I stacked up four plus pallets of wood along with the other stacked pallets. I cleaned out the pile pretty good, enough so that I was left with only a few short sections of logs in the main pile. There is a secondary pile around the power pole that consists of smaller pieces that I will go after in the next round but the main task was the large pile that was in the way of the side park area along the driveway. 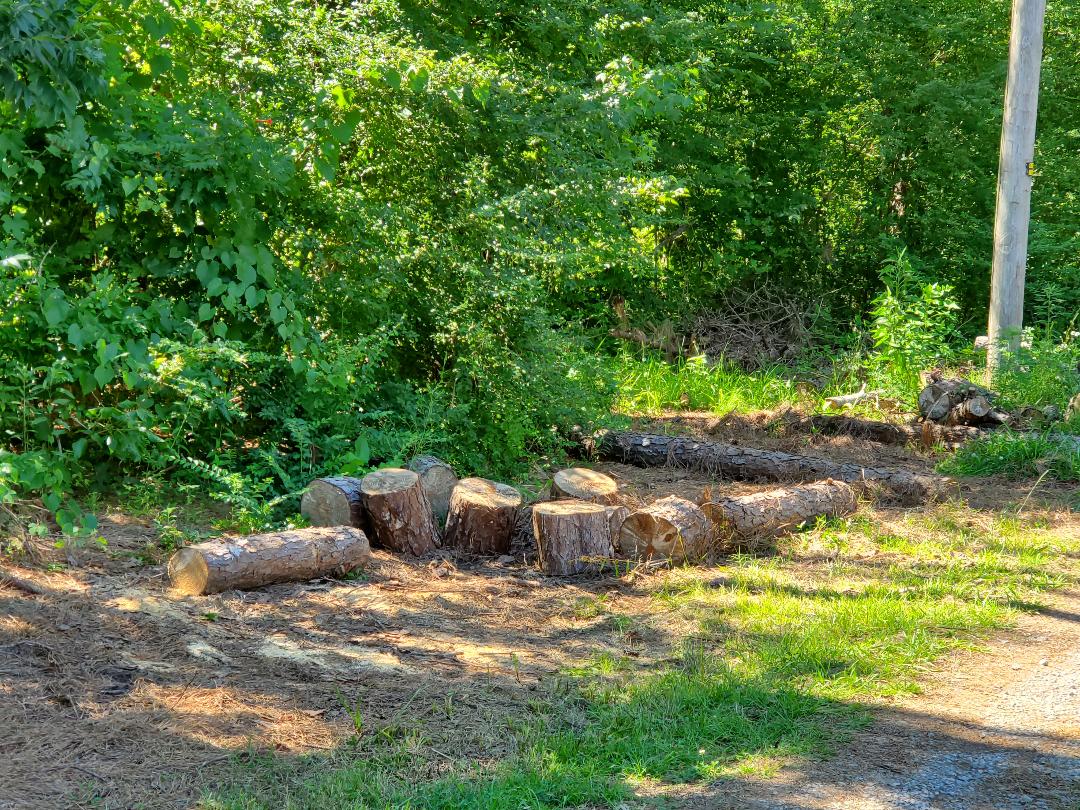 Dwindling log wood pile I've had to dip into the decaying pallet pile trying to find more pallets to stage so I can put more split wood onto. I might even have to go as far as patch a pallet or two to provide extra surface for stacking. I'm estimating that I will need two more pallets to take care of the remaining wood plus any extra that might be generated from around the lot. Under some circumstances I've even sacrificed some otherwise useful branch pieces to the burn pile as I didn't want to spend the extra time trying to glean usable wood from these pieces plus I'm already up to my ears in firewood. Plus with the decaying pallet pile, there is another source of firewood that I still have to tap into. This wood will probably be relegated to outside use wood since it is usually treated with chemicals and has nails and screws in them. Again, I'll be awash with wood for the foreseeable future. And speaking of burn piles, there was the matter of the pile generated from that tree that I cut up earlier...  The ever growing firewood stockpile. The burn pile from the branches of that tree were plenty dry after sitting for several days plus it was growing even more as I dug out more branches from the log pile that I didn't want to mess with. Other miscellaneous branches and shit were also stacked on the pile. The large sheets of bark that came from the logs were also stacked on the pile. I also had a large pile of bagged trash to be disposed of. I went ahead to fire the burn can, which was more or less half surrounded by branches. I already knew what was gonna happen with this. The burn pile caught after being subjected to the heat from the burn can long enough. The dry leaves helped flare up the pile nicely. I kept adding bark to the pile as I split more wood and threw the outer sections of branches further into the hot zone as the fire burned its way down further. I did have the thought of trying to cut some other branches that I saw as "low lying fruit" to further throw on the pile while it was burning but said fuck it as I figured there will be plenty of episodes of growing burn piles as I do more landscaping around the area. 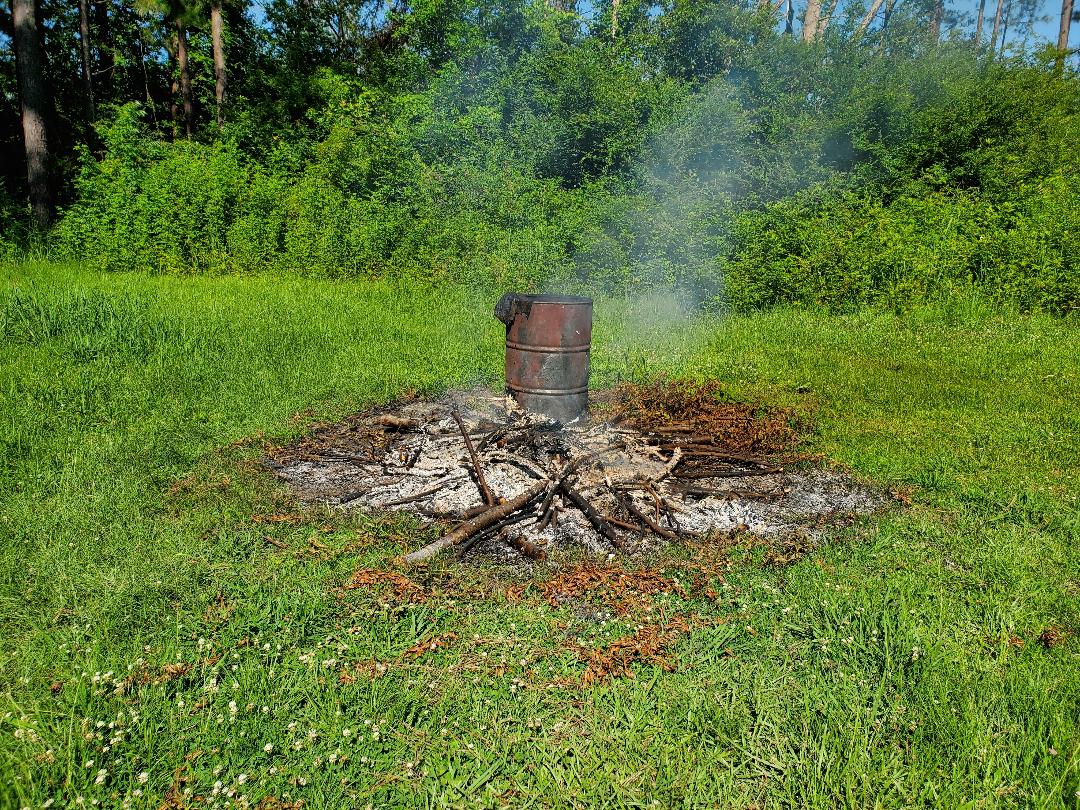 Burning down pile of rubbish around burn can.
Well mother nature is at it again. After tropical storm Cristobal passed through the south a couple days ago, overnight, it took down a tree in our yard. Yep, another fucking tree. The funny thing about this tree is the idea that the day before, I was looking at this tree and at the root base and was telling myself that this tree is in danger of coming down as the dirt around the tree was starting to pull up.
Well after the winds passed over, it pulled the tree up enough to make it come down, but not fully. It fell enough to get caught in the power line coming to the pole next to the house. A retaining bracket that holds the line against the top of the pole was all that was holding the tree up as well as keeping said tree from pulling the power line free from the pole. Well since it was in a live power line I didn't want to take a chance trying to cut the branches free as there may be a chance the line might be energizing the tree. Before I can get anyone out to cut the tree up I had to move two vehicles and some miscellaneous junk out of the way. The tree was hanging over the LUV and the Mustang Chicken Coupe. I ended up moving the Scion and Tracker from the driveway along with some powered equipment and other misc shit from the path that was between the LUV and the 69 Mustang next to the Storage Trailer. My plan was to pull the Mustang up to the LUV and drag it from its spot across the driveway and along side the Storage Trailer. The LUV and the Mustang will end up being along side the Storage Trailer. 
LUV pulled over to Storage Trailer with 69 Mustang.
The next thing was to move the Mustang Chicken Coupe. Since there was a good clear shot behind the car down the driveway I figured I would just push the car down and leave it at a spot between the car trailer and the side of the driveway, well out of the way of the area under the fallen tree. With the ole lady's help we were able to carefully move the car out of the way to its new spot. Since the car had no brakes, I had to put a tire behind the car's tire so it can roll against it every few feet to control its "descent". After moving the cars it was time to get the power company out here. 
Mustang Chicken Coupe moved to new spot.
After calling the power company they actually did a pretty good job of getting a couple of guys out to the house to take care of the tree. It really just took one guy with a pole chainsaw to cut the tree branches free from the power line enough that all that was remaining was the trunk leaning at a 45 degree angle but still free from the power line. At least this means I can safely get to work cutting the tree up. 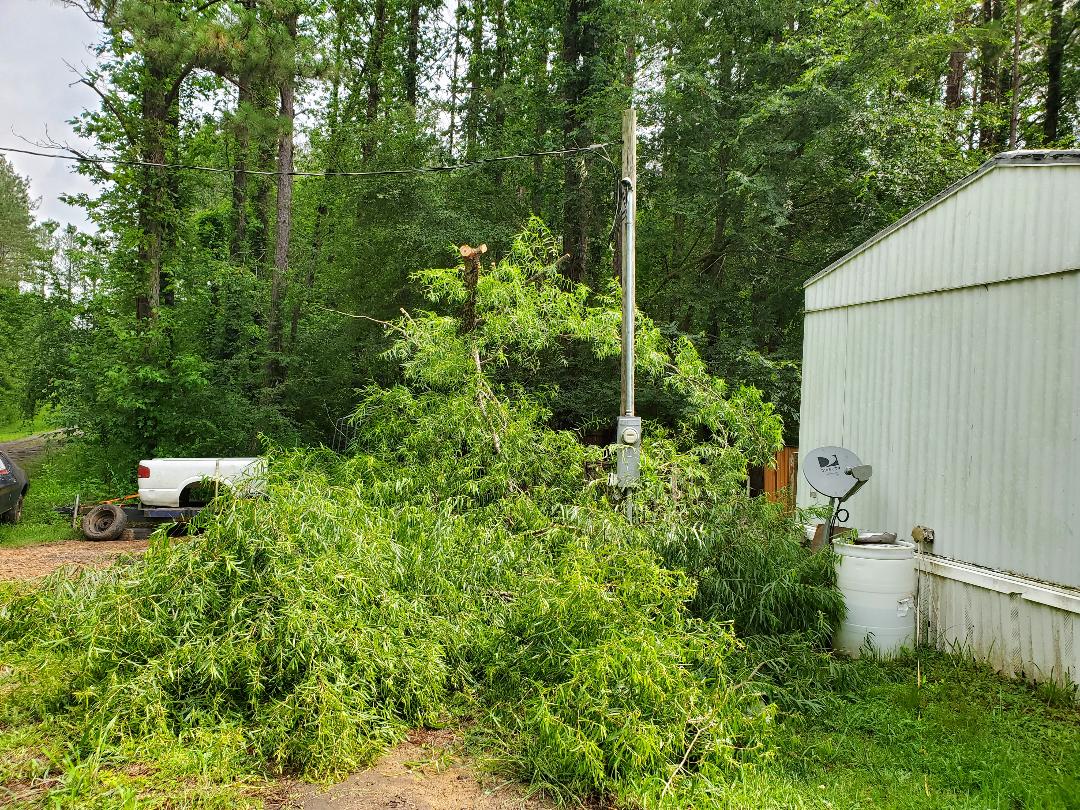
Tree cut down from power line
With the help of the battery chainsaws and the pruning clippers I managed to cut the branches up into smaller sections so they can be stacked up by the burn can so they can dry out. Most of the cutting was with the clippers but the larger shit needed the saws, no biggie. Once I got to the trunk I was able to get a third of the trunk cut down, cutting it into foot long sections, before I ran out of battery power. The trunk being super green wood, took more power to cut through than dried wood. Plus I wanted to have the wood cut where all I have to do is drop each piece on the log splitter to finish the job. When I knew I was getting close to the end of charge on the larger saw, I went ahead and started cutting through the trunk at the root base so I can at least say the trunk is on the ground to finish the cutting up. I was able to cut 80% of the way through before the saw died but was at least able to finish cutting with the smaller saw. 
Trunk down after cutting several sections from the top of the trunk and at the base.
With the saw work done it was time to move all the branch shit to the burn pile staging area, by the burn can. This took many trips as the gap between where the tree fell and the burn area had me navigating a gauntlet between two vehicles and either the garden or the porch depending on which side I took. Eventually I had all the branch pieces stacked into a nice large pile next to the burn can. Now we play the waiting game. Once the branches dry out good I can fire the pile to dispose of this menacing tree once and for all! 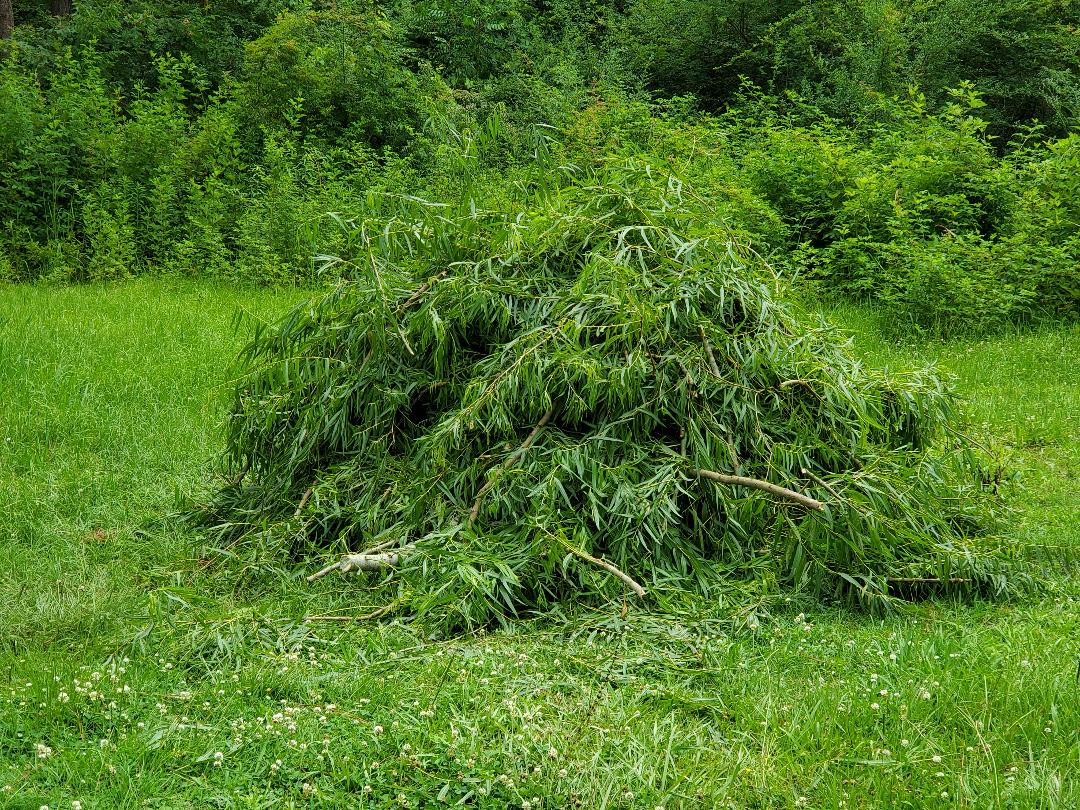
Pile of stacked branches staged by burn can (hidden behind pile) awaiting drying.
Over the weekend I managed to get a number of things taken care of around here. Of the several things I did do, I started with having to cut up a bunch of firewood. This was done for two reasons. One, I had to get more of this wood taken care of as its been sitting around for a few months and needs to get cleaned up. Second, I needed to clear the area along the driveway for when I have to stage the F250 and the small trailer that I plan to load up with scrap to haul out. By clearing more wood from the area I'll be better able to pull the rig in place to park and still be able to pull back out with little effort. I spent a good chunk of time moving branches and other refuse to the burn pile for future disposal while moving a wheelbarrow full of logs and other wood to a staging area by the log splitter where I also had the electric chainsaws on hand to help cut everything up. I managed to get another pallet filled up with more split and cut wood ready for drying and future use this winter. Even though I did this much wood, there is still a lot of wood remaining to cut, probably another couple pallet's worth of wood there.  Remaining raw wood that still needs splitting and cutting even after processing the load I did. 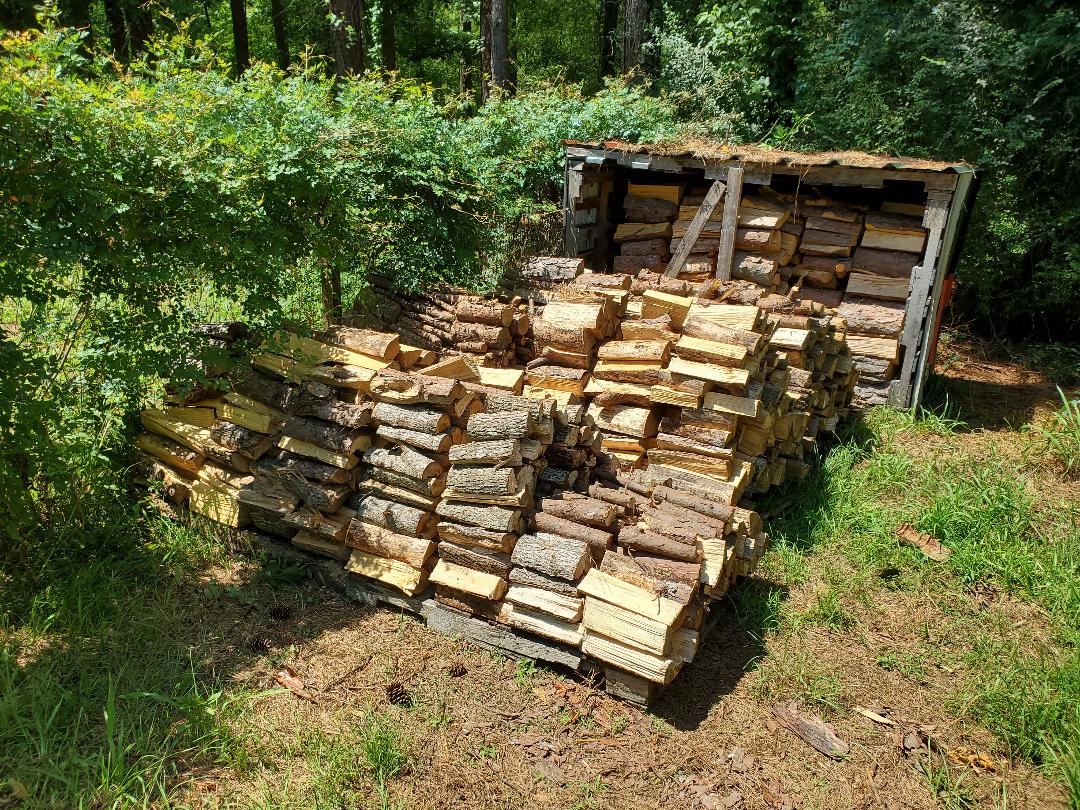 Firewood pile at six pallets deep so far. With the area cleared fairly well I moved on to loading up the bed of the F250. A large amount of the scrap I had piled up next to the truck was loaded up with minimal remaining. There were a few items that still needed to be loaded up, a couple of seized engines, an old fuel tank as well as an old satellite dish. After loading the truck I went to the garage where the small trailer is kept and hitched it up then loaded up the seized 318 engine I had up there. I still had to remove the cylinder heads and intake but chose to do that down at the yard. I also grabbed the Dodge's old fuel tank from the garage and threw it on board too. After getting the 318 engine on board I came back down, docking the truck and trailer along the driveway as intended. I spent a few moments using the impact wrench to pull the intake and heads from the engine. After taking care of that I took the 302 engine that I pulled from the F150 and loaded it up on the trailer. I had already stripped any remaining usable items from the engine so it was all ready to go . A couple other scrap items were tossed on the trailer and the old sat dish was thrown on board. With that all taken care of, the rig is ready to haul and a large pile of scrap will be on its way out. 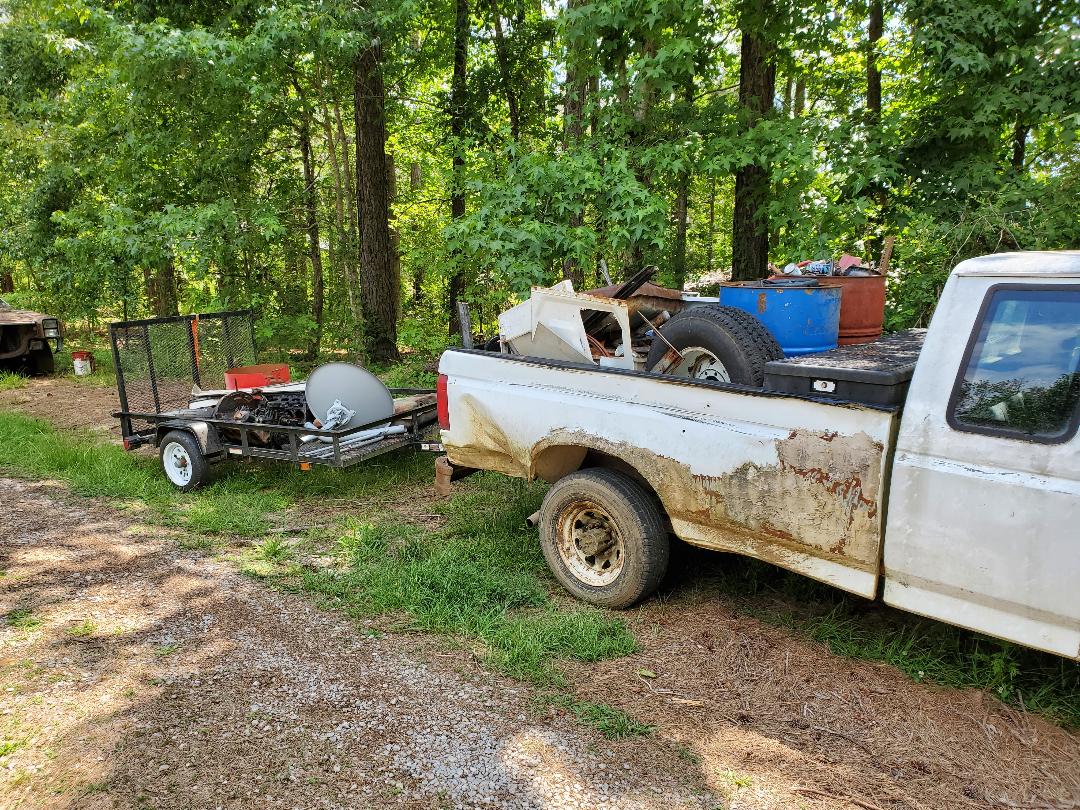 Scrap metal loaded on to truck and trailer, staged off to the side, ready to haul out very soon. With that work done I moved back on to the Mustang Chicken Coupe. The first and main thing I wanted to do is install the hood hinges on the car so the heavy large hood can be opened and closed by either of us with easy. The passenger side hinge had all its bolt clips in place but I did have to cut back the firewall lip I welded in place on a past day in order to accommodate the hinge body. This was pretty insignificant as the area is still able to move water the way I intended. After getting the passenger side hinge in place I did the driver's side. One of the bolt clips was missing so I ended up just making sure the other two bolts were on tight. With both hinges in place I recruited my help to help me get the hood in position where I could add the bolts to secure the hood to the hinges. After getting the hood on I was able to test the hood out, opening and closing the unit while still having it line up decently. Satisfied with that I moved on to installing another cooling fan but this time on the firewall somewhere and blowing into the main cab. 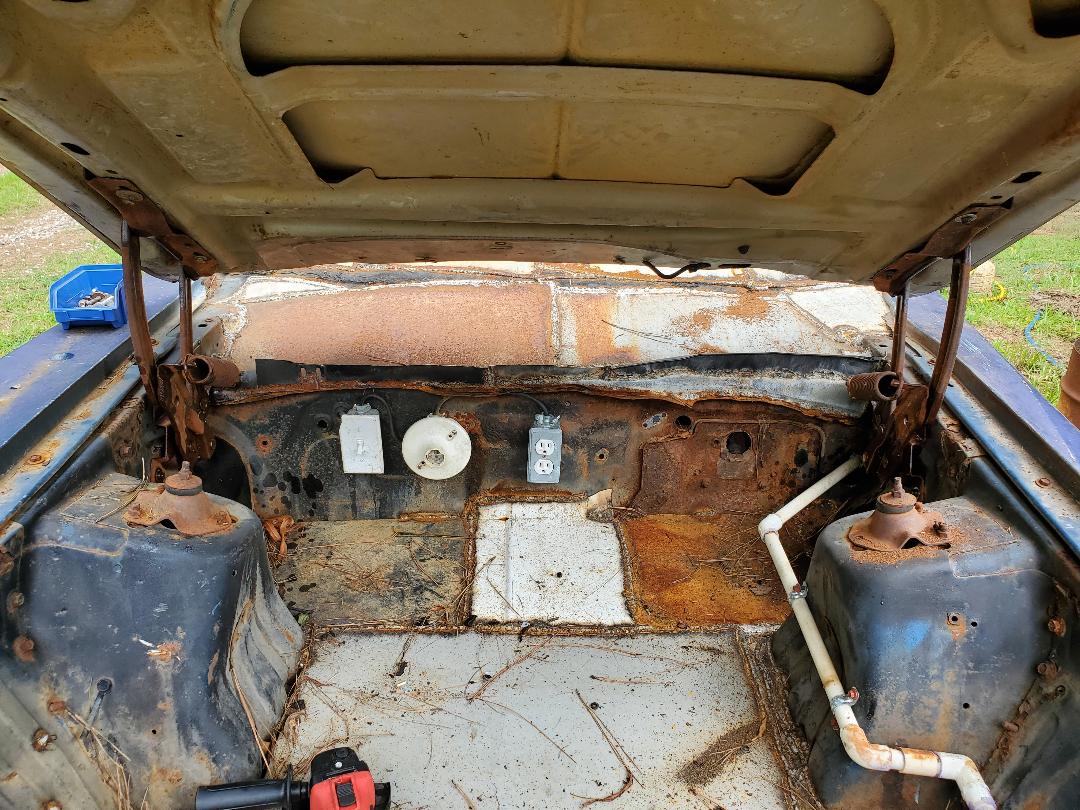 Hood hinges in place with hood bolted down 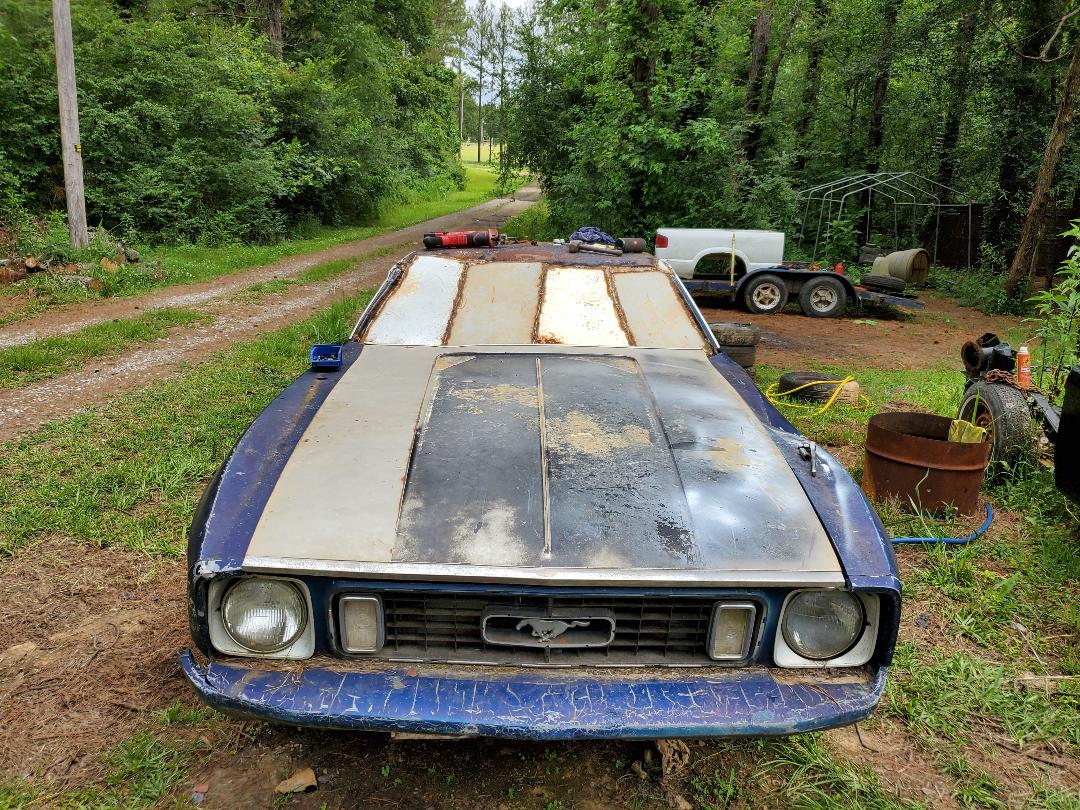 Hood closed down with hinges showing everything lined up. As for the cooling fan, I had a couple more large computer fans in stock I was able to take from. With that I ended up finding that the only good spot to put the fan was over the hole where the brake master cylinder used to be. I did enlarge the circular opening with the die grinder, making a large oval shape so more area was opened up to the face of the fan. I drilled two holes, diagonal from one another, so I can drive some long wood screws through the fan body's mounting points and into said holes. The wood screws' thread has a shallow pitch that allows it to grab into metal easily when the pilot holes are the right size. With that I was able to secure the fan in place over the opening. All I have to do now is find another 12v power supply to power this fan. 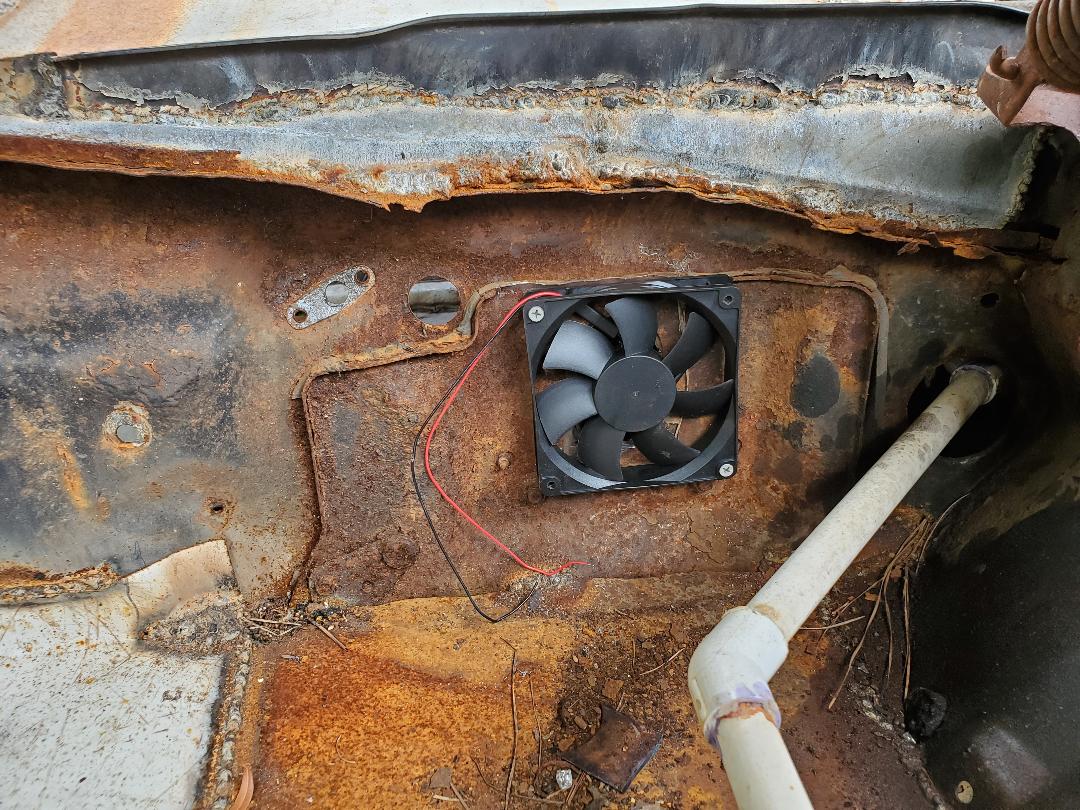 Brooder area cooling fan screwed in place over the old brake master cylinder mounting point and hole.
After getting a couple of barrel bolt/sliding latches and a dryer vent I was able to move on to the next stage in the construction of the Mustang Chicken Coupe. First thing I did was line up the latches at the middle of each door and from there was able to mark and drill a hole in the support pipe that I welded just behind the trunk lid and right above the tops of the doors. On one of the bolts because the door was not as lined up with the support pipe as the other side, I had to weld the bolt body where it overlapped above the top of the door. I was only able to use two of the screw holes to spot weld the piece in place so I had to put welds along the edges of the bolt body to fully secure it. I also had to cut a small piece of the trunk lid to accommodate that protruding portion of the bolt body when the door was opened. The pics show everything.
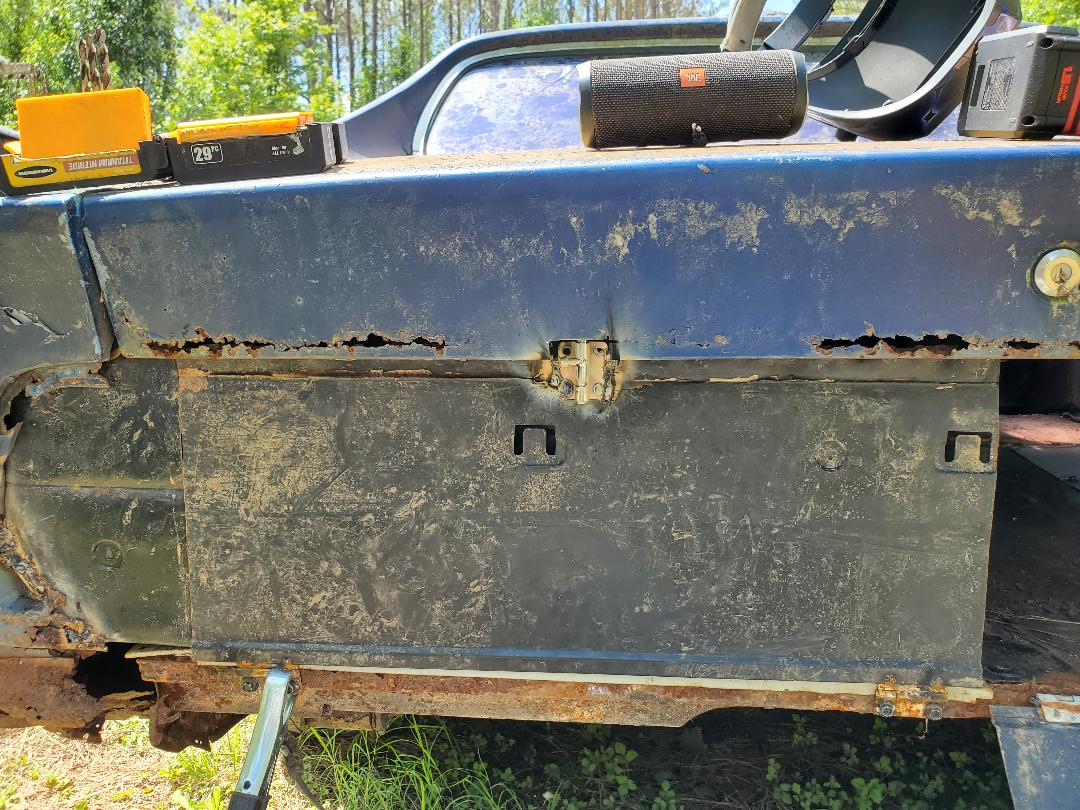
Left door latched closed with barrel bolt. Note notch of metal cut from trunk lid.
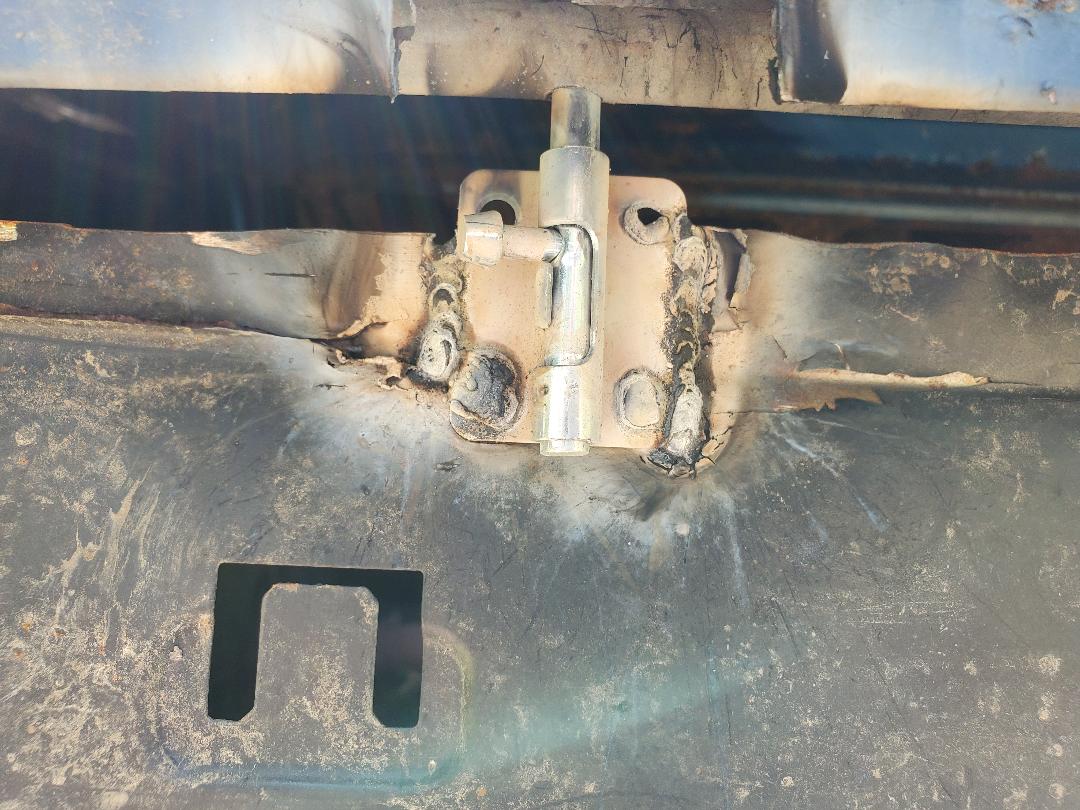
Closeup of barrel bolt latched into support pipe, again note notch cut from trunk lid.
On the right door the latch I had was a bit smaller and the support pipe was lined up better so I was able to use all four screw holes to spot weld the piece to the top of the door. I still did welds along the outer edges for extra support. Because the top of the door was closer to the support pipe and the barrel bolt body was lined up evenly with the top of the door, I didn't have to remove any metal from the trunk lid. Guess you can't win em all when fabricating shit, especially with rusty jacked up shit like this. 
Right door latched closed with barrel bolt. Note lack of notch cut from trunk lid on this side.
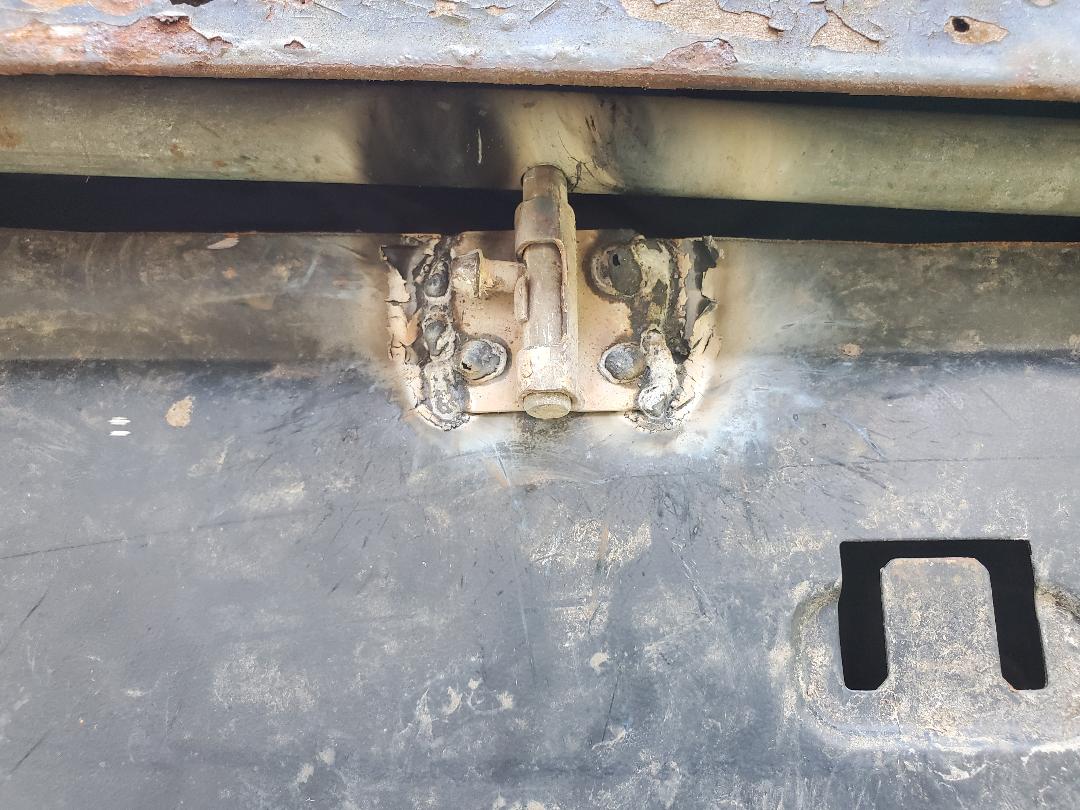
Closeup of barrel bolt latched into support pipe on right side door.
With the nest area doors secured I moved on to the vent/fan assembly. This assembly will consist of a dryer vent with some metal tube attached and a large computer/power cabinet ventilation fan. First thing I had to do was take the metal tube portion of the dryer vent and trace a circle on the window panel on the driver's door. From there I used the die grinder, which since its disc was already worn down, allowed me to cut a decent circle by just cutting a series of cuts around the circle. With the circle cut out of the door, I then took the dryer vent body and removed the metal tube from the vent. I then drilled four holes in the window panel and secured the dryer vent to the panel with screws/nuts. 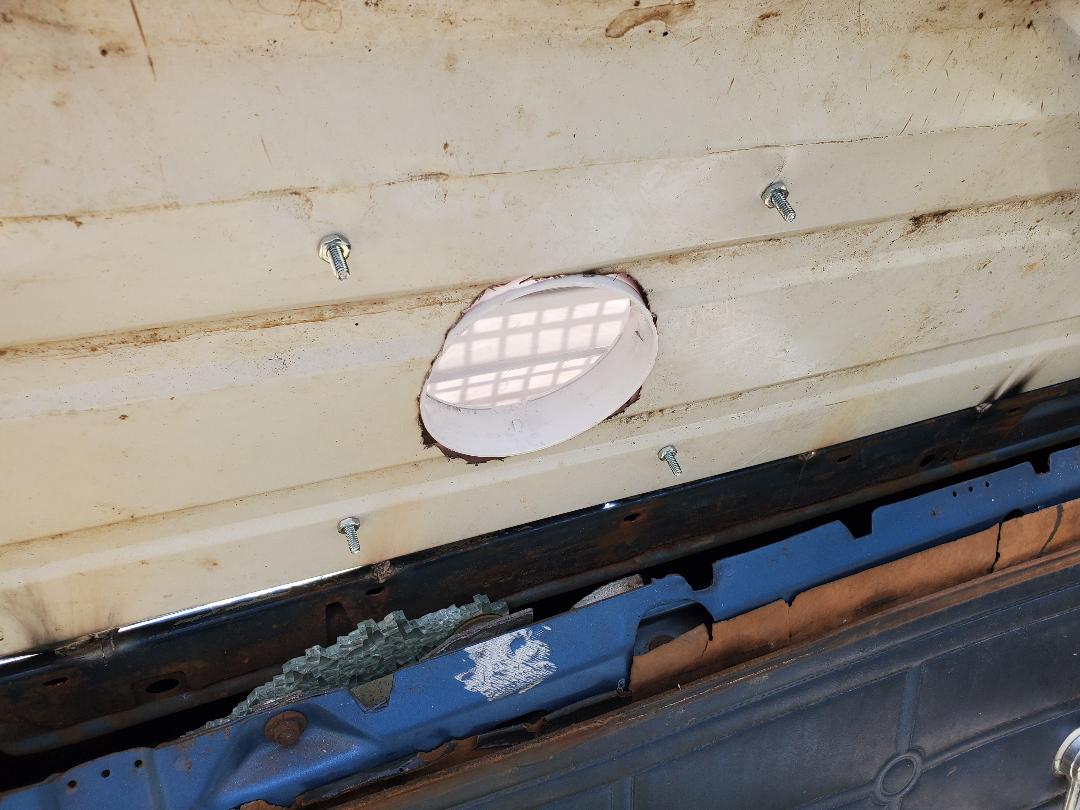
Dryer vent body secured in hole on window panel. Note screws and nuts holding the piece in place.
I took the metal tube and drew lines to make four tabs evenly spaced around the tube, a few inches from the end that snaps into the dryer vent body. I cut the excess metal tube off and then cut along the lines to expose the tabs. I bent these tabs out for my next step. The next step was fitting the fan where its bolt holes line up with at least two of the tabs. I was able to achieve this goal, getting the two opposite tabs lined up with the two opposite screw holes in the fan. I secured the fan to these tabs with more screws/nuts. From here I took some duct tape and used it to cover the gaps that were present between the fan and the metal tube. With that I snapped the metal tube back in to the dryer vent body. Time for the wiring. 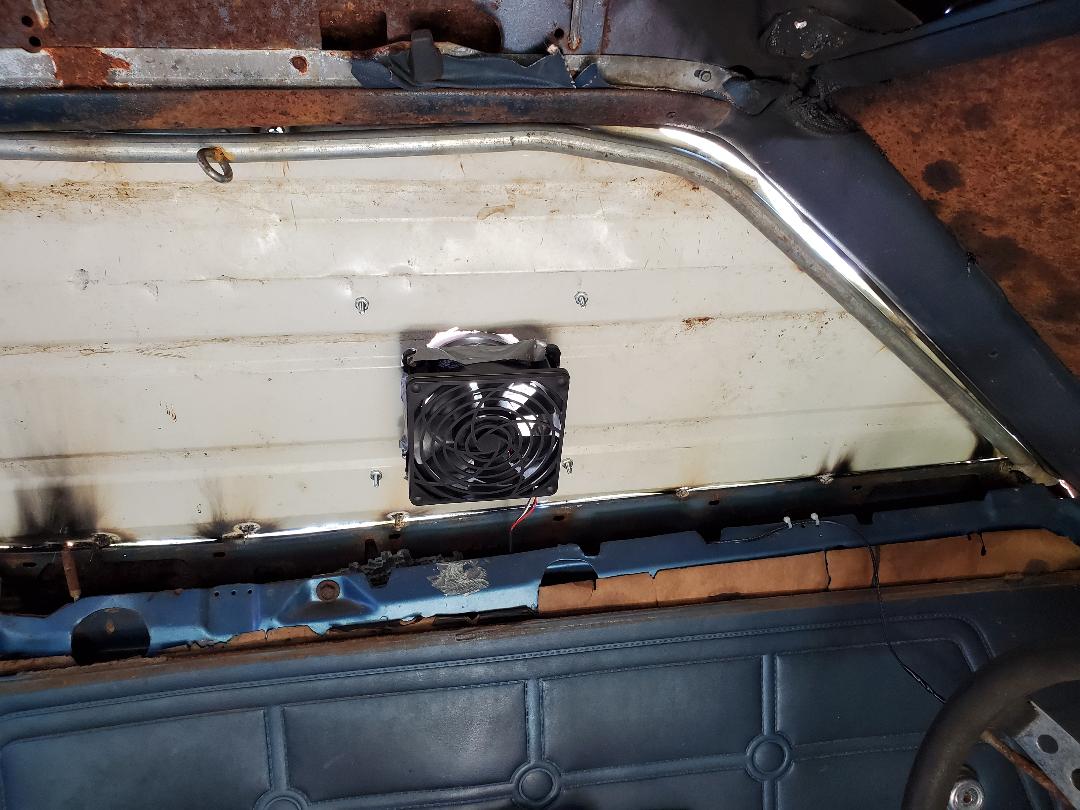
Vent fan attached to metal tube which is attached to dryer vent.
Next was the power supply for the fan. I dug out a 12v power supply I saved from a long dead router, rated for 12v at 1 amp. I plugged it into the outlet and routed the wires over towards the fan to see if I needed extra wire to complete the connection. Of course I did need a little extra wire so after digging out a little bit of 2 conductor wire from my wire stash, I soldered the wires together, covering them with heat shrink tubing. I wire tied the wire to a few spots along its route to keep it all neat and secured. I also plugged up the heater that I used in the dog's house to verify it'll fit with the fan power supply. 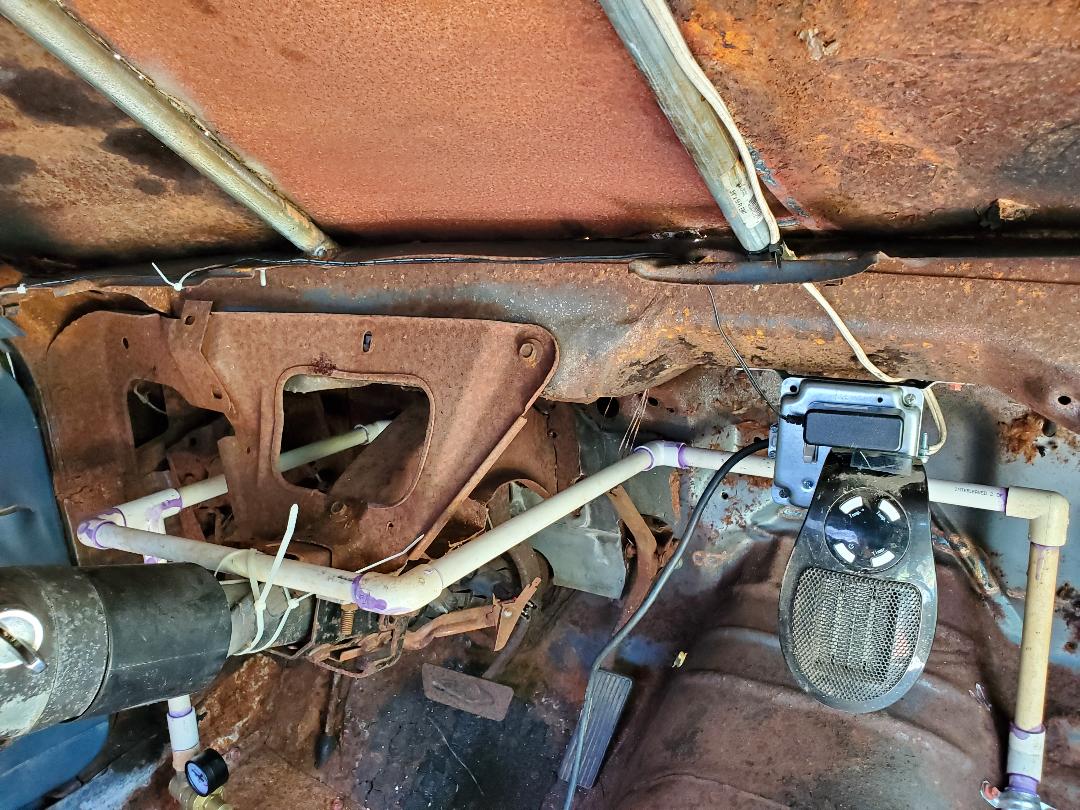
Heater and fan power supply plugged in. Note wire from power supply going up along bottom of windshield panel to the left.
The last thing I did was prop open the louvers on the dryer vent. Even with the fan running there wasn't enough pressure to push open the louvers. I couldn't think of anything off the top of my head to prop the little plastic flaps open so I just used some of the screws from the barrel bolt. I just drilled three holes on one side just under the open flaps so when I put the screws in place, they kept the louvers open at about 45 degrees angle. With that the fan will be able to move air out in a decent manner and still keep rain from just making its way in if I just had an open hole with the fan on it. 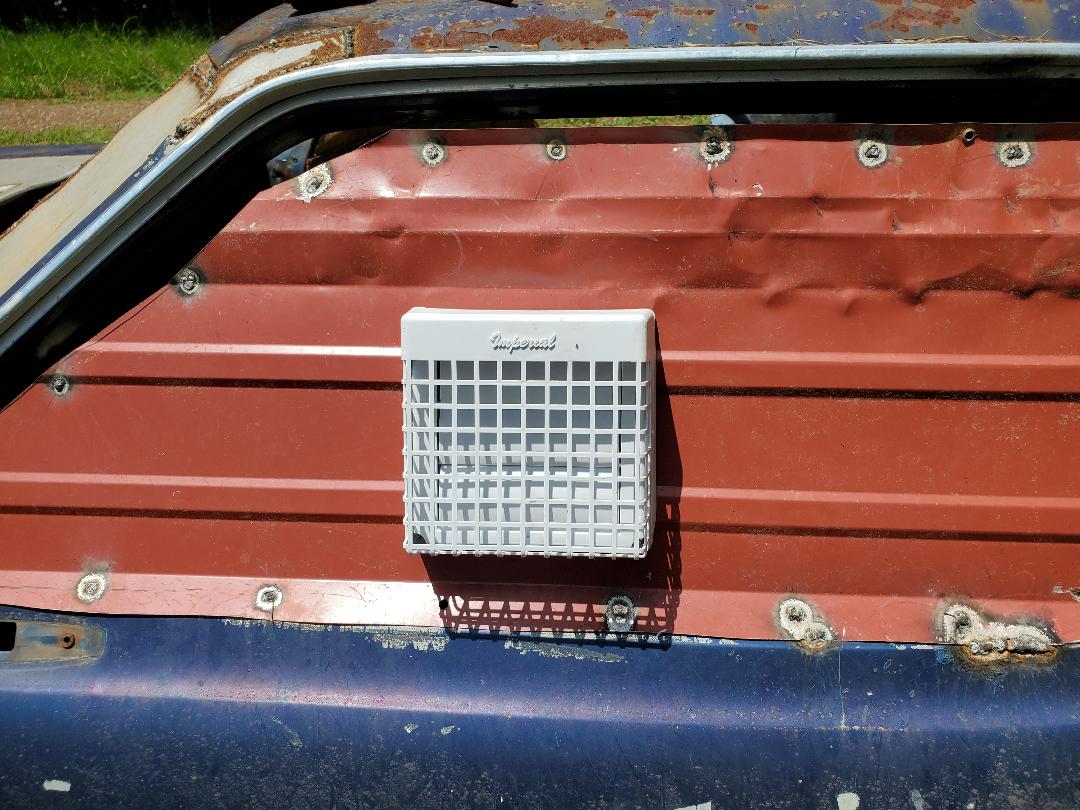
Dryer vent body outside view.
With all of that done, all that's really left is to install a cooling fan in the brooder area/engine bay. That'll probably be done by cutting a hole in the firewall where I'll attach another computer fan and hooking it up to another small power supply that I'll plug up to the outlet in that area. With that, there really isn't much else to do other than move the car into its final resting place and hook up the utilities in a more permanent manner before putting mulch and birds within.
Today was rather simple and straightforward, getting the window frame "covering" set up on the passenger side door on the car. Unlike the driver's door, which has a Sheetmetal panel, this door is just going to have a chicken wire fencing covering over the window opening to serve as an opening to the outside without allowing the birds to be able to escape or something else to come inside. Like with the driver's side I had to start with the window frame. This was done again with conduit pipe, two pieces, one for the back side, and one with an obtuse angle to match the contour of the window opening. These were welded in place to get the initial window frame set up.  Starting window frame welded in place on passenger side door. The next thing I did was cut and weld a piece of pipe to weld along the top of the door, at the bottom of the window frame. This piece of pipe was especially necessary since the top of the door is bent in from the tree that fell on it. The pipe will give the window frame that straight bottom portion to help support and hold the chicken wire that will be used.  Bottom pipe welded in place for extra support in window frame. Note how top of door is bent in from the tree damage. I had to look around for a suitable piece of chicken wire fencing to use. The piece didn't have to be big but I did need to be able to cut enough to be able to fold the edges around the pipe window frame and weld tack points along the bottom on the door. I ended up finding a piece of chicken wire that was attached to a couple of trees from a past project in this section of the yard. I ended up being able to cut a good piece from this. From here I trimmed the piece to fit the window frame and give me a few inches extension at the bottom. I also allowed for some overlapping along the top and back sides of the window frame with the intent on having the chicken wire stems that remained after I trimmed the piece. I was able to bend these little stems around the pipe to secure the fence piece around the actual window frame. From here I carefully tacked points on the fence where the wires crossed in order to optimize the amount of surface area to take the fire from the welder. Of course I burned through the wire on several occasions but was able to salvage things and get the spots secured to the door. 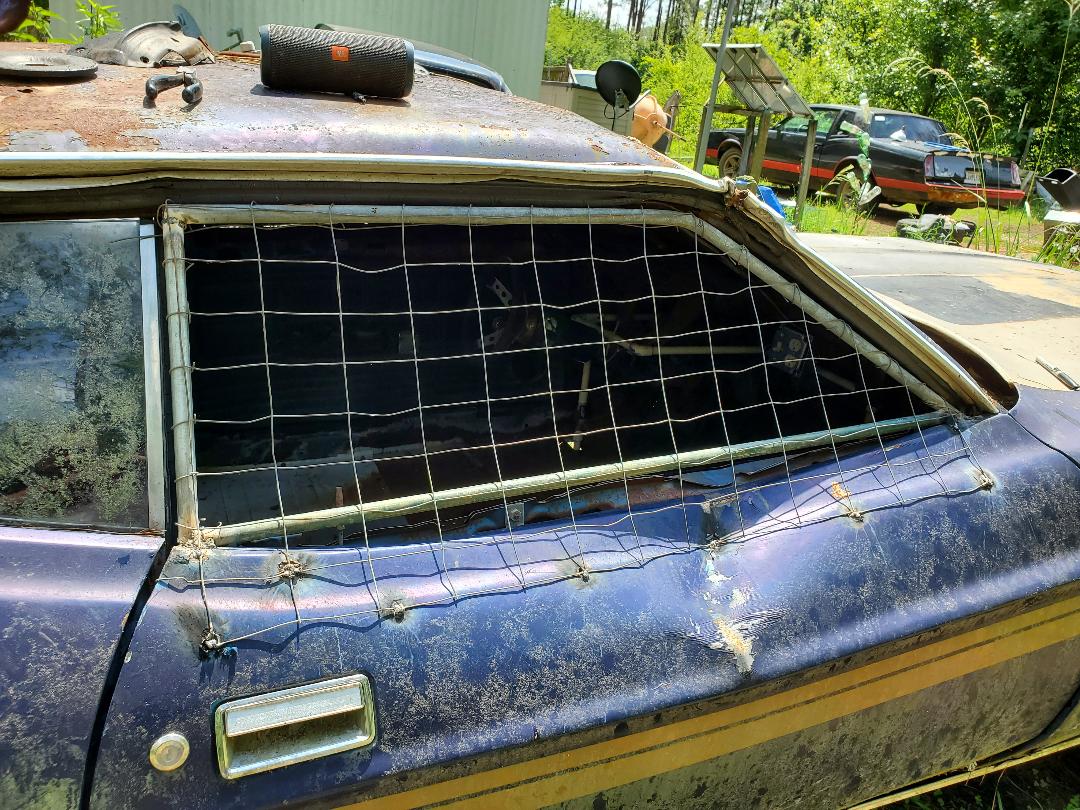 Chicken wire attached to the door frame, note how wire is bent around the pipes and tack/spot welded to the door.
When I installed the new drinker cups on the water lines in the Mustang Chicken Coupe I still had the problem with the water pressure being too high for the units. Some wouldn't function as designed while others flat out popped apart after a while. I had to get the pressure down. Luckily when I ordered the new drinker cups I also ordered a pressure regulator to install on the line in case the new drinker cups still couldn't handle the water pressure.
The regulator finally came in so the first thing I did was install that. I had to install a 1/2" male thread to female smooth adapter bushing on both sides of the regulator. Afterward I cut the PVC line just after the valve right when the pipe comes up through the floor and trimmed enough pipe so when I installed the regulator the water valve and hose adapter section of PVC was flush against the bottom of the car. I adjusted the regulator valve to a point where the pressure should be damn near zero. I turned the water on then tweaked the regulator valve so that water came out of the drinker cups at a reasonable rate that shows that the pressure was low enough to keep the system from exploding like before. 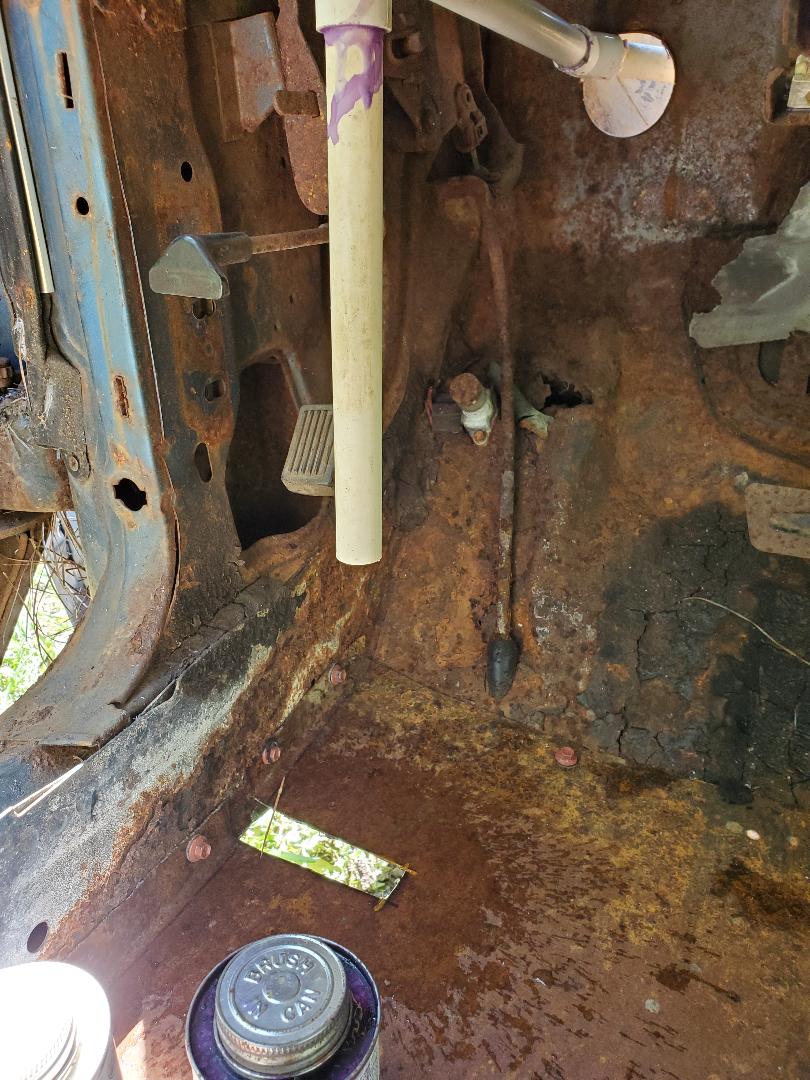
Cut PVC line in preparation for the regulator.
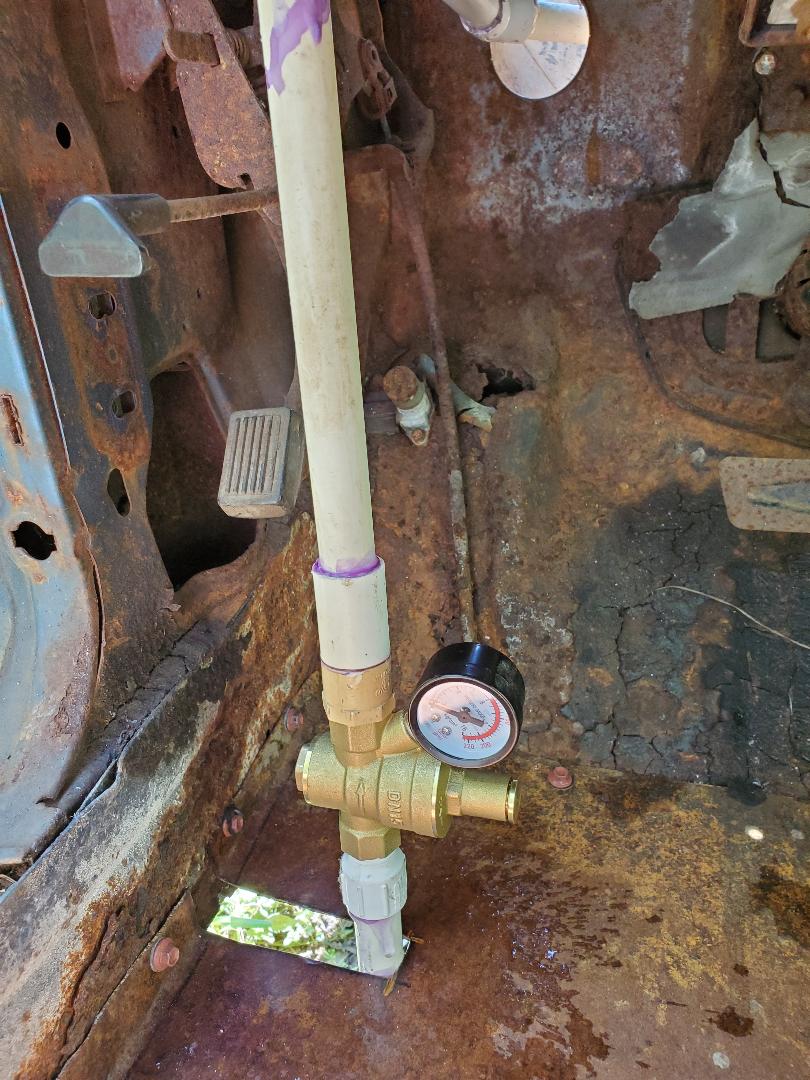
Pressure regulator installed
The next thing on the list was welding a metal lip above the firewall to serve as a diverter for any water that manages to run down past the hood during any rains. Since the hood is not really able to seal from water around the edges I figured I had to put some kind of lip across the top of the firewall to divert the water to the edges so it can run down harmlessly to the ground at the corners of the back of the floor. This is very necessary since the outlet and lights are mounted on the firewall and water is not a good mix for these items. I used some scrap metal cut to a couple of inches in width and welded it all in place across the top. It's in a kind of irregular pattern but it doesn't have to be neat, it just needs to be able to divert water, plain and simple. 
Metal lip welded across the top of the firewall.
The next thing on the agenda is covering up the missing window over the driver's door. Since the window is gone, something has to cover this opening. My plan was to use some sheet metal to cover the opening. I had to make a frame to the same contours of the window frame to serve as an anchor point for the sheet metal. This was to be done with conduit. I cut two pieces of pipe, one for a vertical piece at the back of the door and the other to be bent to match the obtuse angle of the top and angled down sides of the window opening. I welded everything up at those three points to make the framework for the door window panel. 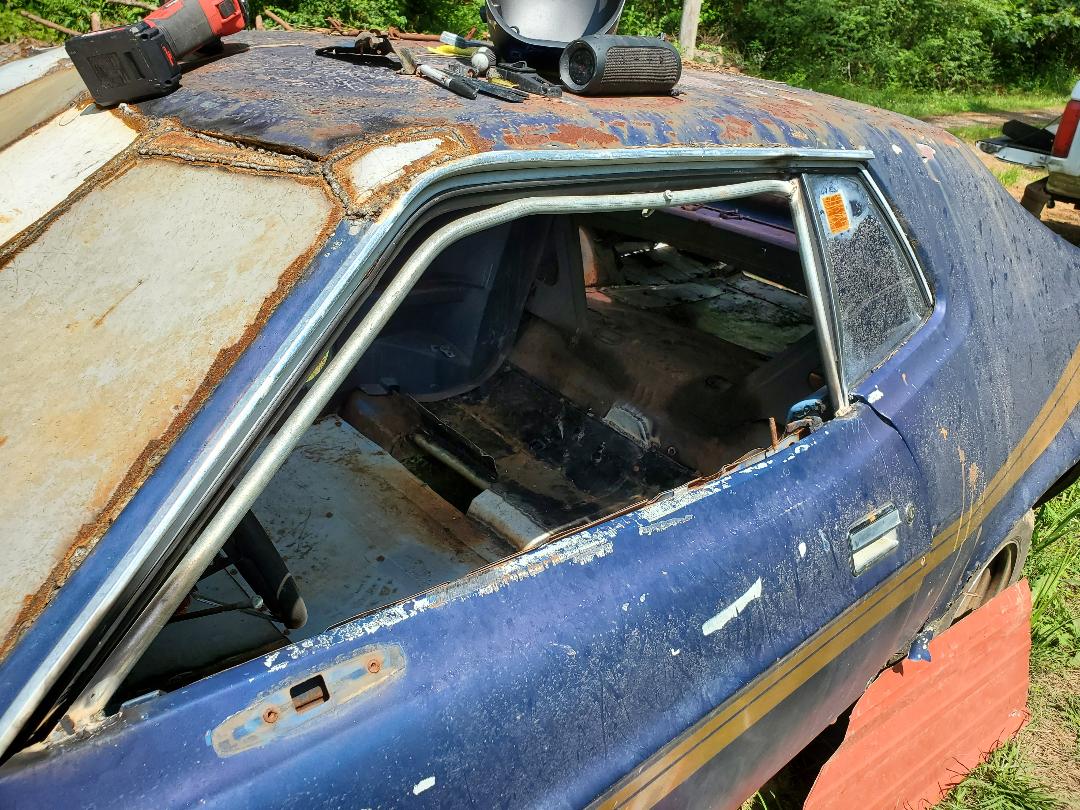
Conduit pipe frame welded to door top to match contours of window.
At first I was going to use one of the large pieces of sheet metal I had in stock from a washer to cut out the "window" for the door but then I saw a piece of corrugated sheet metal that was too small to be used for any roofing application but was just right for this application. I took it and drew a rough outline of the window opening, also taking into account adding an extra lip at the bottom to serve as a better anchor point for the panel. To secure the panel I used the same concept I did for the door hinges: spot welding. Except I had to drill a series of holes around the edges of the panel to serve as spot welding points all around the panel. After welding the panel in place I looked at the whole setup and thought about the idea of maybe welding some extra metal around the inside of the window frame to make the whole works more rigid. Luckily I already closed the door so I didn't have to fight the shitty door hinges or door latch mechanisms to ensure that the door was fully latched in place. 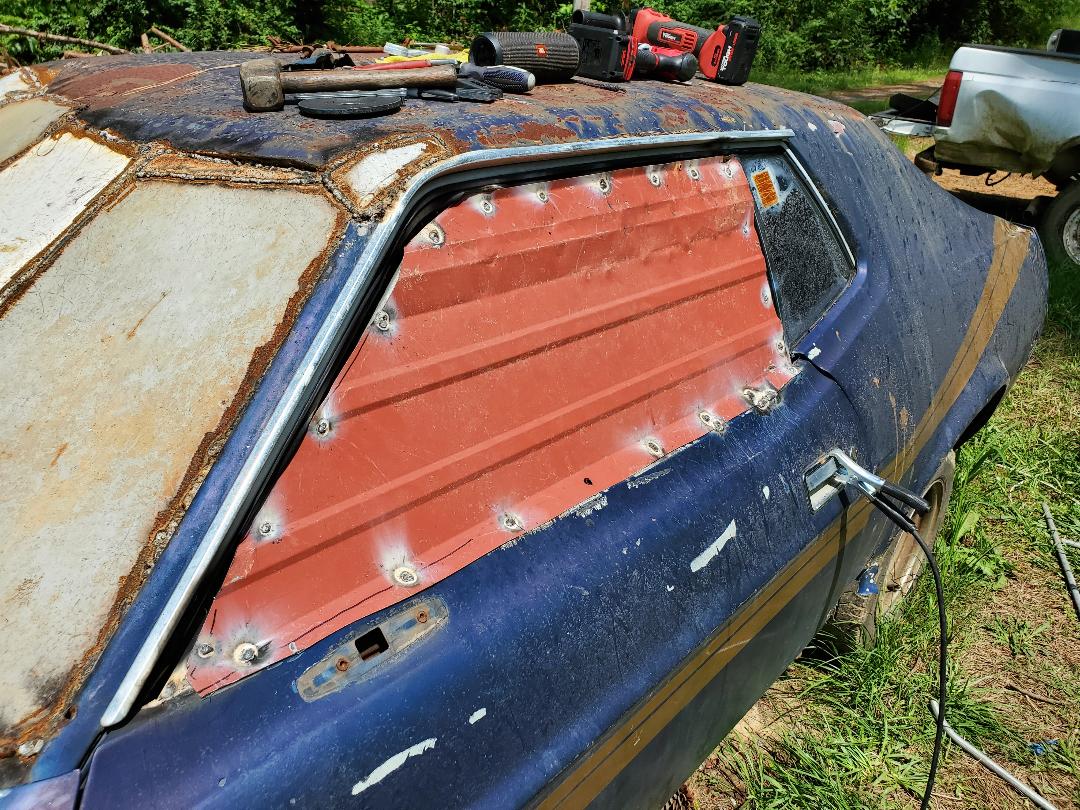
Sheet metal panel spot welded to door frame.
With the driver's door taken care of the next move will be the passenger door. I plan on doing the same thing as far as making a window frame for that door but instead of sheet metal I plan on attaching some chicken wire or some type of small mesh fencing to allow for the open side that would make the chicken coupe "open" to the outside while still being enclosed for the most part. I will have to put some type of ventilation fan or fans in the car in order to move air around when the outside temps go north of 90 degrees. The combination of heat and chicken shit and piss inside is not a good combination that is conducive to the chickens' longevity so I will need ventilation when everything else is done. But that's for a later date.
|
