|
In this episode, I took the time to more or less do some general cleanup around the grounds. One of the biggest things that is in need of cleanup is the area of the fallen trees. For a recap, we had several large pine trees brought down due to them either dying or already being dead. Prevention was the best medicine since the last thing we need is more risky trees breaking at the wrong time and falling on something and destroying a lot. Anyway, even with the cutting that I have been doing, there is still a lot of material left. There's still whole trunks laying on the ground that need to be cut up into manageable sections for moving to the driveway where I typically do my log splitting. The trunks would need to be cut into short sections so they can be moved easier without the use of heavier equipment.
In the process of cutting these fallen trees, there's also the matter of the branches and other smaller detritus that we don't have any real use for. This small stuff I cut up and stack into a burn pile in my designated burn area so when the pile gets large enough and stacked with enough garbage that I could fire the pile and ensure complete consumption of the waste. Well I had more than enough brush after a short session of cutting earlier that I was able to fire up. 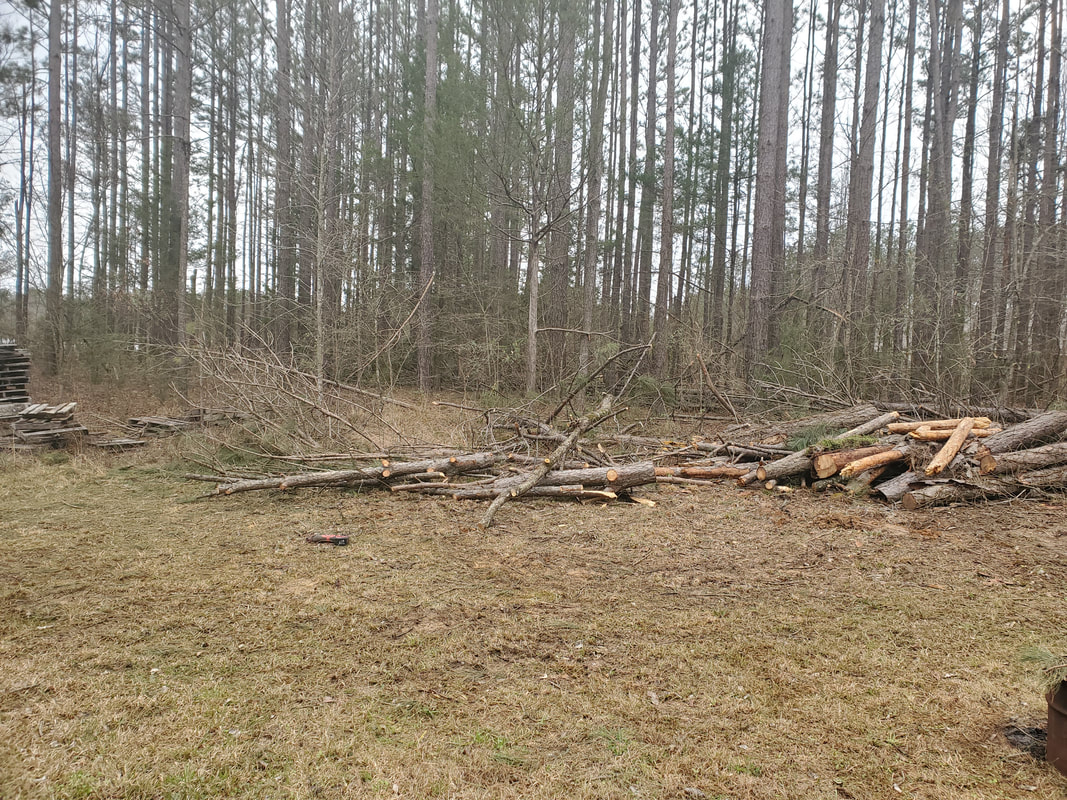
Area of the fallen trees that I've been working on in order to clear the branches before dedicating my time to just the trunks.
I moved from one end of the pile to the opposite end where all the branches from the tree tops were laying so I can cut as much of this up to stack onto the burn pile. By doing this I can clear all of the garbage from the area and dispose of it, allowing me to dedicate my time more to cutting up the larger trunks and branches into usable firewood. I really don't want to have to go back and forth cutting and stacking branches, then moving on to chopping up trunks for firewood then back again. After having allowed the brush pile to dry out and having stacked plenty of regular trash under and around the branches stacked in a teepee formation, I went ahead and fired the stuff up so it can burn down, even while still cutting up branches for further stacking. I had my half drum in the work area to burn the smaller pieces that could be fully consumed within the can versus trying to bundle these small pieces in my hands to walk them across the yard over to the burn pile. 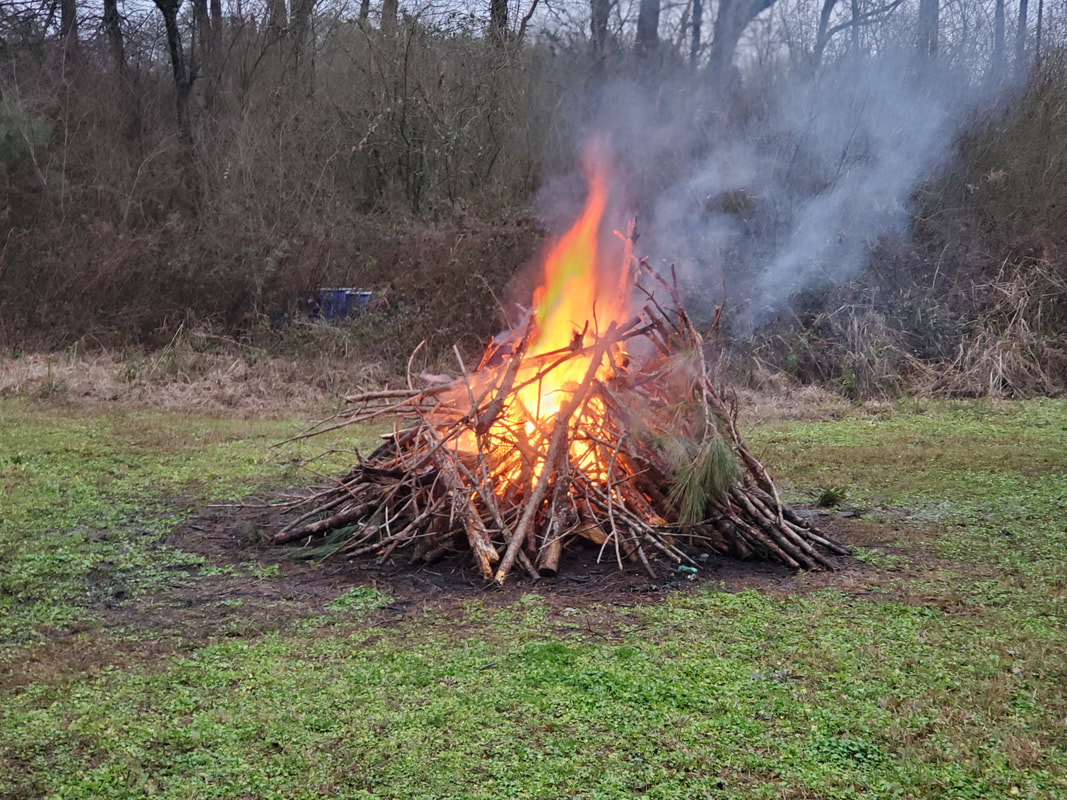
Burn/brush pile blazing away.
With the brush pile burning and me adding more material as I went along, there were times that I did cut up larger sections of branches that were too good to just burn up with the rest of the garbage. These pieces I did take time to cut up into lengths that were movable and allowed me to stack them with the other pieces I already had staged. I continued to add to this ever growing raw firewood pile, knowing I'll have my work cut out for me when I do get to where I'm doing nothing but splitting firewood. But just like with me wanting to cut up the smaller garbage pieces of wood and burning the stuff up now so I can dedicate my next phase in the project to just cutting the trees into raw firewood, I want to make the 3rd phase be the splitting into the final product. Eventually by the time I got tired of cutting wood and the burn pile burned down, I made a sizable dent in the fallen tree pile. 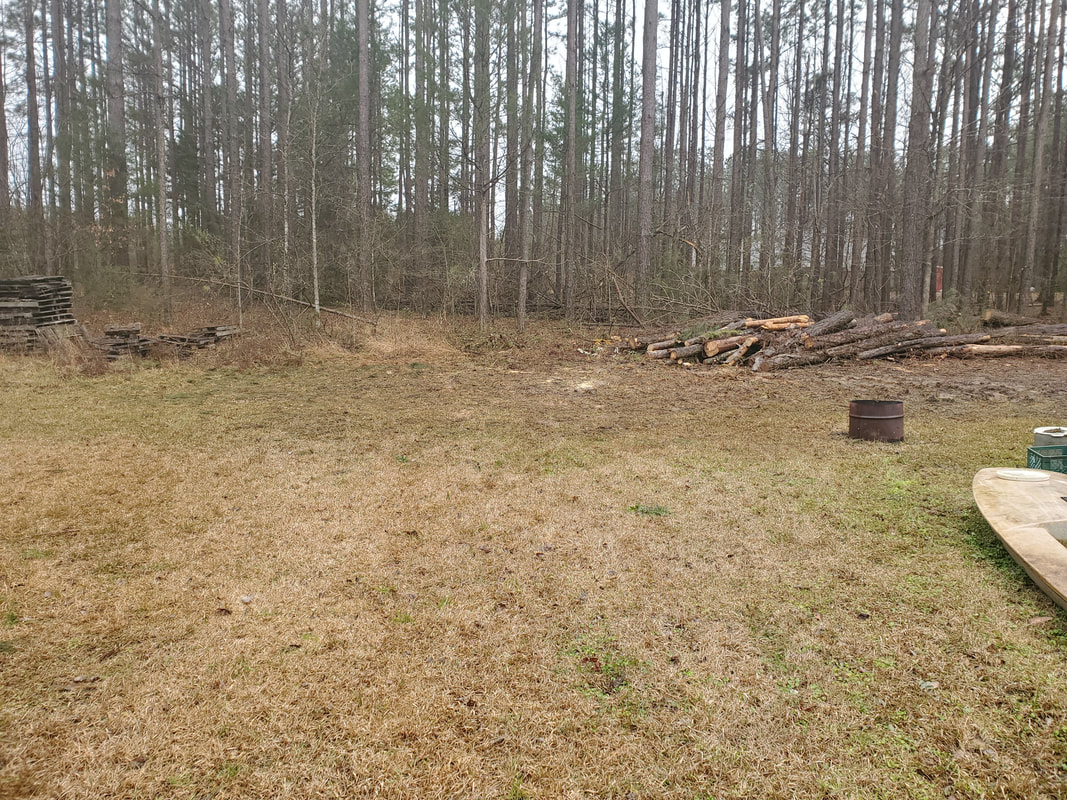
Branch side of fallen trees after clearing the amount that I did clear for the day. Compare the before and after pictures to get an idea of how much was cleared.
The next little task I decided to take on was processing the scrap wires I pulled from the 65 Mustang in the recent past days. Most of this wiring was the original wiring from the car with a small portion being extra wire I added in the process of running new circuits and hooking up new lights or other devices in the car. Since all this wire's out, I went ahead and did the same thing that I did with the wiring pulled from the chicken coop cars prior to my work on them. Of course I had to get a fire going in the half drum so I can have a good cooking surface with which to burn up the wiring to get the insulation off. After I got that started I went ahead splitting up the wire bundles to separate the individual wires so I can cut usable sections from the wiring. From here I rolled up the lengths of wire and taped them up, stacking up a pile for storage with the large amount of wiring I already had on hand from the past cars' wiring. I even saved some specialty plugs and multi conductor plugs and what not since these can be used in another car's wiring or some new circuits that may incorporate these pieces. 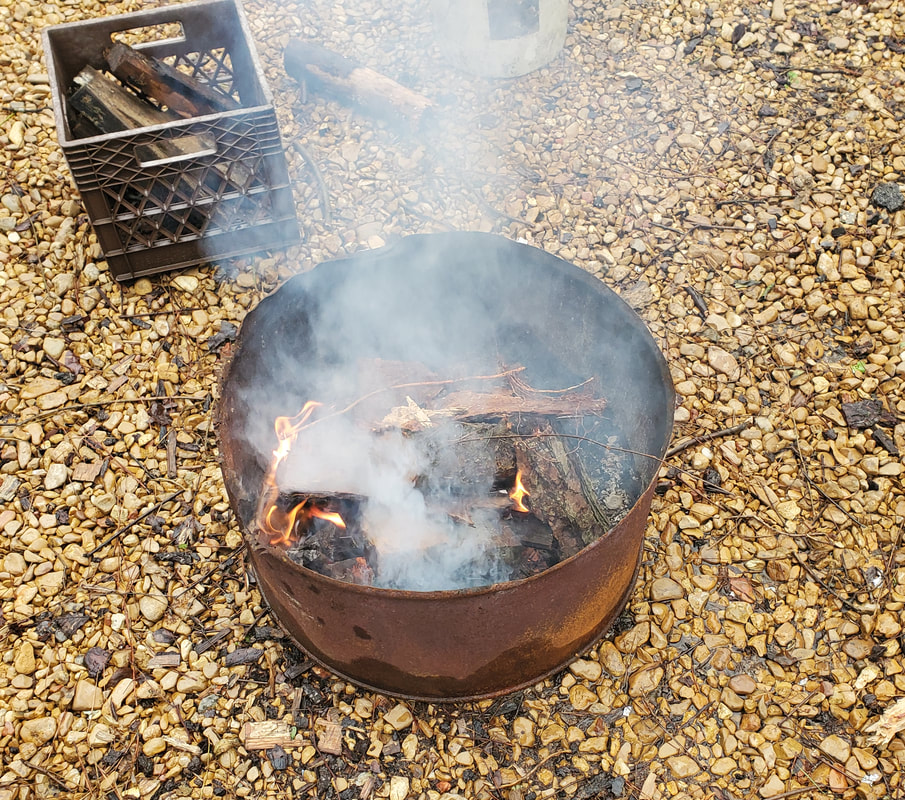
Half drum fire started up.
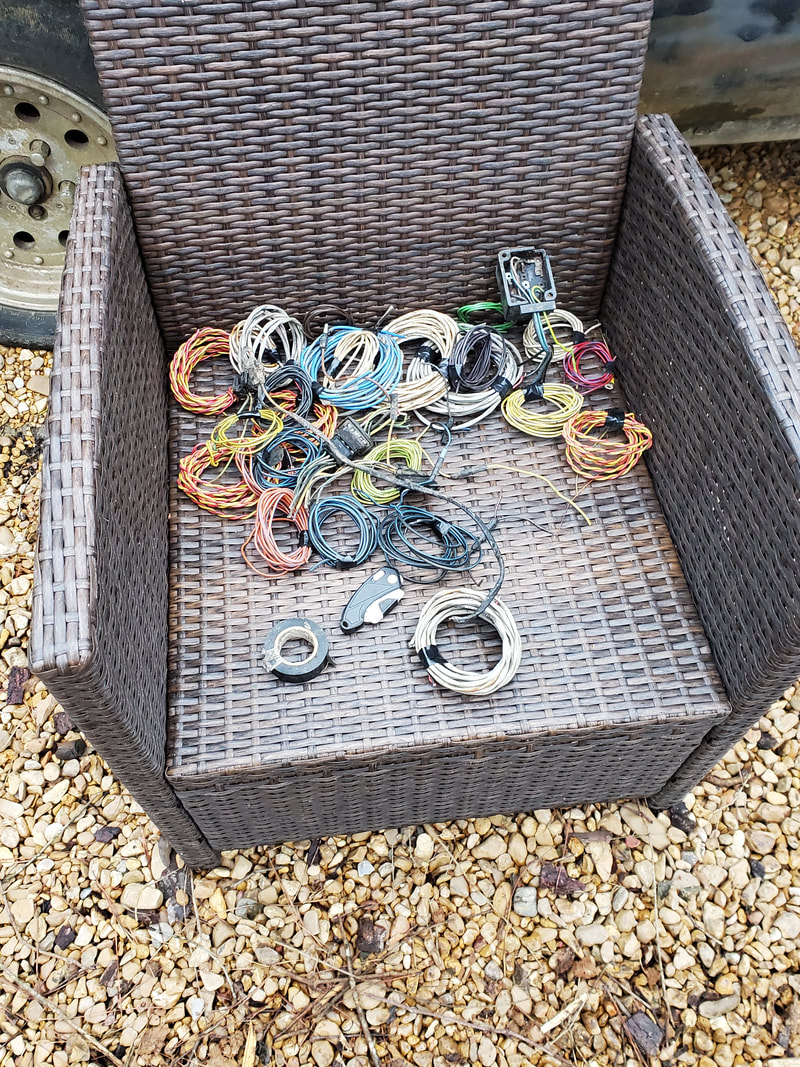
Rolled up individual wires staged on chair awaiting storage in trailer.
Once I salvaged all the usable wiring I was comfortable with from the bundles I pulled out my grate to lay over the top of the half drum. I put all the leftover scrap wiring on top of this and sat the grate over the fire, letting it do its job of burning the insulation off while I went ahead and cleaned up my tools and any other stuff I had outside for the day. This way when the wiring was done burning up I'd have everything else inside and I could set the grate on the ground to cool off real quick before sticking the bare copper into the bucket that I currently have other burnt copper sitting in, awaiting their trip to the scrap yard. 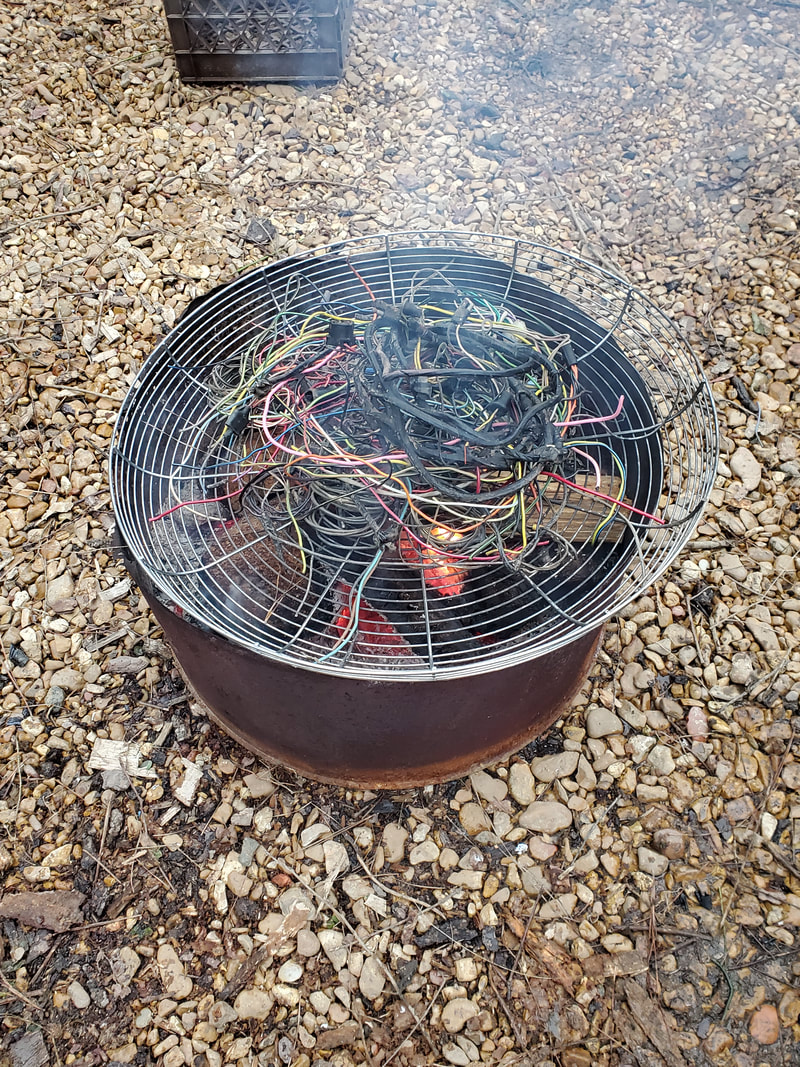
Half drum fire started while working with wires.
Once the other mess was cleaned up the burnt wires were cooled down sufficiently to stuff into the drum. I already put the rolls of salvage wire into the storage trailer so with that, the day was done. A large amount of fallen tree crap was cut up and disposed of, the brush pile was nothing but ashes and a large bundle of wires were also taken care of, clearing up more of the yard so I can be able to conduct other work in the future. The fun continues...
0 Comments
One of the normal things that goes on around here that most people who know us see happening is the spreading of gravel. With the sheer size of the area we're trying to cover, there will be many many gravel runs done before all is said and done. Even when we do manage to cover all the ground that we intended to cover, we'll still keep spreading gravel over some areas to touch them up as high traffic and the elements push some gravel into the dirt more. I will keep up with the gravel until we have such a thick layer of gravel on all the grounds that we will be able to drive a Mack truck over even the worst areas of the yard without it sinking in. This gravel run was intended to cover more area in the general parking area between the main driveway and the west end of the house. At this point there's enough gravel laid down that all we need is one more good patch to lay that is the width of the F250 before this gravel patch meets up with the gravel patch of the side driveway/car park. When that area is covered I can then move some stuff around before trying to gravel up the area going northwest towards the perimeter fence corner where there's a couple of pine trees. This area is supposed to be where the trailers are to be stored. But in all actuality I'm choosing to lay gravel over the midway going between the house and the garden. There's still some area in front of where the Monte is currently parked that is mushy and is in serious need of gravel. I'm going to focus next on covering this area with gravel once we're done with the western end of the yard where we're currently laying gravel.  General parking area covered with more gravel. With the gravel taken care of, the next thing is to split up some fresh firewood i had cut from a couple of dead trees I brought down recently. 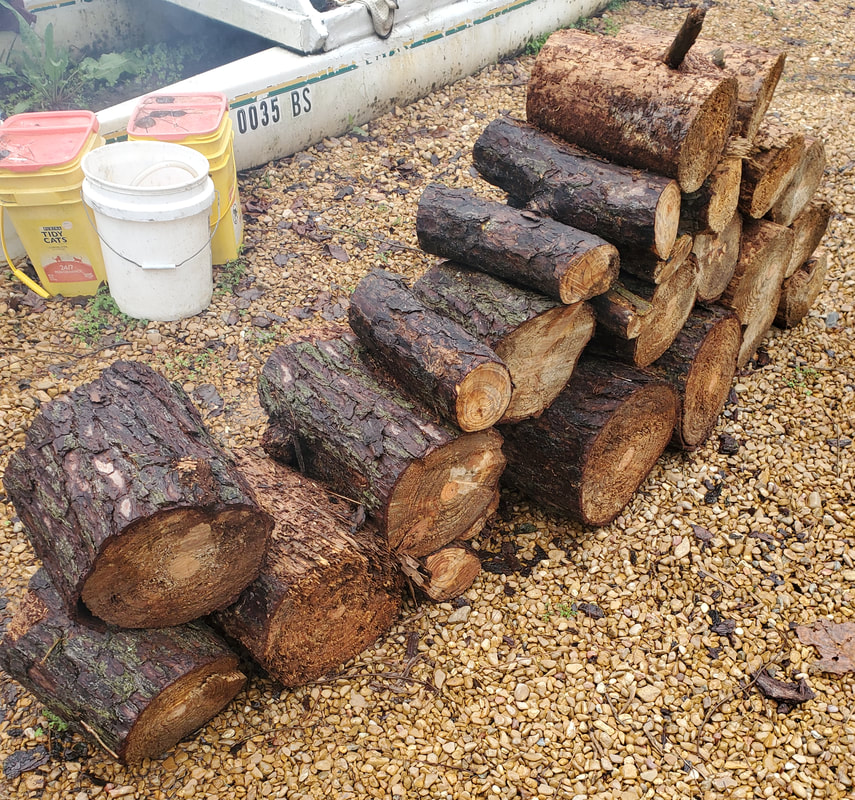 Logs cut up and stacked prior to splitting. Since these trees were dead the wood actually had a chance to season in place and be ready for use almost immediately. Of course most of these trees that end up like this do so because of these beetles that bore their way through the trunk, making a network of tunnels all through the tree, laying eggs and hatching even more beetle larvae which in turn grow up and do the same thing, creating a whole beetle civilization within this tree. After the tree inevitably dies, the beetles continue doing their thing until someone like me comes along and chops the tree up and splits it then throws the different suburbs of the beetle-opolis into the 1000 degree heat of a wood stove or open fire pit. With the wood all cut into the sizes I needed I then started splitting the logs into the final chunks that will be used for the stove or can fire. With every log I split I found more and more beetle daycare centers with hundreds of the little white larvae hiding within. The insulation from the inches of wood would've kept these beetles nice and cozy through the winter until the temps went up enough for them to continue to grow and turn into the destructive beetles that are killing these pine trees around here.  The supply of logs dwindling down as I split the wood into the final product. As you can see in the logs to the right, the insides show the tunnels that were inside the trunk. 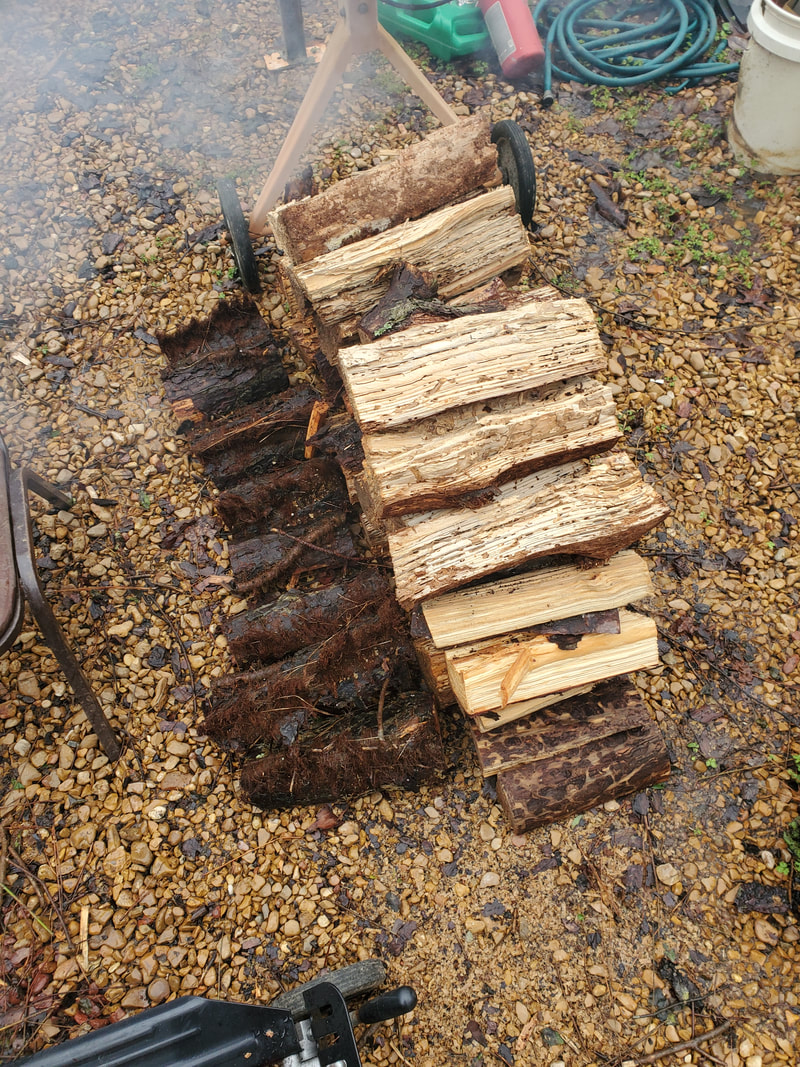 Split pieces of logs being stacked up after final cutting/splitting. After some serious splitting I finally managed to get all of the logs finished off. I had a double stack of logs split and drying back out, awaiting their turn as destiny as a heat source. As before, almost every log I split up had beetle larvae infesting the piece with tunnels running all through the trunk. I had to actually tap out the bunched in larvae so when I brought in the logs so these little bastards don't end up somehow infesting the wood of the house and causing a problem there too. Of course the super cold weather made fast work of the exposed beetles so after a few days these pieces of shit weren't really a problem. 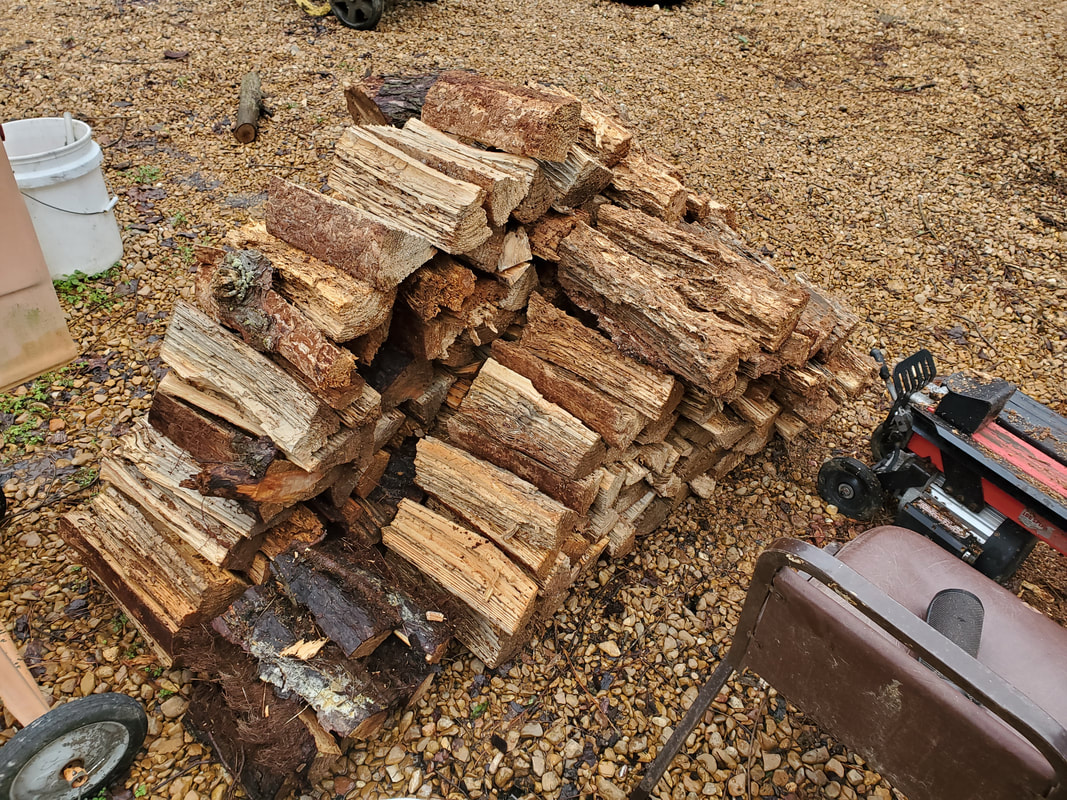 Double stacks of logs all split and ready for use. With this work done, I managed to add to my firewood supply as well as get some more cleanup taken care of around the yard. The more that gets cleaned up the more I'll be able to move around when it comes to moving vehicles and other equipment through the yard, and beside, it just looks better when there isn't shit all over the place.
After the ice thawed enough to make driving relatively safe, the junkyard in town finally opened up, allowing us to hit the place to be able to see what we can get from the couple of junked Trackers for our R&R. Luckily we found most of what we needed to make the complete fix.
We already had a replacement headlight housing, grille, fender and bumper skin from the old Tracker that I had saved just in case. Now the fender is a little flawed as it had dents that were knocked out as much as possible on the old truck during the fixes I did on it over a year ago. The bumper skin was really from a Suzuki Vitara, slightly different cosmetically, but still fitting nonetheless. The grille was complete but was damaged at the two hidden mounting points where plastic pegs hold the grille to the metal subframe. At the yard I was able to find a better fender that was black so the color contrast isn't too extreme. We also got the inner bumper and bumper skin that was intended for a Tracker, air filter box and the section of fender apron/subframe that I needed to have to replace the damaged section that I already cut out from the truck. Along with some other parts for a couple of other cars, that junkyard run netted us a good score. 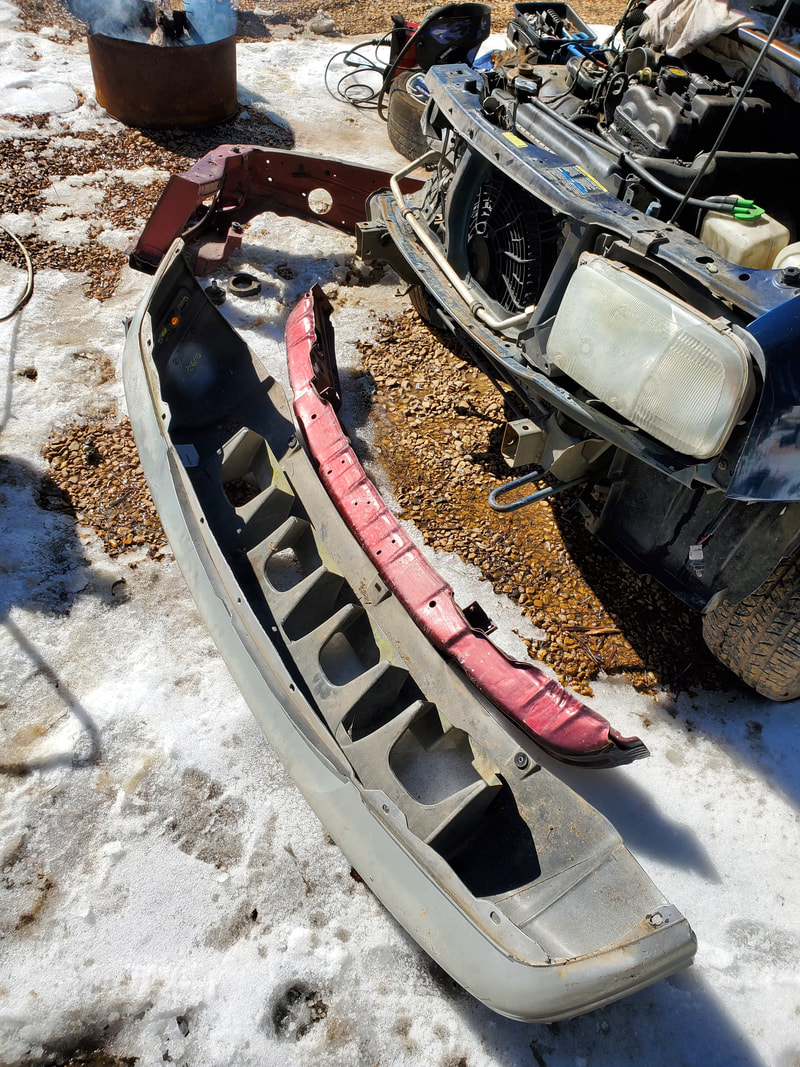
Bumper skin and inner bumper staged in front of Tracker prior to attachment.
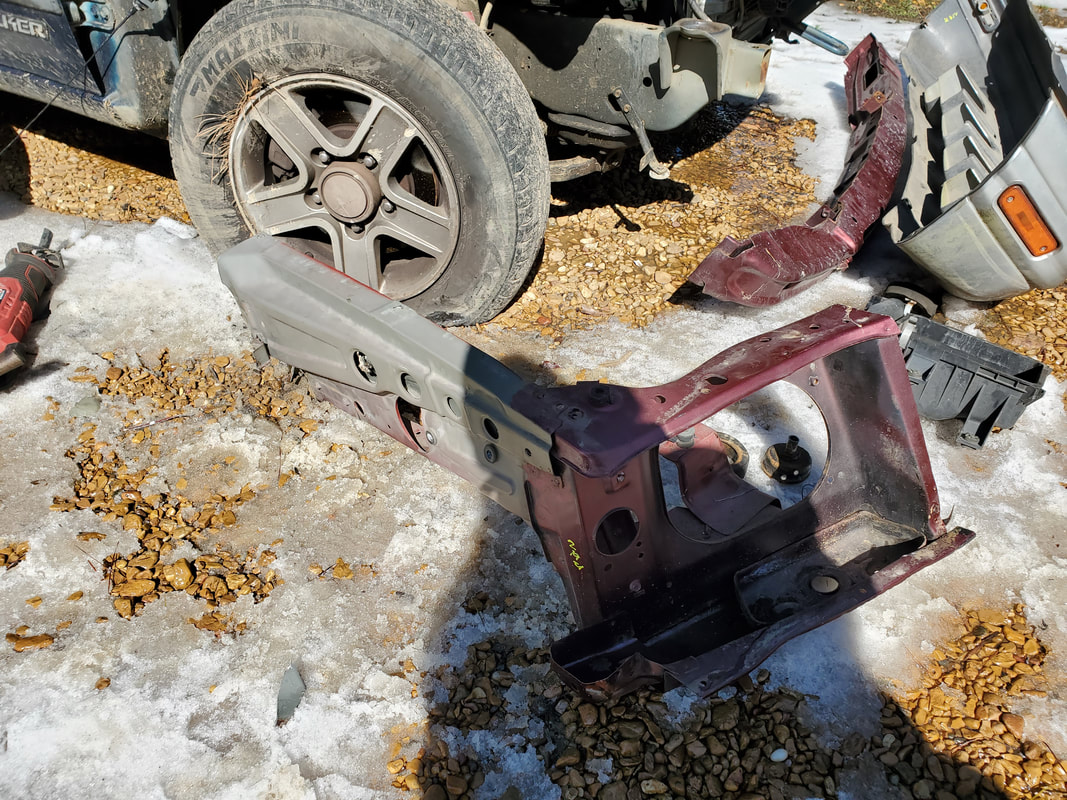
Fender apron/subframe portion cut from a junkyard truck, staged on right side of our truck.
The first thing that I started was the fitting of the fender apron/subframe. This would involve trimming excess metal from the junkyard piece so it would fit in the space that I have on our truck. I had to try to get everything as precise as possible since the alignment of this piece will determine the alignment of the fender, grille, bumper pieces and headlight shell. After measuring and eyeballing the junkyard piece several times and trimming slivers of metal several times to get the piece lined up, I was finally able to get the piece in a position where everything looked even with decent accuracy. I went ahead and welded a light stream at the back portion of the panel to get the panel hung most of the way. From here I hung the fender on the subframe so I can make sure the mounting bolts lined up all around the fender to ensure the exterior panel would be fitting properly and not have any stress points or spots that might buckle. Everything looked good at the fender so the next point was to line up, fine tune, and weld up the front portion of the panel to the rest of the front subframe. 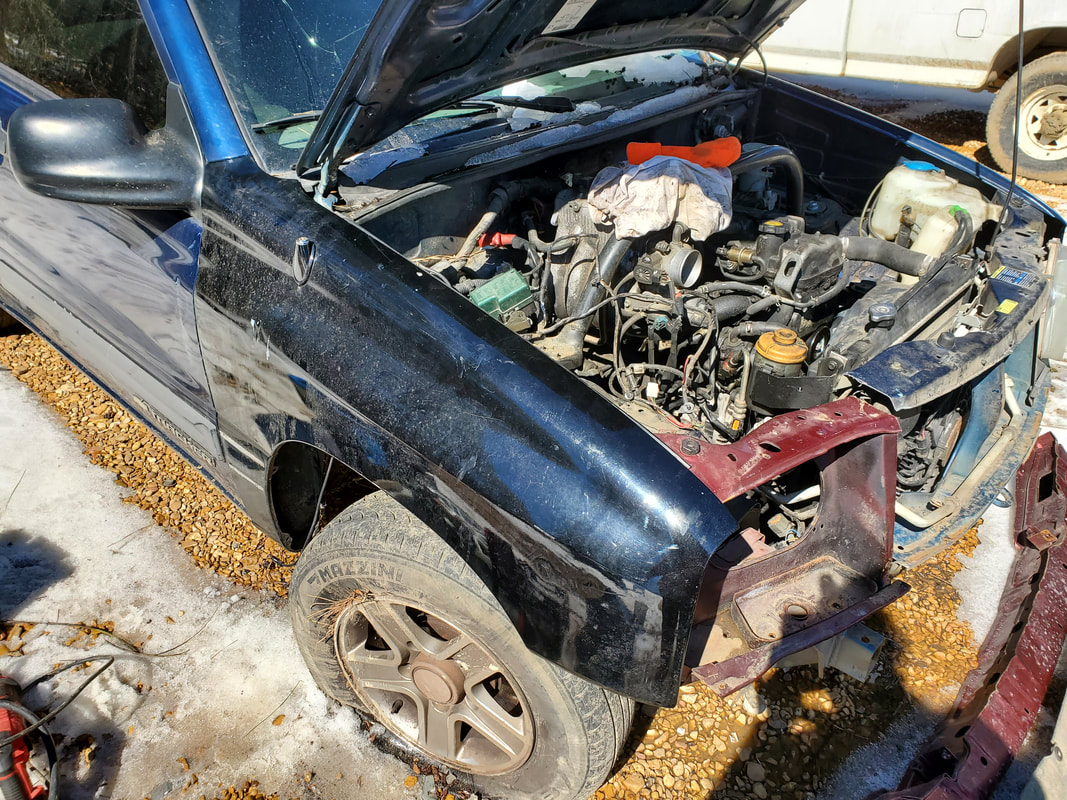
Outer fender mounted as I finish the fitting of the fender apron panel.
In finishing up the fitting of the fender apron panel I had to mount the headlight housing since I would need to test fit the grille as well as see how the hood closes over all of this mess to ensure that everything is lined up before I did my final welds. With some minor trimming and some minor stretching of the original portion of the front subframe, I was able to get everything staged properly enough to be able to do the final weld around this portion to connect the old with the new. I left the headlight housing in place long enough to get most of the weld done around the portions not close to the mounting points since the metal would get hot enough to melt the plastic tab of the headlight housing. 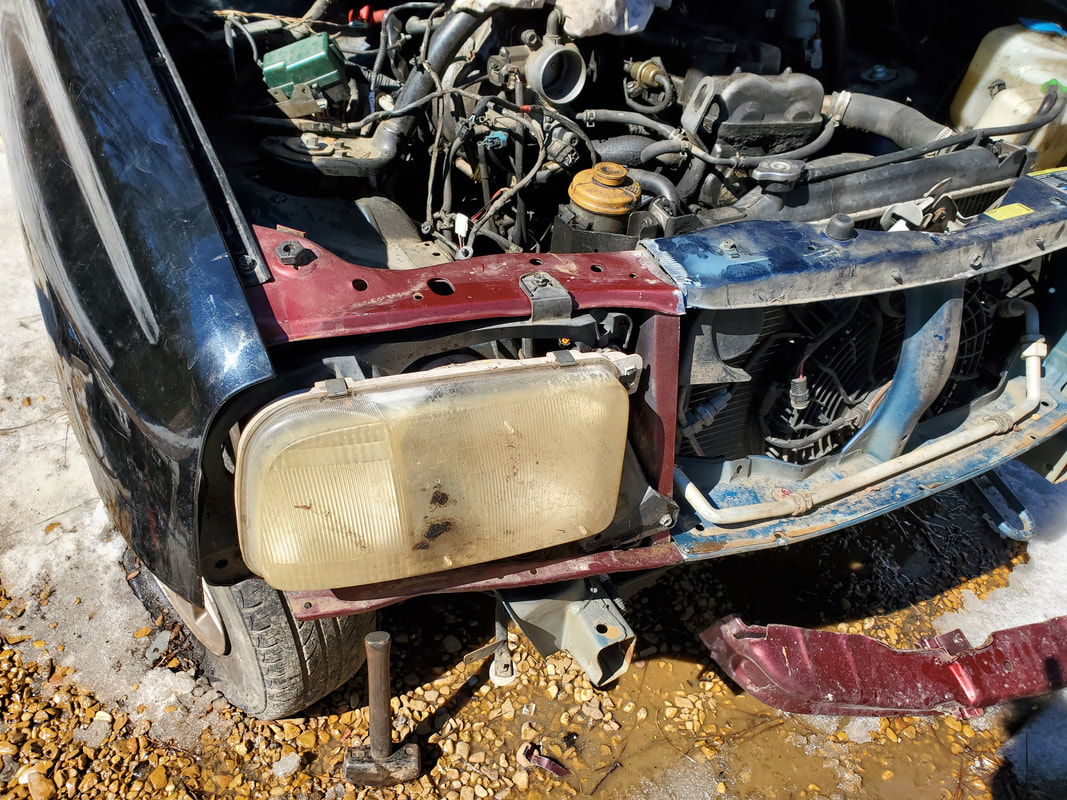
Headlight housing mounted while doing the final tweaking of the panel before welding.
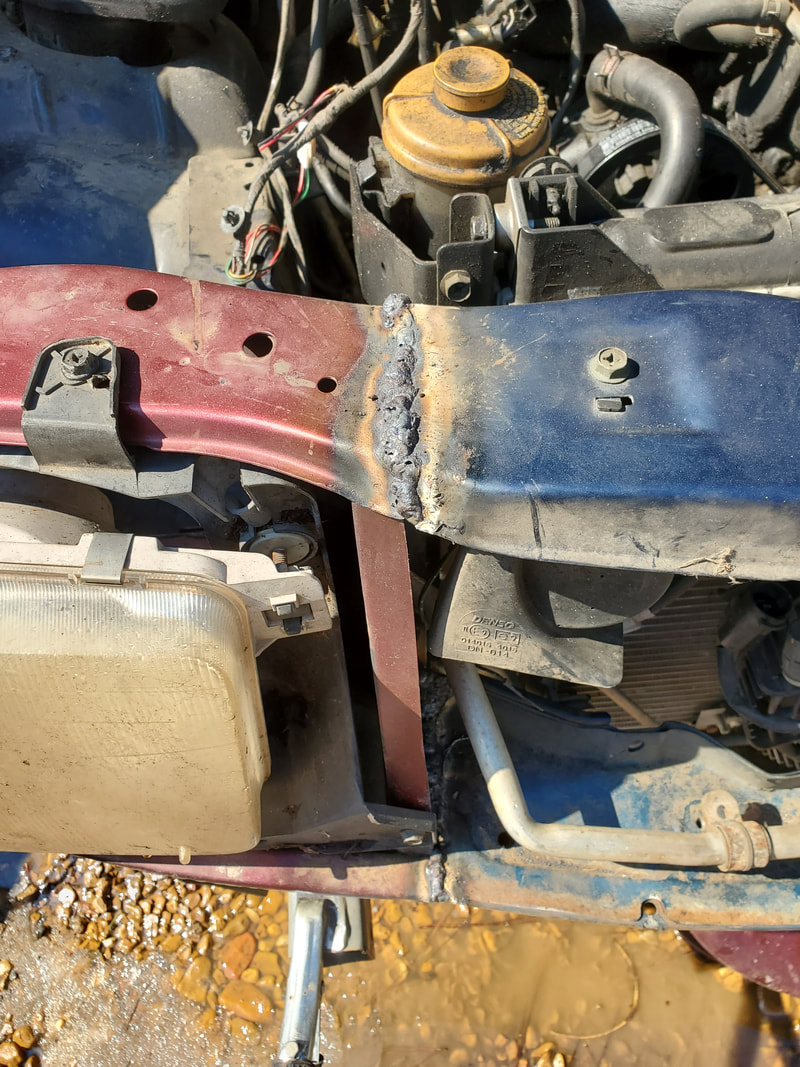
Top weld of front of the section of the new subframe. Note headlight housing in place to immediate left.
At this point I went ahead and mounted the bumper. I had to start off with the inner bumper, the metal section that takes the brunt of any impacts as well as holds the flimsy bumper skin. This large metal piece was held in with four bolts, two on each frame rail. This replacement panel went in pretty fast, allowing me to focus on hanging the bumper skin. The top of the bumper skin is held in with these special pegs that have a shell that pops in with an inner piece that expands this shell when its snapped in place. I don't have any of these pegs so I ended up using screws with nuts and washers along the top. I used 3 sets of fasteners to hold the top of the bumper skin in place. From there I was able to use the factory bolts to hold the rest of the bumper skin in place along the bottom, securing the piece properly. I snapped in the light sockets for the parking lights. From there I moved on to the grille. 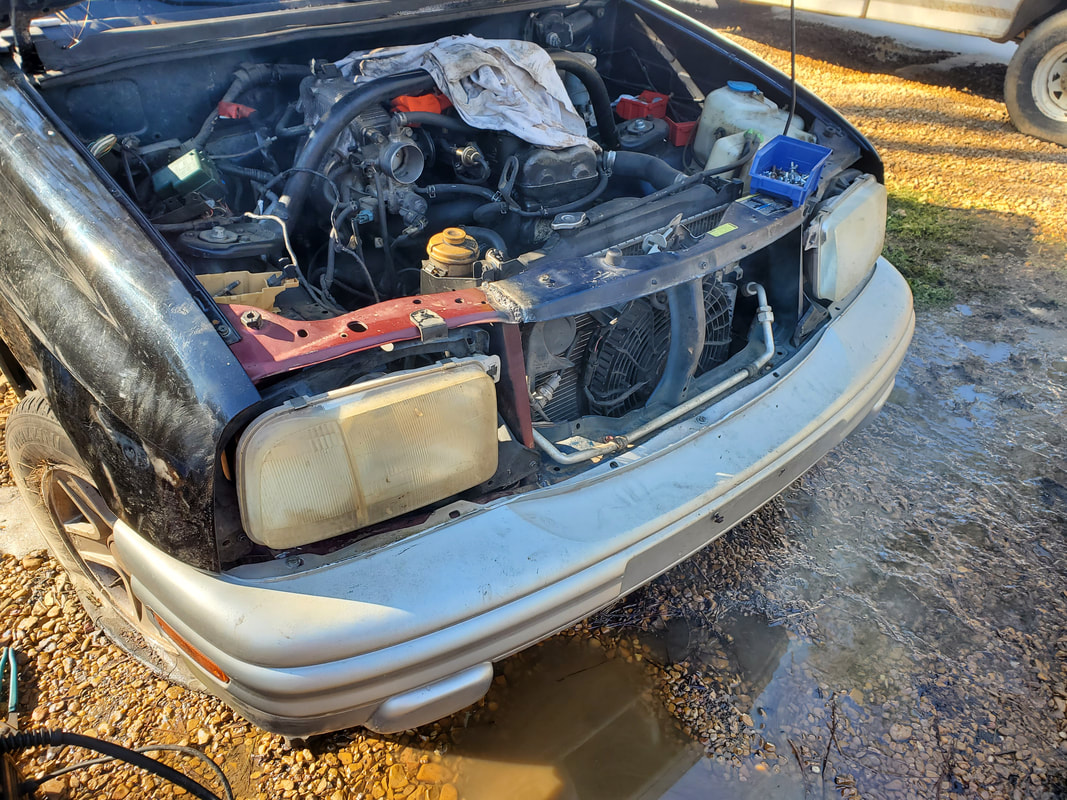
Bumper and bumper skin secured and straight on front.
Another angle of the bumper in place.
In fitting the grille in place, I had to figure out how I would attach the piece in place. Reason being the whole grille is hung in place with plastic pegs that snap in to hold the top of the grill down and two hidden mounting points that have pegs holding the grille in place. I don't have any of these pegs and the two hidden mounting points are damaged where even with the pegs, I wouldn't have been able to mount the grille at these two points. I ended up having to use some countersunk screws with nuts and washers to hold the top of the grille to the same mounting holes where the pegs would've gone. I then had to drill two holes, one on each side, into the plastic of the hidden mounting points, which then allowed me to use zip ties to hold the grille through these holes into the holes in the subframe where the pegs would've gone. After tightening the zip ties, the grille was pretty sturdy and solid. 
Grille in place secured.
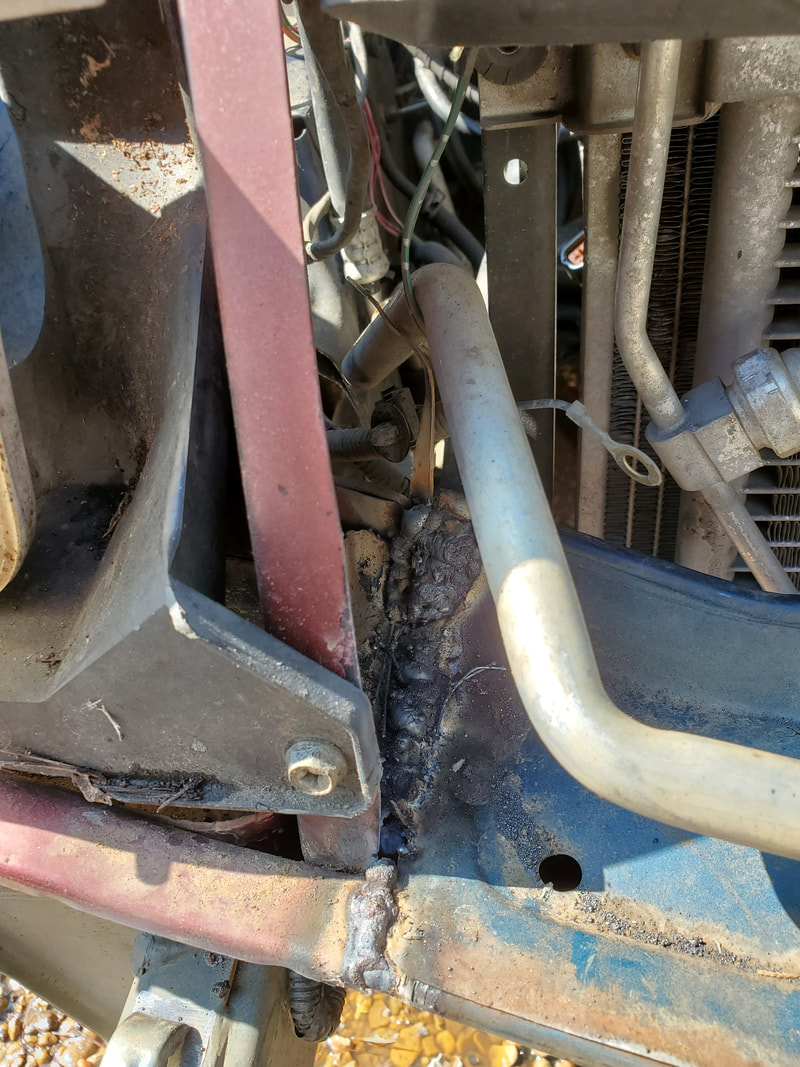
From here I moved to the inside of the fender apron/subframe panel, running along the line lengthwise. I had to trim some excess metal from both sides to get everything lined up with either side so I can do one good straight weld along the length of the seam. With a bunch of eyeballing, I trimmed enough metal from both sides to allow me to get the seam straight so I can get the weld in place. This was a way cleaner job than the patchup I did on the old Tracker. 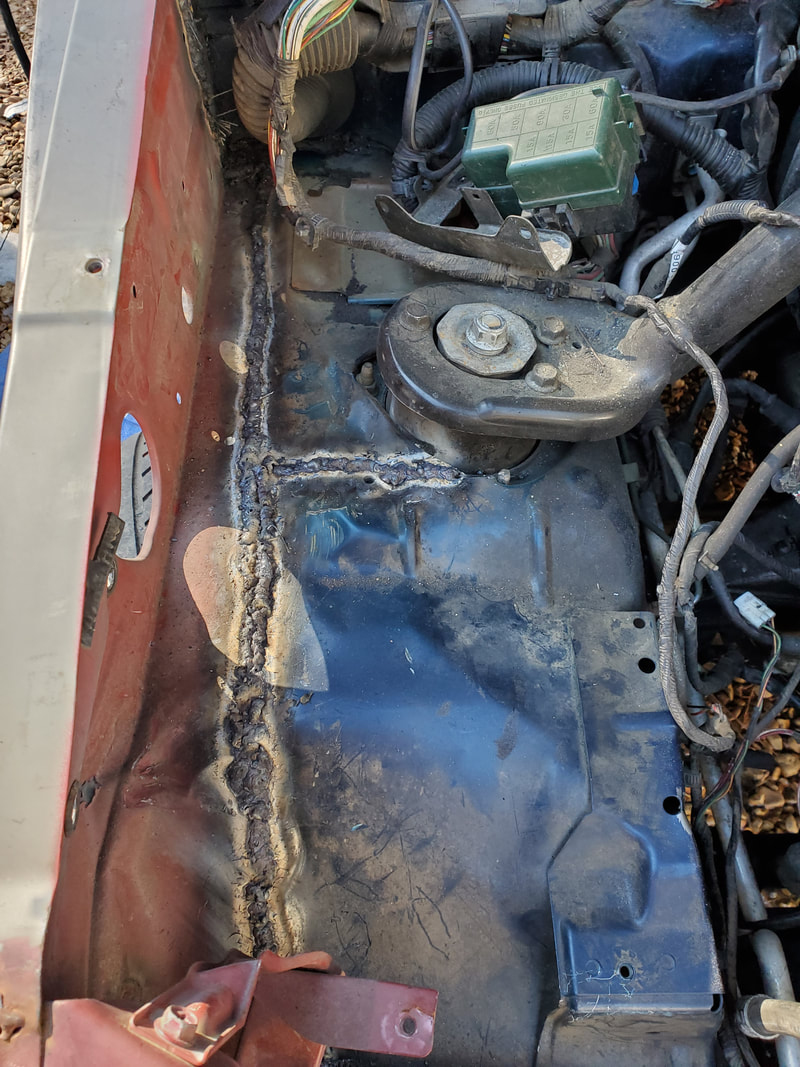
With all this done I moved on to the fuse box and air box. These just needed to be secured with the factory bolts as everything was taken apart without any damaging of the pieces. This went rather fast so on to the air box I went. From there I had to do some minor moving of one of the metal brackets that held a mounting point for the air box. With the air box secured with its factory bolts I mounted the top half of the box and attached the hose in place. Two of the snap on tabs were unable to be secured because the tab mounting points at these two corners were both damaged. I ended up manipulating the air hose in a way where it put downward pressure on the top half of the air box to hold the piece down against the bottom half of the box. 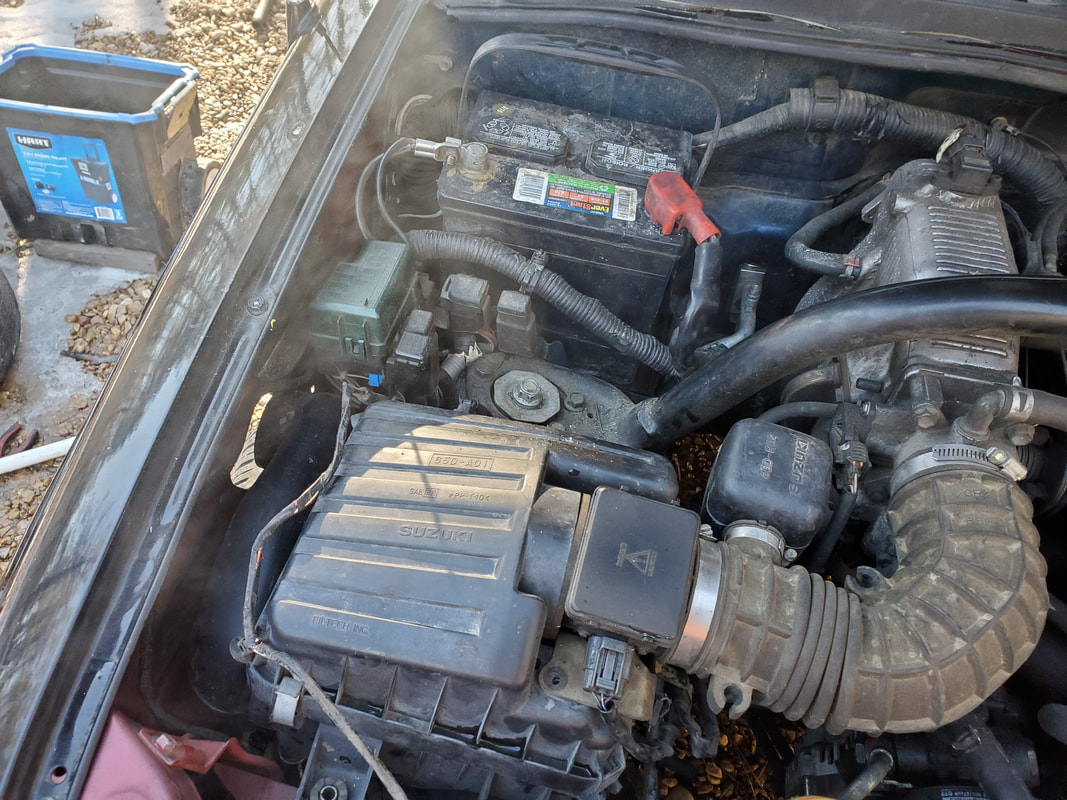
With that, I just had to do some minor bending of the hood to get it straighter so when I closed the panel it would line up with everything. After doing this I was able to close the hood properly without any portion of the panel pushing or rubbing against anything. It turned out even better than I thought despite the few minor flaws in the panel from the accident damage. With that I put the battery back in and fired the truck up to ensure everything was still working properly. I put air in the right front tire since it was flat and with that, I had the Tracker back in service once again.
With the weather starting to degrade the conditions were predicted to go straight to hell. Well just prior to the shit show that was displayed in the last post, the weather started off with a little rain, nothing serious but enough to start making its presence known. The ole lady took the Tracker to make a run to the store and to a restaurant to get some food for the night while I continued to do some work in the garage, mostly cleaning things up in preparation for moving the Mustang up there to pull the engine.
I get a call from her saying that she took a curve at a spot on a normally traveled route, having one side touch the dirty shoulder, causing the vehicle to loose traction and slide off the curve and into a tree. Now while it wasn't the head on type of impact, she did slide the truck side ways, hitting the tree with the right front quarter of the truck. 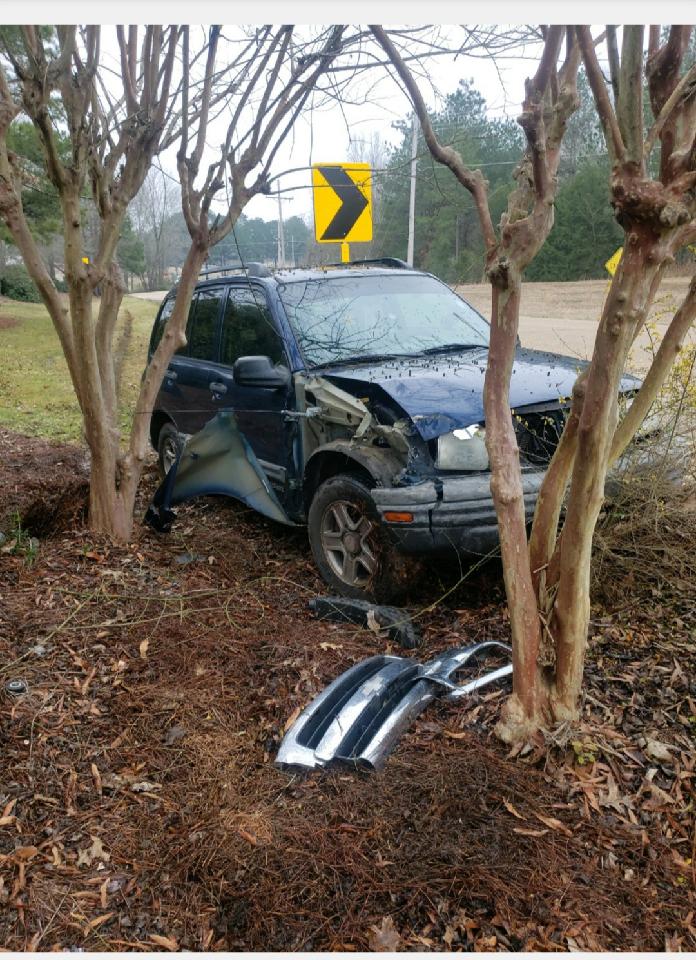
Tracker on side of road against trees, showing damage to fender and front end.
After the tow truck came and dragged her back on the asphalt she was able to drive the truck back to the house. Of course it was all fucked up from my point of view since what I can see is me having to do some more cutting and welding and more fuckery to get the body fixed back up. After really looking at the whole thing I told myself that the best bet is going to be to find a junkyard truck and take my battery powered tools and cut out the twisted metal from that truck and weld in the replacement metal versus trying to beat and cut and re-weld the twisted metal into a somewhat normal enough shape to be able to bolt on replacement panels. 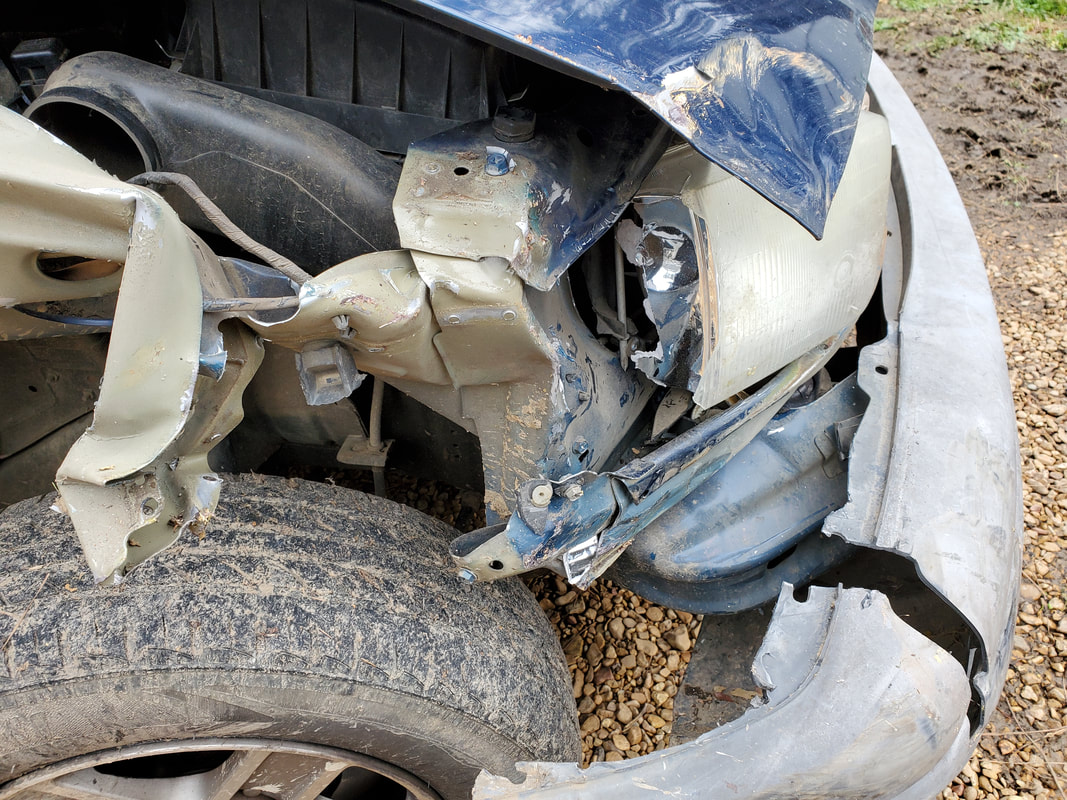
Front quarter damage after assessment. A number of parts will need replacing and fender apron/side wall will need replacing as this section of the inner structure is heavily damaged.
The first chance I got I started removing everything that could be unbolted. The headlight housing was trashed, the bumper skin was heavily damaged and would need replacing. The inner bumper frame was bent at the right quarter section from the frame rail out. The right fender was of course totally trashed. The hood's damaged but was straightened out. Depending on whether I find a replacement or not will determine whether I straighten out the damaged unit. Even the air cleaner housing will need replacing due to the mounting tabs being broken. The grille of course will need replacing due to its being in several pieces. 
Another angle showing damage to internal structure where fender and grille are mounted. All of this will need replacing.
Now there's some solace to all this. Before we scrapped the other Tracker I took time to pull off the body panels that were still usable even after the tree fell on the truck. This included literally everything that got damaged on this Tracker. The hood, right fender, headlight housing, grille and bumper skin. Even though these panels aren't in the best shape, they are here. If I can't replace these panels with junkyard parts. All I have to do is get that internal structure metal from a junkyard truck to replace the shitty metal on ours. 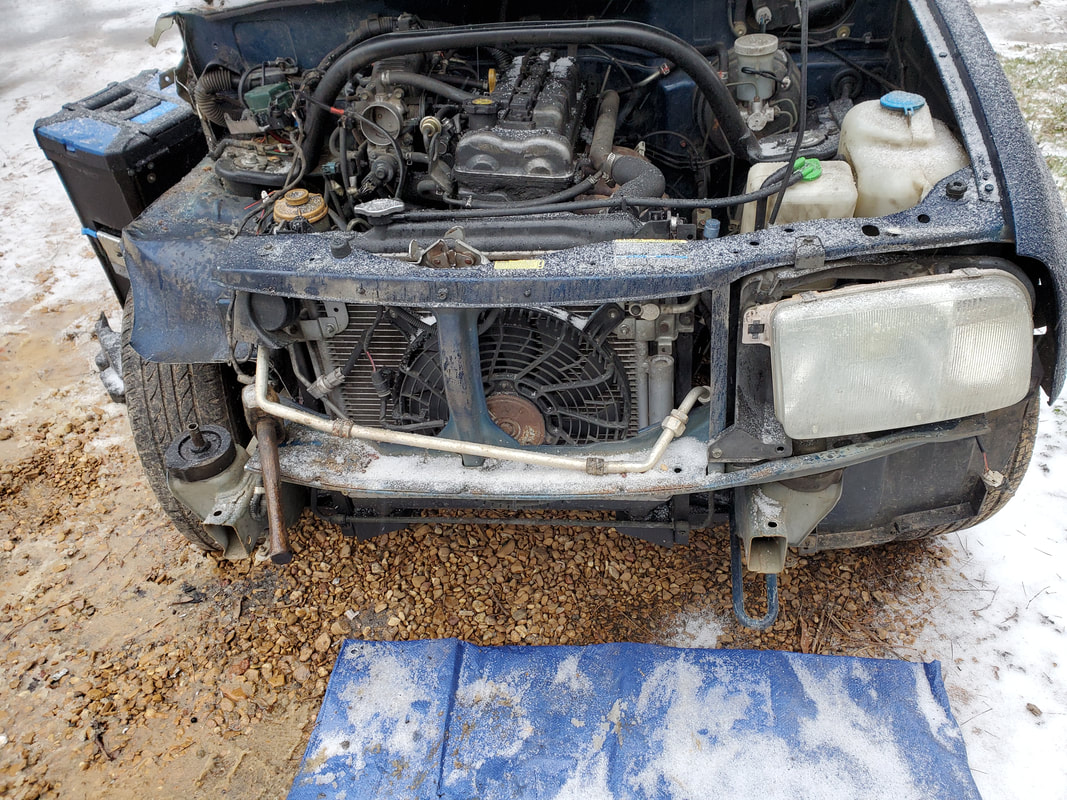
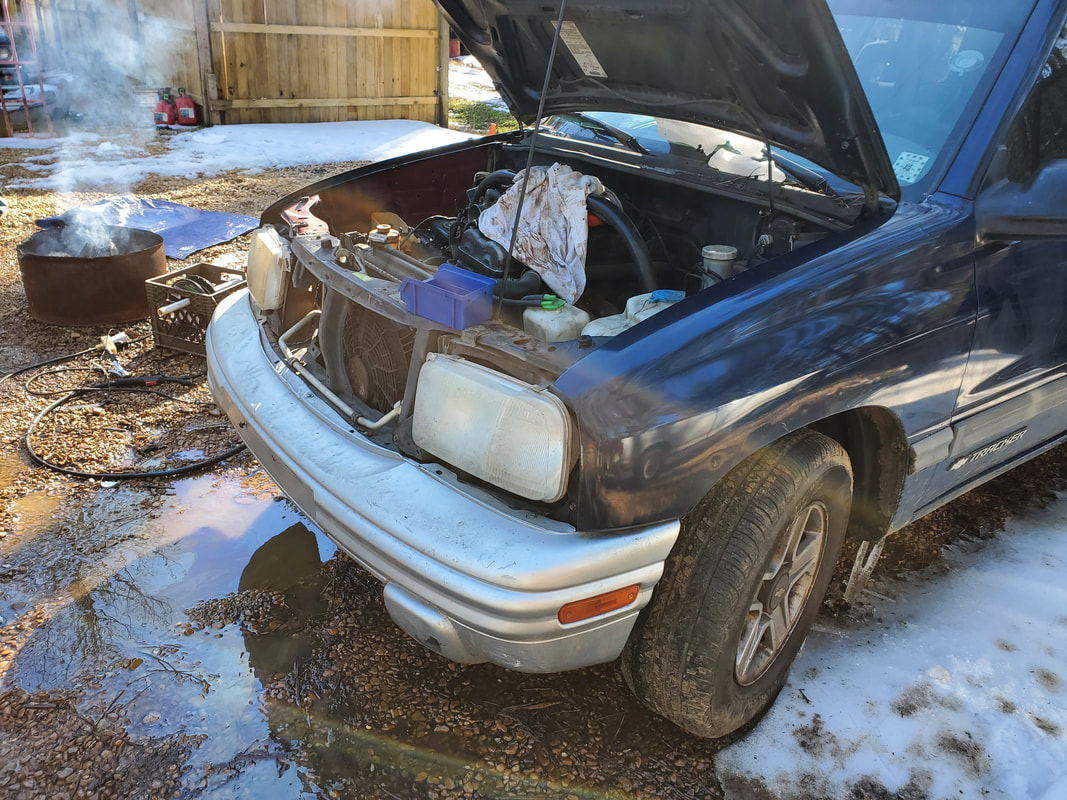
Front end after removing bumper cover and inner bumper along with headlight housing.
Since the headlight housing was all hashed, it was held on by only a couple of bolts. The inner bumper was held in by a few bolts on each frame rail so I was able to remove that entire component. Funny thing is I didn't take time to make this observation on the other Tracker when I was making the repairs to that inner bumper because I could've just removed the trashed bumper from that truck and replaced it with a straight inner bumper from the several junkyard trucks we encountered during those repairs. At least now I won't make that mistake twice. I also removed the air cleaner housing, which since the mounting tabs were broken, all I had to do was unplug the MAF and take the worm clamp loose and pull the unit out. There were some other lone bolts along the fender apron where the fender used to be secured. 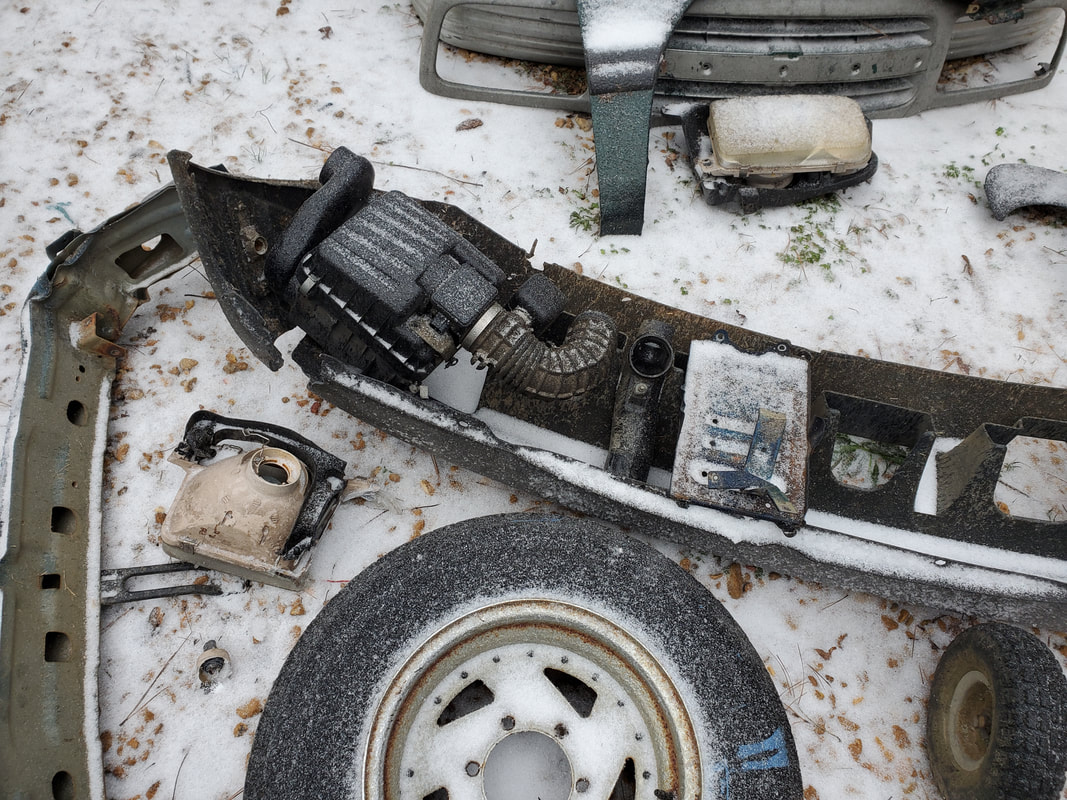
Parts gathered after stripping, along with the spares that I had on my auto parts scrap pile.
I did another assessment of the fender apron metal to see how much I would need to cut out so I can duplicate those same cuts on the junkyard truck to have a clean patch. Even with this plan I still want as clean a job as possible so it doesn't look too ugly or is too weak. I looked at what was bent or damaged and made strategic cuts around the end of section of the grille frame where the headlight is mounted and just past where the front right body mount is located on the frame, all the way to the back just in front of the cab portion of the body. The welds will be more at the edges of this section more so than in the middle. 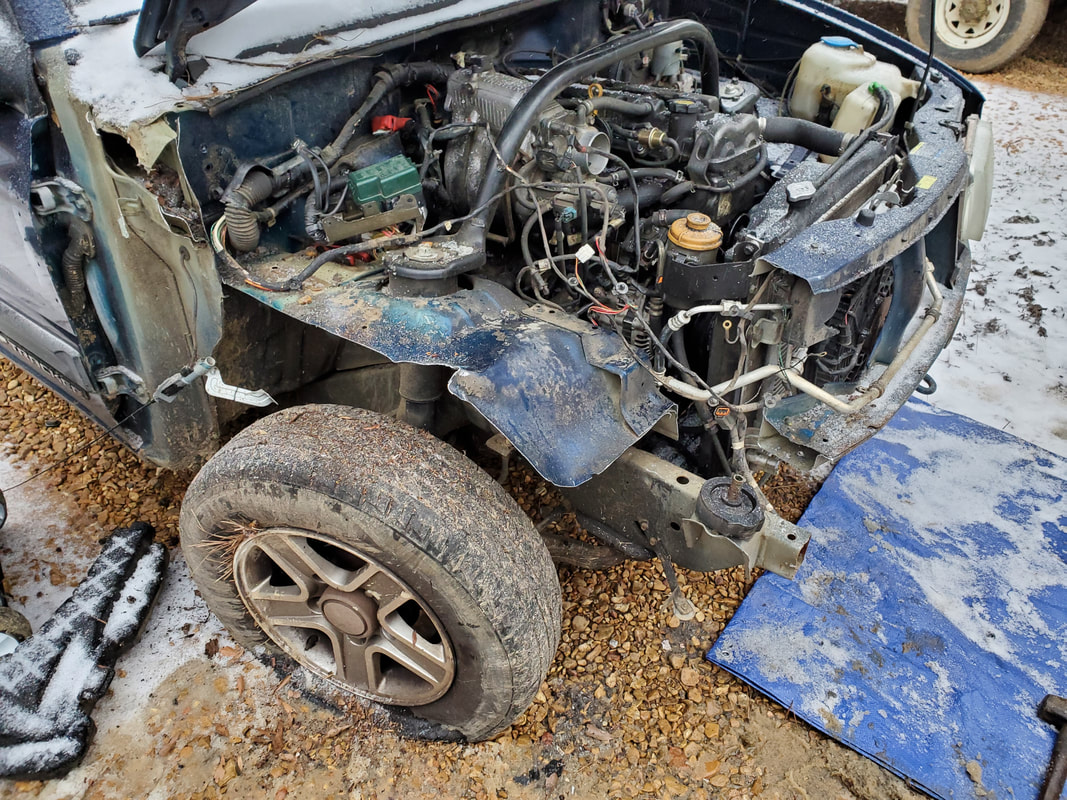
Quarter after cutting out inner structure metal from truck. Note grille section where metal was cut away, removing headlight housing, body mount and fender apron/side panel.
With that, the Tracker is ready for its new metal and components. Of course because of the shitty cold weather, the junkyard has been closed for the last few days so we're going to have to wait until the weekend and hopefully be able to get in to grab some parts for this impromptu project. Of course while we're at the junkyard I'm going to hunt down some F150 parts. I have to see if I can find a 5 spd manual transmission, clutch pedal assembly, clutch master cylinder, flywheel and clutch and if need be a driveshaft. The plan is to put a 5 spd manual into our F150 so I don't have to wrestle with rebuilding the AOD that's sitting on the shelf. Plus as anyone who knows me can tell you, I prefer manual transmissions in everything since the transmission is one less thing I have to worry about. Worst case is replacing a clutch. But that will be another project for another day.
As most people are probably aware of, there is a wave of bad weather hitting all over the country. Sad part about it is the idea that we were not immune from this weather either. A few days ago the temps went up into the 70s, giving us some good weather for enjoying the outdoors. But just like any good weather you get in the dead of winter there's either going to be some shitty rainy stormy weather right after that brief spell of Indian Summer, or in our case, super cold and snow. 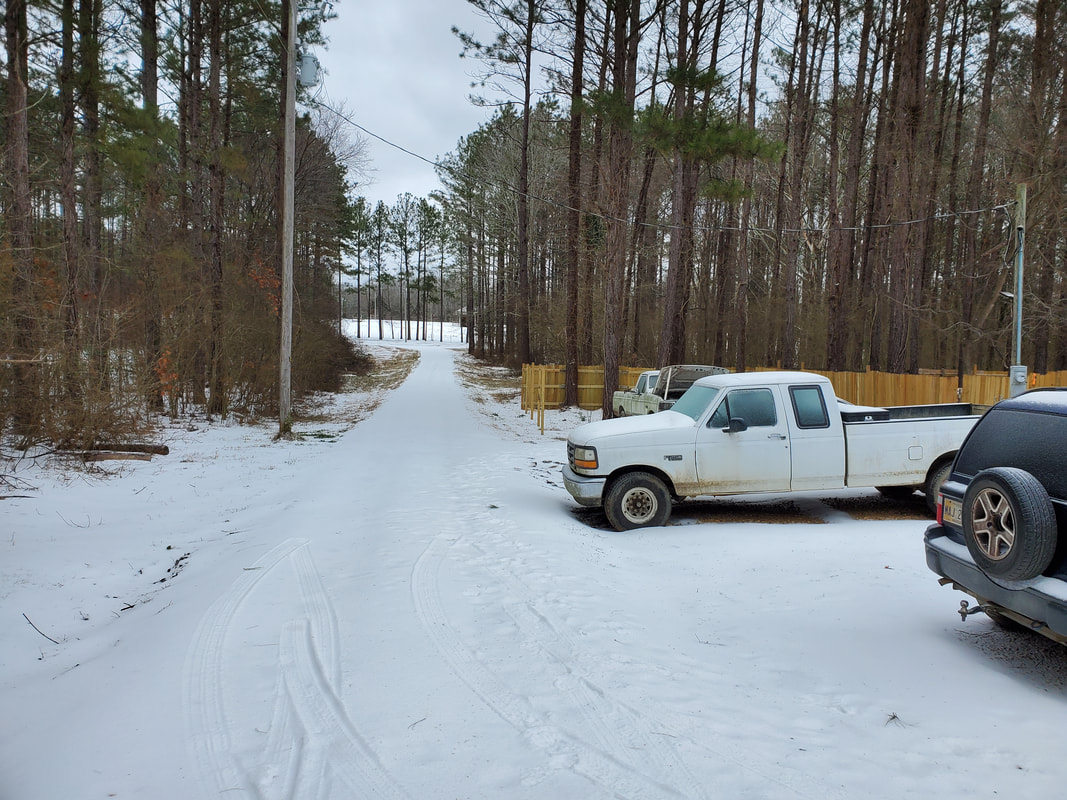 Snow covering the main driveway among everything else.... After the warm weather there were predictions that a cold front coming through along with some shitty weather. Of course it ended up coming out that it might snow. For the most part we would just get some rain, along with the cold, which would make for some uncomfortable conditions, but nothing like this shit we woke up to.  Side road going past storage trailer, covered in snow... Yesterday the weather was already starting to go down in the temps, enough that it was flurrying and sprinkling a little bit. We was going to try to go to the junkyard since we need to hunt down some replacement parts for the Tracker after Evel Knievel aka The Ole Lady slid the vehicle off a curve and into a tree, tearing up the right front quarter and everything associated with that side. Well in the process of heading in that direction, the conditions were slowly deteriorating more and more. The junkyard ended up being closed, having closed early due to bad weather. Bridges were getting iced over. We ended up getting some food and heading back home as the weather. 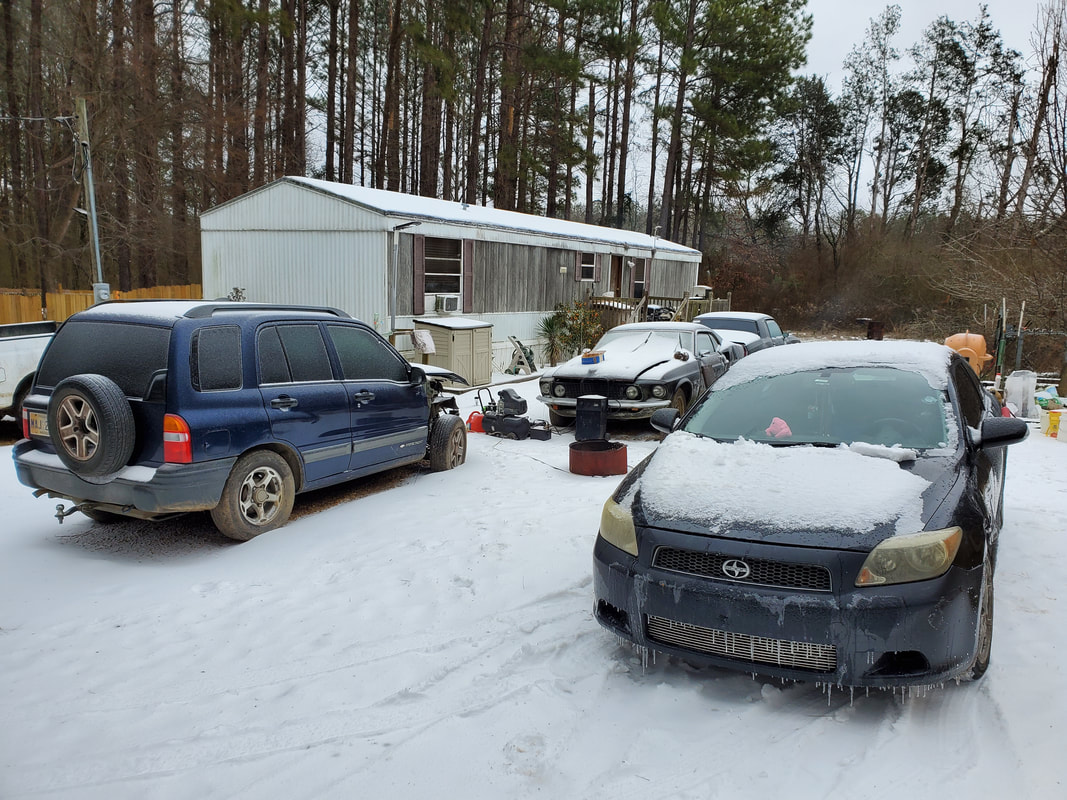 Main car park/side driveway covered in snow and ice, along with vehicles, note right front quarter of Tracker, having been stripped of damaged metal. After having come back I took a little time to strip the damaged metal and other stuff from the Tracker before saying "Fuck this shit" and heading back inside to a warm fire and some warm food. But fast forward to today and we have snow and ice everywhere. Everybody with any sense shut their stores down. No one was in the streets unless they needed to be. We sure as hell wasn't going anywhere. In the mean time we did head up to the garage to take care of some other small business since there really wasn't much else we was gonna be doing. We picked up some car dollies from Harbor Freight and still needed to assemble these so they'll be ready for use when the 65 Mustang is pulled up there. I also had some accessories from the F150's engine that I wanted to pull up to the garage for when I reassemble the replacement Ford engine for that truck. Lastly I had some scrap metal I had to bring back down to stage in their respective places. 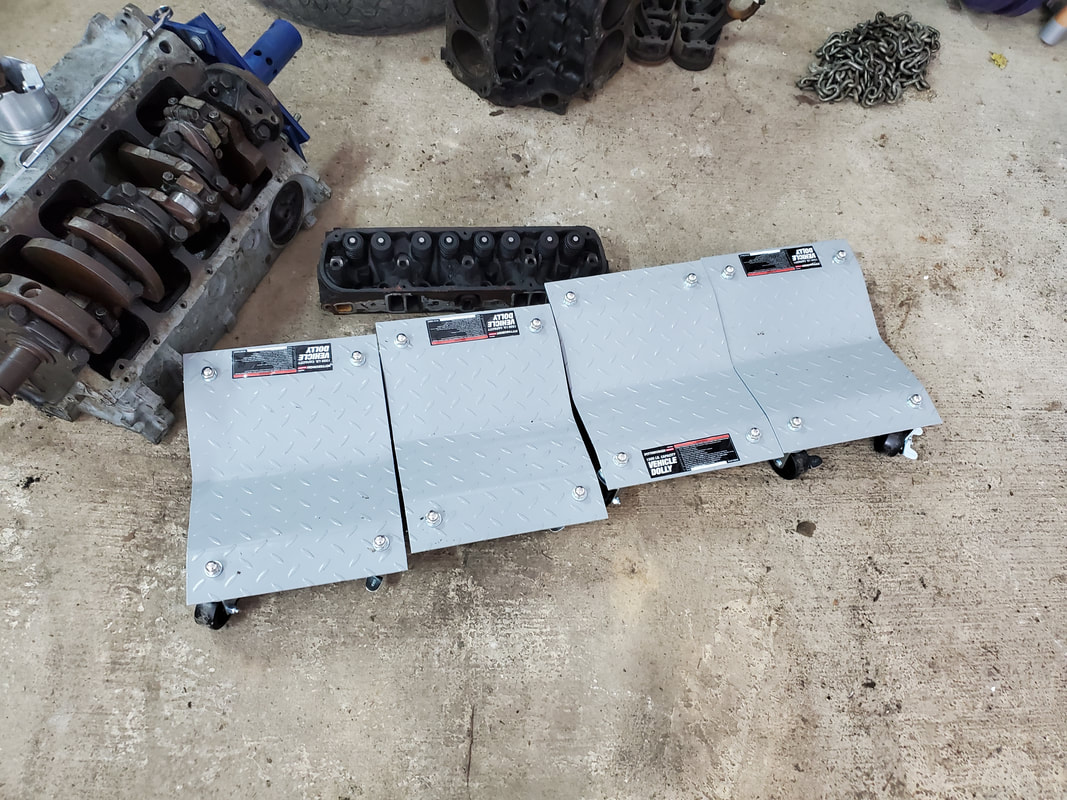 Harbor Freight car dollies set up and ready for use. We spent a few moments in the garage since despite the shitty conditions outside it was actually comfortable inside. Even without heat in the garage it was warm enough inside that I was starting to sweat under my sweatshirt/flannel quilted shirt combo. We did manage to get all the tools cleaned up and back on shelves and in the tool box. These were the tools that were all over floor during the time I was doing serious work on the Dodge. Even though I'll still be working on the Dodge, I decided to get the tools and a number of other miscellaneous items picked up from the floor around the driver's side of the car. Since I will end up needing to move the Dodge around when I do bring the 65 Mustang up, it would make sense to get the floors cleaned up as much as possible prior to this work so I'm not wasting time moving shit around while trying to move a dead car up there and move an engine crane around to remove a whole power train from said dead car. We also got the F150 parts staged by the Ford engine so everything is organized and ready for work in their respective spots.  Ford 302 engine at upper center of pic with parts beneath it in pic. Even the chickens weren't really having it in this weather. Most of them were literally cooped up until our presence let them know that it was time to eat. Only then did they come out. We had to put water bowls with hot water in them so the birds will be able to get some warm liquid water. Even though the water line going to the car coops was still dribbling, the low pressure side of the water lines was frozen and showing no sign of thawing out even with hot water poured on them. Since it was low pressure we'll just have to wing it and hope the low pressure water in the lines doesn't cause any damage to the PVC pipe. I did have to pour hot water on the faucet in the chicken yard to thaw it out before leaving it open enough to trickle while it stays cold.  If you could hear the chickens, they'd all be saying "FUCK THIS SHIT" All in all, this was a day full of "FUCK THIS SHIT". Couldn't drive anywhere with the ice on the roads. Even if we did make it through the ice gauntlet nothing that we needed to go to was open. Even if we did make it to the places we wanted to go and get what we wanted to get the temps were too low to be able to do anything before our hands and feet froze over. Because it was so cold outside even in the garage the mood was full of "FUCK THIS SHIT". In the end we ended up just pooing around the house doing general cleanup and hauling wood inside every couple of hours. We did still get some stuff done but not what I would've wanted to get done. Hopefully the next day will be a little better, even if in the idea that the icy conditions slightly improve enough to be able to leave without the risk of dying frozen death upside down in a ditch off the highway waiting for rescue that will never come because no one else in their right mind would be caught dead in this shit. So in closing, FUCK THIS SHIT! Our scheduling allowed me to be able to go ahead and get another load of gravel once again to continue spreading it over the general staging/parking area between the main driveway and the west end of the house. The spreading is getting closer to the main car park area so eventually I'll get the area covered all the way to the main car park area, blending in the grounds into one great graveled floor that will allow us to park vehicles wherever we need to without the worry of getting stuck on mushy spots. The load of gravel that I got this time allowed me to cover an area the width of the F250, going from the established main fence line along the main driveway all the way up to where our smaller trailer is staged, about 8ft from the west end of the house. I did want to leave this area opened also because I plan on digging up the ground right at the west end of the house where I have a new drain pipe routed out from where I set up the walk in shower in our bathroom with the intent of being able to catch the gray water from the shower for use in watering the garden. I set the pipes up where only the shower and the bathroom sink are routed through this new run of pipe with the lowest point routed to the outlet at the west end of the house. This pipe will be routed into some underground tanks or drums that are connected together via pipes. When these tanks fill up, it will back up into the pipe going up to the next level of drain pipe, just above the lowest outlet, which is connected to the main drain line going to the septic system. This allows for gray water to freely flow into the holding tanks without allowing black water from the main drain line to flow into the same tanks. I'll do some reporting on that project at a later date.  Patch of gravel spread right under truck. Gravel was spread and truck backed up over gravel as area was covered. With the gravel spread, I moved back onto the Mustang. After gutting the interior I moved on to pulling the underside apart. I had the driveshaft, exhaust pipes, shifter, and engine/transmission mount bolts to take loose. I did this so when we get the car up to the garage, all I have to do is hook the engine crane to the engine and just yank up and pull the whole powertrain free from the car. I had to slide under the car of course in order to pull the shifter free, which took no time at all. The driveshaft required me going under the car from the trunk area and jacking up the rear to allow me to turn the wheels to better reach the U-bolt retaining nuts on the U-joint. After pulling those items the next thing was the exhaust system. To better facilitate the exhaust system's removal I cut free some more of the rotted floor so I can get better angles for me to hammer at the sections of pipe and the mufflers and in the worst case, cut the pipes. 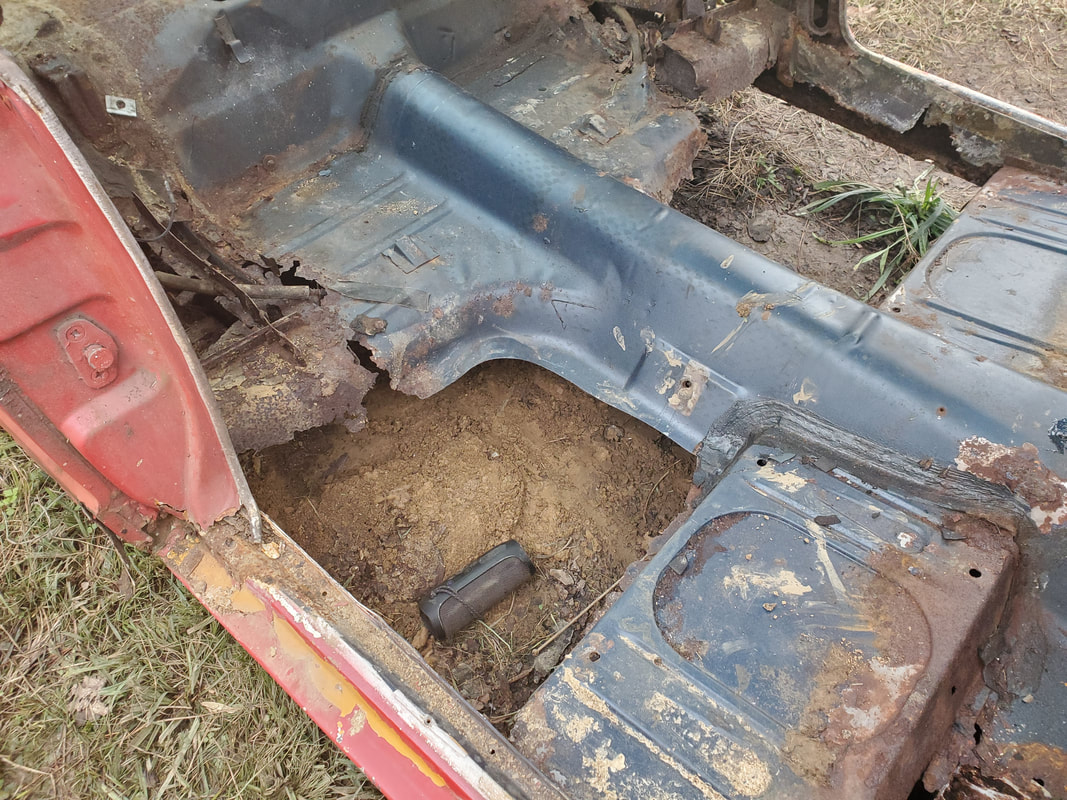 Sections of rotted floor cut free to allow me more angles with which to get the exhaust system disassembled. As I started getting things pulled free I started staging parts in the back of the S10 so I can bring the parts up to the garage for cold storage. The exhaust system is actually two separate systems, no H or X pipe linking the two. I was able to work on one side at a time all the way through, trying to minimize any cutting so I can at least try to reassemble the system with a minimum of couplings and/or welds. I actually did pretty good getting the system broken down without having to do any cutting surprisingly. The mufflers have more dents than one may care to have but otherwise they are still intact, not compromised in any way. 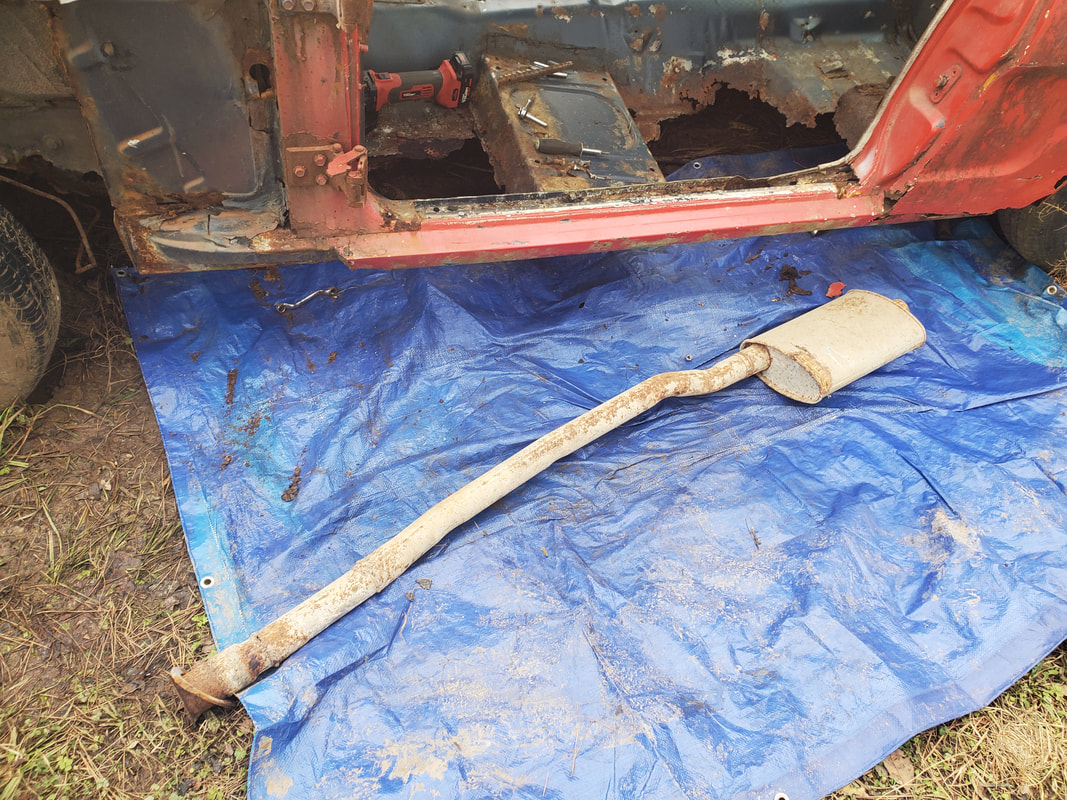 Section of exhaust pipe removed from under car. I took the time to undo the headers from the engine as well since they would catch on the shock towers as the engine is lifted from the engine bay. In order to put the headers on I had to lift up each side of the engine off its respective engine mount to get the clearance necessary to install the header from under the car up into its resting spot next to the engine block where I could secure the unit to the exhaust ports. Since I wasn't trying to lift the engine off the mounts where the car is at, I just took the bolts free from the cylinder heads so the headers are just resting in place between the engine and the shock towers. When we do go to lift the engine and transmission from the car, the headers will be free to fall to the floor, unsecured from anything in the car. 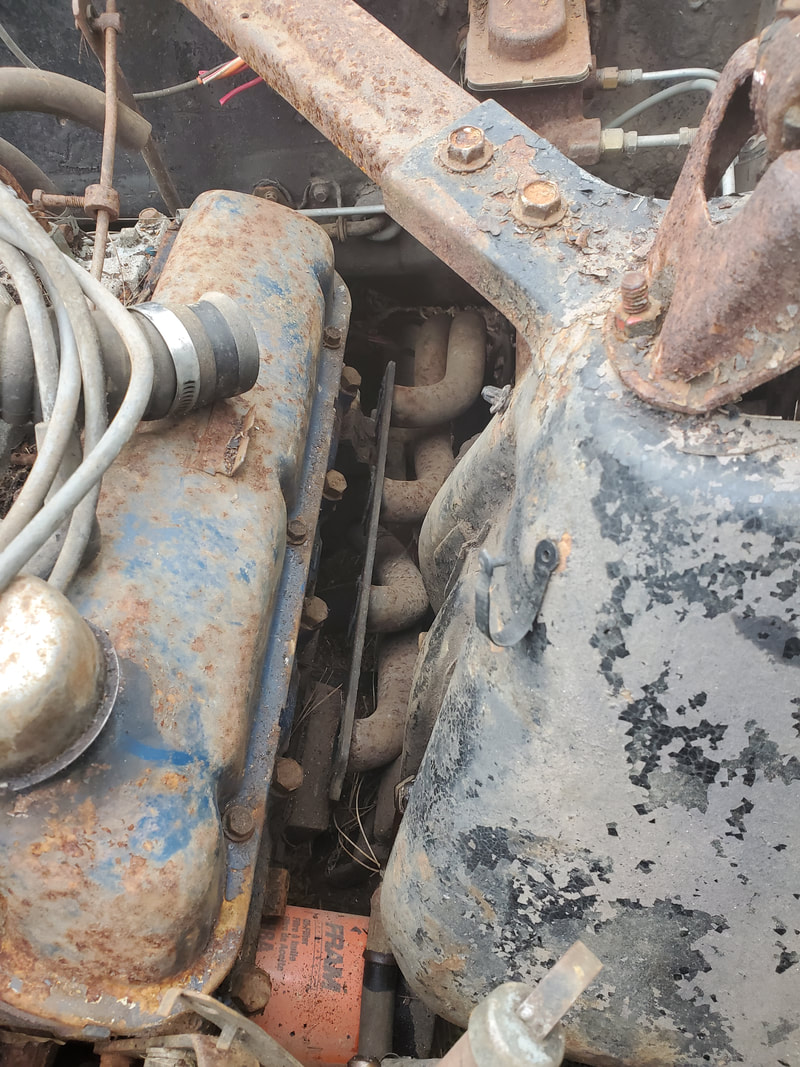 Left side header resting between the engine and shock tower after removing the bolts from the cylinder head. With that, I pulled everything I needed to pull free to have the car ready for powertrain removal. I will put a carb lifting plate on the engine so all I have to do is just hook the crane to that piece and pull the works from the engine bay. We do still need to get two more tires on the car so we can roll the car or more accurately, drag the car up to the garage. Putting fresh wheels on the car all around will also allow the car to rest evenly and high enough to move around underneath and get jacks under the car easier, not to mention be able to rest on car dollies so the whole thing can be moved around the garage with ease. As for the parts removed, they were all piled up and ready to take up to the garage. 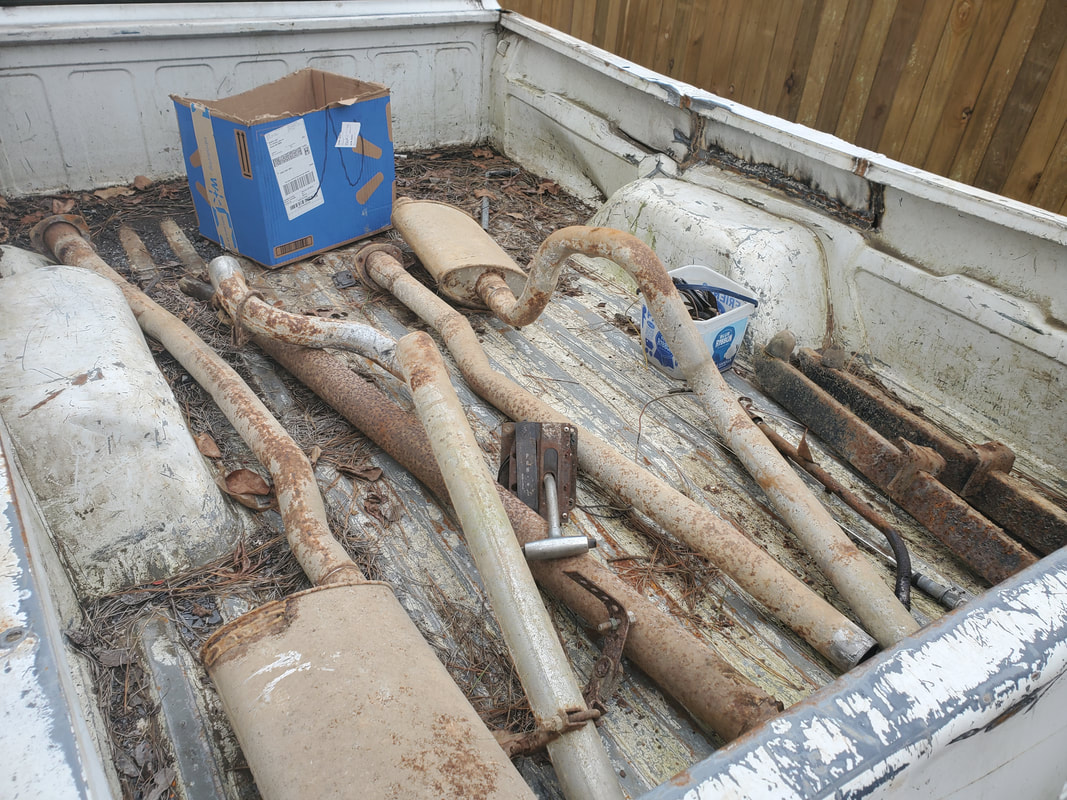 Parts removed from underside of car, exhaust, shifter and traction bars. Traction bars weren't mentioned as they were an afterthought that was discovered late in the day and were pulled so they wouldn't be in the way later on. I still have to leave the hood on the car over the engine as I don't want any rain to go down the carb port and run into the engine and start the vicious cycle of rusting the engine from the inside out. Since this is the original powertrain from this car, it would be nice to be able to retain this with the body despite the body going on a truck frame. I also want to retain the original rear end from the car as well, which will require me to cut off the shock mounts from the Ranger rear end and re-weld them to the Mustang's rear end so it can be remounted under the Ranger truck frame. This is also necessary as the Ranger rear end is a higher ratio rear end geared for use with an overdrive transmission. The 3 speed C4 on the truck's original rear end would have the engine screaming at 3k + RPM on the highway. I would have to either deal with that inconsistency or replace the C4 with an overdrive transmission, stick shift or otherwise. It's easier to just install the Mustang's rear end with some minor re-working. The adventures will continue....
After moving outside of the chicken yard gate with my gravel spreading, I've been slowly spreading gravel out into the parking area that covers an area between the main driveway and the end of the house and the side driveway. I went out from the gate and covered an area next to where I parked the car trailer and worked my way towards the side driveway.
I did manage to get a large area covered that would cover parking space for two vehicles if I did have to park something there. Of course since there will be a fence line running parallel to the driveway I didn't bother wasting gravel spreading out further onto the main driveway, only to split this little driveway up with a fence running right through it. When I do put up the fence I'll fill in any bare area that still remains within the fence. 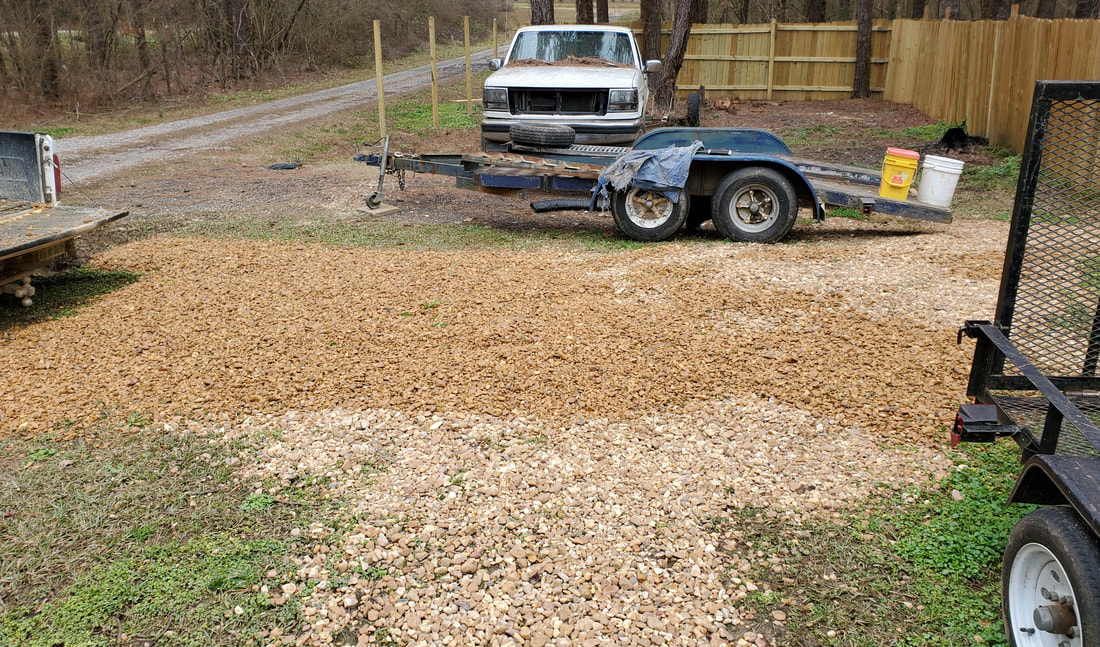
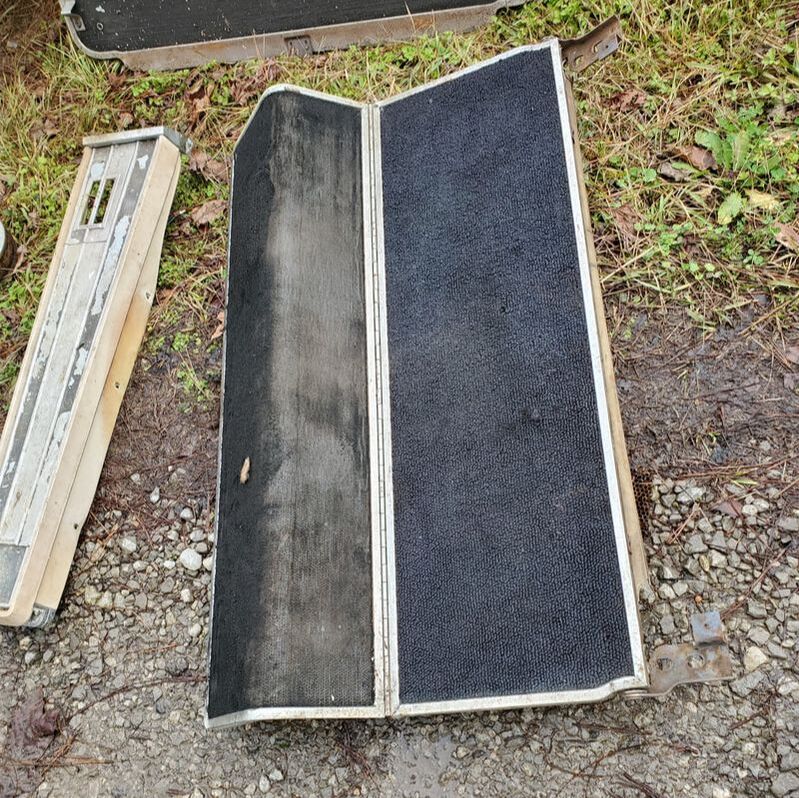
Cut out section of floor in left back seat area.
Like with other areas, I'll end up having to come back over this area with more gravel as traffic causes the first layer of rock to settle in the soft ground, as it has done just outside the chicken yard gate. I had to dump extra gravel over this small area as the ground was mushy and sucked up a good amount of gravel. I did also spread more gravel around the power pole butting up against the outside of the chicken yard fence. Covering this ground will help stifle future weed growth as well as make it easier to utilize any natural weed killers or something stronger if need be, to kill the grass and any errant weeds that may pop up through the gravel. 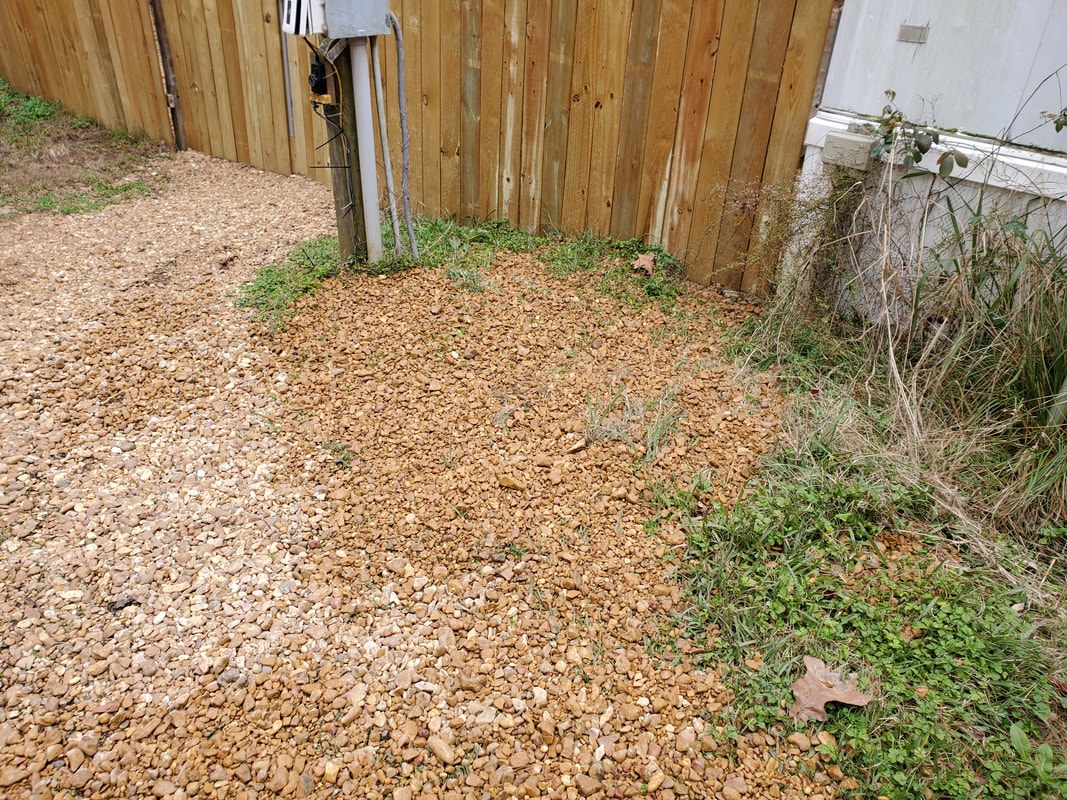
Gravel spread around power pole and up to fence line.
As for the Mustang, there was still work to be done with regard to gutting out the interior. As had been noted before, the floors are pretty much trashed in this car so they will need to be replaced or patched. I ended up having to remove a chunk of floor that was already sagging since I would have to put my feet over this area as I crawl through the interior while I'm pulling things out. The last thing I need to have happen is for the remainder of the floor to break free and have me fall on my ass or have my leg slide across this jagged rusty metal the wrong way and cut the hell out of my leg. The last thing I need is to have a nasty rust covered wound get super infected, so this metal had to go. Thanks power tools. 
Rusty section of rear floor on driver's side cut out completely so it doesn't get in the way of movement through the interior.
The next area I targeted was the dash frame and panel assembly in the car. This is the structure that holds the gauge cluster and HVAC controls and dash pad and whatever other crap that is usually bolted up in the dash area. I found all kinds of screws in obscure spots that defied any rhyme or reason as to how they got there and how I would have to get to them in order to remove them. I ended up peeling away a lot of the already decaying pad material from the dash thinking that maybe removing this stuff would expose the screws and/or bolts that I needed to get to in order to pull the metal dash structure free from the car. 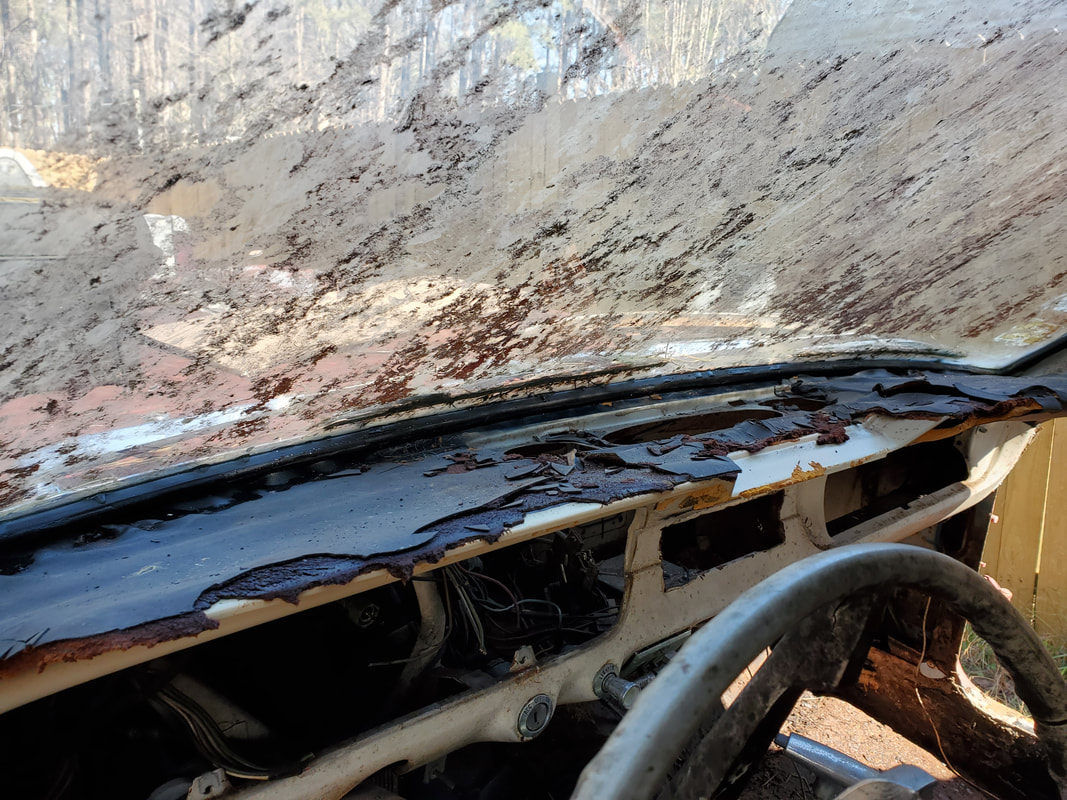
Shredded dash pad after trying to find how to remove bolts and screws that weren't meant to be removed.
After finding that I couldn't find any possible way to get the fasteners pulled out to remove the dash structure, I ended up retreating in order to do research on the removal of the dash frame in a 65 Mustang. Later on I found out that the metal structure is actually tack welded in place, not to be removed, unless one takes time to break these multiple welds for the sake of replacing a damaged or rusty dash frame. What this meant is the dash is NOT coming out under any circumstances. I wasn't about to go through the grief to pull the dash free only to have to re-do the same shit or have to figure some way to put removable fasteners in strategic spots around the framework to secure the dash frame in place.
With the dash removal a mission abort I just moved on to the HVAC box. Well HV box since this car was not equipped with factory AC. But I digress, the box still had to come out. This was a rather easy removal. One of the blend door boxes that connected to the main blower box was actually made of some type of particle board or card board or some flimsy shit that degraded over the decades to the point that I was able to just pull the whole box out. With that and the associated tubes and hoses removed I was able to turn to the bolts that held the main box in. These bolts were attached through the firewall and once these few bolts were removed I was able to remove the whole HVAC box from the inside. With the HVAC box and the other hardware removed I was able to sit back and relax since I managed to get yet another large item pulled from the car and moved to the storage on the shelves in the garage.
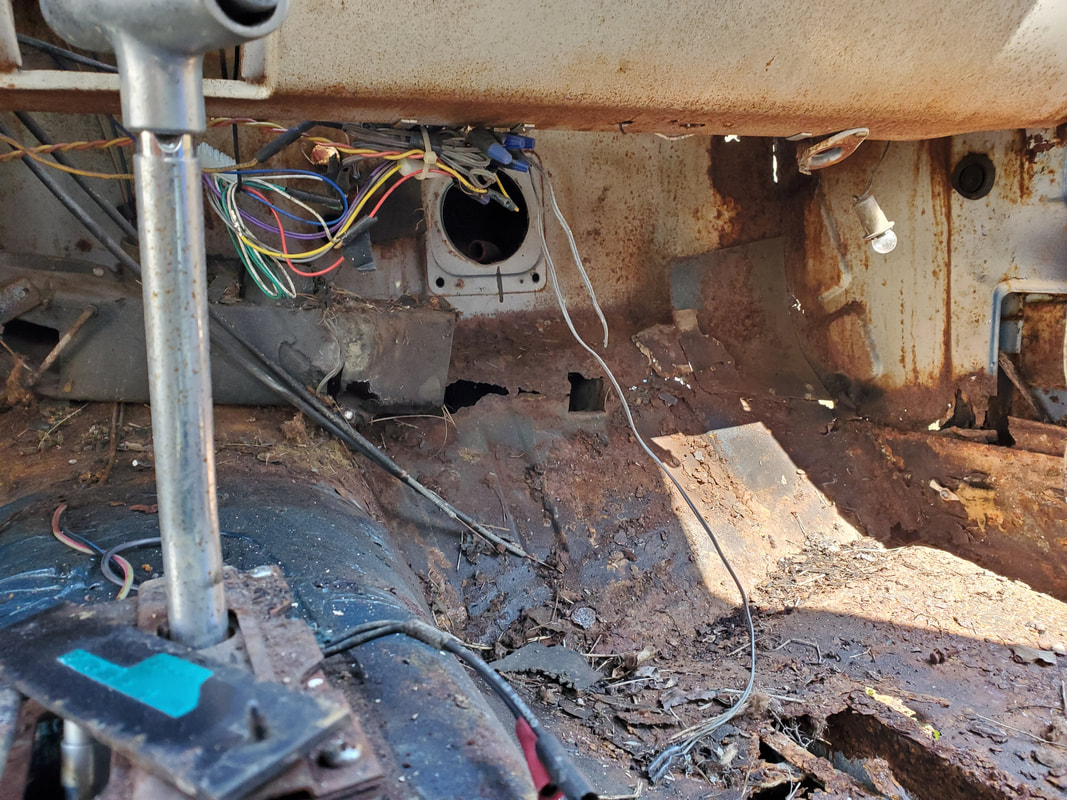
Cavity opened up after removing HVAC box from under the dash. Note rust on floor and firewall.
The next round of work to be done on the car will be the removal of the shifter along with the exhaust and everything to do with the powertrain short of actually pulling the engine and transmission free from the car. By pulling everything free I will be in a position where I will be able to immediately pull the powertrain free from the car once I do get it up to the garage. By getting the shifter, exhaust, driveshaft, and mounting bolts removed, all I have to do is bolt the carb plate to the intake and just hook the crane up to the plate and yank the whole powertrain out in one fell swoop.
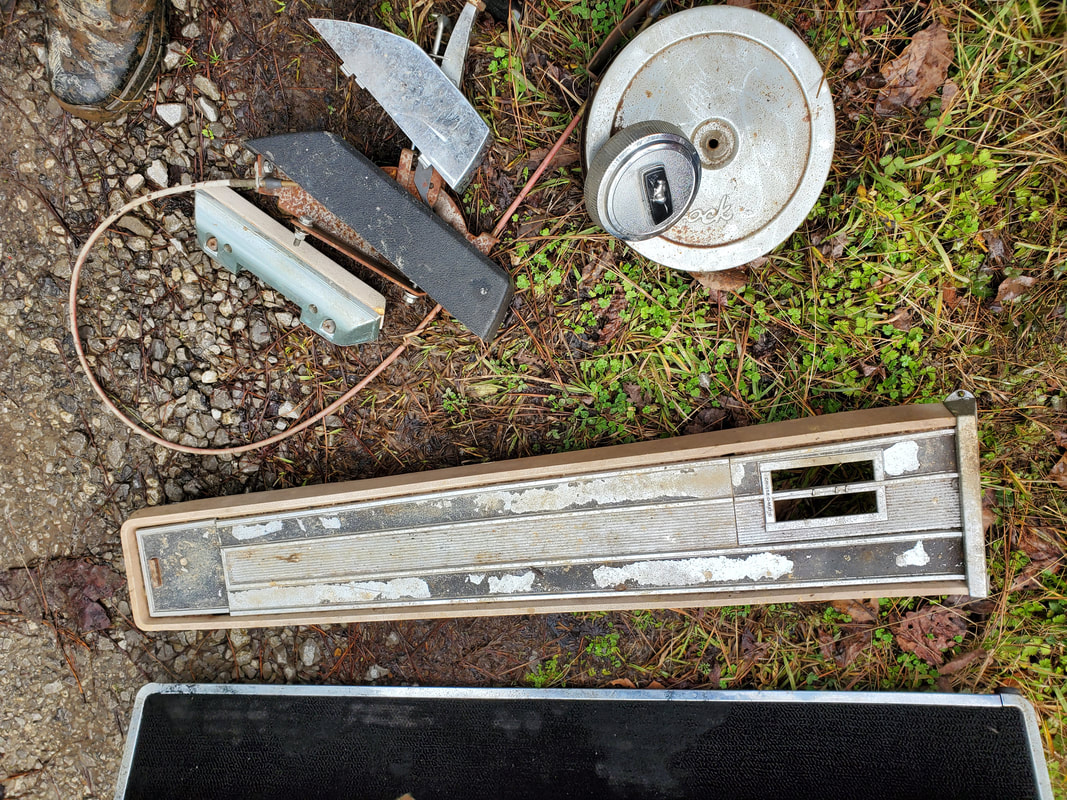
After getting the floor carpet pulled and most of the other items pulled from the floor I moved on to the rear of the interior and into the trunk. The interior side panels that flank the back seat as well as the back panel holding the speakers had to come out. From there I had to pull the rear bumper and tail lights, finishing up the rear of the car. The side panels were pretty easy as these were held in with simple sheet metal screws. There was still a matter of being careful with the movement of the panels as these things are made of whatever passed off as plastic back in the middle 60's. The last thing I want to do is make one abrupt move and crack or damage these panels, especially at the mounting points. Well with that, I did get the two panels out completely. The speaker panel wasn't really bad either as it was held in by a few 1/2" hex head bolts. With that the panel came out quick and dirty, going along side the side panels prior to their trip up to the garage to be put on the shelves or stacked up for cold storage while the body undergoes its transformation. 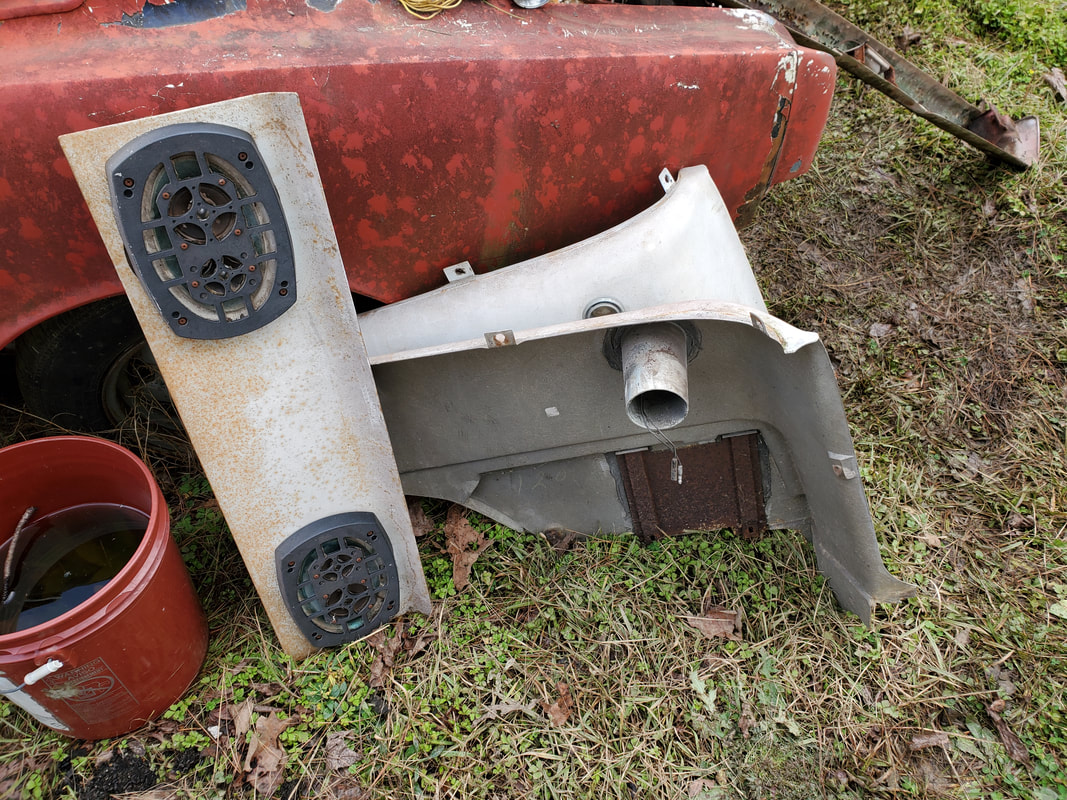 Speaker panel and side panel pulled from interior and stacked to the side while work continued. With these panels pulled I did take time to use the shop vac to vacuum up all the dust and rust and dirt and crap that was accumulated behind these panels and on the floor, especially since most of this dirt was from the ants that made an ant hill in the car, up through the hole in the floor from the actual ground outside. Well needless to say, those little bastards have been formally evicted. 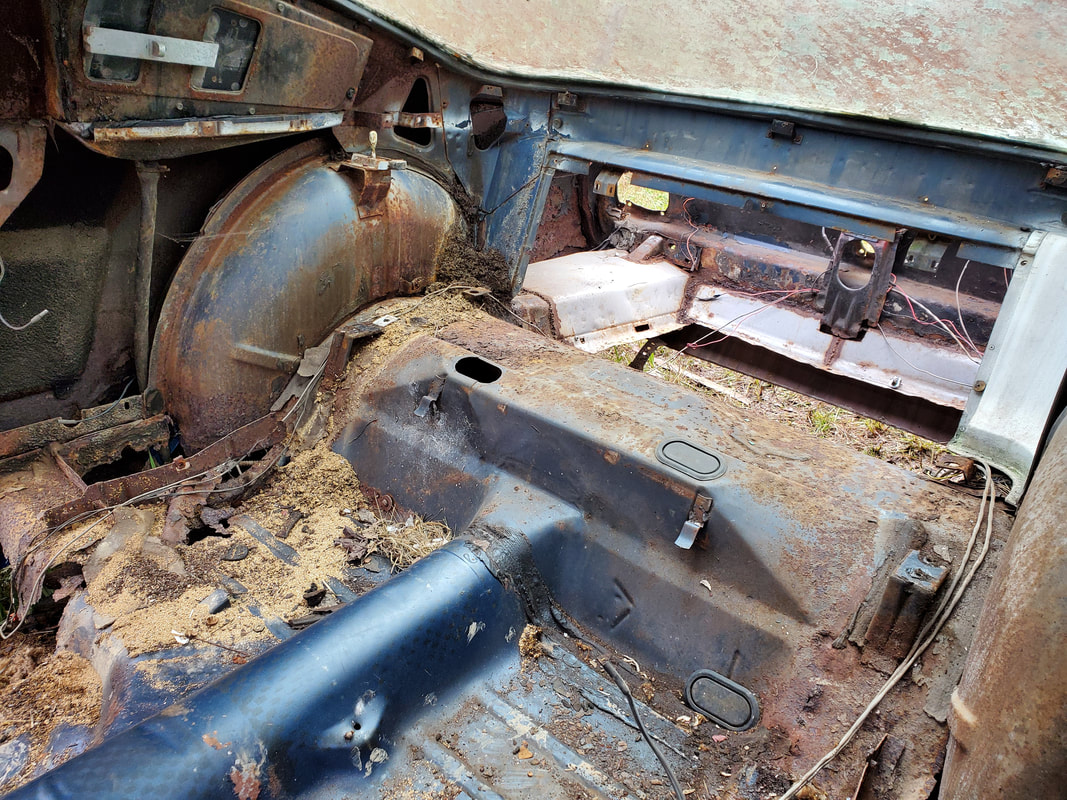 Interior rear floor before cleaning up floors, note rust and holes all over by fender wells and just all over in general. 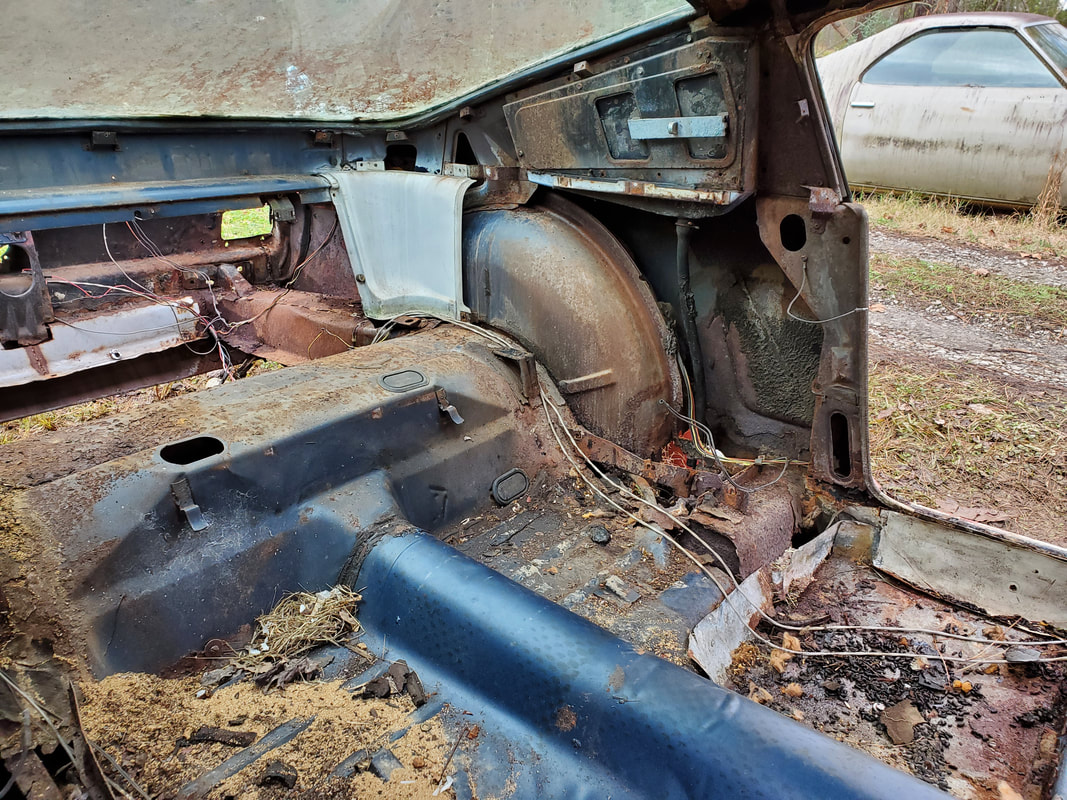 Another angle of the rear interior floor and sub structure showing level of rust and decay especially around the floors. Note dirt and rat shit on floors as well. Moving on back into the trunk area I took a few moments to pull the tail lights from their mountings. This was rather easy as well, only a few small bolts needing to be removed to get the two housings pulled free from the tail light panel. I will have to really look at that panel to see if I want to try and save it or just cut all this stuff out and replace all the sheet metal and start fresh. It would be nice to be able to retain some of the original sheet metal from the car. Lord knows not much is left. The bumper on the other hand wanted to be a challenge to remove. The large bolts holding the bumper to its mounts against the rear were rusty at best and seized at worst. I was able to get two out of four of the bolts free but ended up just pulling the reciprocating saw and angle grinder to chop out the nut side of the bolts from the inside so I can pull the bumper free. The remaining stubs of the bolts were easily removed and will be replaced with some chrome plated bolts later on during the rebuilding phase of the project. For right now I just wanted all these old fasteners removed. Even if I was able to get the nuts and bolts free, I still tossed a lot of these and will more than likely toss the whole lot, replacing them with all new hardware so this won't be a problem again. 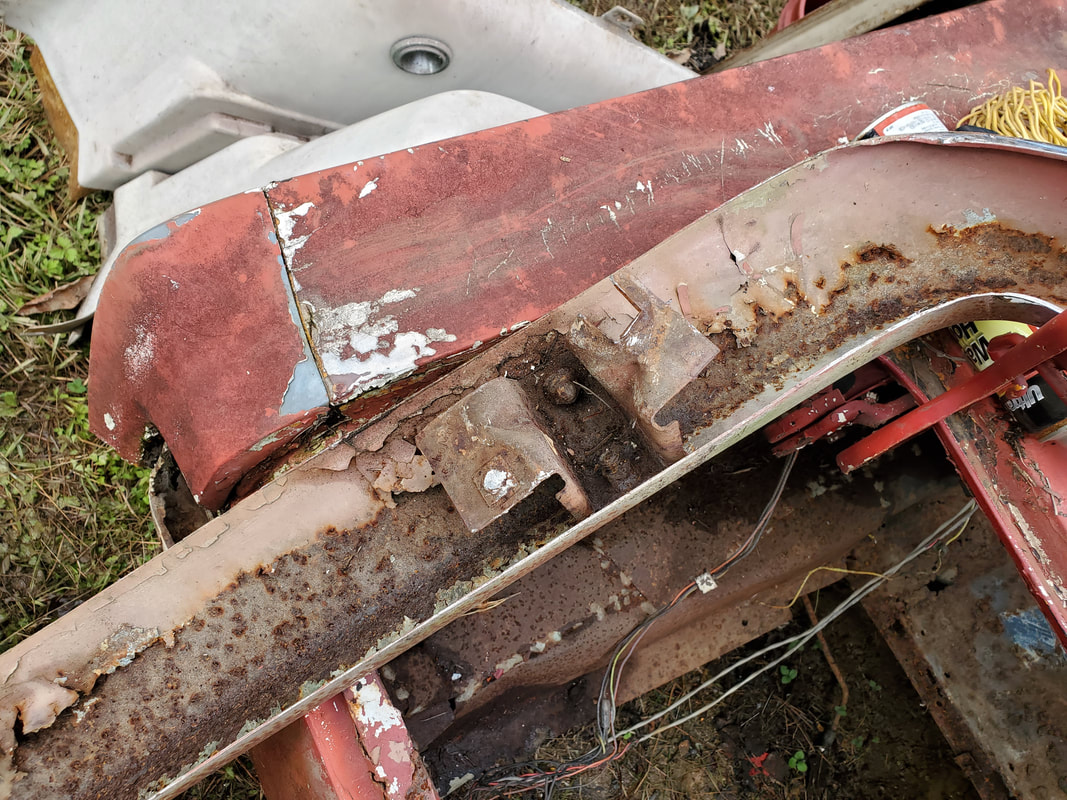 Rusty mounting bracket on inside of bumper after cutting rusty bolts free to remove bumper. At least these brackets can be replaced for way cheaper than the bumper itself. Most of these old parts are being held for the sake of scale, using them to line up panels to new mounting points for the body and any new frame mounts or other fastening points. With the old fenders and doors and other panels I will be able to see where I may need to reinforce the body or add mounting points, especially as I cut away parts of the unibody that will no longer be needed, such as the front and rear sub frames, the torque boxes under the rear seat area, and the old shock towers in the front and back. Most of this will not be needed as most of this structure will be provided by the truck frame itself. I just need to get mounting points for the fenders and front valance and bumpers as well as the radiator support that will need to be reinforced due to rust. Even if I did plan on rebuilding this car metal for metal, I will need to replace 90% of the metal since its either rusted to the point of being unusable or its just gone, rusted into dust. This project will definitely be a learning experience. 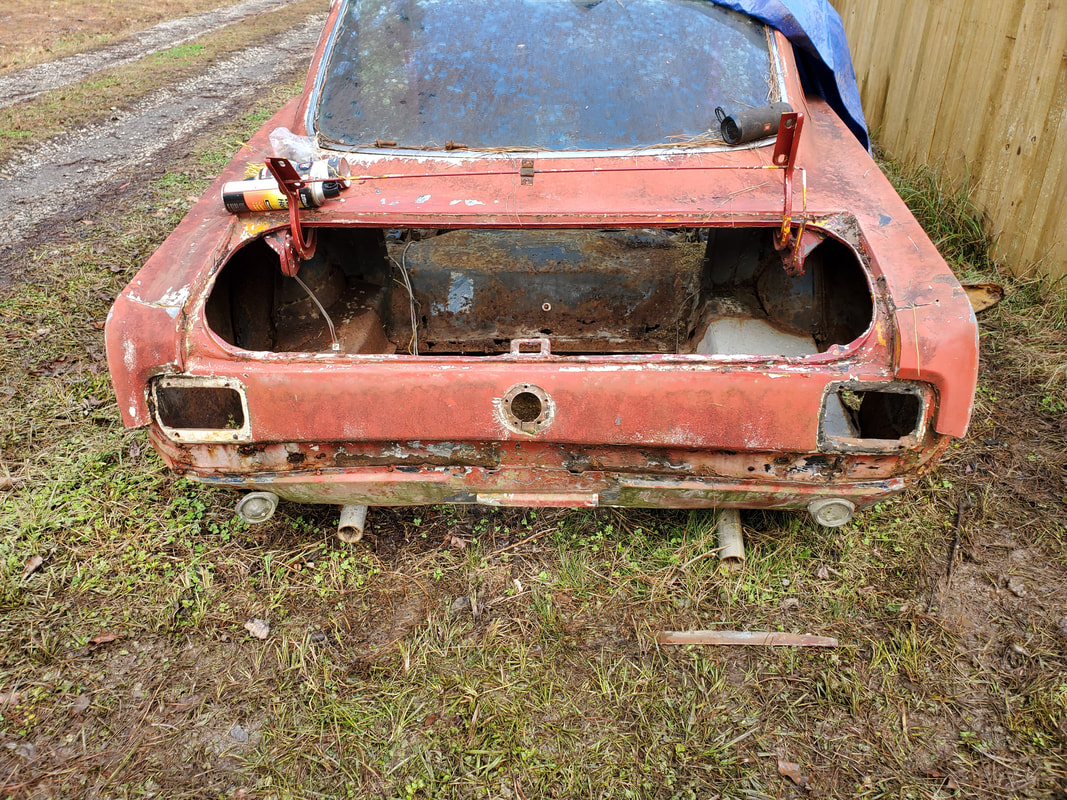 Rear of car cleared of bumper and tail lights along with the rest of the interior. I am coming into the home stretch when it comes to stripping the smaller stuff from the body. At this point I will start pulling stuff from the powertrain in order to prep the system for removal when we can get the car up to the garage. I will have to pull the driveshaft, exhaust system, shifter and engine/trans mount bolts. With that all that will need to be done at that point is hook the crane up to the unit and yank the works out. On a side note I will also pull the rear shocks and the backup lights from the rear just so those components will be out of the way when I do start working on the body. This project will definitely be a learning experience. After ripping out all of the larger items from the Mustang's interior I was finally able to pull the car's under britches off now. The carpet was cleared away for removal, minus the seat belts. In order to pull the seat belts off I had to pull one large bolt off per seat belt. While this sounds pretty easy, we must remember, this is a 65 Rustang. Everything in this car was rusted all to hell, including the bolts. I was able to pull one bolt off with some effort and a large breaker bar but the other one ended up stripping. Because of this, the angle grinder had to come out. Of course the angle grinder ended up making fast work of the bolt head so with that the seat belts were out and the carpet was ready to come out. To help make things easier on me when it comes to removing and disposing of the old carpet, I took the time to cut the carpet in spots where necessary to pull the carpet out in pieces. Now because of how the seat platforms are situated, the front half of the carpet from the seat platform forward was rotted and able to pull loose from the rest of the carpet. I used my box cutter to further cut the carpet into small enough sections that I was able to fold up the pieces and stuff them into a feed sack so I can be better able to throw the stuff onto the burn pile without having this unwieldy old carpet laying across the top of a pile of brush. After a bunch of cuts and pieces folded up and stuffed, I managed to get the entire carpet removed, including the base layer that went under the carpet. Of course I didn't completely get rid of all the rat shit as it spilled out over the floor as I pulled carpet out. That's ok, I'll end up vacuuming up all that later. 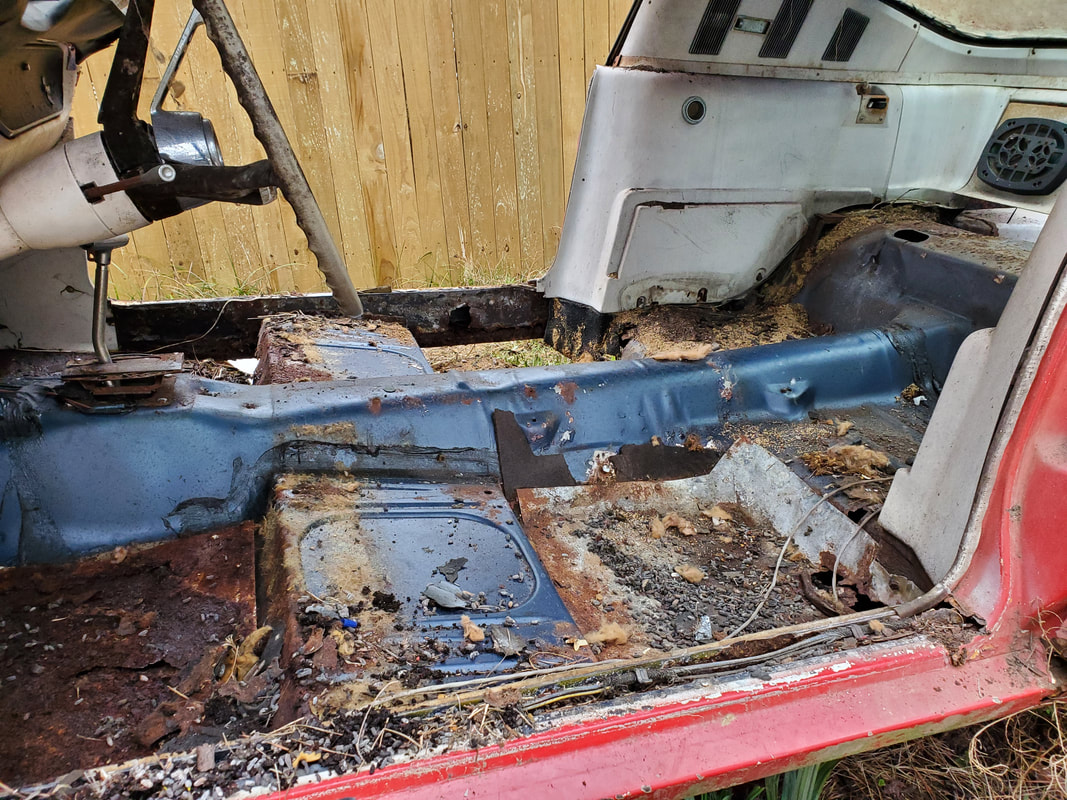 Interior and floor after removal of the carpet. Rat shit and other dirt still covers the floor, what's left of it that is. Of course after removing the carpet it fully revealed just what we're dealing with here. The floor was in no lesser terms, fucked. The floor was rotted all around in various spots, falling in at some corners, and separating where the floor was patched in the past. When it comes time to actually do the structural and body work prior to mounting the body on the truck frame, the entire floor will need to be replaced. At least whole floors can be purchased for a reasonable price so its no big deal when I do have to replace this. Also, I won't cut out the floor until the time actually comes to do the work and replace the panel. If I chop out the old floor, I may not have an accurate guide as to where to weld up the new floor. Keeping the old rotted floor in will help me mark out the floor lines so I can get the replacement floor panel welded in as accurate as possible. 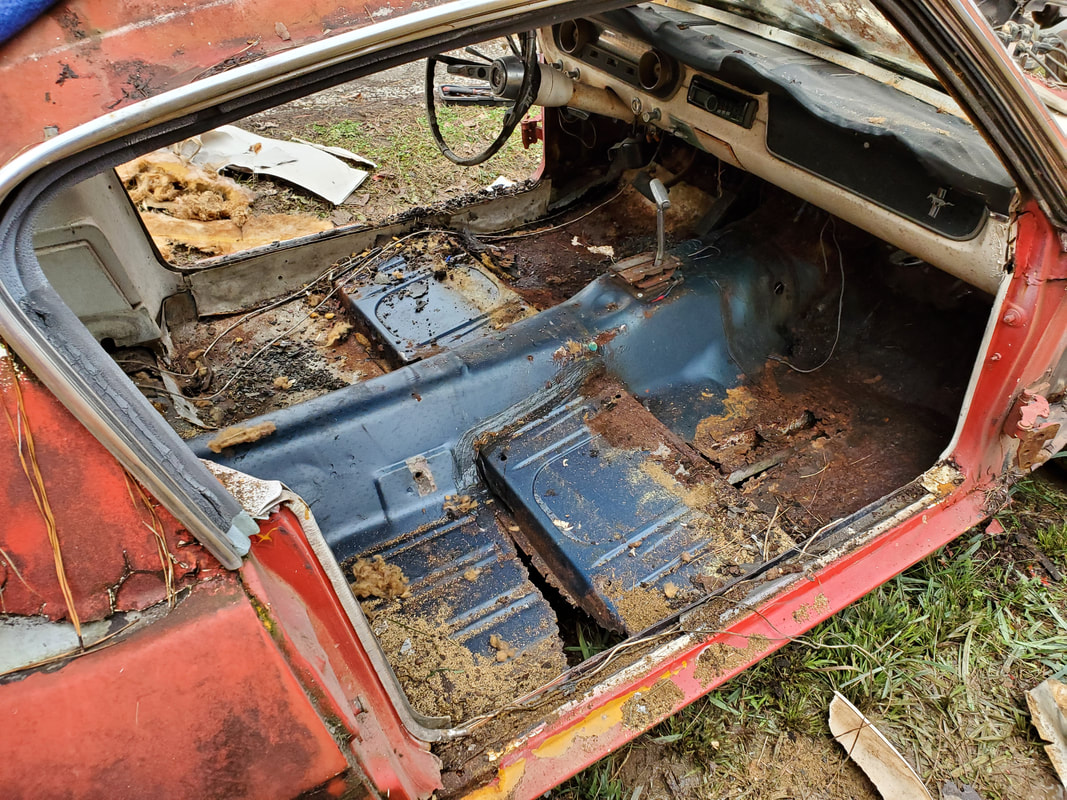 Another angle of the bare floor showing the shitty spots around the cab. With the floor taken care of the next thing was the headliner. Of course the material was rotted enough that I was able to tear off the material from the roof. The ribs of the headliner were exposed easily after tearing away the material. Just like with the carpet all these pieces were stuffed into a feed sack to be tossed on the burn pile. As for the ribs there were only three of them to be removed. The ribs are flexible enough that I was able to manipulate down and out from the roof to get each unit unhooked from their mounting points along the left and right sides of the roof structure. These ribs, like the other parts of the car to be saved went up to the garage to be stored on the shelves to be reused later when the car is being rebuilt. 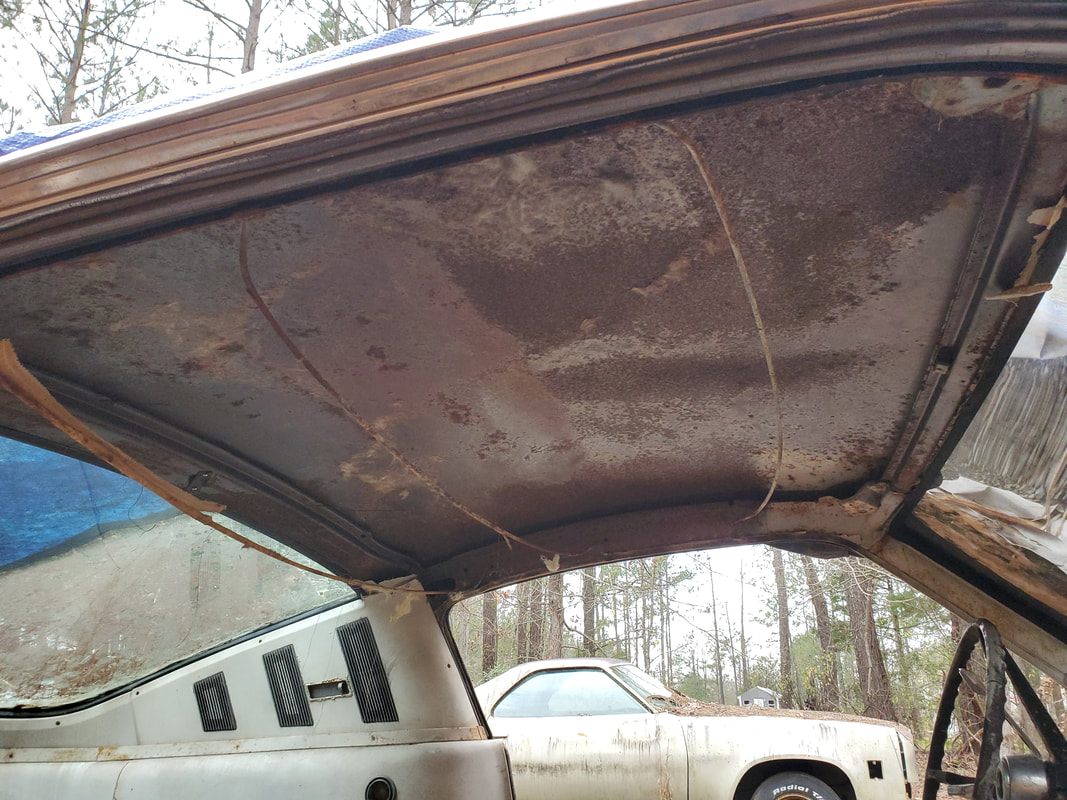 Ceiling of the car after stripping the headliner material from the area. Note the ribs that are flexed downwards just prior to removing them from their mounting points on either side of the roof structure. Also note leftover material still on the ribs after pulling the headliner material free. The next order of business in the stripping of the interior will be removing the side panels in the back seat area. There's the lower panels that had the arm rest surface and side interior lights then there's the vent panels at the top. The actual vent mechanisms won't be removed but the exterior panel that covers these mechanisms will be removed. I may end up still having to remove those vent assemblies if in replacing the rear quarters I end up having to do a complete cut out of the rear quarter from the rear glass and roof seams down to the rocker panels, in much the same was as I had to do on the Dodge many years back. From what I can see the upper quarters are still in good shape so the most I would have to do is cut the panel from the fold in the metal where it goes from horizontal to vertical as the panel folds downwards towards the rocker panels. This will just be a matter of carefully cutting right on that seam then tack welding spots along the joint between the old upper panel and the new replacement panel so as to not warp the sheet metal. The welding would continue in increments until the whole seam is done then it would be covered either with body filler or maybe with lead filler to make a more permanent patch that wouldn't just decay in time with moisture. We'll see how we're going to do this work, that's still a ways down the road.
In this installment I started off the day with another round of gravel. As usual I made my run to the cement facility and came back with the load of rock and commenced to spreading it out. I only had a little bit of area left to cover in the chicken yard and this load was more than enough to cover that area with plenty left over.
After taking care of the chicken yard I wanted to spread gravel at the main gate to the chicken yard where the ground was mushy, partly because of my traversing over it with 200 lb wheelbarrow loads of gravel and because rains made the ground mushy to begin with. So with that once I got the remaining area of the chicken yard covered I took my victory in completing the task of covering the chicken yard with gravel where I wanted, time to move on. 
Remaining area of chicken yard that needed covering with gravel. All areas I wanted covered within this yard are now covered.
With the laying of the gravel outside the chicken yard gate I did have to walk over the rock to mash it into the mud and add more on top of it until I got to a point that the rock was holding the mud together enough that I could walk over it without the mud pushing out under my feet and taking the gravel with it, leaving mud holes within the gravel floor. After getting this bad area taken care of I started dumping more gravel on the grounds surrounding the truck. These grounds extend straight out from the chicken yard gate and the power pole to the house. This area is where the truck and trailers typically end up depending on what I have going on at any given time. Because of this type of traffic it was imperative to start laying gravel here as well. Even though I will put up fencing that will effectively enclose this section of the yard to where the only way into this area is from the main driveway, it'll still be important to have gravel down so there won't be any issues with the moving of vehicles or equipment due to mud. 
Gravel laid at the chicken yard gate and extending out into the general parking area, note trailer and truck on either side of the pic.
With my exercise done for the day I turned my attention back to the 65 Mustang and its continued disassembly. At this point I'm cutting through the interior like a wildfire, pulling out anything and everything that's screwed down. I had the rear seat and center console to pull out for this round on the car. Luckily the rear seat in these cars is only held down by a couple of bolts with the base part being snapped in. Popping out the base took no time at all. 
Rear seat base pulled from car. It's not in that bad a shape.
Now since there was a certain level of rust throughout the car that would scare just about anybody who's trying to play with a resto project, it was of no surprise that when I went to remove the few bolts holding the top portion of the back seat down that a couple were no longer secured to anything. Their mounting points were rusted away so I was able to just pull the seat assembly up and out, leaving only a couple bolts to actually remove. Another thing that I went ahead and took care of was removing the center console. This unit was actually only held in with a few sheet metal screws on either side. The impact driver made fast work of these screws. With the disconnecting of the wires going to the interior lights in the console and removing the shifter grip, I was quickly able to remove the center console, no problem. 
Top portion of rear seat along with center console and other miscellaneous hardware that is destined for the garage shelves.
Shot of top portion of rear seat as it looks on the outside when rear seat is folded down.
Center console and aftermarket shifter as well as a few other components that will most likely be used in the build later on.
One more panel that had to be pulled that went along with the rear seat was an intermediate panel that goes between the actual seat assembly and the rear speaker panel. This panel is just there so when the rear seat is laid down, there will be a smooth flush floor from the front seats all the way to the speaker panel. This panel was only in with a few bolts so its removal went fast as did the others. 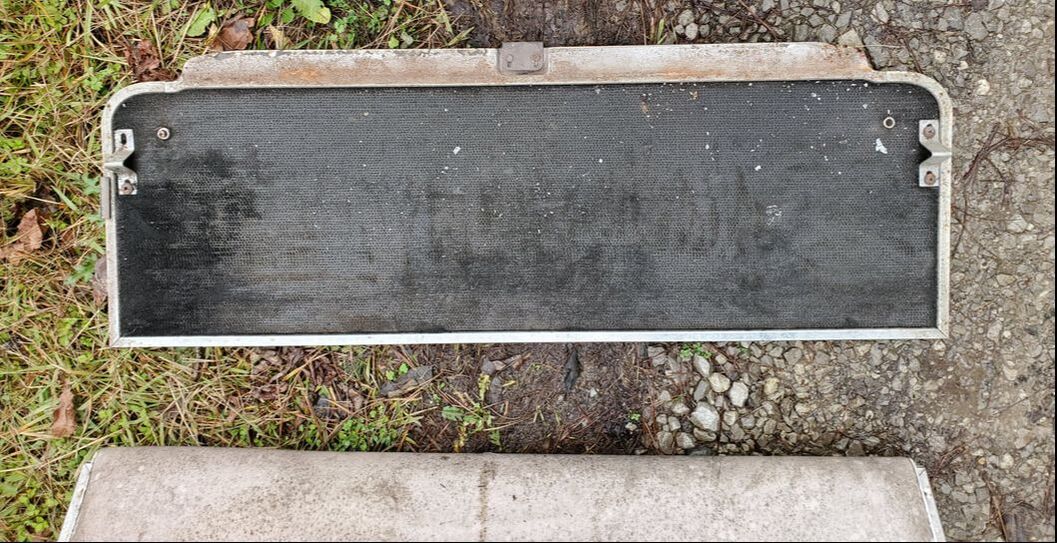
Rear panel that goes between rear seat and speaker panel.
With these large components removed from the interior that leaves the carpet open for removal. Of course there will be no salvaging of this as its been stained with rat shit and years of moisture and rust rot. Carpets are too affordable for me to even give this old piece a second thought. This carpet will be cut out in pieces and stuffed into large feed sacks destined for the burn pile. 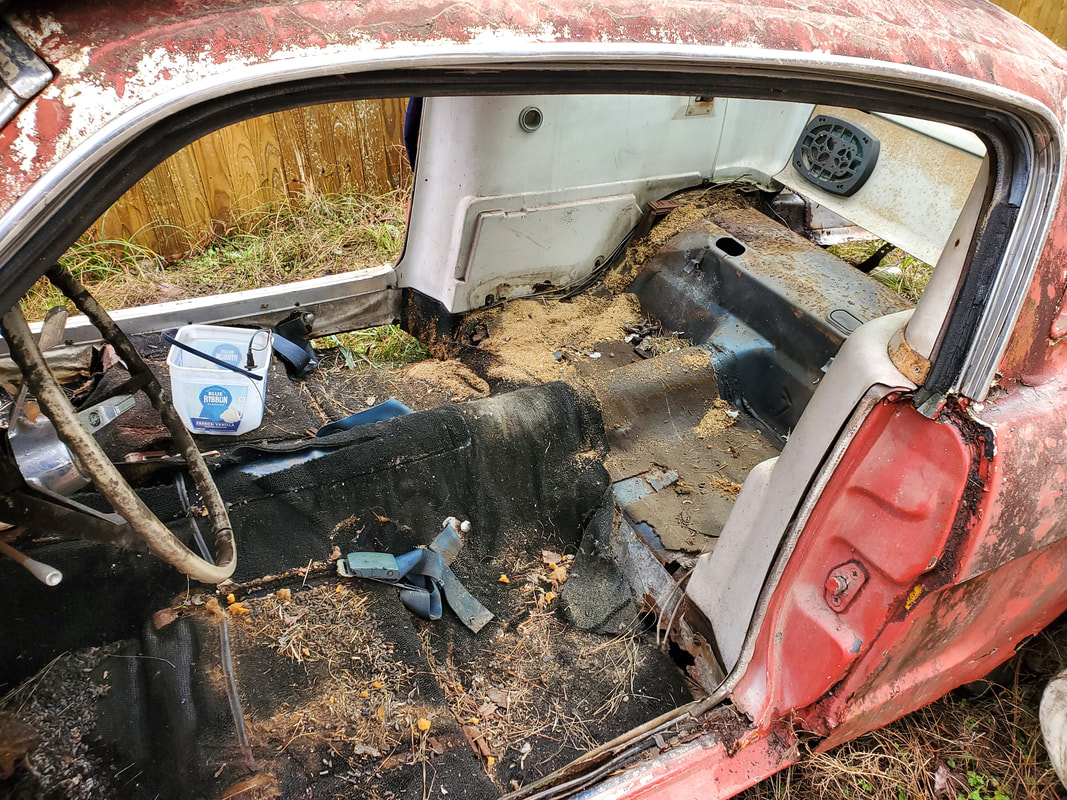
Interior sans everything but the dash. Carpet is cleared for removal.
Outside of the two seat belt assemblies, the carpet is cleared for removal. These seatbelt assemblies are held in with just one large bolt each, these should come out pretty fast and easy. If for some reason they don't, the die grinder will make quick work of them. With that, the carpet will be gone once and for all! Of course removing the carpet will expose the shitty rotted floor that lies underneath. I'm not going to mess with it as I will need to be able to put the car body along side the truck frame so I can start looking everything over to see just where I might need to weld supports or see what I can cut out and how I would replace those panels and parts that are rusted out. One thing that I want to be able to do is not have to add so much extra metal where it may not be needed. I will try to do other things to the body and the areas underneath or behind the exterior panels to make things watertight, soundproofed and just clean. Never should I have to go through extra crap just to remove a panel, especially to access certain parts or spots under the car. Things on this car will be 100% different when the project is done.
|
