|
In this installment I headed back into the garden for another good day of busting my ass. One of the things I wanted to do was break down the last of the two ground level raised beds I had set up in the middle of the garden. This bed had some fig trees planted along with some strawberries. Problem is because of the neglect we subjected the garden to, grass and weeds were allowed to take over the garden. This shit needed to be cleared before proceeding since these plants were getting transplanted elsewhere. The last thing I wanted is to have errant weeds take the trip to any new planters with the desired plants so they can take over those just as well. I'm not going to cover the specifics of dismantling the actual raised bed as it was the same as the first one, pulling the sheet metal sides free then removing the posts from the ground. There was a problem though. Within the garden along with the weeds was a gigantic fire ant hill. These satanic fuckers were thousands deep when I broke up the dirt. They engulfed the areas of the garden, covering the dirt and even the plants, making removal of anything a little difficult. I had to take my time moving dirt away little by little and carefully pulling strawberries free one plant at a time. Since I had to do this careful work I decided to go ahead and start replanting the strawberries in their new homes. I had transplanted the fruit tree from the first raised bed to the half drum I had cut so the next thing for this drum planter was to put strawberries in it. The strawberry plants I pulled from the ant infested bed were transplanted one at a time into the fruit tree planter until I pretty much covered the surface area with strawberries. 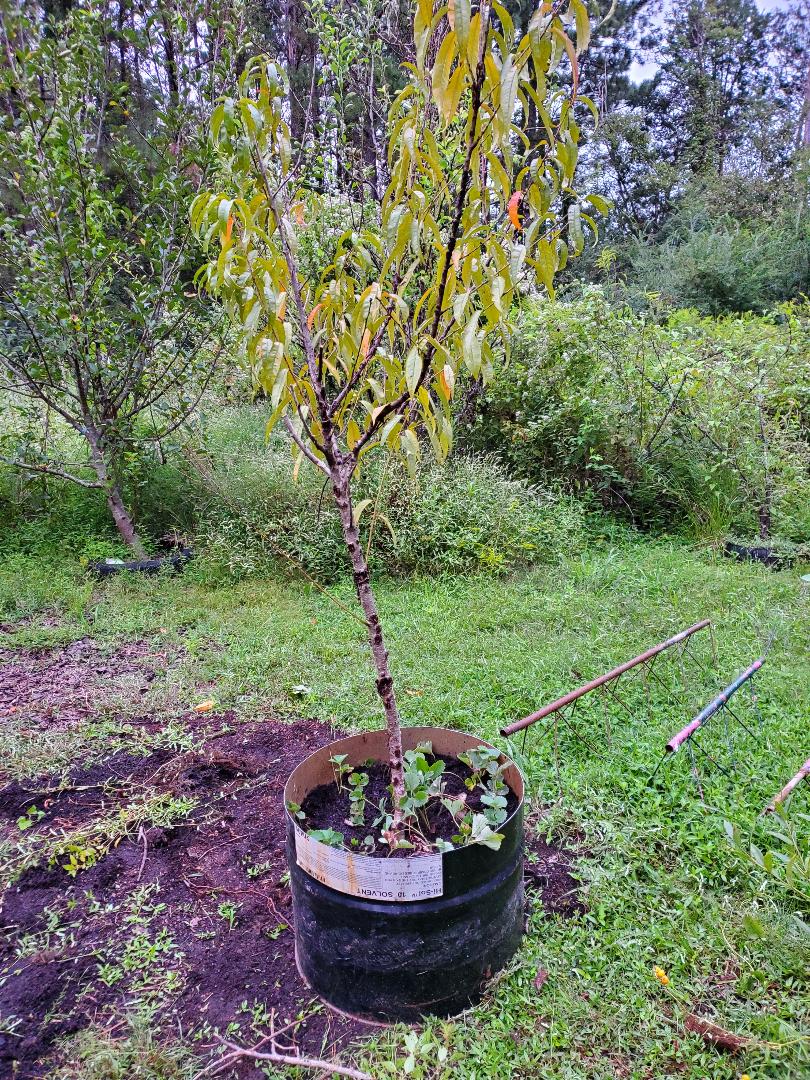 Fruit tree in half drum planter surrounded by strawberry plants. 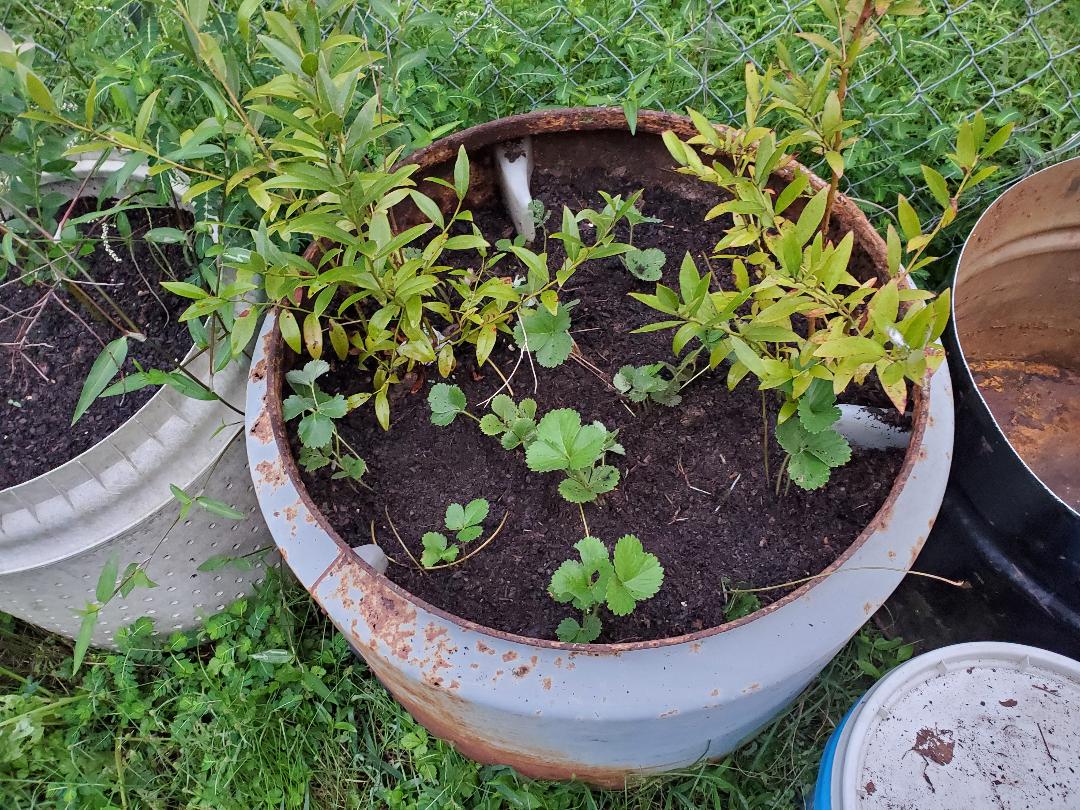 Washer drum planter with blueberries and strawberries planted. Even after filling the previous two planters with strawberries I still had plenty of plants left in the raised bed site. I had some extra dirt on hand available that I was able to use to fill up an extra recycling bin I had laying around. This bin went next to the other recycling bin that I currently have other strawberries planted in. This bin was on the porch until I moved it to a spot next to the dog kennel greenhouse. Once I pulled the remaining strawberries from the dirt I was actually able to make full coverage of the dirt in the recycling bin so now I have two recycling bins full of strawberries. Hopefully with proper care we'll have plenty of strawberries next year. 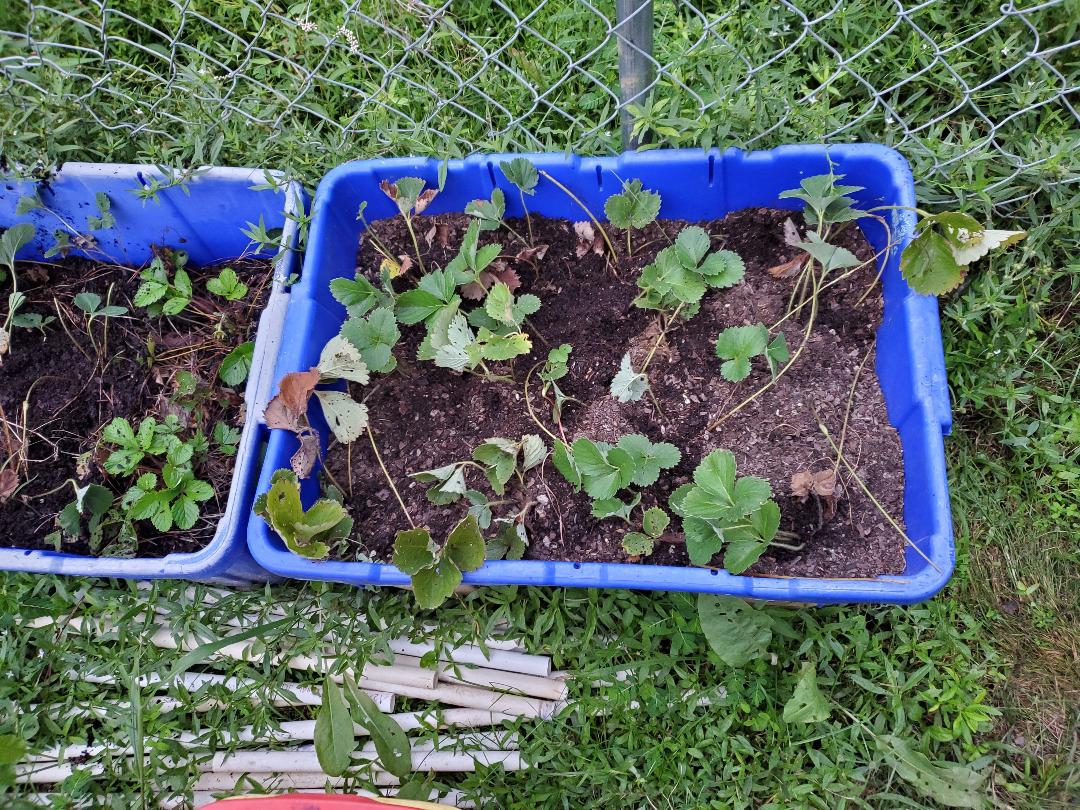 Recycling bins full of strawberries. With the strawberries cleared I moved on to the fig trees. Now the crazy thing is, these "trees" are really just part of one greater tree. A tree that was planted in the raised bed initially had sent out runners that took root sending another tree up next to the initial tree. I ended up having to cut the section of trunk that came up from the ground from the main tree and crossed over to the other tree. This section being cut allowed for the separation of the two trees without damaging the trees. 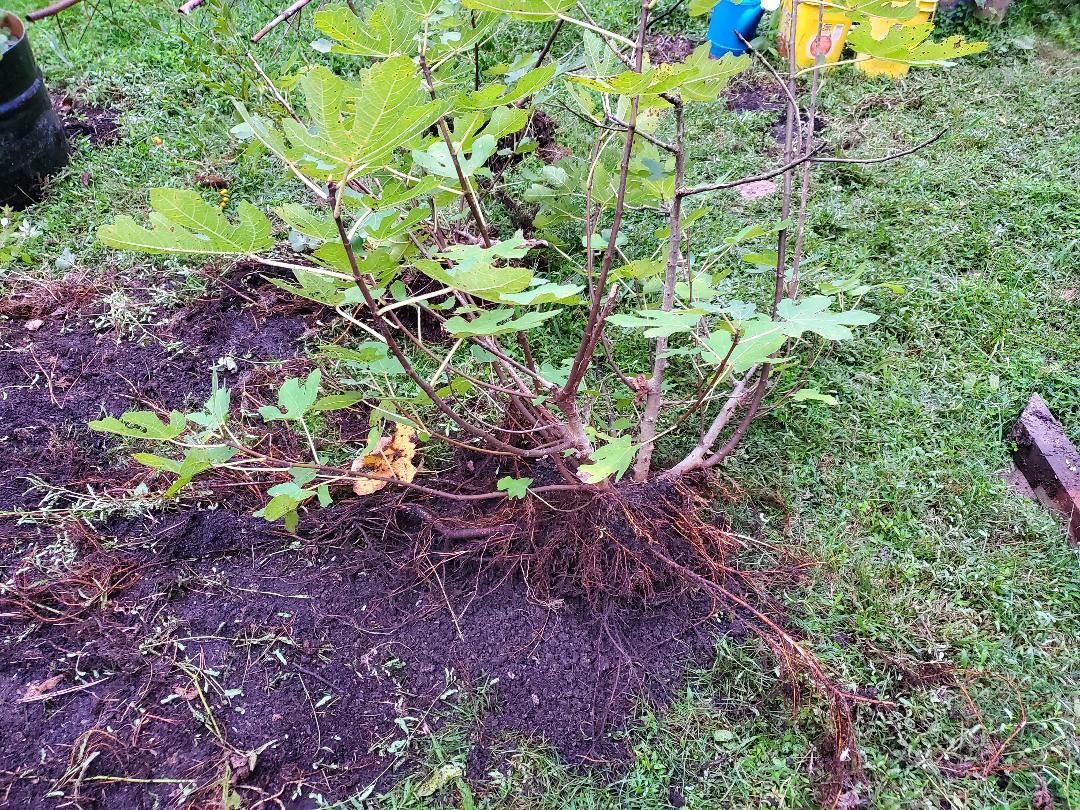 One of the fig trees after separation. Tree has been uprooted already. With the trees separated I was able to work on uprooting each tree so I can free the overall tree from the ant infested dirt so I can set them aside prior to finishing the last stage of the clearing of the raised bed. I had to ensure that I preserve as much of the root system of each tree as I can so the trees won't go into shock too badly (hopefully). These trees will be transplanted into some more container planters to be moved to new spots somewhere in the garden at a later date. 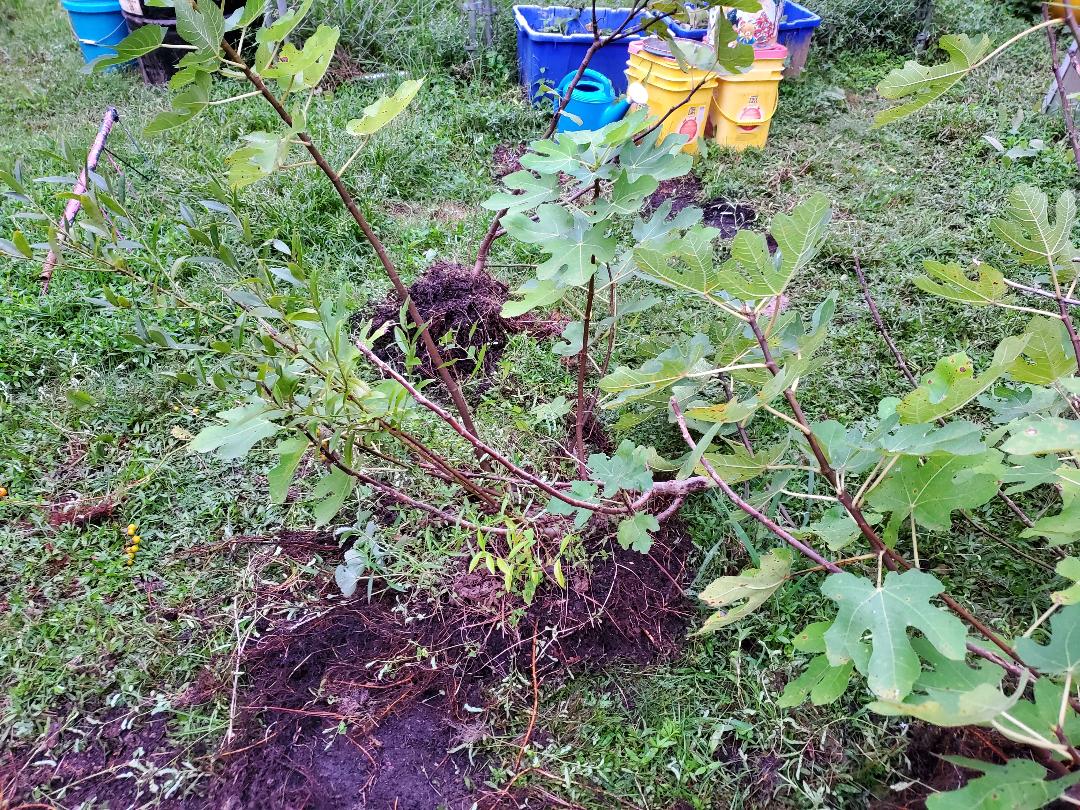 Other fig tree after being separated and uprooted from the soil of the old raised bed. At least by planting these trees in container planters, I can move them wherever whenever I want to. If I don't like the spot that the planters are staged I can always move them to a better spot. Since fig trees typically get huge, they will have to be staged in spots in the garden where there will be plenty of clearance around each of them so they can grow. If not, I will have to trim them every year to keep them a specific size so they don't get out of hand growth-wise. I will probably have to clear other shit from the garden before I establish the final plots for these two planters when they're all done and ready. With the fig trees out of the way I was able to finish off the clearing of the remaining dirt from the raised bed. Even with the ant infestation since I wasn't trying to remove plants anymore and the fig trees' roots didn't get in the way, I was able to just start shoveling dirt. I ended up shoveling the dirt into some mushy low areas in the middle of the garden to try and fill the area with more dirt prior to dumping gravel down. Since the dirt was pretty much useless to us it only made sense to try and get some type of use of the dirt. What better use than filler material? I didn't completely fill in the areas I wanted to but I did get a good start. 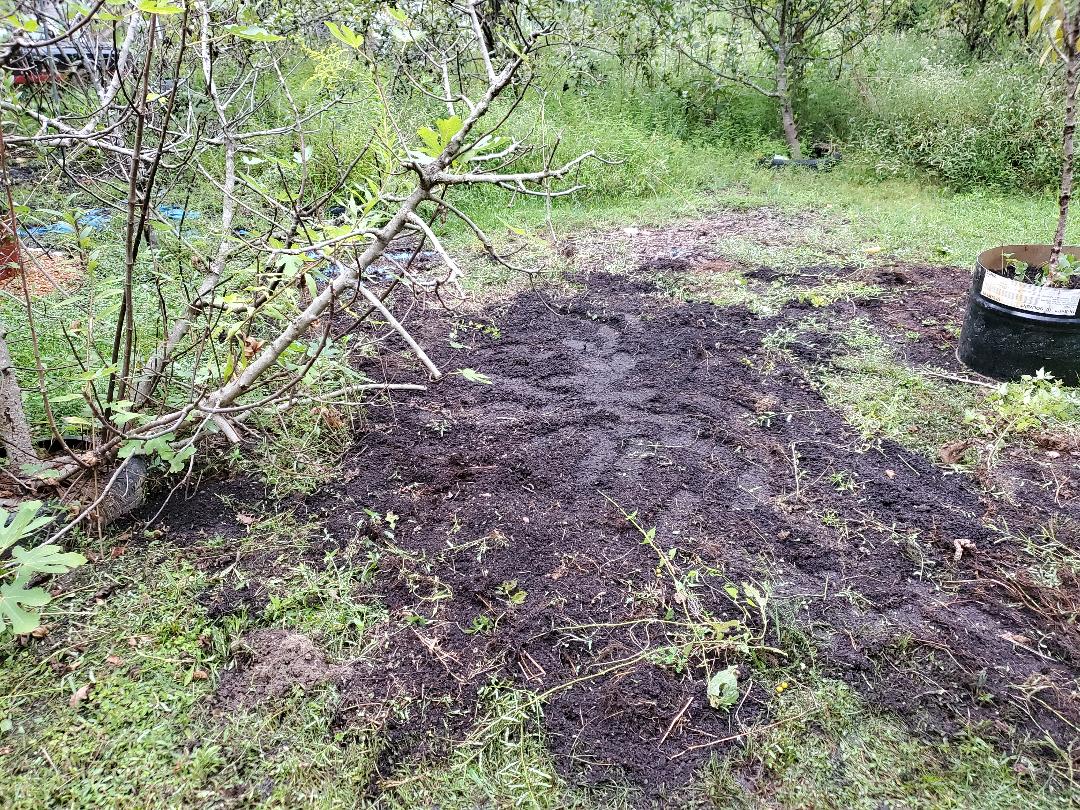 With the two raised beds gone I can now start focusing on my other plans, which was to remove the last regular ground level raised bed which was used for growing tomatoes and replace that with some raised beds along the fence line when the fence is put up along that corridor. Also the areas around the fig that's in the ground need to be cleared up. There's really only supposed to be the fig and a pear tree in that area. Everything else in that area is weeds and high grass. There was another ground level raised bed there but the boards disintegrated a long time ago and nothing has been planted there ever since. Once this area is cleared I can make more plans as to what to do with the area, up to and including spreading gravel all over the area. Little by little the garden continues to grow together.
0 Comments
On a lighter note, I finally managed to address a little problem that had needed attention ever since I decommissioned a particular fixture on the homestead. This fixture is the solar light that I had set up for a while to illuminate the driveway at night. The old unit had long since died due to the main battery crapping out and even afterward had continued to degrade as the plastic container started to rot from sunlight. I wanted to revive this concept so I had added the newer solar light that I picked up for cheap that uses a self contained solar panel and lithium ion battery and LED array that does an excellent job of illuminating the driveway.
I had already dismantled the solar array from the old setup and installed the pieces on the roof of the storage trailer in order to power the fan there. The LED's that were used were dismantled from the board and stored away and the plastic container disposed of. All of the components within were also stored away as these parts were still good. With the new solar LED light hung on the post, that still left the old wooden framework. 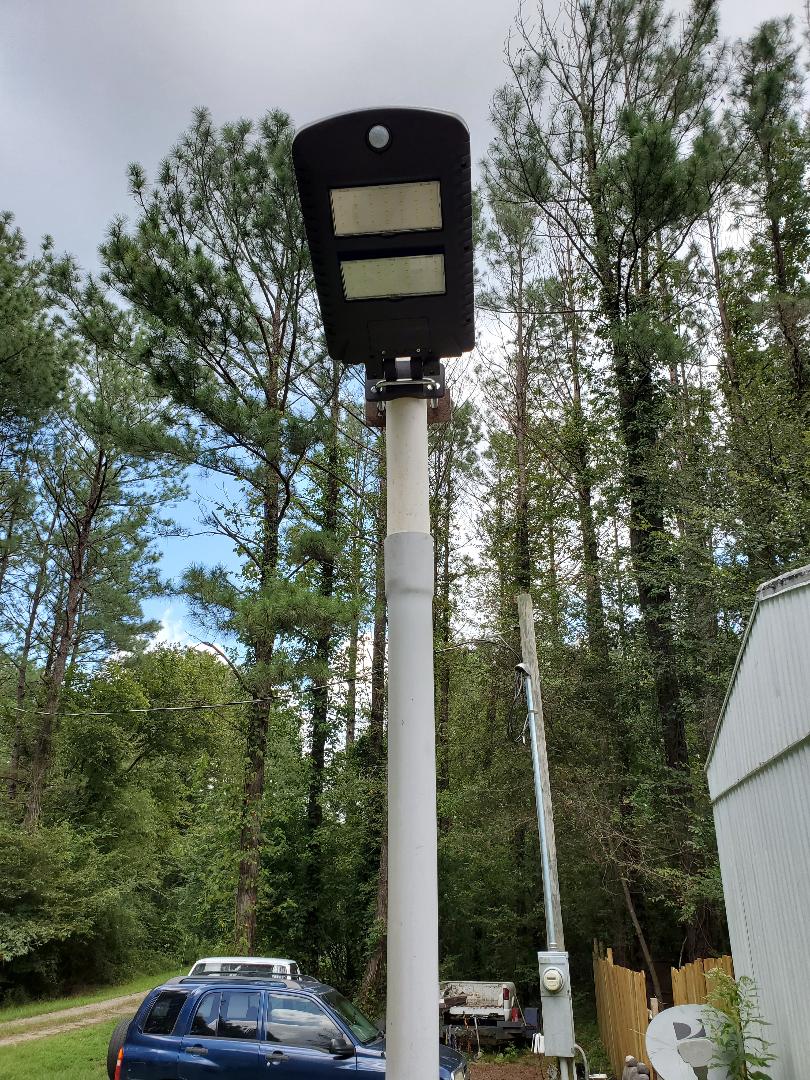
New solar light hung on post.
With the old wood post, I couldn't cut all of it up as part of it was actually holding the plastic post. Without that support the pipe would flex too much and eventually break. My plan was to cut the front portion of the frame free from the back most posts where the supports are at for the light post. Leaving this back most part of the frame and its concrete blocks, I'd remove the cut wood frame and front concrete blocks. 
Old solar light frame just after making cuts at back of frame, separating the desired support frame from the unwanted framework.
After making the cuts on the frame I was able to pull the unwanted framework away from what I was keeping. I further cut the section so I can work the two sections separately as I had to remove the concrete block and metal bracket from the wood. I wanted to retain the blocks and as many wood screws as possible for later use. The brackets went into the scrap. After separating the blocks and brackets from the wood I removed as many of the screws as I can to separate the boards from each other. With the boards separated I was able to cut the boards down into smaller pieces for later use as firewood. Most of this wood was already at the point of starting to decay so its use as lumber later on was highly unlikely. Firewood was the best use for this wood. I ended up actually using this wood for another oil wood bucket, especially since I had recently changed the oil on our two daily use vehicles so I had plenty of old oil to use. With the blocks stacked away and the unwanted wood cut up and applied to its new future use, I had the now opened up area in front of the rear most part of the frame and light post to contend with. The next move was to use the trimmer to cut the grass all around the old solar light site and move some dirt around to fill in the openings in the ground left from the removal of the blocks. With the ground now cleared all around I was able to relocate some equipment I had staged next to the old solar light frame. The small air compressor and truck jack I had outside were moved into this little area to put everything on a smaller footprint so I can more easily trim/cut the grass in this area in the future. 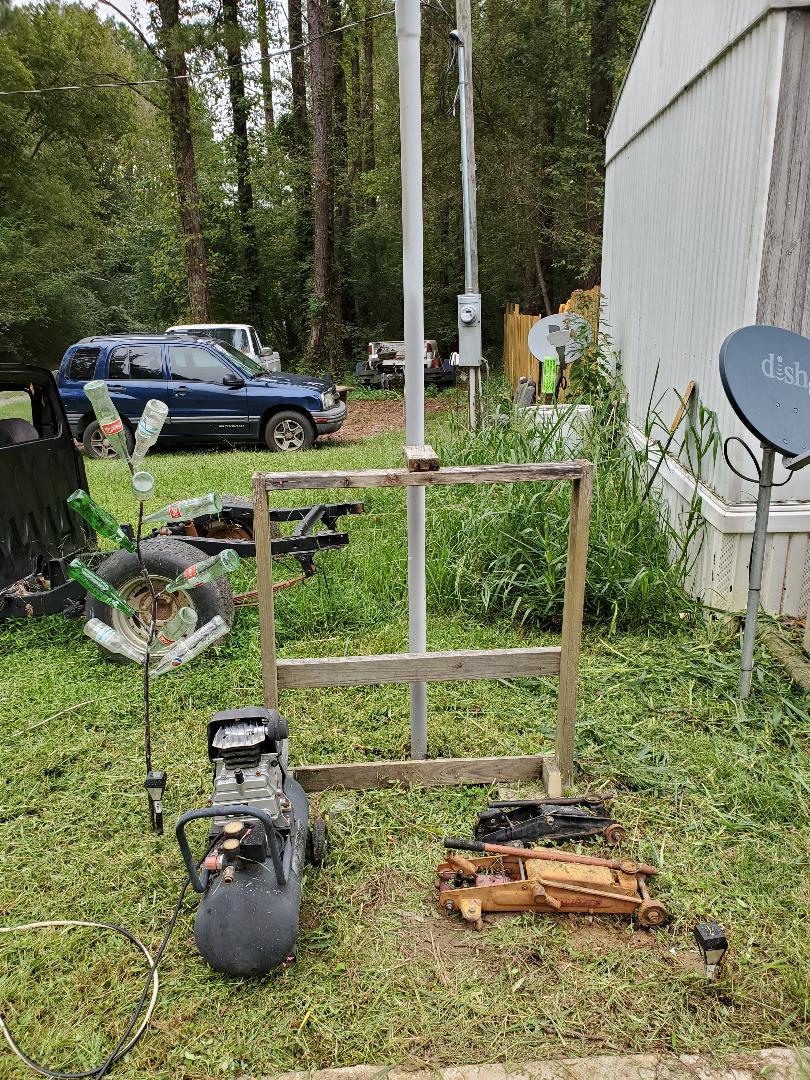
Cut down framework with area cleared of high grass and leveled off. Note equipment moved in front of frame and light post.
With the area cleared other future plans for this immediate area will be the extension of the pea gravel coverage from the area between the walkway and the rock garden. This gravel will proceed along the walkway all the way to the driveway with it blending into the regular gravel as it extends into the greater area along side the house and into the clearing between the house and the main driveway, soon to be a fence line. At some point this wood too will decay to the point where it'll no longer be able to do its job of supporting the plastic pipe post. At this rate I'll have to come up with an alternative to the wood which will most likely have to be something that can either stiffen the plastic pipe or maybe fully replace the pipe in holding the light at the height that it's currently at.
After having exhausted the gravel supply in the garden I ended up making another run for another load of gravel, this time to cover some more of the driveway around the cars as well as some mushy area on the service path that runs along the storage trailer into the rear yards where the old dog yard is at. The main goal is to try and cover as much of the muddy mushy areas around the yard as I can. Even if the coverage ends up being an uneven mixed up patching of gravel, I just want the areas covered to the point where I can continue to move about without the use of mud shoes. As usual the trusty wheelbarrow and shovel helped me make fast work of this load of gravel. I started off with the service path. The boat and trailer that are sitting on the ground here are both surrounded by muddy ground. Of course both of these things will be moved, exposing a large amount of muddy area. I at least got a head start by getting gravel down along side the boat and trailer. This will also aid in driving over the area as I have more leeway in where I position the tires of the vehicle. And again, it allows me to walk over this area with more room to maneuver and not sink in mud. 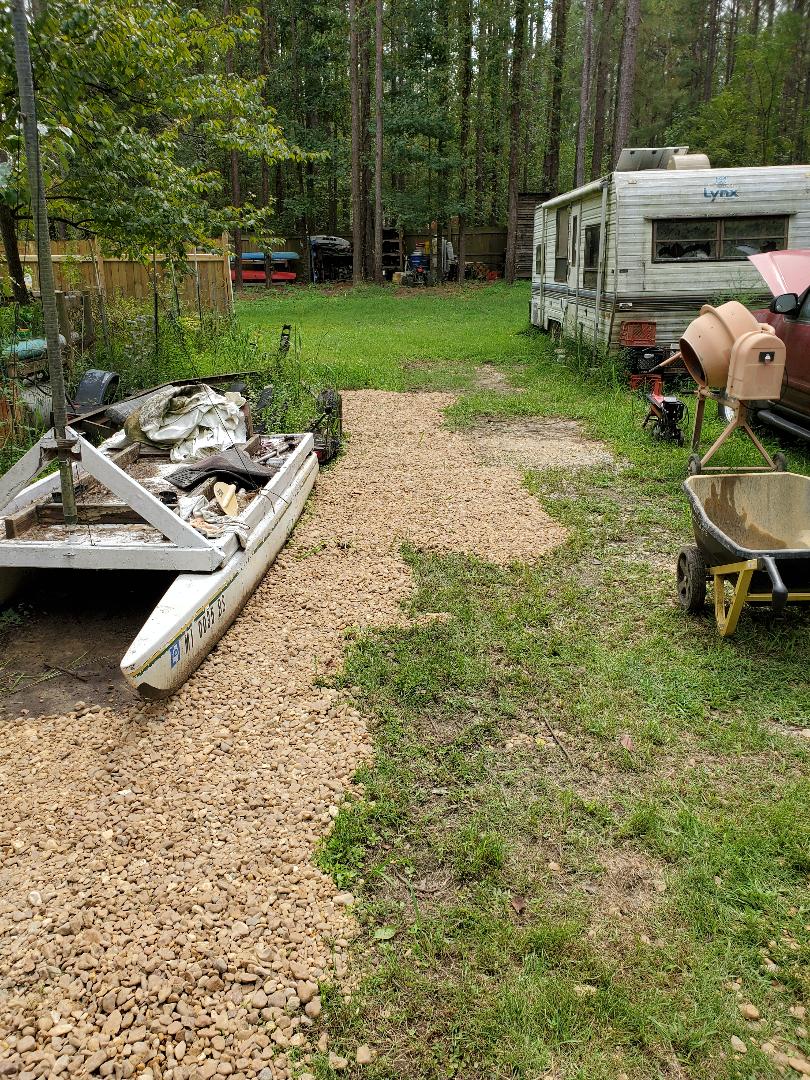 Gravel spread around and along side the boat and trailer in service path. With this area covered where the mud was at, I moved on to the main driveway. There was more area around the gate to the garden that was mushy so I covered even more than what was already covered from previous applications of gravel. Part of it was aesthetics but I was mainly trying to cover more ground so I would have more area that can be traversed without making contact with mud. Some of the wet areas were around the sides of the two old cars in the driveway. Applying gravel over these areas will also help in making the area more solid for when the cars do get moved. These areas also met up with the larger patches of gravel to help in more complete coverage. 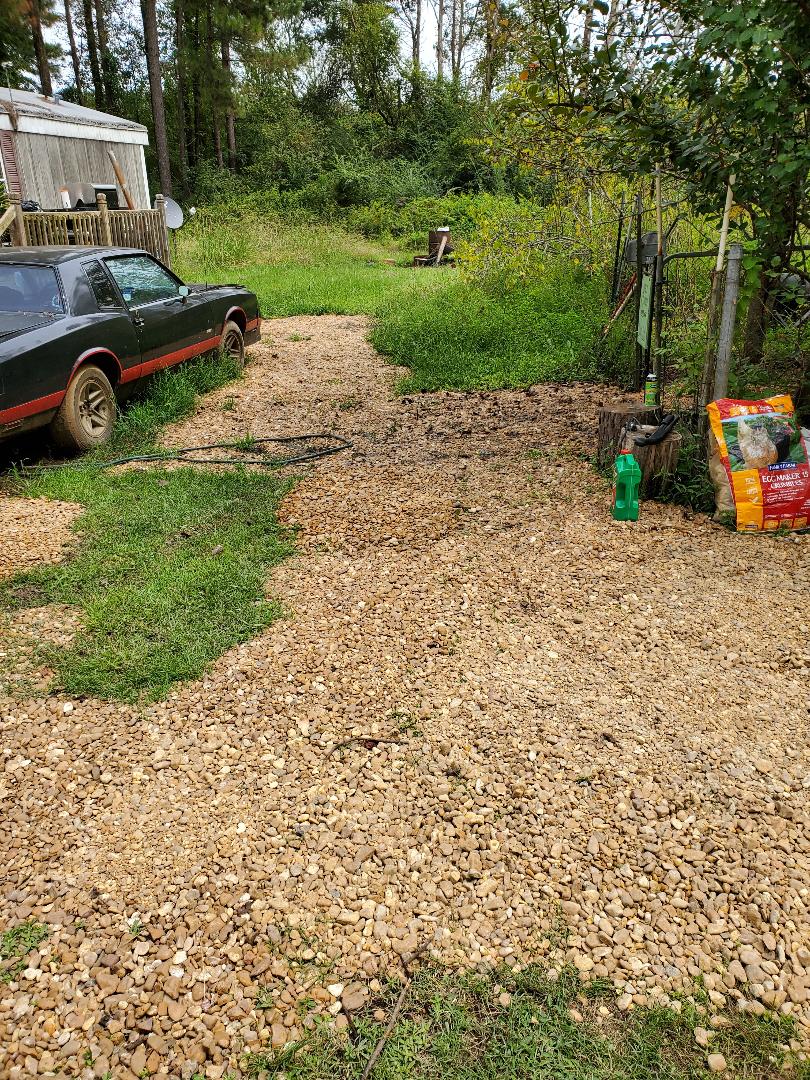 Wider coverage of gravel in front of garden fence. Note gravel around car in background and how it meets up with greater patch of gravel. As can be seen the gravel trail extends ahead along side the car and into the large area in front of said car where there is a serious mud pit. The uneven coverage is on the count of the idea that the uncovered areas aren't muddy or otherwise problematic to warrant coverage by gravel. As I continue to get more of the muddy areas covered, these lower priority areas will get covered just to make things look better as well as cover the ground so the grass underneath won't grow and be a problem. Even if I trim the grass the clippings on top of the gravel are unsightly and can possibly trigger growth of blades of grass that I'll have to kill off later on. 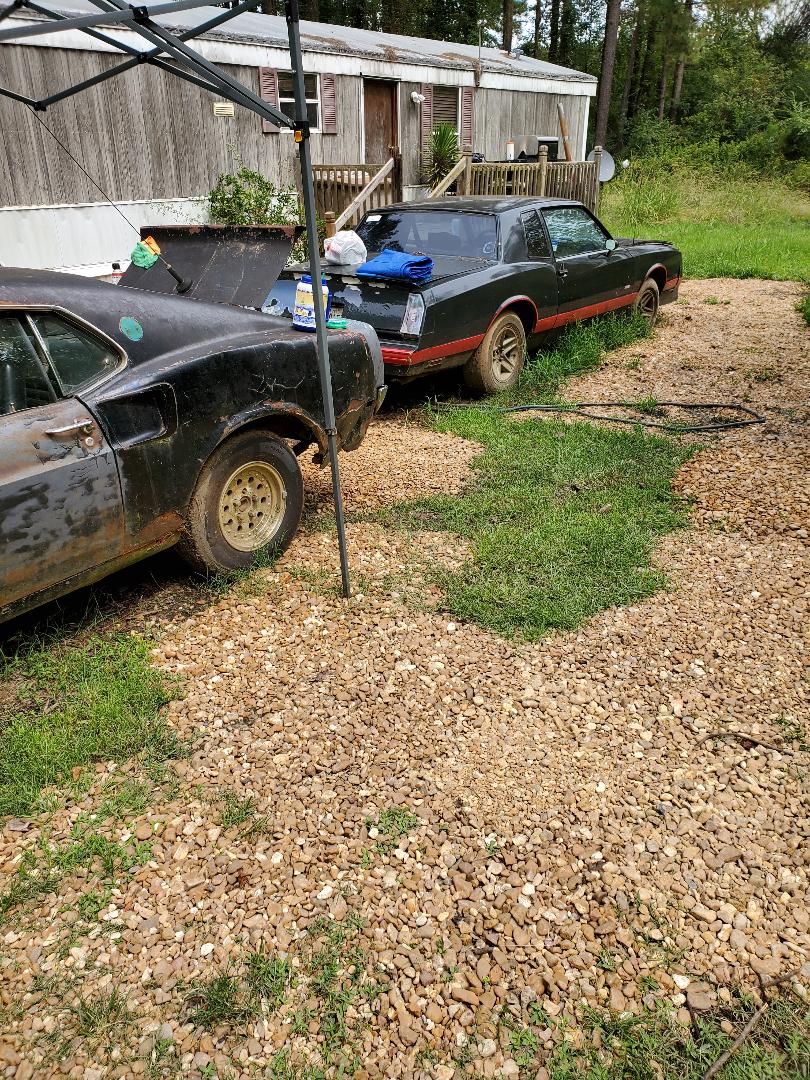 Uneven coverage of grounds in main driveway around cars showing how patches connect with one another. Note how grass isn't fully covered and will need to be killed off before it gets too excessive. As can be seen I started just dumping gravel in areas around the cars to cover some small patches of ground that were a little mushy, mainly to get more area covered that was real close to the walkway so we can navigate from the house into the garden or between the parked cars and over to the storage trailer or into the driveway. These high traffic areas will continue to be covered first before moving on to the less important areas around the grounds. At that point we're just looking at covering ground to control grass growth. So far I've been able to do two gravel runs a week so with that frequency I should manage to get a LOT of ground properly covered by the end of the year. With the constant hauls of gravel that I keep bringing in once to twice a week I'm getting plenty of ground covered around the area. The latest area I'd been concentrating on is the garden. I had already laid gravel down in the main driveway all the way up to the entrance to the garden and started going into the garden, covering the soft ground that has been a nuisance for the longest time. Now I continue moving further into the garden, laying a path to cover the highest traffic areas of the garden, leading back to the rear of the garden where I have the raised beds set up. Since I have an old raised bed still present on the ground plus a couple of fruit trees on the opposite side of the pathway that runs past that raised bed, I continued laying gravel down over this area, butting against the raised bed but only extending partway to an imaginary line where the fruit trees are at. The idea is that at some point in the future I will lay some railroad ties or landscape timbers around the fruit trees to do some sort of food forest type setup, probably for growing something like lettuce or some other low light plant. I don't want to waste gravel covering area that will ultimately be covered by timbers later on. I can always come back with more gravel to fill in any areas that are left uncovered when I do lay down the boards I want to use. 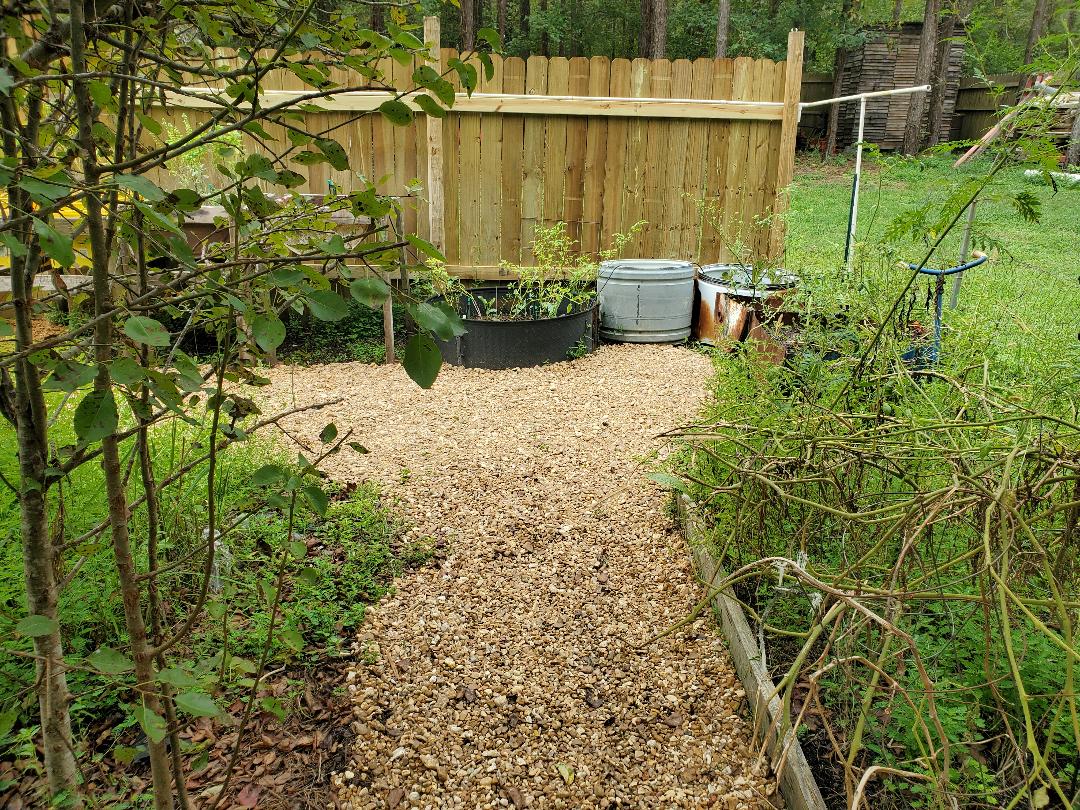 Gravel path working its way to the rear of the garden, note ground level raised bed to the right and branches from fruit trees to the left of gravel path. Since the raised beds and drum planters along the back fence are over what was grassy area, I took a little more time to ensure that gravel that I laid down either met the drum planters or went under the raised beds some. While I didn't just shovel more gravel under the raised beds or lay it all down around the drums to make sure that every square inch of ground was covered all the way up to the fence, I did make sure to get enough covered to help keep high grass from popping up in the walkway. When I get through doing the initial covering of the walkways I'll come back over these areas to spread more gravel to fill in the gaps. 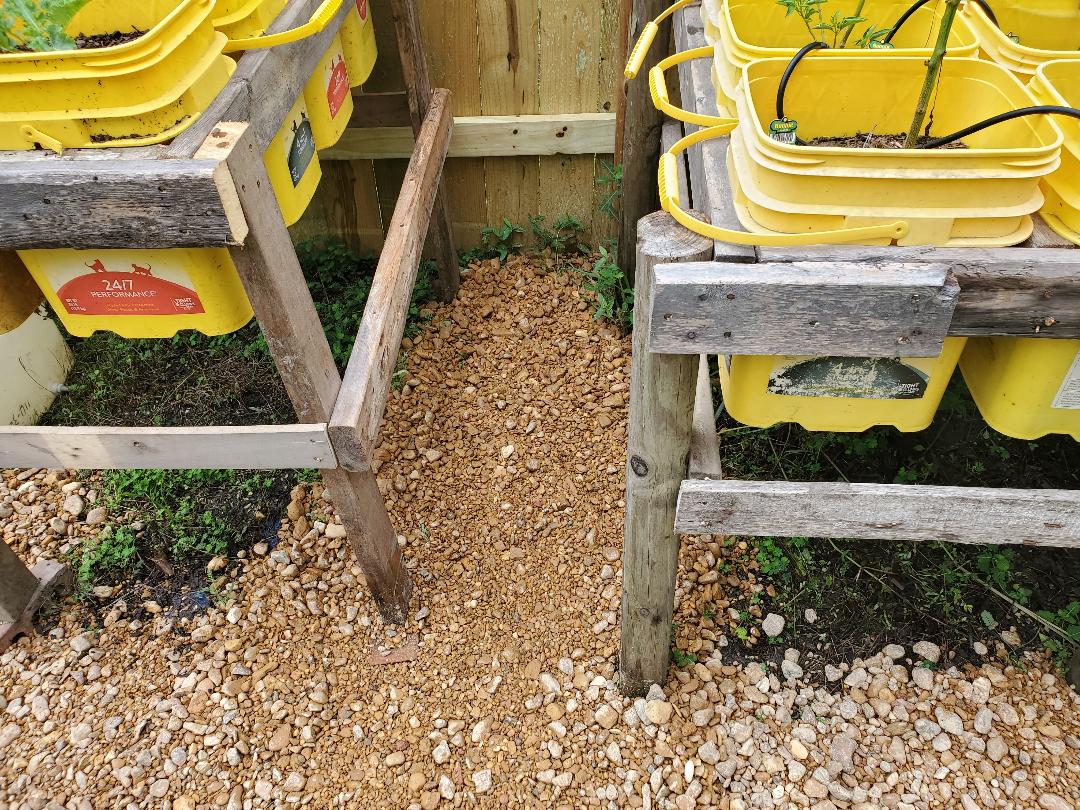 Gravel spread around bases of raised beds and between units to cover ground up to fence. The gravel path continued on along the path of the rear fence and the raised beds until I covered the mushy ground that existed in front of said raised beds. The ground really got that way on the count of the micro irrigation system's water eventually making its way to the ground enough so that it soaked the ground to the point of becoming mushy. With the gravel covering the ground and being mashed into the mud, we can hope to get that concrete effect enough so that even with the water on the ground the gravel will help keep the ground solid enough that we can walk over it without sinking into the mud. Because there was an old raised bed that had deteriorated into the ground along with a fig tree in a tire plus an old ground level raised bed that I was planning on dismantling, I didn't make the gravel path wide. Besides not having the gravel to spare to allow me full coverage of the muddy area, widening the gravel path would again take me into the areas that I may set up something later and I don't want to find myself wasting gravel on the count of just covering it all up in the future. I can always come back over the areas later on to apply gravel if need be. 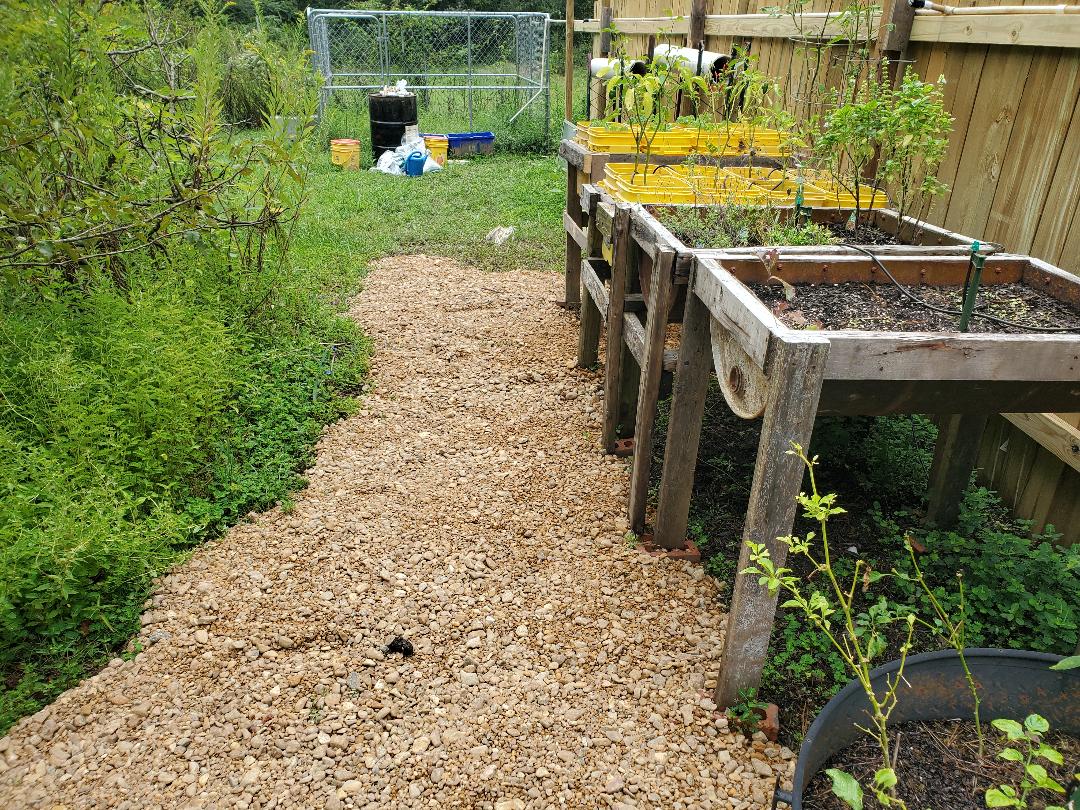 Gravel path extending to the end of the raised beds along the rear fence line. With the gravel path laid down where its at, I can now move about through the garden from the gate all the way around the back, being able to service any of the raised beds and drum planters while being able to wear lighter shoes and not having to worry about sinking in mud in spots. As I bring in more gravel I will continue to fill in areas for aesthetics. The more areas I cover with gravel, especially areas between beds or drums and along fence lines, the more areas I will not have to worry about weeds or grass or other unwanted foliage popping up in quantities that will make it a problem. After rebuilding the carburetor I got the unit installed and successfully started the engine once again. Surprisingly the engine starts rather fast, choke or no choke. Of course its warm enough to not really need a choke but still, this thing with a couple of pumps of the pedal it'll start up quick. Also the engine runs rather smooth, not skipping or farting or anything that would be indicative of a problem. Why do I mention this? Because for whatever reason or another it sounds like the valve train isn't getting proper lubrication. Multiple lifters/valves are rattling like they're not getting oil like its supposed to. The oil pressure gauge reads around 10-15 psi. While this might be inaccurate due to the degradation of the gauges, it does show that oil is apparently making it up to the valve train. My next best guess is that the lifters are all worn out just like the head gaskets, just like the bad piston, just like most of the stuff on this engine. I did put some oil treatment shit in the oil to see if that helps but that'll mean running the engine for a while with the hope of getting the stuff circulating real good through the whole engine. If that doesn't work, I will probably change the oil to some 20w oil to see if the heavier oil will help in putting oil on top and keeping it there enough and maybe filling in any gaps in the lifters or cam bearings or any other parts of the oil system to hopefully quiet things down. Again, despite the rattling, the engine actually runs smooth. 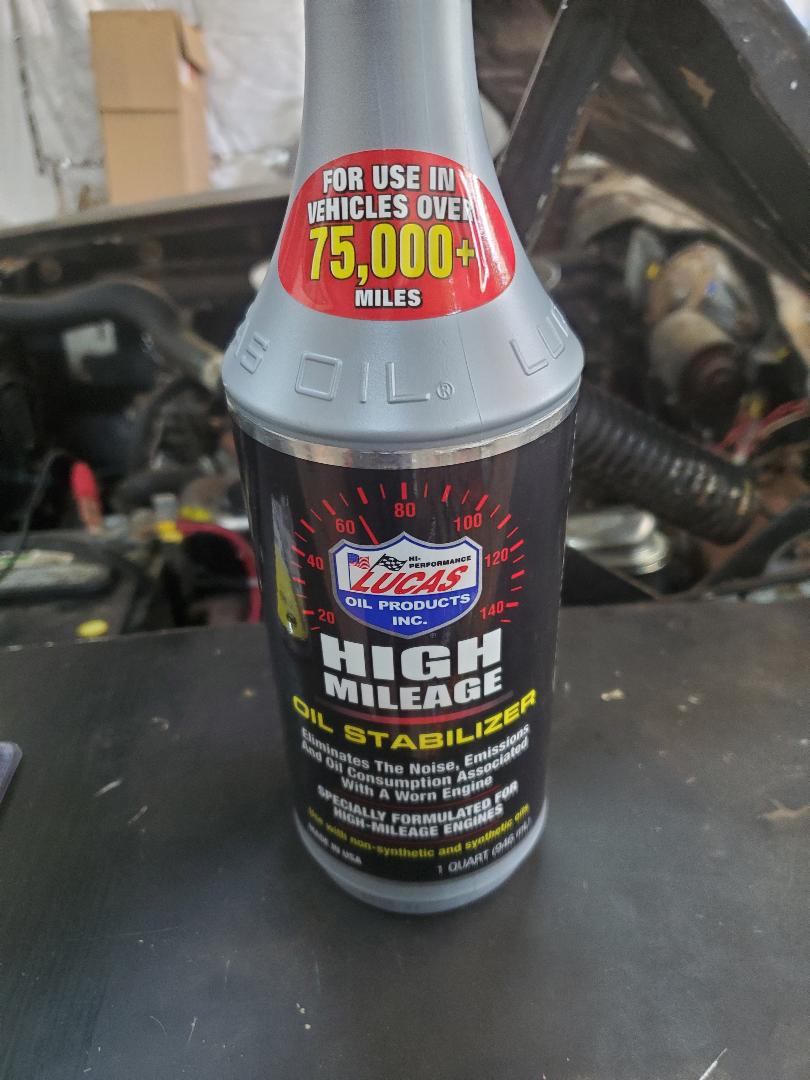 Oil treatment used for engine in the Dodge. I did do several tests where I drove the car up and down the driveway just to see how things worked. There was still a matter of making sure the transmission shifted like it was supposed to and making sure the front end alignment was right enough that the car would not steer all over the place. At one point I was preparing to check the upper control arm alignment again and upon jacking up the car to get the clearance above the tire I ended up finding out that the lugnuts were not tight at all on the rim. Since these are aftermarket mag rims that use a special lugnut that incorporates a washer and these did not have said washers in place, the nuts weren't tightened down enough so the rim had play. I had to get some new lugnuts with a shorter shank for the bolt holes on the rim along with the washers. After installing these and getting things snug, I took the car for another test drive. At this point the car ran rather straight without the crazy bump steer it had prior to doing the alignment. 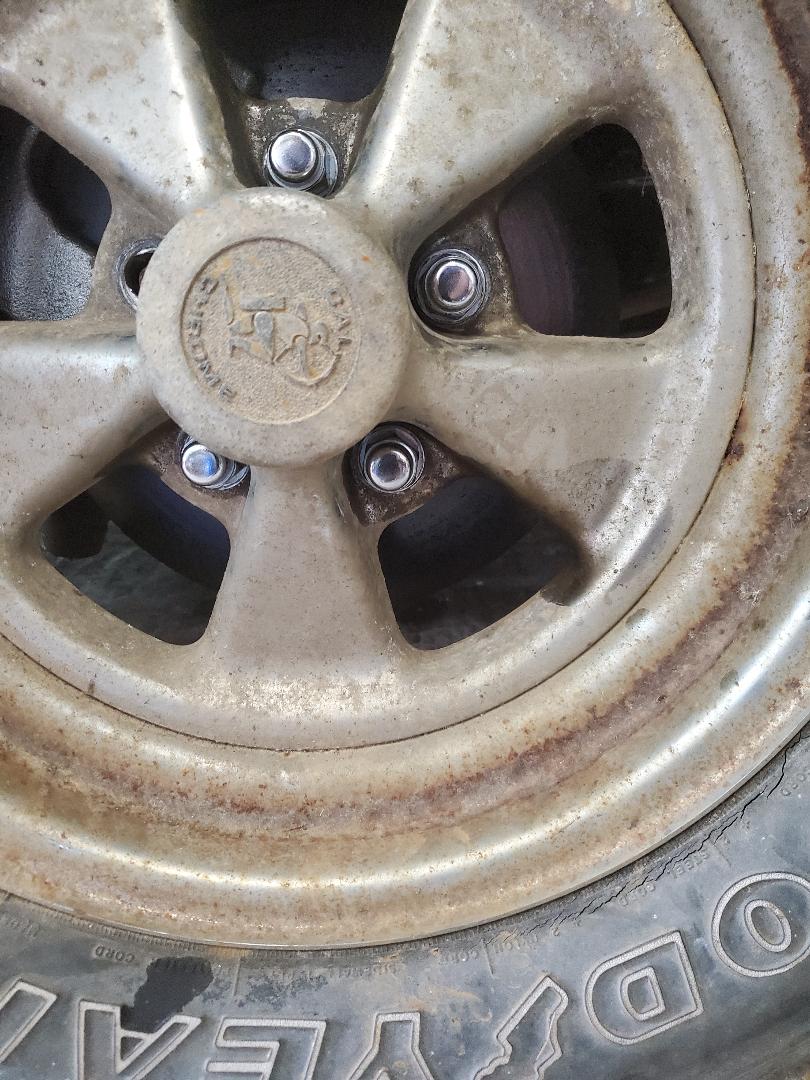 Mag rim with new lugnuts and washers in place. Note one missing lugnut due to bad stud. The next order of business was the speaker panel. This is the panel that mounts in the back right behind the rear seat and right under the rear window. The old panel was made out of what amounts to cardboard and obviously deteriorated over the years to the point of being completely useless when I started really working on the car several years earlier. To make a replacement I had some old interior wall paneling leftover from our bathroom remodel project. The back side of the panel is smooth so I figured on cutting a replacement panel from this stock and installing it bottom side up. Painting it would complete the work so the thing at least has some sort of factory feel to it. First thing I had to do was cut a template from some bulk cardboard I had laying around. I took some basic measurements then drew what amounted to what the panel should look like and cut it out. Of course I erred on the side of caution, leaving excess material so I can easily remove material as necessary to ensure a nice fit of the panel. This includes drawing out and cutting the speaker holes themselves. 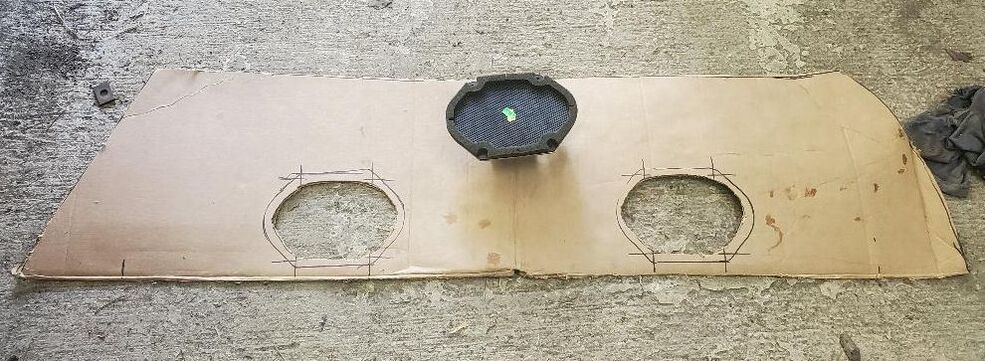 Speaker panel template cut from cardboard, note speaker used to gauge speaker holes to be cut. Also note how lines for speaker holes don't reflect the smaller size of the holes, since speaker cone has to be taken into effect. With the template made, it was easy to draw out and then cut out the final panel on the wall paneling. After test fitting the new speaker panel in the car and with the fitting of the speakers it was time to take it outside for painting. 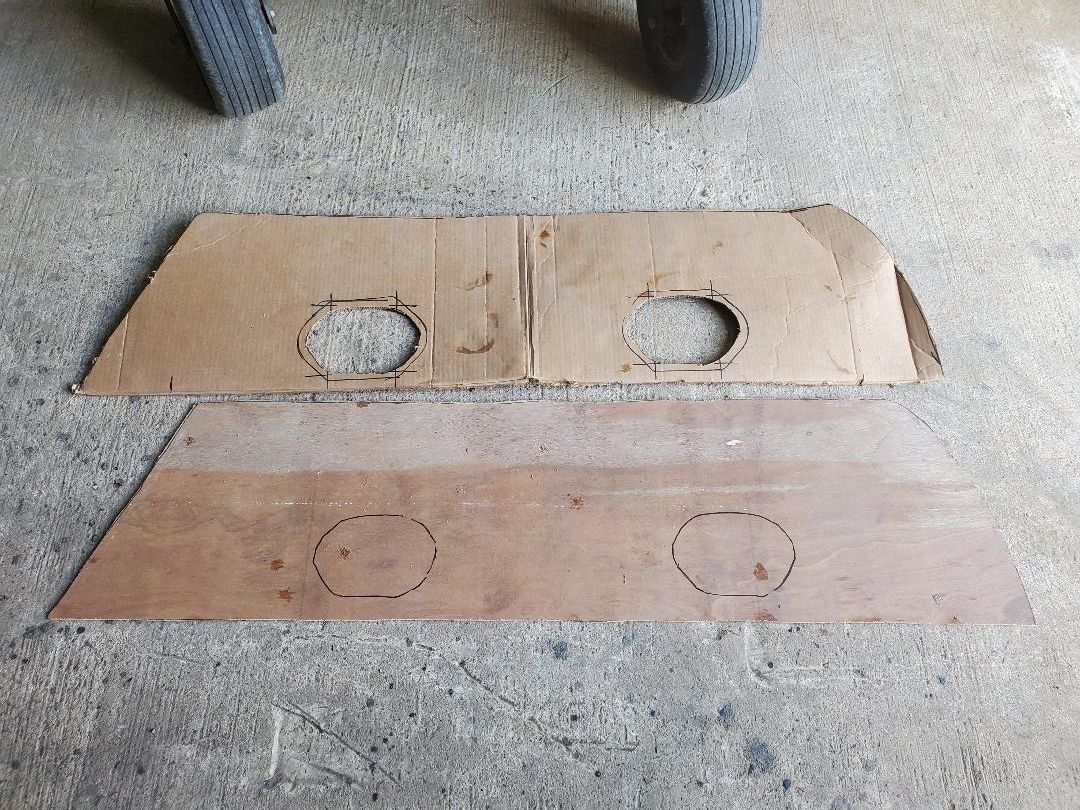 Final speaker panel cut from wall paneling gauged against cardboard template. Painting consisted of using a couple of old cans of black spray paint to cover the bare surface of the backside of the wall paneling speaker panel. I did this on the grass so there wouldn't be an imprint on the garage floor. Any paint imprints on the grass will go away over time. With the paint job done it was time for the speakers. 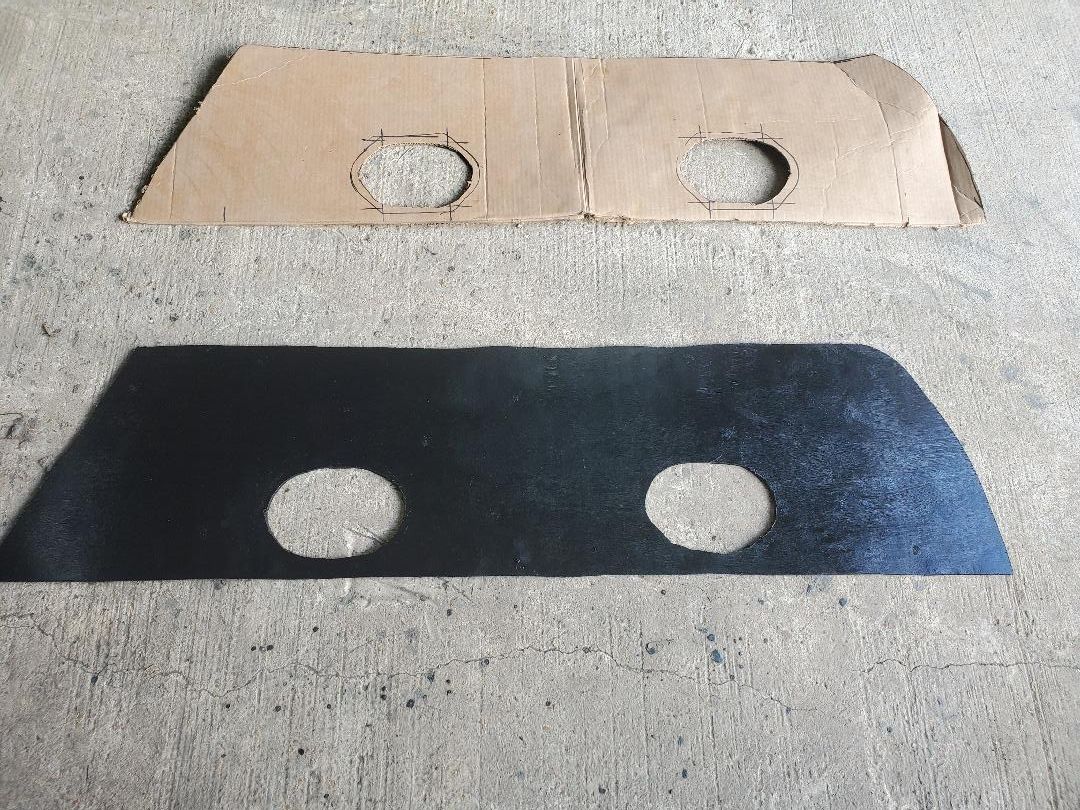 Speaker panel painted with black spray paint while it was still good. After I installed the speakers into the panel I had to run some power runs over to the speakers so they'll get their electrical connections. This wasn't a big deal as it was just pulling out a couple of the wires from the car's radio wire hardness. These wires are color coded to be an exclusive pair for speakers. Once everything is online I turned on the radio only to have it start going on and off like it was being keyed on and off. After some basic troubleshooting I decided to pull this radio and install another spare I had. The old radio was a junkyard radio and is pretty much touch and go either way. The replacement was the radio that was in the old Chevy Tracker. Of course to my surprise when the key was turned on the damned radio stayed on but got no sound at all through it. I ended up troubleshooting and found nothing wrong. At this point I figured I may as well get ready to fetch another radio when I get the chance. Either way I did set out to do what I said I was going to do, which was build a speaker panel complete with the speakers for the car. Only thing now is getting a replacement radio, no big deal. If I can find the same media player radio then I can share the same wire hardness plug that coupled to the old radio this way I don't have to do any rewiring of power/speaker. I secured the speaker panel with strategically placed screws, holding the unit down. After getting the panel down, Looking at the setup it came out pretty good, all things considered. 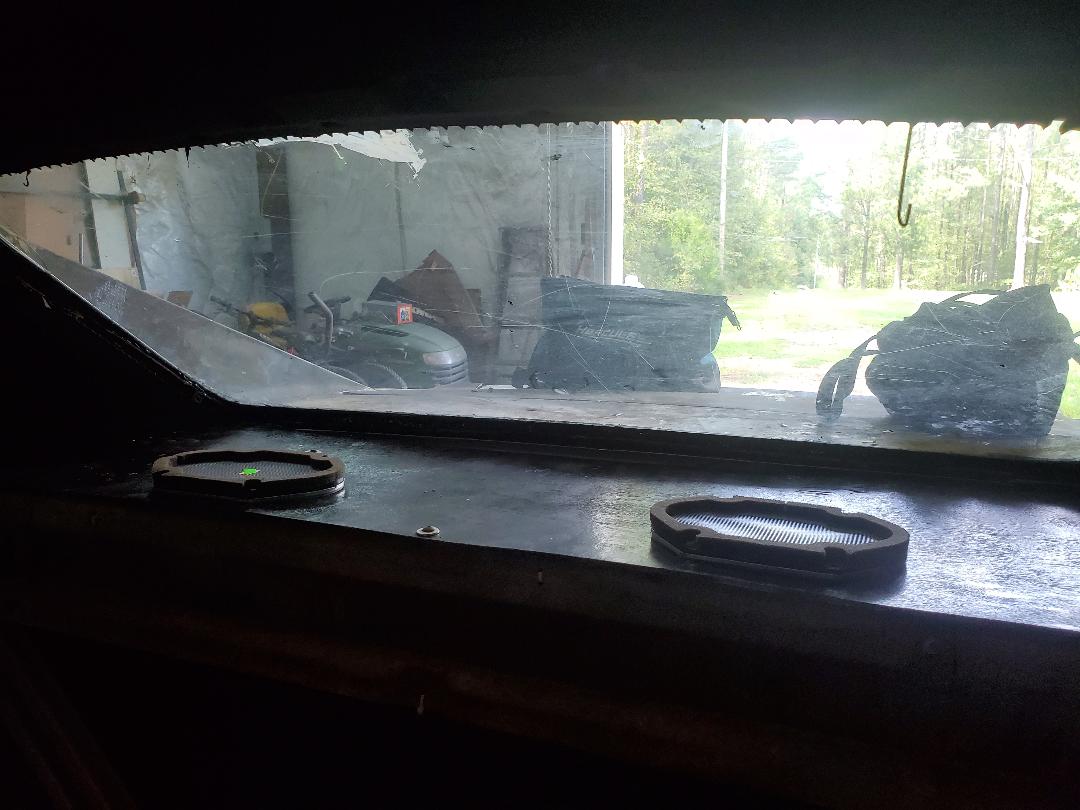 Speaker panel installed in back window area of car. Still need a radio.  Outside shot of speaker panel through rear window. While waiting for an opportunity to get another radio I did run the car some more, doing more of my up and down the driveway runs and even taking the car down the gravel road a quarter mile to the mailboxes and back again. Everything acted fine, no overheating issues or anything that would really have me worried. One thing that I was a little concerned with was how the transmission shifted at certain throttle positions since this transmission uses a throttle valve (TV) cable instead of a vacuum diaphragm. It seemed a little weird how the thing shifted but that will be one of those little tweak bugs I'll work out later when I know that everything is straight with the engine and everything else. The other thing that I had to make note of is the fact that this car is loud as hell. The mufflers on the car were on the 69 Mustang when it used to have a 351W V8. These mufflers gave a good idle sound but at higher RPM's the engine was loud! Again, this is one of those minor things that will probably not be addressed in any capacity if the engine issues are ironed out and I can put this thing on the road for some endurance runs. I'm just pacing myself and not rushing anything too much as I want to not miss anything in the build, even if I ultimately have to do some other serious work like replacing lifters or even an oil pump. As planned, I will keep bringing in truckloads of gravel to cover the shitty areas around the yard and grounds. The next area that I picked for covering is the garden, mainly because of the work I've been doing and plan on continuing to do there. There are several areas that are mushy with mud that I find myself walking over. The main place I'm starting is obviously at the gate to the garden. This area has been pretty mushy given the fact that water seems to channel itself right through this area. 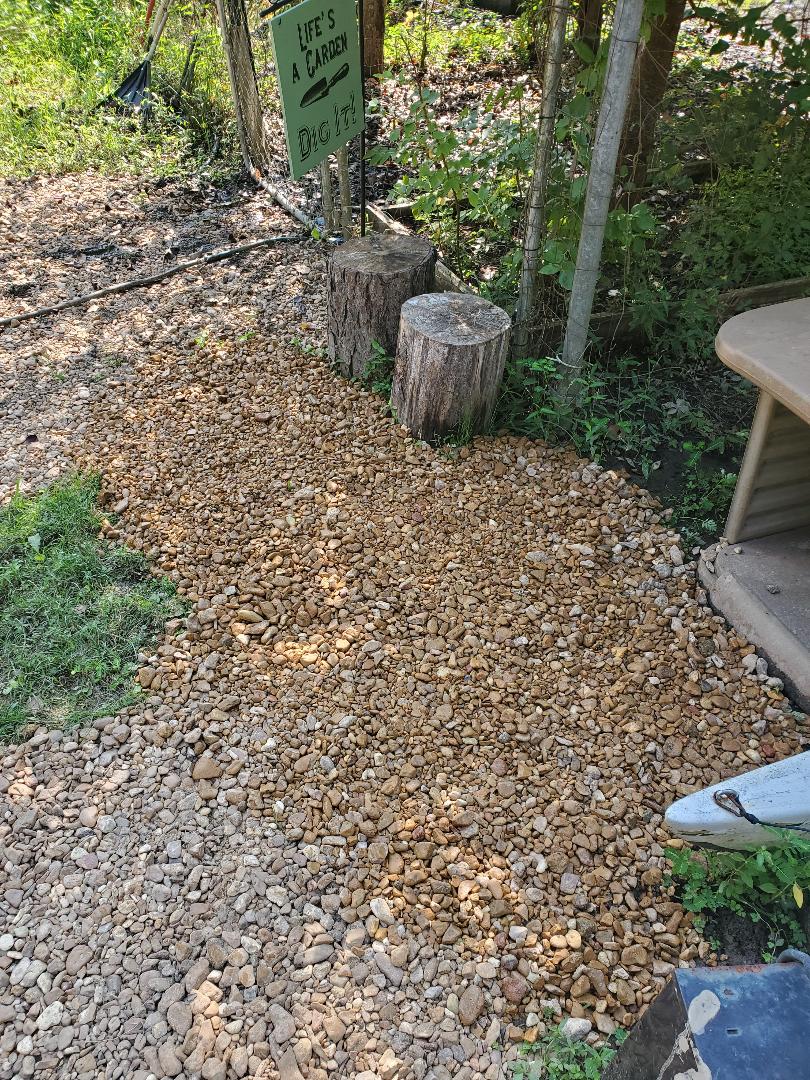 Gravel spread on ground in front of garden up to gate. As with other very mushy areas, I had to spread the gravel down then walk all over it to mash it into the mud before spreading more on top of the area. As I continued to spread the gravel I was able to make my way into the garden, covering the area that is in front of the gate and going between the two food forest raised beds. Of course one of these raised beds no longer has any wood around the dirt and the dirt within the garden has pretty much leveled itself with the rest of the ground so when I spread the gravel I had to stop spreading it when I got to where the wood would've been. I will probably end up re-doing the raised bed, next time using railroad ties or something heavy duty enough that it won't just rot away over a short span of time. Either way, I don't want to put gravel down in the way of where I would put down the barriers for another raised bed, that would just be a waste of gravel obviously. 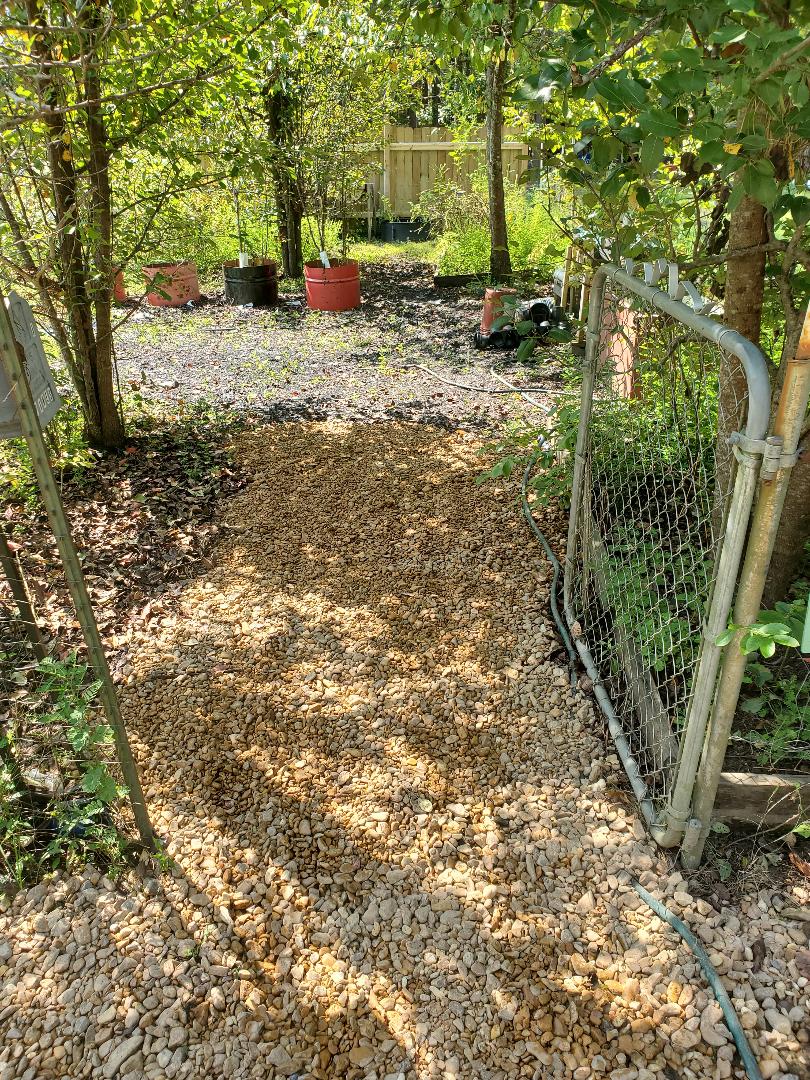 Gravel spread out just past the gate going between the first two raised beds. As I make my way into the garden the next area I laid gravel down was in front of the fridge raised bed and sewer pipe hydroponic garden. Since this is another area that is high traffic as I'm harvesting peppers from the plants within the HPG, I wanted gravel spread over this area next. I still had to mash the gravel into the mud in spots to help get the solid foundation needed to ensure that gravel that continues to go on top stays put to form a good walking surface that doesn't have me sinking into the mud where I end up needing shoes for just this type of problem. 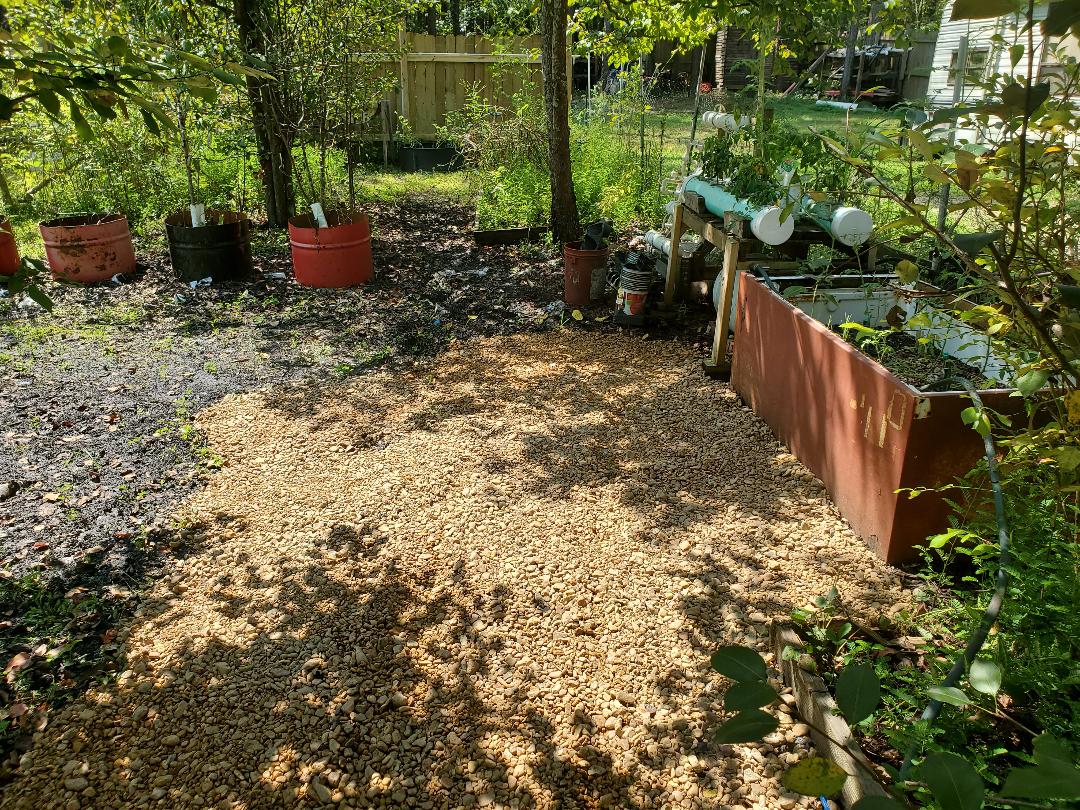 Gravel spread in front of fridge raised bed and hydroponic garden. As can be seen there is a lot of surface area to be covered by gravel. Some of these areas will have new raised beds or hydroponic gardens built to sit on these areas. With the gravel laid down and a solid surface established, I can ensure that weeds won't be a problem around the fixtures in the garden and we can navigate the garden grounds easily without needing mud/rain boots. Being able to walk into the garden using what almost amounts to house shoes will definitely be a welcome reprieve from having to put on work boots or rain boots just to go pick veggies. Any seasoned gardener makes maximum use of their gardens throughout the year. This means planting some cold weather crops in the early spring while the warm weather crops are still seedlings. When the cold weather crops are almost done it'll be time for the warm weather crops. They'll make their run through the summer as we make our way through to the fall by getting a 2nd round of cool weather crops in the works. Once fall is coming around and the warm weather crops are pretty much done, the 2nd wave of cold weather crops go in the dirt. These crops will conclude the year, making its run through until the first frosts come around. After I threw together a number of raised bed gardens using everything from old washer drums all the way to fabricated frameworks using buckets as planters, I figured that I have to adopt this same principle if I want to get the maximum use out of these gardens. I ended up pulling a lot of the old plants from many of the drum style planters while getting the latest raised bucket bed done. The first thing I did was plant seeds for the types of greens I normally make use of in these beds to see how many I can get to sprout and start growing. I also put some seeds in the smaller hydroponic garden to see what I can get to come up from that unit as well. Sometime later I was able to get some seedlings of the common salad greens and other greens I would typically put to use. Also I was able to get three viable lettuce plants from the hydroponic garden. At this rate the first thing I did was take one of the drum raised beds and transferred the three plants from the hydroponic garden over to it. There were some seedlings that appeared to have sprouted as well. I made sure to plant the three plants at one end where they were away from the sprouts 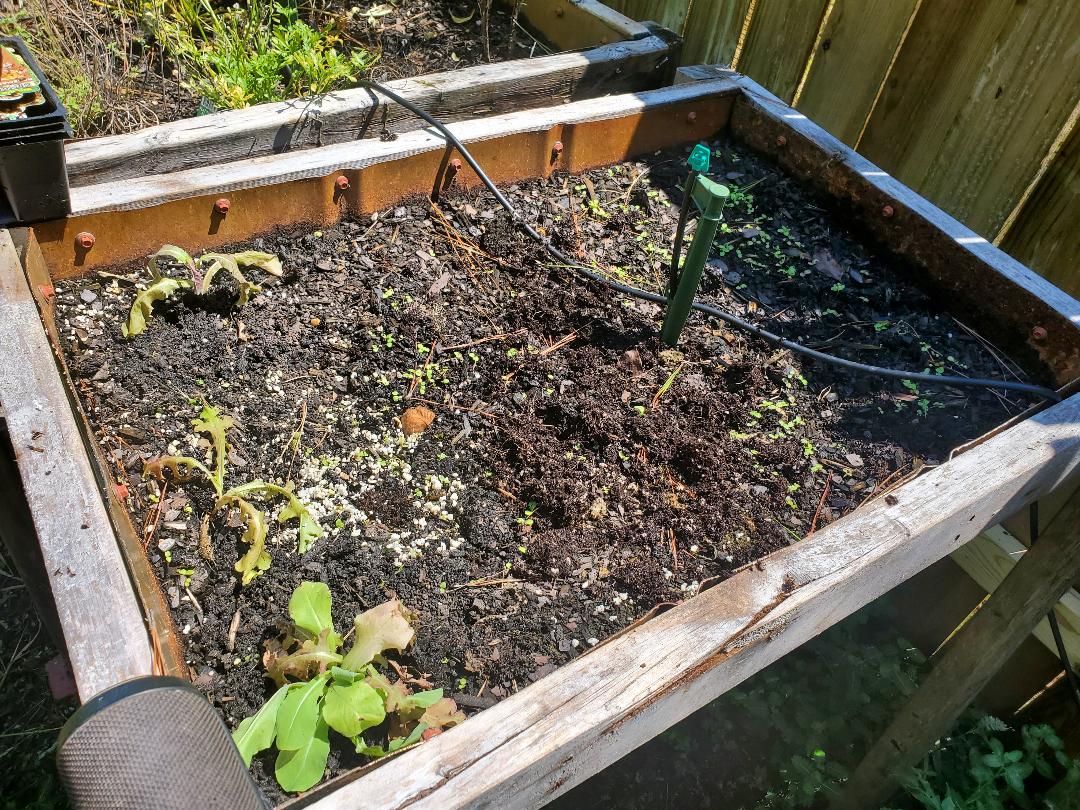 Drum raised bed with three lettuce seedlings along with the multiple sprouts throughout the rest of the soil. After removing the old cucumber and tomato plants from the two washer/dryer drum planters, I planted several lettuce seedlings I picked up from Lowe's. Leaving the micro irrigation system in place, all of these planters will get proper watering. Along with periodic sprinkling of dry slow release organic fertilizer, hopefully I'll be getting some thick greens for the fall into the winter. 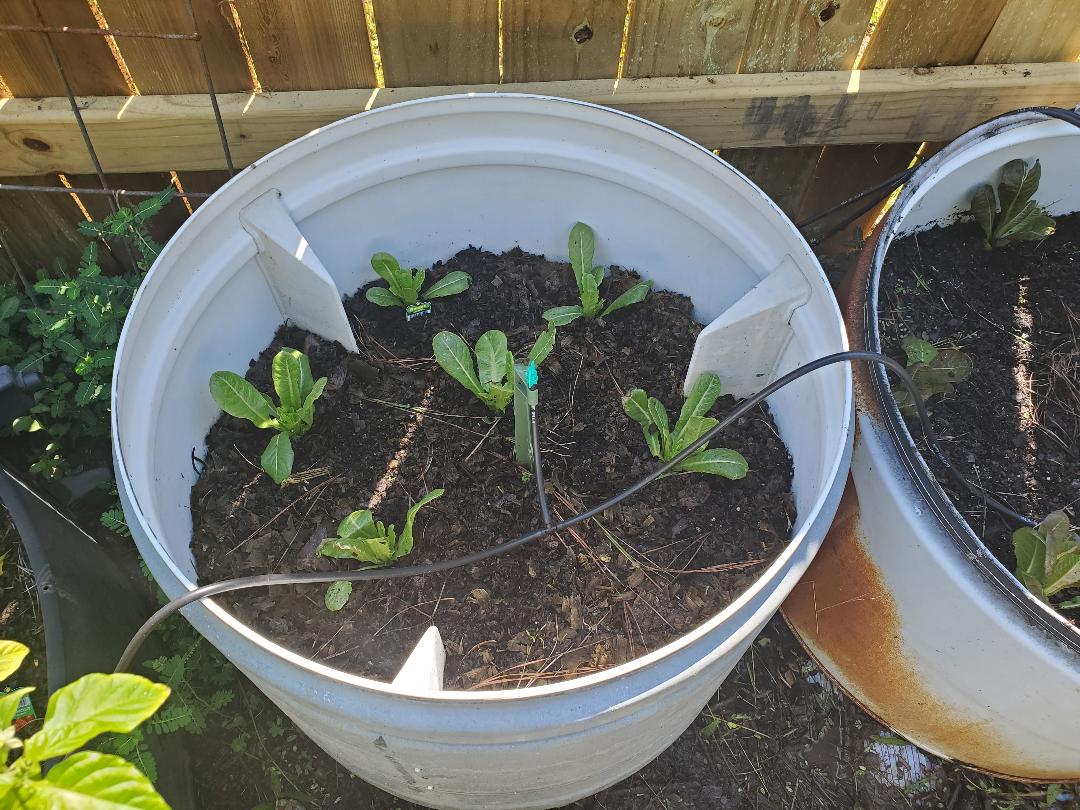 One of the drum planters with lettuce seedlings planted, note micro irrigation system in place.  Other drum planter with lettuce plants in place. As for the new bucket raised bed, I had to plant eight plants since I have eight buckets in place. The planter flats from Lowe's have six plants in them so I had to find something to put in the other two buckets. I wanted to plant collard greens for our iguana lizard but couldn't find a flat of seedlings, only kale. I ended up getting a flat of kale to plant in the six buckets then took some collard seeds and sowed them in the other two buckets. 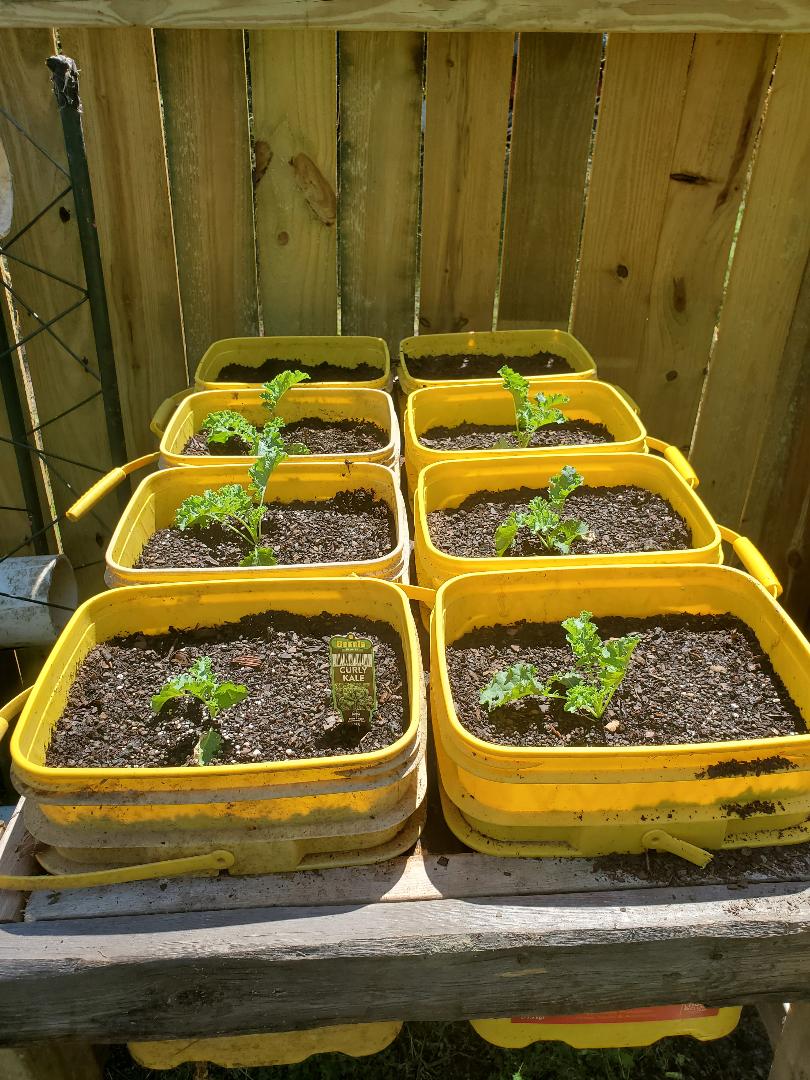 Raised bucket bed with kale seedlings in place. The current micro irrigation system has not been expanded to incorporate this raised bed but another project I'm going to be working on will be running an above ground water line along the fence line that will have taps along the line to feed micro irrigation hoses for future raised beds. This water line would be fed from a sprinkler valve so it wouldn't have constant water pressure on it. There wouldn't be any threat of damage from freezing in the winter at this rate. When the water line is done, I'll be able to water multiple planters and raised beds to the degree I should have production numbers that rival anything I had when I planted crops in the ground directly.
On a lighter note, I was able to get some automotive tasks done that weren't immediately necessary but necessary nonetheless. Having to rebuild the carburetor on the Dodge, I had to source a rebuild kit for the carb so I went online. Much to my surprise I ended up finding an aftermarket/X brand kit for a quarter of the cost of the name brand kit. With that, I got four of these kits since I had several of the Edelbrock carburetors in house. These kits would allow me to get four of the five carbs rebuilt, including the Dodge's carb.
I went ahead and got started on the carbs. In my opinion, edelbrock carbs are pretty easy and minimalist rebuilds compared to other carbs. There's only so many gaskets, and the small hard parts are not many either. In fact it takes more time to clean these things than it does assembling them. 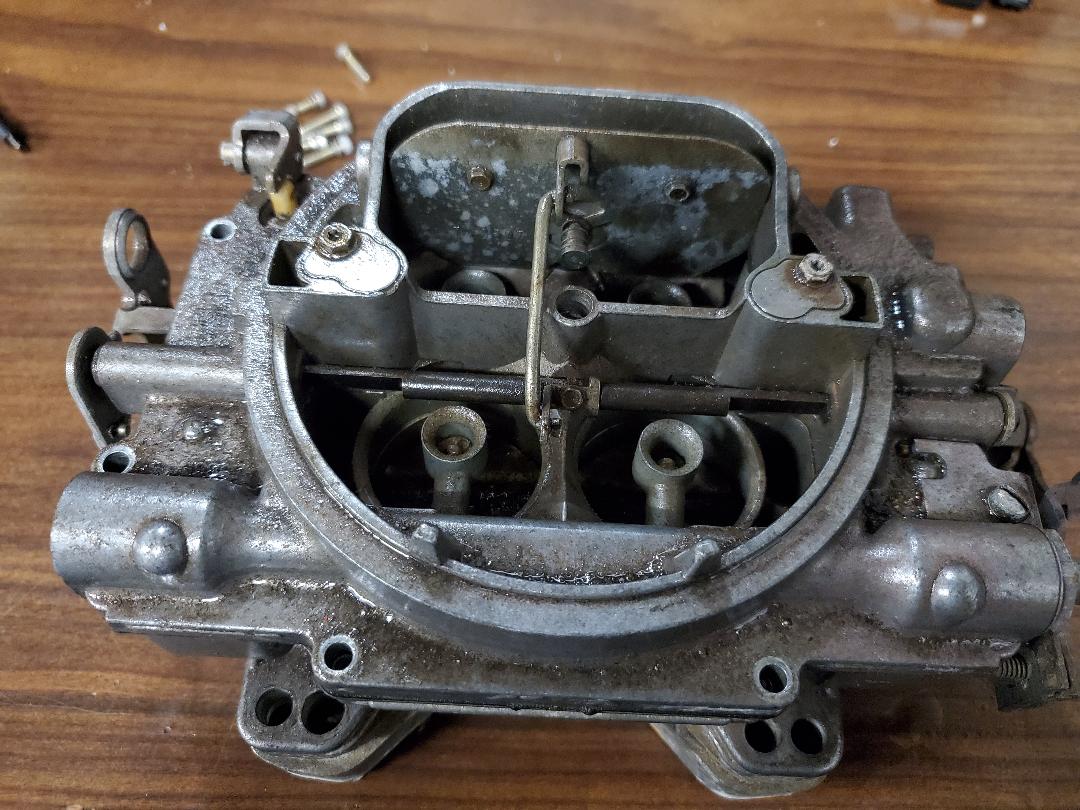
Edelbrock 4bbl square bore carburetor, ready for disassembly.
I used a parts washer along with some brushes and other small tools to clean the caburetor after taking the thing apart. After pulling the top off and removing the individual pieces, I was able to clean the body out, ensuring that any dirt is removed from any orifices and other crevices. Even the different fuel passage assemblies were cleaned out, sometimes having to use compressed air in order to blow out minute dirt particles. 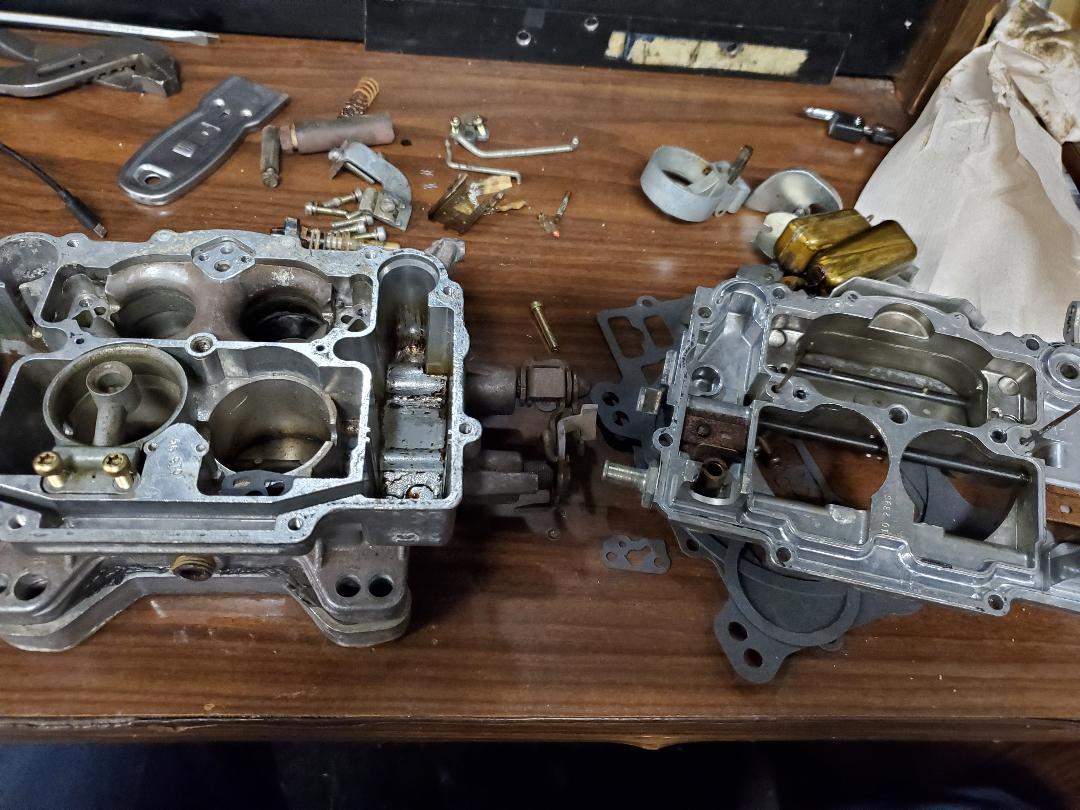
Carb broken down on work table.
With everything cleaned out good, reassembly went pretty fast. Because of the relatively fast process of rebuilding these carburetors, I was able to get four units done in a short span of time over a few days. I did have to make some minor alterations to a couple of the gaskets that came with the kit since they weren't perfectly cut to match the components on the carb. This was pretty minor and even with the alterations I was able to place the gaskets where they needed to go and assemble the components that went with the gaskets. 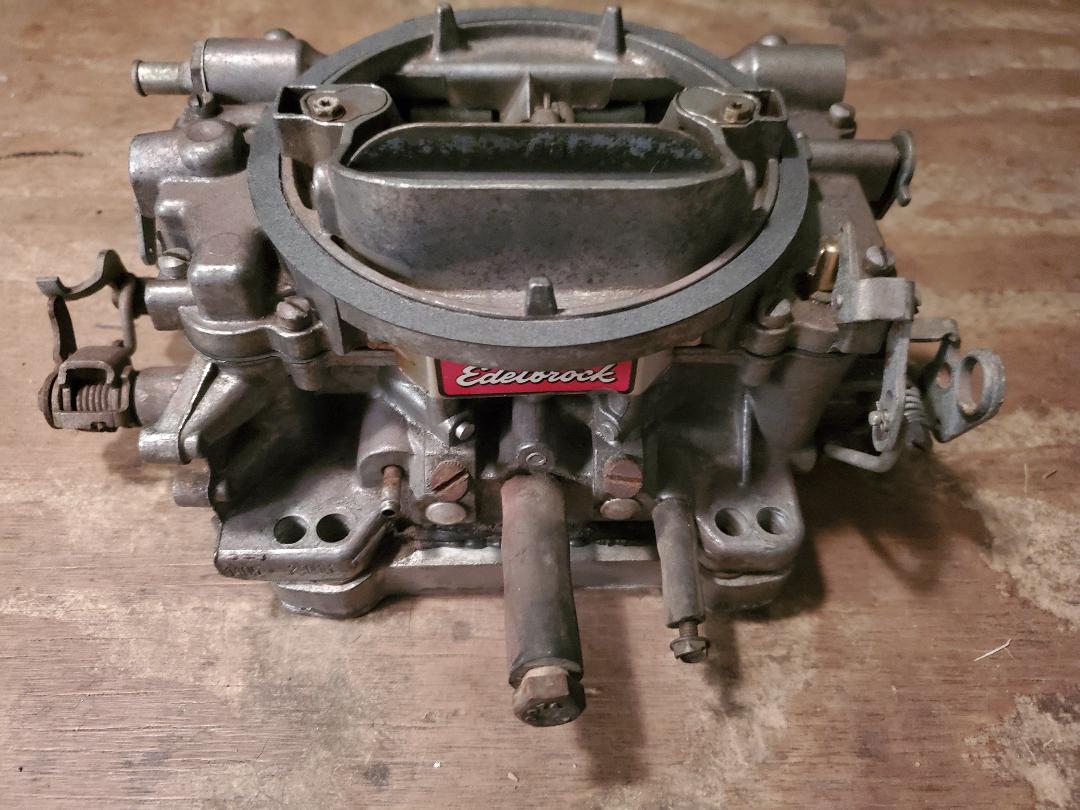
Edelbrock carburetor reassembled and ready for use or storage
The next thing that I needed to get ready was the replacement spindle for the Scion TC. Problem with the old unit was the idea that the old ball joint had wallowed out the knuckle holding its shaft during the times the thing loosened up. Because of this I was unable to secure the new ball joint unless I used lock washers to act as spacers for the nut to be able to apply the pressure necessary to draw the ball joint shaft tight into the knuckle. After having ordered a replacement spindle, I figured that I needed to replace the wheel bearing and hub since the unit would need to be pressed out using a shop press. It would suck to install this new spindle assembly only to have the old wheel bearing crap out and I end up having to remove the spindle again in order to replace the wheel bearing. The first thing I had to do in the process of replacing the wheel bearing was the removal of the hub itself, which is pressed into the inner race of the wheel bearing. To start this I had to knock out the lugs/studs. Using a sacrificial lug nut I was able to use a hammer to knock the studs out. 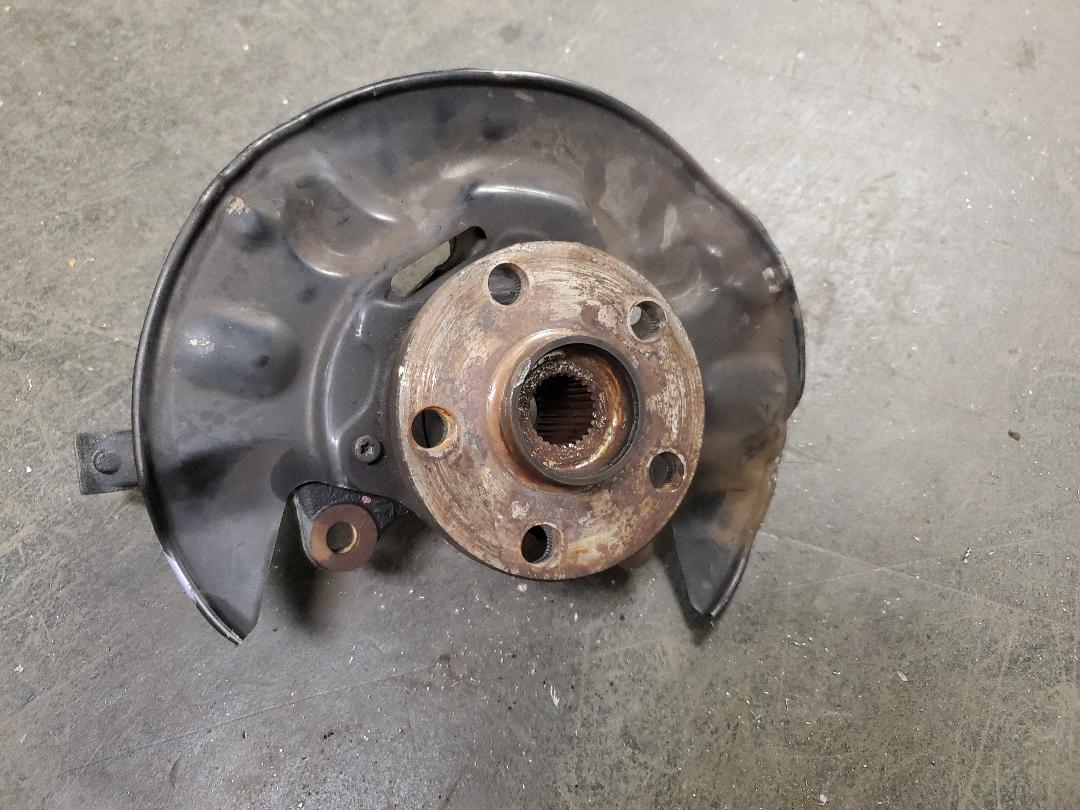
Hub inside spindle with studs removed
Using the shop press and some other heavy metal pieces, I was able to knock out the hub from the bearing assembly, taking the inner race with it. It didn't matter, the old bearing was coming out anyway. After removing the hub, I had to use some other metal pieces that were of the right dimensions to make contact with the outer shell of the bearing prior to pressing. After getting the right metal pieces in place and the whole works set up nice and solid, the shop press made fast work of the old bearing body, pressing it completely out. 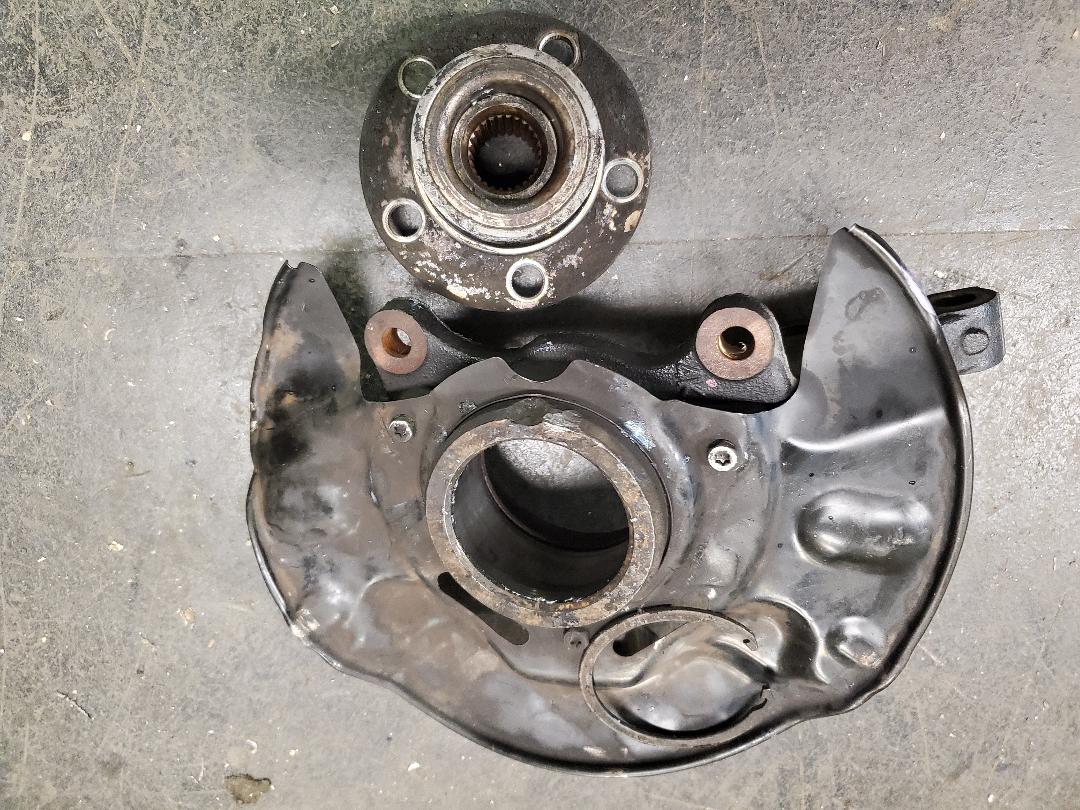
Spindle assembly with hub and bearing removed.
Obviously installing the new bearing and hub was done in reverse. First the bearing went into the spindle assembly. Again, using the right improvised metal jigs, I was able to slowly press the new bearing into its new home, quick and dirty. From there the hub had to be pressed in. 
New wheel bearing pressed into spindle assembly with retaining snap ring in place.
Pressing the hub isn't as easy as one would think. Metal jigs had to be set up to hold the inner race solid against the downward force of the hub and shop press so the inner race doesn't get pressed right out of the bearing assembly. With everything solidly mounted and lined up properly, I was able to press the hub all the way into place. With that, the whole spindle assembly was done and is now ready for installation onto the car. 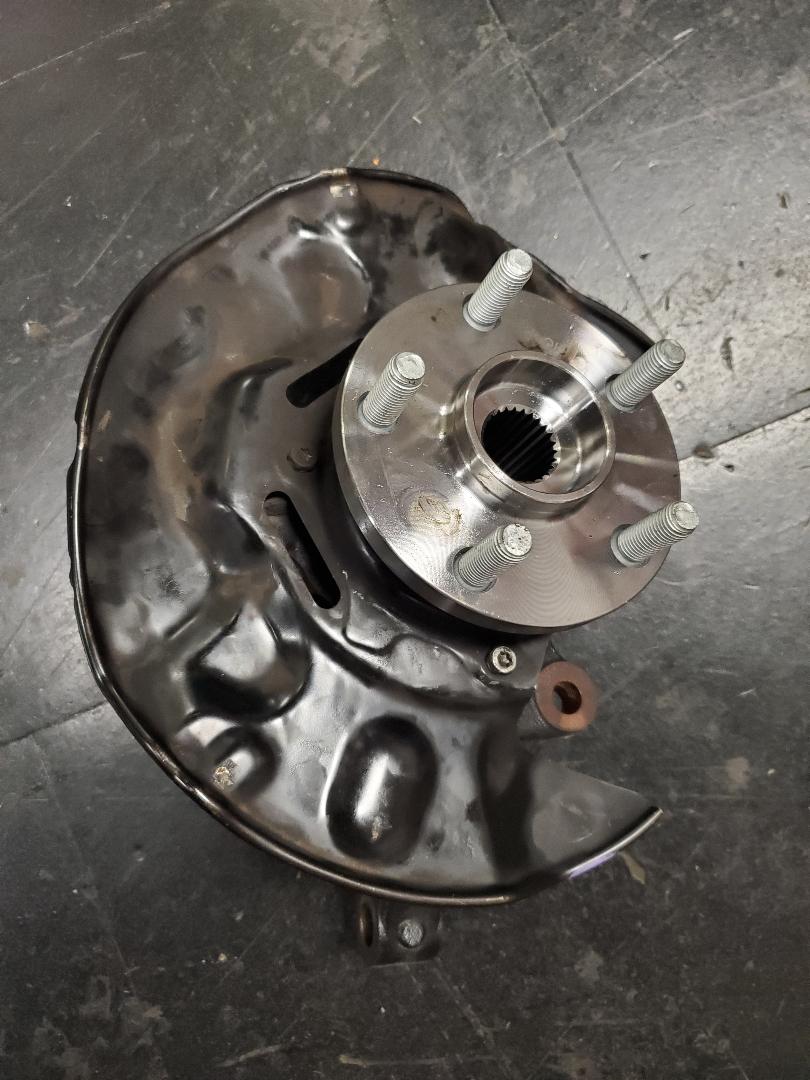
Spindle assembly with new wheel bearing and hub installed.
Other than straightening out the dust shield, the spindle installation will be pretty fast. After removing the nut that holds the CV axle in place, the strut, ball joint, break hardware and tie rod end will be easily removed, allowing the complete removal of the spindle. I will end up acquiring more replacement spindles, one for the right side as well as another one to serve as a spare for the left side since I can't use the old left side spindle. Having a pair of replacement spindles with new wheel bearings installed will allow me to make suspension repairs on the Scion go fast versus having the car down for the time it takes me to remove the hardware and press in new bearings.
As part of my never ending quest to clean things up and get some order around the homestead, I decided to start up the construction of another hydroponic garden system. Unlike the other hydroponic systems, this one is more or less being pieced together on the fly, utilizing some of the surplus material I have laying around. Just like the last successful HPG, I'm using sewer pipe since it allows me to use larger planters. But unlike the other unit, I'm using some frames that I was using to hold posts for growing plants vertically in the past. These posts look like some kind of lattice frame, having rungs that are perfect for holding the pipes. I do plan on stacking two pipes vertically on these posts, to get a vertical growing medium instead of building a table to accommodate the two pipes. This will allow me to put the twin pipe assembly against the fence, taking up a smaller footprint. To get things started I took a couple of the lattice posts and cut a couple of rungs from them at equal levels so when I set the pipes in them the pipes will be relatively level while still being cradled securely. 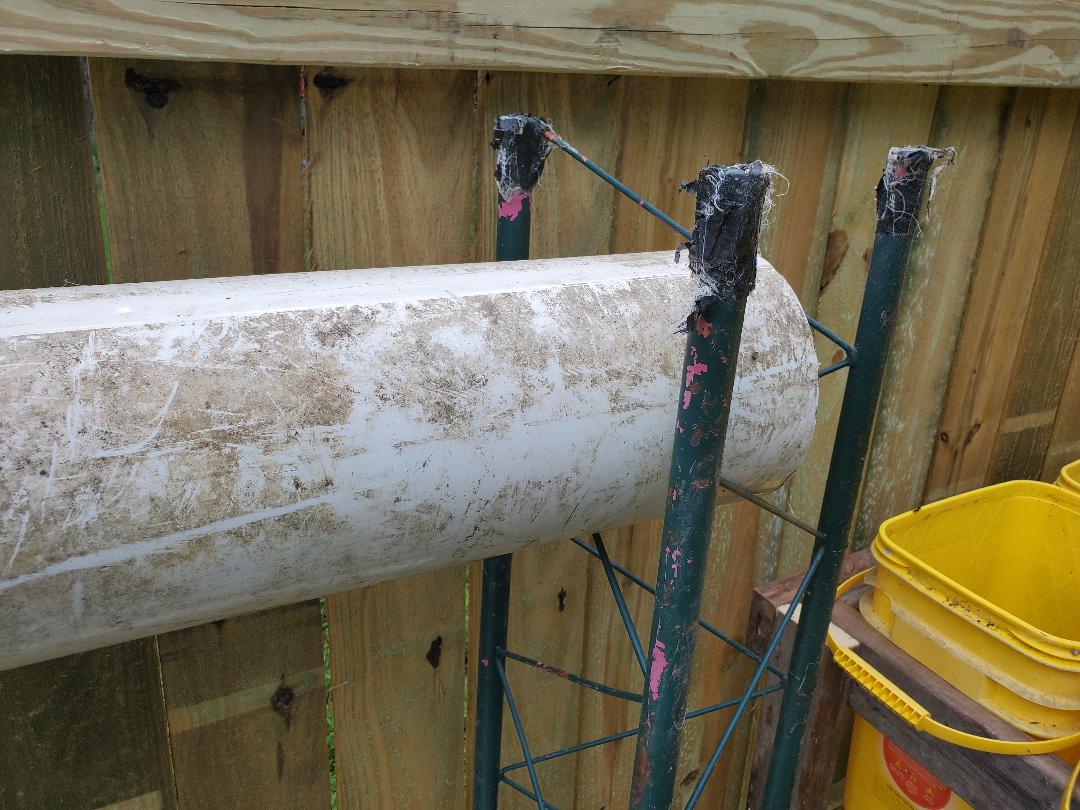 Closeup of lattice posts with rungs cut out to cradle sewer pipes. The next thing I had to do in order to ensure stability of the posts while they hold these pipes, especially when they're filled with water and plants was to secure them to the fence. This was easily accomplished with simple conduit straps. I used wood screws to secure the straps around the poles that comprised the lattice posts to the 2x4's that make up the supporting structure of the fence. Even with the posts stuck in the ground, using the straps made sure that the posts can't tip or otherwise move any when under the loads they will be enduring. 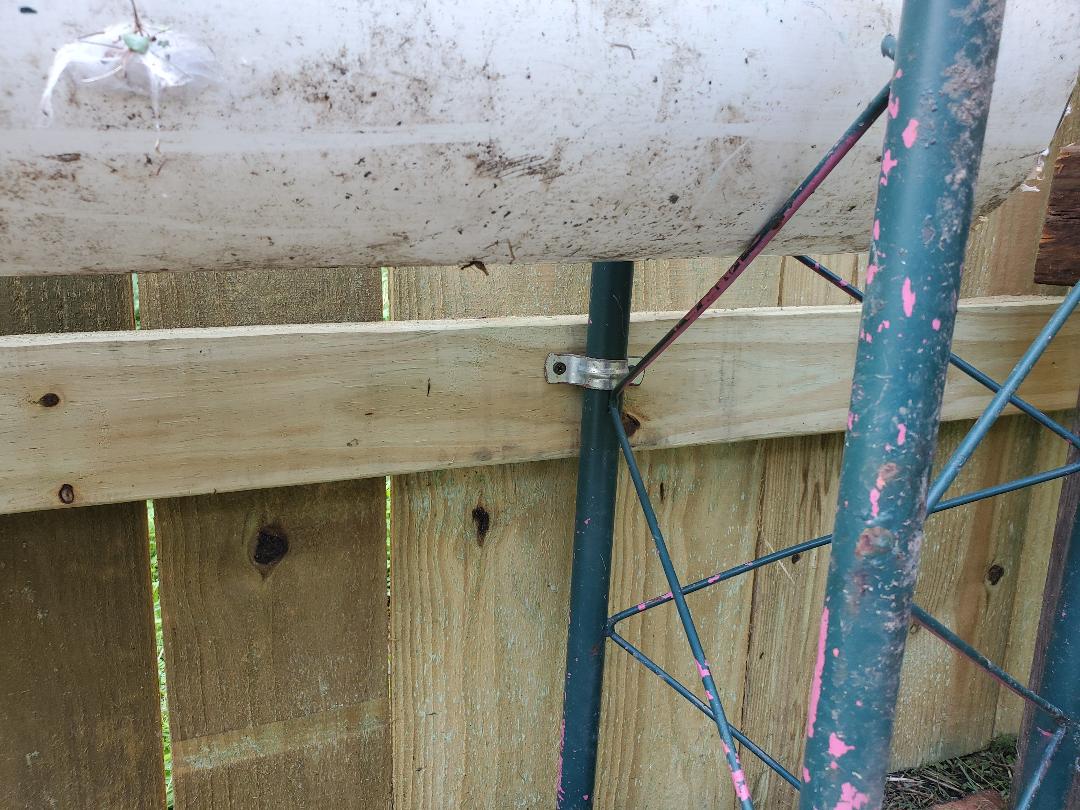 Closeup of conduit strap holding lattice post to 2x4 of fence. With the first pair of lattice posts secured and the first pair of pipes cradled within them, I decided to set up another unit since I still had some pipe and more lattice posts. I repeated the same process with the cutting of the rungs and securing with pipe straps. With the 2nd HPG assembly set up, I moved on to one more little thing I needed to do. 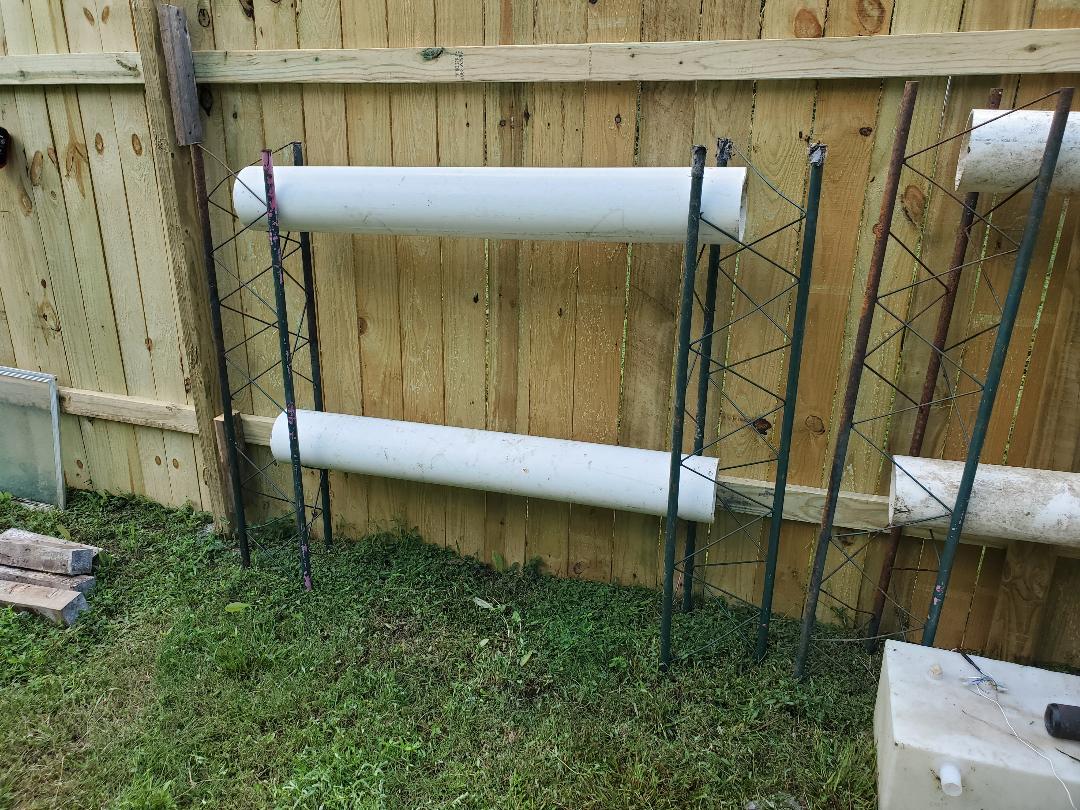 2nd HPG setup right next to 1st setup. I had to come up with a reservoir for the first HPG since the large sewer pipe setups will require a large amount of water to be able to feed the setup while still having reserve in the tank. I had an old holding tank I pulled from the storage trailer during its construction last year. This tank looks to be around 30 gallons or so, plenty to feed the HPG setup. With the HPG setup against the fence, the tank had to go right in front of the unit, almost under the first pipe but not quite. It's close enough that whatever small pump I use will be able to push the water up the hose that will link the tank to the top pipe. Water will flow down into the 2nd pipe and back into the tank.  RV/camper trailer holding tank set in front of HPG assembly. I couldn't go any further as I needed the end caps for the sewer pipes, along with some hose, pump, fittings, plus I still had to mark and cut the holes for the planter cups I'd be using. I turned my attention to the raised bucket bed garden assembly I built just recently. I initially set it up right next to another raised bed. After having to lean over the thing to reach the rear most buckets in the older setup, I decided I had to set the new bed up a few feet away from the old one, leaving an opening for me to go into when I need to service either one of the raised beds. I moved the bricks and set the newer raised bucket bed up as intended so now there's room to work around either unit.  Newer raised bed moved over to make room on either side so both raised beds can be serviced. The next phase as noted will be adding the extra components to finish the HPG assemblies, getting power routed to the site so I can then get the garden assemblies online. Since it is later in the year, I may be able to get some salad greens growing in a quantity along with the existing gardens where I'd be well supplied in salad greens until the first chills start up, maybe afterward if it doesn't drop below freezing in the winter. Ever since we got the storage trailer we've always had to deal with the shitty entry door that would periodically bind up where we couldn't get it shut properly unless we lifted it or otherwise manipulated it in some way to get it to close. Just recently the door's internal framework weakened to the point that the whole door sagged when opened so the thing looked like a parallelogram instead of a rectangle. I finally had enough of this shit and decided to fix the door.  Storage trailer door removed from frame. After removing the door from the trailer I had to straighten the thing back out to where it was a rectangle again. I also had to tuck the skins back into the outer frame moldings around the door as well so they wouldn't find themselves flapping around excessively. Once I straightened the door I had to survey the bottom of the door where the inner framework was missing.  Rotted/missing internal frame section of trailer door. After seeing that the thickness of the door frame was the same as that of a normal 2x4 I decided to just use a length of 2x4 to make the repair. The first thing I had to do was cut some of the internal foam away to make room for the 2x4 since the old board was a length of 2x2 board. After cutting the foam away I measured out the length of 2x4 I needed.  Measured out piece of 2x4 for making repair to bottom of door. With the 2x4 cut, I had to screw it in place. First thing I had to do was trim the lips of the outer metal frame to make some room for the 2x4. Even though the door was the same dimension as the board, the outer frame metal was slightly narrower than the board. By trimming the metal from the frame I was able to rest the 2x4 against the inside of the frame where I was able to secure it with wood screws. After repeating this on the other side of the door, I had the bottom held together properly and the door was solid once again. 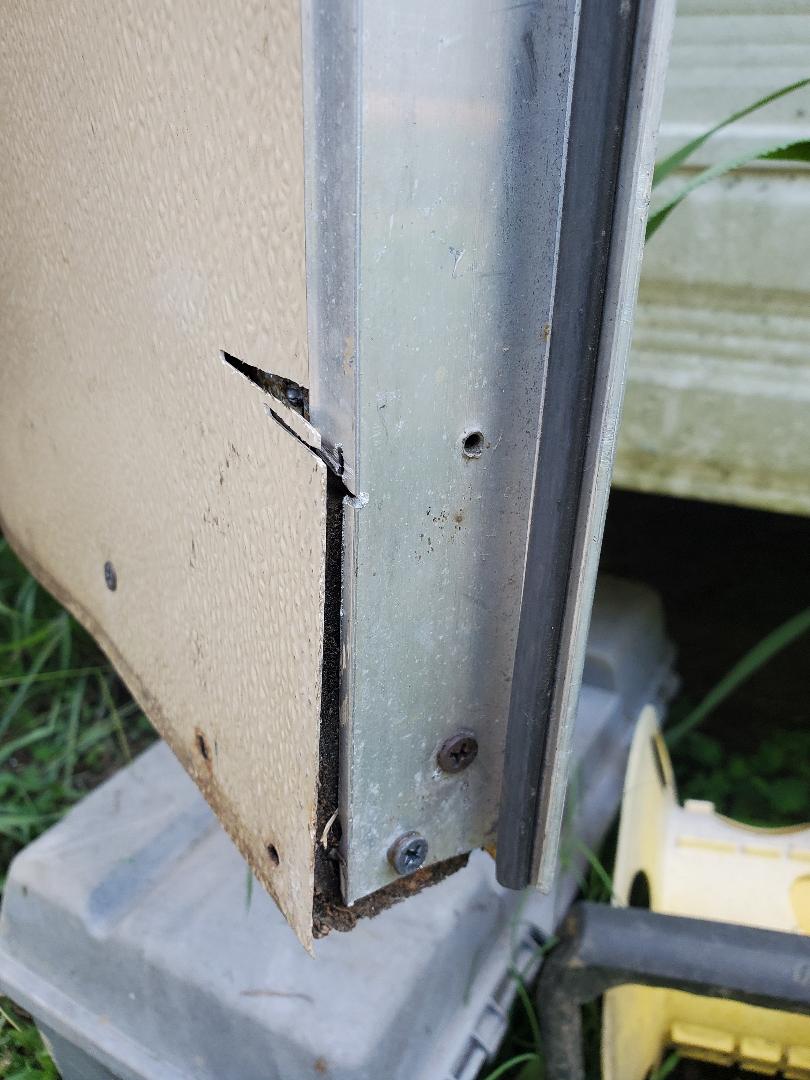 Closeup of trimmed lip from outer metal frame. This is to accommodate the 2x4 where it will be flush enough so the door body doesn't bulge around the edges. With the door solid I wanted to do some fine tuning with the door. I used some small washers and more wood screws around the edges to help secure the skin to the 2x4 so the skin won't be able to flap around or otherwise get caught up in any way where it can be torn or broken more. With the skin solid and the door frame solid I was able to re-hang the door. Afterwards I found that the whole setup was better than expected. The door was able to close smoothly, being able to easily lock with little effort. Since I was this far ahead I even went ahead and trimmed the opening for the bottom latch on the door so the door can be latched closed without having to lock it. At least now the door can be locked and/or latched with one hand, no more having to lift the door and manipulate the lock to get the damned thing to latch properly. |
