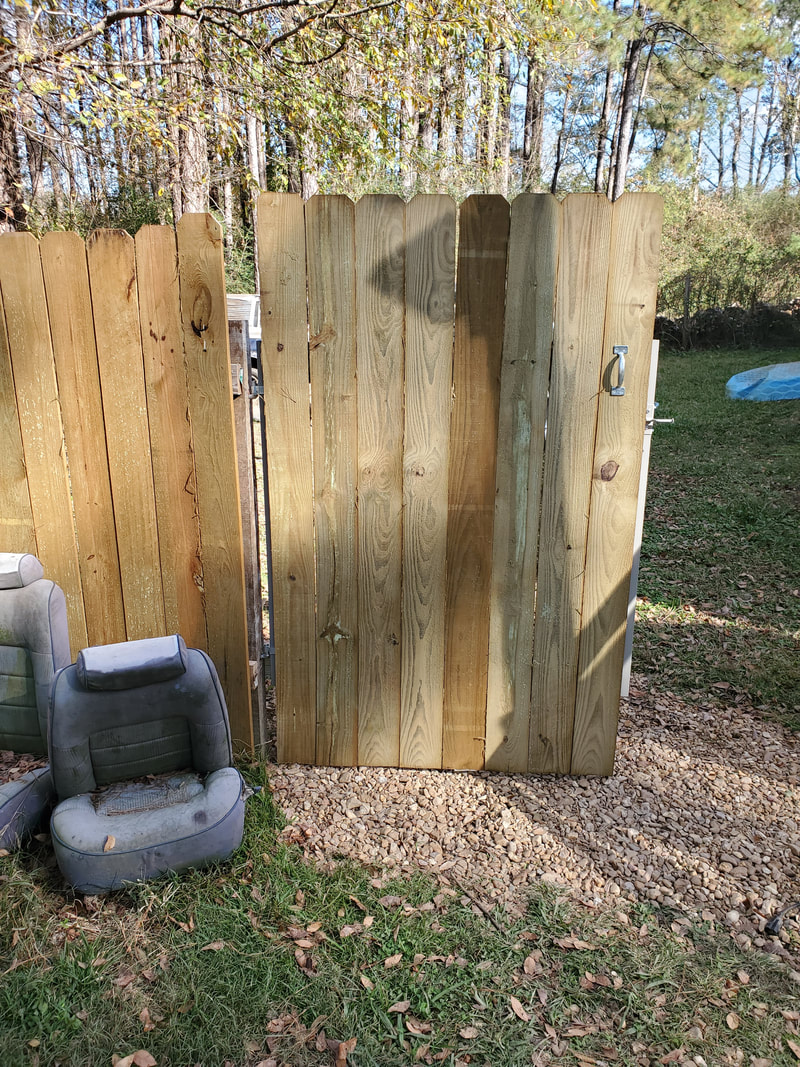
Setting Up The Extension For The Rear Gate To The Chicken Yard And The Mustang Gets New Mirrors11/29/2020 As the chicken yard comes together that much more with the completion of the two gates to the main opening of the yard, I moved my attention to the rear of the yard. I intentionally set the spot up to accommodate a smaller gate for entry to the yard from the rear. Problem is the side gate running parallel to the main driveway (that the gates are connected to) will terminate at the rear fence leaving probably a 1 1/2 feet of space between the tree that the rear fence stops at and the imaginary point where the side fence would've stopped at the rear fence. To alleviate this problem the last couple of feet of the side fence had to angle away from the tree where the rear fence currently stops at. That also means sinking a new post at the new ending spot for the side fence so the space between said post and the tree will be between two and three feet wide, more than enough for a small entry gate for a person. First the extension panel. As stated I had to sink a new post at the proposed spot where the fence would end at. Of course my trusty (for right now) post hole digger made fast work of the ground giving me a nice deep hole for the post. Laying the post in the ground, filling it with powdered concrete and soaking it with water landed me the anchor point I needed for the 2x4's that were to go on afterward. 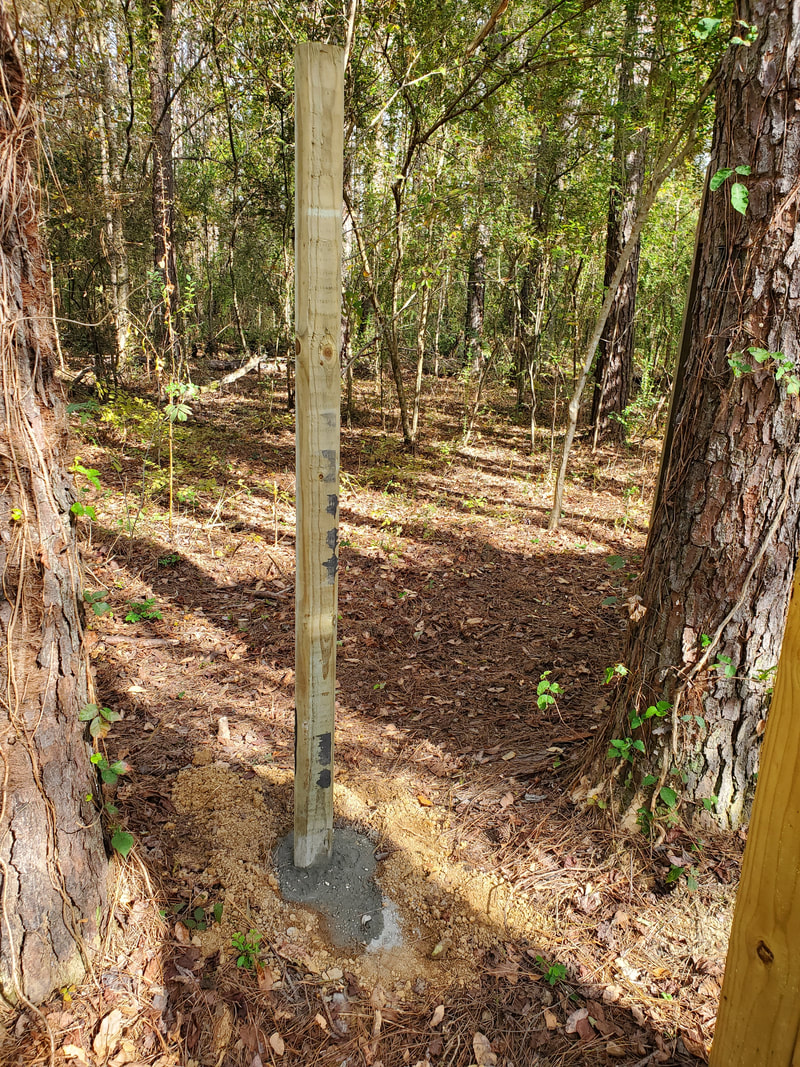 Rear post sunk in the ground with the side fence end showing in the right foreground. The tree to the right is where the rear fence ends. Using the level and the nailgun I was able to get the two 2x4's leveled and nailed in place at decent spots from top and bottom to accommodate the pickets that were soon to follow. I had some overhang as the spacing between the post and the end of the side fence was not quite six feet. Of course those pieces of 2x4 would come in handy later if I needed to add extension pieces to a post for 2x4's that didn't quite mate up to the next post in the line during the construction of a fence panel. 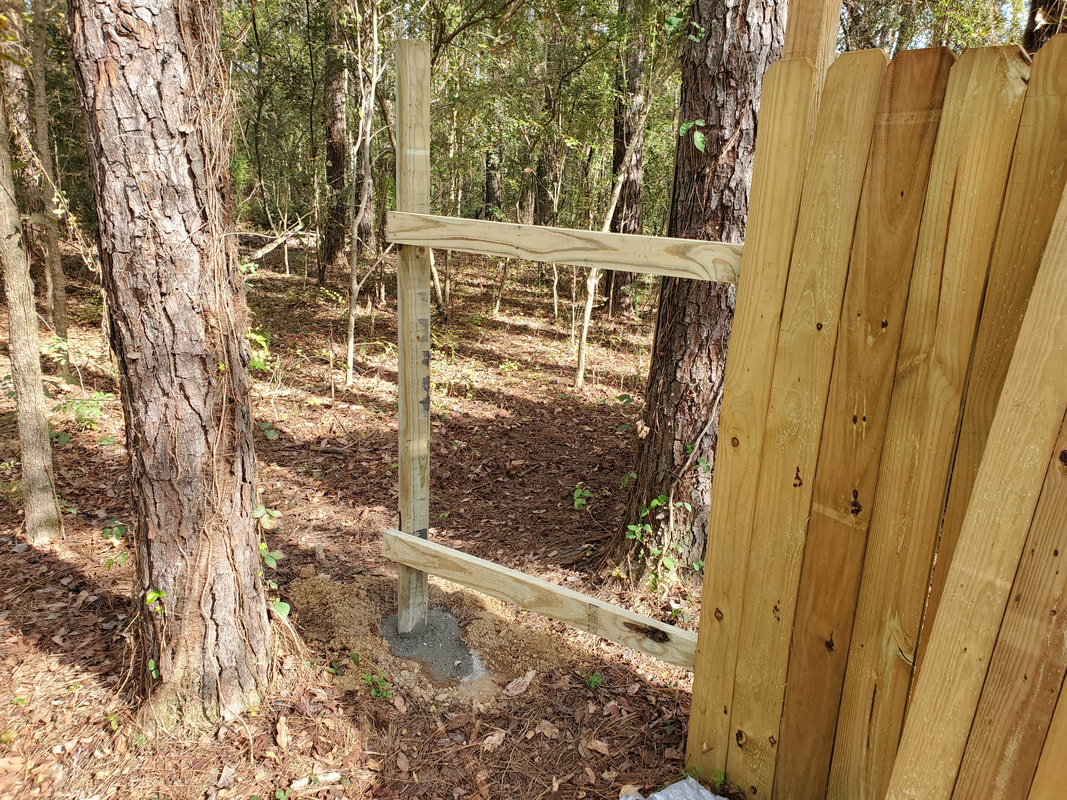 The 2x4's in place in the last space of the side fence, a slight angle can be noted from where the pickets and where the post is. From here the pickets went on pretty quick. As usual the nailgun made fast work of the installation. The ground was level at this point, there was no need to install the pickets slightly higher or lower than the last. With that, I was ready for the construction and installation of the rear gate. I just needed another gate kit though. 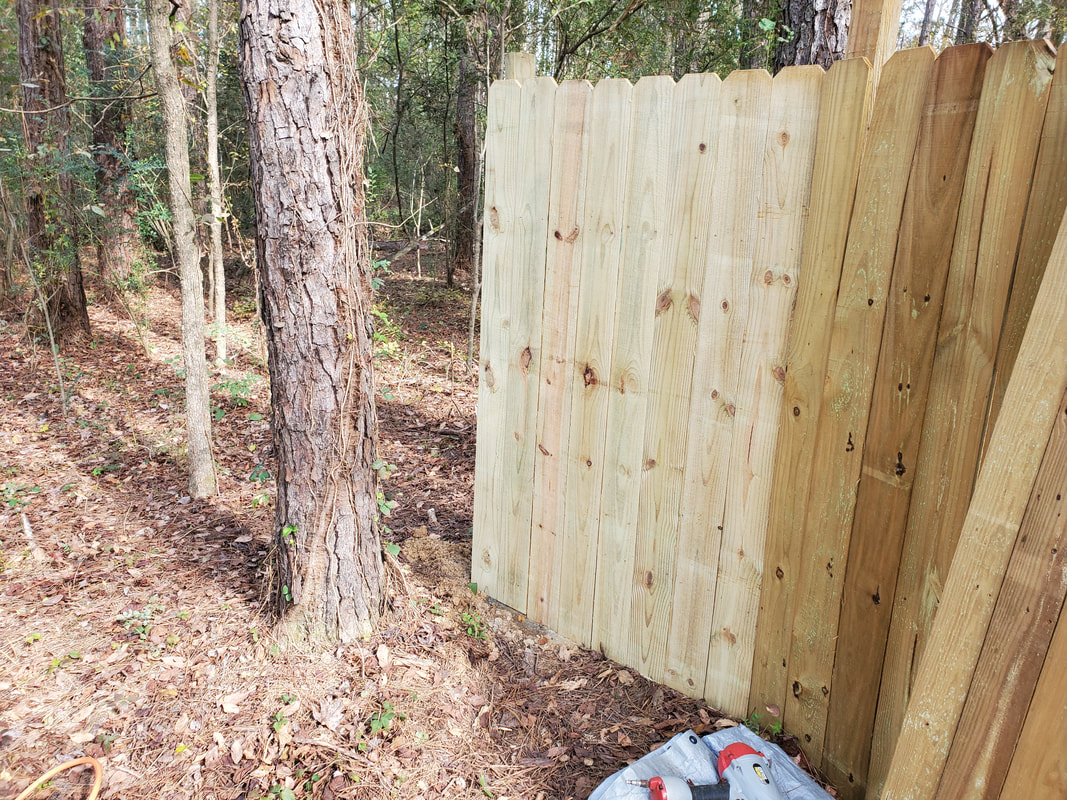 Fence pickets installed on extension to complete the side section of chicken yard fence. 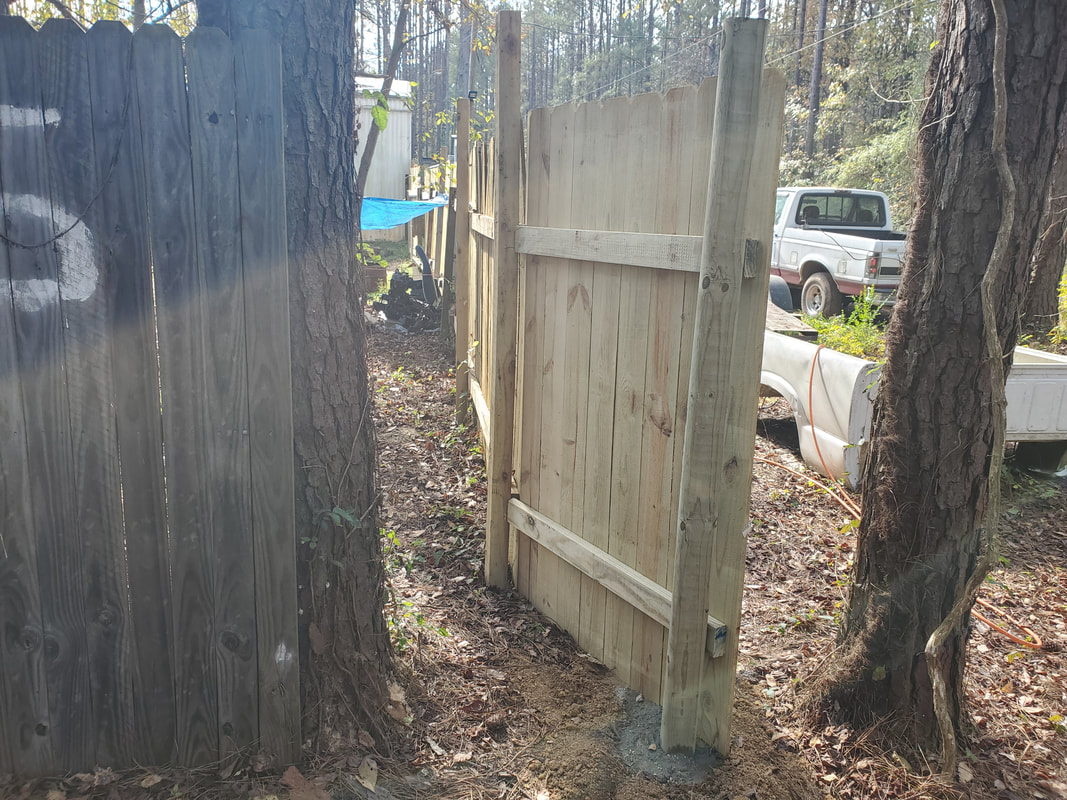 Shot of the rear opening of the chicken yard, note the angling of the last panel to the post. On a lighter note, I did manage to take time to get a little something done on the Mustang, which was install a new pair of mirrors. The driver's mirror was already broken while the passenger mirror was just faded and it would only be a matter of time before the plastic degraded enough to crack and break just like the driver's side mirror. I ended up ordering a pair online that were chrome covered, which kind of mimics the old school mirrors that were on this era of cars. Those mirrors were typically metal disc or slightly conical but were made of chrome plated metal. Even though these mirrors are the newer style bullet shape mirrors that would've been found on cars from the late 70's/early 80's, the chrome finish will be reminiscent of the 60's era. 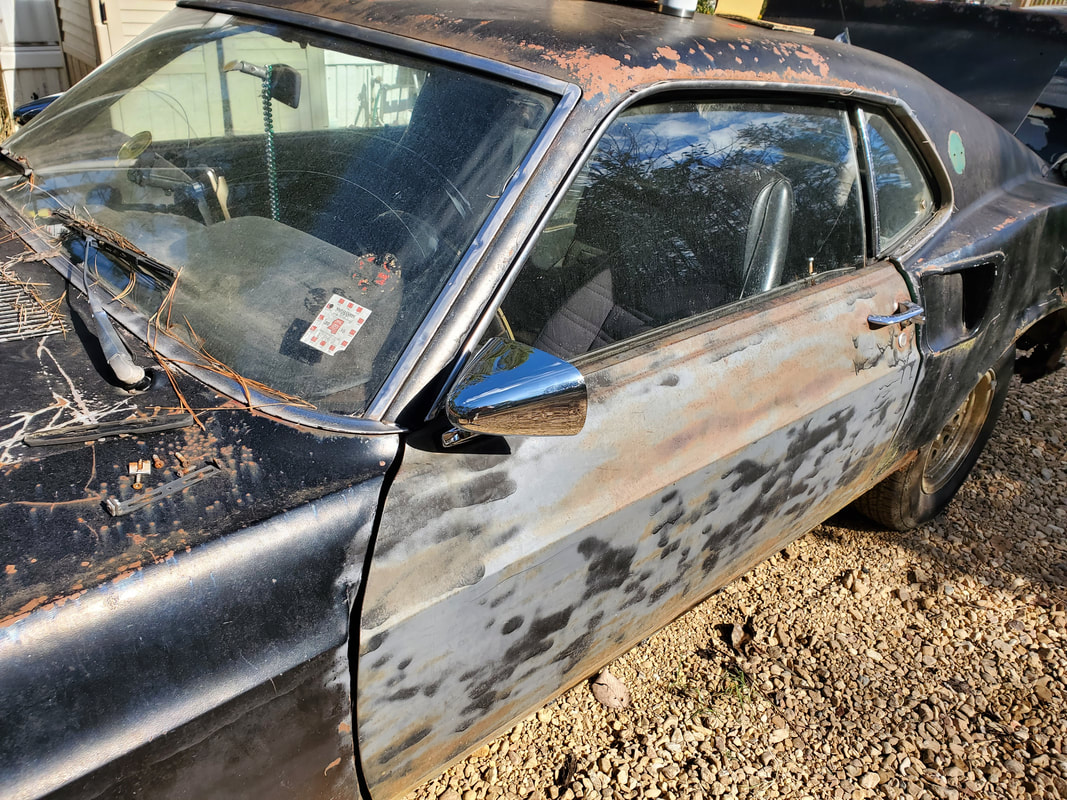 Driver's side mirror installed on Mustang, note chrome reflection of finish. 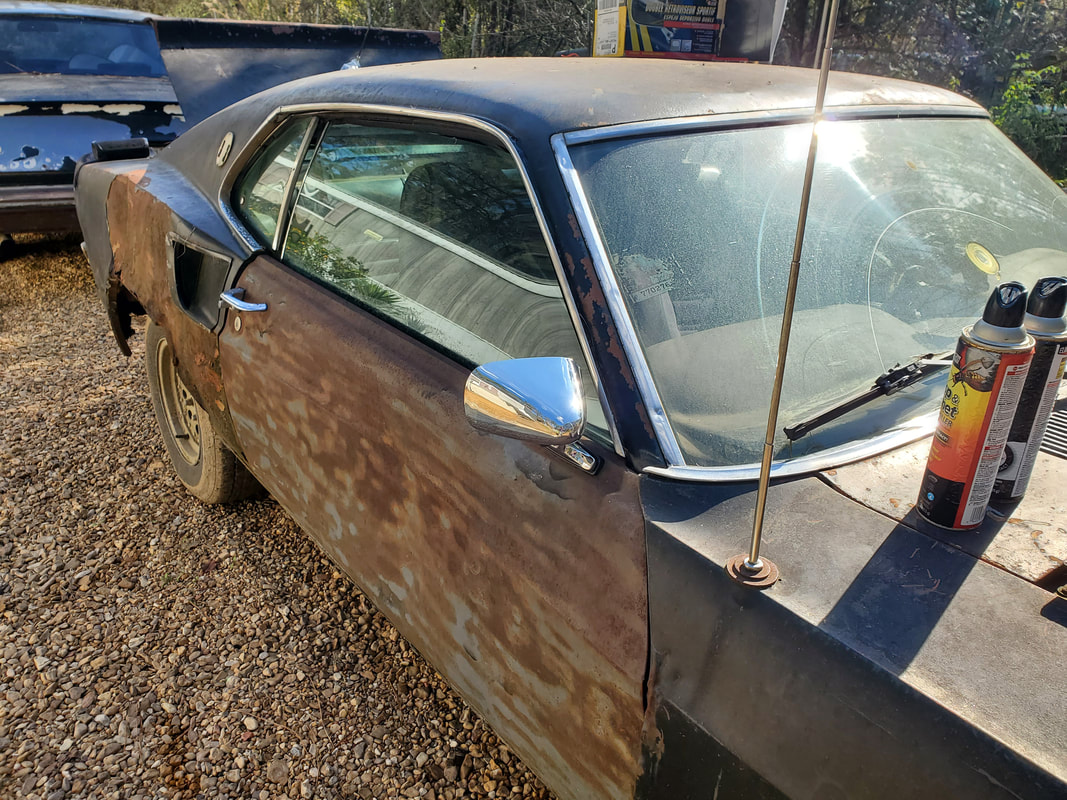 Passenger mirror installed. Chrome finish is more pronounced from this angle. As for the Mustang, the car's ready to hit the road again. I've been periodically running the engine to keep things loose and to just keep an eye out for anything that might need attention like an oil leak or tune up. Other than fully addressing the heat issue in the car, I will be able ride out anytime I need to during these cooler months. As for the fence, once I get the gate kit I can get to work on that, but at the same time I have enough fence pickets stocked up that I can start working on the other side fence that will fully enclose the chicken yard.
4 Comments
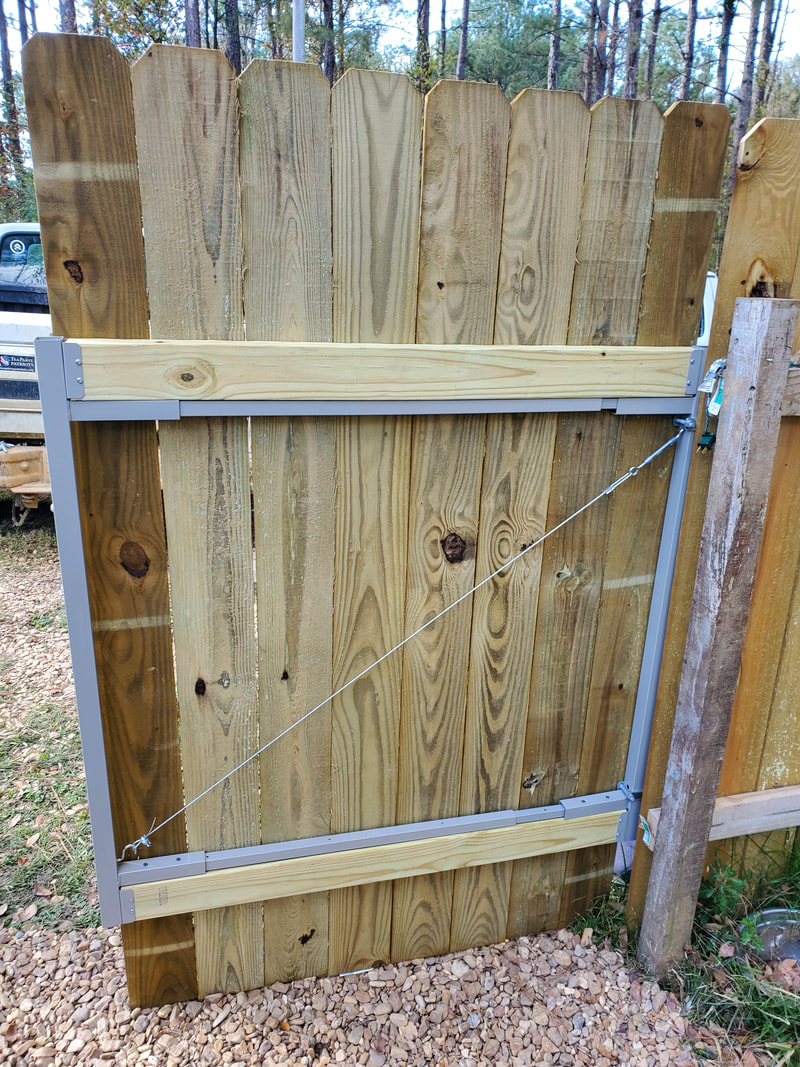
At this point I finally got around to hanging the two main gates for the chicken yard. These gates consist of kits we got from Lowe's which consist of metal frames with which you add 2x4's and pickets to complete the overall gates. The kits come with a turnbuckle and cable to help hold the square of the frame as well as hinge bolts that are screwed into the wood posts of the fence to hold the fence in place. The opening to the yard is approximately 8ft in diameter so each gate will be approximately 4ft wide.
I started off with the first gate, measuring the diameter to approximately 47 inches. Assembling the two main sections of frame, I spaced the bars that go between these two pieces. From there I drilled holes through either end, using the already made holes in the two main sections as guides to poke the holes through the bars. From there sheet metal screws held the bars together with the two main pieces, making the square frame. From there I measured, cut and slid the 2x4's into the slots on either end of the frame, securing them with wood screws. 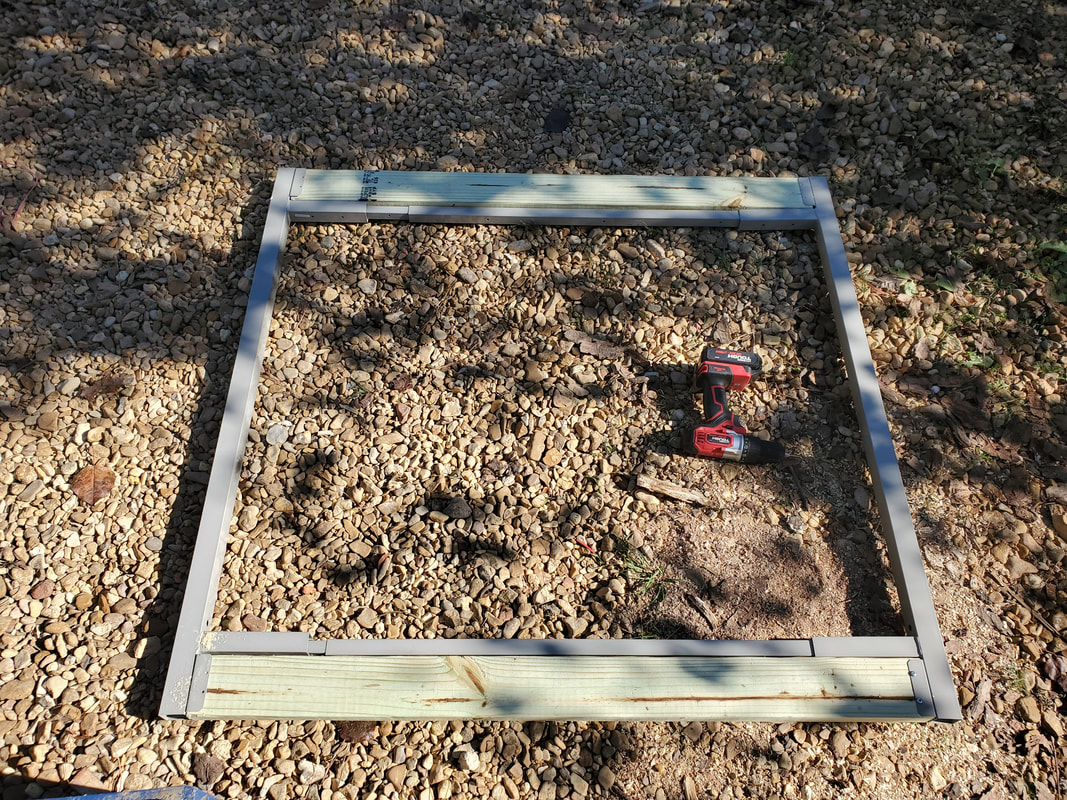
Gate frame assembled with 2x4's installed.
From there I added the turnbuckle and cable. This consisted of a turnbuckle with a hook on one side and an eye bolt on the other, the cable, and a cable clamp with another hook. Holes on the frame allow for the hooking of the turnbuckle and other hook. This whole assembly didn't take no time, just tightening the clamp after putting tension on the cable. After tightening the clamp I tightened the turnbuckle to put the necessary tension on the assembly. 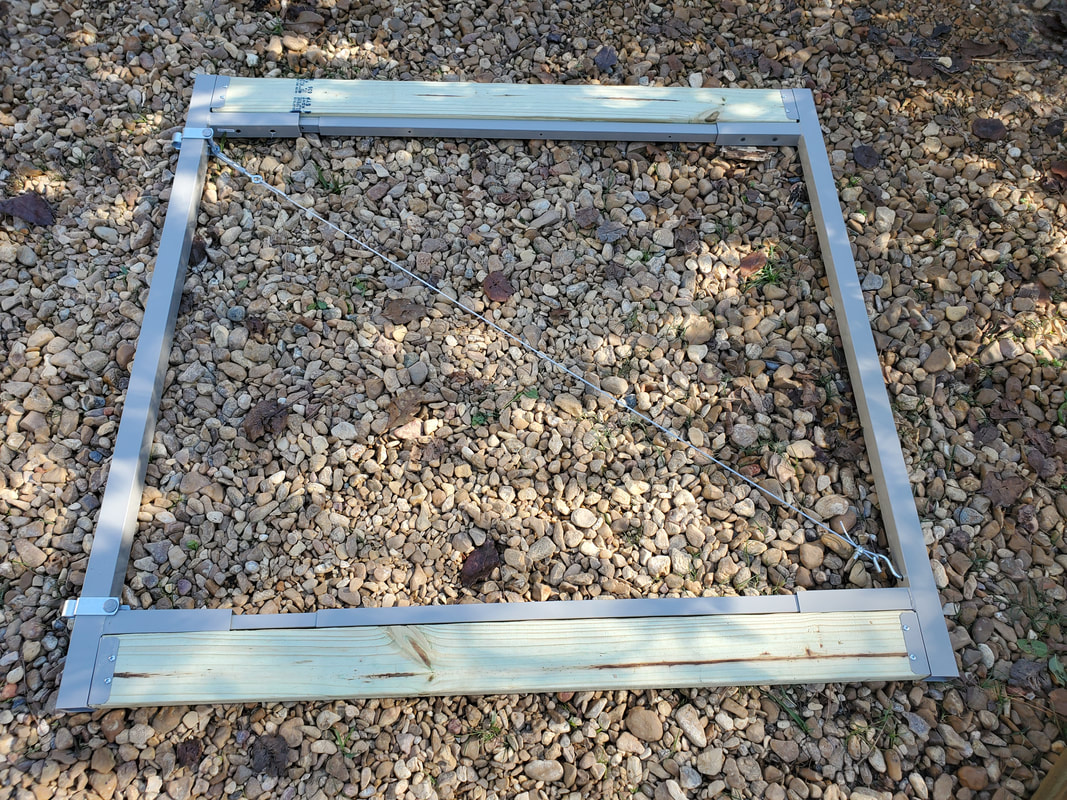
Frame with turnbuckle cable assembly in place. Frame looks like its not square since the picture was taken at a slight angle.
Next came the hinge brackets and pickets. The hinge brackets were just a simple clamp with a loop to go over the end of the hinge bolt. This clamp is held with a carriage bolt to tighten it to the gate frame. As with the regular fence panels, the nailgun made fast work of the pickets, tacking them on in no time. With the gate more or less assembled, I had to line the gate up with the fence post so I can mark where the hinge bolts needed to go. From there I used a 1/2" spade bit to drill the holes in the post to allow me to screw the hinge bolts in place. From there We were able to hang the first gate in place. Making sure of the height before putting the bolts in place allowed for the first gate to hang at the right level where it can free swing without hanging on the gravel below it. 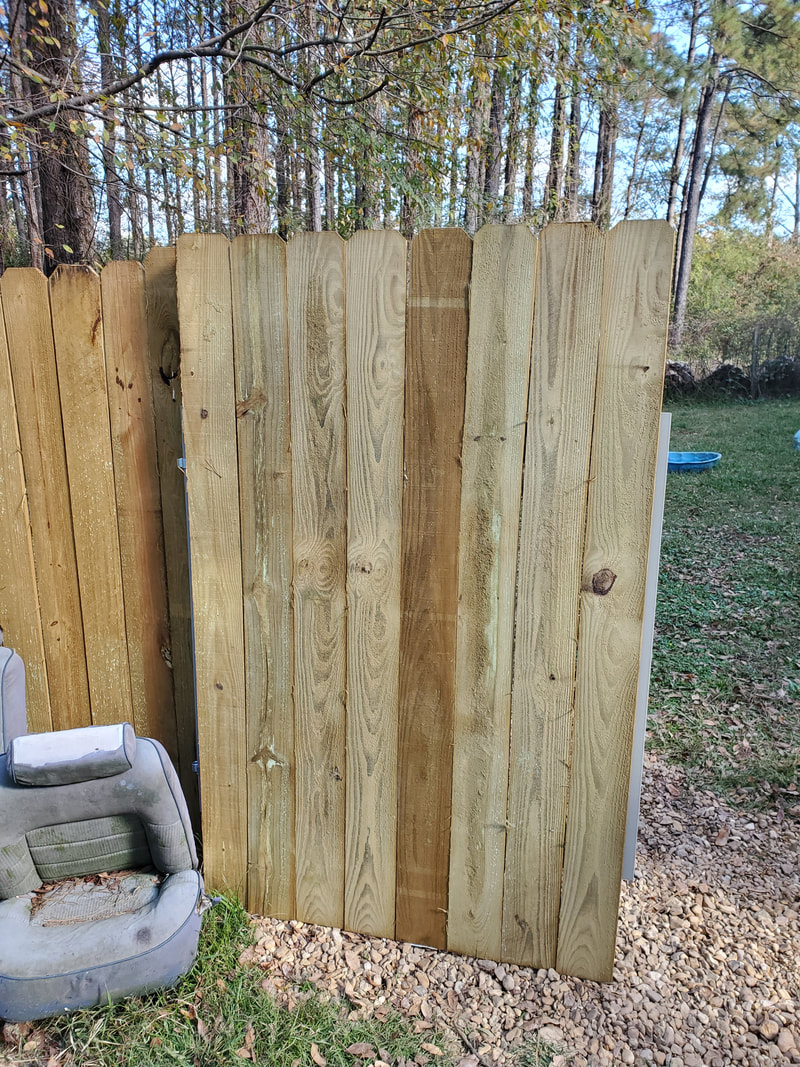
Lining up the gate prior to hanging.
Left gate hung on hinge bolts. Note latch half on right part of frame.
Inside shot of the completed gate after hanging it to the fence post.
After hanging the gate I also added one part of the latch pair, the shaft that latches into the actual catch. This was held in place with self tapping screws. Now as for the next gate, I did something a little different. Since the whole complete gate was heavy and took two of us to move it in place easily, I figured I would just assemble the frame with the hinges and hang the frame bare then tack on the pickets with the gate frame in place. This ended up being a way smarter idea. 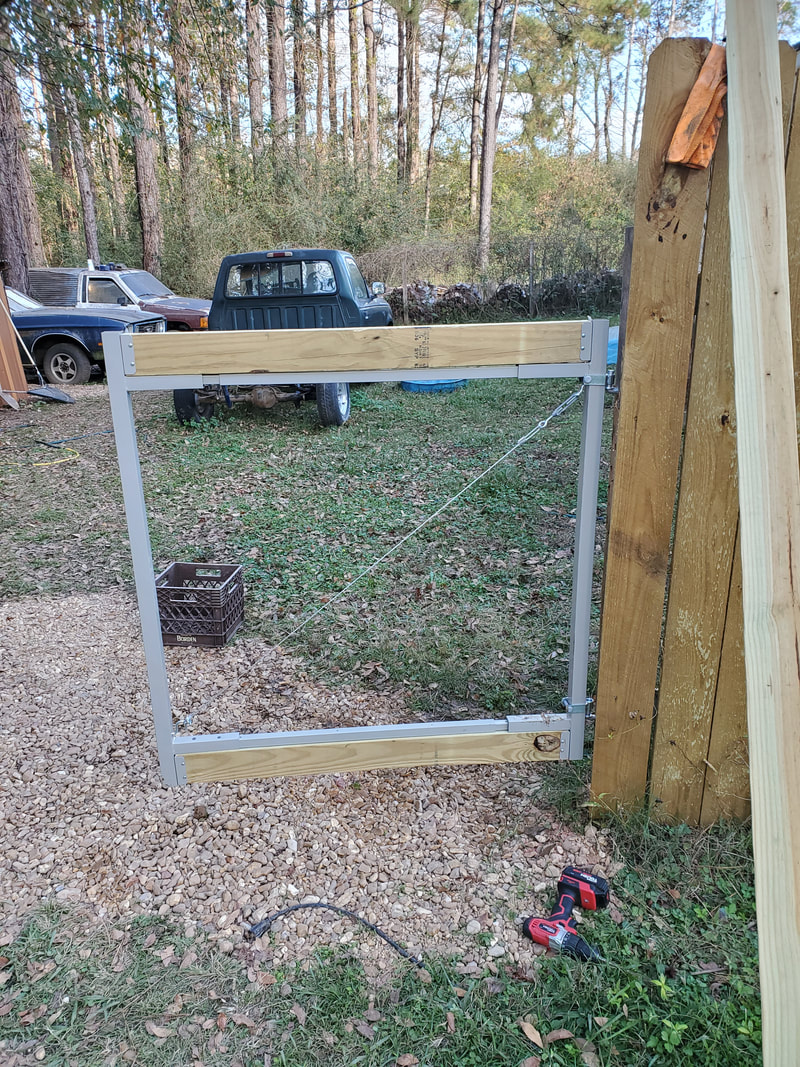
The second gate frame built with the 2x4s in place and hung to the fence post.
Even though hanging the pickets took no time there was a slight problem with this gate. The ground right under this gate is actually at a slight grade, causing the bottom of the gate to drag when we opened it to the outside of the chicken yard. This ended up requiring me to cut the bottom of the pickets at an angle and testing the opening of the gate to see how the bottom scraped the ground, trimming as necessary to ensure that the gate can open while not removing too much material from the bottom of the pickets since this gate is here to keep chickens in and other animals out, for the most part. After a few trims I managed to get the gate set up where it can open properly about 80% of the way to the outside but can open all the way to the inside for when we have to move something large like one of the car coops or something of similar width in or out. Lastly I added the other half of the latch pair so the gates can be latched closed, plus I took a couple of handles that were actually salvaged from the one chicken coop that was falling apart, and screwed them to the gates at the point where the 2x4's were to allow us to be able to open them with ease. The only things left to do at this point were to reinforce the fence posts so they don't move under the weight of the gates especially during opening/closing. 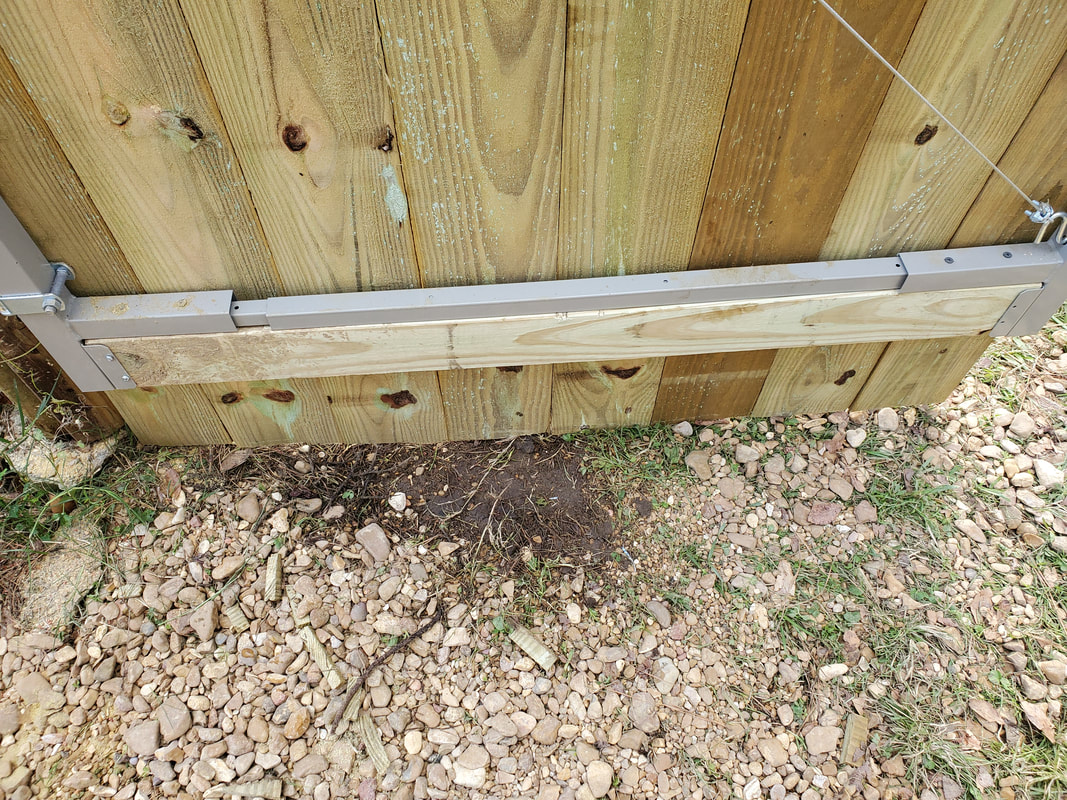
Bottom of gate after trimming pickets to allow for movement of gate.
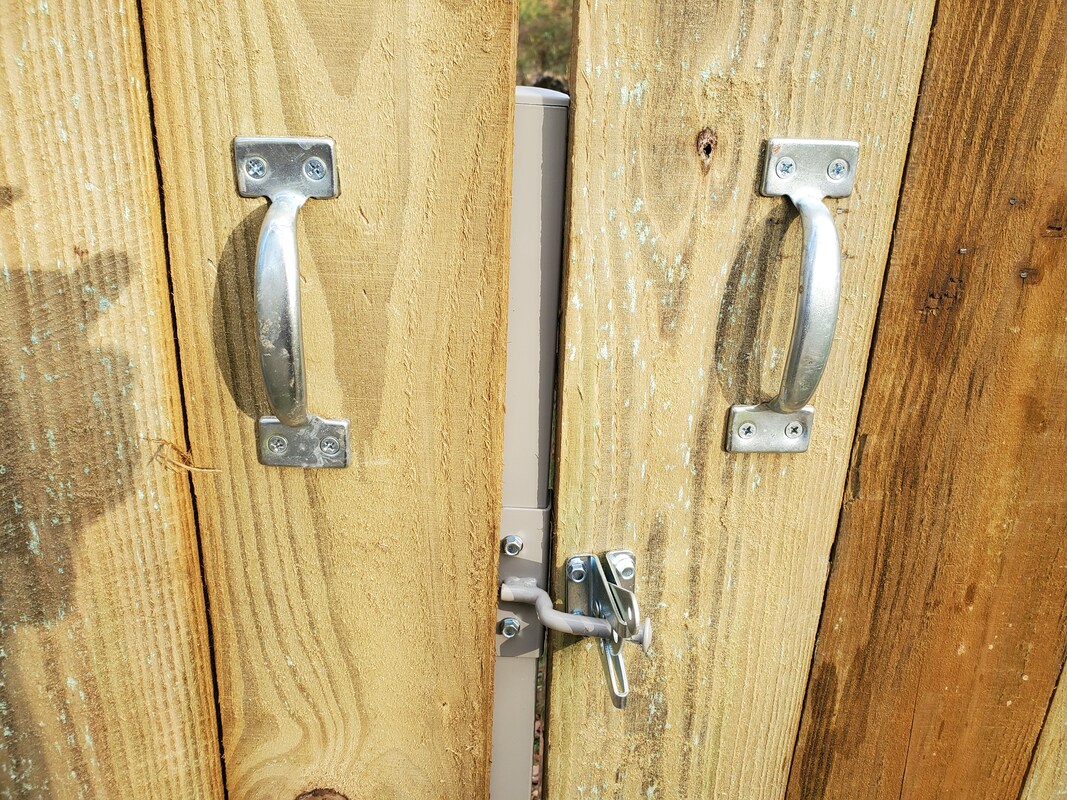
Closeup of the latch assembly and door handles on the gates.
I had some leftover fence posts, approximately 2" in diameter that would serve the purpose of reinforcing the wood fence posts. Using large pipe clamps with some extra 2x4s' for spacers would hold the posts up against the wood fence posts. I pushed each post into the ground just outside of the cement anchor of the wood posts and pounded each metal post in further with a sledgehammer. I probably hammered each post in a good 2 ft to ensure a good solid anchoring. From there I nailed a short piece of 2x4 to the wood fence post then the clamps pulled the wood posts against the metal posts, ensuring they won't swing and move around with the use of the gates. This will ensure that the gates will close properly and not bind up. 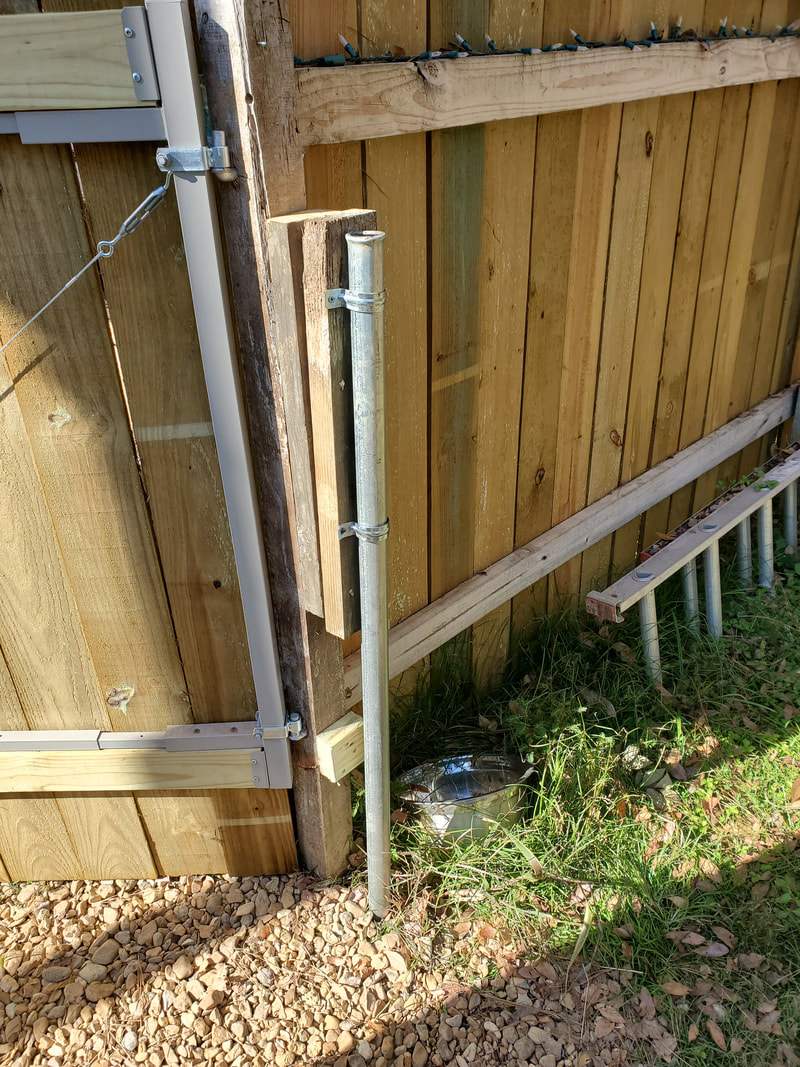
Metal post hammered in the ground with a spacer board between the wood and metal fence posts to create a solidly mounted gate post.
The second gate's anchor post with spacer 2x4 and pipe clamps.
With the main gates hung now the next course of action is to start installing the sections of wood fence to close in the opposite side of the chicken yard, where the back fence will connect up with the house, fully enclosing the chicken yard. Lastly, a small rear access gate will need to be installed that will allow for anyone to be able to access the chicken yard for tending to the chickens without having to pass through the main yard. This is important as once the main fencing is up, we will have yard dogs roaming the grounds within (minus the chicken yard) so this gate will allow for anyone we have watching our chickens in our absence to be able to access the yard without having to worry about the dogs.
With the work going on in the chicken yard one of the bigger things that needed to be done is covering the grounds with gravel. With the large area of sloppiness, gravel is very important in this section of the grounds. Of course because of the size of the area, just like with the driveway its going to take a large number of loads to fully cover this area as intended. I've already been dumping gravel down in some key areas and am spreading out from those areas to gain more coverage. The area in question this time is the area just behind the Chicken Truck and to the left of said truck. Behind the truck is a large super sloppy area that will suck a shoe off your foot if you step in the right muddy spot. The areas around the truck aren't sloppy but I may as well go ahead and cover them up since they are around the truck and eventually cleaning mulch out and possible water leakage will make the ground soggy. Better to get it addressed before it becomes an actual problem. 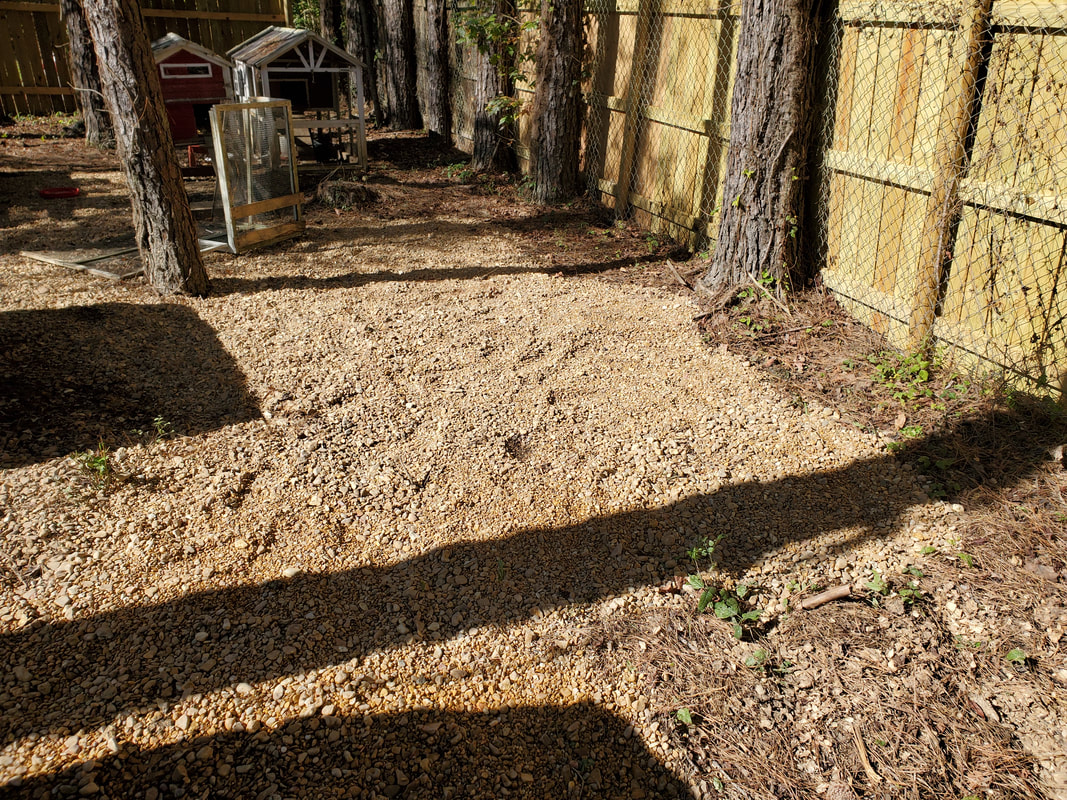 Sloppy area behind Chicken Truck that needed gravel badly. 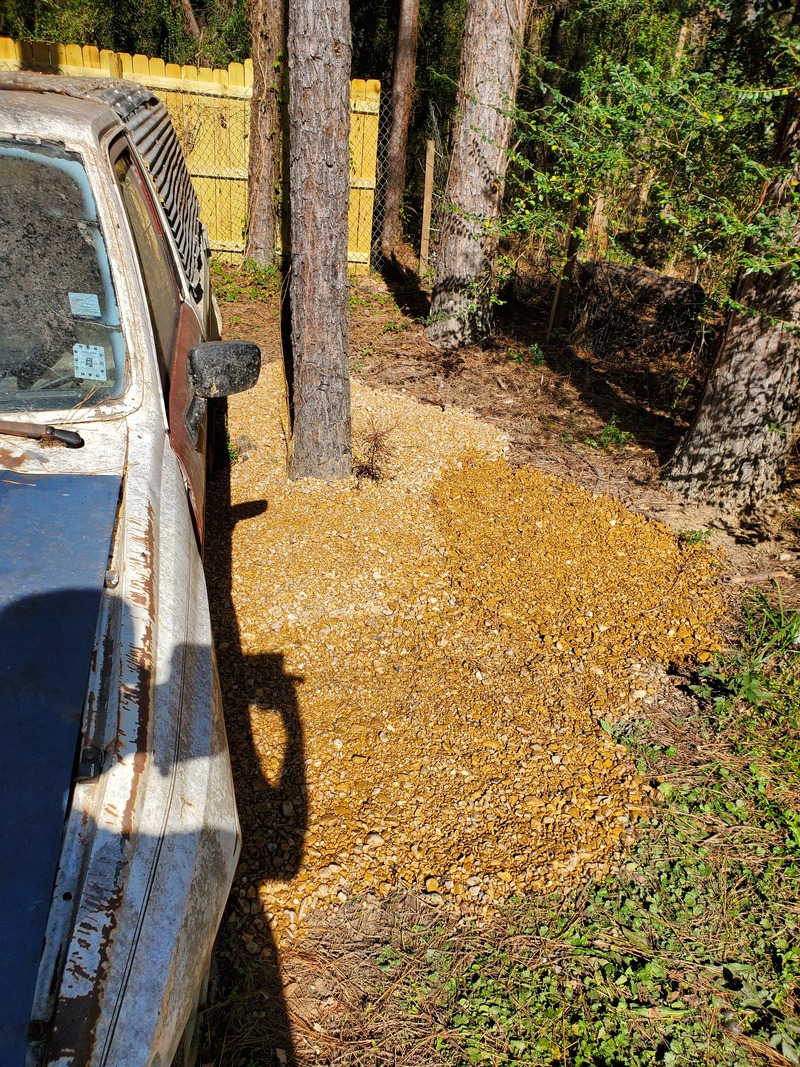 Area to left of Chicken Truck that wasn't sloppy but still got covered since it is next to truck and will be a high traffic area. 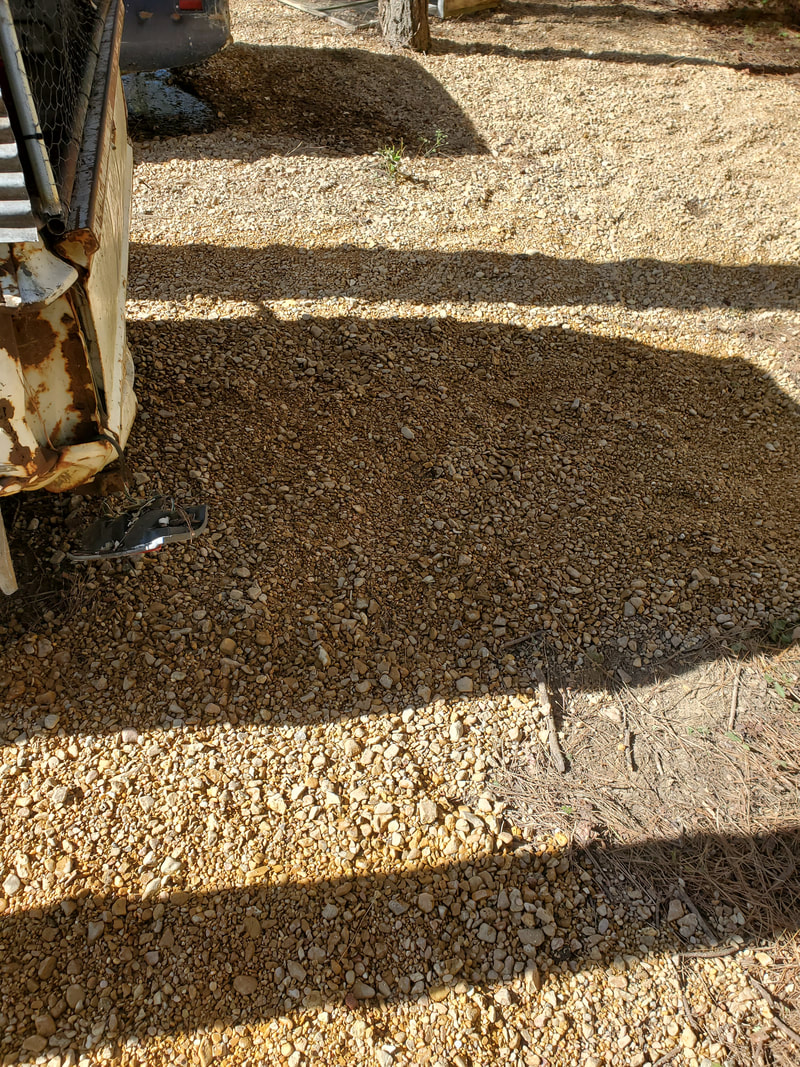 Area immediately behind Chicken Truck. This area was sloppy as it was draining over into the main sloppy area. In addition to getting the gravel out, there was more firewood to be processed. After having done a load of wood recently, We had another stack that needed cutting and splitting. Making up another pile of wood, we've expanded the firewood piles to the point that firewood is being stacked further and further away from the original firewood shed. Of course this means that we will never want for firewood for any reason in any case. This load was cut shorter as some pieces were a little too long for the stove and the splitter made more work of the wider logs. 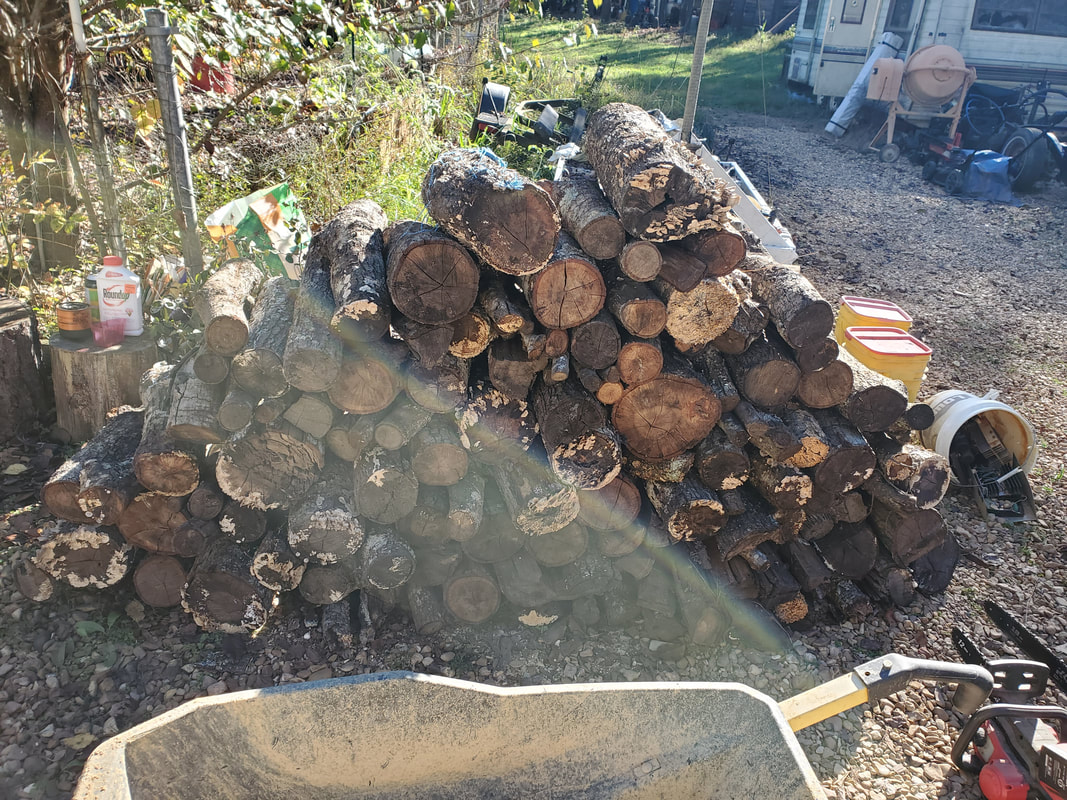 Another stack of firewood to process. 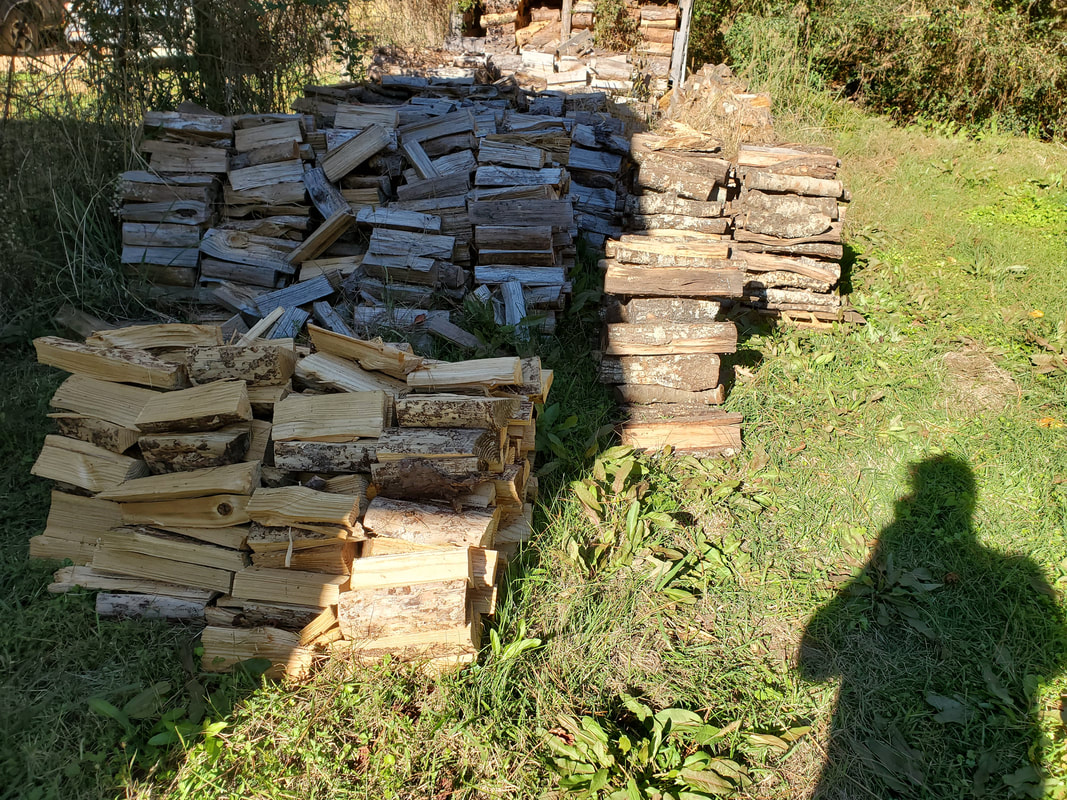 More stacked firewood, the pile grows.... With this stuff done the next thing that will be worked on is making the gates for the chicken yard. We have the gate kits in hand plus the necessary wood (2x4's and fence pickets) so now we can work towards closing in this area so the chickens can be free ranged within the yard safely. With all of the things that I got set up on the Chicken Truck there ended up only being a couple of things left before I can really say I'm done. After putting the hatch on the bed cover I moved the chickens into the truck but still needed to get the electricity flowing into the truck. As stated before I had to install an outdoor outlet to plug the two cars up to. This involved me taking a surplus outlet box I had laying around and bolting it to the tree that is between the two car coops. Now I had already buried an extension cord leading up to the Mustang Chicken Coupe to supply power to it. Since there's two cars now, I ended up taking the extension cord and routing the cord that was above the ground over to the tree and burying it under some gravel before cutting the plug end from it. I ran the cable end into the bottom of the box and wired it up to the outlet. In the future as I bring more gravel to the site the cable will be further buried. With this I was able to plug the two car coops to the outlet. 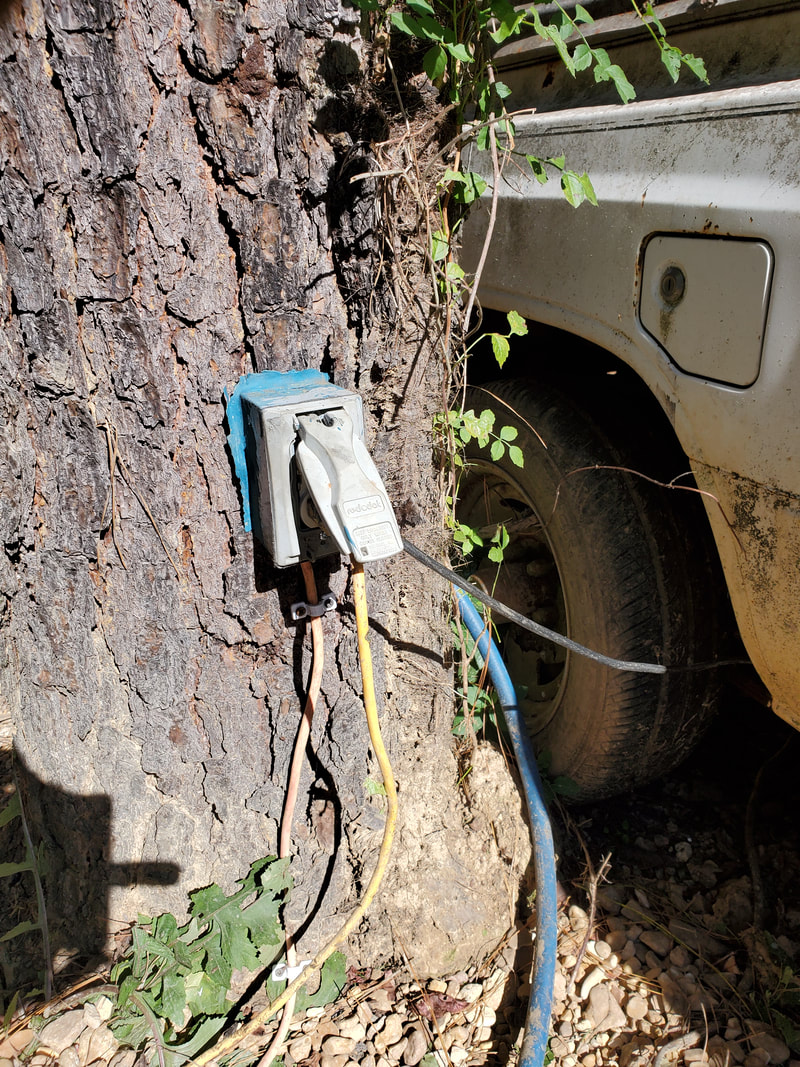 Outlet box secured to tree. Note orange extension cord under box that is secured to tree via screws. This is the buried cord that's supplying power to the box. The other cords going to the box are the plugs from the car coops. With the plugs in place and the garden hose made up to supply water to the water bucket, the Chicken Truck was fully online. We had already put mulch in the bed, the cab floor and engine bay before throwing the chickens inside. I had already installed the heater and LED light bulb so all of those things were ready to go as well. Lastly we put the large feeder in the cab so the birds will be able to eat. Now I will probably end up installing another light fixture in the bed under the bed cover to make use of the other switch in the cab but then again I may just swap this over to a switch/outlet box and use the other outlet to plug up a circulation fan to move air between the cab and engine bay. Until then I will just roll with the current setup. 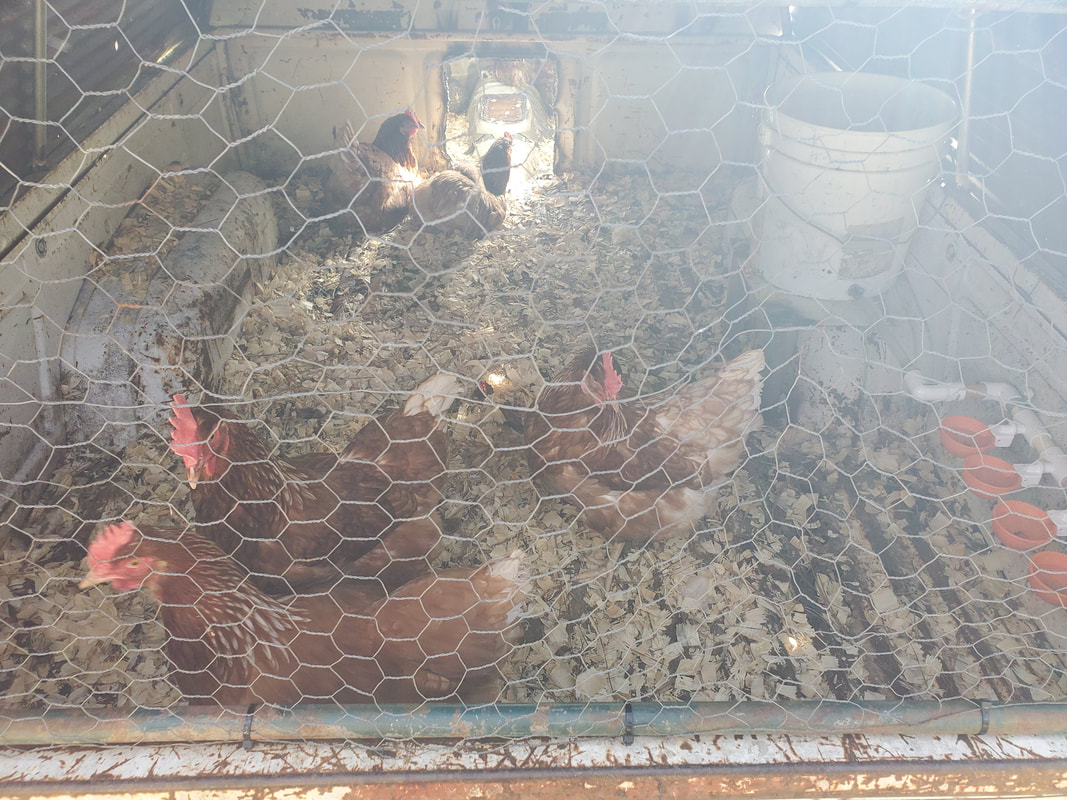 On a lighter note, since the bad chicken coop was now vacant, I removed the gravity feed drinker cup watering setup and swapped it over to the coop that has a single duck in it. Since the duck was using a regular pan for water, putting the drinker cup setup will give the duck an automatic source of water on top of a bucket for her to play in. This little task was done pretty quick since all of the apparatus was set up. I moved the bucket to the top of the coop on the screened area near the door. I wire tied the drinker cup assembly to the side like I did on the other chicken coop and hooked the hose up from the drinker cup assembly to the hose barb under the bucket. Afterward I wire tied the hose to the mesh side to keep it out of the way. With that, the water setup for the duck was ready to go. 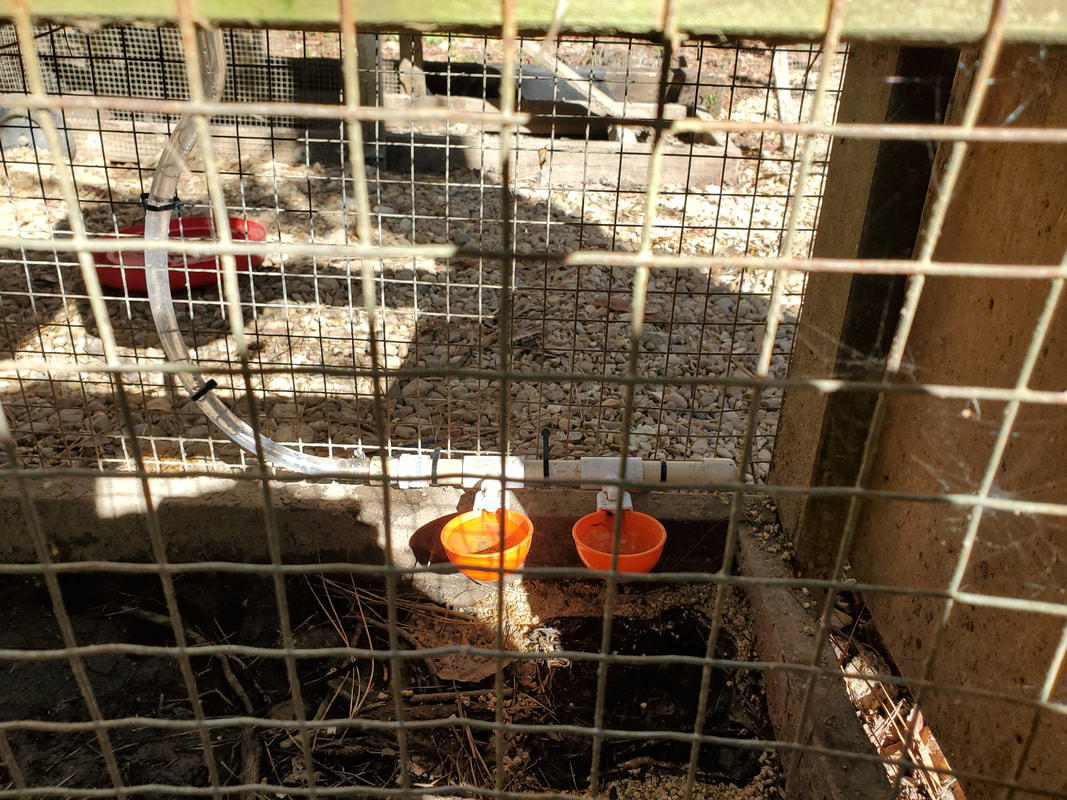 Drinker cup assembly attached to mesh side on duck coop. Note hose wire tied to mesh side. 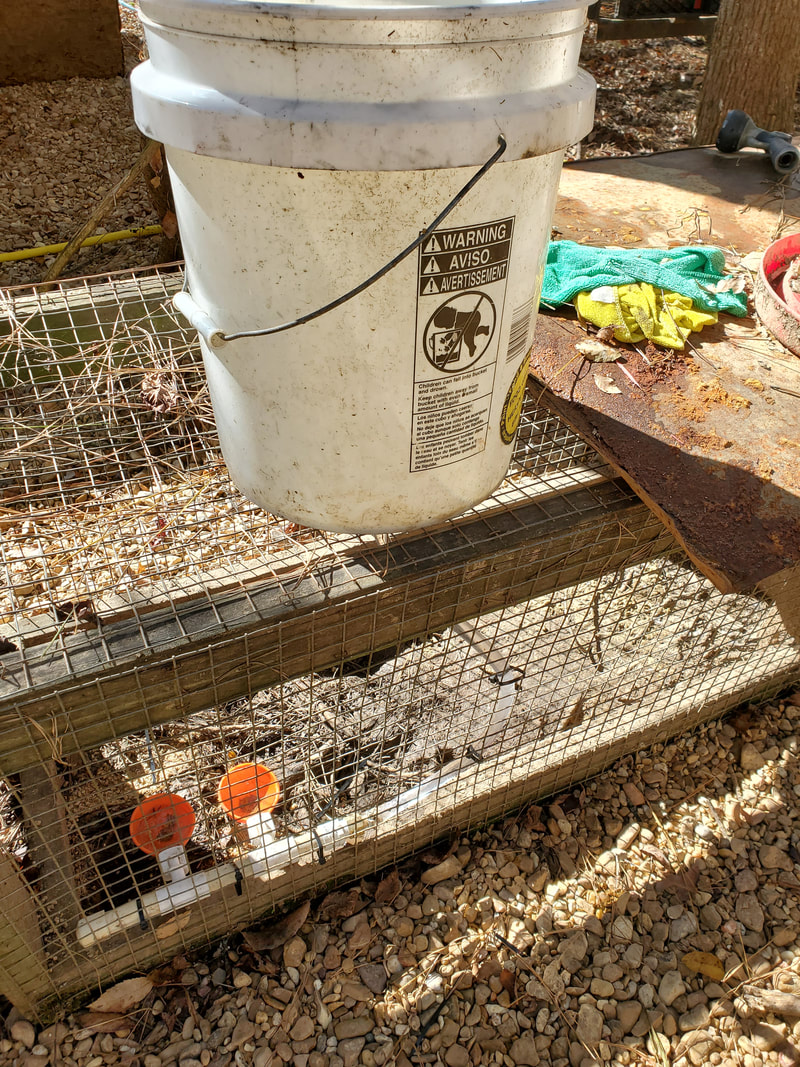 Bucket atop duck coop, note hose running down to drinker cup assembly. With the water supply done for the Chicken Truck the next and pretty much last thing I had to do on the truck itself was make a cover or shell for the bed. Unfortunately I couldn't find a camper shell that would fit this bed so my next option was to make one from scratch. Since I had plenty of scrap metal laying around this wouldn't be hard. My plan was to make a frame using conduit, welding everything together then cladding the frame with some corrugated sheet metal I had salvaged from some past outbuilding demolition. I started off with making what I would like to call "ribs" of the frame. These are the parts of the frame going across the truck bed from left to right. I used a pipe bender to bend the long pipe to have the same angles as the cab itself so when I put the frame together and cover it with the sheet metal, the lines will flow seamlessly from front to back, compared to if I just made a shell that had 90 degree angles, like a box. I got one rib done and welded the ends of the pipe right to the top of the bed right at the front, ensuring that the bends and angles match up to the cab. I even did some light welds to the back of the cab to keep everything solid. 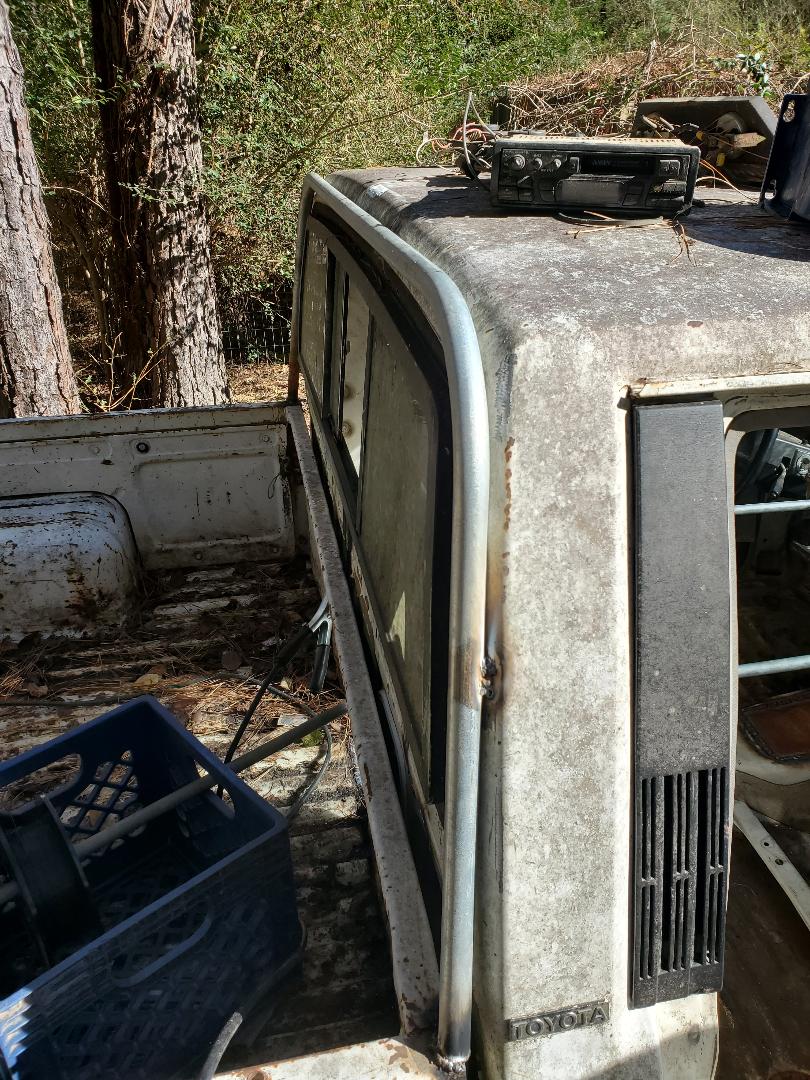 First rib of bed cover frame bent and welded in place on the bed and back of cab. I did this same thing two more times, putting a rib at the back of the bed over the tailgate and one mid ways between the front and back. From here I welded four lengths of pipe laterally along the top of the ribs on the left and right sides, connecting the ribs together to complete the overall frame.  Middle and rear rib frame sections welded in place. 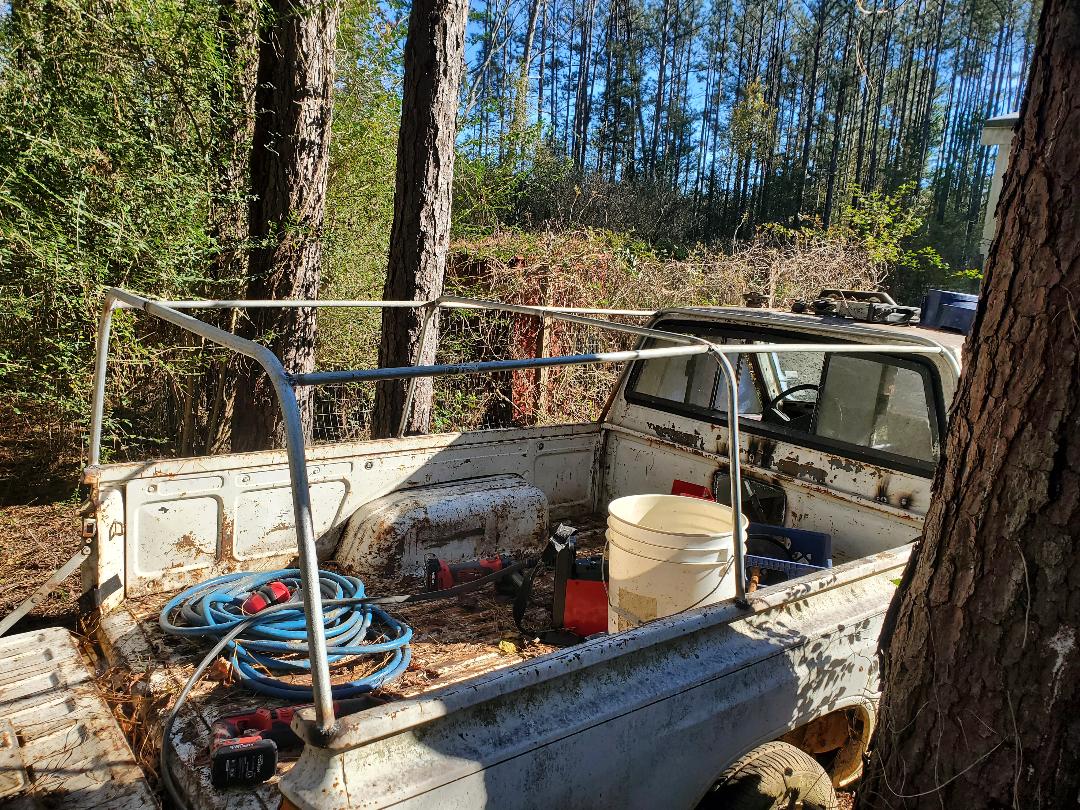 Connecting pipes between rib sections completing the overall framework. With the frame done I pulled out the corrugated sheet metal. These sections were about 8ft long, far longer than the bed of the truck. This made things easier as I only had to secure the sheet metal to the frame laterally, not having to overlap sections as I work my way back. I only needed four sections of sheet metal, one on each side and two across the top, overlapping the left and right side sheets so any rainwater runoff will run over the side and not leak down into the bed. Using self tapping screws going through the sheet metal and into the pipe frame, I was able to get the covering completed. All I had to do from there is saw off the overhanging sheet metal flush with the rear section of the frame to complete that part of the cover. 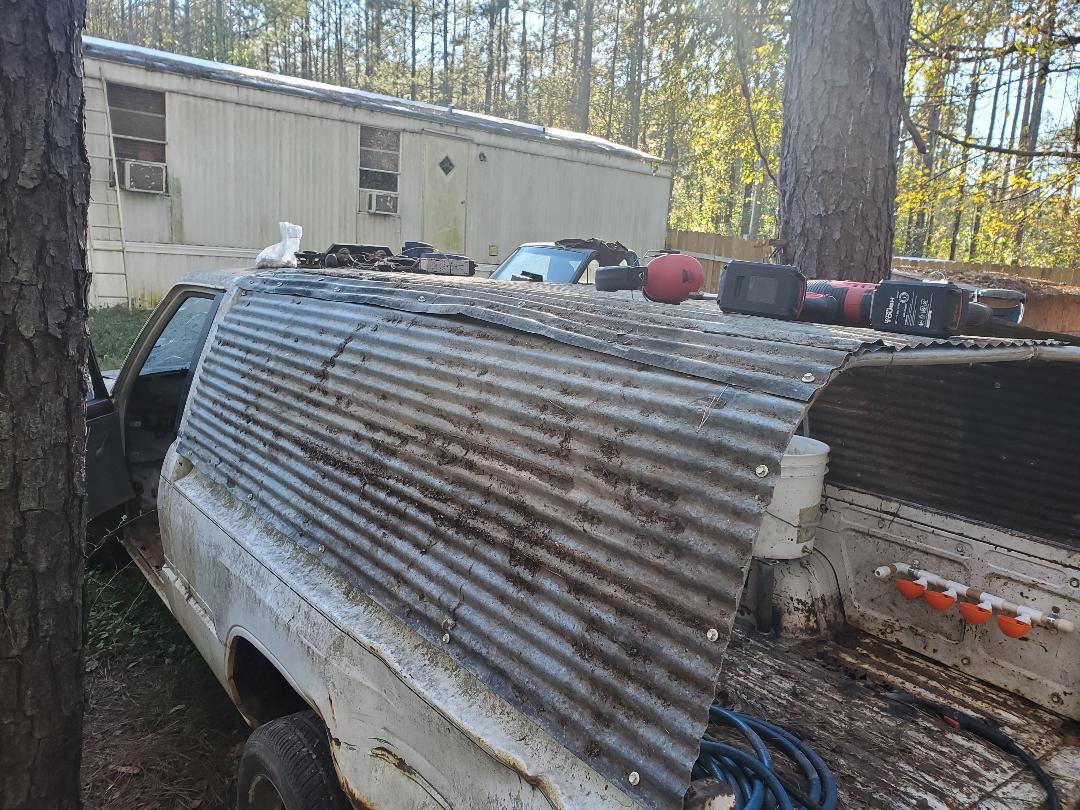 Left side shot of bed cover. 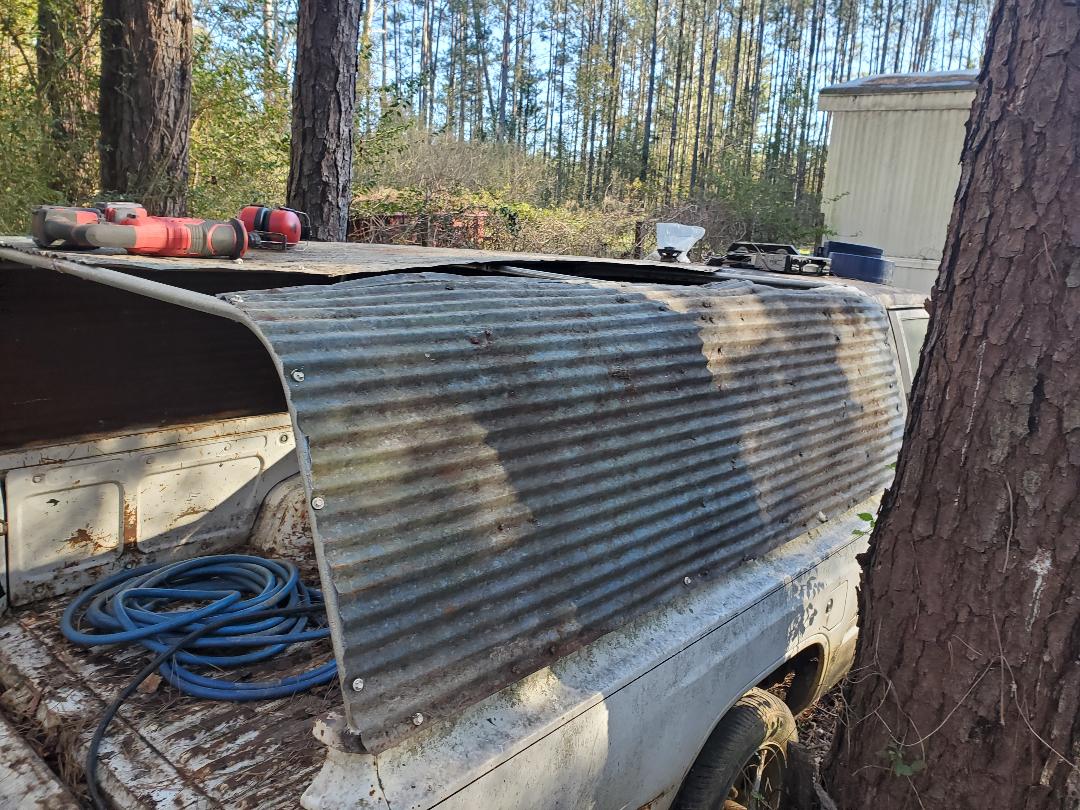 Right side shot of bed cover. 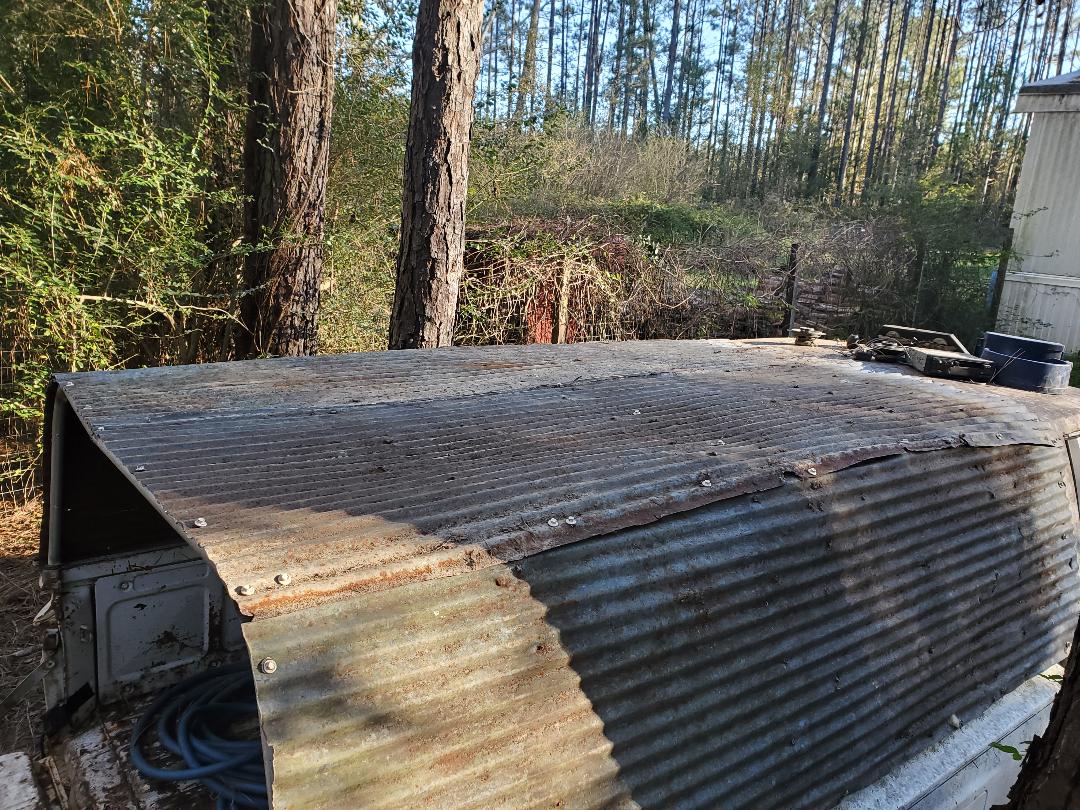 Shot of top of bed cover.  Shot inside bed with cover in place. The last part of the project is the hatch for the bed cover. Just like the bed frame, it too was made from conduit. I made measurements of the top and bottom of the opening and the sides so I could cut four pieces of pipe matching these dimensions. I laid the pipes out in the shape to match the opening to the bed cover and welded the frame together. I test fitted the frame to verify that it would fit in place in the opening of the bed cover then went ahead and welded on a pair of hinges to the top corners of the frame. Finally I took some scrap chicken wire and wire tied it all around the frame, trimming off the excess before hanging the hatch in place. 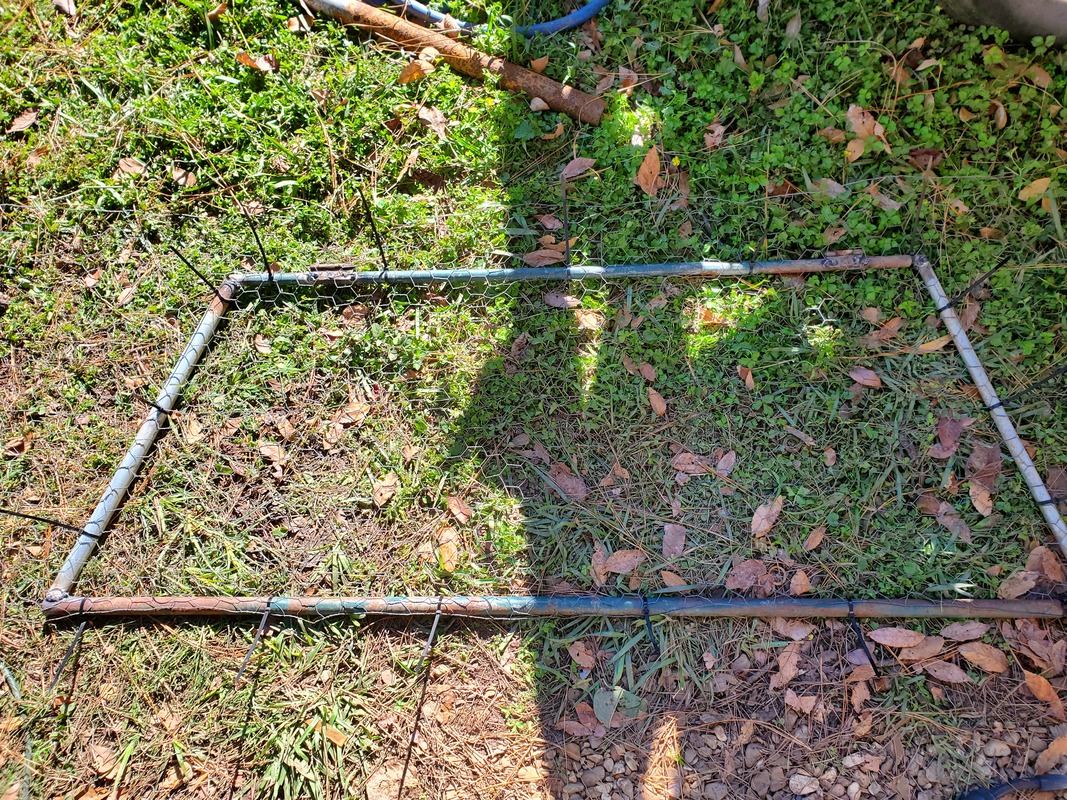 Hatch welded together with chicken wire zip tied to frame, note hinges on top portion at left and right corners. With that I went ahead and lined up a point on the sheet metal from the inside where the pipe would make contact from the water bucket and drilled a hole through the metal. I assembled the pipe and pressure regulator and poked it through the sheet metal, screwing it in place in the float valve. I made my custom garden hose as stated in the previous post so I can connect the regulator to the Y pipe down by the Mustang. When I turned the water on the float valve worked just fine after making a last minute adjustment to the float, filling up slowly with no extreme pressure. Once the water level pushed the float up it softly shut the valve killing water flow into the bucket. The water had filled the drinker cups slowly already so at that point everything was ready to rock and roll. 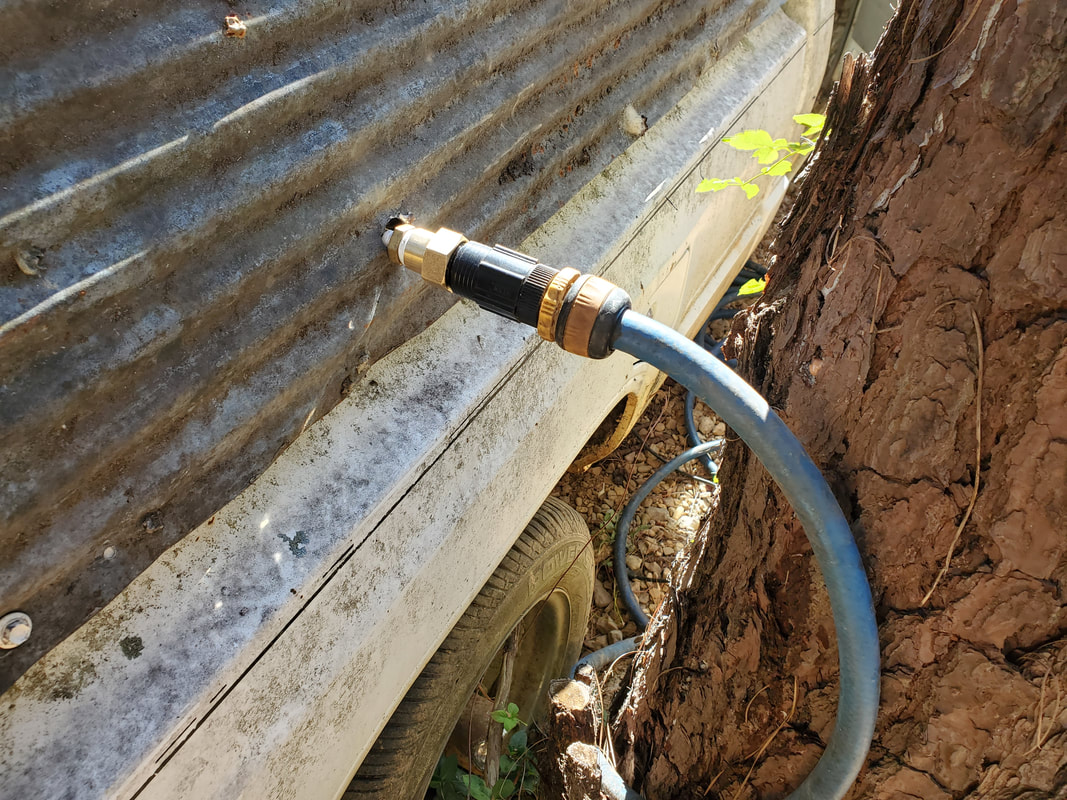 Pressure regulator and pipe nipple inserted through hole in sheet metal to float valve. Garden hose is attached with repair fitting end on hose going to regulator. 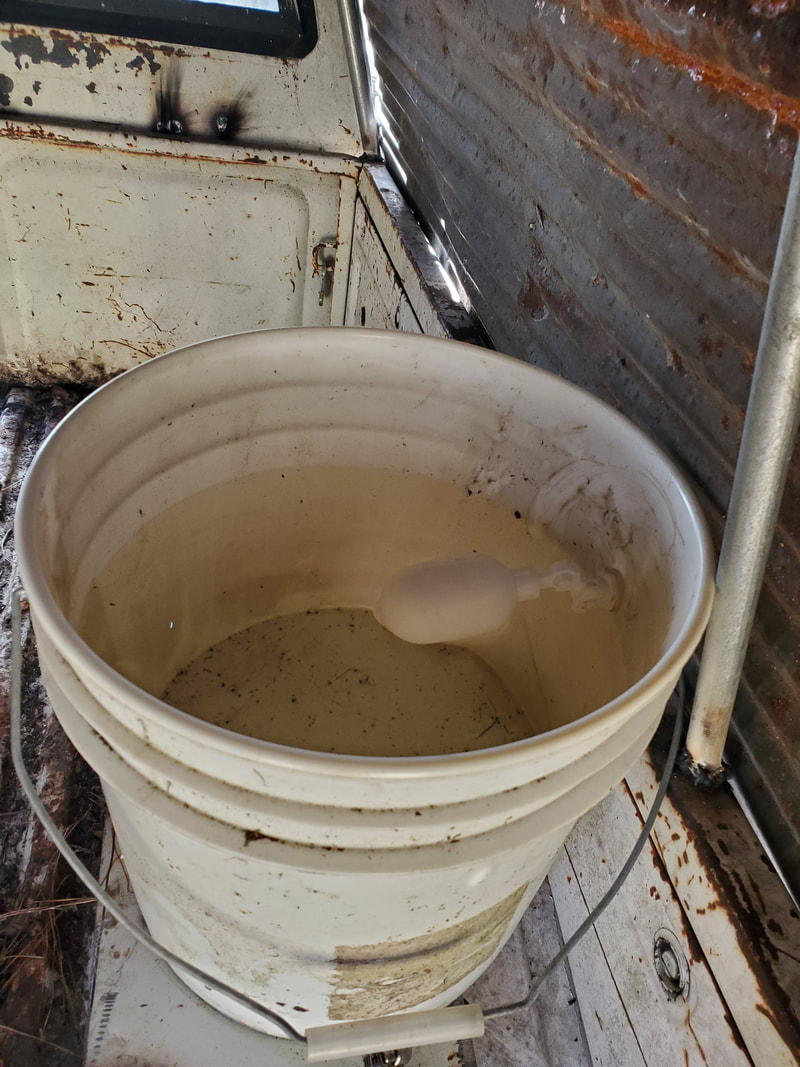 Water bucket full after float valve did its job of filling the bucket. All that's left now is installing the outlet box and hooking the power cord I currently have in the ground up to it and plugging both cars up to get everything powered up. We have to add mulch to the truck then finally move the birds into their new home.
With things done in the cab the next move was getting the water system set up. This would be similar to the Mustang Chicken Coupe in that it uses drinker cups that automatically refill but the difference is that this system will be like the temporary systems I set up for the two chicken coops where water is gravity fed from a bucket into a PVC manifold that holds several drinker cups so it all works at a low pressure. The extra bit here though is that the bucket will have a float valve hooked up that is tied to the regular high pressure water line to replenish the water in the bucket as it's used up. A few things had to be done to make this work however.
First thing of course was putting together the manifold for the drinker cups. This consisted of four 1/2"x1/2"x1/8" NPT PVC tees, some short pieces of PVC pipe, a cap, an elbow, and a 1/2" adapter and hose barb fitting. Since this is a super low pressure system on this end, there was no need to glue anything together. Everything's just pressed together. 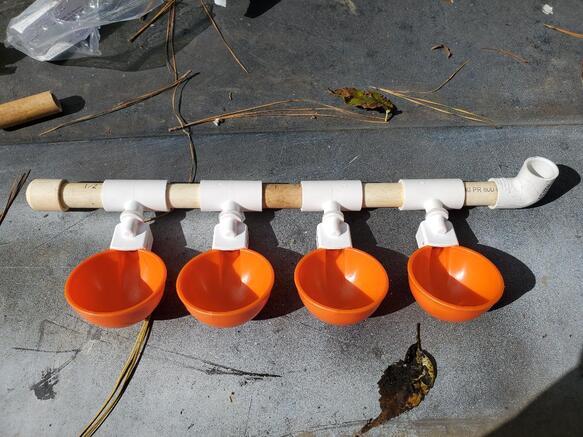
Drinker cup manifold assembled minus the hose barb fitting.
From here I mounted the assembly to the right rear side of the bed of the truck. I wanted it close to the tailgate in case I have to do any maintenance on the unit, it'll be a lot easier than having to climb into the bed with mulch and chicken shit all over. I used conduit straps and self tapping screws to secure the assembly in place. 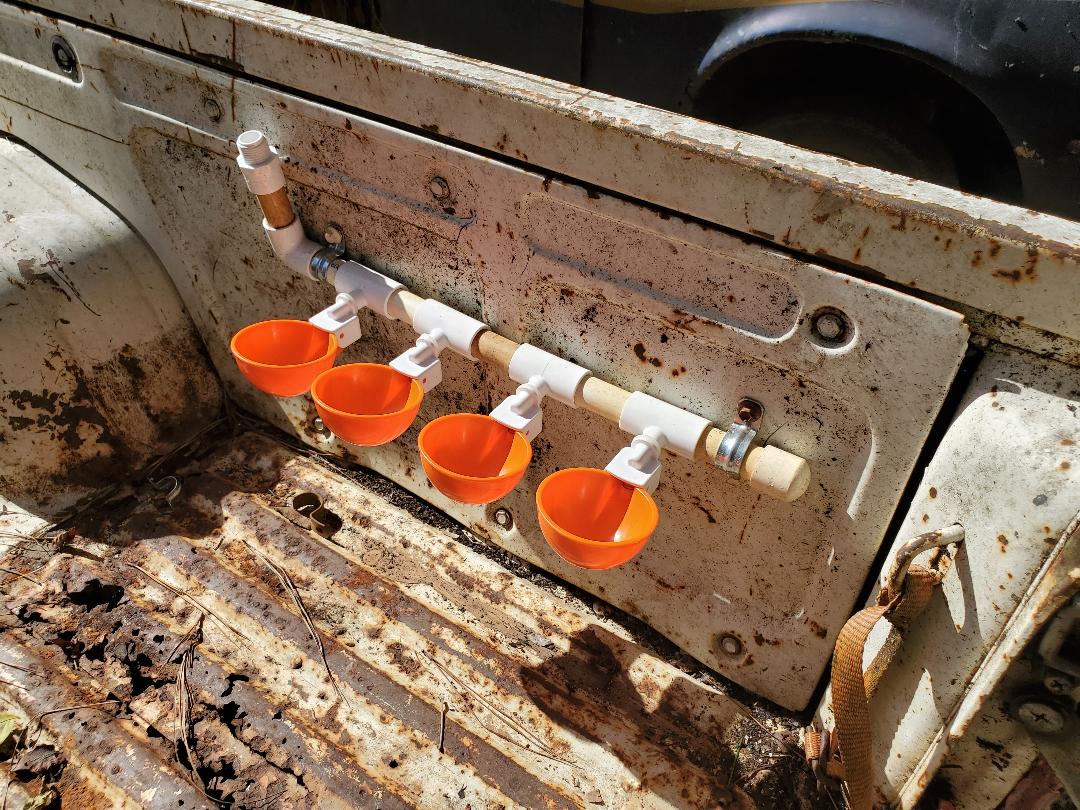
Drinker cup assembly in place with all fittings attached.
Next I had to set up a platform for the bucket to be secured on. Since the only spot was the fender I went ahead and made a little platform from some scrap that extended out from the fender apron into the bed. This consisted of a piece of heavy sheet metal and two short lengths of fence post pipe cut to serve as legs to hold the sheet metal platform level from the fender apron. Everything was welded together so as to be strong enough to hold the 5 gallons of water that the bucket will be toting. 
Sheet metal platform welded in place, note fence post legs under platform.
With the drinker cup manifold and bucket platform in place it was time for the bucket itself. To complete this setup I had to start off with a couple of holes in the bucket. I drilled one near the bottom and one a couple of inches from the top of the bucket. The hole at the bottom is for the hose barb fitting that will link up to the other hose barb fitting on the drinker cup manifold. The other hole is for the float valve that will be secured in place inside the bucket. The float valve has a nut and rubber washer to help seal the unit in place in the bucket and a female 1/8" thread within for a pipe nipple. 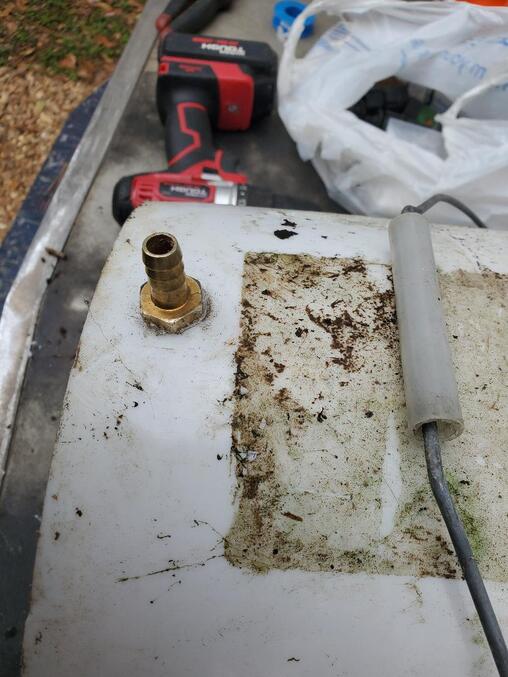
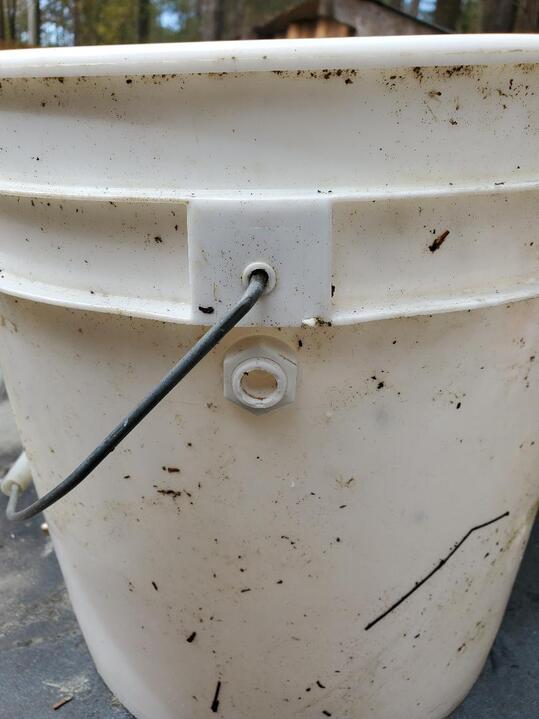
Bucket with hole drilled and hose barb fitting in place.
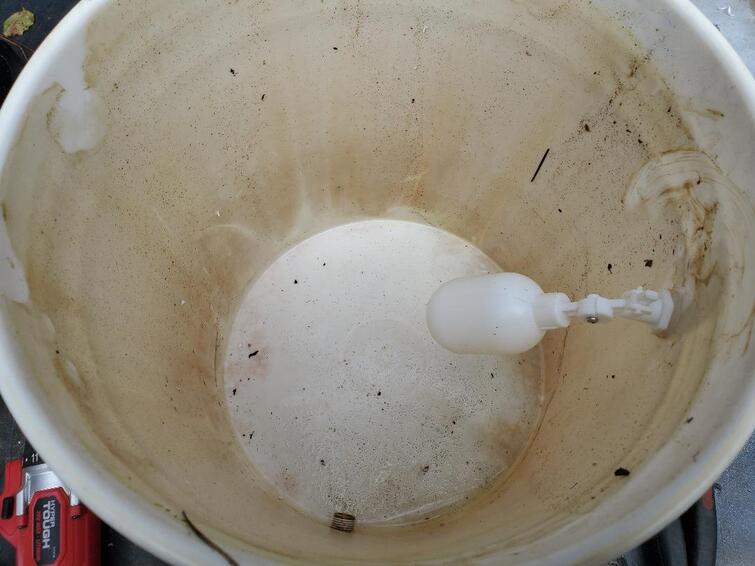
Float valve in place in bucket.
1/8" NPT port in float valve on outside of bucket.
With the bucket in place I positioned the unit on the platform and cut a short length of hose to put between the two hose barb fittings to couple everything together. I filled the bucket with water from a garden hose to test the system to make sure everything was good on the bottom end. Other than a minor leak from the one of the hose barbs, everything was straight. Now on a side note, the section of floor on the truck's bed happens to be pocked with a number of rust holes. While this might be a problem to some, it actually works to my advantage due to the fact that with the lateral ridges in the bed's floor, they act as a channel to route any leaking water straight to those rust holes and out to the ground. This way the mulch in the rest of the bed remains dry and just that one little area gets wet from any leakage or just messy birds splashing water around. The rest of the system will consist of a piece of 1/8" NPT pipe nipple and a pressure regulator that is used for micro irrigation systems. This regulator has garden hose threads male on one side, female on the other. The regulator cuts the pressure down to 25psi, enough to not rupture the fragile components in the irrigation system, or in my case, a plastic float valve. This pair of components will be routed through a hole in the skin of the bed cover I will be making to cover the bed and into the float valve. A regular garden hose will be hooked up from this regulator to the spigot by the Mustang Chicken Coupe. I put a Y pipe on the spigot to branch water over to the Mustang and the truck. I will have to make a custom length of garden hose since I won't need a long length to bridge the gap between the two points. I have some old garden hose that I can cut one end off and use a repair end fitting on the other end to complete the hose. 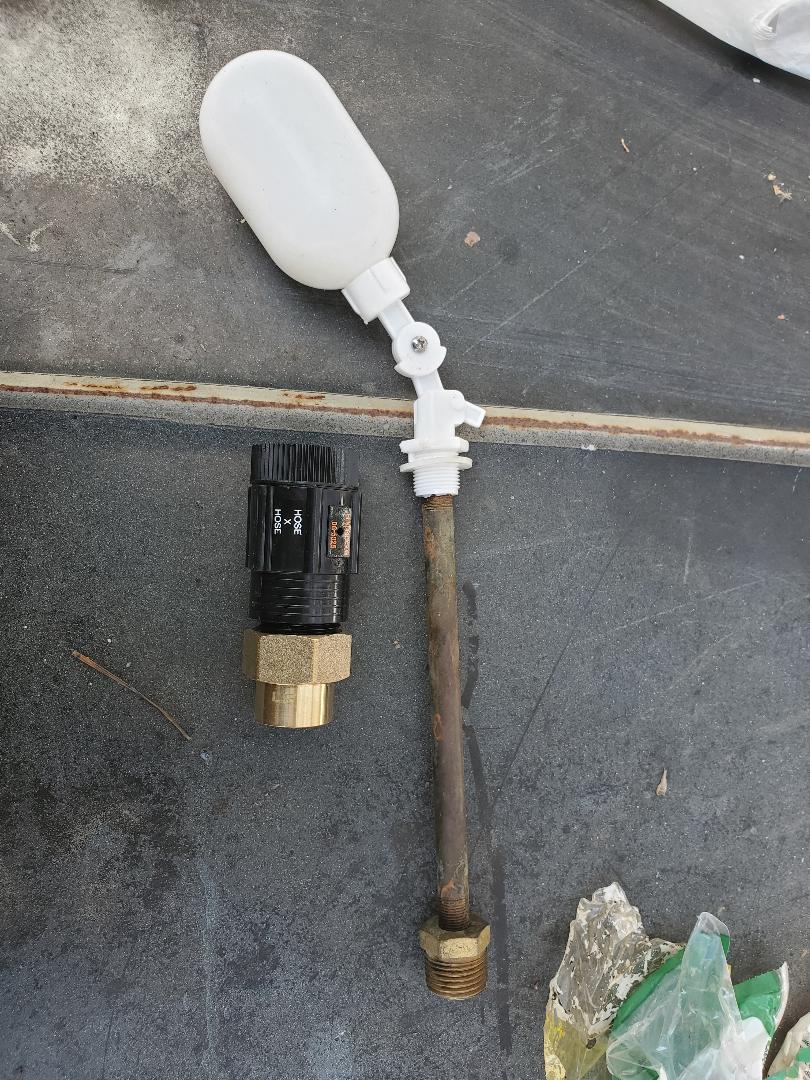
There are a few more things after this that will need to be done, again, the bed cover being the biggest part. Afterward I will have to make a hatch for the bed cover and a power distribution point for both cars, which will most likely be an outdoor outlet box that both cars will plug up to. I am very close to completion of this project.
After getting the holes cut in the cab and plugging the shifter hole up it was time to start finishing out the inside of the cab. This would include the electrical boxes for the outlet, switches and light fixture. Also I had to install some roosting posts for the birds to roost on at night. These consisted of two lengths of conduit that I cut to length prior to welding them in place from the back panel of the cab over to the support bar that held the dash and steering column. I did it this way since the two doors would still be allowed to open, so installing the posts laterally only made sense. I had to ensure a good weld on both ends since these posts will be used to hold several heavy chickens when they roost for the night.  Two roosting posts made from conduit welded in place from the back panel of the cab to the front support bar for the dash and steering column. The next order of business was the electrical boxes. I wanted to put two boxes in place, one for the outlet and one for two light switches. The two light switches will control the light I'll install in the cab and the one I'll install in the bed shell I'll make later on. I had a stash of old electrical boxes, outlets, and other electrical hardware to pilfer the needed materials from. I installed the boxes on the back of the cab, right above the rear opening. This was the most suitable place since there was a large surface area available for securing the boxes. I did spot welds through the punch out holes in the backs of the two boxes to secure both units to the rear panel in the cab. 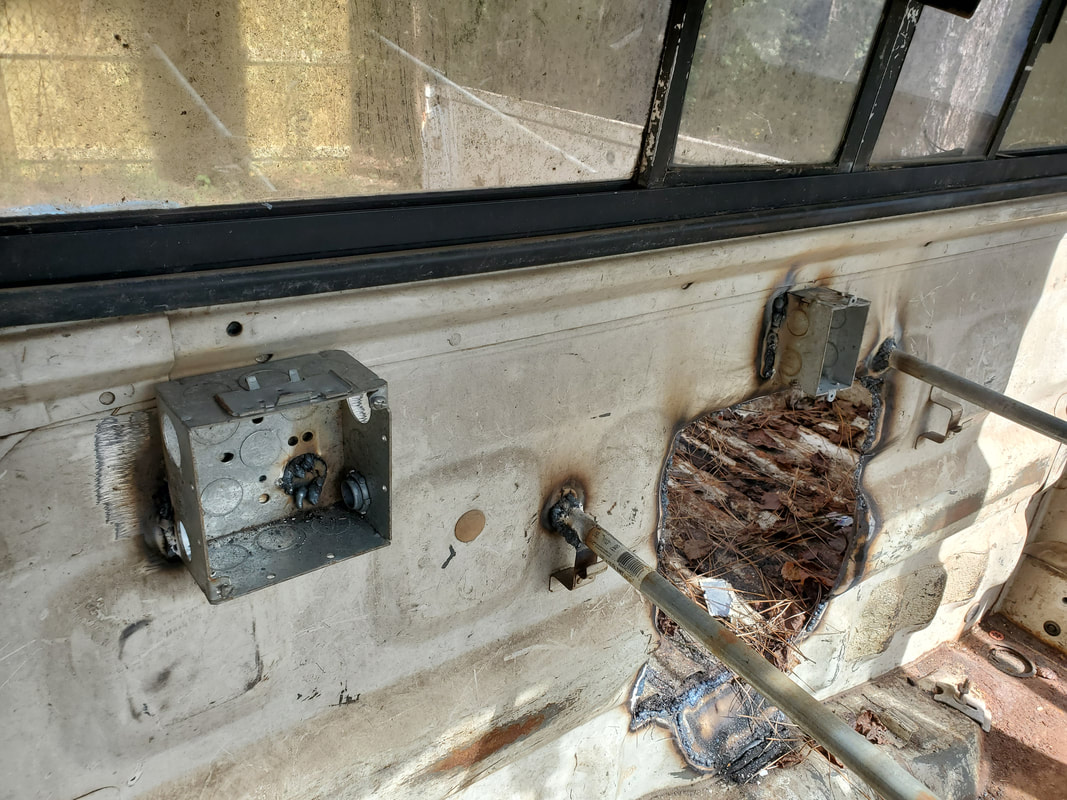 Two electrical junction boxes installed on back panel of cab. Note weld joints for box to left and weld joint for roosting posts. From here I started installing wiring, which consisted of some scrap wire I had stored in a box in the storage trailer. I recycled a lot of lengths of wire from multiple sources and was finally able to put some of that wire to use right here. Instead of using all new wire I just took a multi-conductor cable and cut it to a suitable length to bridge the gap between the boxes and have extra for wiring the outlets and switches. I had to install a power cord as well. I put the power cord in the large switch box since it was closest to the passenger side where I would need the power cable routed out from. Next I installed the switches and outlet in both boxes, wiring them up to the power cable and the length of cable hooked between the two boxes. I also installed a cable to be used for the light socket as well. 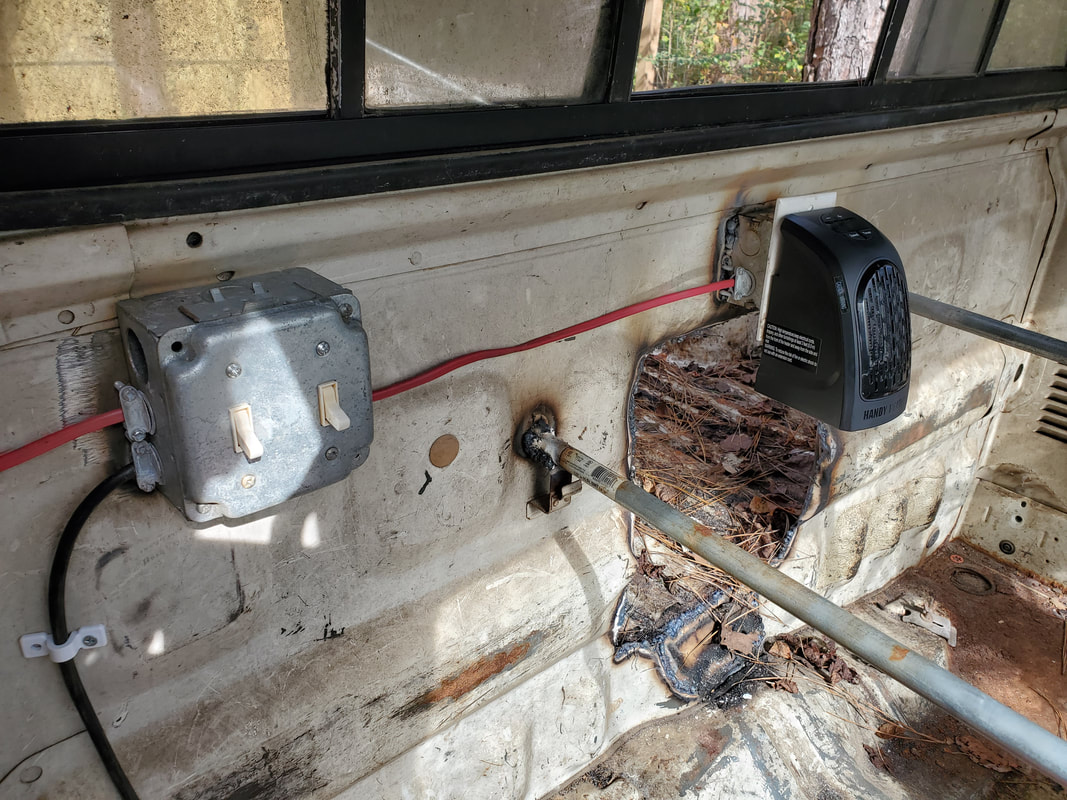 Electrical boxes wired up. Note electric heater plugged up to outlet in right box and switches in left box. Red cable is the multi-conductor cable used for delivering power to their respective loads. Also note the black cable going into the left box below the red cable. This is the power plug after it was routed into the cab from a once rubber capped opening. Lastly I installed the light socket. Unlike more modern setups where there would've been a third junction box to install light fitting on, I had this old school ceramic light fixture that could be used as a standalone unit since the ceramic fixture had two mounting tabs on it. I mounted the unit on the rear pillar on the passenger side. I couldn't mount the light on the ceiling since there was still a headliner in place and the roof isn't exactly super thick. So after installing the light fixture and wiring it up I put a bulb in and plugged the unit up. 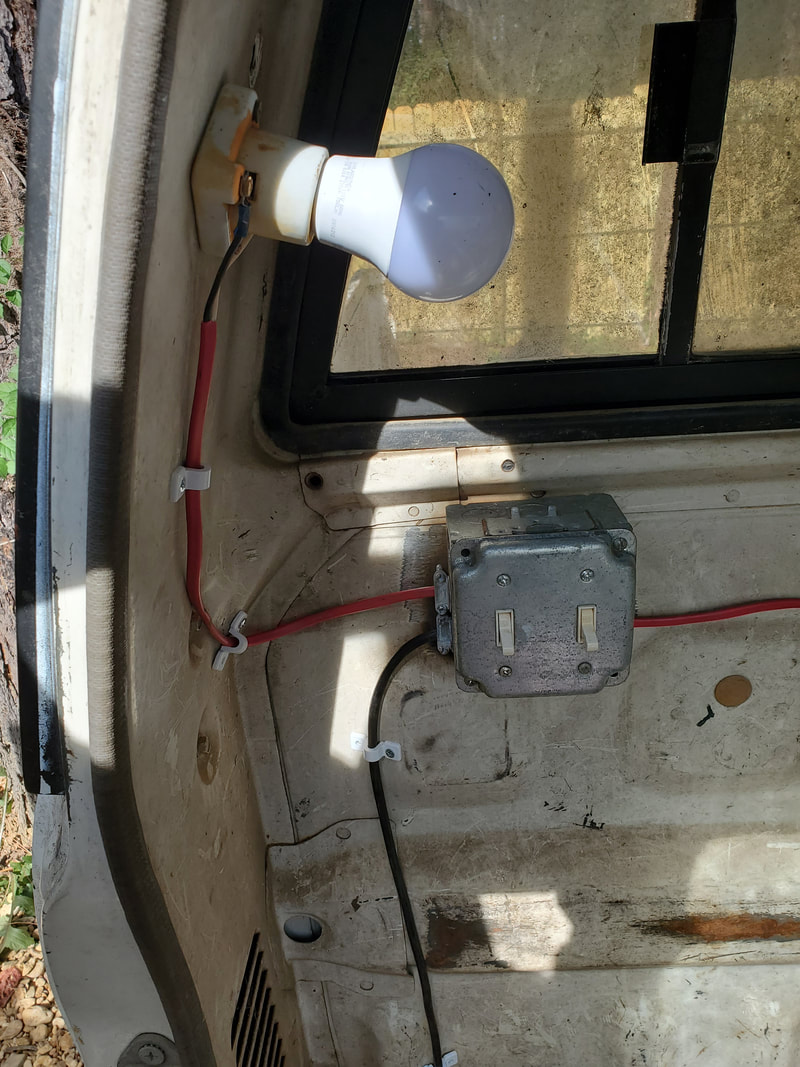 Old light socket secured in place on rear pillar with cable routed up to it for power. Bulb is already installed. With everything installed I plugged the cable up to an extension cord for testing. The light came on as expected and the electric heater that is pictured came to life with no incident. The truck was ready to go on the inside, but I wanted the whole project done before turning it over to the chickens. I didn't install the second light fixture since I never made the bed shell yet. With the electrical system done in the truck the next move would be the watering apparatus. More on that in the next installment. After getting the engine bay welded up I still had to close up the front of the engine bay at the radiator mount. Duplicating what I did in the Mustang Chicken Coupe I wanted to do a sliding panel that can be quickly lifted up to open the front to allow for easy removal of mulch. Since the panel where the radiator goes is more or less flat, I had to add something to either side of the opening to hold the sliding panel. I ended up taking some fence post and cutting two sections from this. This post is about 1 1/2" in diameter. I cut two pieces about 18" long and then cut a slot lengthwise along the entire cut of each pipe. Doing this made the pipe open up since pipe is nothing more than sheet metal rolled up and welded lengthwise into a pipe. This slot in each pipe is where the sliding panel will fit through. I finished up by welding the pipes to either side of the radiator panel opening.  Fence post pipes with cuts made and welded in place on either side of the radiator opening. Now I actually got lucky in sourcing the sliding panel for this setup. I ended up finding a piece of sheet metal that was cut from some larger piece in the past that ended up actually being perfect for this position. It had the right height and width to slide right in without resistance or being too short or too high. This made the access panel sub-project go real fast. Lastly I bolted the hood back on. Even though the latch is still in place the hood shuts without engaging the latch, which is fine since there is no need for the latch to be engaged. I'll probably end up removing the latch mechanism to sell with the other parts later on. Now its on to the cab.  Sliding panel in place over the radiator panel opening. The nesting area is ready to go. 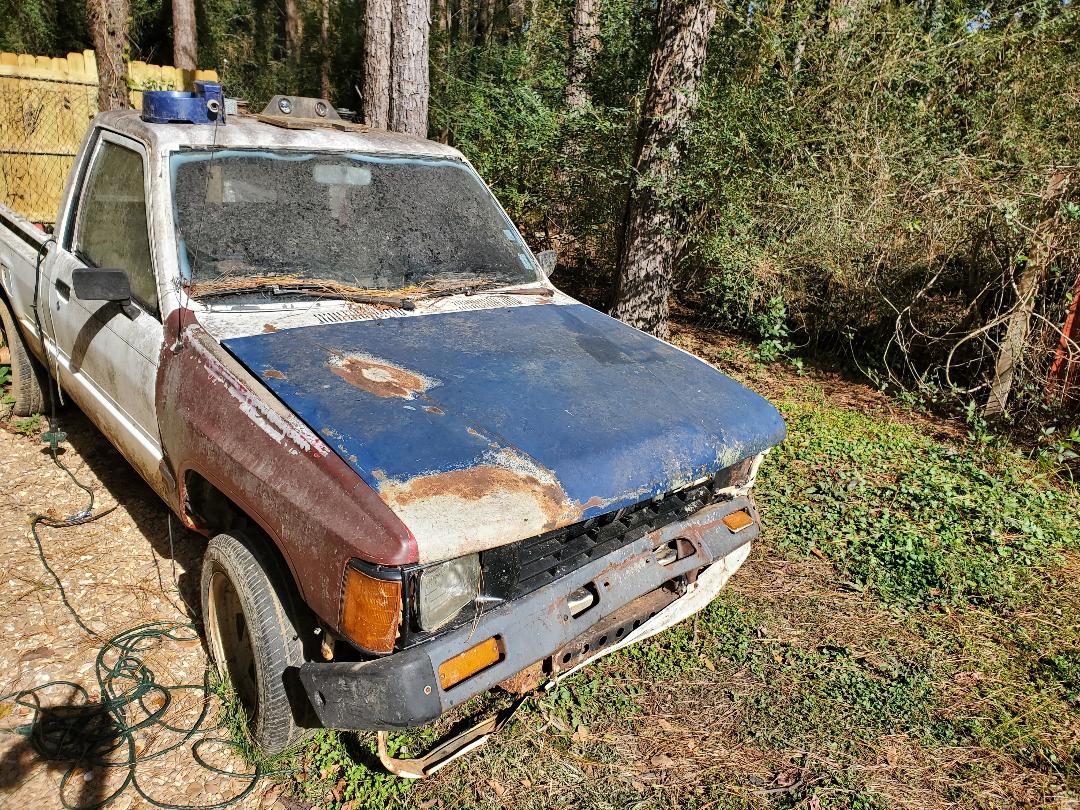 Truck with hood in place. On the cab I had to do a couple of things. One was patch up the hole where the shifter popped up from the transmission. This was pretty simple, just grinding the paint from the surrounding metal to expose the bare metal then cutting a patch of sheet metal to weld in place over the hole. After doing these couple of quick tasks I had the shifter hole covered up. The next thing on the list was cutting a hole from the back of the cab into the bed. 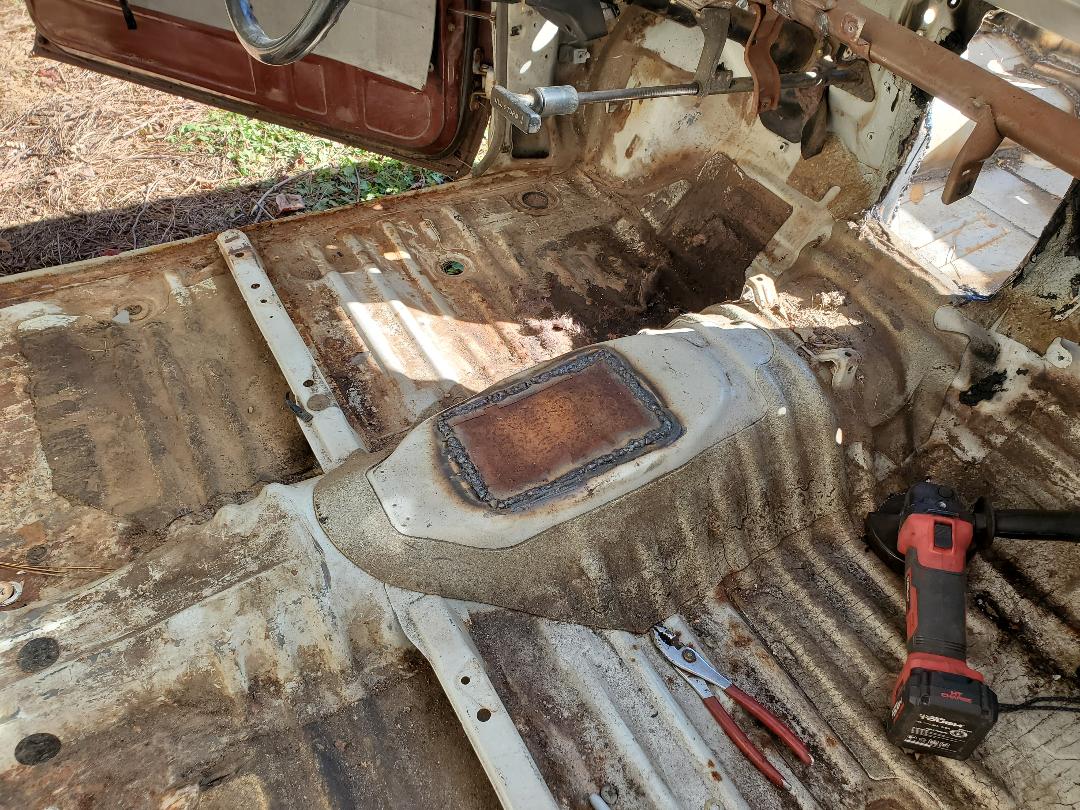 Shifter hole welded up with sheet metal cover. Just like with the firewall hole, I cut a large enough hole to allow the chickens to pass through. Unlike the firewall though, I had two panels to cut through - the back of the cab and the front of the bed. After chopping through this with the reciprocating saw I then pulled the metal together between the bed and the cab and went to work welding on that to get the two sections welded together so bugs or rain wouldn't get through that easily. 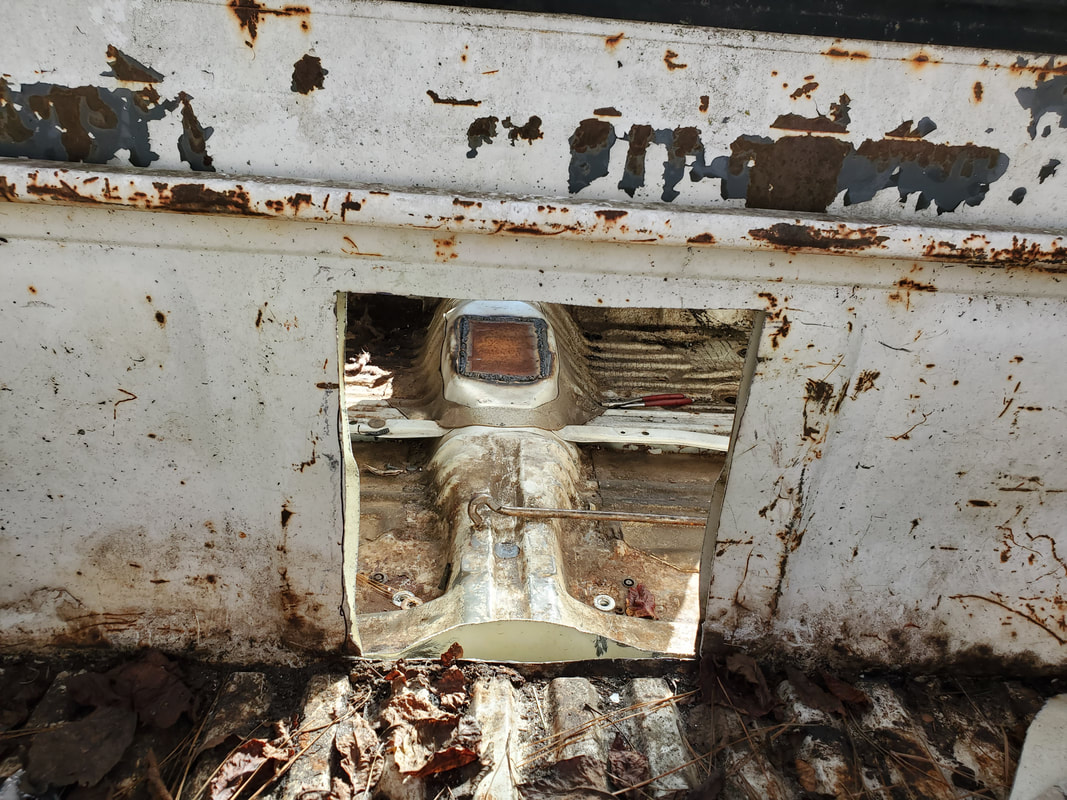 Hole cut through bed and cab. Edges are welded up between the two panels to complete this opening. 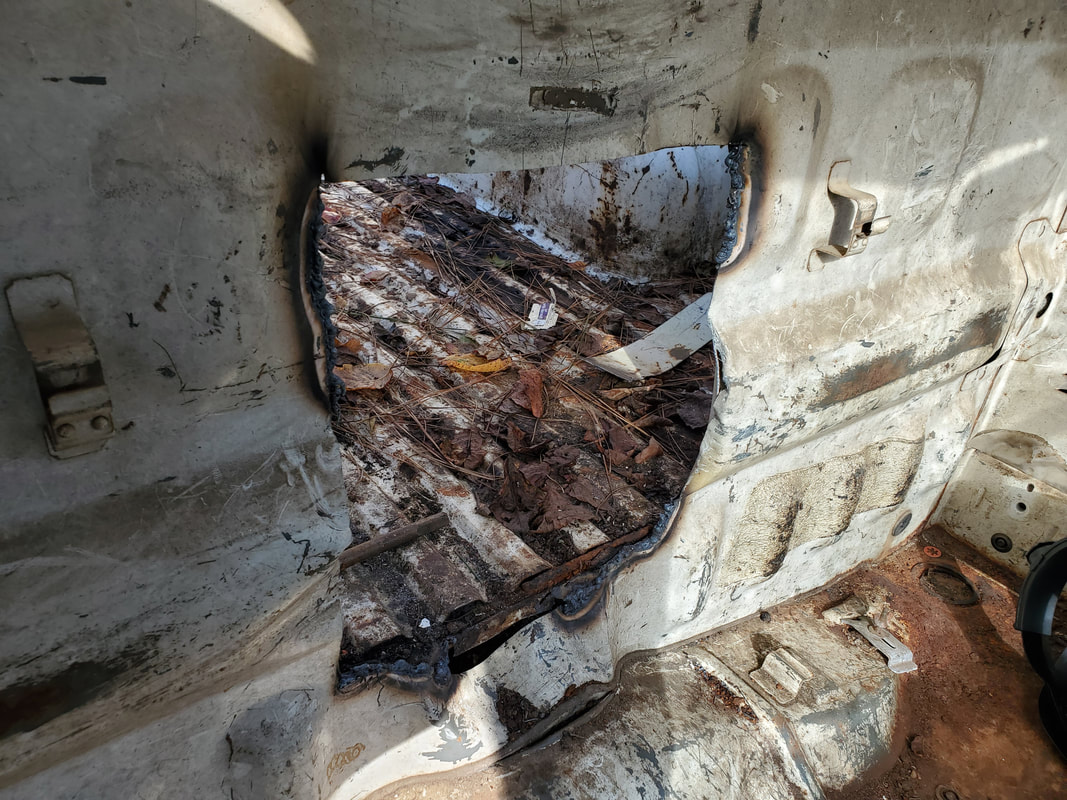 Shot of opening from cab into the bed. Note the welds around the edges of opening. With these couple of simple things taken care of I can start on the cab. I have to put in a couple of roosting posts, and install an outlet box for the electric heater I want to put in, as well as a light fixture and a switch box to turn said light on and off. Next time it will be cab day.
After having stripped the Toyota truck of all the unnecessary parts it was time to get started on the construction of the chicken coop. I started off in the engine bay as this area would be the nesting box area. Unlike the Mustang Chicken Coupe this truck won't have a brooder area as we won't be constantly breeding chickens or getting babies that will require a large brooding area.
I had to start off with the welding up of the right side fender apron as it was rusted enough to be flopping around. After a crude weld up to hold the section of metal I moved on to welding a couple of pipes in place to be the supports for the floor of the nesting area. 
Engine bay with pipes welded in place at the front where the radiator would've been and just behind the motor mount brackets. Welded fender apron is in the foreground at bottom of pic.
With the support pipes and fender apron welded I proceeded to start cutting and welding in metal around the open areas below the fender aprons and over the engine area. I had to cut multiple pieces of sheet metal from my scrap stock to fabricate the floor for the nesting area. 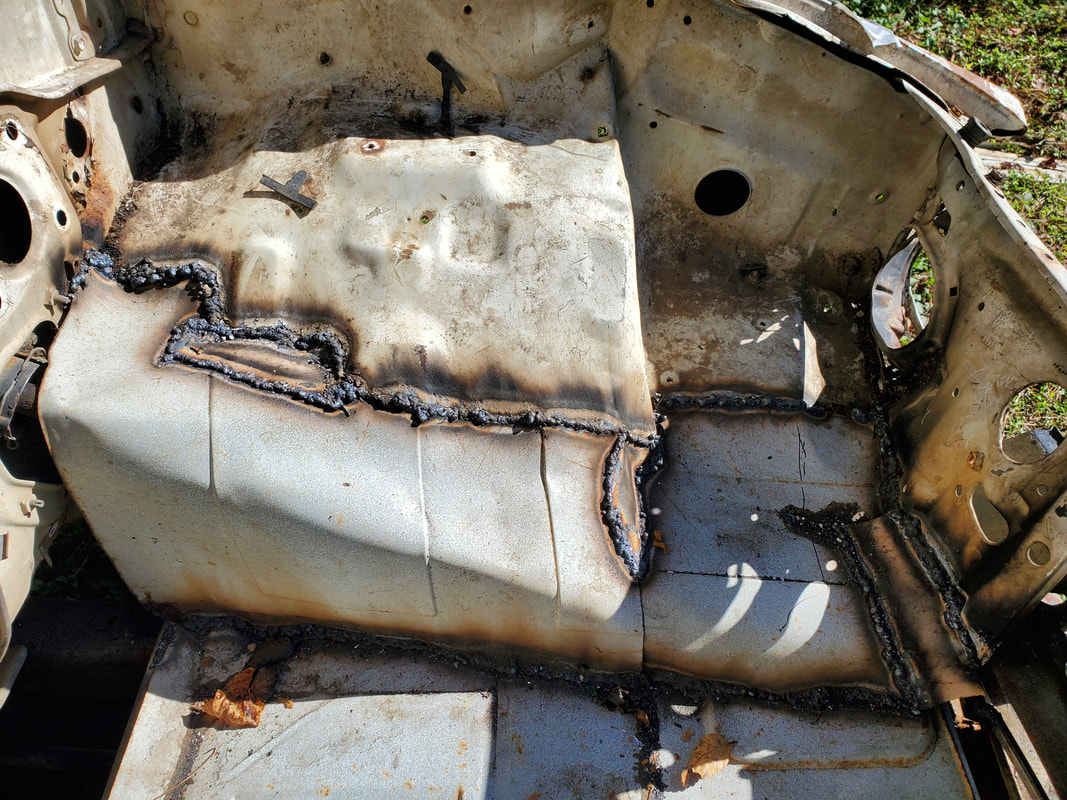
Sheet metal patches that were welded in on the left side, using the fender apron and pipes for the support structure to hold the metal.
The biggest pieces of metal were those that were cut to be welded to the edges of the fender aprons and the floor where I welded in the pipes since this metal would help close the opening where the engine would've gone. The floor consisted of two large pieces of scrap sheet metal. These pieces had slots in them from being metal that was used on a computer or some other electrical hardware and would require ventilation. This would provide a good means of drainage during cleaning. Of course I had to bend the sheet metal and trim off excess that was in the way of mating the sheet metal together as neatly as possible. This ended up taking a fair bit of time because of the cutting and measuring multiple times. With the floor in I was able to get the sheet metal from the fender aprons welded in place to help make up the nesting area floor and walls. In the end it did get done though. 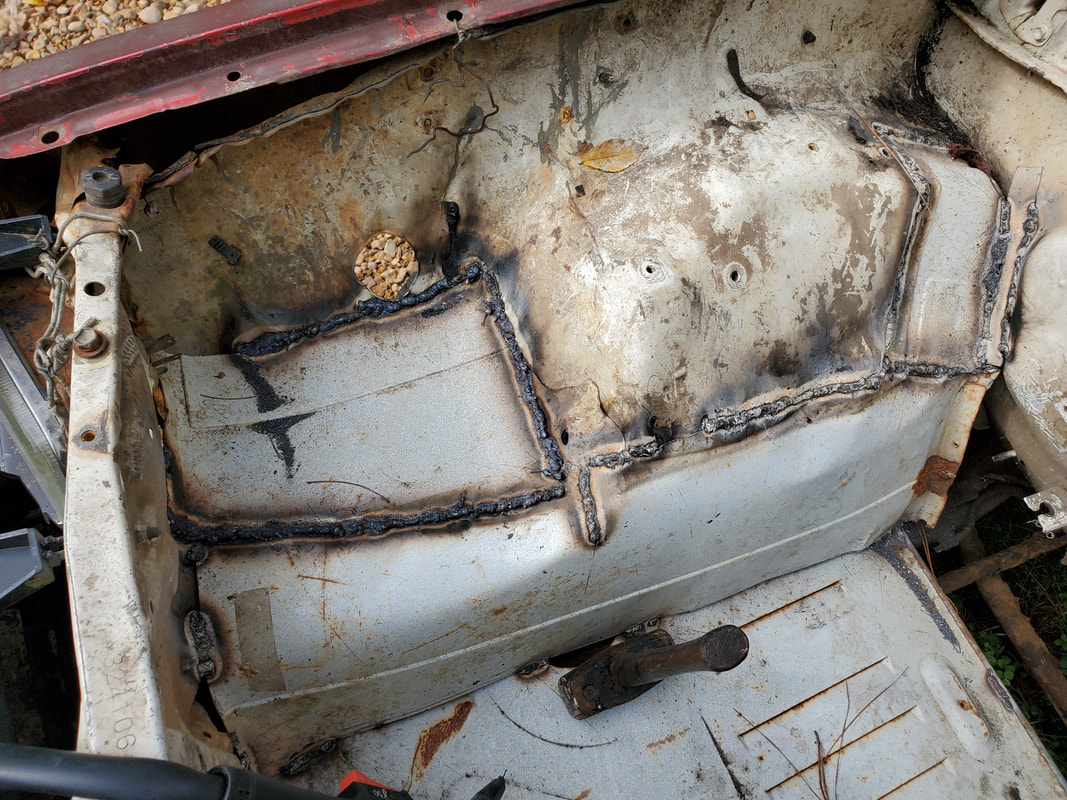
Sheet metal cut and welded in place on the right side of the engine bay. As with the left side, the fender aprons provided a suitable spot for the metal to be welded to in order to close in the area from the outside. As can be seen, larger sections of sheet metal were welded in to make up the actual floor.
The last segment of the nesting area was the firewall. I had to start off by cutting out the doorway in the firewall so I can know where to put the extra sheet metal that would go from the bottom of the firewall to the rest of the floor and fender apron sheet metal. When I cut out the opening I left the section of metal attached at the bottom so I could bend down the metal to serve as a ramp for the chickens. That section of metal was welded to the floor. Just like with the other areas of the nesting section I had to cut a large piece of sheet metal and weld it in over a couple of spots then shape the metal and cut the excess off prior to welding. 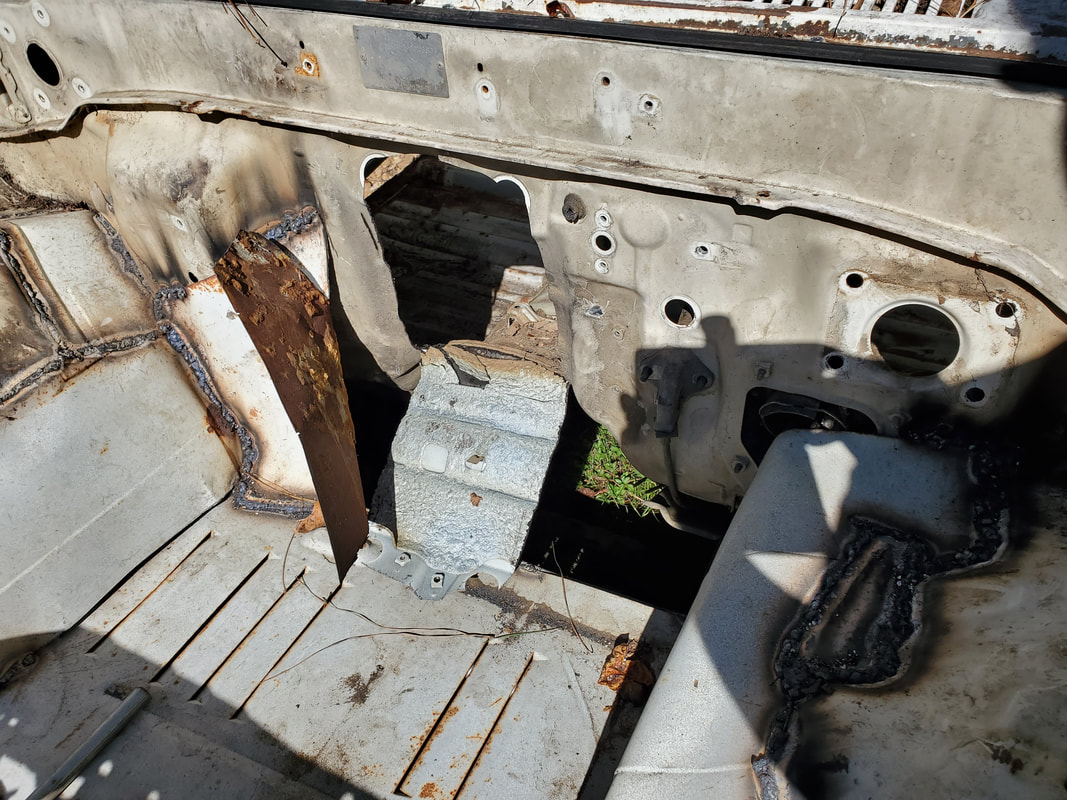
Opening cut in firewall with the section of metal bent down for a ramp. First section of firewall metal is welded up where it can be welded prior to shaping and cutting excess metal.
After getting one side of the firewall done I repeated the process with the other side. I finished off welding everything up as needed to fully enclose the back section of the engine bay. It took a lot of welding to ensure that all the joints were solid and would not fail in some ridiculous manner when the weight of several chickens is upon it. 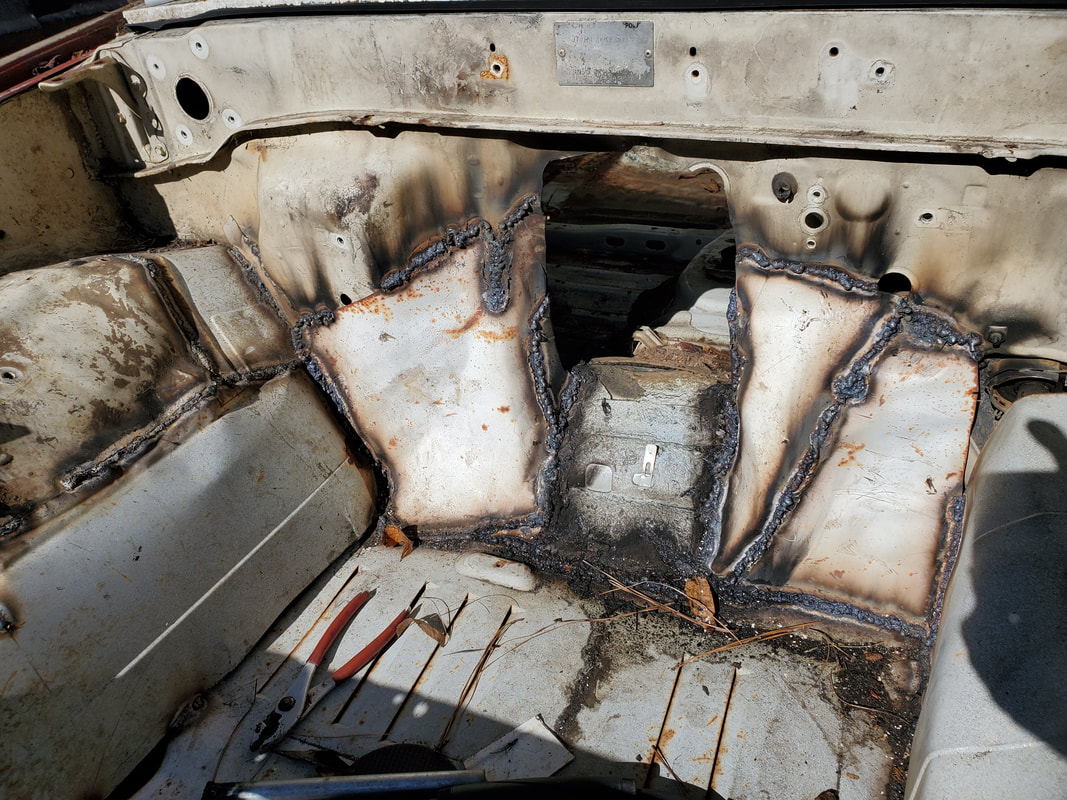
Firewall metal welded up around ramp, floor and fender aprons.
With the sheet metal all welded in place and the nesting area pretty much made solid all around, the next thing I had to do was make a trap door for the front at the radiator support panel. This, just like no the Mustang, is to be used for easy cleaning by sweeping the mulch out of the front and onto the ground. I will have to be creative since opening is pretty flush and doesn't facilitate holding some type of panel like the Mustang was. I will continue with this fun project in our next installment.
In our quest to make the chicken yard better we started up the project for the Chicken Truck and soon will be starting another vehicular coop when I manage to strip down another donor vehicle for the vital components (More to come on that one). With this we need to get the ground itself situated due to the fact that mud is everywhere. Being at the lower end of the lot, any water runoff will collect here enough to make the area sloppy. This is where the gravel comes into play. I had already spread some gravel around the Mustang Chicken Coupe but even that area needed touching up due to the gravel having sunk into the mud and getting covered with chicken mulch from past cleanings. With the Chicken Truck in place gravel is definitely needed as there will be that much more traffic as we work around these vehicles in our everyday workings with the chickens. With that, I went to grab another load of gravel from the cement place. With the wheelbarrow in play I got to work spreading gravel out. The first places I started was in an area behind the storage shed and next to the passenger side of the Mustang Chicken Coupe. Wanting to touch up the areas around the car I wanted to continue on behind the storage shed and around the soft areas that were surrounding the chicken tractors we had set up in the back of the chicken yard. The area directly behind the storage shed wasn't soft so it needed only a thin layer of gravel. 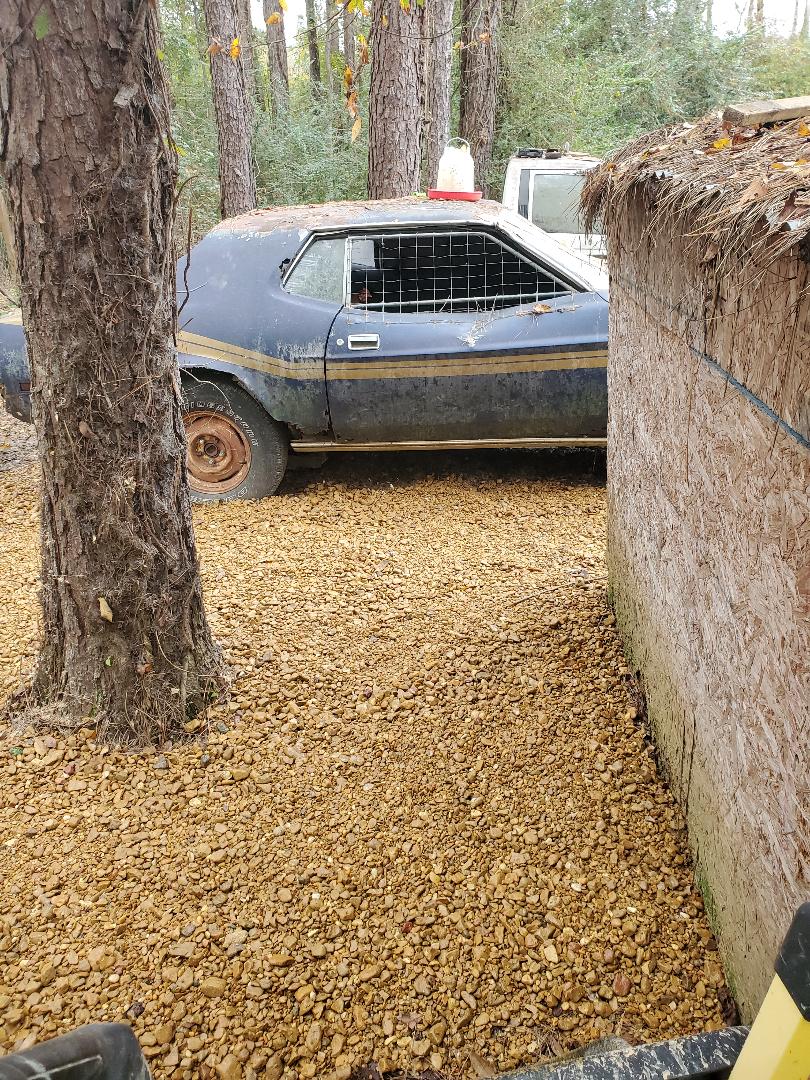 Graveled up area behind storage shed leading to the passenger side of Mustang Chicken Coupe Continuing on from the Mustang and the storage shed I spread more gravel over and around the chicken tractors. Some of this area was muddy due to water that leaked from the drinker cups as the chickens drank water or knocked a cup loose enough to make water drip out excessively. Since we do have to work around these little structures, it only made sense to get some gravel on the ground and around these things and the surrounding area. There was one really bad area that was more or less in the middle of the yard but close to the rear of the yard near the fence. Its about halfway between the chicken tractors and the rear of the Mustang. This area really needed a lot of attention as the ground was sloppy and muddy. I did not want to have to deal with feet sinking into this mess so I really concentrated on getting gravel mashed down into the mud here to ensure that the area would be nice and covered so our feet and our shoes can stay relatively dry and clean.  Muddy area between chicken tractors and Mustang Chicken Coupe covered in gravel. As previously stated the area that I graveled up around the Mustang needed to be touched up due to the gravel having been settled over time. I moved more gravel in over this area, especially at the back of the Mustang since this area was really settled in to the point where the gravel was more muddy than anything. This area was right next to the muddy area that I previously covered so it only made sense to get this area covered in gravel as well. At least now this high traffic area can be navigated without slopping through mud. 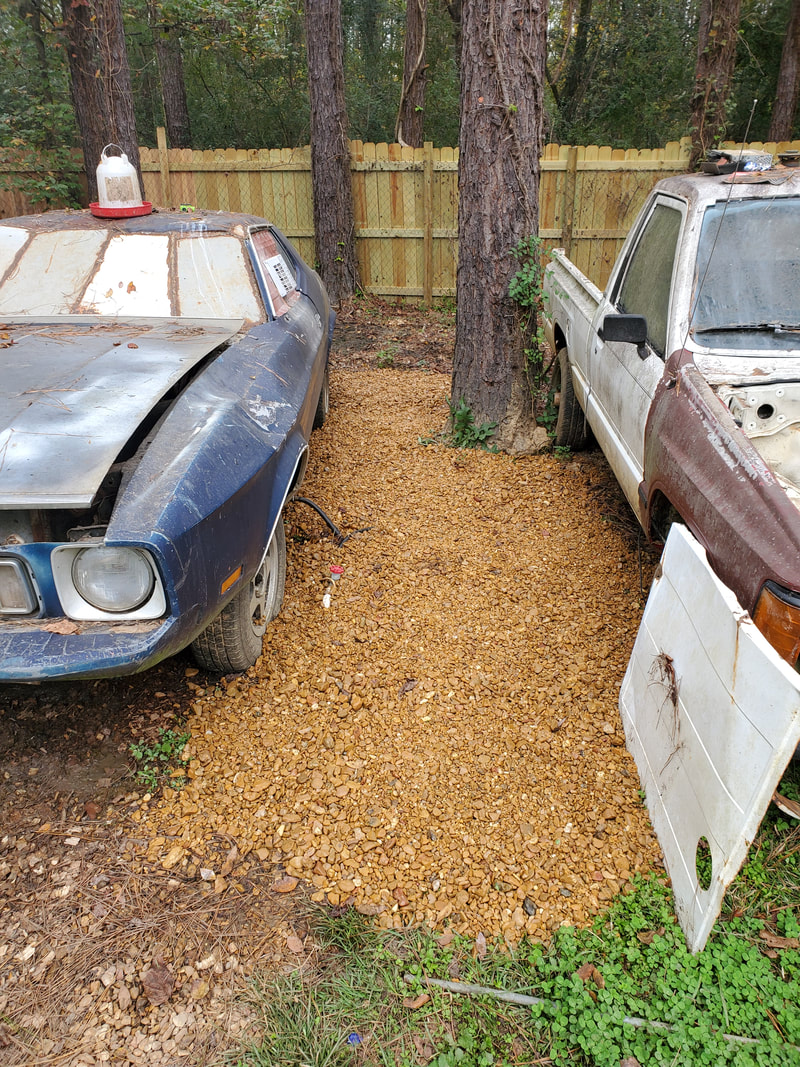 Area between car coops covered in gravel in preparation for the high traffic this area will be subject to when the Chicken Truck is completed. Coming near the end of the gravel load in the truck I wanted to try and get a small area in front of the chicken yard "gate" since this area was starting to get a little sloppy too. I wanted to catch this area while it was still early before this area turned into a mud pit as well. It didn't take much gravel to cover this span of ground between the posts of the opening in the chicken yard fence. At least when I bring in more gravel I will be able to work on getting this graveled area linked up to the other areas that will receive gravel along the inside of the fence all the way over to the car coops. 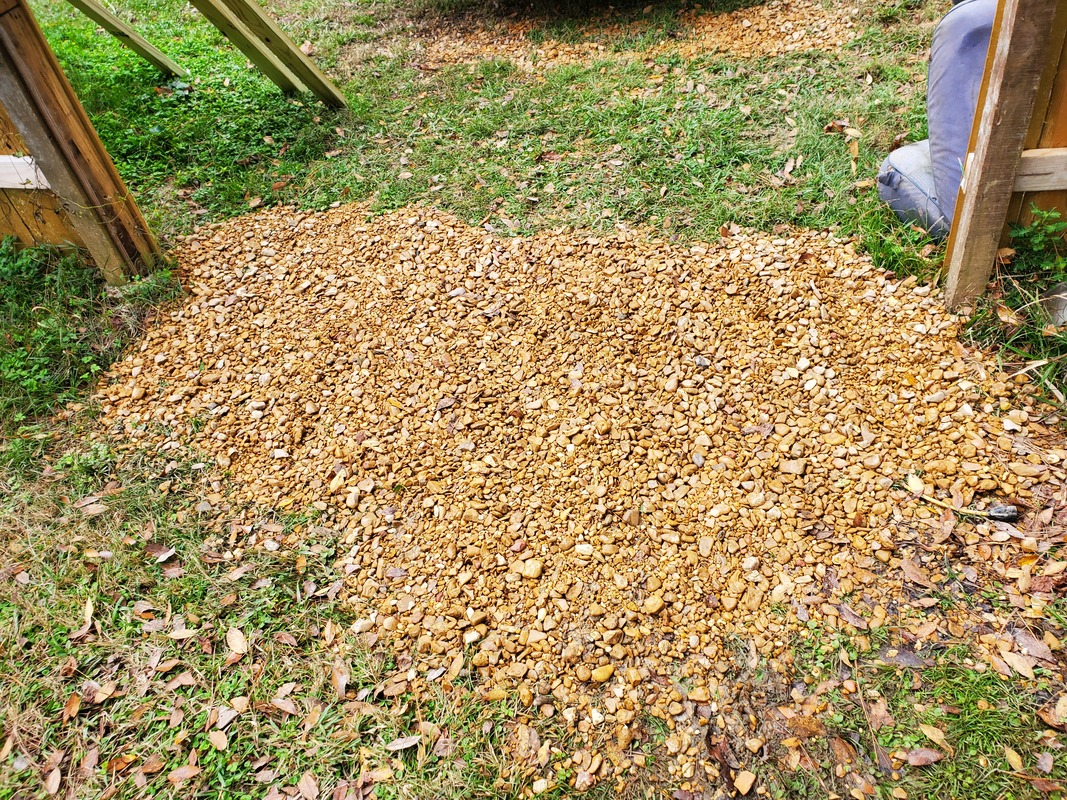 Area in front of opening to chicken yard covered in gravel to cover the muddy area that was starting to form right here. My goal is to eventually put some landscape timbers in the chicken yard, running them parallel to the house and starting from the opening post of the fence opposite the house. I'll run the boards from the post all the way to the opposite side of the yard in a straight line. With that I'll spread gravel over the section of the yard that is within the landscape timber line and the perimeter fence line that makes up the "back" of the chicken yard. The rest of the ground will be left grass. The intent is when I get the gates up and perhaps get some other form of protection over the chicken yard (such as some form of overhead netting), I can let the chickens free range in the yard. They can then have access to a patch of grass so they can dine in a more natural state than they would've if the entire area was covered in rock. From the way its looking I will probably have the chicken yard complete before I have the garden area complete. These two food production areas are an important asset to the homestead and need to be set up and taken care of if we are to expect them to serve us in the future. |
