|
As far as being prepared is concerned, when you live out in the country, having a generator is not even an option. Power outages happen all the time on the count of trees hitting lines or lightning or whatever. The power company usually doesn't get to us immediately if its serious enough so we have to be prepared for the inevitable power outage. Even better is having two generators. We ended up getting a hold of my mother's old generator after she upgrades to a whole house generator. While it worked back then, fast forward to now and the generator is in need of some service. The thing that is most likely to go wrong on any small engine is the carburetor. In this case we found out the generator needed a carburetor when we needed to fire it up during a power outage. When the unit wouldn't stay running without starting fluid we had to go to our old genny for the backup. While it was a good thing to have the second genny on hand, it also meant getting this unit back up and running more sooner than later. I ordered another carburetor online for the genny and once it showed up I got to work. The old carb was held on with two nuts holding the unit on the studs in the engine. The new carb came with the gasket and the couple of extra choke lever configurations typically used on this carb. The new unit went on pretty fast all things considered. The old carburetor was rather grungy looking which explained a lot. 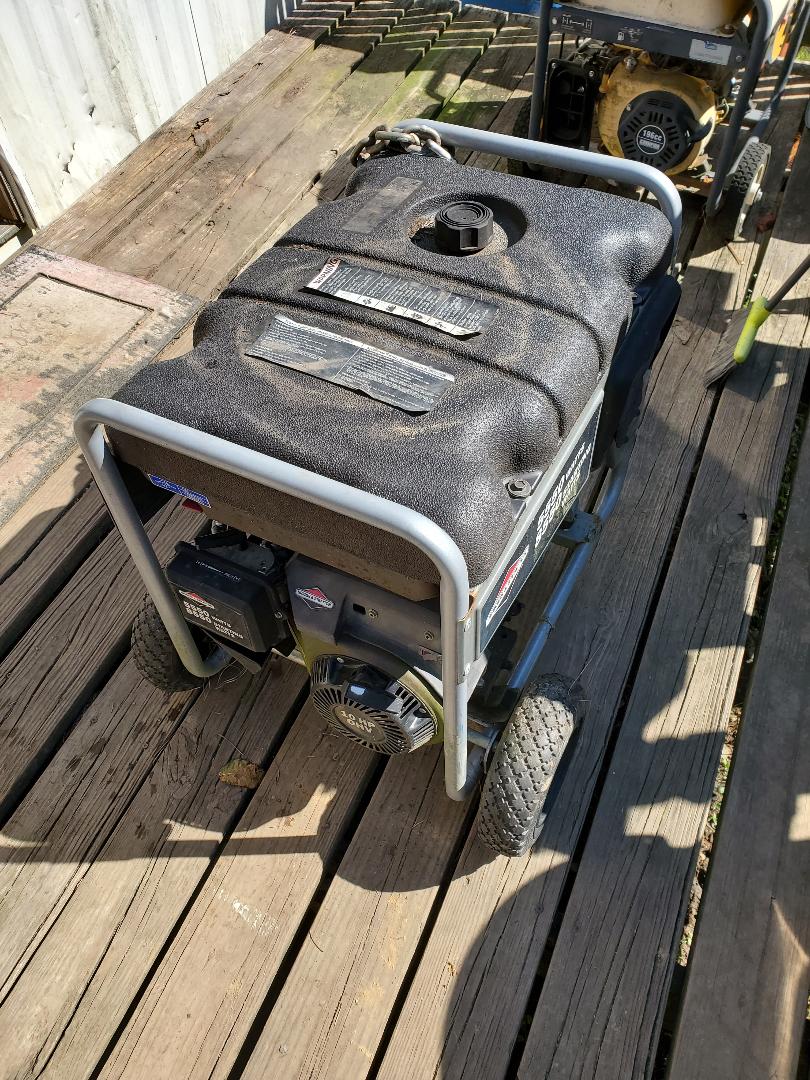 The 10hp generator with Briggs & Stratton generator. After replacing the generator I had to give the thing many pulls before the engine could pull gas through the carburetor but once it did the machine fired right up. Our other generator always needs a shot of starting fluid in order to get it started but this one fired right up and ran pretty good. I let the thing run a good 15 minutes before shutting the fuel valve to let the carb drain back out so when it sits up there won't be any gas in the carb to gum things up. We are now back in business with two full size generators ready for use. 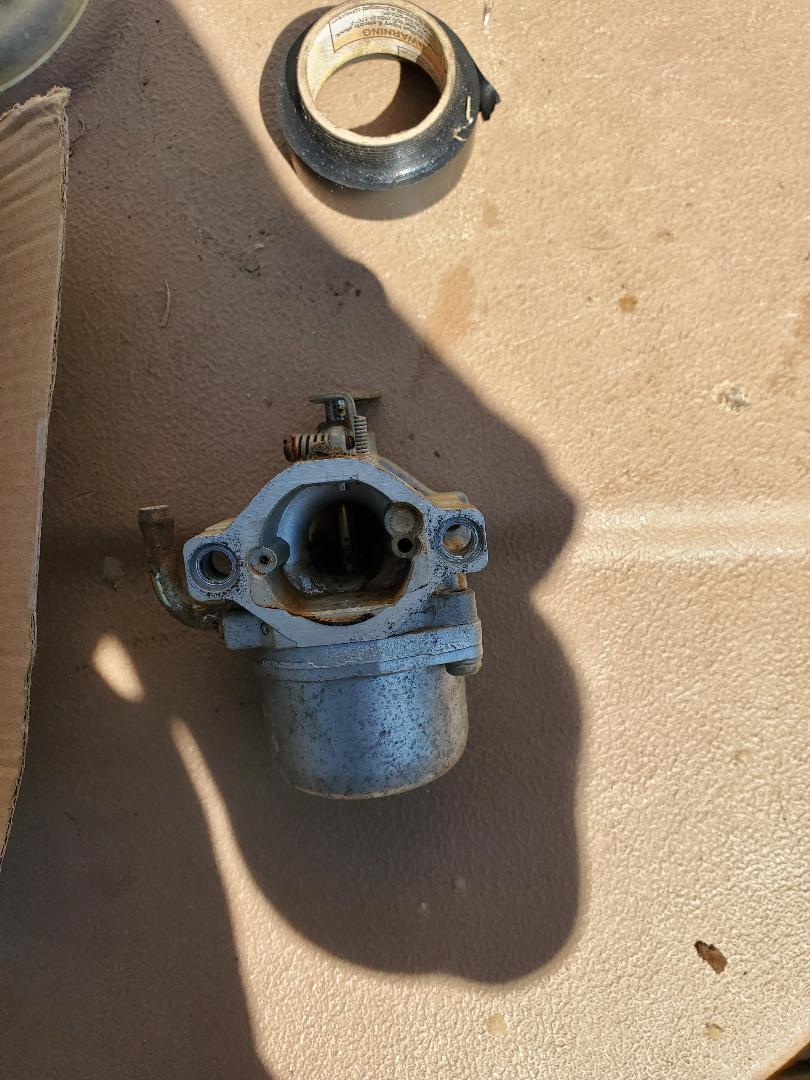 Old carburetor removed from generator. The next little side project I did was plant a few plants we had within the rock garden. we had a yucca plant that was in a pot for the longest time on the porch and a couple of newly acquired aloe vera plants that were small that I figured would make good residents within the rock garden. The yucca plant is over 3 ft tall and is in dire need of a transplant to a bigger area. I went ahead and moved the lava rock out from the area I designated as the planting spot for this plant and tore the plastic I had on the ground prior to laying down the rock. I dug out a good five gallons worth of the shitty native soil and pulled the yucca from its pot and laid it in the hole. I had some potting soil left so I put some of that around the plant to further fill the hole before putting the plastic back over the area and moving the rocks back around the plant. I did the same thing with the aloe plants, except I didn't have to move as much dirt since the plants are in small containers, approx a quart in size. I was able to get these two plants in the ground, spaced a couple of feet apart from one another and from the yucca, which itself is spaced a couple feet away from the citrus trees that are still in the ground in the same area doing rather fine. With these three plants in the ground within the rock garden, I probably have room for two more plants before I can sign off on completing the planting of the rock garden. 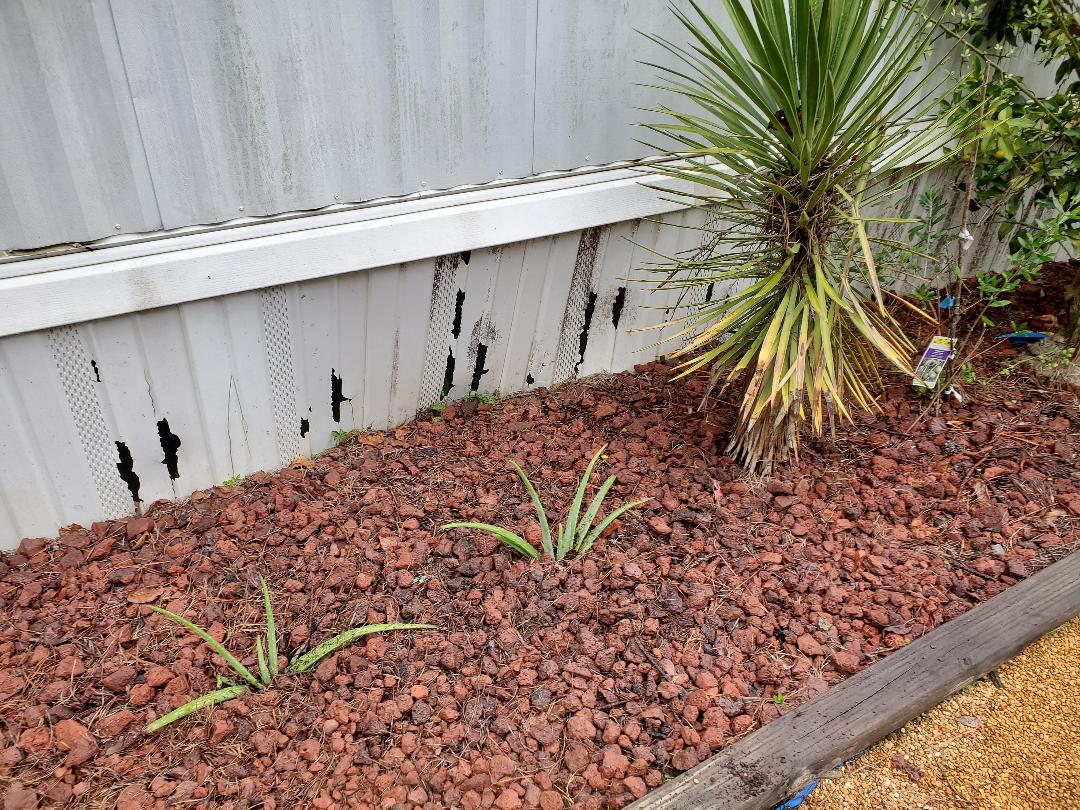 The two aloe plants and the yucca plant within the rock garden.
0 Comments
In the process of clearing the area behind the chicken yard prior to installing the fence I had to deal with some sections of logs from the leaning tree we had cut down earlier this year. The logs were probably 12ft long in a couple of sections. In order to even move these logs they had to be cut into shorter sections where I can lift them up and roll them onto the 2 wheel dolly to move them from the area. Of course this is where the electric chainsaw came into play.
Now prior to using the saw I had to address the chain. The old chain had been stretched and resharpened so many times that it was time to get rid of that. We got a 2 pack of chains to have a spare on hand after installing one on the saw. Once I put that new chain on the saw the tool ate through those logs like a knife through butter. I got all the sections cut down to manageable sections and got them moved out to the main driveway. 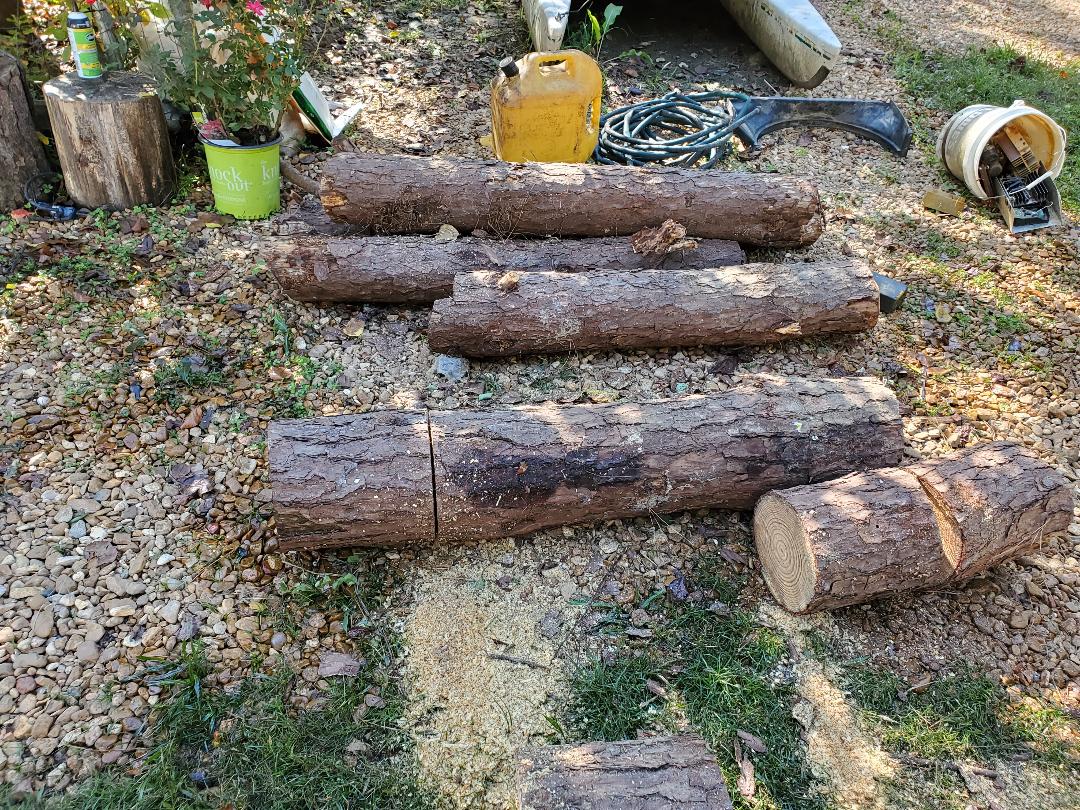
Cut sections of logs moved to the driveway for further cutting.
Again, with the new chain on the saw, I was able to slice through the logs easily, cutting them into short sections for further splitting on the log splitter. On the next go around I managed to get another nice stack of firewood logs after splitting everything. Now we're even more set on the firewood. Of course that wood will have to further cure so we'll be burning the oldest shit first while this wood dries out. I'll probably end up moving those cuts closer into the area by the firewood shed as we do use up wood. That's for another day. 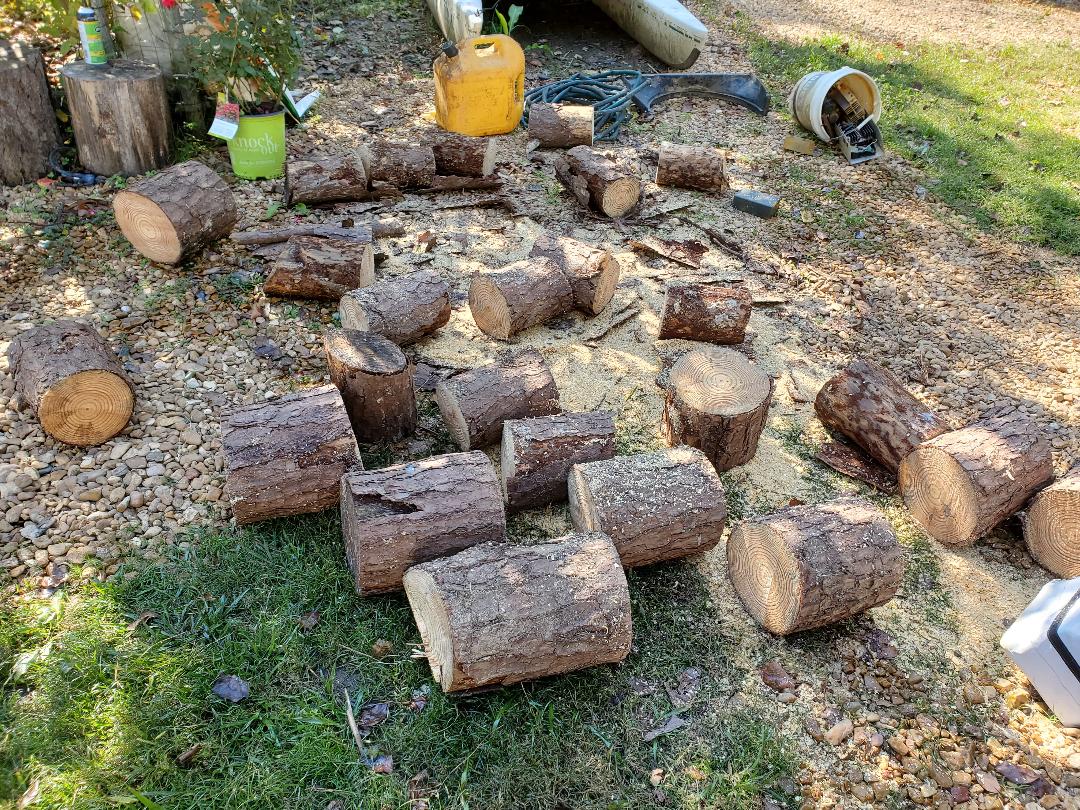
Logs cut down into short sections for splitting.
As usual I also had another load of gravel to spread out, this time, going around to continue the coverage of the driveway. Being in the main driveway allowed me to just park the truck in the general area and just start shoveling gravel out into the driveway covering the bare ground. As I got the ground covered and had to extend out from the truck I did have to start using the wheelbarrow to move the rock to the spots I wanted covered. 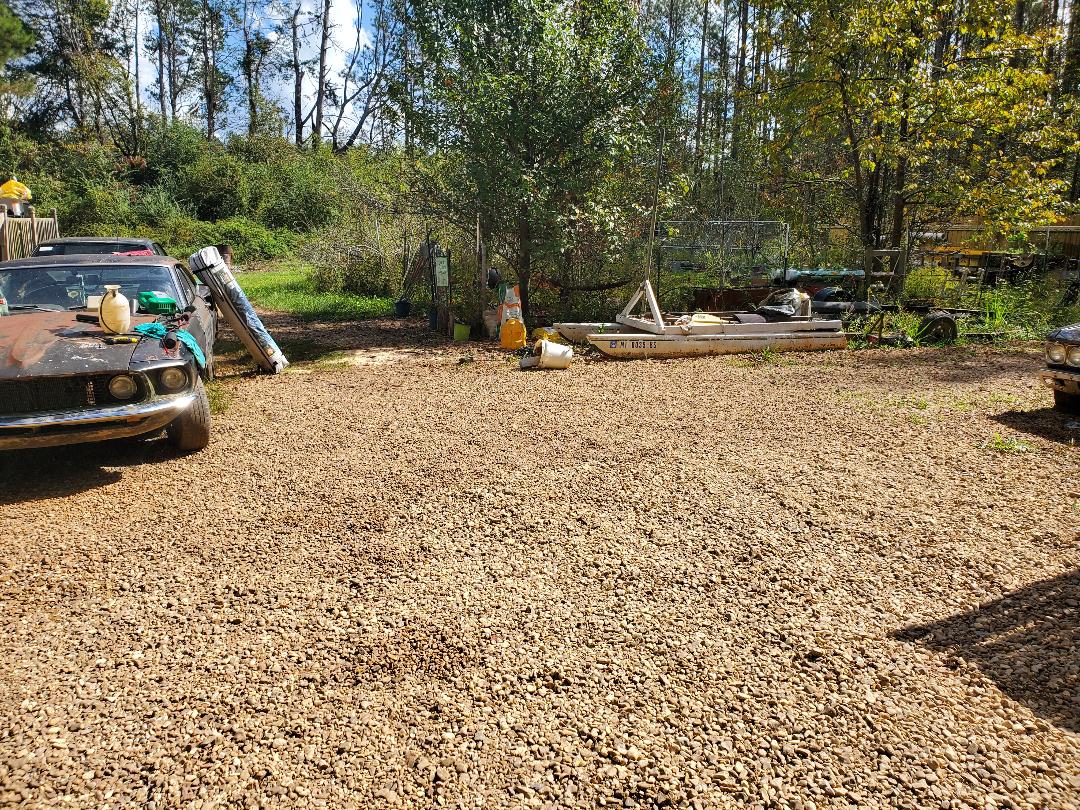
Main driveway with more coverage of gravel.
More coverage of the driveway.
As for the coverage of the gravel I still have the areas around the two old cars in the driveway to cover then I have to move the cars to get those areas before I can say I have the main driveway covered completely. From there I'll cover the extended driveway that goes further along between the house and garden where I had started covering the area before. This area was super muddy at one time but is now pretty good on the coverage but can use some touching up plus I didn't get the area completely covered from the house to the garden. I want all the ground covered so there is no grass all the way up to the skirting on the house and the porch and no grass up to the garden fence. That gravel laying will continue all the way to the opposite end of the midway to where we have the burn can staged and where the east perimeter fence will run. With that I'll have another high traffic area covered up with rock.
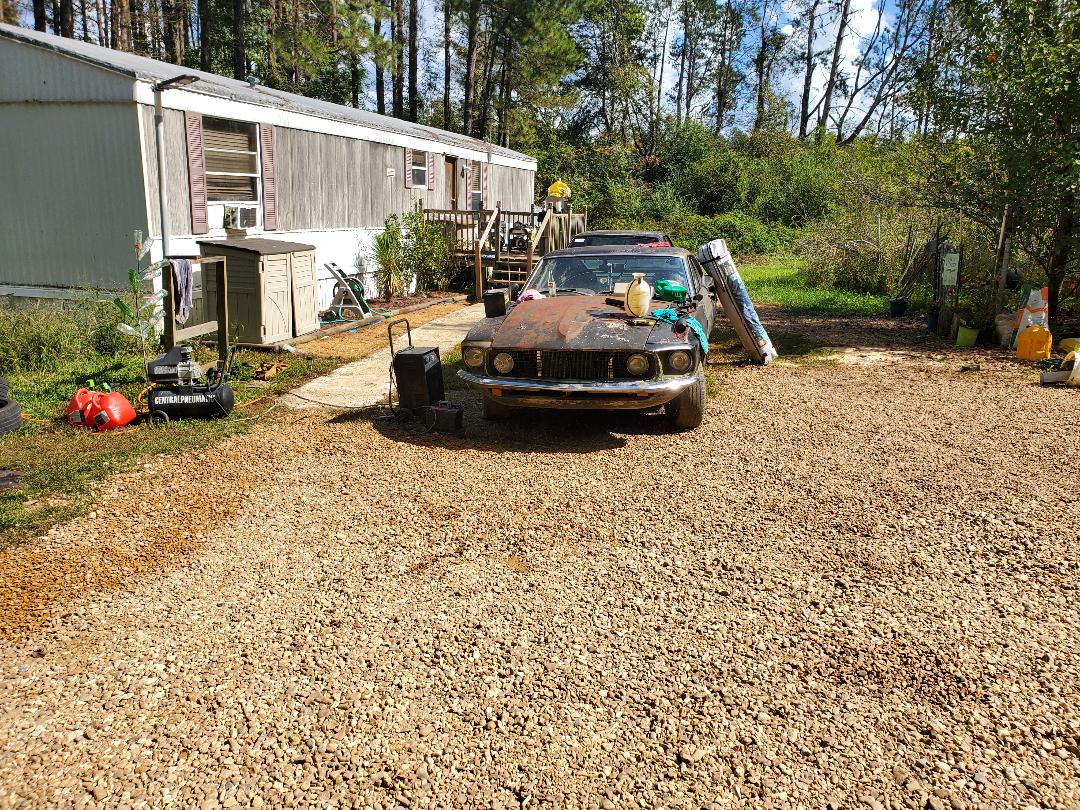
After getting the wiper motors swapped out, I got the motivation to get several other things done on the F250 to make it more ready for the continuous use that it's facing as a defacto gravel truck. Obviously the first thing was replacing the wiper blades since the old ones were trashed. Among other things that needed to be done, I had to change the oil and do a radiator flush. The oil hadn't been changed in this truck for probably a year or more since the truck hadn't seen much use and the radiator had been filled with water more times than not so the cooling system definitely needed flushing. 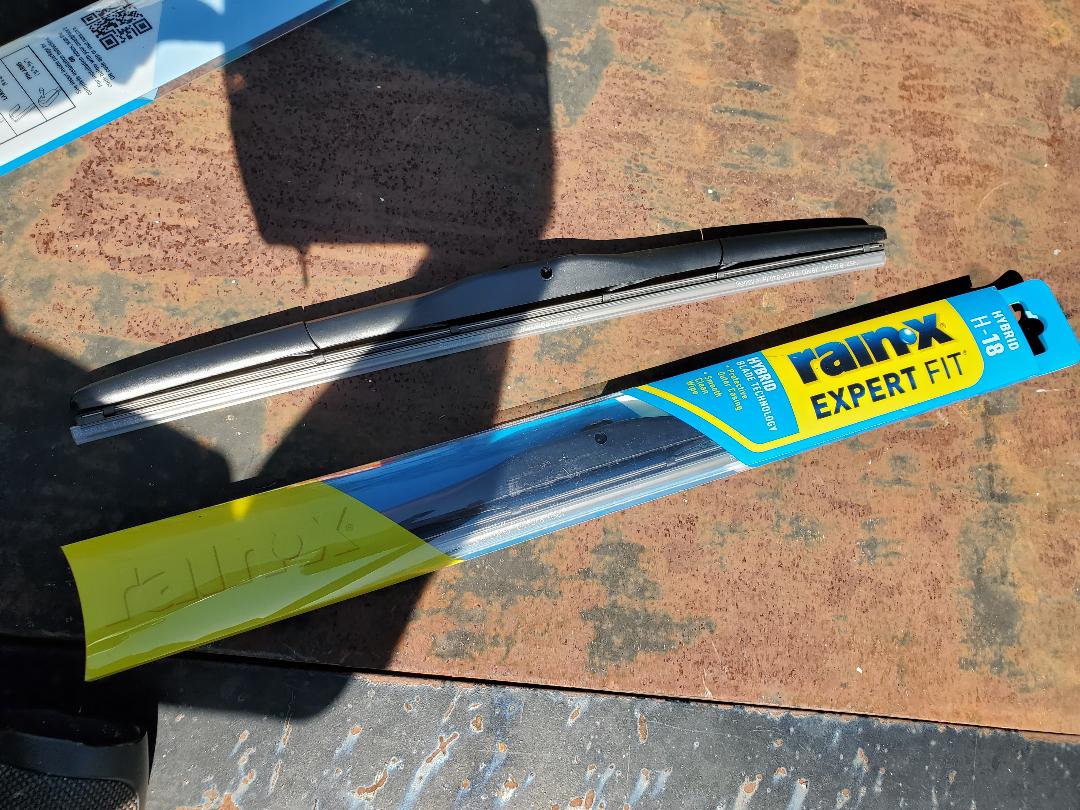 Not going with cheapo wiper blades this time for the F250. Cheap wiper blades obviously didn't last all to well in that they fell completely apart, so this time I got some name brand decent ones that will hold up better and have a better quality squeegee style wipe on the window, nothing but the best for the old truck. The next thing was the oil change. Of course the oil was black as tar but after replacing it with some name brand Quaker State, I took the old oil and mixed it with some gas to use it as a weed killer for the weeds that were still sprouted up through the gravel. With the oil and filter taken care of I went to the radiator flush. I had a bottle of flushing liquid in the trailer so I was easily able to get this little procedure on. I drained the old water from the system then added some fresh water and the flush liquid to the truck and ran the engine until it was at operating temperature. Afterward I opened up the system to drain it. The water that came out was baby shit brown. After draining all of that water I left the drain open and put the hose in the top of the radiator and let fresh water run into the unit while running the engine to circulate fresh water through the cooling system to further flush the cooling system. 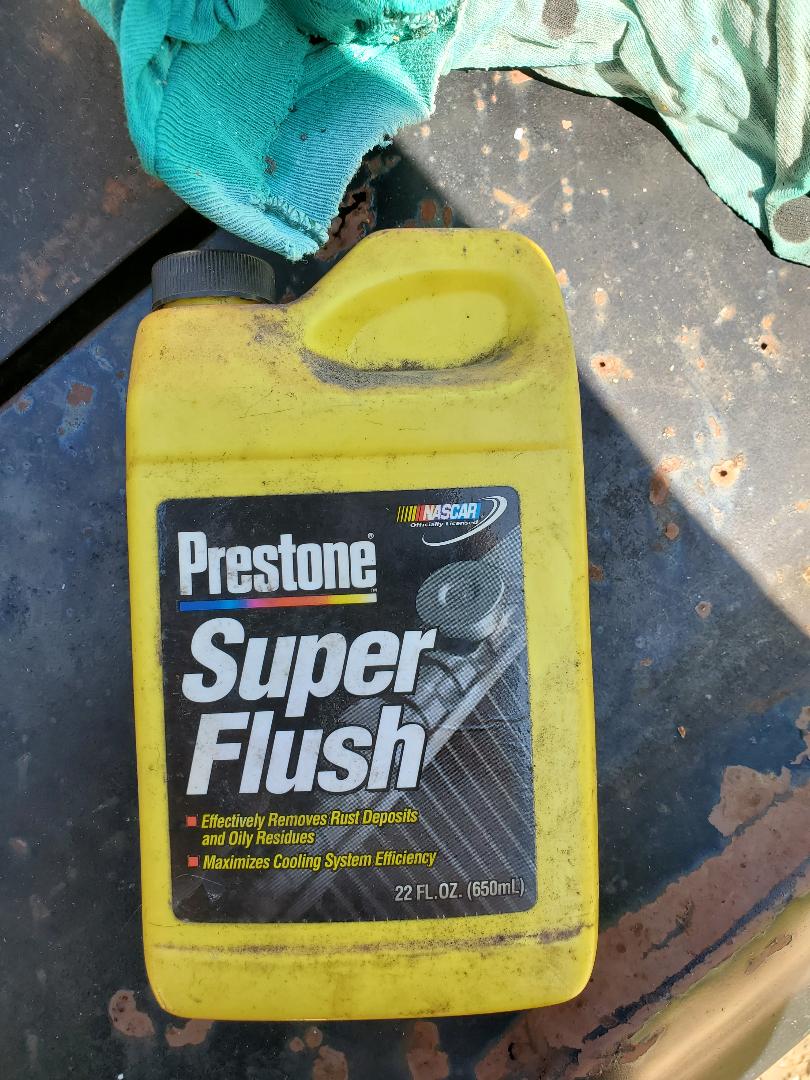 Bottle of radiator flush liquid I had stored away in the storage trailer, finally getting put to use. 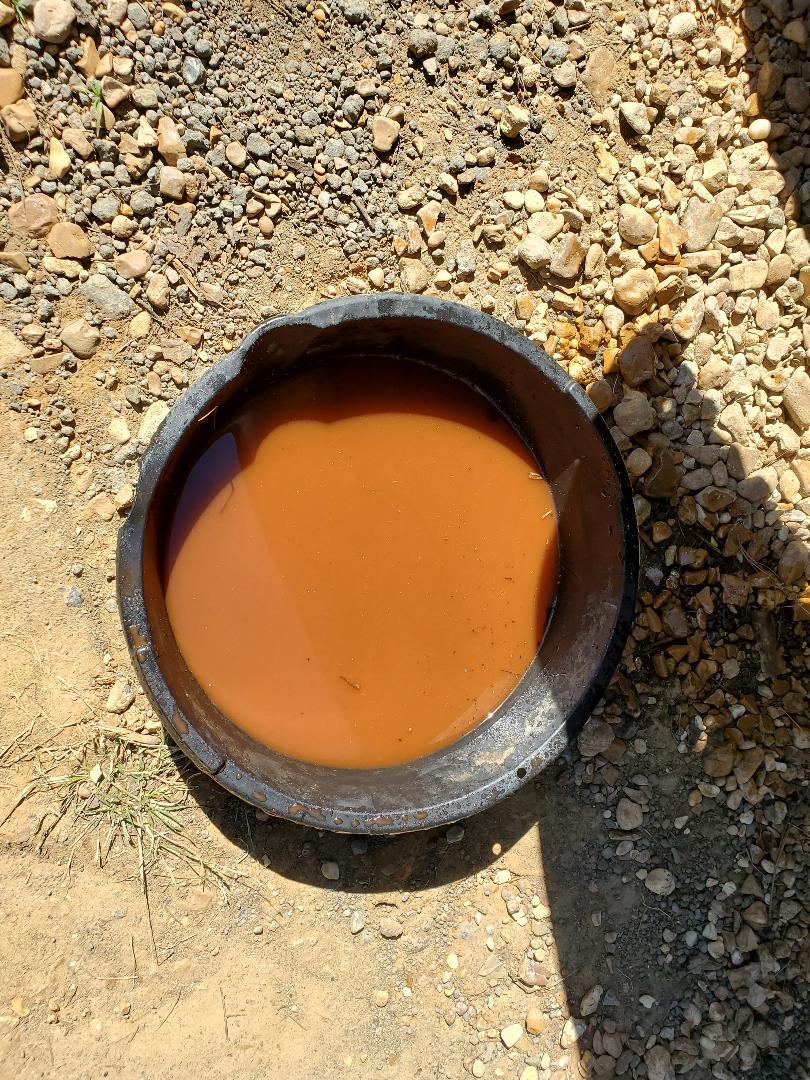 Shitty rusty water drained from radiator after doing flush. The next thing I decided to do was see if I can get the HVAC system fully running again. The system had the problem where none of the blend doors worked and I only had defrost on the system. I pulled apart the control panel to look at the vacuum hoses to see if there was any damage present. This was clearly a problem with the vacuum in the system so after checking this out I traced the lines going out to the firewall to see how they were on the outside. I ended up finding the main vacuum hose broken at the junction coming from the exhaust manifold to supply vacuum to other components. I ended up having to dig into my stash of vacuum fittings and other shit to get a replacement fitting. The fitting where the hose went into had a piece of the broken hose stuck inside and was unable to be salvaged. With the fitting replaced and the hose hooked back up I got vacuum to the control panel working again. 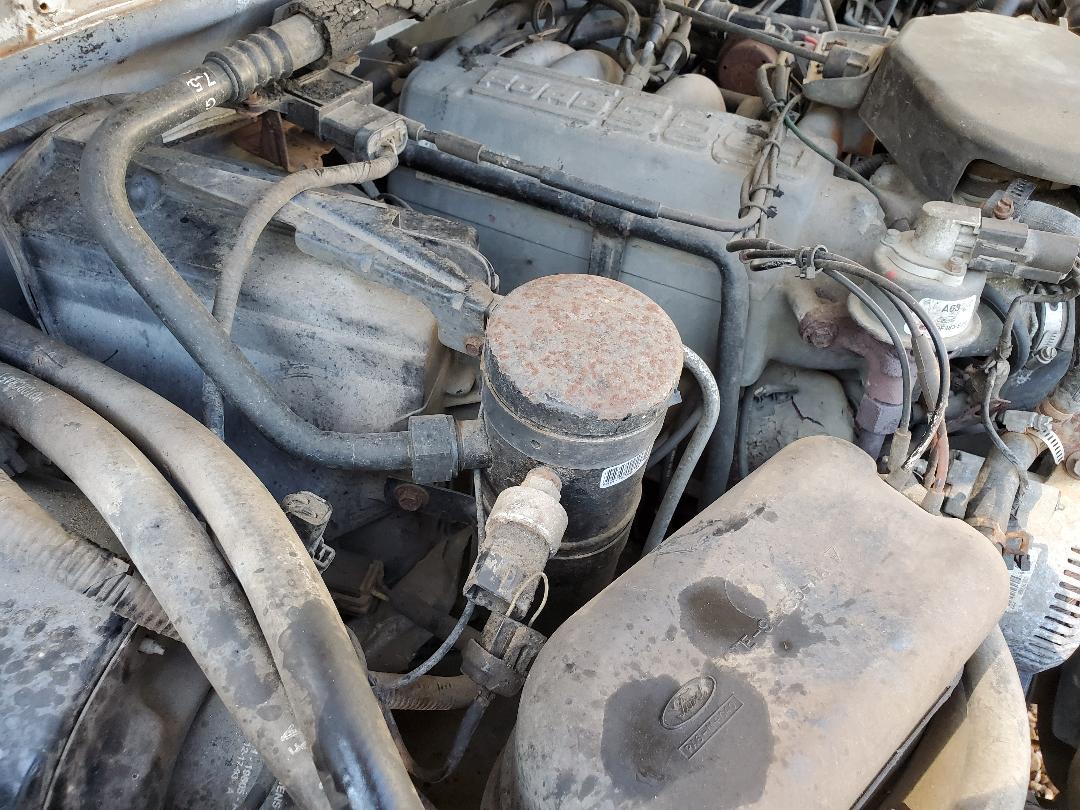 Location of vacuum line, to the immediate left of dryer assembly. With the HVAC system working on the inside I decided to try and get the AC working again. This ended up being a simple attempt to recharge the system. I had to dig out my AC tool bag and a few cans of refrigerant since this is an old school system and it takes a lot of refrigerant compared to newer cars. 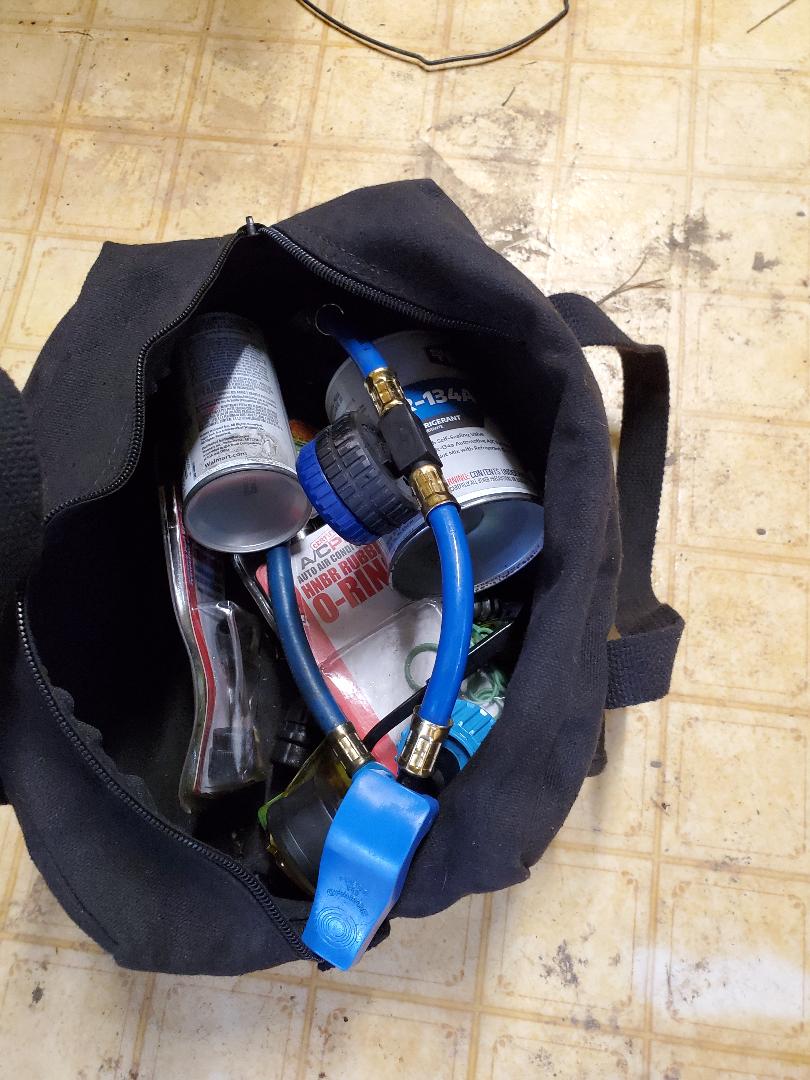 Bag of AC tools. After dumping three cans of refrigerant and a can of stop leak into the system I was able to get the system at a mid range pressure on the gauge. I finally got cold air from the system once again. I thought all was well until the next time I made a gravel run and it was warm out so I figured I'd use the AC system. Wrong. Apparently there's a small leak somewhere in the system making the refrigerant bleed out. Great. So now I'm going to have to make that another mission to try and locate the leak and repair that shit now. 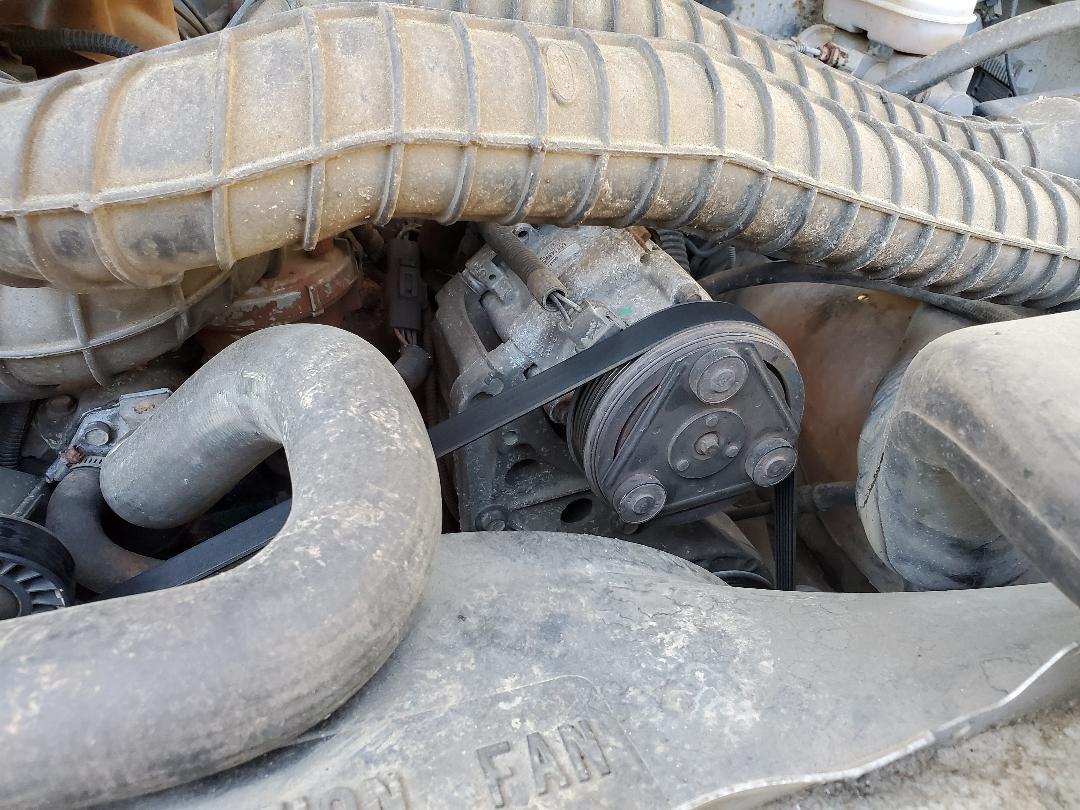 AC compressor tucked away under intake hose, not really too bad to get to overall. My first target area is going to be the AC compressor since this unit is a used unit that I replaced a couple years back. Whether its the compressor itself or the O rings, I will be focusing my energies here first. I never touched any of the other system components so it only makes sense that if there's a leak its going to be where the system was last opened up. Also I can replace the dryer and the pressure switch while I'm at it since the dryer is the original and these things tend to allow shit to break up and go through the system plus the pressure switch isn't working since it was bypassed with a jumper wire at the plug. While I'm at it I'll even replace the orifice tube just so I can say I covered all bases in the repair. I want this truck to be ready for next year to the point that I'll be able to count on it to do damn near anything.
After having used the Mustang Chicken Coupe for two generations of baby chickens and having gone through different trials and errors with the way things were set up and their following corrections, we decided that another car coop was needed to help in making the chicken yard more complete. There are a couple of reasons for this. One, the current generation of baby birds maturing in the brooder section of the Mustang Chicken Coupe are going to need a place to stay and Two, the kit coops that we have set up are going to deteriorate more sooner than later, requiring their residents to relocate more sooner than later.
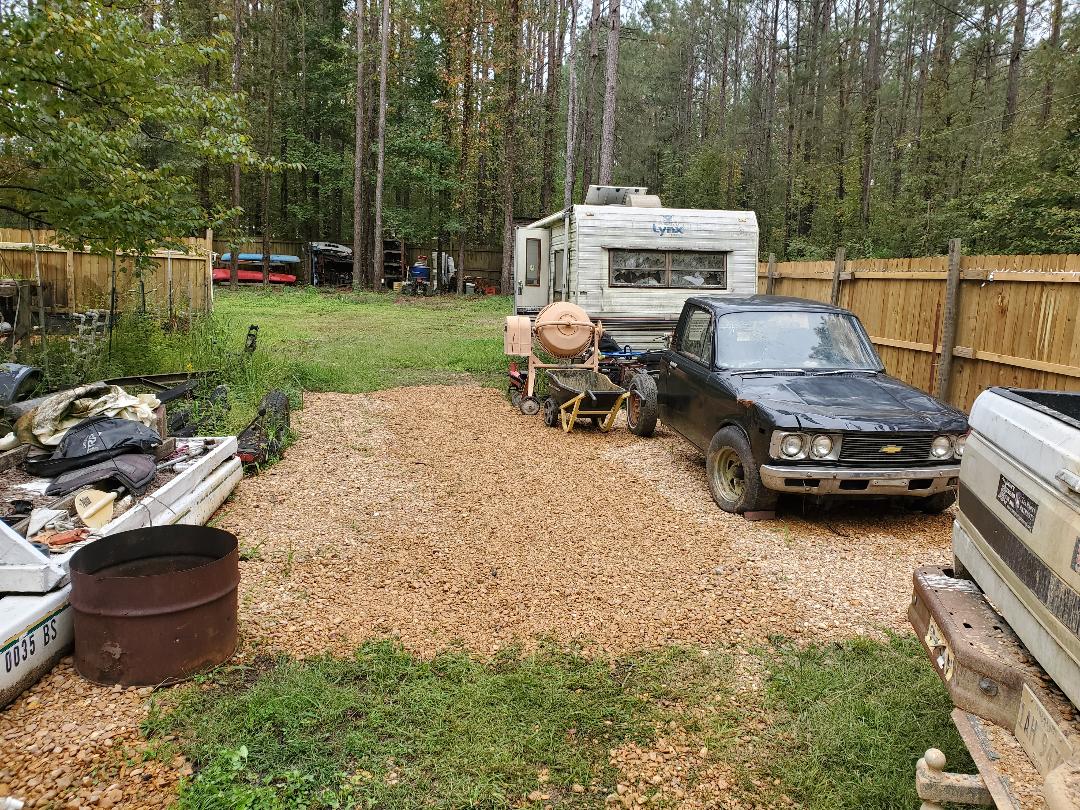
Now I didn't want to just settle on any car to be the donor to go in the yard next to the Mustang Chicken Coupe. I wanted to uphold the theme of old/classic cars by finding something that was old itself so it would fit in the same environment as the old Mustang. How would it look having a 2000 something sedan set up next to a 73 Mustang? It would be completely out of place. So off to FB marketplace to hunt. Now being the car guy I am, I didn't want to just sacrifice a nice body to the chicken coop project as I would look at it as being a waste. Only reason the Mustang was sacrificed was because it was rusted to hell plus was damaged severely by fallen trees. If I found another vintage Mustang body that was in pretty nice condition and had the title to it and I was able to get it for a few hundred bucks, no bloody way would I bother butchering it to make a chicken coop, no, I'd be restoring that. I want something that doesn't have a title so its not going back on the road under any circumstances and because the body is shitty it wouldn't even serve as a decent donor body or parts body for a hot rod or whatever. I basically want something that is a tow truck hook away from the crusher. Well our prayers were answered when this 86 Toyota truck fell into our lap. This truck has accident damage in the front, relatively superficial. It had its engine pulled by the previous owner for another truck so its not going anywhere under its own power any time soon. It also didn't have a title so there's no way its driving on US roads again. Given these facts, the truck was only good for pulling parts off it before sending it to the crusher. Or in this case, to our chicken yard. And for $300 it now resides in the chicken yard. 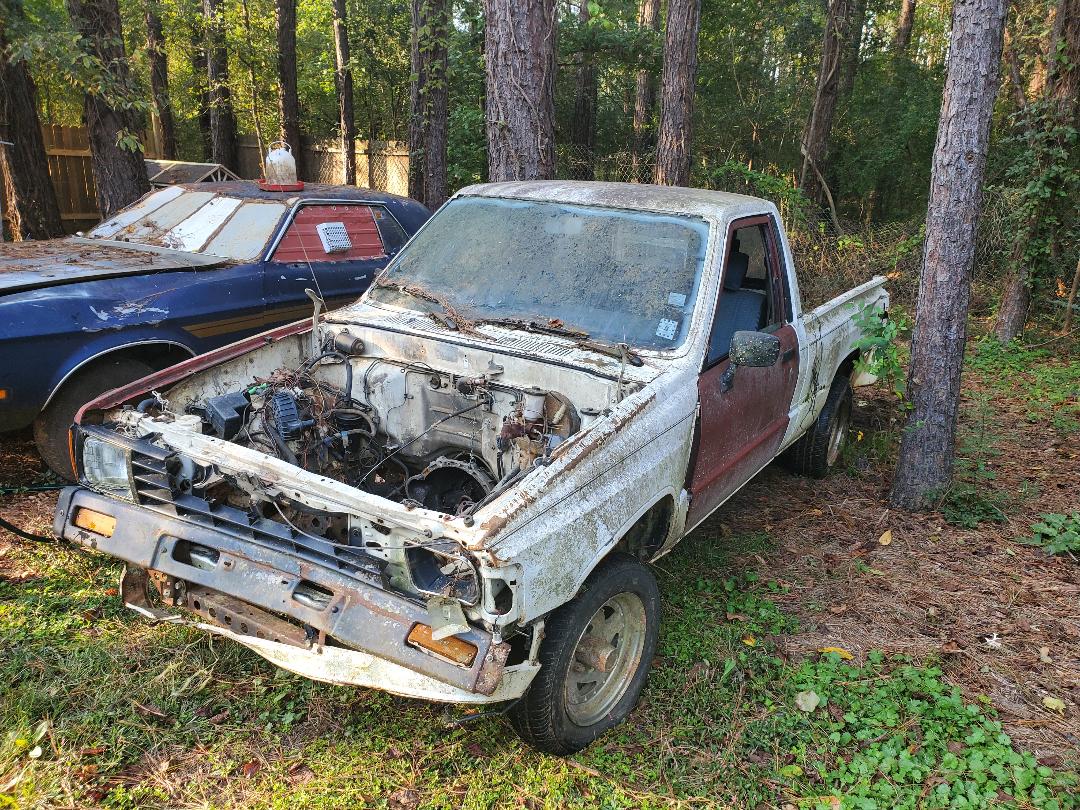
86 Toyota truck body parked next to Mustang Chicken Coupe.
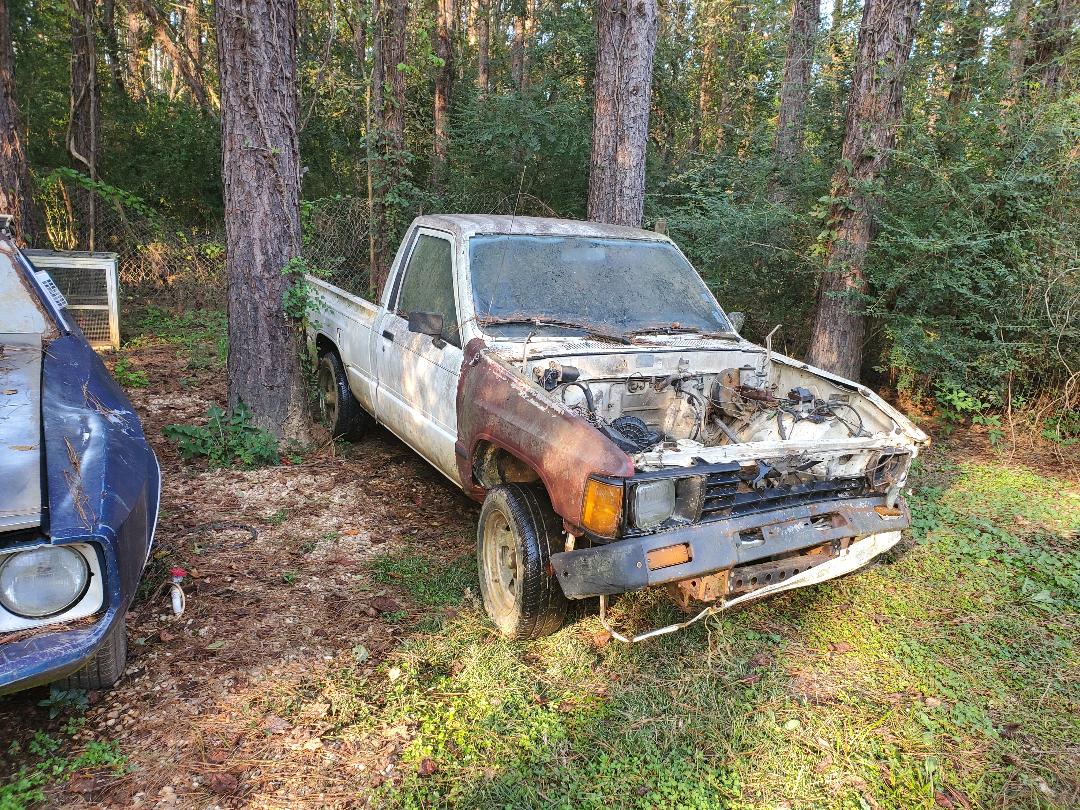
Right side shot of Toyota truck, as with other pic note front end damage, missing engine and just overall degradation of truck. Perfect donor for this project.
While I have the previous owners old engine that they swapped out after taking this truck's engine, this truck still has the manual tranny among other parts in this truck. I will have to gut the interior, which includes the dash section, HVAC, seats and carpet. The tranny and driveshaft will have to come out and I will of course pull all wiring out from the truck. If the wiring appears to have that corrosion that copper typically gets from being aged and exposed to the elements, it will be processed for later scrapping, otherwise I'll probably process it into usable lengths of wire while taking care of the remains for scrap. The parts pulled from the truck will of course be sold online to help recoup the costs spent on the truck. Now funny thing is the powertrain from this truck has its potential for being used outside of just a powerplant for this truck. If I really wanted to, I could rebuild the setup to drop in another vehicle, maybe mod it, who knows. These trucks were modded for offroad and racing purposes so there may very well be a good aftermarket for these powerplants that would facilitate their use elsewhere. Hell I might make a Frankenstein car that uses this plant. I don't want to just sell it off immediately until I do some research to verify the ability to put this powerplant to use like I would want to. Even the seats can be used in another project as far as providing seats for a vehicle. Even though I might not actually see a return money-wise from some of the parts, knowing that I can fill a gap elsewhere in the project field w/o spending anything because I can press some of these parts into service is still a win. Until then, there is a slew of other parts that I can sell off to someone who may be fixing up one of these trucks. As for the other additions to the chicken yard, we managed to get our hands on a bunch of fence pickets once again so we went ahead and got the other materials, 2x4's, landscape posts and concrete so I can go ahead and start erecting more fence along the backside of the chicken yard to finish covering the expanse of that fence line. Using the pine trees that I conveniently plotted the line across I started to nail up boards to get the fence up. I even left the old chain link mesh in place, not only because I didn't want to go through the hassle of removing and disposing of the material but it would actually provide a twofold barrier from critters just making their way through the fence into the chicken yard. 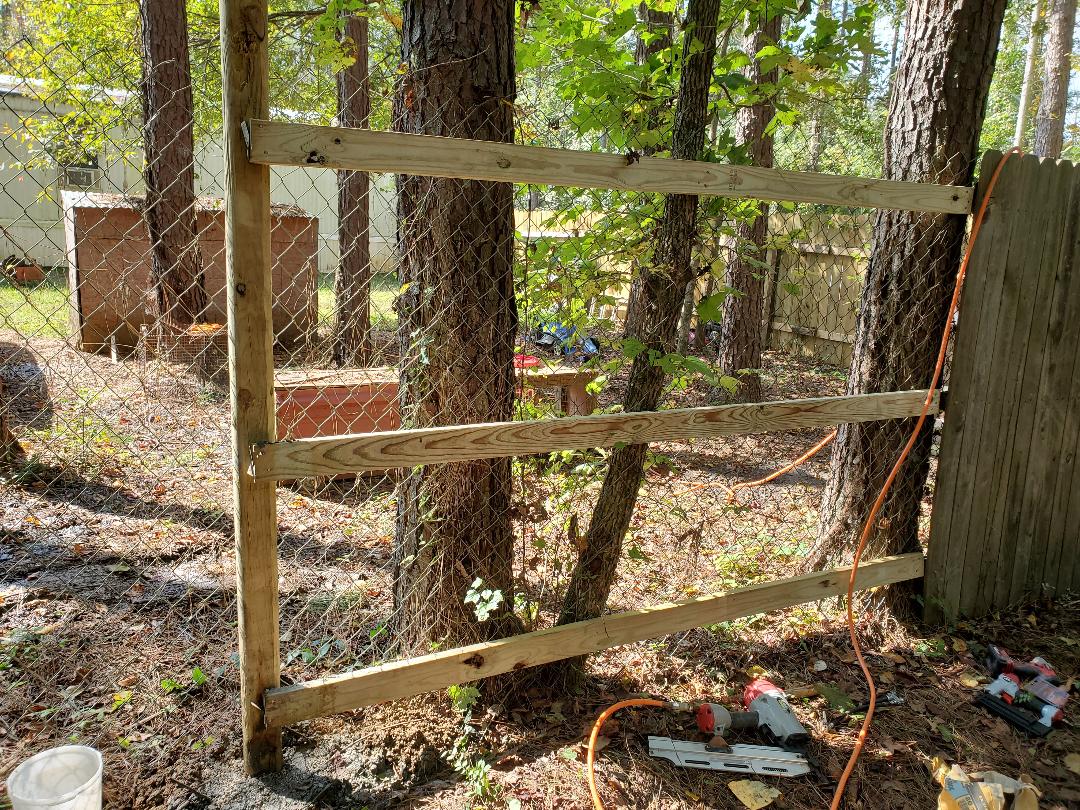
Landscape post cemented in place and 2x4's nailed in place for first section of fence.
Making use of the post hole digger I managed to immediately get a hole dug for the post and after pouring raw concrete into the hole I added water to soak into the powder. After a short time of the wet concrete settling I went ahead and tacked up the 2x4's, using my level to get the boards horizontal. I had to use the longest deck screws I had available to reach through the boards and through the thick bark of the tree and into the wood to ensure a good solid attachment. From there the pickets went up. 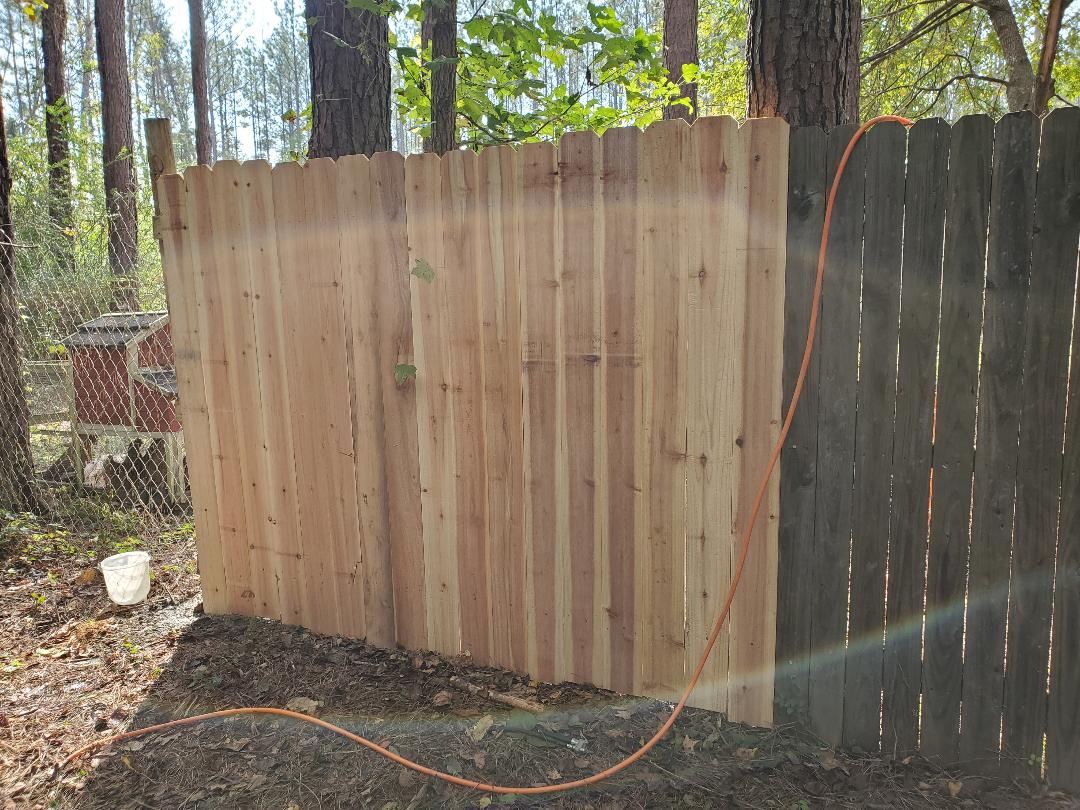
First section of fence erected behind chicken yard.
From here I continued with another post hole dug and a post sunk with more 2x4's nailed up, and then some more pickets nailed up. The nail guns were put to serious work in this op. Now, the one problem with using trees as fence posts is the idea that getting the fence perfectly plumb is NOT going to happen. Accepting the fact that the fence is going to be off kilter somewhat allows me to just continue to get the fence up without being distracted by the fact that it is kind of goofy looking. But the fence did go up. 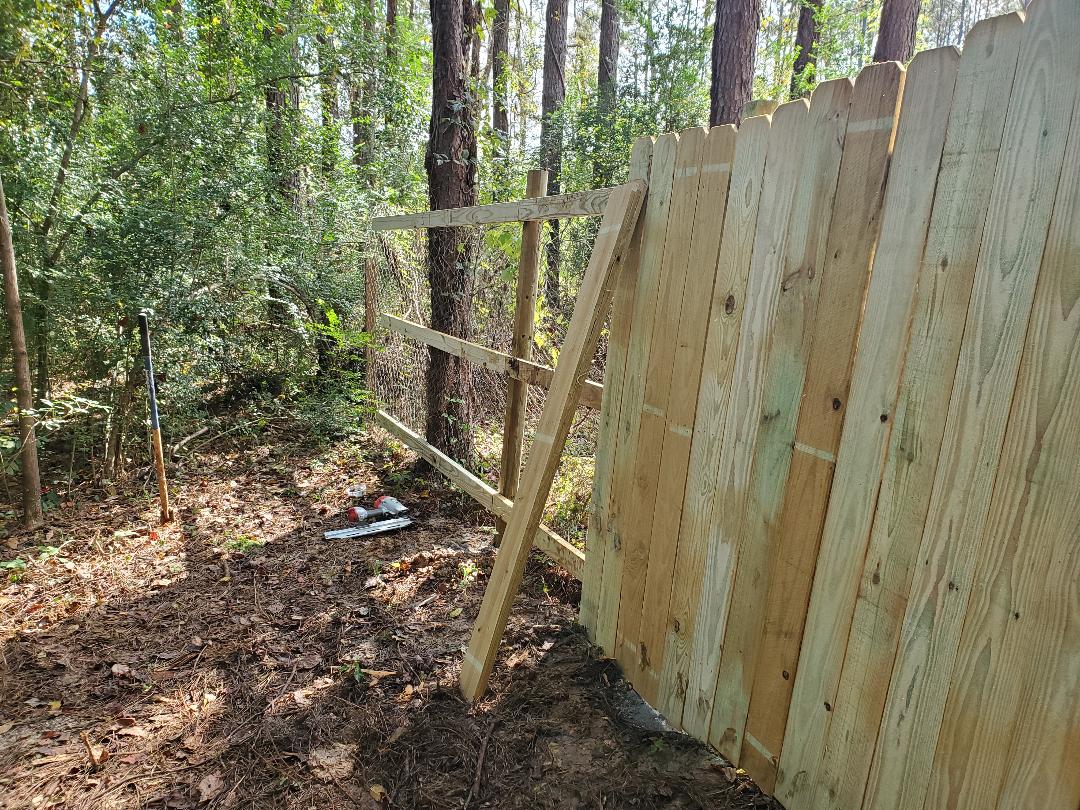
More of the fence going up after posts and 2x4s were secured in place. Note how fence it slanted somewhat in the right foreground, on the count of being anchored to the trees.
Luckily I actually had more than enough fence boards to completely cover the span from where the existing back fence ended all the way to the opposite end of the chicken yard. With the back fence done I will have to get more material so I can start on the section of fence that will enclose the east end of the chicken yard from the back fence to the house. 
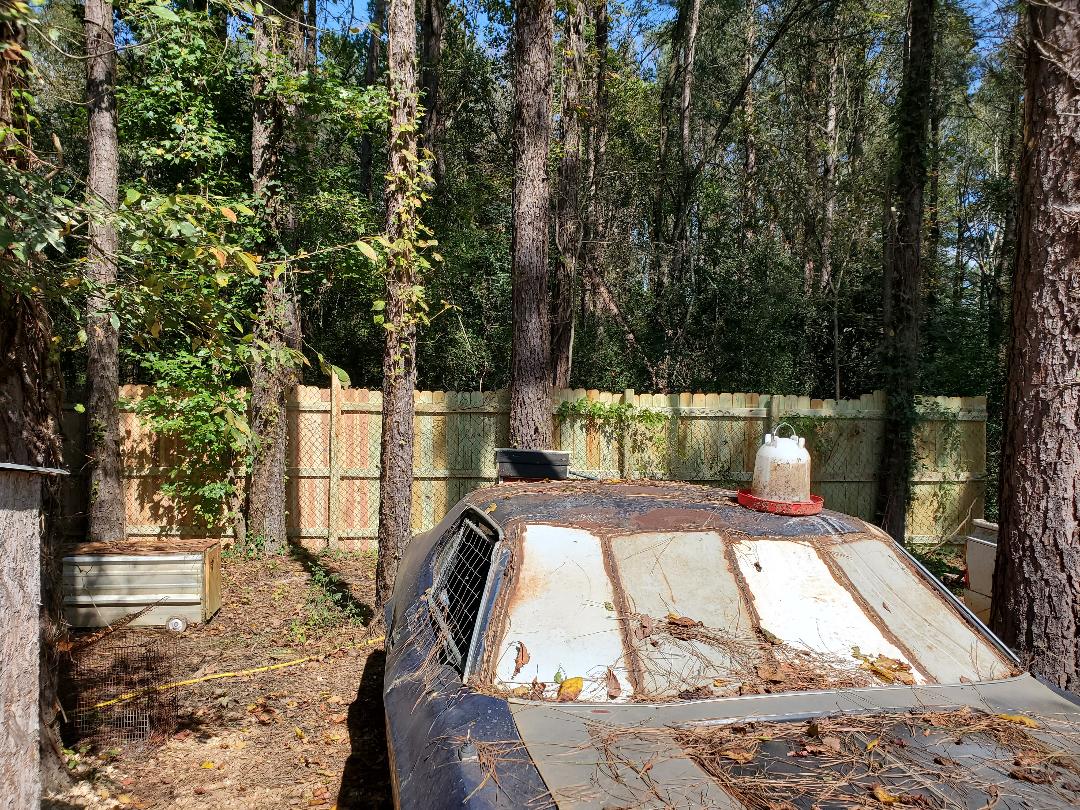
Completed back section of chicken yard fence.
The other important thing to note about this section of fence is that this is also the perimeter fence for the entire yard. Since the chicken yard is against the edge of the plotted perimeter fence line, this fence needed to be made to the same standard as the regular fence panels are, using three boards to hold the pickets up compared to the two boards that I used for the interior garden fence. Even the sections of garden fence that serve as the perimeter fence will be made with three boards if I have to make the sections from scratch versus using completed panels. Again the chain link adds some reinforcement to this main fence line so intruders will have a harder time penetrating this line of defense. 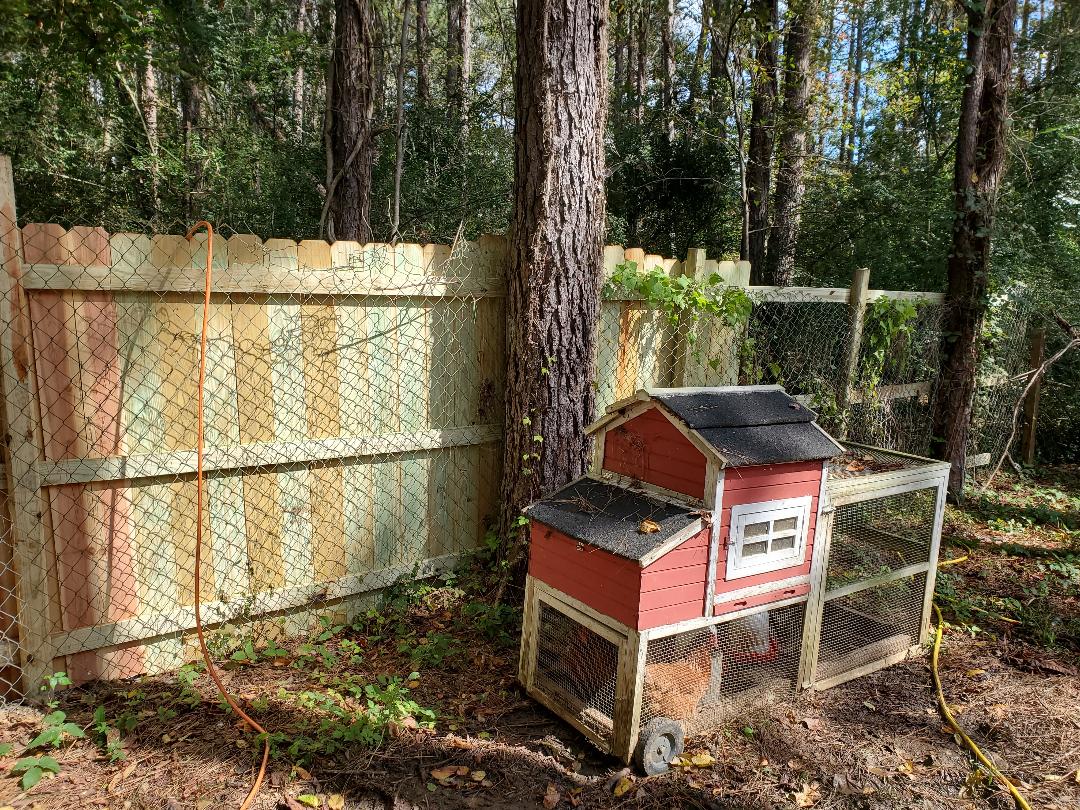
Inside shot from chicken yard of the fence going up. Note old chain link fencing still hung against trees, sandwiched between wood fence and tree for reinforcement.
Wider shot from inside the chicken yard showing the fence.
As can be seen in previous pics the area behind the fence was cleared to make way for easy access to the area for us to erect the fence. I cut down everything that wasn't a pine tree and hauled it away to the burn pile in order to make for a buffer zone behind the fence. This almost serves as an "access road" in case we need to get back there to service the fence, or, as I plan, being able to more vehicular traffic to the other end of the compound without having to actually go through the compound. This is especially important when it comes to any automotive work we do as it will keep us from having to move cars around just to access one car or to get one car to a certain spot in the lot. Plus without having brush and other plant trash up against the fence, it will help keep the fence from being damaged by trees that can get knocked up against the pickets. There's plenty of benefit to having the area cleared around the fence line. 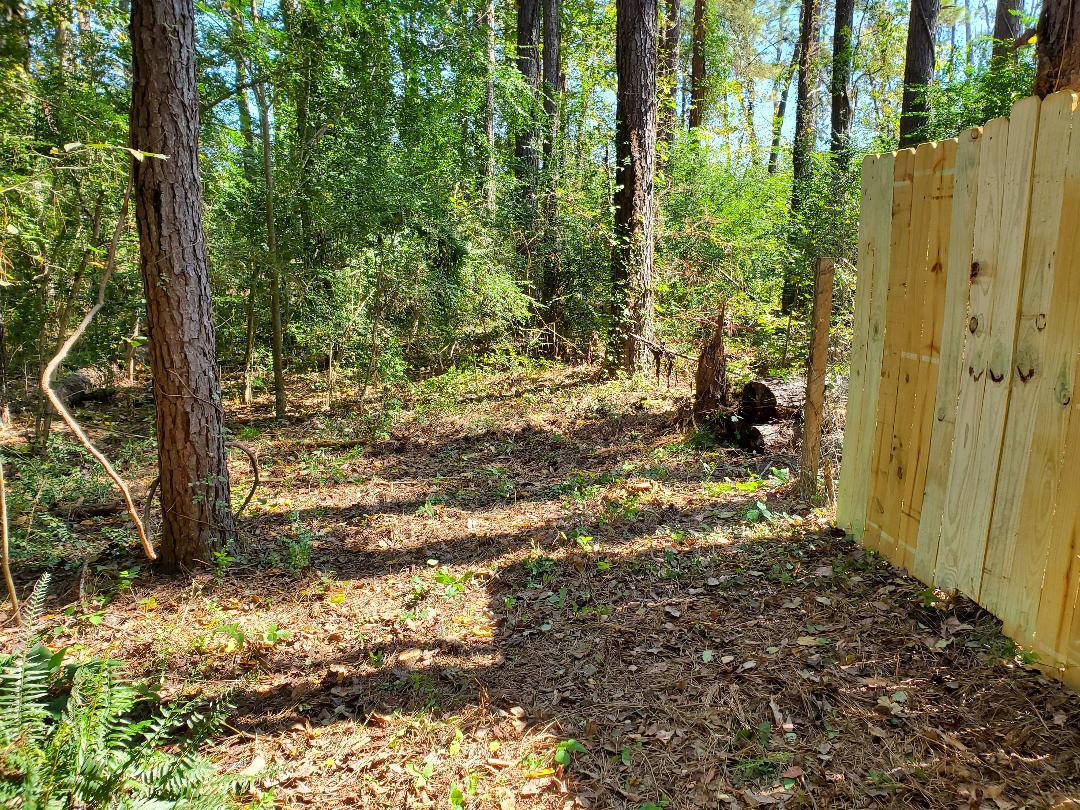
Clearing behind chicken yard/perimeter fence showing how wide the gap is from the woods to the actual fence. Wide enough for a small vehicle to pass through.
Along with the section of fence going up to the house the other order of business is putting up gates for the main entrance and the back entrance. Lowe's sells gate kits that consist of iron sections that can be put together along with fence pickets to make a reinforced gate assembly that can be hung and not sag or distort and can be made up to 6ft wide, which will work perfectly for the 8ft main opening to the chicken yard with double gates. The back section will be less than 3ft wide which is within the scope of these kits as well. The back gate is for allowing any caretakers to be able to access the chicken yard without having to go through the main yard to gain entrance. When the fences are complete our plans are to let our dogs be able to run free through the entire compound and even though we do not plan on breeding vicious dogs, some people will not want to mess with territorial dogs if they're trying to do something like tend to our chickens. Especially when one of the dogs is a pit bull. So having that back gate will help immensely in allowing outside access to just the chicken yard. Of course it'll be locked up to keep out unauthorized access. Stay tuned for more to come in our exploits on the homestead.
As part of a quest to try and automate our chicken operation I decided to upgrade the drinking cup setup from the units I originally had in place for the car coop as well as move this same setup to include the regular coops.
The original drinker cups were small and not really able to handle the kind of traffic that was hitting up these old cups. Plus the things really weren't made to handle the type of pressures that were present on the water line, even with the regulator in place. They leaked constantly after a while. The worst problem was the idea that the chickens were too stupid to peck the little nipples in the drinker cups to cycle water into the cups. I wanted to find drinker cups that were like the very first ones that I tried. Those were the type where they were spring loaded. When empty they would spring up, opening a simple valve that would let water into the cup then as the cup filled up the weight would make the cup dip down, closing the valve. We ended up finding this type of cup but this time with the 1/8" NPT screw tip instead of the hose barbs that the other ones had. So of course we got a pack of them. First place I set up the new drinker cups was in the brooder section of the car coop. I just had to unscrew the old units and replace them with the new ones. Turning on the water yielded good results as the cups slowly filled with water then weighed themselves down to where they shut off. I was satisfied with em so I moved on to the main coop section. 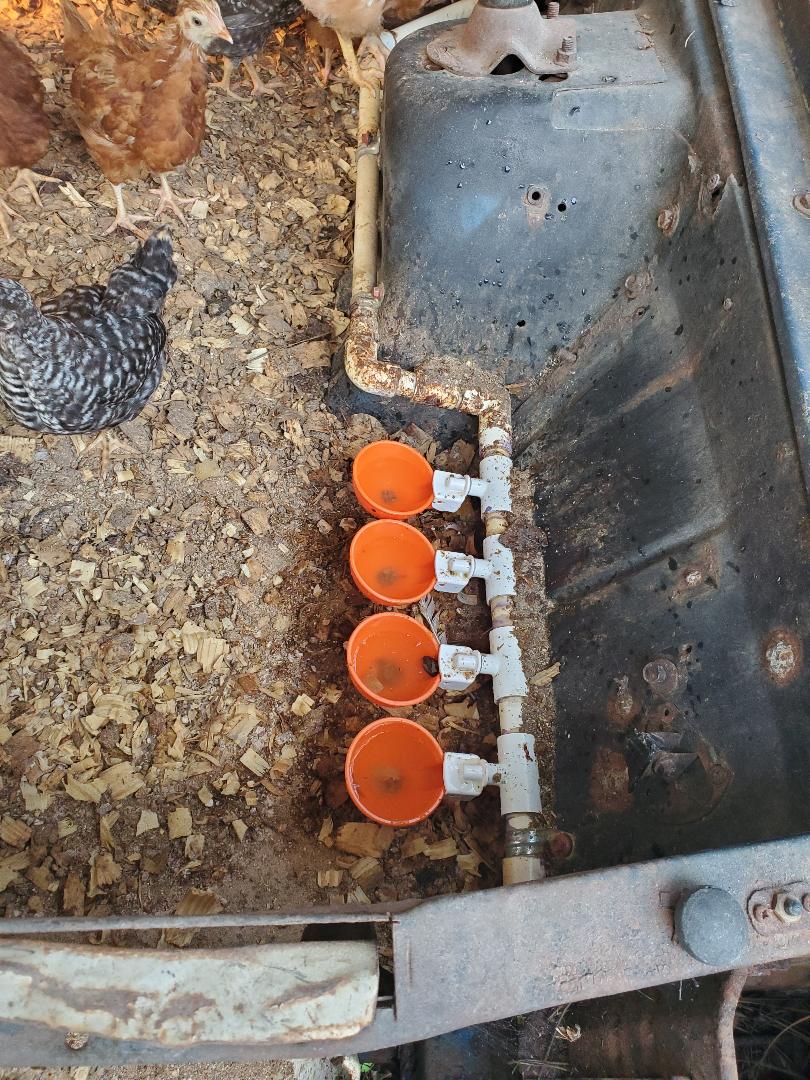
New drinker cups installed in brooder section of car coop. Note larger size compared to older units.
Moving on to the main coop I did the same thing, removing the old drinker cups then installing the new ones. Only when I turned on the water, after the cups filled they started leaking over. I ended up having to cut the PVC pipe and install a coupling then turn the section of pipe holding the drinker cups to position them at an angle that would allow them to be level when filled so they won't leak. After doing that, everything worked as designed. 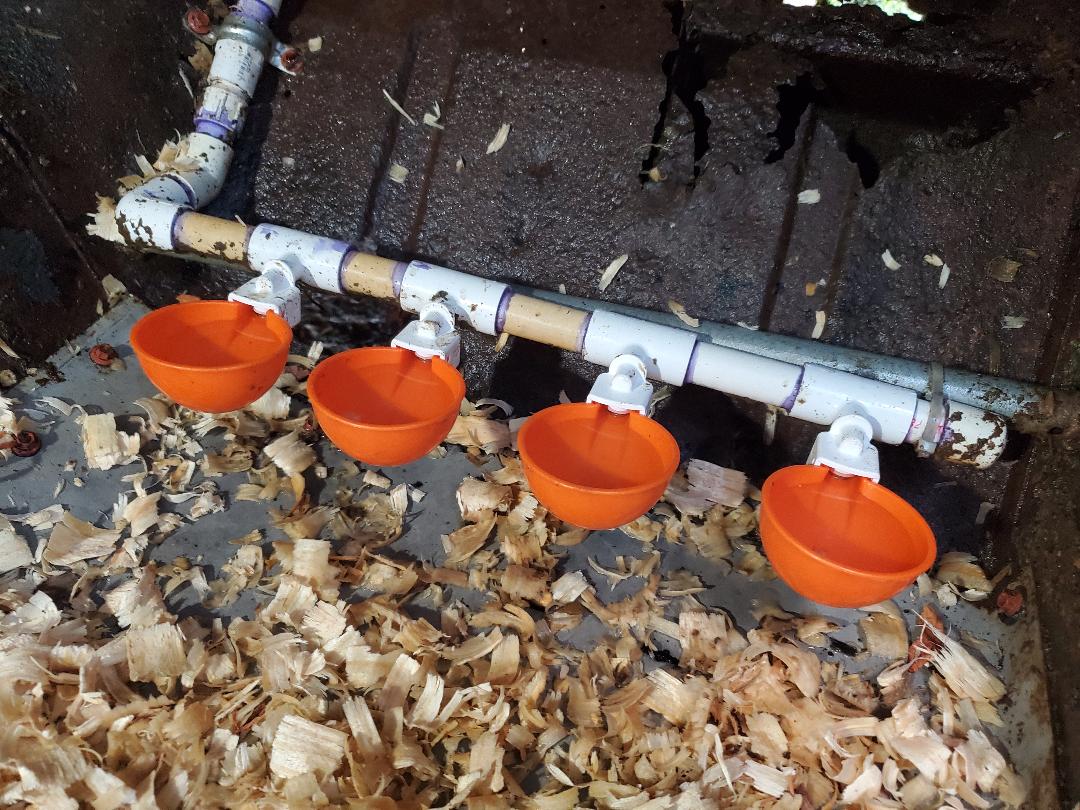
New drinker cups installed in main coop section of car coop.
I had to work out a couple of bugs with the drinker cups to get them where they won't leak or otherwise cause problems since we can't have flooded chicken coops and grounds. Besides it will get expensive on the water bill if we have constant leaks at these stations. With the overall success of these drinker cups I will start building the things to set up the chicken coops to have water drinking cups as well. Ideally I'd want to have a gravity feed hopper for each coop where it slow fills the drinker cups via gravity. What this will do is take away the pressurized water lines that are prone to rupturing the drinker cups' valve seal. Plus it allows for the apparatus to operate in the absence of pressurized water. What I want to do is take these small float valves and attach them to the tops of the water hoppers and hook the pressurized water lines to those so they take water to fill up then slow feed it to the drinker cups. I'll see based on how well things do in the future. The next thing on the list is the spreading of even more gravel. After getting another truckload, this time I concentrated on the main driveway. I started spreading over a depression area where it was getting a little too wet and starting to mud up the cars as they went in and out over the area. Plus the rest of the driveway was getting a little more worse for wear. I started dumping the gravel over the worst areas then started just covering the ground over what would be considered the main driveway, or main car park area. 
Starting to cover half of the main driveway with gravel.
As I completed the covering of the half of the main driveway where it was open I started putting gravel down around the Tracker as it was parked in the other spot. This was ok since my next load of gravel would be used to cover that area after moving the truck out of the way. In the meantime I wanted to get as much ground in this area covered. I even started putting gravel down up to the fence so help make things look even and neat. 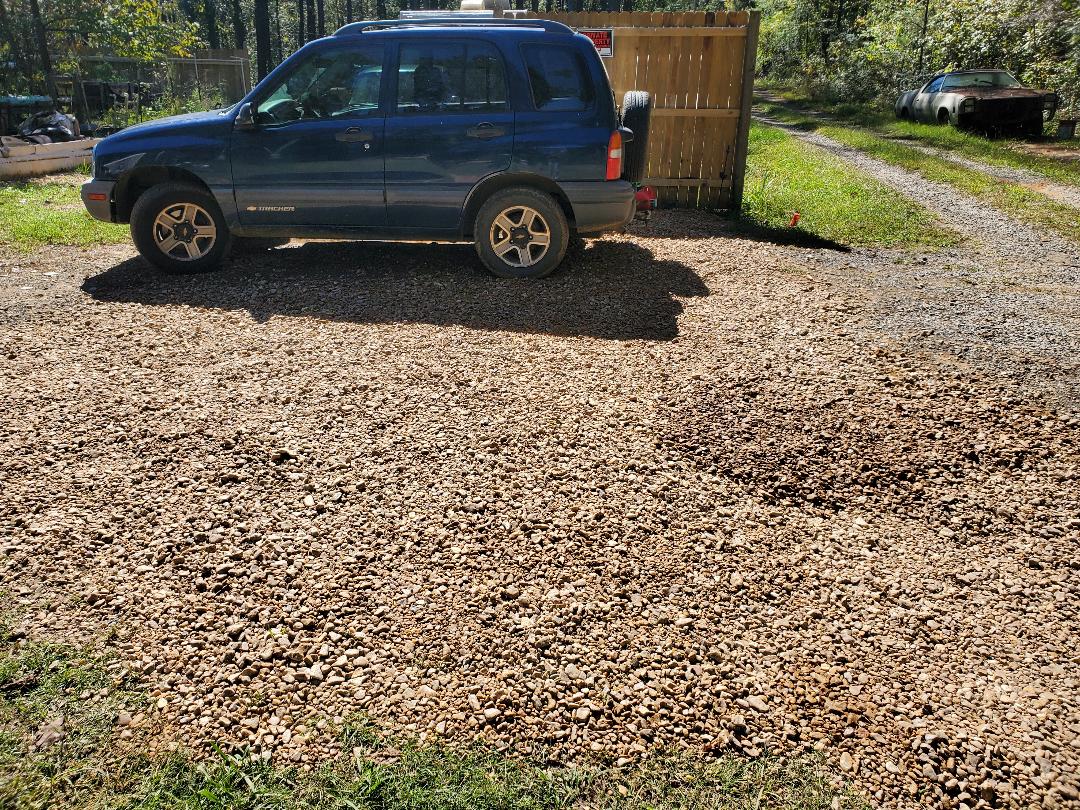
Expanding the coverage of the gravel over the main driveway, going around the Tracker and up to the fence line.
I decided that I wanted to continue the coverage of the main high traffic areas going across and through the main driveway so I can create areas that are plenty solid and nice enough to walk on. As I get these main high traffic areas covered I will then slowly expand out into the other areas that I wanted to get covered. Slowly but surely I will achieve total gravel coverage and not have to worry about cutting grass that much if at all.
After having replaced the bumper cover on the Monte Carlo I went back on the hunt for tail lights for the car. The units that were in place were damaged by the hailstorm that came through earlier this year, knocking out the lenses from the shells. I managed to find a replacement left light on ebay but the seller didn't put a picture on the ad that would indicate that it was a complete unit. Since the ad didn't have a thorough description I had to ask if the light was a complete shell. After exchanging texts I ended up getting pics of the unit and to my satisfaction it was a complete light housing, lens and all. They wanted $30 for the shell, free shipping so of course I bought it. Unfortunately they didn't have a right side though. After a brief wait the light came in and I went to work on replacing the unit.  Damaged tail light on Monte Carlo, missing red lens. It was covered in red lens patch tape but that faded in the sun over the summer. These tail light housings were only held in by a couple of screws, no bolts or anything fancy. Of course this meant that the old unit was pulled out quickly and tossed aside as it is no longer needed in any capacity. There were three light sockets in the housing; brake, turn signal and back up light. These twist and pop out. After pulling the old shell out I placed the sockets back into their respective holes and quickly re-secured the light housing. As quickly as I started the whole job ended rather fast. Now the next thing is to find a replacement right side tail light housing. 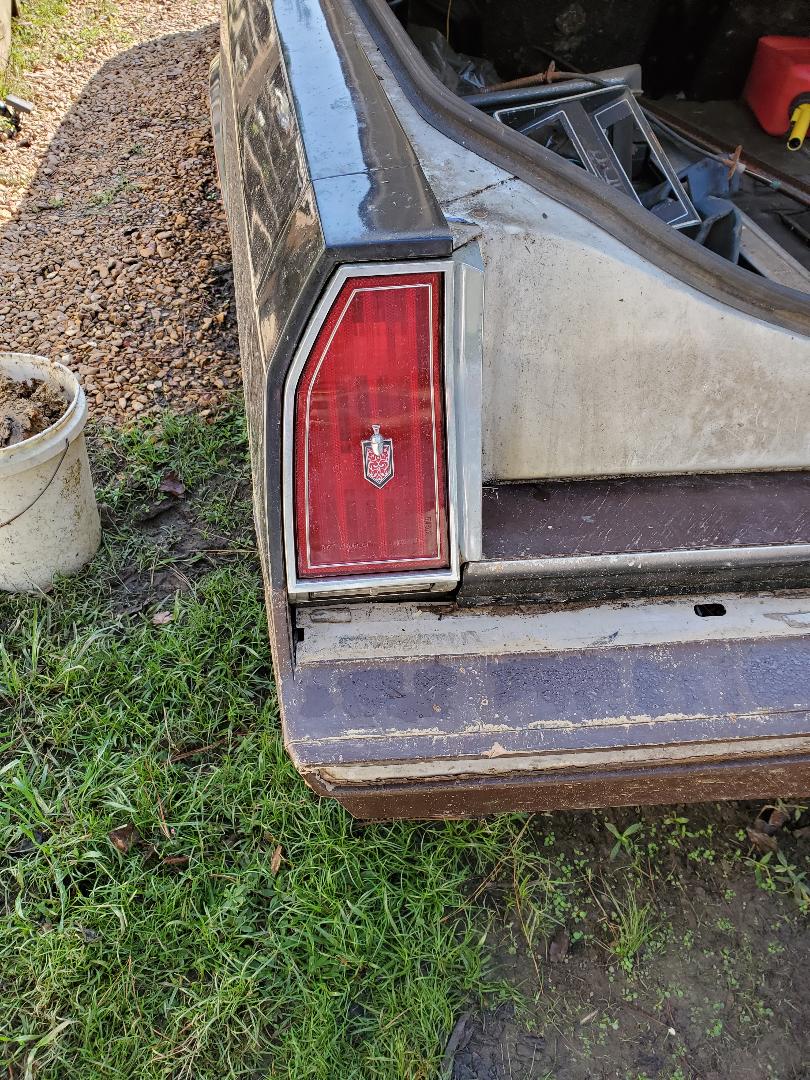 Replacement tail light housing screwed back in place, awaiting its partner housing to be found so I can get the car back on the road without it looking like shit. On a lighter note, after putting the tail light in on the Monte, I went into the garden to check things out to see if I could harvest something prior to going inside for the day. I did manage to get a few small habanero peppers, a couple of small tomatoes from one of the late planted tomatoes, and my first harvest of salad greens. I got a few varieties of lettuce so I could duplicate my spring mix salad that I normally use. I snipped several leaves from most of the plants, not taking all the leaves so the plants can continue to grow. I had enough leaves to make a couple of reasonable salads.  Bowl of salad greens with peppers and tomatoes buried underneath. There's enough here for a couple of salads. There is still some season left that I should be able to take advantage of harvesting some more salad greens before the first frost sets in. The tomatoes and peppers will be pretty much done for in probably the next few weeks. All it takes is one or two good nights of being in the 40s and its pretty much done for those fair weather plants. The lettuce and other greens should last well into the frosty season. With some preemptive care I may be able to keep those plants growing well into the winter, frost or no frost. With the switching up of plants its always nice to be able to still grow our own food even as the regular growing season is just about done. The only thing that would make all this better is a greenhouse....
After using the Scion for so long it was inevitable that some stuff would start going wrong. Besides the normal routine of going through tires, we had to change out the struts, brakes, alternator and ball joints. As of lately the engine seems to use a little oil, nothing serious, but something that you have to keep an eye on lest we run out of oil. It seemed like the engine was just normally using the oil since there was never any oil on the ground nor a cloud around or behind the vehicle.
At this time just for the hell of it I looked over the engine and seen that there is oil residue on the top end of the engine, classic sign of a bad valve cover gasket. It isn't severe enough that there's oil on the ground or oil leaking out so badly that its landing on hot surfaces and burning off creating the smoke screen that is part of having bad oil leaks. With that I wanted to address the bad valve cover gasket now while its still benign. After getting the gasket, which is a rubber piece that fits into a groove around the edges of the valve cover, I went ahead and got to work disassembling everything. 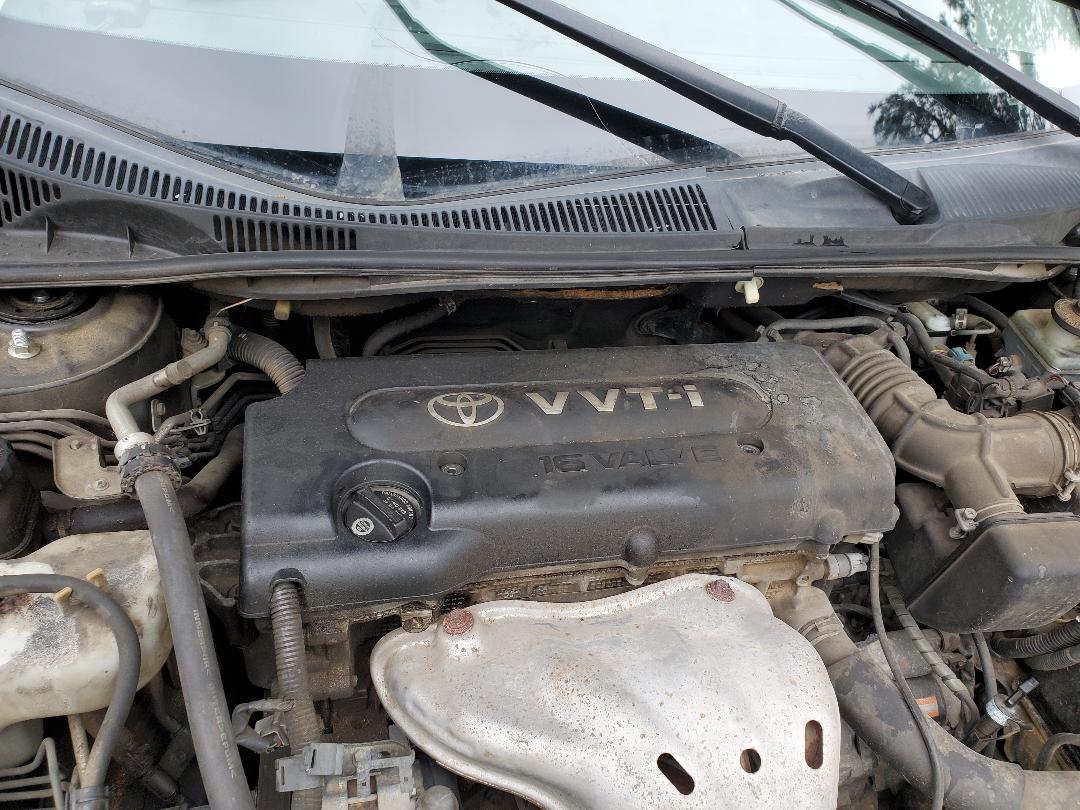
Scion TC's engine with cover in place.
From the looks of things this was going to be a pretty easy job. First I pulled the cover from the top of the engine. Afterward I removed the four coil packs. Upon removing these I found that the plug boots had oil on them, sign that the gasket was indeed bad. This engine is one of those types where the plugs are recessed in the top of the cylinder head instead of coming out from the sides so the oil pan gasket incorporates material that goes around these tunnels where the plugs go. 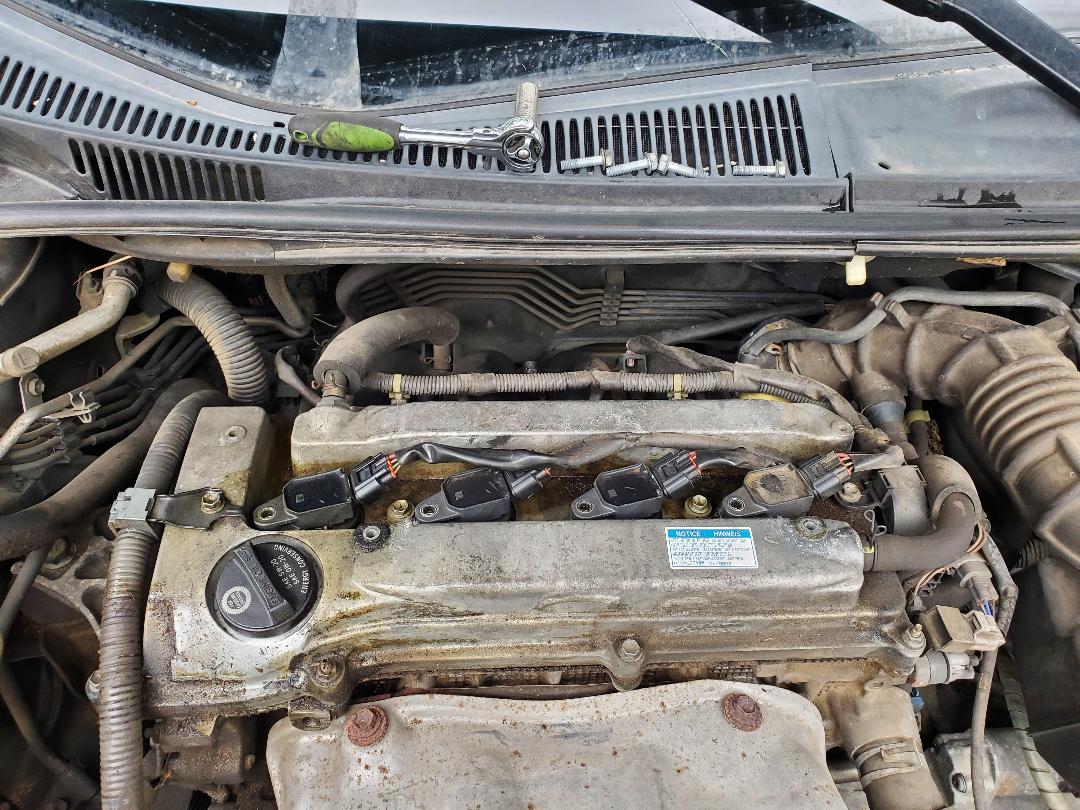
Top of engine after removing cover, exposing coil packs and actual valve cover.
With the coil packs off I got the cavities around the spark plugs cleaned of oil by stuffing a rag into the cavities to soak up the oil. From there it was 8 bolts between me and removing the valve cover from the engine. There were a couple of hoses and plugs to a couple of sensors that had to come free in order to clear things from the valve cover but this was nothing, getting the valve cover off was very effortless, more so than some of the older cars in fact. Looking at the old gasket I seen that it was indeed bad. While it was intact it was very brittle, not able to be bent in any way without cracking and breaking. This brittle nature would easily allow some oil to seep by as the rubber was hardened and not able to contour to any imperfections in the surfaces that it came in contact with, so obviously it had to go. 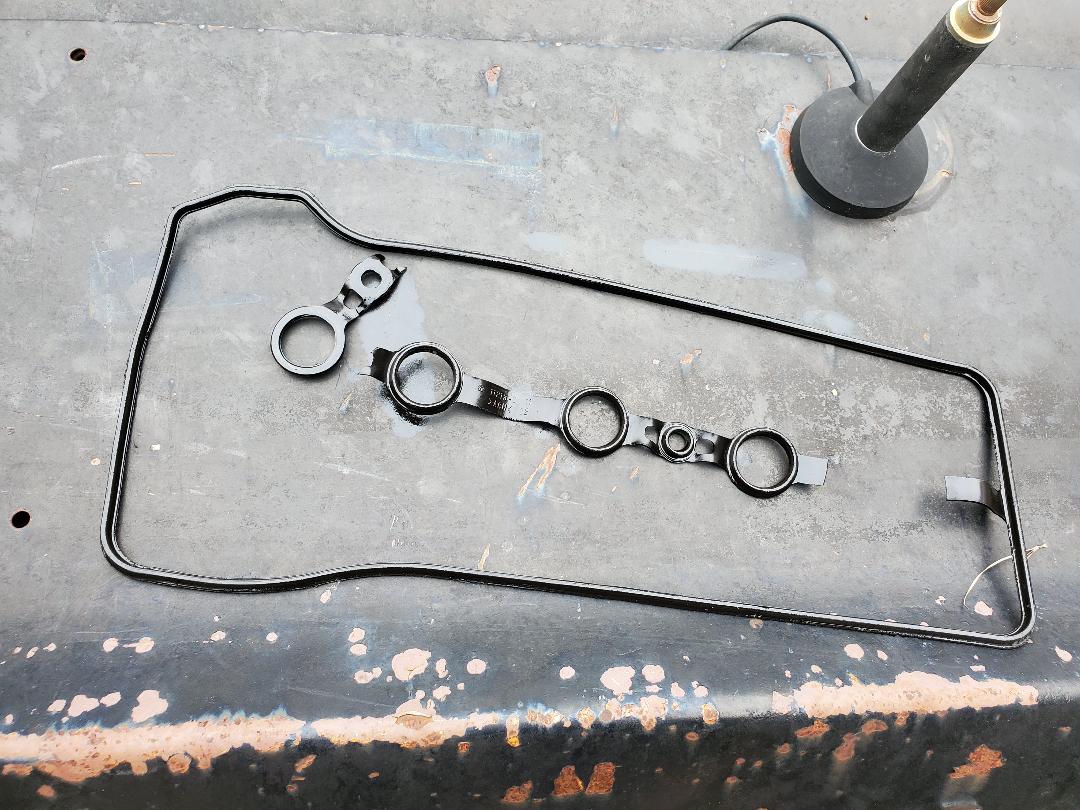
Old valve cover gasket after removing from the valve cover. Note how spark plug tunnel gasket portion broke free from overall gasket.
From here I cleaned the groove in the valve cover to get oil residue from the metal prior to seating the new gasket in place. What I did do to assist in making sure the new gasket stayed where it needed to be as I set the valve cover back down I applied some gasket maker in a few spots, just putting a slight amount to act as a glue to ensure that the gasket it held in place completely around the valve cover. I didn't want to get the cover set down then find out the gasket popped free in one small area and is now pinched or otherwise distorted when I secure the valve cover. This way, the gasket maker will help keep everything straight and won't hurt anything. Other than the idea that it might cause the gasket to stick if I have to remove the valve cover in the future this move allowed me to guarantee that the gasket is in place properly. 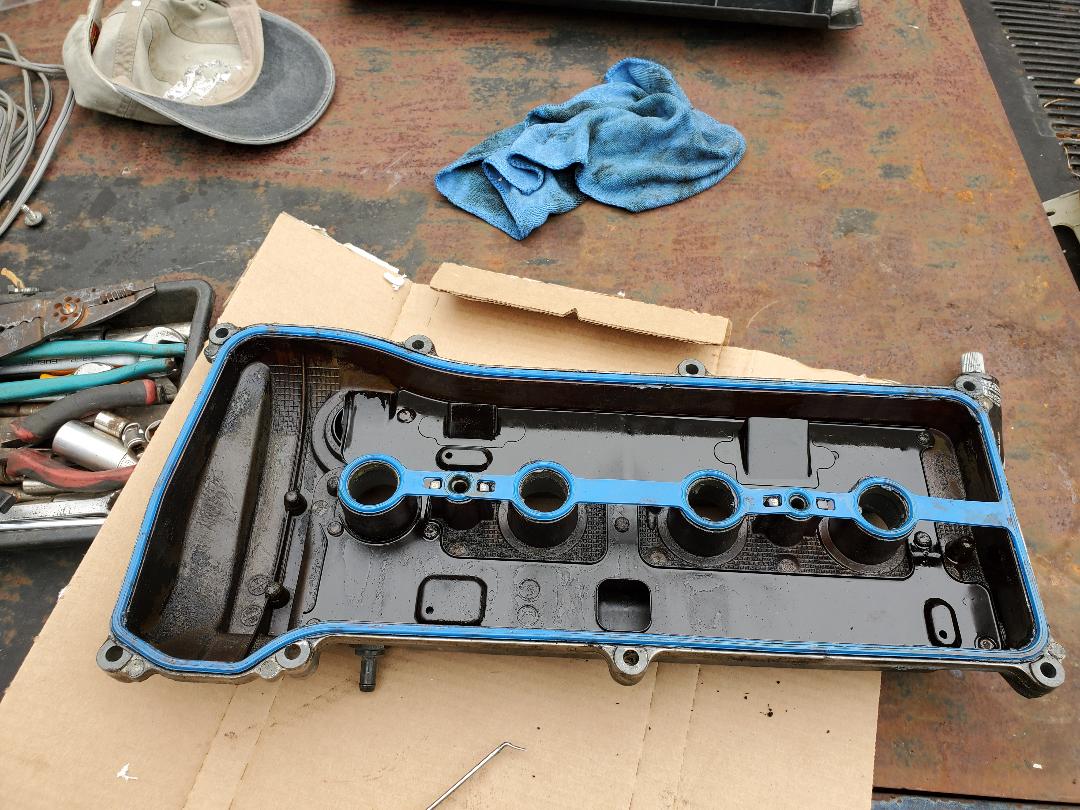
Valve cover with new gasket in place, note light smears of gasket maker in spots around the gasket.
With the new gasket in place the valve cover was quickly re-seated and bolted back down and everything was reassembled quickly in reverse order, not leaving a single bolt behind. The car started back up quickly with no signs of leakage and should probably run better as there is no oil around the spark plugs and plug boots. With that, the Scion is ready to roll again, until something else inevitably craps out on us and it needs replacing.
As usual with every passing week I try to get a load of gravel in to spread out over the vast shitty areas that exist around here. This time I continued with the covering of the side park/work area near the storage trailer. As was the case with the area where the LUV is currently at, I was able to get the grounds covered rather fast. As it stands I can park another vehicle next to the LUV and be on gravel, able to work on it without standing in or laying in mud. Of course if it does rain the ground will still be moist but at least not sloppy. In time I will manage to get more gravel on top of the already spread gravel so I can build up a good bed all around that will allow us to do everything up to driving over the rock without the worry of exposing mud.
Side park area covered in more gravel next to car park where LUV is situated currently.
In order to make this happen I did have to take on a side project. Since we're going into the fall that means more rains to come. The wiper motor on the F250 was dead so every time I went out for a gravel run I had to make sure it was on a day that it didn't rain. I went ahead and ordered a wiper motor a week or two ago. After getting it I went ahead and just before making the gravel run (since it was going to rain that day) I went ahead and replaced the motor. As easy as one would think this is it wasn't exactly problem free. 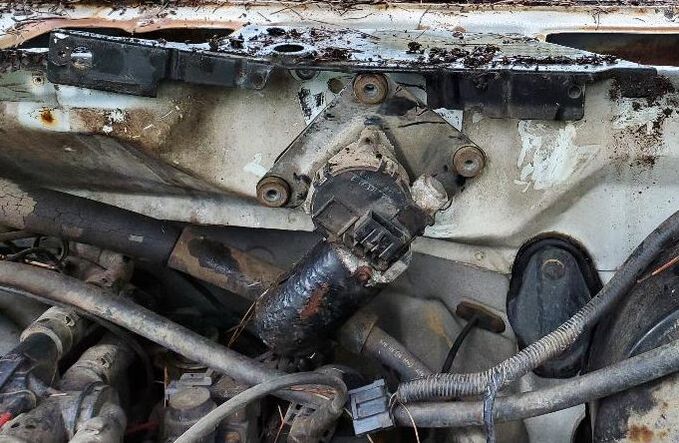
Old wiper motor on firewall, looks easy to replace don't it? Wrong!
The motor is held on by three bolts. The lower two bolts came off easily but the last one, which was under a lip on the wiper arm panel. What this ended up meaning was I had to remove the wiper arm panel or at least get it freed up (since the antenna is attached to it) so I can expose that last bolt, and of course get to the clips that hold the motor's arm to the wiper arm assembly. I had to pull the window molding free as well as remove the wiper arms then go ahead and remove the screws holding the panel on. About 8 screws held the panel on. After removing the panel I was able to get the old wiper motor off. Now time for the new unit. 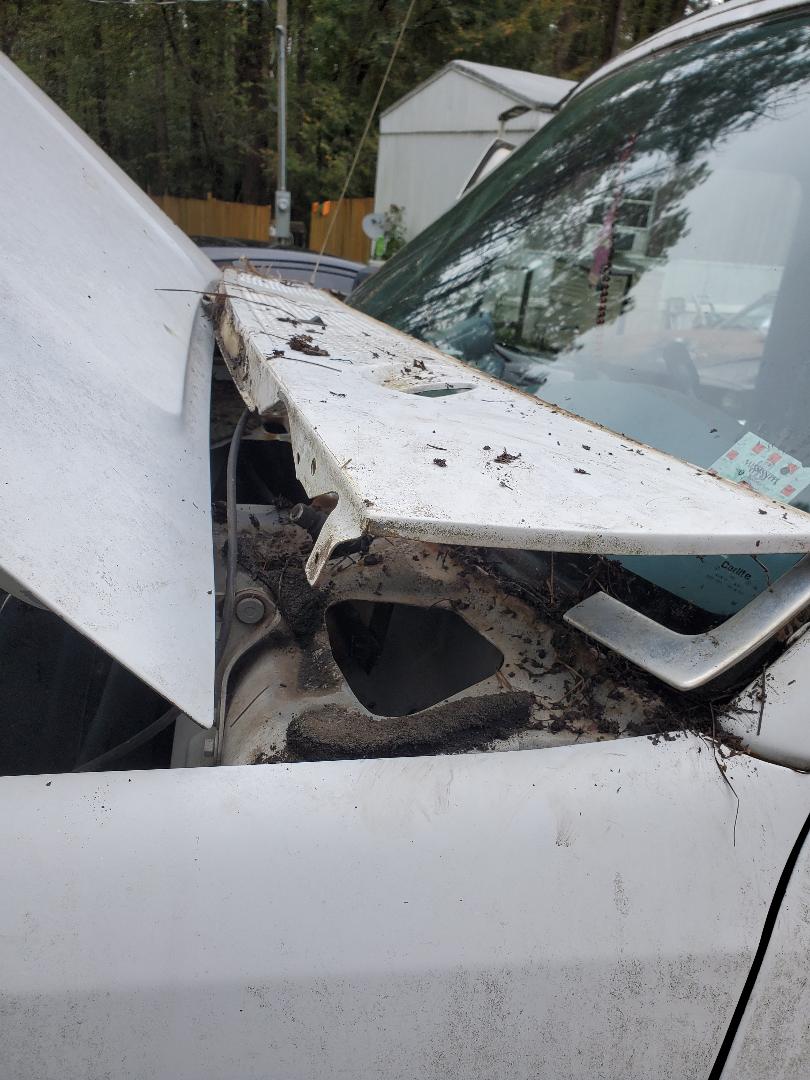
Wiper arm panel lifted up to facilitate the removal of old wiper motor.
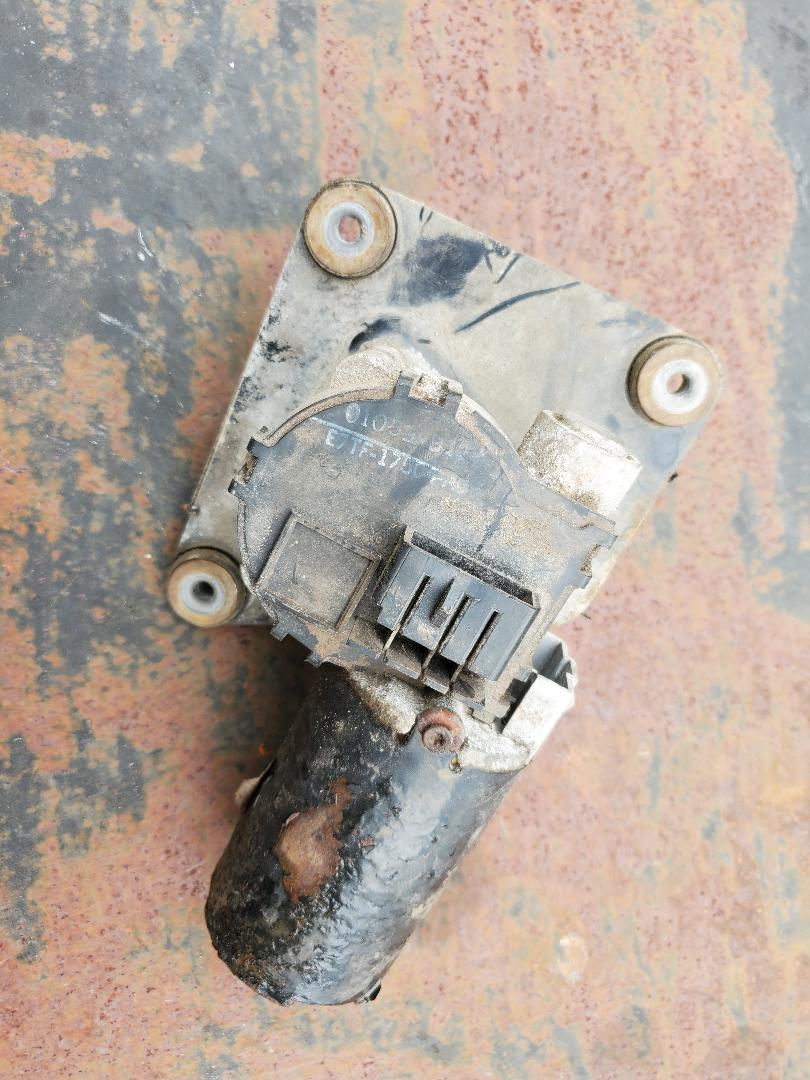
Old wiper motor removed. Obviously it looks old.
Once the hard stuff is done and the experience is gained from taking the stuff apart, the reassembly always goes easily. Everything was just done in reverse. Bolting up the new motor, securing the wiper arm linkages to the motor's arm with the clip it uses, plugging the motor up and then reinstalling the panel, all done in order. The wiper arms went back on, but the blades will need replacing as they are completely trashed. But the main thing is once everything was put back together, I clicked on the switch and BAM! The wipers are working once again. Once I replace the blades (which will be some decent ones and not the cheap shit) I will be able to ride the F250 anytime rain or shine. 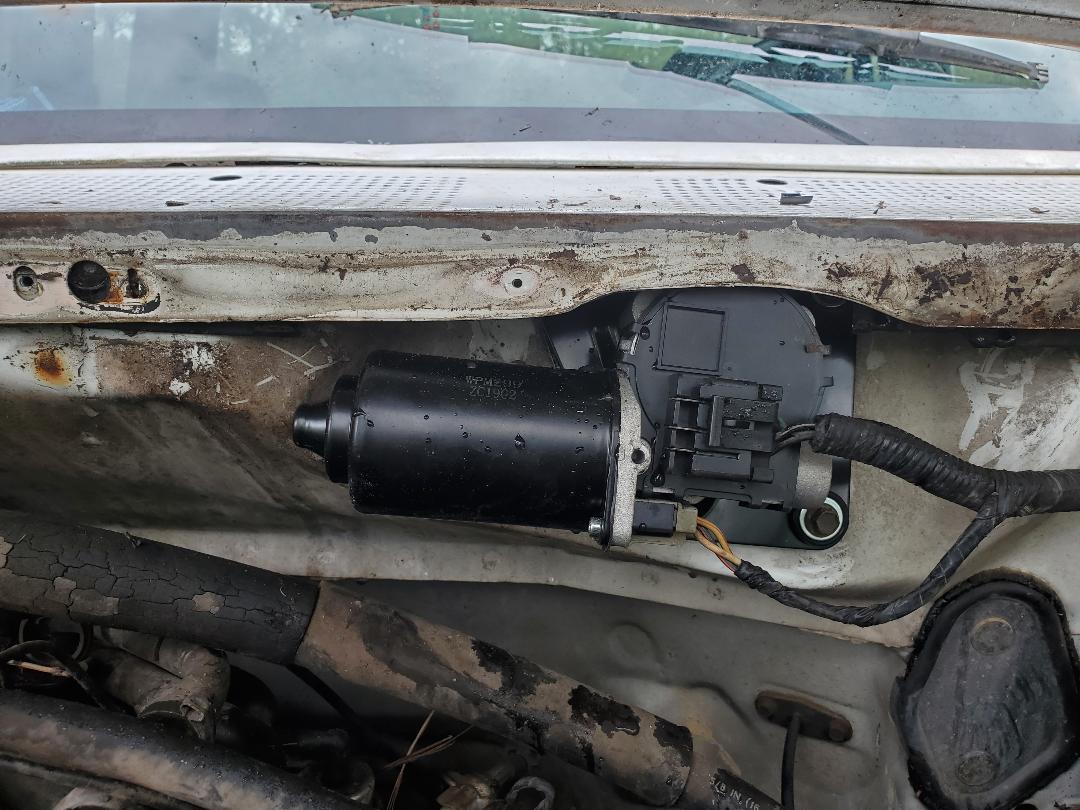
New wiper motor installed and ready to go.
There's a few other odds and ends I want to address on this truck to make it more ready for the long haul. I still have to see what is up with the HVAC system since the vents are stuck on the defrost setting. It would be nice to get this addressed so the truck can at least have heat this winter and AC in the summer next year. Another thing I have to address is the starter. It appears weak when starting cold but when the engine is hot it will bind up on cranking, sometimes taking a couple of attempts to get the engine to turn over enough to fire up. It needs replacing. I also need to replace the two rear tires as they aren't exactly the multipurpose type. The tires are more road tires and I need something that has at least a little dirt gripping capability as this truck does see dirt quite often and being able to dig its way through dirt and grass and light mud would be a solid plus. Like with the other vehicles, this fall and winter I want to get all these little things taken care of so the fleet will be in A-1 shape for the long run.
After sitting so long I finally decided to see what it would take to swap out the bumpers on the Monte Carlo. What's wrong with the bumper you ask? Well a few years ago the ole lady's old car she USED to have pretty much blew up in the driveway due to a strange short circuit malfunction, who the hell knows, but either way this car made of mostly plastic and aluminum and other nice hot burning shit fried itself pretty good. And it did so only a few feet away from the ass end of the Monte. Luckily the ole lady and our neighbor were able to quench the fire before it had a chance to take out the Monte all together, especially since the fuel filler tube is in the back of the car. Despite their efforts the rear bumper was melted part way to the point that its pretty much not repairable. Fast forward some and I managed to find a replacement bumper, well really this is a bumper cover. The 80's was a decade of transitioning over to more and more plastic on cars and going away from the chrome bumpers of the 70's and before. So I have this bumper skin that is complete but a little worse for wear. It will obviously need to be sanded and prepped up in order to be repainted to match the rest of the car. The bumper cover came with the license plate frame, also plastic, but damaged some. So with that, time to go to work. 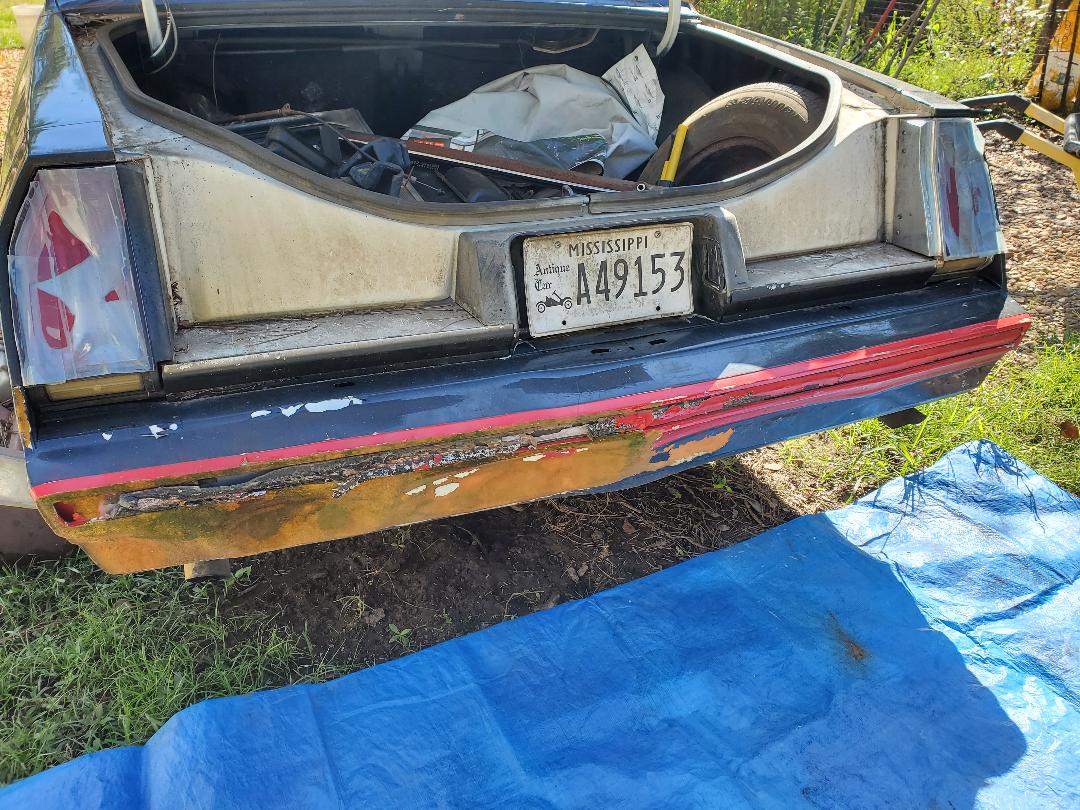 The burnt up bumper cover on the rear of the Monte Carlo. I had to get under the rear of the car in order to snake my hand behind the bumper cover to access the multiple cap nuts that were used to hold the bumper cover onto the car. I also had to remove the spring loaded license plate holder and the cap nuts holding the license plate mount in place. After playing around with these stupid little fuckers I was able to get the bumper cover finally removed. At first I was worried that I might have to try to fix the damaged license plate frame on the replacement bumper since I got it all together. After examination I found I could break the two down so I went ahead and swapped the old license plate frame to the new bumper cover before starting the reassembly. 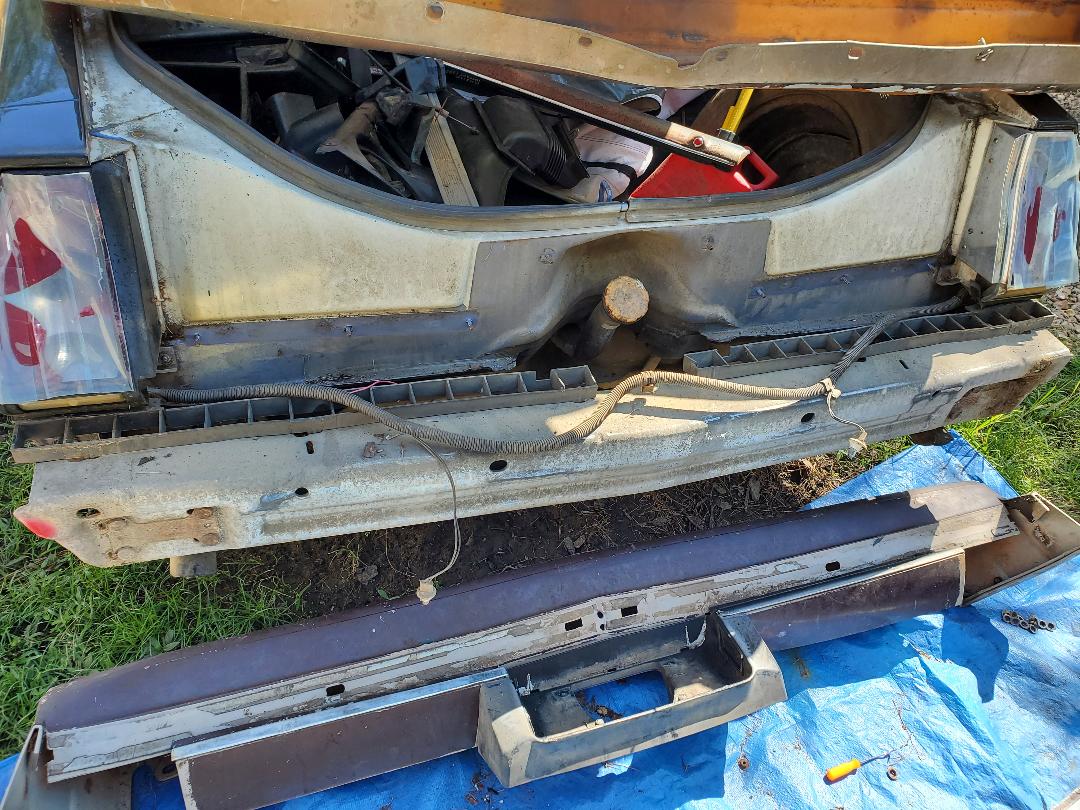 Replacement bumper cover staged under car with old license plate frame attached. Note how actual bumper is a large chunk of metal attached to the car's frame versus a decorative chrome bumper like older cars. As with most things the reassembly went in reverse of the disassembly. I still had to snake my hands under and behind the bumper cover to get the cap nuts in place, having to omit a few due to distortion that caused them to not grab the shitty threads of the studs that were in place. Since this is a 30+ year old car, most of these types of fittings are degraded where the threads are shitty at best and nonexistent at worst. I managed though and was able to get more than enough cap nuts in place to get the bumper cover installed and the license plate frame secured and the spring license plate mount attached. With that the bumper is in place. 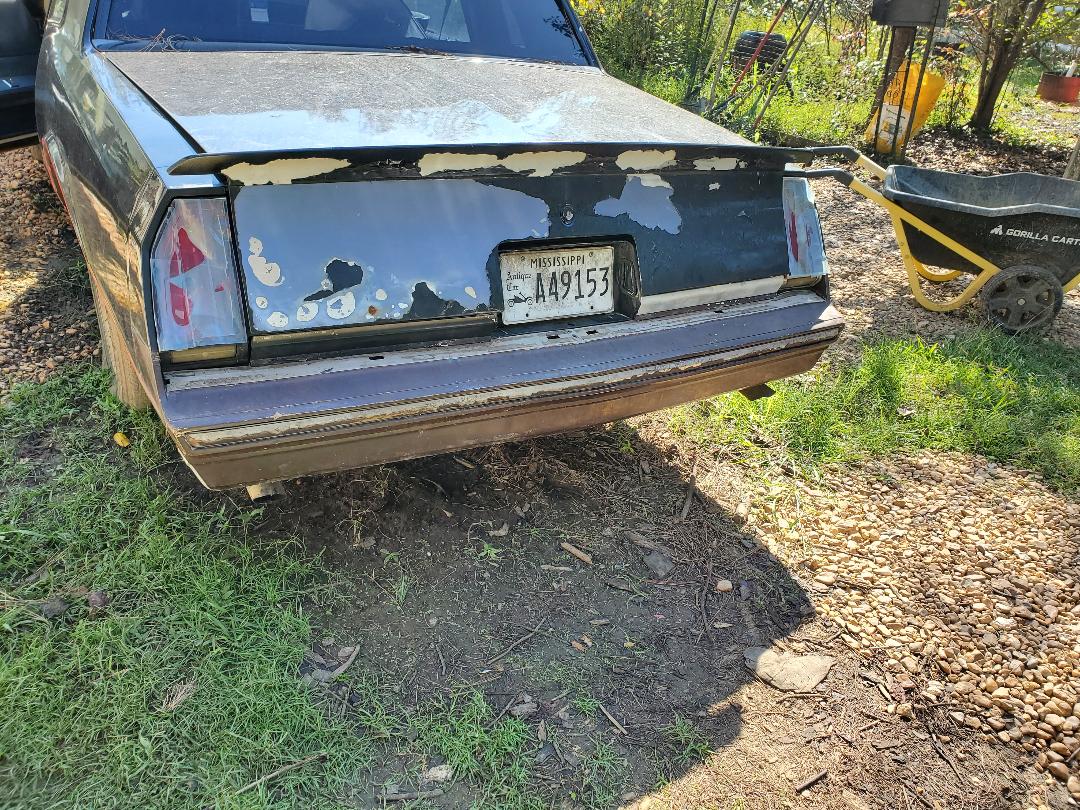 Monte Carlo with replacement bumper cover in place, note finish of unit which obviously requires work to get it all matched up and looking good as it needs to on this car.
After burning up the first brush pile from the trimmed branches that were left along the driveway I quickly picked up the remaining branches that were along the driveway. You might think remaining means there wasn't a lot left. You would be wrong. There was a shit ton of branches still strung along probably another 100ft + of driveway. I ended up having to pull a lot of branches from this area and stacking them on a new burn pile in the same area I had the last burn pile. The quicker I got all these branches cleared the quicker I can get to the work of clearing the grounds behind the chicken yard fence and along the future fence line going from the chicken yard fence to the driveway.

The large brush pile staged for burning. Pile is actually 7ft tall and same in diameter.
After a while I finally got all the branches cleared. I had to use the shears to trim many of the branches into smaller sections in order to better stage them into a tighter stack on the burn pile. When the pile is fired I won't have to work as hard to move the errant branches that aren't close to the hot zone further in. Once the core of the pile burns down I would've had to kick many branches into the coal bed for them to be consumes versus making sure the pile was dense to begin with so all of the material would burn properly. I even stacked some garbage bags under the branches as I was stacking them to aid in the burning of the still green wood. But once the driveway was cleared I was able to move on to a new project. 
Driveway cleared of trimmed down branches going on down the driveway.
The next project is the hanging of white LED Christmas lights. The point to this project is to have these lights lining the fence on the inside as well as being placed in strategic spots around the homestead like on the house or even in the larger fruit trees of the garden so when activated the whole yard will be illuminated in a light white glow that will allow us to move about the yard at night without messing with our night vision. Plus the glow from the LED lights will help make the grounds look pleasant. The first spot I started in was with the fence going from the driveway into the yard a bit then turns towards the storage trailer and back toward the fuel shed. I had a 23 ft long string of cool white LED Xmas lights that are expandable. I wanted to see how this string of lights works when it comes to illuminating the area. I started tacking up the string of lights using the staple gun and working my way slowly and carefully from the edge of the fence down and around. The staple gun made quick work of the light string. I left everything up so when the job is down I can relish in the glow of lights across the yard at night at any time. 
White Xmas lights hung up along top of fence.
Of course that following night I had to test out the lights to see how they shined so I can determine if I might need to try something else. Of course because the beginning of the string was at the end of the fence far away from any established outlet, I had to grab some extension cord to plug the lights up. Once I plugged the lights up they lit up the area around the driveway and in front of the storage trailer pretty good given the idea they are some low intensity LED lights. When You get a lot of them together their brightness adds up. 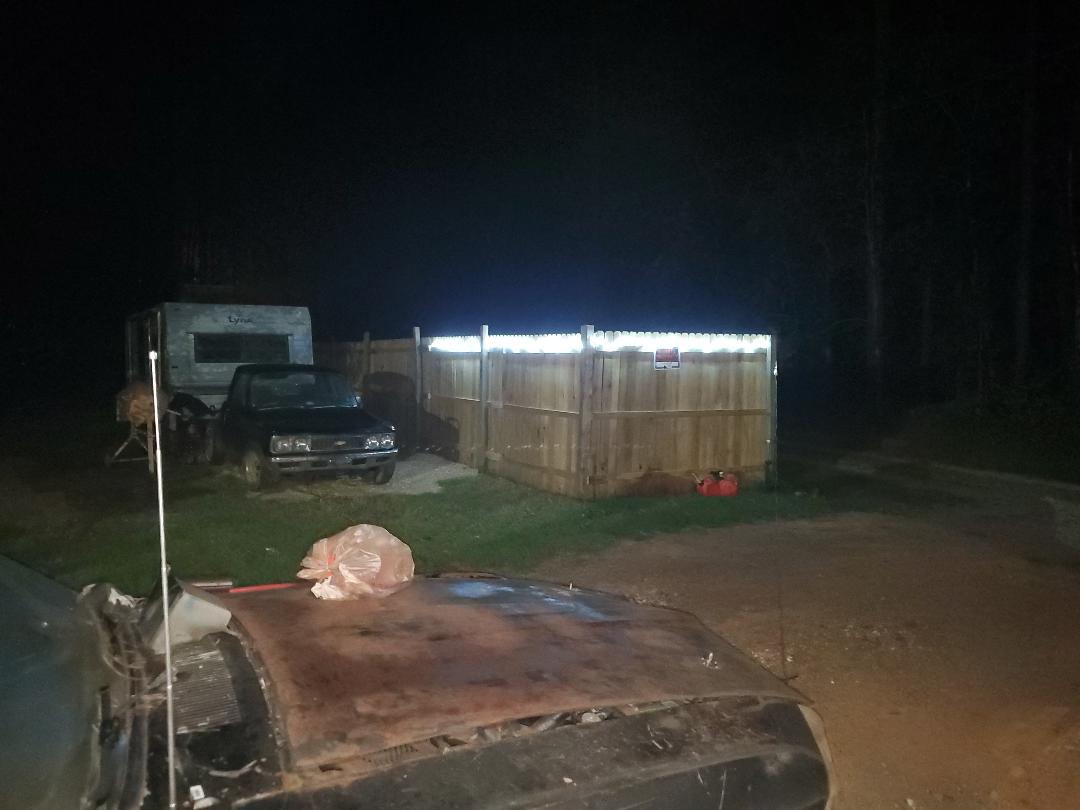
LED Xmas lights powered up on fence at night as a test.
As can be seen the lights are pretty good. I can only imagine when the whole fence line is lined up with these LED lights they will light up the yard pretty good with a low glow that still penetrates through the yard far from the source of the light. These lights will also be strung through the chicken yard as well for the sake of bathing the yard in the same low intensity glow necessary to help us see anything that may not belong in the yard without turning the chicken yard into a nighttime baseball game with blinding light. I will also have to run new power lines to feed these lights, more than likely doing like I did before with the extra long extension cords either trenched from main power lines such as the run going to the storage trailer or the run feeding the chicken yard. Either way I'll end up installing more outdoor outlets fed by buried extension cords and the lights will be plugged up to these outlets as the only load, meaning that I have to strategically place the lights in order to capitalize on the expansion capability of the light strings so I can one power feed taking care of 100+ foot strings of LED lights. Hell I might even put remote controls on these lights where I can wirelessly activate the lights from inside the house when desired. I wouldn't want to just turn on a shitload of LED Xmas lights all over the place if I'm not going to be moving about through these areas. With the low cost of these lights I will be able to cover all of the areas I want to cover with a minimum cash outlay. The hardware for the power runs will obviously cost more especially if I factor in any remote control hardware. Time will tell.
|
