|
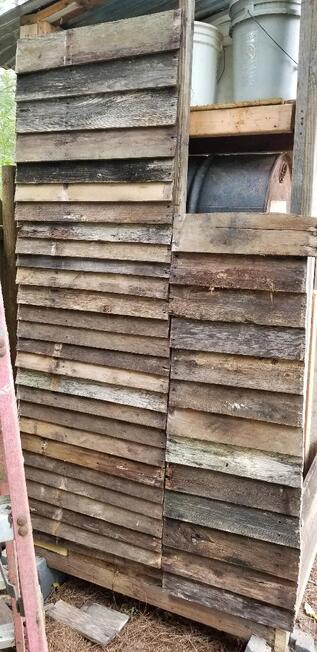
Today was more of the same when it comes to the fuel shed - cutting up pallets and nailing pickets onto the frame. With the front of the shed fully clad top to bottom with pallet boards I moved on to the back. As usual I had to keep carting in fresh pallets to cut up for more boards. At the same time I was running low on brads/nails for the nailgun so I figured I'd go as far as that dwindling supply would go then take a bit of a break from the fuel shed in order to work on other stuff around the homestead that still needs attention. In the meantime even after I finish the few things I have in mind to do I can still go ahead and cut up more pallets, not to mention I can cut up the other boards that made up the pallets that I was not able to use after salvaging the picket boards.
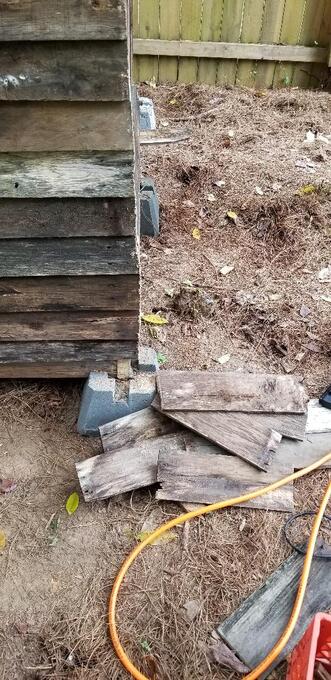
I am knocking out the stacks of pallets in the back of the lot, cleared one stack, almost cleared another stack. When I did run out of nails I managed to fully cover a third of the back wall and a half of another third. I figure I'll probably knock the remainder of the one stack that's almost done and probably another stack. This is mainly because a lot of the pallets were rotted enough that out of the whole pallet I may have salvaged only two or three good boards. The rest was rotted punkwood that when dry would make excellent firestarter. One thing that did occur while nailing the boards up was a bit of an accident. Either I misjudged where my left hand was while holding up a board or I misjudged where I had the nailgun with my right hand while rushing to finish the job before it was time to come in. To make a long story short I triggered the nailgun and had a nail jab me right in the tip of my left ring finger. I reflexively pulled back fast and attempted to stop the inevitable bleeding that resulted from the puncture. I really didn't have to do much short of holding the finger to help kill circulation to the tip, it surprisingly stopped pretty fast. A couple of times I had to wipe a little bead of blood that formed on the tip of my finger and some blood that was on the side of my finger while I kept working afterward. It wasn't until later in the evening when I took a close look at my finger did I realize that the blood that was on the side of my finger wasn't blood that was accidentally wiped onto the side from moving around or from any other injury in the process, it was from that fucking nail going right through the tip of my finger and coming out of the fucking side! That shit happened so fast that my mind couldn't even register what happened and still hadn't registered what happened until long after the shock wore off. Of course the finger swelled up a little and changed colors a little, and is throbbing as well. Yep, that's what happens when you rush, you fuck up something! Well as usual, I'll continue to fight through the pain until things heal up. At least now my next order of business will be to pull the carburetor from the zero turn lawn tractor to clean it out later and hopefully be able to get the machine running again. I also plan on installing the exhaust manifolds on the Dodge and move metal working tools up to the garage temporarily to start putting together the exhaust system so I can try to get as far as I can on the car until I reach the point where I need to buy more shit to continue. Hopefully tomorrow will not result in any more bodily injury or dismemberment.
0 Comments
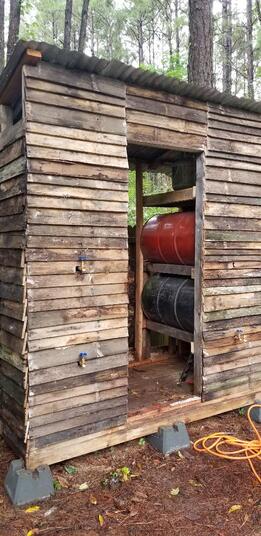
Today was all about cutting up pallets and tacking on shingle boards on the fuel shed. What I did do was move two pallets at a time since that's all the dolly can handle, and took the reciprocating saw with a fine tooth blade to cut the nails on all the pickets of each pair of pallets then I move to tacking the pickets onto the shed as usual. At the front of the shed I did have to contend with the pipes that I had to screw into the fronts of the barrels for the output faucets. I did stop tacking boards on when I got to the first barrel so I can line up the pipe with the next board that I would tack on so I can mark and cut the board before tacking it on. Once the board was tacked on I was able to insert the pipe through the hole and screw it in place into the drum.
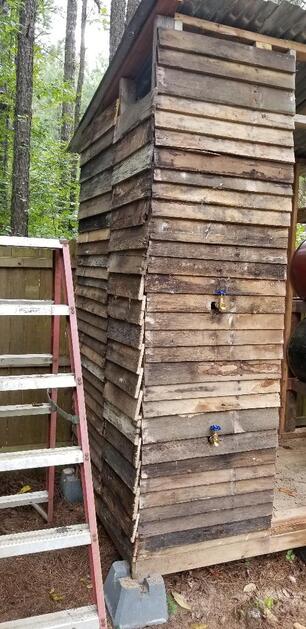
With the pipes in place I was also able to screw on the faucets which have metal internal valves that make full contact with the inner walls of the faucet body. This was important as there would be gasoline coming in contact with the internals of the faucet at all times. With the faucets screwed in place I would be able to just open the valves up to dispense fuel into containers as needed. One thing I do still need to do is get the large pipe fittings to screw into the larger flanges of each barrel so I can add a filler port to each barrel. The flanges are 2" NPT, which the regular chain stores do not carry, I'll have to go to an Ace hardware to find this specialty shit. I'm still up in the air about whether I want to have the filler pipes extend to the outside or if I can add the fittings in the tight quarters between the fronts of each barrel and the inside of the wall. I'll have to see how much space will be needed with the fittings available. Worst case if I do have to extend the pipes to the outside I'll just have to do some eyeballing and approximations of the locations on the pallet shingles where I'd have to drill pilot holes to be able to cut out the larger holes for the filler tubes. Well back to the pallets. I started on the other side of the shed to get most of that wall up. I did clad the side with boards all the way up to the lowest point on the sloped roof. It is at this point I'll have to cut an angled notch out of the following boards to fit them in place under the sloped roof eave on each side. Once I was done on the side I moved on to the front where I had to do all the lining up of the pipes and cutting notches prior to putting the pipes in place as mentioned in the first paragraph. I managed to get almost to the top of one side before running out of pallet boards and time. On the other side I ended up putting one pallet board too many up and was blocking the bottom pipe flange on the bottom barrel. As a result I had to eyeball where the pipe would come out at and drill a pilot hole for that pipe so I can cut the hole out further with the reciprocating saw before putting the pipe in place. At this point I'll have to drag more pallets over for "processing" so I can continue with the shingle setup.
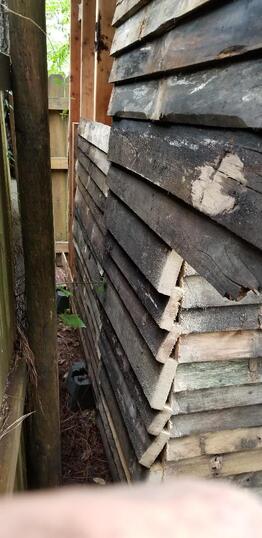
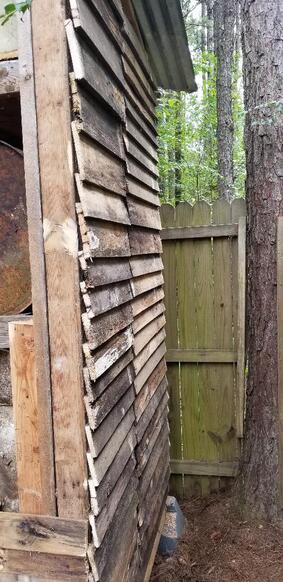
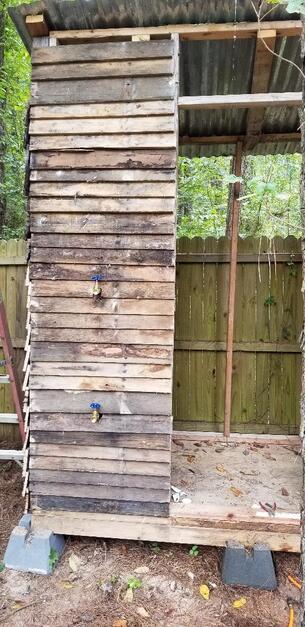
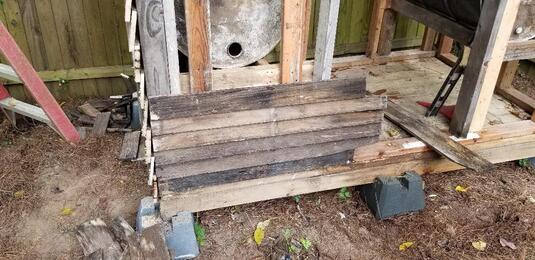
This past Wednesday I worked on tacking pallet boards to the sides of the fuel shed. Since the boards were a few inches short of being able to span the whole 2ft width of the sides of the fuel shed, I had to tack the boards starting at the middle stud going out. This then had pallet boards extending out past the front and the back of the wall, so after tacking enough boards to reach the point where the lower side of the roof starts, I took the reciprocating saw and cut all the way down, using the stud wall as a guide to get the cuts straight so when done I ended up with a nice shingled wall and a pile of short cuts of pallet boards. The pallet board cuts ended up on the pile of outdoor firewood cuts next to the fuel shed.
As far as how the shingles were done, I tacked the bottom board on first, perfectly flush against the studded wall. The next board went above but slightly overlapping against the top of the bottom board, putting it at an angle. I placed several brads into the board along the length, top and bottom to make sure the board is secured against the bottom shingle board and the stud wall. The next board went on the same way, overlapping. The brad/staple nailgun made quick work of these boards, using 1 1/4" brads. The boards went on the same way all the way to the top, so it looks like a wall with siding/shingles like an old style house. After getting the boards tacked on the one side I started tacking on boards on one side of the front of the shed, working my way up to the bottom drum. I'll stop when I get to the point where the bottom pipe will come out of the drum, since I'll have to cut a notch in the board to be able to place the board over and around the pipe. I only got so far on the front side wall of the shed before I ran out of time. On to Thursday....
Cuts along back of side wall, more firewood for the pile.
Front wall shingles tacked in place.
Thursday I ended up installing the new fuel pump in the S10 after finally getting it in the mail earlier. I was planning on continuing with the pallet shingles on the fuel shed but the S10's return to the road was more important. I had already pulled the fuel tank and old fuel pump so everything was ready to accept the new unit. Everything was plug and play for all intents, I just had to seat the fuel pump into the tank and lock it down with the snap ring, then position the tank where I can plug up the fuel lines and electrical plugs. I had to put a jack with a piece of 2x4 under the fuel pump to jack it up into position so I can put the two straps into position. After a little bit of wrestling I managed to get the straps into position and secured. I got the filler tube in position and secured to the rubber hoses in the fuel tank then secured to the filler port in the quarter panel. With that I went ahead and attempted to fire the truck up. When I turned the key on I didn't hear anything so at first I had to double check to make sure everything was hooked up properly. When that checked out I hit the valve on the fuel rail to bleed it to see what happens and pressurized air and soon after a trickle of fuel also came out. That was a good sign as that meant the pump did come on and push air to the valve. I went ahead and cranked the engine over and shortly after the truck sputtered to life. Everything ran smoothly like it used to and surprisingly the fuel pump was dead silent, which tells me that the old pump was probably on its last leg for a long time due to the fact that thing was noisy as hell. Either way, the S10 is back online and on the road again.
After getting the brake work done on the Tracker I started another little task that is connects to one of the other tasks. I started moving pallets over to the "work site" the area by the storage trailer, in order to break them down. I cut the nails using the reciprocating saw and a fine tooth blade so I can cut the nails and separate the pickets from the pallets before switching over to a regular wood blade so I can cut the main boards into smaller pieces which will then be stacked next to the fuel shed in order to serve as fire wood for outside can fires while working. The reason for separating the pallets is to be able to use the pickets as siding on the frame of the fuel shed in lieu of regular plywood. It would give the fuel shed a more homey look on the outside versus just plain plywood. I managed to get several pallets broken down over the course of one session outside. This will kill two birds with one stone as it'll allow me to clear the pallets from the back of the lot while acquiring building materials to finish another project.
Things were short lived with the Tracker as the ole lady still had issues with the brakes on the Tracker as well as with the AC cutting out periodically. Not sure what to expect since all the rear brake shit was replaced. Well this morning I pulled the rear wheels off to check out the hardware and found everything was kosher, wheel cylinders weren't leaking and all internal hardware was still in place. My next move was to try and bleed the rear brakes again to see if there was more air in the system. It appeared that there was some air in the lines but nothing significant. I even tried to bleed the front brakes to see if maybe there was some air there. Left front was fine, the right front bleeder valve wouldn't even open, frozen piece of shit. I ceased trying to open the valve because it would be just like it that the valve will break then I'm stuck having to replace the whole caliper which would put the car down for the day and end up costing even more money. I figured there wasn't any air in the right side since the left side was fine anyway. The last thing to try was the first thing I was going to try in the beginning, which was change out the master cylinder. I actually bought this thing in the beginning then put it on the shelf when it looked like things wasn't getting worse, fucking hindsight.... I did a crappy bleed of the master cylinder, really I just poured fluid in the chamber and opened the caps on the outputs letting gravity do its job of pulling oil through the passages. After getting oil coming out through all passages I went ahead and pulled the old unit and swapped in the new unit. I bled the rear brakes again and the left wheel and didn't get much of any air out of any of them. After doing a test drive it was determined that the brakes were better than ever before. Lastly I looked at the pair of AC fuse holders and had already figured that the only thing that would be allowing the AC to cut off is the crimp terminal on the first fuse holder. Those things are touchy at best and shitty at worst, having bad connectivity issues due to vibrations and even heat, as would be the case in an engine compartment. I cut the terminal off and put some heat shrink tubing on before soldering the wires together. With that the AC system is back online with no flake out issues. With that, I used the remaining time to move a bunch of pallets back to the work site so I can continue with what I was doing before all this car horseshit started. I was able to move a good little stack of pallets that have some good solid pickets on them so for the next day I'll be able to stack up a good little batch of pickets and of course continue to build up my firewood pile and clear the area of old pallets too. The work continues..... 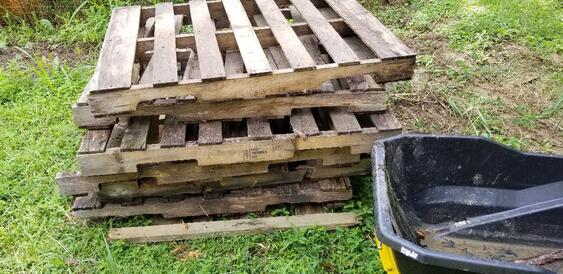
Stack of pallets for future processing.
Well many things have occurred over the last several days, with many plans thwarted due to normal shitty circumstances that come with the territory when you mess with old worn out stuff in an environment where you and only you are the sole authority when it comes to maintenance. Because of some of the horseshit that has gone down over these last few days, pardon me if I get a little um, excited in this post.
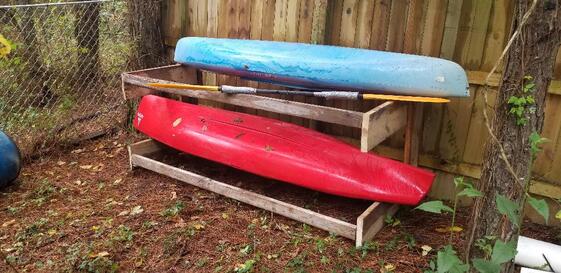
Things started off pretty smooth, my first plan was to build a kayak rack to store the kayaks on a smaller footprint in the yard versus just having them laying on the ground like they've been for the last several years. Since I have plenty of salvage wood stacked up, I used that to make what I decided to call the yak-rack. This design was literally a shoot-from-the-hip plan that I made up as I went along. All I really needed to do was make a rack that would hold the bigger of the yaks on the bottom and support the smaller of the two decently enough that the wood won't sag or break under the weight of the smaller boat. The whole rack was made with a combination of 2x8's and 2x4's. The 2x8's were used on the bottom and top sides and the vertical support. The 2x4's were used along the length of the rack. The nail gun obviously made for quick assembly of the rack with me being able to get the whole thing done in a couple hours, and that's including knocking the nails out of the boards and cutting the lengths I decided upon for the rack. I did have to muscle the whole thing to the final site and use a couple of bricks to support one side of the thing since the ground was uneven where I wanted to set the rack. With that I was able to set the two boats on it along with one of the oars. The other oar was actually being used for a rudder and backup oar for the catamaran I was working on at an earlier time. 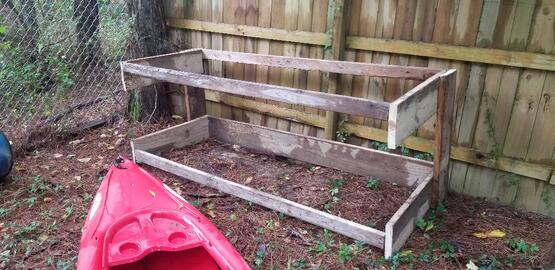
Shot of yak rack before placing boats on it, note the simple construction using 2x8's and 2x4's.
I did play around with the little ATV trying to figure out why the thing isn't getting spark, trying ideas from forums and just simple analysis of how the system is put together. I still haven't quite figured it out but I feel I'm getting there. But after playing with the ATV, this is when things started getting hairy. This past Wednesday while riding back after we went to the gym that night my S10 was just humming along when all of a sudden it just shut off. I threw it in neutral while still rolling to try and see if I can restart the engine but to no avail. After pulling over and trying to restart it I ended up calling the other half to turn around and come back so we can contact roadside assistance to send a tow truck to pull this fucker back to the house. Because most of these insurance company tow services take a year and a day I said I'm going to the house, I'll leave the keys under the sun visor, its not like anybody's gonna be able to steal this fucker anyway. With that the 90 min wait began and we took our asses back to the house. Once back at the house had to clear an area for the truck to be able to place the S10 where it won't be in the way as we still need to park the ole lady's truck without issue. After moving the mustang wreck and tow dolly and some other shit back enough to open up an area for the S10 to be staged, we got the call that the tow truck hooked up the S10 and was en route. When the truck showed up it turned out it was a regular tow truck with the boom on the back, not a flatbed...puta madre! This meant that he won't be able to just back the thing up into my staging spot I had set. As a consolation the driver did offer to help me push while the ole lady steered the S10 so we can push it into my staging spot after he unhooked it. That went surprisingly easy at least. At this point I had to do some troubleshooting. I put the scanner on the S10 only to get no codes. At that point it made me believe I was either dealing with a fuel delivery issue or no spark delivery, not from the electronic sense. With no codes that meant that it wasn't a sensor failure issue that was keeping the ECU from firing the fuel injectors or the spark plugs. First thing I did was put my piece of shit harbor freight fuel pressure tester on the thing. The reason I said its a POS is because the gauge with the kit is good for maybe a couple of good tests. Once gasoline comes in contact with the gauge's internals, all the rubber shit inside degrades so the next time you hook this cheap Chinese shit up the damn thing leaks all over the fucking place creating molotov cocktail conditions. Well After tightening the gauge set enough that it wouldn't leak too much I cycled the key to make the fuel pump cycle. The gauge went up to maybe 7 psi then bled down with the leaking of the shitty gauge. These EFI systems are supposed to pressurize around 50 psi or so, way off from the 7psi I read, this is barely enough to run a carbureted engine. As a side test I did pull the air cleaner tube and sprayed starting fluid in the thing and attempted to start the engine. It did start up on that, so that definitely told me that the ignition system was fine and we were dealing with a fuel pressure issue, more accurately a bad fuel pump. I did one more check with the shitty gauge after tightening it again and it held pressure....at a nice 10 psi, not shit. With this I ordered a complete fuel pump assembly from Ebay. Reason I did this was because before the truck died I had noticed the fuel gauge was barely responding to the use of fuel. The thing read a full tank for 3 days, to which at that point I felt I need to put some fuel in this thing because there's no way in hell this thing went 3 days and is still reading a full tank. I was right as this thing took what amounted to 4/5 of a tank of fuel. The next day I did get a new fuel filter just to try for shits and giggles to see if the fuel filter was so clogged that maybe it wasn't passing the necessary pressurized fuel to run the engine. While this went pretty fast, it didn't do shit to solve the problem so yeah, we're still on the fuel pump. On Friday morning I had to remove the fuel from the tank since the universe found it necessary to make this damn fuel pump die the moment I filled the tank, sonofabitch! I did have an idea, I found the relay for the fuel pump and jumpered out the contacts so I can turn on the fuel pump manually. I pulled the fuel filter from the fuel line and attached a length of hose with a metal line on it and ran it from under the truck where I can put the end of the line in a gas can. After cycling on the pump I went about messing with other shit while waiting for the gas to pump into the can as the pressure and fuel flow was so slow that it took a minute to fill up a 5 gallon gas can with the slow tinkle that came from the line. After removing two and a half 5 gallon cans of gas and putting that in a couple of other vehicles I was able to go ahead and remove the straps and other supports for the fuel tank, dropping it to the ground where I was able to remove the sending unit/fuel pump assembly. At this point I've gone as far as I can go on the S10, now its waiting time for the replacement fuel pump. The next bit of fuckery was with the ole lady's truck a 2002 Chevy Tracker. First I ended up discovering that the radiator decided to leak at the seam where the core is crimped to the bottom plastic body. Luckily I kept the old radiator which had turned out to be good after some past troubleshooting and was able to be re-installed in the truck to fix the radiator problem. On Friday while I was driving I got to experience what she was saying was an issue with the brakes where they seemed to not grab all the time. At one point I figured the master cylinder was failing but the way this was getting worse I figured that the rear brakes were giving me grief. Since the front brakes seemed to be grabbing more while the truck took a little longer to stop I figured that the rear brake shoes were worn enough that maybe they were allowing for the rear brakes to not grab enough to stop quickly. We got a set of shoes from Auto Zone with the plan being to change them out Saturday. I went ahead and started pulling things apart, only to find the Japanese engineered bullshit that was this rear brake system, with extra components that I can't possibly see as being necessary. I've never seen these extra components in any old school drum brake set up and usually I've been able to change out brake shoes pretty fast on the old school cars due to the simplicity of the brake systems. But oh no, not this POS! Well after finally re-figuring out the layout of the components (photographing was hard due to the wheel hub plate blocking 90% of the view of the whole assembly), I was able to get the shit put back together with new shoes. I absent mindedly went to the other side to repeat the process. Upon almost putting everything back together I went to squeeze the wheel cylinder pistons in so as to make sure the shoes are brought in enough to allow for the installation of the brake drum and I noticed brake oil skeeting from around the piston seals. Well sonofabitch! That's what was wrong the whole time, the motherfucking wheel cylinders decided to go completely flatline on us, causing the brake pressure to drop shortly after applying the brakes, not allowing the rear brakes to grab good and allow for a quick stop. With this we ended up having to hit the street back to Auto Zone to luckily find a store that had both wheel cylinders in stock. Another $40 down the drain on top of the other money spent. On a side note, one thing that I can say I was impressed with on the rear brake system is how the routed the oil lines to the wheel cylinders. While old school cars have a distribution block that attaches to the rear end to take the one brake line from the front and split it to go to each wheel cylinder individually, this set up takes that one brake line from the front, plugs it into the right wheel cylinder, then another line is routed from the right wheel cylinder over to the left wheel cylinder and that unit has the bleeder valve on it. So instead of bleeding two wheel cylinders, you only have to bleed one. The pumping will force all the air from the right wheel cylinder over the left where it can be bled out. Another issue we had on the Tracker was with the AC. It had stopped on us a couple of times to which we thought maybe the thing bled the refrigerant out. After attempting to put more in while checking the pressure to see if it was even needed we still couldn't get the system to cycle on. Then, after just touching the fuse block to check to see if one of the fuses burned out, the damned system came on. This meant that the other fuse in the original fuse block was having continuity issues, just like the other fuse in the block that kept burning up on us, causing me to take an aftermarket fuse holder and splicing it into the circuit to bypass the old fuse holder. When we got the wheel cylinders we ended up getting another fuse holder so I can install that after working on the brakes. The last bit of fuckery on the Tracker was an issue we've been having on and off with shitty starting issues and a bad idle upon restarting. At one point on Friday we thought we might need to be towed back as I couldn't get the truck to start up and when it did the damn thing wouldn't stay running. I kinda figured the damned thing was hot from running all day in the high 90's temps so I let the thing cool a minute. Then like nothing was wrong the stupid thing started right back up like all was good. Going by another Auto Zone to get the ECU scanned was inconclusive as the same codes popped up again. One code for the temp sensor did pop up but I'm theorizing that this only happened when the radiator bled all the water out by the time the ole lady came home and wasn't reading right. At this point I started thinking that one of the sensors may be intermittently flaking out, cam or crank sensor, maybe the temp sensor is causing an issue with the ECU controlling the engine. Not really sure, can't tell until the problem comes back and stays. In the meantime the only thing I really can do is just start getting components and change all this shit out. Luckily the parts are pretty cheap on Ebay so it wasn't too cost prohibitive to get a temp sensor and cam sensor. We already had a crank sensor from the first time this truck started acting stupid like this and I had guessed that maybe the crank sensor was failing. I will try this shit when it comes in and hopefully fix the problem with the engine management on the Tracker. Saturday night after hanging out with the fam I did come back outside and complete the assembly of the left rear brake assembly which turned out to not be too bad after I had it fresh in my mind how all that shit went back together. The wheel cylinder went in pretty fast as well. After getting the left side put back together I went to the right side and pulled the wheel and drum loose. Luckily all I had to do was take the bolts and brake lines off the wheel cylinder and pry the shoes apart with my hand enough to remove the old wheel cylinder. Everything went in reverse with the new wheel cylinder and shortly after I had the right brake assembly put back together with no issues. Filling the master cylinder with fresh oil and getting the ole lady outside to pump the brakes I was able to get the rear brakes bled quickly and confirm that the brakes were grabbing solidly like they're supposed to. I turned my attention to the AC fuse block. This went pretty fast as well since all I was looking at was cutting the wires from the old fuse block and soldering them to the leads on the fuse holder. Some electrical tape, a wire nut and heat shrink tubing made sure all bare joints were covered up safely so there won't be any issues with shorting. I zip tied the pair of fuse holders to the bracket that normally held the old fuse holder along with the relays that control shit on the truck. The AC came on without incident. At this point I have to see where the crank sensor is located so I can see if I can change that out pretty fast and test the truck out to see if we have any more issues. The very last bit of fuckery was with the lawn tractor. While I was working on the rear brakes on the Tracker, the ole lady fetched the zero turn lawn tractor to cut the grass across the grounds. Well while she was attempting to cut along the main driveway the mower shut down on her. She tried to restart the thing, getting it to fire a couple of times but the thing wouldn't idle let alone throttle up to be able to drive it. Trying starting fluid didn't help either. After looking at it I determined that the fucking lawn tractor has the same issue the S10 has, dead fuel pump. The fuel filter was barely full despite the tank being 3/4 full. At this rate rather than keep fucking with the thing, since I was working on the Tracker, the ole lady attempted to try and drive the tractor back up to the garage to get it back where it belonged. She tried to do this by constantly spraying starting fluid in the open air intake while trying to engage the tillers. She had an issue doing this so I said fuck it, I sat on the back of the mower over the engine and sprayed starting fluid in pulses while she worked the tillers, allowing us to get the tractor back up to the garage and parked out of the way. A maintenance kit that included a replacement fuel pump, air filter and fuel filter, spark plug and fuel shutoff valve was ordered from Ebay so now we will wait for that shit to show up so I can work on getting that fixed. As you can see, things come in threes- first the S10 fucked up, then the Tracker fucked up, then the lawn tractor fucked up. As I said, a fruit basket of fuckery was delivered to me and I now have the pleasure of eating the fruits of that fuckery as I go down the list fixing all the stuff that needs fixing on these pieces of shit, I mean equipment. Time marches on......
At this point in time I've managed to put together several oil buckets with which to stack on top of the shelf of the fuel shed. Of course I didn't have enough old motor oil to use to fill the buckets all the way like I wanted to so I had to cut the oil with the old gas that I pulled from the regular gas drum in the old fuel shed. The last few gallons had a lot of sediment and trash in it that I wasn't going to put into any of the vehicles let alone in a piece of powered equipment. I ended up also changing the oil on the ole lady's vehicle so I can get another jug of oil available for the drums. I ended up having to partially fill three of the five buckets with an old oil/gas mixture. The gas would help soak further into the wood than the oil would by itself. I have one bucket that I couldn't put any oil in but I did put some of the old gas inside to at least get started on the "treatment" of the wood. I did put the buckets in place on the shelf just to put everything to use as intended.
I did have an idea about the siding on the shed, based on what I seen on a video regarding a small survival cabin. The idea involves using pallet boards to make a form of siding, tacked onto the stud walls in an overlapping manner to look like traditional siding. This idea appealed to me based on the idea that I still have a shitload of old pallets stacked up in the back end of the lot that I can salvage the boards from. This would actually kill two birds with one stone as I can get the fuel shed covered up and use up the old pallets, helping to clear that area prematurely. Since the boards are free the only expense would be for the oversized brad nails for my smaller nailgun, which is pretty cheap, compared to having to buy six full sized plywood boards to cover the shed. 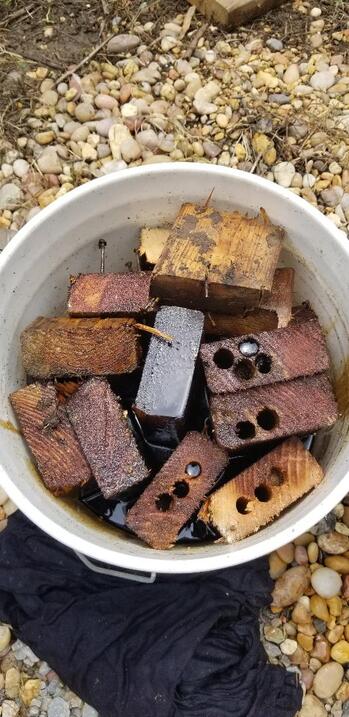
Oil bucket filled with scrap wood and a little oil.
Oil buckets stored on shelf in fuel shed.
With this work done and me at the point where I really can't do much else without buying anything I of course moved to something else. In this case I moved on to removing the fence and cleaning up the yard. I had already started pulling the fence apart from one section in order to open up the yard when I was initially building the fuel shed so I just continued on with pulling the chain link from the three wood posts in the ground. This wasn't really difficult, the hammer made quick work of the U-tacks that held the chain link to the posts. I had to cut one string of the chain link where the fencing met with the garden fence so as to eliminate the difficult task of trying to remove the fence with another fence mated against it. With the sections of chain link pulled free and rolled up I pulled the 3ft high shitty sections of chicken wire fence that was in place before the chain link was put up. This all came down easier than if I had to mess with the garden fence since that fence wasn't planned for removal. With the fence removed all together along with the pipes running along the top of the fence posts I was able to pull the T posts from the ground then use the electric chain saw to cut the wood posts at ground level. A few large weeds also had to go. Lastly I moved the large PVC pipes and other sections of smaller pipes I had stored against the old fence as well as the stacked buckets and drums that were clustered against the garden fence and the old fence. All the buckets and pipes and drums were stored against the wood fence near the fuel shed, at least temporarily. With the whole fence line removed along with the other crap, the area is opened up for further development. 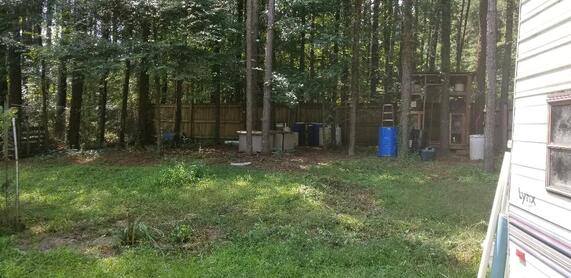
Cleaned up yard after fence removal. Note garden fence at left side and storage trailer on right and fence line with stuff stored in place and fuel shed to the back right.
On a side note I did have to do a little repair on the S10 as one of the control arms that I recently replaced was defective. The bushings wore out and spun loose in the control arm so there was excessive play in the piece. I ordered a new pair of arms and received them this past Friday. I went ahead and installed the bad arm since it was the bad unit and held the other one in reserve in case the other one decides to go bad as well. A little gathering of some veggies and some general yard cleanup rounded off everything.
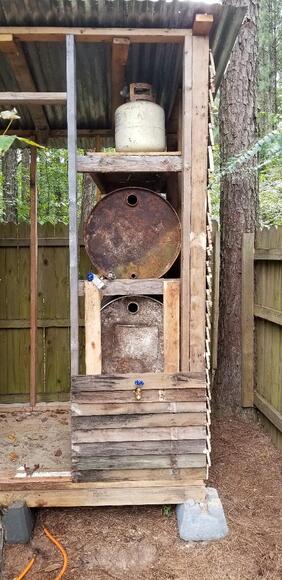
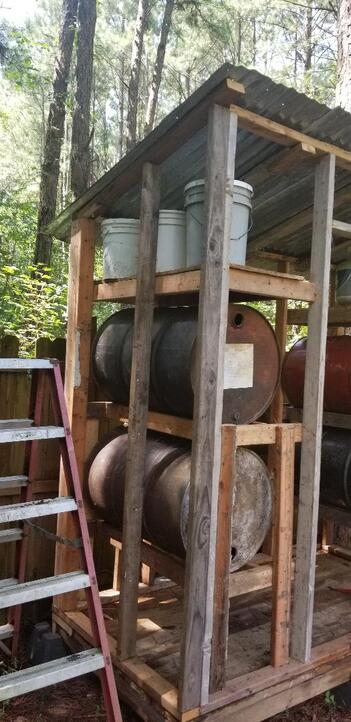
A few things have occurred in the last couple of days. First of all I did manage to make the shelf that I wanted to have over the top cradle/drum in the fuel shed. Just like with the cradles I cut some 2x4's and nailed them to the studs and linked them with more 2x4's before cutting a piece of salvaged OSB from the old shed to lay over the wood to make the final shelf. On this shelf I set the two 25lb propane tanks I had stored in the old fuel shed. There's enough spacing between the shelf and the ceiling/roof that I'm able to put the tanks up there with some room to spare.
Top shelf installed with propane tanks resting nicely.
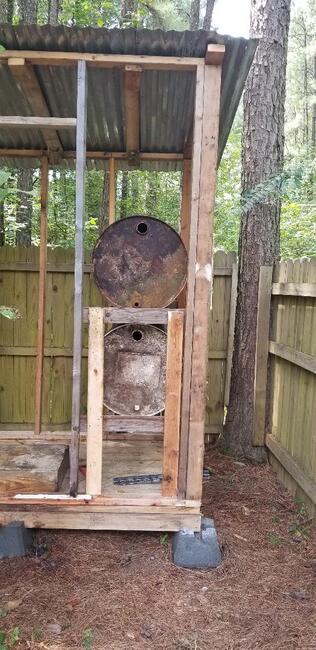
The next event was one of those sudden occurrences. The ole lady's baby SUV finally decided to smoke its alternator while she was out and about. So after getting it towed back to the house and me making an emergency auto zone purchase of a replacement alternator ($240 with core charge), I found myself outside after getting home from the job changing out an alternator. At least it went pretty easy and after finishing that the truck was back to charging like its supposed to. With that mini crisis averted I can now turn my attention back to the fuel shed. I did manage to finish emptying the remaining regular gas in the one drum sitting in the old fuel shed. After filling the two vehicles I had about one more 5 gallon can of gas I pulled from the drum. This gas had a bunch of sediment and rusty crap in it, no way that's going in any car. I did the next best thing, take my jug of old motor oil that I use for burning trash and put some of the shitty gas in with the oil. This will allow for a nice mixture that'll get any trash fire going pretty good. One of the other drums I planned on using also had some mineral spirits inside that I also salvaged for the same purpose. As for the cradles on the other side of the fuel shed, I made my measurements and cut the 2x4's needed to make the first cradle, then set the old regular gas drum in place on that cradle. I repeated the process with the top cradle and set the old mineral spirits drum atop that cradle. Everything went pretty smooth and fast all things considered. With the cradles and drums in place I can now cut the secondary support boards that I'll nail in place in the front and back of the two cradles to give it that added support for the weight it'll be holding when the drums are full. This will most likely happen tomorrow morning. More to come.. 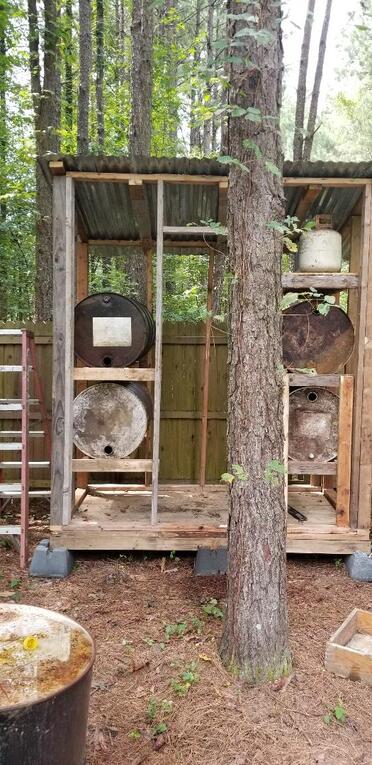
Gas drums mounted in place on their cradles.
At this point in the new fuel shed project I've been transferring fuel from the one regular gas drum in the old shed and putting it in the two vehicles we normally use. Of course because the fuel is old, I didn't want to just completely fill the tank, I've been putting the old fuel in the vehicles on top of a half a tank of fresh gas in order to dilute the old stuff so it will burn better and not cause any issues in the engines. So far so good on that note.
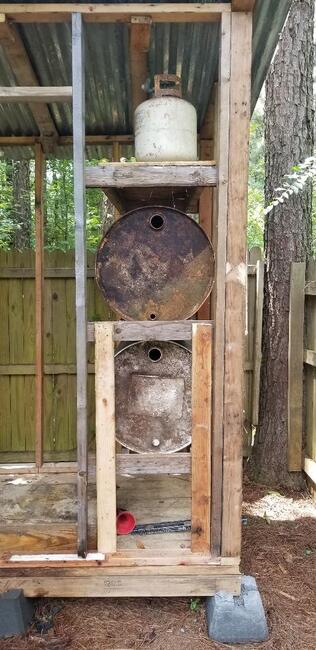
The next thing is, after transferring the kerosene/diesel fuel mixes into one drum, I ended up freeing two drums for my stacking in the new fuel shed. In order to do this I salvaged more 2x4 boards and made measurements in order to cut the boards as needed. I nailed these boards to the studs of the shed then added boards in between to serve as cradles for the drums. After nailing the boards in place, making sure they were leveled, I fitted the drums in their new homes. Lastly I cut four more long boards that I nailed to the stud boards on either end of the drum stacks. These boards serve as reinforcement boards, resting on the floor of the shed and further holding the boards that are nailed to the studs. When the drums are full and holding probably 500lbs+ of fuel, these boards will help keep things held in place. The next go around will be to add more boards between the studs in order to make a shelf above the two drums for putting either the propane tanks or oil buckets. I also need to gather some PVC fittings to put in place on the top drum so I an have the filler spout in place and the output spout in place coming out from the drum. I'll get metal fittings for the kerosene drum since PVC might not hold up to the petrol based fuel. Tomorrow I plan on doing this and starting on the boards for the other side. Hopefully I'll get the one gas drum emptied by then so I can stage it, otherwise I'll just have to mirror the measurements from the other side and just place the new drums in place when they become available. I did purposely space the top and bottom boards to allow for removal of the drums individually without having to pull shit apart since the drums may end up rusting from the outside enough to spring a couple of pinhole leaks. The new fuel shed is surely coming along nicely.
At this point I'm moving into the advanced stages of the new fuel shed build. Since I'm not ready to buy the plywood panels yet to clad the walls, I'm going ahead and starting to move some fuel drums over to the new site. The biggest thing though is the transferring of fuel after setting up the drums as I planned. I did make a few changes to my original plans though.
At first I did want to link the two gasoline drums and have one drum for kerosene but after I started moving drums I realized I had a large amount of waste veggie oil along with diesel fuel too. I decided to add a fourth drum over the kerosene drum that will contain waste veggie oil for when I do resurrect my diesel generator, or at least the engine from the genny. Of course since there will be two different fuels in those drums, I would have to have two separate output spouts as well as filler spouts. This would be easy in that the outputs from the top drum would angle over a few inches through the use of some 45 degree angled pipe fittings and then exit out right next to the output from the bottom drum. This idea sounded good enough that I decided to use the same idea for the two gas drums. Even though they would both contain the same fuels, it makes sense to have two separate outputs as it would eliminate the complications of trying to link the drums together as I previously thought of. Plus it would allow for the use of one drum's worth of fuel if the other is compromised for any reason. Worst case I might decide to start making alcohol and can then use one of the gas drums as the storage for that fuel. Another perk to doing the drums this way is that I can make the frame work to mount the drums all the way to the finish without having to get pipe fittings to try and link the two drums up first and building the frame around the spacing between the already linked drums. Once I get the frames built and the drums set up all I have to do is take the plywood and drill the holes for the output lines and tack the boards up, the shed will already be "active" for all intents. The extra drums that are needed is so I can set the drums as I need them to be and just pump the fuel from the old drums and transfer it to the new drums. I already started transferring what I think is kerosene into a drum, but I have another drum that is probably half full of either kerosene or a diesel/kerosene blend. Because all of these fuel oils are kinda old, my plan is to just blend the two and use this blend in the torpedo heater this coming winter to use it up and just fill up the new kerosene drum with fresh fuel. As far as the gasoline drums, one is almost full of non ethanol gas and the other has some old regular gas. I'll be using the regular gas in the vehicles and transferring the non ethanol into one of the newly staged drums while filling up the other with some fresh non ethanol gas. I'll probably try to use up the regular gas first that way I can just take that drum and use it right away in the new fuel shed. 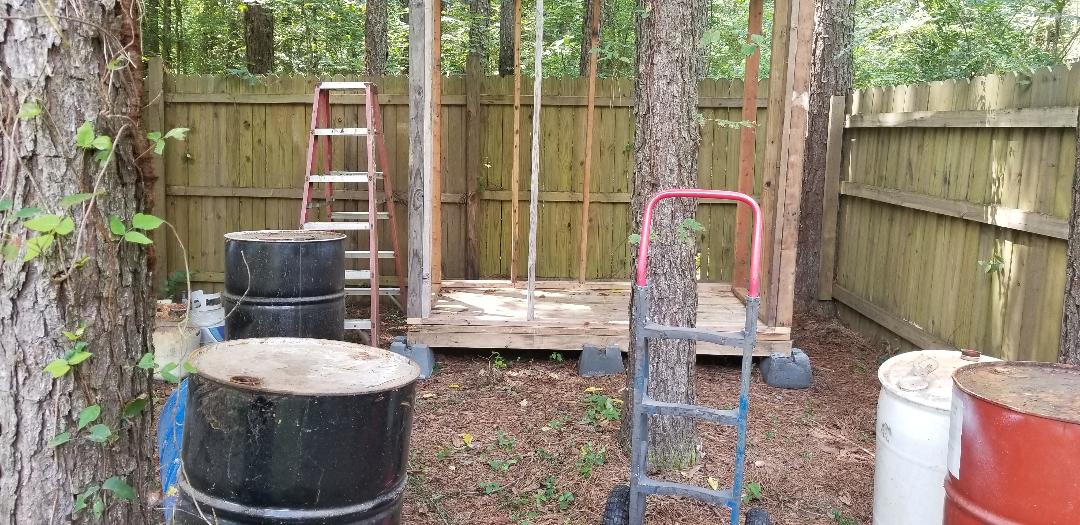
Fuel drums staged in front of fuel shed.
The other thing that I was working on was assembling the ATV a little more after getting the new batch of parts to try and resurrect the machine. After the first attempt I figured I was probably missing something, like the stator coil maybe needed to be installed to deliver the voltage needed to operate another part of the machine, who knows. I did take time to make a gasket and glue it to the stator cover so I can at least assemble that in order to run another test on the machine. I also had to do some rearranging on the plug for the handlebar switch assembly since the pinout was different and I had some issues with the wire harness almost burning up on me. I later found out that for one reason or another, the engine cutoff switch is somehow shorting out when its "on" so I made sure to remove the pins for that switch so it doesn't accidentally get turned on and burn up the wiring. Anyway, even after redoing the wiring on the switch assembly and installing the stator cover, the unit still wouldn't fire. I didn't get any spark after doing an open spark plug test nor did I get any kind of power anywhere at the coil or outside of the ignition module, short of the 12v coming in. My next move was to order a new coil and ignition module. We will see how that turns out. In the meantime i did wire tie the wire harness up to neaten things up and installed the fuel tank so all I have to do is install the ignition parts when then come in and see what happens next. Hopefully this will be the last thing I have to do to get this machine to come back to life. 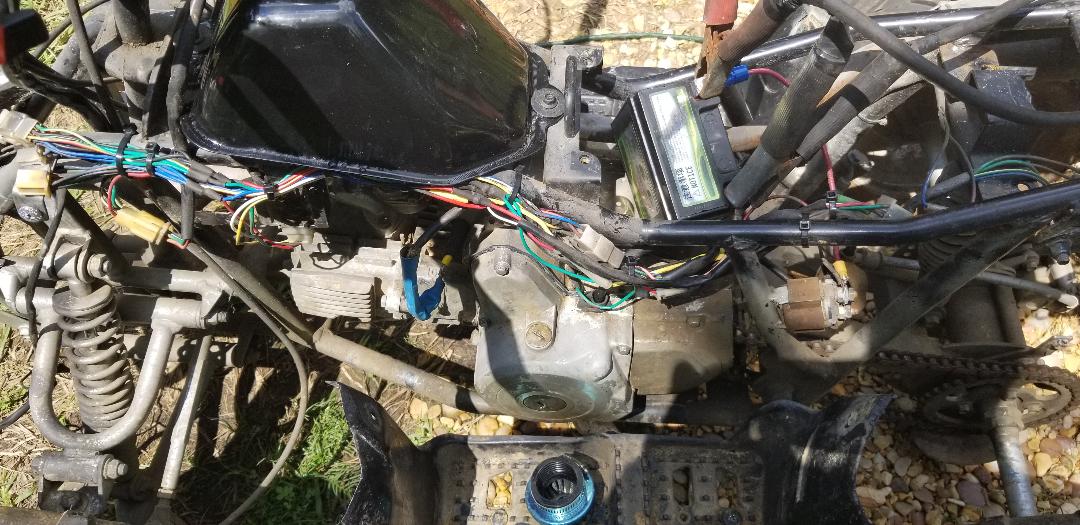
ATV with wire harness tied up and fuel tank secured.
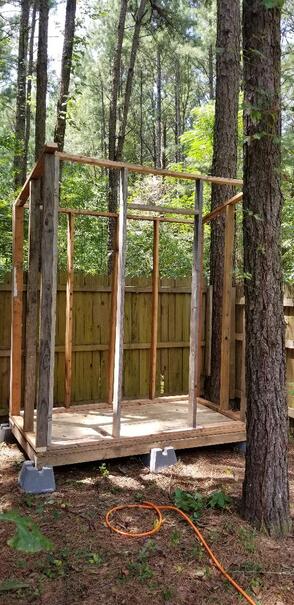
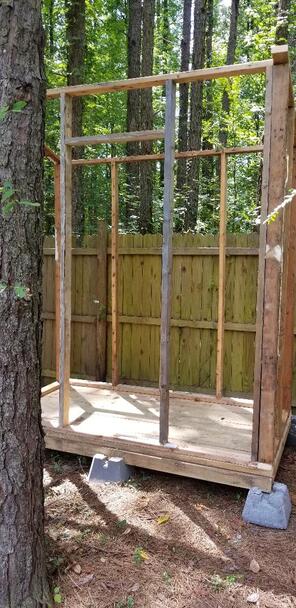
Today I was able to finish the other two walls of the fuel shed pretty easy, even factoring in the "processing" of the scrap wood that I have piled up. Having the dimensions of the other two walls made things easy enough in that I mirrored the other side wall and was able to use the gap in the front to make the last wall. I did have to scope out some door sizes on the Lowe's website to get some numbers of the dimensions of the most common door sizes so I can place the studs on the front wall at the right spacing to accommodate a door. After getting that taken care of I was able to nail the remaining studs on the front wall frame and finish up erecting the frame. At this point all that's left in the framing stages is placing some boards along the top with the proper spacing to allow me to screw down the pieces of corrugated sheet metal that I do have available. I'll also be able to make the frames for the drums and get them situated as well. With that I can dismantle the old shed, even before putting up the plywood and the door.
After finishing the work on the fuel shed, I had to water the garden beds as I hadn't done so yesterday (despite it actually raining over only our area today). In the meantime I ended up having picked a good amount of cherry tomatoes, then found several figs that were ready to be picked, a couple more pears, and several red and green apples. Most of the pears on the trees are small by normal pear standards but are ready, most of the time I know they're ripe when they fall from the tree and I catch em before some critter does. There's still plenty of pears on the trees and apples as well. The muscadines aren't quite ready but when they are, there will be a shitload of those to pull. In the meantime, I won't be needing any tomatoes for my salads, and I'll have some snacks to boot!

Bowl of fruits gathered
|