|
As we get deeper into the summer some veggies and other stuff are ready for harvest. We've already harvested a number of blueberries and blackberries, which we've liberally used on salads. I've removed some leaves of different herbs that we used in stews a couple of times, along with some green beans I also harvested. Now while I'm still pulling green beans and herbs and some blueberries, I was waiting for the potatoes and even the pears which seem to be staged and waiting for maturity on their respective trees. Unfortunately we didn't get any apples other than some scraggly specimens and peaches were a no show. Strawberries were mediocre but we still got some.
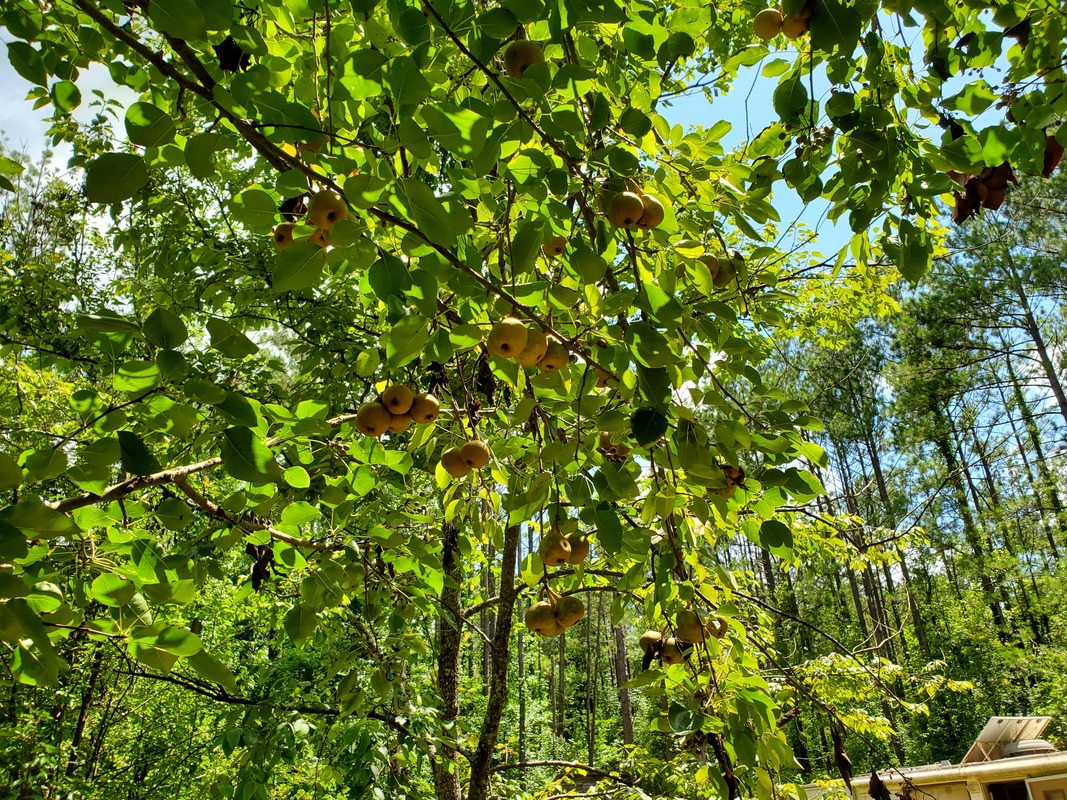
One of the many bundles of mini pears growing on one of the main trees in the garden.
For anyone who knows about growing potatoes, they'd tell you that you start off by planting the eyes from a seed potato, along with a portion of the spud as well. These eyes eventually grow into huge plants that mimic some tomato plants. In the meantime underground, the root system develops into a network of potatoes, all growing on the ends of some of the roots in the system. Eventually the plant dies back, leaving behind the tubers, as the potatoes are called, still sitting underground in the now defunct root system. Well now the time has finally come that the plants have died back. I started digging into the dirt of one of the raised beds used for potatoes, an old refrigerator. This large bed had three plants in it, along with a tomato plant (I couldn't find anywhere else to plant the thing). I started digging up spuds from one plant and as I kept digging I kept pulling up more and more spuds of various sizes, from large grape sized to about 5 inches long. After I was satisfied with the clearing of the fridge bed, I had a fair amount of spuds amassed. I still had three other beds to clear, one was a half drum, another one was half of a shop fan shell, and the other a washer drum. 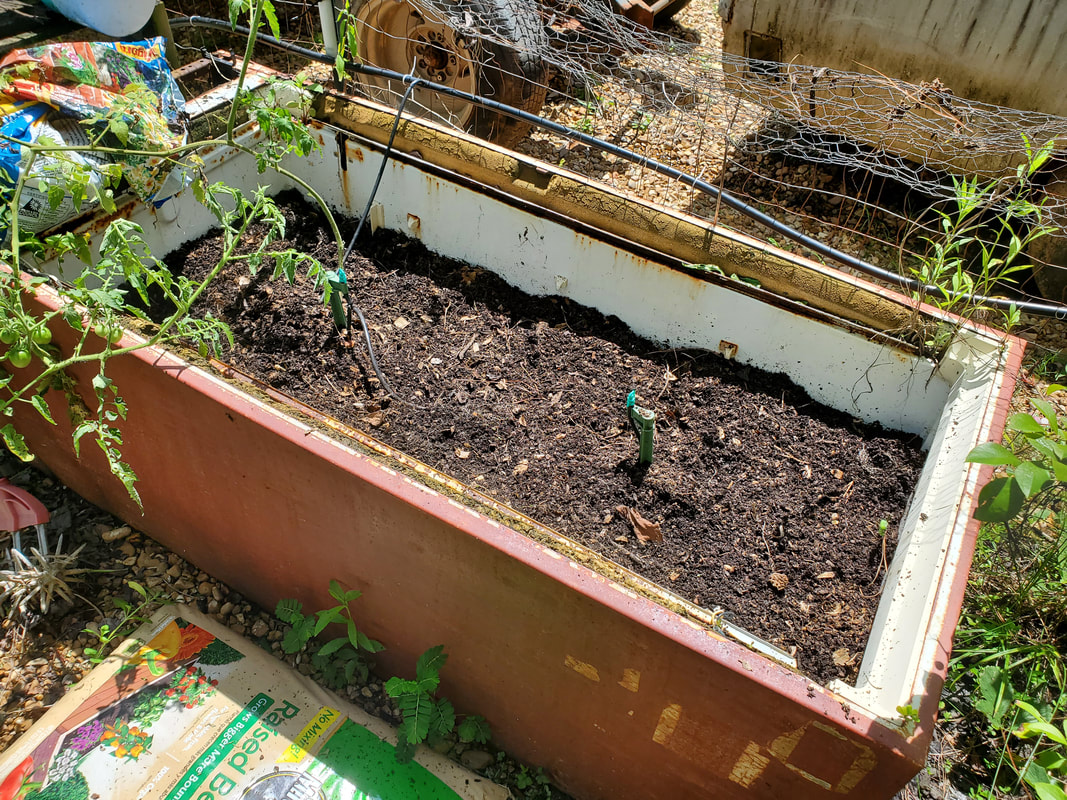
Old fridge used as a raised bed for potatoes.
In the half drum bed, there were two potato plants, with one that was still alive and well so that one had to be left alone and my digging had to be careful so as to not damage the roots of this plant. I carefully dug around where the dead plant was an pulled up some more spuds, but not many. The half of the fan shell with the spuds netted another good batch of spuds along with the washer drum. With that, I cleared all of the planting spots of spuds, and while I was at it I pulled up some old lettuce and other salad plants that got too old for use. With these newly cleared beds, I could plant some new stuff now.... 
Half drum raised bed cleared of one plant's spuds.

Fan shell and washer drum beds, two of which were cleared of spuds and the third cleared of other salad greens.
Now when I initially planted the spuds early in the year, I didn't use up all of the eyes on the seed potatoes that I had in the bag I got from TSC. I still had three whole potatoes that had multiple eyes on each spud. So with the beds all cleared of plants I replanted these areas with new potato eyes so I can hopefully have another harvest of spuds at the end of the growing season later in the fall. With the harvest of spuds, we now have to come up with some ways to use these things without overdosing on the starch in our diets. We'll probably end up using these things in a series of stews or soups. Of course some of the spuds can be allowed to mature to where they start spawning eyes of their own which I can use for another generation of spuds in the following spring. Of course when the next batch of spuds do grow these will most likely be the ones I'd use for the next spring's plantings. In the meantime we'd have to try and use up this batch so they don't go bad. 
Spuds after cleaning the dirt from them and putting them up on the kitchen counter.
The overall harvest hasn't been the best but it hasn't been the worst. The crazy thing is with all of the other things going on, some of the things I wanted to do in the garden I didn't get to yet and of course that caused me to have to do some last minute things to get some plants in the dirt which of course is reflected in the lowered production. The cooler and super rainy weather in the spring months all the way to almost summer caused the spud plants to grow like mad but oddly enough, other plants didn't grow like I thought they should, and now that the weather has gotten oppressive, a lot of plants are just kind of going inside and chilling in the AC for the summer. Hopefully they'll get off their asses and really go into some growth spurts and put out something worthwhile for the year to make this planting season even more worthwhile.
0 Comments
If you remember from earlier in the last couple of months we had moved a large stack of pre-cut wood from the backyard area behind the garden fence to an area by the east end fence/midway area for staging so I could further cut and split the wood for stacking on the firewood pallets in the firewood staging area. Well after chipping away at this pile of wood for so long I finally managed to get the last of the wood taken care of. With the wood all cut and split and stacked, I was able to cut the grass over this area to get the grounds prepared so I can spread more gravel over these grounds. Some areas are getting mushy and bare so its high time for some more gravel to cover this area around the east fence so I can move on without the worry about having to deal with muddy or otherwise compromised areas when moving about the homestead.
Surprisingly the pallets that were laid on the gravel in the firewood staging area had just enough room to accommodate the remaining firewood. Of course this doesn't matter as I don't have any fresh firewood other than some "scrap" wood from the dismantled porch that I will cut up. I will have to spread more gravel over the bare area in the firewood staging area and get my hands on some more pallets. More on that in a bit... 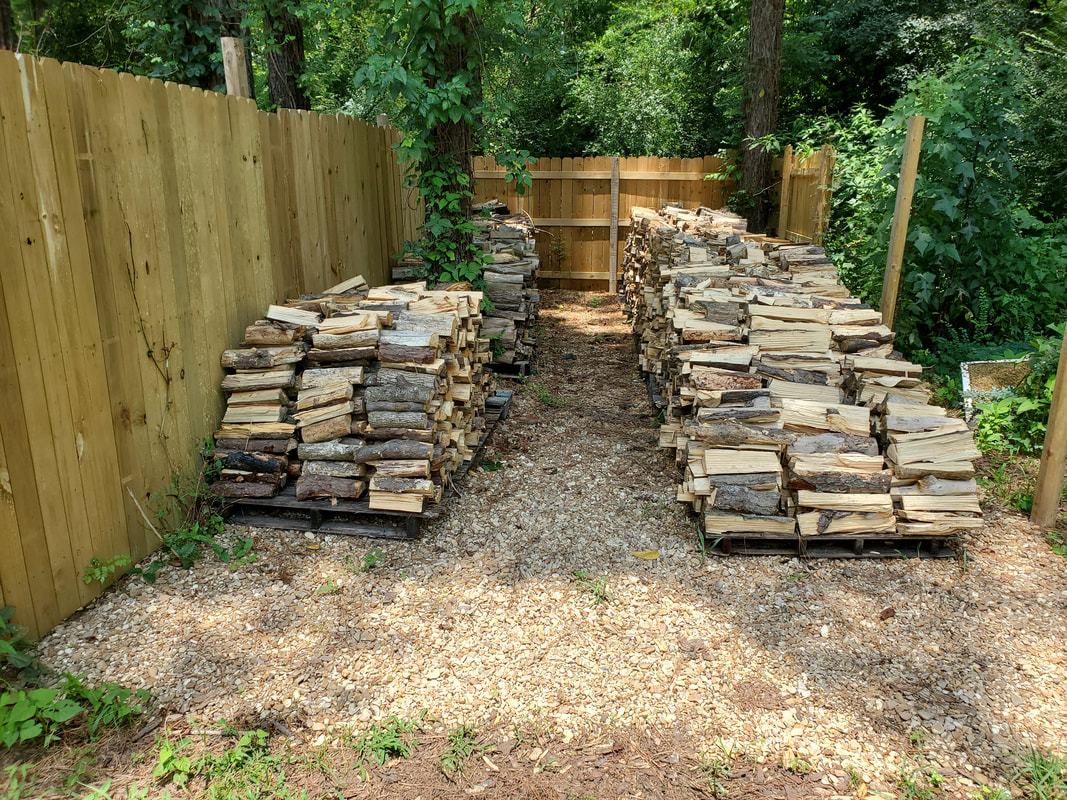
Firewood stacked on pallets in firewood staging area. Note there's no remaining room on pallets.
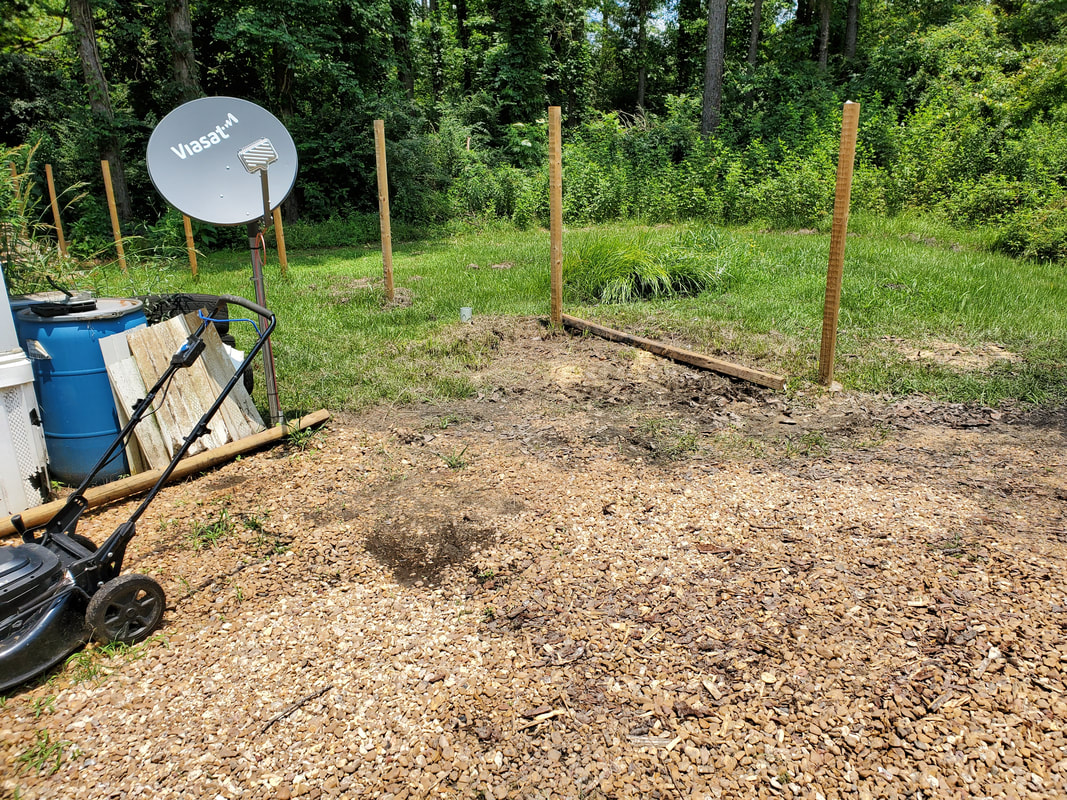
Area cleared of firewood leaving a boogered up area that is in need of more gravel.
With the firewood taken care of the next thing on the menu was more gravel. Instead of spreading gravel on the side path by the storage trailer, I moved back over to the eastern fence line to cover up the areas left bare by the wood and the tow dolly and my foot and wheelbarrow traffic through the area while working with the firewood. Of course unlike before where I could just stage the truck over the area to be covered and just shovel the gravel from the bed onto the ground, I had to use the wheelbarrow to carry gravel over to the area to be covered. This made things take a little longer of course and had me burning more energy and getting hotter but it did get done. I first took time to cover up some more of the area in the firewood staging area since I did manage to get my hands on a couple more pallets when I was on the gravel run so I can stack some more firewood I had made when I cut up some of the porch wood that was not worth saving. After dumping a few wheelbarrows full of gravel down I was able to set up these two large pallets on the ground. I'll be able to stack a boat load of gravel over these. 
Gravel laid down with two new pallets, note the size of the pallet on the left. Also note the stack of freshly cut wood waiting to be stacked.
After getting the firewood area taken care of I started spreading gravel over the grounds next to the midway, more or less continuing with the gravel that had been laid a long time ago. Some areas that started getting bare or low also got some gravel as a touch up. I managed to get a good covering of ground from the midway up to the eastern fence line and up to the edge of the house. Because I got enough ground covered I actually moved the S10 over closer to the house, setting it on the new gravel. Doing this allowed me to open up the midway enough that I can drive through with the F250 or any other large vehicle without interference. 
Patch of gravel spread over grounds from midway towards firewood staging area. Note S10 truck moved closer to the house.
Grounds between midway and house that are covered with fresh gravel up to eastern fence line.
The last thing on the agenda was correcting a problem that I should've been taken care of from a long time ago. For the longest time the F250 has had an issue with its starter cranking ultra slow when the engine is hot. It cranked sorta slow when cold but would still start up. If its shut down while hot and I tried to crank the engine, it would crank like the battery was almost dead. Most of the time it would still crank up but I can only imagine that the battery was really loving me the whole time. Well I decided to see what I could do to remedy this since I had a bunch of starters stored in the storage trailer from other Ford V8 setups. After looking I found out that these trucks actually had a two stage solenoid setup for the starter. The truck has the regular external starter on the inner fender like its older counterparts, but that solenoid actually fired the onboard solenoid on the starter itself. It seems like overkill but that's how Ford designed this shit. 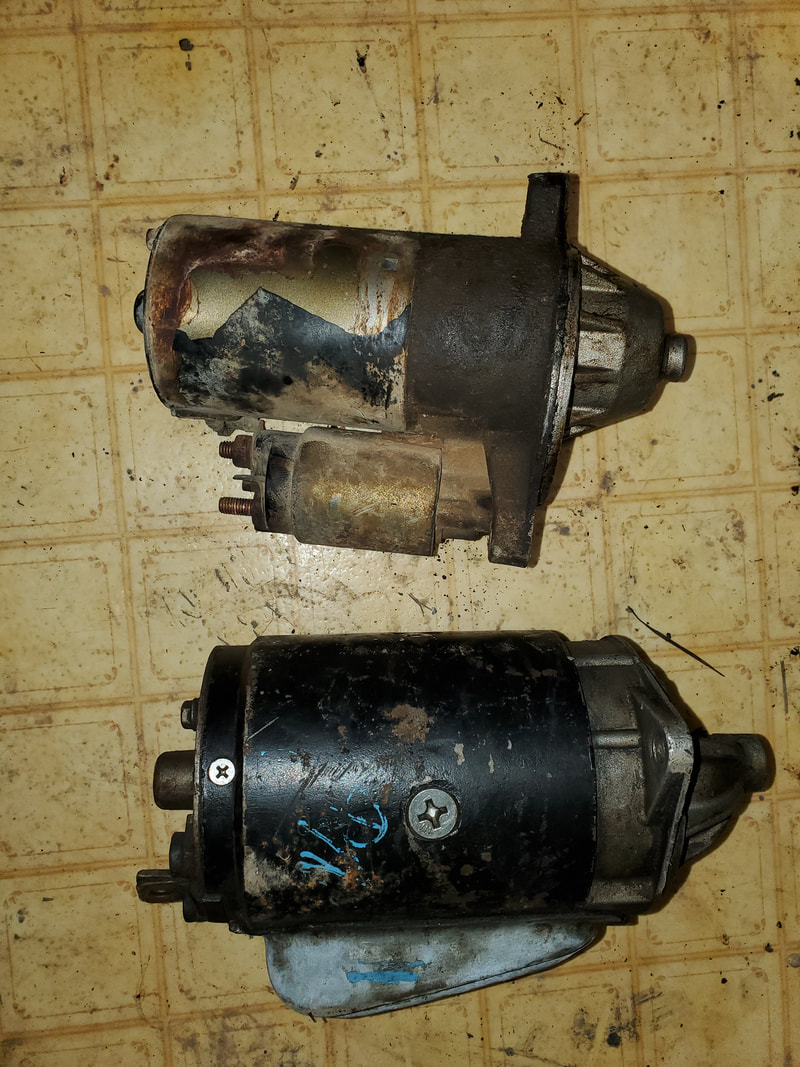
Comparison of newer starter from F250 with older SBF V8 starter. Note single terminal on older starter for heavy gauge cable coming from solenoid versus the extra solenoid on newer starter.
Now I could've just reversed all this and just ran the heavy gauge cables straight from the first solenoid directly to the starter and been done with it but I ended up finding the starter that I pulled from the FMT. Since both of these trucks are the same year and same setup, I just took that starter and used it as the F250's replacement starter. Now the solenoid terminal on the FMT's starter actually used a stud for a loop terminal while the F250's old starter used a male spade terminal. I ended up making a short jumper with a loop terminal and a male spade terminal to plug up to the F250's female terminal and allow me to connect to the stud on the FMT's starter. 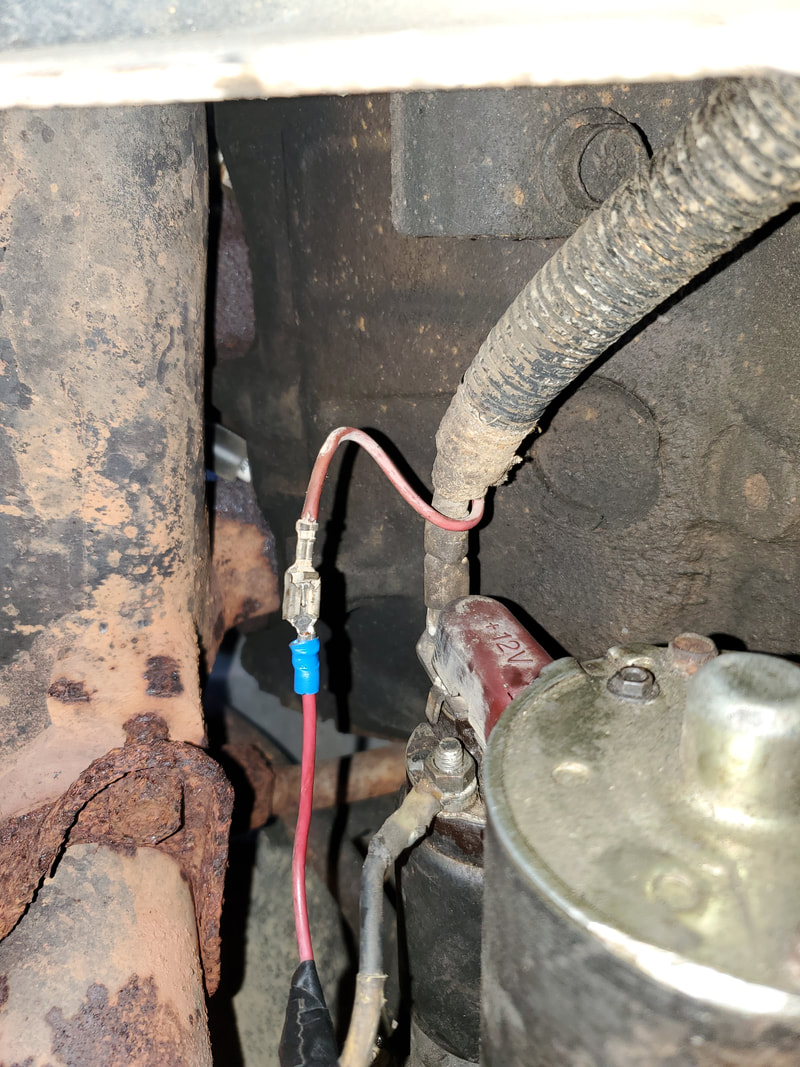
Starter mounted in place with jumper wire made up to adapt F250's wire to the new used starter.
With the new used starter installed along with its jumper, I was able to crank the truck up, seemingly faster than before, obviously. I let the truck run a while to warm back up then shut it off. When I tried to crank it again it fired right up without skipping a beat. A little while I moved the truck back to where I normally park it and shut it down again. The engine cranked and started right back up with no problem. Now I don't know how old this starter is as far as usage so there's no telling how much life this thing has. But for right now at least I don't have to worry about having to leave the truck running when I use it since I couldn't crank the engine when it was hot.
Taking a bit of a detour from our normal mixture of cars and home improvement stuff, I'm going to talk about a little pet project that popped up at the spur of the moment. The beginning of the project really started off probably over 20 years ago when me and the old man was working on something in the house we used to live in in the Chicago suburbs. I had to reach down into a heater vent in what was my old childhood bedroom, if I recall to reach for a wire being run through the wall via the heater vent where it terminated at the wall. The forced air heating system was a later addition to this house so the ductwork was not original to the house.
Anyway, while reaching into the vent, I felt something kind of weird. It wasn't wet or furry or anything that would indicate that it was a dead animal so I further reached for it and grabbed it to pull it free. Curious as to what it was the old man watched as I removed the item only to be surprised at what it was. It was an old newspaper. Carefully opening it up to see the date, it turned out the paper was from 1912! That was one helluva find in this dusty heater vent of this house that apparently must date back to earlier than that. So with that find I felt I was holding on to gold as a teenager. Of course as a teenager I wasn't exactly smart on many things. When it comes to something like this, most wiser people would think about trying to preserve such an artifact. But what does a teen do? He puts the thing in a plastic bag. So yep, this then at the time 75 year old newspaper ended up in a plastic bag. Periodically I would run across this bag and open it up to look at the old paper to remind me of this old artifact but otherwise, it stayed in the plastic bag for years and years. Fast forward to now. After moving to the South, the paper came along with everything else but still stayed in that same plastic bag, which surprisingly came from a now defunct hardware store called "Builder's Square". Of course as time progressed, so did the degradation of the paper. As the years passed, the paper reached the 100 year mark. The acids in the papers used in the past actually contribute to the decay of the paper so this paper has been breaking down to the point that it was actually crumbling when it gets moved around. At this point, I was trying to figure out what I could do about this. Could I sell this to someone or to some museum? I don't know and if I wanted to try to go through the hassle to find some entity that might be interested in such an item, the paper would probably crumble into complete dust by the time I did finally find someone or some entity that wanted it. So the only other option would be to try and preserve it on my own. Now how to do that? The only option that came to mind was to separate the individual pages and laminate them to keep them preserved. So we went to walmart and picked up a cheapo laminating machine which really is nothing more than a heater and a roller, sorta like a printer, where it takes these plastic sheets you open up and fold over the item to cover then feed the plastic sheet into the machine where it heats the plastic to seal it and harden it around the paper item in question. We grabbed a pack of laminating sheets and after getting back home, got to work. 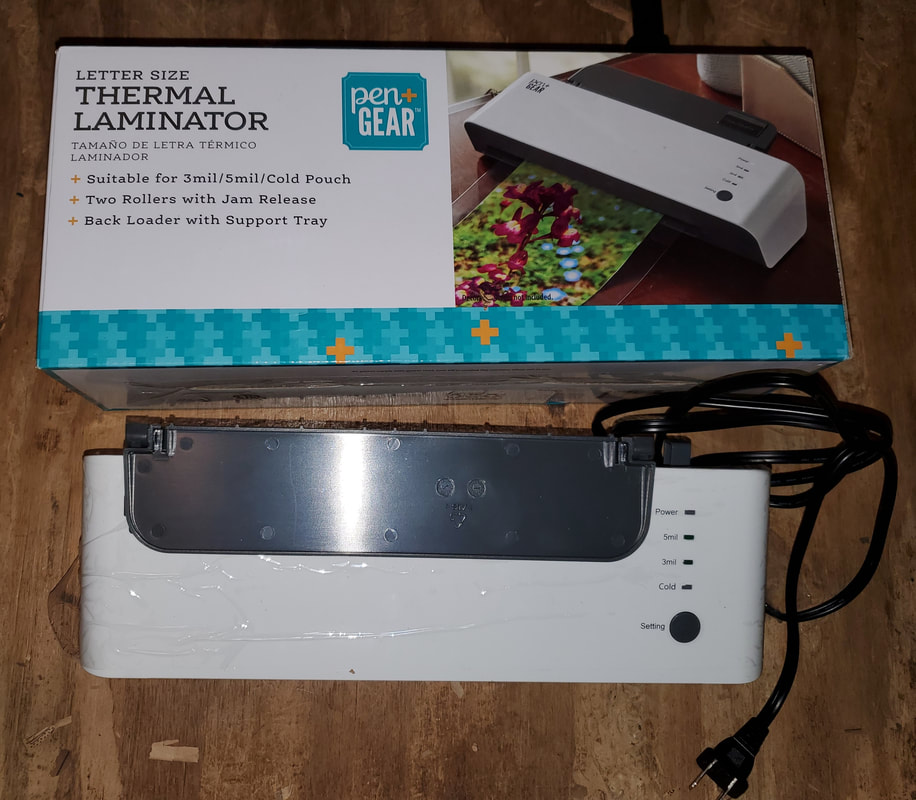
Cheap walmart laminator machine.
The laminator came with a few sheets but this job would surely take more than a few sheets. I started to carefully separate the newspaper page by page and after dusting off the crumbs from the large portion of paper I laid the piece in the laminator sheet. I did have to break away some excess paper from the edges that overhung out from the laminator sheet in order to ensure that the old paper would be completely covered by the plastic sheet. I started running sheets through the machine, getting them sealed and hardened up rather nicely. 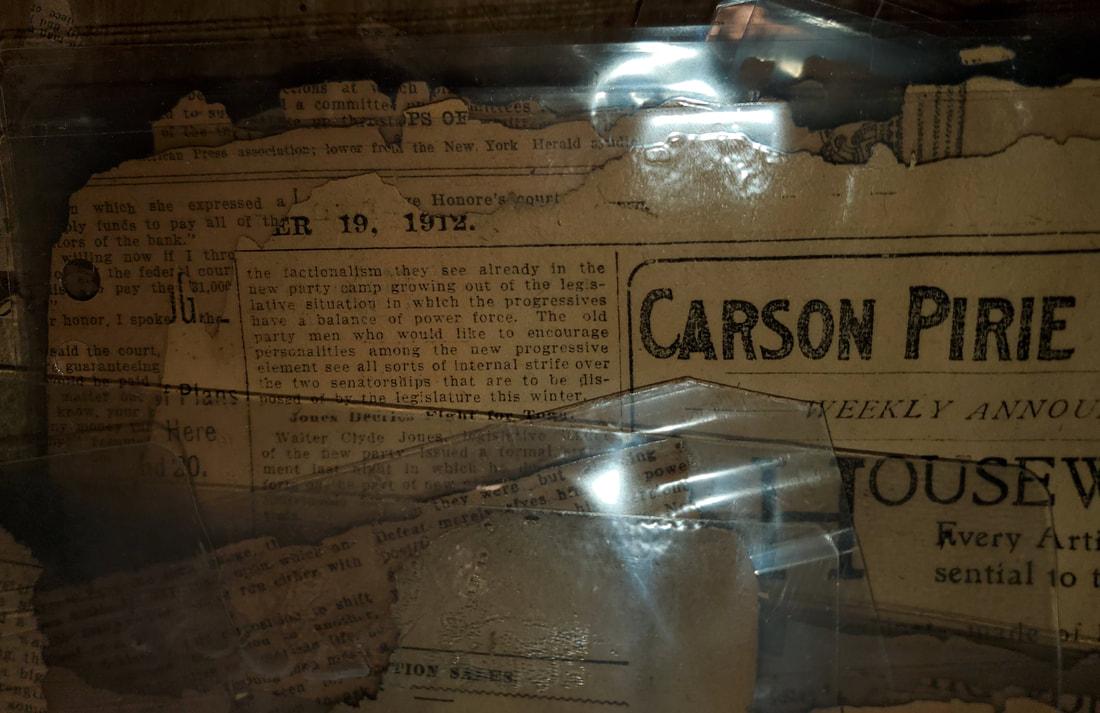
Laminated sheets of old newspaper, note the date of the paper.
Now here's where cheapness comes back to bite us in the ass. The cheapest laminator from walmart was $17 and there was an upgraded model that was around $40. This model was working fine but I would have some episodes where the edge of the sheet would get hung somehow on the edge of the casing and instead of slowly feeding out, the rollers would keep pushing the plastic forward, bunching it up. The first time this happened I quickly turned the machine off but because this was a cheaper machine the manual said to hit this button that would stop the rollers then just pull the sheet out from the feed port. Unlike a more advanced machine where it would have trap doors that can be opened to access the rollers to clear jams, this thing's solution is to just snatch the paper and plastic from the back of the machine, how marvelous! So that's what I ended up having to do when this thing wanted to be stupid. That still didn't solve the problem of the crinkly plastic that now has my 100+ year old newspaper partially sealed within. I had to carefully try to re-feed the plastic through until I finally got it to feed all the way through where it started coming out. Luckily the heater helped iron out the crinkles in the plastic enough that it didn't ruin the piece. 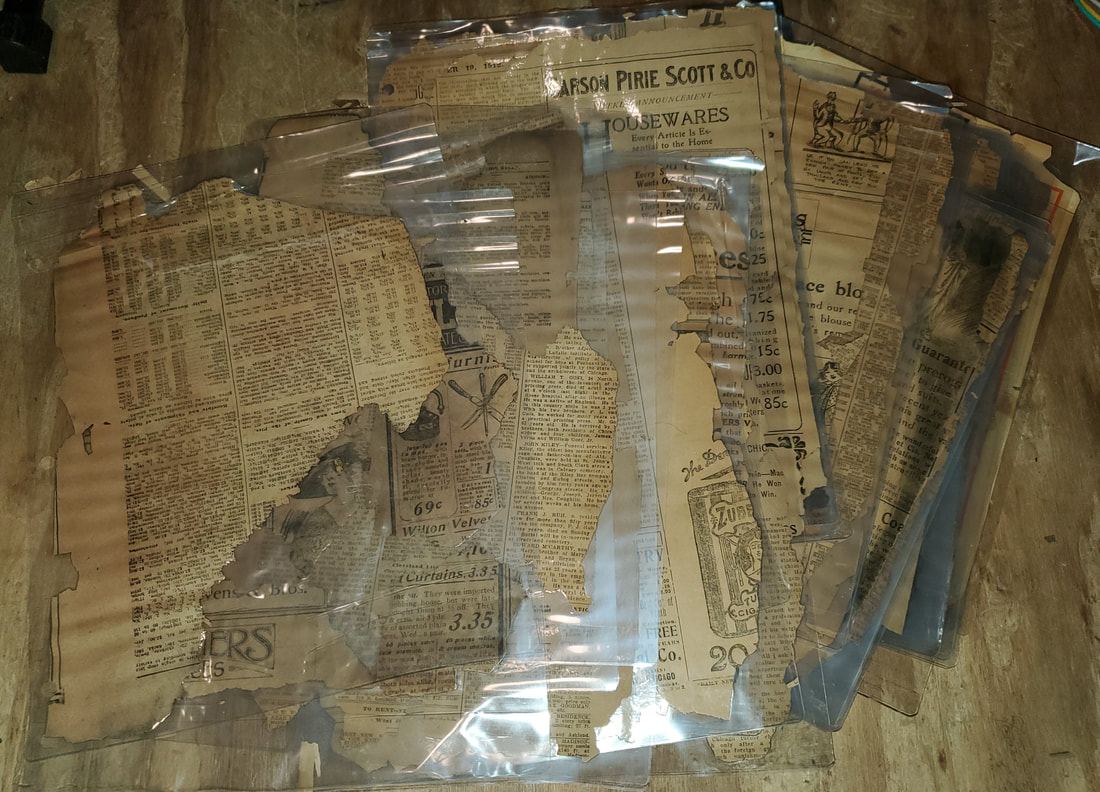
Laminated sheets completed, note the crinkles in some of the sheets from the jams that occurred.
It seemed like this machine started jamming up more the more I used it. It really did start getting aggravating after a while but I had to deal with it. I especially have to deal with it for as long as I have this machine until we can get to a point where I really need to laminate stuff where it would warrant me buying a better machine. Because me having to laminate stuff will have few and far occurrences I don't see a need to buy a more expensive machine right this moment but I did get a crash course in laminating papers and do see the merit in this piece of equipment. Now the next thing is what to do with these newly laminated sheets of old newspaper. The obvious thing is to three hole punch the sheets and put them in a three ring binder so they can be viewed like a book, even though there's no order to the pages. This is where our other walmart special, a three hole punch comes in. This piece of equipment was picked up many years ago when I was printing out pages of info on preparedness and survivalism oriented material along with some DIY stuff on self sufficiency and other related topics to create a bound and printed library of information. With that I took the hole punch and started punching holes in the laminated sheets, doing two at a time since the thick plastic sheets are more than the typical paper that this thing would normally punch holes in. After punching the holes in all the laminated sheets I had to find a binder to use. Ironically the only free binder I could put my hands on was some wussy cat binder that the ole lady had left over from wherever. So screw it, I took the cat binder and put the laminated sheets within and put the binder on the shelf with all of my other printed materials and binders, which also includes scrapbooks of postcards from our travels. 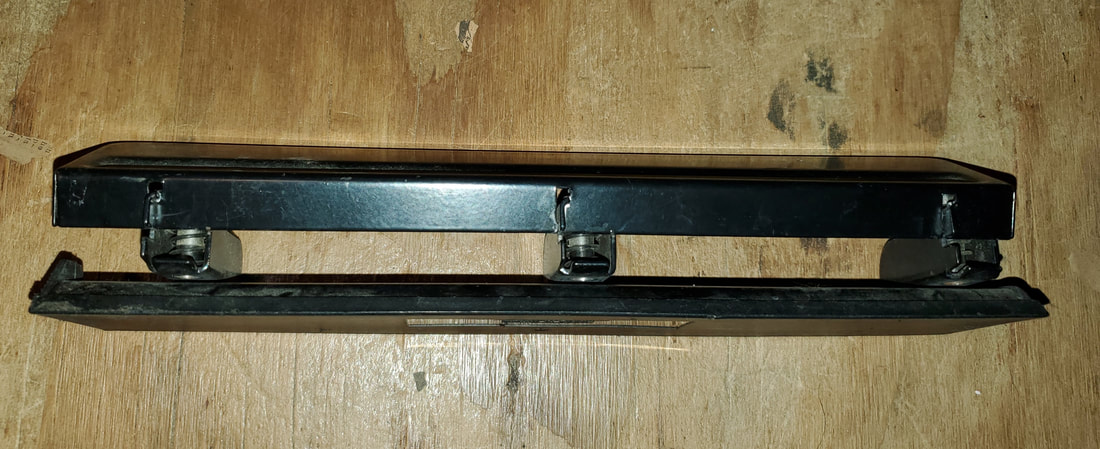
The cheap walmart special 3 hole punch, it does get the job done pretty good though.
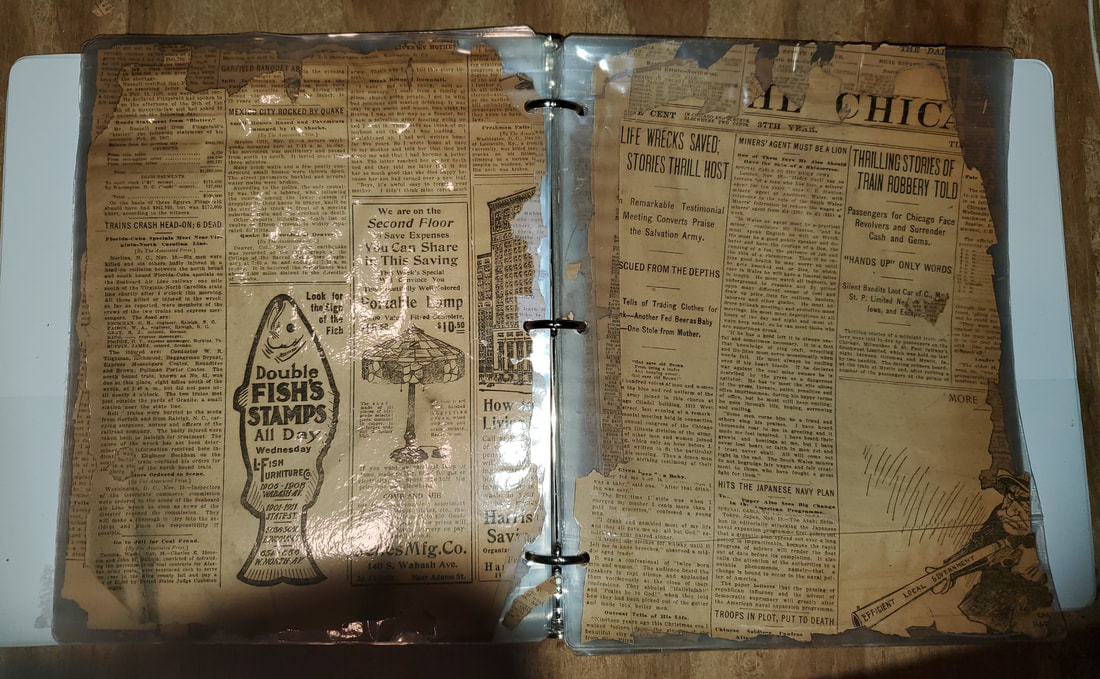
All of the laminated newspaper sheets at home in the 3 ring binder.
At least now the issue about what to do with the old newspaper has been resolved. If for some odd reason someone did come up saying they were interested in buying this old newspaper for a museum display or whatever, at least they can say that it is preserved and not crumbling further into dust. And even if that never happens, at least I can come back to this binder whenever I want to just to thumb through it to look at the pages to get a brief look to the year of 1912 and how things were done at the time. But in closing, the laminator machine is an essential piece of equipment for the homestead as it will allow you to preserve any kind of printed material for any purpose or application. The costs of these machines and the sheets to feed them with are so affordable there's no reason not to have one.
After having touched down in Texas earlier and taking a few moments to play tourist by visiting the Ft Worth Aviation Museum, we went to the seller's house to pick up the car. Just like last time we rented a truck from Enterprise, basically the same model truck, a Dodge Ram 2500 diesel crew cab truck so this thing is more than capable of yanking a car down the road. Since I wasn't really in the mood to try and use a full size car trailer as these things are a PITA to maneuver around, I decided to press our newly acquired tow dolly into service. I did recently do some work on the dolly as I had noted in a previous post where I had to weld up the ramps and add some plate metal to the tops to replace the broken plastic tops that were on the ramps previously. I had the ramps nice and secured and since the base of the dolly tilts after removing a retaining pin, it would make loading up this car body relatively easy. 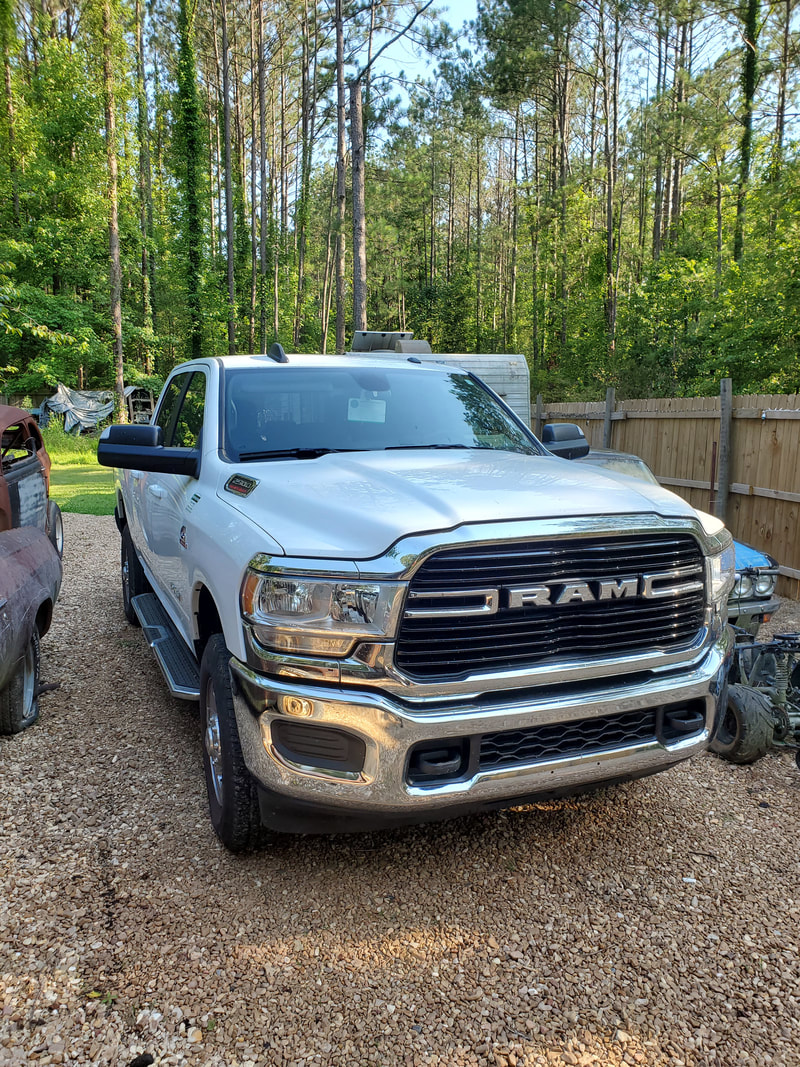 The 2021 Dodge Ram 2500 diesel truck that pulled the 46 Ford home. 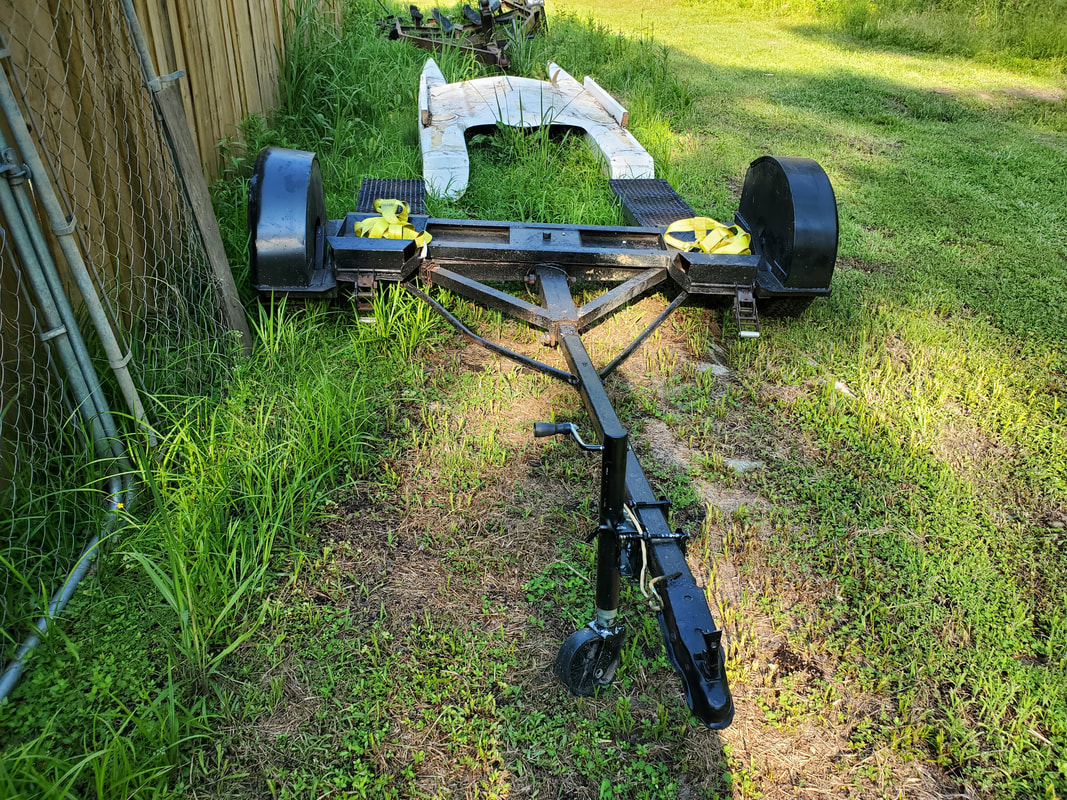 The tow dolly with the straps for securing the tires of the car to the cradle. The car is a body that was pulled from its original frame and had undergone a light chop top job where the guy did pie cuts at the rear then closed the gaps by pushing the roof down and tacking those joints together to get the desired drop of the roof. Now of course the interior of the body is stripped so it will need to be put back together but this was necessary as part of mounting the body to the S10 frame. 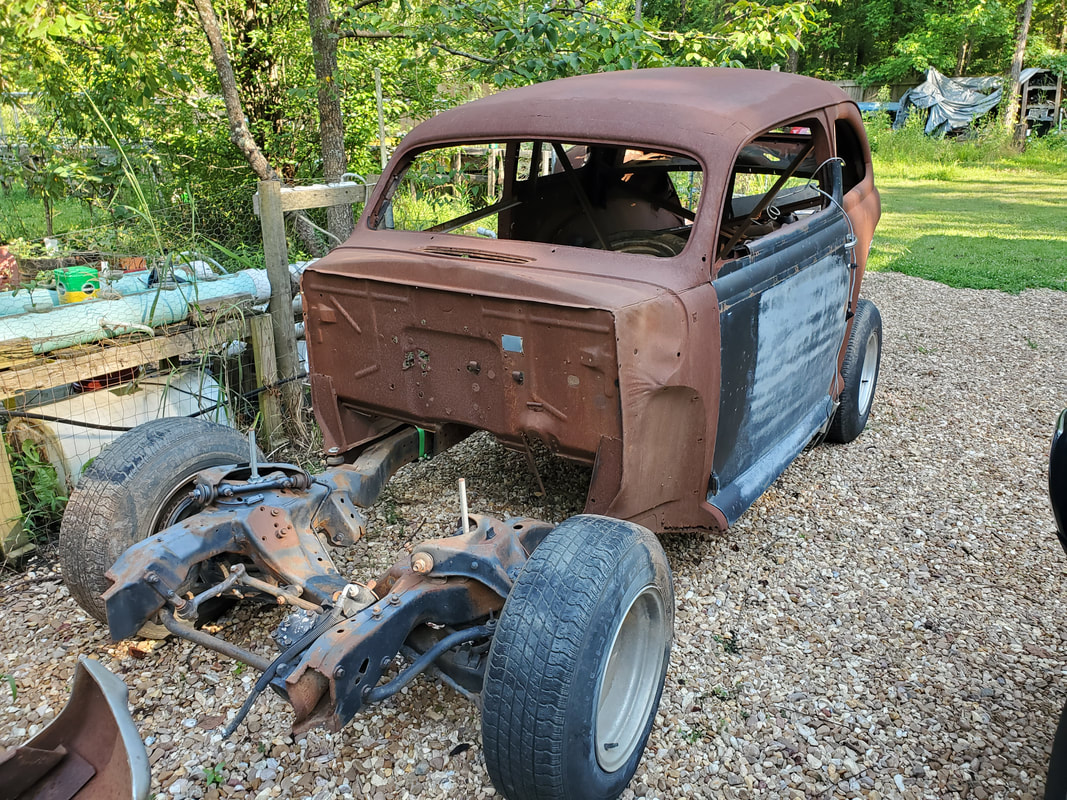 Shot of 46 Ford on S10 frame 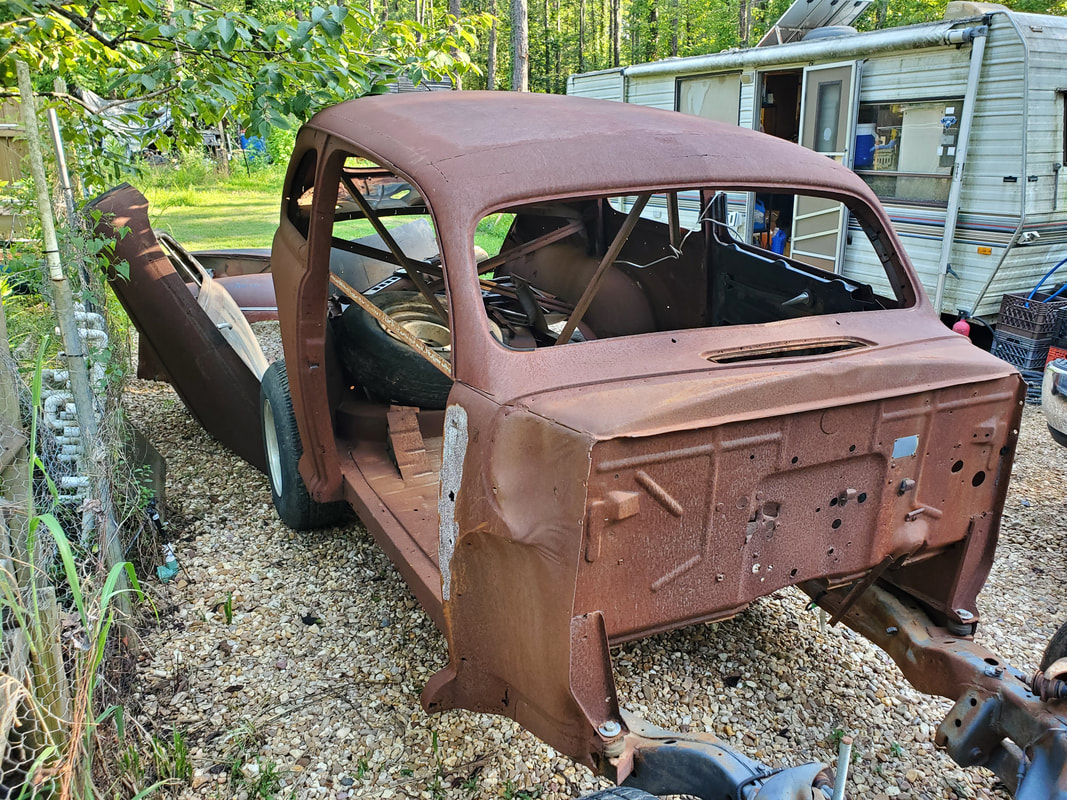 Shot of right side showing angle iron bracing used to maintain rigidity while chopping top. 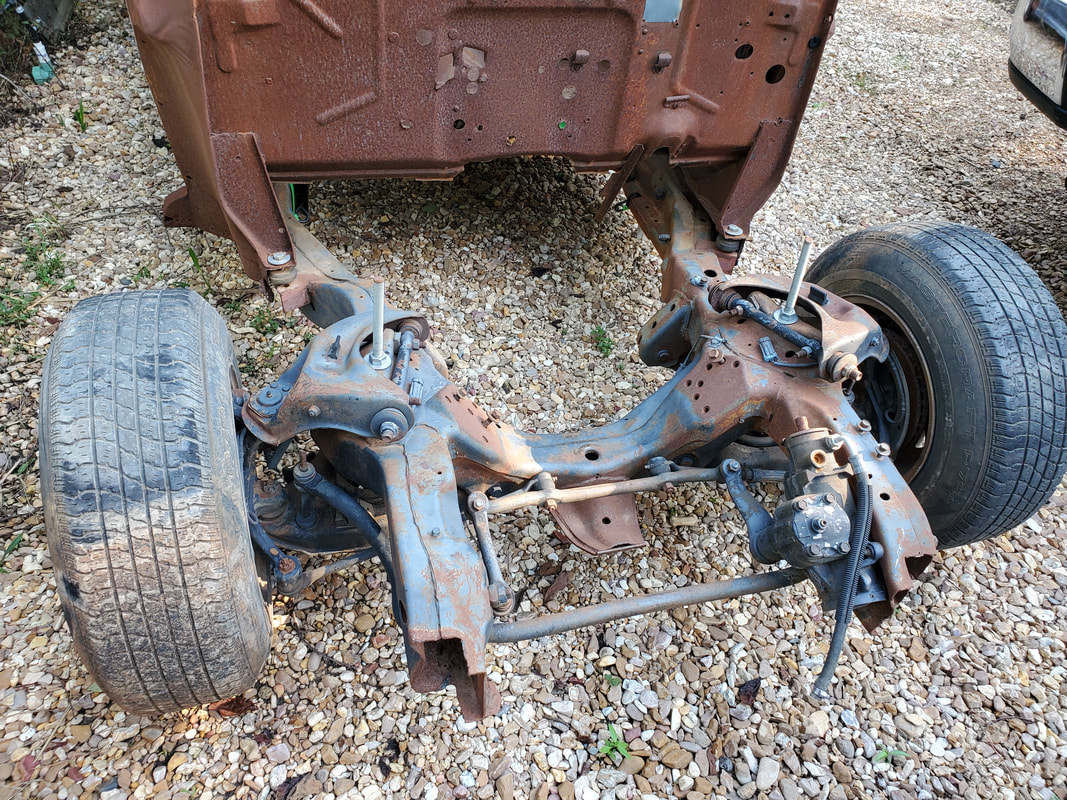 Shot of S10 front end and firewall of body showing front mounting points. As can be seen in the previous pic, the front mounts of the body are simple tabs that are matched up to holes in the S10 frame where bolts are used to temporarily hold the body down. There are bushings in place but I will more than likely use better bushings and heavier grade 8 bolts to secure these mounting points at the front as well as the back and the middle. Bushings will be used at those other mounting points just as well. There are angle iron braces that the guy used to maintain the body's rigidity while chopping the top. This metal is still in place, including on the right side since the door hasn't been remounted yet. The driver's door will have to be finished up on the chop since the top part that goes along the A pillar was cut off and never finished up. After examining this and completing the job on that door I'll have to duplicate the same thing on the passenger door, but will have to get the door mounted first so I can line things up to see where and what I have to cut and weld.  Passenger side door and trunk lid. Hood is behind door and rear fenders are buried between the door and hood. Luckily I got all the body panels for this car so there won't be any concern with trying to hunt down any of these hard to find and/or expensive parts. All I'll have to do is clean everything up, probably even prime these panels and have them staged somewhere to keep them safe, more than likely in the garage. In the meantime even before I do anything with the fenders, door, trunk and hood lids, and front clip, I will finish the work on the main cab/body so that part will be all done so as I do my work with the removable body panels, I can attach them to a body that I more or less do not have to work on anymore short of painting the thing.  Shot of rear of the car showing fenderwells minus the actual fender skins. If you look closely the cut lines can be seen in the roof. I even have the privilege of having the dash panel that came with the car, which has the glove box door, gauges and other moldings in place. Cleaning this up and rebuilding the whole dash to make it more "modernized" will add to the overall effect of this build making it a unique piece of art when done. When I do remove the braces from inside the car that will open up the whole cab to where this vehicle can have some utility to it in the form of being able to open the trunk to slide longer items in place. Of course I will more than likely only replace the two front seats in this car and not worry about any back seats. The rear area can make a good storage area for cargo whether the car's used for just routine supply runs or actually used for a road trip where we're carrying luggage and other crap like we tend to when on road trips.  Dash panel showing the hardware that comes with the panel, a lot of potential here to make this a clean work of art. As you can also see in the previous picture I have all of the inner door panel and window regulator hardware as well. While I will have to clean up all this stuff and get everything lubed up to work again, the idea that I have everything puts me miles ahead of those who get projects like this and have to replace parts that are long gone. I even have the original window glass for the doors which even though they're broken, they can serve as templates for making replacement glass. Another thing that I have that I found unique is the one piece front clip for the car. This consists of the fenders and grille, all connected, which kinda makes it easy to work on as once the bolts are removed, me and the ole lady or some other partner can remove the front clip in one piece to facilitate quick work in the engine bay such as removing the engine without risk to damaging any sheet metal. Even suspension work can possibly be easier with the front clip removed.  One piece front clip that incorporates the fenders, grille, hood latch and other hardware as can be seen. As you can see there is a lot of potential with this project as all the parts are there and a lot of the harder work has been completed. Now while I'm not going to do any shitty work, I can't realistically expect to do some super high quality "professional" car builder type work either. We will have to take our time and just make sure to measure twice cut once. Making sure to get things lined up properly before making final attachments or welds or cuts will go a long ways. Taking time to install certain components as well before making final welds and attachments will save me a lot of time in not having to cut things up after welding or attaching things. I will probably try to get the body secured to the frame first then get some of the rear body taken care of just to get those parts out of play and on the car. When I get to the front, I will try to have a powerplant in hand that I can use for test fitting purposes. My plan, since this is an S10 frame and the intent of this project is for it to be a potential daily driver/cruiser, I will just go with a 4.3L V6, same as what was in the S10 truck, with a 5 spd manual to save me the headache of dealing with transmission issues, especially if we road trip this car. The powerplant has the potential to be made into a performance unit that can get the car down the road in a reasonably fast manner and will still be small enough to make it easy to work on compared to a V8. Now will I never consider a V8? I can't say that I won't but for right now I just want to build something that will be fun and economical to use. The other funny thing to look at too is the idea that since this is indeed an S10 frame, I could actually install a frame hitch to this thing to allow this car to pull trailers with ease, further increasing the utility of the car. Also I could do suspension mods that either drop the car to the ground or raise it up high depending on what I may want to do. Using an S10 frame opens up a lot of doors to what can be done with this build and also opens up the door to fast repair turnovers since this chassis is common enough that replacement parts are easily had at any auto parts store for reasonable prices. This would be a definite plus for a road trip situation as having to replace a ball joint or brakes in the field will be made a lot easier when the parts can be had the same day. As we do start working on this car you will be the first to see the progress documented here as well as on our YouTube channel, The Improvisation Center. Stay tuned for upcoming posts and videos on this and all of our other projects around the yard and shop! Until the next time.... Over this weekend we took a little road trip back to TX to pick up our latest automotive acquisition, which will be shown in a future post. Our plan was to ride out to TX on Friday, leaving in the morning after picking up the rental truck, and touching down that evening. We stayed at the hotel we stayed at in Ft Worth when we came down to pick up the 51 Suburban. From here the following morning before going to the guy's house to pick up the car we did a detour to the Ft Worth aviation museum so we can at least say the trip wasn't just strictly business. Unlike the VB aviation museum the planes at this little museum are display pieces, not able to be flown. That's ok because the planes at this place are mostly jets from the cold war era into the more recent years. These planes are restored with regard to the paint and body and other items to make them look more pristine as display pieces. Most of the planes were demilitarized before being brought to the museum but to help better preserve them, volunteers at this museum put in many hours working on these planes to get them ready for display. 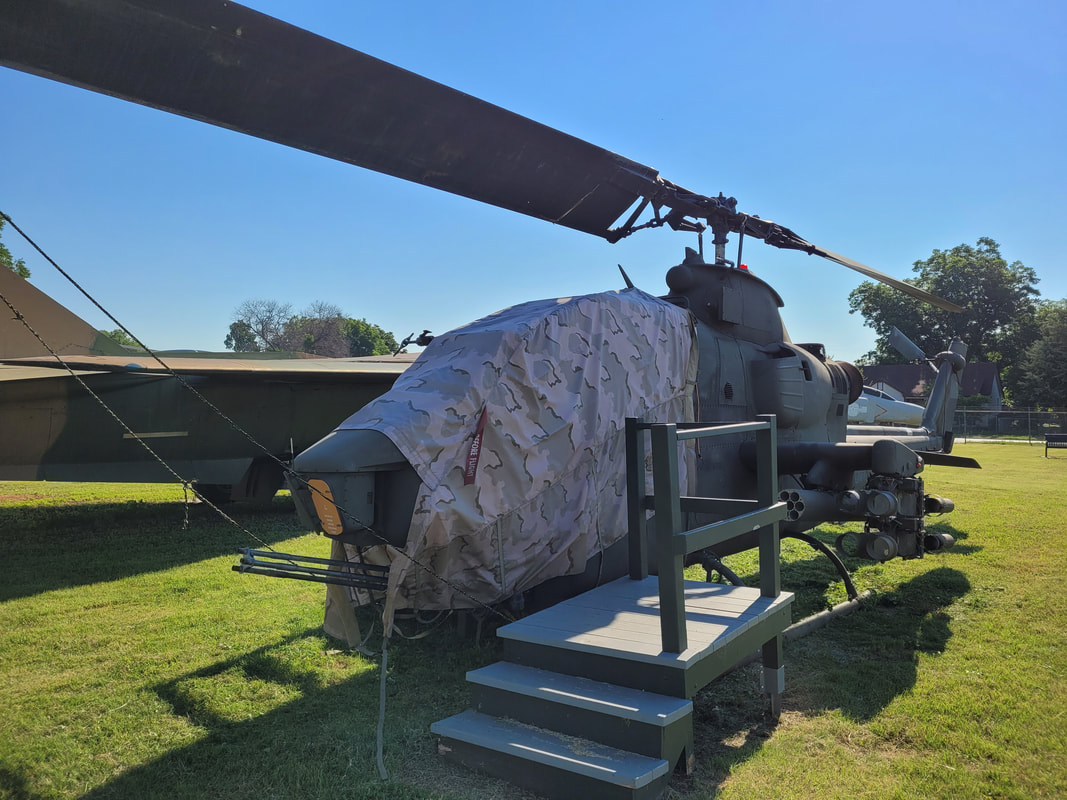 Huey Cobra gunship with canopy covered up 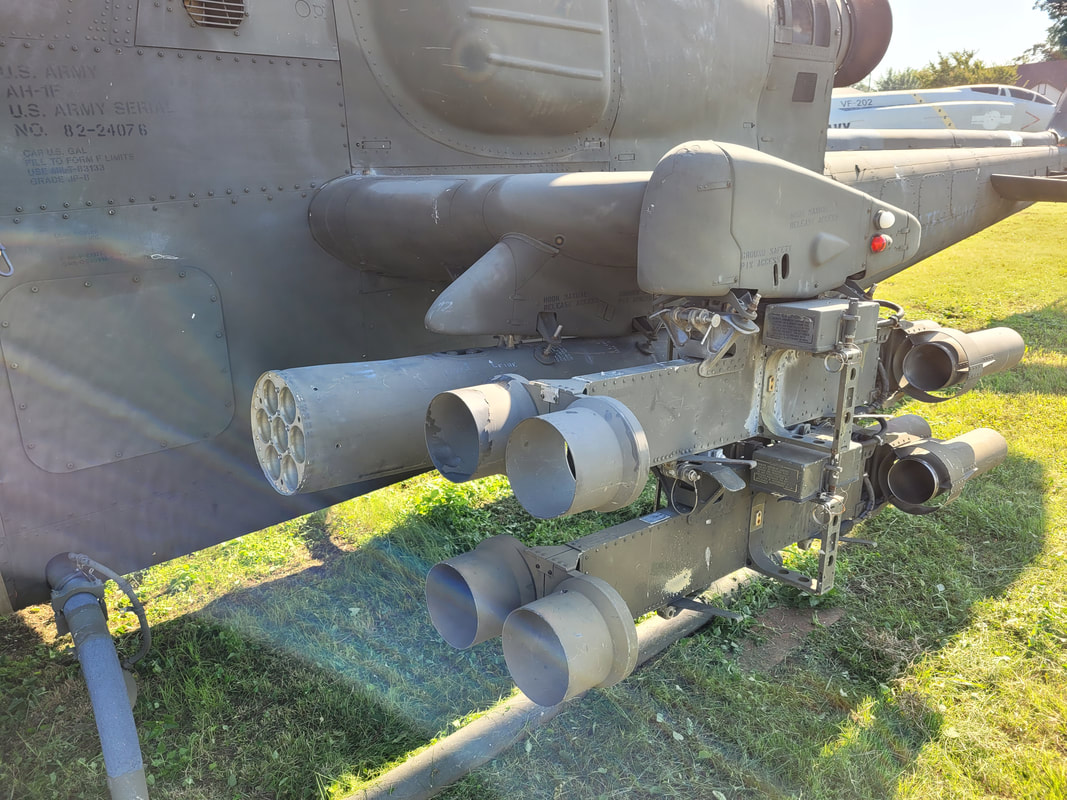 Rocket pods on Cobra 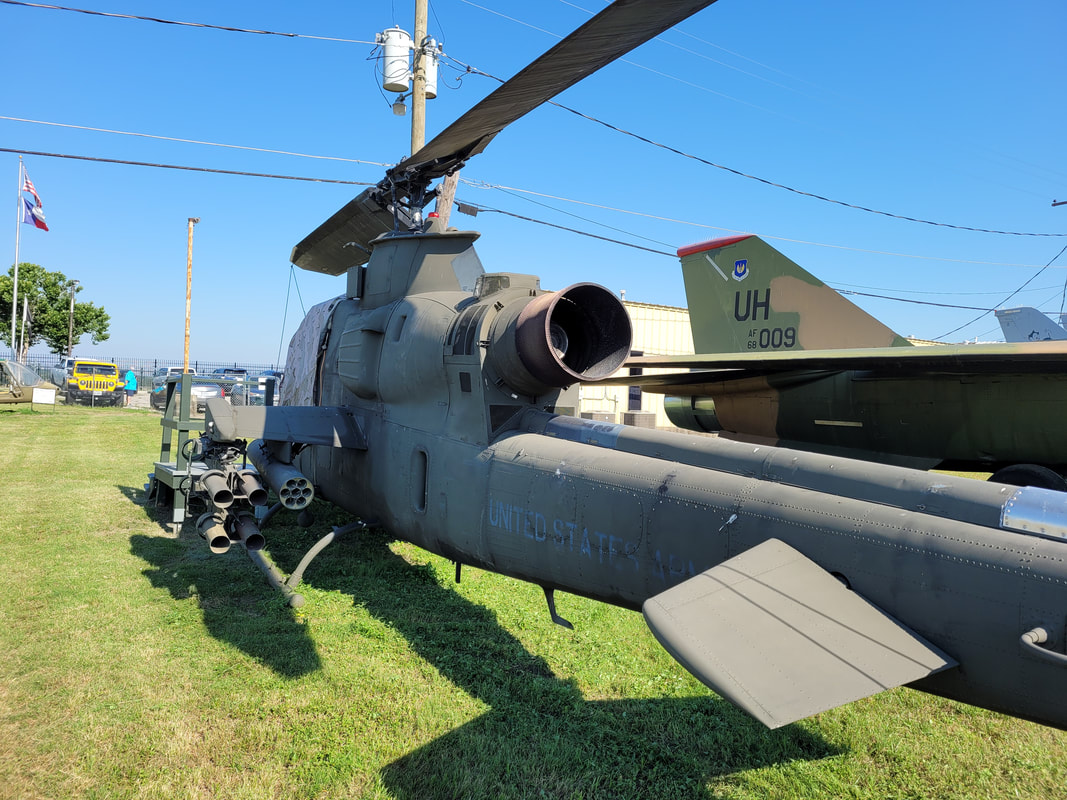 Turbine exhaust port and tail section of Cobra Many of the jets here are cold ware vintage planes that many afficionados would recognize just by a quick glance of them. Contrary to the WW2 and WW1 vintage planes at VB, these planes are rather large, showing the advancements in aviation technology that required the sizes of the planes to adapt to accommodate the powerplants and weapons systems. 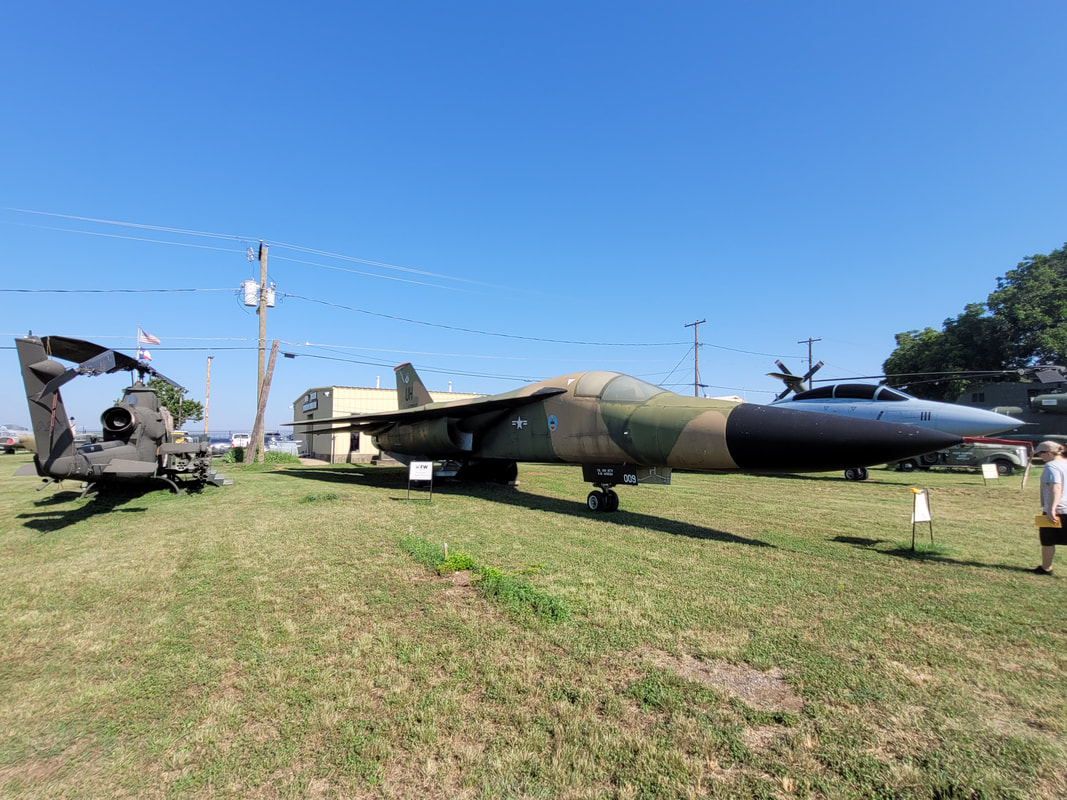 F-111 bomber, this is a large plane. 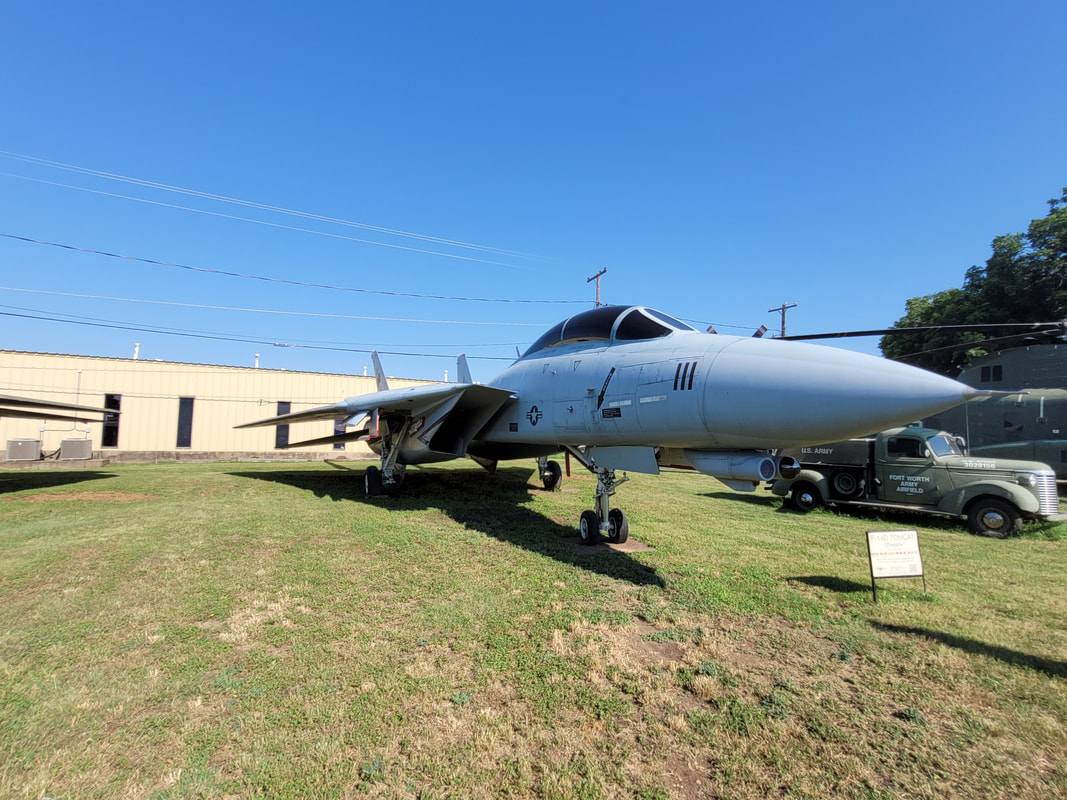 F-14 Tomcat fighter, an iconic plane. 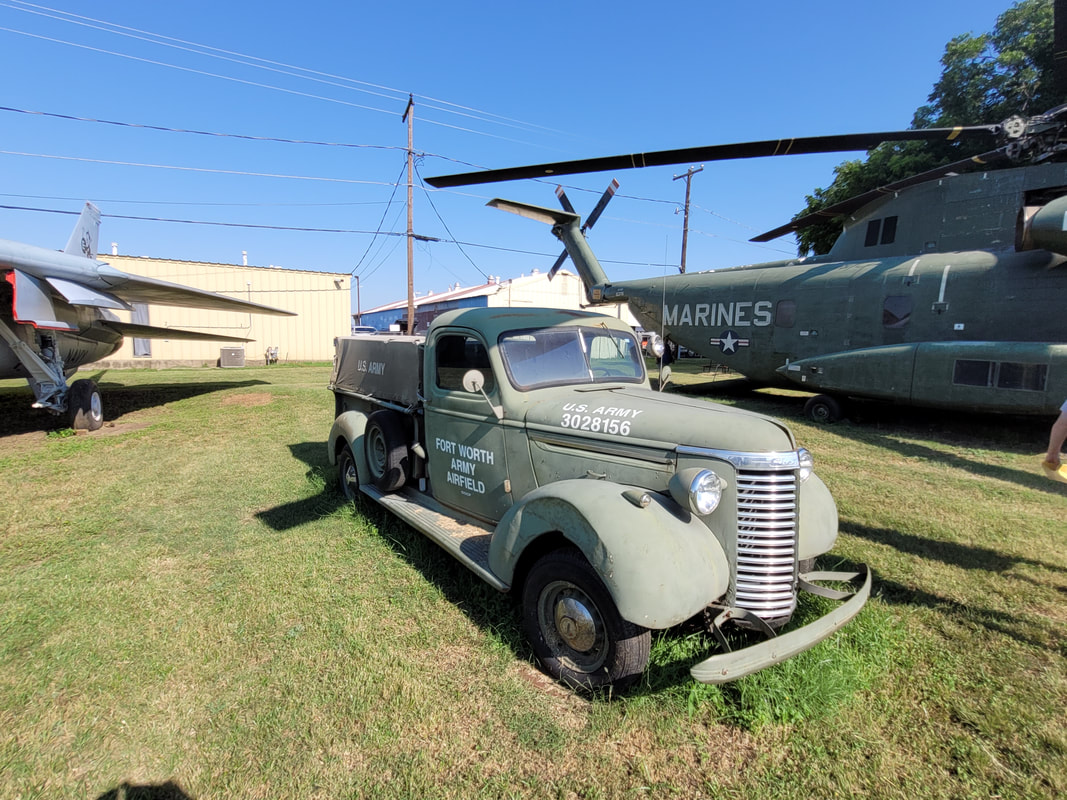 Old military truck displayed among the aircraft. We even got a good view of the working area where the volunteers work on the planes, with a couple of projects they're currently working on. It's kind of like looking in an auto restoration shop, seeing how the workers take down the planes and do the different body work and reassembly with new or newly restored components to make these planes look as they did on the airstrips where they were based. 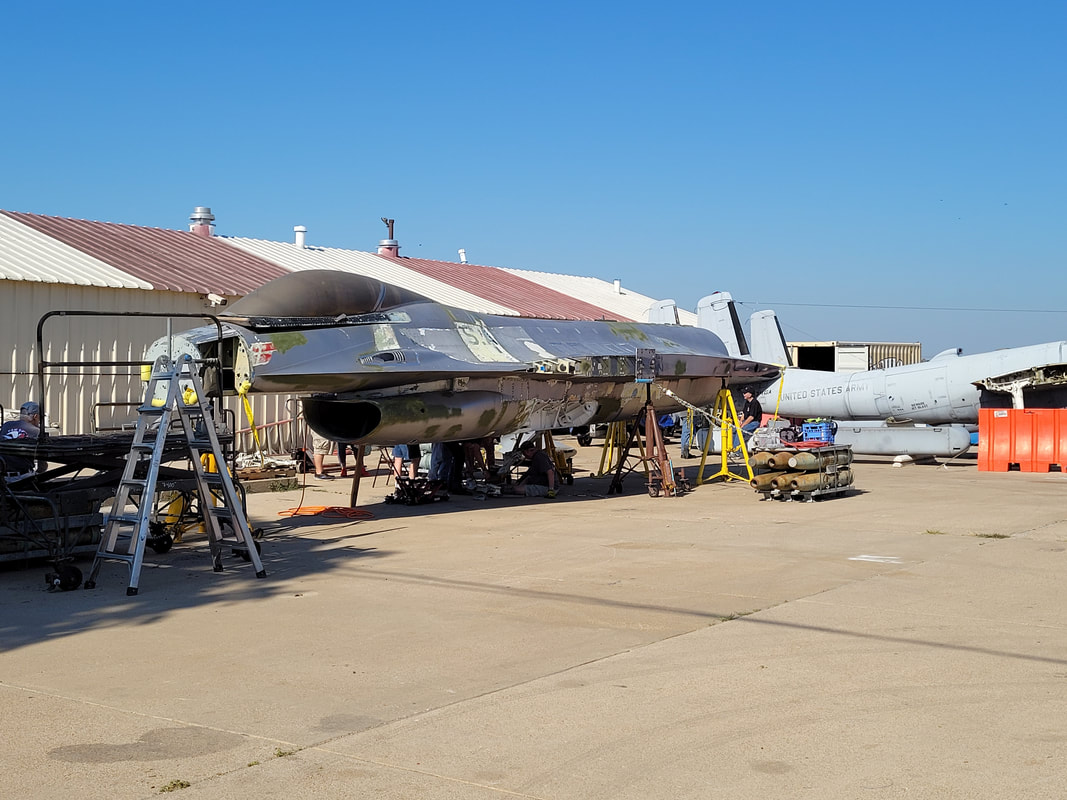 F-16 in a disassembled state being worked on.  A harrier jump jet in partial disassembly. 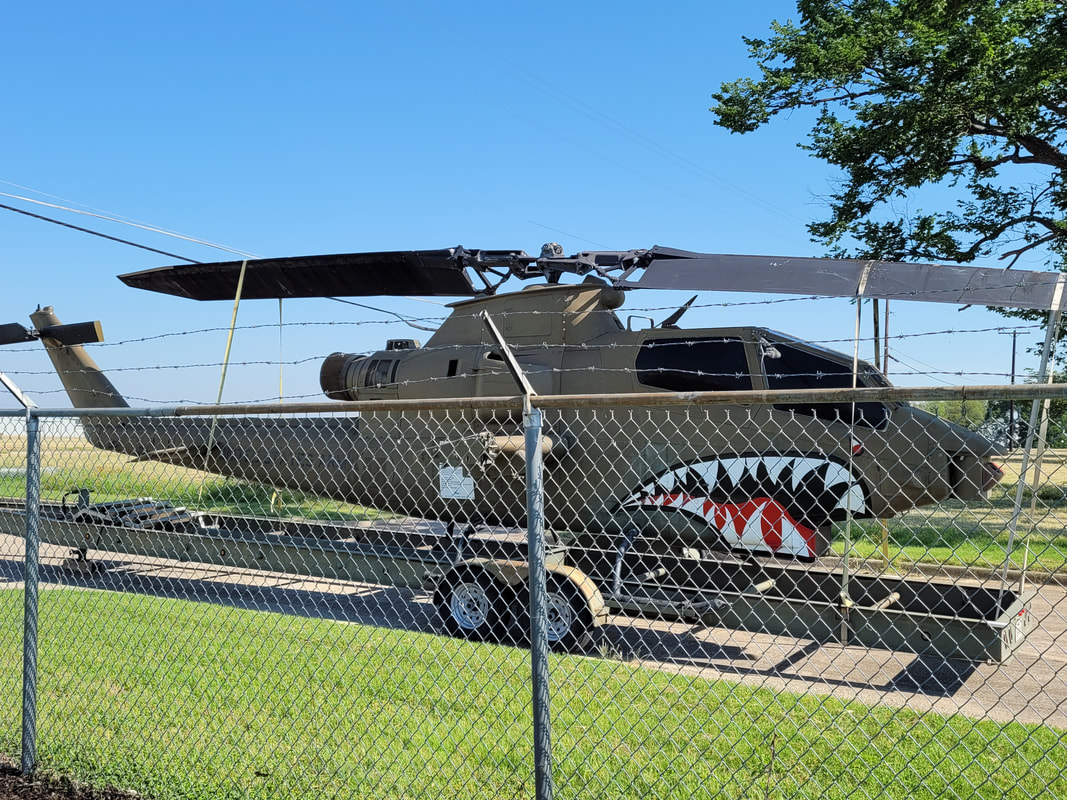 Another Cobra gunship on a trailer, just outside of the gate of the workshop area. Many of the planes here are planes that served through the 60's and 70's probably serving in Vietnam and other conflicts of the era. Some served on carriers while some were at airbases overseas. Seeing these planes would bring back memories in the minds of the vets who have probably flown these very planes. 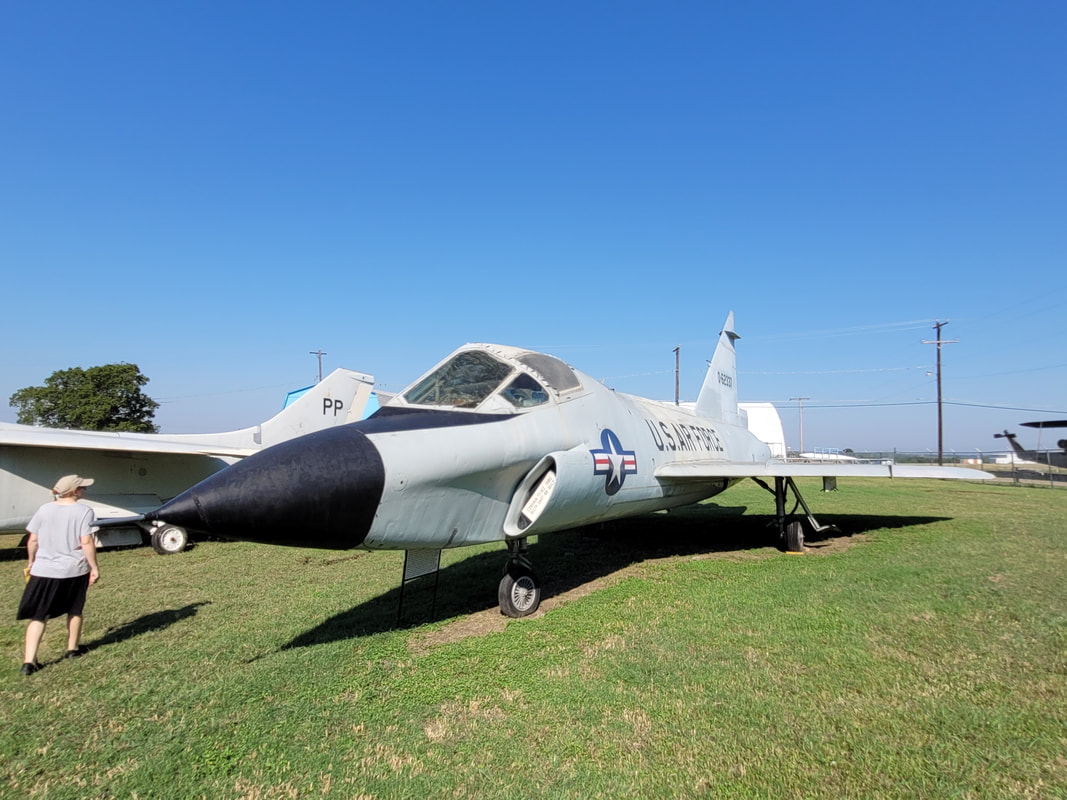 F-102 Delta Dagger 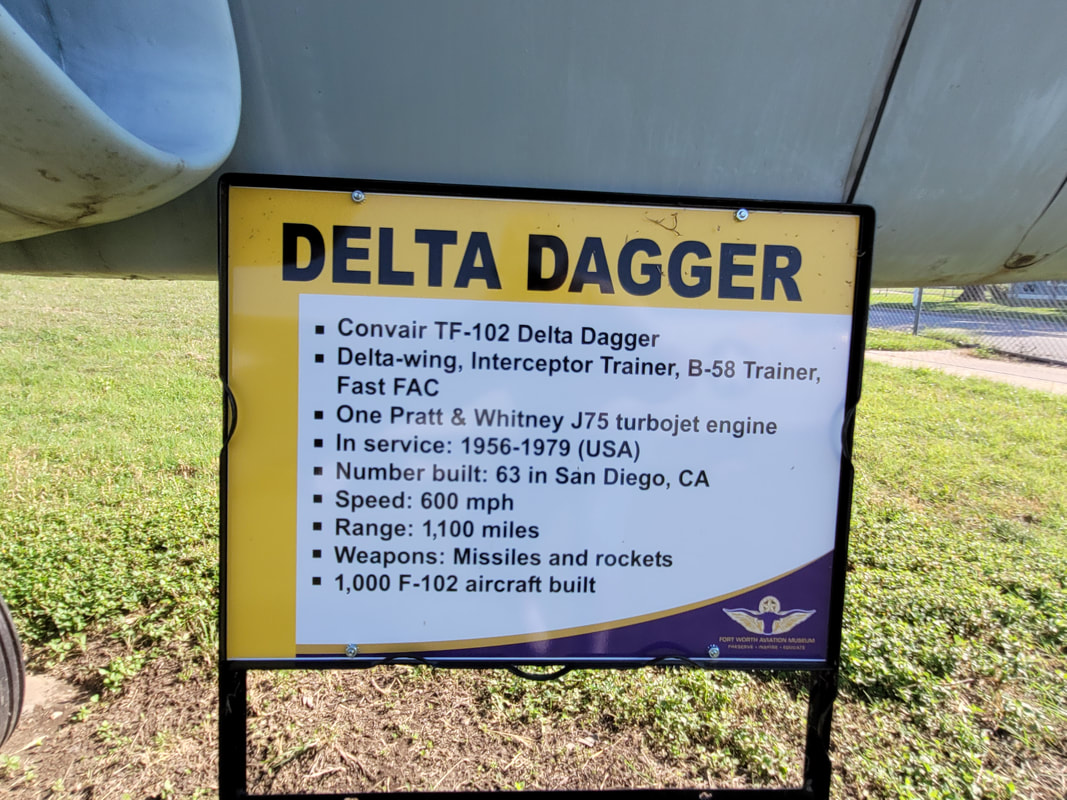 Placard for the F-102  F-8 Crusader carrier based fighter plane 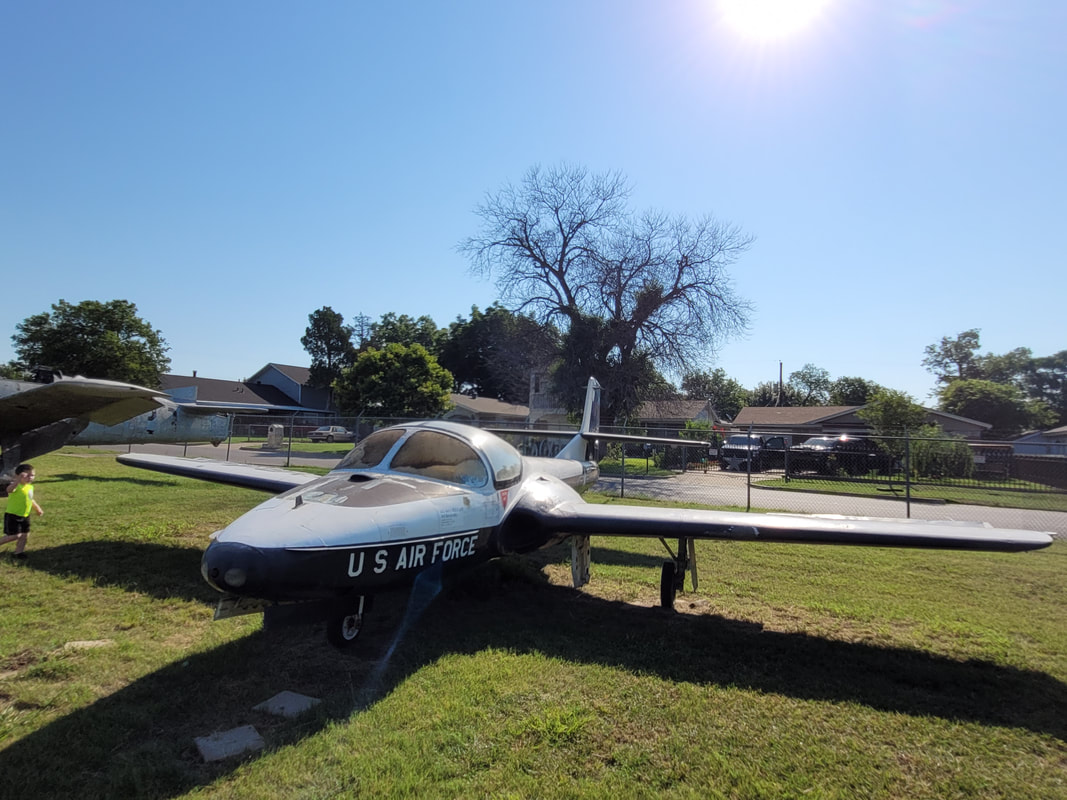 A-37 Dragonfly light attack jet. 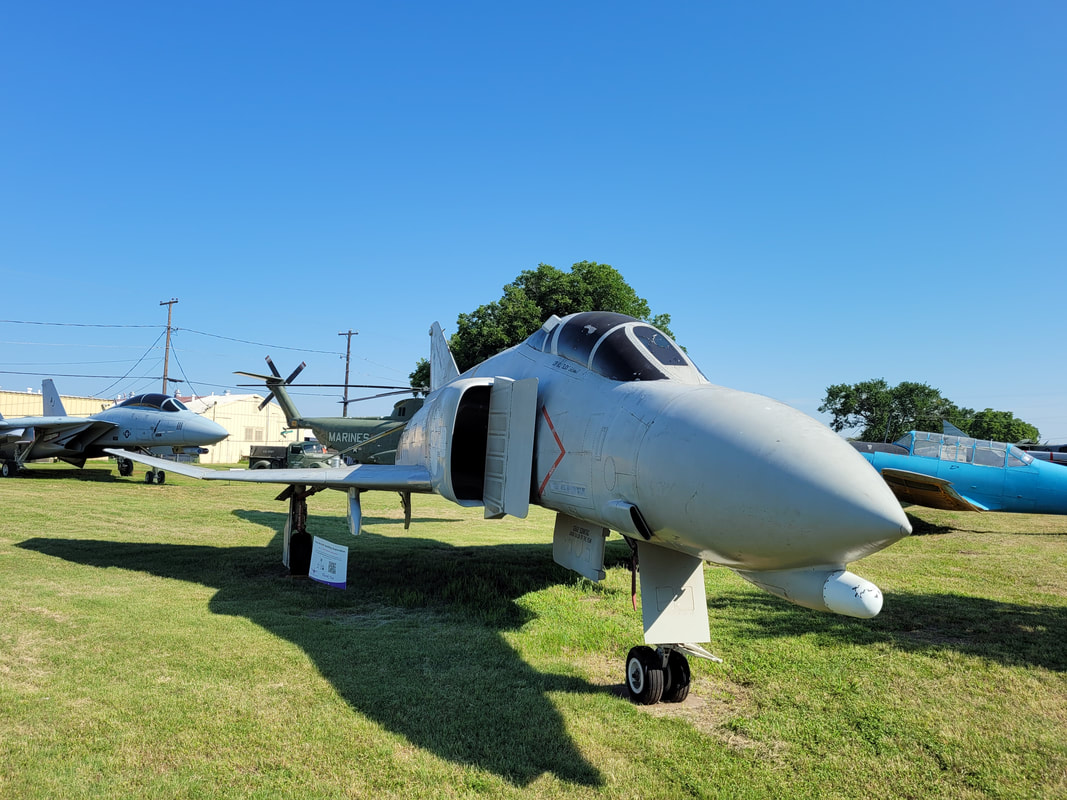 F-4 Phantom, another iconic 'Nam era plane. 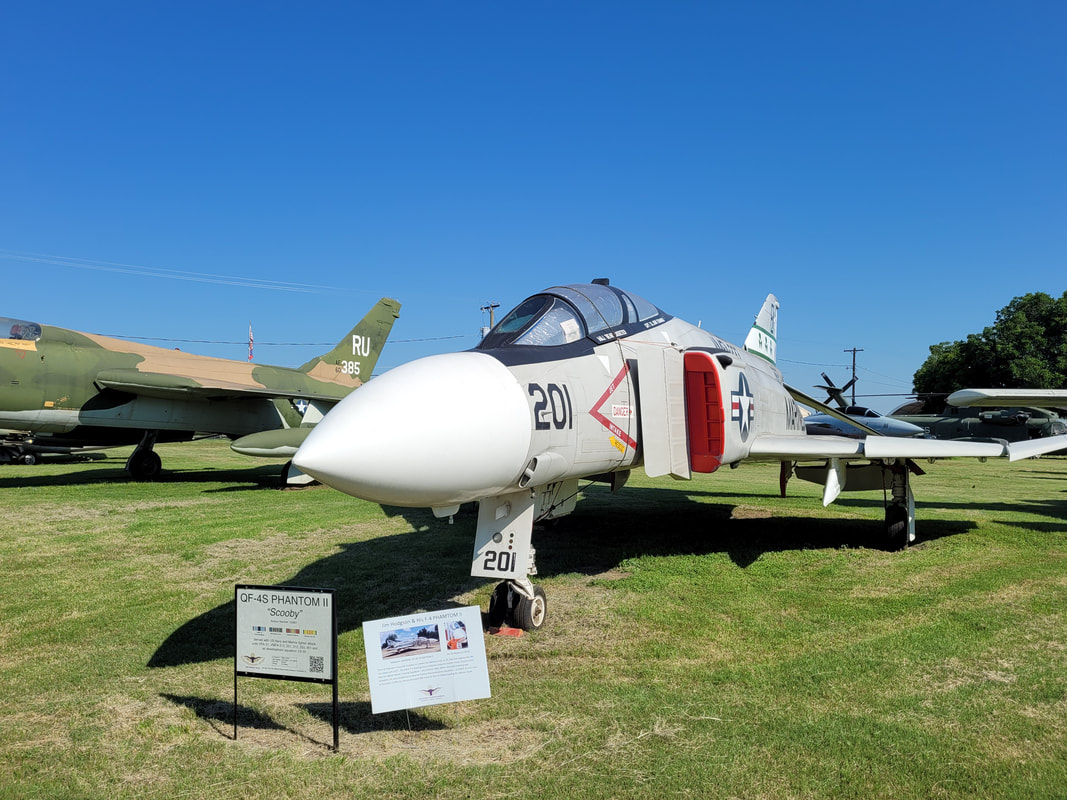 Another F-4 Phantom variant.  Placard for previously shown plane. There were a couple of oldies displayed here as well. One of the planes was in a partial state but was opened up around the engine to be able to get a good close look at how the radial engines typically used in these planes were put together. The other plane was a trainer plane that probably served in late WW2 into the post war years.  Kinda hard to ID this half plane but it appears to be a SBD Dauntless, maybe. It was a WW2 carrier based plane though. 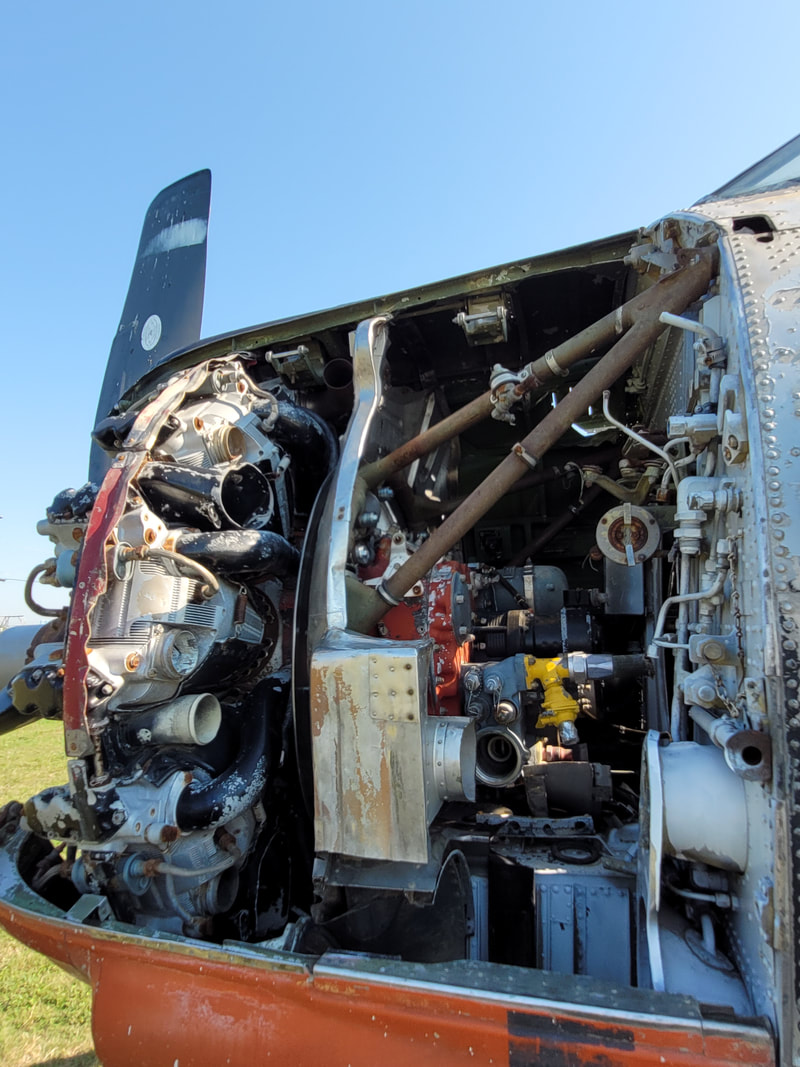 Closeup of the radial engine in the half plane.  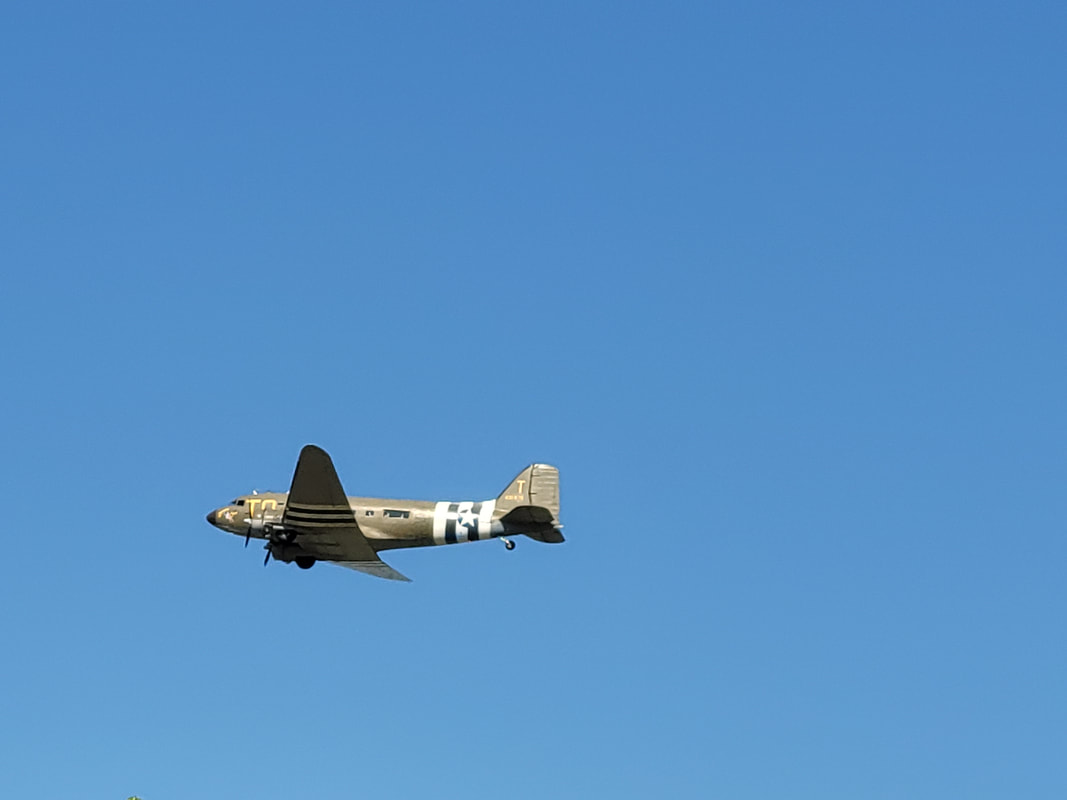 We did have a treat of seeing this C-47 taking off from the nearby airport and flying overhead, a real blast from the past. One of the planes that this museum emphasizes is the OV-10 light attack plane. This plane utilized turboprop powerplants which were turbine engines similar to what would've been in choppers but instead of being a turbine jet engine it spun a prop to drive the plane. These prop planes were the next step forward in prop planes as they didn't use the piston engines of their WW2 elders. There are a couple of specimens of this model of plane here. 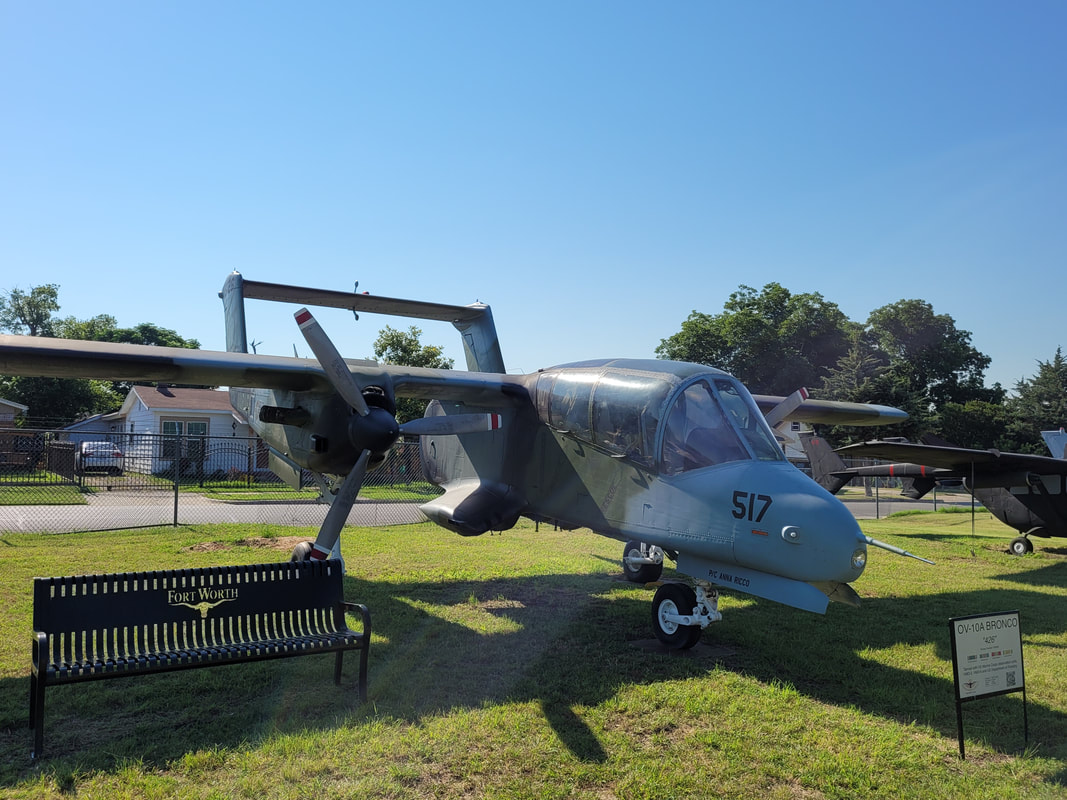 OV-10 Bronco  Placard for OV-10 Bronco 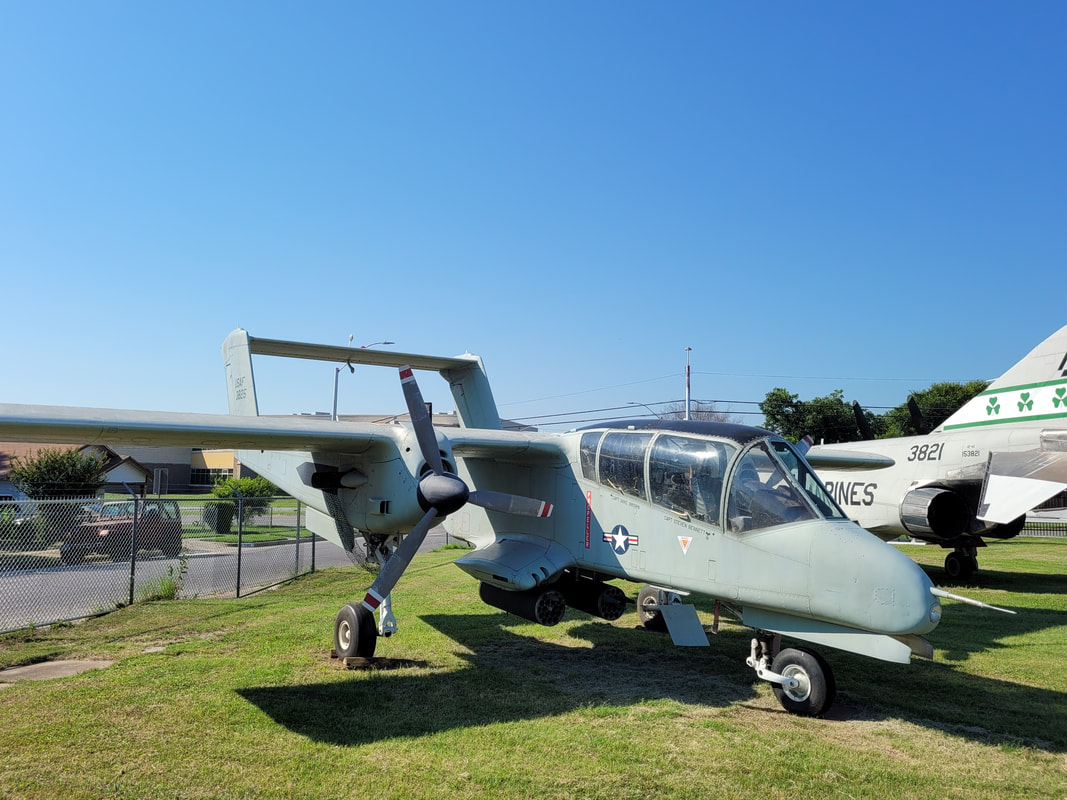 Another OV-10 Bronco There was another plane called the O2-A Skymaster. The plane was unique in that it had two engines/props, one forward facing and one rear facing with a twin tail setup. I believe this was another 'Nam era plane, similar to the OV-10 and was used for recon and light attack work. There was another twin tailed plane that was in the same class as the O2-A and OV-10 in that it was a light prop plane that was used for both recon and light attack work due to the rocket pods they tended to have mounted under the wings. 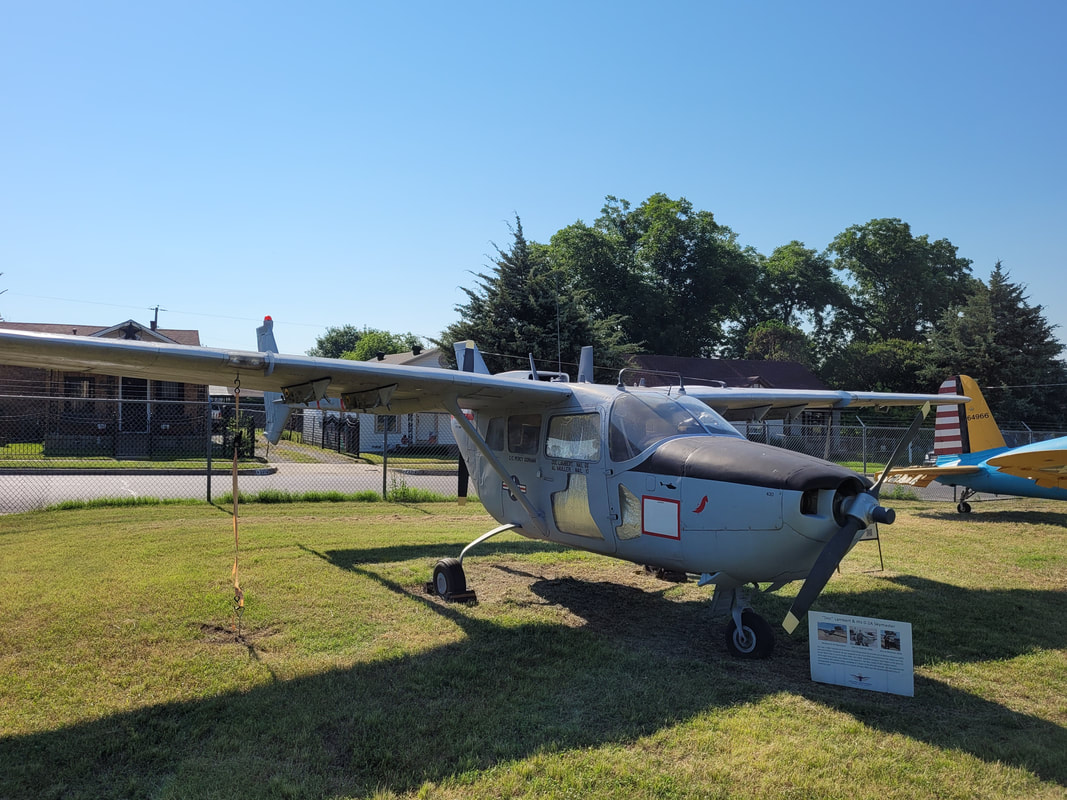 O2-A Skymaster 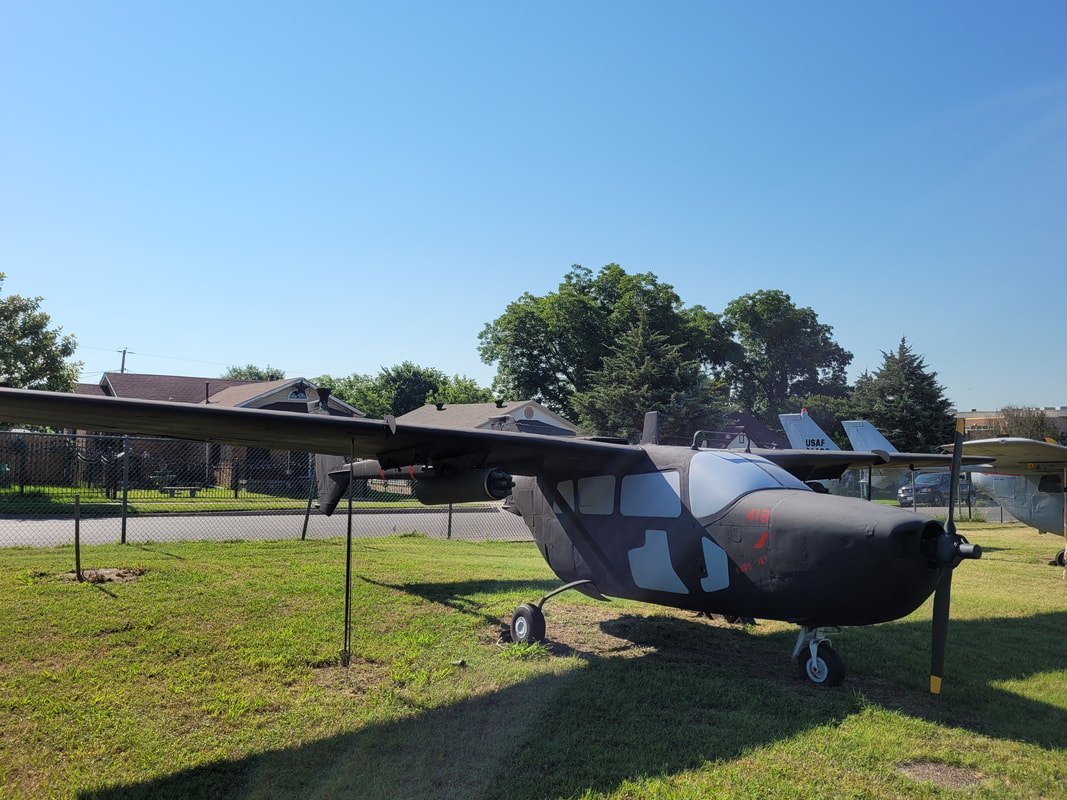 Another twin tailed piston engine aircraft 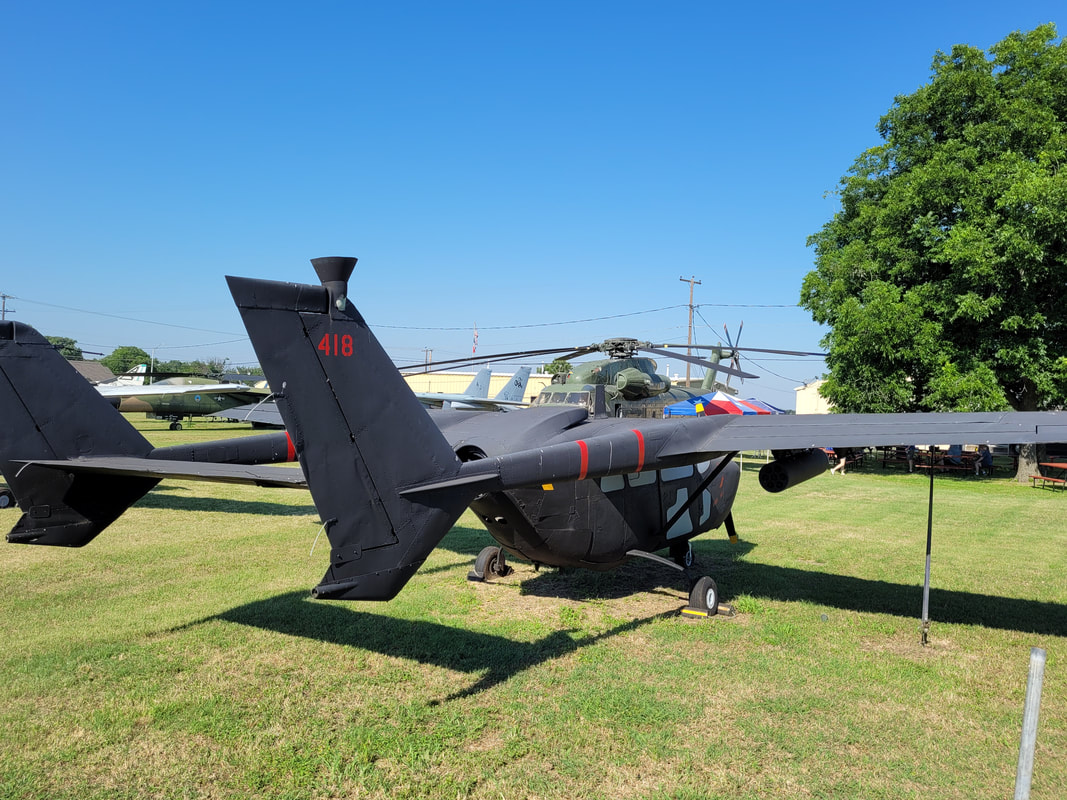 Shot of twin tails of aircraft. There were still some more later model planes to see, including a Blue Angels F-18. A couple of these planes still had the markings for the carriers they were assigned to. One of the planes was marked as being on the carrier USS Oriskany, which if anyone who's into military hardware and history would know, was a late WW2 carrier that later served through the Cold War and 'Nam and was later retired and not too long ago met its end in a controlled scuttling off the US coast to serve as an artificial reef. 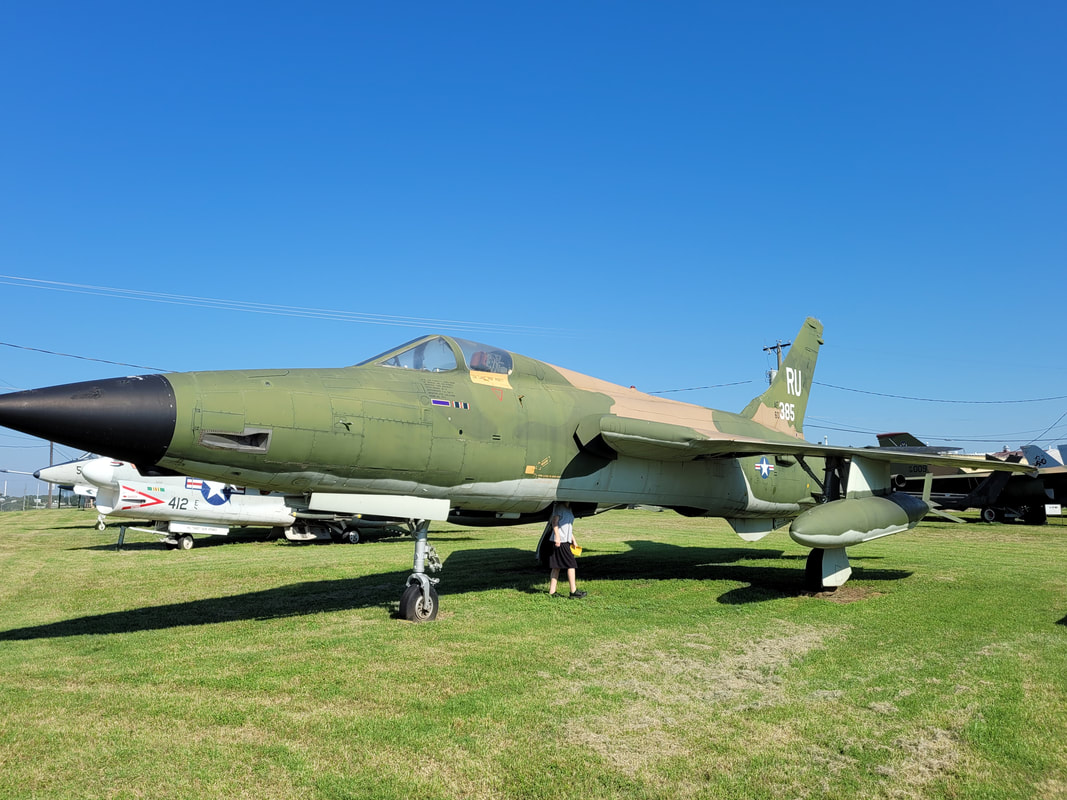 F-105 Thunderchief 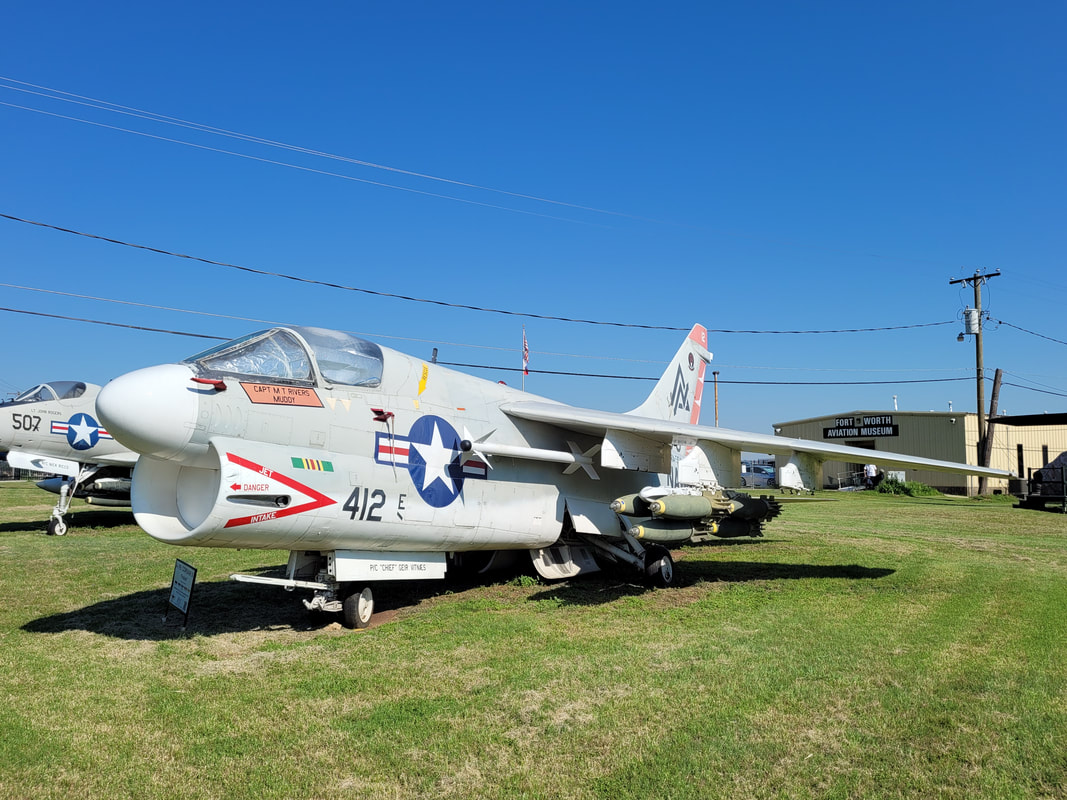 A-7 Corsair carrier based plane 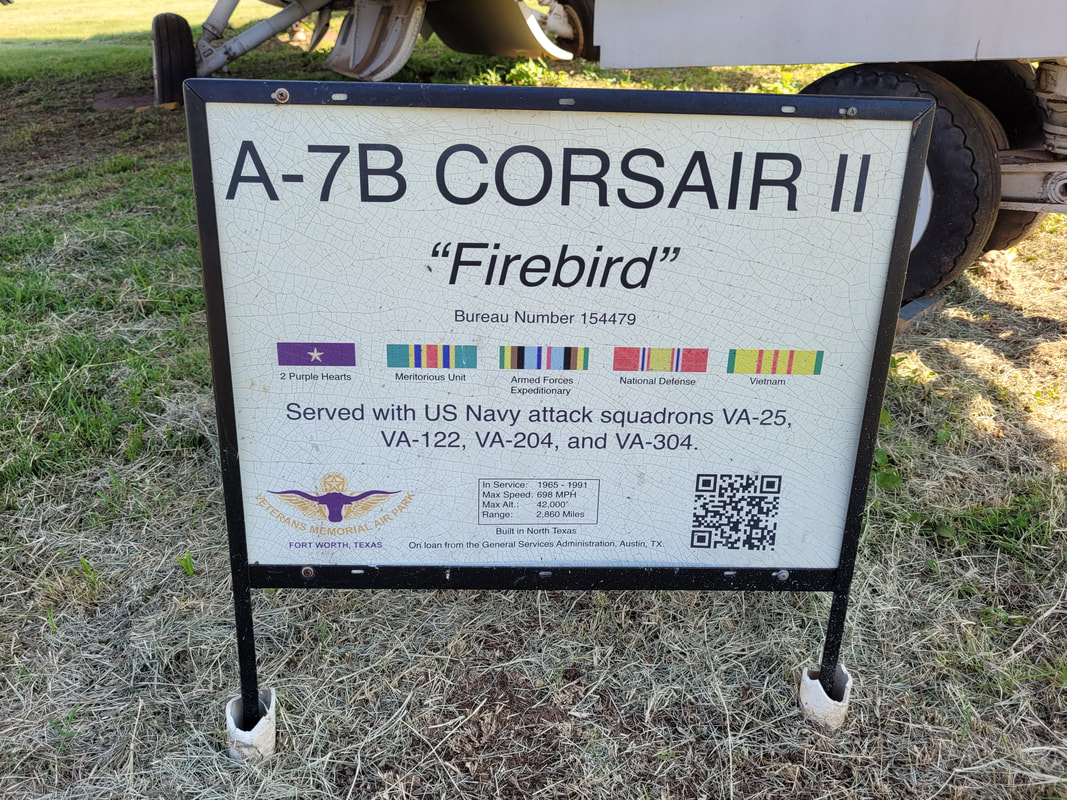 Placard for A-7 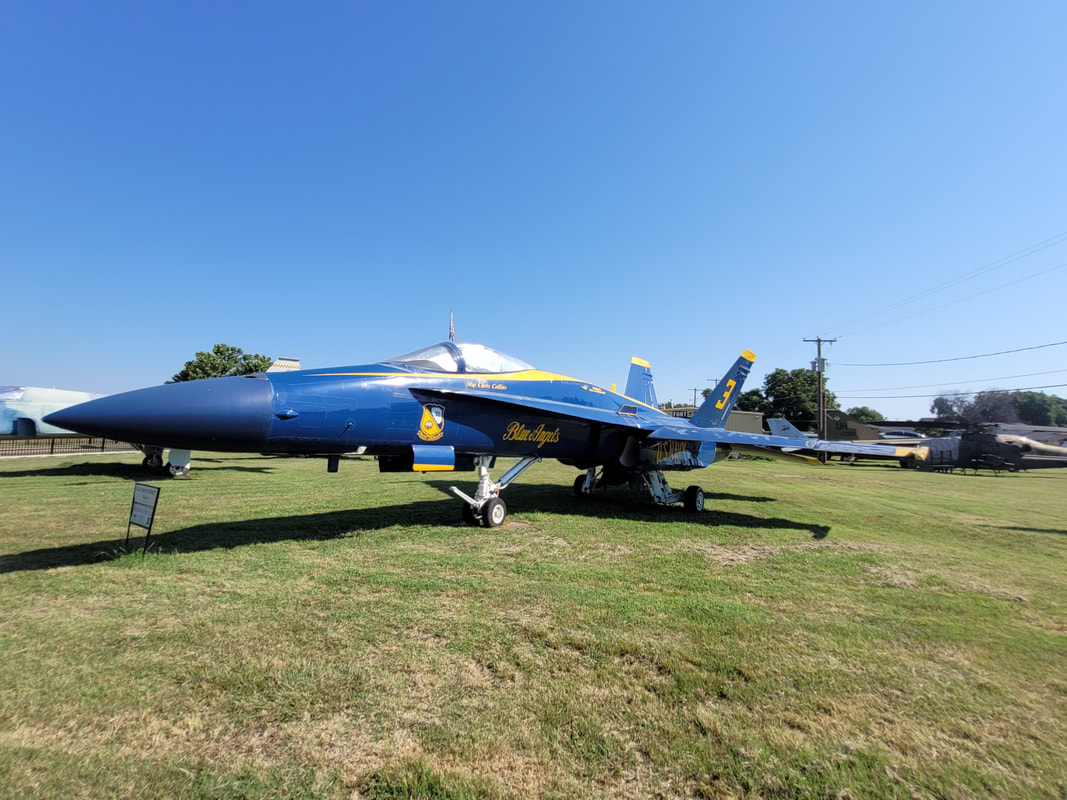 Blue Angels F-18 Hornet  Placard for F-18 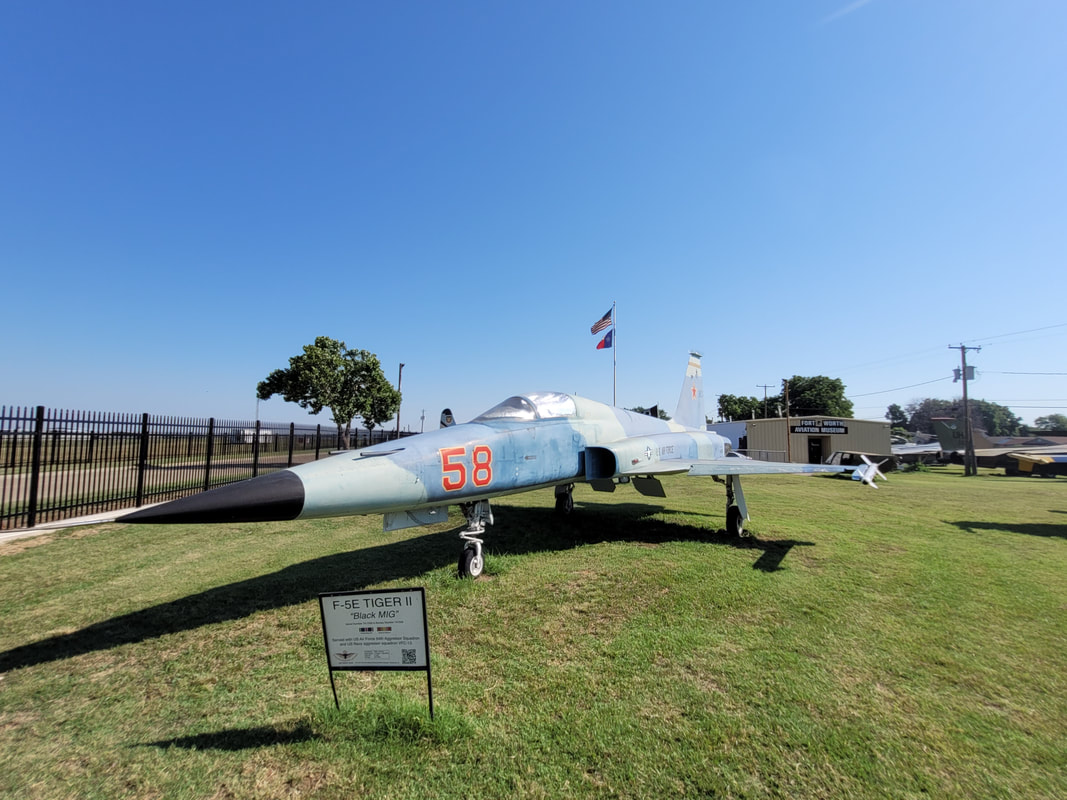 F-5 Tiger painted up to look like a Russian plane, nicknamed Black MiG  Placard for F-5 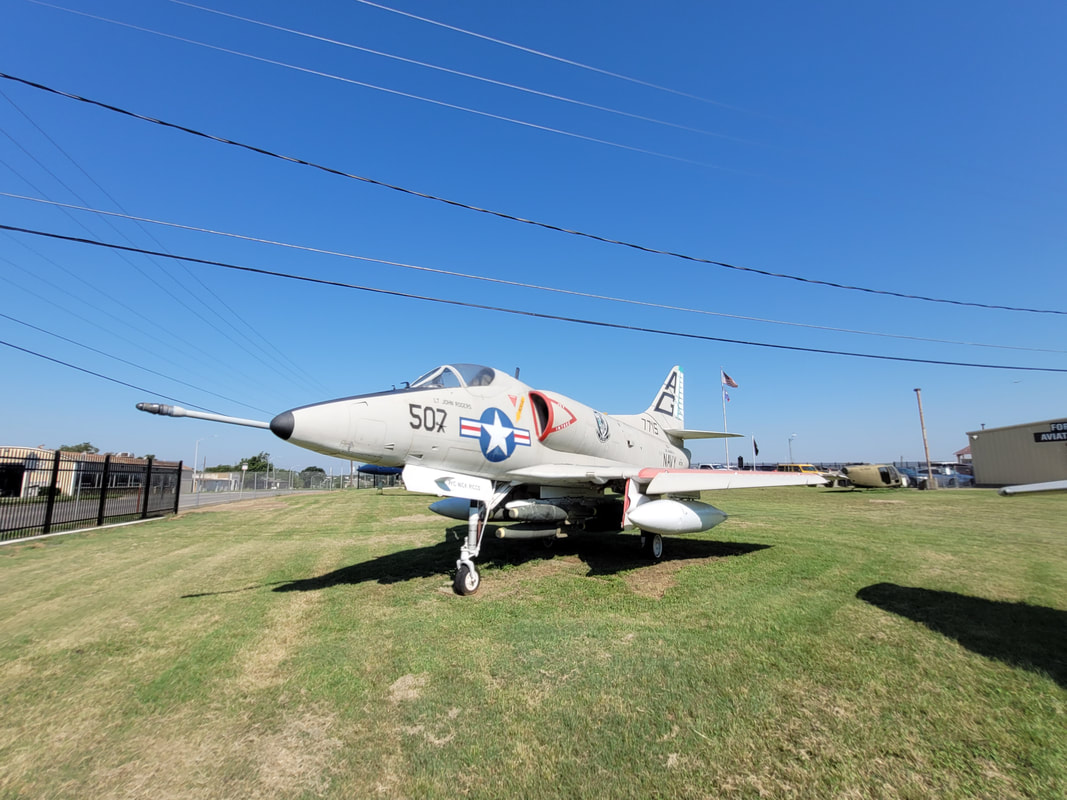 A-4 Skyhawk  Markings identifying this plane as being on the USS Oriskany 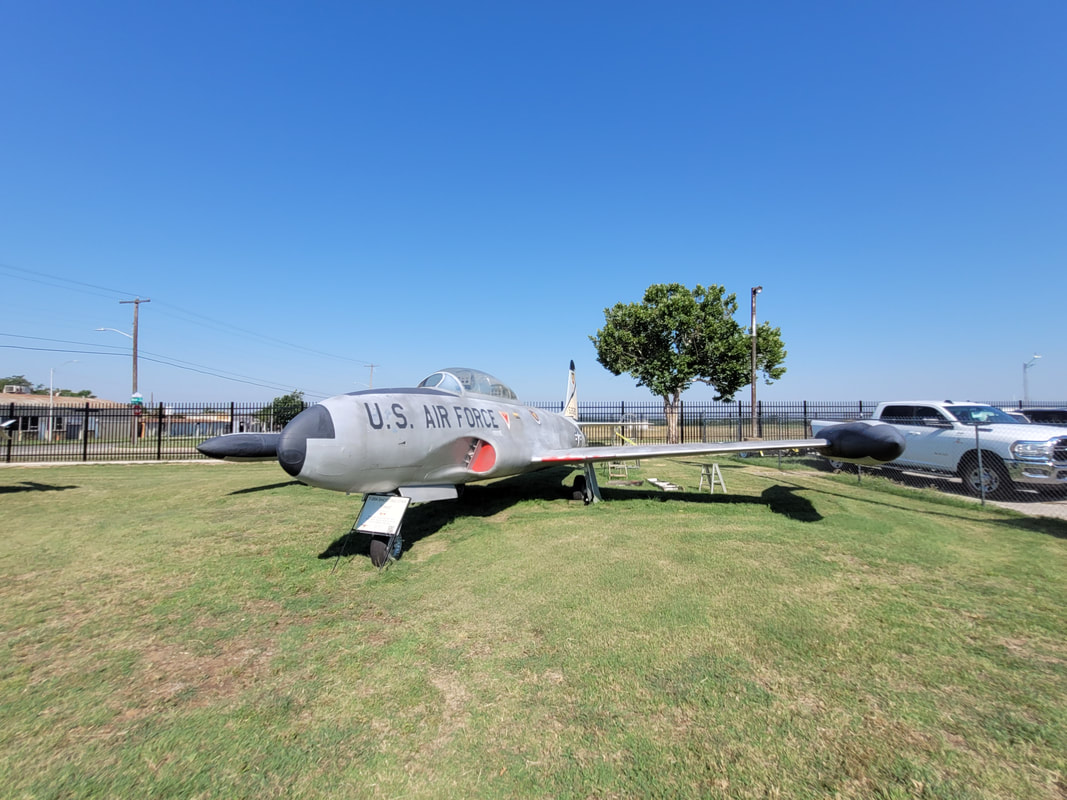 P-80 Shooting Star Another little treat was a transport helicopter that was open for people to go inside and even had the cockpit opened up to go inside. Of course the chopper is inoperable but it was still cool to be able to get into the cockpit and have a taste of what a pilot worked with. It was pretty tight quarters and I can only imagine that most pilots were relatively small people and not the oversized people like me. Bailing out would be next to impossible in this craft. 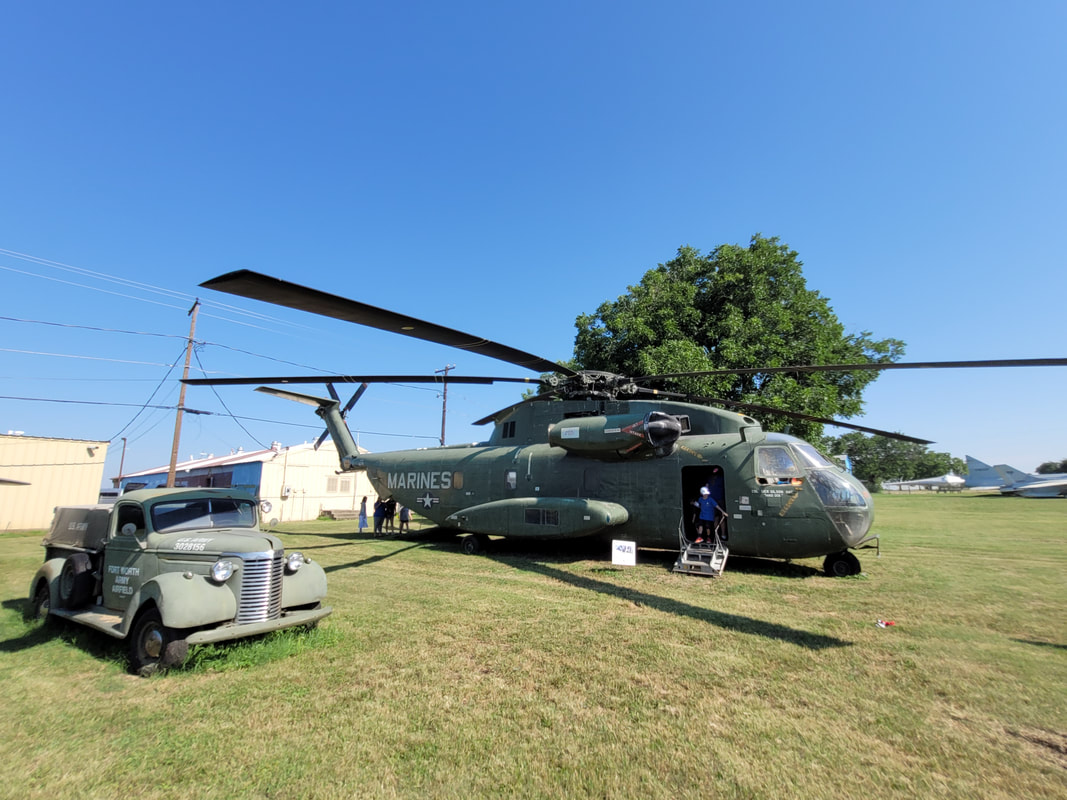 CH-53 Helicopter 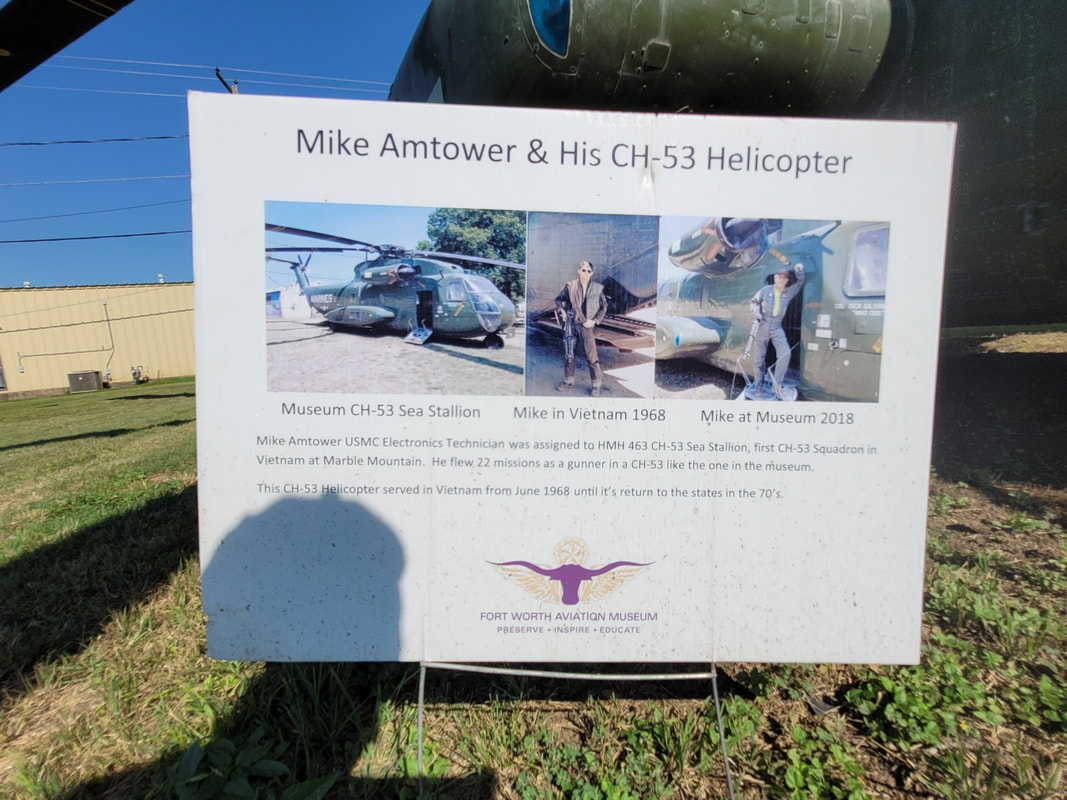 Placard for CH-53 helicopter 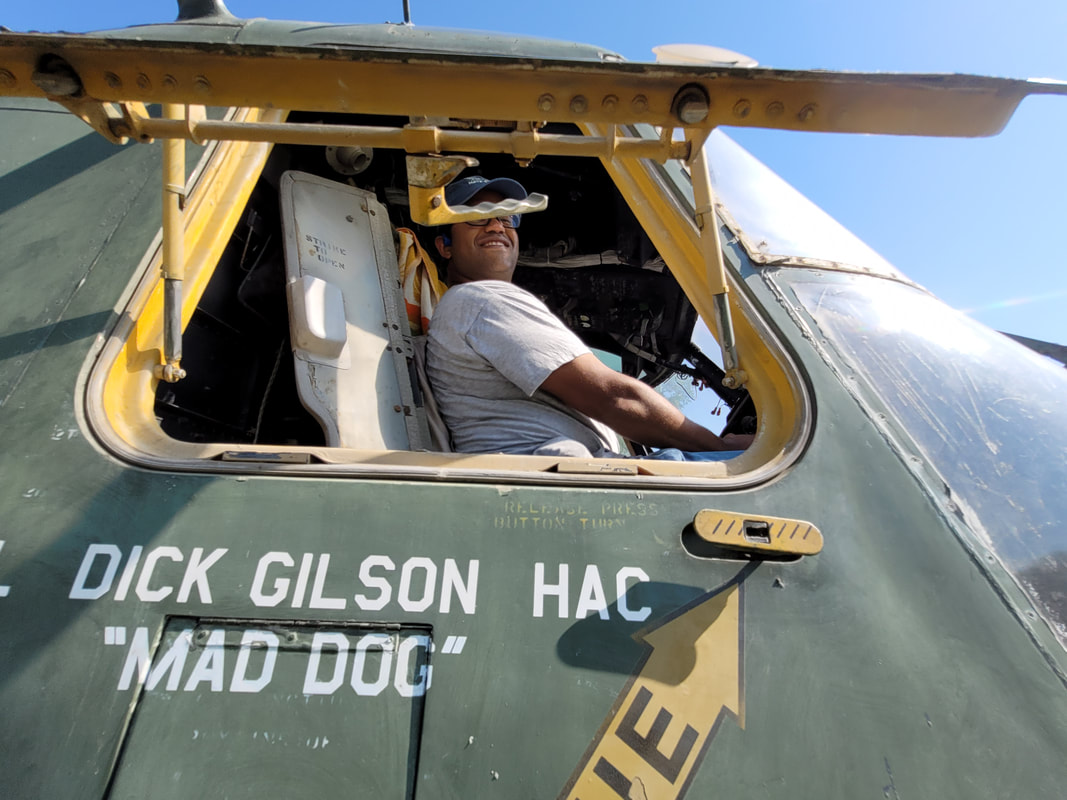 Its the Mad Dog! 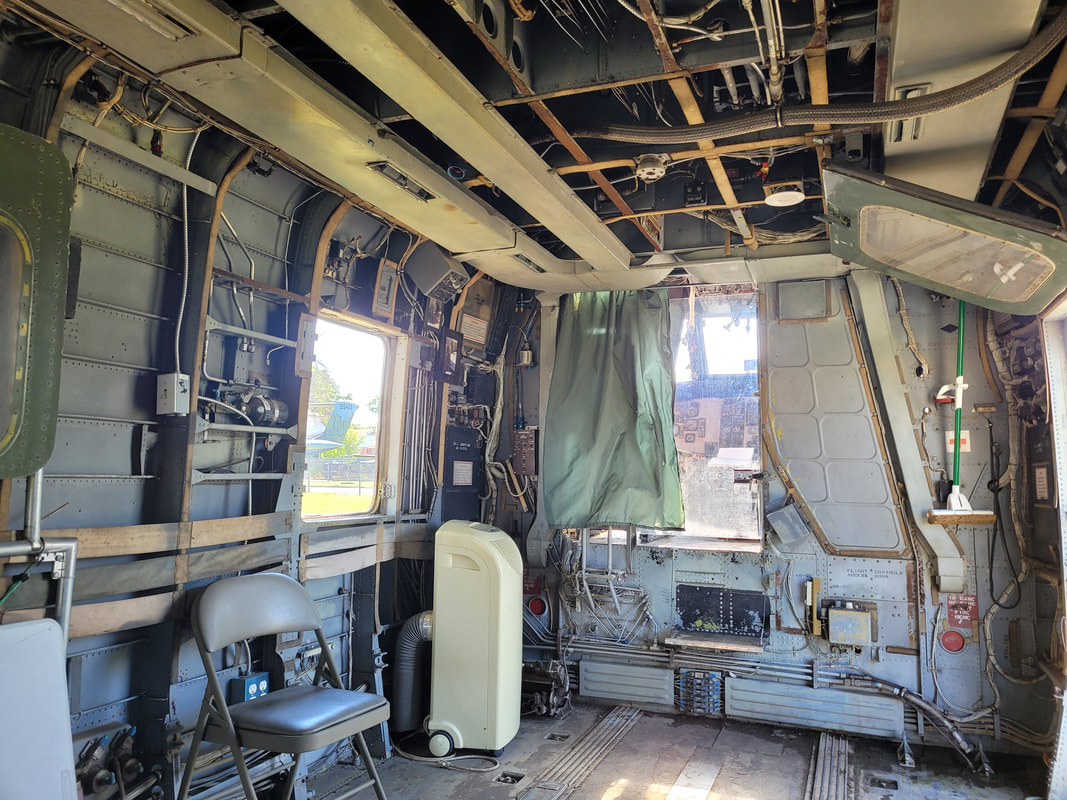 Cargo bay looking at cockpit in CH-53 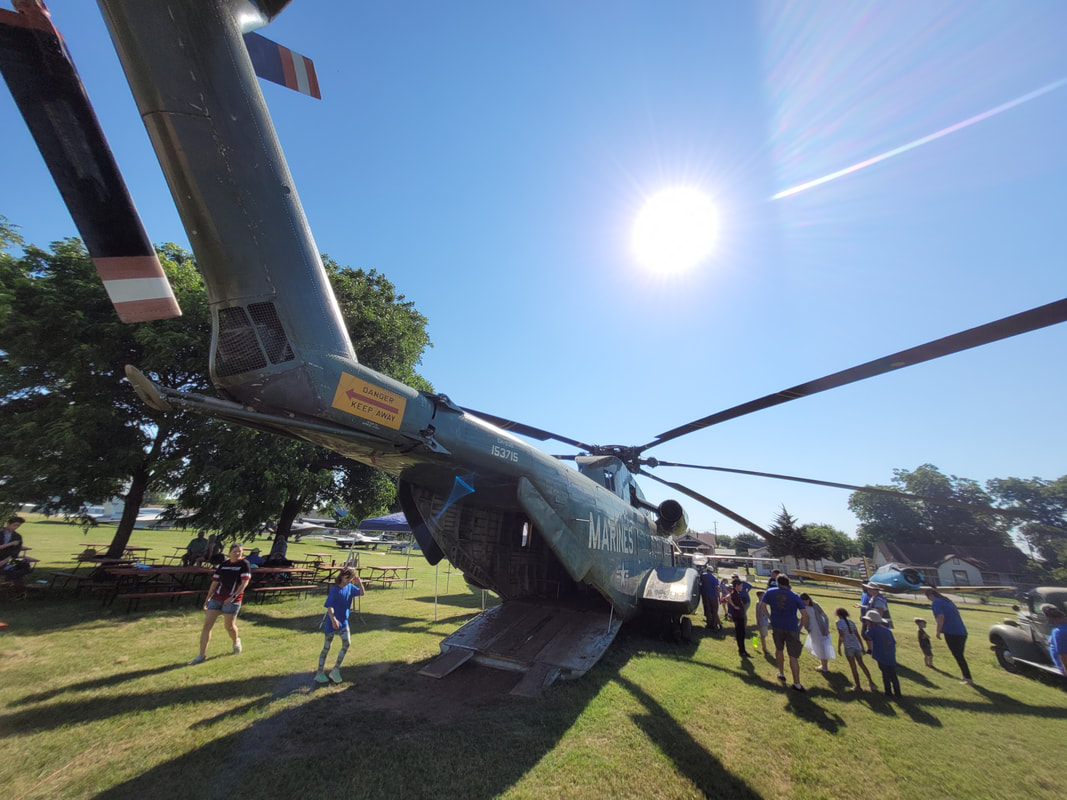 CH-53 rear bay door After going through what the museum dubbed "The Petting Zoo", we made our way inside to look at the displays of models and placards talking about the aviation history surrounding the B36 Peacemaker bomber that was built in the Convair factory in Ft Worth. The museum also showcased the OV-10 among other planes. There were a lot of cool models of different aircraft and the placards showcased some key figures in aviation history. There was plenty of other hardware that was displayed in the museum as well. 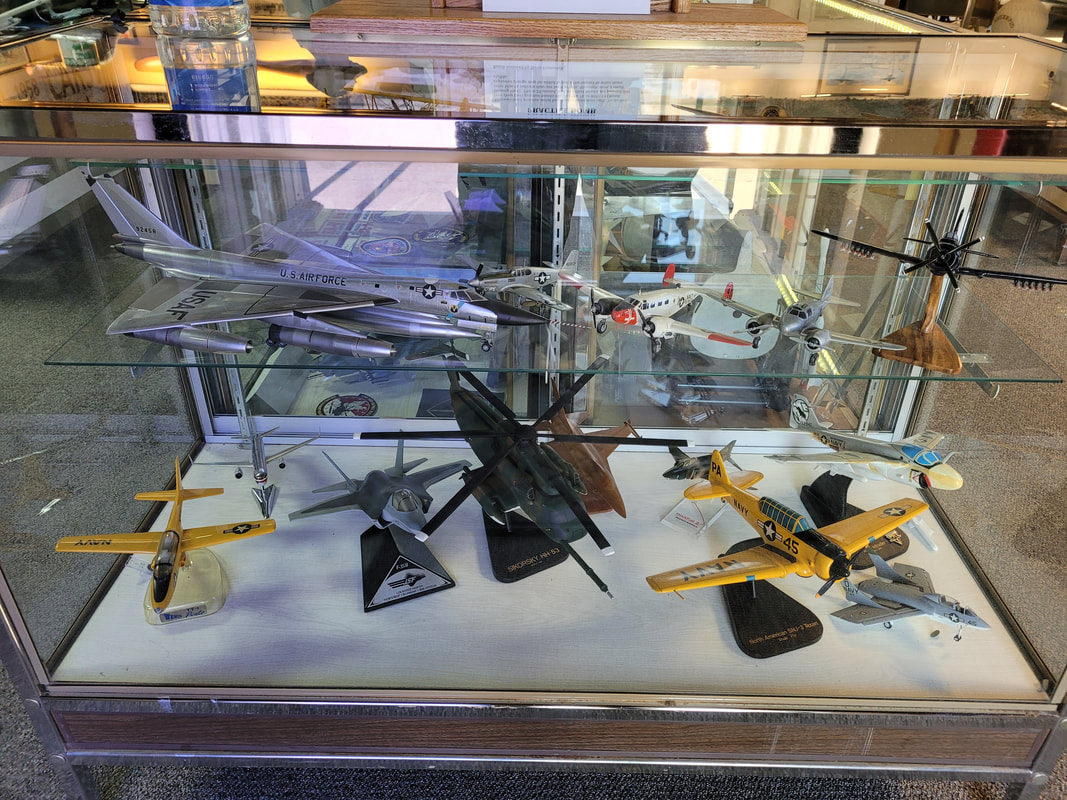 Models of various aircraft 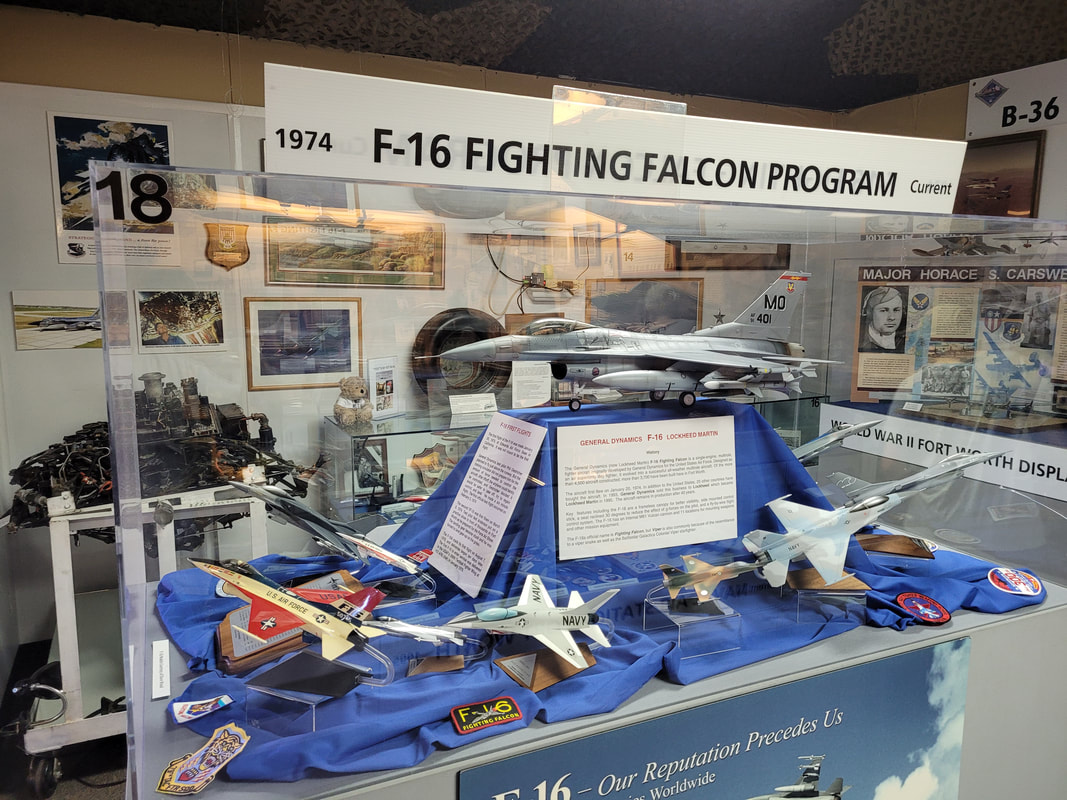 F-16 Falcon display 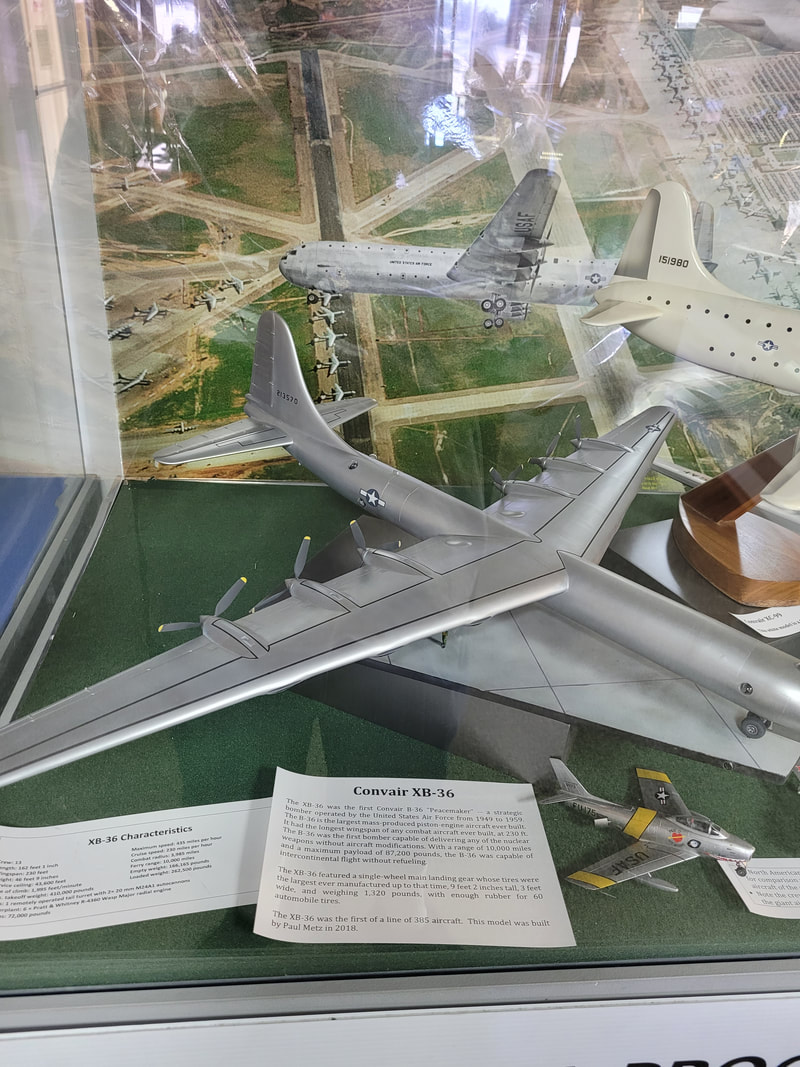 Model of B-36, showing rear facing piston engines even though the final model had four jets on outer edges of wings added. 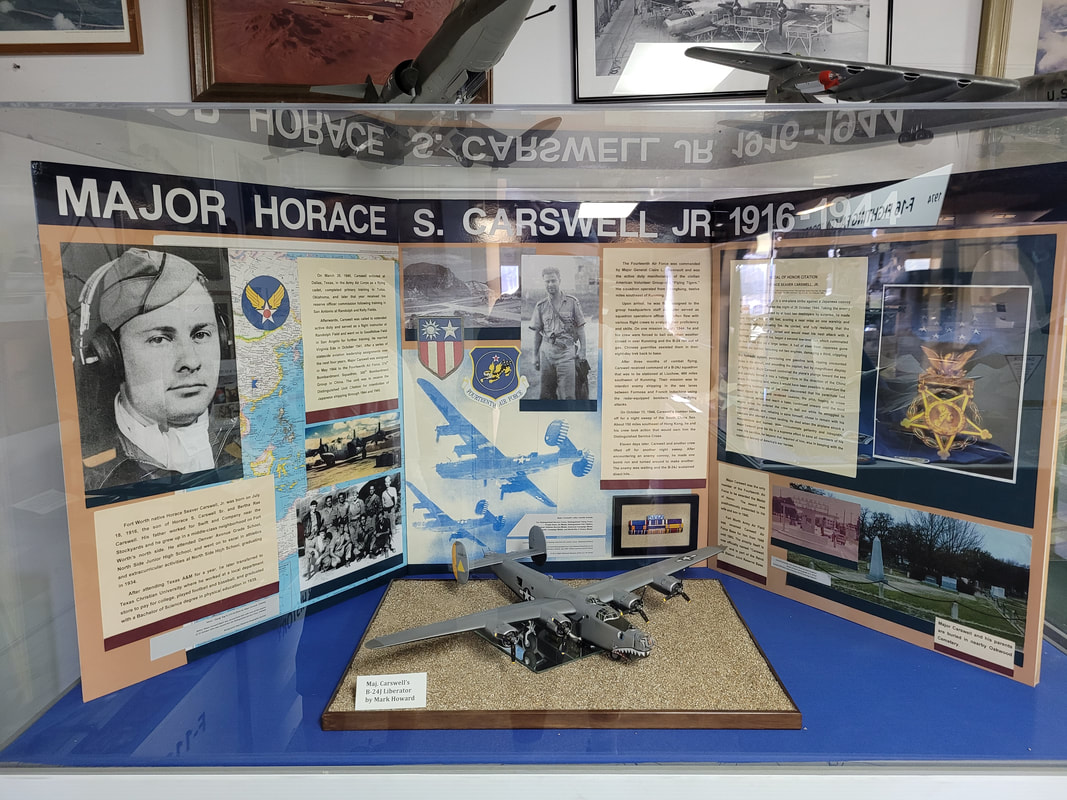 Display commemorating pilot Horace S Carswell 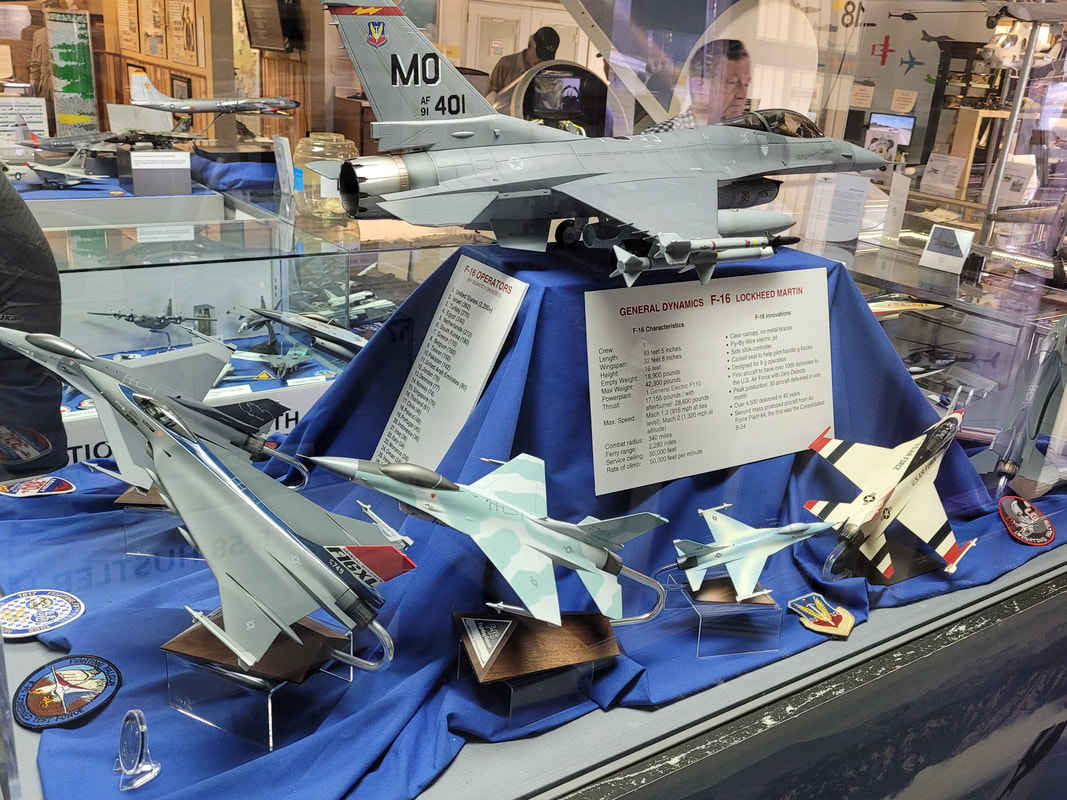 Another shot of the F-16 display 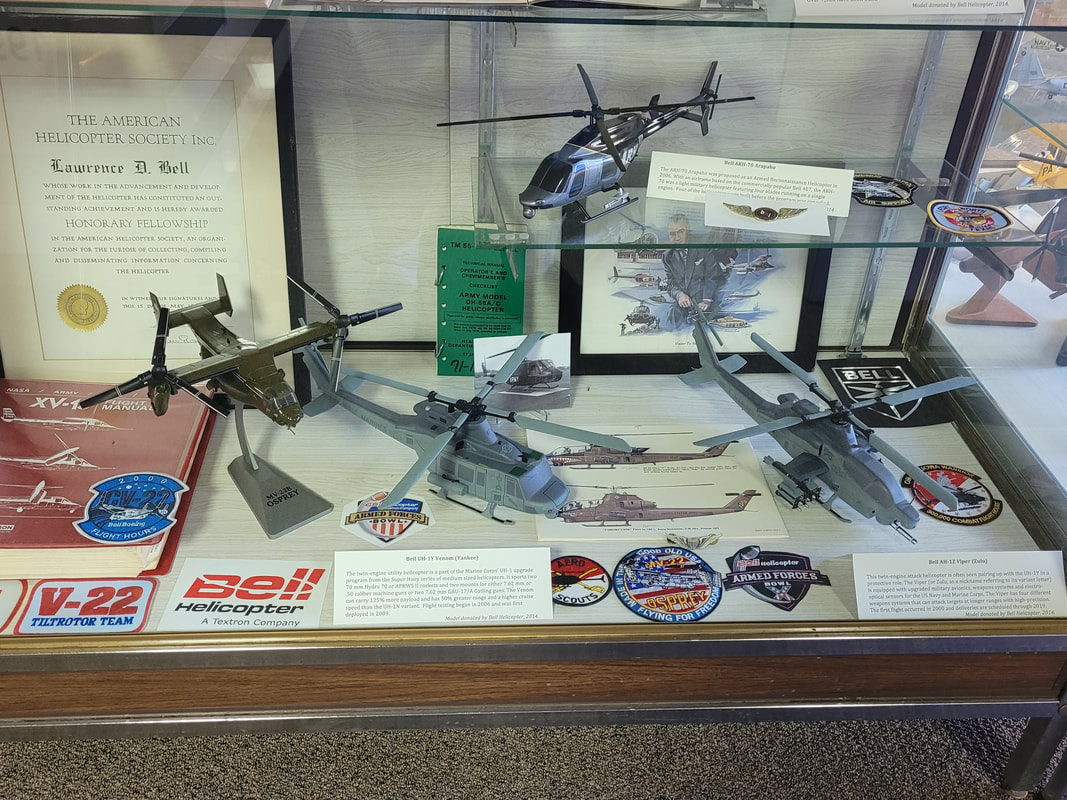 Bell Helicopter display.  Weapons and other stuff hanging on the walls  More hardware from the cold war/nam era. 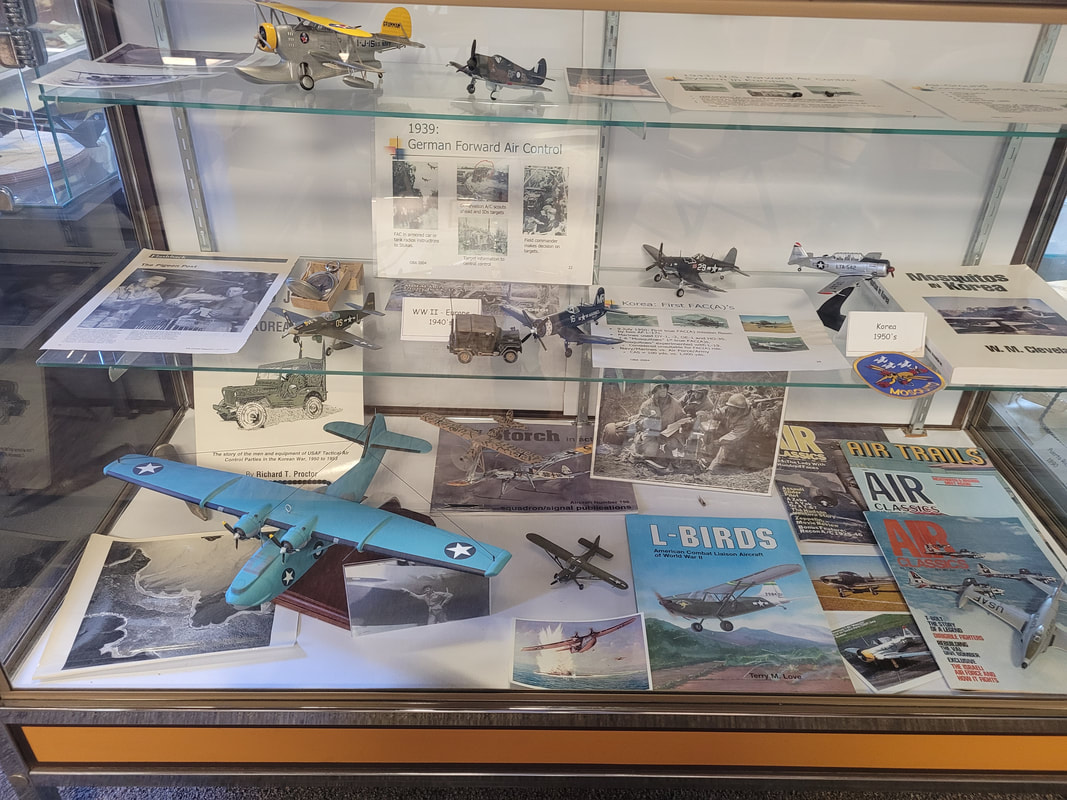 Models of WW2 planes and other printed material. 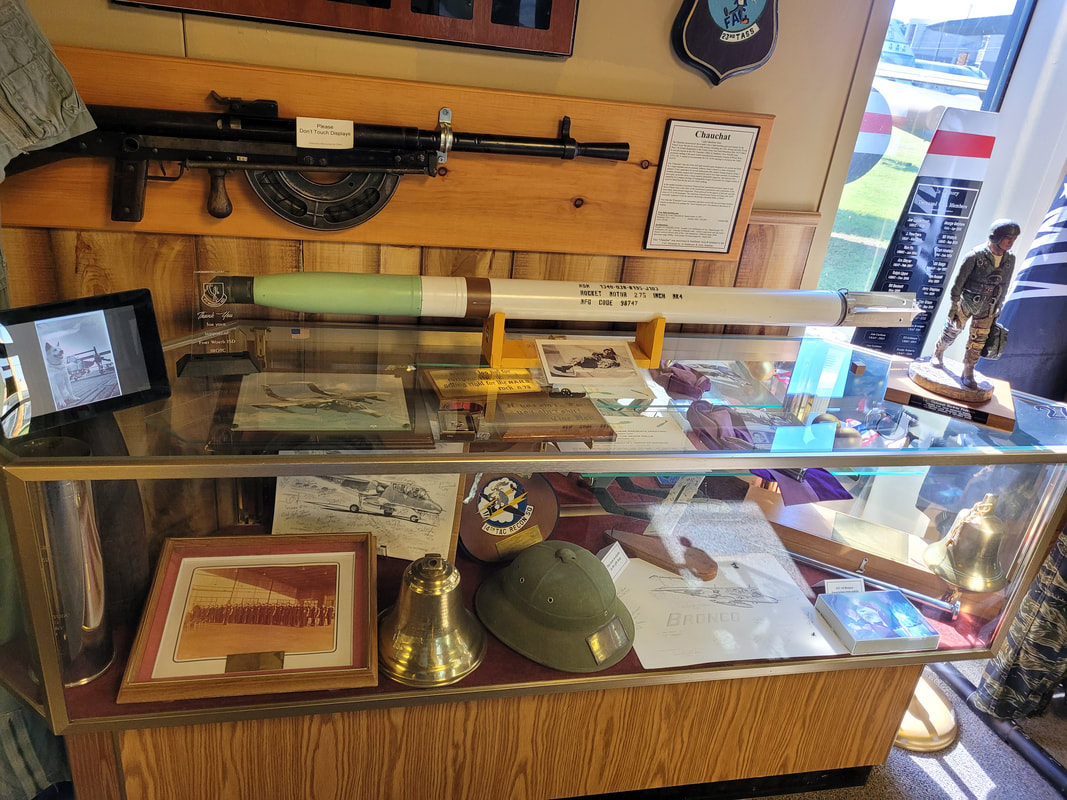 More military hardware and other stuff on display. 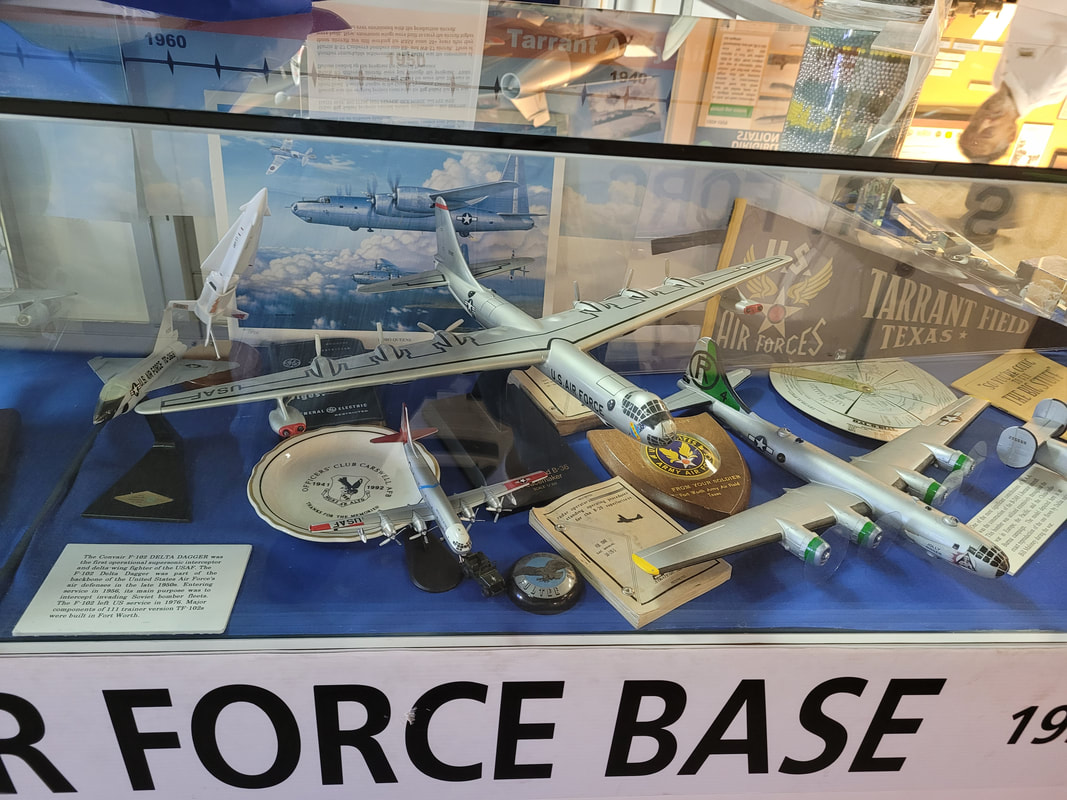 Another B36 model showing jet engines on outer wings along with piston engines.  Model of Hindenburg Zeppelin 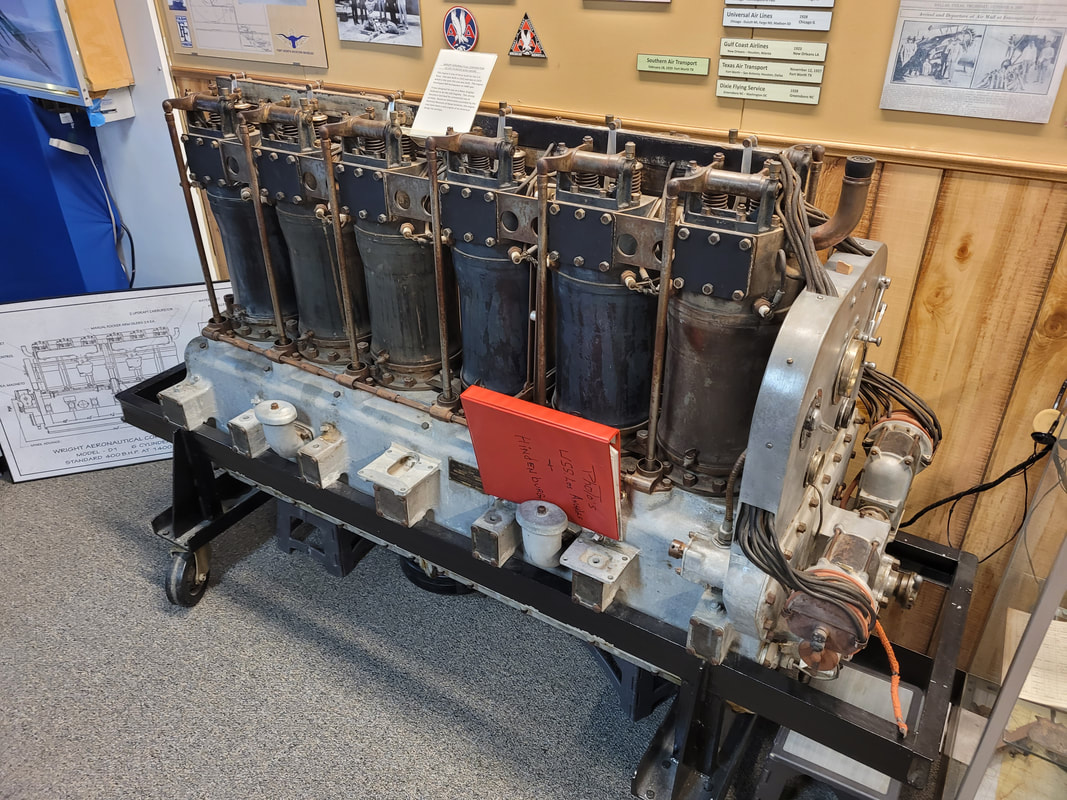 Piston engine used in airships of the time. 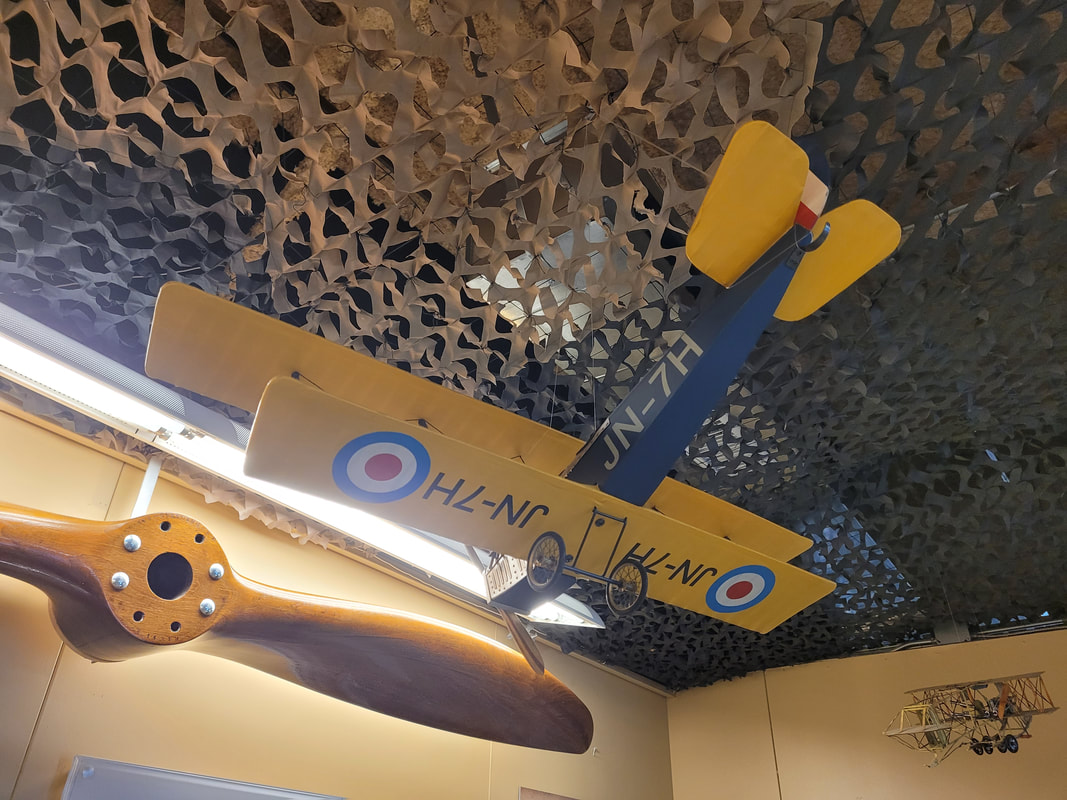 Curtiss "Jenny" Biplane model 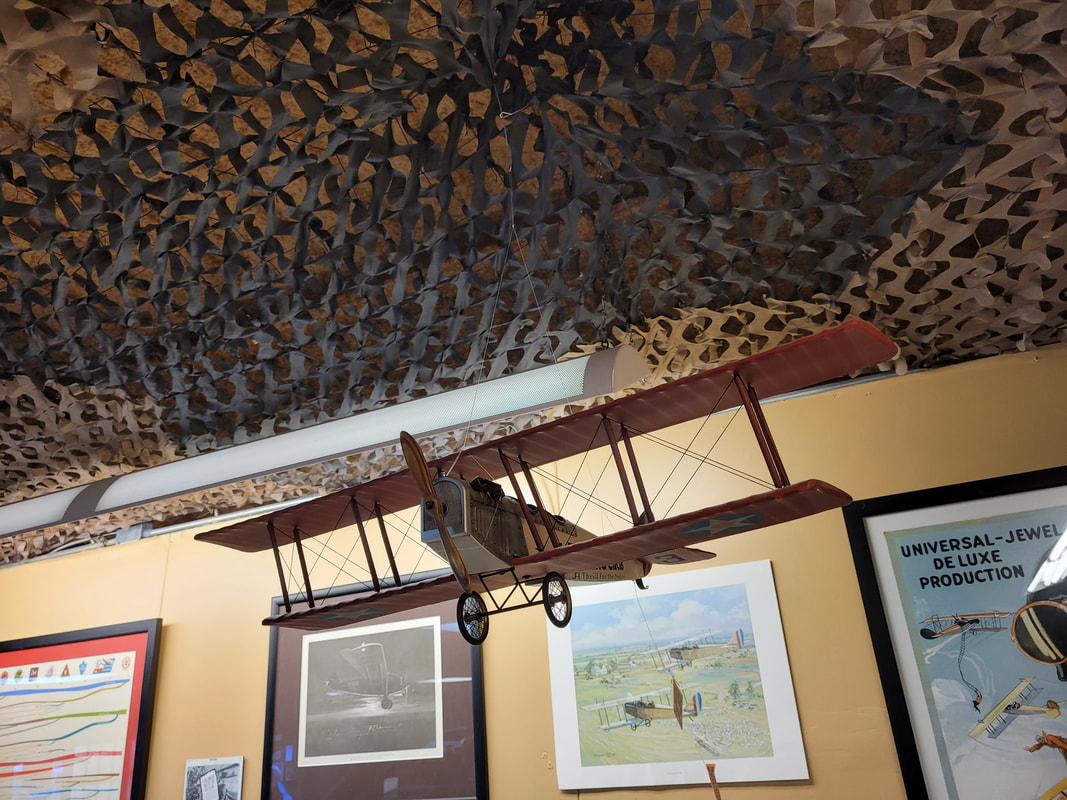 Another model of a US made biplane 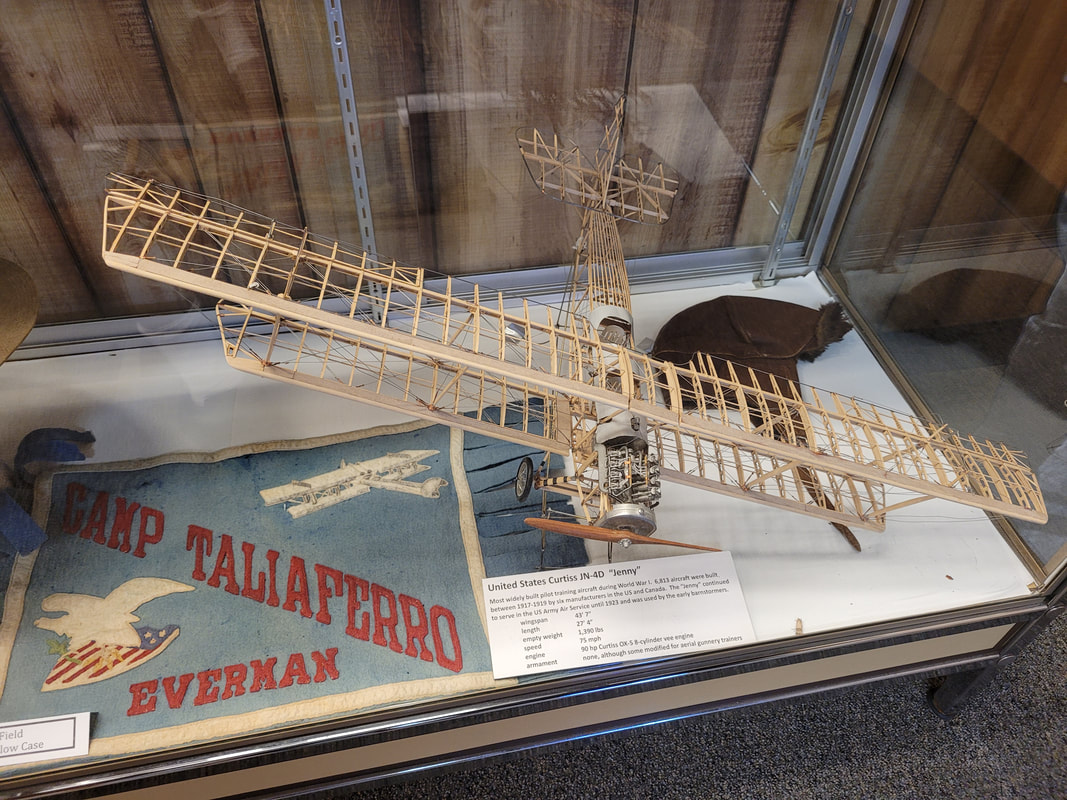 Model of wooden biplane frame 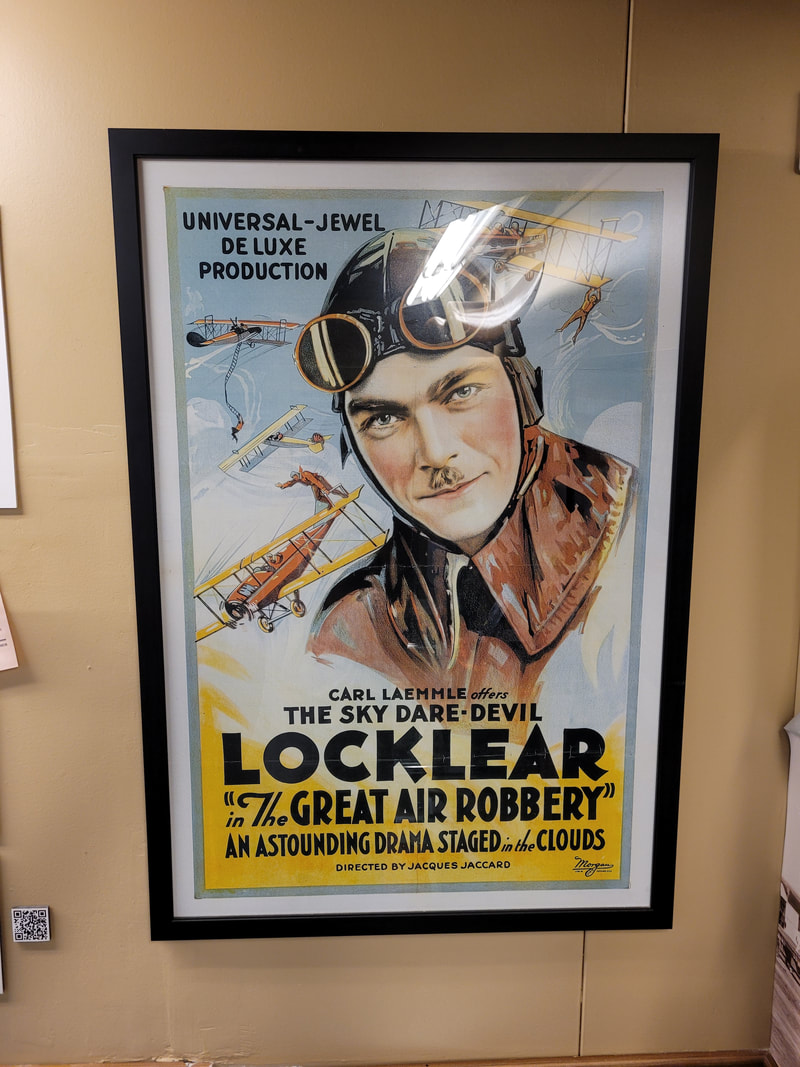 Poster of air stuntman Ormer Locklear in the silent movie "The Great Air Robbery". We may not have spent a long time in this museum as we did in VB but this place was still cool nonetheless as it had its own flair that made it an enjoyable experience just before we got back down to business and made our way to the seller's house to pick up the newest acquisition to our fleet, a 1946 Ford Coupe sitting on an S10 frame. More on this little number in the next post. Stay tuned.
In keeping up with the routine around here I try to bring in a load of gravel 2x a week, Monday and Friday. Also I had the privilege of having to replace the radiator on the Scion since it decided to spring a pinhole leak that ended up growing progressively larger to the point that it was affecting driving since the coolant was coming out fast enough and dropping pressure in the cooling system that it was causing the temps to rise. Anyway, after hitting up Auto Zone and getting a replacement rad and spending more than what I would've normally ended up paying if I bought online or from one of these local places that stocks the generic stuff.
So anyway the only thing I can rest easy on with this job is the idea that the swap out would really take no time. The rad is held in by two brackets on top of the unit and then there's just the hoses for the coolant and the tranny lines and the overflow bottle. The only other thing that I would have to worry about is removing some of the splash panel underneath to allow me to access things from underneath. 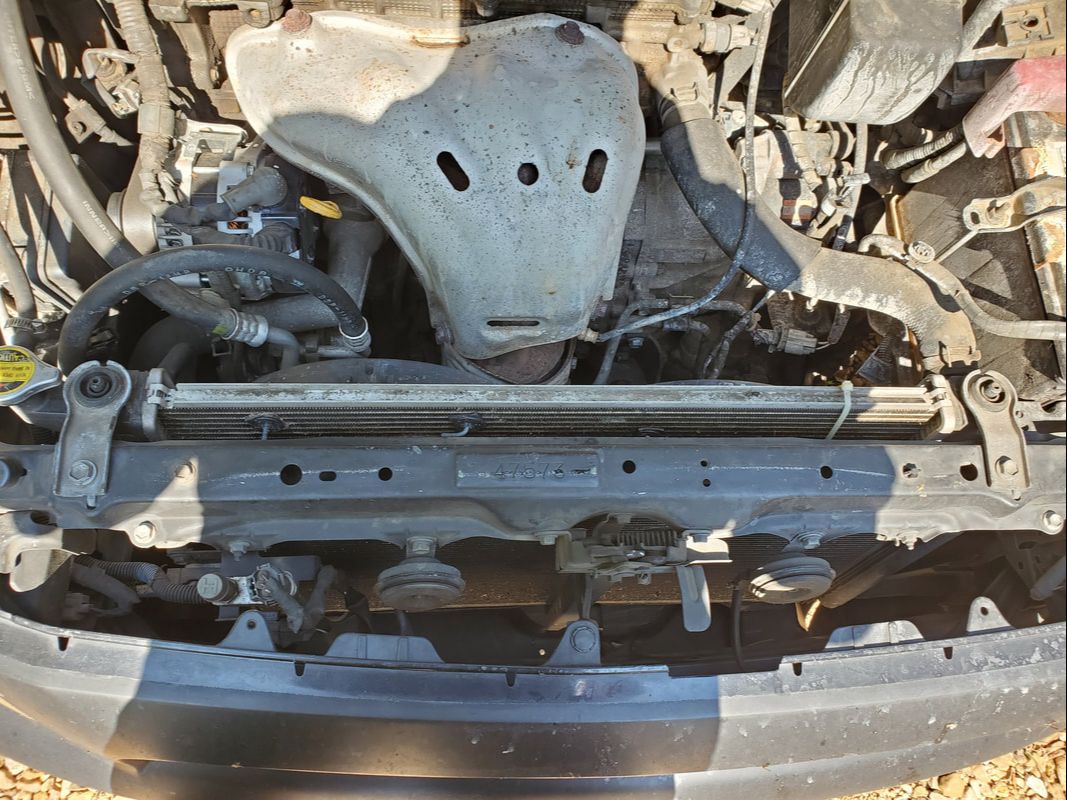
Radiator in car, note brackets holding the unit in place.
After pulling the brackets loose and pulling the hoses loose, which took no real time, along with the panel underneath, which was already in a bit of a shitty state that it only had three bolts really holding in place, and unplugging the fans, I was able to remove the whole rad with the fans still attached. A thing about the fans though, since the original fan assembly crapped out, I ended up using a couple of universal aftermarket fans that attach to the surface of the rad. These fans are of a high enough CFM flow that they get the job done pretty good, even in the hot weather. Now the way they're held in place is with these locking stems that press through the fins of the rad and are held in place with a locking disk on the other side of the rad. That was what ended up causing the hole in the rad, the stems didn't lock as tight as they should've been and one of the fans was able to vibrate around enough that the stem wore a hole on one of the coolant passages. 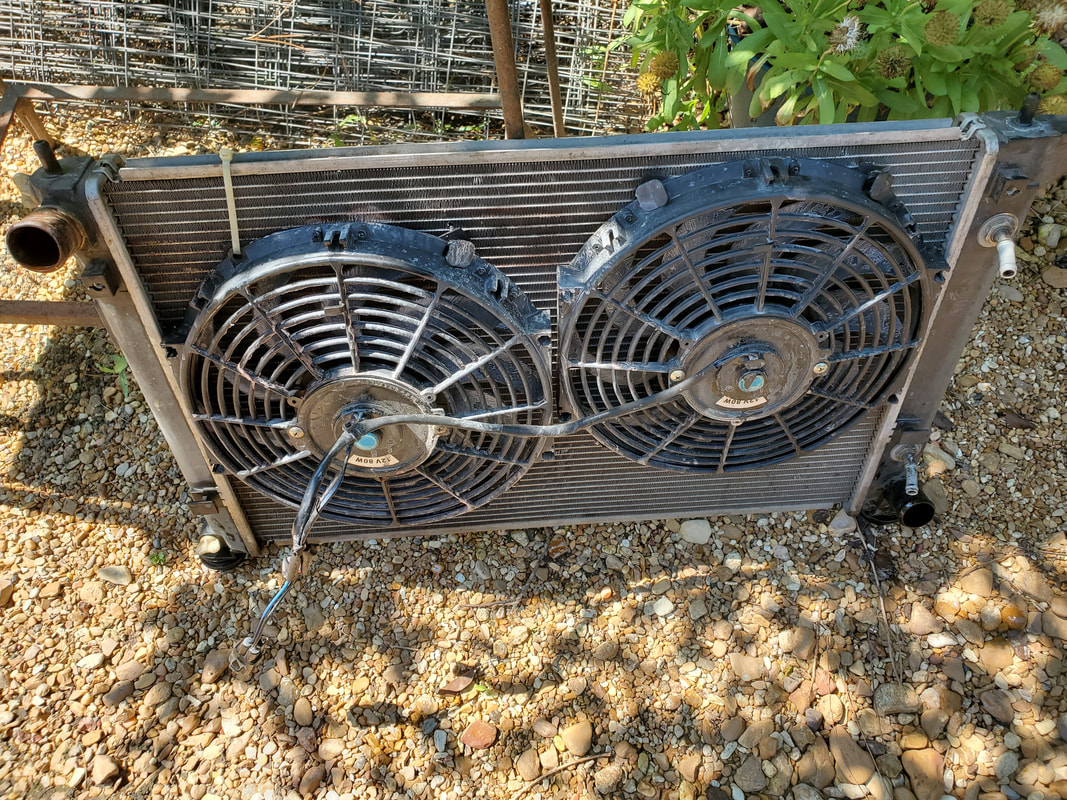
Old rad pulled out with fans still attached.
Cavity after removing rad, note apparent tightness of space yet simple way for unit to come out despite lack of space.
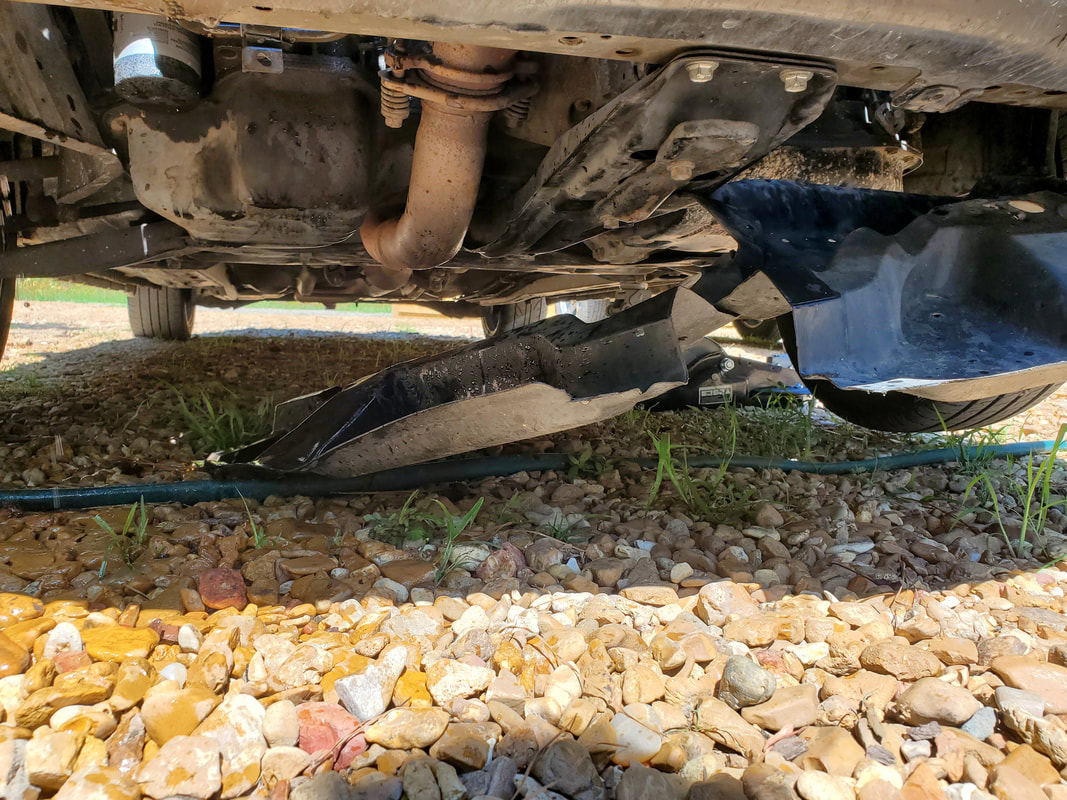
Splash panel dropped and pulled aside to allow access from under the car.
After pulling the fans from the old rad and setting that unit aside since I could actually attempt a repair of the damaged area, I changed up how I attached the fans. Instead of reusing the old stems and their retaining washers, I just used the foam pads that keep the fan's hard plastic surface off of the rad's flimsy metal surface. I then took regular zip ties and pressed them through the fins then reinserted them through the fins about 1/4" apart, securing the zip ties to hold the fan in place. The zip ties are situated where they can't really rub on the surface of the coolant passages like the loose stems did before. With the zip ties the fans are nicely secured to the surface of the rad where they can't vibrate and cause problems. 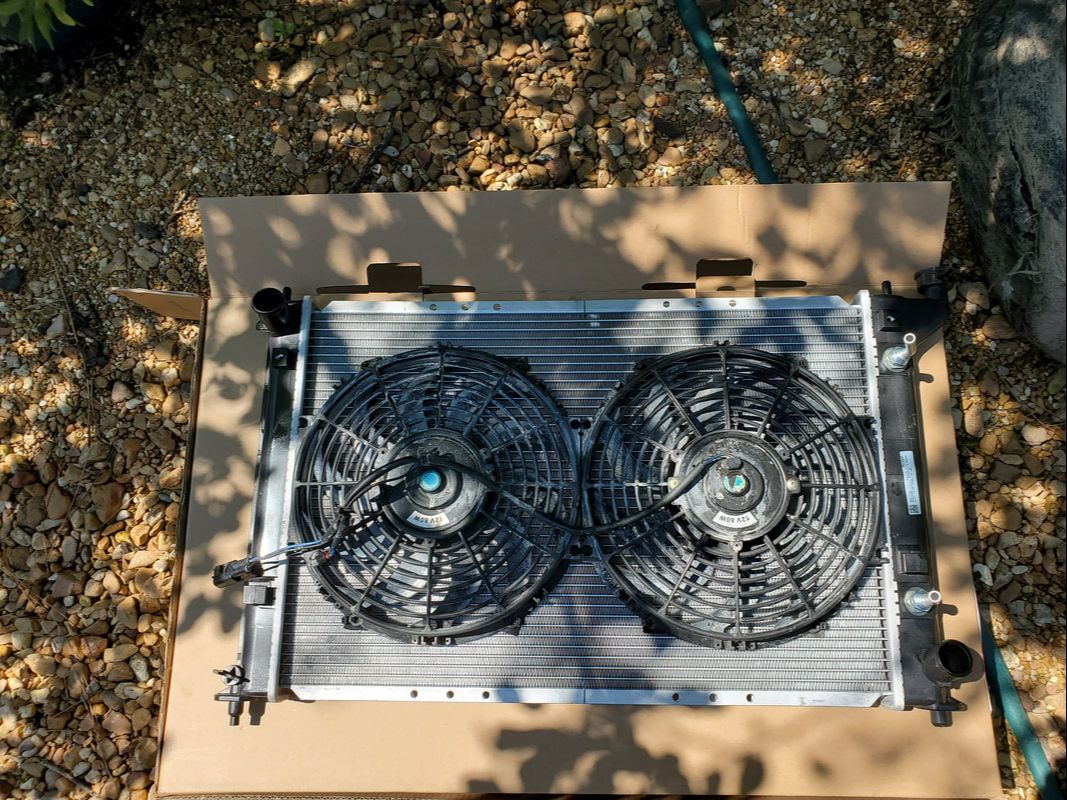
New rad with fans attached via zip ties.
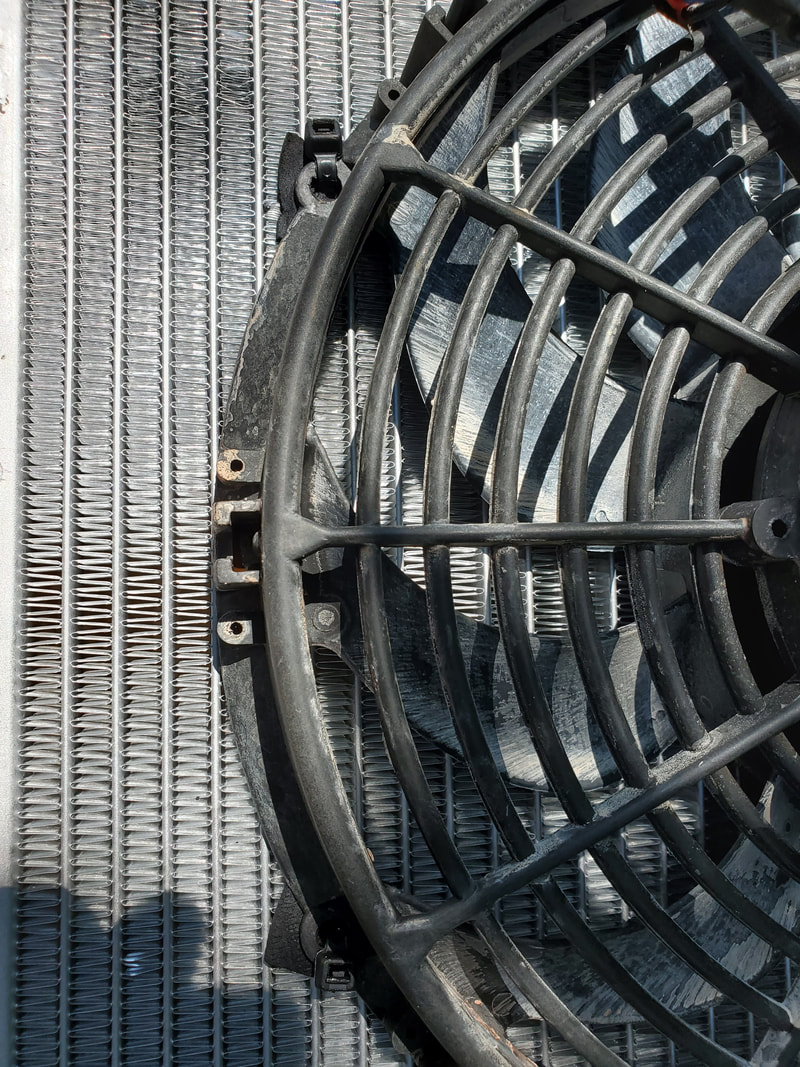
Shot of zip tie attachment for fan, note how zip tie is situated to coincide with the pattern of the fins so as to not put undo stress on any of the metal in the rad.
With the fans attached I swapped the bushings on the pegs on the bottom of the rad from the old to the new and placed the new rad back in the car. After attaching the hoses and plugging up the fans, I reinstalled the brackets to secure the unit in place. I then spent some time installing extra fasteners to the splash pans underneath to ensure all three sections were securely held in place so they won't vibrate lose or get caught in the rotating tires. After filling up the rad with coolant I started up the car and turned the AC on to let the system get hot quicker. Even at a standstill everything was cooperating despite the intense heat outside. Another success has been realized and the Scion is able to hit the road again to bring in some more money to fund our exploits. With the car done I moved on to the gravel. As I had been doing before, I would take a few wheelbarrows full of gravel and spread it over some more area in the firewood staging area to cover more ground to allow me to place a couple more pallets (even though I need more pallets). I also spread some more gravel over some areas where the gravel settled and allowed water to pool up when it rained, or where mud was starting to push up through the gravel so I can keep the ground evenly covered. As I had made note of before, I will have to come back over multiple areas with more gravel even after I finish the initial covering so I can get the ground evenly covered with a nice thick layer of gravel for both aesthetics and so when I end up laying on the ground I don't end up with a wet ass or extra dirt on me from mud and dirt. The remainder of the gravel went on the side path between the garden fence and the storage trailer, covering that ground some more and getting it ready for more vehicular traffic, especially since I plan on parking a couple more project vehicles along the garden fence in this area. Eventually I'll be able to start covering the backyard area to get that area prepped up for the future plans I have when it comes to construction in that area. The work continues..... 
Area of side path covered with more gravel, slowly working my way deeper into the back yard area.
After tackling the tow dolly and getting some more gravel on the ground I decided to get some more work done on the wood pile. As before, this would involve using the chainsaw to cut up the larger pieces of wood into smaller sections that can be placed on the log splitter, split up, then stacked onto the pallets in the firewood staging area. Of course the larger sections of logs need to be cut down into lengths that are short enough to produce pieces that will easily fit in the wood stove.
To get some form of assembly line procedure going, I started off by cutting up a nice pile of short sections of wood with the saw first. When I generated this smaller pile of wood, which was situated next to the chair I have sitting in front of the log splitter, the wood should produce enough finished product to fill the wheelbarrow a couple of times in just that batch. Of course to make myself feel better by being able to have the illusion of making some progress on the wood pile I grabbed pieces of wood from one side and cut them up so I could shrink the overall footprint of the wood pile. I did get a good stack built up next to my chair. 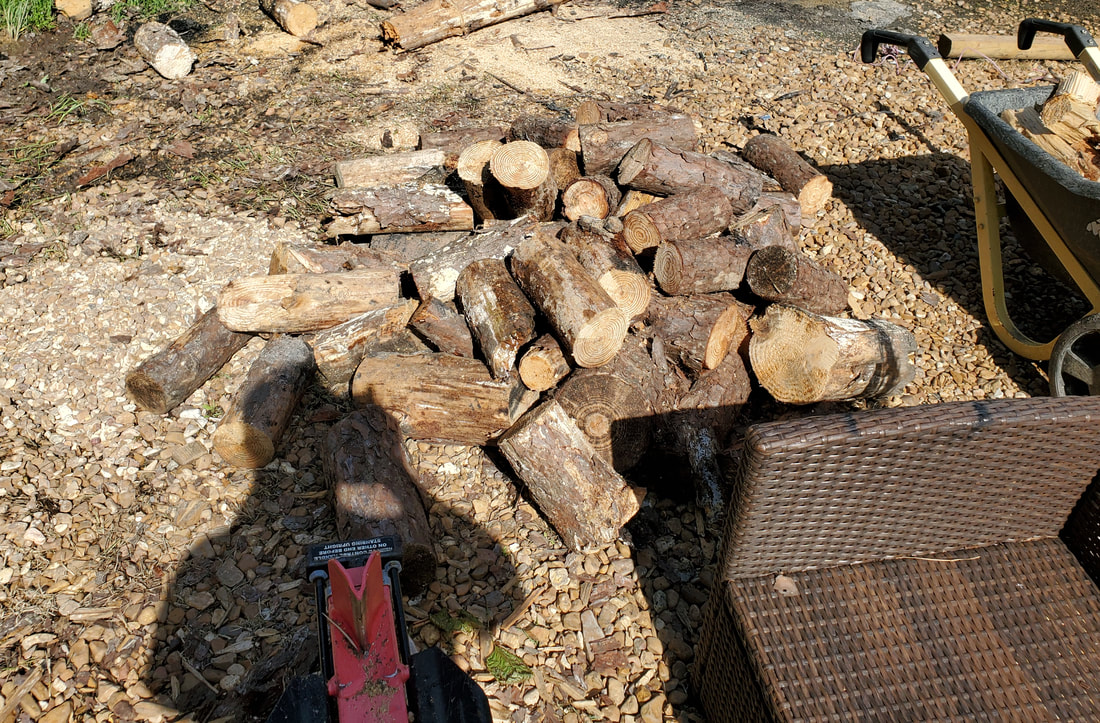
Pile of shorter lengths of logs cut up and staged next to the chain I use when splitting wood.
After getting this first pile knocked out I did go ahead and chop up enough wood to do the same thing again. I did have to replace the chainsaw chain as I couldn't get any more filings out of the last chain. Once I replaced that chain I went through some wood like it was nothing, building up another good pile and getting it all split up in no time. I had already started stacking on the pallets, having laid some more gravel over the area and setting down the last two pallets I had staged in the firewood staging area. 
Firewood staging area with last two pallets set up on more freshly laid gravel.
I was able to get a good stacking of firewood on the pallet to the left in the picture, managing to get to the same height as the rest of the firewood despite not having a back wall to stack the wood up against, as was the case with the beginnings of the two old piles. By cutting and splitting the wood I was able to clear more of the midway where the wood pile was stretching over into, as well as around the tow dolly and along the fence line. This project, like others around here, fall into the category of just general clean up, since the whole goal is to clear up the clutter around the yard. Whether its so I can move vehicles and equipment around or finish the fence or lay more gravel, being able to eliminate this woodpile is necessary. 
Dwindling wood pile.
Once I get this wood pile cleared there is another wood pile I have to deal with. The old porch wood that is stacked and staged along the garden fence line in the midway also needs to be cut up. Some of this wood can be salvaged for future use in another porch or similar structure and other wood is only worth firewood. I have several posts that are still intact and can be used again in the building of another porch while there are 2x8 boards that are so rotted that they barely make good firewood. Whatever boards I can save will be stacked by the other scrap wood until they can be used for a future project while the posts will also be staged by the scrap firewood until I can get started on building another porch again to use this stuff up. I want to get the midway cleared as it will make moving vehicles around easier plus will make it easier when it comes time to cut the grass and the zero turn tractor needs to maneuver through the area. In the end, regardless of what the initial purpose may be for getting wood cleared up or getting other tasks done, the main goal is to get everything in order and cleared out so the area can look a lot better without having clutter taint the appearance of the yard. The work continues.....
A couple of months ago we had picked up a new used tow dolly to replace the homemade unit that we had for a couple of years and only used once. The homemade dolly is ok but there was definitely room for improvement. I stumbled across this dolly on FB marketplace for a reasonable enough price that I sealed the deal and we ran and got it. This tow dolly is of the type where it has fixed ramps on it and a swivel cradle to aid in making a sharper turning radius when towing a car. The dolly's ramps were pretty floppy and cockeyed due to excessive use and also because the previous owners didn't know how to use it apparently. Because it has fixed ramps, the dolly is set up where a retaining pin is pulled, allowing the whole back half of the dolly to tilt down letting the ramps touch the ground. When the car is driven or pulled up onto the cradle, the back half will tilt back into place where you can replace the retaining pin and secure the car and drive off. As a result I would have to remove the cradle and do some welding and probably some reinforcement of the sections of the ramps where they would normally be attached to the base of the dolly. But in order to do this I would have to get the cradle off. There's a huge nut that holds the cradle in place and also provides the swivel point.  Top of tow dolly showing how cradle pivots  Large socket on large nut holding swivel point of cradle in place. The nut that's holding the cradle in place is huge. Like huge enough that it requires a 1 1/8" nut. That means it required a huge ratchet as well, which luckily I have on hand. Now the fun part is because this nut was on for a long time, it wasn't coming off easily. I had to use the so-called "cheater bar" to give me the leverage to be able to turn the nut. This consisted of a length of fence pipe. With that I was able to slowly but surely work the nut off, which was still a PITA because I later found that the nut's threads were jacked up, whether from previous removal and/or cross threading or the nut was the wrong thread type for the stud on the cradle. Either way the stud's threads were intact so I would end up reusing the nut afterward.  Cradle removed from the dolly after removing the nut. After getting the nut off we was able to remove the cradle so I can survey the scope of the damage or degradation on the dolly. What I saw was pretty much as predicted. The ramps were supposed to be welded all around the front of the ramp and along the sides of that same mounting point. Most of these welding points were either broken or very weak. There were two teflon or kevlar (who knows) plastic strips of approximately 1/2" thickness bolted to the tops of the ramps to help hold the ramps and provide for some minor flexing when in use. These plastic strips were broken at the end bolts and for all intents were pretty much useless for the job they were intended to do. Even some of the framework where the ramps were welded had been damaged some where it would all have to be straightened out and welded back up and probably reinforced.  Left ramp showing framework that is broken where it holds the ramp. Note the plastic strip and where it too is broken.  Right side ramp showing similar damage to metal. The first thing I did was obviously remove the plastic strips. Since they were damaged they would not be reused. Depending on what I have available the most likely replacement will end up being some wide flat iron stock. I had to straighten out the ramps to get them into the position where they need to be in order for me to get the frame metal straightened out as well as just having the ramps straight. In order to do this I ended up taking some measurements at the front of the ramps to get the width then cutting a piece of 2x4 to this length. I then wedged the board between the ramps at the rear of the pair to spread them out and have them in the positions where I wanted them. This helped straighten out the frame metal enough for me to do my patchwork.  2x4 wedged between ramps to straighten and spread them out  Left ramp framework in position for welding. 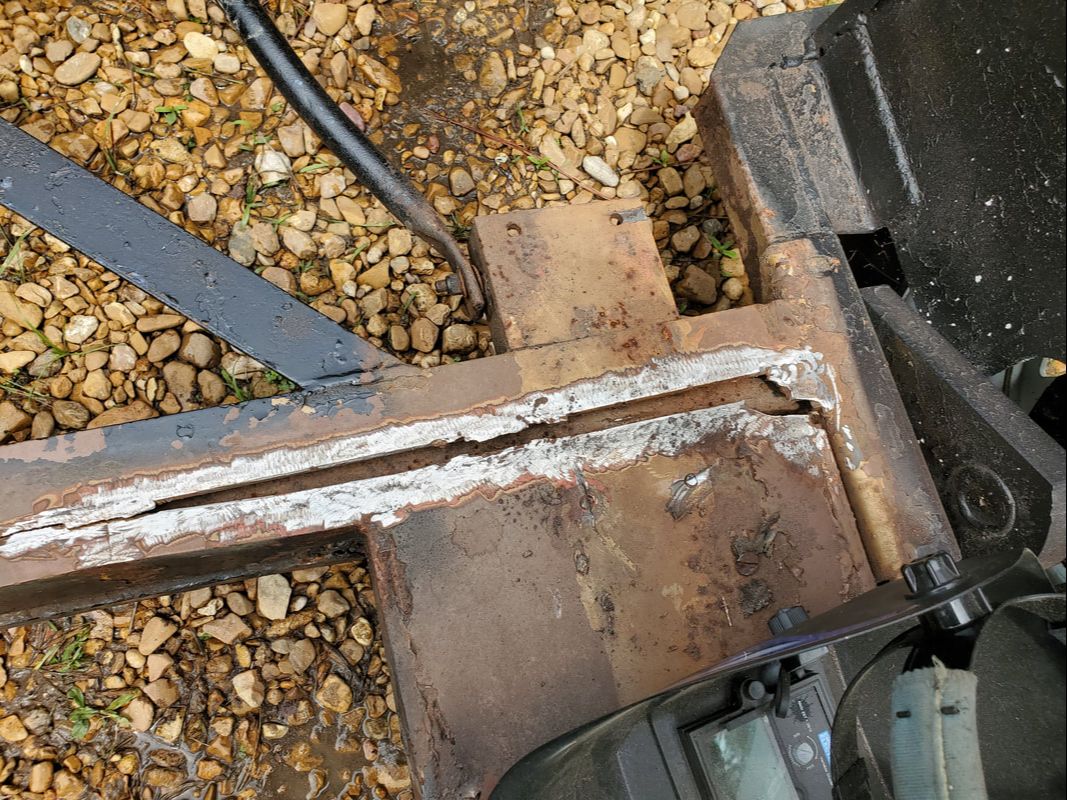 Right side ramp and frame in position ready for welding. I started off by welding beads along the seams where you see the gaps. I only did small beads since I would end up having to reinforce this since the gaps were a little larger than what I would normally be comfortable with when it comes to welding seams. I found some good stiff flat iron scrap pieces I had that actually would serve two purposes. First because the metal was pretty stiff while having some flexibility, I was able to cut two large pieces that would replace the plastic strips that were on the ramps. The leftover metal would provide me with inch wide strips that I was able to use to cover the wide gaps and weld all around to provide a good reinforcement and patch to hold the frame together at the fronts of the ramps. I was able to finish up the remainder of the gaps where it was narrow enough to just weld into them.  Welded bead over gaps in frame.  Flat iron stock laid over gap prior to welding. 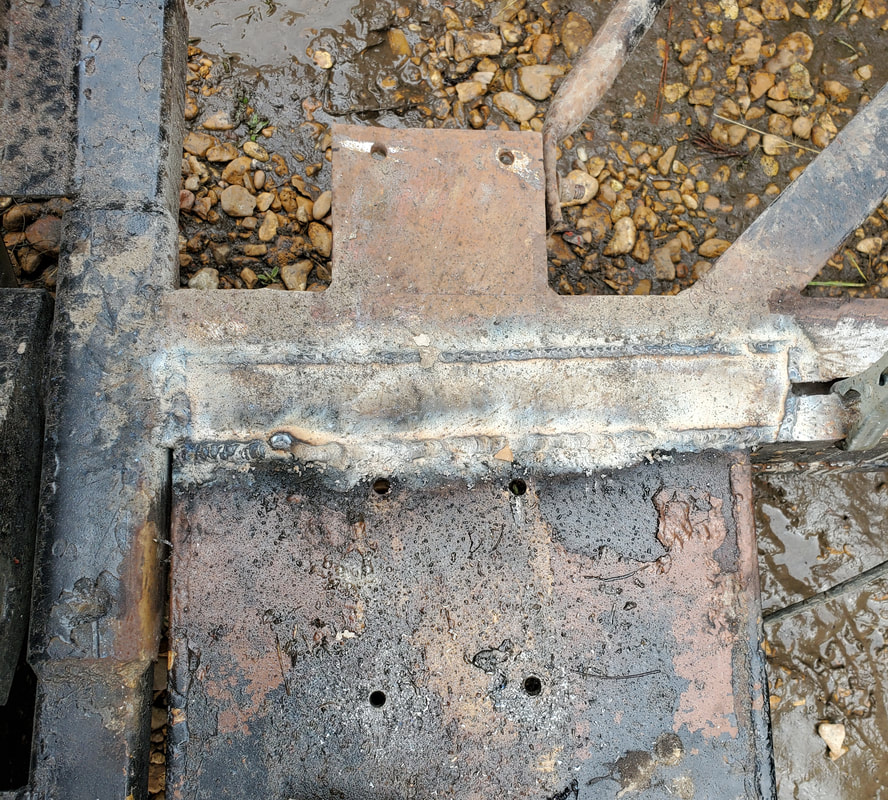 Flat stock welded in place over gap to hold frame together for ramp. The next thing is the metal plates to replace the plastic strips that were damaged. While the pieces of flat stock I cut aren't as long as the plastic strips, the fact that they are made of the same rigid yet flexible metal will totally make up for it. These metal plates were lined up with the holes for the frame and the first two holes on the ramp. I installed the four bolts on each metal plate then welded a bead around the back third of each plate to further hold them in place in place of the last pair of bolts that I couldn't reach. These metal plates are overlapping the welded bars on the frame and being bolted down, everything is reinforced and able to hold on nicely. 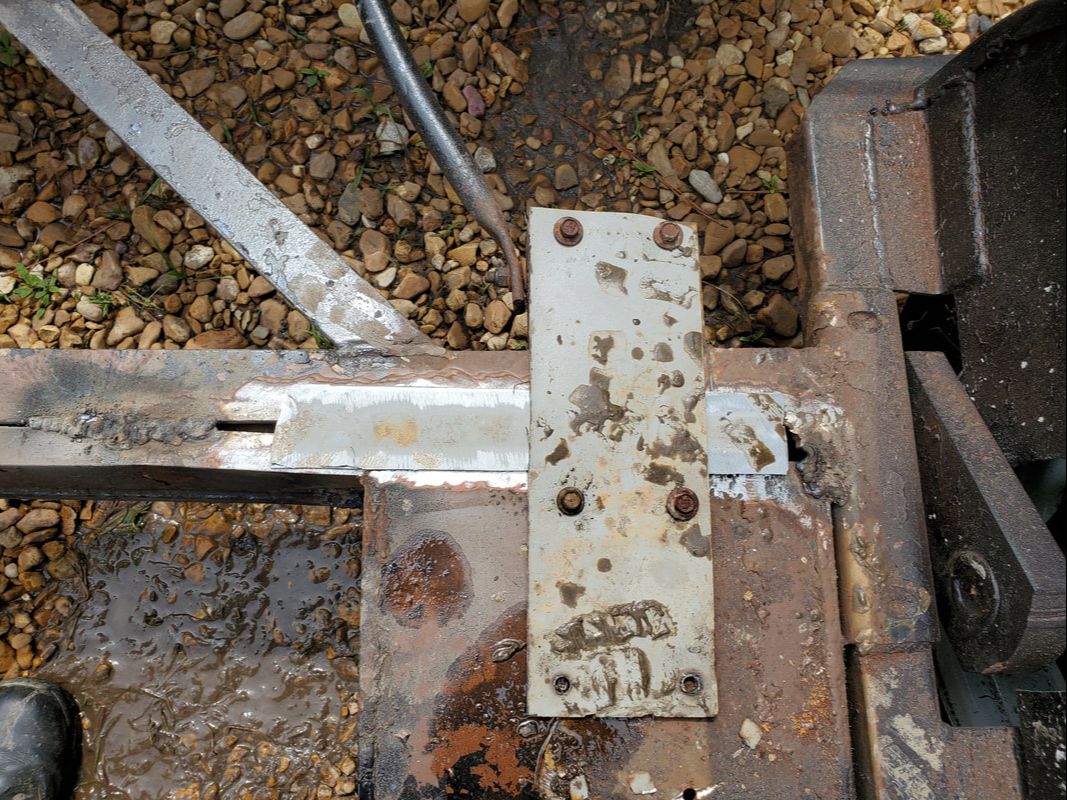 Lining up the metal plate on the frame and the ramp to get the bolts installed. 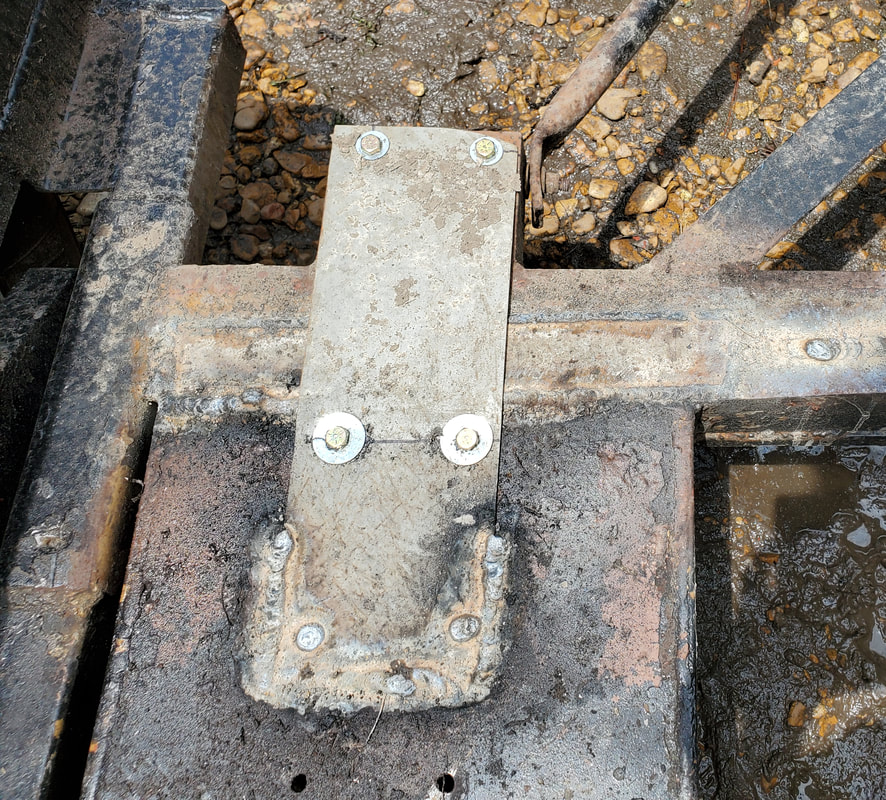 Metal plate bolted to frame and ramp and welded around back third of plate. Note pair of bolts at bottom of pic that are unable to be reached by plate. With that, I was able to remove the 2x4 from the back of the ramps and have everything be nice and straight and sturdy. I went ahead and re-installed the cradle onto its perch and went ahead and force threaded the big nut back onto the stud. Even with the damaged threads the nut didn't take as much effort to screw it into place. With that the dolly was all done and fixed up. 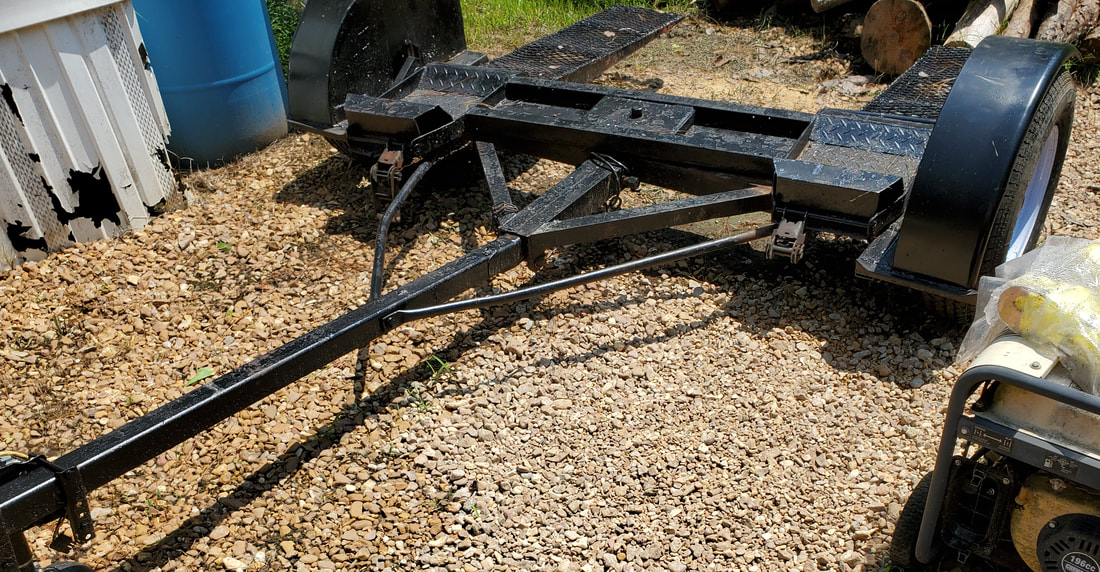 Repaired tow dolly ready to rock and roll. I would've looked at installing and wiring up a fixed set of taillights but I figured I can just stick with the universal trailer lights that I have and just make it a habit of wrapping the wire bundle around the yoke on the trailer to keep the wires off the ground while sitting the fixtures on top of the fenders. The only other thing left is just acquiring a spare tire for the rig so when we do use the unit for long distance hauling. The boat trailer that we moved over to the back of the yard has a 5 lug rim that I had to see if it would match up and lo and behold the rim does fit. Only thing I have to do is take the rim to the local tire shop to replace the tire. I can toss this spare into the truck, at least until I look at building a tire mount to sit on the dolly frame. All that's left is installing the straps onto the unit so they will be ready for when I do go to use the unit. In the meantime, on to the next project.
After having driven the Scion TC for so long doing food deliveries, the car started acting a little stupid. After having Auto Zone do a quick scan, the ole lady was told that the code that was popping up was from one of the cylinders misfiring, which she was told was either the spark plug or the coil. She was able to get a set of spark plugs but because the coils were more expensive at the store we went ahead and ordered a set. After they showed up I got to work on that.
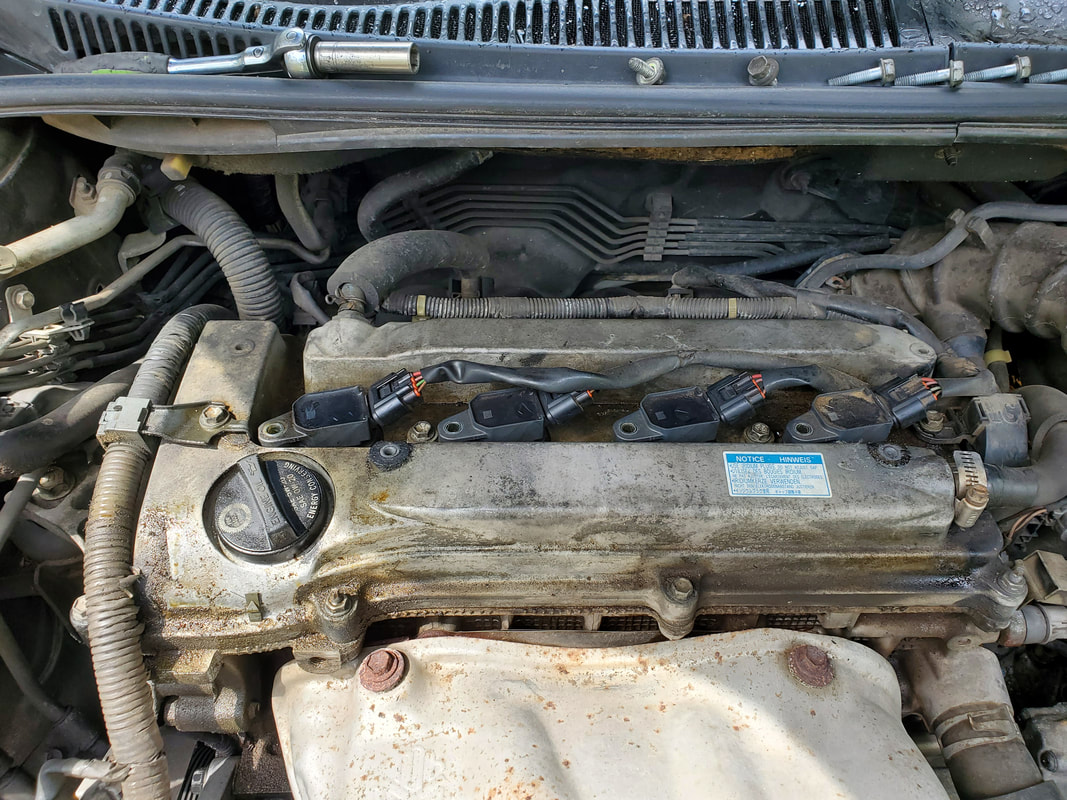
Top of engine showing how coils are situated through top of valve cover, plugging onto plugs.
With one bolt each, removing the coils was pretty fast. The thing is, in the process of replacing the plugs, some anti-seize grease should be used so the plugs won't risk getting stuck inside the cavities that they rest in. So anyway, when I pulled the first plug out, I was surprised at what I saw. The electrodes were burnt up pretty good on the plug. Apparently the plugs have gone for so long without having been replaced that the electrodes just burnt away versus getting caked up with carbon and other crud deposits like engines tend to get as they age and start running shittier. So with that I was impressed that the Toyota engine and the Bosch plugs are such a good system that they could run for so long that the parts will just burn away and still keep running until the parts can't sustain the operation of the engine. 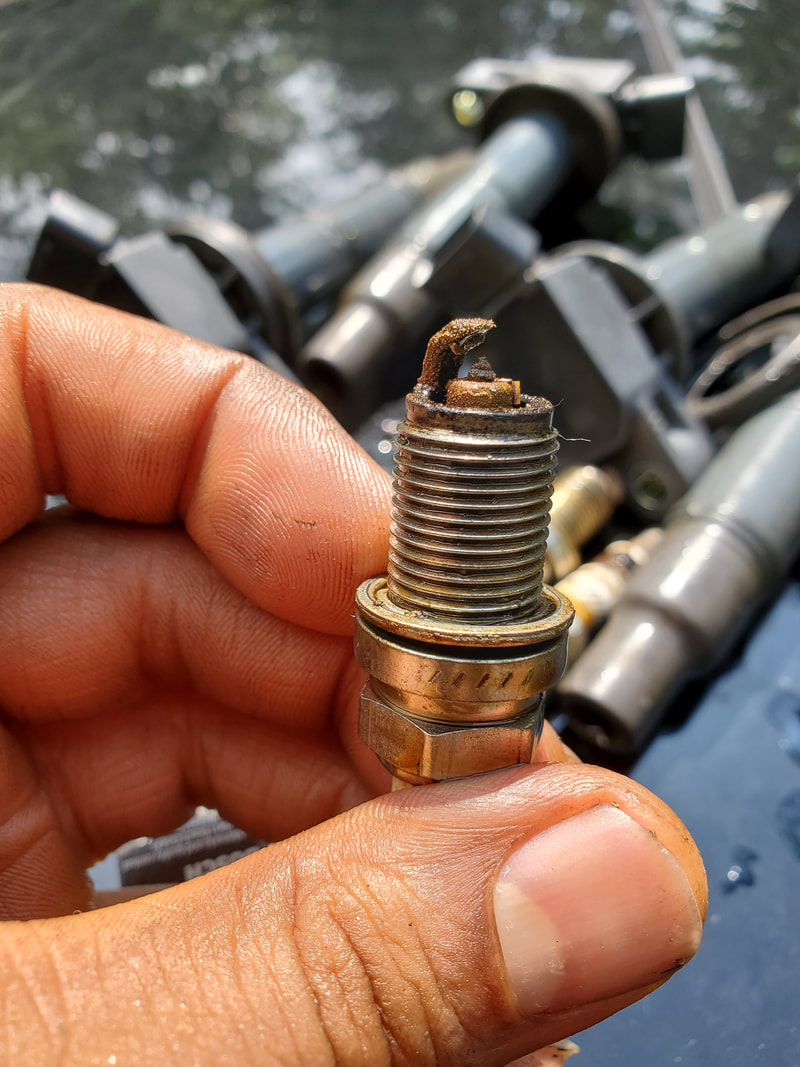
Closeup of spark plug pulled, note how electrodes are burnt away.
After pulling the plug and replacing it, I replaced the coil as well. Rather than try to test each coil to see which one may be bad, if any, I just went ahead and just replaced all the coils. I'll do a resistance check after researching and getting the specs on what I should get so I can determine if any of the coils are indeed bad and discard them otherwise I'll have a set of coils to use in case one does legitimately die. 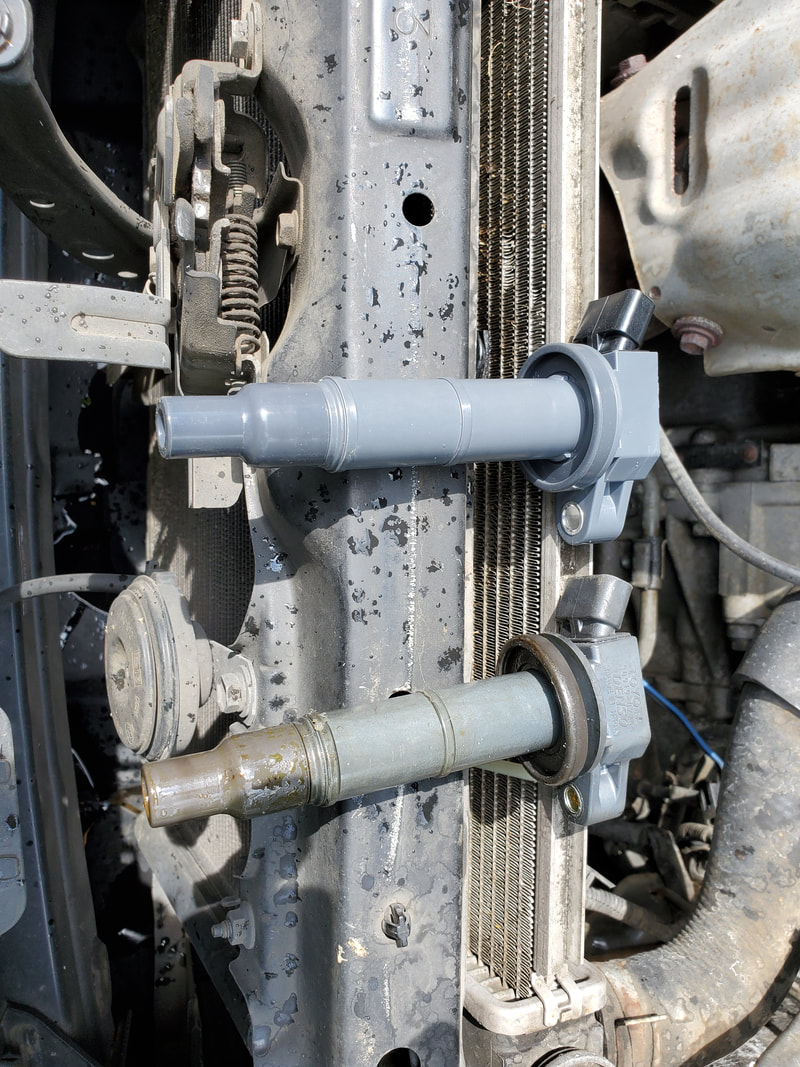
New versus old coil, note aging around boot of old unit from being subjected to the head in the middle of the cylinder head.
With the Scion back in business and ready to get back to running the roads in the name of food delivery and bringing us money I was able to go ahead and dump another load of gravel over the side path area, continuing to cover the grounds between the garden fence and the storage trailer. Even though the El Camino is parked where we wanted it, I'll still have to put some gravel under the car as we tore up the ground some in the process of moving it into position. Even as I lay the gravel down on the soft ground behind the Elco, I will end up still having to lay more gravel down as I mash the older rock into the soft ground, especially when we do go to move the other vehicles into position behind the Elco later on. The main thing is still getting the ground covered so as to make travel over the grounds more convenient and not having to deal with mud or having to cut grass over this area.
Now that we're back we're able to play catch up and get things done that were put off while we were out of town. For a little while I'll probably be working extra trying to squeeze as much as possible into each day just to get to a point where I feel comfortable with where I stand on accomplished work versus the time of the year it is. Of course we have to recover from the trip financially so I'll be trying to do as much work as I can that doesn't involve buying anything or at least anything significant. Once I get to the point where I've run out of "free work" to do around here and need to buy something here or there in order to further advance on the bigger projects then I'll start getting back into ordering parts or getting whatever supplies I need from Lowe's and other suppliers.
The whole purpose of us going to VB was to go back to the Military Aviation History museum to finish going through the facility. We visited the place four years before and only made it about halfway through the place due to the idea that we had another tour that we had to do at a specific time and our timeline had us where we had to leave the museum without finishing going through the place completely in order to make the drive over to the next venue so we didn't miss the ride (it was a boat tour on the river going past the Norfolk navy base). Since we were going to be on the east coast we worked in a visit to VB in order to go back to this place. This museum is centered around a couple of large hangars that have military aircraft from WW1, WW2, and just after, along with other military machinery and vehicles from the era. Inside the climate controlled areas of the main hangar are a lot of paintings of different war scenes, along with models displaying battle scenes and other artifacts from the time, be they uniforms, electronics, weapons, etc. The unique thing about this place is the fact that all of the planes in this museum are running flying machines. The workers for this organization tasked with preserving these machines of military history have restored these planes to the condition they were in when they rolled from the factories that produced them upwards of 100 years ago. Some of these planes will actually fly to air shows and be displayed, either on the ground or doing fly-bys for spectators. If you're an aviation afficionado then you would do yourself a service checking this place out. 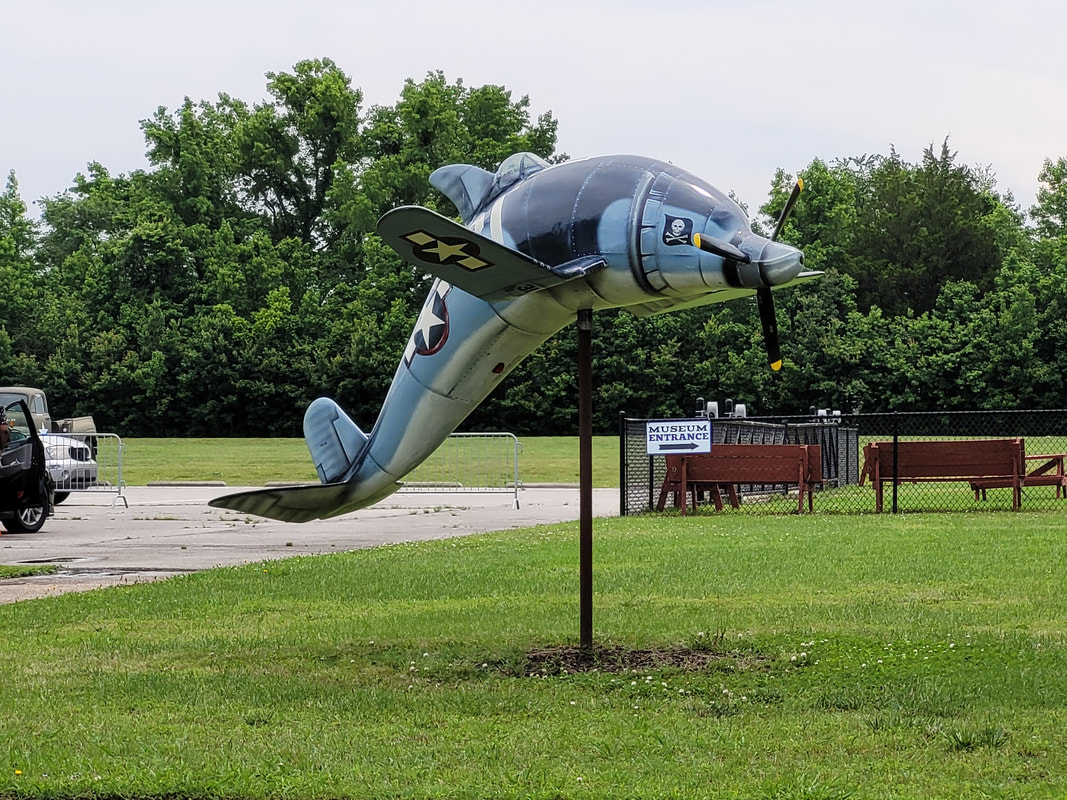 Dolphin shaped sculpture made up to have features of different old aircraft. 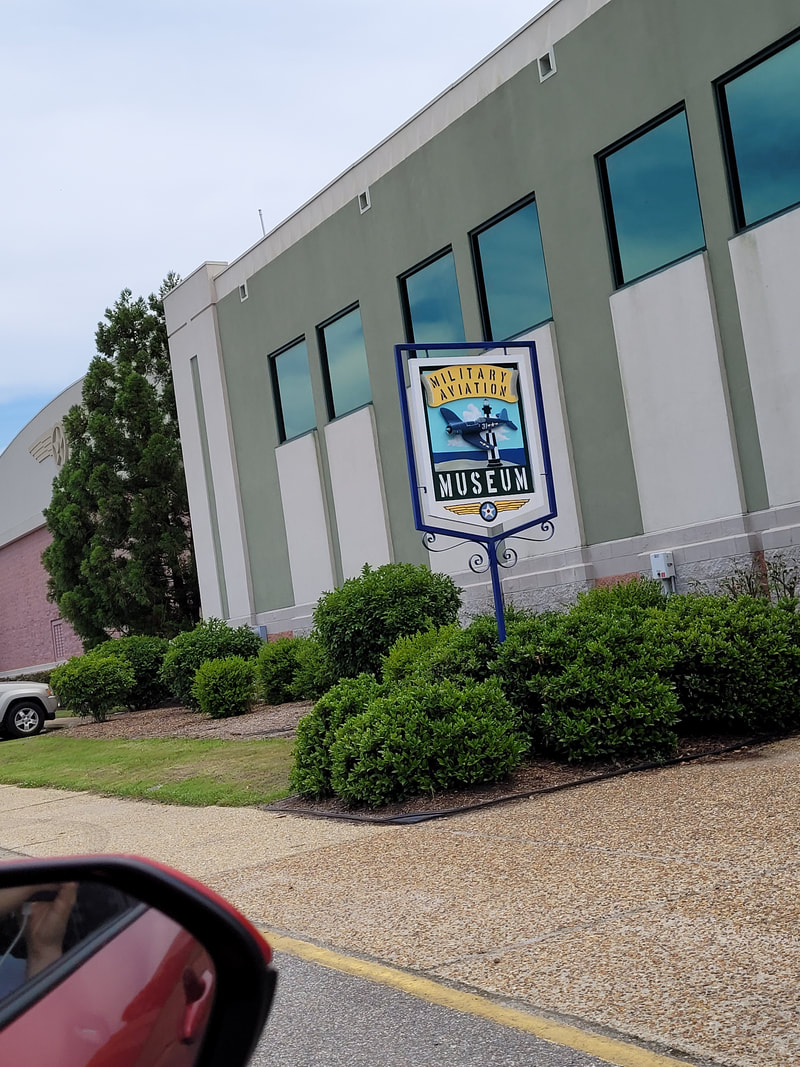 Pulling up to museum entrance. 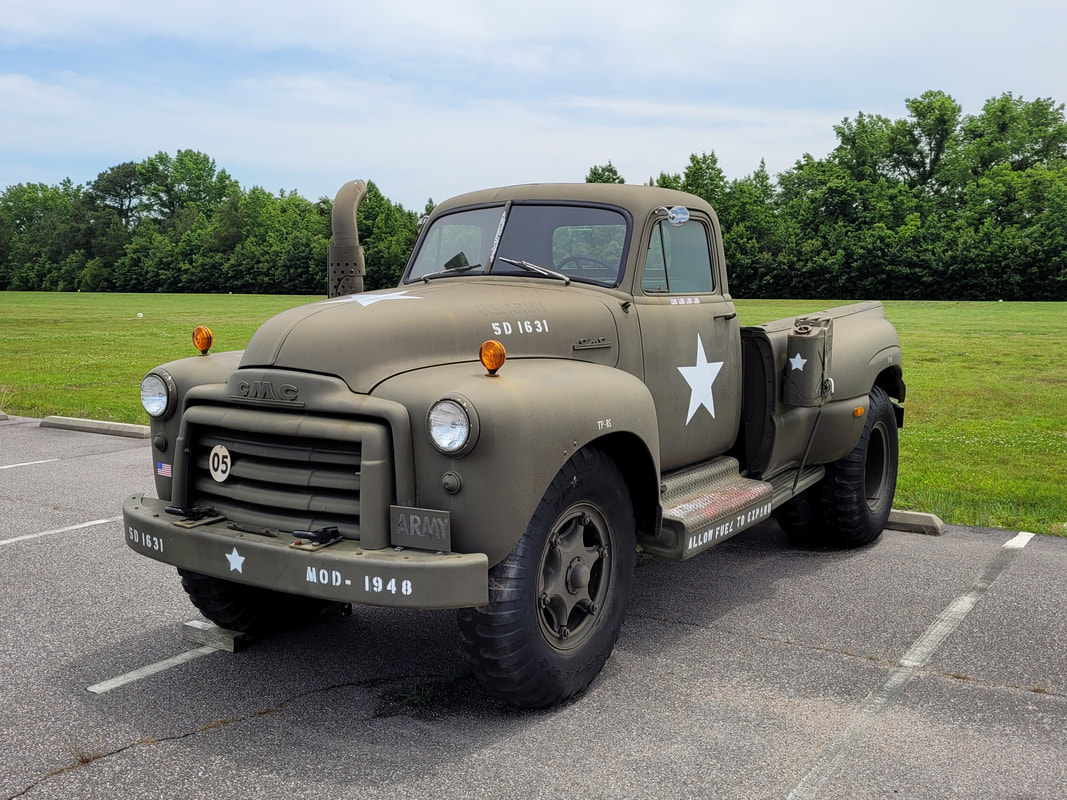 Old truck, around 51-53, painted in a military paint scheme, note the bed from a modern dually pickup that was installed on the truck. Inside the main building where you pay for admission and shop the souvenir shop, there are several displays to check out. Some are military vehicles from WW2, some dummy ordnance which includes a German V-1 buzz bomb, several engines that were used in the planes back then, along with many pictures and other good stuff to look at. 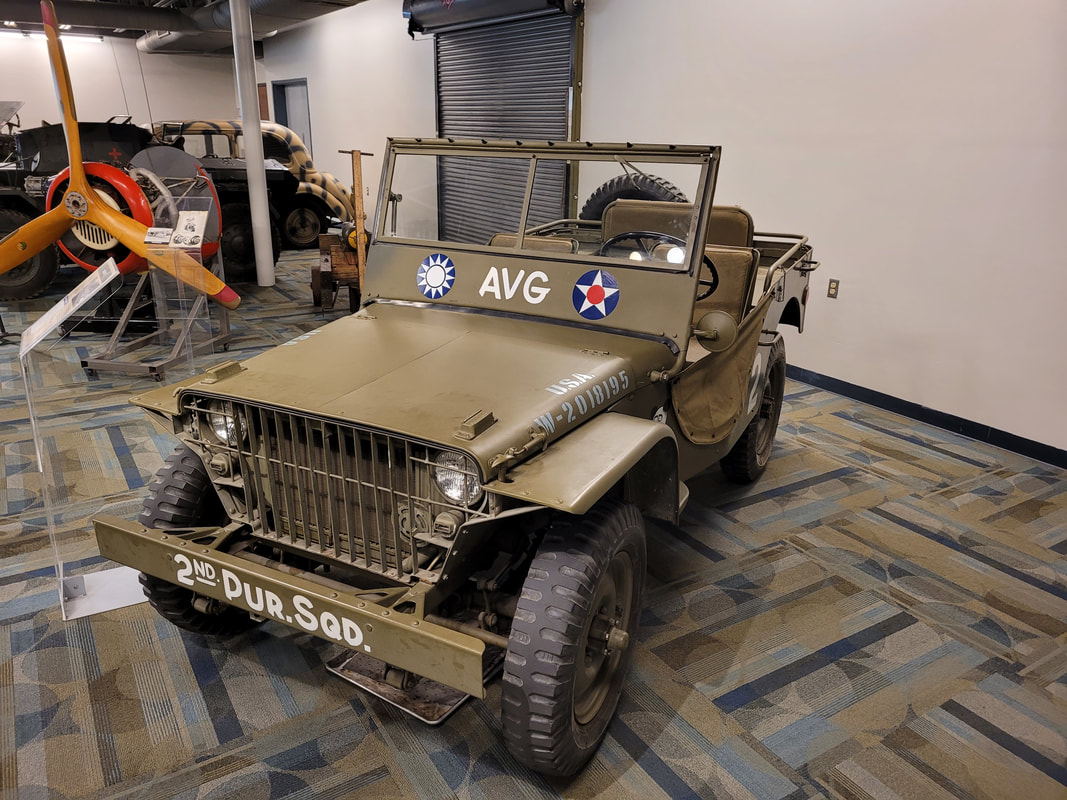 MIlitary jeep 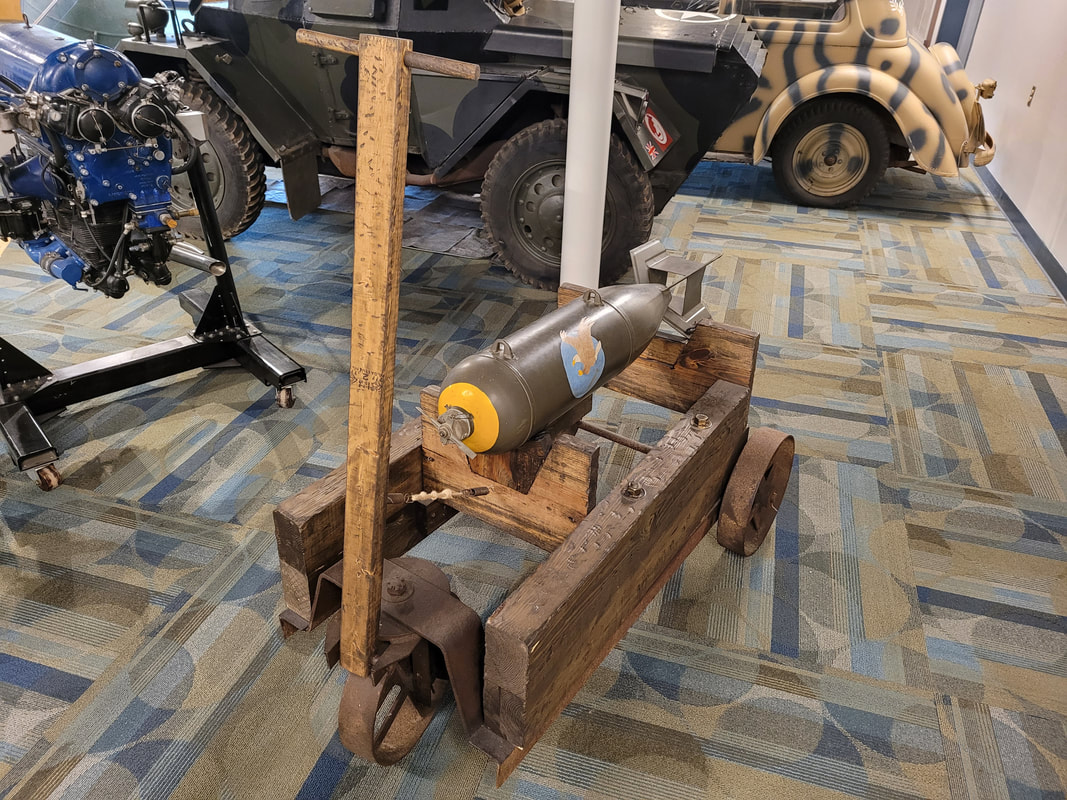 Bomb on carrier that would've been used at airstrip 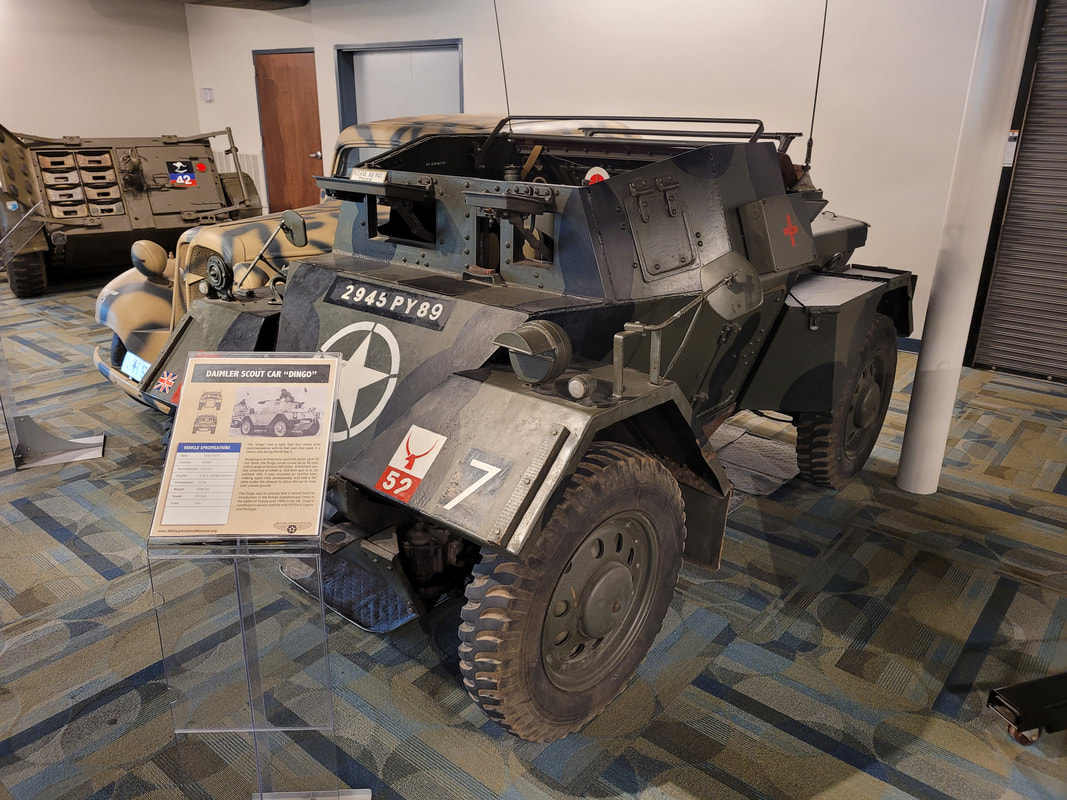 Daimler German scout car 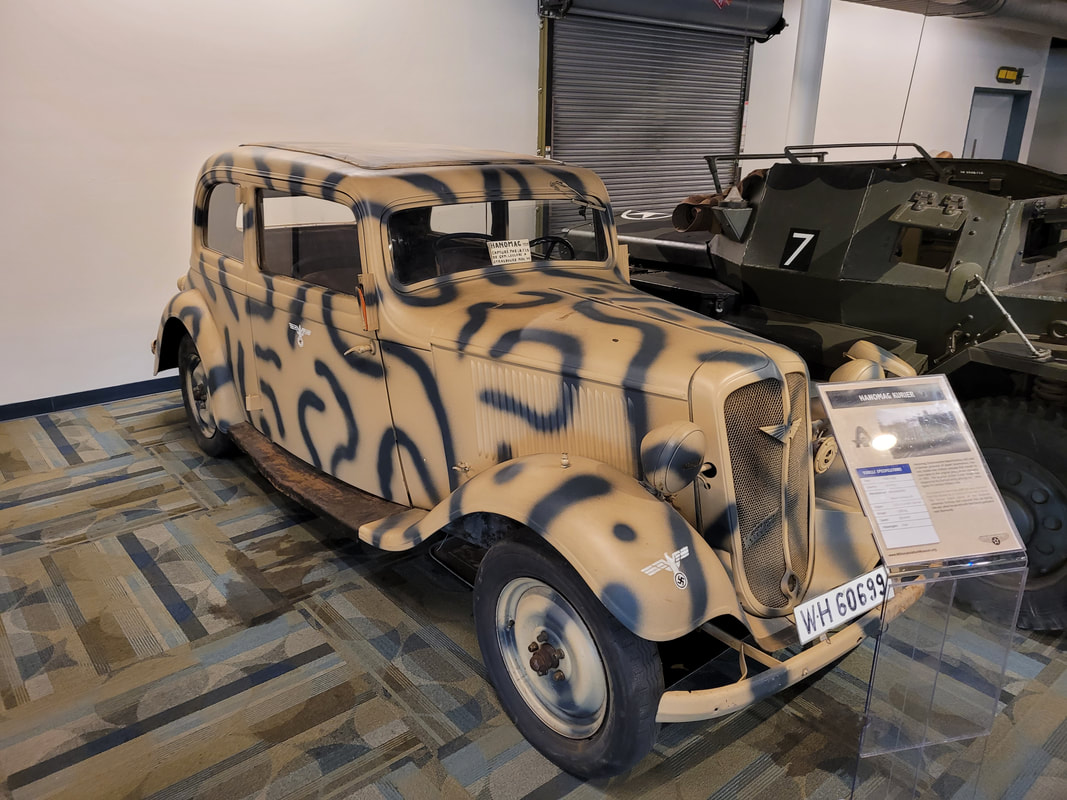 Another German officer's car 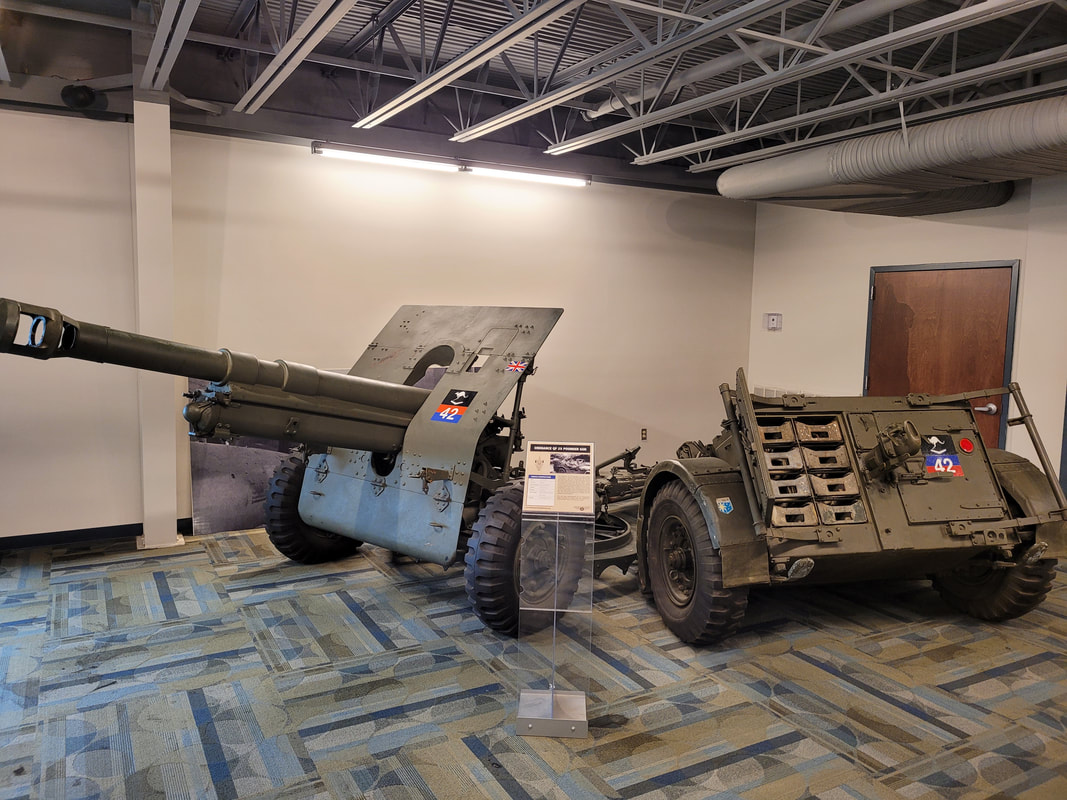 Artillery piece and support cart. 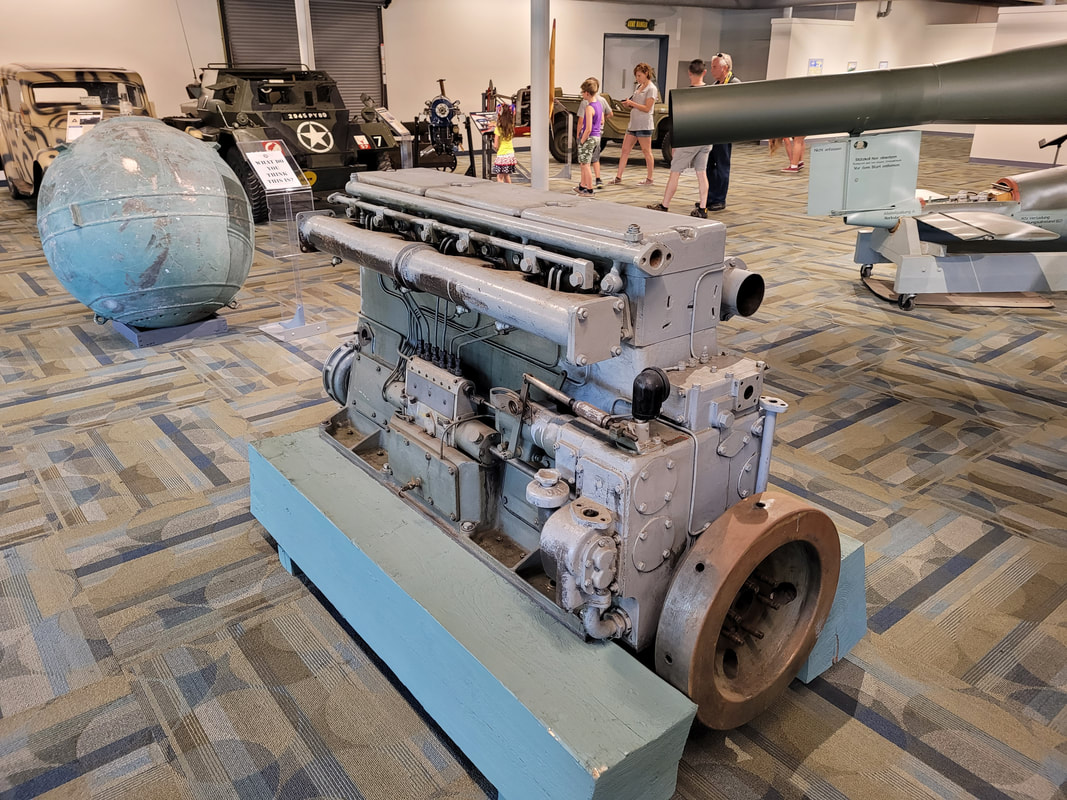 Primitive fuel injected straight 6 cyl engine, operation is very similar to an older diesel engine in the use of a mechanical injector pump. 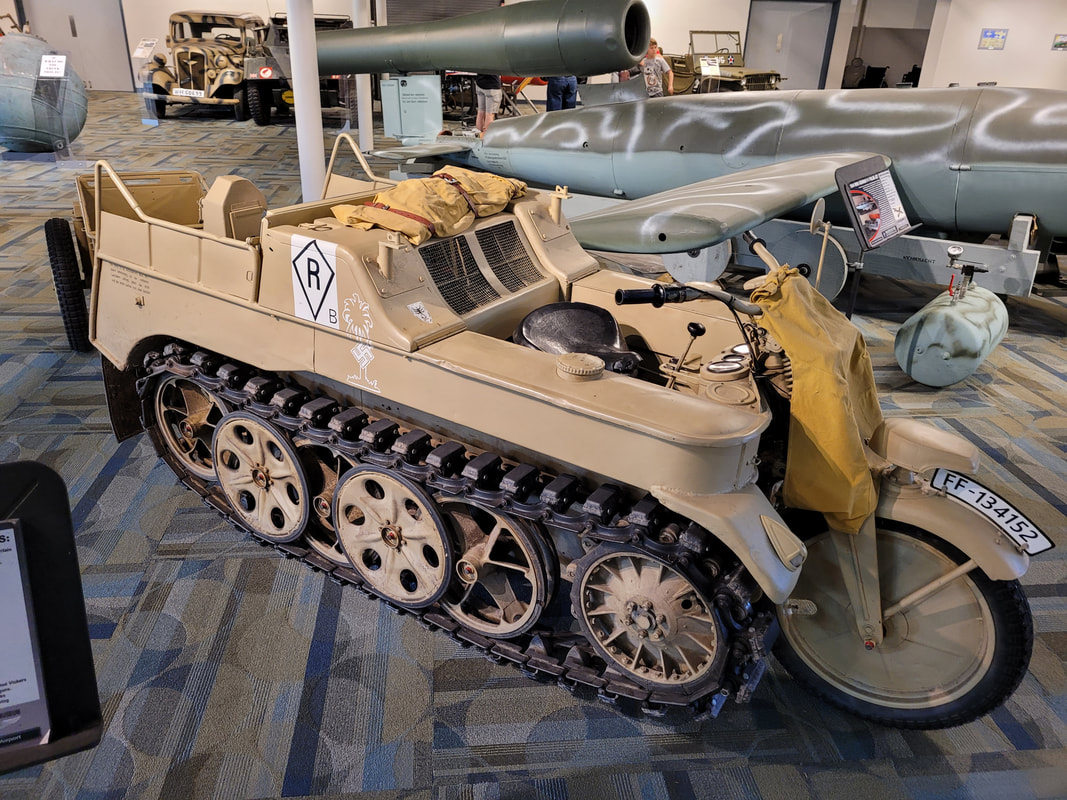 Another scout car 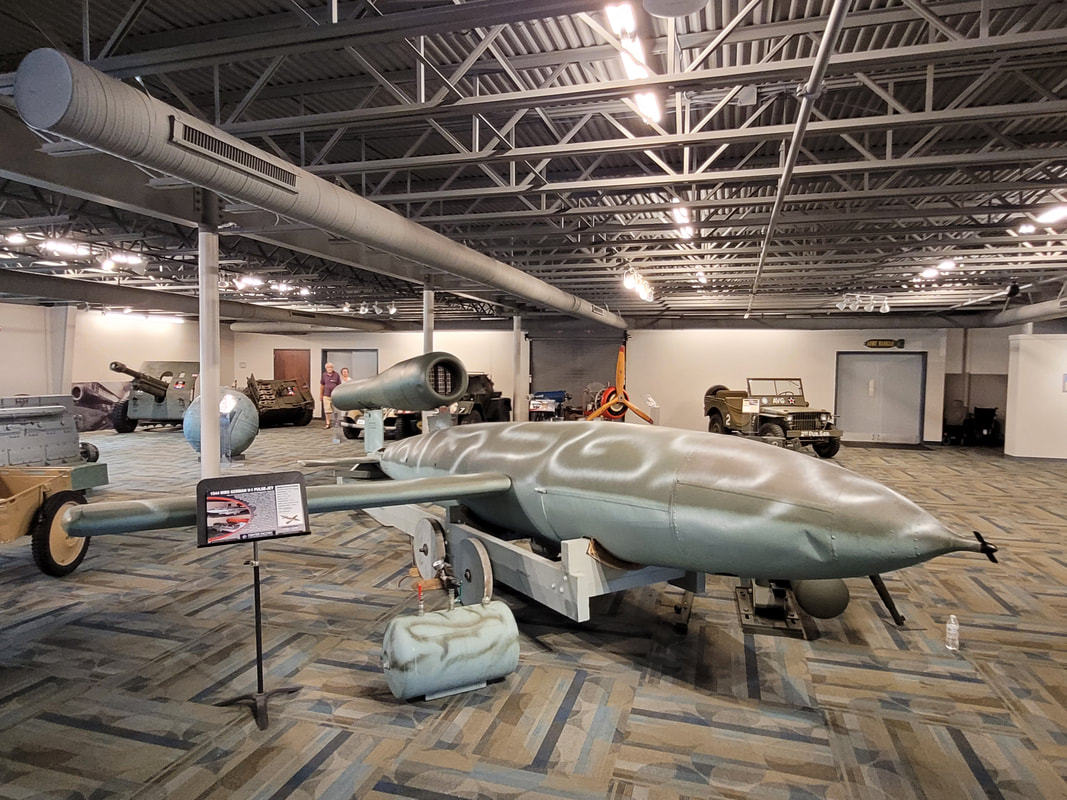 German V-1 flying bomb, also known as the buzz bomb, worlds first cruise missile. 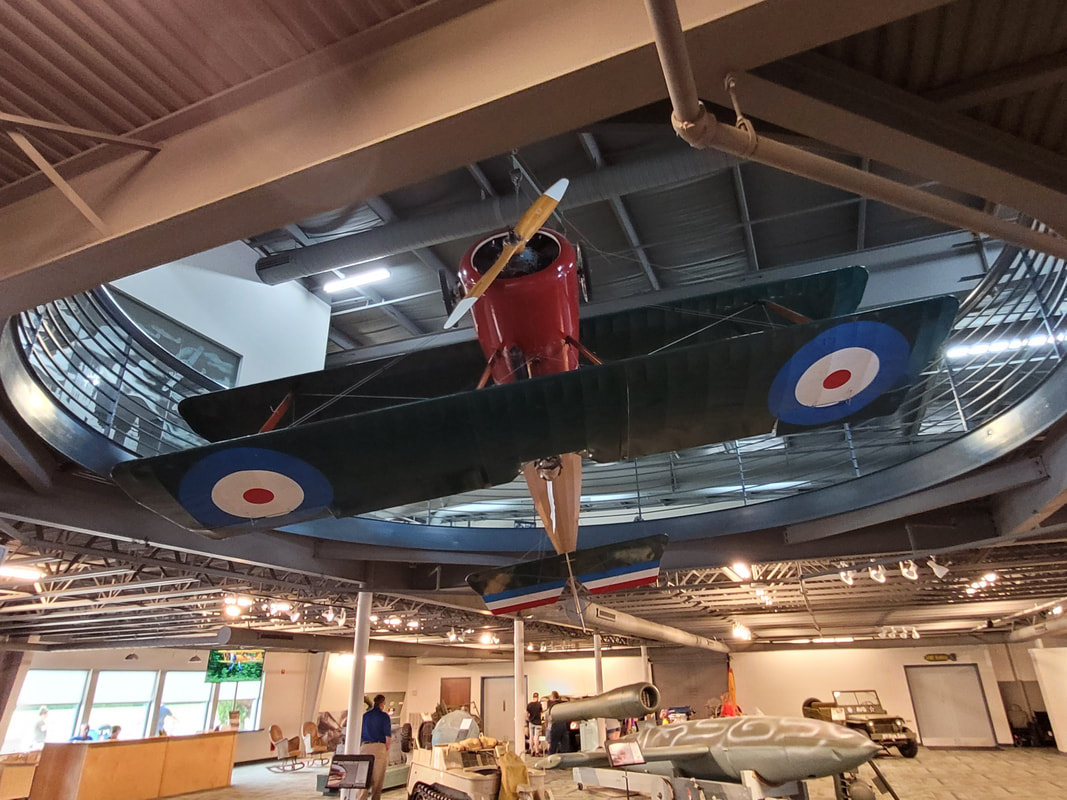 WW1 Biplane suspended upside down over lobby area in main building. 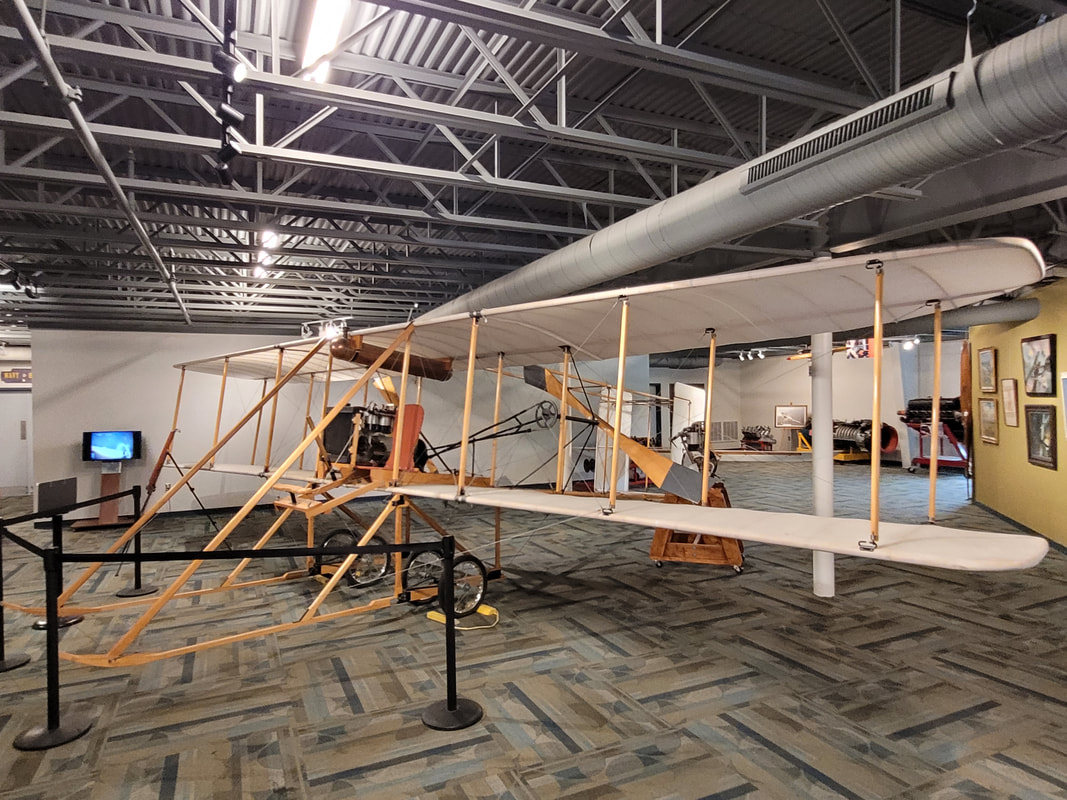 Model of Wright Brother's Flyer 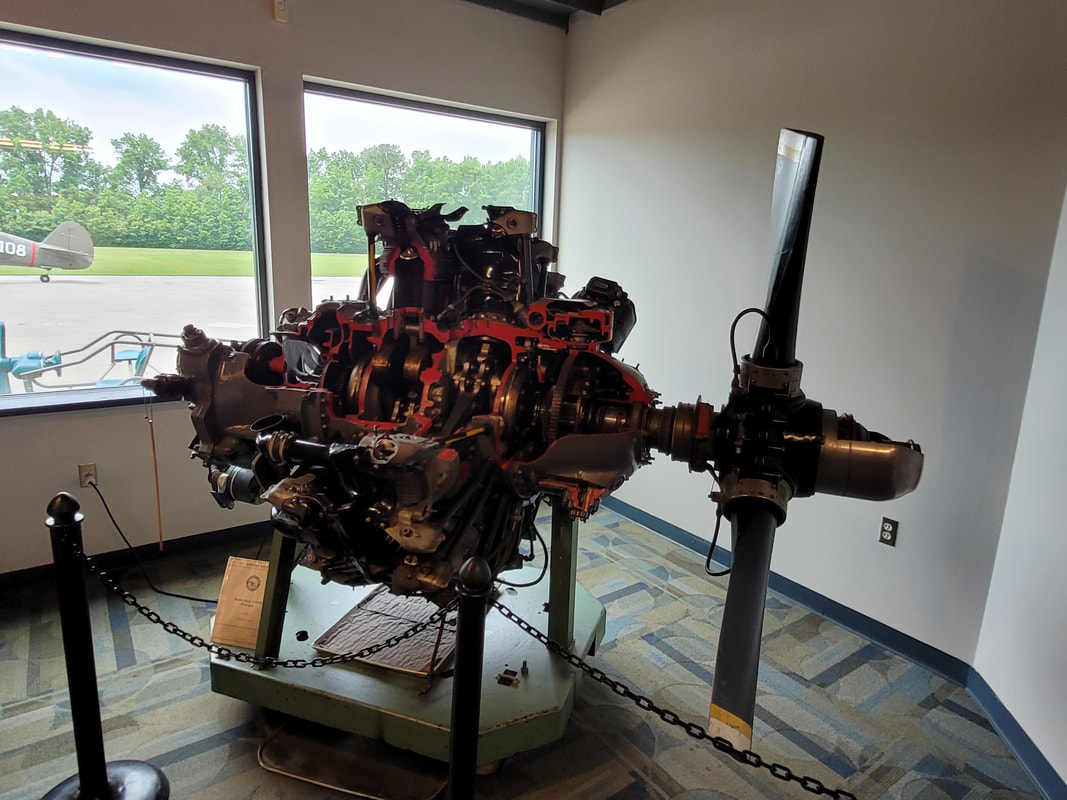 Working model of radial engine typically used in WW2 aircraft. It was demonstrated for us to show how the internals move as the engine runs, very unique piece of machinery for the time. 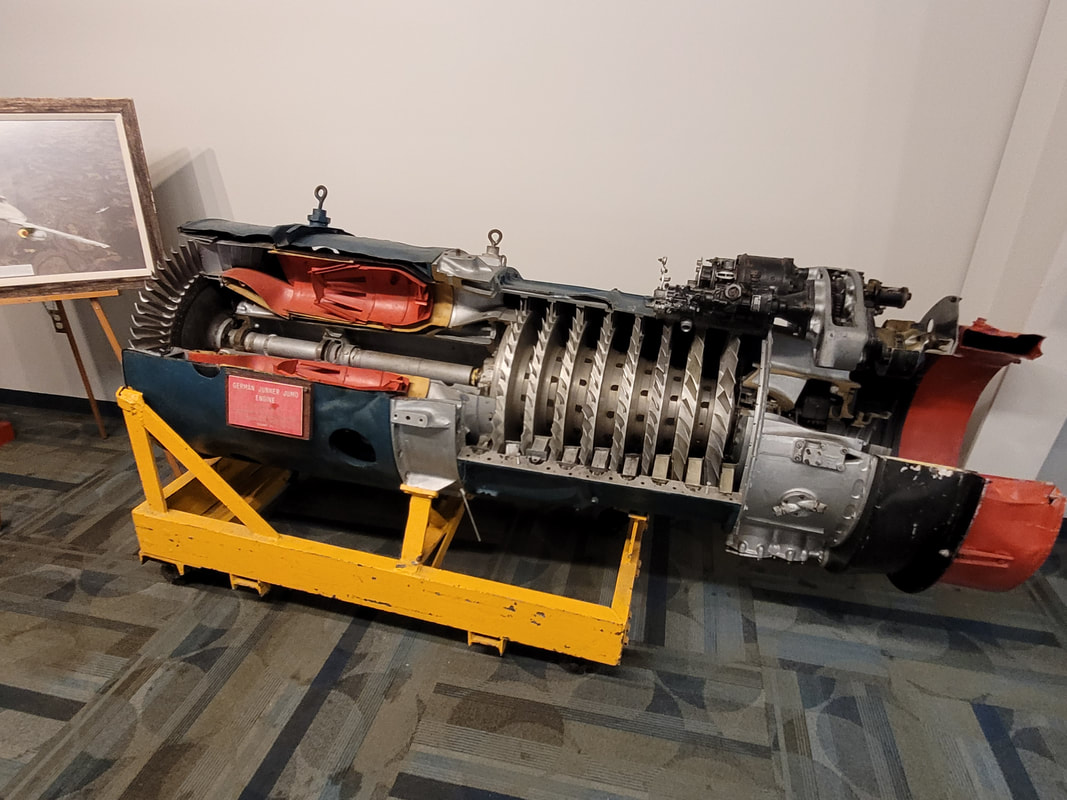 Model of jet turbine engine used in German Me-262 jet fighter. Proceeding into the main hangar we got a view of multiple WW2 planes and a couple of other planes that served as trainers during the interwar and post war years. Again all of these planes are working models, periodically started up and run and moved around to keep things loosened up and demonstrate to spectators. Depending on what's going on these planes will be moved around to different spots, sometimes moved to the maintenance hangars for servicing. These aren't just simple museum pieces, they can hop in and fly off in em. Most of these planes are very recognizable by anyone who is even remotely familiar with WW2 birds. 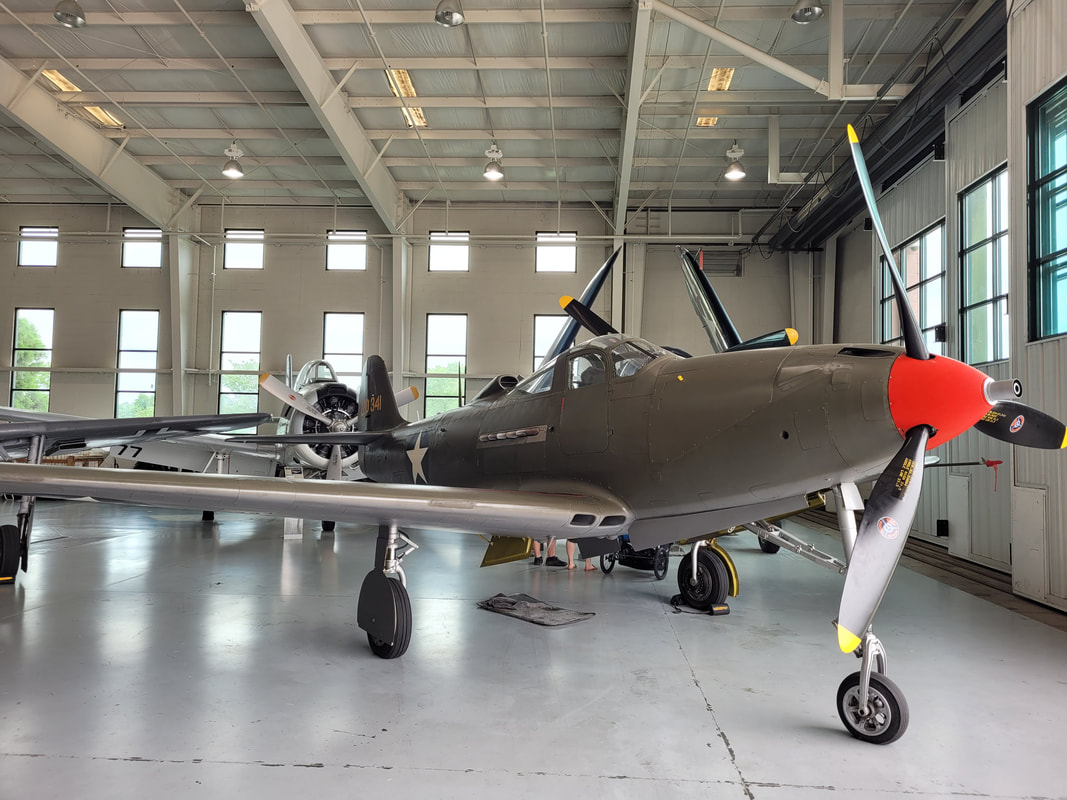 P-39 Aircobra fighter plane 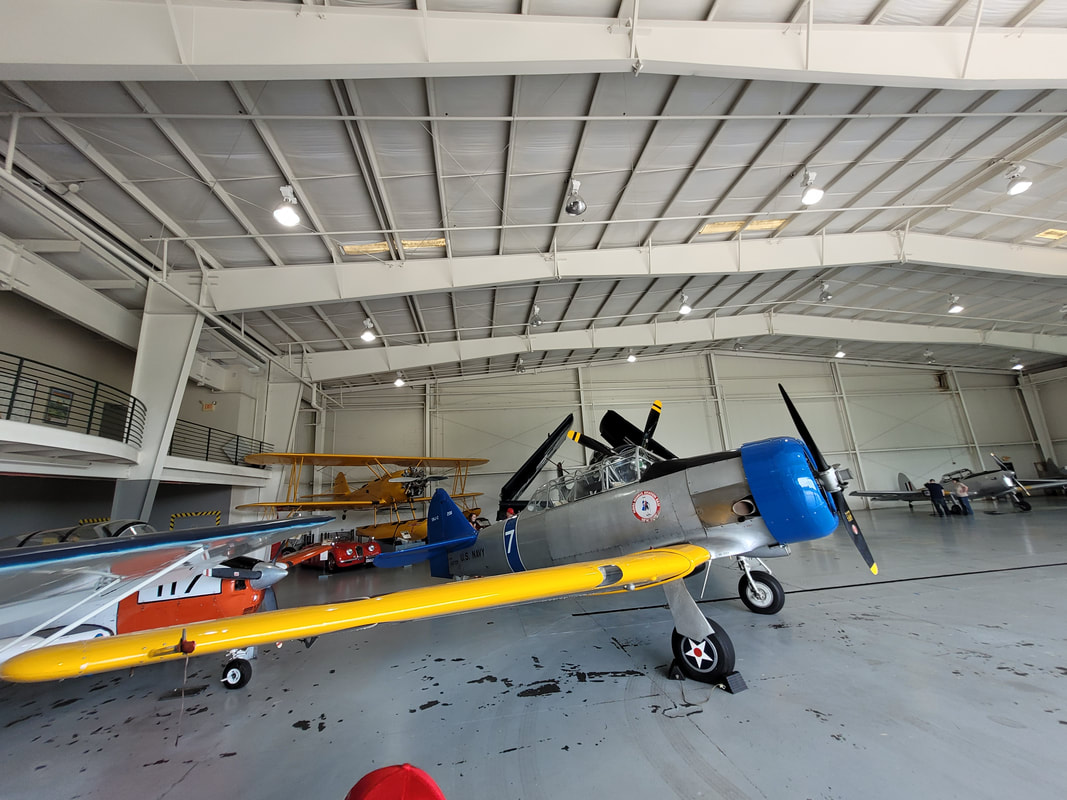 T-6 Texan trainer plane 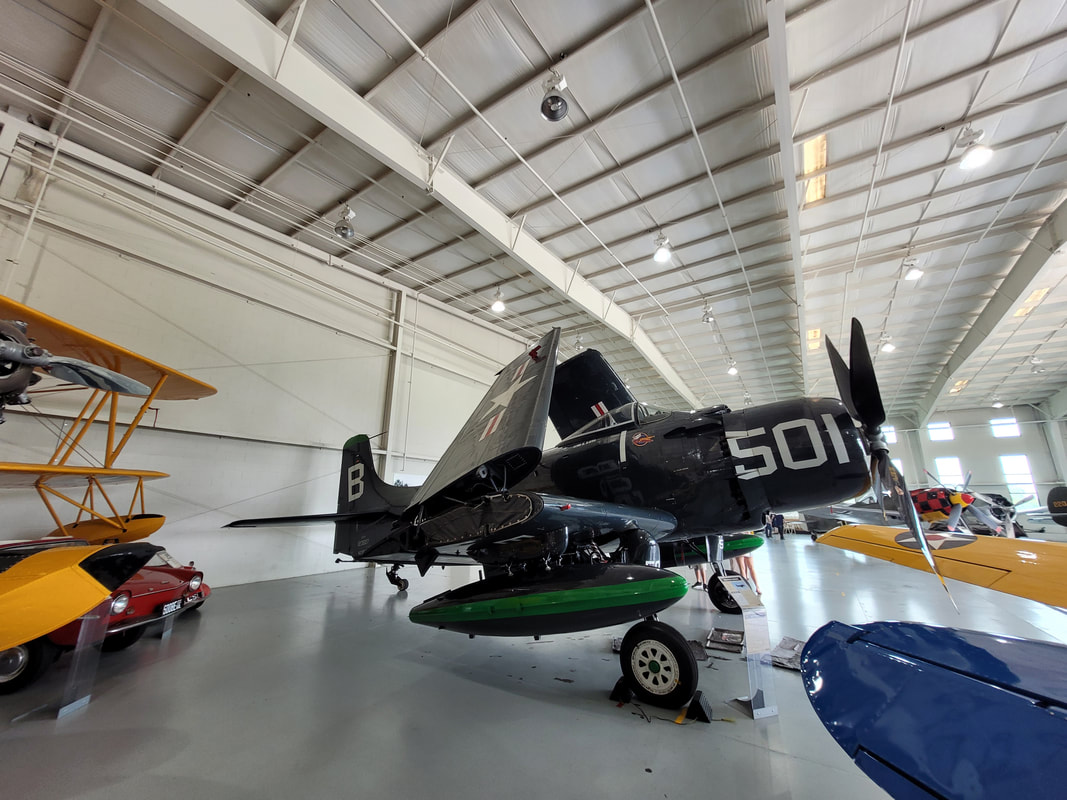 F6F Hellcat, carrier based fighter 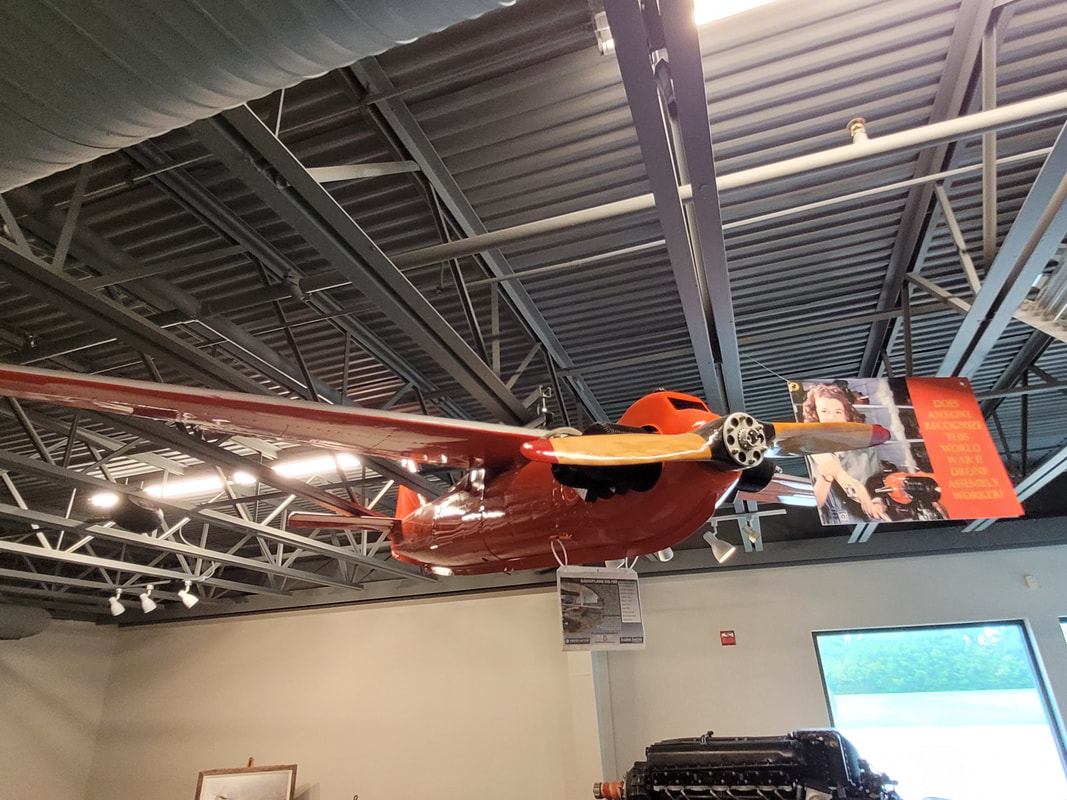 Target drone used for training fighter pilots. 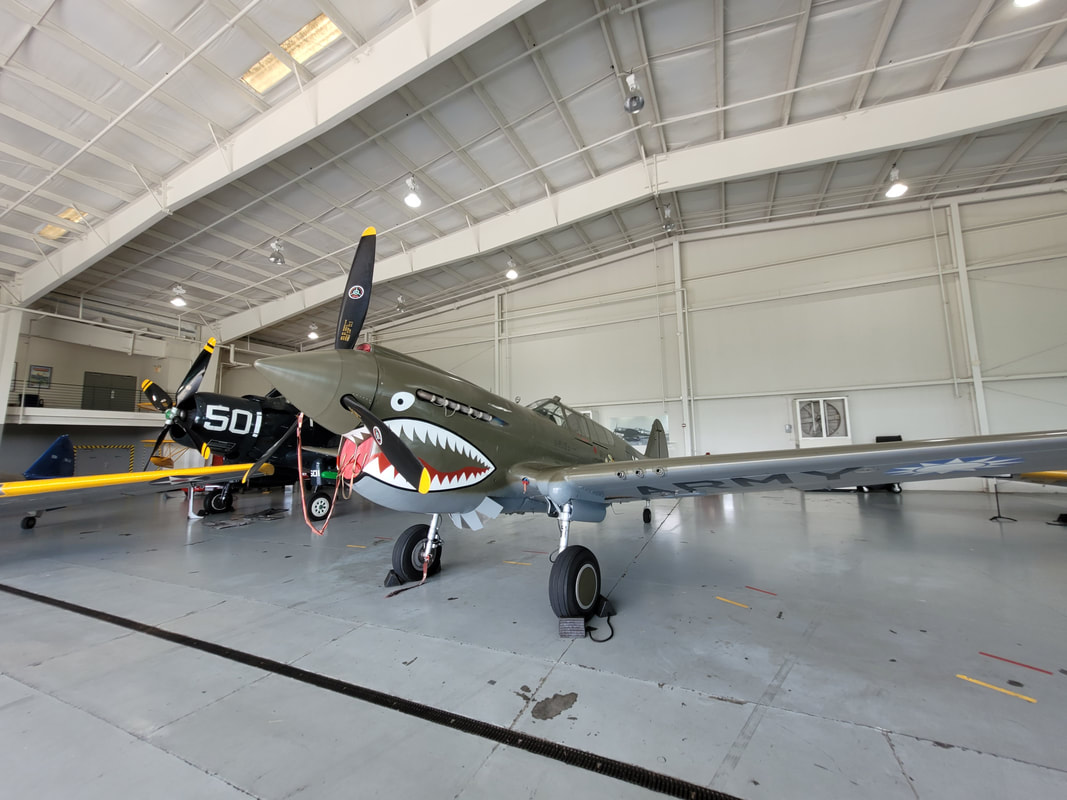 P-40 Warhawk fighter plane 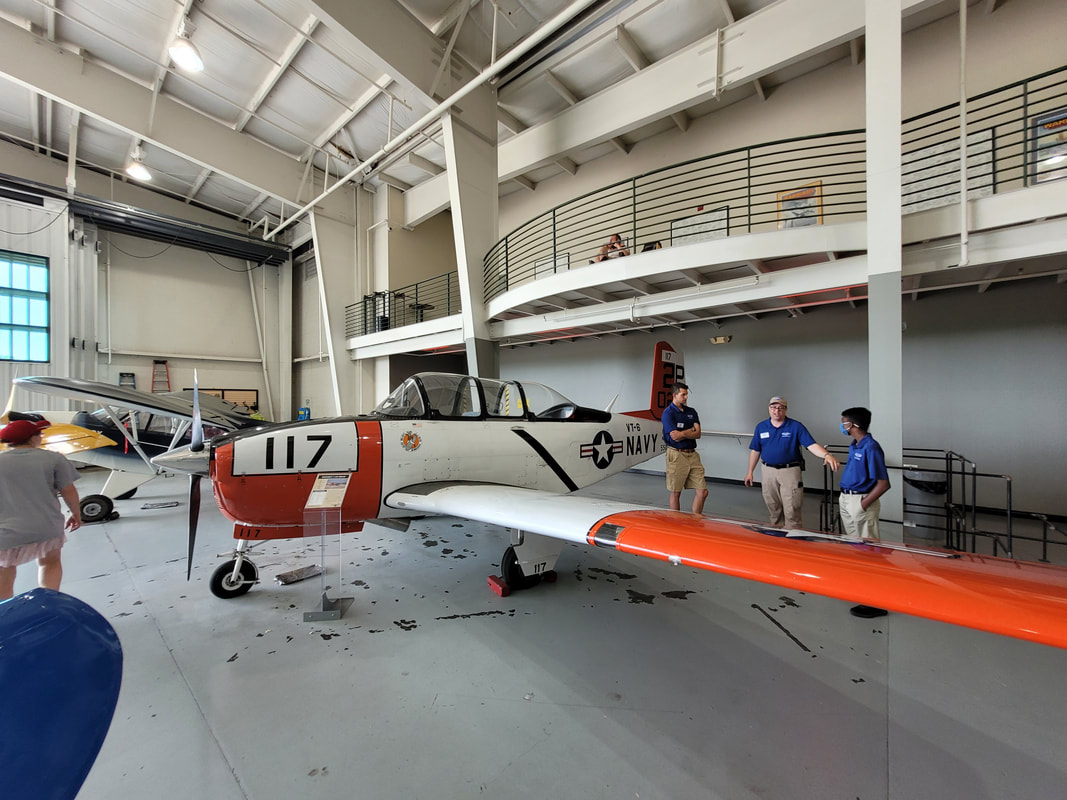 Another trainer plane 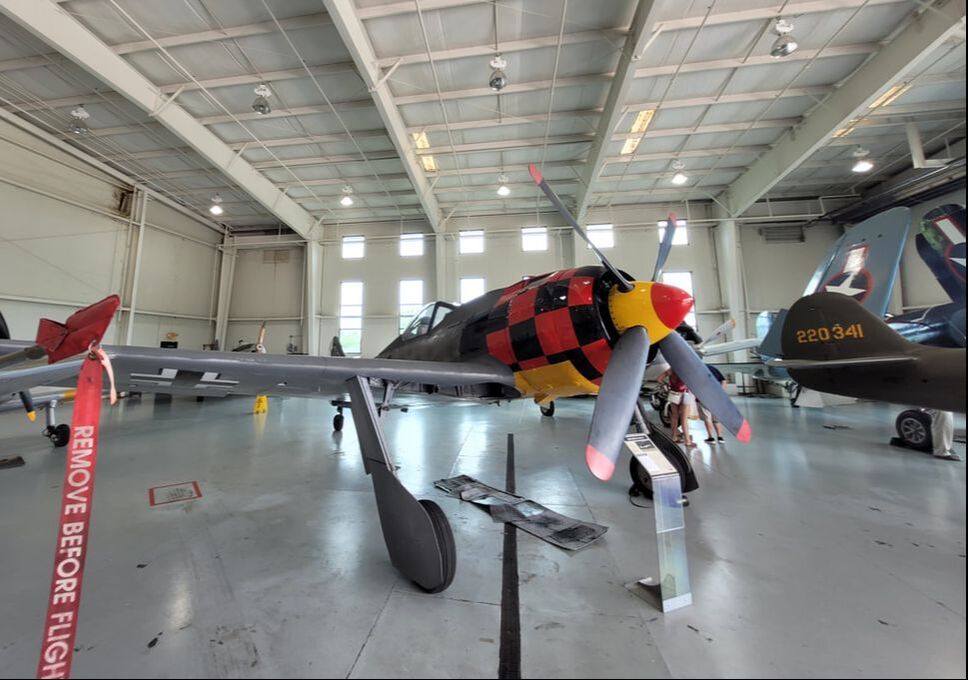 FW 190 German fighter plane 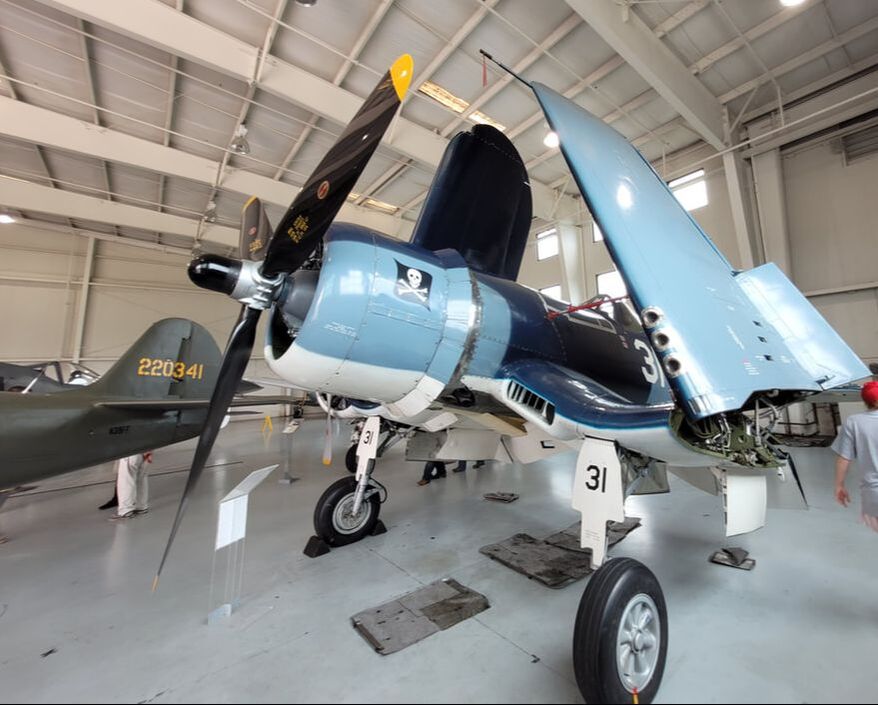 Corsair carrier based fighter, note folded up wings for storage below decks. 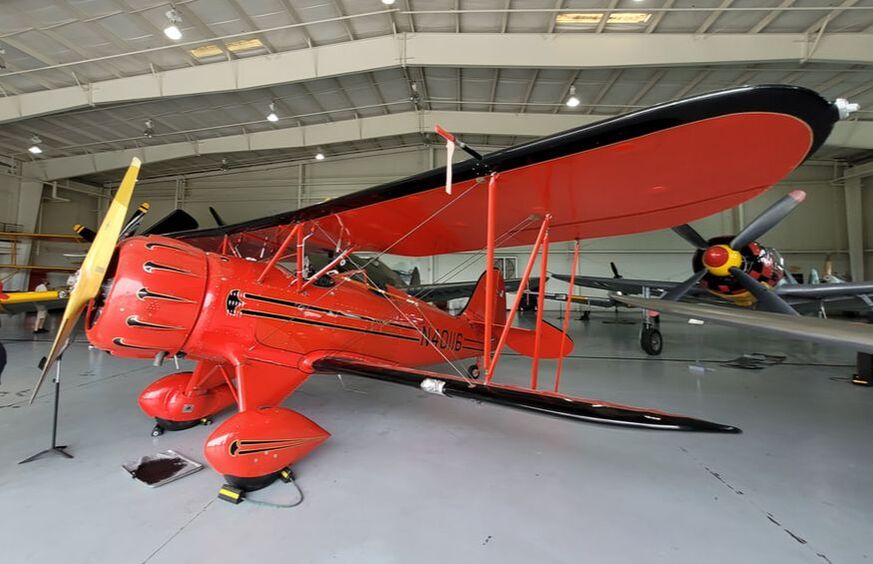 Waco UPF-7 trainer biplane 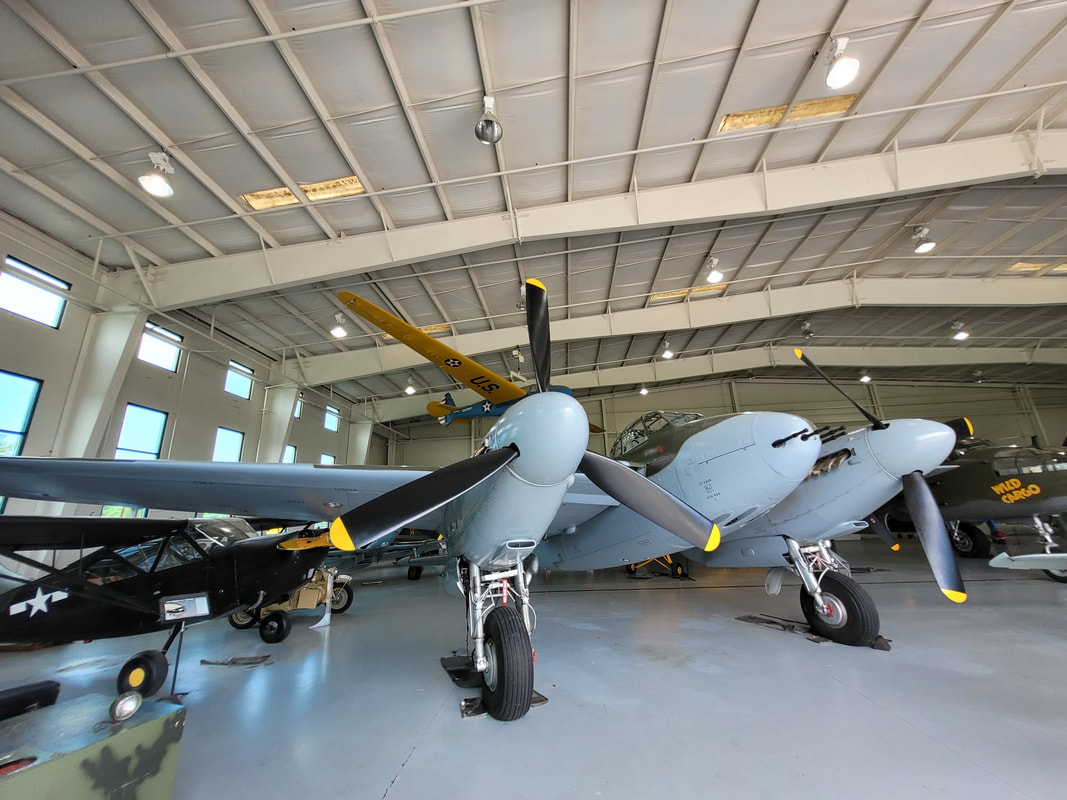 DeHavilland Mosquito, British multipurpose fighter/bomber, actually made of wood, nicknamed the "wooden wonder" 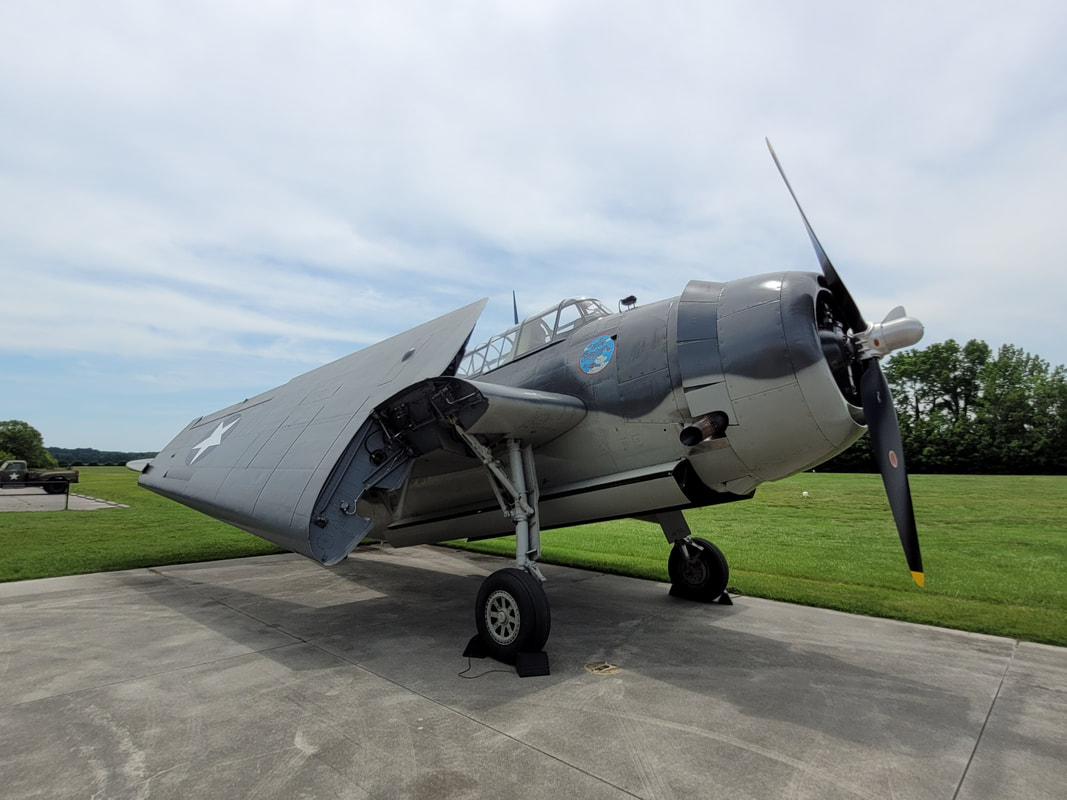 SBD Dauntless dive bomber 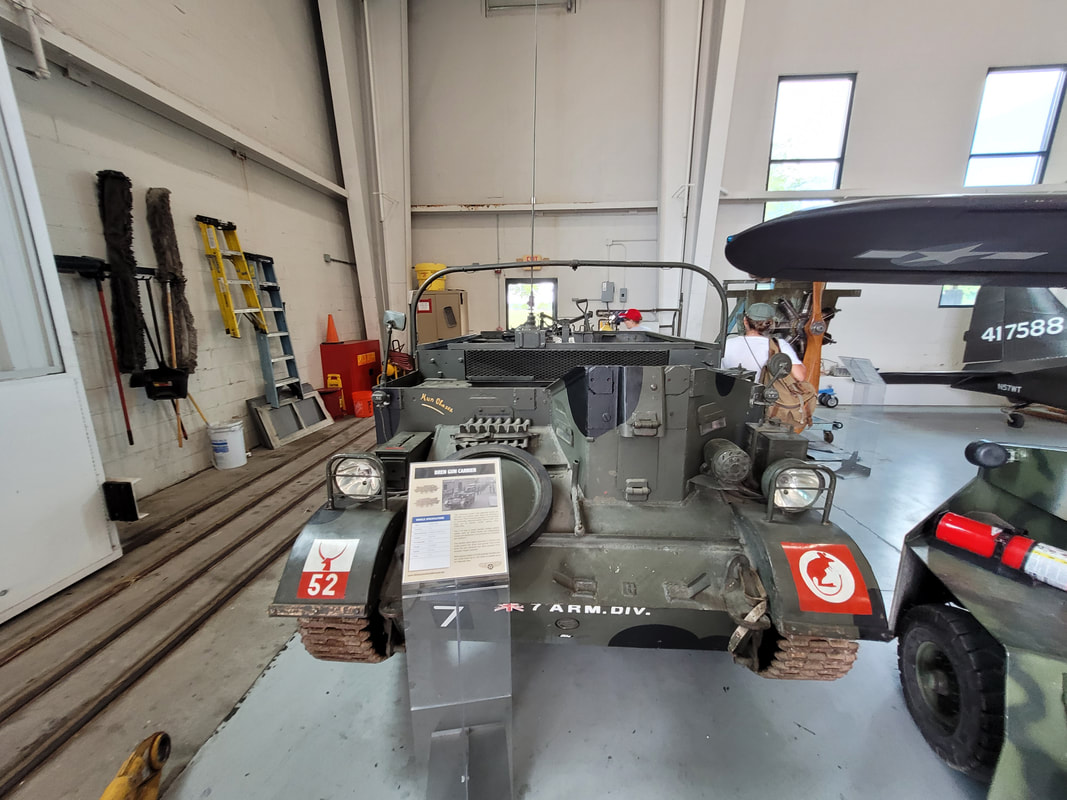 Light tracked support vehicle 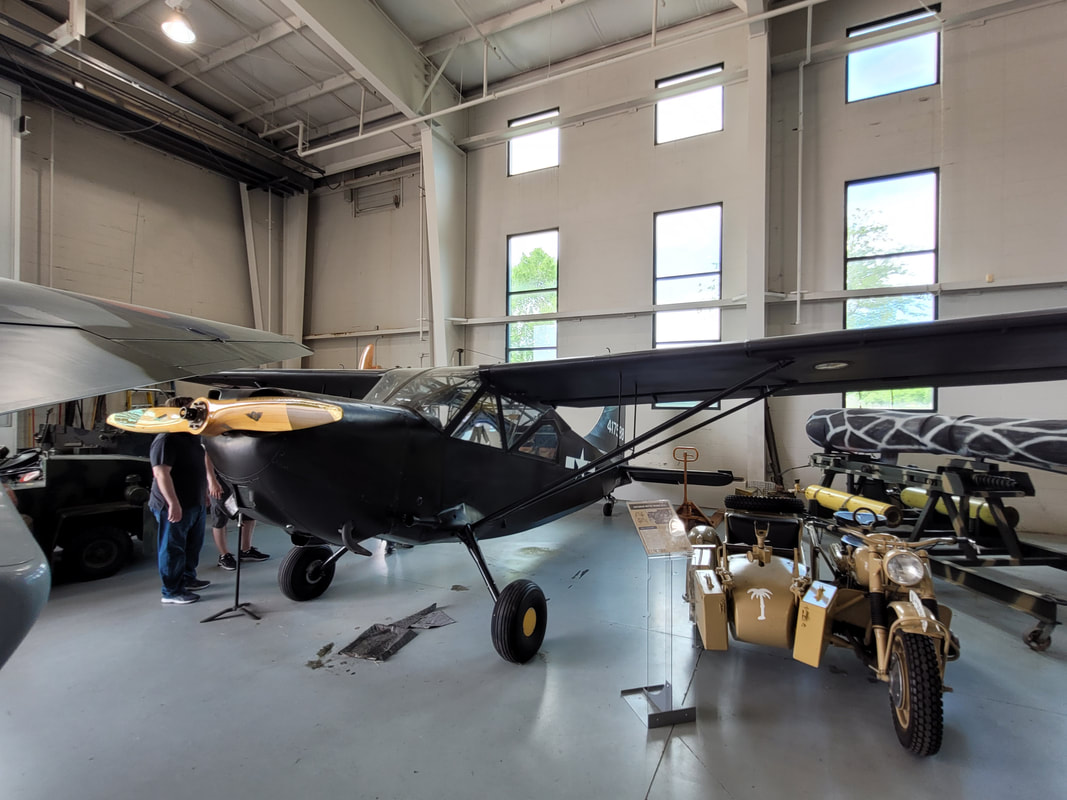 Light transport/trainer aircraft, didn't get the make/model 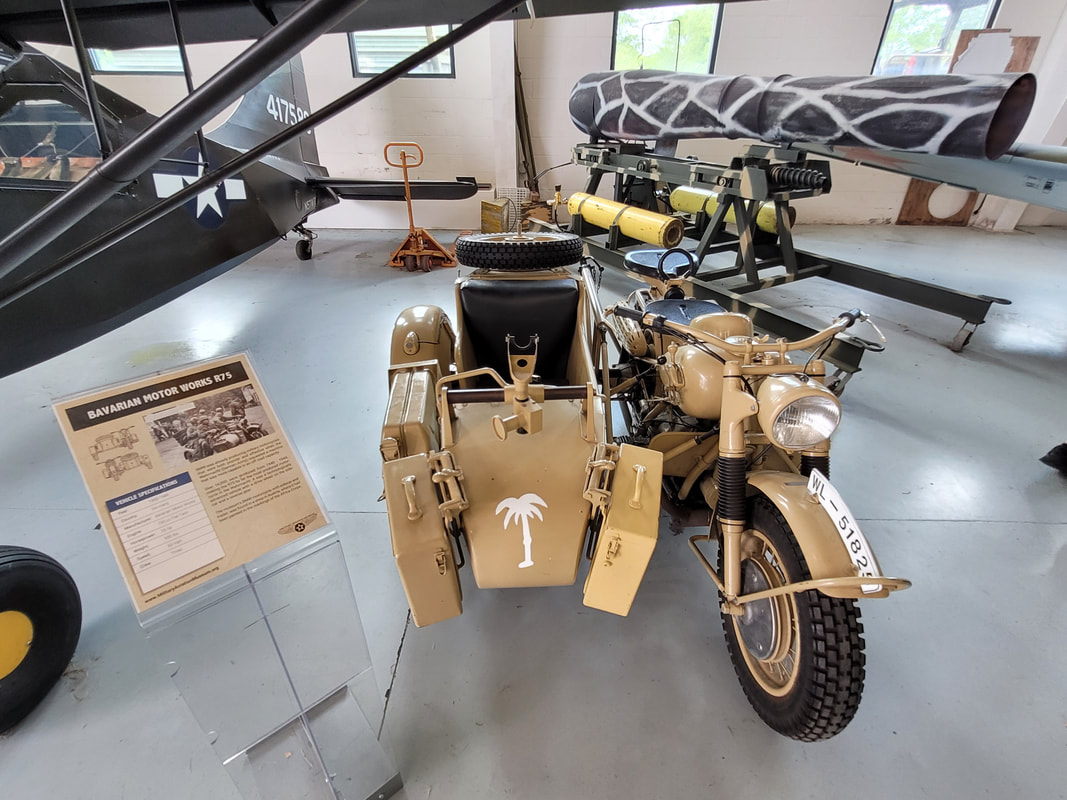 BMW motorcycle with side car.  Russian MiG-3 fighter/interceptor  P-63 King Cobra, US made, Russian used.  B-25 Mitchell multipurpose bomber 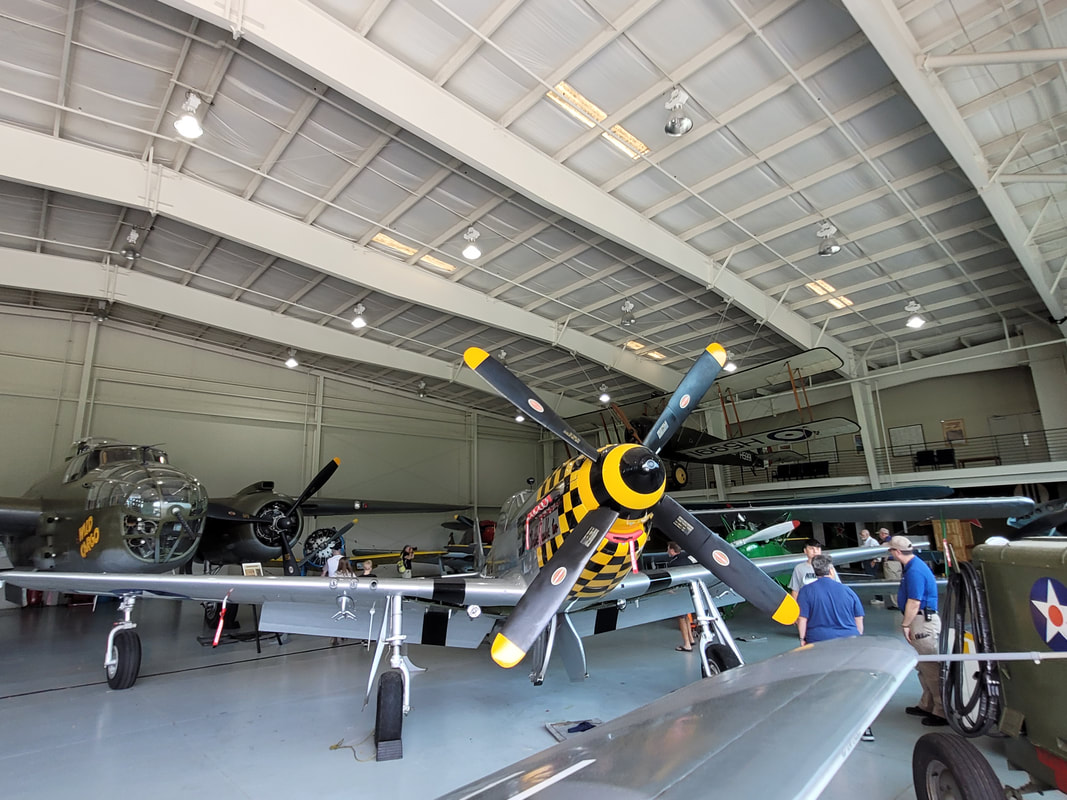 P-51 Mustang, fighter escort 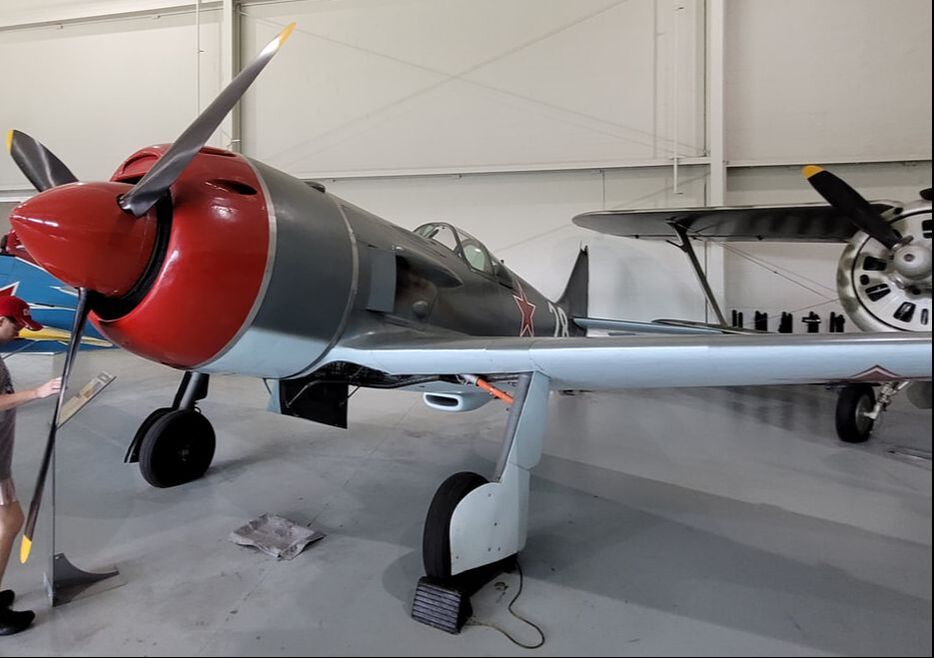 LA-5 Russian fighter 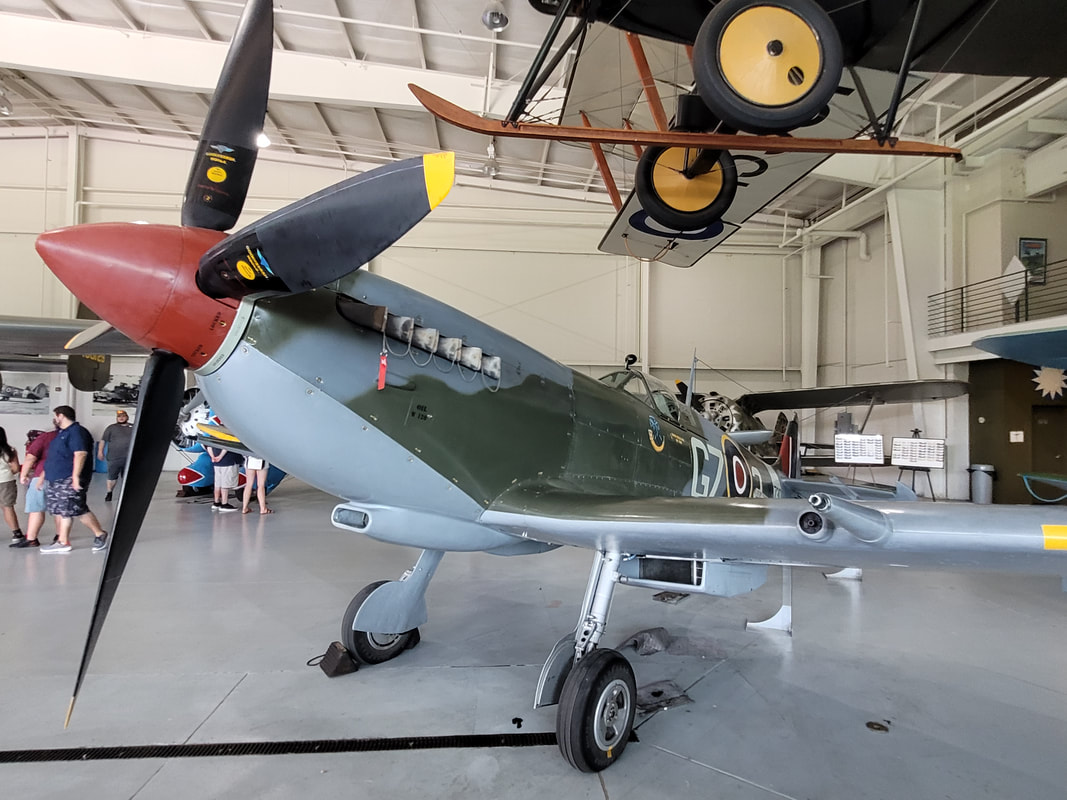 Supermarine Spitfire British fighter interceptor, another iconic plane. In the upper level of the hangar there were displays of things like uniforms from the time used by the different powers, radio equipment and other hardware, model displays of the different war machinery even some layouts of the naval battles of Midway and Coral Sea using micro models of the different ships of the Japanese and US navies in their positions during the battle. Picture paintings of different war scenes covered the walls. 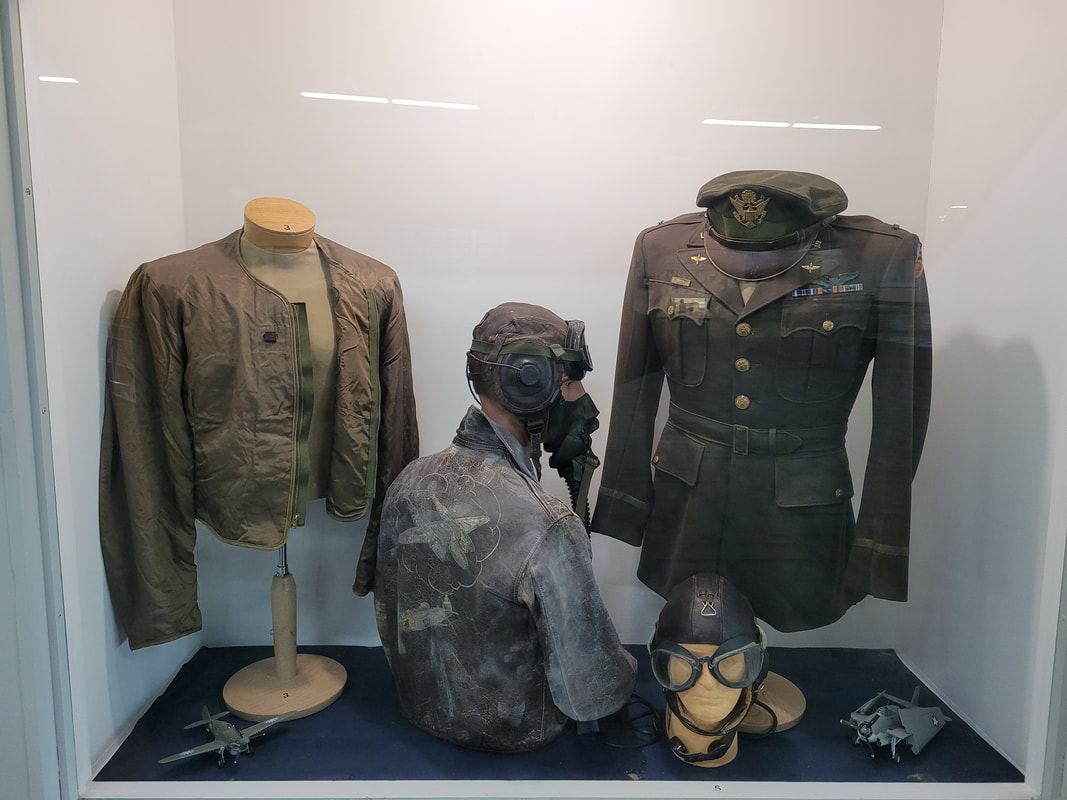 American clothing and gear, with a couple of model planes flanking the display. 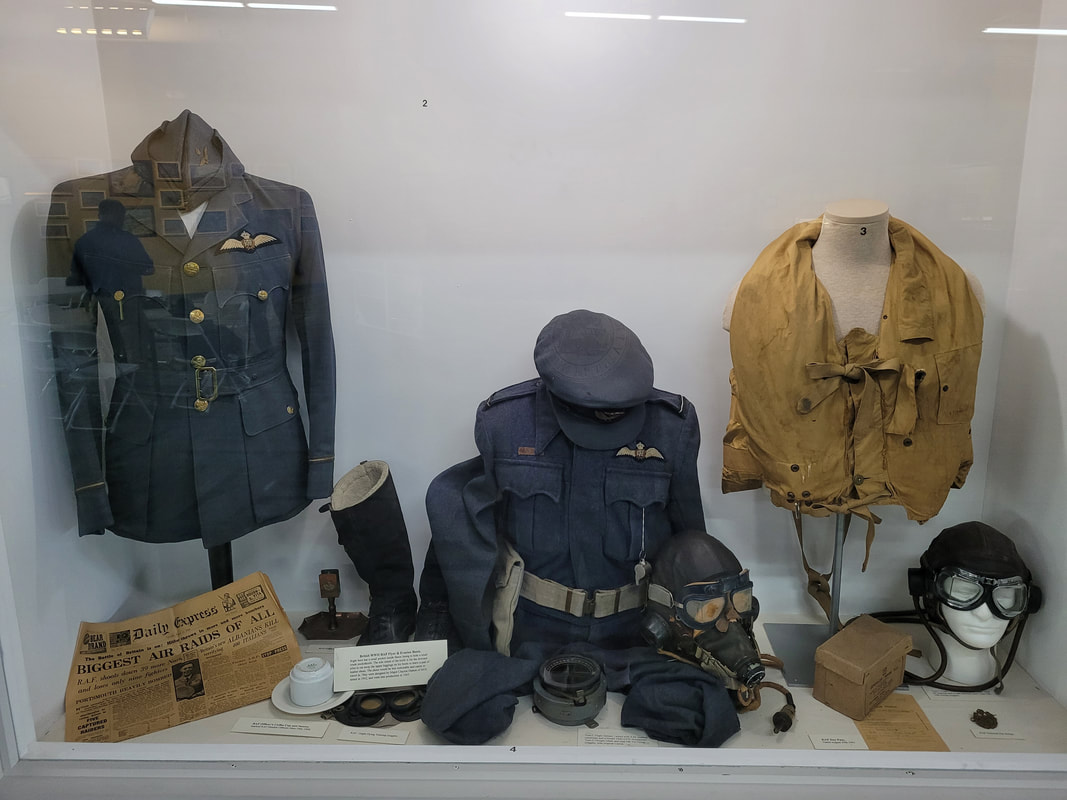 British clothing and gear. 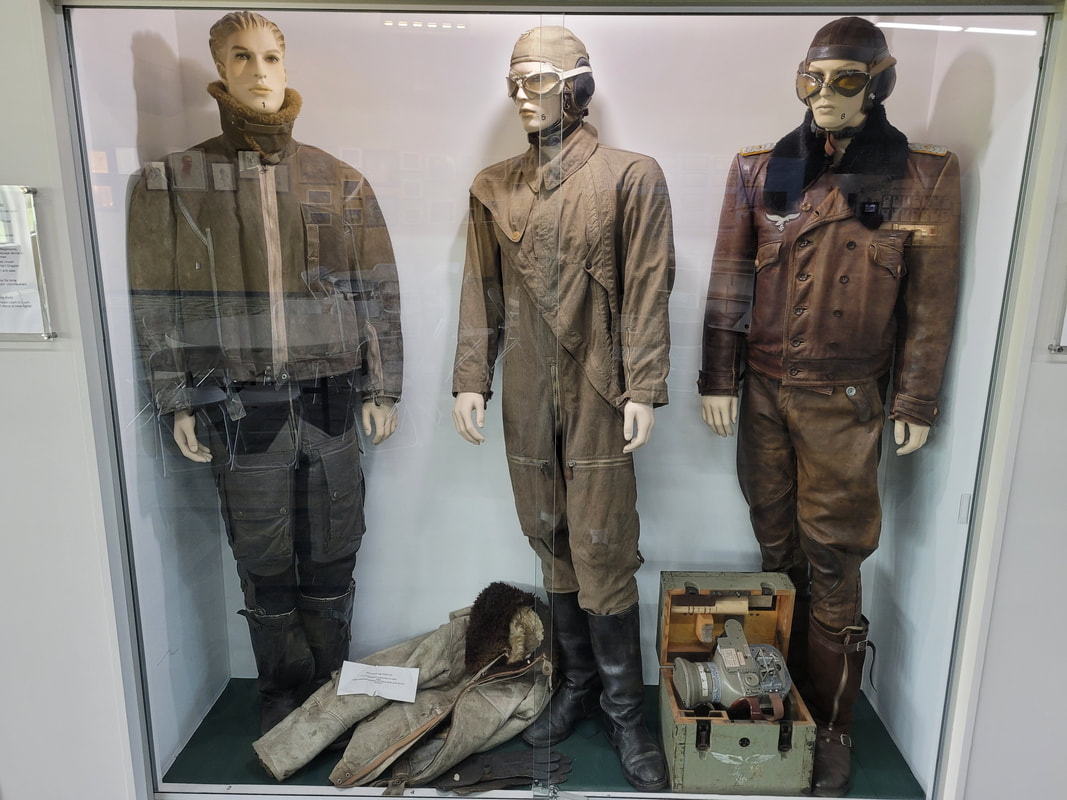 German flying gear  Radio equipment and other electronics from WW2 Moving on to the other hangar, which we ideally drove over to as it was a few hundred yards away from the main hangar, we got to see a series of different WW1 planes. Some are familiar from certain pilots who used them but for all intents, one would have to be a guru in WW1 aviation history to really identify many of these planes due to the simplicity of the designs compared to their WW2 counterparts. Most of these planes started off as simple recon planes then evolved to having pilots carrying side arms to fight other planes to planes having mounted machine guns. Technology had to advance to create hardware like interrupter gears for the propeller and the firing mechanism to keep the machine gun from being able to fire when the prop blade is in front of the barrel of the machine gun. Bombers went from pilots dropping grenades from planes to having purpose made bombs that were suspended under the bodies of the craft. WW1 was another period of technological advancement when it came to aviation technology. Kinda sad when wholesale murder is the catalyst for the human race to advance technologically. But that's another argument for a whole other venue. 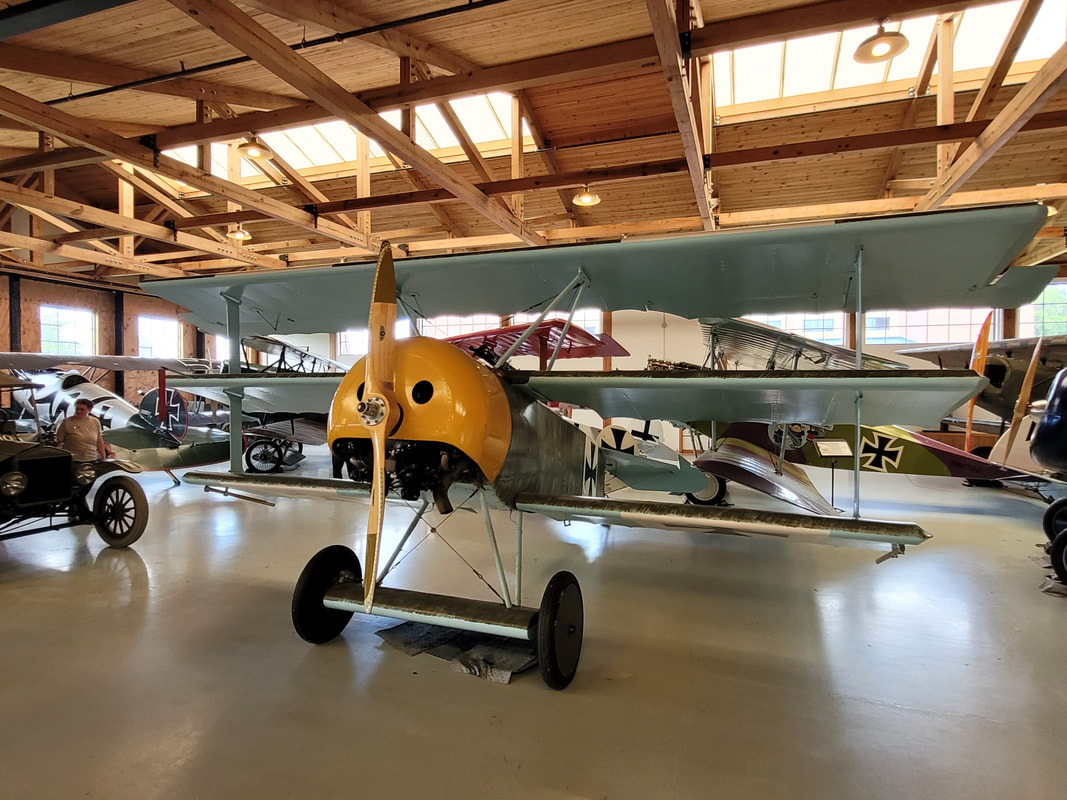 Fokker Triplane, famous for its use by the famed "Red Baron" of Germany. 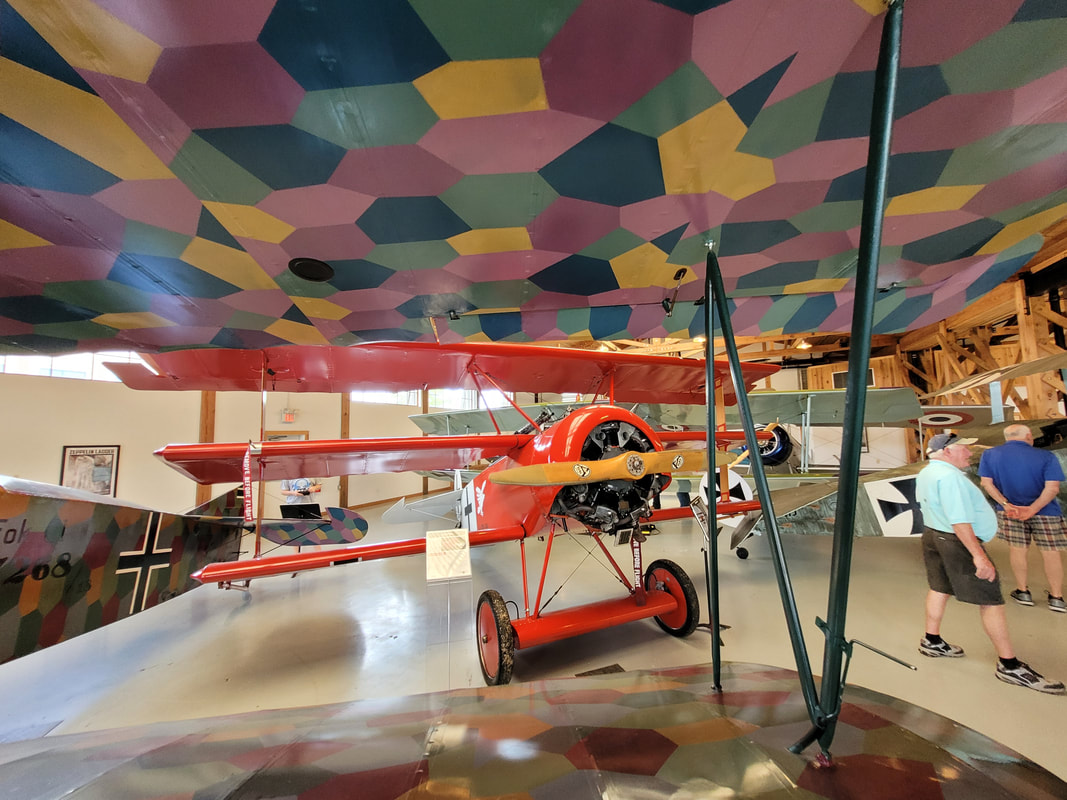 And speaking of the Red Baron.... 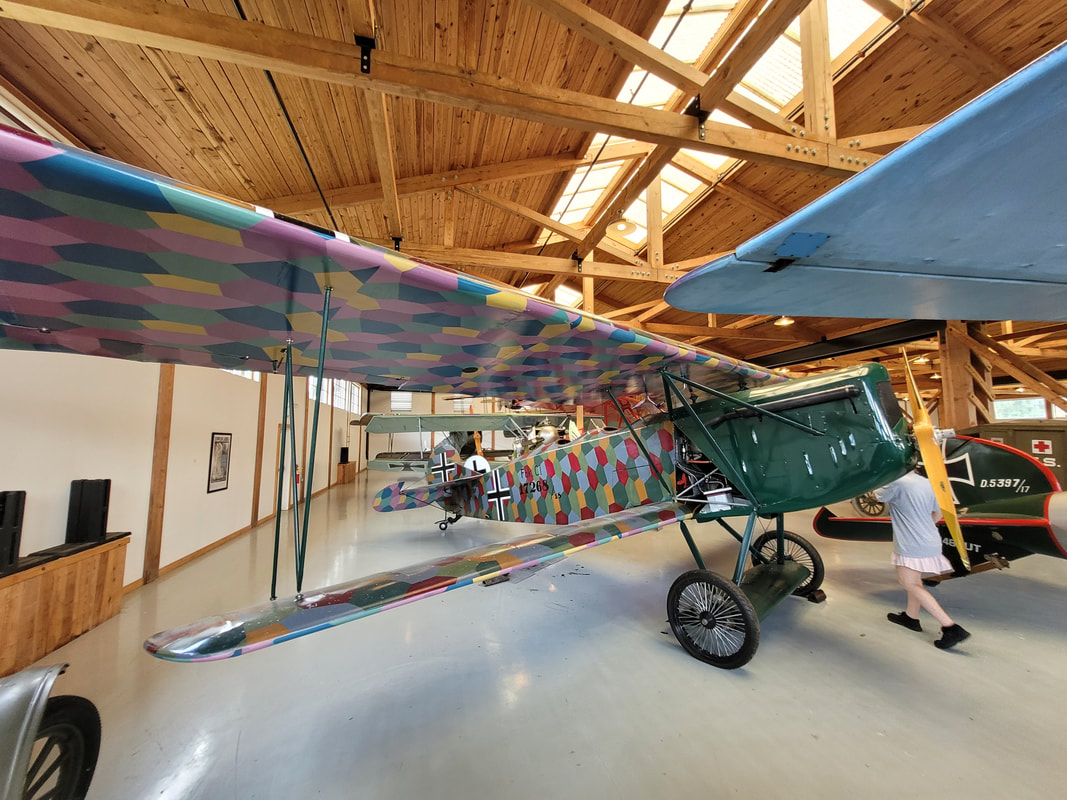 Another German craft, this time a typical biplane 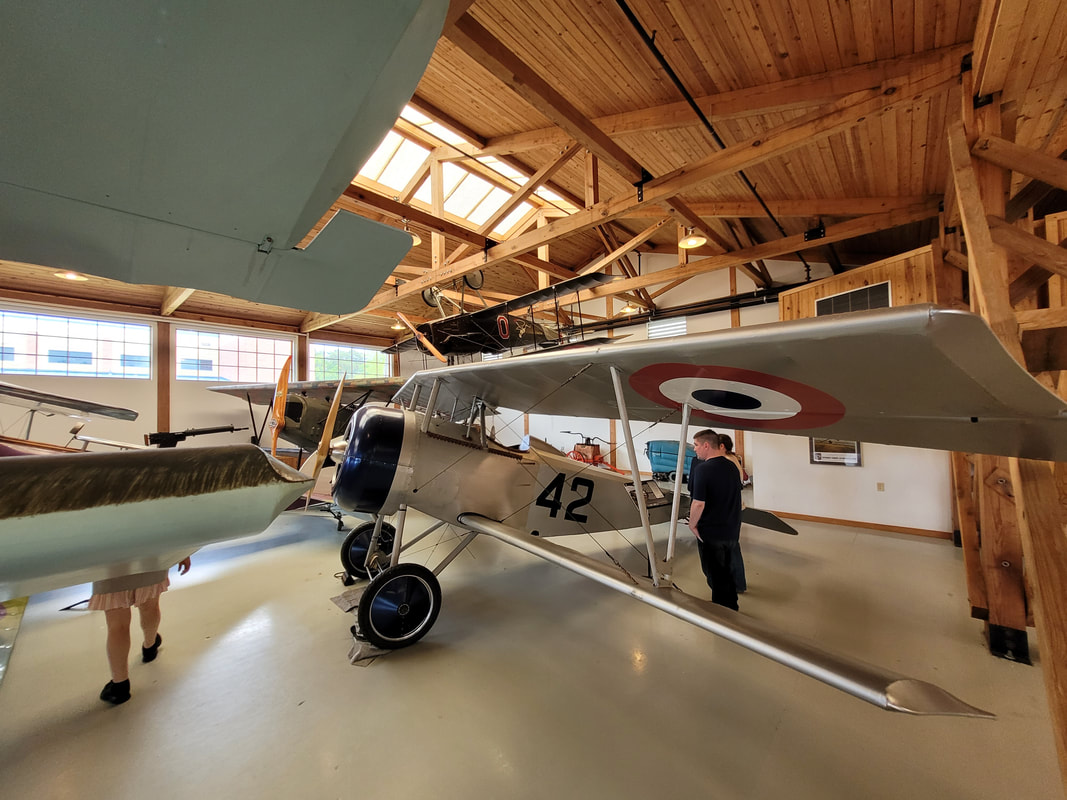 British biplane 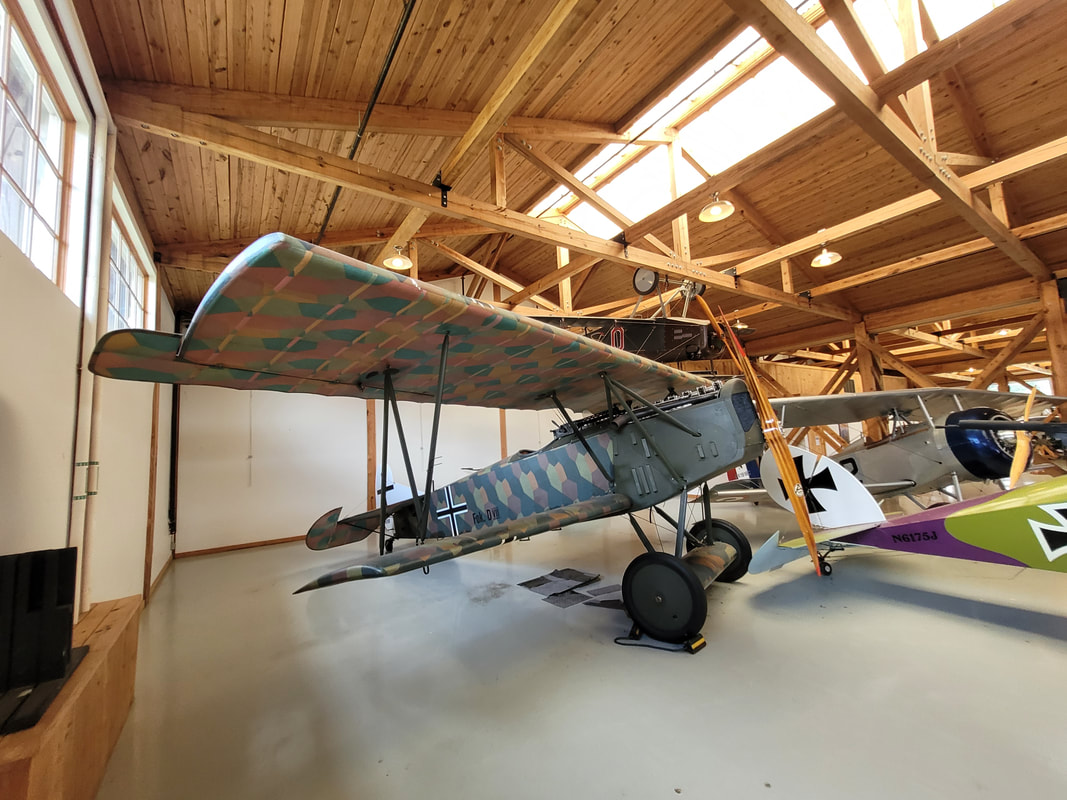 Another German biplane 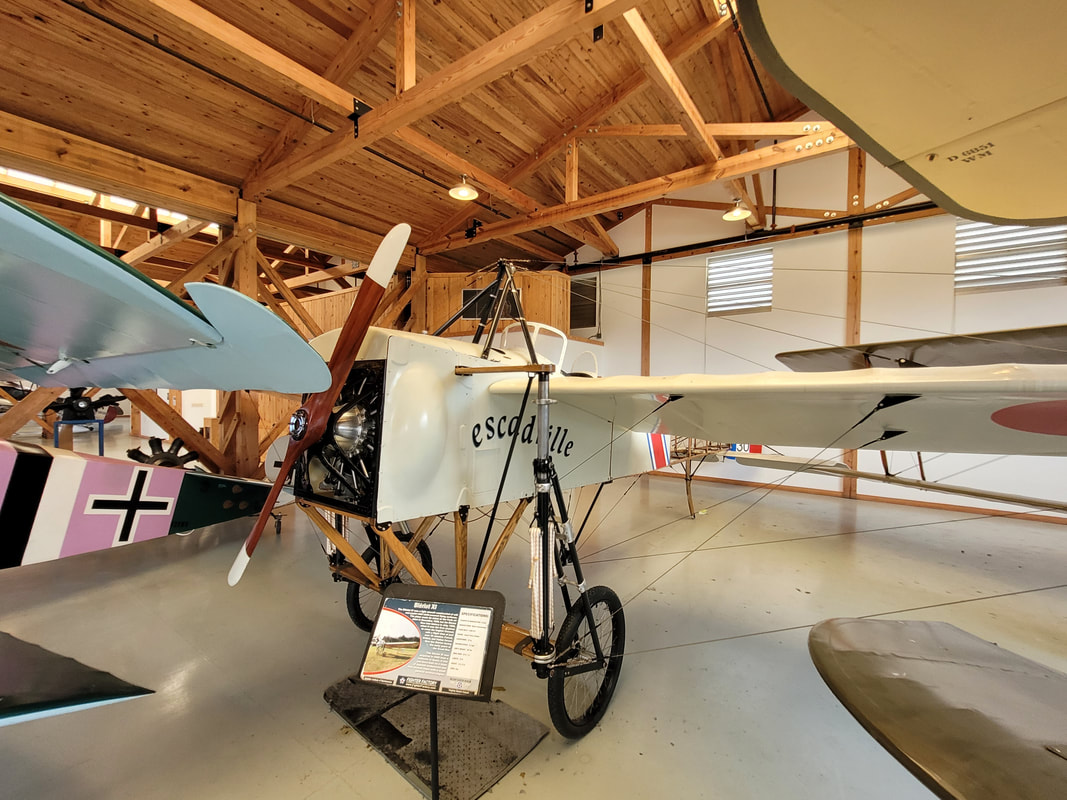 A French monoplane, more unique in a time of biplanes and triplanes, note the suspension cables all over the craft used to maintain rigidity.  Another French biplane, more solid design.  Another French plane note the sharp lines, aerodynamics wasn't really a factor in the overall design of these first fighter planes.  German monoplane, another advancement in the design and implementation of aeronautics. As can be seen, we had a chance to see up close and personal the planes that served our countries in war and fought to crush those who seek to oppress and take over the world. We even had a chance to check out workers starting up the SBD Dauntless and a sister carrier bomber that were both staged on the tarmac. That was an interesting sight watching them get the engine to turn over and watching it backfire and sputter to life in a cloud of smoke as the plane roared to life. They lowered the wings into takeoff position then drove the planes a short distance along the runway to demonstrate how pre-flight checks and prep would've went down with these planes. That was pretty cool watching these 80 year old planes come to life. But now it was time to leave this cool place and move on to this petting zoo/farm we found. This facility is actually located in the middle of town, with townhouses and apartment complexes among other housing and businesses. It is a regular city for all intents and a busier city at that, the farm is right smack in the middle of all this urban/suburban sprawl. Anyway, the complex has some small buildings that serve as souvenir/refreshment shops before you go to the admission booth at the gate to the farm. There's a barn building that serves as a event hall for weddings or other large gathering events that can be rented out. The farm consists of several pens with different animals, a large chicken run/coop area with 12ft high fences to keep birds from flying out and a large apiary with small tropical birds that you can feed with little bird seed sticks.  Chickens and guineas in a large coop/run area where you can enter to interact with the birds. Some will let you pick them up too. 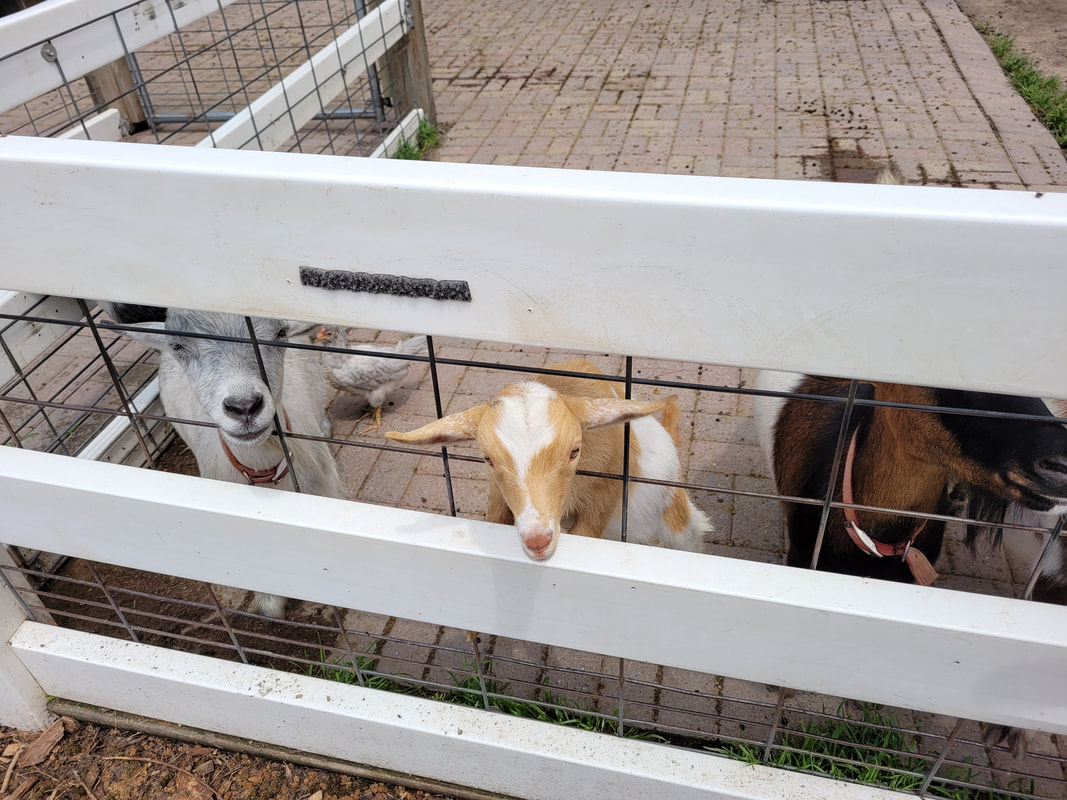 A trio of begging goats waiting for a handout. 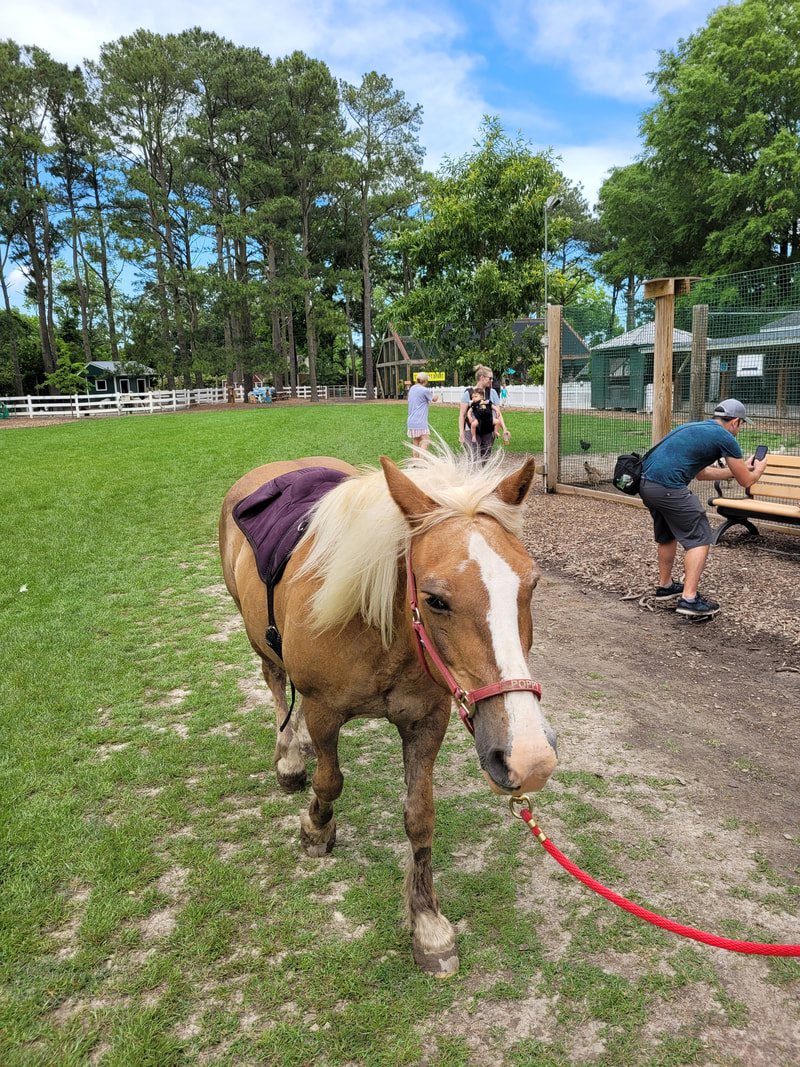 A pony that can be ridden by kids being walked around. 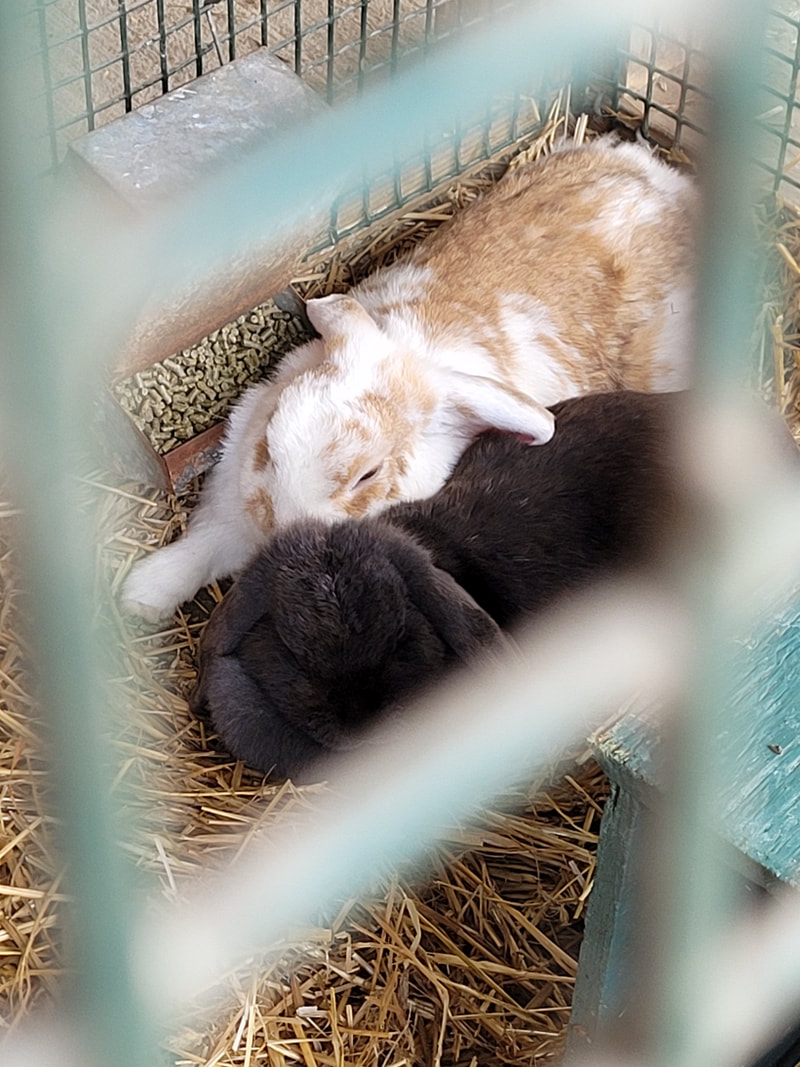 A couple of fat bunnies napping in their pen. The farm also has a garden area that incorporates raised beds, much like what we had set up here. The only difference is all of the walkways are covered up so there's no concern with grass/weeds choking out walkways or encircling the raised beds, its a nice and neat layout that allows for growing a fair amount of veggies.  Raised bed gardens made with large timbers, note the gravel walkways all around. 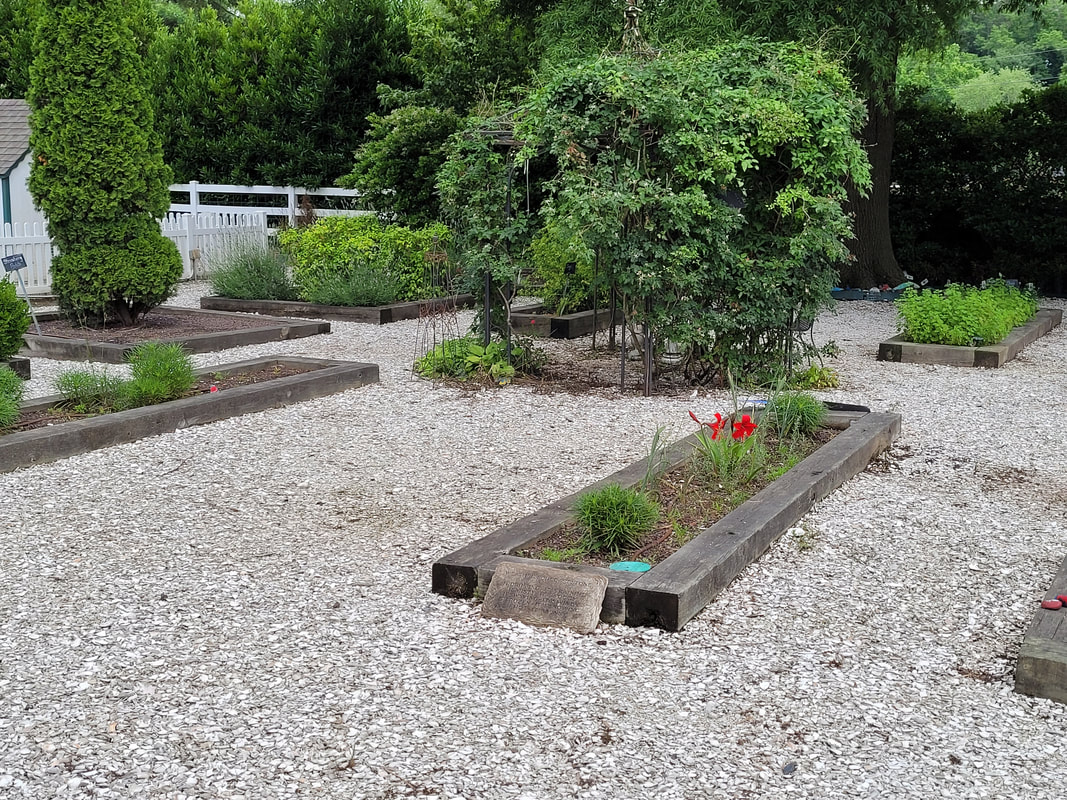 More raised timber beds, note the spacing making things pretty easy to maneuver wagons or any other equipment for work in the garden. Of course as part of the experience the staff sell souvenir cups full of animal feed that you can use to entice the animals who will willingly come to you as they are getting fed constantly. Its really a helluva hustle since they make money off the selling of animal feed they have to buy anyway so its like they're getting the animal feed for free in the end, and you have the privilege of paying them to feed their animals! But nah, its all good though, its one of those things that's fun to experience if you don't have farm animals or have never really seen them up close and personal. There's different goats, llamas, ducks and geese. some pigs, rabbits, pea fowl, and of course the horses. All of which are hungry.  A couple of oinkers in the mud  Begging ass goat and llama  More beggars 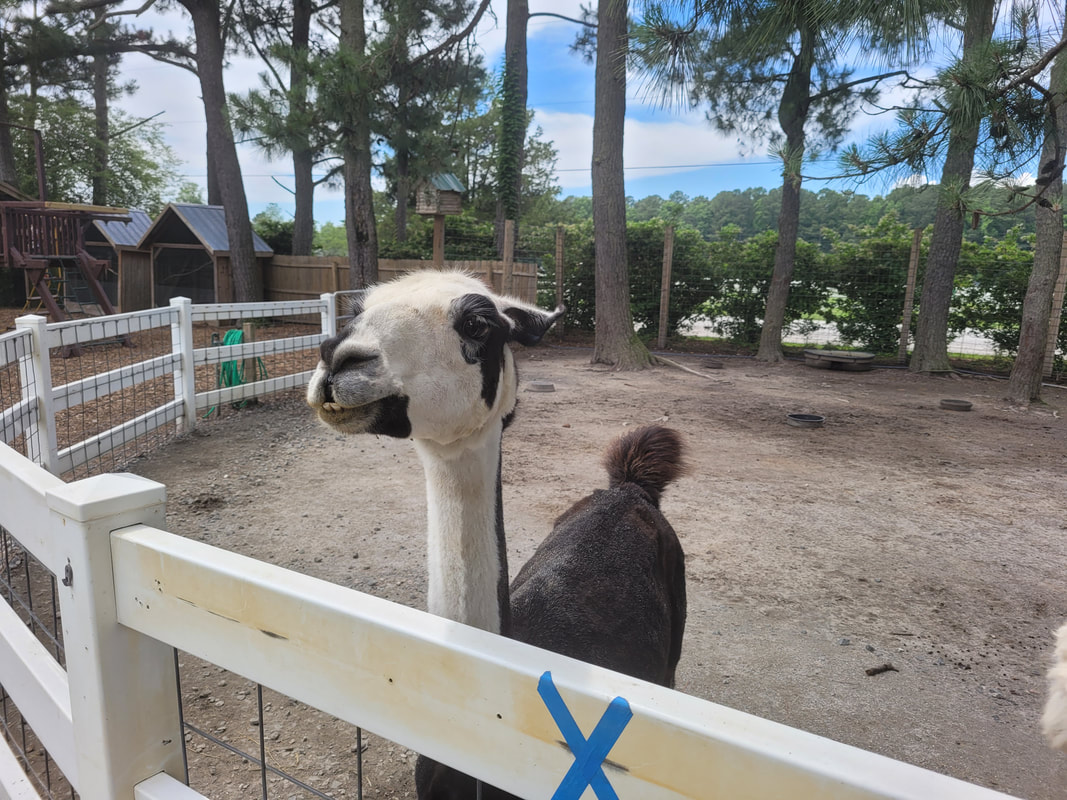 Posing... 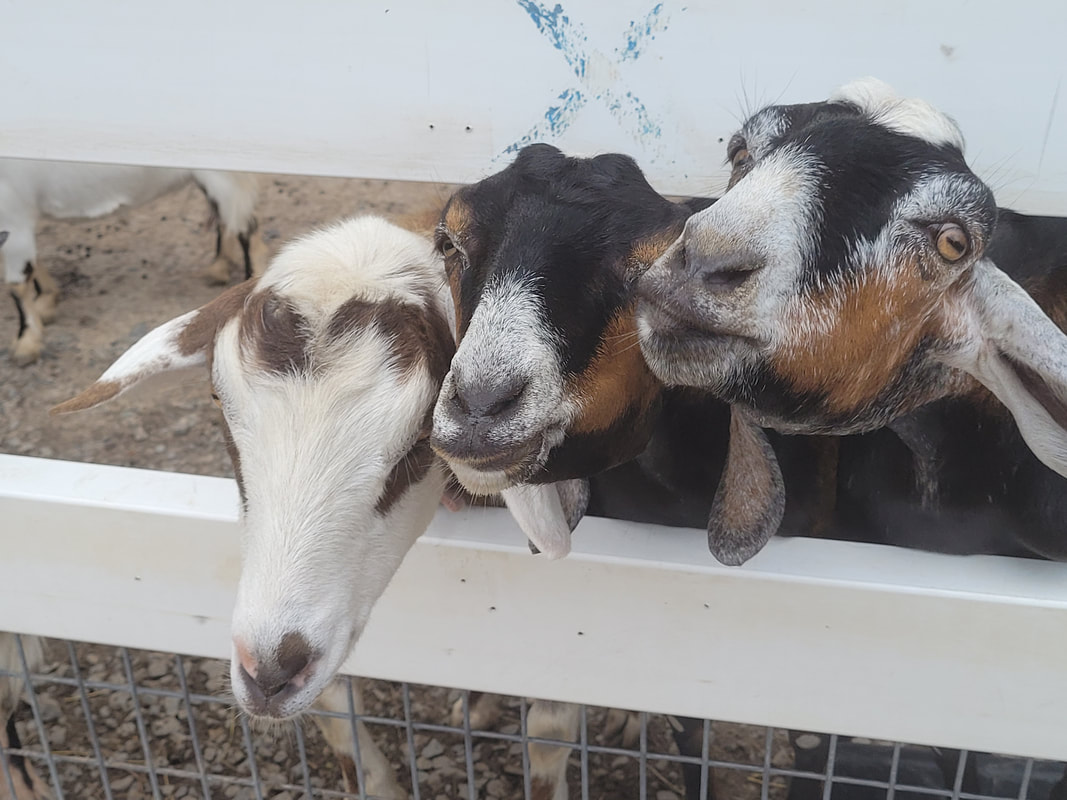 The Three Stooges The facilities for the other birds are actually impressive. The structures are large enough that they could serve as small houses due to the high enough roof and width to accommodate a good number of birds while allowing caretakers the ability to comfortably walk inside and service the pens. There's foliage inside the pens that the birds can use along with some decorative rocks and mulch that allows the birds a comfortable secure facility where they would never have to come out to be able to "free range" since they can really free range within the enclosed pens. The apiary consists of small tropical birds, like the ones you'd find in a pet store. The structure is like the last pen except larger with higher ceilings. It's made specifically for the small flying birds so it has a few trees within and is set up to mimic a small piece of jungle or rain forest. This is mainly an attraction versus being a productive part of the farm however. 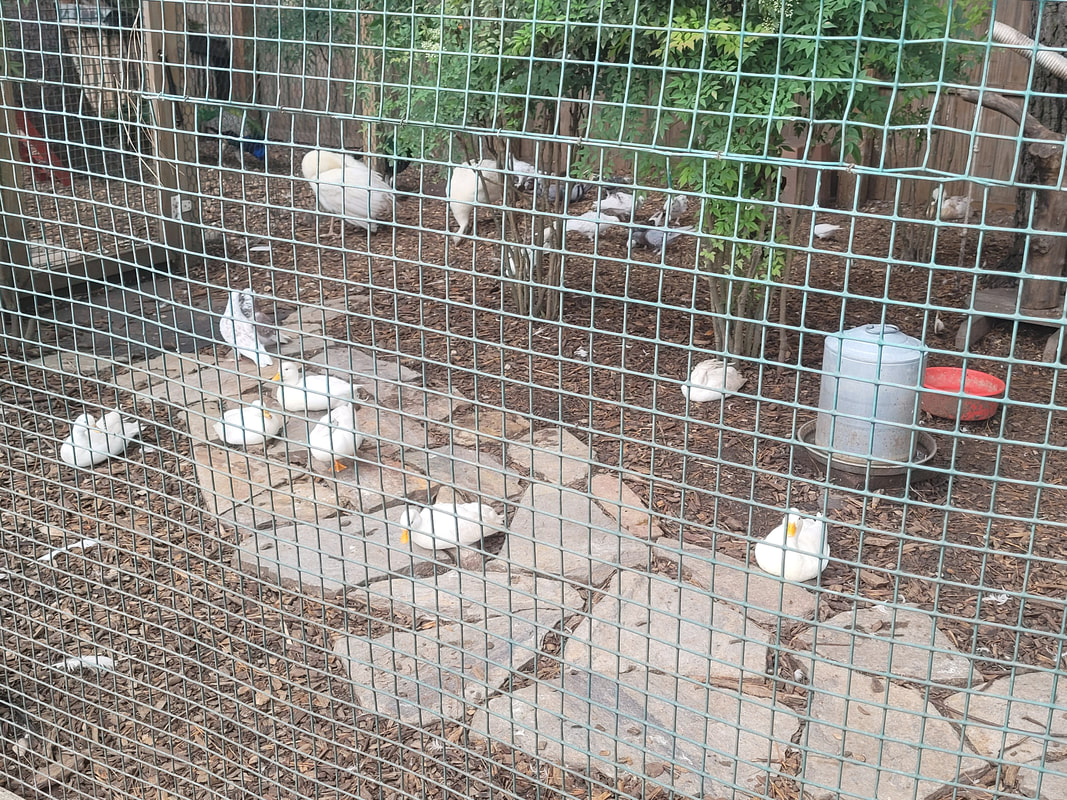 Ducks inside pen chillin on walkway rocks and mulch. 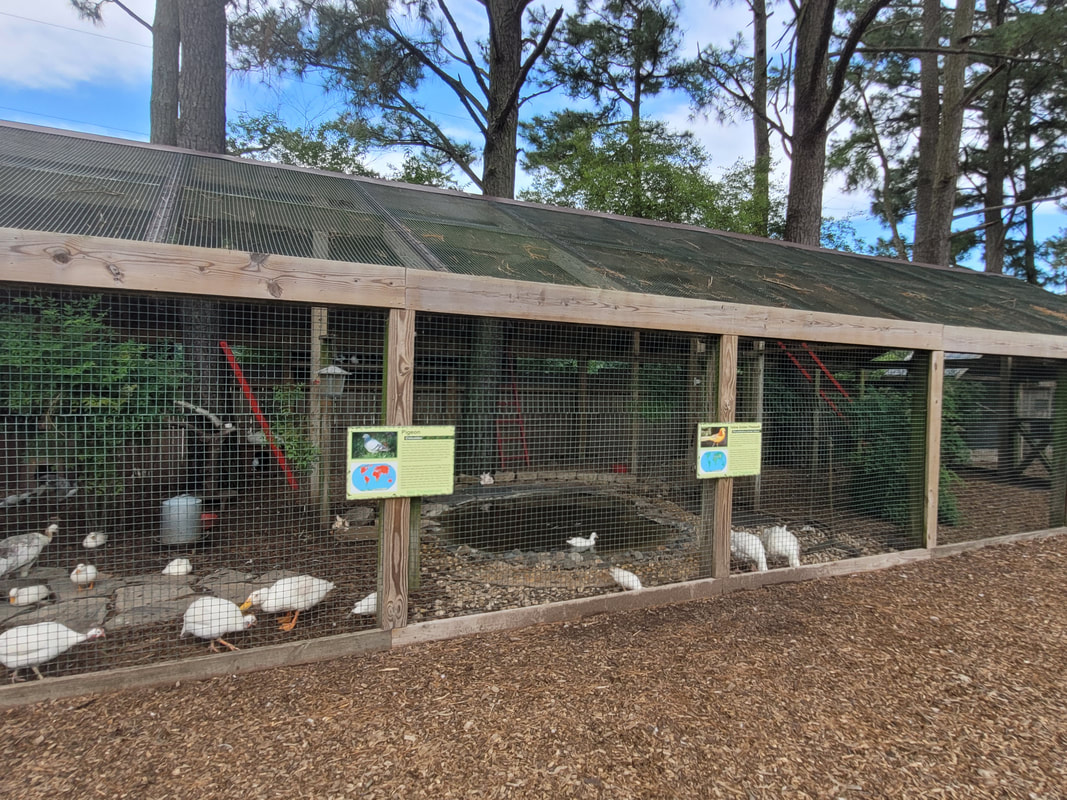 Pen set up with pool and plants for birds. Note chicken wire on roof and sides. Also note the amount of room available. 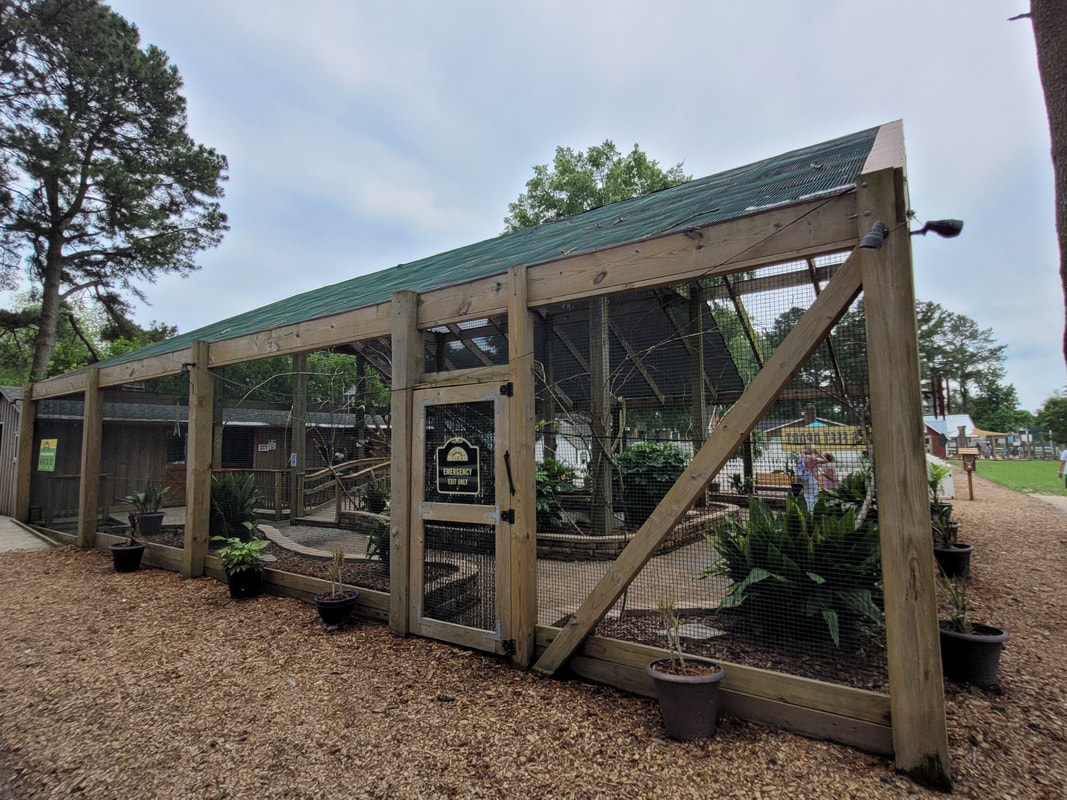 The apiary, note the size of it compared to the other bird pen. 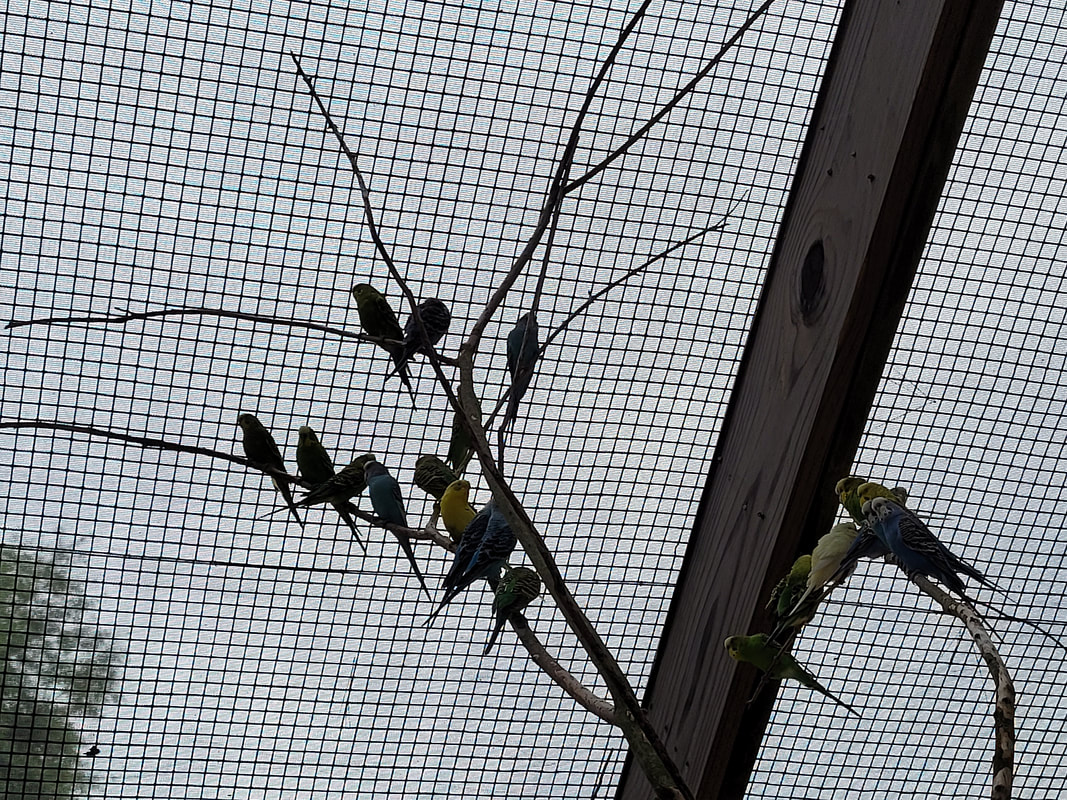 Small birds in tree inside apiary. 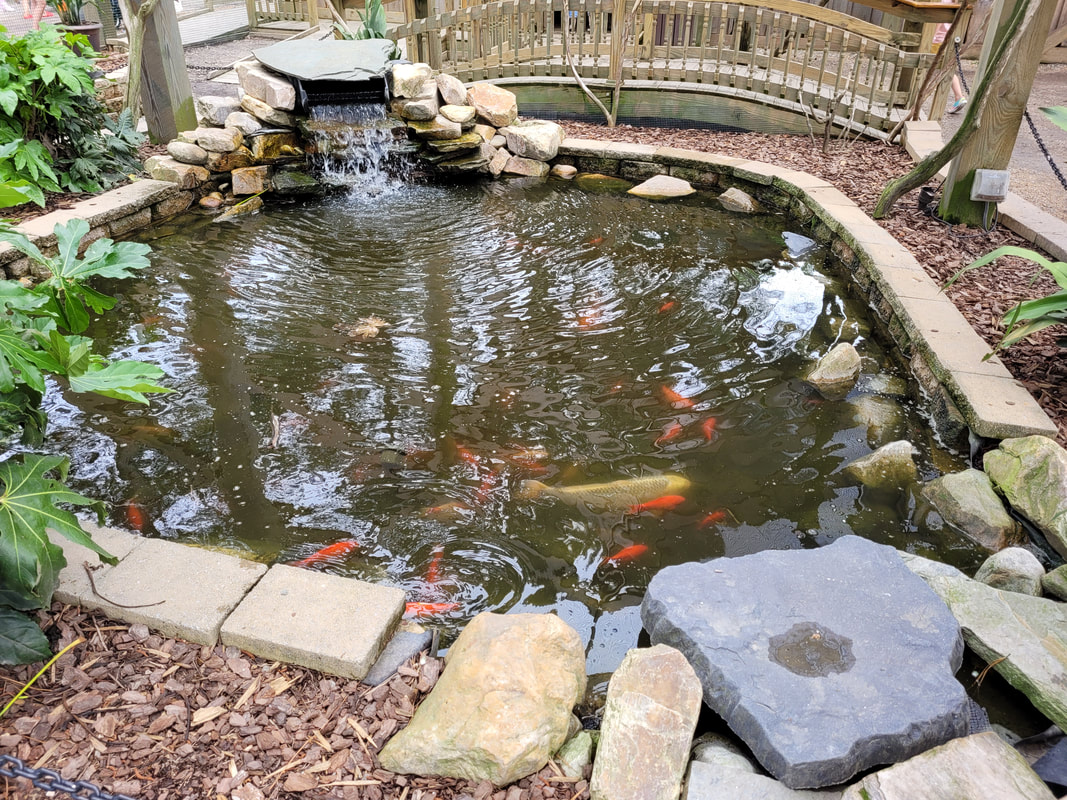 Koi pond within apiary. Note how its all set up. The last part of the farm was another thing that was strictly an attraction versus a productive part of the farm. This was a tree top network that consisted of several treehouses that had bridges spanning between the trees, connecting the different treetop platforms. It was another little attraction for kids to enjoy where they can be high above ground going from tree to tree. The tree houses were nicely built and the walkways were safe and sturdy rope setups that were more than capable of holding my weight. We went in and navigated the network of rope bridges and went from treehouse to treehouse. It was pretty cool and I was mainly admiring the workmanship of the whole thing. Almost makes me wanna build a treehouse and the connecting bridge for it and another platform or treehouse. 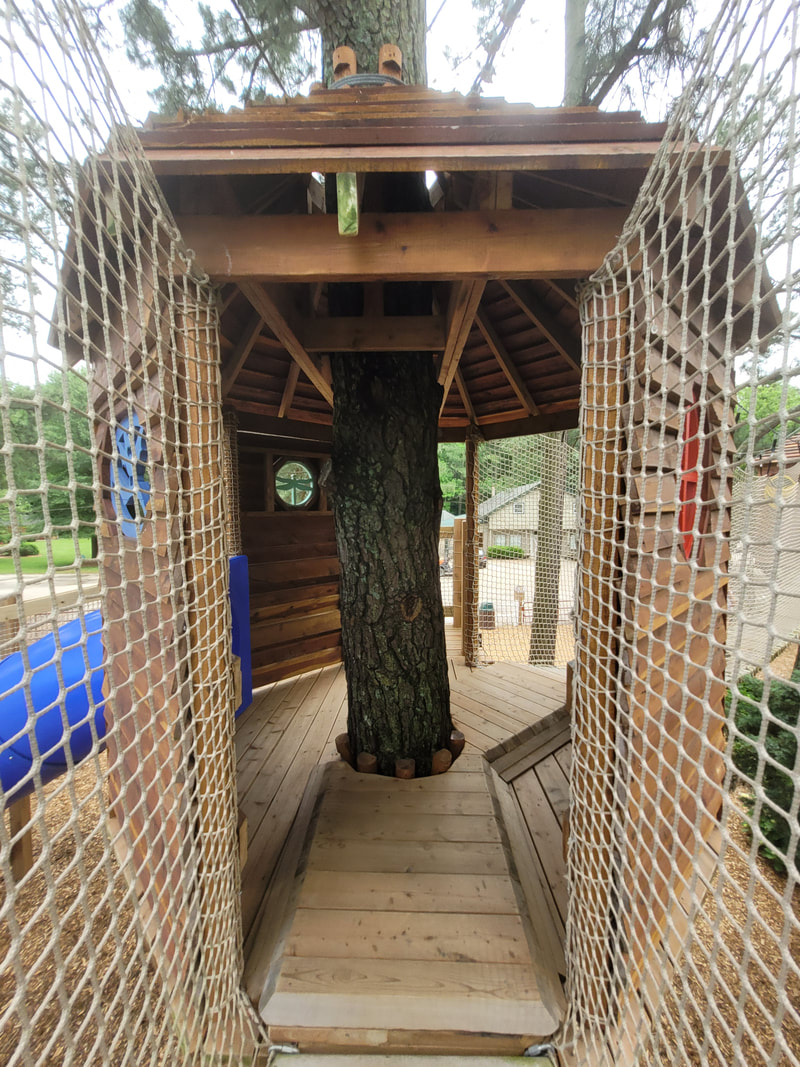 Shot into treehouse platform from rope bridge. 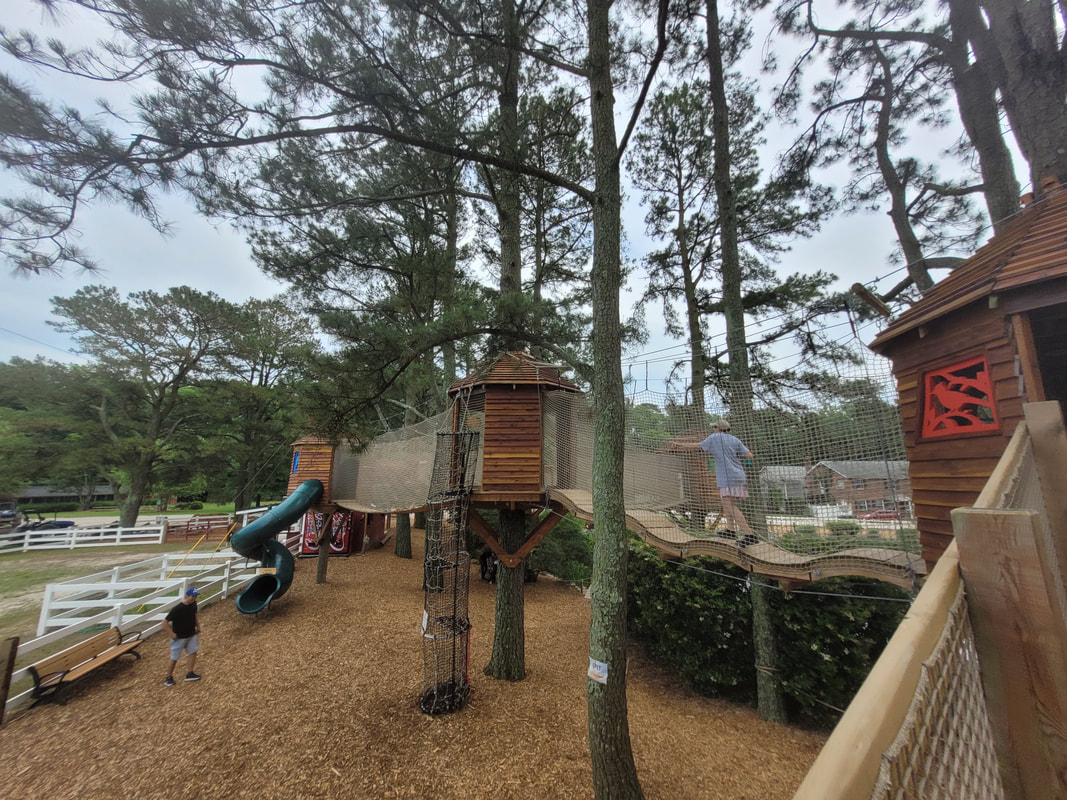 Shot of line of rope bridges between several treehouses. Note the slides for kids who want to try sliding down from the treehouse back to ground level. 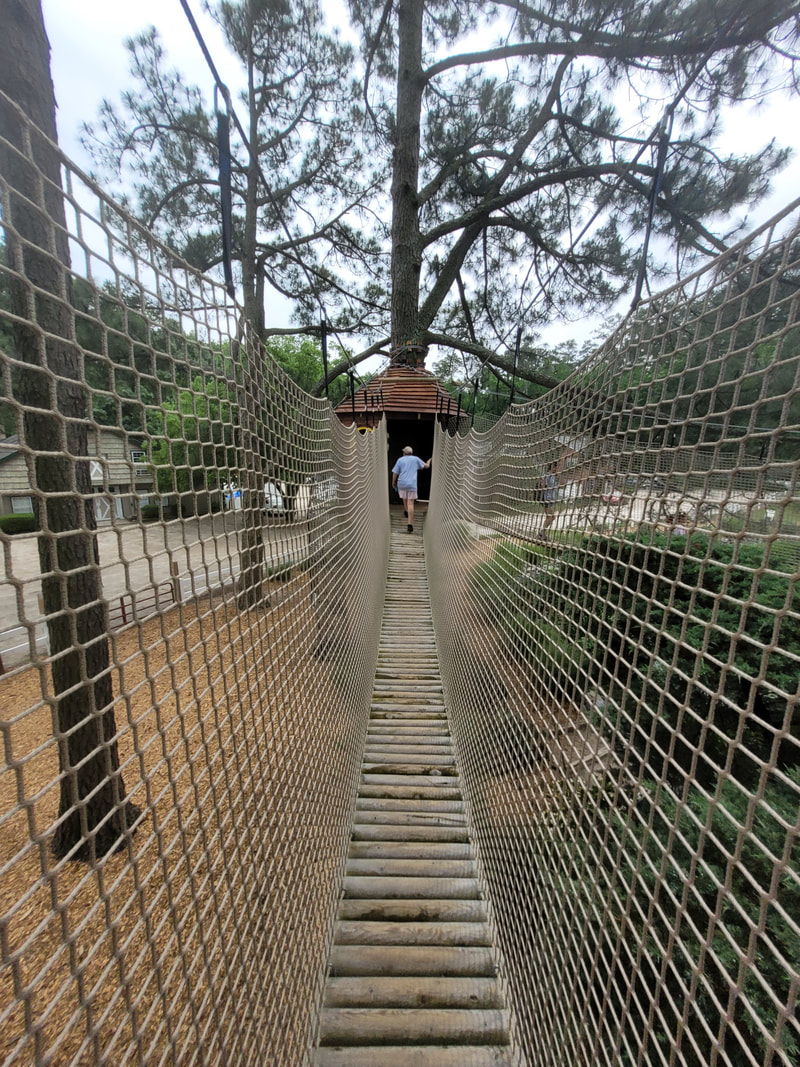 A look down one of the rope bridges into the next treehouse. So there you have it, last leg of the trip, which was in Virginia Beach, has come to an end. After we left the petting zoo we went back to the main drag near the boardwalk and grabbed some food for the road and started heading on out. We drove for the rest of the evening for approximately 7 hours, trying to reach the midway point so when we picked up the next day we would already be halfway home. That put us in South Carolina, about an hour from Atlanta, GA. From there we just kept rolling, stopping only to stretch our legs, refuel a couple of times, get some food and check out the visitors centers for a couple of states. We made it home with daylight to spare. With that the east coast tour was officially over. |
