|
There were a few things I had to do before I can get the fuel shed foundation base set up. I had already brought the foundation blocks in place in the area at the back of the dog yard but I still had to move the miscellaneous junk from the fence line, start pulling some of the fence down to open the yard up and cut the grass all through the area just for the sake of cleaning up the area as the grass was pretty high.
The very first thing I did was clear the junk out. We had placed miscellaneous items along the fence to cover holes that the dog dug under the fence in the past. As the fence is gonna come down anyway, none of this shit is needed in this area anymore. After placing the stuff on the scrap pile as most of it was car parts (rims, tires, a hood), I then brought in some branch cutters so I can cut the little sapling weed trees that were all in the way at the back corner of the dog yard. With that crap done I was able to bring in the push mower and cut all the grass down as I wanted. With the grass cut I then moved to the fence. I removed the cable/pipe set up I had done before to try to keep the dog from climbing the fence in the past then used a hammer to pull the U-tacks from the fence post to be able to pull back the chain link from the first 8' gap between the fence posts. This opened the area up enough so I can bring the foundation base in. As mentioned before, this base is fucking heavy! With the 2x8 boards on this thing had to weigh a few hundred pounds, spread out over a 4x8 area. Well either way, this thing had to move. So I went ahead and picked it up then slowly and gradually dragged it inch by inch towards the back of the dog yard. I had to stop to turn the thing at one point and pull it over some pipes and shit that were in the way. After that I was in the last leg of the trip and got the strength to drag it the rest of the way pretty fast. After I got it staged in the area I lifted it onto a couple of the blocks and after setting the base on the first blocks I continued to place the rest of the blocks in their respective spots in the four corners and the two center points on the foundation base. With the foundation base established on the foundation blocks, I can now start making the studded wall frames and the drum support structure for the setup I plan on doing with the fuel drums. More to come tomorrow. 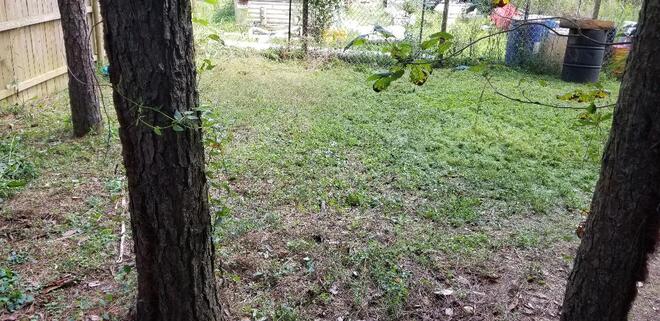
Cut yard view from foundation base. Note storage trailer in background.
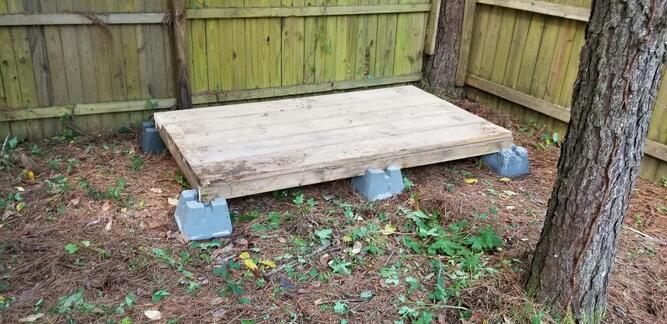
Foundation base established on foundation blocks in corner of old dog yard.
0 Comments
After setting up the storage shed and tearing down the old shed, the plans for condensing everything onto a smaller footprint are still in high gear. The next move is to build a new fuel shed in a new spot in what is the old dog yard, and of course tearing down the old fuel shed, which is made from pallets and is rickety now.
Since we have a bunch of salvaged wood from the old shed I'll be able to throw together a frame pretty fast. My plan is to make the thing 4'x8' in size instead of the large size of the old one. Reason being is I plan on stacking two oil drums on homemade stands on one side of the structure, linking their ports together with pipe to allow for filling into the top drum, which will flow into the bottom drum. The bottom drum will have a pipe coming out of its bottom port and through the wall with a valve attached to allow for filling fuel cans w/o the use of any pumps, a simple gravity feed system. Another drum will be placed on the opposite side of the shed and set up the same way with a filler line coming out of the wall. Instead of stacking a 2nd drum over this one, shelves will be built over the drum to hold a couple of 25lb propane bottles and a few buckets that'll contain a mixture of neatly stacked cuts of wood with old motor oil inside to soak the wood up. These will be used to accelerate the starting of any fires using wet wood or any wood for that matter, while working outdoors. The center of the shed will obviously be where the door will be installed. The shed will be made using 2x4's with 24" spacing. Instead of using a 4'x8' piece of plywood I'll be using the 2x8's that were pulled from the old shed. These will help hold the weight of the full oil drums on the foundation frame. Using an air powered stud nailer and reciprocating saw to trim excess wood after fitting the boards, I was able to assemble the frame pretty fast. The next course of action will be to move this heavy section over to the final site at the back outer corner of the dog yard. I have six cement foundation blocks, the kind with the cross notch cut into them, for fitting dimensional lumber into without the risk of shifting. These blocks will elevate the foundation base off the ground enough to allow for air circulation so the wood will last a lot longer than if the structure was built on smaller blocks or directly on a slab. The wall studs will go together just as fast thanks to the nailer as well. I'll be building the structure with a higher front wall in order to have a slanted roof so as to make the roof be a simple affair made with straight pieces of corrugated metal instead of having a peaked roof like the old shed was. The whole thing will be topped off with a plan exterior door to lock the structure down and keep varmints out. 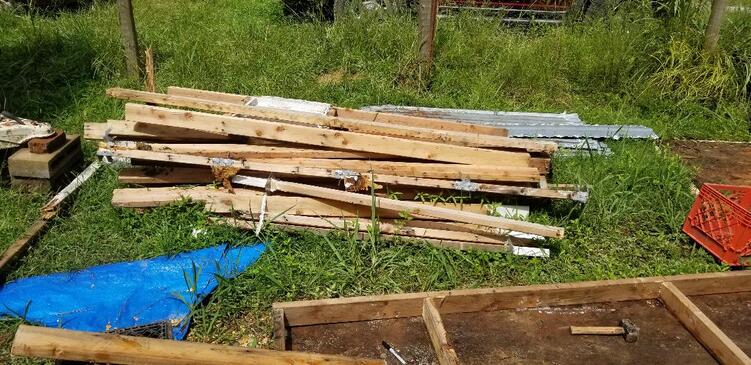
Stacks of salvaged wood from the old shed, note the start of the foundation base in the foreground.
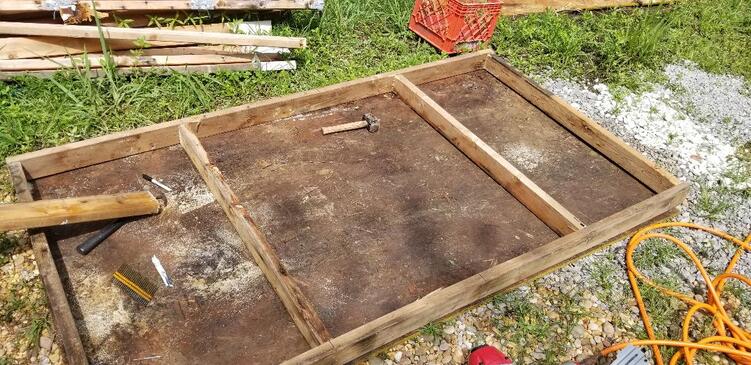
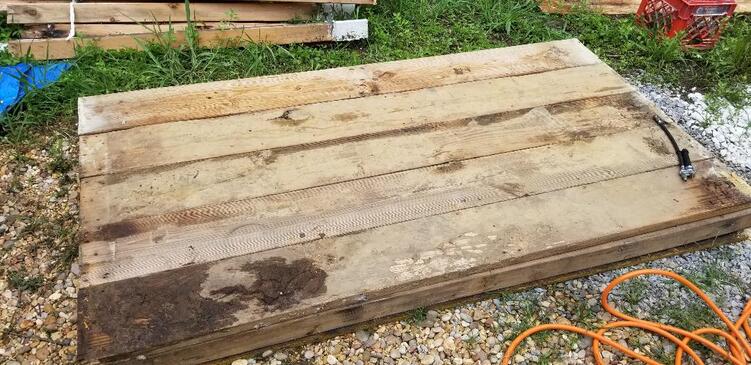
Completed foundation base with 2x8 boards secured.
Over the last few days a lot more shit has been going on, good shit however. For one, I managed to acquire some new stuff for the stead from one of our good friends. Our buddy is planning on moving and is trying to downsize the inventory of shit prior to making any big moves. A couple of the things that came my way for the sake of helping out was the frame to a portable 10'x20' garage and a smaller Chinese ATV.
On Friday I spent the greater part of the morning and afternoon breaking down the portable garage just enough to store the post sections onto the trailer and in the back of the truck. I have to be able to quickly reassemble this thing when the time comes. I do have a plan for this framework, since the plastic has long since deteriorated. I plan on laying a 2x4 foundation with a plywood floor then anchoring the frame on top of that. Lastly I'll add some tubing in between the existing posts to add anchor points for either plywood sheets or corrugated metal panels. Some 2x4 sections might be added for securing a window AC unit and a door. In the end I'll have a nice workshop that'll be more than able to do what I need of it. The other thing that I received from our buddy was a smaller 110cc Chinese ATV that needs some work due to some "issues". One of the main things was a section of wire that burnt up. Other was the starter switch that was bad and a bypass switch that was hooked up. Can't be much to this thing right? After digging into the ATV I tested the starter and found it was alright, checked the solenoid, it was good. The battery appears to be weak even though it takes and holds a charge. The bypass starter switch was actually connected between the points jumping the main power to the terminal feeding the starter. Perhaps this caused an overload on the ground wire which is what was burnt up. The nipple at the bottom of the fuel tank broke off as well. The air filter was shitty as well. In order to reinstall the starter I had to remove a cover on the crankcase to expose a drive chain that connects the starter to the crankshaft to turn the engine over. Upon doing this I released some standing water in the bottom of the crankcase. At this point I'll need to clean the engine out some, probably by running some thin oil in the engine then changing it out in short order. I did go online and found a website that sells spare parts. I was able to find everything I needed. I have a spare gas tank, air filter, battery, and handlebar switch assembly (which has the starter switch). All of this with shipping came out to $75. I'll make a replacement gasket for the crankcase. Hopefully this will all be enough to resurrect the little ATV as it'll be a useful addition to the stead. 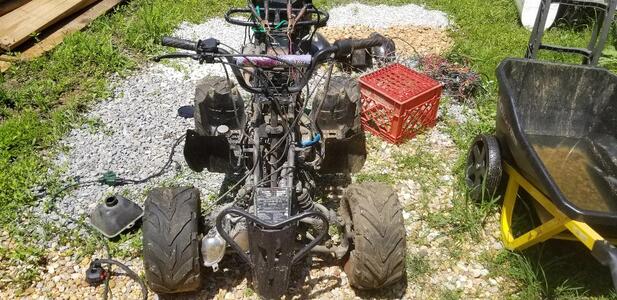
ATV with skin removed, note parts scattered about.
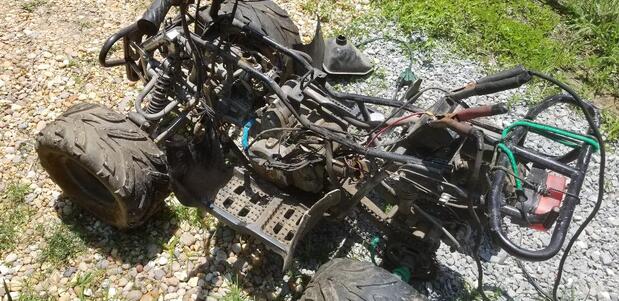
Another shot of guts of ATV
Another little thing that happened to fall in our laps was a set of aftermarket headlights and parking lights for our 2001 S10. The right side headlight was compromised along with the parking light due to the ole lady's being careless (women drivers!!). Replacement stock lights turned out to cost more than just getting a set of aftermarket clear lights. While I already had some saved on my watch list on Ebay, I ended up running across a set on facebook marketplace complete with LED bulbs all for $60. Everything was brand new unused so I had to jump on this. Since the lights are super fast to replace (two clips per headlight and parking lights just snap in), it didn't take any time to replace everything. Only thing is I will have to replace the grille, not just because it too was damaged but because part of the retaining structure for the right parking light is damaged so it doesn't fully secure the new parking light in place. It's snapped in on one side plus the wire harness for the bulb helps keep it from just dropping out but with one side not fully secured, the thing moves. This will be remedied soon enough. Much to my satisfaction the LED bulbs in the headlights are actually brighter than what I had in the original headlights. Win/win for me. 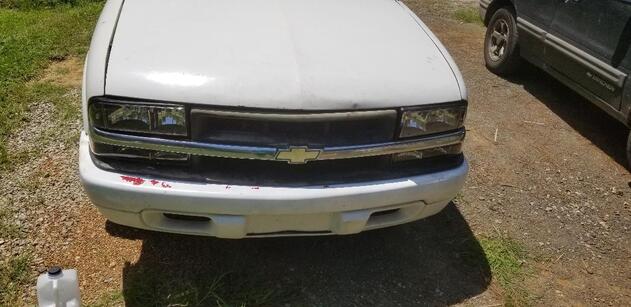
New headlight fixtures in place, note how right side parking light is crooked due to not being secured
Over the last few days I've been continuing to set up stuff in the storage trailer, going through the large amount of loose and small contents that still litter the garage and sorting through what's trash and what's not. More stuff continues to make it to the outgoing scrap pile while certain things like boxes or wrappers/containers for items I end up sorting into organizers ends up in the fire can. Other items make it to the regular shelves to be organized according to its category. Things are slowly thinning out but there's still a long way to go.
The biggest thing that's been going on over the last couple of days has been the work started back up on the old Dodge Charger, the flagship car of the fleet. There were some things I had to do based on what I had available parts-wise. I still had to install the harmonic balancer and valve cover gaskets I bought on ebay, along with installing some components after that. Some things have to go on in a sequential order. I can't put fan belts on w/o the balancer. I can't put the radiator in w/o the balancer. I can't put the valve covers on w/o the gaskets. I've been avoiding the work for some odd reason while trying to get other things done but like with many things in life, sometimes you have to get that itch or bug once again to be able to just jump in. And usually what ends up happening is I'll go in hard and fast for a minute then crash again for a while. Hopefully that won't be the case, especially since I'm so close. Anyway, I swapped out the balancer and put the pulleys back on. The next main thing I wanted to see was if I can reuse the bracket that holds the alternator and AC compressor that was on the engine when it was in the truck that it came from. It would've worked if not for the compressor bumping into the thermostat housing. About the thermostat housing. Originally I thought I would have to buy one off of ebay as I didn't have one for the 318. When I did another search I ended up finding out that the housings are actually interchangable between the small and big block mopar engines. With that in mind I borrowed the thermostat housing from the 440 that's on the floor that came from the car originally. I had to cut a new gasket from some gasket paper and test the thermostat itself to make sure it still worked. I did this by putting the thermostat in a pot of water and bringing it to a boil to get it to "operating temperature". Sure enough it popped open. Now whether its opening with the right temperature I'm not 100% sure as I didn't have a thermometer. The water wasn't physically boiling but it was steaming so it wasn't quite at 212 degrees. Bubbles were not forming either, just surface steam, so maybe it was around 170, 180? Who knows. Point is, the thing opened up when in the hot water and closed shortly after pulling out, then sprung open when put back in the water so its functional. I assembled the unit with the gasket and a little goop for good measure. The AC compressor bumping into the housing prevented me from being able to use the old bracket that would've facilitated hooking up AC in the car using the current hardware I have. It also prevented me from hooking up the alternator as well. I would've had to find a compressor delete pulley or shorter belts that would route around everything except the compressor. Instead I had already bought the little brackets to mount an old school mopar alternator to the engine. I also found out that the alternators used on the mopar big blocks also works for the small blocks too. This was perfect not because I could borrow the unit from the 440, but because I already had a spare alternator on the shelf that I could use. I was able to install the old school alternator and brackets along with some large nuts to act as spacers for the bolt that hooks up to the cylinder head to fully secure the unit. The only thing was the pulleys on the crank were for the truck setup. The pulleys that lined up with the old school alternator needed to line up with the water pump as well but the water pump is a long neck unit whose pulleys extended out farther. I did a little looking at the shorter belt that loops around the water pump and power steering pump and crank pulley and found that it worked for the alternator to the crank pulley, except I would have to put it on the outer grove on the pulley. Both sets of pulleys are double V belted and the inner groove would've had the belt rubbing along the bottom of the water pump neck. The outer grove cleared just fine, so I'll end up having to roll with one belt on the alternator to crank pulley run. This still kinda works out fine as that means I only need to stock the same belt for either the power steering/water pump run or the alternator run. As of right now I won't be able to do any kind of AC hook up with this current configuration. I could spend the extra money and get the short neck water pump for the old school set up, along with the right pulleys and the proper mounts for all the old school shit, including the power steering pump. More money, much more money. It would make sense to not do any of this and just dedicate any monies spent on getting the 440 right and getting its transmission right so I can put that rig back into the car at a later date. With those things all hooked up the next thing was the valve cover gaskets. These are nice rubber units, not the cork shit that used to be used on old school setups. The valve covers went on with no issue. I even installed both heater hoses, hooking one up to the engine. I just have to get a fitting to go in the intake to hook the other heater hose up to conclude that part. I did attempt to put the radiator in but I found out that the bottom hose port was on the driver's side. The bottom port on the 318 is on the right side so that would mean either doing a bullshit extended run of hose that'll be problematic or just spend a couple of bucks and get an aftermarket aluminum radiator for this configuration and call it a day. I found one on ebay, 3 core, for $140, not that bad all things considered. 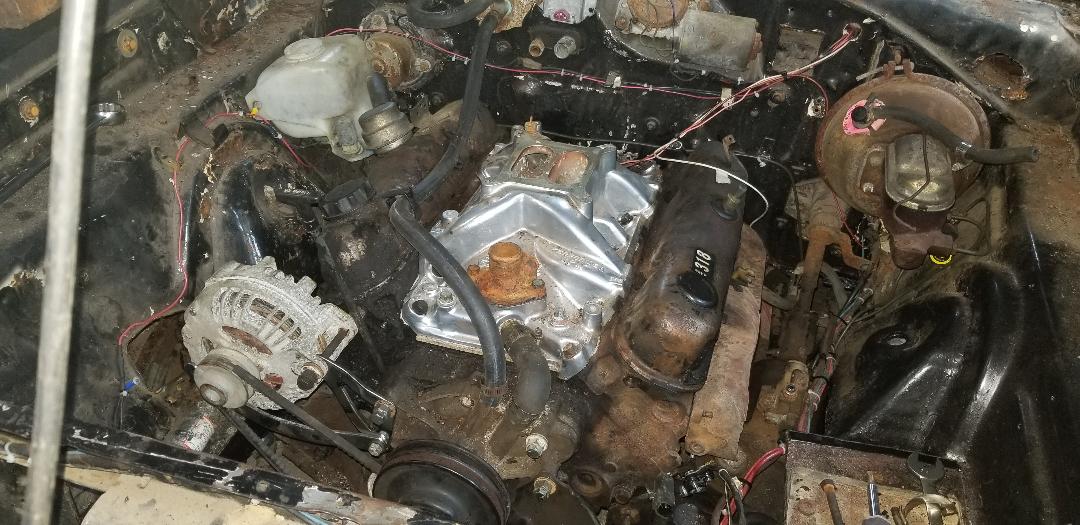
Shot of dodge engine bay, note valve covers, thermostat housing and alternator in place.
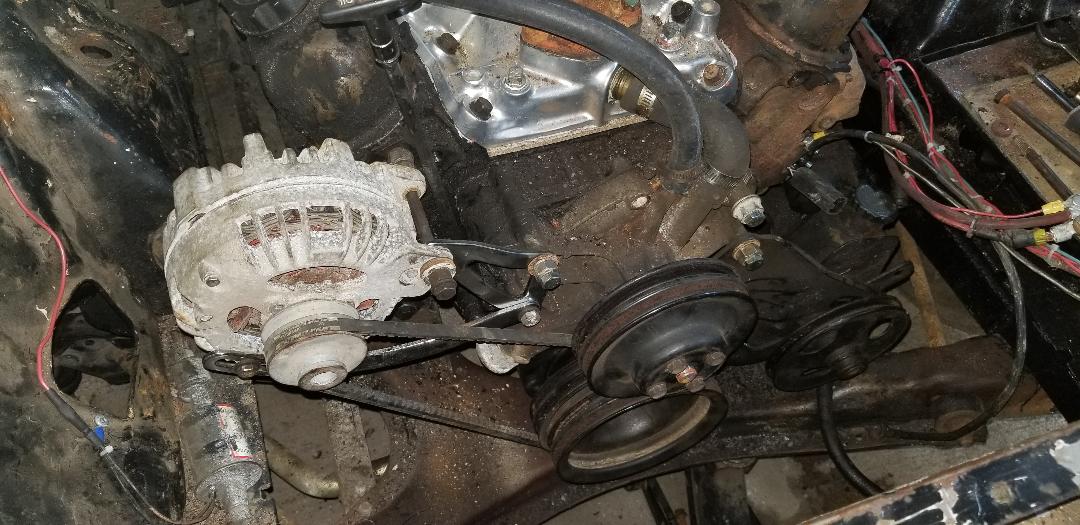
Closeup of alternator assembly, note how belt goes under water pump.
After the dodge I did take time this morning to load up the truck with a bunch of shit from the garage, a lot of it being garbage destined for the burn can. A good amount was also scrap. I had a lot of it staged behind the dodge in the garage previously. I loaded up all this crap and found even more crap off of the shelves still in the garage. A lot of this stuff is stuff I would either be putting to use in the near future, like battery chargers and what not, or I'll be using the stuff to build new stuff or continue to repair other stuff. That is my biggest thing, anything that is moved down to the trailer has to be getting put to use, I don't want to end up making the trailer like the garage was, just a bunch of shit piled on top of shit. Even after shit ends up organized in the trailer, it needs to get put to use to move it from the trailer to its final spot in a car, a building project or what not. The main goal is downsizing on everything to get to a slimmed down, neat, organized inventory where everything has an immediate use, not a maybe or what it application. 
Shit
Over the last few days I've managed to move many small things from the garage over to the trailer, small things like relays and small electrical items, hardware, other miscellaneous crap. Of course there's the matter of finding a place for all this stuff on the shelves too. Friday we did pick up a wall organizer set that consists of hangers that mount on a wall and the associated trays that hang on them. We also got a small table top box with drawers that will also be used for storing small hardware in a more organized manner. When you get to the point that we're in you come to realize just how much little shit can actually accumulate over the years.
With the new organizers in our hands I was able to place the drawer unit on the shelf where I left a large space open. The wall organizers were hung on a spot on the wall between the two automotive parts shelves in the right hand corner. Some more were hung on the other side of the bathroom nook wall, on the toilet side. In these extra trays a lot of small hardware was divided up according to the category it falls in. A lot of small hardware also went into the drawer box as well, all kinds of small stuff - fuses, screw/nut combos, automotive relays, etc. Not every compartment or tray was filled but at the same time extra trays and drawers are needed in order to better divide the hardware. Right now some trays may have bolts of different sizes stored but they're the same diameter, or they're metric, or whatever. The end result is to have trays set up where we have say, 1/4"x1", 1/4"x1.5", 1/4"x 2", same for 3/8", same for 5/16". Another batch of trays and drawers will allow me to have a nicely organized inventory of different hardware for all of our applications whether car related or "other". Another thing I did was take some spare shelf panels and installed them on a couple of the shelving units. There was enough space above the drawer box that I was able to put a shelf panel right above it and still have room to store more crap. The other two shelf panels went on the shelving unit that's up against the back wall of the trailer, in the area where the tub was. These extra shelf panels will allow me to put even more crap up. Once I get the remaining nuts and bolts and other crap sorted out I can then fully move on to the next phase which is further dividing the hardware based on the individual sizes to fulfill my plan of having a highly organized parts/hardware storage system. 
Shelving unit with extra shelf panel and drawer box in place.
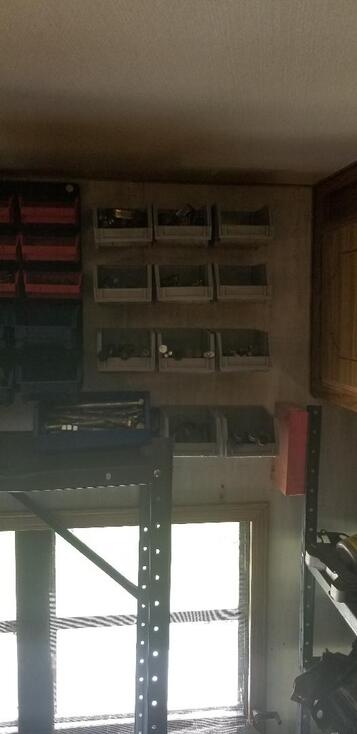
Wall trays hung in place, already full of crap
Shelving unit full of crap and extra shelf panels
Wall trays hung in bathroom nook
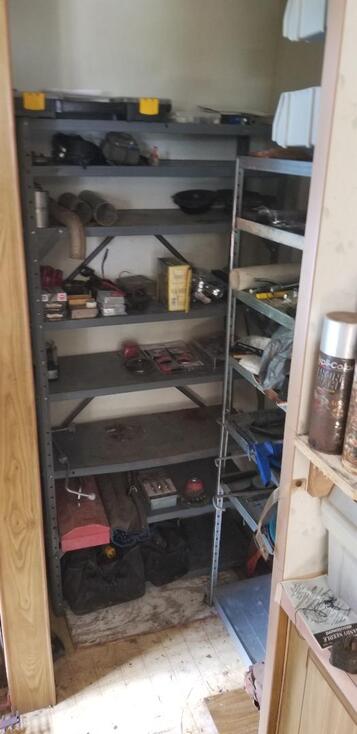
Today was some more repetitive shit, basically moving more hardware from the garage down to the trailer, but the biggest part of the move was clearing the last two metal shelves so they can be moved and staged in the bathroom nook of the trailer.
I had to bring a couple of large buckets up to the garage in order to put a bunch of contents from one of the shelves but because of the sheer amount of shit that was on these shelves, those two buckets were not enough. I ended up storing a bunch of the contents on the floor in a pile to be picked up probably tomorrow morning. I moved some of the larger stuff, like a couple of boxes of rolled up wire and another portable tire pump along with some old paint cans. While putting the stuff we staged into the back of the truck we decided to empty out the many 2 liter soda bottles of water that were kept on the bottom of one of the pallet shelves in order to throw the empty bottles in the truck for later disposal. I had to cut the top shelf from one of the shelving units before bringing it into the trailer. I also had to break up this decorative pipe cover on the floor that covered the drain and water lines running over to where the bathroom sink used to be. After busting that wood/particle board up and out I was able to set up one of the shelves in that corner nicely, while setting up the other shelf in the tub nook nicely. I secured the shelves against the walls with screws. Next I took the three shelf panels I salvaged from the rickety metal shelf that was behind the old shed and installed them in the gaps between the original shelves on the unit. This gives me seven shelves to store a lot of shit on. Now with the two shelves in place I can start sorting out the shit I brought down in the buckets as well as the other shit that I pulled from the shelves in the garage. Once this is done then the inventory organization part of the storage trailer and the next stage is the clearing of the remaining junk from the garage and the sorting of the remaining items that are going to be kept, all the large shit that can't be put in the trailer, like engines and transmissions. 
Bathroom nook shelves, secured in place.
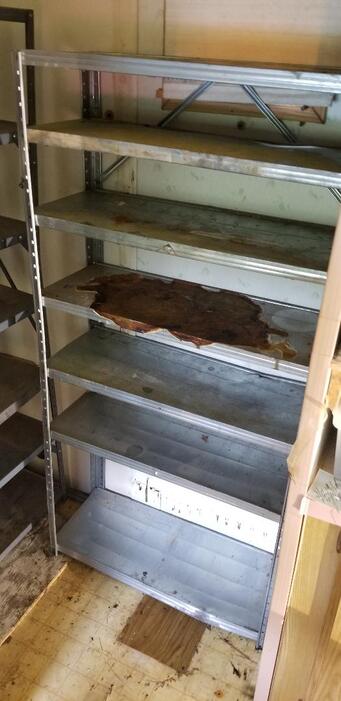
Toilet nook shelf with its extra levels.
This morning had many things go down in the short amount of time that was available. As noted before, I was working on clearing the bathroom nook and had pulled the toilet but had the flange in place still. Well upon cutting the thing I did end up finding out that the thing screws into the holding tank. After removing the flange I turned to the tub.
The side wall for the tub had an access panel made of particle board that I had to remove to access the drain line. I used this access panel as a patch to cover the opening over the toilet drain. This went fast with four wood screws. Afterwards I removed the moldings around the tub then used the reciprocating saw to cut the drain pipe in order to pull the tub out in one piece without damaging the unit. The drain pipe can be removed from the flange and replaced accordingly when installed elsewhere. After removing the tub I removed the wood base that held the tub then cut through the wood screws that held the side wall in place, removing all of that stuff, leaving the open nook with an opening in the floor under where the tub went. I cut a piece of the remaining plywood from the old shed door and secured it with more wood screws. The last thing I did in the bathroom nook area was remove a small shelf that was mounted to the wall behind where the toilet went. As an added bonus I mounted said shelf on another spot in the trailer up near the ceiling over where I have some bulk containers so as to make a limited use of some vertical space. 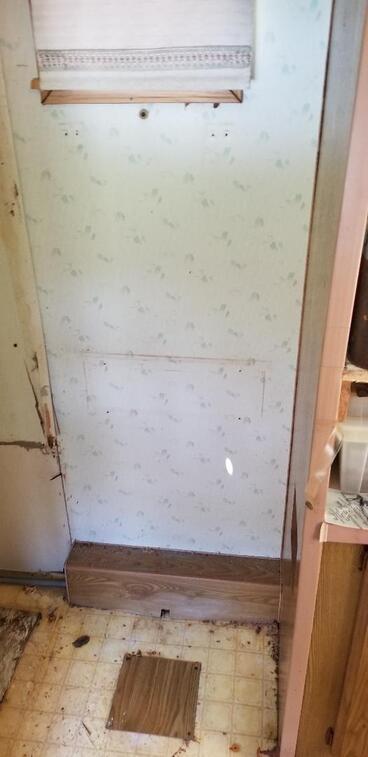
Toilet nook area cleared, note particle board patch over drain hole.
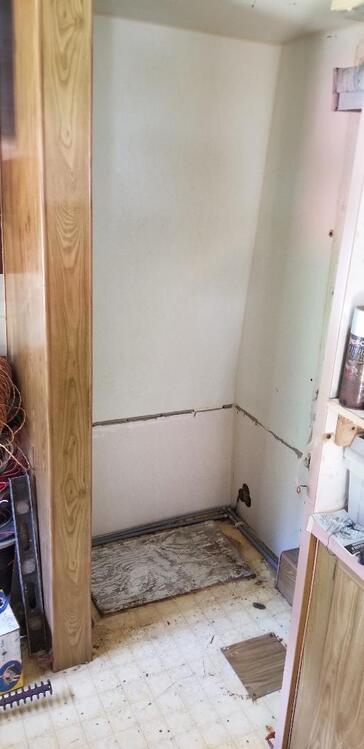
Tub nook area cleared, note plywood patch over hole.
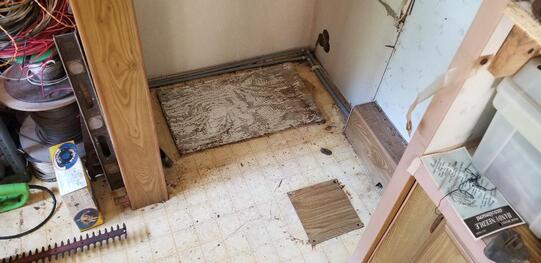
Closeup of bathroom nook floor with patches in place.
With the bathroom nook area set up the way I wanted I had to turn my attention to the chicken yard due to the fact that while I was working on the trailer I noticed all of the chickens just running free in the yard, following me around like nothing's wrong. I ended up discovering the fence post that held one of the gates had broken at the base, due to rotting in the moist ground. The gate was on the ground, allowing all the birds to escape. While they didn't go far, this still needed attention. The only real option I had was to do like I did with other wood fence posts that broke in the fence areas-pound a metal fence post in the ground and secure the broken wood fence post to said metal post. A quick dig in the scrap pile turned up a narrower width section of fence post about 5' in length. This would have to do. After pounding the post in the ground about 2' right at the broken base of the wood post I first drilled three large holes, one at the top, the middle and near the bottom, these holes being about 3/8" in diameter. The next thing was to drill three more narrower holes behind the three large holes. This is to allow me to drive wood screws through the post into the wood post without having to go all the way through the metal post on both sides. The first set of holes are access holes. With this, I was able to drive three 2" long wood screws through the metal post into the wood post, securing it and allowing me to get the fence back right again. Only other thing I had to do was remount the loop that holds the fence latch since the fence post technically moved in height just a little. With this, the chicken yard fence was restored and the chickens secured. 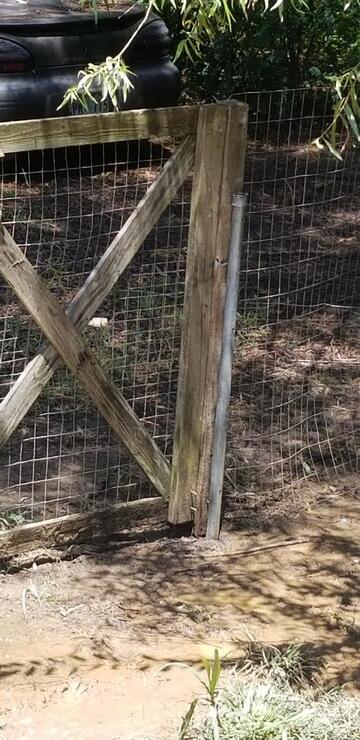
Fence post secured to metal post hammered in ground
The last thing that I did for the day was to clean up the loose bolts on the garage floor so I can sort them out at a different time in order to cull the scrap from the batch and organize the remaining hardware. I gathered two buckets of hardware, one a 2 gallon and the other a 1 gallon bucket. I gathered a few odds and ends destined for immediate scrap and an organizer container along with some other small containers with which to use to hold the hardware. The last thing I did in the garage is pull all of the 2 liter bottles full of water from the bottom level of the pallet shelf and staged them behind the Dodge for later disposal. This is also in order to allow me to dismantle the pallet shelf, with it being cleared of extra crap. Until the next time....
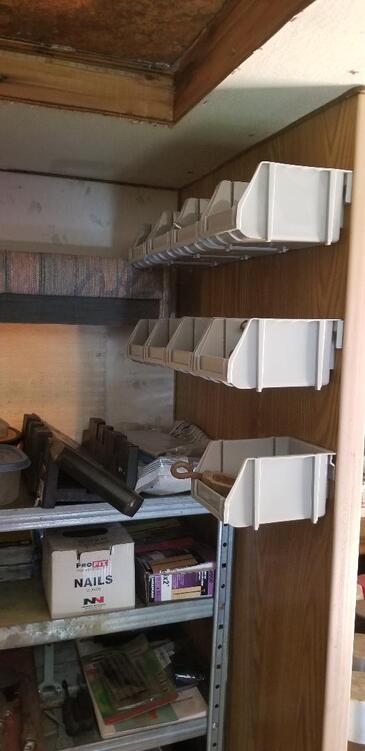
This installment of the work that was done this Tuesday involved some more storage trailer work, specifically adding a couple more shelves to one of the metal parts shelves that I installed in the trailer. While I left a large gap near the top for my hardware organizer racks that I plan on making from food cans, there was room underneath to add a couple of shelves so I can store all of the smaller miscellaneous auto parts I gathered up to sort out.
To add these extra shelves I pulled two shelf panels from a rickety metal shelf that we had stored behind the old shed. This shelving unit was flimsy and would've needed extra support to eve be usable under normal circumstances so I just disassembled the damn thing. I took two panels and added them between the bottom and 2nd from the bottom panels. I had to actually use a couple of large nuts and longer screws to secure the other side of the panels as they were about a half inch narrower than the shelving unit they would be going into. After adding the two panels I had two buckets I filled with a bunch of small auto parts and other related hardware. A few things were relegated to scrap but in the end I laid out a bunch of parts on three shelves. I will probably end up tossing out more of the parts that are on the shelves as they go to vehicles we no longer have and for all intents may not acquire again for us to use these parts. 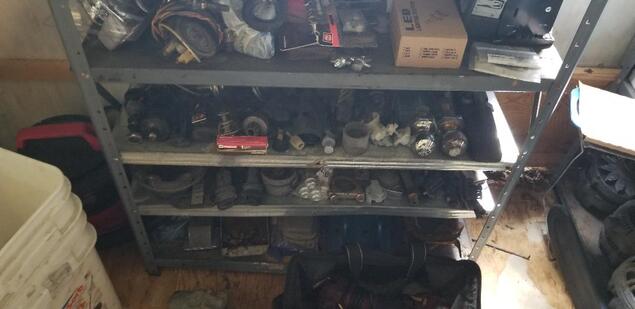
Auto parts shelf set up with extra inventory.
With the shelf taken care of, I moved on to another area that still needs attention, the bathroom nook. The toilet and tub are still in place and if I can remove these, I can install some more shelves for more storage. Since the toilet is the easiest of the two I started there. Two bolts and a water line had the toilet out in no time. The large plastic flange had several large screws securing it to the floor but even after removing these the flange still wouldn't budge. As it was time to quit due to needing to get ready to go to the job, I had to rethink a new approach for removing this piece so I can cover up the hole easier. This plan will pretty much be to destroy this flange, probably by running the reciprocating saw through the thing at two points, cutting the thing in half to make removal fast. I'll cut a piece of plywood to fit over the opening and mate up to the divider and the wall to make things somewhat neat. With that I will turn my attention to the tub, hopefully I will be able to remove the tub without damaging the thing as I can sell this to someone who may be redoing a camper. 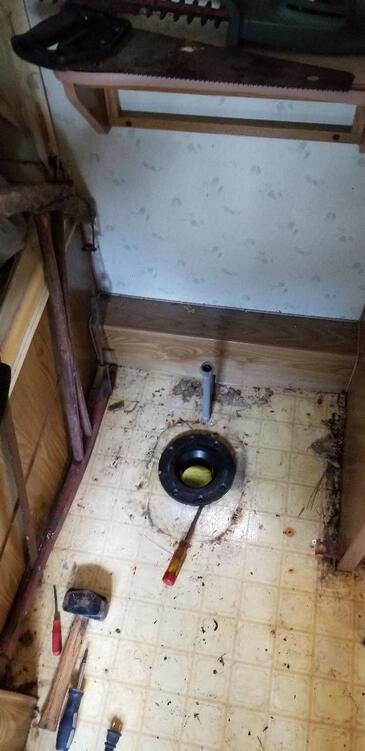
Spot where toilet was, note big flange still in floor.
Well there's been another day of constant rain after the hurricane passed through the South but on a lighter note it wasn't a heavy rain. It was slow enough that it allowed me to be able to go outside to still do a little work I had planned on doing. This time my work is centered around the vehicles being used by the two of us every day.
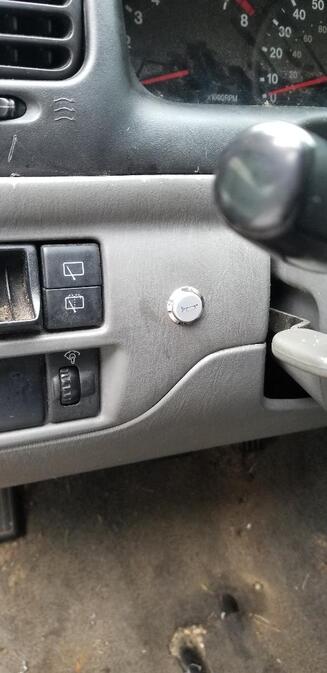
First up, in the S10 truck I have a car radio that doesn't have bluetooth capability due to being a slightly older radio, so in order to use the Iheartradio app through my phone and into the trucks radio, I had to use a two way male audio cord. Just recently the ole lady picked up a bluetooth FM transmitter that allows you to link your phone via bluetooth and FM transmission to an empty channel on your radio, sort of like those old audio transmitters you can hook up to your CD player back when cars didn't have CD players and it would transmit the music to some empty station like 87.5 or what not. Well anyway, the unit had stopped working and after checking my phone charger in the 12v socket, I concluded that the socket was dead. Forgetting exactly how this jack was wired up when I first got this truck, I had to do a little probing. I checked the regular cig lighter fuse and found it was good. At this point I figured that the socket is not wired in the regular electrical system, I must've ran a parallel circuit to feed the socket, so with a little tracing of the wire from the socket I ended up finding an apparently old inline fuse that was fed through the firewall on the driver's side to the wire to the socket. I didn't recall if I put that fuse block in or reused it or not, didn't care, but checking the fuse I found that the fuse was degraded enough that it came apart when I pulled on it, so I replaced it and BAM had power again. One problem was fixed. The next little issue I wanted to resolve today was hooking up the horn in the ole lady's baby SUV so as to have that option of blasting idiots on the street when they aren't paying attention. The horn pair was already installed but the device called a clock spring in the steering column was broken. The clock spring is like a slip ring that allows terminals to continue to transfer power to the loads in the steering wheel when the wheel is turned. Because of the clock spring's failure the airbag is also offline. We have yet to find a replacement clock spring as this is an oddball vehicle that doesn't carry a lot of parts supply. The only other option at this point is to just install a horn button somewhere close to the steering column and just hook that up to the horns. I bought a generic horn button off of ebay that would require drilling a hole somewhere then securing the horn switch in the hole with the included nut and hooking the wires up to it to complete the job. I had to do a little checking out around the dash area to find a suitable area to put the horn button. After a couple of areas were passed over as candidates I finally decided to just pick a bare spot in the lower dash next to the coin tray and rear wiper button. This area was easily accessible behind the panel as well after removing a lower panel from under the steering column. After drilling out the hole I then moved to the horns. Because the horns were mounted on the driver's side and the original circuit is pretty much not viable for this improvised circuitry, I decided to just pull the wire from the horn pair and run it directly to the switch through the firewall, a shorter run, without having to dig into the vehicle's original wiring. For all intents and purposes if we do manage to find a clock spring, all of this can be reversed easily and restored to regular operation. The last thing was to get a power feed to the other side of the switch/button. Luckily after looking under the dash when feeding the wire from the horns through the firewall I spotted the wire I ran that feeds the cigarette lighter socket in the center console. Since this wire is on an inline fuse in its own circuit and not part of the vehicle's original wiring, I tapped into this wire to feed the horn circuit. A simple 2 way connector allowed me to connect the horn circuit wire to the 12v socket power line. Some electrical tape to cover all bare connections and lastly buttoning up all panels and the whole job was finished. The vehicle now has a working horn once again. 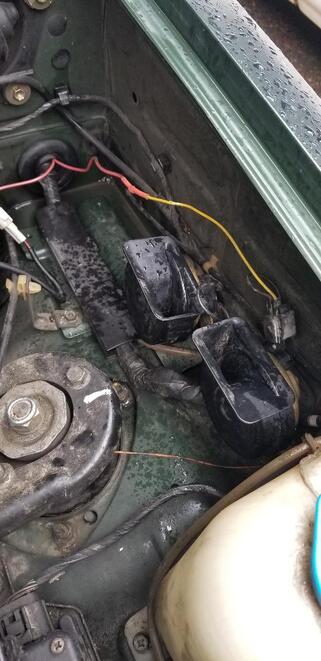
Horn bundle mounted on driver's side fender apron. Note rain drops on everything.
Horn button mounted in lower dash panel between coin tray and steering column.
As part of trying to clear out my mother's garage we've managed to set up the storage trailer, made from an old camper trailer. Contents from the garage, including shelves, have been moved from the garage and set up in the trailer. Some items are being scrapped or thrown out in the process of moving from the garage to the trailer. One of the items that was on the chopping block was an old push mower we had that had stopped working probably over a year ago. As with most small engine powered equipment, it ends up being the carburetor that fucks up on these things. In the very beginning I was unable to source a replacement carburetor for this particular push mower engine, but fast forward a year and a quick search on ebay turned up a replacement carb for a real cheap price so obviously I ordered one. After waiting for the item to arrive it finally came a couple of days ago.
I decided to work on the push mower this past Sunday in the morning before going to the job. Of course because of the hurricane that passed by over the weekend, rains have been light yet steady all morning. The storage trailer comes to the rescue again! There was enough room in the trailer to move the mower inside and still be able to sit down to work on the thing comfortably. It didn't take long to swap out the carburetor as its only held on by a few small screws. Funny thing too was that there was still gas in the tank, old but still viable. Conveniently this carb has an optional choke flap on it too, the old unit did not as it used a priming button to prime the thing to start up. It didn't take long at all to get the thing to sputter back to life in a poof of smoke and run smoothly. I shut it down and moved it outside and fired it up again, effortlessly. With the mower up and running now we can be able to do more concentrated mowing in closed up areas without the worry of the electric push mower going weak and/or dead prematurely. Also with the mower I have the option to use the bag to gather grass clippings for compost if I choose to do so once again. On a side note after finishing with the push mower I did bring down our small pancake compressor from the garage in order to store in the trailer. I decided to take some 8' long pressure treated 2x4's and use the air nail gun to nail the boards between two of the fence posts right after where the wood fence ends for the old dog yard. We will be taking on the building of the wood fence continuing from the dog yard along the perimeter to the driveway. Only thing now is to catch a sale on fence pickets....
|
