|
For those of you who have been following for some time, you'll know we've been spreading gravel over the grounds here for quite some time. We would pick a particular area and spread the truck load of gravel that was picked up for the week, then repeat the following week, working our way around that particular area. The most current area is the garden. At this point, we've finally managed to fully cover the garden area, including under the raised beds. With the load of gravel we picked up we even managed to patch up some of the older areas of the garden where gravel settled enough to expose raw ground once again. 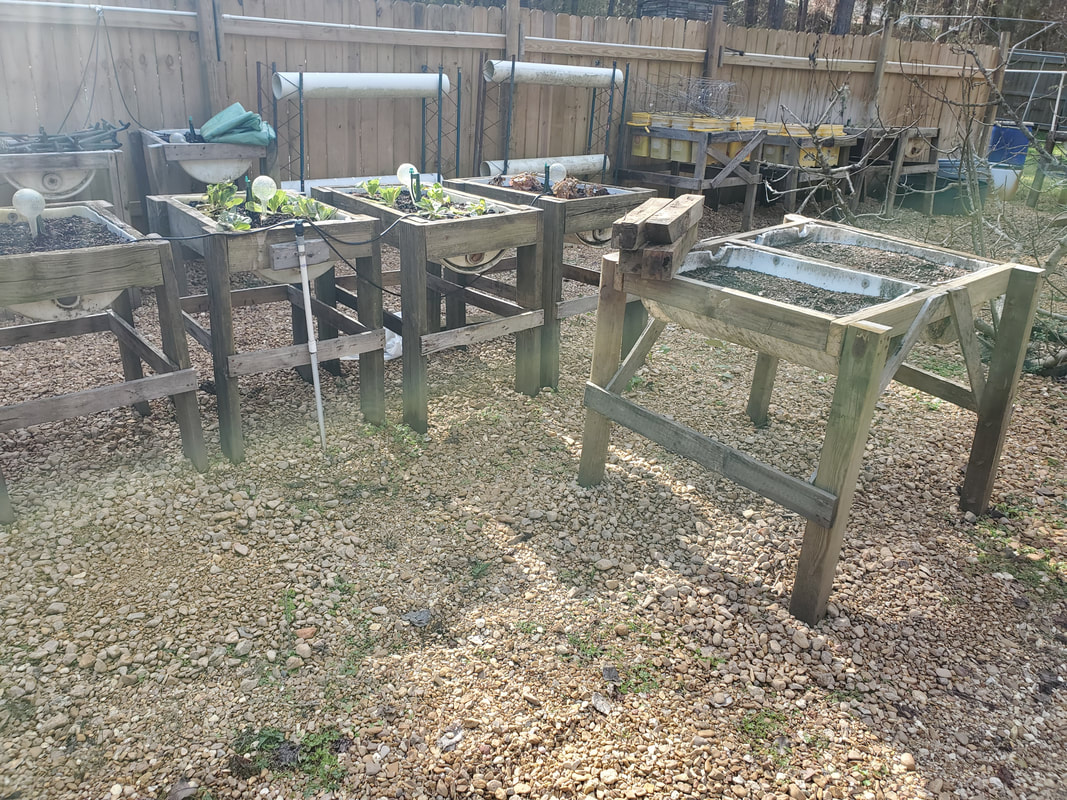 Newer raised beds in the middle of the garden with gravel spread underneath them to cover the grounds. Note the grass and errant weeds that have popped up through the older gravel. Some of the older areas have started to get grown over some with weeds, meaning I'll have to figure out some form of weed treatment in order to not have to resort to more drastic means like spreading roundup over the gravel in order to kill the weeds. Spreading anything super toxic on the gravel may not be a big deal but there is a matter of the free ranging chickens that frequent the garden grounds. These people may ingest contaminated leaves from the weeds and end up with the toxic weed killer in their systems, can't have that. So we'll have to see what can be used that will kill the weeds without being toxic to the animals or the greater grounds. Of course as we build more raised beds and set up more furniture in the garden, it will take care of some of the weeds since we'll end up covering said weeds with the apparatus we set up in the future.  Raised beds along the rear fence of the garden, with gravel spread underneath to cover the grounds up. With the garden pretty much complete, the next target area for gravel is the back area along the eastern fence line, leading up to the firewood staging area. This area for the most part is still bare, with only the immediate firewood staging area and the main driveway running along the house up to the east fence being covered with gravel. The area in between is not. This is where we'll be focusing our gravel attention next. The next thing I took a few moments to give attention to is doing some paint work on the ass end of the Monte Carlo. A few years ago an old newer vehicle we had somehow spontaneously combusted in the driveway and because it was parked behind the Monte, the heat and flames burned the rear bumper cover, taillights, and paint off the trunk. I've long since replaced the taillights and even the bumper cover (with a used piece). At this point the rear still needed to be painted over to make the car more presentable so we can get some insurance back on the car to be able to put it back on the road. This involved prepping the area prior to spraying paint on the ass end. The first part was cleaning the bumper cover up so I can spray black paint on the plastic material. I still had some black trim spray paint in the trailer so I was able to cover this body part with the proper paint. After getting the paint on it I then scraped off the chipped paint on the trunk lid since it was never cleaned up after the fire took its toll. 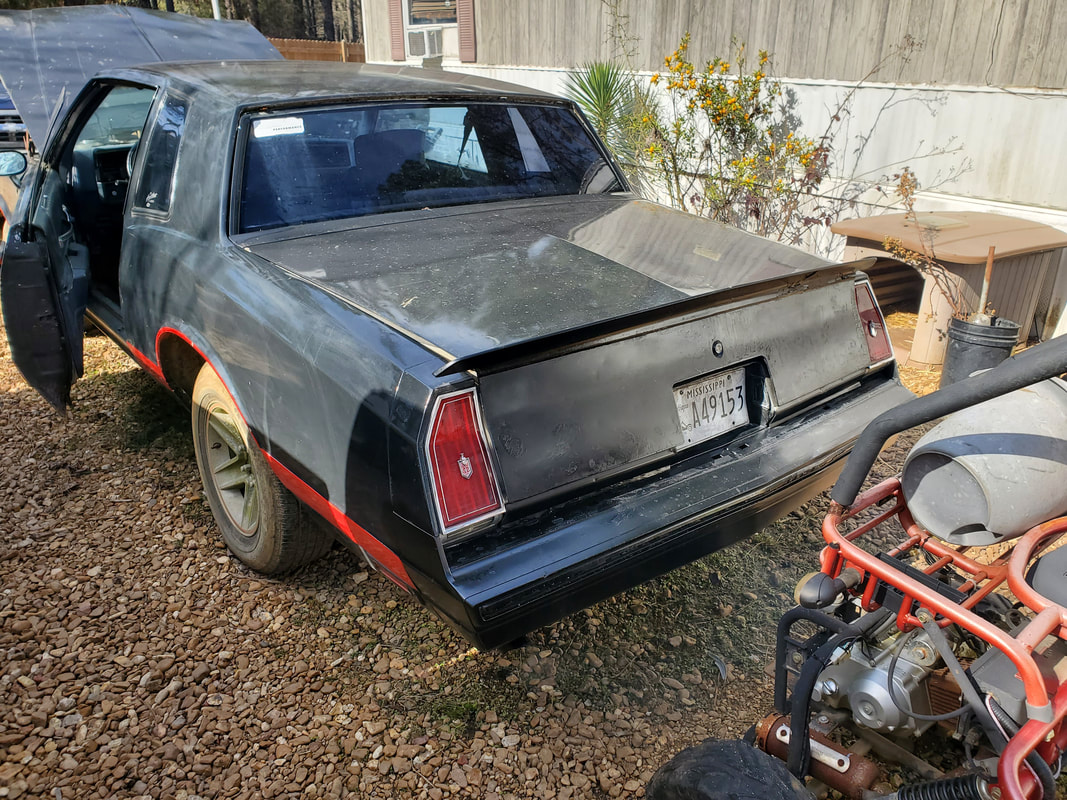 Monte's bumper cover with paint sprayed on surface and trunk lid also sprayed after scraping old paint off. After scraping the old chipped paint off I was able to spray more black paint on the trunk lid to get it covered pretty good. A few good coats on both the bumper and trunk lid ensured a good even covering of paint on the rear body of the car. The last thing I had to do was add the red stripe around the bumper cover since there's a red stripe running along the sides of the car. I had to mask off the bumper with newspaper and tape to cover up everything on the bumper except for the surface in the middle that will accommodate the red stripe. With that done I was able to start spraying paint on the bumper. 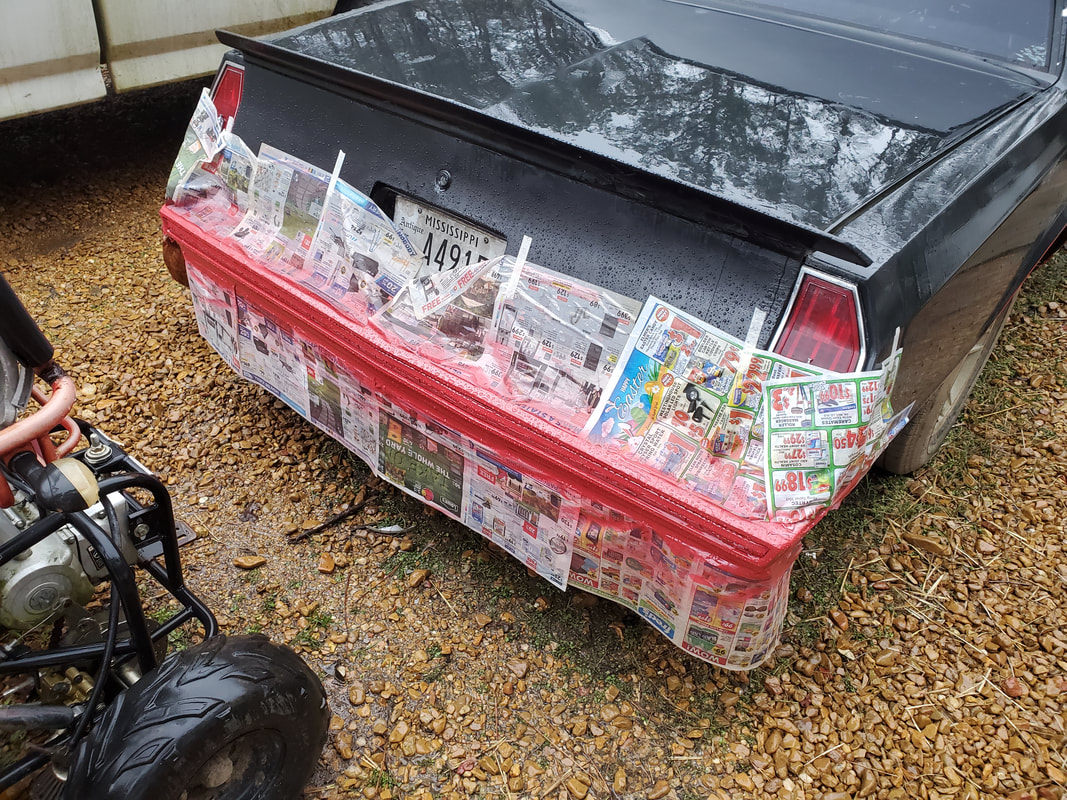 Rear bumper cover masked off with newspaper and sprayed with a can of generic red paint. I used an entire can of generic red spray paint I had in the trailer. One, I wanted to ensure a good even heavy coverage of red paint on the bumper and second, I wanted to use up this old paint that I have in the storage trailer. With the paint on the rear of the car, that's two cans of spray paint I no longer have to worry about. After the car was able to sit overnight, I peeled off the paper and tape to be able to admire the quickly paint up job of the rear of the Monte. 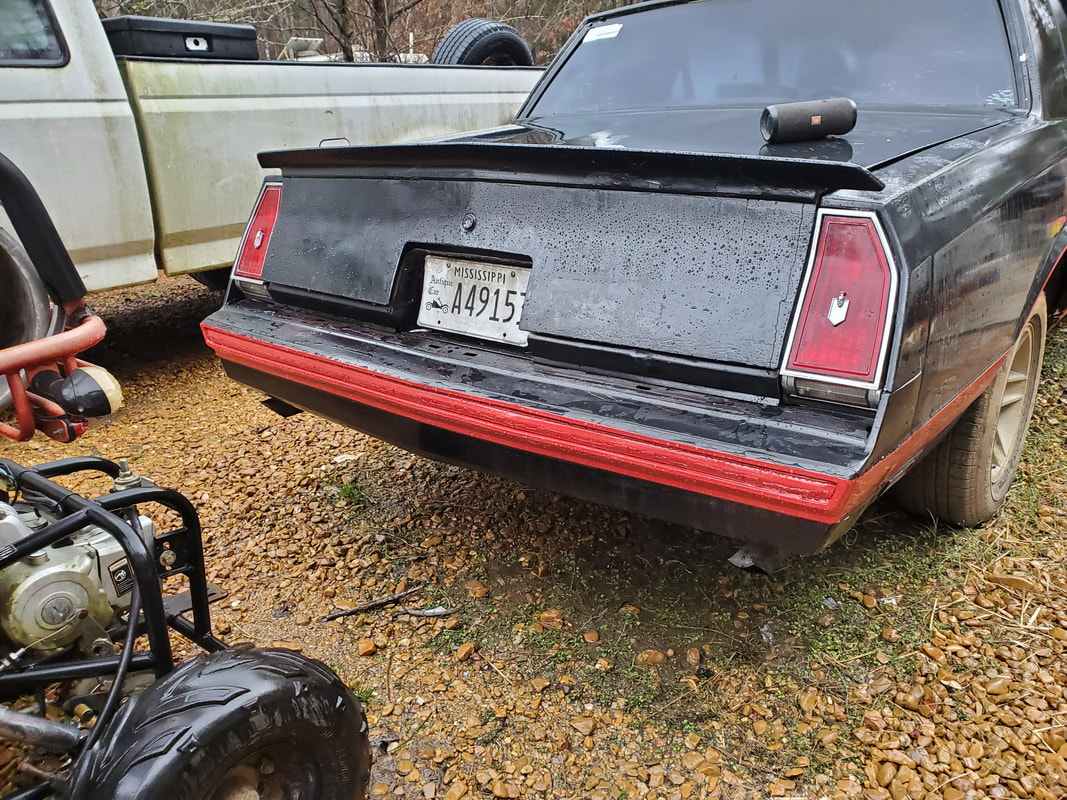 Rear of Monte after removing newspaper and tape from bumper cover. Note how straight red stripe is around bumper. 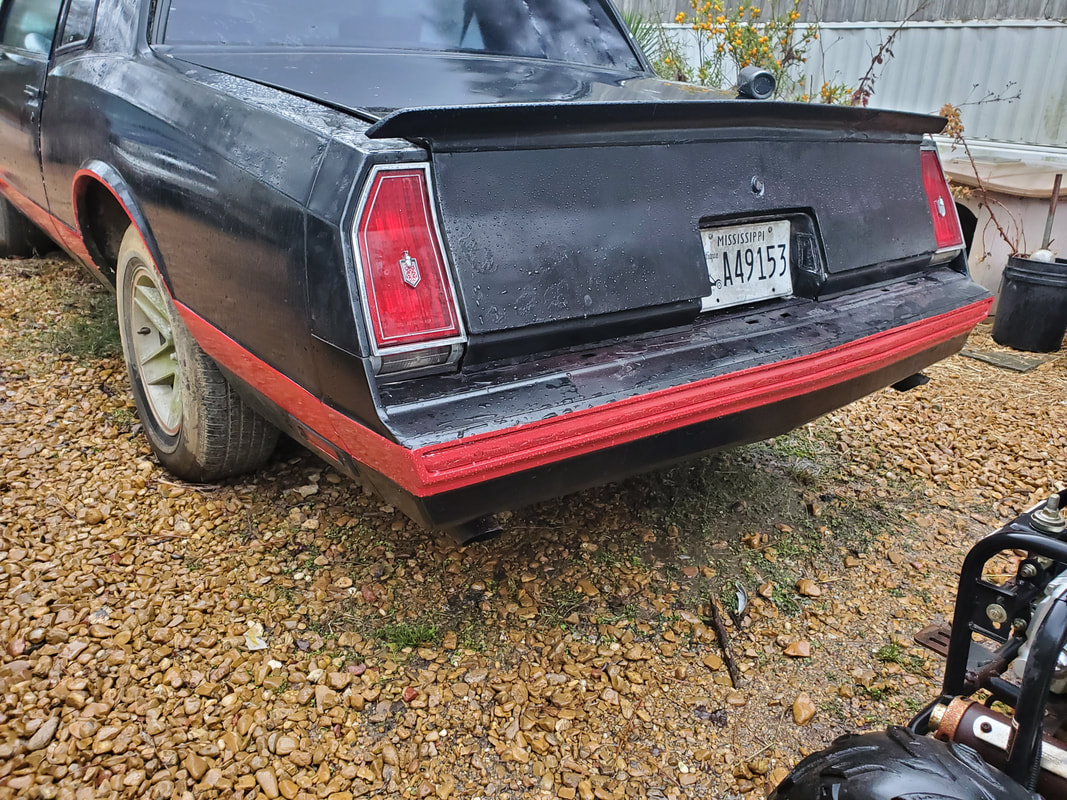 Another angle from the other side, showing how the red paint on the bumper matches up to the red stripe on the side of the car. Now most will realize that this was more of a backyard job when it comes to paint and body work on a car. There's plenty I needed to do before even spraying a molecule of paint on the car. I can get away with this on the premise that one day I will do full body paint work on the whole car, much less the rear end. By only doing a light patch-up job as far as paint, it keeps me from spending too much time and trouble trying to patch the ass end right, only to have to cover the work when I have to sand down every square inch of body, even the rear section, prior to painting once again. For now, this patch/paint job will hold things down from the aesthetic point of view.
0 Comments
A while back when we were retrieving the GMC Safari minivan from our friend's house, I ended up breaking the right side mirror on the truck. The driveway at the house was super narrow and barely able to accommodate the big F250, much less any smaller vehicle. As a result, I ended up hitting some lumber that was stacked up against the fence post that was against the house, breaking it from its mount. Now this mirror was already repaired once for the same reason after we accidentally broke it while moving a fence panel past the truck many months before. I ended up putting the mirror back on the base, using Gorilla glue to secure the mirror to its base. This time I did the same thing with the exception of removing a small screw that helped hold the mirror together. Through this hole I drilled into the upper body that holds the mirror glass. This allowed me to pass a long wood screw through the base with the hole and up into the upper body, holding the two pieces together. Gorilla glue finalized the attachment of the two sections. With the mirror fixed yet again, I installed it back on the truck, taking care of that little mishap.  Right side mirror mounted back on F250's door. 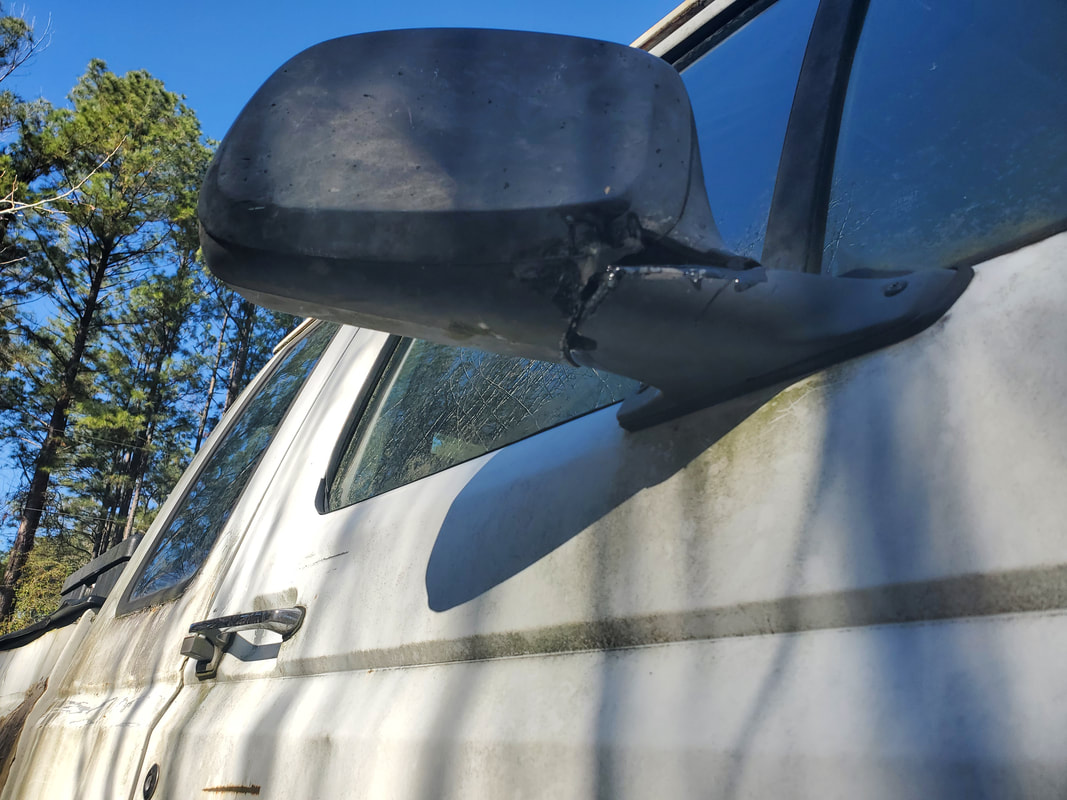 Underside showing crevice on base where screw was inserted through to hold the two sections together. Also note the dried up Gorilla glue all over where the two sections are put together. Now for the FMT. I wanted to test fit the rear sump oil pan with the side mounted dipstick bung to see if there would be any interference issues with the left motor mount, oil filter or K-member when I install the dipstick tube. First I had to mount the pan in place, which would involve lifting the engine up again. After positioning the crane and hooking it back to the chains that are still on the engine, I also jacked up the truck to give me the clearance to allow my fat ass to slide under the truck more easily. The next problem I noticed was that I still couldn't slide the oil pan in from the back, due to the angle being too steep to allow the front of the oil pan to clear the oil pump. I had to put the pan in from the front, the same way I pulled the old oil pan out from the front. But, due to the pan being a rear sump, the crank pulley was actually in the way. Luckily the pulley is separate from the harmonic balancer, so a few bolts was all that stood in the way of getting the pulley out of my way. 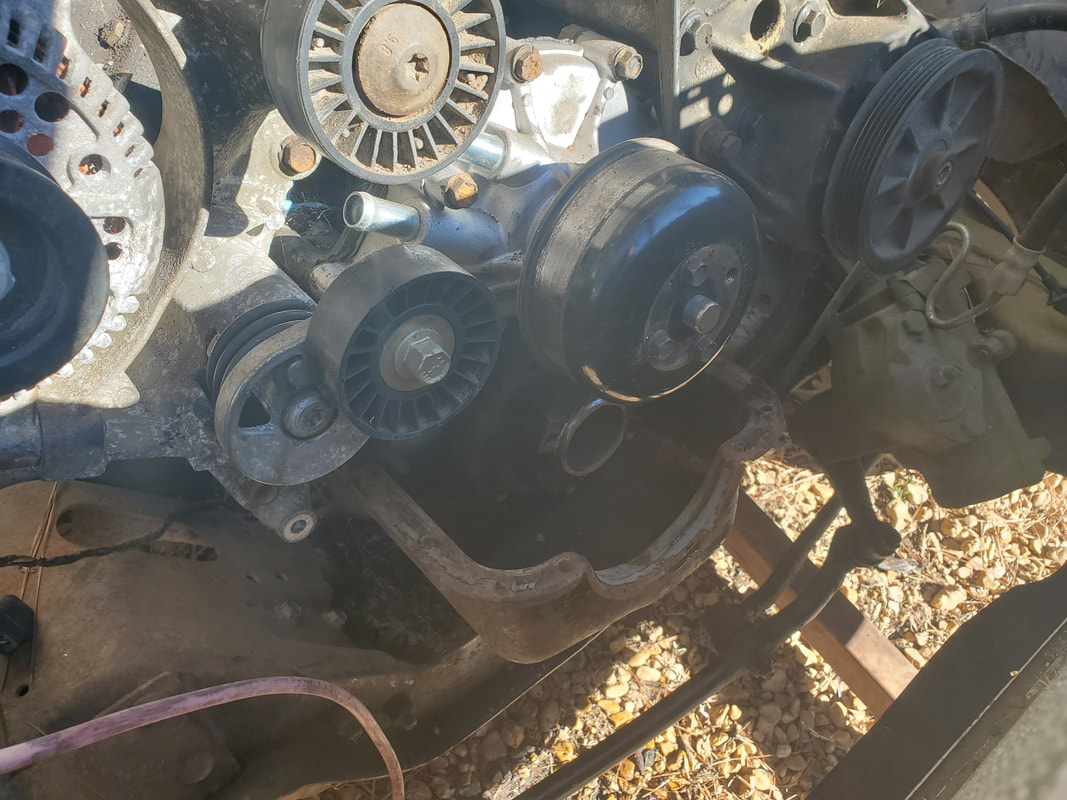 Installing the oil pan in from the front after removing the crank pulley. After doing some eyeballing, I ended up pulling the pan down and reorienting the dipstick bung to be at about a 10 degree angle due to the idea that the dipstick was unable to even go into the bung at a higher angle since the motor mount was right in the way above the bung. From the way it looked I would have to put the dipstick tube in at the same angle, going forward under the power steering pump. If I use the current dipstick, checking the oil would involve me having to reach under the PS pump to grab the dipstick to draw it out. 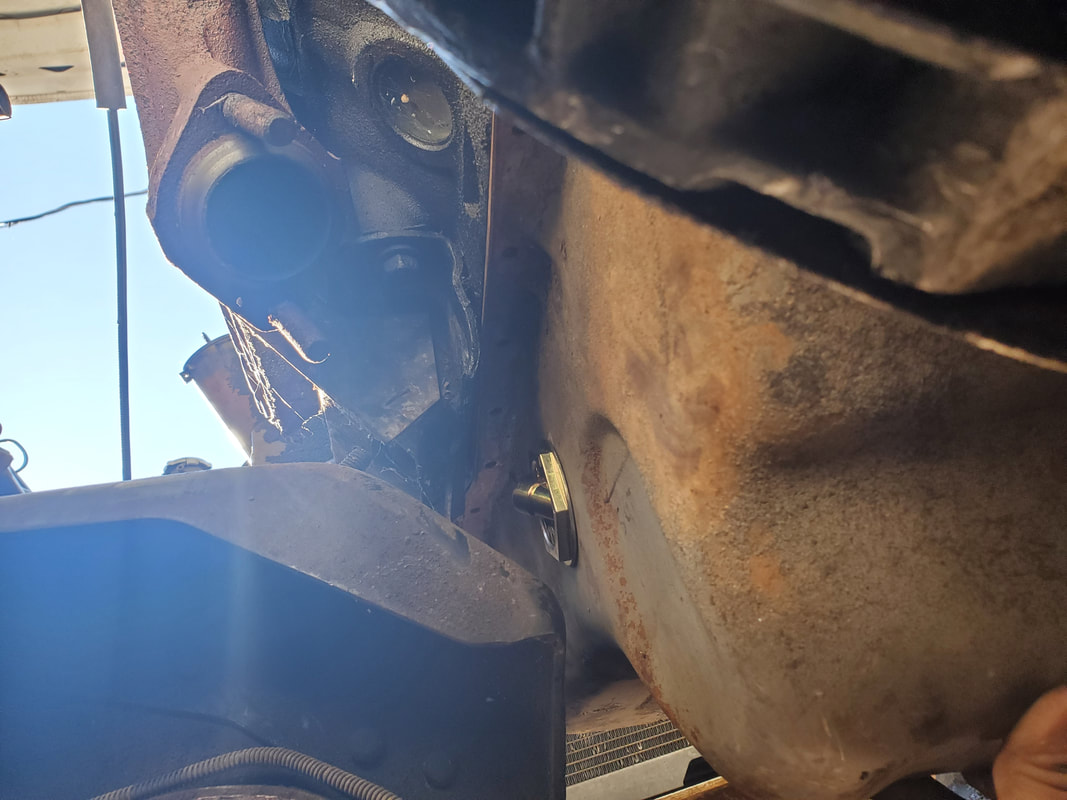 Oil dipstick bung at upward angle showing how the motor mount stands directly in the way of the direction the bung port is aiming. It would have to be turned down to near horizontal. Once I had the bung oriented the way I wanted it, I used a few bolts to secure the oil pan to the block so I can have it still when I do the final fitting of the dipstick. I can still orient the bung if need be by using pliers to slowly turn the bung wherever I need to. The funny thing is with the bung at the angle it is, when I test fitted the oil dipstick on the outside of the bung, the tip of the dipstick sat just below the level of the oil in the pan, based on the line I marked on the outside of the pan. This just showed me that I can still go with this dipstick with no ill effects other than the idea that I'll have to reach under the power steering pump. 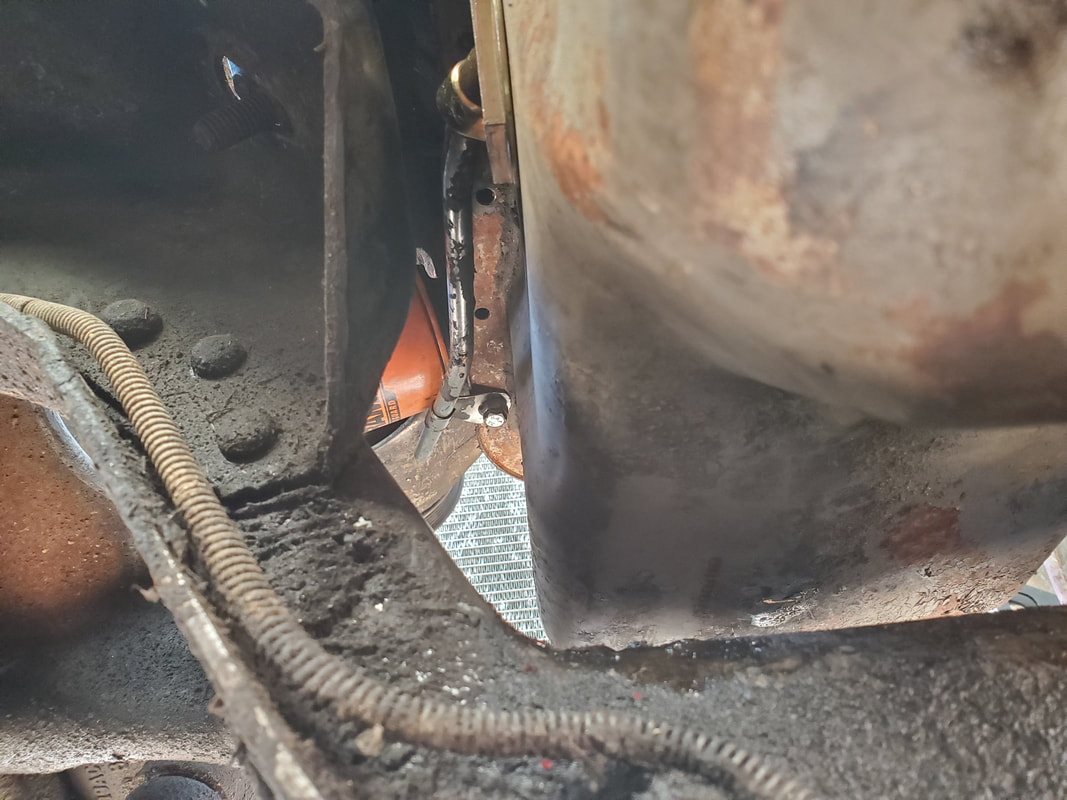 Dipstick placed in bung for fitting purposes showing how it would have to sit once permanently mounted. Note the loop, spacer nut and long bolt used to secure the dipstick to the oil pan mounting bolt. To place the dipstick in the bung I'll more than likely have to use some epoxy to place the tube in the bung. Only a little bit would be needed to get the seating started, with extra pressed around the tube to fully fill the gaps around the tube. Now, another thing would be me finding some tube that can be bent easily and has the same dimensions as the dipstick tube that would fit in the bung. I could then place the tube in at the 10-degree angle then bend the tube up to allow the tube to come up behind the power steering pump and just use a long dipstick to fill the extra length of the tube. In the meantime, the current dipstick tube has a loop that I used to secure the thing to the oil pan using a nut as a spacer and an extra-long bolt to go through the loop and the block, holding everything together. Either way, we'll be ok with the setup. The main thing that was keeping me from getting the FMT's engine fully mounted on the K-member was the idea that the oil pan is a front sump pan whereas the K-member requires a rear sump pan. I did find the oil pan that came from the engine that was in the truck so that was good. I also took time to affix the side mounted oil dipstick as well since the engine setup did not allow for a regular oil dipstick due to the block being an older unit that had the dipstick in the timing cover but needing the newer timing cover for the newer engine, which had the dipstick in the block. Anyway, with the new old oil pan ready to swap out, the old unit needed to come out. After removing the bolts, I had to move the engine crane back in place over the engine and hook the chains up, which conveniently were still attached because I would have to lift the engine again. I had to lift the engine to even be able to drop the pan down at all since the bottom of the oil pan was right on the K-member. After lifting the engine up, I couldn't pull the pan down from the back since the front sump being so close to the K-member kept it from moving any more to the back. Luckily I was able to move it forward and down to clear the K-member. Without the fan in place nor a fan shroud, I was able to pull the pan down and out. With the pan out I dropped the engine all the way down on the mounts for the time being since I needed to pull the crane free from the truck to make things easier for me to work underneath without crane legs being in the way. 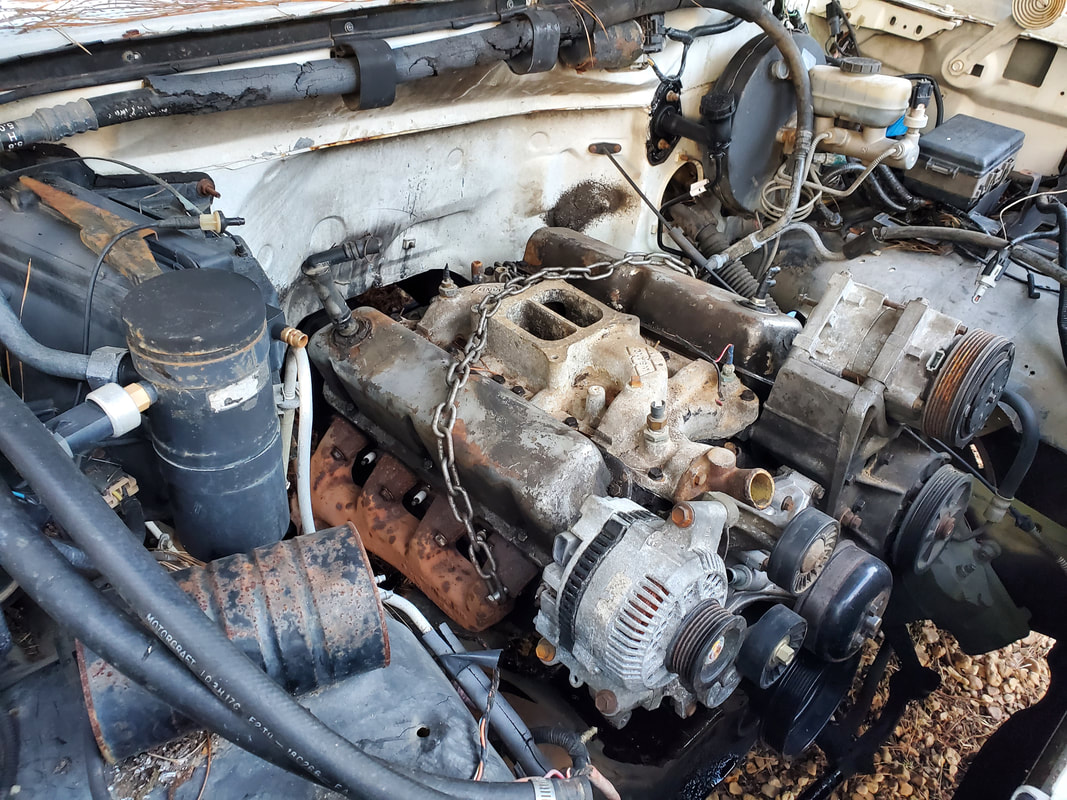 Engine after sitting down on mounts, note how much lower the engine sits and how much space is present behind the engine now. 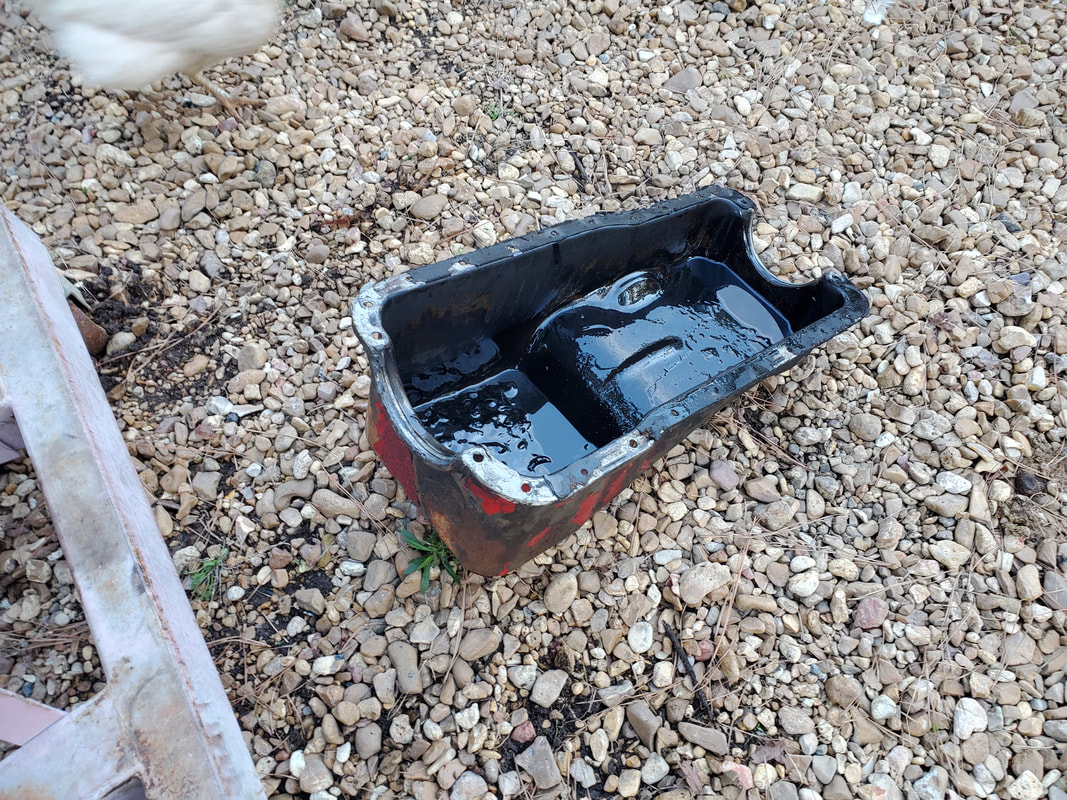 Old front sump oil pan free from the engine and out of my way completely. Funny thing is, because the sump section of the oil pan was resting on the top of the K-member, I was unable to access the drain plug. Because of this, when I did pull the pan free, the ass end of the pan dipped down, dumping most of the oil out to the ground. When I pulled the pan all the way out from the front, causing the rear to dip down again, the rest of the oil came out on the ground. Now, I'm going to have to lay something on the ground when I do slide back under the truck to put the new pan up. a minor inconvenience but still one nonetheless. At least now I can prep the bottom of the engine for the new oil pan gasket. 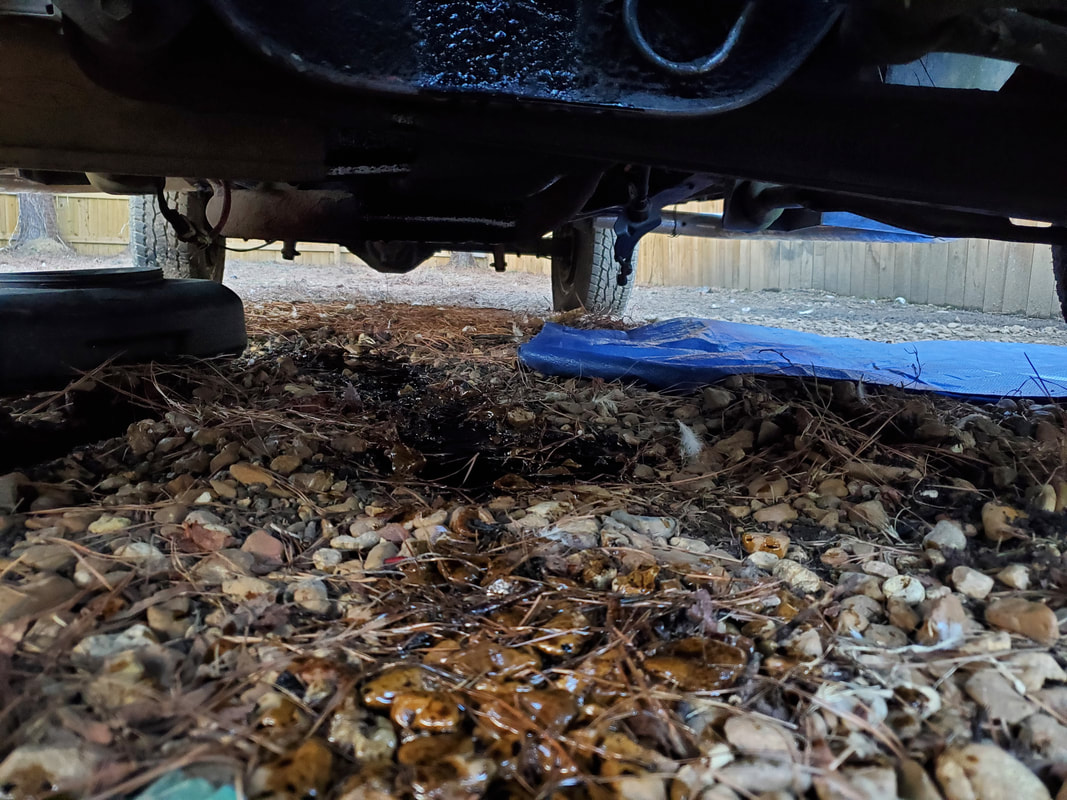 The environmental hazard created when I removed the oil pan. 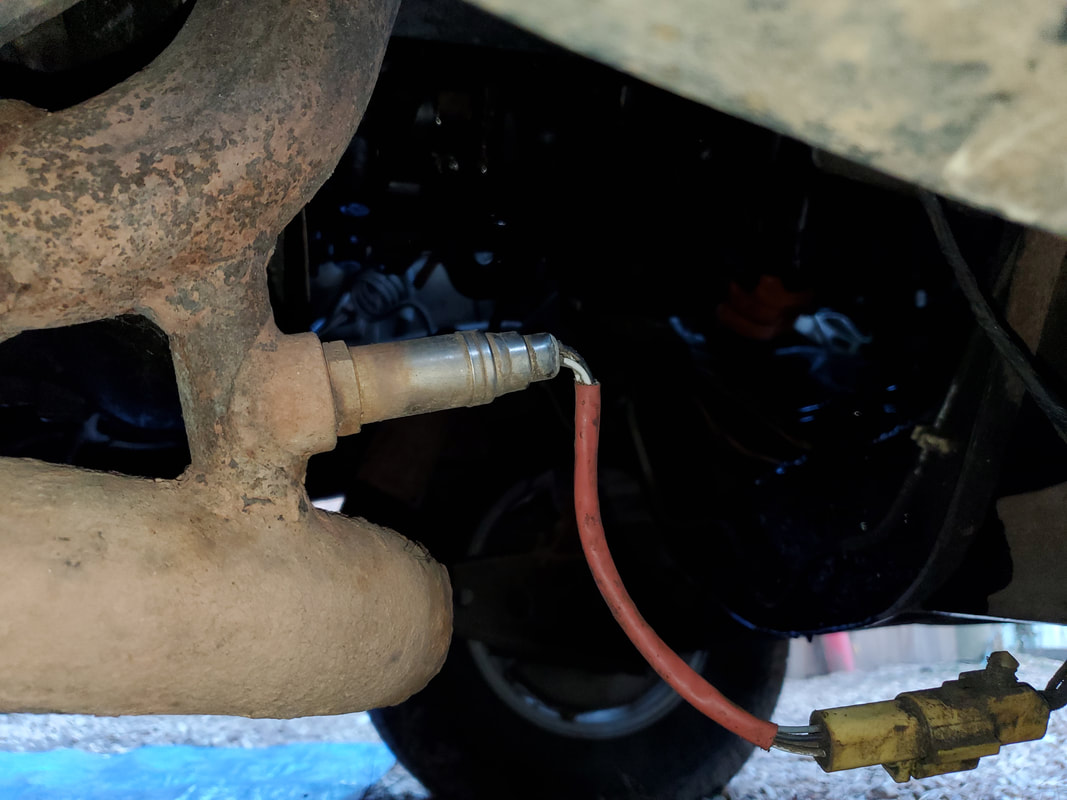 Guts of engine barely visible after removing the oil pan as the daylight wanes.... One last thing I wanted to confirm was good for the day was the fitment of the slip yoke we picked up from the junkyard. Since the yoke I had from the FMT's old driveshaft was a bit too wide for this transmission, we had to find one that had the same number of teeth but a narrower shaft diameter. After finding what the numbers should be for the dimensions, I brought my digital caliper along to measure the yokes we did find. Just when I thought all was lost, we managed to find a driveshaft from an older F150 with an auto transmission. It was a perfect match, same number of teeth, correct distance between the U-joint caps, and right shaft diameter. I brought along the tools to allow me to pop the U-joints out and remove the slip yoke from the driveshaft. With that we fast forward to now and I was able to install the new used yoke on the FMT's driveshaft. Of course, before I did that, I test fitted the yoke to find that it was a perfect fit in the 5spd's tail shaft bushing. 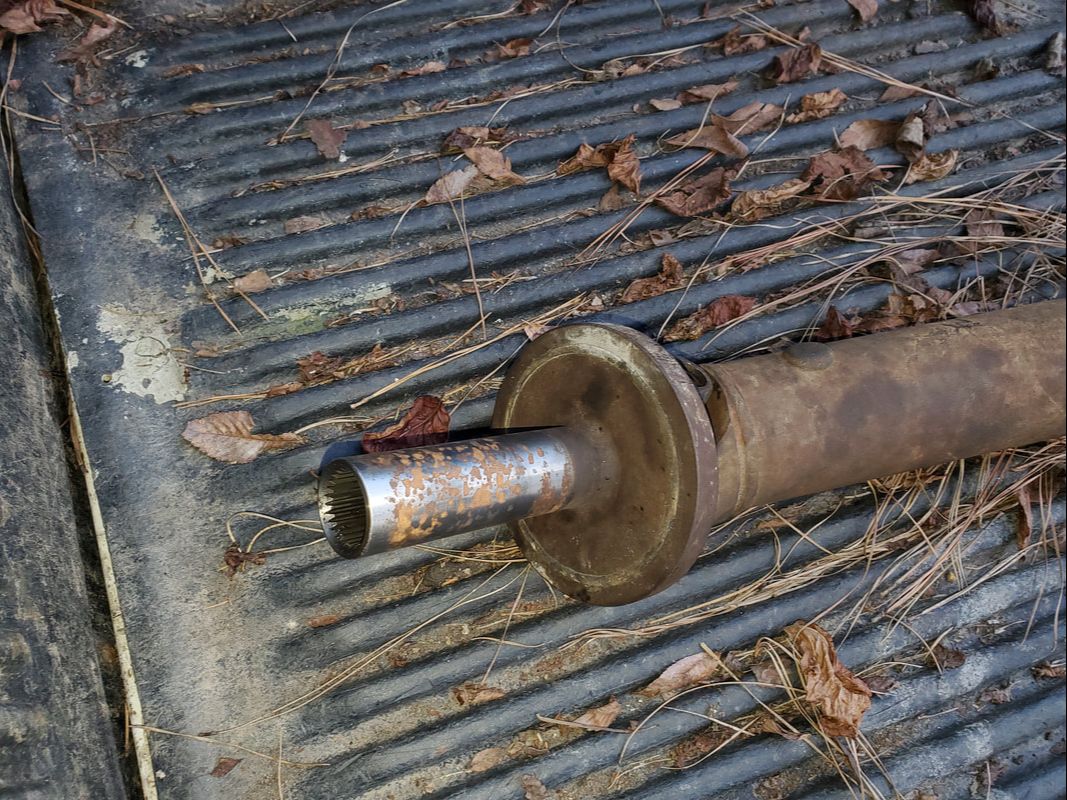 The FMT's driveshaft after installing the new used slip yoke from the junkyard. This is a turning point for the FMT due to the fact that a replacement driveshaft would've set us back upwards of $400 if we had to have it built from scratch. With this being taken off the table on our list of needs, there isn't really much left to do or buy for this truck before we can get ready to crank this thing over for the first time. After gluing down the sheet metal on the sunroof frame, I had to lay a tarp down over the whole roof, while adding some weights in order to hold the sheet metal down while keeping the whole works covered due to the fact that rains were coming. It's a good thing too because the rain came down hard as hell. It was bad enough that we were concerned that we might not get a break from the rain to be able to go outside and finish things up with the sunroof, especially since we both had to hit the road. I ended up deciding to bring the car up to the garage, and despite the Dodge taking up most of the garage, we were able to pull the car in enough to have the sunroof protected from the outside. The rain did slow down to a drizzle as well, so that added break made things a little easier on us. The first thing I had to do was eyeball where the front glass supports made contact with the corners of the sheet metal so I can mark those areas to cut out the metal. Since the sheet metal is thin, it would not be able to apply the force necessary to push down the deflector glass without distorting the sheet metal's corners. After tracing out the edges I started cutting with the angle grinder, after opening the sunroof back up so I can stay clear of the deflector glass. No need to risk hitting and breaking that glass too. 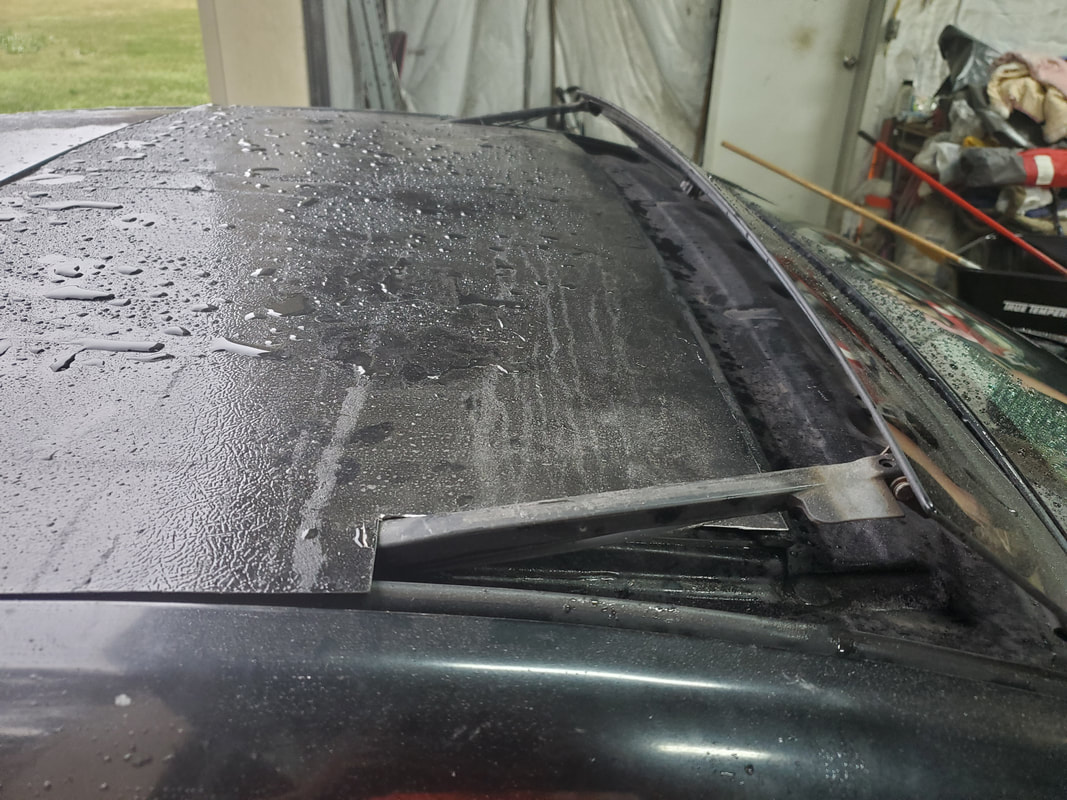 Sheet metal sunroof in the down position, with corners cut out to allow for deflector glass supports upward position. It took a little trimming to get things right enough that the edges of the sheet metal wouldn't make contact with the deflector supports when the sunroof is opened and closed. With my cuts, I still had plenty of metal covering the weatherstripping so when the sunroof is in the closed position it would lay on the rubber good enough to not leak any water. Besides, the deflector glass would serve as just that, a deflector to keep any rainwater from making it under any gaps that may be present between the bottom of the sheet metal and weatherstripping. I also had to slightly bend the overhanging metal downward some to ensure that the metal rested on the rubber even better than it did originally. Again, being temporary, the thin sheet metal had to be manipulated to keep it down as needed. 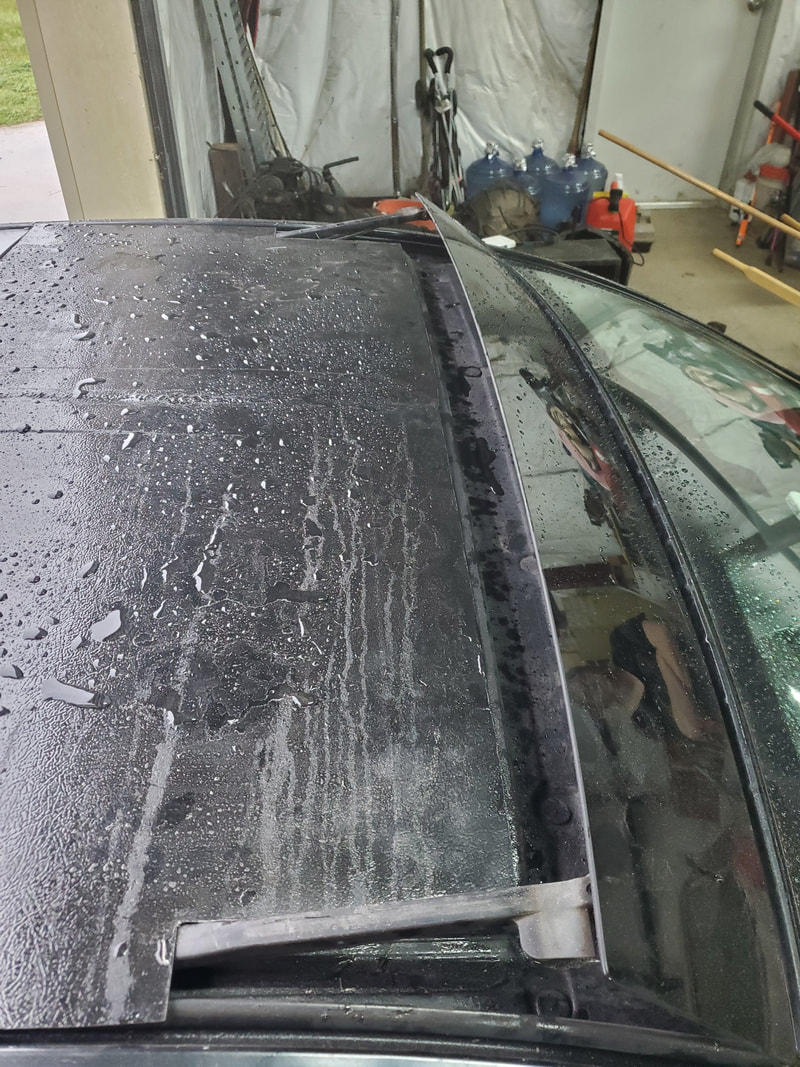 A better angle of the sheet metal sunroof showing how everything sits. As for the inside, there was still a matter of the pinholes in the weld seam where the two pieces of sheet metal joined together. As stated, I planned on sealing these with hot glue. Again, since this is temporary, there is no need to get too involved with the level of work. After drying the inside of the panel (since it was raining after all), I applied the hot glue over the holes, sealing everything up. Now, the sunroof is sealed all over. Other than a slight air leak, the bootleg sunroof is done and ready to go. 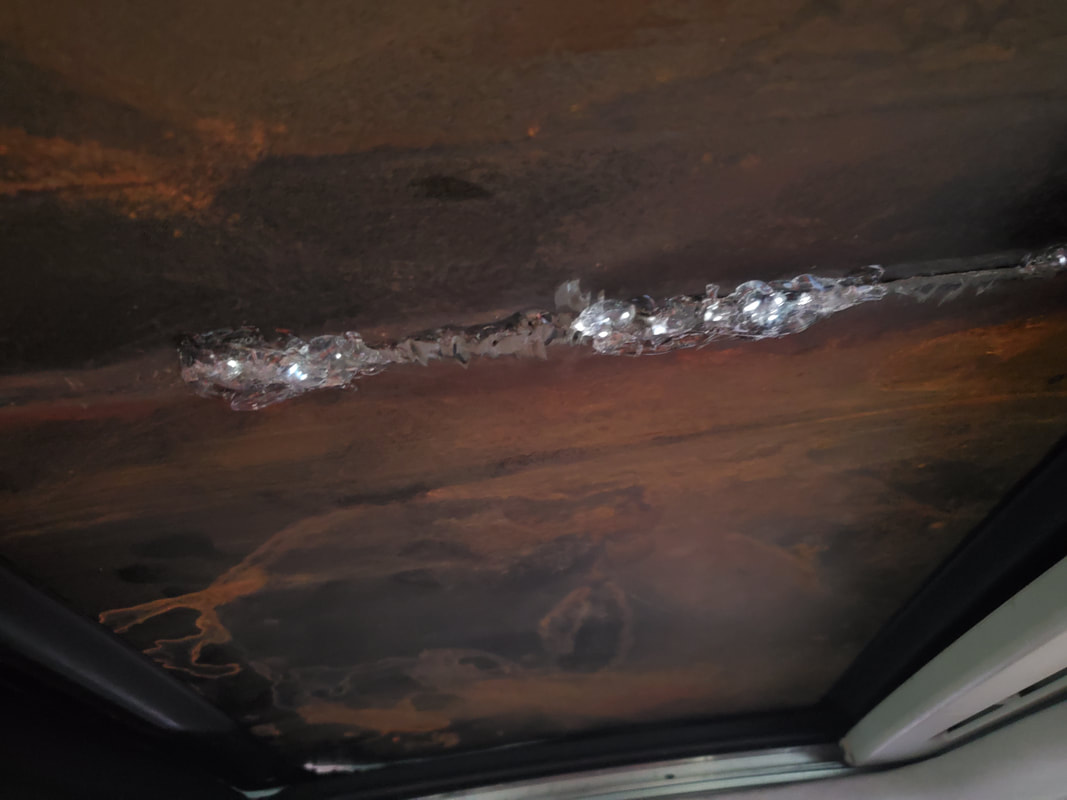 Inside of sunroof weld seam after applying hot glue to cover pin holes. As you can see, even though the inside of the panel has surface rust and rusty water stains, once the cover is slid closed, the driver will never see this. Of course, I could've painted this but to spray paint over the whole surface would've made it difficult to stick to the glue, since it would be the paint that would be sticking, more so than the actual metal. Only other option would be to apply paint with a brush. Trying to spray paint now would only make a horrendous mess with overspray on everything. The outer surface was sprayed gloss black to make things match up pretty good to the rest of the car body. At least now, unless one knew better, they may not fully question the nature of this sunroof. Until then, I can stand by and wait to see what happens as far as compensation for a replacement sunroof. But if I manage to source one from a local junkyard, then I will just say fuck it and replace the damned thing and move on. After getting back home with the Scion with the taped-up roof, I had to figure out a battle plan. In the meantime, though, I had to clean up the whole roof and the surrounding area. This involved vacuuming out the broken glass from all around the channels in the sunroof frame as well as the tracks. From there I had to pull the frame from the tracks to further clean things up. The frame is held to the tracks with three bolts per track. With the track out, I was able to start removing all the glass from the metal frame. 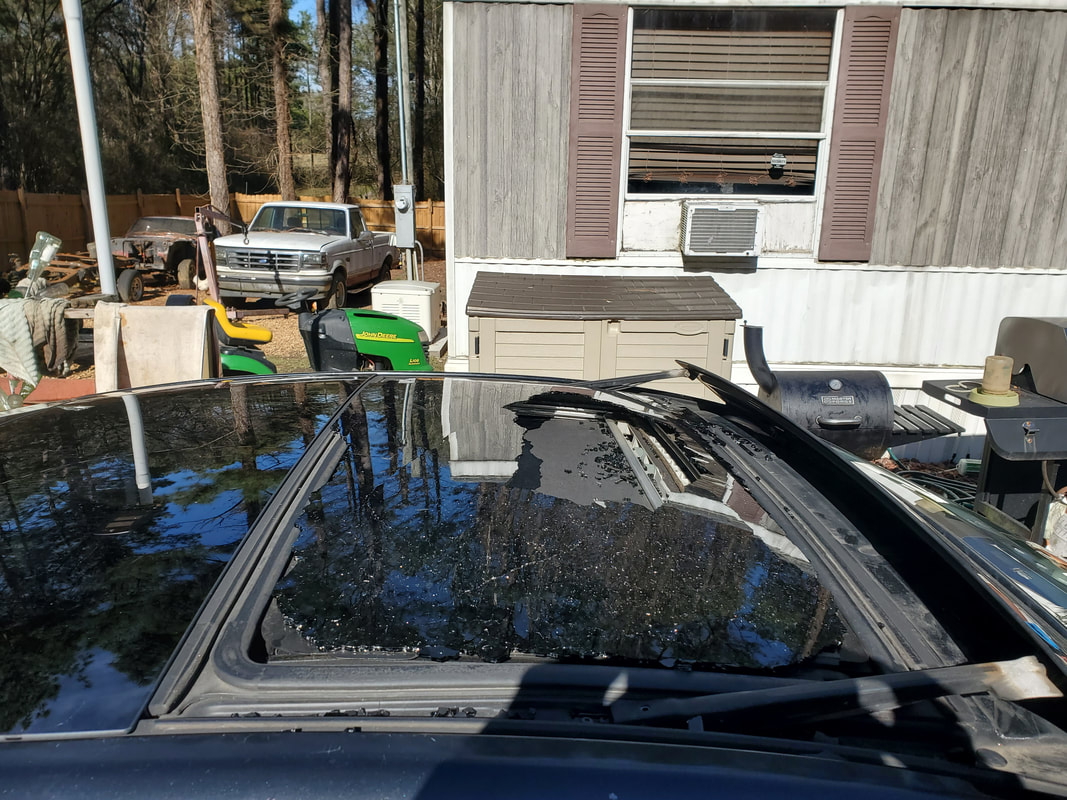 The broken sunroof glass, half out, half shattered and ready to fall out. 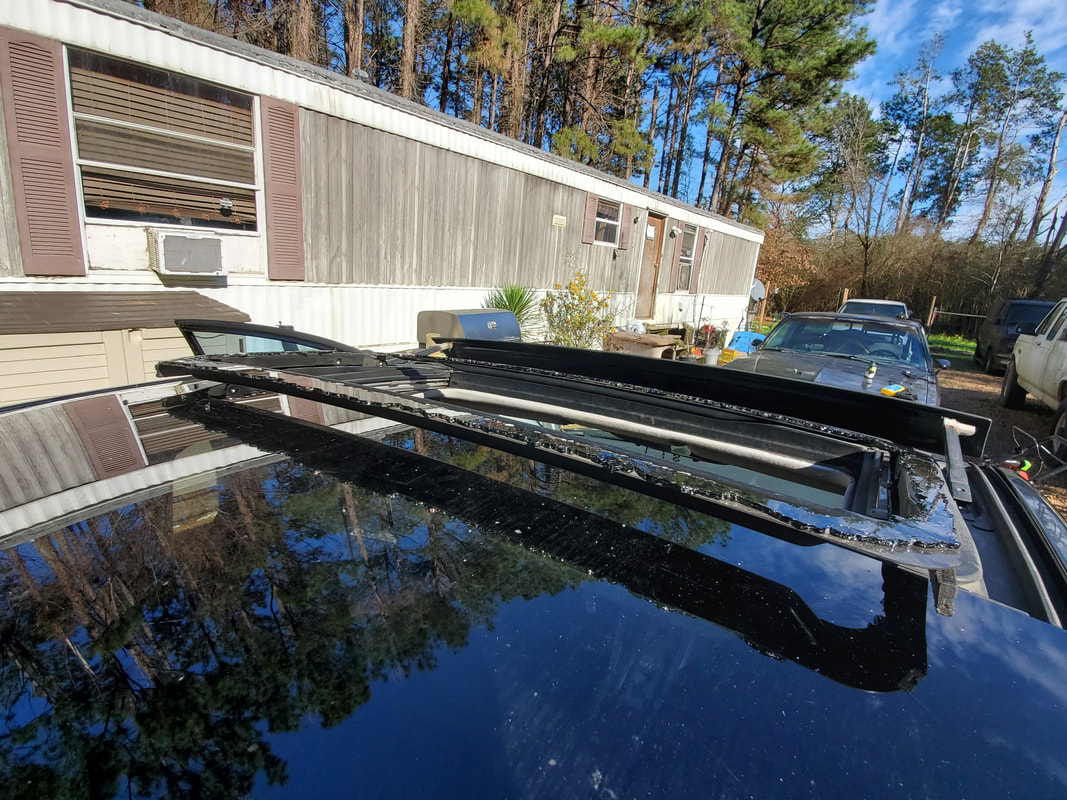 We managed to get the sunroof frame up into the open position despite the glass being jammed up in everything. Note all the glass is broken out from the frame. 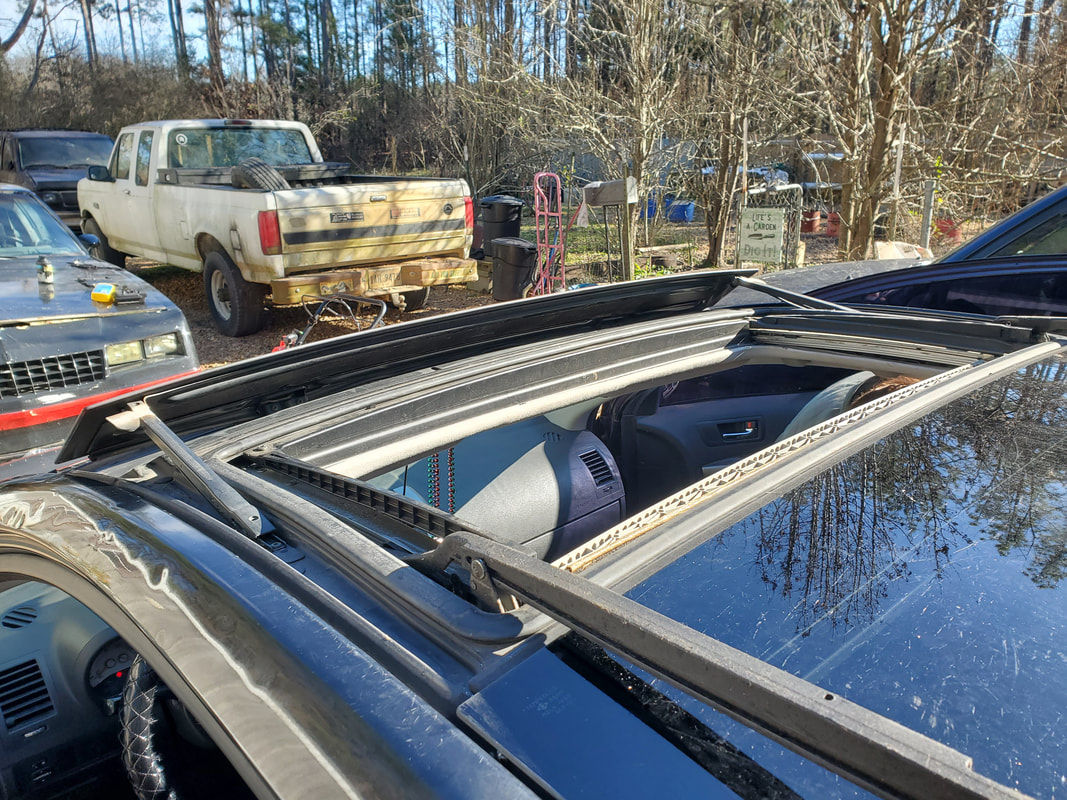 The sunroof frame is removed from the greater assembly, with just the tracks in the open position. With the frame out, I had to take the time to break the remainder of the broken glass from the frame. Really it wasn't breaking more than peeling the shards from the glued surface of the frame. After a tedious process of removing the glass from the frame it was time to do some material sourcing. After checking out the prices of pleixglass, we came to a quick conclusion: fuck plexiglass. The size of the piece of plexiglass needed would've been almost $100. I could've just tried to grab a replacement glass for less than that at the junkyard. Hell, a new replacement glass is $150. So after aborting that idea, I decided to use some scrap sheet metal. 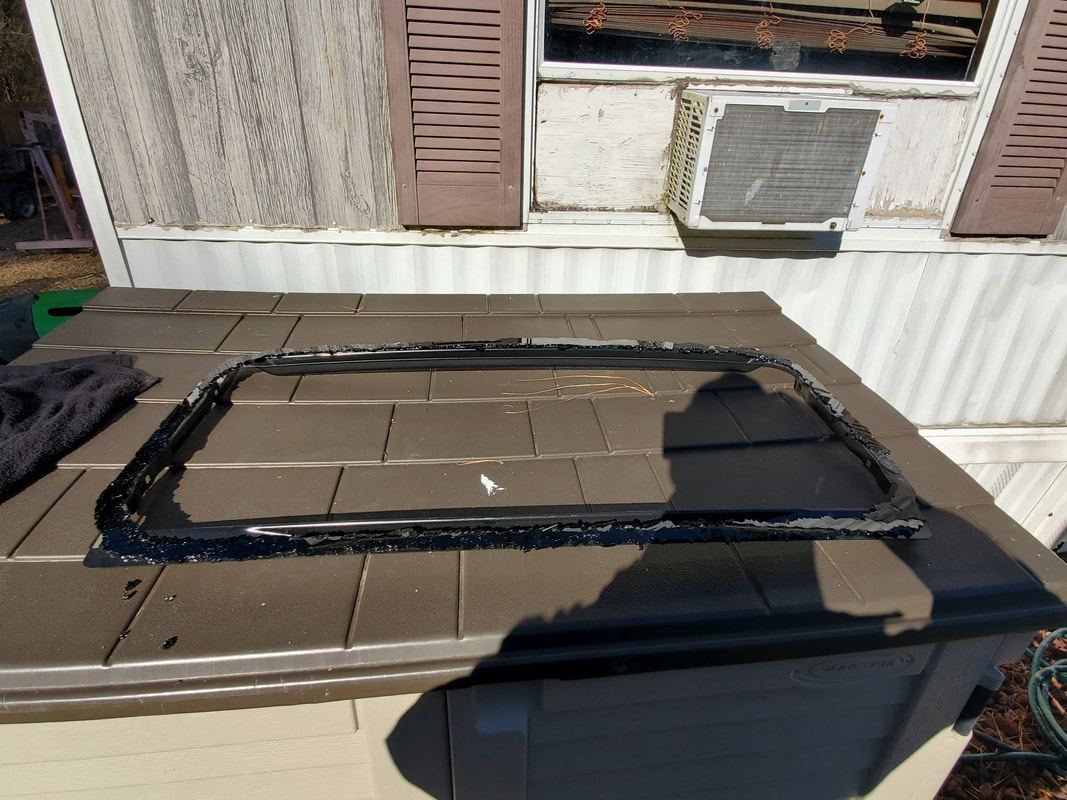 The sunroof frame with the broken glass shards still stuck to the glued surface of the frame. 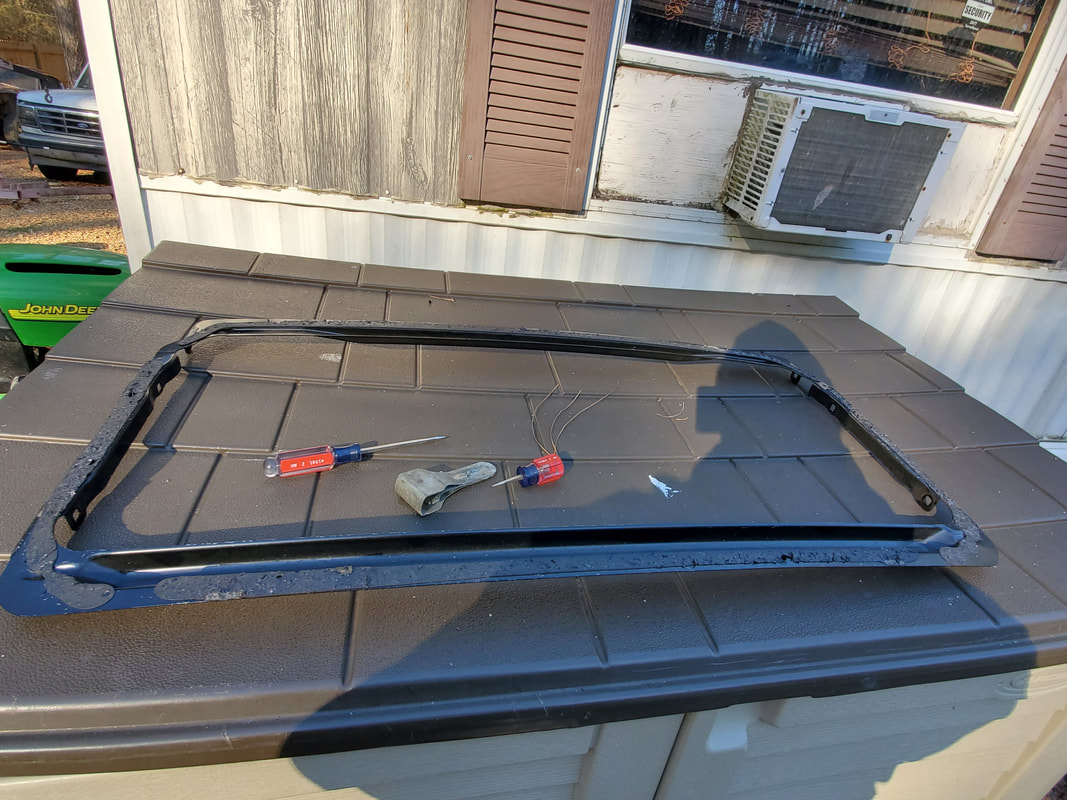 The sunroof frame after cleaning off the glass. After the glass shards were removed I used a blowtorch and scraper to remove the glue from the metal to prep the surface for new glue. Since I didn't have any single flat sheet metal that was big enough to fit, I had to take two identical pieces and weld them together then cut the piece I need from that larger piece, keeping the weld seam in the middle to at least try to keep things symmetrical. The sheet metal used was actually salvaged from an old appliance and was thin to the point that I had to carefully fan the weld gun over the seam to keep the arc from burning a hole through the metal. This still happened anyway so I had to further fan the welder over to fill in the holes. After taking more time than I care to when welding something this small and simple, I took measurements and started cutting metal from the greater piece. I had to place the two-piece panel on the roof and draw lines to mark where the edges will be when the piece is in place. 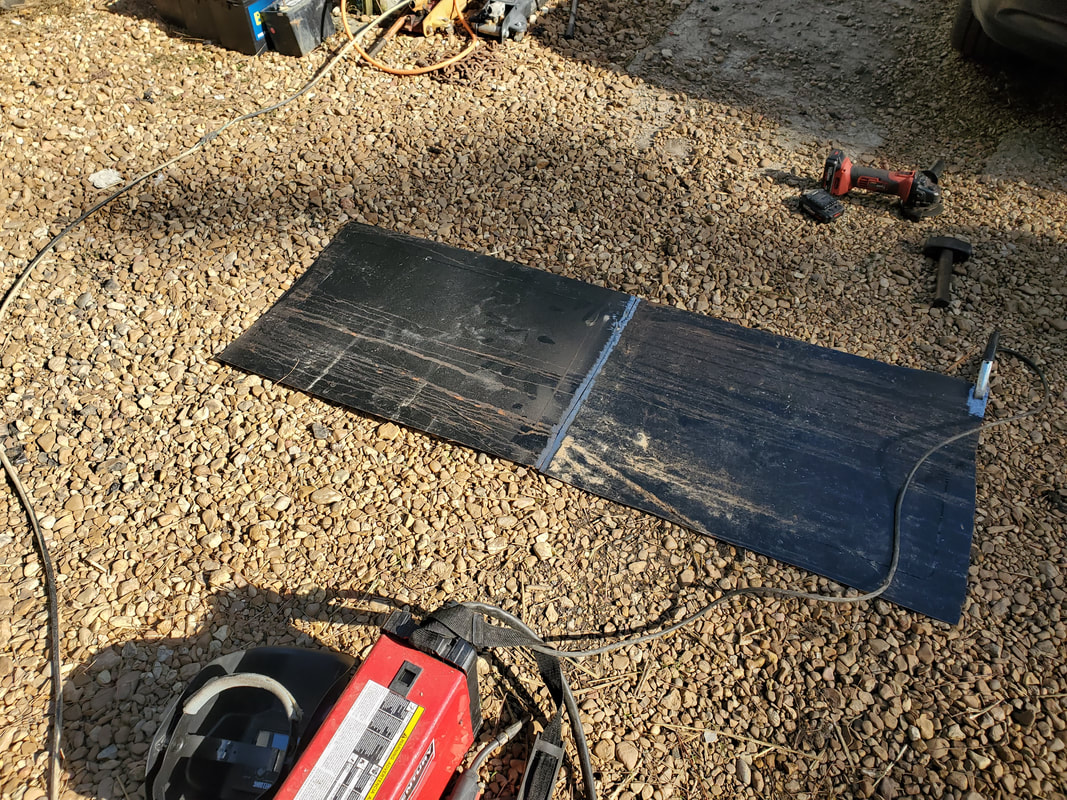 Two pieces of sheet metal butted together with the welder hooked up. Note seam with paint grinded off prior to welding. 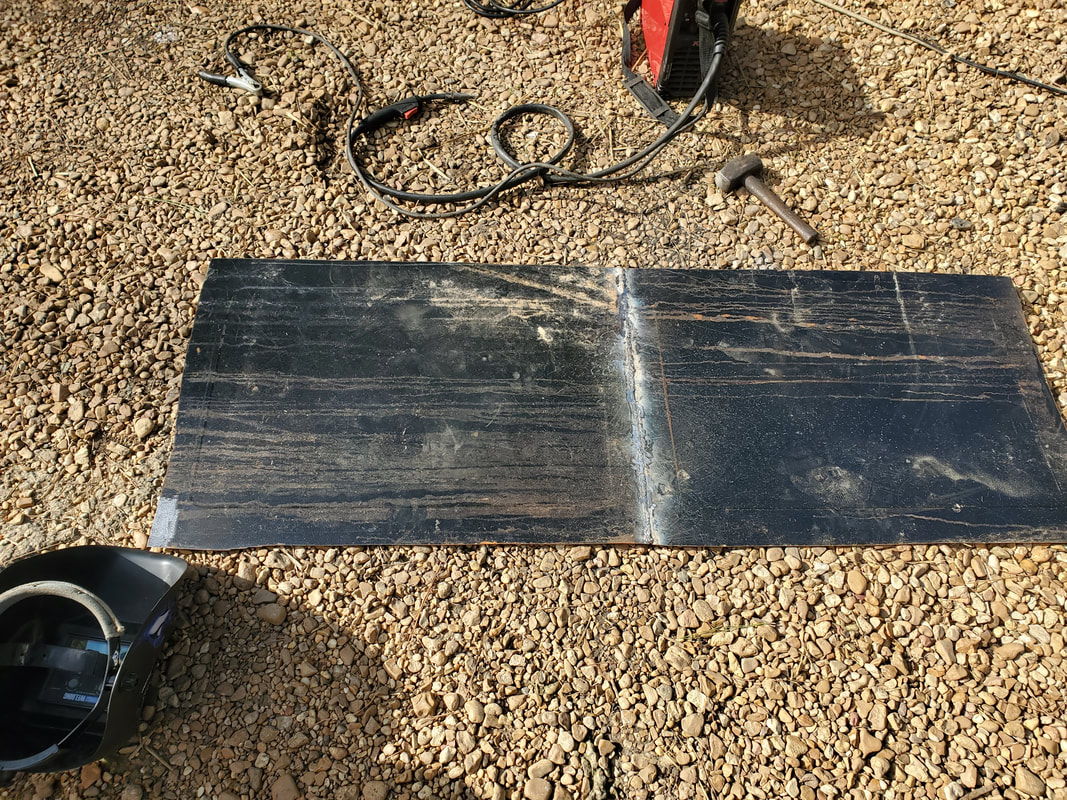 Pieces of sheet metal welded together. 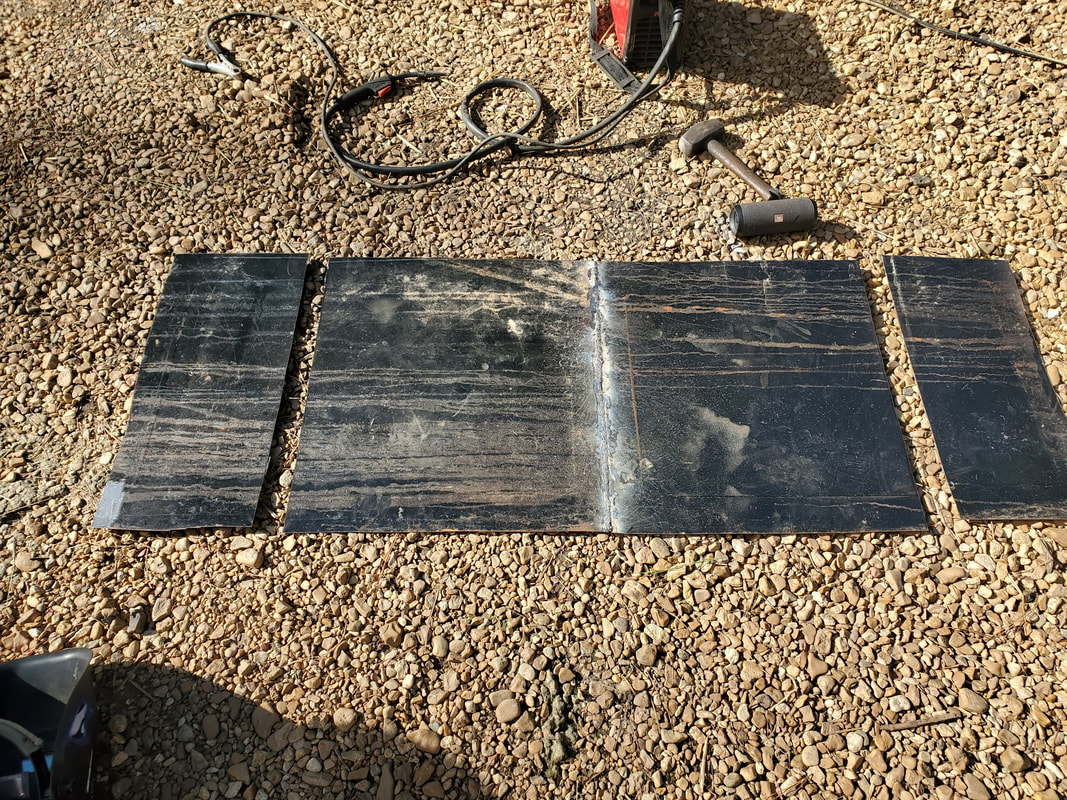 First set of cuts to create the piece to be placed on the sunroof. These are the sides that are removed. Next is the front and back sides. After doing another fitting and trimming the front and back sides of the panel the next thing was to apply the glue. I picked up some Gorilla brand construction adhesive to use. I can go on the hope that this shit is more than strong enough to bond the sheet metal to the metal frame for the sunroof. In the meantime, I had to grease up the tracks on one side of the sunroof frame to make it be able to freely open up when activated since there was a broken piece that was making it difficult to open properly. The thing is, I needed the tracks in the open position in order to be able to glue down the panel. Well not immediately. First, I would have to apply the glue then lay the panel on top, pressing down to get the panel to make contact with the glue as I work the switch to open the sunroof. As the roof frame moves to the open position, it will move the panel with it, and press even further against the panel, allowing the glue to mash into the two surfaces even more. Once the frame is in the open position enough that the panel isn't making contact with the weatherstripping, I can put some weight on the frame to make it stay pressed directly against the frame and the glue. In the closed position the weatherstripping would push up somewhat, not allowing the panel to make direct contact with the glued frame. 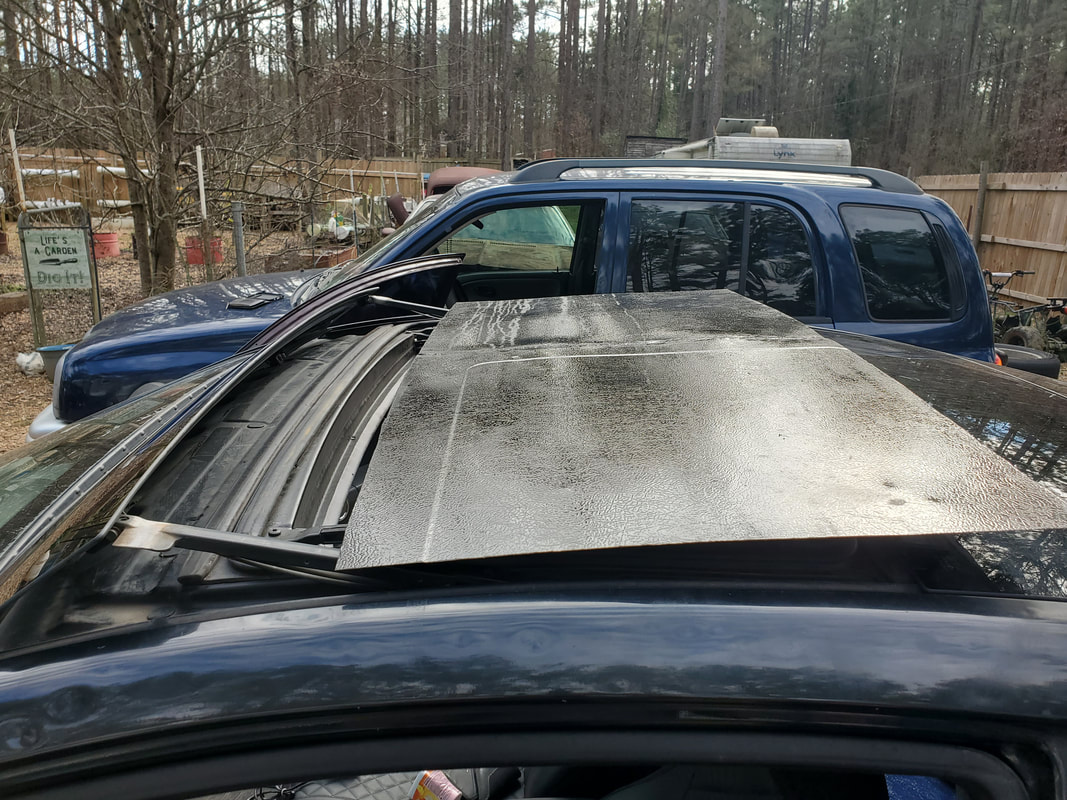 Sheet metal panel pressed against sunroof frame while in the open position to allow glue to set. 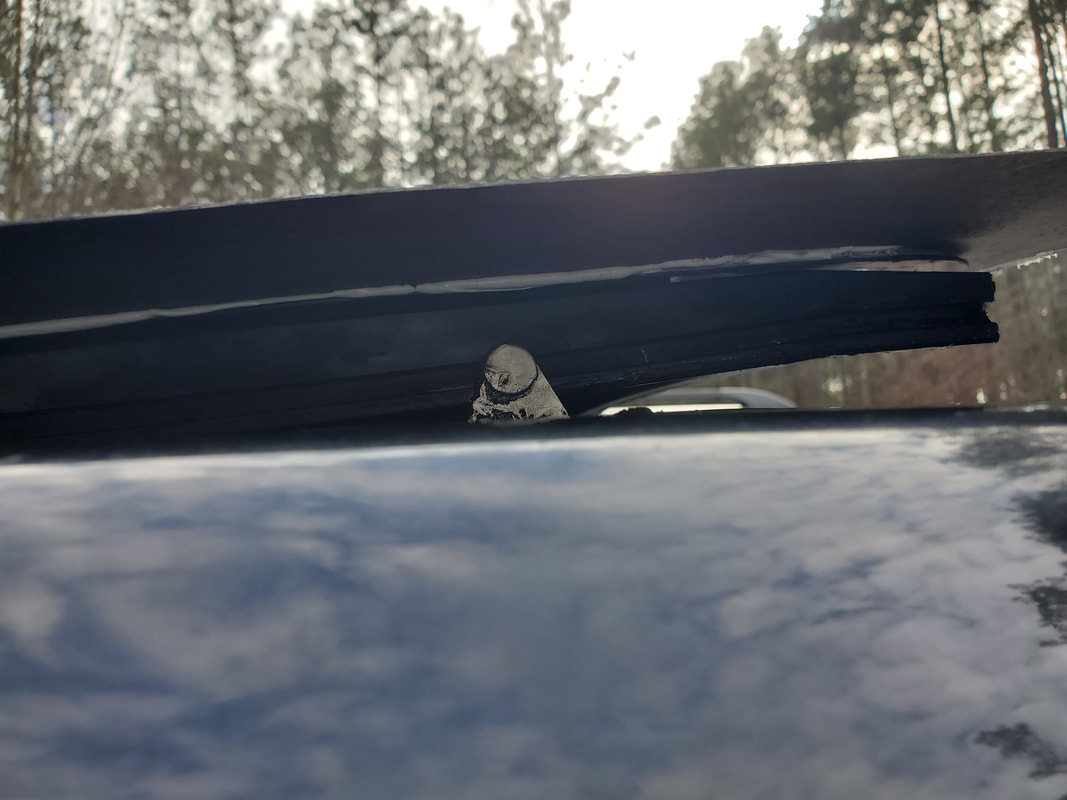 Shot under the panel showing the bead of construction adhesive holding the panel to the sunroof frame. 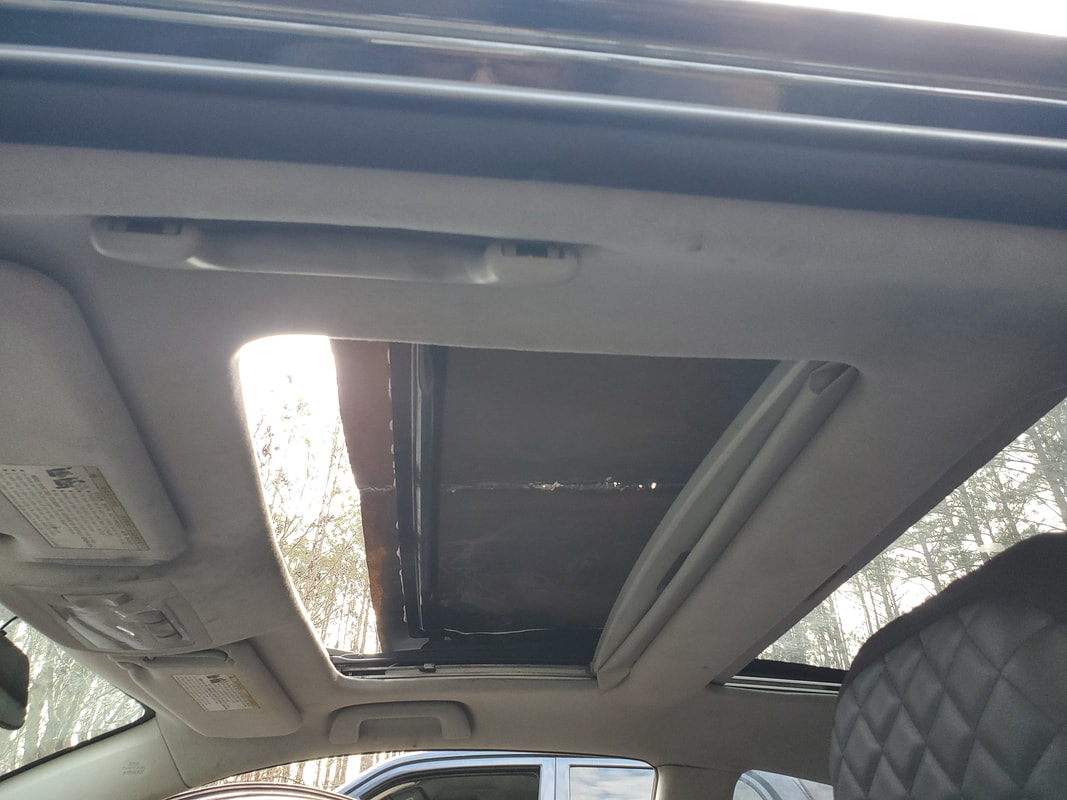 Shot of the inside of the sunroof panel showing the unpainted (and slightly rusty side). As you can see in the last pic along the weld seam there are some pinholes that I'll need to tend to, probably with the hot glue gun since again this shit is temporary. I just need to keep this thing from leaking if it rains. Again, I'm going on the hope that things will be ironed out enough that this shit will be fixed right more sooner than later, or I would have to concede and just source another sunroof from one of the local yards and go through the steps to remove it. One thing that I would have to take into account is the idea that I will have to put together a portable 12v power source with leads that would allow me to plug to the terminals on the relay or fuse that would allow me to feed power into the sunroof motor to allow me to open the thing up in order to reach the bolts that hold the thing in place. Without this, the sunroof will be unable to be removed and will most likely be broken by anyone attempting to remove it otherwise. After getting the fuel pump installed, I still had to finish up things with the transmission crossmember. Where I had left off, I had put one of the bolts in on one side since I was able to turn the crossmember at an angle to reach one of the factory bolts. After really looking at everything, I decided to just drill new holes for both sides. Again, this transmission is not the version that was supplied for these trucks from the factory. I'll have to look for casting numbers or something to see if this isn't the M5R2 or one that was supplied in the next generation F150s from 97 up. I don't know, since it was supposed to be pulled from a 351 truck, maybe a 96 I believe. If that is indeed the case, maybe Ford changed things up in that last year before transitioning to the newer style F150s that had the Triton V8's and 4.2L V6's. Either way, the tranny is in, it's not coming out and we have to work with it. I'm satisfied, I'm lucky to have even found one (even though we did find one just recently at the local junkyard). So back to the crossmember and its mounting holes. I ended up positioning the crossmember where it was straight across then pulled out the small bit, drilled a pilot hole then used the step bit to widen the hole for the bolts. 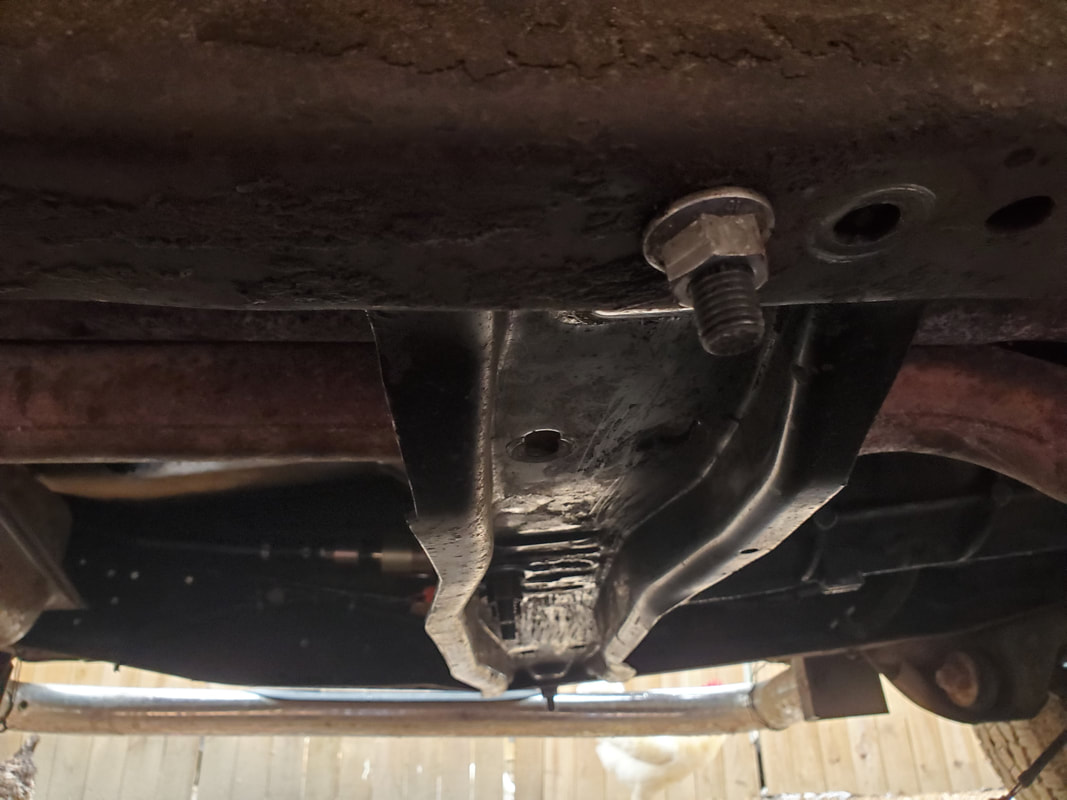 Crossmember in place with the right side mounting bolt in the upper foreground of the pic, secured with a nut. Note how the position of the crossmember has it as far forward as it can go before bottoming out on the mount studs. Now one of the problems that I had with the placement of the crossmember is the idea that I couldn't position it where the mounting studs were more centrally mounted. I ended up moving the crossmember as far forward as it can go before bottoming out on the studs. Reason for this is the way the frame rails are angled. At just this point where the crossmember sits, the width between the frame rails widens slightly as the crossmember goes back. What this means is the amount of frame lip available to drill for a large hole gets less since the position moves closer and closer to the edge of the lip the farther back I go. I had to position the crossmember as far forward as it can go so the holes on the frame lips will be as far from the edge as possible. The last thing I need is to crack the lip of the frame where those bolts sit because of their position near the edge. 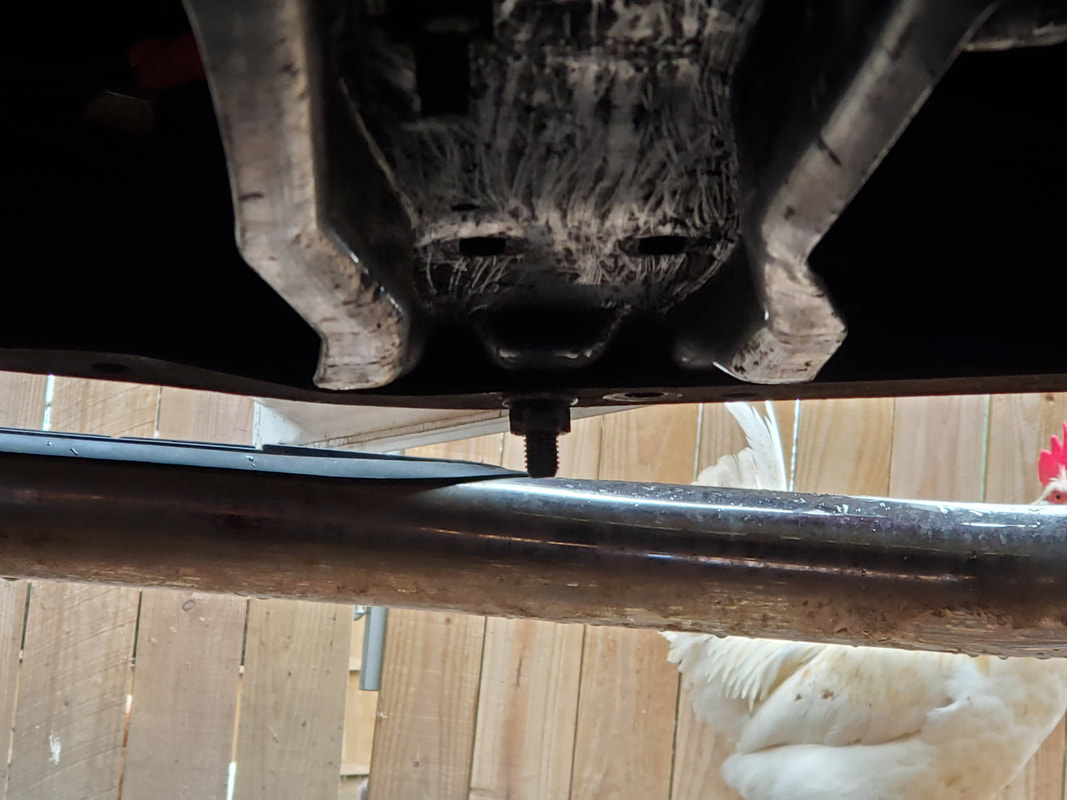 Closeup of the left side crossmember mount. You can kind of see how the edge of the nut is right on the edge of the frame lip. With the crossmember in and the mount secured, the next order of business for this truck is pulling the wrong oil pan from the engine. There are a few things involved with this, first being the removal of the bolts from the pan. I'll have to hook the crane back to the engine and lift it up high enough to allow me to pull the pan down and free of the block. Once that's done I can get under there to clean the bottom of the block of old gasket material in order to get it ready for the one-piece gasket that I picked up for this setup. I used one of the one piece oil pan gasket sets, which are standard with the middle 90's Ford V8's, on the 351 we used to have in the Rustang a long time ago. It was one of the best components I've ever had the experience of using since gone were the days of lining up four separate pieces of gasket material. This is essentially another reason for my enthusiasm with putting a V8 back into the Rustang in leiu of the I-6 since there are so many options or different parts and modifications on the SBF V8 that are not present on the I-6. Now we had another curveball thrown our way. The ole lady, while riding the Scion doing her normal travels, found herself behind a dump truck on an on-ramp to a highway she frequently travels to her area of operations. Unable to go around, she was in the prime position to catch whatever may come from one of these infernal machines. In this case, it was an errant rock. And the errant rock didn't just hit the windshield. No, it had to hit the sunroof. And the sunroof is made of tempered glass so when it suffers an impact, the whole damned thing shatters. Well, that's what happened here. 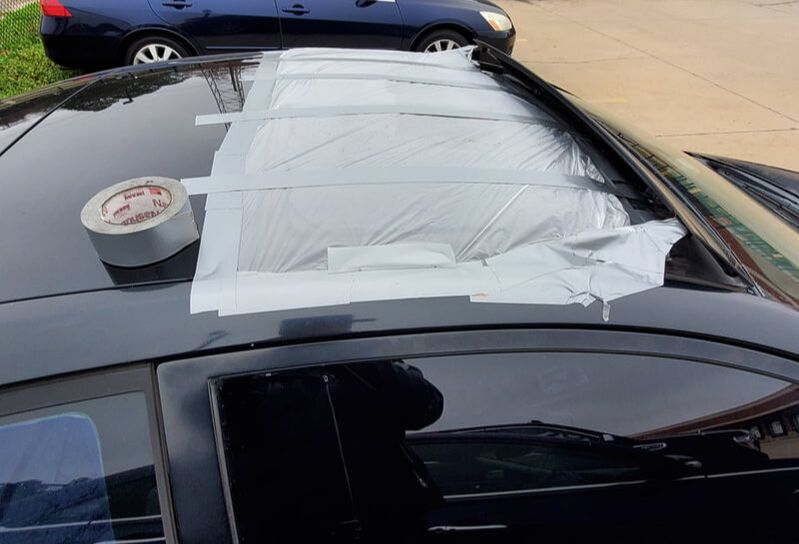 The bootleg plastic bag/duct tape job done to cover the broken sunroof on the Scion. Because of this, something had to be done to at least cover up the hole in the roof. The ole lady switches cars with me then continues on her way. In the meantime I took a trash bag and did a bootleg job of covering up the broken window so I can at least keep out any sprinkle from the skies plus be able to drive home without freezing my balls off. Of course this was the least of our problems. I had to try and figure out what I can do to temporarily remedy this problem while waiting to see if there's any chance of reimbursement from the insurance company covering the dump truck (since it was from the county). The full scope of the damage on the sunroof. Completely shattered glass, half of it gone, the rest waiting for the right impact to finish it off. There's a couple of options, based on cost of course. One is to get a large piece of plexiglass and cut it to fit and glue it down on the frame that holds the sunroof glass. The other option would be to put a large piece of sheet metal over the frame in the same manner. For all intents if I could find a replacement sunroof glass from the junkyard I'd just replace the fucking thing and be done with it. Problem is, if we go through our insurance, the deductible would have us still coming out of pocket since the cost of replacing the glass won't come close to the deductible, and it'll end up just being a non-starter as far as being covered in any way. Second, depending on how long it takes for anyone to get back with us (if at all) we will end up just fixing the thing since we will end up finding the part we need and getting it for somewhat cheap and end up being able to just fix the shit in one hour and moving on. Otherwise we're talking about riding around with a bootleg roof for who knows how long.
In this brief post, we will cover the installation of the aftermarket fuel pump on the FMT. If you recall, I had to modify the sending unit assembly on the front fuel tank since I removed the in-tank fuel pump due to the fact that it will pump at too high pressure for the simple carbureted system. While the sending unit has been retained sans pump, I still would have to add an external electric fuel pump in the fuel system to supply fuel to the carburetor.
The obvious answer is to add a generic aftermarket fuel pump, the same that's used on the Elco, the same used on the Dodge, as well as the Monte Carlo. These little fuel pumps are pretty affordable, clanky and pump with a decent enough pressure and volume to supply most street carburetors. The pump kit comes with a bracket to hang the pump anywhere a hole exists to hold the single bolt that would hold the bracket in place. A pair of short hoses also come with the kit, as well as hose clamps. Hose barbs and an in-line fuel filter are included to assemble the pump package and install wherever you may need it. When it comes to a typical automotive installation its best to install these pumps as close to the fuel tank as possible in order to lessen the strain the pump will go through to draw fuel up from the tank. Installing the pump at the engine will cause the pump to go through undue strain and fail prematurely. In the case of the FMT, there's a perfect spot on the frame rail just forward of the fuel tank where I routed the fuel line alongside the brake line. In this area the wire harness that connected to both fuel sending unit/pumps as well as the rear lights runs right along with the fuel and brake lines, plus there's a couple of holes in the frame. This makes things perfect for the installation of our fuel pump. 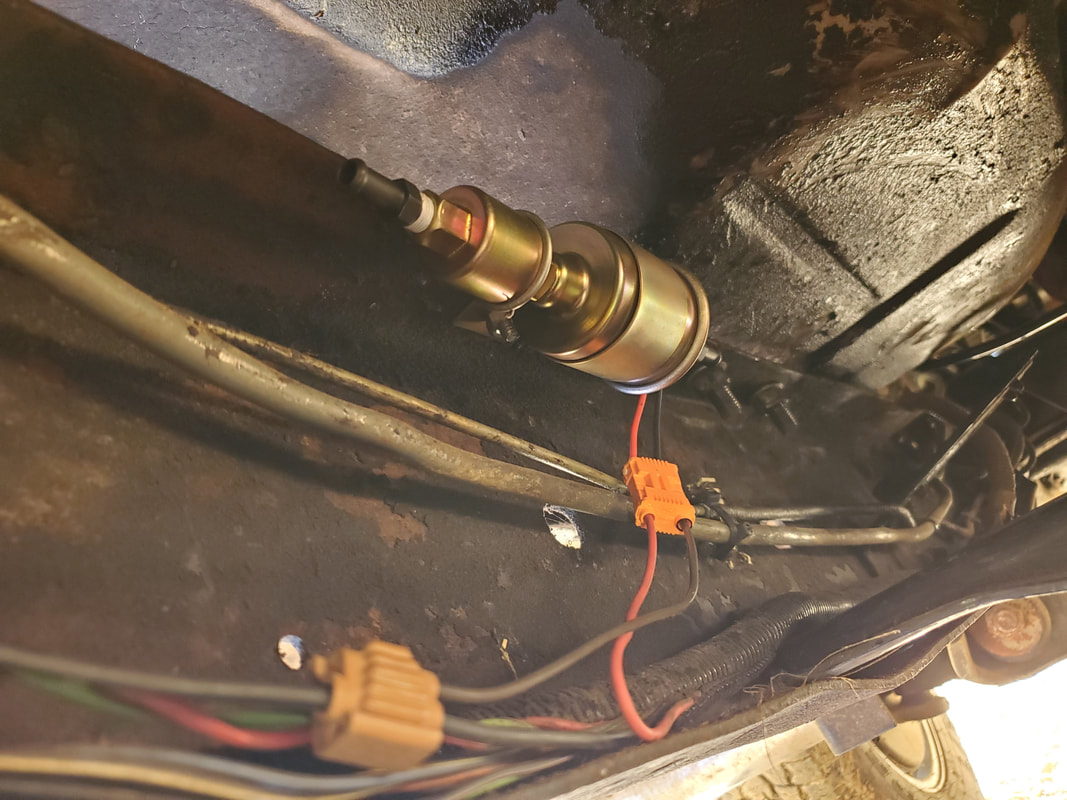
Fuel pump installed with clamp after connecting the other components. Note wires hooked up to connectors and to wire harness.
After assembling the in-line filter and hose barbs, I wrapped the bracket around the pump and hung the unit to one of the holes on the frame rail. With the pump hung, I pulled a red wire and the black wire from the wire bundle. There were two red wires in the bundle, well red-ish. Mainly red with a stripe, either one feeding the front or rear pump assemblies. The black wire was of course the ground. The other wires would be for the sending units themselves and the lights. I snipped a red wire to route to the fuel pump then used a splice connector to tap into the ground wire. At the fuel pump itself i used a two-terminal male/female plug to connect the fuel pump's wires to the red wire and to a short piece of black wire that was then connected to the splice terminal on the main black wire. Once that was all done, I cut a section of the fuel line based on the position of the hose barbs. I wanted to leave a small gap between the ends of the hose barbs and the ends of the fuel line after cutting out the section. I could then easily install the short pieces of hose with the clamps to couple the fuel pump assembly to the ends of the fuel line. 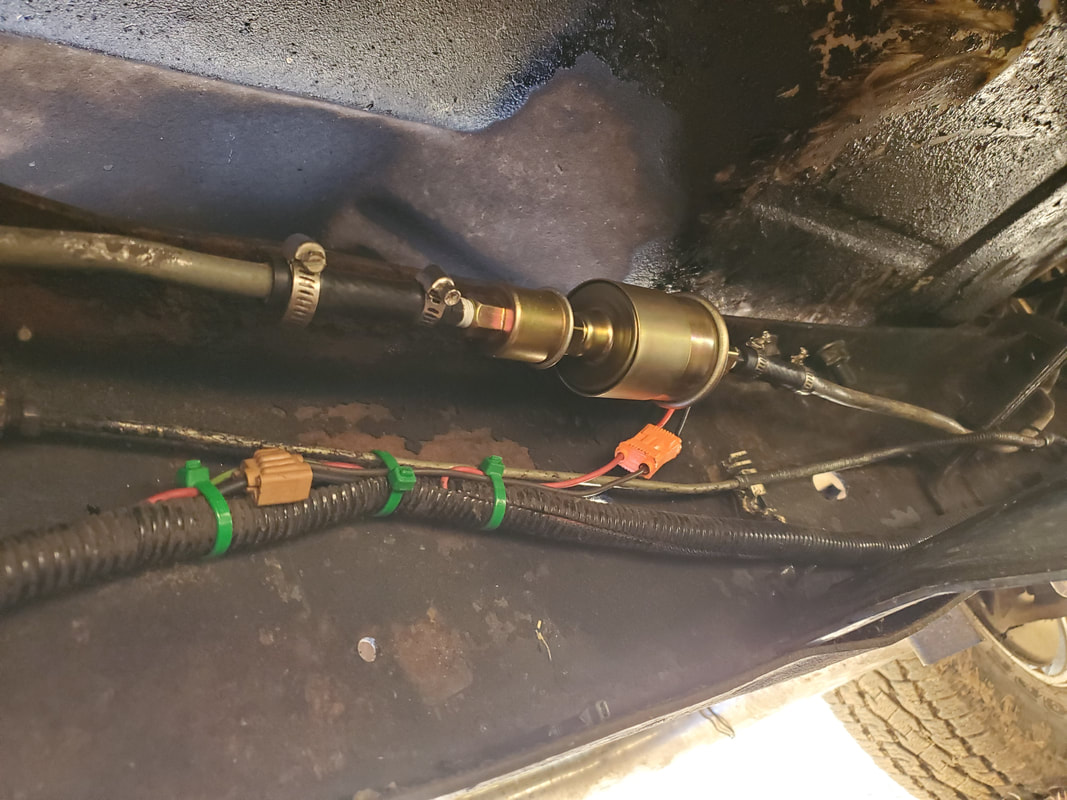
Fuel pump with hoses and clamps hooked up to fuel line after cutting out section of said fuel line.
With the fuel pump installed completely, the only thing left to do is go to the dash where the fuel tank selector switch was at and find which of the output lines will feed power to our fuel pump. This will be as simple as trying to fully identify the stripe color on the red wire going to the fuel pump then match it to the plug in the dash. From there I have to find which wire is feeding 12v to the outputs. Lastly, I have to install a jumper between the 12v power feed wire and the output to confirm that the power is reaching the pump. Once that's all done, I can say the fuel system, short of the carburetor, is done.
After making the modifications to the parts for the FMT, I was ready for the real work. Besides installing the shifter in the transmission, I still have to drill holes around the hole in the floor in order to secure the accordion cover at the base of the shifter. Installing the shifter was the easy part. Getting things lined up to drill the holes in the right spots while dealing with the carpet gumming up the drill bit would be what slows me down. I ended up drilling an extra hole due to having one of the holes off slightly. It's no big deal, the carpet covered all that up. Plus, I had to move the flexible material to expose the holes in order to put the screws through. Next I had to use some longer drywall screws to be able to reach down and grab into the holes. 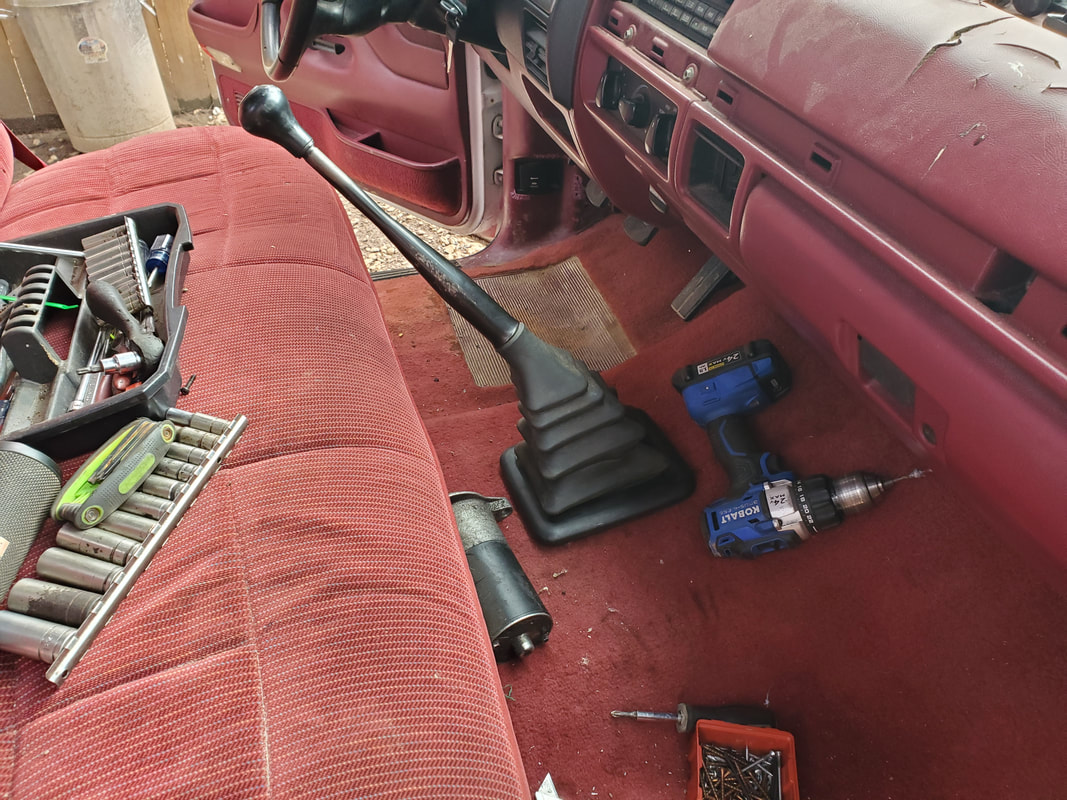 Another problem that I uncovered after putting the shifter base cover on was the idea that I fucked up and cut the hole too large to one side. Even with the cover screwed down to the floor, there is an inch wide gap on the left side, exposing the open transmission well underneath. I will have to cover this up and the easiest and probably cleanest way to do this will be to cut a piece of sheet metal then use some self-tapping screws with round heads to secure the piece of metal to the floor. I'll probably have to make minor cuts in the carpet under the shifter cover to peel back some of the carpet to expose the metal floor as well. Once the hole is covered, I can put the carpet back and cover up any evidence of my mistake. 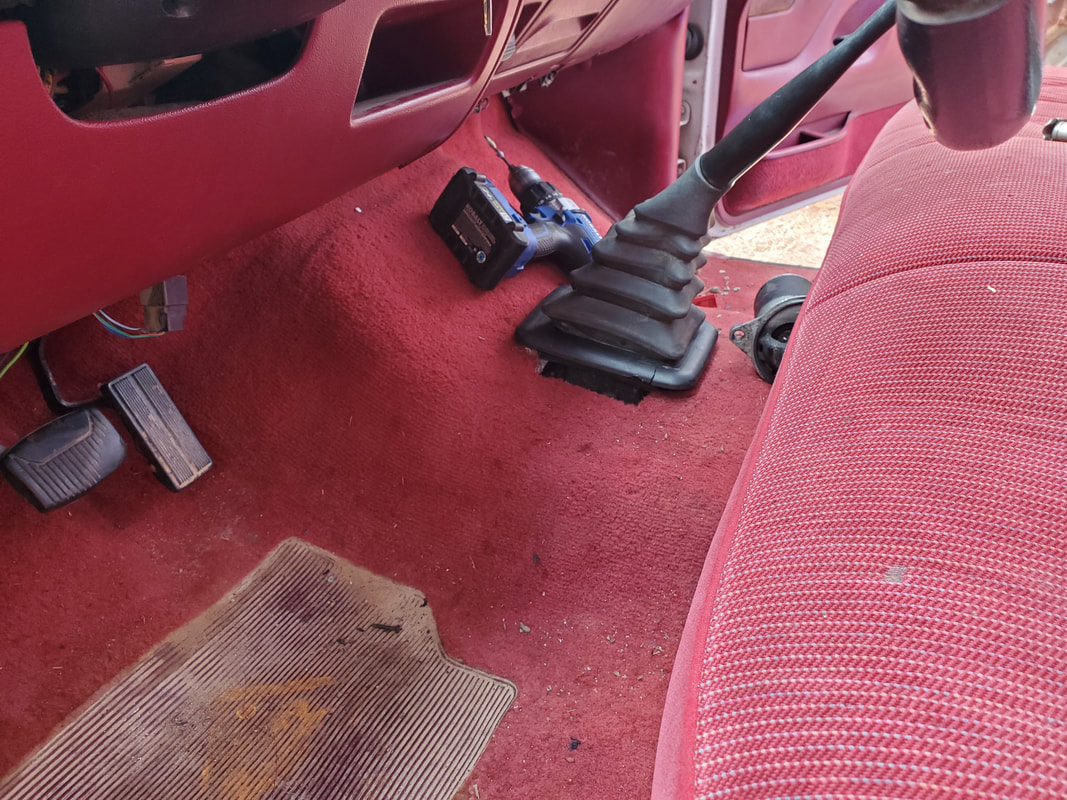 Left side of shifter base showing the opening from the extra large hole that I cut in the floor. The next thing to install is the transmission crossmember. I had to partially mount the transmission mount so I can line things up with the crossmember. Putting one bolt in allowed me to swing the crossmember as needed to then mount the unit to the studs on the mount. Once the nuts and washers were on snug, I could then swing the crossmember in place on top of the lips of the frame. 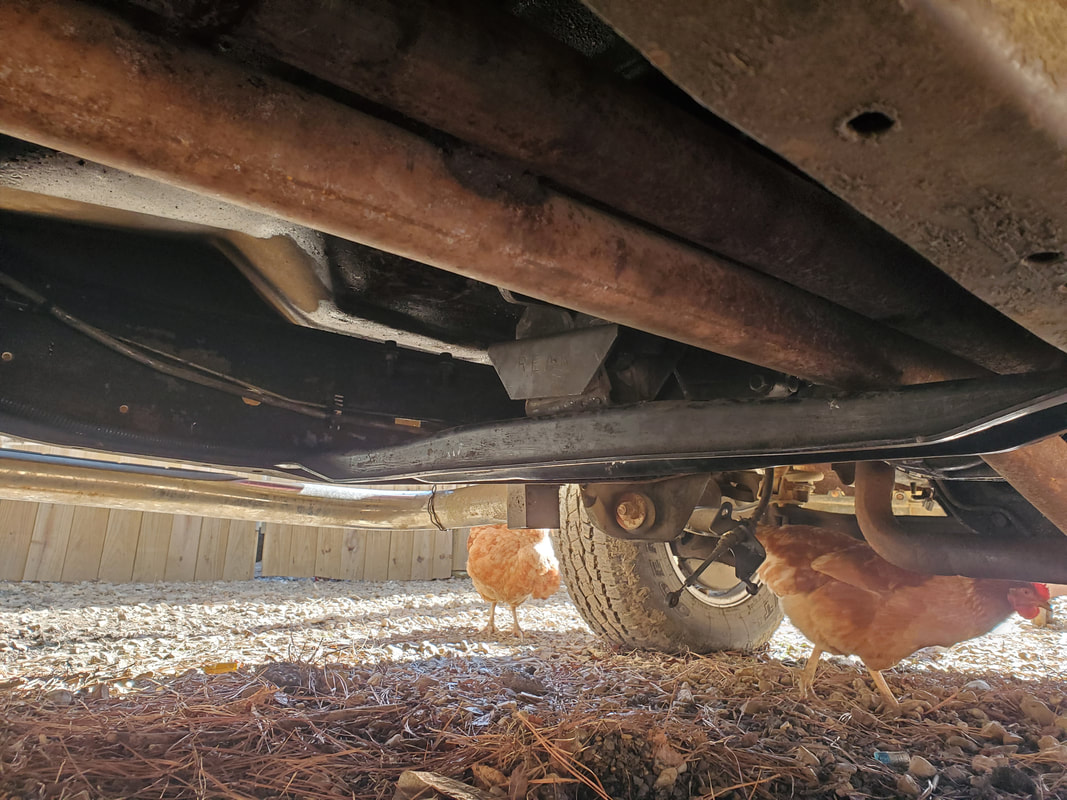 Crossmember in place on the frame while secured to the transmission mount. Now the problem I ran into regarding the placement of the crossmember is the idea that because of the transmission and its apparent difference in length to the 5spd that would've been on this truck. Because of that, I was only able to put one bolt in after swinging the crossmember to a slight angle to reach one of the mounting holes. With the slots on the crossmember, it allows me to do this even with the mount's nuts and washers in place. 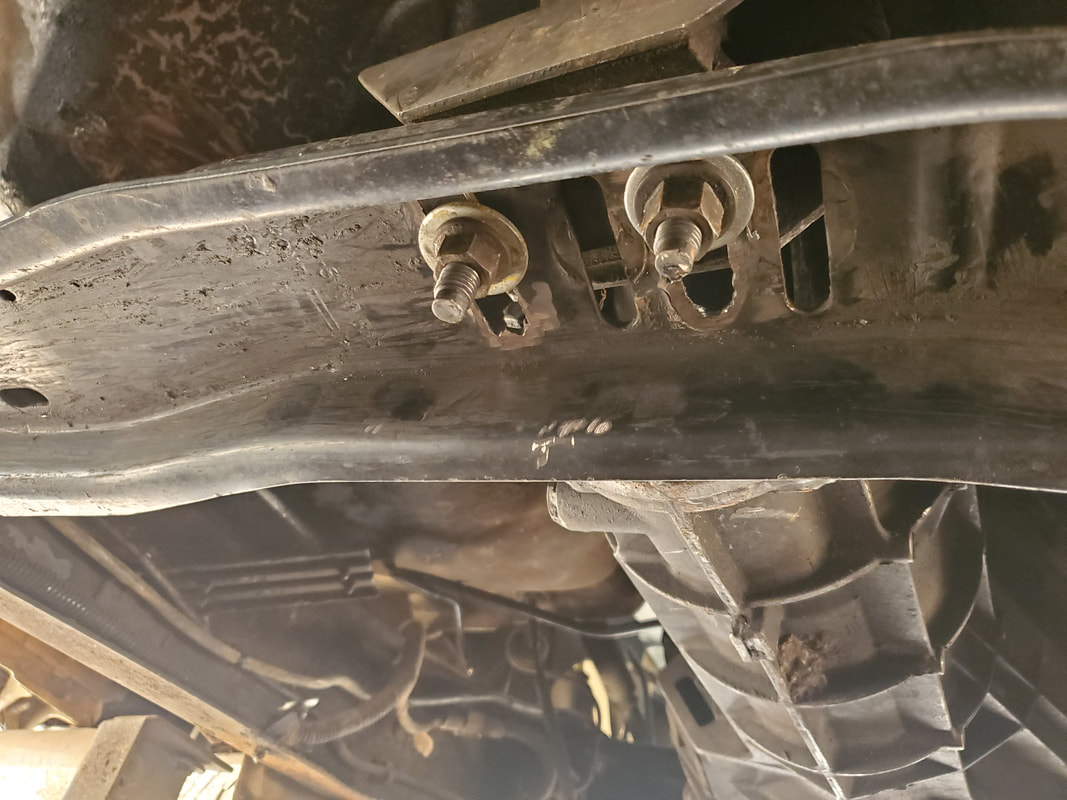 Closeup of nuts and washers holding mount to crossmember. Note the apparent angle and position due to the positions of the studs relative to the crossmember's position. Now it's not really important that the crossmember be perfectly straight across, so long as it's holding the transmission mount in place and is cradled on the frame. I will have to drill another large hole in the crossmember's new position in order to meet up with the hole on the other side of the crossmember to get the whole unit fully secured. Once that's done, I can then move on to the fuel pump. After grabbing the 5spd transmission shifter from the junkyard (and the whole transmission the next day), along with some other parts for the FMT I made an attempt to install these parts on our truck build. As usual, I was met with hurdles. The first hurdle was the idea that the shifter would not fit on the selector tongue in the transmission due to the flat spot on the tongue that helps hold the shifter still being 90 degrees off from what would be needed to have the shifter pointing in the direction it needed to be. Apparently, there's a couple of differences between the 5spd in the FMT and the 5spd we pulled from the junkyard. If I put the shifter on and inserted the retaining stud, the shifter would've been pointing at the driver's side door. To remedy this problem, I took the selector tongue and lined up the shifter with the position it would need to be on the tongue and marked it with a marker. From there I ground the metal away with an angle grinder, creating another flat surface that the retaining stud can rest on so the shifter would sit in the position it needs to be for proper movement through the gears. 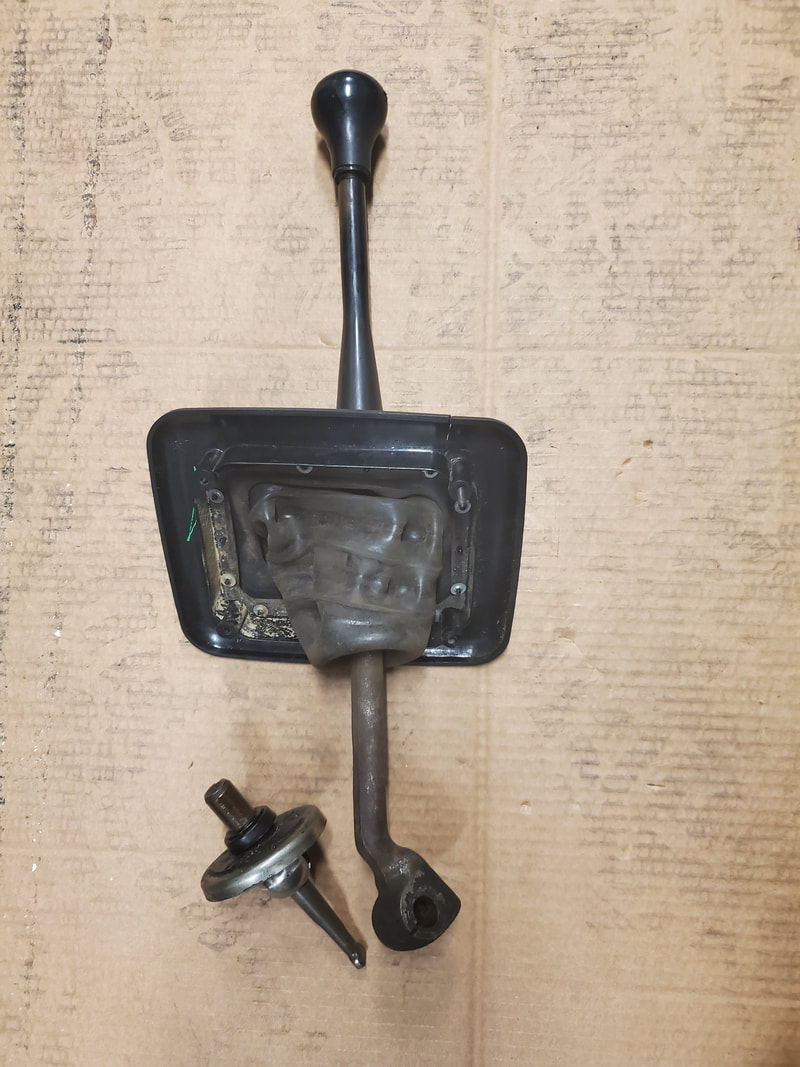 Shifter with selector tongue removed. 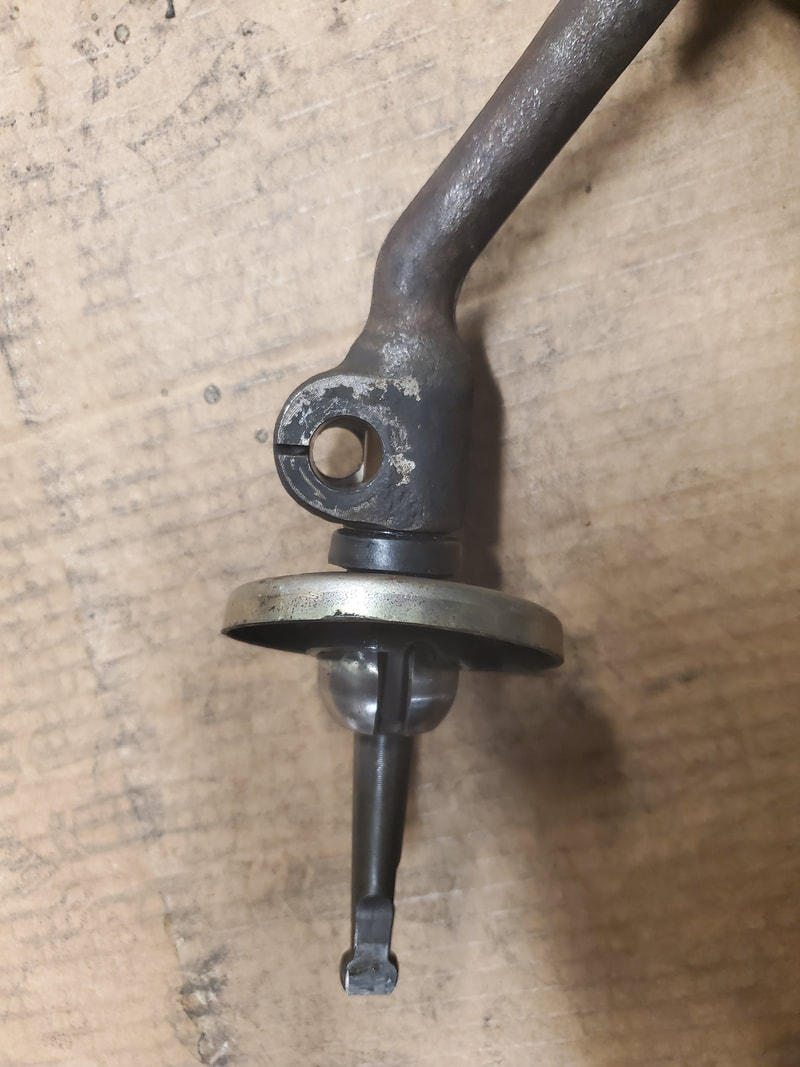 Shifter on selector showing how flat spot is off when I turn the selector in the position it needs to be in for the shifter to sit in the right position. 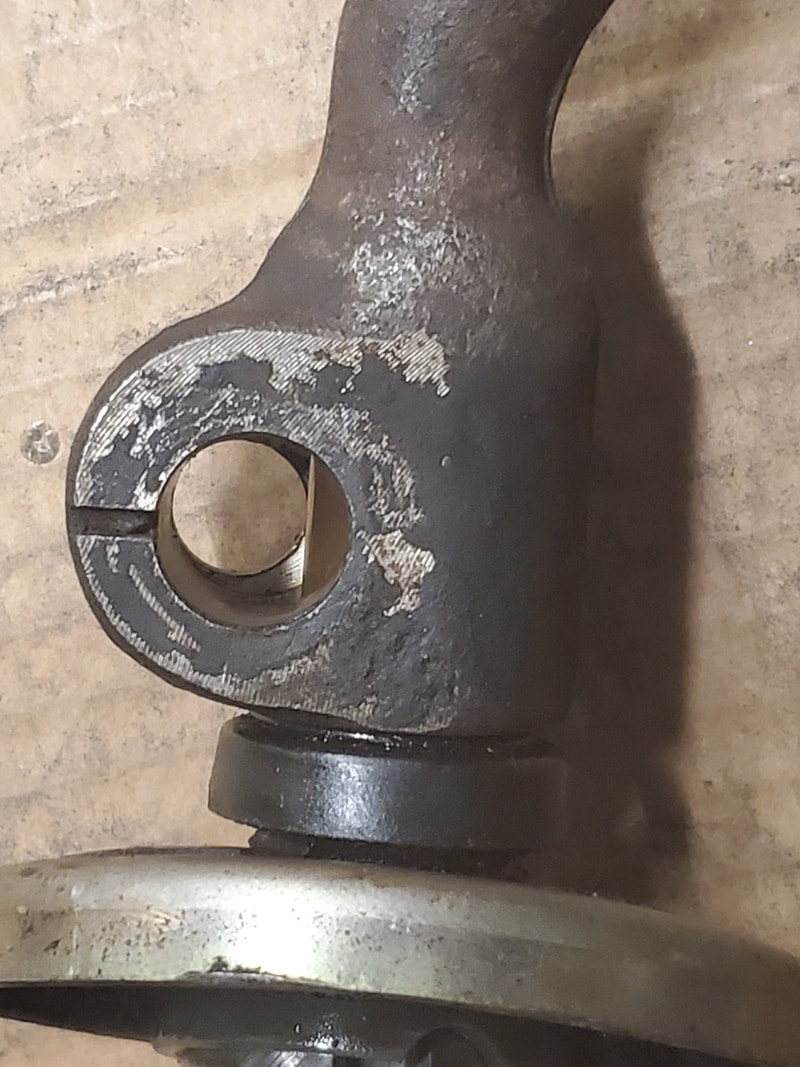 Closeup showing the metal that will need to come off to allow the retaining stud to slide all the way into the hole on the shifter. 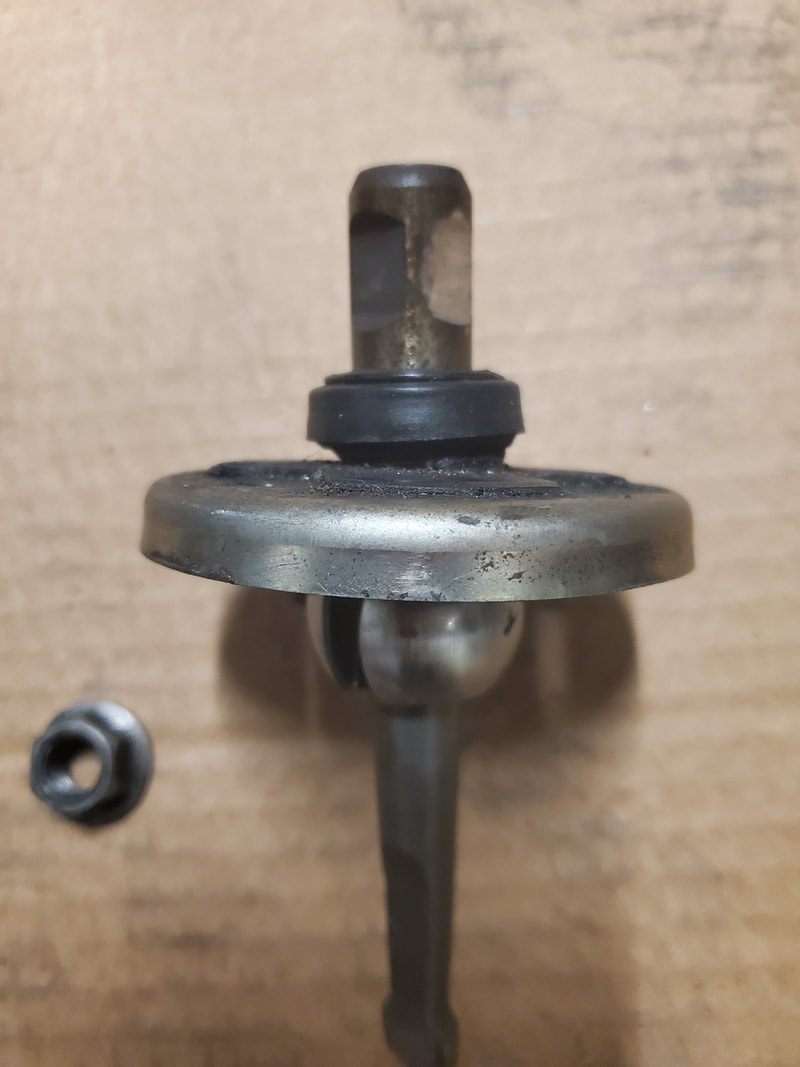 Selector tongue after grinding metal away in new position. Note how new flat spot is 90 degrees off from old spot. 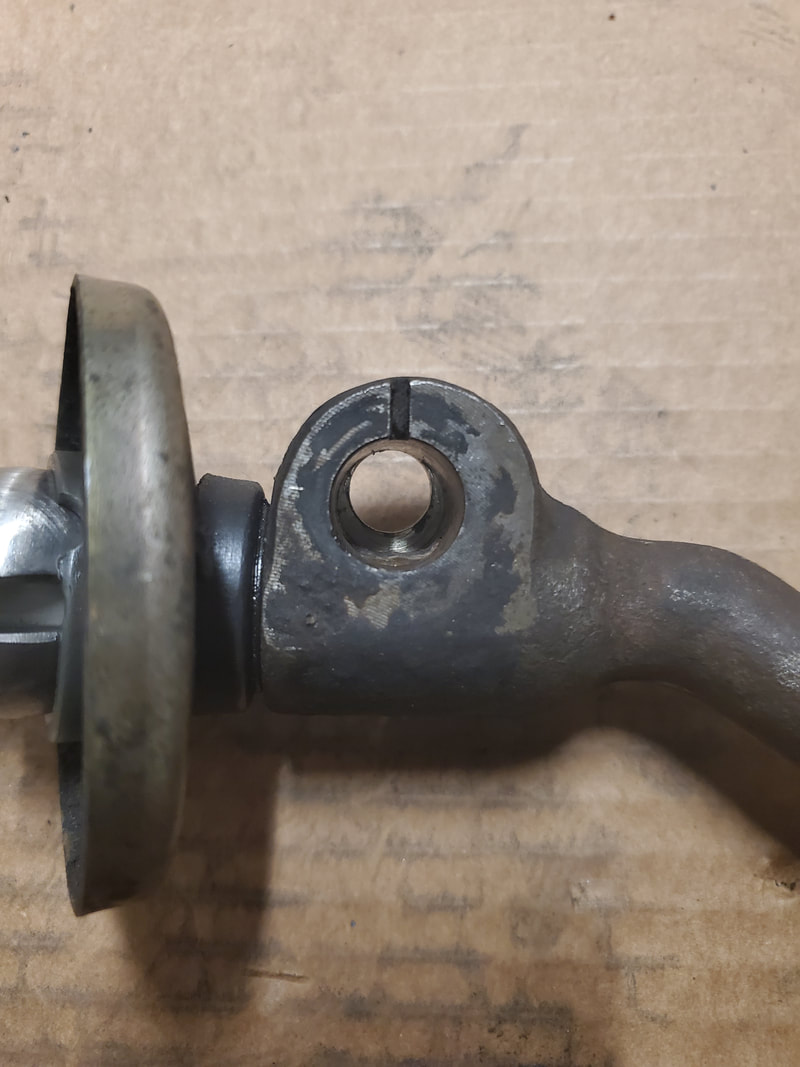 Selector tongue inserted and sitting in new flat spot, it's a clean shot all the way through the hole. 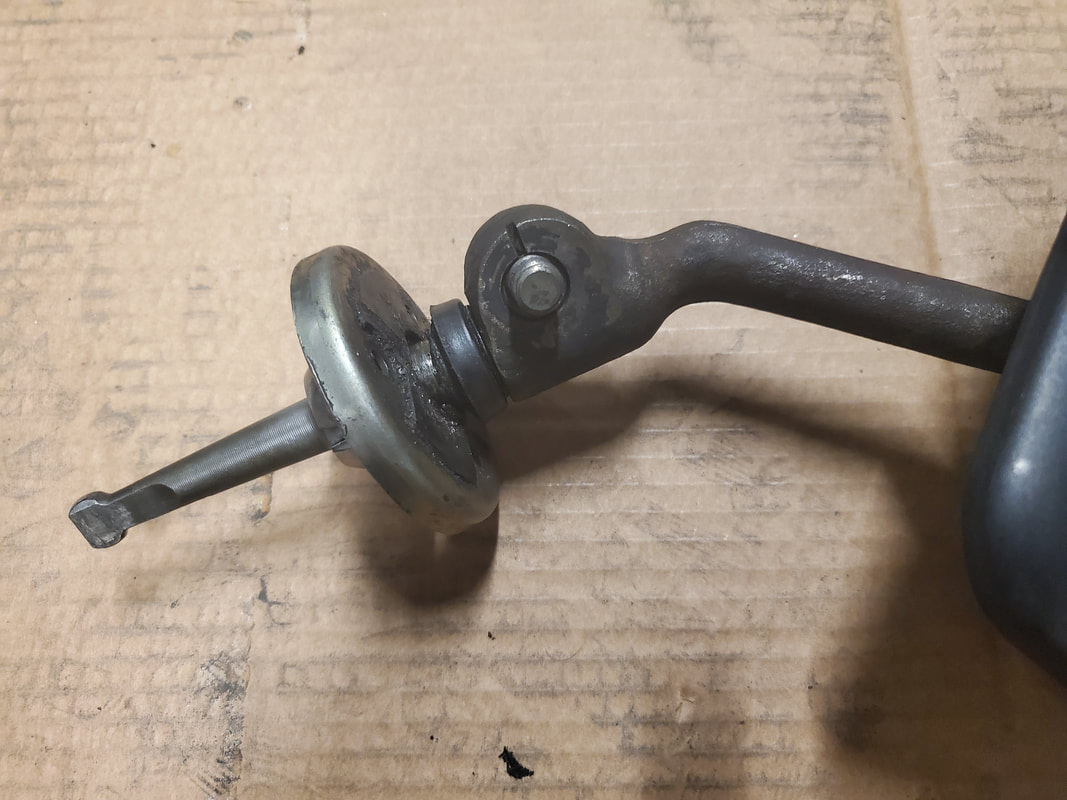 Retaining stud inserted all the way into hole on shifter, holding it tight to the selector tongue. Unit is ready for installation. The next part to be modified is the transmission crossmember. The transmission mount we pulled from the junkyard truck has studs that were spaced a little closer together that it couldn't be used on our truck's crossmember. Conveniently the crossmember has indentations among the already existing slots that look like they were stamped to show where holes would be cut if this crossmember used the other type of transmission mount. With this, I was able to use a plasma cutter to burn out those indentations to create a whole extra set of slots to accommodate the studs of this transmission mount. Now, this may compromise the integrity of the mounting surface by making it easy for the transmission mount to crack the narrow tab of metal between two slots. We'll cross that bridge when we get to it. If need be, I can weld some filler metal in to reinforce the area, otherwise, we'll just roll with it. 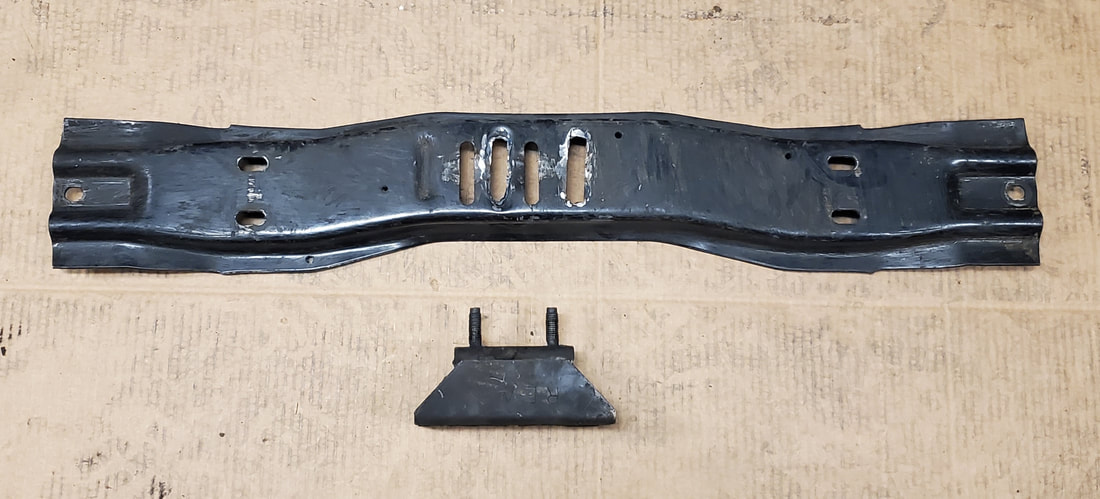 Crossmember with new slotted holes cut to accommodate the mount. 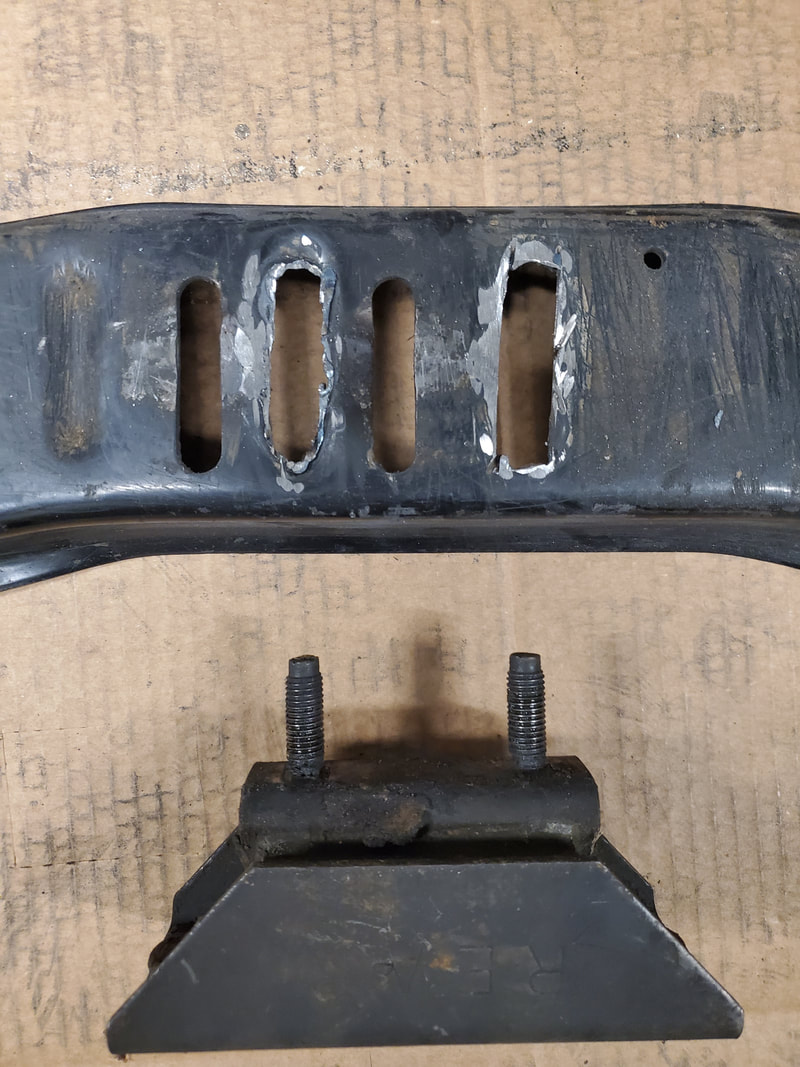 Closeup of holes showing the jagged edges after plasma cutting and grinding down to smooth out the edges as best as I could. The last part that I had to modify is the oil pan. Since the engine and the timing cover used on the engine have no provision for a dipstick, I had to find an alternative place for one. That place is the oil pan. I was able to source a replacement dipstick bung used on Powerstroke diesel engines. In order for me to use this on the FMT's oil pan I would have to drill a hole in the side of the pan to secure the piece. I would also have to either find a dipstick and tube that will fit and put the dipstick at the level necessary to ensure a proper measurement of oil levels in the pan. I did fill the pan with 5 qts of water to mark the level in the oil pan so I can put the dipstick bung at a level that will be above the oil level to lessen the likelihood of a rogue leak. Worse case I may have to add something like a piece of rubber hose and extra dipstick tube to lengthen the overall tube to accommodate a dipstick to get it at the level I need it to be. That of course will be at a later date as well. 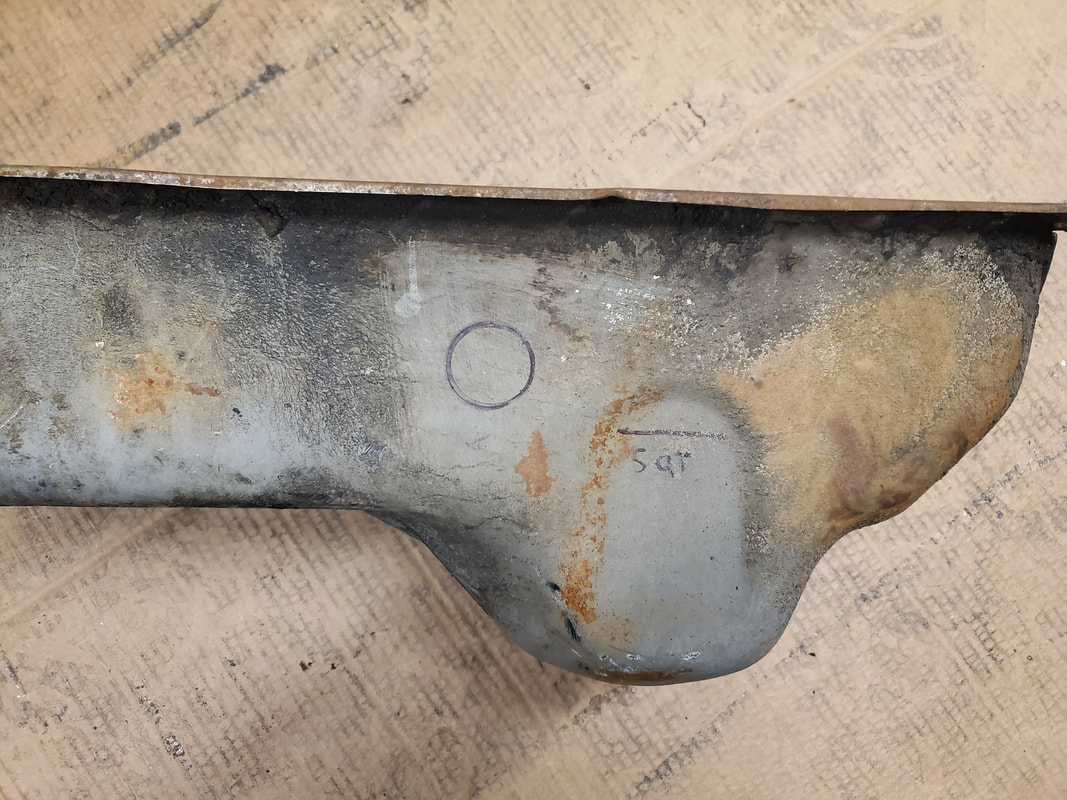 Marks made on side of oil pan for oil level and where the hole needs to be drilled for the dipstick bung. 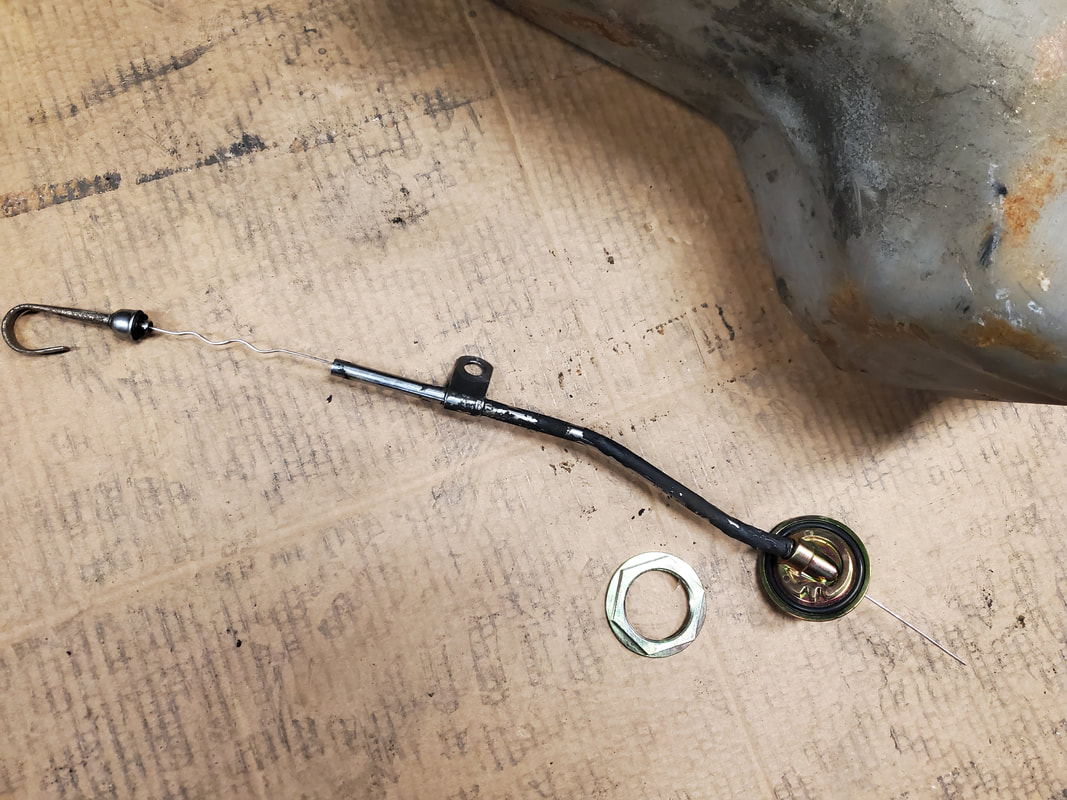 Dipstick and bung from Powerstroke diesel engine. The easiest way to cut this size and type of hole was to use a hole saw. The bit that I had access to was just slightly smaller than the diameter of the threaded bung, so after cutting the hole I had to use a grinding wheel to widen the hole a little more. Once that was done, I was able to put the bung in the hole and secure with the included nut. There's a large O-ring that will help seal the bung but when I permanently seal the piece, I'll use some gasket maker around the hole and the bung. I also have to put the position of the dipstick bung at an angle in order to allow the dipstick to go down to where it will touch the oil while also putting the dipstick in a forward leaning position to aid in better reach for the operator checking the oil. Of course, if I have to use a piece of rubber hose and extra dipstick tube, I can slightly bend the dipstick and secure it however I can to keep things stiff and secured. 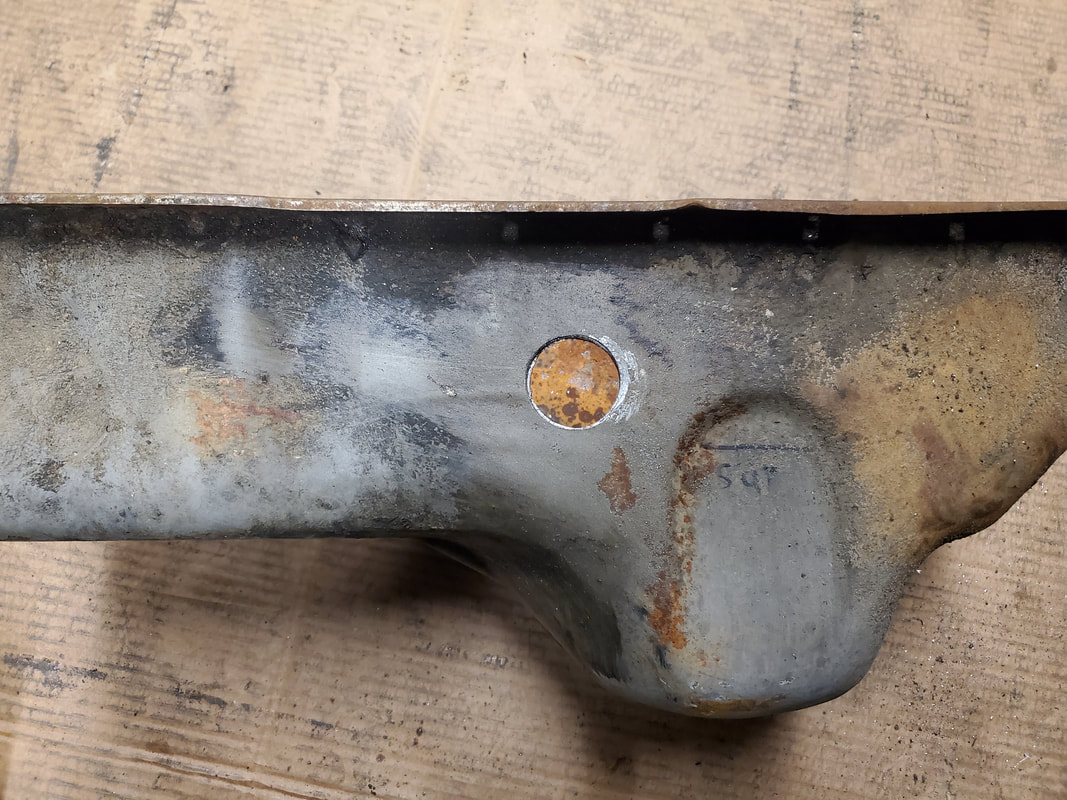 Hole cut with hole saw, note how hole is above oil level line. 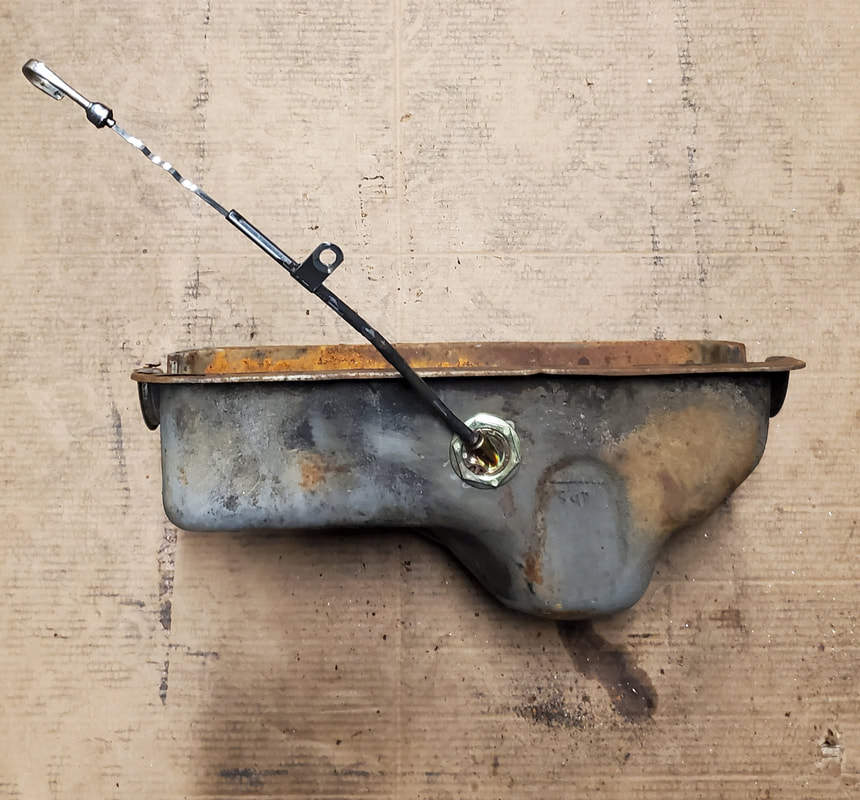 Dipstick bung in place with dipstick oriented at a forward angle, allowing tip of stick to reach down to the sump of the pan. 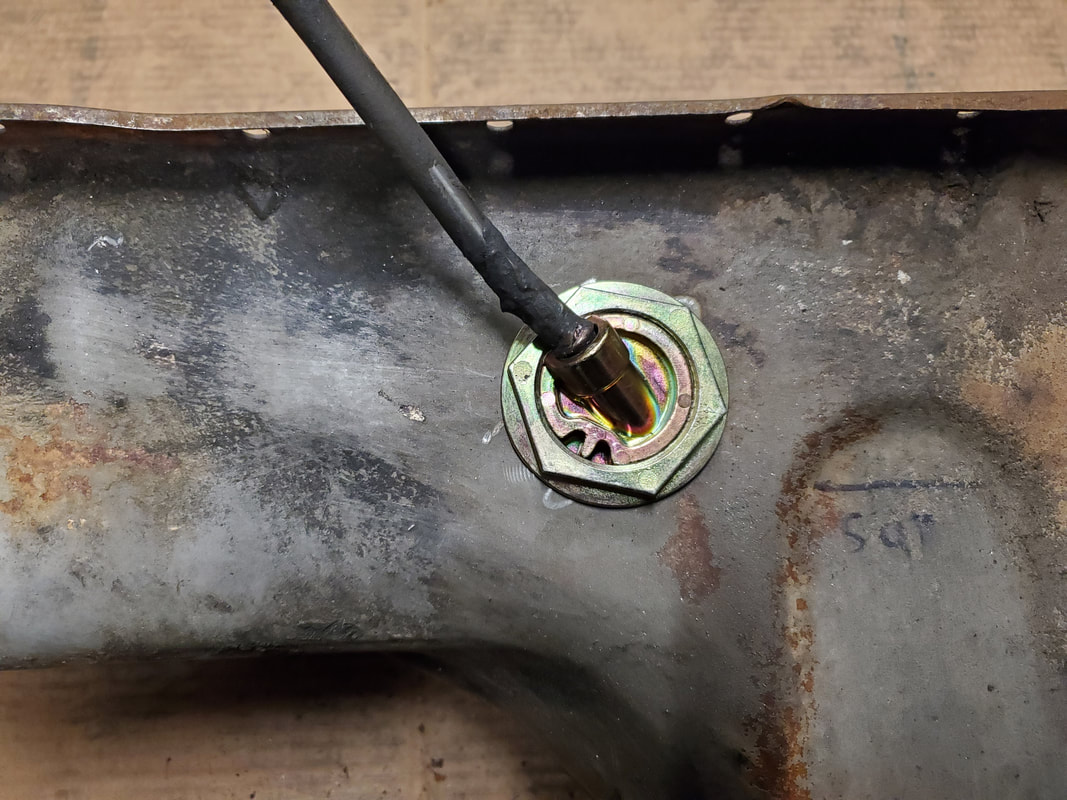 Closeup of dipstick bung in the side of the oil pan. Now with these parts taken care of, I can start the real work. First, I have to put the shifter in the transmission. Next will be the crossmember and mount for the transmission. Afterward I still have to install the fuel pump and filter in the fuel line close to the fuel tank. From there I can lift the engine and pull the old oil pan off. I need to change the oil pickup around to accommodate the rear sump oil pan, then clean the block of the old gasket, replace with a one-piece gasket then reinstall the new oil pan. I can then install whatever I plan on using for the dipstick. Once all that is done, I can move into the advanced stages of the project, getting closer to starting this truck up. During a routine supply run to the local junkyard to see if we can find some parts for a couple of the vehicles, we decided to check out the Ford section to see if we can find some parts for the FMT, or even any of the other Fords on our lot, for shits and giggles. We ended up stumbling upon a 94 F150 truck that just so happened to have a 5 spd manual transmission. Even though this truck had an inline 6 engine, both the I-6 and SBF V8's share the same bolt pattern so these transmissions are interchangeable. Now at the very beginning my main thing was to grab the shifter since the FMT's 5 spd needed a shifter. I sourced a couple of shifters online but they were around $100 for the shifter and the rubber base cover. I knew I could get the shifter and base cover for less than $10. While I was more than elated to get this shifter since I can now write off the shifter on the greater project. After going home and thinking about it, I figured that I'm missing out on a real unicorn here. These transmissions are hard to come by and even when found, end up costing from $400 and up. I had to come back and get this thing, even though it would need a shifter. Even if I have to buy one of the $100 shifters, I'll still come out ahead with the cost of the transmission at the junkyard and the online shifter. I did rest easy knowing that taking the whole shifter and gear selector tongue from the transmission would render this thing useless to the novice. Fast forward to now, and we're back at the yard with all the tools necessary to pull this transmission with a minimum of headache.  The 5spd peeking through the hole created by the vacated shifter and base cover. Some of the work was done since the driveshaft was already pulled and with the truck on improvised jack stands, it would make it pretty roomy underneath. I started off with pulling the crossmember. At the same time, I grabbed the transmission mount since I needed this part just as well. Once the crossmember was out, I got to work pulling the bellhousing bolts. 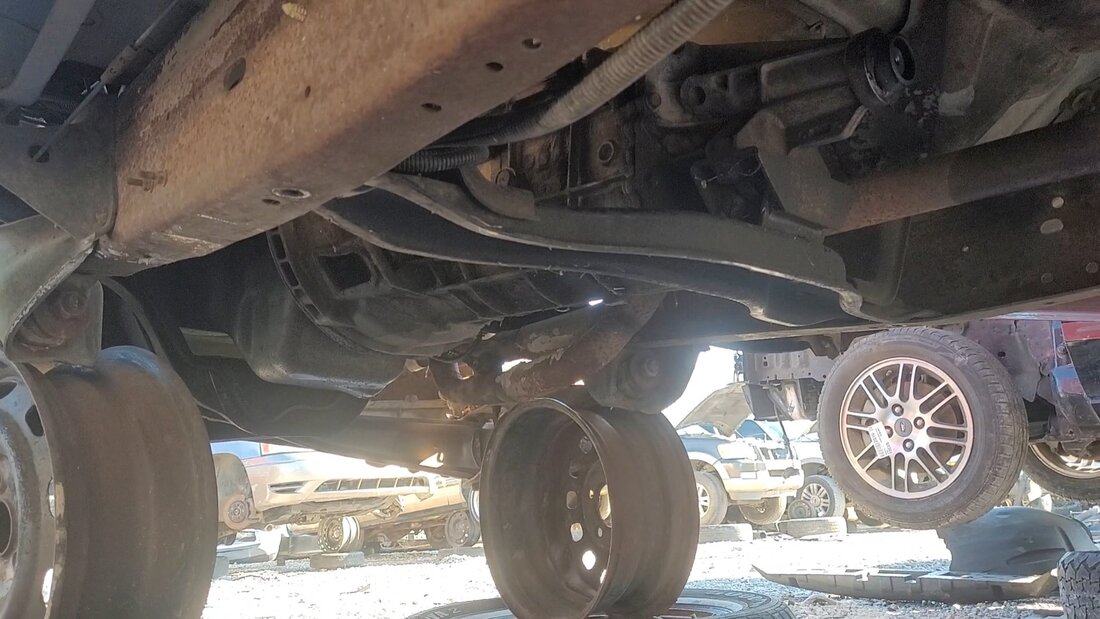 The transmission sitting pretty under the truck, which is on rim jack stands making for a roomy workspace. Once the bellhousing bolts were free, all six of them, the next thing that had to come down was the starter. It didn't take long to determine that this part had to come along with us too since I needed a starter for the FMT's powertrain. Used starters are like $20 or so, cheaper than a new one obviously. I did have a bit of a time trying to get one of the two bolts out due to its being stuck pretty good. I ended up having to cut the exhaust close to the manifolds to open up the area enough to get my socket wrench in place perfectly straight to be able to finally break the bolt free. Once the bolt was free, I had my starter. With those parts and the crossmember down, I just had to pull the clutch master cylinder to free it up so when the transmission came down, it wouldn't pull on the oil line and damage this component. I would also be taking the entire clutch master cylinder/slave cylinder and hose assembly, another $100+ part online. 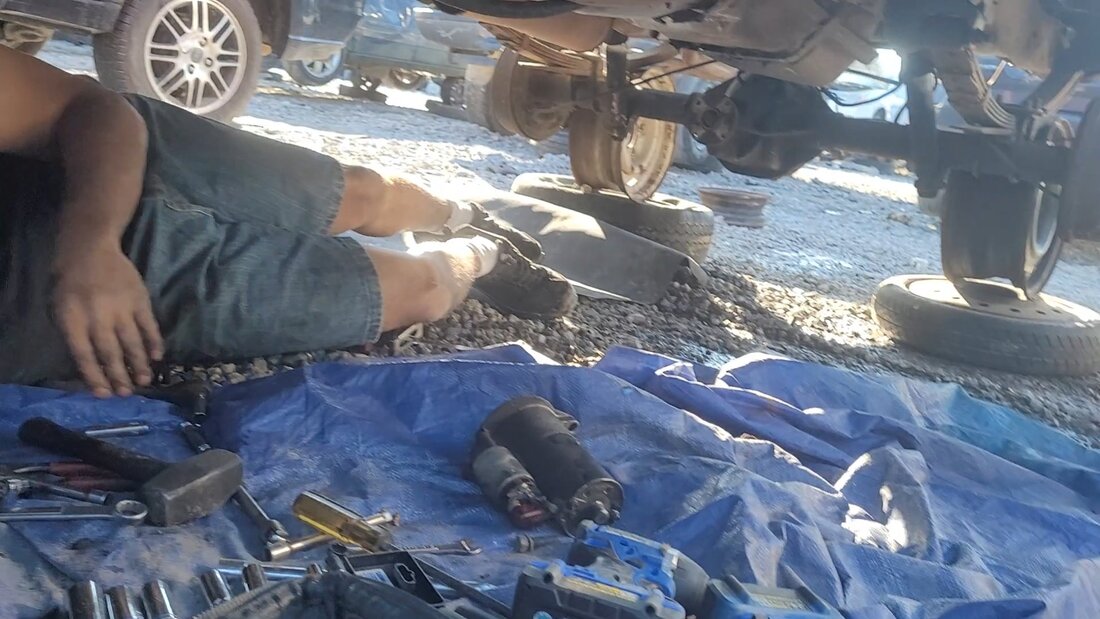 Starter pulled free from the engine. The clutch master cylinder is held on by two bolts and a clip inside that secures the rod to the clutch pedal. With the master cylinder free, I moved it around everything to have it resting in a spot that will allow it to free fall once the transmission is down. 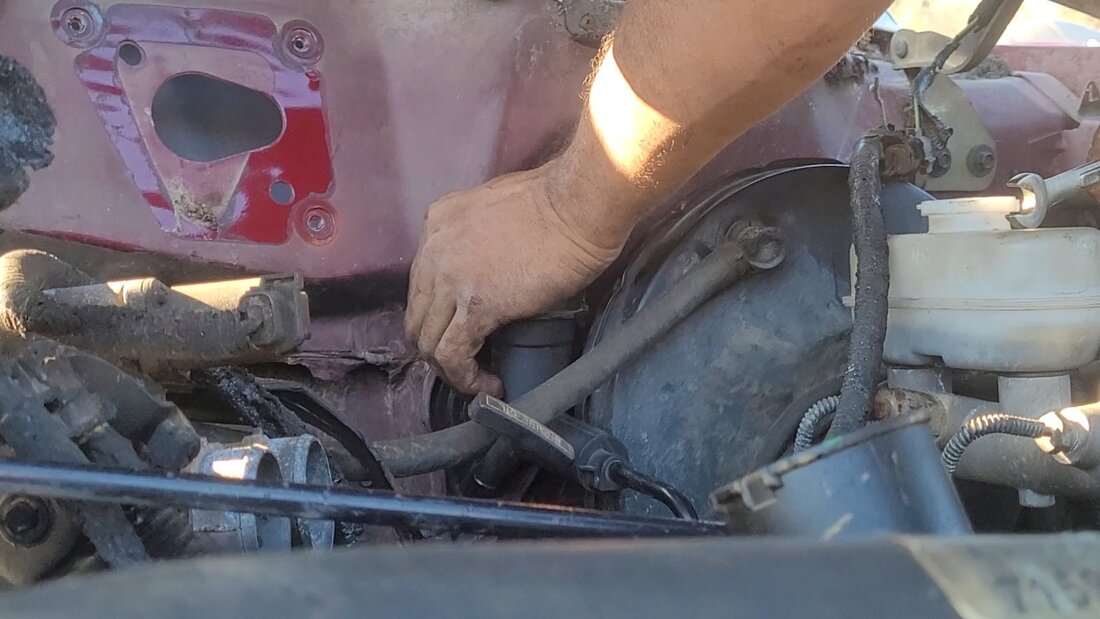 Removing the clutch master cylinder from the firewall. After getting into a suitable position to be able to catch the transmission as it fell from the back of the engine, I wiggled the heavy machine, working its input shaft from the clutch assembly until it finally fell free. As the transmission broke loose, I braced myself to catch it and slow down its descent onto my torso. Once on my torso I guided it to the ground, concluding the hardest part of the whole job. 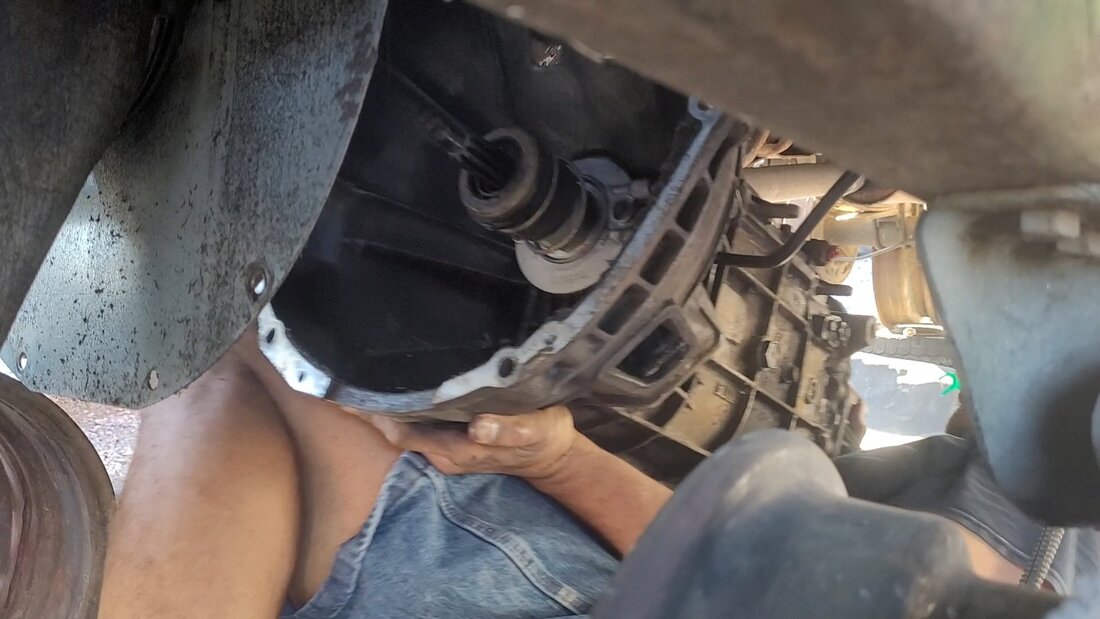 Catching the transmission as it slid free from the back of the engine. 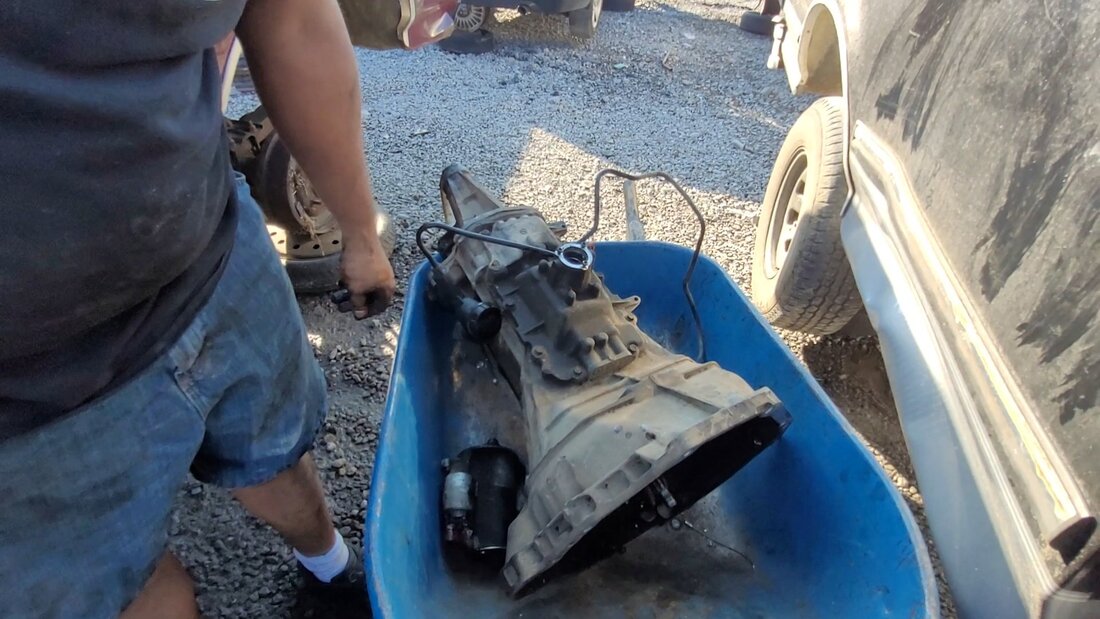 Loading the transmission and other associated components in the wheelbarrow. With the hard part out of the way, I used the impact wrench to pull the bolts from the flywheel to remove the clutch assembly quick and easy. I wanted the clutch since it was still in good shape and would obviously go along with this tranny. I was about to get the flywheel too. Even though it was on a 6 cyl, they still are interchangeable with the SBF V8. My own negligence caught up with me in that I never replaced the 19mm impact socket that I was missing from my set and I didn't have a 1/2" to 3/8" adapter to use a 3/8" drive 19mm socket. Without the ability to use the impact wrench there was no way for me to break the bolts free since the engine was still freed up and spinning. But all was not lost. I still had a flywheel from the 5spd we picked up in TX. This flywheel, along with the flywheel that was on the 302 were interchangeable in their bolt patterns. So we went home without the junkyard flywheel, it was just as well. 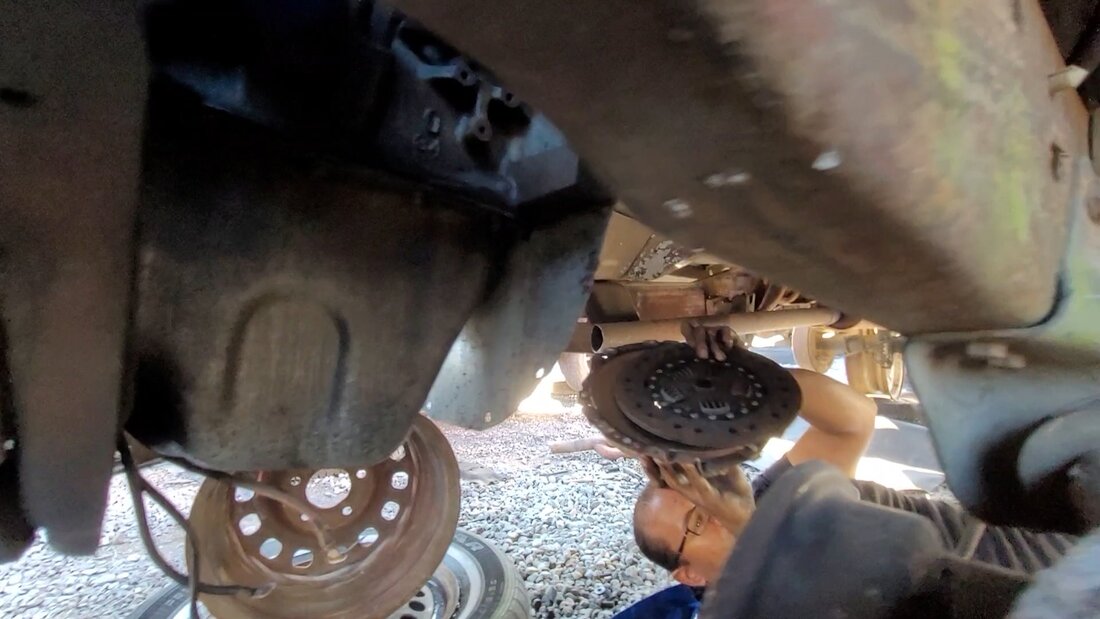 Pulling the clutch assembly from the engine. Lastly, I needed the clutch/brake pedal assembly since this will be needed to convert any F series truck from this era to manual, or, any vehicle that may be getting modified to accept this transmission. Only a few bolts needed to be removed and the steering column coupler had to be separated to allow me to remove the pedal assembly from under the dash.  The clutch/brake pedal assembly after removal from the truck. Now I can very easily use this transmission on any build with this pedal assembly due to the fact that the pedal assembly holds the clutch master cylinder and brake master cylinder. Other than drilling a few holes in the firewall, once I mount the pedal assembly under the dash of whatever vehicle being built, I can bolt up the master cylinders in the engine bay and just adapt the brake lines to connect to the F150 master cylinder. Having this large a brake master cylinder would give any hot rod build an A-1 braking system. This plan is in the works for the Rustang. Since I plan on eventually dropping the Rustang body on another Ranger frame (after finding the right one), I can install this 5spd in the build, setting up a power plant that will have the capability to handle whatever engine I'm likely to build for the car. The main point is, I now have this hard to find hardware in my hands, regardless my intentions of use. |
