|
After gutting the 73 Mustang which was then turned into a chicken coop, I was left with a lot of usable parts as well as a lot of scrap which was hauled off. Some parts were sold off while others were set aside for future use, like the engine and its associated parts. One of the things that was salvaged was the windshield washer bottle. I thought about the idea of maybe installing this thing on the 69 Mustang to give this car the ability to clean the window on the run. Now in all reality one can buy a universal washer bottle with the motor incorporated into it online and all but I figured, why not use this thing since I have it. Now the other thing that had to be addressed is the idea that the motor in the bottle was pretty much rusted and garbage. I also had the washer bottle that I pulled from the Toyota truck in the process of prepping it to turn into a chicken coop. The bottle itself was dry rotted and broken but the motor was still usable. I figured I could remove the bad motor from the Mustang washer bottle and install the Toyota washer motor instead. I had to do a little prying to get the old motor removed from the bottle since it was rusted and jacked up. Of course it ended up coming out in pieces which was no biggie but now I had to figure out how I was going to put the Toyota motor into the Mustang bottle. 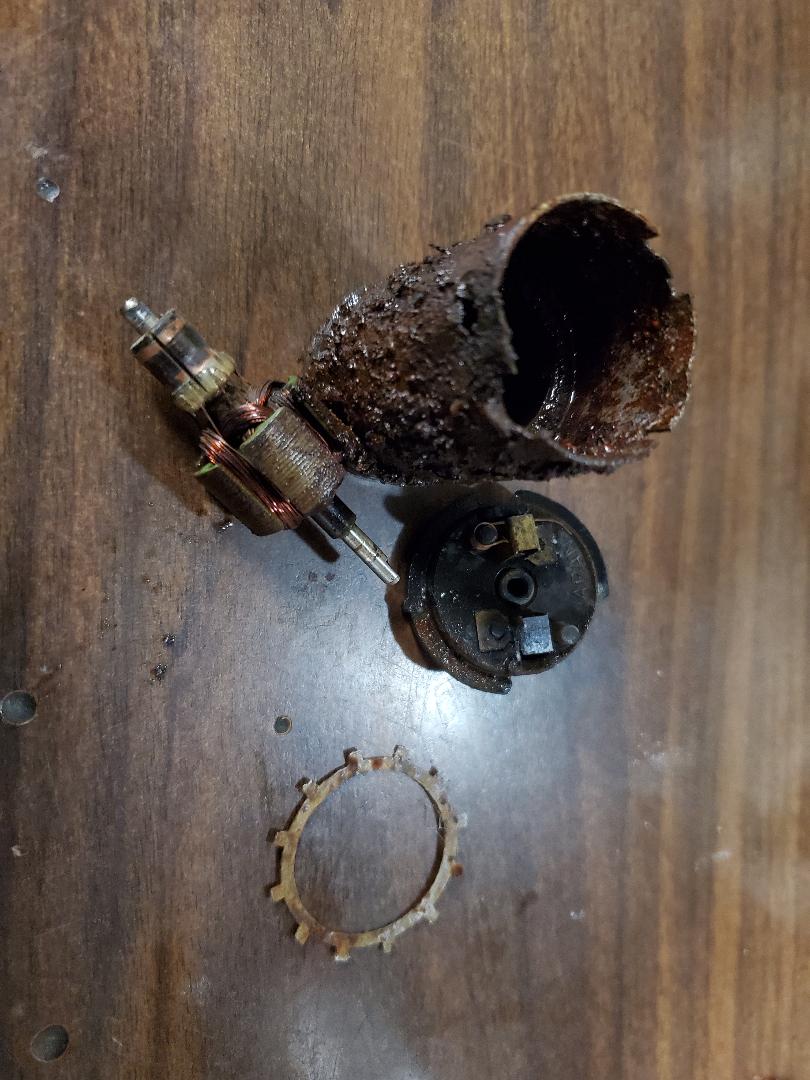 Old washer motor removed from Mustang washer bottle One of the other small problems I had with the washer bottle was the dry rotting and cracking on the plastic that was where the motor was mounted. One of the things I looked at regarding the Toyota motor was the idea that I will have to remove this plastic from the motor cavity anyway in order to fit the motor into the spot where the old motor resided. The Toyota motor has the input port on the side versus on the end like the Mustang motor did so I couldn't just slide the motor into the cavity. 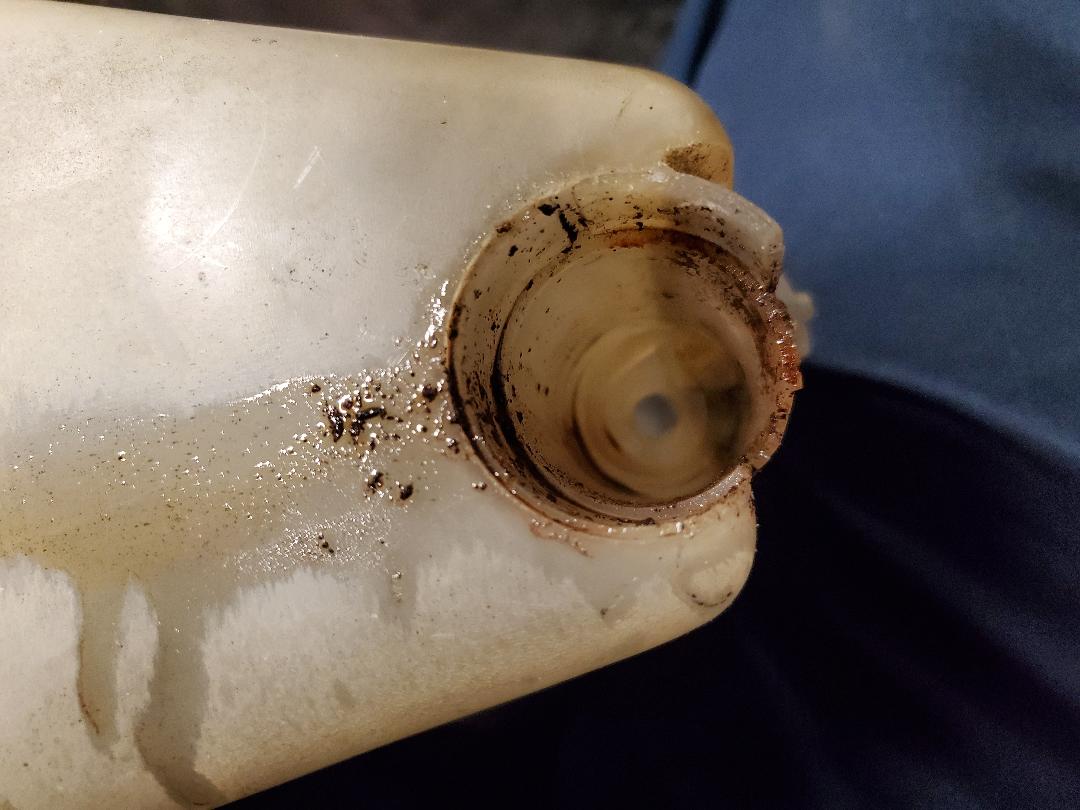 Washer bottle after removing old motor 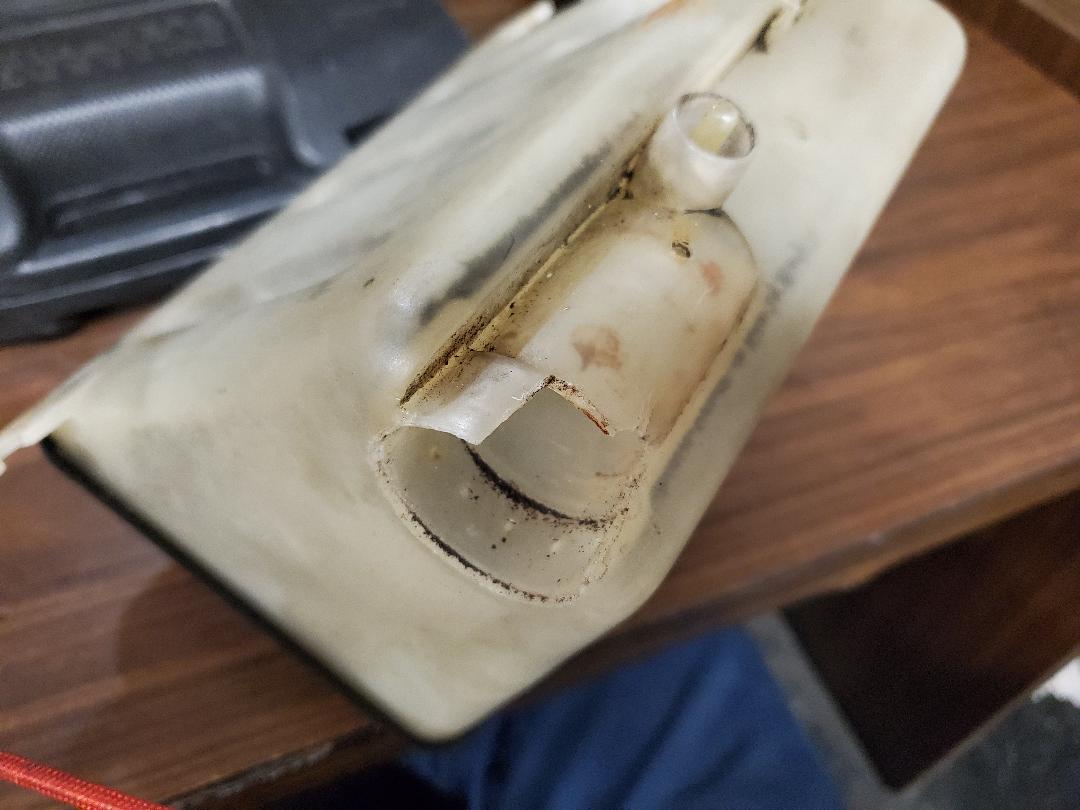 Cavity and plastic of bottle where old motor went. This section will have to go for me to install the Toyota motor I brought out the rotary tool and a cutting disc so I can cut the plastic without risking damage to the rest of the bottle plastic since the whole bottle is almost 50 years old and was showing signs of possible cracking if I put too much stress on any part of the plastic material. I cut away the outer portion of the plastic, exposing the motor cavity. The motor output was actually part of this plastic where it output through a port in the plastic that fed a nipple where the hose for the sprayers plugged up to. All of this plastic was removed leaving the inner half of the motor cavity. Now since the input port on the Toyota motor was on the side I had to drill out an opening in the bottle on the inner part of the cavity so the port on the motor would rest inside said hole while allowing the motor body to sit snug inside the bottle's motor cavity. 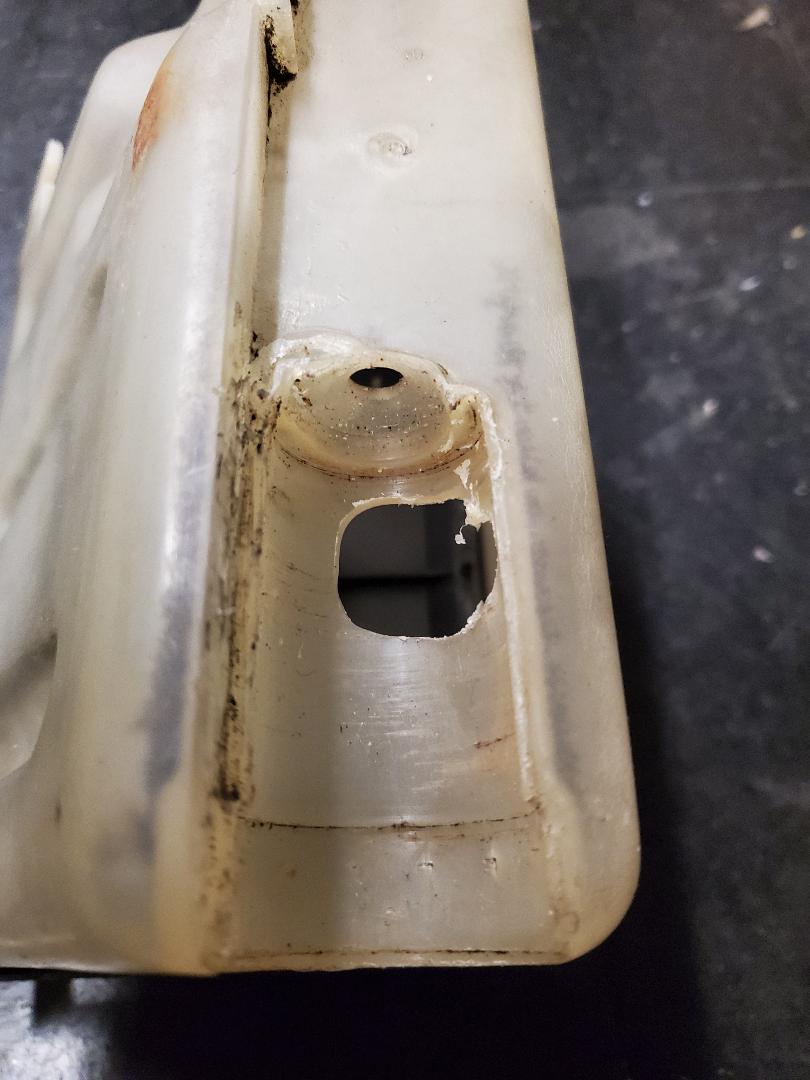 Motor cavity after cutting out outer portion of surrounding plastic and drilling out an opening for the port of the Toyota motor to fit into. Note old input port for original washer motor at the end of the cavity. After getting the cavity prepped for the Toyota washer motor I did the test fitting. Of course the port had to be trimmed to make sure the input port on the motor fit pretty good with a minimum of play since I will have to seal this thing up later. After getting the motor situated and test fitted in the cavity the next and final step was to seal everything up. 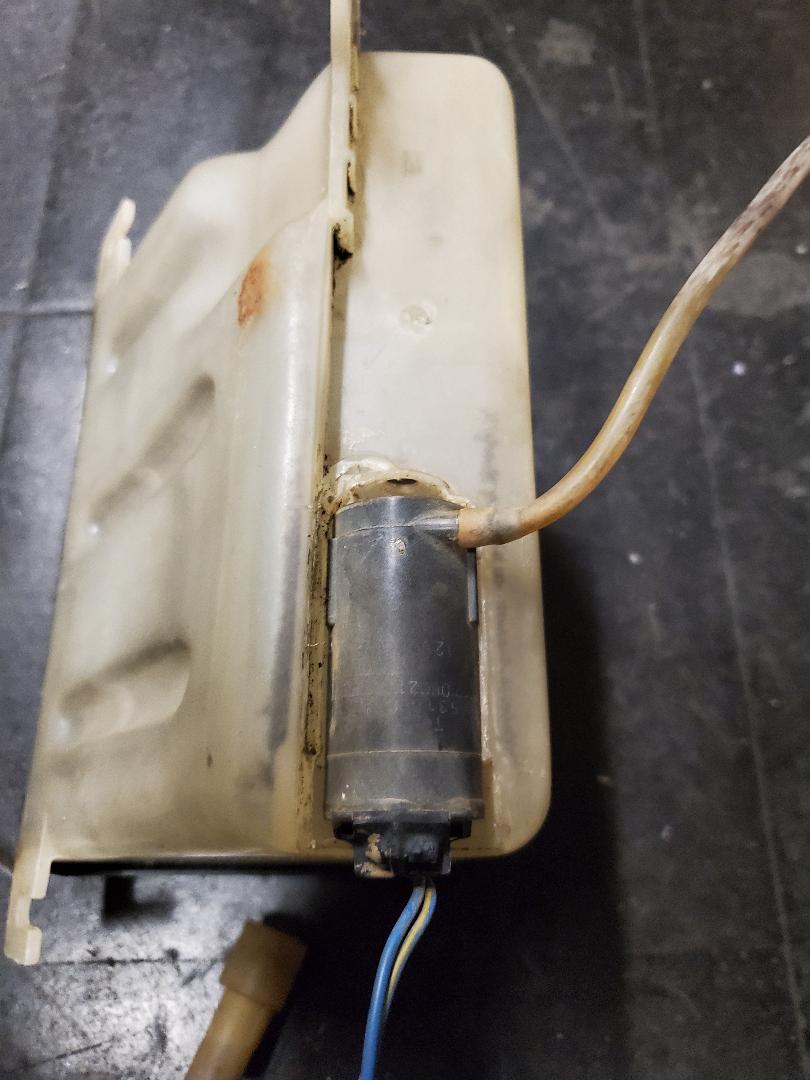 Toyota washer motor fitted into Mustang washer bottle. Note output nipple and hose on Toyota motor. I figured I would just use the hot glue gun to seal the Toyota washer motor in the Mustang washer bottle. Of course after taking this measure the Toyota washer motor would not be able to be removed without having to cut the glue free to remove the motor. Since I was doing an unorthodox method of making a working washer bottle assembly I had very little options with the resources I had available. I went ahead and hot glued the motor into place, making sure to get glue in every crack and crevice around the motor and around where water could possibly leak out around the motor body. 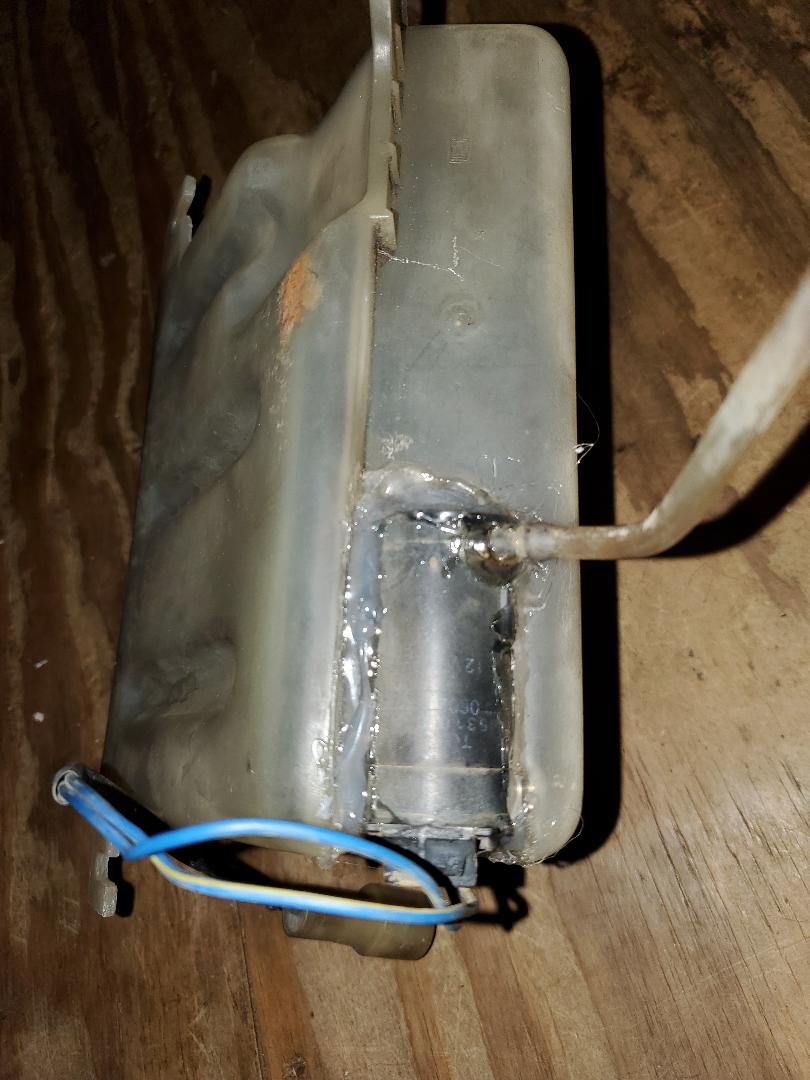 Toyota washer motor hot glued in place in the Mustang washer bottle's motor cavity. Note wires and output hose with hardened glue around everything. After gluing the Toyota motor in place I had to test the unit by filling the bottle with water to see if any leaked out and if so, from where, so I could further seal it with more hot glue. Of course after doing this test i had to come back over some spots to further seal the unit. I had to put glue around the output nipple and hose as this spot was the spot where the leaks came from. I ended up having to come back over this thing 3x before finally getting the unit to stay sealed from water. Of course when I saw it didn't leak anymore I hooked the motor to a small 12v battery just to test the thing to see how it worked. Of course the motor, having already worked, came to life spraying water all over. Instead of looking at this as a mistake I looked at it as confirmation that my hybrid washer bottle assembly worked good. What I will have to do next is find a suitable spot on the Mustang, most likely on one of the fender aprons to the left of right of the engine. I will have to use a hose coupling to couple the short piece of hose that's currently on the bottle to whatever hose I may have to install on the Mustang's washer system. This isn't a big deal since this is what would've had to be done if I bought a universal unit online. Afterward I will have to get power to the motor then get the ground wire over to the firewall and through it in order to get it over to the washer motor switch on the dash. The other end of the switch would be hooked to ground to complete the circuit. Hopefully the sprayers will be intact and won't have to jerry rig that part of the system to make it all work. Worse case I might have to try and salvage some of these components from the Toyota.
0 Comments
Living out in the country has its challenges at times while having many benefits. While its more quiet and you don't have to worry about many two legged varmints being an issue in your isolated homestead you will have to continue to deal with four legged varmints of many shapes and sizes. We may have to deal with the occasional coon or possum tearing up the trash or a fox or stray dog snooping around the chicken yard. But one of the biggest issues that I feel is a problem especially out in the country is rats and mice.
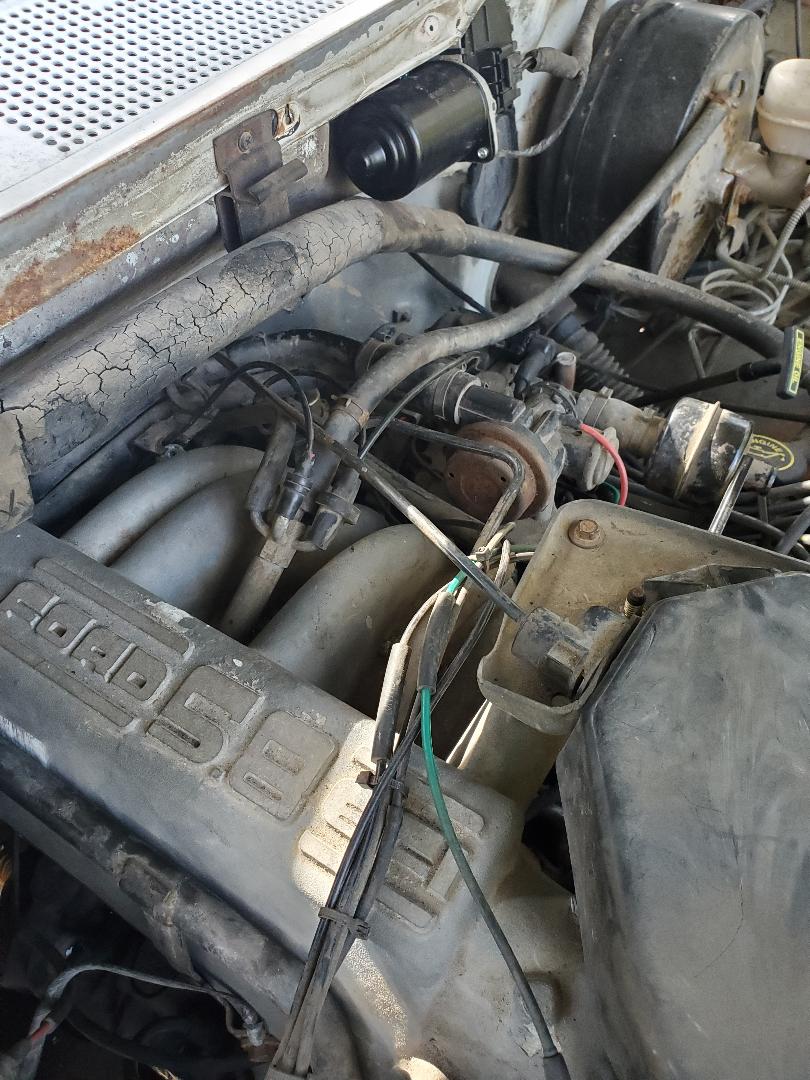
Rats and mice have a habit of getting into places you would never expect any critter to get into, chewing through things, shitting everywhere and just making a mess in places you can never really reach without having to tear something apart to access it. In my case I had to deal with the issue of a rat or rats getting under the hood and under the intake plenum of the F250's engine. This issue surfaced about four years ago when the truck had suddenly started running erratic. After doing some inspections I found what amounted to nesting material under the upper intake plenum of the F250's engine. After getting in at the right angle with a light and my eyeballs I was able to make note of the chewed up wires going to multiple fuel injectors. What this ended up meaning was the fact I would have to disassemble the whole upper intake plenum and everything attached to it to expose the right bank of fuel injectors and get some plugs from the junkyard to replace the chewed up units in the truck. While this wasn't too big of a deal, it was more of a time consuming issue since I had to hit the junkyard to clip several fuel injector plugs with enough wire on the ends of them to allow me to solder into the truck's original wiring to make the repair. After getting this all done I was back in the saddle again, for a good while. Now, fast forward to the present. In the recent days the truck started running noticeably shittier, which was first discovered on my last gravel run when the truck choked up during a cold acceleration and even after warming up still running a little sluggish. Even at an idle the engine smoked more and raw gas can be smelled coming from the exhaust. At first I thought the truck needed a tuneup as I hadn't touched the ignition system on this truck in years. I figured what the hell, let me get the plugs and wires and the dizzy cap and rotor and get started. After looking under the hood again I got a sight of the dreaded nesting material under the upper intake plenum, again. I already knew where this was going. After an inspection I saw just what I suspected, two fuel injector lines chewed apart with one chewed down to the plug and the other one chewed badly enough that the wire wasn't salvageable. So back at it again, tear down the top end of the engine to access all this shit. After tearing everything apart i found that the rat had chewed the wire down to the main bundle that feeds power to the fuel injectors, the other wires being switched grounds, chewed into oblivion. Problem is, I needed replacement plugs. Luckily I was able to turn to the F150 that we have sitting in the yard that is a future project. Since I plan on making that truck a carbureted powerplant I decided to just grab a couple of the pigtails from that wiring harness. With that I was able to get to work. 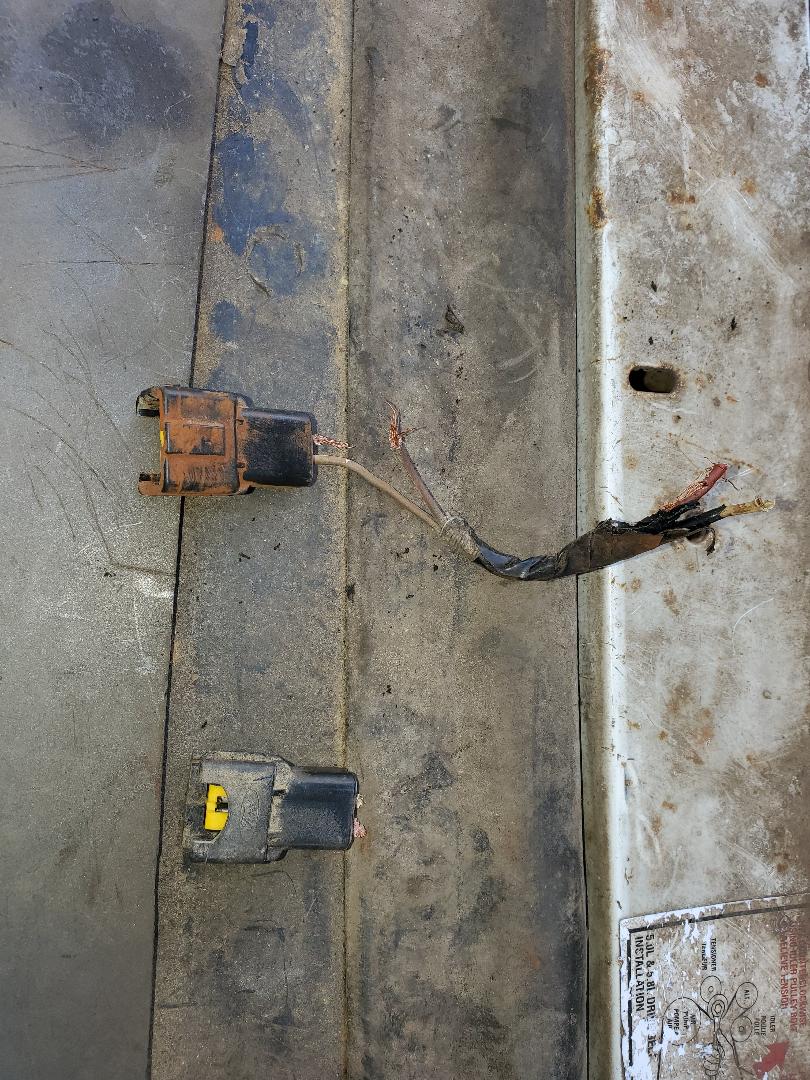
Chewed up fuel injector plugs from F250.
I made sure to cut enough wire on the ends of the plugs to allow me to just splice right back into the F250's wiring harness without having to add short pieces of extra wire. I had to expose some of the original wiring in order to get to where I could solder in the new wiring. I put head shrink tubing over the wire before soldering the wires together in order to cover them up while still using electrical tape to get extra covering for the repaired wires. After getting everything repaired I neatly taped up the wire bundles and situated everything where its not going to be in the way or otherwise interfere with anything. Now it's time to put everything back together....

Fuel injector plugs wired back into truck's original wiring.
I had to get a new upper intake gasket since the old one was brittle and broke into two pieces after pulling the upper intake free. No big deal, Auto Zone to the rescue. With the gasket in place and the upper intake bolted back down it was time to get all the vacuum hoses routed around diffferent hardware so they can be plugged up in their respective sockets. This wasn't as bad as it may seem to the novice as most of the plugs are specific to their sockets and the hoses are of specific lengths to allow the plugs to only reach the sockets they belong to. After getting all of the vacuum hoses in place I installed a couple of cooling system lines that send coolant through the upper intake (for preheating purposes), I got the throttle cables hooked back up. From here it was on to the ignition system since I still wanted to replace the old ignition system components. 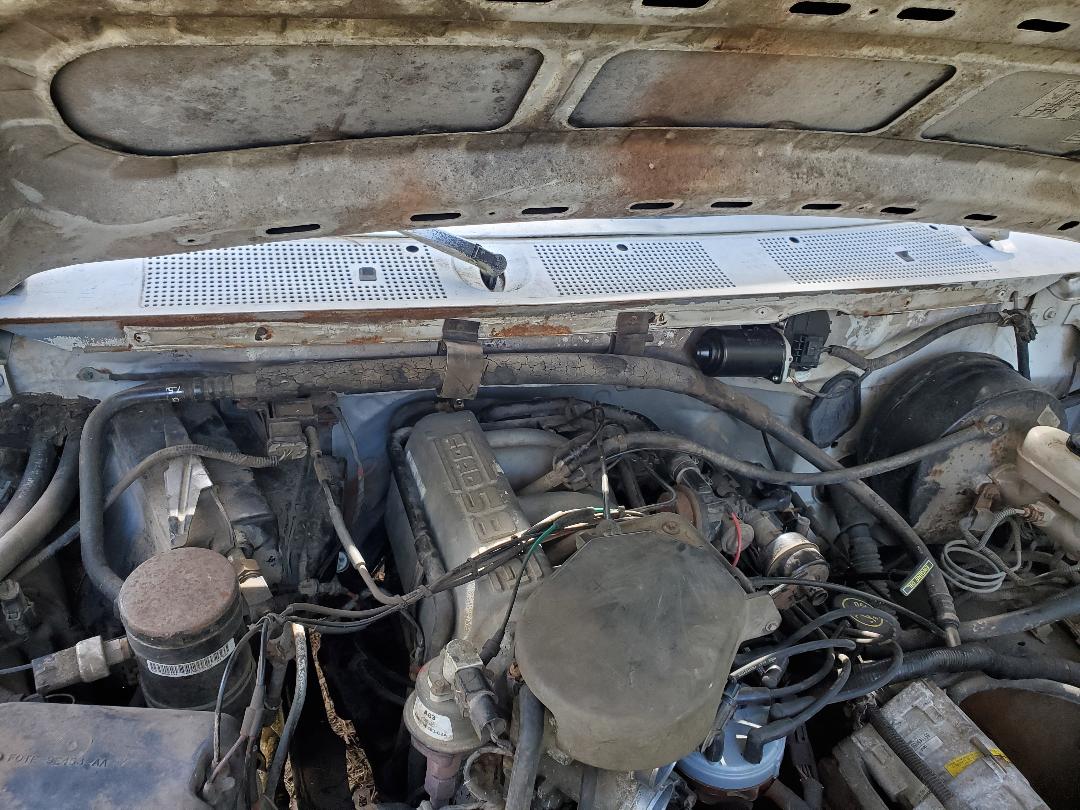
Shot of the engine and upper intake plenum with vacuum hoses and other attachments. To the novice this may appear to be a daunting issue to contend with.
Closeup of upper intake and multiple vacuum hoses routed across and throughout the different hardware that is attached to the engine.
As with any typical ignition/tune up, I started off with replacing the distributor cap and rotor. From here I went and did each cylinder's spark plug and wire at the same time. I pulled the plug and wire, replaced the plug, then matched the old wire to the new wire, installing the new wire on the plug and in its corresponding spot on the distributor cap. This duty was able to be performed without having to worry about removing the upper intake plenum, which is why I waited to finish that job before moving on to the ignition tune up job. With the new components in place I went ahead and fired the truck up. 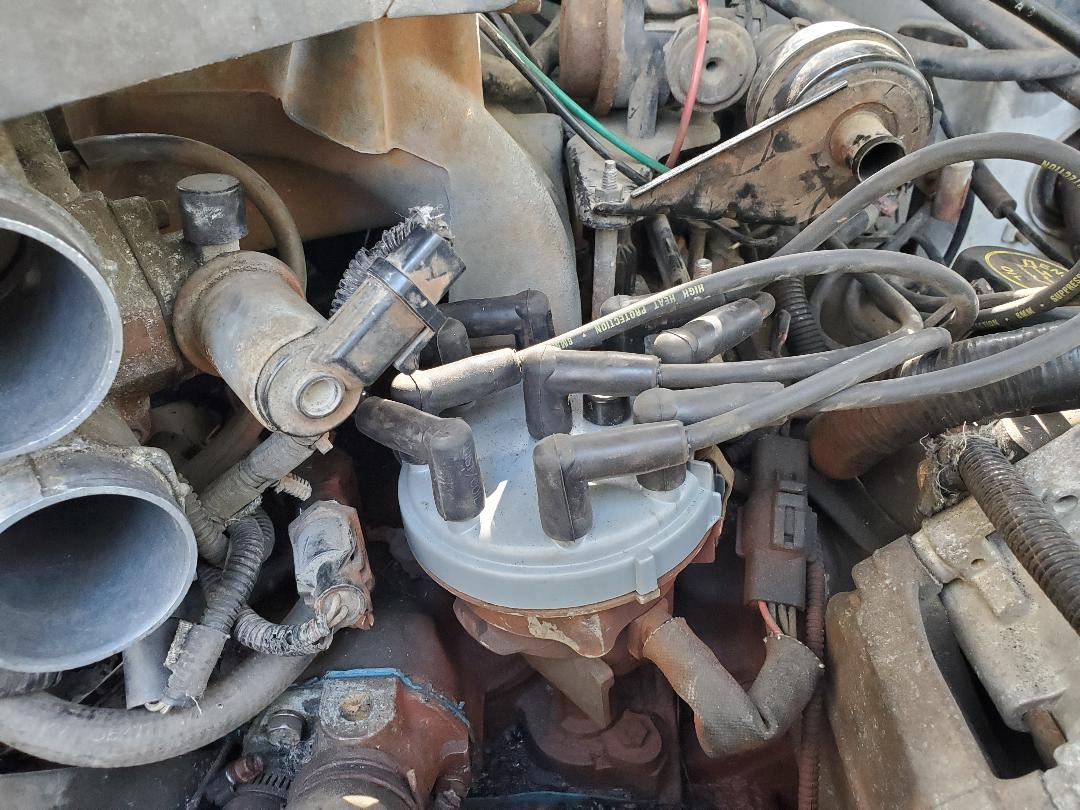
Upon starting the truck did run noticeably better, but not quite perfect. It didn't stumble or act as if it was running on six cylinders as it was when the wiring was damaged. The engine did still smoke some but the exhaust didn't smell of unburned fuel. I'm hoping that this isn't a sign of possible oil blow by that is indicative of worn piston rings. Once the engine warmed up the smoking did settle down for the most part but was still present nonetheless. I'm also hoping that maybe a session of driving with everything back where its supposed to be will cause the computer to "re-calibrate" itself to where it needs to be, versus trying to run with the degraded capacity of an engine not firing on all cylinders and fighting against a couple of dead cylinders at that. Either way, we will just have to see how the truck runs on our next gravel run as our work continues on the homestead and in the workshop.
After getting the Toyota truck parked in its new home next to the Mustang Chicken Coupe I had to start the gutting process first chance I got. Of course this involved pulling apart everything I could in the engine bay. Luckily the engine was already out of the truck so I didn't have to worry about removing it. Since this is an older truck there really wasn't a whole lot of stuff that had to be removed from the firewall and fender aprons. In a couple of sittings I was able to get everything removed from the engine bay that could be removed without having to go into the interior. Things like the brake booster, or throttle cable and hood release cable had to be accessed from under the dash before getting them free to be removed. With that I did turn my attention to the interior.  Toyota interior prior to stripping Again, being an older truck and a worn out one at that, stripping the interior wasn't going to be too big of a deal. It was more of an issue of trying to get the dash and everything under/behind it pulled free with a minimum of damage as I would be trying to sell as many of these components as I can. I started off with the seats. I had to get the two seats out before I can get the floor removed and any wiring that went under the seats/floor. Of course removing the seats wasn't as easy as one would've thought. I had a couple of bolts that were rusted frozen and required the die grinder's intervention in their removal in order for me to remove the seats. After getting the seats pulled free I moved on to the seat belt assemblies behind the seats. With the seats and the seat belts removed I then put the knife to the vinyl floor sheeting to get as much of it removed as possible. Since I wasn't recycling any of the floor it was no big deal to just slice and dice the old floor and its insulation under layer in order to get everything removed. The bundles of wire harness that ran under the seats was cut and removed as well. 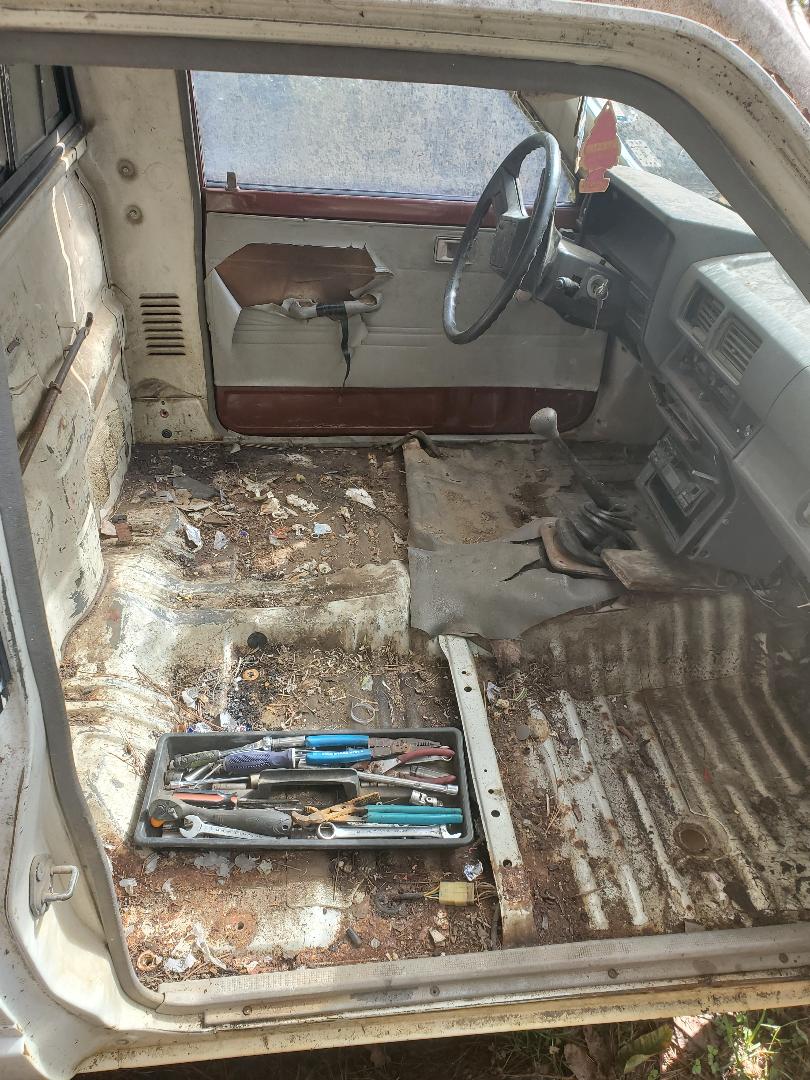 Toyota interior after removing the seats and belts and part of the floor sheet. In the next installment I attacked the dash. This was even more problematic. The way the dash went in and the gauge cluster and other components, it was like certain parts had to be removed in order to get others, but in order to get to those others you had to remove certain parts. The layout of the bolts and how they came out didn't completely add up. Needless to say I did end up damaging things like the tabs and other bolt mounting points on things like the gauge cluster and some dash components. While this sucks I can still sell some key components from those damaged assemblies. Things like the actual gauges and printed circuit board can be salvaged from the gauge assembly and used in another assembly to facilitate its repair. The HVAC box and other similar components were obviously able to come out much easier after pulling the dash and gauge cluster. The previously mentioned cables were disconnected from the pedal assembly and other points so they can be removed. Even the pedal assembly was removed as these pedals could possibly be used. With some time I managed to get everything out from the dash and everything under the dash. 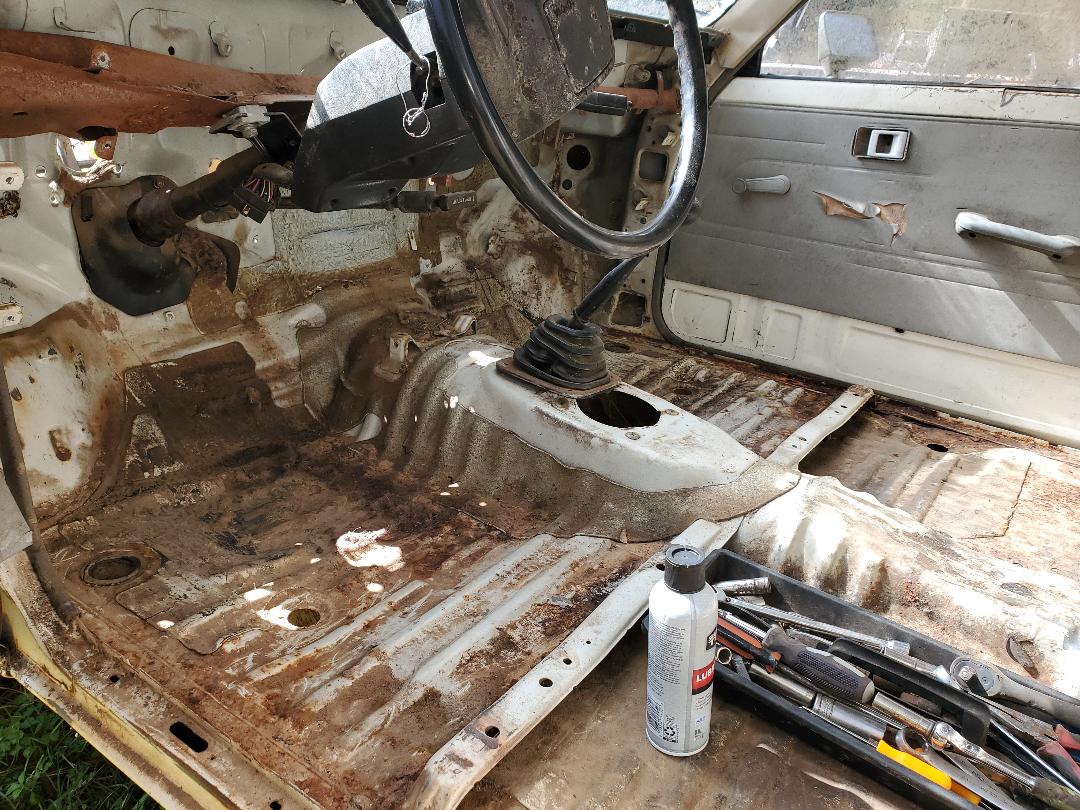 Completely gutted interior, with the exception of the steering column. The rest of the wire harness was removed from the under dash area as it was obviously not needed. The fasteners holding the brake booster were removed as well. With all these things removed, all that was left was the steering column. I wanted to leave that present for when I may need to move the truck in the future. If we ever relocate we would be taking these car coops with us and being able to steer them would be very useful in their quick moving and staging. As for the engine bay, all that is left is the removal of the transmission, the exhaust and any remaining wire harness. In order to remove the transmission I'll have to remove the shifter prior to going under the truck to disconnect the tranny mount and driveshaft. Even with the exhaust I'll have to cut the pipe halfway back just before the muffler so I can remove that half then probably cut the pipe just after axle bend in order to get the remaining pipe out. If I can manipulate the back half of the exhaust I may be able to get the rest over the axle without further cutting, which would be good as far as being able to use the system for a future exhaust installation. 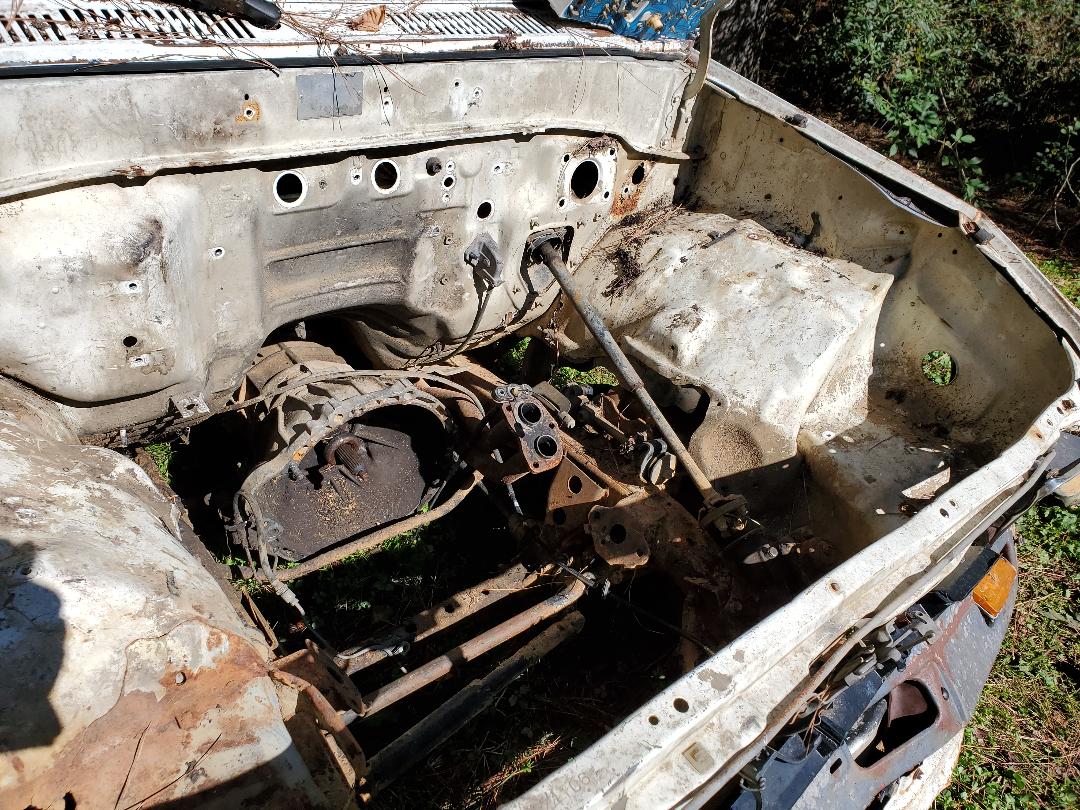 Stripped engine bay in truck with just the tranny and exhaust pipe/manifold remaining. Note cleared firewall. With the final removal of those components will I then be able to start the actual chicken coop build. I'll start off with welding in pipes and sheet metal in the engine bay to provide a floor. I'll also install a removable wall at the grille for when we have to sweep the mulch from the engine bay area, which will be the nesting box. Instead of wiring up the engine bay with an outlet and light I'll just install a high powered computer fan over a hole I'll cut in the firewall in order to draw warmed air from the cab into the engine bay. Another large hole will be cut in the firewall for the chickens to be able move between the cab and engine bay. The cab will have an outlet wired in for a wall plug electric heater and a light fixture will also be installed on the cab's ceiling for cab illumination. The cab will serve as the "interior" with roosting posts for the chickens to retreat to at night or when its cold. Another hole will be cut in the rear to connect the cab to the bed so the birds can also move between the cab and bed, which will serve as a sort of chicken run. I'll build a frame with metal tubing that will mount on the bed and be leveled with the cab roof. I'll clad the frame with corrugated sheet metal to completely cover the area with the exception of the rear. There I will make a frame that I will cover with simple chicken wire screening which will allow for proper air movement. In the bed I'll also install the plumbing for the drinker cups. This will have the added benefit of keeping water away from the interior and the engine bay where mulch should last a lot longer before it gets soiled to the point of needing replacement. I plan on having this chicken coop project done in much less time than I had used for the Mustang Chicken Coupe.
At this moment we have the Mustang Chicken Coupe set up with automatic watering apparatus in the form of auto refilling drinker cups while the two chicken tractor/coops that are also set up in the yard were using large gravity feed water bottles that are typically standard in chicken coops. While these things are a fast way to get a large amount of water to the birds, they can be troublesome when it comes to having to clean them since they are sitting on the ground and chickens aren't necessarily the cleanest creatures. They will get mud and shit on the rim of the basin that holds their drinking water. Along with the idea that any gathered dirt will get wet from the water, creating more of a mess, one can see that these watering containers will need periodic cleaning along with refilling since they are about a gallon in capacity.
Since the ole lady was the one tasked with cleaning and refilling these water containers, it grew old kinda fast. We did make plans on setting up similar drinker cup water hookups for the two coops and linking them via custom garden hose to each other and to the water line that is currently feeding the car coop. The problem with doing all that is the idea that these two coops aren't going to be used forever as they are currently deteriorating and will need to be replaced. We already have two more automotive coops in the planning stages with one being stripped down. It wouldn't make a lot of sense to spend a lot of money and resources assembling a drinker cup setup only to have to tear it apart, and be stuck with some components that may not be usable as they were custom made for the current coop setups. After looking at what I had available I had a plan. Since I had some drinker cups of the first generation kind that use hoses on either side to link the units together, along with the regular 1/8" NPT thread cups that can be used with the special tees I had gotten for just this purpose, I figured I can whip up something real quick and free. The whole idea was to use a couple of 5 gallon buckets as water reservoirs along with a hose fitting that is screwed into the bottom of each bucket. A hose will run from said fitting down to the drinker cup line where it'll plug up, feeding water via gravity to the drinker cups so as to eliminate the need for a pressure regulator. The drinker cup assemblies would be wire ties to the mesh of the chicken coops to secure them. Five gallons of water should be more than enough to keep these drinker cups flowing for a while and when they do need servicing we're just looking at putting the garden hose in each bucket to fill them up and giving the drinker cups a light spraying to knock out any dirt that may be present in the cups, quick and easy and very light maintenance. I first started with the hose hookup drinker cups. I had an assembly that was already set up from when I used them in the car coop that consisted of three drinker cups with short lengths of hose on either side and a terminating hose with a bolt clamped in it to cap it all off. I removed one drinker cup since two would be enough for the number of birds in the coop. Since the coop had a flat level surface over the chicken run area, I figured this would be the perfect spot to prop up the bucket. I started off with a couple of pallet boards, sourced from my scrap wood pile. I laid them on top of the screened frame of the chicken coop, securing them with wood screws. Next I clipped some of the mesh to open up a spot for the nipple to fit through when the bucket is sitting on the boards. Next is setting up the bucket. 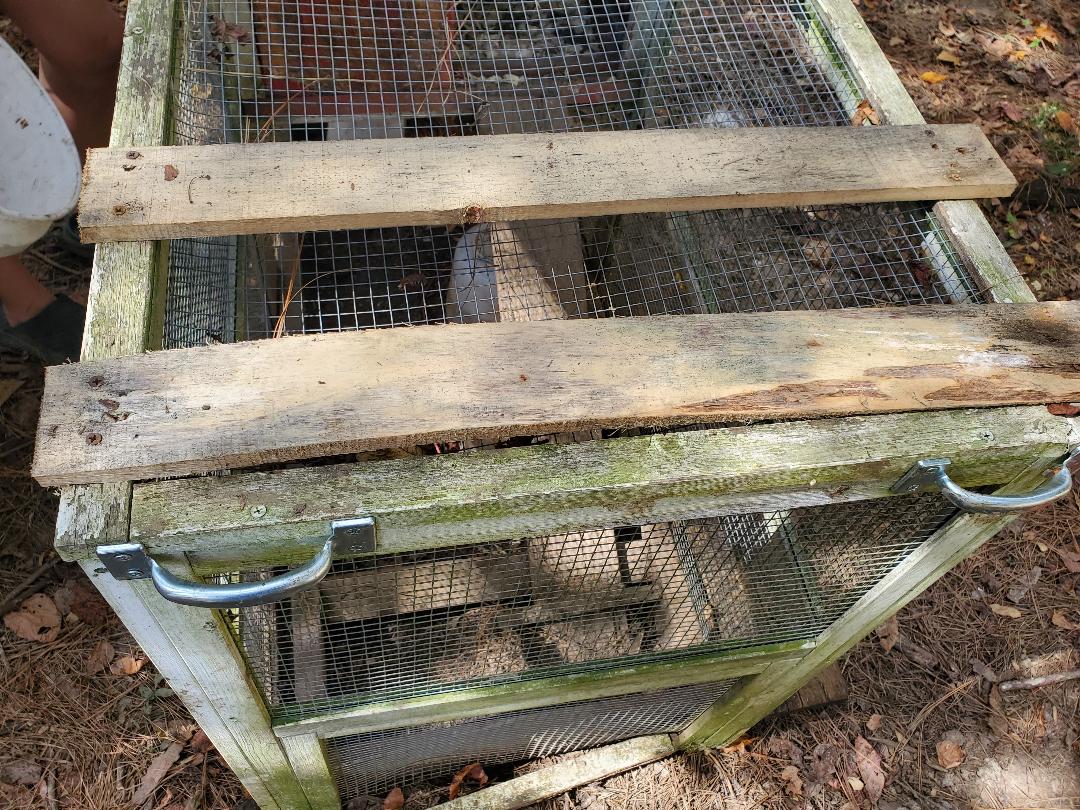
Pallet boards screwed to top of chicken coop frame in preparation for supporting 5 gallon bucket.
I took the bucket and started off by drilling a hole in the bucket with a step bit to get the wide hole I needed since the hose fitting is 1/2" NPT male thread to 1/2" hose barb. After making the hole just big enough to start catching the threads of the fitting I applied teflon tape to said fitting then worked the threads into the hole. Once the threads caught I was able to screw the fitting in all the way down with the added security of the teflon tape sealing the joint from leakage. 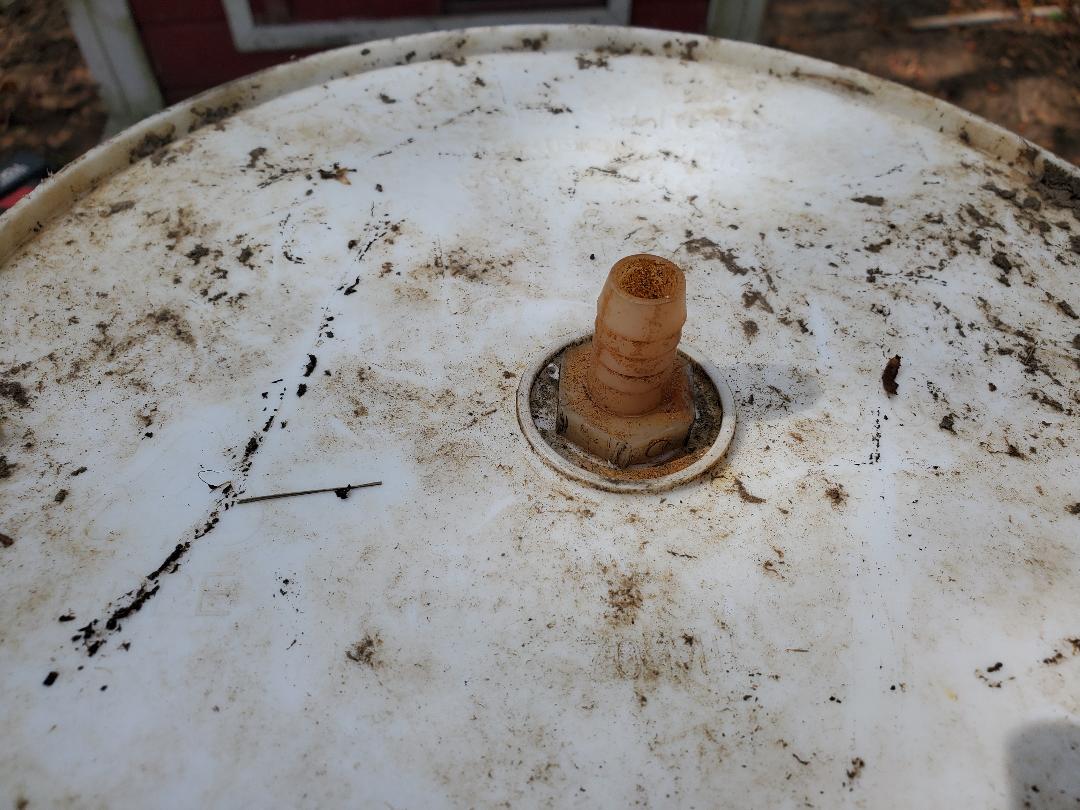
Hose barb fitting in bottom of bucket.
Next move is setting up the drinker cup assembly on the mesh of the chicken coop. I placed the assembly at a level that would allow the birds to still reach the cups while keeping them high enough that they won't be able to kick dirt into them easily. Using wire ties I secured the assembly in place on the mesh, making sure everything was level so when the cups do fill with water they will dip down and be perfectly level where they'll shut off and not leak out. 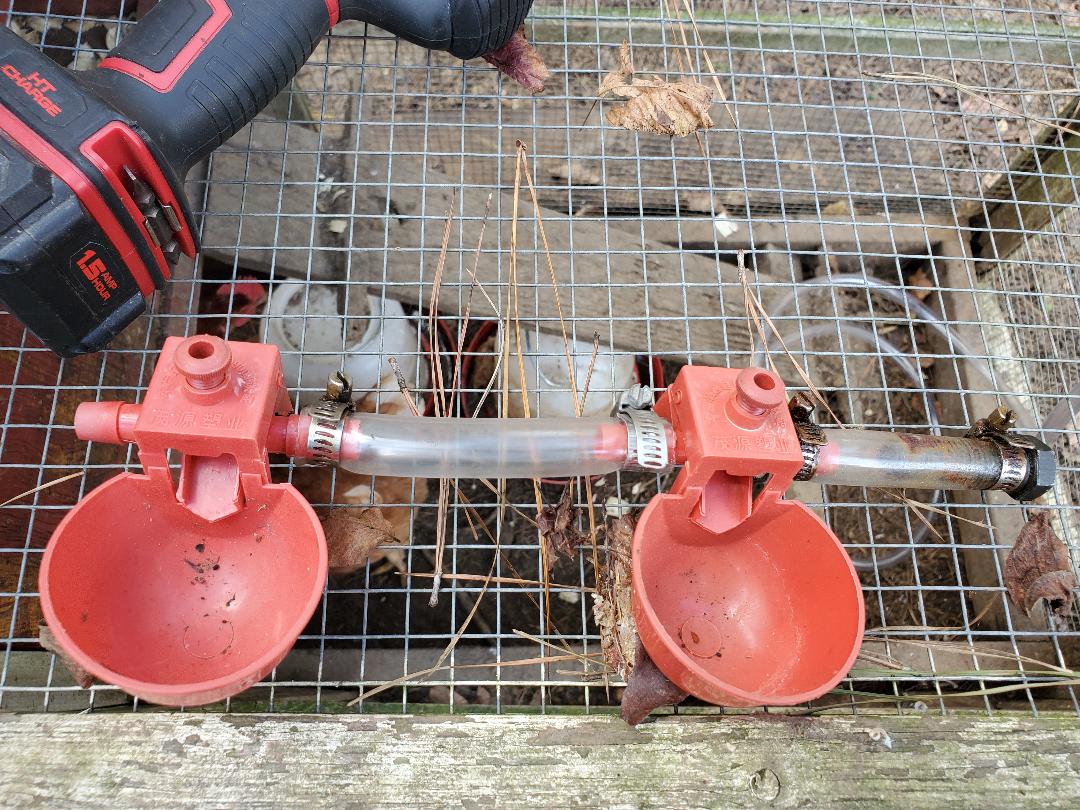
Drinker cup assembly set up prior to installation.
With the drinker cup assembly attached to the mesh the next thing to do was install the hose that goes between the bucket and the assembly. Hooking up a length of hose (which I already had on hand along with the other crap), I was able to measure out a suitable length of hose to go to the nipple on the drinker cup assembly. I wanted to make sure that I can wire tie the hose to the mesh so it isn't just in the way. After securing the hose to the mesh I trimmed the excess and attached it to the drinker cup assembly. 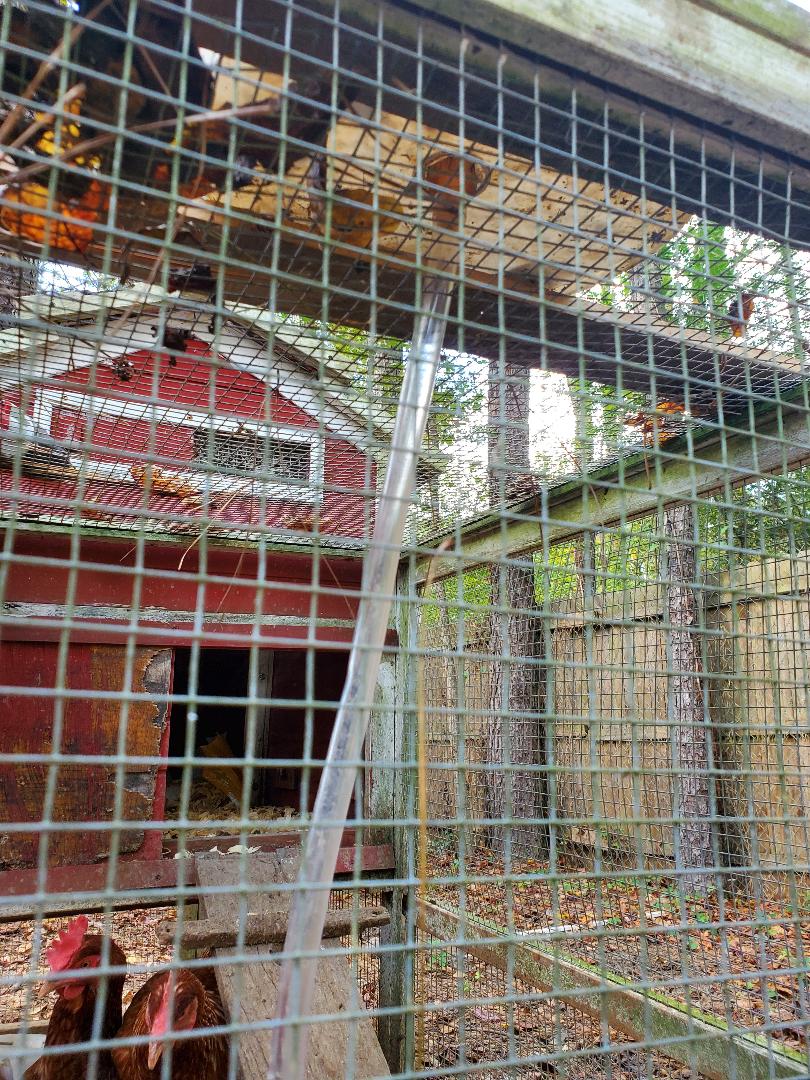
Hose routed down from bucket towards drinker cup assembly. Note awaiting chickens in foreground.
With the hose attached to the drinker cup assembly I filled the bucket up. Water began to flow down into the assembly filling the drinker cups until they weighed down and closed the valves. I did have to tighten up the clamps on the hoses as they did want to dribble a little bit but once that was taken care of the system was ready to go. 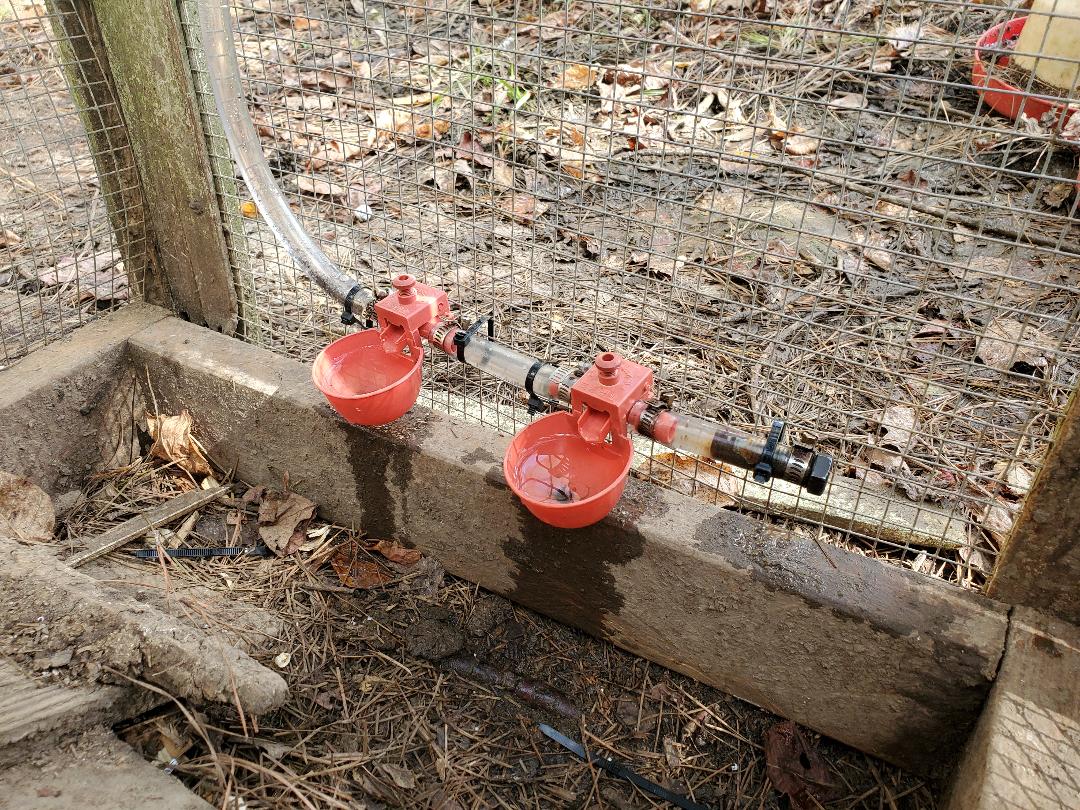
Drinker cup assembly full of water after filling bucket.
With this setup done I moved on to the next one, which turned out to be better as the components were of a better grade. I still had a couple of the special tees along with a couple of the drinker cups that thread into said tees. Since the water pressure would be very low I didn't even bother using PVC glue for assembling the pipe assembly. I cut the short lengths of PVC needed to couple the tees and put a cap on one end. Pressing together everything would ensure that the assembly would be sealed, with the exception of putting teflon tape on the threads to the drinker cups. Since this assembly is a pipe assembly, in order for me to hook up the hose from the bucket I had to have an adapter fitting that would allow for the attaching of a hose barb fitting. Again, my supply stash came to the rescue. With the entire assembly done I attached it to the mesh in the chicken coop with wire ties. 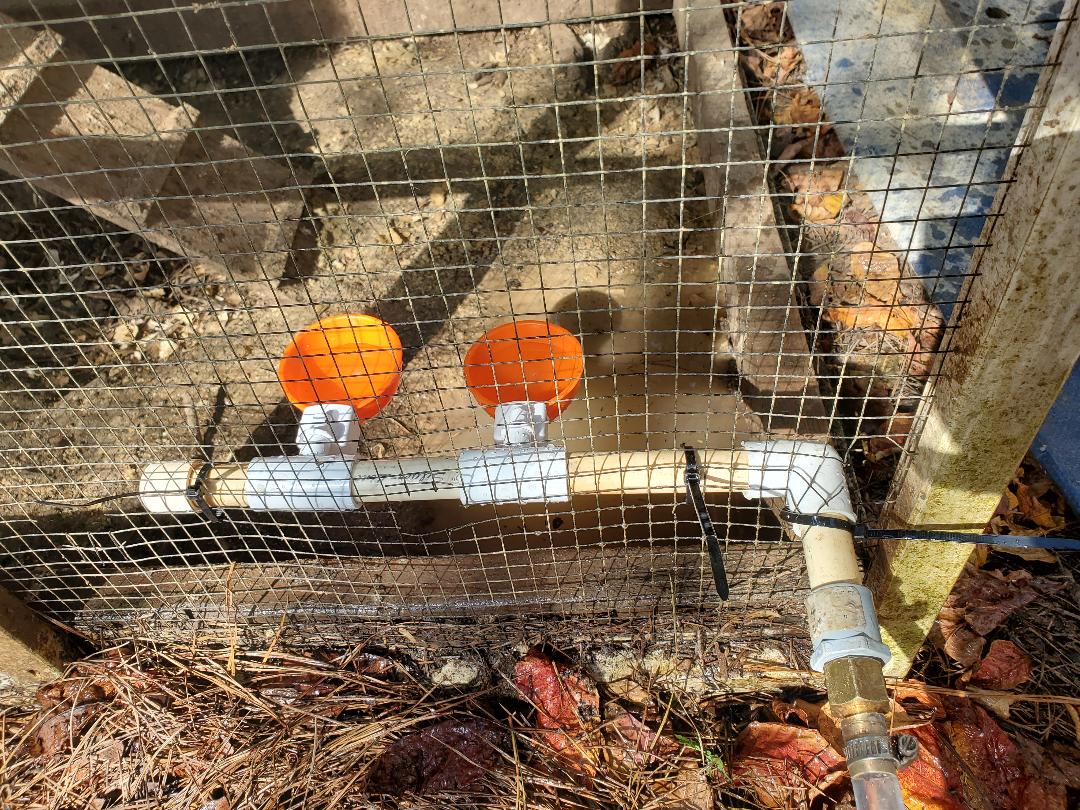
Drinker cup assembly made from PVC fittings attached to mesh in chicken coop.
Now the problem I had with this chicken coop compared to the other one is that is no flat surface to mount anything on. The whole roof with its slant covered the entire top of the chicken coop. Since I couldn't mount the bucket on the chicken coop roof, I just set up a crate next to the chicken coop to hold the bucket on. The length of hose needed would be much shorter now as we're only going a couple of feet from the bucket (which is only a few inches higher between the nipple in the bucket and the hose fitting on the drinker cup assembly. Instead of drilling a hole in the bottom of the bucket I drilled the hole on the side, since the bucket is going to be so low to the ground. Doing things the same was as with the other bucket I was able to get the hose barb fitting threaded in with a good seal I attached the hose I had remaining to the nipple and routed it over to the fitting on the drinker cup assembly and trimmed the excess hose. After I got the hose attached I filled the bucket up with water. As with the other drinker setup, this one filled up with water until the valves closed up. Only difference here was the idea that this system didn't piss water all over the place. It sealed up good all around, making this system more than likely to last longer than the first one as there won't be any leakage whatsoever. 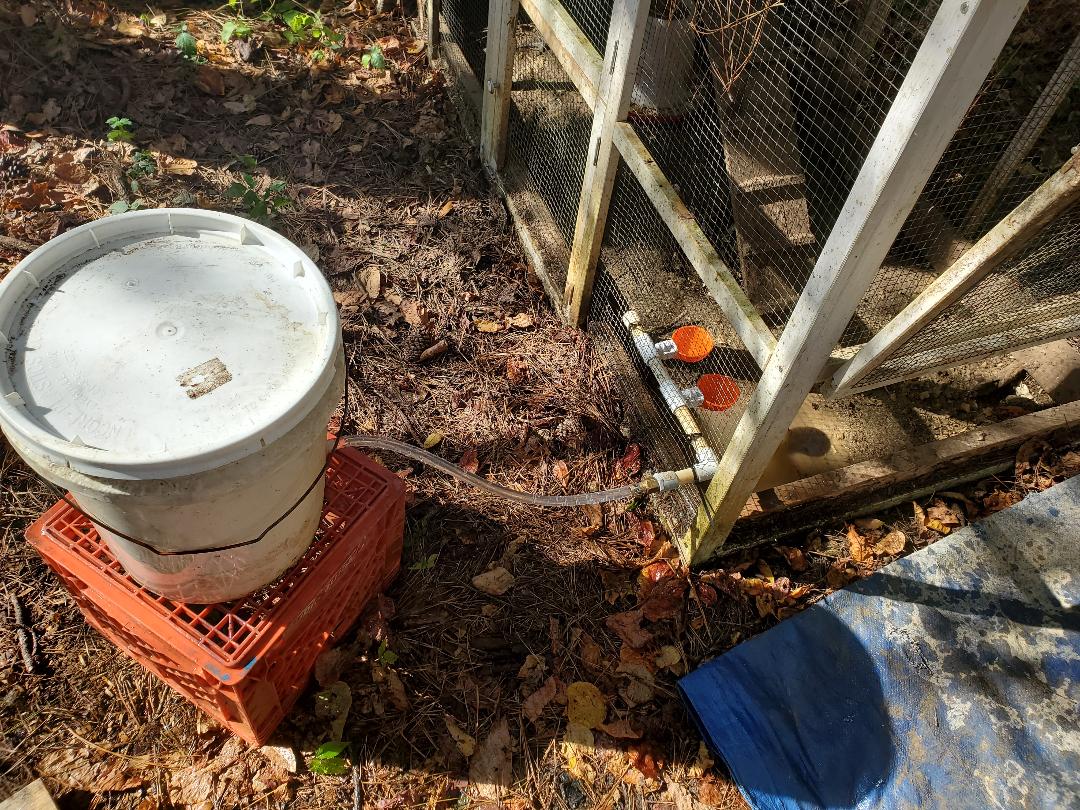
Bucket situated on top of crate with short length of hose between it and the drinker cup assembly.
With that, both chicken coops were hooked up with automatic watering apparatus that doesn't require as much maintenance as the standard watering apparatus. The unit with the PVC pipe setup lasted much longer, barely draining any water after a good 24 hrs of operation. The first unit despite it leaking some, still had over 3/4 full of water. Fast forward to the present and with the watering apparatus up and running, the ole lady didn't have to worry about watering since the systems did their job of only metering out enough water to fill the drinker cups. Each hopper went a few days before needing refilling. As can be seen, this project was an overwhelming success while still having the added benefit of being able to salvage most of this stuff when I set up the next car coop.
|
