|
After getting everything hooked up on the HPGV#2, I took the planter cups and drilled a series of holes in the bottoms of the ten cups. I made this easy by stacking the cups then just running the drill through all of the cups at the same time. I drilled probably ten holes total in the bottoms of the cups to allow for water to flood the cups when they're in the pipes.
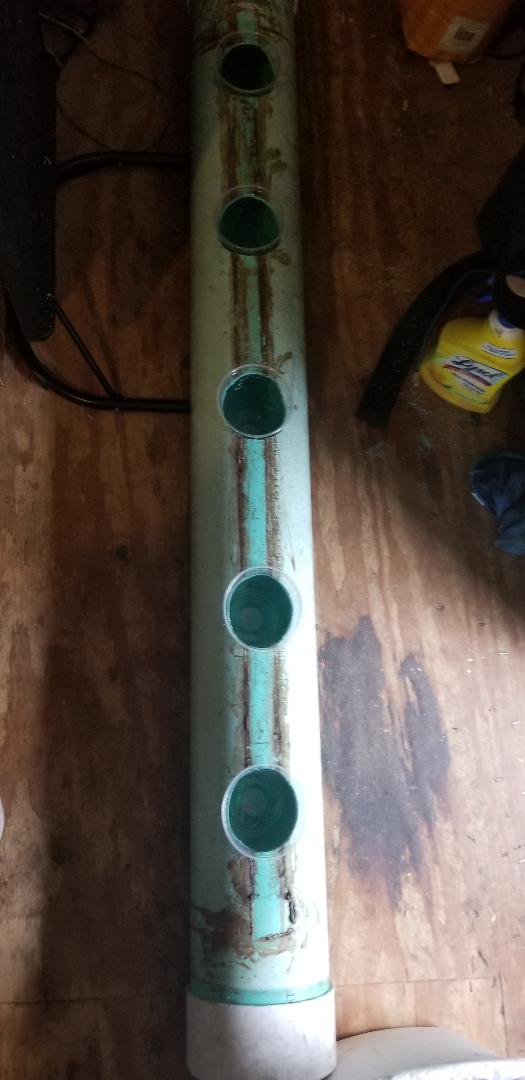
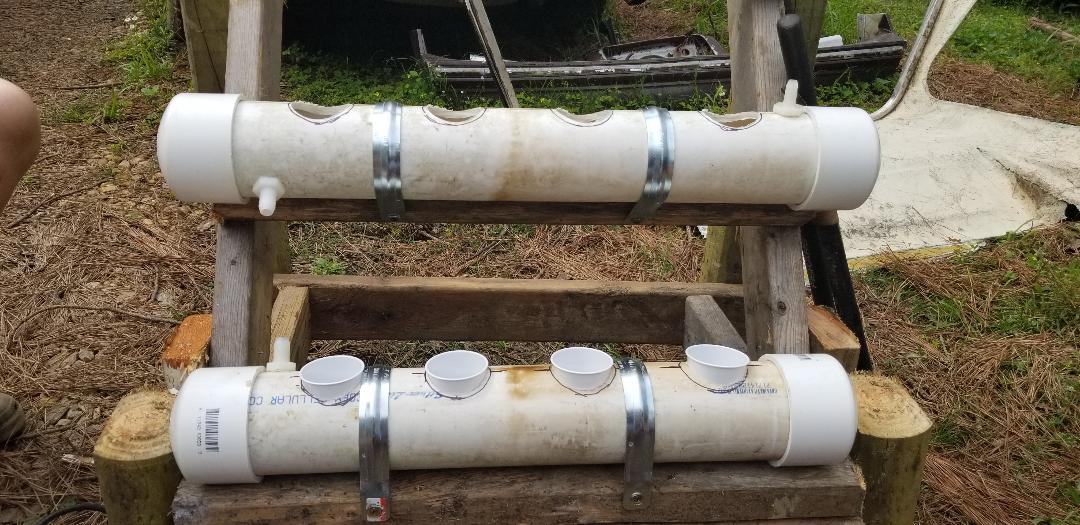
The next thing I did was fill the cups with a little perlite, then put the seedlings into each cup. I made sure to only put enough into the cups that when I put the root ball from the seedling into the cup, it was still about an inch below the top of the cup. This way when I filled the cup the rest of the way with perlite, I was able to cover the root ball of each seedling without having the top of the perlite near the top of the cup. Reason behind this is because when the cups fill with water, the water will sometimes push the perlite up a little bit until it completely soaks with water and weighs down where it'll settle into the cups. With the top of the perlite not being at the top of the cup, the perlite won't overflow out of the cups. With the seedlings in the cups all that was left was to set them into the holes in the two pipes then fill the drum up with fertilizer and water and plug the pump up to test. When the pump came on it immediately began filling the first pipe up with water. It didn't take too long before the water level reached the output nipple and started flowing into the 2nd pipe. I did have to make some adjustments to the pipes so the water level in the first pipe didn't get too high. Of course the cups began to fill with water and the perlite began to saturate. As the 2nd pipe filled with water and those cups filled up the water level finally reached the other output nipple and flowed out and back into the drum. A couple of things I noticed was that the caps on the pipes didn't seem to seal completely, enough so that they dribbled some during the time that they were filled up and the other problem was that the water level in the 1st pipe was getting too high that it overflowed out of the planter cup holes on the top of the pipe. The way that I'll have to fix this is remove the output nipple from the pipe, plug it, then drill and tap a new hole at a lower level so the water level will only fill up to the level of the new nipple. I did adjust the output of the pump to slow down the output of the pump so this helped a little but not quite enough. Of course when I put a timer on these gardens the pumps will only come on long enough to get the planters saturated then cycle off, lessening any losses of fertilizer water from leaks or overflow. Of course the flaws will still be corrected. Activating the gardens was necessary in order to find these flaws though. 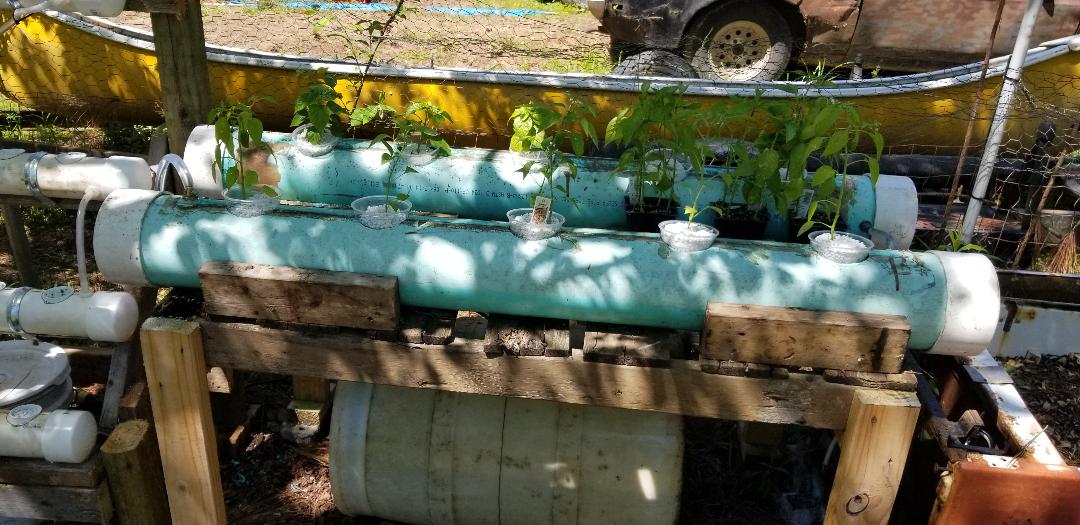
HPGV#2 with planter cups filled with pepper plants
After taking care of the HPGV#2, I turned my attention to the S10 bed. I commenced to beating on the right side with a sledgehammer to try and move the crushed metal some but as this was not exactly going the way I hoped. Of course this was predicted so the next move was to start cutting. I cut down into the bed at the focal point where the tree hit the bed then ended up cutting sideways, working to cut a patch out. The reason for this was because just cutting the side of the bed in half wasn't going to be enough. I figured that the "easiest" way to handle this was going to be to cut out a large patch (or two or three), straighten the patch(es) out and weld everything back together. This is not going to be pretty by any stretch, especially on the inside of the bed. I'm going to also be looking to see if I can also cut large patches from the short bed to use to fill in the holes that I will probably end up cutting out of the sides of the crushed bed. We will get it done. 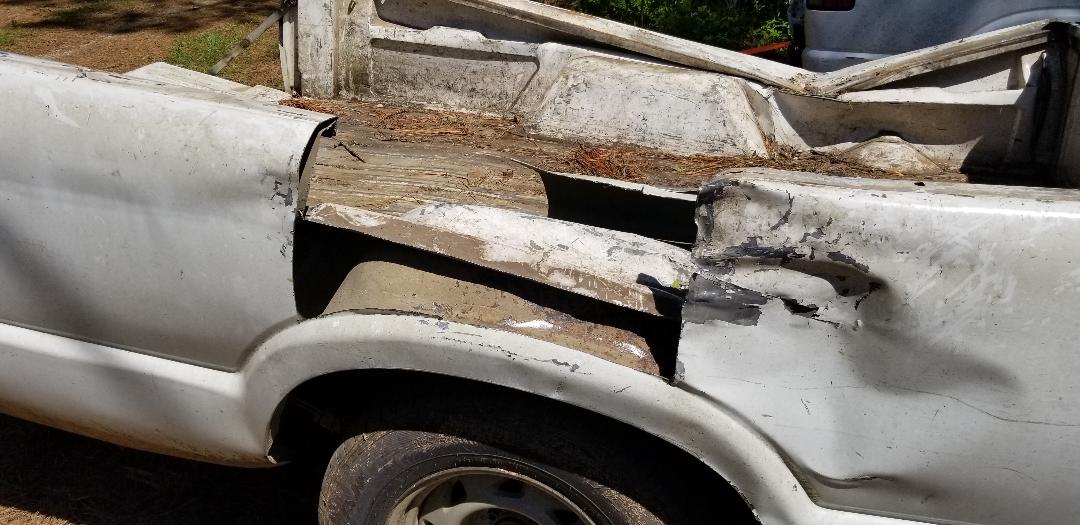
Large hole from patch cut from right side of S10 bed.
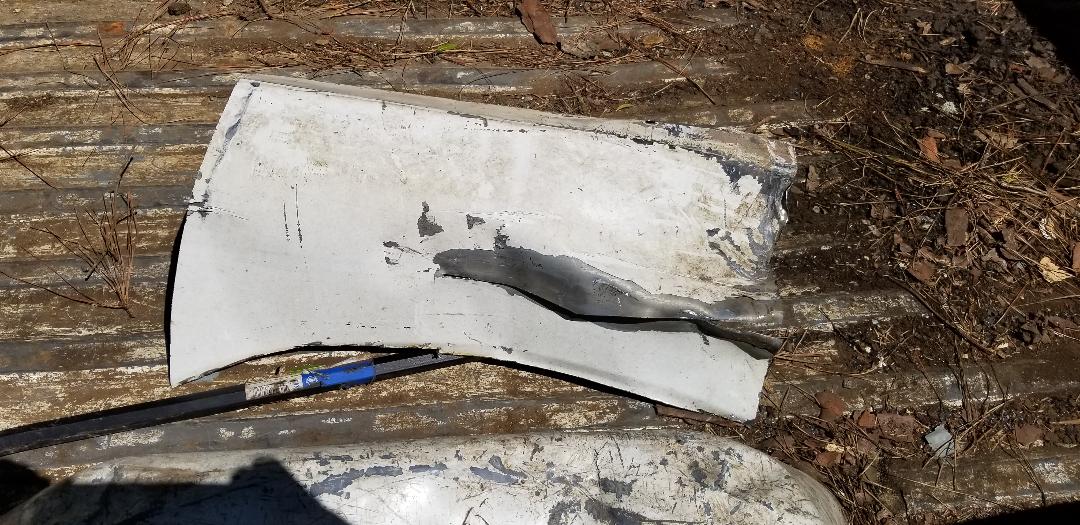
Patch cut from side of S10 bed.
0 Comments
With the Tracker online and being put to use, the next project is the S10. The S10 was damaged by a tree that came across the bed, crushing the camper shell and crushing the sides of the bed quite a bit. Luckily the frame wasn't crushed so at least the truck is salvageable. The first thing that I had to do was get the truck running and move it over to where I have the other truck bed resting on the car trailer. I had to charge the battery the night before to get the thing started up. I moved the F250 over to provide the parking spot for the S10, so after parking the truck next to the car trailer I gathered my tools. The first course of action was to remove the remains of the camper shell. This involved detaching the bolts that held the frame of the camper shell to the top of the sides of the bed. This was rather easy despite having to use a crowbar to pry the crushed sides of the bed up some to get a wrench under the sides.  Left side shot of crushed S10 bed with crushed camper shell. 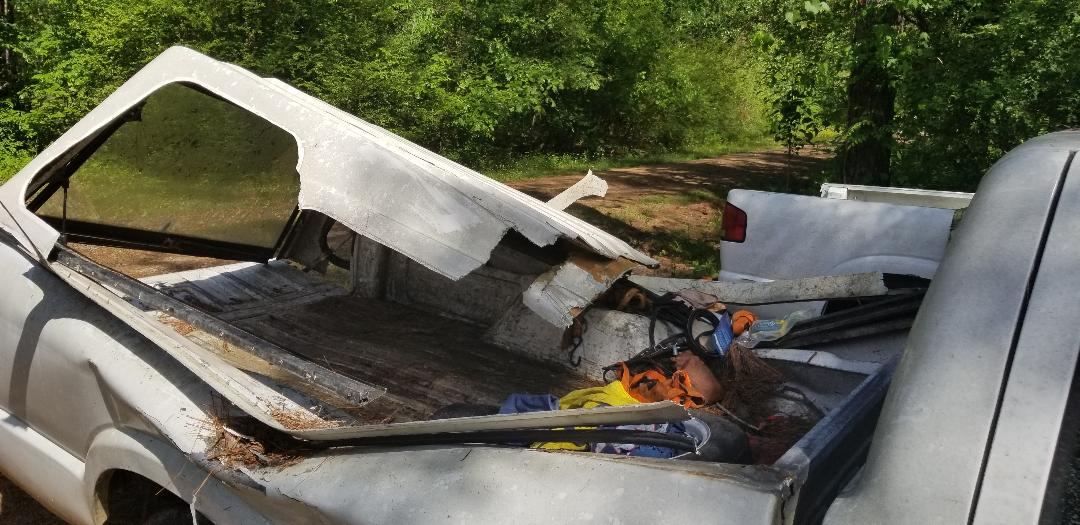 Right side of crushed S10 with crushed camper shell. With the camper shell fully detached from the truck bed the next thing was to start cutting the thing up. Since the frame is aluminum, the metal cutting blade on the reciprocating saw made fast work of it. I cut sections of the bottom frame apart then cut around the rear of the bed around the hatch to remove the whole hatch section. The side window frames came out on their own so they were no problem. Lastly the fiberglass shell body, what was left of it, was cut into multiple sections to make it small enough to manage since it was going to the garbage to be picked up. The frame pieces obviously were staged with the scrap metal to be hauled out later. With the shell completely out of the way the next thing I did was start cleaning up in and around the bed. Broken glass had to be vacuumed up as well as a few odds and ends be removed that used to be in the bed. I will be looking over the inside of the bed over and over to come up with a plan of how I will either reshape the sides of the bed or how I can blend the intact short bed with the crushed long bed to make one good bed. 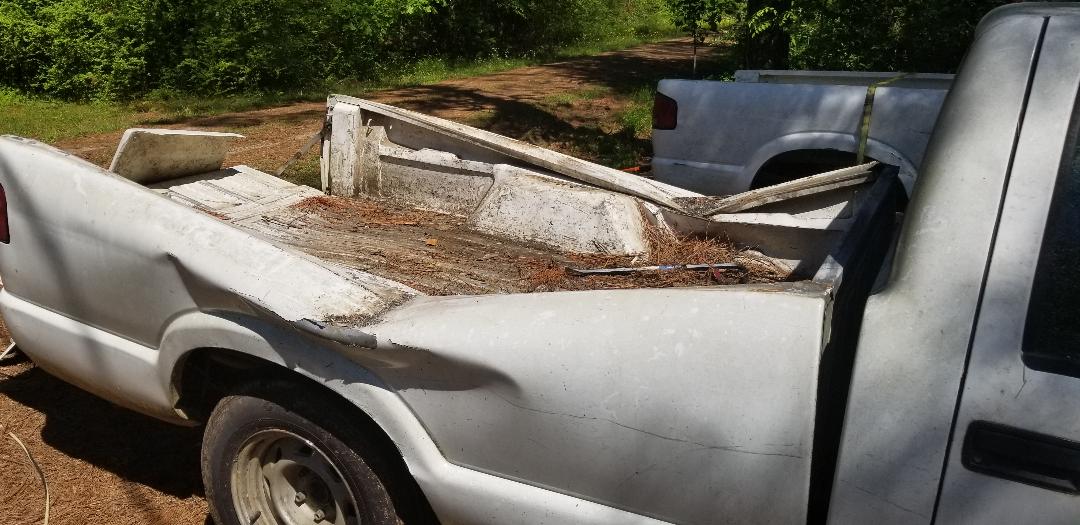 Crushed S10 bed sans camper shell. 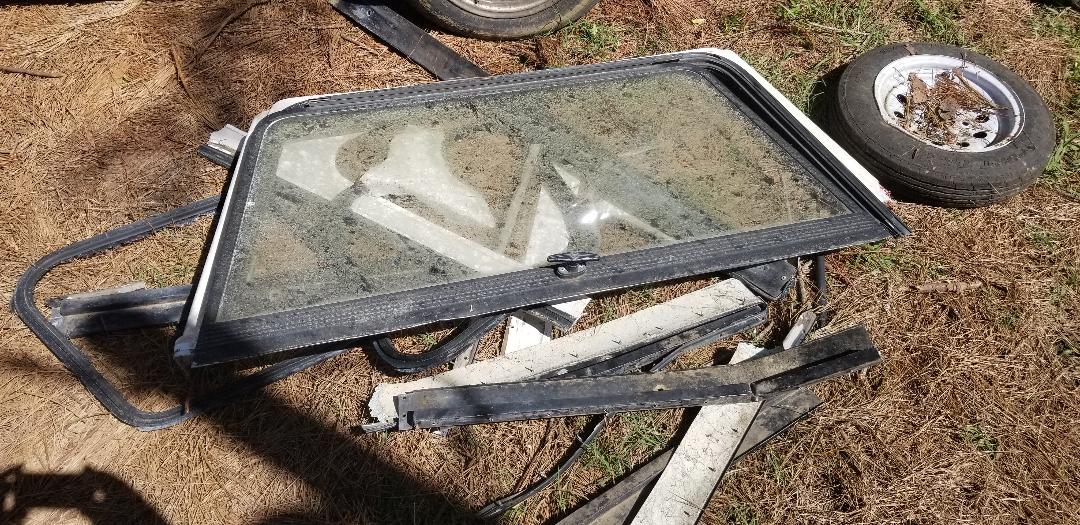 Aluminum pieces from S10 camper shell.
Along side the hydroponic gardens I also wanted to make more raised bed gardens using components that I already have around the homestead to make things cheaper. One of the things that I had around here was a couple of old washer or dryer drums (I'm not sure which but they came from one or both of these appliances). I already had another drum that is currently being used as a vessel for seed potatoes along with the couple of drum halves that I made into elevated/raised bed gardens so another drum would be right at home along with these.
Now since I planned on bringing in the perimeter fence of the garden, that means that the current location of the dog kennel greenhouse falls within the zone that will be eliminated. Because of this I decided to put a washer drum basically right in front of the kennel greenhouse. When the kennel is moved, the new fence will be established right where the inner side of the kennel wall is at, putting the washer drum along the new fenceline. With the drum set up with dirt in it, there was a matter of deciding what to put in the thing. This ended up being pretty easy after we picked up some seedlings at a local nursery. I decided to plant a couple of cucumber plants in the drum. I already had tomatoes in the last ground level raised bed and potatoes, garlic, and onions were distributed through the other raised beds and the peppers I got will be going in the HPGV#2. The drum would be perfect for a couple of cukes. To make things better I had a piece of cattle panel fence that was being used as a small trellis when I had some squash plants in the ground in years past. This would be perfect to go in the drum with the two cucumber plants. I did have to cut the fence panel down to a narrow enough size to be able to stand it up in the dirt within the drum. Planting the cukes on either side of the fence panel will give both plants plenty of room in the drum to grow and they can be trained up the fence panel as they grow. 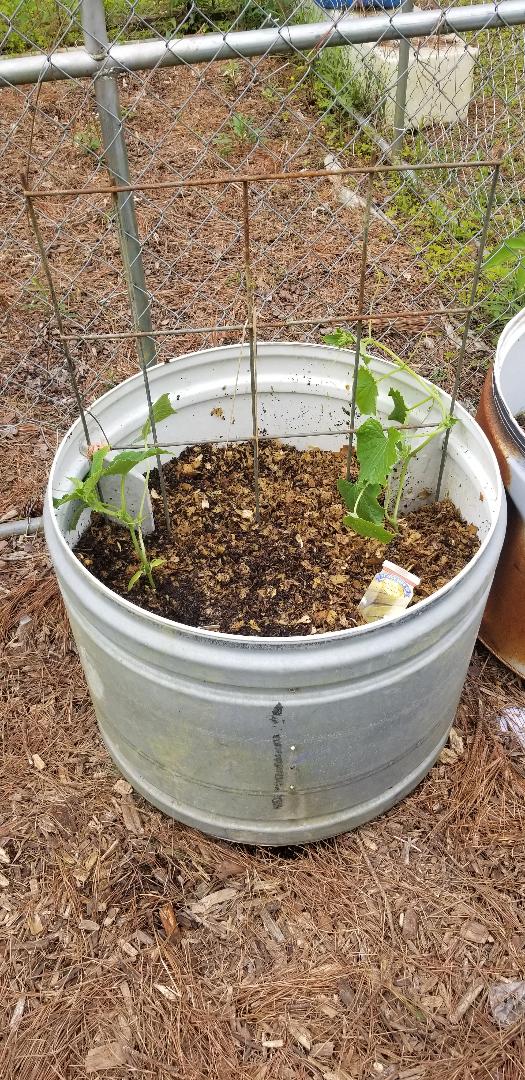
Washer/dryer drum used as a raised bed planter for two cucumbers with a piece of fence panel as a trellis. Note wall of dog kennel greenhouse right behind the drum.
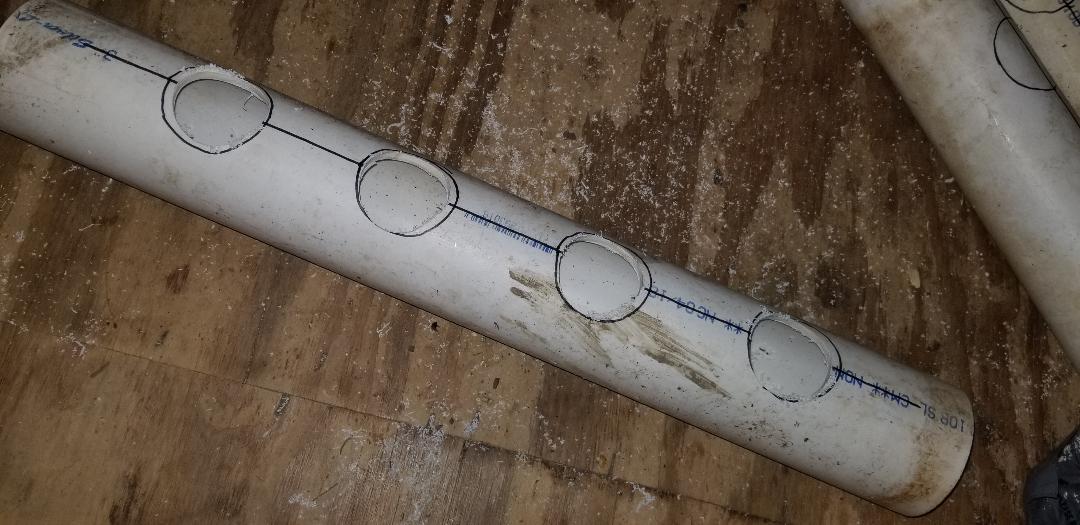
Now back to the HPGV#2. After drilling out the starter holes with the hole saw (for the planters), I used my jigsaw to cut the holes wider in order to accommodate the larger cups I first drew a circle around the holes, extending out about a half inch prior to cutting. After cutting these holes I was able to insert the cups nicely enough that 90% of the cups fit into the holes. This means that the water levels in both pipes will not have to be so high to be able to saturate the perlite within the cups. 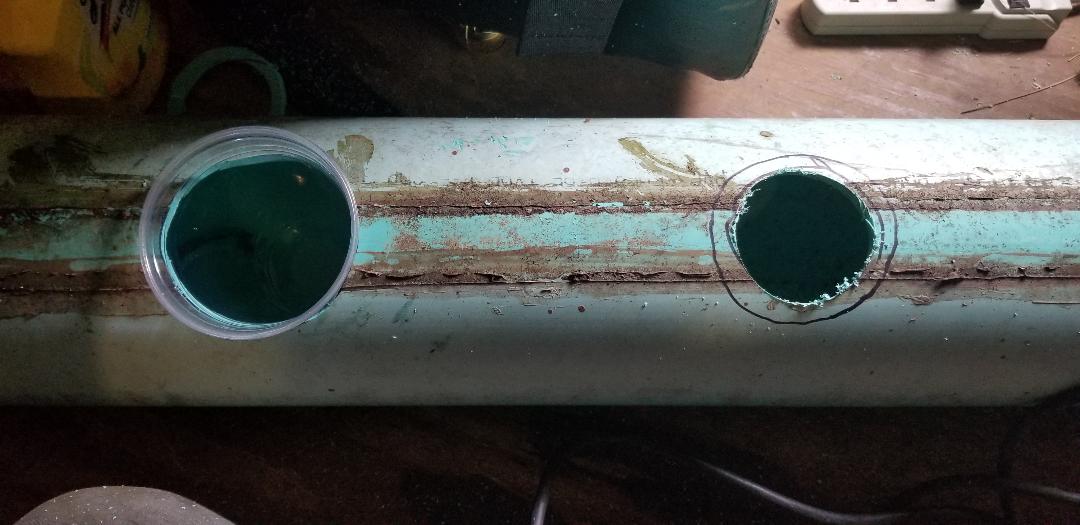
Hole traced in pipe next to hole already cut and fitted with a cup.
Pipe with holes cut and fitted with cups.
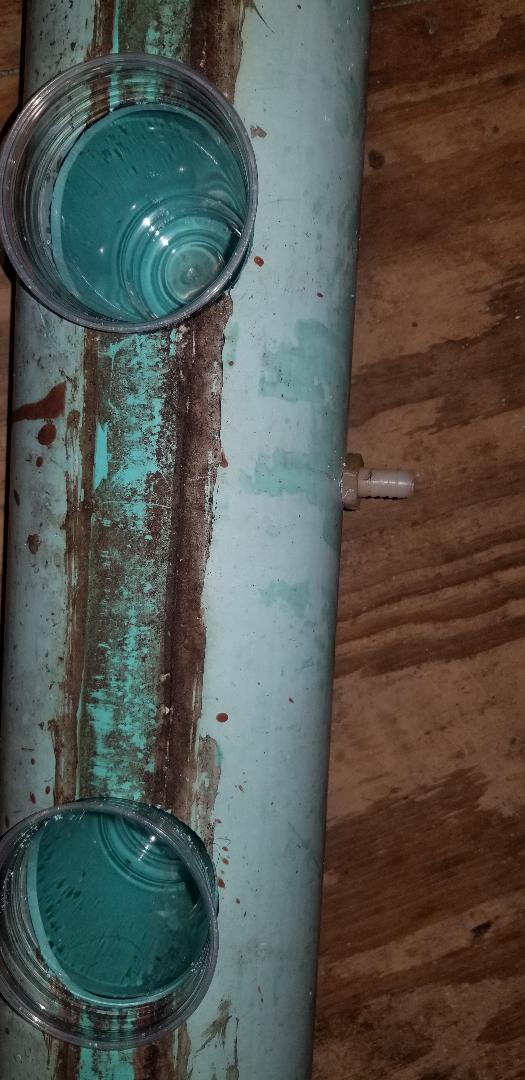
In the first pipe I drilled two holes for the nipples that will administer and release fertilizer water. The input nipple in this first pipe was drilled in the top of the pipe on one end next to one of the cup holes. Using the tap I cut threads for the nipple and threaded the piece in. The output hole was drilled on the opposite side off to the side about halfway up the side so the water level will go halfway up before running out of the output nipple. This was threaded and the nipple was inserted as well. The nipples for the other pipe were drilled in accordance with the first pipe. The input nipple for the second pipe was drilled to the side on the same end that would allow it to meet up with the output nipple on the first pipe so a short length of hose would be all that's needed to link the two pipes together. The output nipple for the second pipe was drilled on the side as well but this time it was drilled in the middle of the pipe on the opposite side of the input nipple. This will allow for the shortest length of hose outputting directly to the water reservoir that will be placed directly underneath the table holding the pipes. 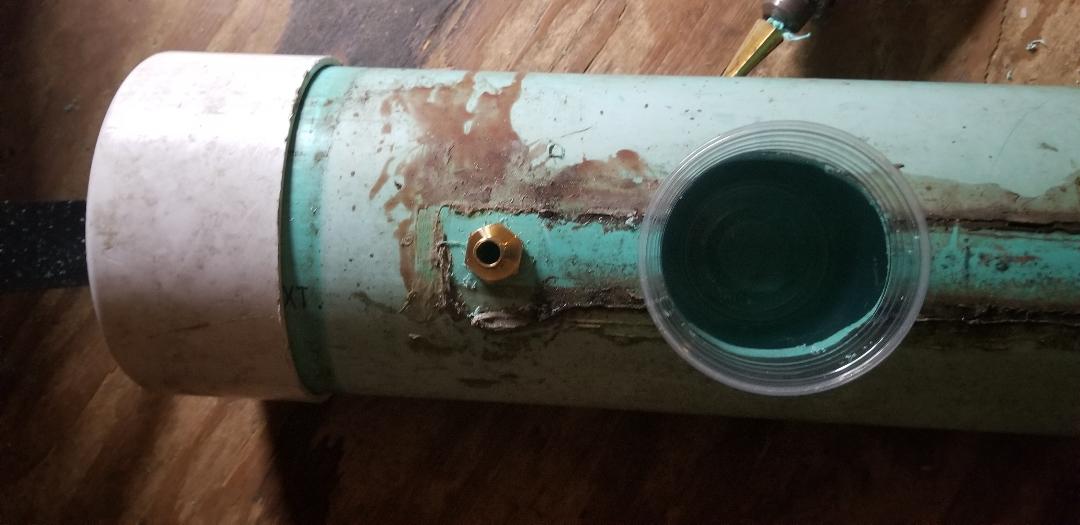
Top input nipple drilled and tapped for first pipe.
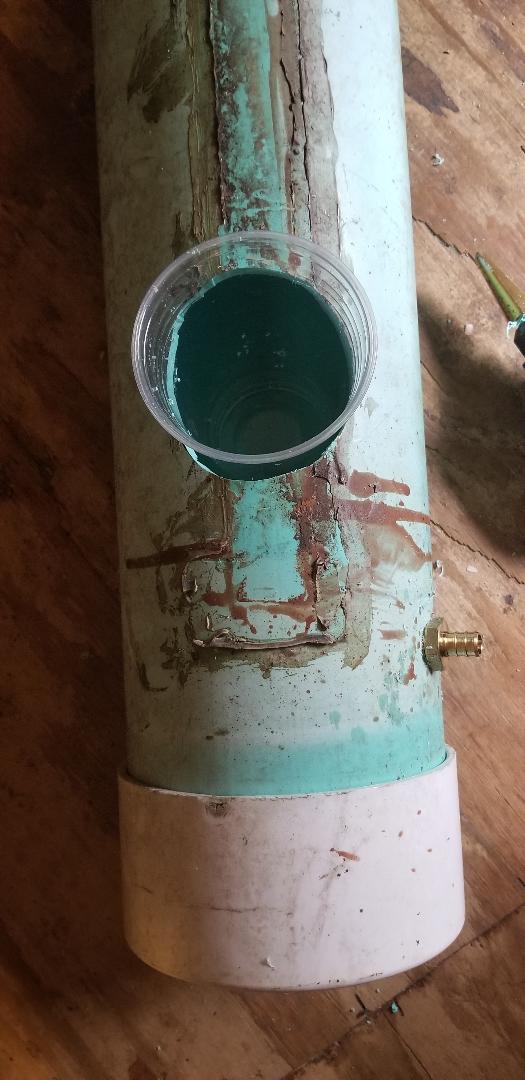
Side output nipple drilled and tapped into first pipe.

Side input nipple drilled and tapped into second pipe, note how it coincides with side output nipple in first pipe.
Middle side output nipple in second pipe.
The next thing I did was figure out what I was going to use for a reservoir for the fertilizer water. Since a 5 gallon bucket was going to be too small for this large setup, the next best thing I had was some small drums I had stacked up by the fuel shed. These drums are approximately 20 gallons or so, making them perfect for a long term reservoir for a couple of hydroponic gardens. I took one and traced a square about 4"x4" on the side in the middle and drilled two large holes on opposite ends of the square then used the jigsaw to cut out the square completely. I used this hole to insert the fountain pump easily. This hole will be the established "top" of the drum reservoir, with the drum laying on its side. The two ports on the real top of the drum are capped so the drum can be filled completely with fertilizer water. When this thing is operating, with the quantity of water that will be present this thing should run a long, long time before needing refilling, due to the water being recycled during the garden's operation. Even with evaporation and absorption by the plants, water loss will be slow. The next thing to do is add the hoses then lastly poke some holes in the planter cups and fill them all with perlite and their plants, put them in their holes and fill the drum up with fertilizer and water and fire it up. 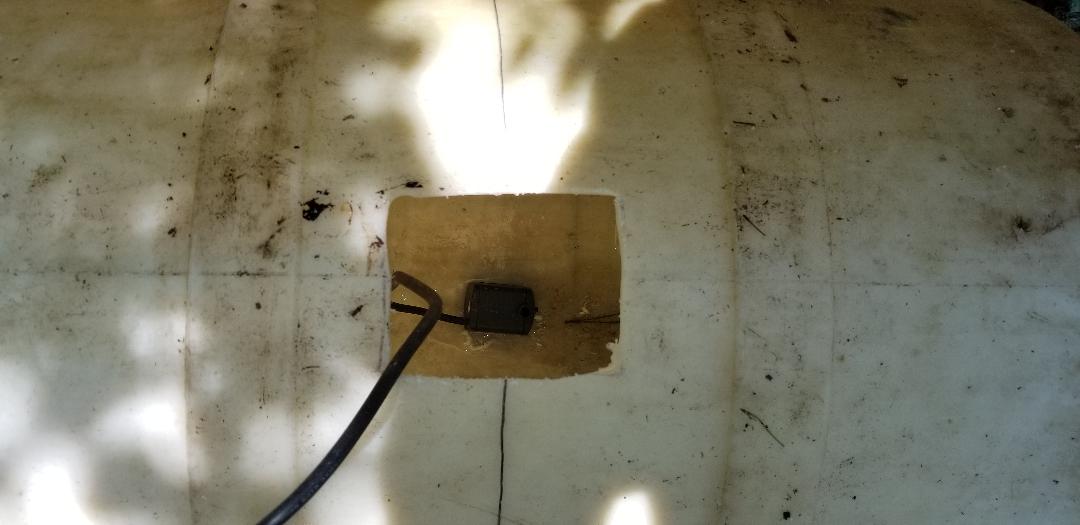
Hole cut into side of drum for inserting pump and hoses. Note pump already inserted into drum.
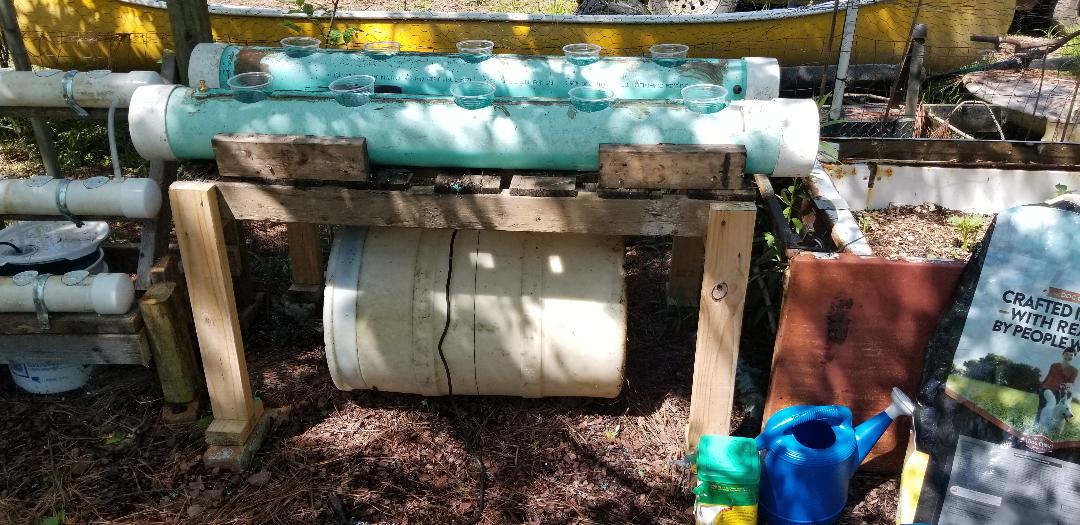
Reservoir drum set up under table, note how there's plenty of room for the large vessel, making this garden a long term self sustaining setup that hopefully will last a whole season.
Pulling F150 Engine, Cleaning Up Portable Garage, Testing Tracker And Starting New Hydroponic Garden4/12/2020
A number of things went on over the weekend here on the Homefront. First of all I had managed to get the Tracker back on line after getting the engine hooked back up and after checking everything to make sure it was all good, it was just waiting its debut test drive. Since I was crunk about getting the Tracker back online I didn't stop there.
The following Friday night I staged the engine crane in front of the F150 and pulled the hood from the truck then managed to get the crane balancer hooked up to the short block. The motor mount bolts and a few bell housing bolts were all that stood in the way of getting the engine free of its perch. After jacking the engine up it promptly pulled free from the tranny with the torque converter still attached. I staged the engine suspended in midair in the engine bay, awaiting the following morning where I could get a little help pushing the truck body back to get it clear of the engine so I can lower it to the ground. The following Saturday morning we both went outside and the first thing done was pushing the F150 body back, which took some effort but we got it done. With the truck cleared of the engine crane I was able to lower the engine to the ground. I tried to see if I could remove the torque converter nuts but that already appeared to be a bit of a problem as these were probably never removed in the life of the truck. It looks like I will probably be getting a brand new torque converter if I stick with this transmission! 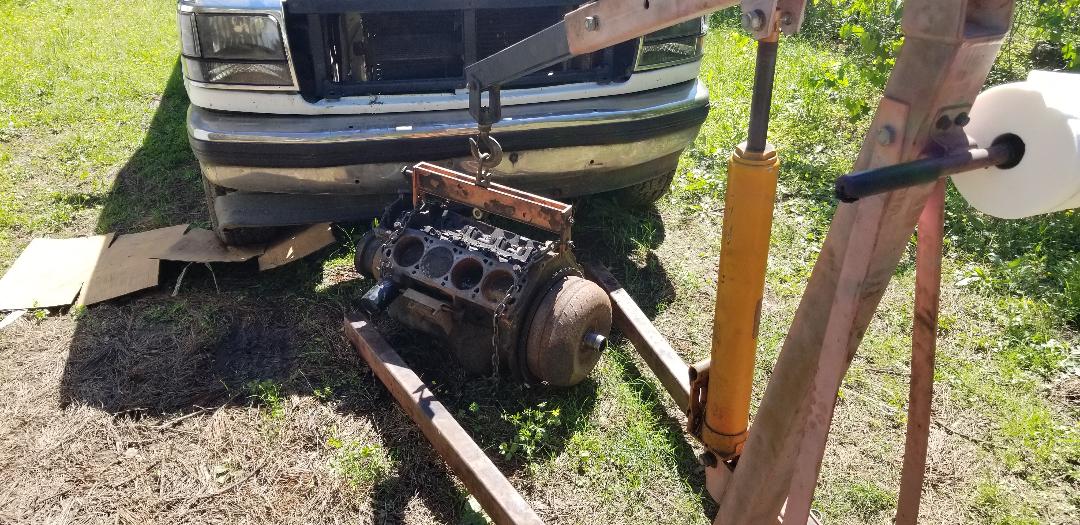
F150 engine on the ground after pushing truck back to clear it of the engine crane. Note torque converter still attached to engine.
The next order of business was to get the Tracker ready for its test drive. This of course consisted of checking the fluids one more time then giving the windows a good Windex cleaning in order to be able to see out of the truck. The ole lady volunteered to take the Tracker to a carwash to get it a good scrubbing while at the same time making a stop by Walmart for some stuff, which included replacement fluids for the stuff I used in the Tracker. While she was out I then turned my attention to the portable garage I had set up next to the chicken yard a year ago and had turned into a temporary storage site for the Grand Prix parts and 73 Mustang parts that were pulled in the past. The portable garage was in a state of decay due to the cover rotting away from the UV rays of the sun hitting it over several months. The material finally gave way all over, causing the skin to pull free all around, exposing the inside to the elements. At the same time the GP parts were not selling and at this point I've decided to just put these parts on the outgoing scrap pile while saving the few smaller parts that still remained. Those smaller parts were moved to the auto parts rack at the back of the dog yard while the larger parts, namely the doors of the GP, were moved to the staging area by the F250 so they can be loaded later on prior to going to the scrap yard with another haul. Another few parts that were culled were the two haves of the GP back seat, with no usable metal in these, they were set aside to be tossed in the trash later on. Also the 73 Mustang seats were tossed onto the scrap pile as these were in a state of serious decay that I can't realistically see anyone being able or willing to even try to salvage these. I figured that rather than keep sitting on this junk, I'll just toss it all out with the next scrap run. Especially since the 73 Mustang was heavily damaged from the past storm, there is absolutely NO prospect of this car ever being restored, it's getting turned into a chicken coop. With that, the seats are absolutely useless to me, so out they go. I did save the 73 mustang's radiator, which was still in good shape, along with the 2 bbl carb spacer and windshield washer bottle, which I may very well use on the 69 Mustang. The 73 Mustang's radiator may be able to fit the 69, I don't know, but I will hang on to this. I also picked up some other crap from the area within the portable garage frame. The only things remaining in the garage are the GP seats and a pair of foxbody mustang seats, all of which I need to find somewhere to store these to keep them out of the weather, or find a use for them before they rot away as well. Aside from that though, it was time to remove the garage's skin. Quick work with a box cutter and I had the skin pulled free and staged for later disposal. I also removed the LED light fixtures I had strapped up on the three sides to light up the garage at night if I ever decided to use the unit to do work in. With the garage stripped down to the frame I can then move to the next task that I decided to take on, starting the construction of the next version of my series of hydroponic gardens. 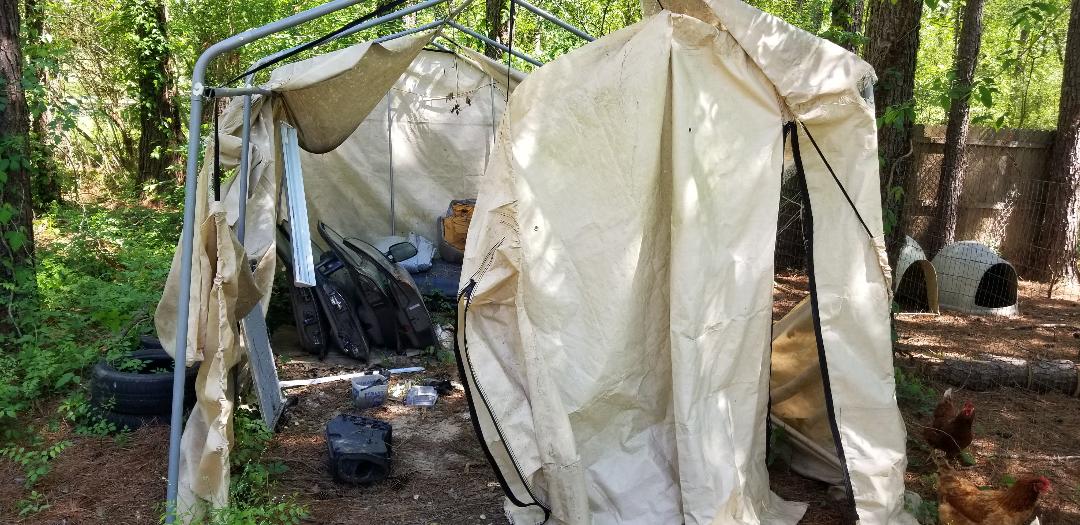
Portable garage in its decrepit state, skin falling completely apart. Note auto parts within.
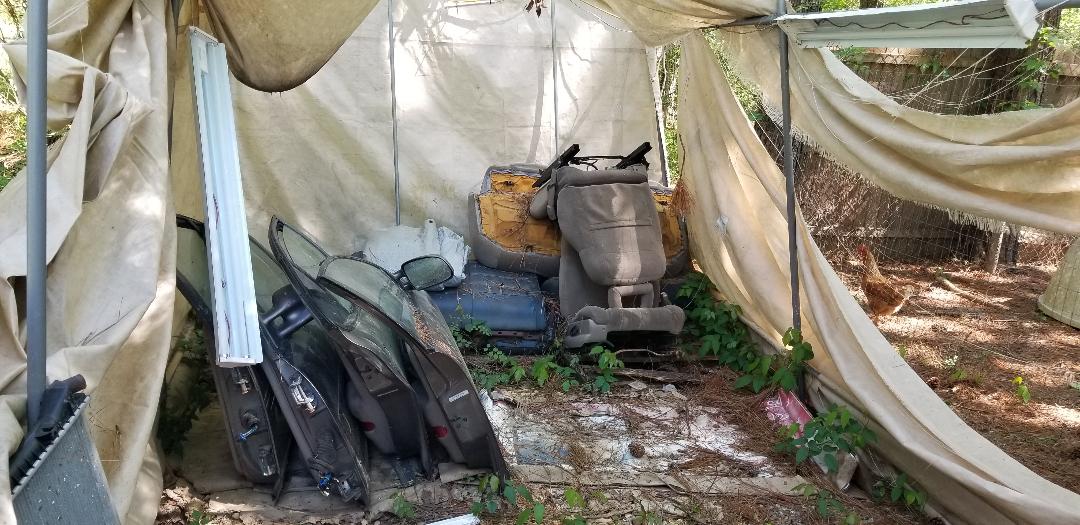
Closeup of parts stored in portable garage. Note LED light fixture hanging down on left side.
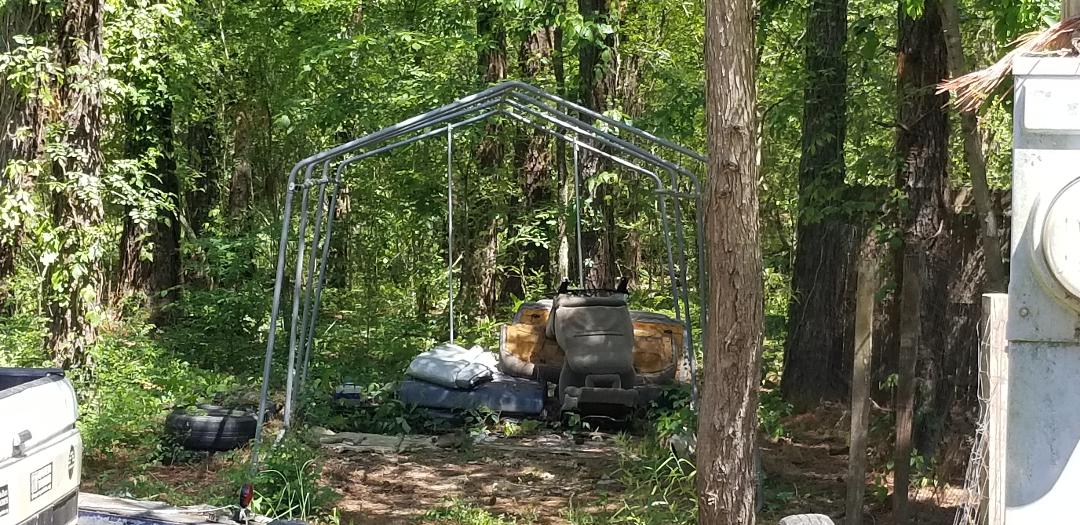
Portable garage stripped of skin and voided of bulk auto parts. Note only seats remaining.
This next version of the hydroponic gardens consists of two 6" sewer pipes that will run parallel to each other and sit on top of a table made from a pallet and some 2x4 boards for legs. This table was supposed to be for the hydroponic garden setups I had made a long time ago that use 2 liter soda bottles as the planters but because of the difficulty in trying to salvage these units without spending more money (which I didn't want to do right now when I already have plenty of parts to make all new gardens for free), I decided to use the table for the current version of HP gardens I'm building now. To hold the pipes in place I had to get some small pieces of wood and secure them with wood screws so as to cradle the pipes where they won't roll when loaded with planter cups and filled with water. This was done by starting with the attachment of two 2x10 boards that were both a foot long in the very middle of the table. These boards will serve as a divider to keep the pipes apart. Next I secured four short pieces of 2x4's on the front and back of the table, right on the edge. This worked out where after securing the boards, the pipes were nicely cradled within the boards, unable to roll but still able to be removed for any maintenance that may need to be done. 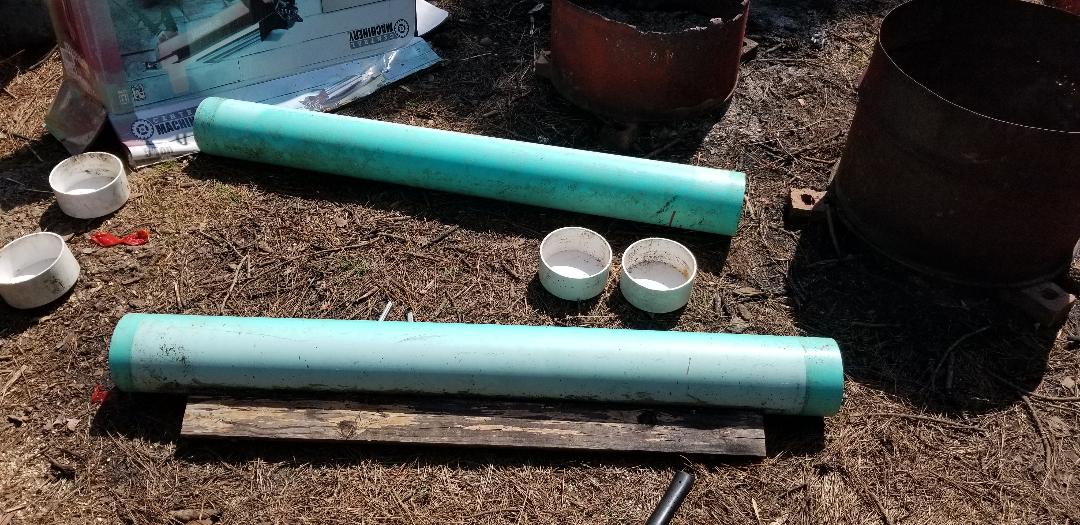
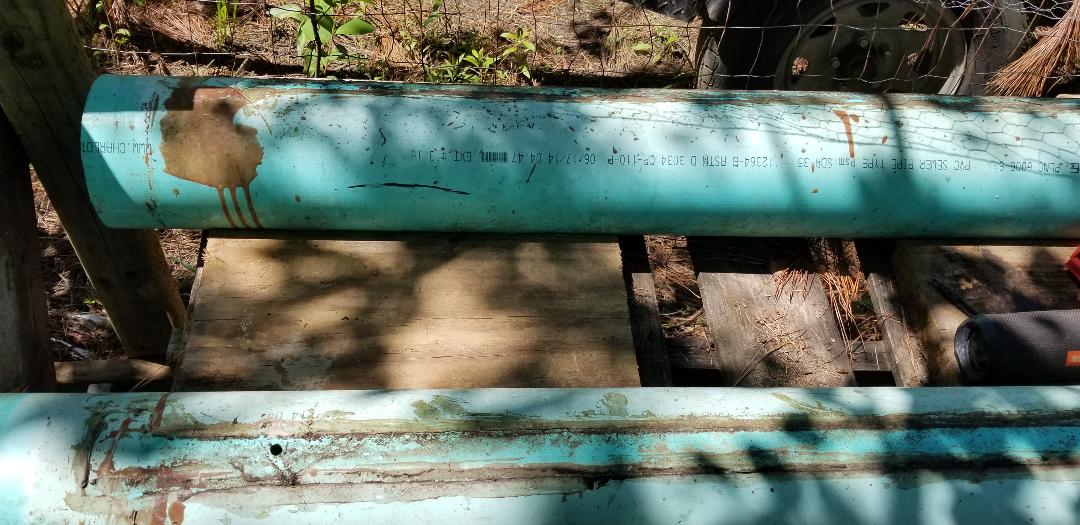
6" sewer pipes and caps to be used for the HP garden, version 2.
2x10 board used as a divider on pallet table to keep pipes evenly spaced from one another.
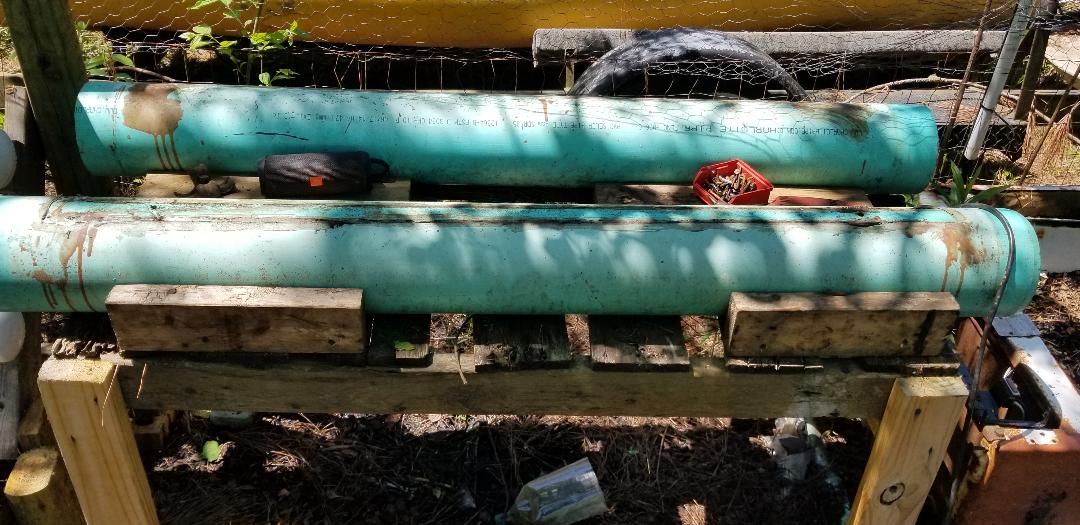
Pallet table with boards secured around pipes to cradle them on the table.
With the pipes cradled, the next thing I did was mark where I wanted the holes to go for the planter cups. Just like HP garden, version 1, version 2 will use plastic cups for planters. Each cup will be filled with Perlite which will absorb fertilizer water when its pumped up into the pipes. I was able to space out circles for five holes, so the whole assembly will be able to accommodate 10 plants in an area that would barely accommodate 4 plants if it was just dirt. I used the hole saw to drill the holes, but because the biggest hole saw diameter was only as wide as the base of the cups, I will have to use my jigsaw later to cut the holes wider to accommodate the cups. No biggie. With the widening of the holes there is the drilling and tapping of the holes for the nipples so I can attach the hose necessary for the garden plumbing. Just like HPGV#1, the unit will use a small fountain pump that will pump from a reservoir of fertilizer water. Since the two pipes are rather large and will probably take a sizable amount of water to fill to a level that will allow for saturation of the planter cups, I will have to use something bigger than the 5 gallon bucket that I used for HPGV#1. I will either use a heavy duty storage container of like 15 gallons or so, or look at one of the smaller barrels I have and work out something with one of those. It will get done though, count on that! 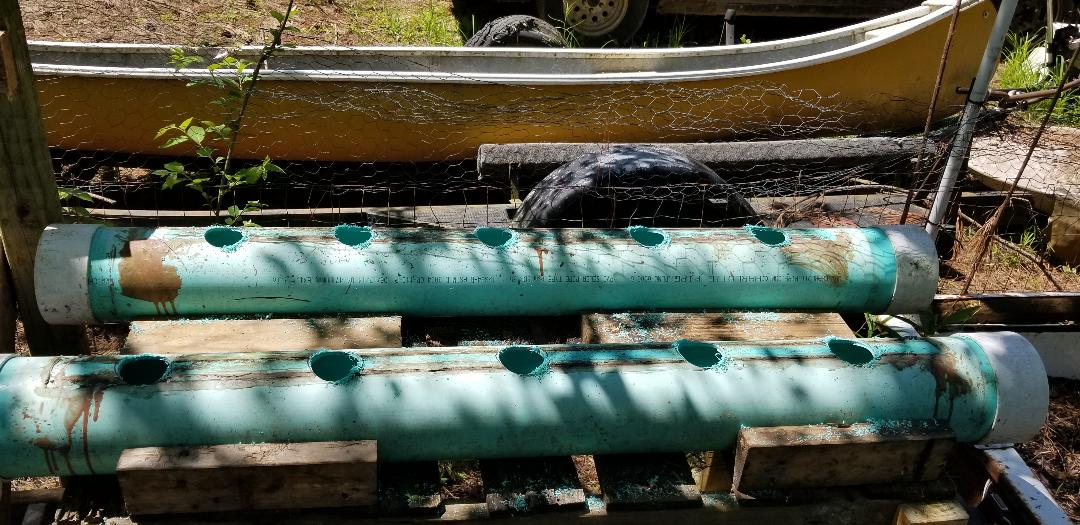
HP garden pipes with starter holes drilled. End caps put in place just to keep things together.
By this time the ole lady made it back with my replacement oil to put back in the storage trailer and had gotten the Tracker washed. Some of the stains were pretty heavy that they weren't completely cleared but all in all the body came out pretty clean. The truck had run pretty good, with only a slight sign of hiccup that was reminiscent of the problems that the same engine had in the other Tracker in the past. All in all the truck ran and drove fine, not running hot or anything. Now with that, I need to charge the AC system and replace the small fan belt, since this was rather shitty from the dead engine. I didn't have this part of the system on our engine since a past accident had damaged the mounts that hold the fan/pulley so I had rigged up an electric fan during the life of the other Tracker. No big deal, since I put the stock fan/pulley assembly back on, I will get another belt soon as possible and install that so everything will be ready to go on that note. The only other thing I need to do is inspect the suspension to see if I will need to replace those components in the near future.
Tracker all cleaned up upon its return after its test drive.
I had to do a couple of things to the Tracker engine and transmission before installing the engine. The first thing that I had to do was install a new crank sensor in the engine since it is mounted behind the flywheel. The other thing I did since everything was open and the old unit was stressed during the removal of the old engine was replace the front/oil pump seal in the transmission. When these parts finally arrived I promptly installed them and commenced to hoist the engine up so it can be installed in the Tracker's engine bay. Engine suspended under crane in Tracker's engine bay. This next process was a pain in the balls. Trying to get the engine to mate up to the tranny was a problem. I had the engine in and out of the engine bay several times trying to see why the engine wasn't mating up directly to the tranny bell housing. I finally checked the torque converter and made doubly sure the thing was seated all the way into the tranny and up against the oil pump, then I made sure that the spacer bushings for the main bolts were properly seated and in the right spots so when the engine mated up against the bell housing the exposed ends of the bushings would slide into their respective spots on the bell housing. After having to stop during the morning attempt to get the engine in, I came back to the engine that night. After doing what I said when I lowered the engine in and guided the unit onto the studs the engine slid right in place with almost no effort. Finally! With the engine against the tranny bell housing I secured the two with their nuts and bolts then began the next step in this project. I immediately started getting things hooked back up, starting with all of the plugs and hoses. Because I labeled all of the plugs when I removed the old engine it made it easier to get them plugged into their respective sensors, etc. With the plugs in, the few hoses I can get came next. Then it was the motor mount brackets, throttle cable, exhaust manifold, starter cables, air cleaner, and hood. All of this happened that night. I picked up where I left off the following morning.  Left angle shot of installed engine showing exhaust manifold/header, left uncovered to help dissipate heat. The following morning I started off with the installation of the radiator. This presented one small problem: one of the radiator mount bushings was missing. These bushings go in the base allowing the studs on the bottom of the radiator to rest snugly and cushion the vibrations of the vehicle from going through the radiator. I ended up cutting a piece of heater hose and slitting one end on four spots so I can open the tabs up like a flower. I then put the new "bushing" into the base then set the radiator down onto the base, securing the top at the bolt points. With that I was able to install the hoses for the tranny lines and main coolant hoses. Lastly came the battery and fluids. 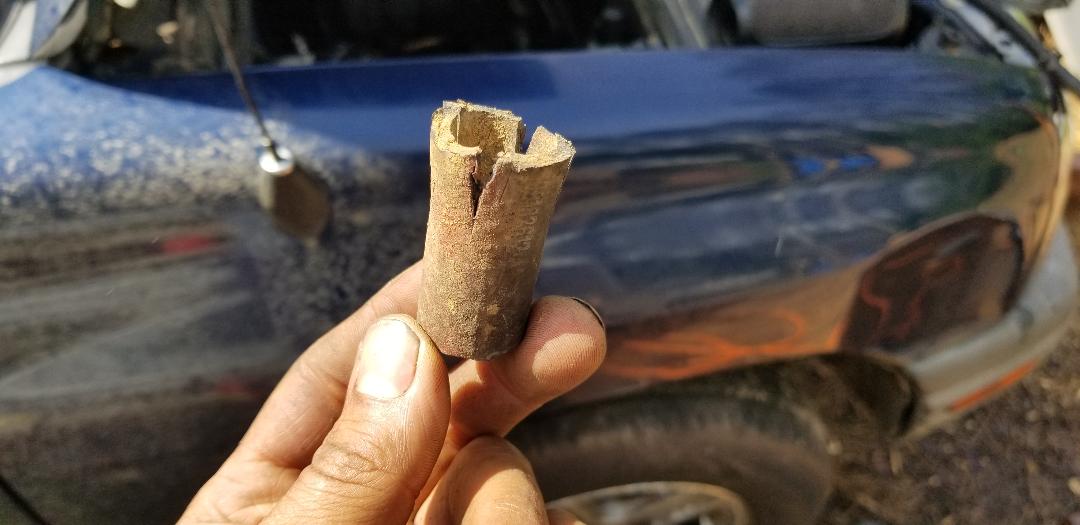 Improvised radiator base bushing made from heater hose. Upon cranking, the engine started up pretty quick, no stuttering. I let the thing run a bit to smooth out then started checking everything out. I then noticed some coolant leaking from the back of the engine, WTF??? After inspecting the leak I found it was coming from one of the heater hoses. After trying to remove the heater hose, which is at the back of the engine in a super tight area unable to be reached with anything to release the spring clamps, I ended up removing the whole assembly that holds the temp sensor, heater hose nipple and base for the extension tube that goes to the front of the engine. When I pulled the assembly I found that the heater hose was indeed split. I had the spare assembly from the dead engine complete with a replacement heater hose. I applied some gasket maker to the metal gasket and reinstalled the whole assembly, getting things hooked back up. I also installed gasket maker to the rubber O-ring for the extension tube prior to installing that as well. While letting that shit cure I went ahead and installed the bolts for the torque converter. After putting some more coolant in the radiator I started the engine back up and checked for leaks, satisfied that none were present. I also tested the tranny running it between forward and reverse, satisfied that the thing went into gear and grabbed pretty good in both cases. At this point I was ready to move on to the last phase of the project, which is test driving the truck. 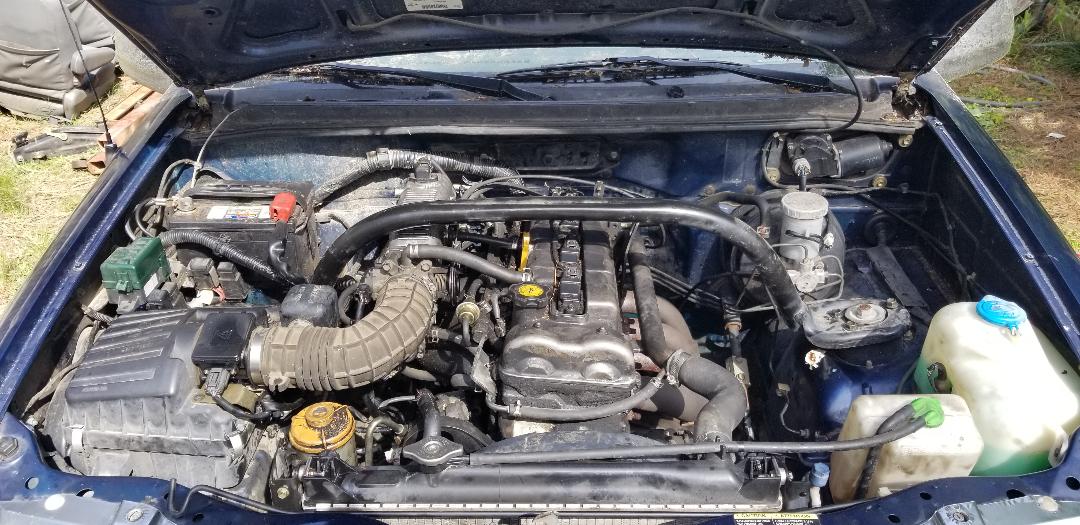 Installed engine with everything hooked up. Tracker buttoned up and ready to test later.
After building the framework for the hydroponic garden the next thing was for me to do the PVC pipes. This involved drilling out four large holes to accommodate the small cups that will serve as the "planters" for the plants to grow in the garden. This involved marking where I wanted the holes to be then using a hole saw to drill out the holes. With that the next thing was capping both ends of the four pipes. This was all done inside at night so I can continue the following morning with the final steps.
The following morning we took the four pipes, the pipe straps and the nipples outside and got to work. I drilled two holes, one on either end of each pipe for the nipples. One nipple would go in at the top, for the water inlet and the other on the opposite side, more to the side, to serve as the output. Putting the output on the side will allow for the water level to reach a certain level so the planters can absorb water as needed for the plants versus just draining out immediately. I used a 1/2" NPT pipe tap for the holes so the nipples would thread in nicely, after wrapping them teflon tape. With the pipes drilled and tapped with the nipples installed, the next step was securing the pipes to the frame with the straps. 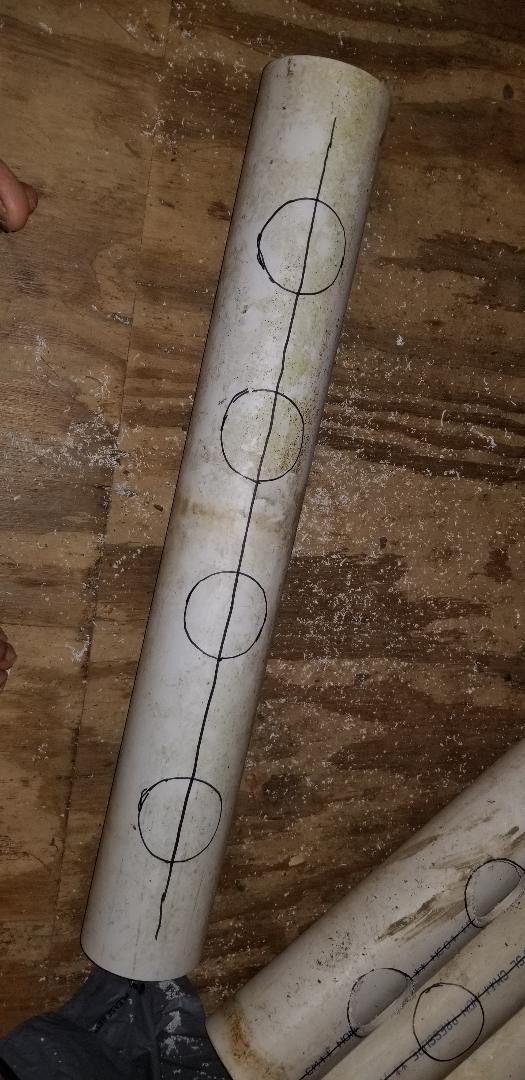
Pipe marked for drilling of planter holes
Pipe with drilled holes for planter cups
First thing I had to do was bend the straps to where the screw tabs were straight with the rest of the strap so each strap looks like a "U". With that we put the straps on each pipe, probably about six inches or so from either end and used wood screws to secure the straps with the pipes cradled within, to each tier of the frame. I made sure that the input pipe from the bottom most pipe was on the same side as the output of the next pipe up, and so forth. Of course with a little rushing I ended up finding out that the last pipe I put the output nipple in the wrong spot to coincide with the input nipple on the pipe just below it. There was no real way to reverse this fuckup so I ended up just cutting a longer length of hose to link the output on the top pipe with the input on the next pipe down. With that I cut and installed hoses between all the pipes. I had to set up the pump and bucket next. First thing I did was take another nipple and drill a hole in the side of a 5 gallon bucket for me to thread the nipple into. I still ended up using the tap to do this just like with the rest of the pipe. With the nipple threaded into the bucket I put the pump in the bottom of the bucket then cut a length of hose to go from the nipple in the side of the bucket to the output of the bottom pipe. I then had to remove the output nipple on the pump (which was a smooth piece of plastic tube) and thread a brass nipple/barb that would accommodate the 3/8" hose that I used throughout the rest of the assembly. With the pump set up I cut a length of hose to go from the pump up to the input of the top pipe. 
Pipes staged on frame
Pipes strapped to frame
Garden assembly with hoses in place
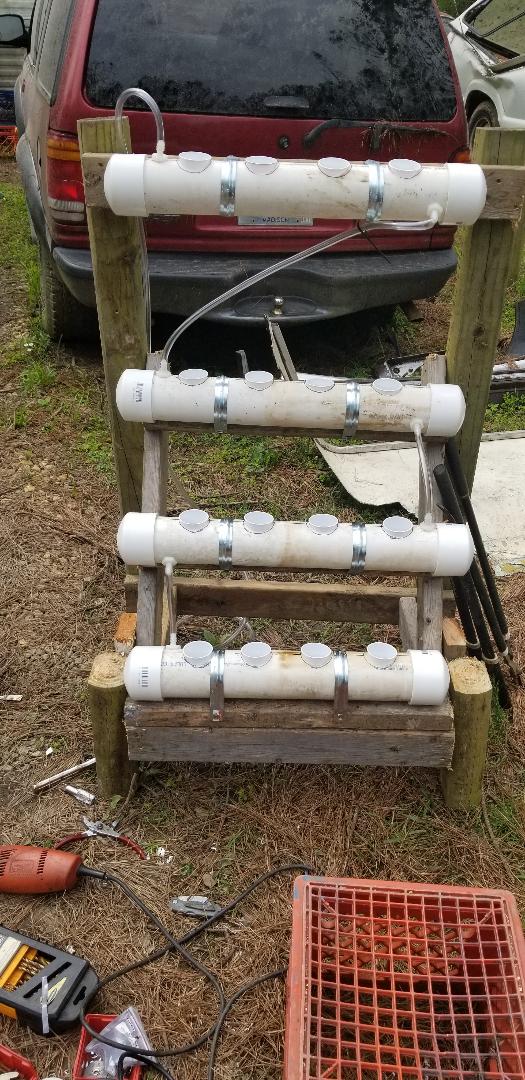
The next thing I did was take the small cups that will serve as the planters and poke a small hole, well more like a slit-hole in the bottom of each one. Afterward I put perlite into each cup and put them back into their cradles in each pipe. What will happen is when the pump is activated, the top pipe will fill up with water to a level that is higher than the bottom of the planter cups, allowing the perlite to soak with water, feeding the plants, up to the level of the output nipple, which will then allow the overflow to run out. That water will then run into the next pipe below, repeating the process, and through the rest of the pipes until the last pipe flows out and back into the bucket, allowing the process to run in a continuous cycle. 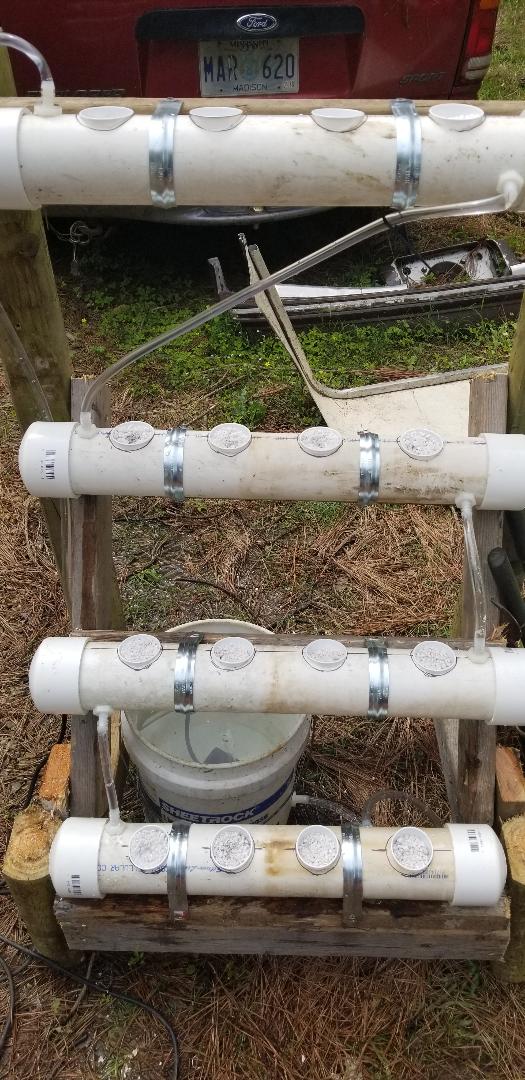
Garden with bucket, pump and hoses in place, planter cups filled with perlite, everything ready to rock and roll.
After activating the pump, everything started working just as I said it would, with a few exceptions, I had to make all kinds of adjustments to the angle of each pipe so the water levels in each pipe don't get too high to the point that the water overflows out of the planter cup holes. I had to clear a little debris from the nipples as well on a couple of occasions. I also had to adjust the flow rate of the pump so its not pumping too much water into the top pipe, which in turn would cause excess water to flow into the other pipes, causing a chain reaction of overflowing into all the pipes. After getting these things adjusted, everything started working properly, with no overflow. 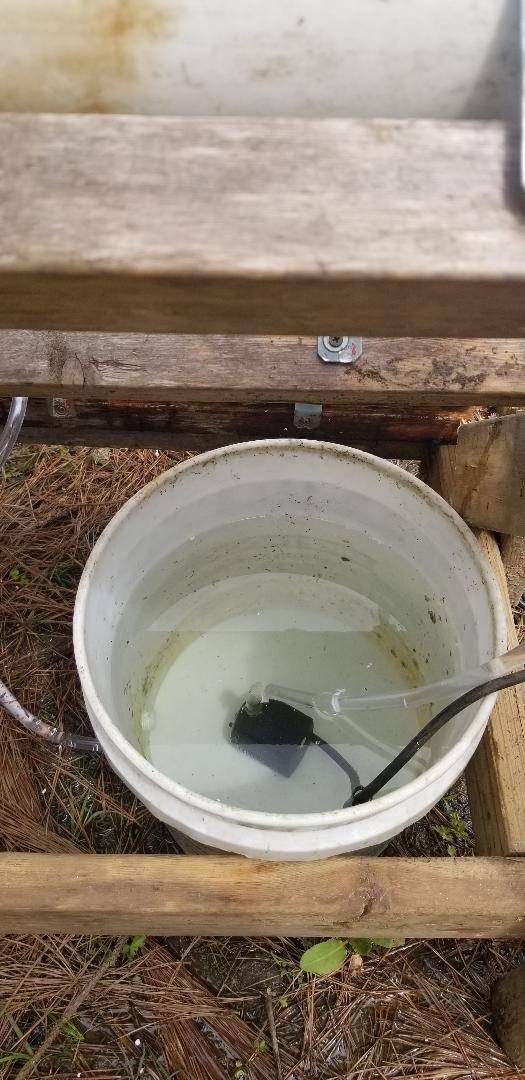
Closeup of bucket with fountain pump in place and hose attached to it.
Even though we've been splitting up a shitload of firewood, there is still the matter of all the branches that came from the same trees whose trunks we've been splitting. The original plan was to run all these branches through the wood chipper to make some mulch for the grounds, especially the spots that have been or still are soft. This was the original plan until my damn chipper decided to start acting up again.
Normally I had to spray starting fluid in the chipper to get the thing running, despite having replaced the carburetor a few years ago. Apparently even with the unit being new, sitting too long probably compromised the internals of the carb to the point that even with starting fluid the damn thing isn't flowing fuel. I had the thing running pretty good for a while, even ground up a good batch of branches until the damn thing started bogging down then finally getting to the point where the damn thing wouldn't even stay running no more. Even though fuel is getting to the carb, the carb isn't passing fuel to the engine so the damn thing can run. SO....That kills the mulch making plan. BUT, there's still a shitload of branches to process. So what does this leave, good ole FUEGO! I dragged out my two half drums that I cut up from some rusty drums, originally with the intent to use as makeshift firepits, something that I can get a fire going while working on a car or some other shit in the yard. Since the drums are small, the heat can start spreading into the surrounding air at a lower level than would be the case with a regular oil drum. Anyway, with these two drums set up I loaded them up with some balled up paper and cut up pieces of cardboard then cut up a sizable batch of branches into small pieces to fit into the cans prior to firing the batches of crap. With the cans blazing away I went back and forth dragging branches from the piles and bringing them over to the drums so I can cut them up and feed them to the fires. At the same time I also used the smaller electric chainsaw to cut up the larger portions of the branches into short pieces which ended up in the wheelbarrow, destined for the woodpile. After a while I managed to clear a good sized patch of branches and larger pieces. After clearing the branches there was a length of trunk that was left that was in need of cutting down. So out came the larger chainsaw. I was able to cut the whole length of trunk down into footlong sections all the way to the last cut before the saw went dead. I ended up having to use the smaller saw to finish the last cut. It got done though. 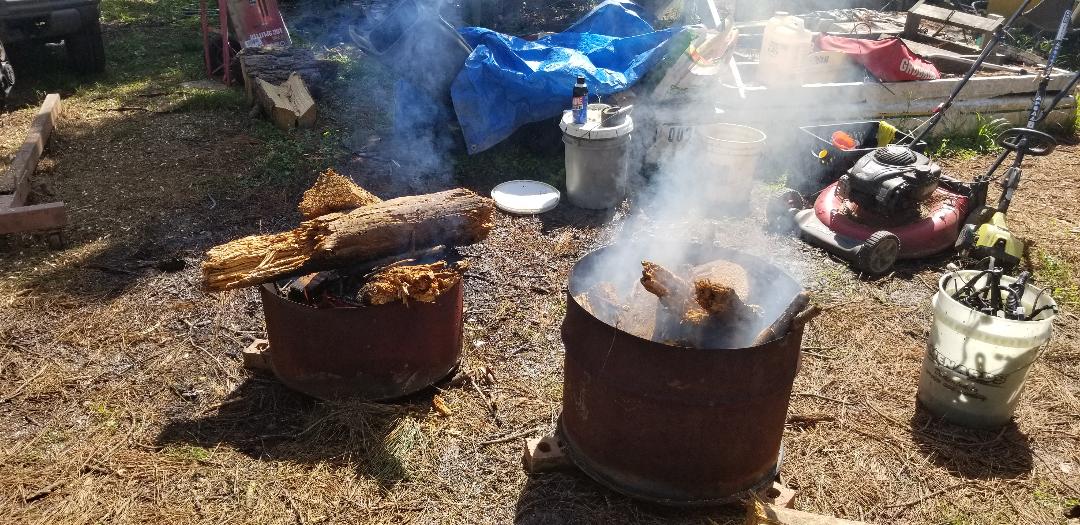
Two short drums set up with scrap wood and branches burning.
The next project of the day is something that is new for the new spring season, that is the building of a hydroponic garden. I've been wanting to build more hydroponic gardens to replace the regular raised beds as well as the ground garden spots that were just cleared of heavy weeds. I've saved images of different hydroponic garden ideas ranging from small personal setups for a couple of plants all the way up to units that hold over ten plants. For my first HPG (hydroponic garden) I decided to use some 3" PVC pipe that came from my stockpile of materials. Along with that some landscape timbers and 2x4's from the same stockpile, I started constructing a framework to hold four 2' lengths of 3" pipe. The frame is made with the bases for the pipes situated at an angle or slope so when the bottom row of plants grows, it'll grow in front of the next row up, and so forth. Each pipe will have 3 or 4 holes drilled into each which will contain a small container that will hold the plant's root ball, which when the pump is on will fill the pipes with fertilizer water which will then soak into the cups which will have holes poked into them to allow the water to seep into them. Each pipe will have end caps on them and two hose nipple fittings screwed into them. One nipple will be screwed towards the top for the water inlet and the other will be on the opposite side slightly from the bottom so the pipe can hold a little bit of water while allowing the excess to flow out. Now, the top pipe will empty into the inlet nipple for the pipe just beneath it and it will empty into the one beneath it until the water gets to the bottom most pipe, which will then empty into the reservoir to be pumped back up in a continuous cycle. 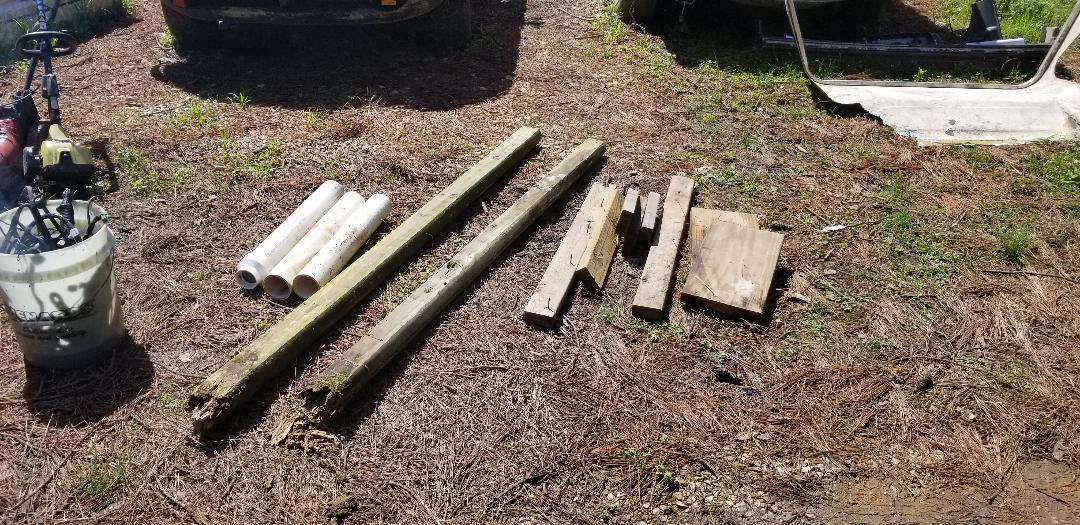
Materials gathered for the construction of the hydroponic garden frame.
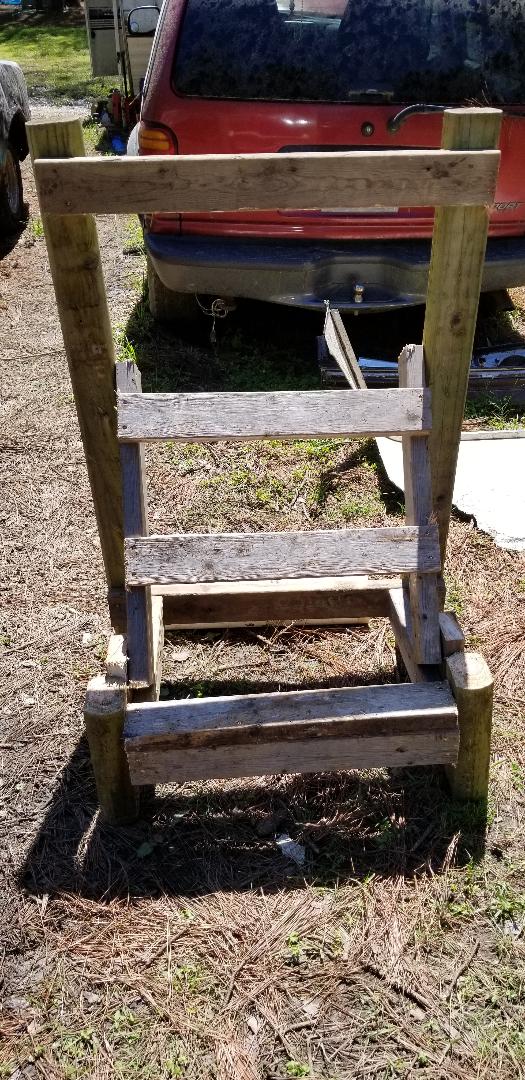
Completed frame ready for attachment of PVC pipes and other apparatus.
My whole plan with these garden setups is to have some flexibility with regard to layouts and just the plain ability to garden anywhere on the property. That's the main problem with traditional gardening, everything is in the ground, unable to be moved, needing to be tended to and cared for in that one spot. The HPG's can be moved wherever its convenient, especially if future building plans have me needing to expand into an area that is currently covered by garden. Hell, if I really wanted to I could forego the garden all together and just have HPG's set up through out the area, next to the house or storage trailer, along the fence or on the porch, anywhere there's a suitable spot to set up a unit. Plants that don't need a lot of sunlight can be placed along the north side of the house or in other blind spots along the fence line or wherever. I could literally have a whole traditional garden's worth of shit growing in HPG's and the compound wouldn't even look like something hospitable to gardening to the layman. It's the perfect setup for urban homesteaders and people who may not want to or are unable to till a plot of land for a garden. This is the type of situation where if you find a plot of land for a future homestead but the ground just sucks for growing shit, because it too rocky or on a slope or is otherwise a poor medium for gardening, then being able to set up HPG's will allow you to grow just as much food as a traditional homesteader without having to dig up land. Hell, you could have a garden setup on the concrete slab of a warehouse if you wanted to. After this unit is done I already have more plans for other gardens as well as some more portable raised beds that can be easily moved due to them being full blown beds versus just a spot that's planted on the ground and filled with dirt. More to come.
One of the things that I decided to do during a lull in other work was to start cutting up the fallen tree that's in the chicken yard. One large pine tree came down in the yard during the past hail storm and luckily fell parallel to the house so it was in a safe state, instead of inside the living room. Either way though, this tree still had to go. My future plans to turn the 73 Mustang into a 2 in 1 chicken coop and brooder box will require me removing this tree, among other things in the yard (like the old brooder box and an old structure that used to be an old firewood shed turned into chicken coop, now a storage box).
Well this brings me to the fallen tree. Since the tree is already on the ground all I had to do is just cut the thing up into manageable pieces that can then be split for firewood and ground up or burnt up in a controllable manner. This is where the electric chainsaw comes into play. As I talked about in a previous post, I acquired an 18" lithium ion battery powered chainsaw for cutting up larger trees since I didn't wanna fuck with another gas saw. This is what came out for the chicken yard operation. In the time I had with the saw before the battery ran out (or maybe the battery or saw overheated, not totally sure), I was able to cut up 90% of the tree trunk and large sections of the branches. The branches will need to be further cut down into smaller sections so I can either grind them up in the chipper or burn them up in a manageable fire that wouldn't be at risk of getting out of control due to being too big. 
Cut up tree trunk, cut into short logs to be split in the log splitter later on.
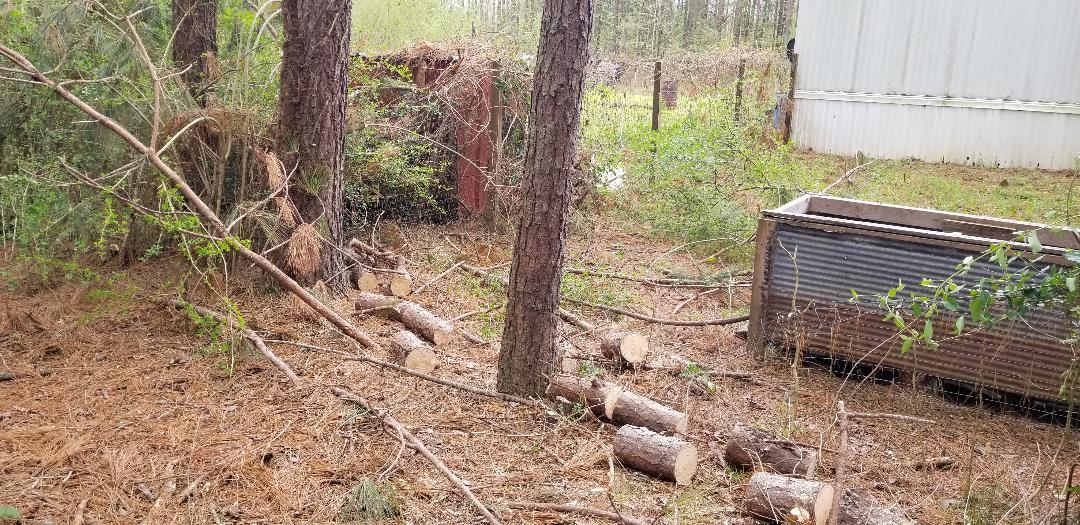
Branches and upper trunk sections cut up at other end of the chicken yard, trunk pieces cut up into manageable pieces for either splitting or immediate use. Branches need to be cut into smaller sections for disposal.
With the tree cut up like this I will be putting up a lot more firewood, to go on top of the firewood that I already have stacked up, and I'm just now making a dent in the total amount of tree shit that's on the ground. At least when I clean this tree from the chicken yard I can move on to the next phase, dismantling the old brooder and coop. The next thing that I started working on after the chicken yard tree is the recycling of the batch of Grand Prix parts I was trying to sell. Now when I say recycling, what I really mean is getting something of use from the parts before I send them off to the scrapyard. There really isn't a lot to pull from these parts, short of some sheet metal patches and maybe short pieces of copper wire that I can later burn up for recycling. Other parts that are plastic I will end up just burning up with other trash. Some of the parts I'll end up putting up on the rack with some other auto parts that I will continue to try and sell as they are of the nature that throwing them out or scrapping them would be foolish, these parts are still valuable for the most part. Things like headlight housings, radiator, starter motor alternator, these things I don't wanna just scrap when they are consumable parts that someone may need later on. I may need them if I run across a Grand Prix that I can resurrect and flip later. I moved the parts that I planned on hanging on to over to the auto parts rack as stated in the last paragraph then attempted to cut some sheet metal from the trunk and the hood. When I tried to cut into the trunk panel I found that the inner section of the trunk was glued to the outer skin, making me unable to separate the piece of sheet metal from the whole panel as intended. When I tried to do the hood I ran into the same problem. This time I decided to use the reciprocating saw to just cut through the inner section of the panel as well as the outer skin (which I wanted). By doing this I was able to finally get a good piece of sheet metal, albeit with some inner structure pieces still glued to the panel. Later on when I do use this panel for something I can chisel or burn off or otherwise remove the unwanted metal from the panel, no big deal. After cutting the hood this way I will attempt to cut into the trunk panel again so I can get a good panel from it. The next set of parts that I will attempt to pull sheet metal from will be the doors. Because of all the shit inside the doors I won't really be able just run the reciprocating saw through the door after cutting slots into the metal. I'll just have to keep grinding with the die grinder until I remove the panel that I want from the door. That will be for another day though. 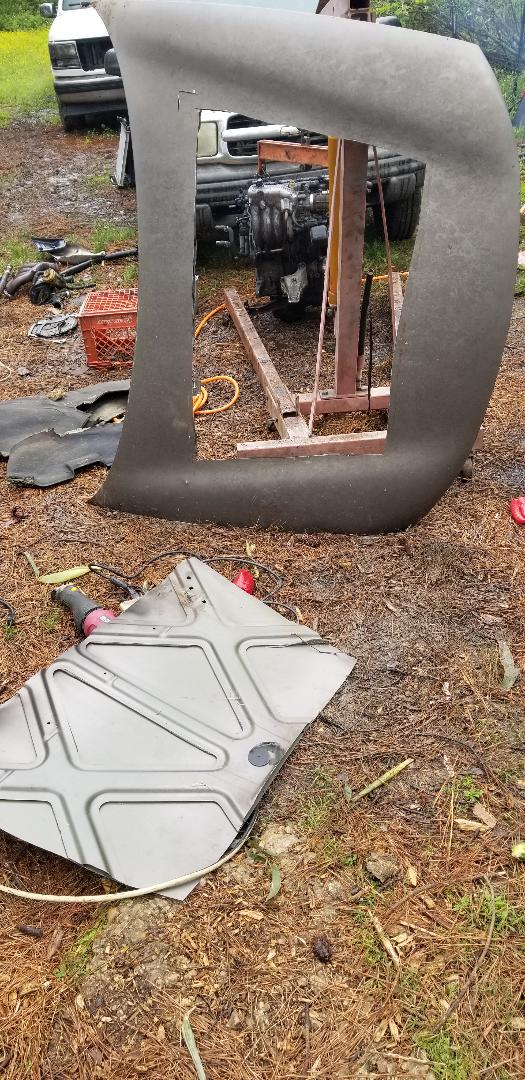
Grand Prix hood after cutting out patch of sheet metal.
|
