|
A little while ago we managed to pick up another vehicle to add to the stable. Unlike most of the vehicles we typically get our hands on, this one is ready to drive right from the start. A new twist as we don't have to fix, rebuild or otherwise restore anything. We picked this vehicle up from central TN after a long search on FB Marketplace. With title paperwork and tag in hand, we're ready to hit the road with this thing. I do want to do a few things to this vehicle before officially hitting the road. 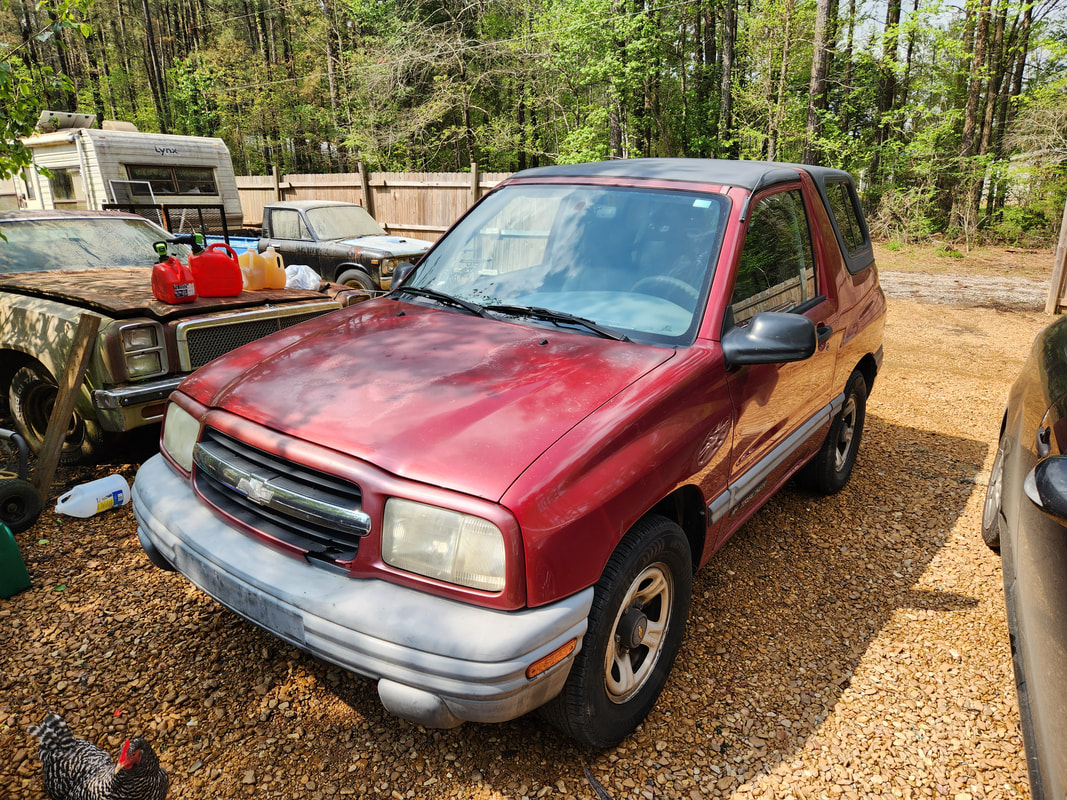 Stubby is a rather clean specimen all in all. I may even be tempted to try and scuff and respray the body just to make this thing look even better. 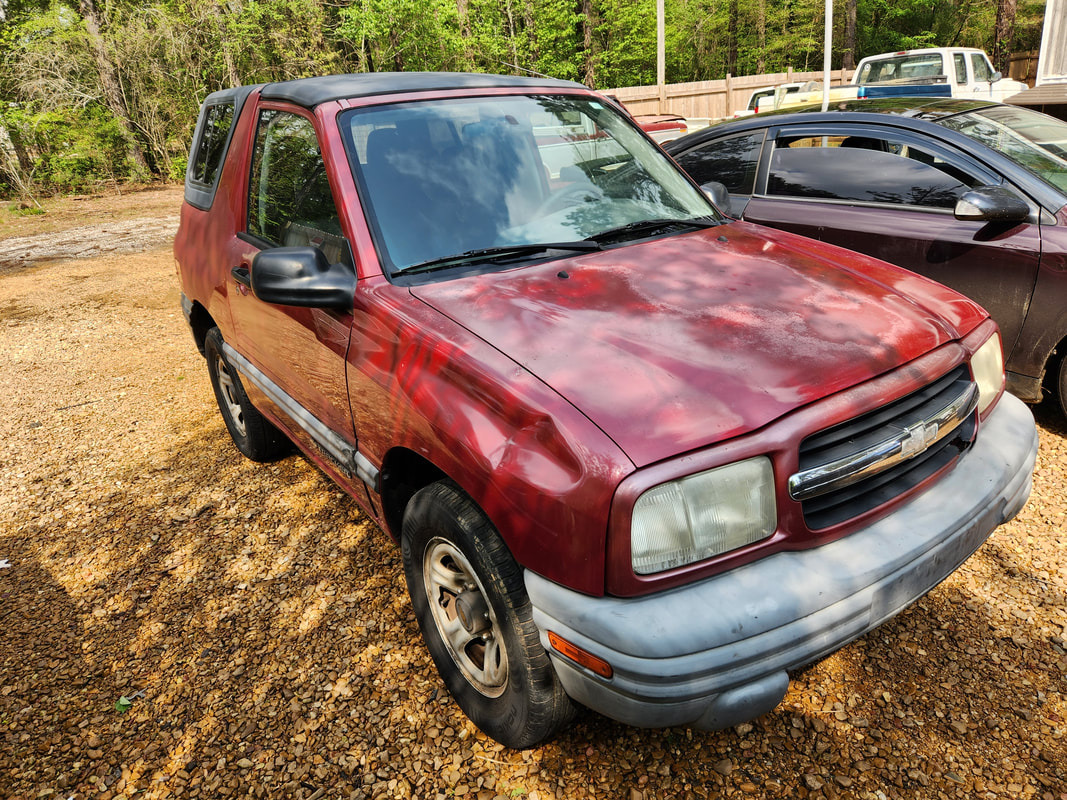 The only major flaws on this vehicle are the dent on the right fender, which I may try to remove and tap out. The grille will need to be replaced as its partially damaged. The clips that hold the grille in are also broken and will need replacing. Even though the oil was clean and everything else for all intents is clean, I want to check things like the suspension. I want to make sure the wheel bearings and struts, ball joints and control arms are still straight. When I did test drive the vehicle there were no signs of suspension issues, no shimmies, vibrations or noises that would be indicative of worn out parts. Nonetheless, I still want to still do a fast check. 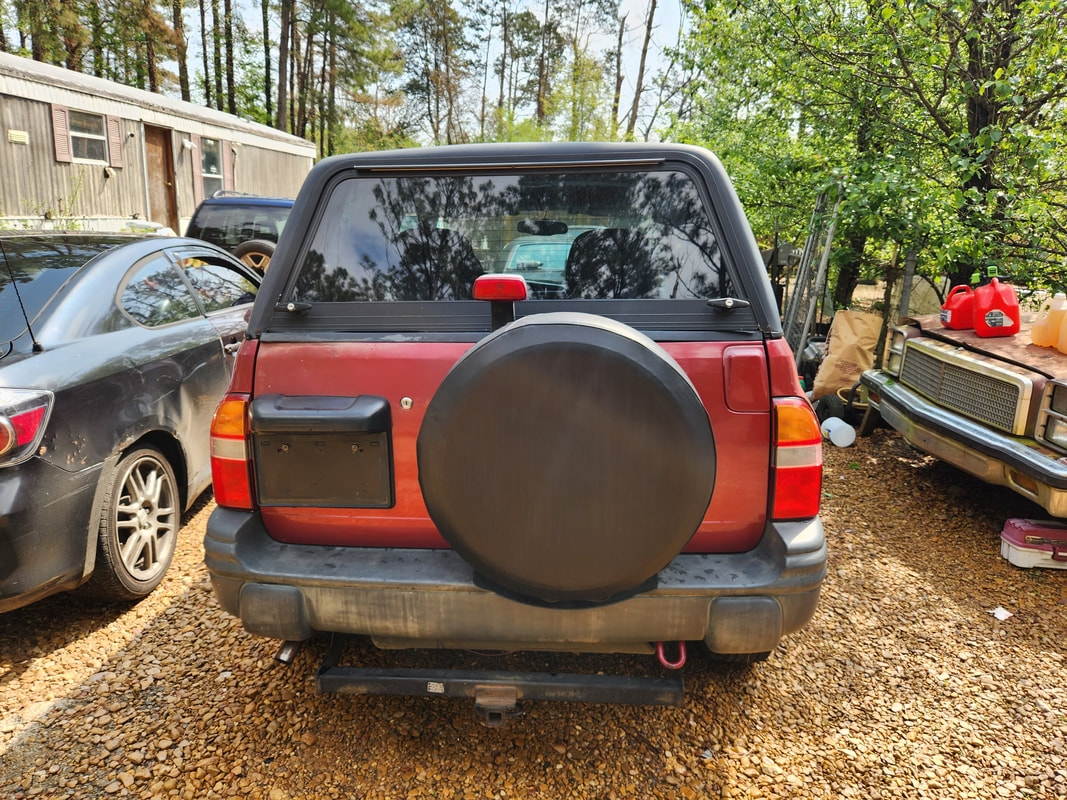 The spare tire has its own cover. I do have the factory cover from the other Tracker that has the name on it that I'll probably switch out, as a personalized touch. I have to add a hitch ball to the aftermarket hitch on the truck. This truck will be set up to be a versatile and fun vehicle to ride in. 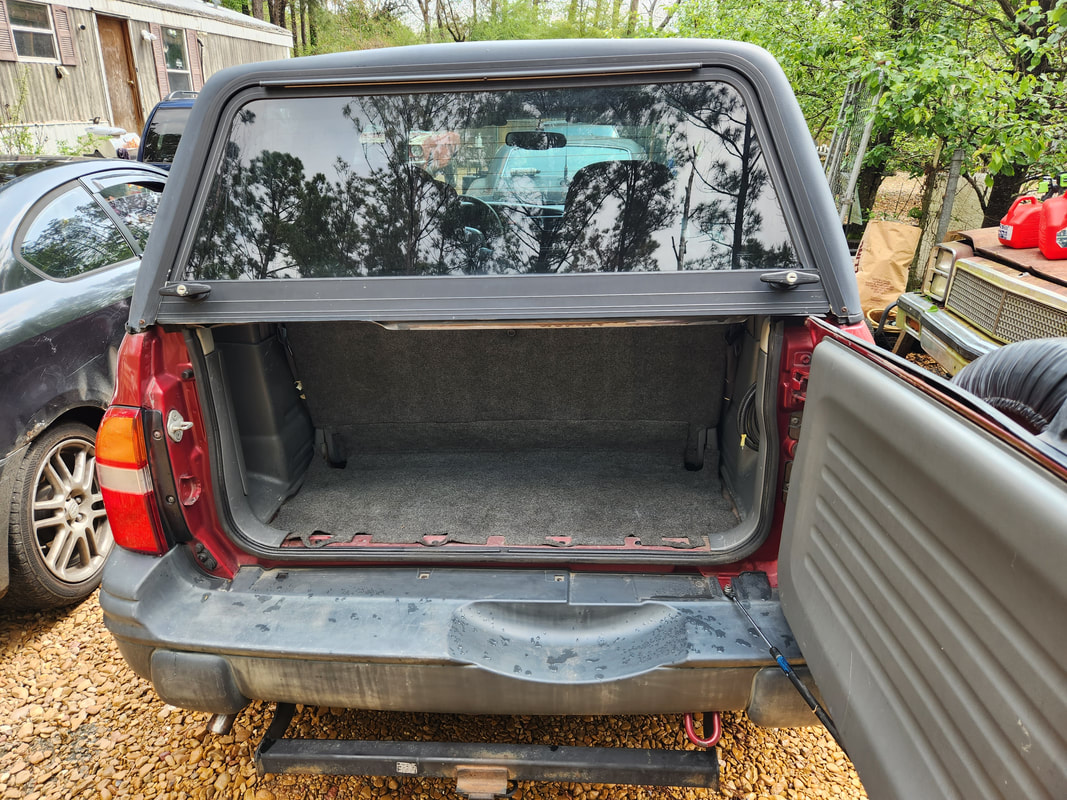 The rear hatch opens the same way as the 4dr Tracker with the exception that the top half opens up like the shell on a pickup truck. I will more than likely have to source replacement locks for this hatch with keys so this hatch can be locked up. Apparently the engine had a serious oil leak at the valve cover that sprayed oil all over the side of the block and the transmission bellhousing. When the engine warmed up, it would start to cook the oil residue to the point that the smell of oil would permeate the air. I may get some degreaser and see if there's a chance of cleaning this residue from the engine and bellhousing, even if for aesthetics. 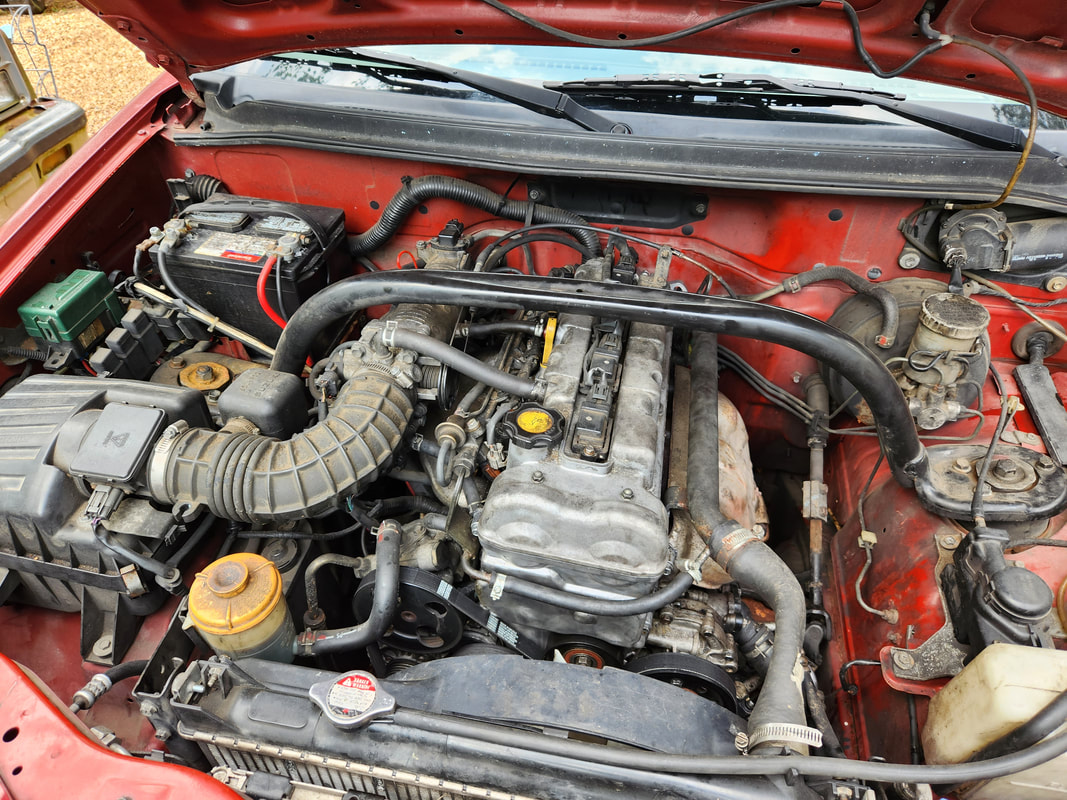 This truck has the same exact powerplant as the 4 dr Tracker, so maintenance is the same here as it would be on the 4dr truck. Of course, there are things I want to do on the inside, like install a radar detector, a small kit with stuff like oil, tools, etc, and my normal assortment of hardware like phone charger, dash cam, and the like. I need to check the functionality of the radio to see if I need to add a new radio, which if I do, I can add one of the cool touch screen double DIN models that incorporates a backup camera as well. I do need to look at the door release linkages to see if there's any kind of adjustments I can make since the mechanisms appear to be spongy to some degree. I may very well add LED headlights to this vehicle as well. 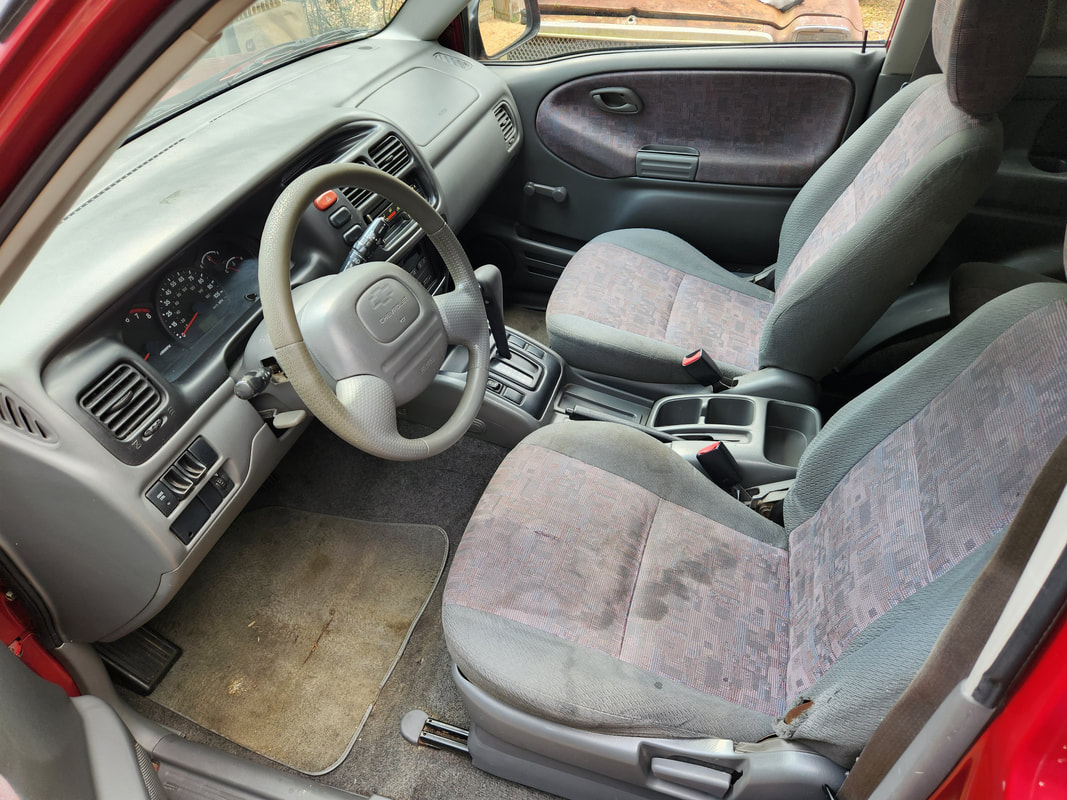 The front seat area and greater interior are clean and worthy of not allowing to get dirty from doing things like hauling super dirty items or, in some cases, dogs, around. It would be nice to keep the interior of this thing clean and smelling good for the foreseeable future. 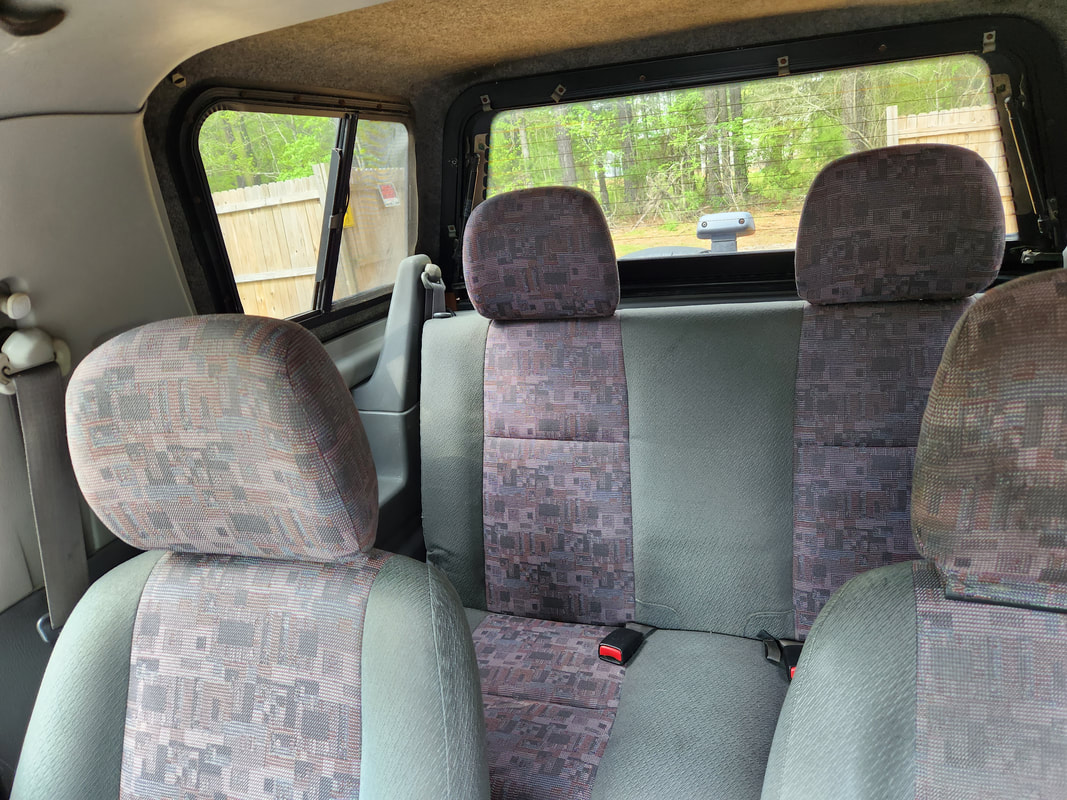 The rear seat area of this truck is even clean too, but more than likely I will be laying the seats down so I can take advantage of the space behind the front seats for carrying anything I feel. There are more advanced things I would like to do to this thing. I still have to add a hitch ball to the hitch on the vehicle, as well as the wiring harness for trailer lights. I would even go so far as to add fog lights on the bumper for added lighting. If one is available, I will even add a grille guard for frontal protection. This is obviously one of those vehicles that's cool enough to do all these little additions to make the vehicle more versatile while still being a cool daily driver. There will be more to come on this little specimen.
0 Comments
After probably a whole year since the last time I worked on the Dog Kennel Greenhouse, I decided that it was past time to get back to work on this structure. Even though I won't be able to utilize it in its full capacity for this growing season, I can at least have it done for when Fall comes later this year. I'll be able to continue growing things in the greenhouse in the capacity that was intended for this structure once its complete. The main thing that needs to be done obviously is install the corrugated clear plastic roof on the structure. There is still the matter of getting power to the structure as well as make some extra tweaks to the output on the watering system to allow it to refill the hydroponic reservoir when the micro irrigation system is operating. I also need to finish up the hydroponic gardens as a whole, installing fixtures to allow for the placement of the 2 liter soda bottles that will serve as planters. I also had to remove the dead plants that were still present in the bucket beds, which was some laziness on my part. 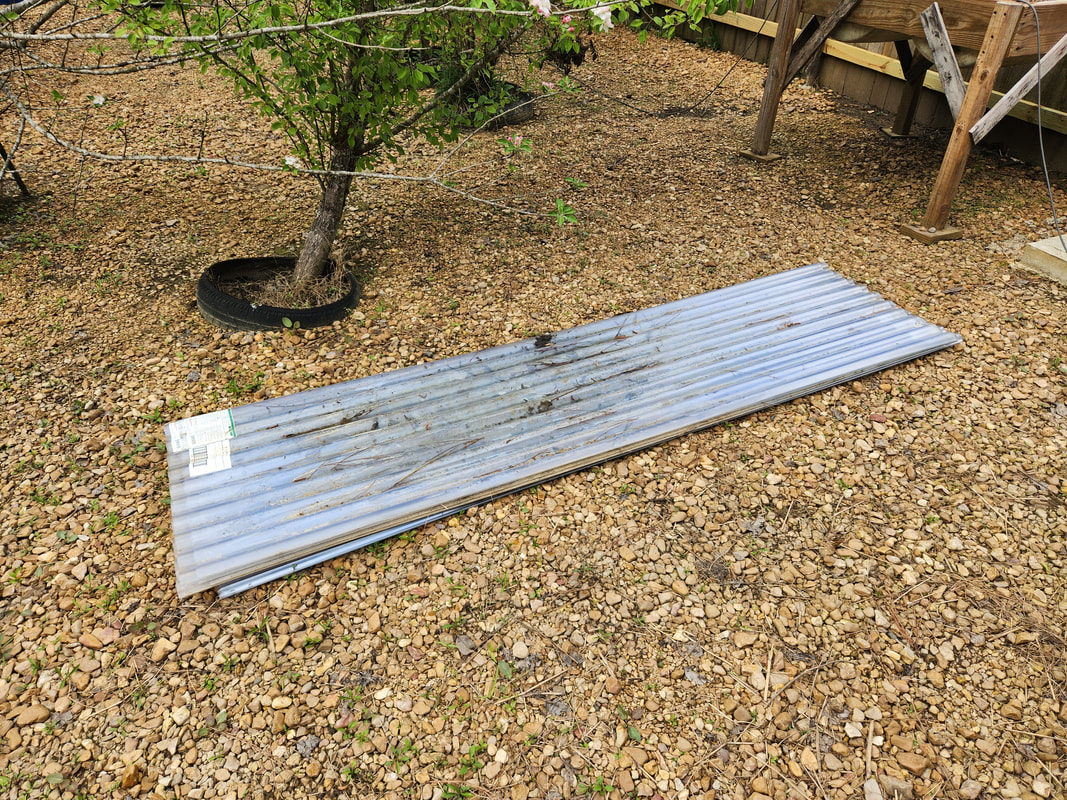 The stack of corrugated clear plastic sheeting acquired to cover the roof portion of the Greenhouse structure. On the hydroponic system, I only pressed the PVC pipe together on the input and output lines, to allow for the removal of the whole manifold if need be for any maintenance. I will have to remove the old bottle caps that were still glued in to the multiple ports in order to grind out the holes to accept regular slip bushings. The ports are female thread fittings that were used to glue in old bottle caps when this system was used over 10 years ago. Now, my idea is to use slip bushings to hold 1/2" PVC pipe, which happens to have an outer diameter that matches the inner diameter of the bottle necks, with some slippage. My plan is to glue the 1/2" pipe end into the bottle necks, then just press fit the bushings into the ports on the manifold. This will allow for the removal of the bottles easily. 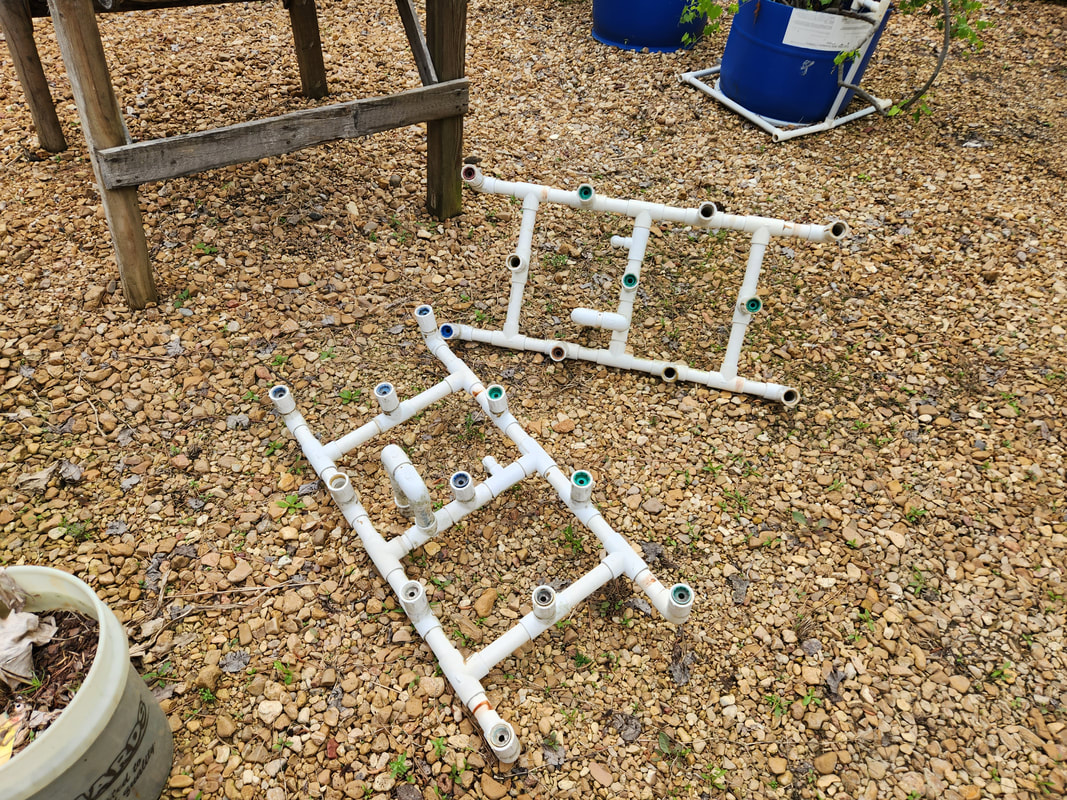 The hydroponic garden manifolds after removing them from the frames in the Greenhouse. One last thing I had to do to finish up the hydroponic garden setup is cut the bottoms of the 2 liter bottles so they'll be ready for use. I will have to put some kind of screen or even coffee filters or cut up fabric into the necks of the bottles before adding Perlite for the planting medium. Water will pump into the manifolds, rising up to the level of the overflow/return pipe, which will raise the levels in the bottles up by something like 5 inches or so, feeding the plants. Each manifold will use 11 bottles, making for 22. I will be saving more bottles in order to make new hydroponic garden assemblies for setup around the greater garden, as I've had exceptional success with this setup in the past.  The 2 liter soda bottles that were saved up for use on the hydroponic gardens. The bottoms will be cut out of these to use them as bowl planters, being fed from the neck going up. I wanted to get all this stuff done on the Greenhouse in order to have the rest of the outfit done before adding the roof. Once the roof is done, I do the water and power. The power will consist of a long extension cord routed around the fence line of the garden and over to the structure. I will have to add an outdoor box at the west fence line, just across from the Storage Trailer, where another power line was routed from the box that's feeding the trailer. In place of the power line that was feeding the old Double Barrel Hydroponic Garden, a post with an outdoor outlet box will be set up, where the extension cord will be connected to feed the Greenhouse. Power will supply power for the hydroponic pump as well as some grow lights I want to install along with a small heater for use in the winter to keep the enclosed plants warm. When I last left off, I had an issue with the engine in Truckstang slowly running to the point of getting too hot. I did change out the thermostat for a lower temp unit and managed to get the temperature to hold at 175 for a good while, but eventually the temps started slowly creeping back up. I'm not sure if this problem would've remedied itself in regular driving, but I would need to know that the engine won't get to the point of running critical if I find myself sitting in traffic for a prolonged period of time. I have to have this engine be able to hold a temp under 200 even when the outside temps are in the high 90's. The next order of business here was to flush the radiator and the cooling system as a whole to try and break apart any deposits or other trash that might be clogging the system. I drained the cooling system and added a bottle of rad flush liquid along with fresh water and ran the engine for over 30 minutes. Afterward I let the engine cool enough to remove the rad cap, as well as the drain valve on the radiator. I let the radiator drain fully, then refilled it with water, while still letting the radiator drain. I ran the engine to operating temperature and allowed water to drain from the bottom of the rad, while continuously adding fresh water into the rad, to further circulate water through the engine to drive more trash out. I'll try to run the engine yet again for a while and see if the temps hold or gradually start creeping back up again. If this ends up happening, again, then I'll be replacing the radiator.  Running Truckstang's engine with the radiator wide open at the top and bottom. Note the hose for refilling the radiator as water drains out, also note this at the bottom of the radiator. Another thing that I managed to figure out was why the battery on Truckstang was slowly draining out. After some troubleshooting, I found the voltage regulator was back feeding power into the terminal and the line that fed the field coil on the alternator. After testing another voltage regulator, I found the terminals had power where it's supposed to be. After an overnight sitting without the battery charger applied, the battery voltage was still at 13.2v so that problem was addressed. Now for the LMC carb setup. I had tried another attempt to install a fuel return setup with the fittings were set up in a way where fuel will hit the carburetor at the same time it flows back to the return line. I also used the Portable Fuel System as the fuel Supply, since it has an onboard fuel pump. The return line was simply routed and placed in the filler port of the fuel can, so no permanent modifications were made to the PFS. After an attempt to start the engine, I found that this carburetor has a very narrow sweet spot where the pressure is high enough to fill the float bowl and keep the carb fed when the engine is running but low enough that the pressure will overcome the needle valve's breaking pressure. With the bypass, the pressure wasn't quite enough to fill the bowl and be able to spray into the intake. This meant that all this hardware came back off. One other thing I also did was remove the flow meter apparatus, since it was never really working to begin with. The minimum pressure to register on the controller was not met by the pressure and flow rate that this bastardized fuel system even generates. That meant that to figure out the MPG on this rig, I'll have to use the PFS as the medium to measure against, since it's made off a 1 gallon fuel can. I installed the PFS in the same spot I installed the metal fuel can, using bungee cords to secure the PFS in place. I routed the power cables just right where they can be connected and disconnected fast while being out of the way. I connected a long enough rubber hose to a nipple connecting to another hose that is connecting to the fuel filter going to the carburetor. The pressure regulator was relocated from right before the carburetor to just after the PFS fuel pump. Hopefully by putting the regulator right at the fuel pump, maybe the pump will overcome any problems the regulator is causing while allowing free fuel flow to the carburetor afterward. 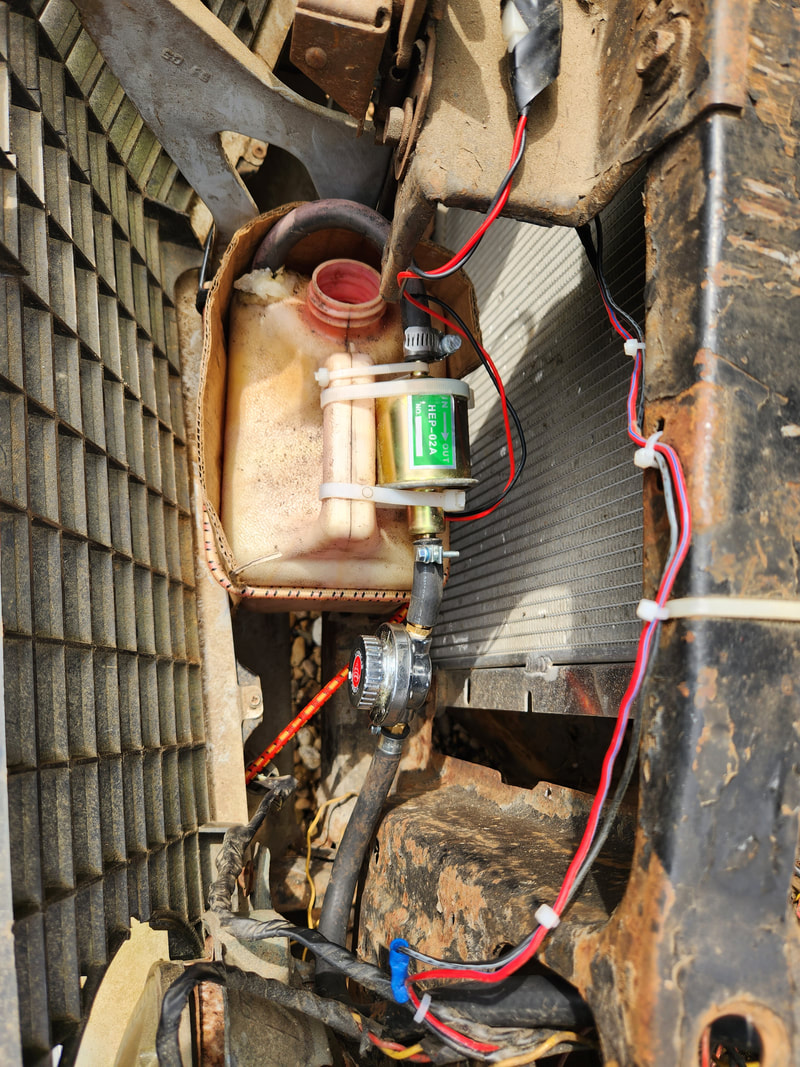 The Portable Fuel System strapped down with bungee cords in front of the radiator. Note the pressure regulator hooked up right after the fuel pump to hopefully remove it from the heat of the engine that may be causing the vapor lock conditions that might be choking this system up. I ran LMC system in this new configuration and it ran fairly well for a while. The regulator wanted to choke up again, and after patting the rotating knob on the body, it seemed like it freed something up to allow the fuel to flow out. I had the dial set to the max of 5psi, even though unregulated, the fuel pump will eventually overcome the needle valve on the carburetor. The pump is more than likely pumping around 7psi or so. I'll have to look at this regulator some more, maybe disassemble the unit to study the innards to see if I could possibly figure out what's going on to cause this thing to choke up. Otherwise, I'll have to just roll with this system so I can get my numbers down for the experiment, so I can move on to the next phase which would be trying to improve the system with better components to make it something that is more viable. One of the things that I've noticed when running Truckstang at idle, especially as the temps increase, is that the engine's idle running temp tended to creep dangerously high the longer it continued to idle. Even with the idle at an average 700rpm and the 16" fan blowing enough air to pull the car forward like a WW2 fighter plane, the engine would still get dangerously hot. The first thing that I decided to do was replace the thermostat with the lowest temp unit available, which is typically a 160 degree unit. In addition to this, I drilled a small hole in the outer disc of the 'stat, to allow for air bubbles to more easily burp through, especially after reassembling the hoses. I did break a bolt off in the intake but got lucky enough, thanks to the propane torch, and was able to remove the broken bolt stud. After reassembling everything and filling the rad up with the same shit rust colored coolant I drained from it, I fired up the engine, got the thing stabilized then let it run. 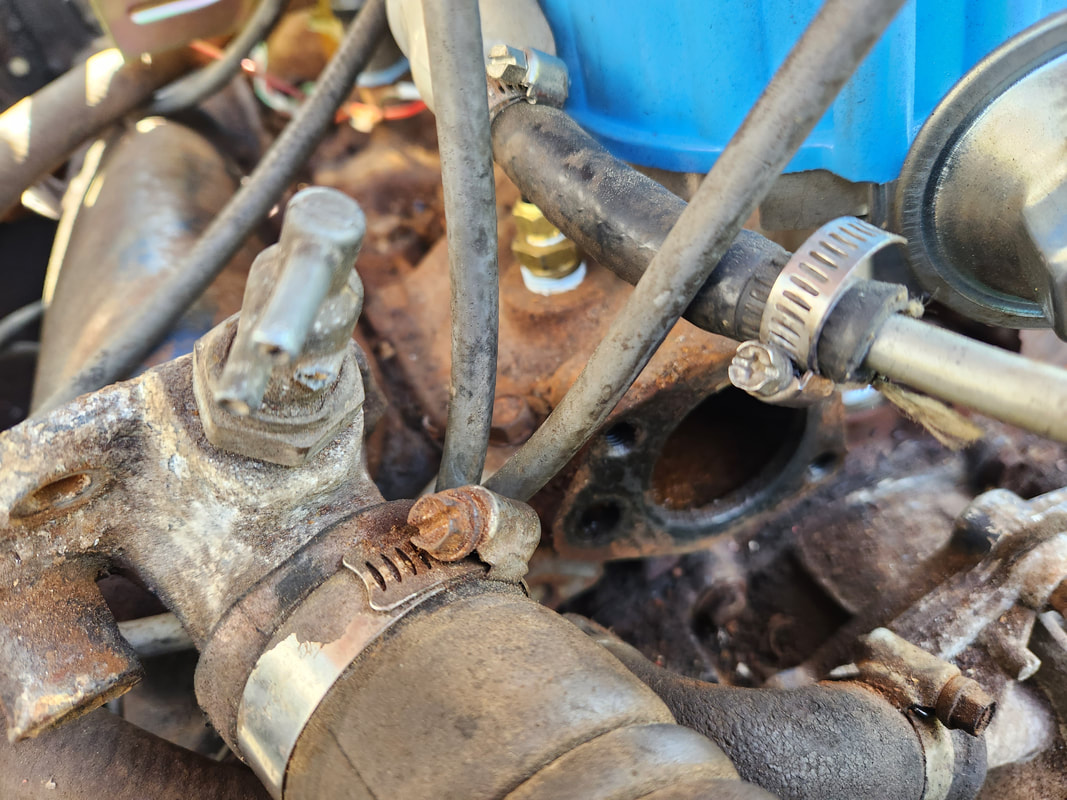 In the process of changing out the higher temperature thermostat, the cap had to be removed and old gasket material cleaned off so the new hardware can be installed back in place. After about 10 minutes running, it reached what would be operating temperature, holding at 175 degrees for a good 20 minutes or so afterward. After a while, I started seeing the temp gradually creep up, one degree at a time, and after about a good hour of running, the temp was in the low 200s range, not boiling out of the rad cap, but definitely getting hotter than it should've. I shut the engine down, pretty much figuring that a radiator replacement will be in my future. Remember when I mentioned the rusty coolant? Well there is a high probability that the rad, along with the block, is full of crud that more than likely clogged the rad enough to restrict coolant flow and by extension, cooling capacity. I will do a cooling system flush to see if this helps, but again, a rad replacement is likely, as this rad is the same one that was in the car since probably the late 80s/early 90s. The fact that this thing doesn't leak is short of amazing. The next order of business is the LMC carb. I've been having an issue where the fuel system seems to get some kind of magical clog that restricts fuel flow, even under the pressure of the fuel pump. After checking out the video from Robot Cantina where they did this same project on a car, the mention of the little lawn more carb suffering from vapor lock appeared to be the cause of my problem. The issue also appears to be in the pressure regulator, as the restriction seems to hold at this point, despite there being no actual physical blockage. When I remove the hose from the carb, pressure vents off slowly, allowing the fuel to flow into the filter. At this point I decided to try installing my old portable fuel system as the supply for the LMC setup. 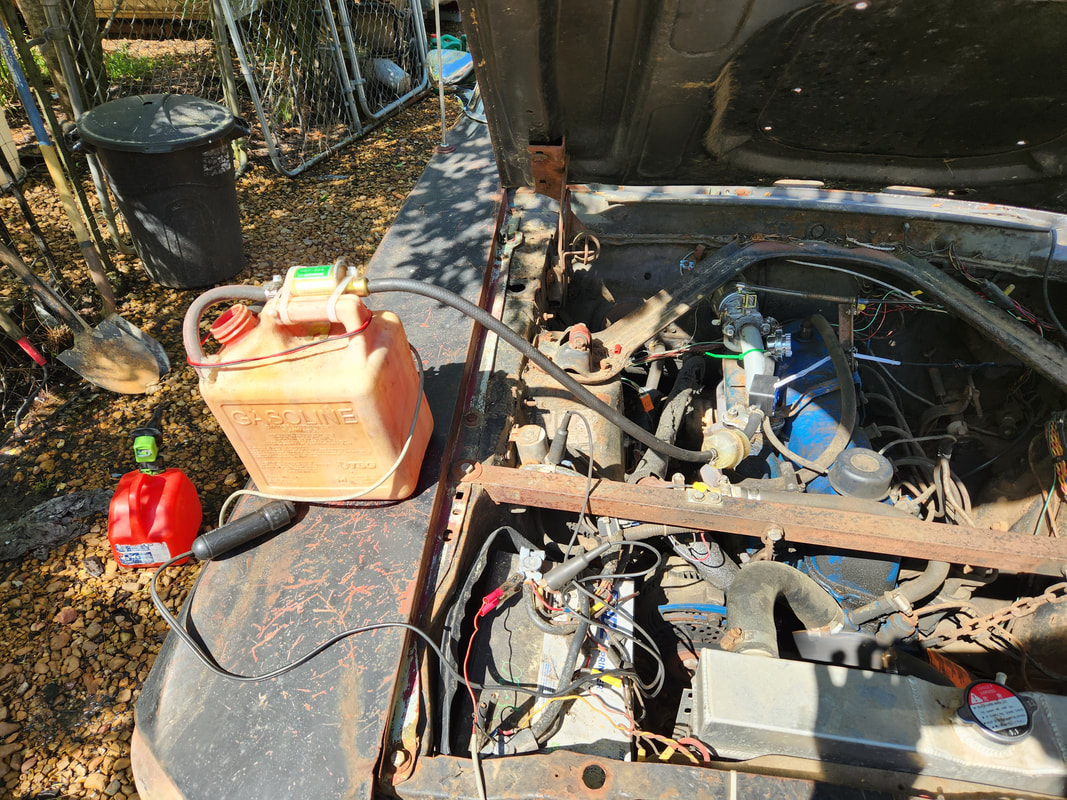 With the finicky conditions surrounding vapor lock and fuel flow with the car's mechanical fuel system, I decided to use our Portable Fuel System to be the sole supply of fuel to the LMC system, in order to see if the symptoms change. At first there was pressure in the fuel system enough so that it didn't let the electric pump on the portable fuel system pump any fuel into the fuel filter. After stopping everything and trying again, it finally released that ghost pressure that allowed fuel to fill the filter. I ran the engine for a while, watching the fuel filter on and off. After a while of running, I noticed the fuel filter drain out, with very little fuel being pumped into the filter. Looks like we were right back to the same BS again. As on the other video, I sprayed water on the carburetor and pressure regulator, in an attempt to cool the components and hopefully break up any vapor lock that was present. This seemed to work at first, as I noticed fuel suddenly start puking into the filter once again. Obviously when these conditions happened, the engine's reactions changed accordingly.  When the vapor lock condition was not present, the electric fuel pump was able to push fuel into the filter and fill the filter up enough to sustain fuel flow to the LMC. After a second vapor/pressure lock condition, I was unable to resolve the situation without removing the hose from the carb to release the pressure. At this point, as with the other video, I'm going to go back to visiting the fuel return setup, but in a way where fuel will be able to flow into the carburetor first before returning to the fuel tank. This will also mean that I'll be visiting a smaller fuel tank, whether the old fuel can or even the portable fuel system with the addition of a return line routed into the filler port of the fuel can. One other thing to make note of, the flowmeter apparatus, really wasn't reading anything during all the run time that I did manage to do with the apparatus in place. Apparently, the CFM of our LMC system is so low that its unable to be registered on the flow sensor. Since the flow sensor is a little impeller, it would require a certain amount of volume flowing through to spin the impeller and shoot that signal to the controller. With that, our flowmeter experiment for all intents, was a failure and we'll be more than likely going back to the gallon fuel can idea again for the sake of testing for MPG numbers, once we get things running smoothly enough of course. The title is sort of misleading, nothing actually died, well sorta. The whole chapter starts off with a test drive on Truckstang. After getting the transmission addressed, the first thing that had to be done was a real test drive to see how things work. During this test process, which involved going up and down the driveway a couple times, then a run down to the main "road" and down the street some before turning around and coming back. This whole run was kept somewhat short on the premise that I didn't want to push the car too much, given the idea there's still things that need to be ironed out. During the testing, I toggled through the shifter, forcing a manual 1st upshift to 2nd then driving to a speed to push a 2-3 upshift. I had to go on the road to get up to a higher speed, probably somewhere around 30-40 mph before the transmission upshifted to 3rd. Funny thing about this 65 year transmission, Ford set up this particular C4 where when its in the D position, it will start off in 2nd and upshift to 3rd, and for "sport" mode, if toggled down to 2, it will start off in 1st and upshift to 2nd, then a toggle to D will force a 2-3 upshift when up to a higher speed. It was a dual purpose feature designed into these transmissions for only a couple years. That was proven to be the case during this test drive. 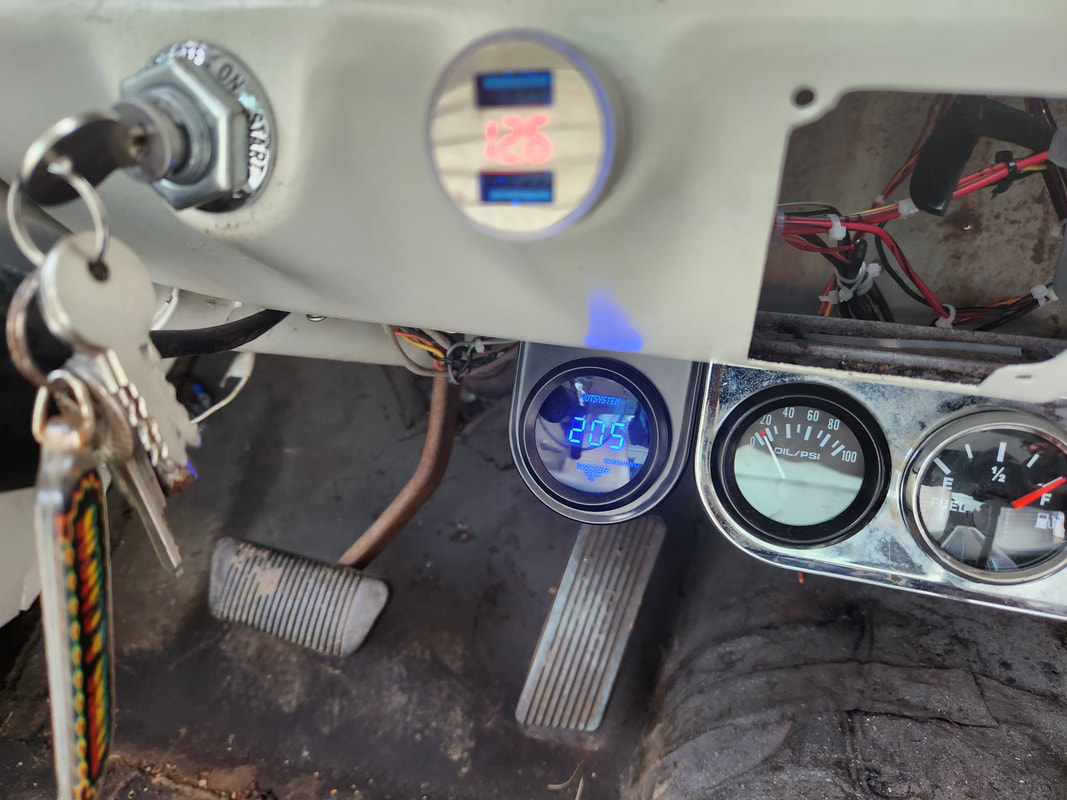 Extended run time results in the car running to the point of being too hot. This engine can't continue to be run with these risky conditions. Now, because this transmission is a 3spd without overdrive, and the rearend is a higher ratio, probably 3.73:1 or something, for the Ranger truck with an overdrive transmission, when the powertrain is in 3rd, its going to have the engine screaming when I manage to get up to highway speeds. Eventually I will have to swap out the gears in the rearend to remedy this problem later on. Another problem is the rearend on this frame was from the generation of Ranger that used a hall effect sensor in the rearend for the speedometer. Currently this sensor is not present, so the rearend is able to just spit up gear oil (or water) when the driveline is running. I will have to source a sensor and bolt from the junkyard to plug this hole later. The last problem is the idea that the engine runs to the point of being hot. The gauge was hitting 220 when I stopped the test, then tapered down to 212 after a while idling. The radiator on this car is small by most standards, but I will most likely end up getting a new rad that is thicker and obviously cleaner than this 40+ year old rad. I also need to check the thermostat to see if I have a 160 degree stat in place, or any at all. Last time I tried to run "statless" the coolant was circulating too fast to actually be cooled by the rad, so the engine ran hot. These things will need to be checked before I continue further tests. 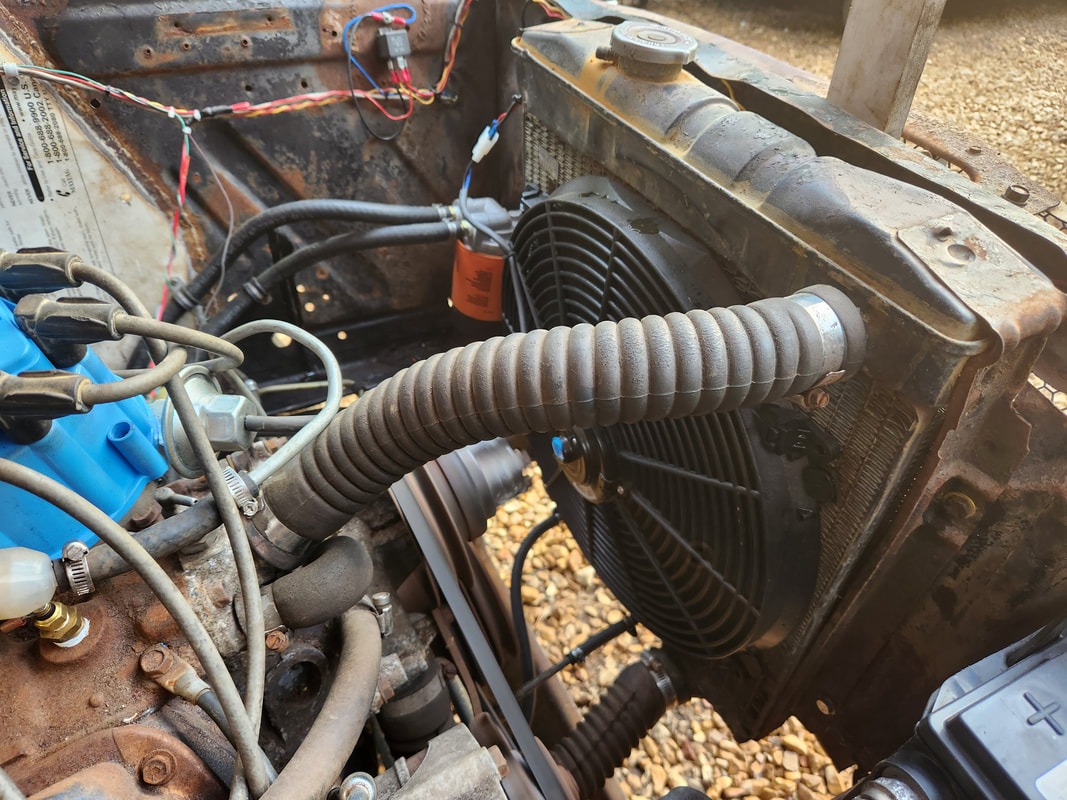 The radiator on Truckstang is small, even compared to the rad in Rustang, and Truckstang's engine is larger. Even the huge fan wasn't enough to keep things cool. I see a new rad in this car's future. One more thing, a rather insignificant one, all things considered, is the idea that whenever I sat my dusty ass in the driver's seat, I leave all kinds of dirt stains on the off white seat. This is one of the biggest reasons I hated anything white, whether a suit, T-shirt, or car interior. Because of this, I will have to do a thorough cleaning on the seat and hopefully not mess up the paint on the seat. At some point this might end up being a case of taking up upholstery and redoing this seat so this won't be as big a problem. Cleaning a new seat will be a lot easier than trying to take care of not messing up some paint that already gave me grief when I applied it. I even need to exercise caution on the side panels for this same reason. 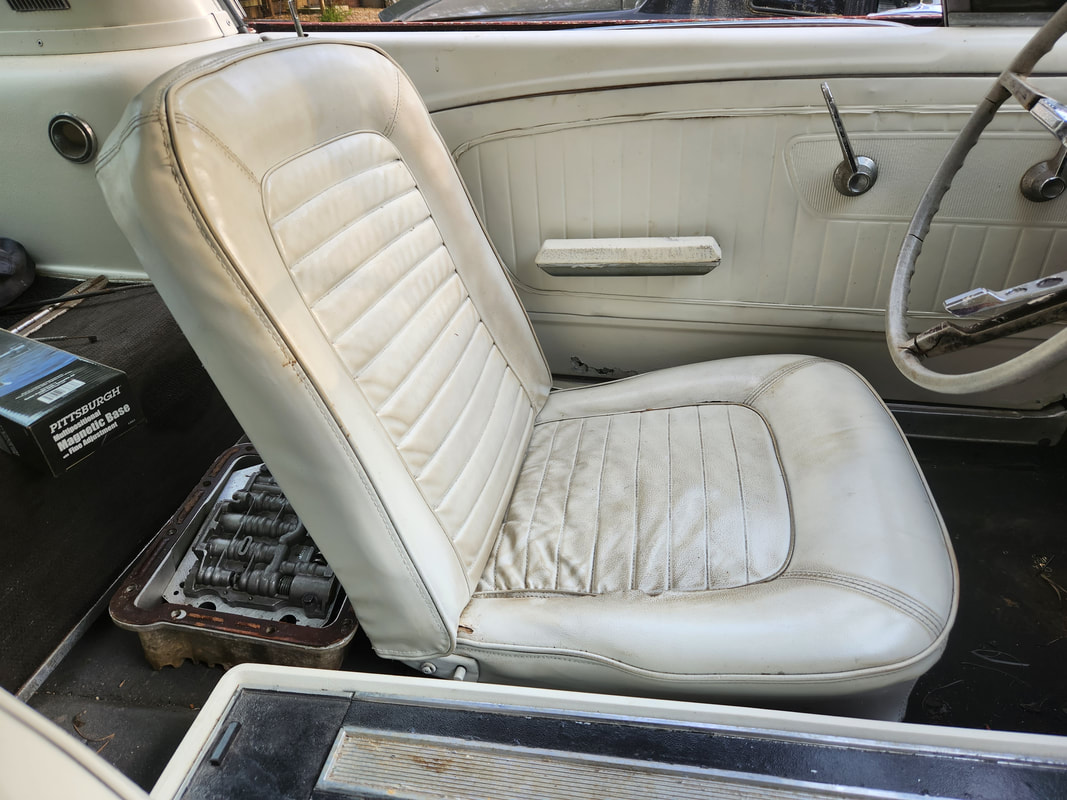 The driver's seat will end up looking rather nasty if I don't clean this and figure out a way to keep it clean without destroying the paint. A reupholstery job would solve this for all intents. Now for the LMC Rustang. After installing the flowmeter apparatus, I had to do a test drive to see if any of this stuff was even going to work. Everything was seemingly fine from the beginning, but as I began to make my run around the "block", I found I couldn't really upshift to 4th, as the engine was sluggish and didn't really have anything left in it. I had to stay in 3rd the whole way. When I was on the final stretch, the engine started just loosing power and getting to the point I had to downshift to 2nd. From there it got worse until it just wouldn't stay running enough to even put a load on the engine. After multiple attempts to start the engine, only to have it sputter out when I tried to put a load on it, I looked at it while running, noting the fuel filter was barely getting spurts of fuel into it from the pump. I changed the pump out with a spare I had in a box of pumps and attempted another start, with no success. After a recovery back to the house, I put the charger on the battery and pulled the output line to see if the pump was pumping. I couldn't get it to pump, so I changed that pump out with the 2nd spare I had. Still had no luck. I "manually" pulled fuel through the fuel line then tried again, cycling the engine to work the pump. After getting the pump pumping, I put everything back together and got the engine running. At first, the filter filled up rather fast, but after a few minutes of running, the filter drained out some more and at that point the engine was running super lean. This lean condition was also noted when the engine began running shitty. 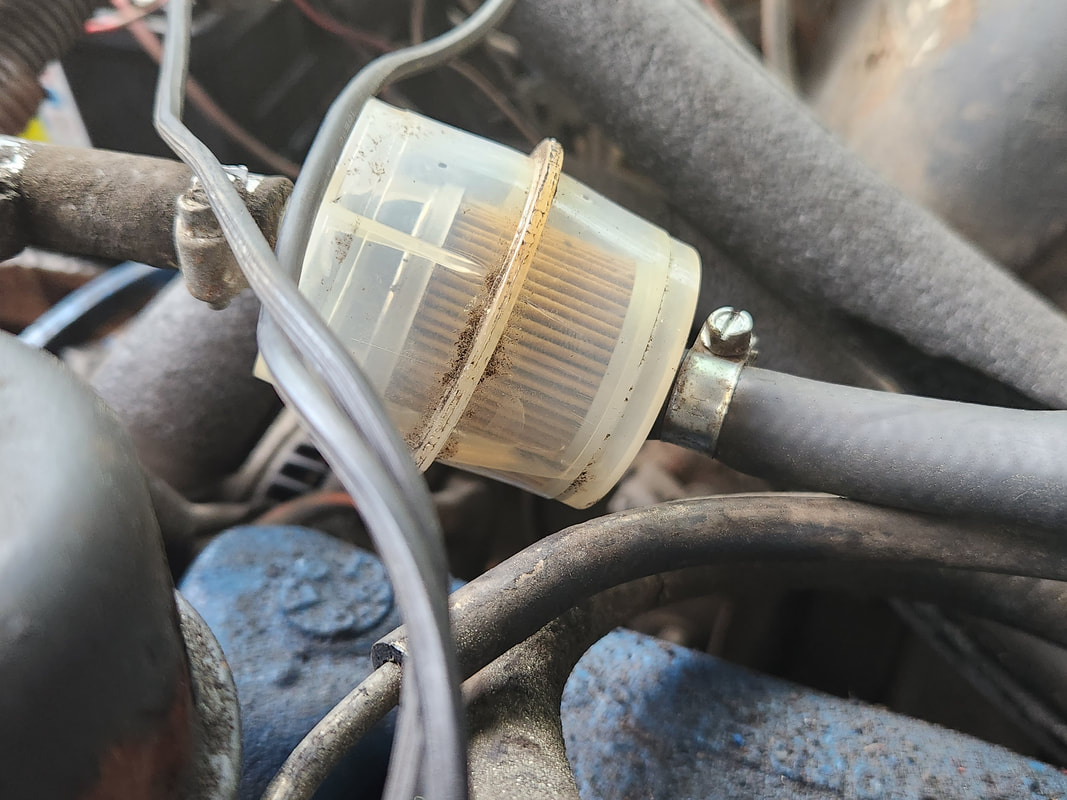 The filter was barely a third full when the fuel system started drying up again, with the engine running sickly as a result. The filter should be damn near full during normal operation. Now, I don't know if this is literally a case of a bunch of bad pumps, which I doubt, or if some kind of air leak in the fuel line between the fuel tank and the pump is causing fuel to not be drawn as smoothly as it should be. Hell, I don't know if there's even a case of the camshaft lobe for the fuel pump getting rounded out to the point where its not cycling the pump as hard as it should. All this leads to is the idea that I will be installing an electric pump at the tank to serve as a lift pump to push fuel up to the mechanical pump. I would fully delete the mechanical pump, but in reality, this problem needs to be solved more than anything. This may be the kind of thing that will keep me from trying to resurrect the mechanical pump on Truckstang, as this problem would really piss me off if it happened on that car as well. I don't know, I really just want to get the problem addressed, as this was really a problem that was present the whole time, even when the engine had the 1bbl carb in place. Maybe at high RPM the pump was able to push enough fuel to keep things going and the 1bbl had enough reserve in the float bowl to keep the engine going long enough to be replenished by the pump. 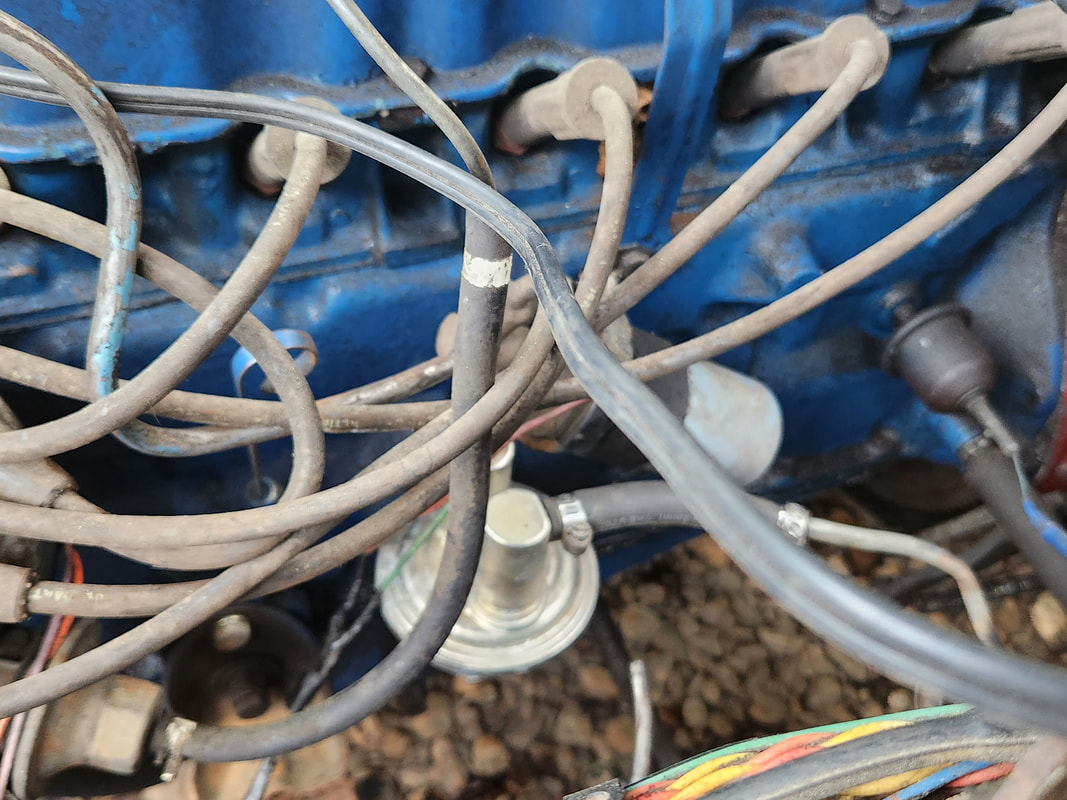 The third mechanical fuel pump tried out with similar results. An electrical lift pump will be getting installed to help things out, unless I can figure out the problem. This problem needs to be addressed in order for me to move forward with testing on the LMC. The problems to be addressed on Truckstang are probably more expensive than those of the LMC but are really small for all intents. I don't know, I feel that Truckstang is more easily addressable than those of the LMC Rustang.
After getting things done with Truckstang, I wanted to turn my attention to getting the flowmeter assembly on the lawn mower carb build on Rustang. This assembly consists of a flow sensor that gets installed in the fuel line, with a long wire harness that connects to a controller module, which is fed from a power supply, or in my case, a cable with a 12v plug on the end instead of a 110 AC adapter. Installing this assembly would be outside of the normal use of this apparatus, as this was normally intended for a more industrial application. The flow sensor won't be much of a problem, its getting the cable through the firewall and to the cab and mounting the controller.
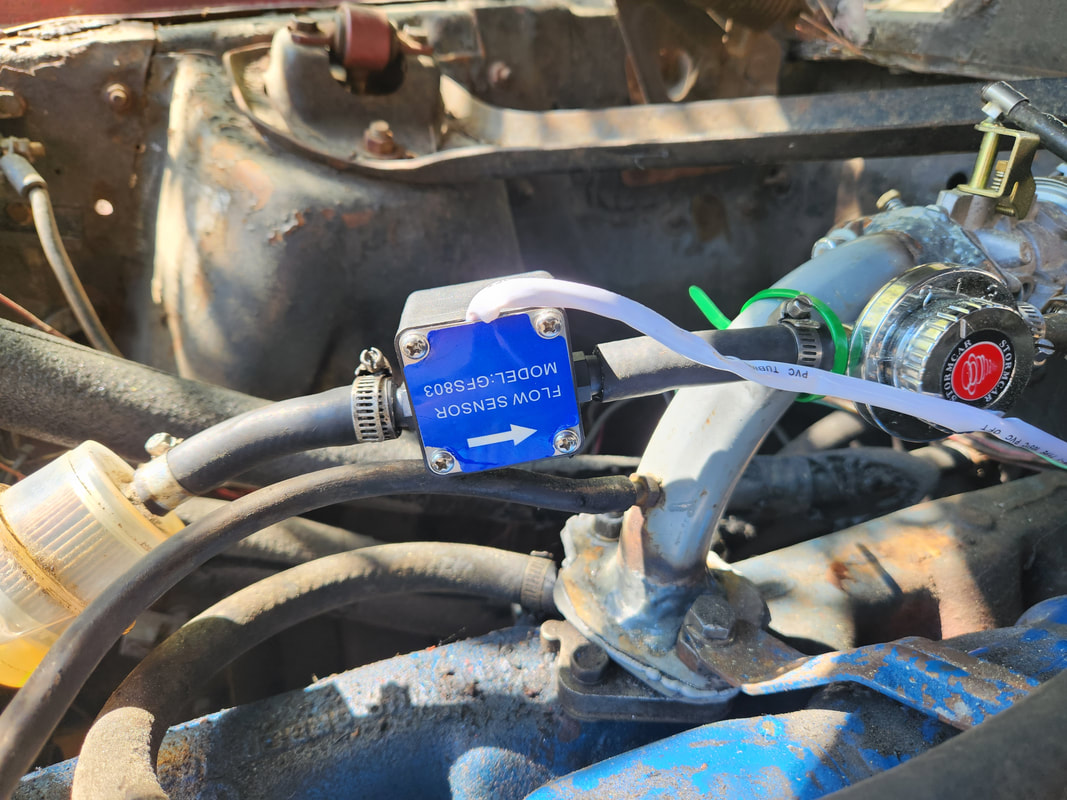
The flow sensor secured in place in the fuel line going to the pressure regulator.
I had to change the hose barb on the input side of the fuel pressure regulator to a 3/8" barb as the barbs on the flow sensor are 3/8". The hose between these two points was clamped down just fine. The length of hose from the input side of the flow sensor to the output side of the fuel filter was different, as the output is 5/16". I used a fuel injection clamp on that side to ensure complete clamping of the larger hose around the smaller hose barb. As for the cable, I routed the cable across the top of the engine and over to a hole in the firewall where the clutch rod passes through. I zip tied the cable to one of the brake lines on the master cylinder to keep the wire away from the spark plug wires as well as the clutch pedal rod. Inside the cab I had to figure out how to secure the controller. 
Small piece of exhaust strap screwed in place to one of the mounting screws for the gauge cluster.
I ended up deciding to clamp the controller just above the steering column. To do this I cut a small piece of exhaust strap, screwing it in place on a screw holding the gauge cluster panel in place. On the back of the controller I slipped a screw in and slid the strap onto the stud of the screw, carefully applying the nut to hold the strap to the screw on the back of the controller. The wire harness cable was secured to the controller and zip tied to the steering column, completely holding the whole works in place. The cable was carefully routed under the dash, out of the way of any pedals or other stuff that could interfere with the cable. 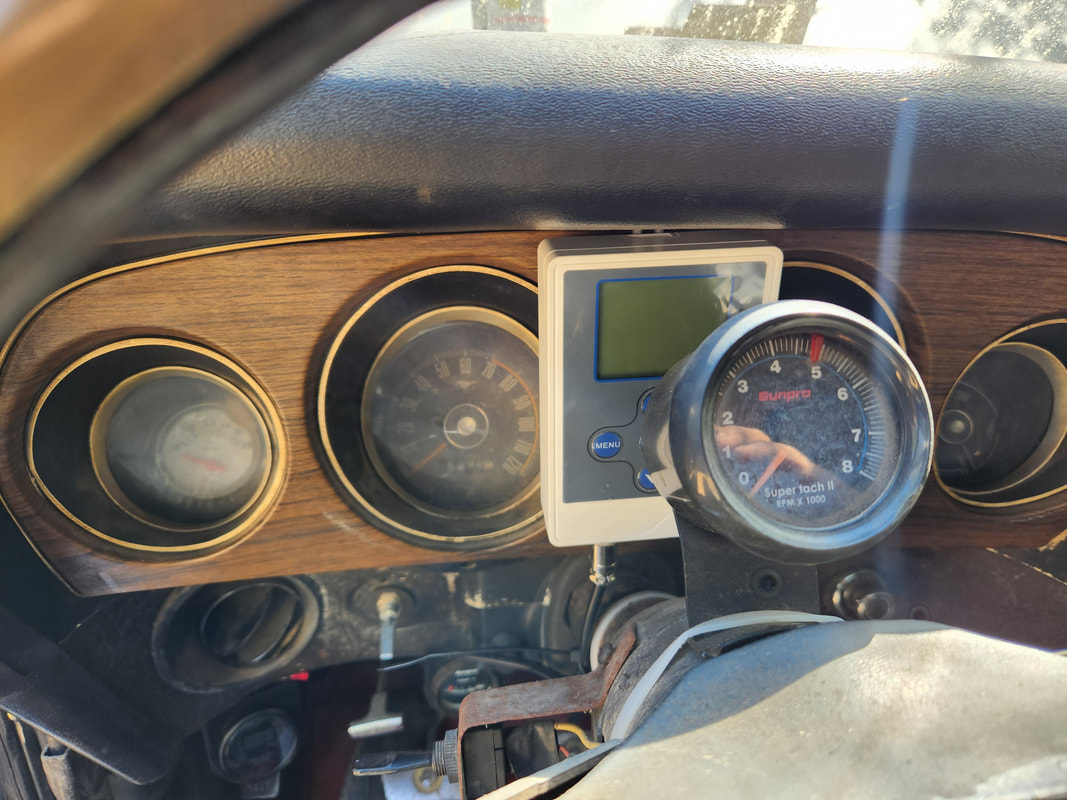
The flowmeter controller fully secured in place with the data cable zip tied to the steering column and the controller clamped to the strap above the gauge cluster.
As for the power cable, I plugged it up and routed the cable across to the center console, using a small zip tie to secure the wire to a point just below the radio. The cable runs straight back to where the 12v receptacle is located, with the excess cable coiled and zip tied to keep it contained, while the plug is easily plugged into the receptacle. 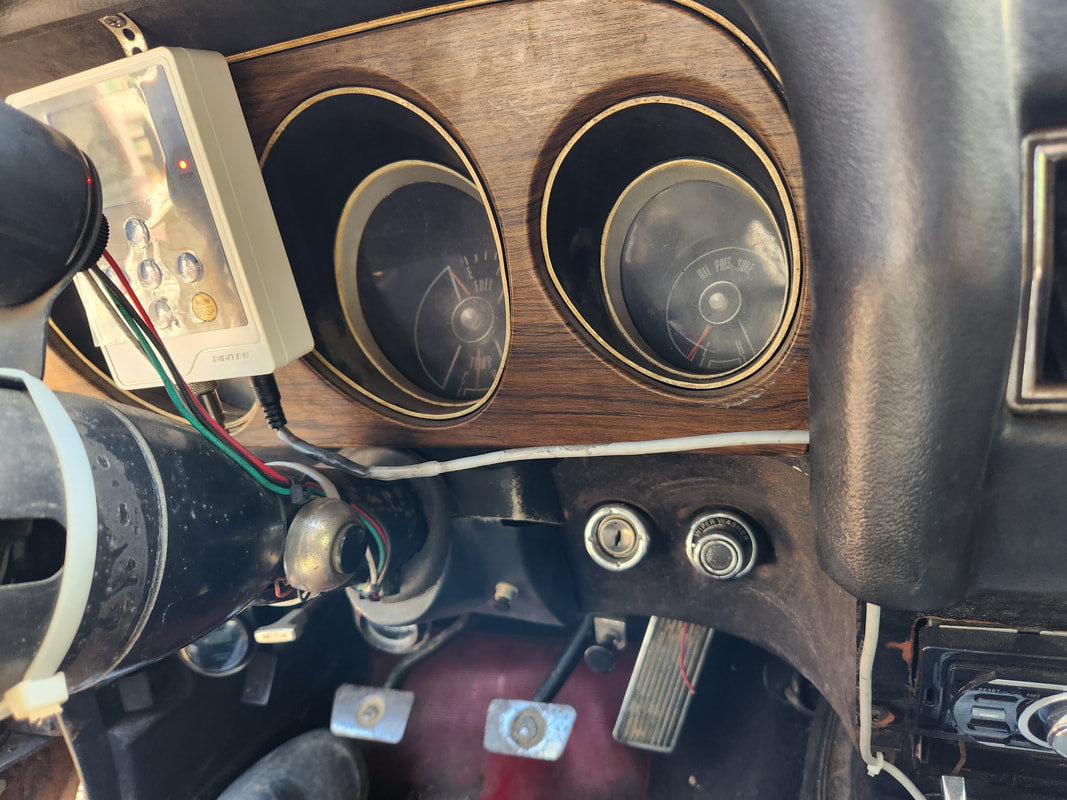
The power cable stretched across the bottom of the gauge cluster panel over to the center console.
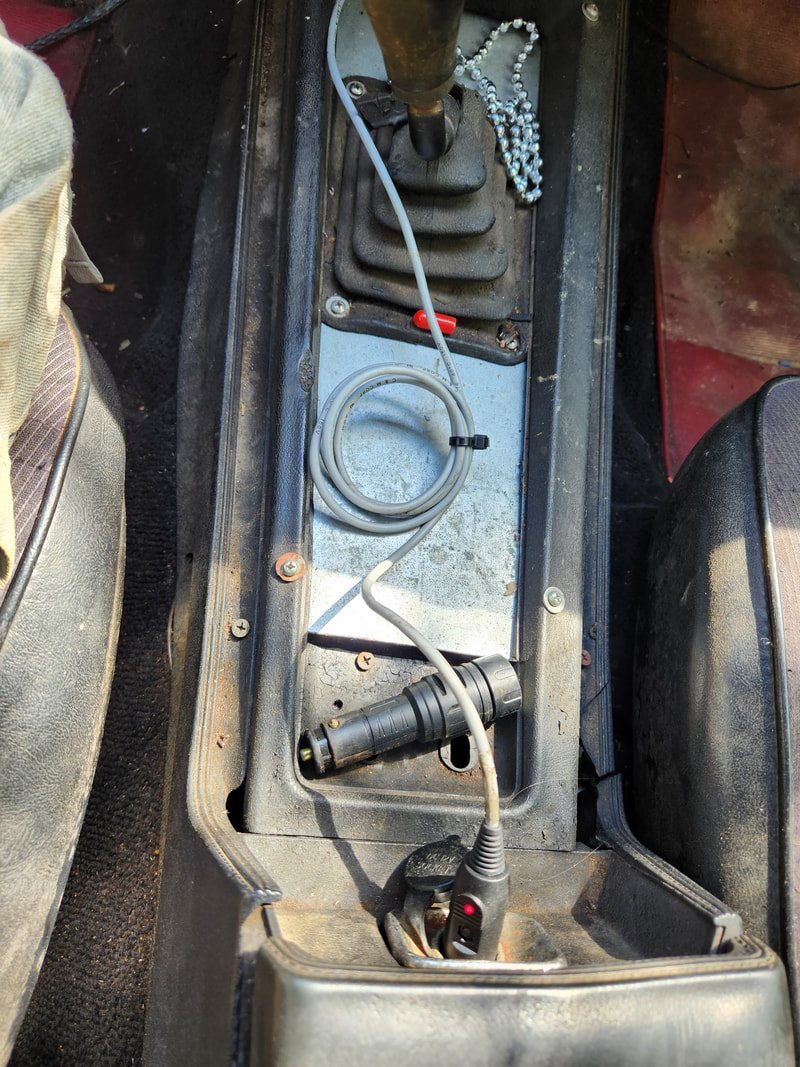
The power cable routed around the center console with the cable coiled up and plugged into the receptacle.
With the power cable in place, I applied power to the controller, verifying that everything works just fine. The controller is firmly secured so that's good. The cables from the engine bay back are all secured. For all intents, this assembly is completed. 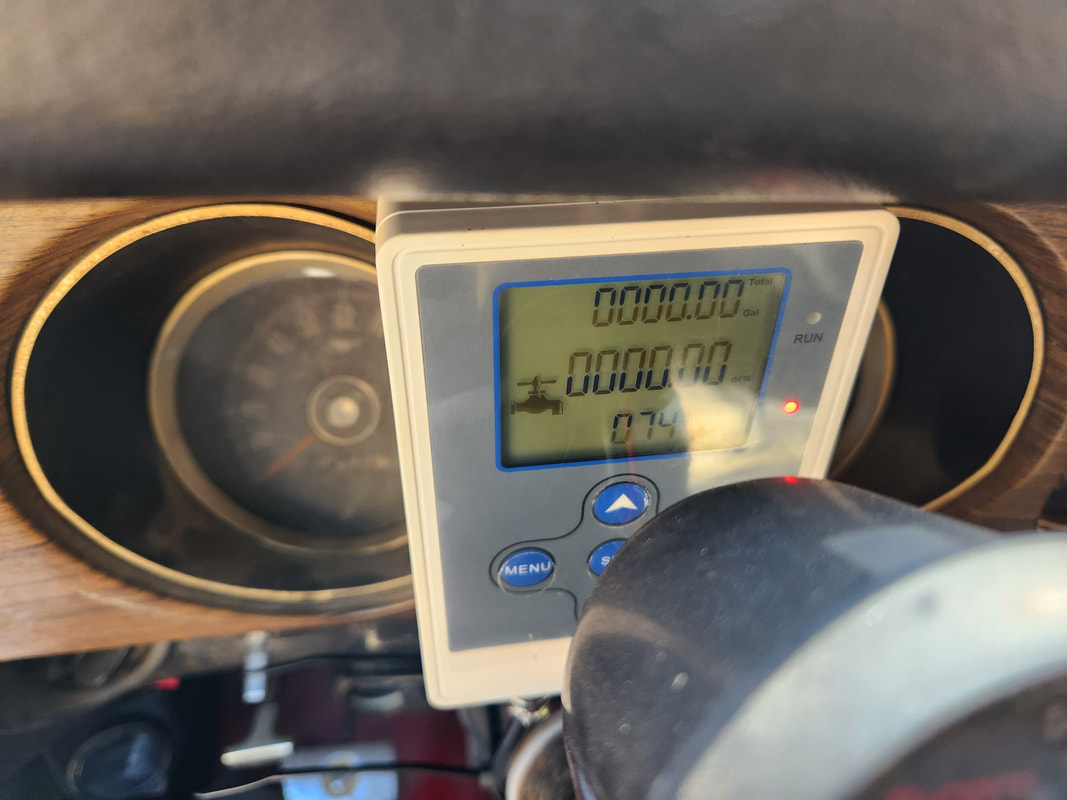
The flowmeter controller online after plugging the power cable up.
At this point the next move will be to test drive the car with the flowmeter apparatus online. I will still need to see if there is any calibration that needs to be done, hopefully not, but at this point, its crunch time. I'll drive the car around, logging the miles traveled along with the GPM on the flowmeter, and with the power of mathematics, be able to translate this into a MPG number. I wont' drive enough to use up a gallon of gas hopefully, but after driving for 15 min or so, be able to log a total amount of fuel flowed to where I can multiply that number to get to a gallon. I can drive until I use a quarter or half gallon of fuel and either multiply by 4 or 2 depending on the fraction of a gallon of fuel used. I would also do the same for the miles traveled and that would give me how many MPG we logged on the system.
With the apparent success of the Truckstang's transmission issue resolution, there were other things that had to be addressed around the yard. As always, something either needs fixing or cleaning up or both. One of the things that needed to be addressed is the loading up of the huge load of scrap that was accumulated over the last several months. Everything from regular scrap metal, to soda cans to copper, etc have been stocked up. To make things easy, I loaded up everything before I do decide to go to the scrapyard, so it will be easier to deal with. With a little help, I got everything loaded up in the F250 that I had on hand. This included some scrap built up in the garage just as well, a lot of weight. 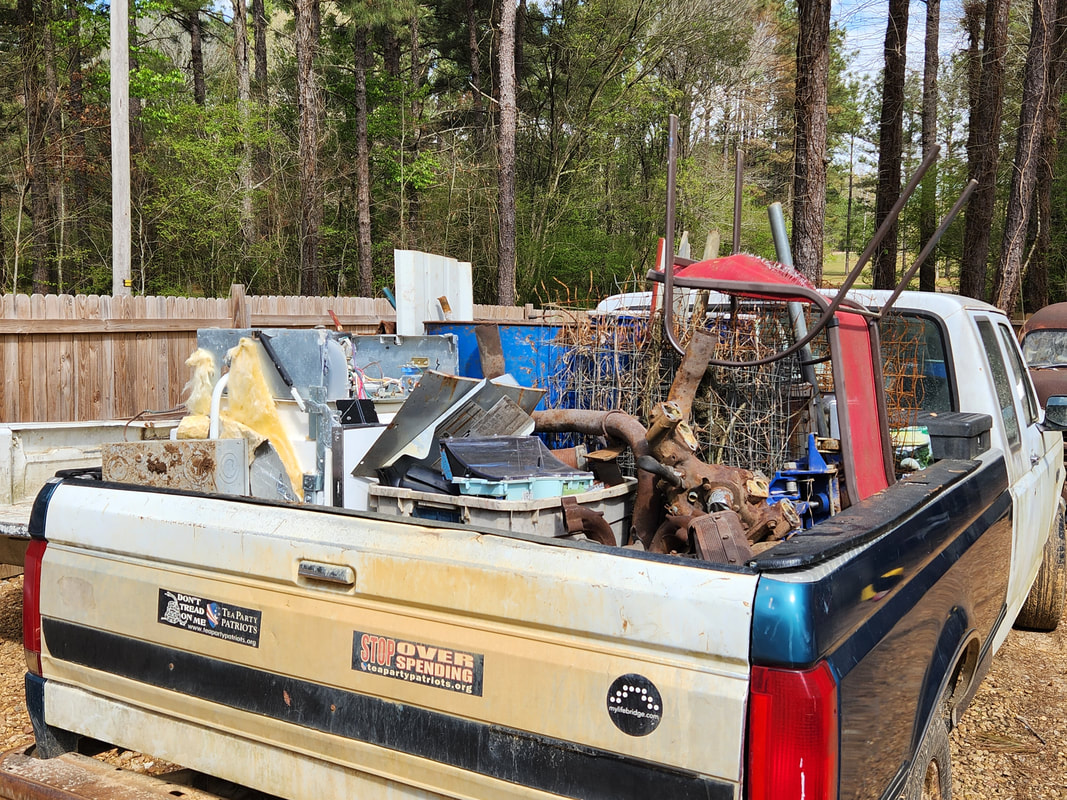 The F250 is fully loaded down with scrap that has been accumulating for several months. This should net me a good payout. Our neighbor also had a batch of scrap to pick up as well, which included a bunch of wiring and an entire exhaust system removed from one of his car projects. The mufflers have a few rust holes in them but the pipes from the headers to the axle pipes are all intact. I really could patch the mufflers if I so desired, but for all intents, I have at my disposal an entire exhaust system for a future project. 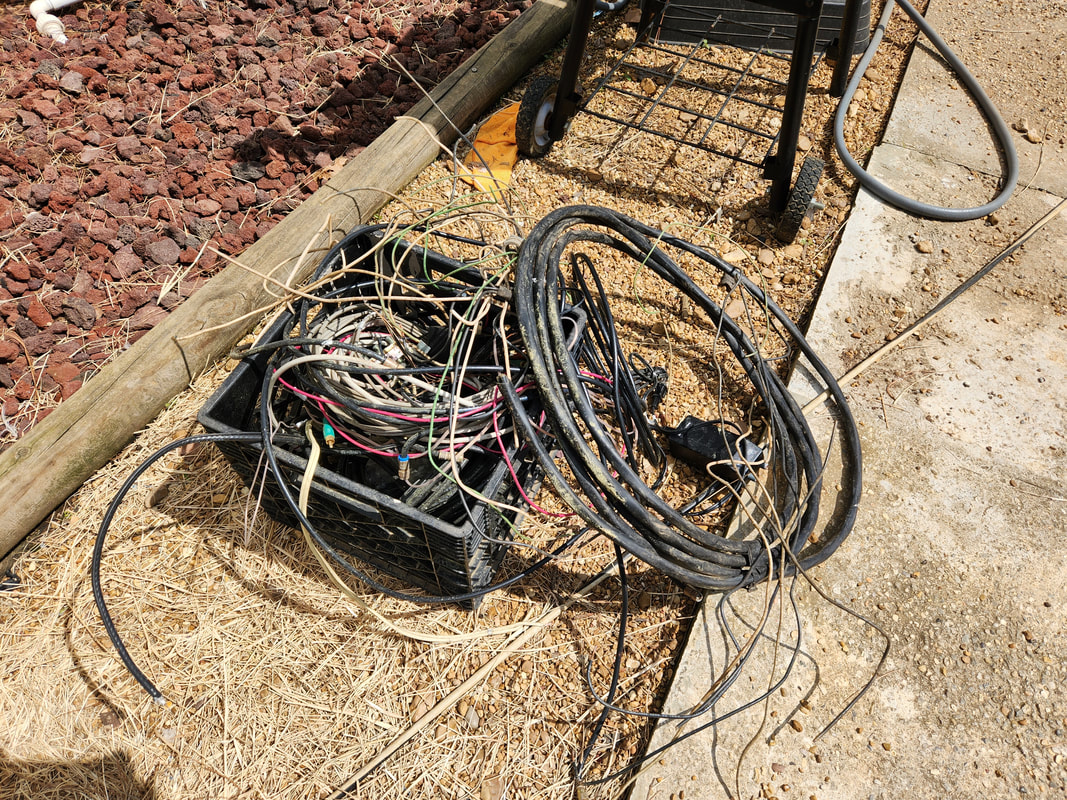 This large batch of wiring salvaged among the scrap from the neighbor needs to be burnt down to the copper before it can be included with the outgoing scrap. I'll try to address this before I haul the scrap off. 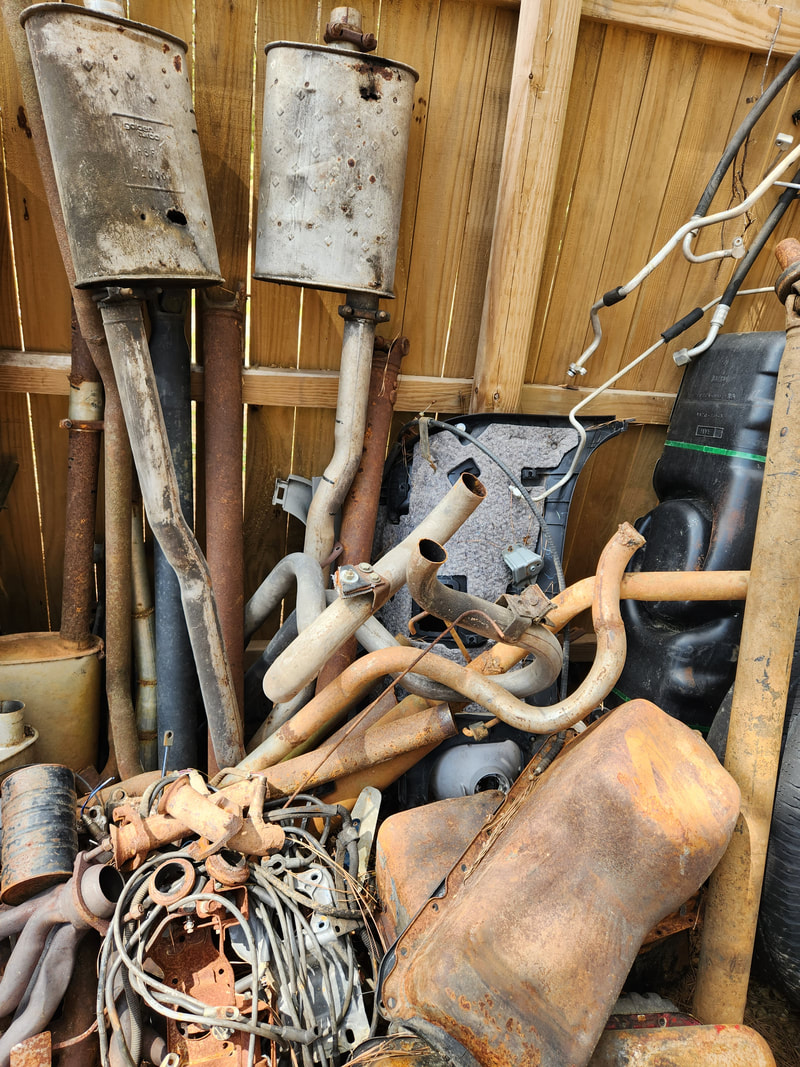 Staged among the existing scrap parts pile, an entire header back exhaust system was salvaged from our neighbor's scrap pile, to be used in the future on another car project. Another thing that needed addressing was the rear brakes on the Scion. They had been squealing for some time so they needed attention. When I pulled the left side, the piston was frozen in place on the shaft of the bracket. I had a helluva time hitting this piece with a hammer and wetting it with WD40 trying to get the thing loosened up. Once loosened up I used the rotary tool and sanding wheel to "remove" some rough metal on the shaft of the bracket to make it a little narrower so it would move freely inside the caliper. I applied brake grease to help this free movement before installing the pads. The right side was just fine, able to move freely with no problem. I still applied grease on that side to keep it free moving just the same. 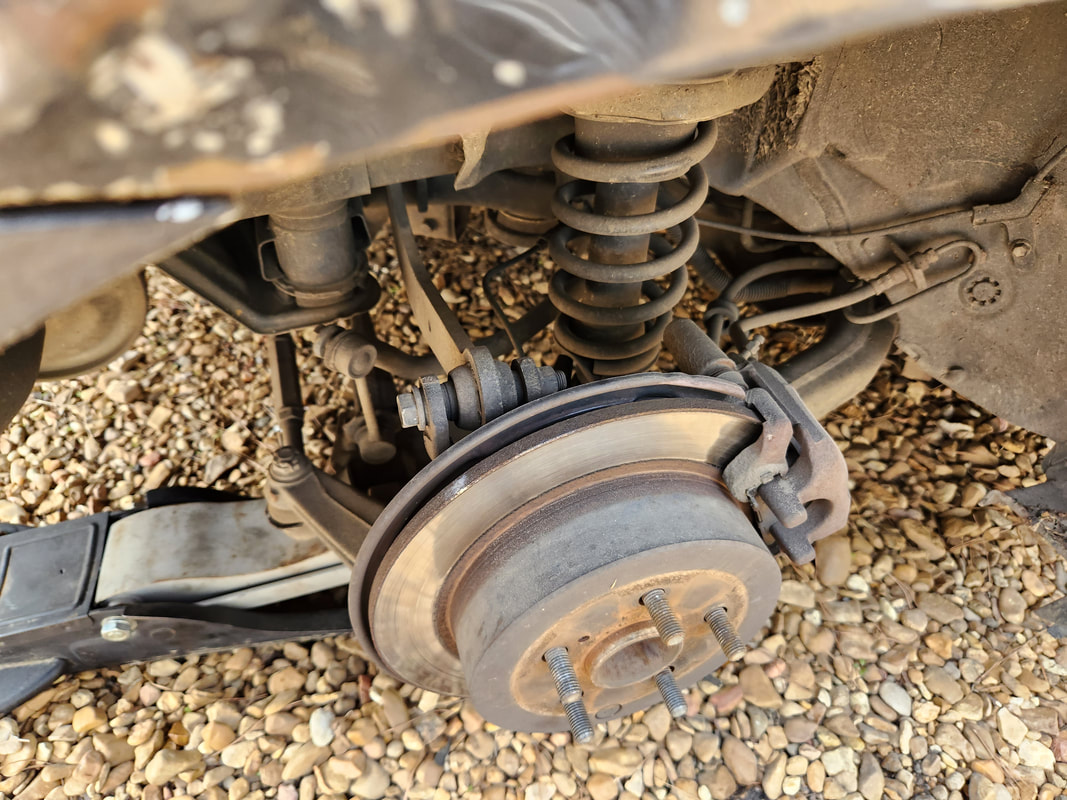 The right side caliper assembly on the car, still free moving, which had those pads still pretty good, but no one ever changes just one side on brakes, so they had to come out. With all this taken care of, the Scion is back in good standing for all intents, our scrap is loaded up and ready, with the exception of the copper wire. I'll have to burn up all that wire before I do haul the scrap so I can include that in the load, otherwise I'll have to just set that aside for the next load, whenever that will be. I do have to get a new battery for Truckstang as the one I had in place was garbage. I temporarily used a larger battery to run the engine during the transmission tests but can't use that during road tests as the battery is too big for the tray and will end up sliding off and hitting the engine. Once I get a fresh battery in place, we can commence road testing.
One of the biggest obstacles to us getting Truckstang on the road and into advanced stages of testing so far has been the transmission. In the beginning, we had a problem with the transmission being stuck in a forward gear, and losing reverse. After pulling the unit to rebuild, I found the piston in the forward clutch assembly was stuck, making the clutch packs stick together, resulting in the always forward condition. After initial testing, I ended up losing reverse shortly after, with no sign of upshifting either. I pulled the transmission a 2nd time and went back inside, resealing the cover for the reverse servo piston, as well as checking and cleaning the valve body. After the 2nd install, I had reverse for a short minute then lost it again. This time, I had to approach this from a professional mechanic's perspective. Before I would pull this transmission a 3rd time, I wanted to check the line pressure on the transmission as the unit is shifted through the different gears, which might shed some insight to what's going on.
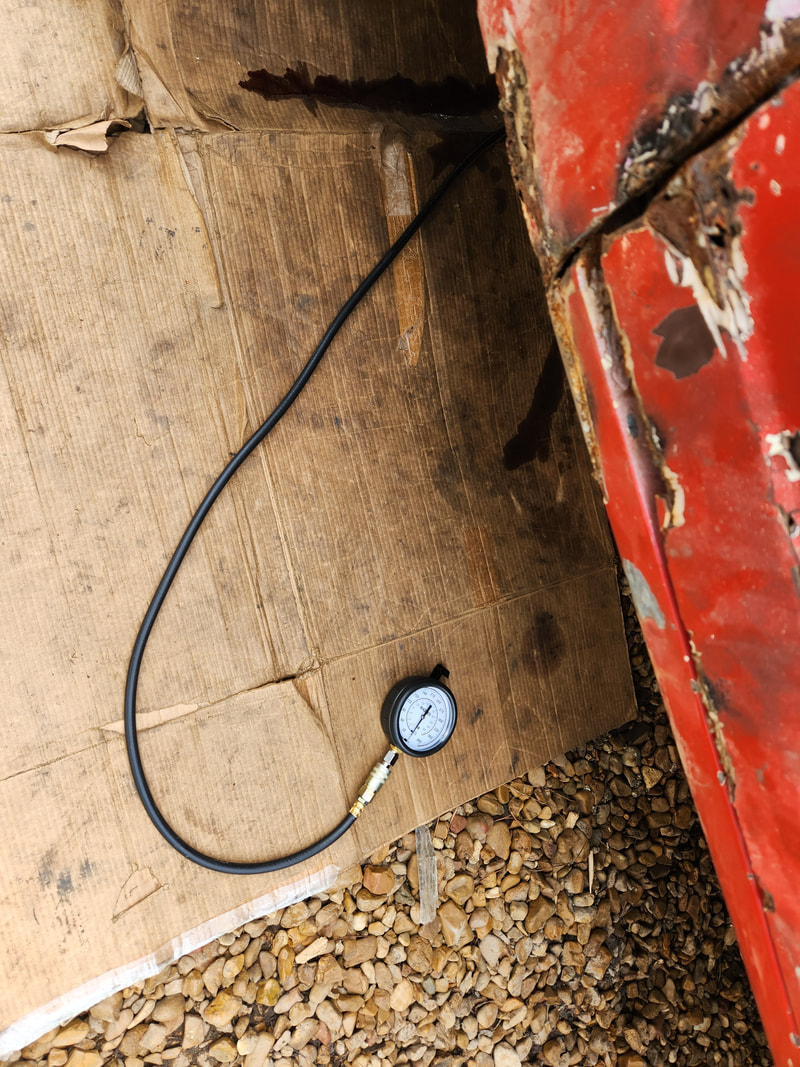
The pressure gauge for testing the line pressure on the transmission. This gauge snaps in a fitting similar to an air tool fitting, able to tolerate the potential high pressures that may come from a transmission. The hose is long enough to route the gauge into the cab to allow the tester to monitor the gauge while cycling the shifter.
I picked up an oil pressure gauge set for testing line pressure on transmissions and engines. This set comes with two gauges, one going up to 300 psi and the other going up to around 100 psi give or take, for more precise measurements. The set comes with a series of different fittings that are in 1/8" NPT and a couple other common sizes to allow the hose and gauge to be hooked up to the test port on a transmission or engine. Of course I would have to run the engine so the transmission oil pump can build pressure to do this test, so after doing some last minute fine tuning to the engine, I fired it up and checked the numbers. 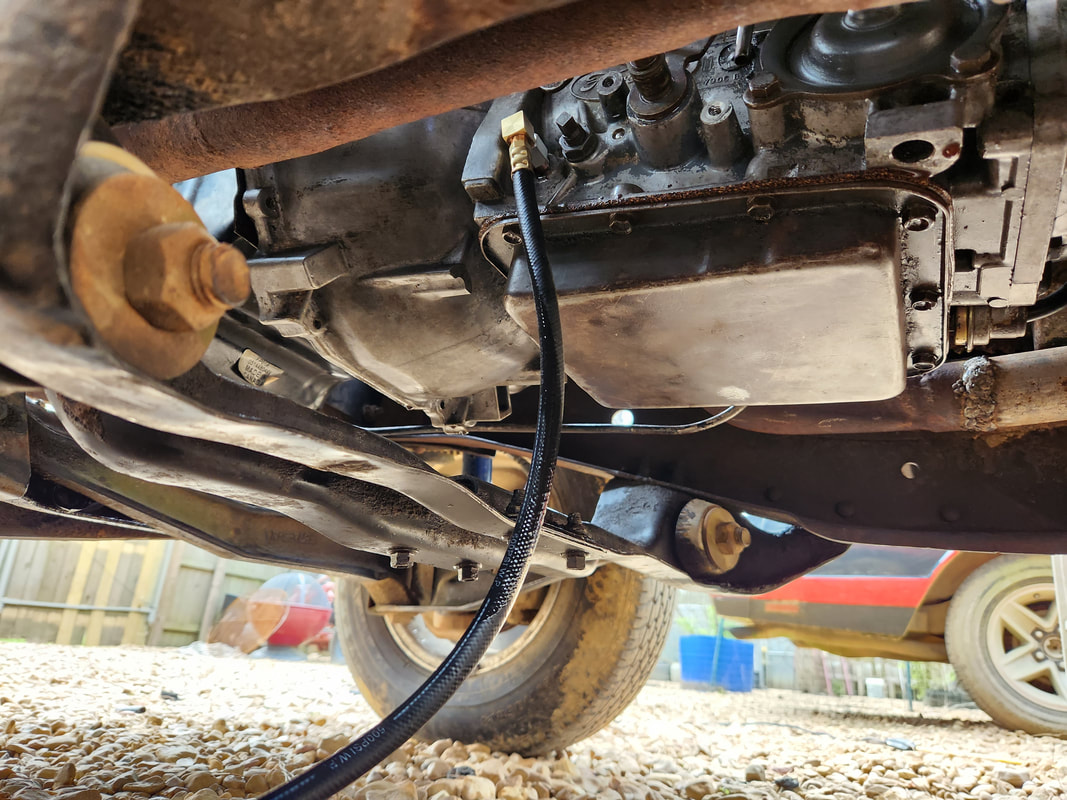
The hose to the gauge unit connected to the adapter pieces which are screwed into the test port on the side of the transmission.
Pressure at idle in park was between 160-180 psi, way higher than its supposed to be. When I toggled the shifter to reverse, the pressure shot up to 260 give or take, way too high. Forward gears were all in the 150+ range, still way too high. I ended up jacking the rear end up to get the wheels off the ground while checking. I still didn't have reverse and the oil pressure was still high. I even tried to run the thing up to light speed in forward gear, and couldn't even get a 1-2 upshift. After a quick look in the transmission book I have, it stated among other things, to check the vacuum modulator on the back of the transmission to see if there is proper vacuum to the unit. The hose to the modulator is connected to a little manifold on the rear of the intake that has lines going to the brake booster and a couple other hose barbs capped off as they're not needed. After pulling the modulator hose, I found I had no vacuum whatsoever. I pulled all the other hoses off and same thing, no vacuum. I removed the little manifold, only to find a dirt plug inside the piece, blocking every passage within. With a pick I scraped all the dirt out of the piece, making sure it was nice and clean and replaced the unit. 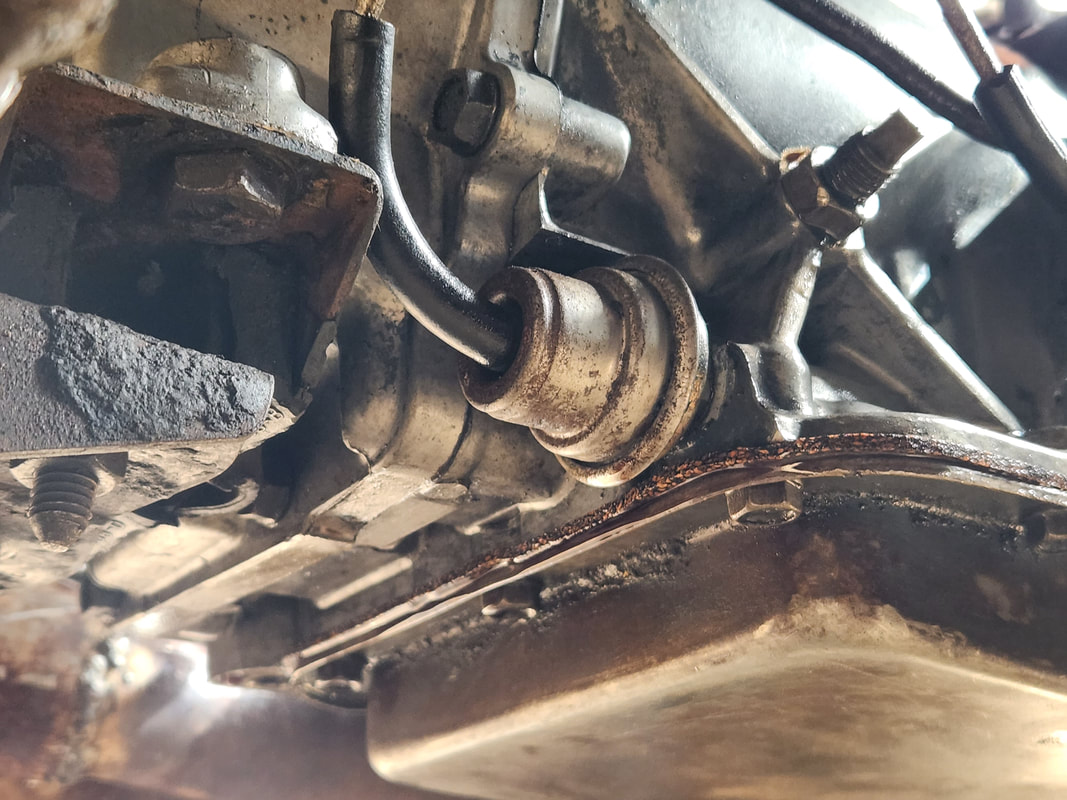
The vacuum modulator on the back of the transmission. This is a very important component in the efficient operation of the transmission.
After reconnecting the hoses to the manifold and firing up the engine again, the first thing I noticed was the brake booster hissing as the vacuum pulled the brake pedal down some, and kept hissing a little more, indicating that the booster may be bad. I toggled the shifter into reverse and with a hard slam, the transmission engaged and the rear wheels started spinning. We finally got reverse back! I also shifted into manual 2 and revved the engine, hearing the engine upshift into 2nd. I toggled into D/3rd, but didn't want to keep revving the engine up to a high speed, as the wheels were off the ground on jacks. Without a real load, vacuum may not be optimum to force a 2-3 upshift so I didn't want to try to force that where the wheels are spinning at what amounts to 50+ MPH. We will just have to put the car on the road to do these advanced tests. 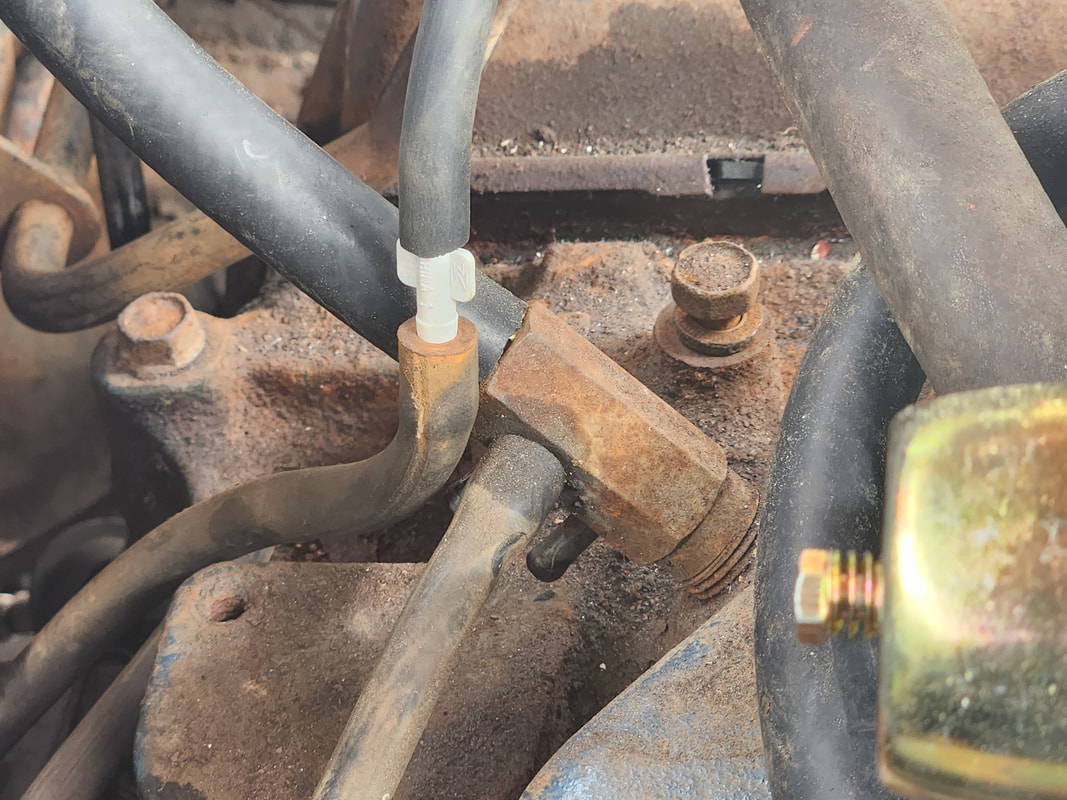
The vacuum manifold with the hoses for the brake booster and vacuum modulator. This component was clogged with dirt.
The vacuum leak in the brake booster caused the engine to want to surge and run erratically for a bit, so more than likely I will end up disconnecting the brake booster from the vacuum and cap off that port. The brakes worked just fine anyway without vacuum assist, so until I can replace the booster, I may go this route. Either way, the transmission is working for all intents, all because of a lack of vacuum. That was a mistake on my part, as I didn't check this right off the bat, having faith that the vacuum manifold was not clogged. Had I done this from the start, I could've very well saved me the headache of pulling the transmission a 2nd time. At least now, I can get ready to do some road tests. I just gotta mount some cameras.
With the fiasco with the Scion behind me, it was time to get back to work on the hobby cars. I did check the rear brakes on the Tracker, only to find that there was still life in the shoes. The squealing that was heard had to be road grime or crud, but not thin shoes. Even with that in the past, I turned my attention to the Elco. There were a few little parts I had to put in, one of which was a two conductor plug for the alternator, and the throttle linkage for the Edelbrock carburetor to hook the TV cable from the 700R4 to. I also had to make a bracket to hold the cable. Starting with the alternator, I had to wire in the two wires, which pretty much meant wiring in the alternator. One of the wires feeds back to the battery, along with a single output line, both being of a thicker gauge wire. I routed these over to the battery, keeping things neat with zip ties. The other wire, thinner, was routed along the wiring bundle over to the firewall and into the cab. From there I zip tied the wire along the existing wiring under the dash and over to the fuse box, plugging in to one of the few remaining slots on the box. With that all done, I moved on to the carburetor bracket.
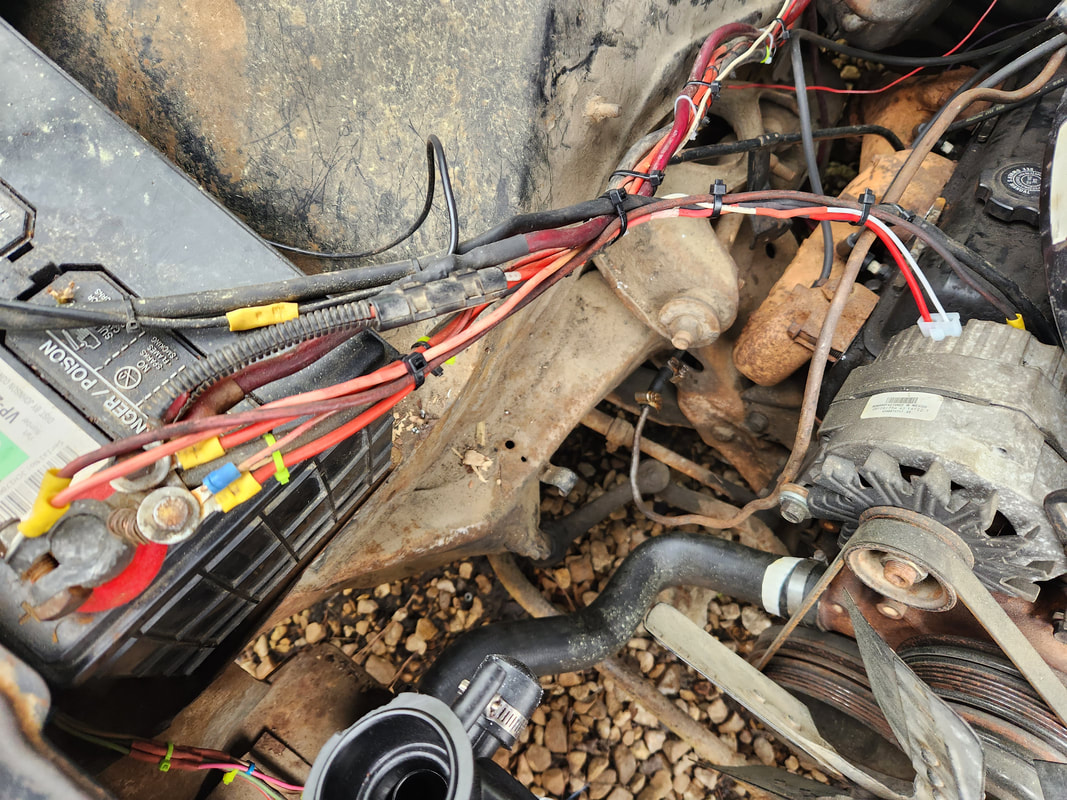
The alternator has its plug in place, along with the output cable. All wires are hooked up to the battery and over to the cab where its hooked into the fuse box, completing the circuit.
The little bracket piece that is Edelbrock specific is a little piece that bolts to the throttle on the carburetor, allowing the cable end on the 700R4 cable to snap to. I still needed to figure out another bracket that would hold the cable stationary, usually on the intake manifold. The TV cable is what controls the shift points on this transmission and needs to be in a position where the movement can be matched up to the throttle movement. This also needs to be within a sweet spot so the transmission doesn't hold a gear too long and risk burning itself up. I'll have to come up with a bracket that will at least give me the ability to make some adjustments in case the initial setting isn't optimal. 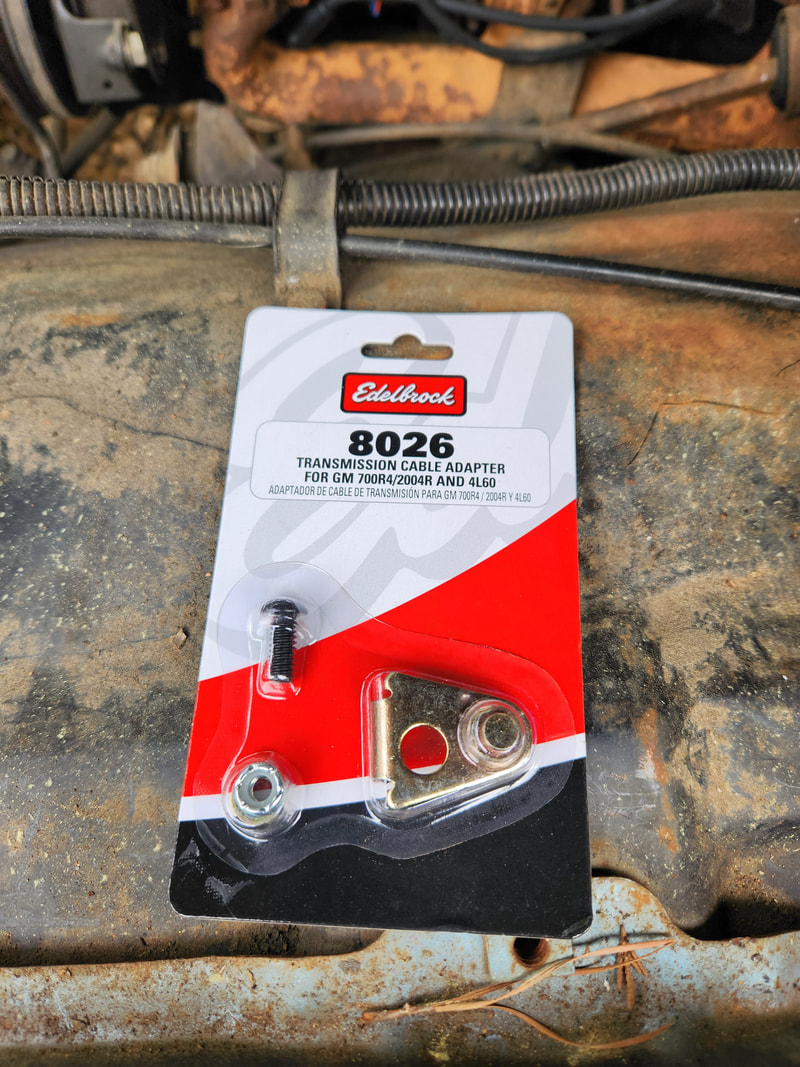
The Edelbrock transmission cable adapter that will hold the cable end to the carburetor throttle.
I was hoping to possibly find an old GM intake bracket that was used for the TV cable but unfortunately struck out. I looked through my pile of scrap crap and used the old throttle cable bracket that I pulled from the 289 on Truckstang a while back. While this bracket is hardly able to accommodate a 700R4 cable, I was able to make it work, especially with the use of a worm clamp and zip tie. I had to use the grinder to cut a slit in the side of the bracket to allow for the worm clamp to hook to. First I zip tied the front portion of the cable to the bracket, then used a worm clamp to hold the larger portion of the body of the cable. I then used a single 5/16" bolt to hold the bracket to a thread on the intake. 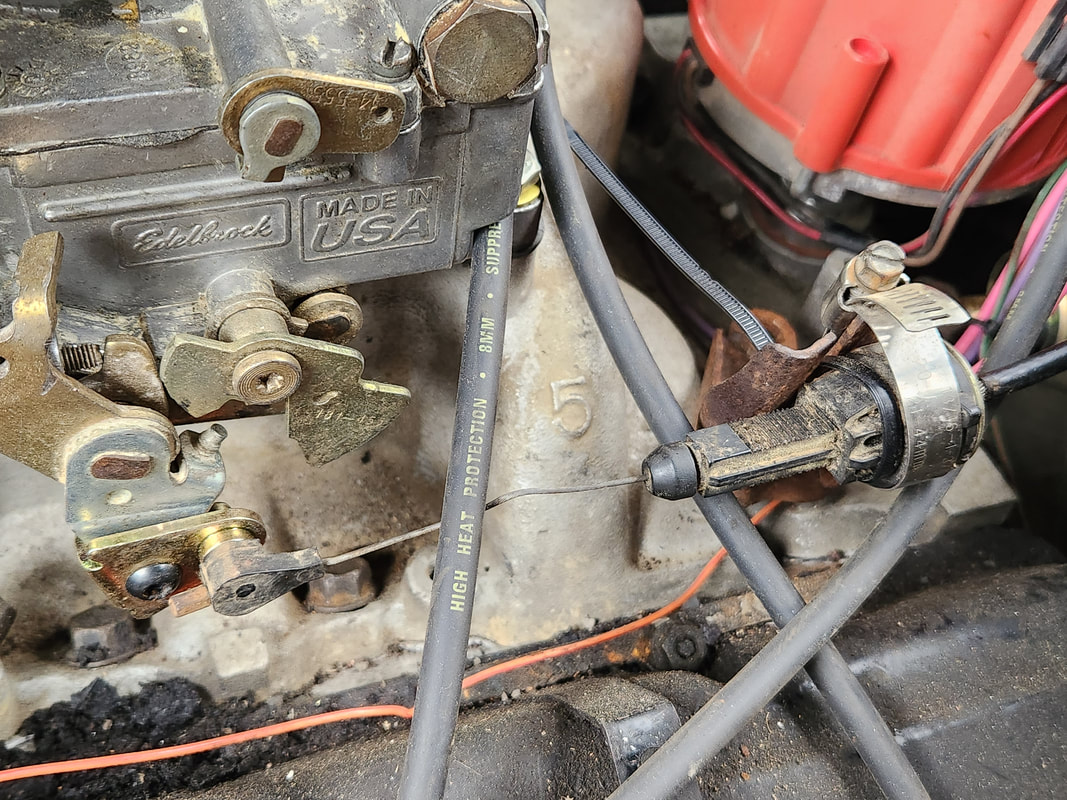
The old Ford throttle bracket is bolted in place, holding the 700R4 TV cable with the aid of a zip tie and worm clamp, while the Edelbrock cable adapter is bolted in place to hold the cable end in place.
With the single bolt holding the bracket in place, it does allow for a bit of swing, which can serve to adjust the cable a bit before the angles get too sharp for the core of the cable. With the arrangement I used, the cable is held firmly in place while being hooked to the carburetor. Of course, the only way to determine if everything is good will be to drive the car, and of course that will not be happening any time soon, at least until the rest of the vital components are hooked up. One might ask, why not buy the dedicated cable bracket or this setup? Well, just like the cable adapter, these things are ridiculously expensive. Now, its not to say I wouldn't get the proper bracket one day, but right now, we're going to work with this makeshift crap, we have other things to dedicate money to.
After the fun debacle on the Scion with the motor mounts, there was another thing that needed to be addressed, and that is the mirrors. One mirror was damaged by an impact with a flying bird while the other was more of a mistake, accidentally misjudging distance from the fence post and not realizing it until it was too late and crack! Another online order and a week later, a new pair of mirrors was in hand. This job would be rather easy as the replacement of the mirrors is just a matter of popping a cap off the inside of the door to expose the three nuts holding the mirror in place, and unplugging the wire harness. 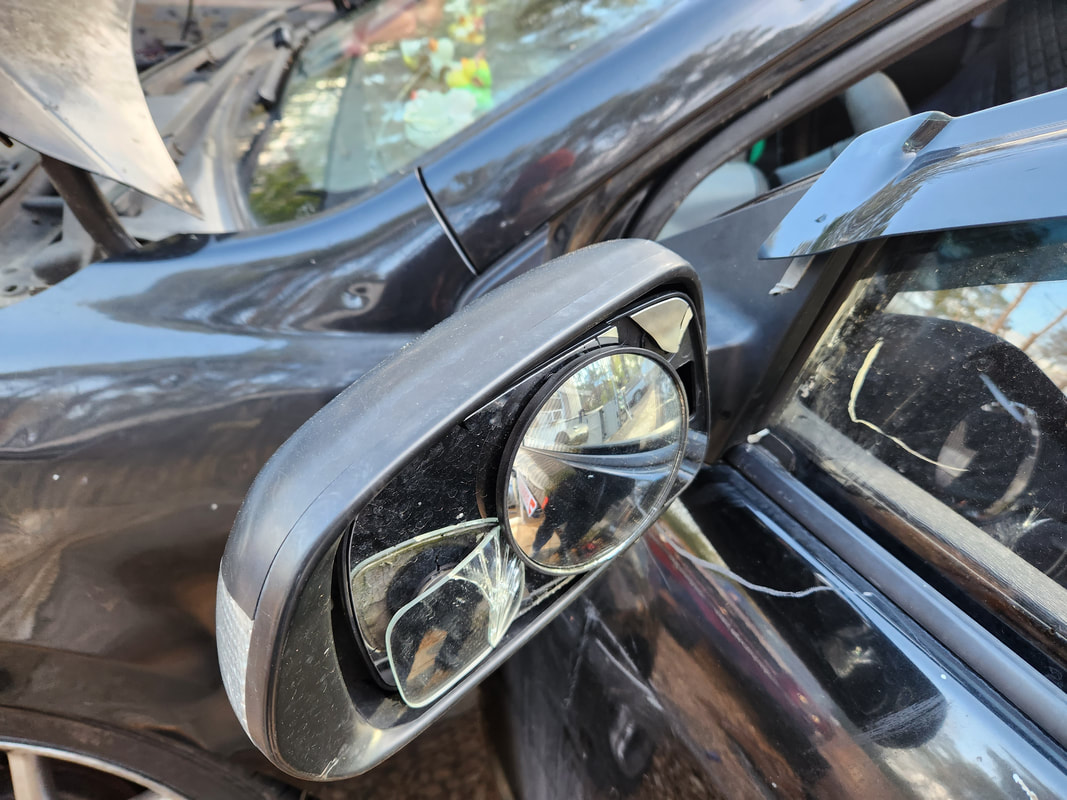 Left mirror in its current state after the "damage". The large round mirror was installed as a crude backup until the replacements came in. 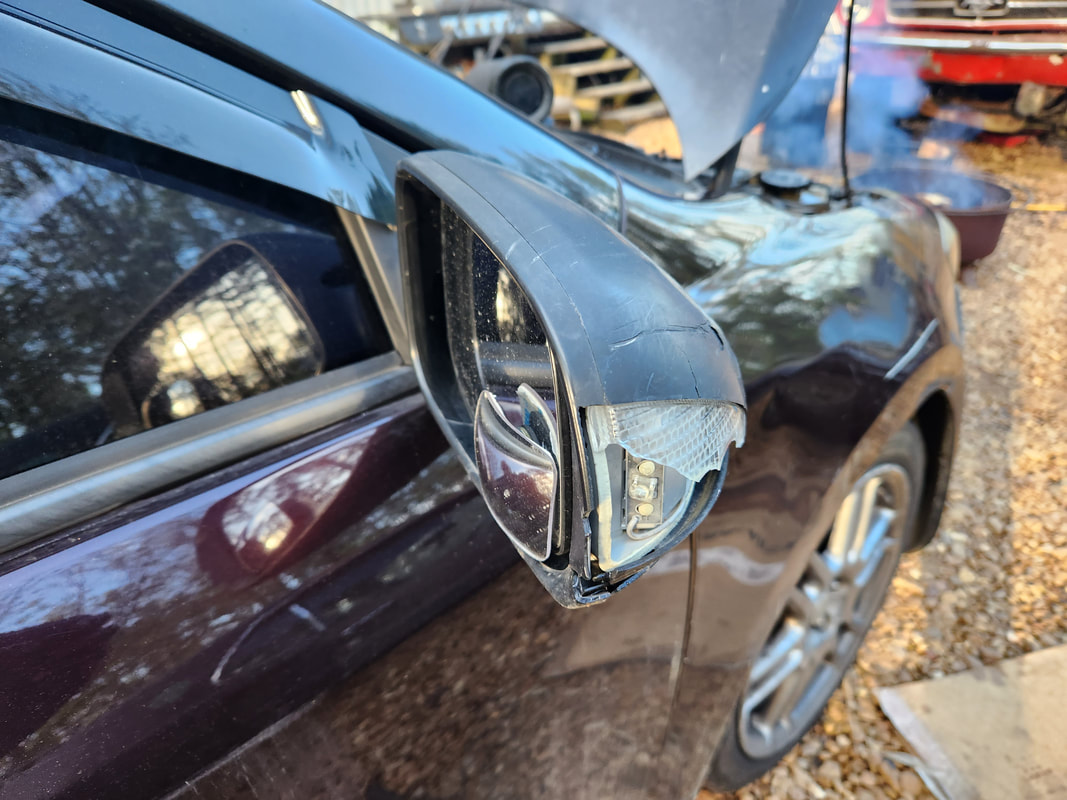 Right mirror with broken light lens and cracked shell. After removing the mirror, I did have to scrape some old foam insulation strip from the door body before applying some new insulation that came with the mirrors. This would seal the area around the stud holes and the hole for the wire harness. One of the studs broke off on the left mirror and required me to use vice grips to hold the inside part of the stud to allow me to break the nut free to remove everything. Once that was done, the right mirror took no time to replace as there was no broken components other than the light lens portion on the body. After the motor mount job, getting this job done super fast was a breath of fresh air. 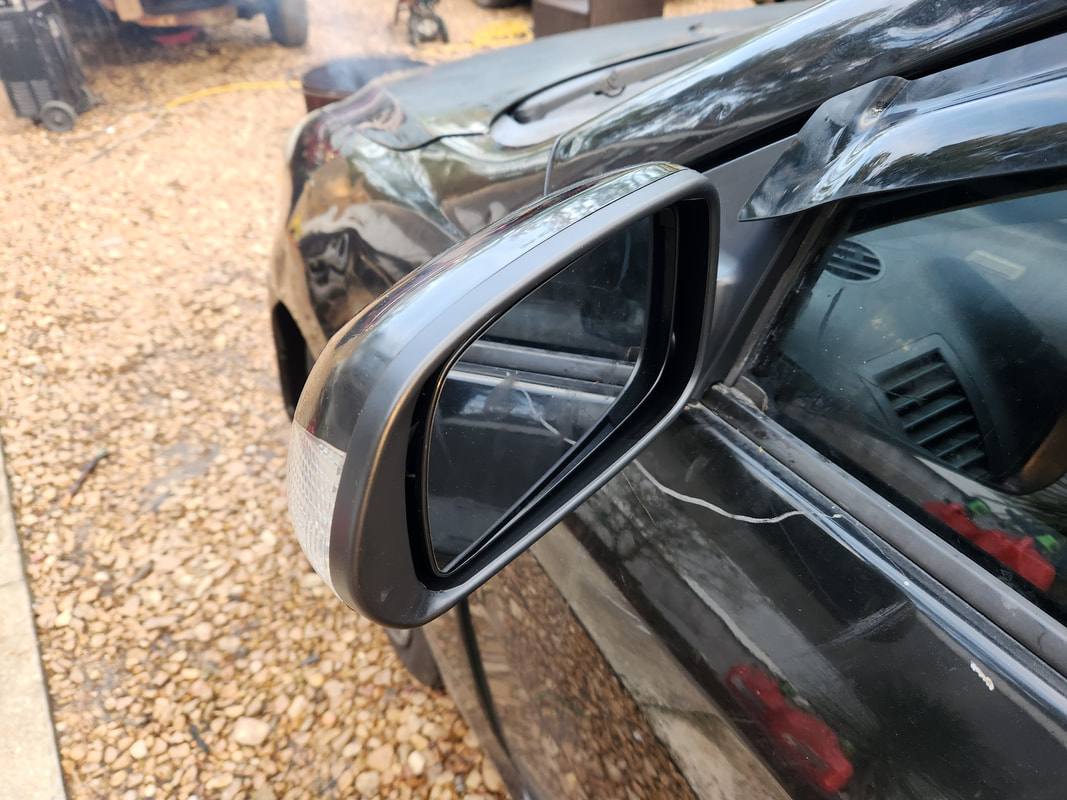 New left mirror fully replaced and ready to go. 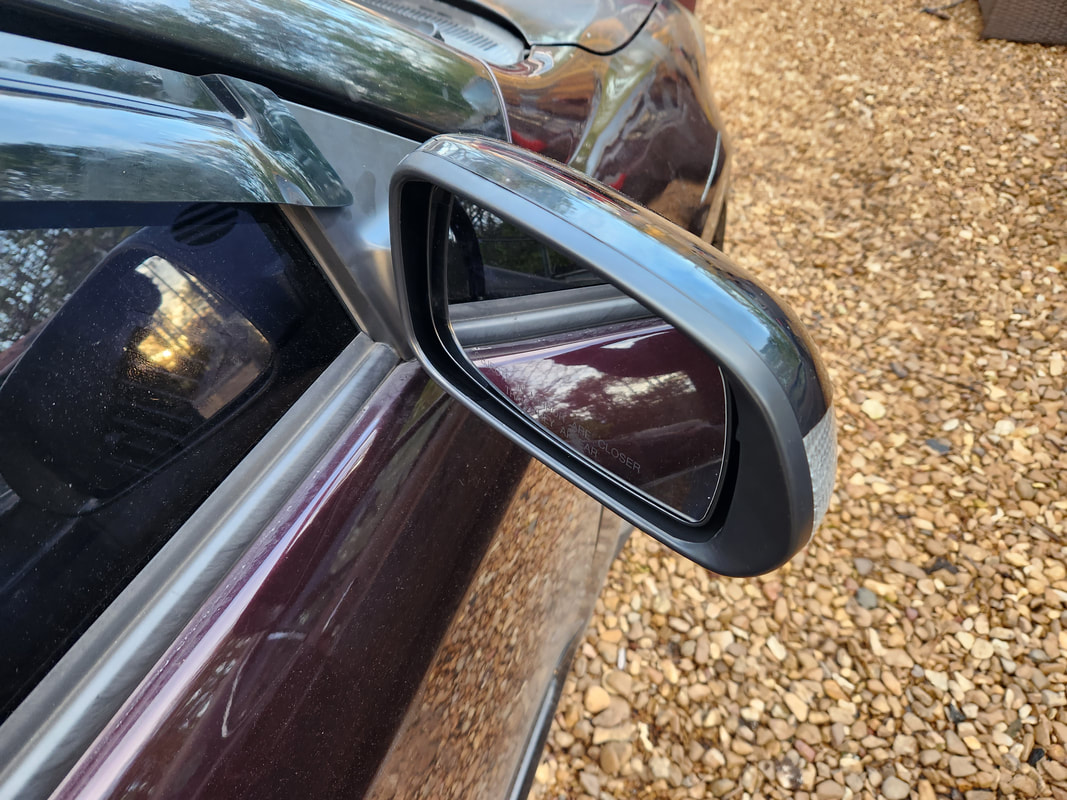 New right mirror fully replaced and ready to go. With this job done, there's a couple other little things left to do in the world of daily drivers. I have to check a rear tire for a slow leak and replace the rear brakes on the Tracker. I really need to look at the rear brakes on the Scion just as well but the Tracker is more serious as its making noise. I want to get this work done so I can get back to the projects, namely the Elco and Truckstang. |
