|
After getting a replacement carburetor for the Deere I was able to get the machine put back together to the point that we can test crank the thing to see if it'll start up. We had already found a replacement oil filter, spark plugs, fuel filter and oil for the Briggs engine that's in the machine so we were able to get all of those things swapped out, just leaving the old carburetor to replace. To replace the carb I had to assemble the intake tubes on both sides of the piece then bolt the whole assembly up to the intake port on the engine block. In the process I hooked up the throttle and choke linkages so when the assembly was secured everything would be in place where its supposed to be. The fuel line topped off the system. 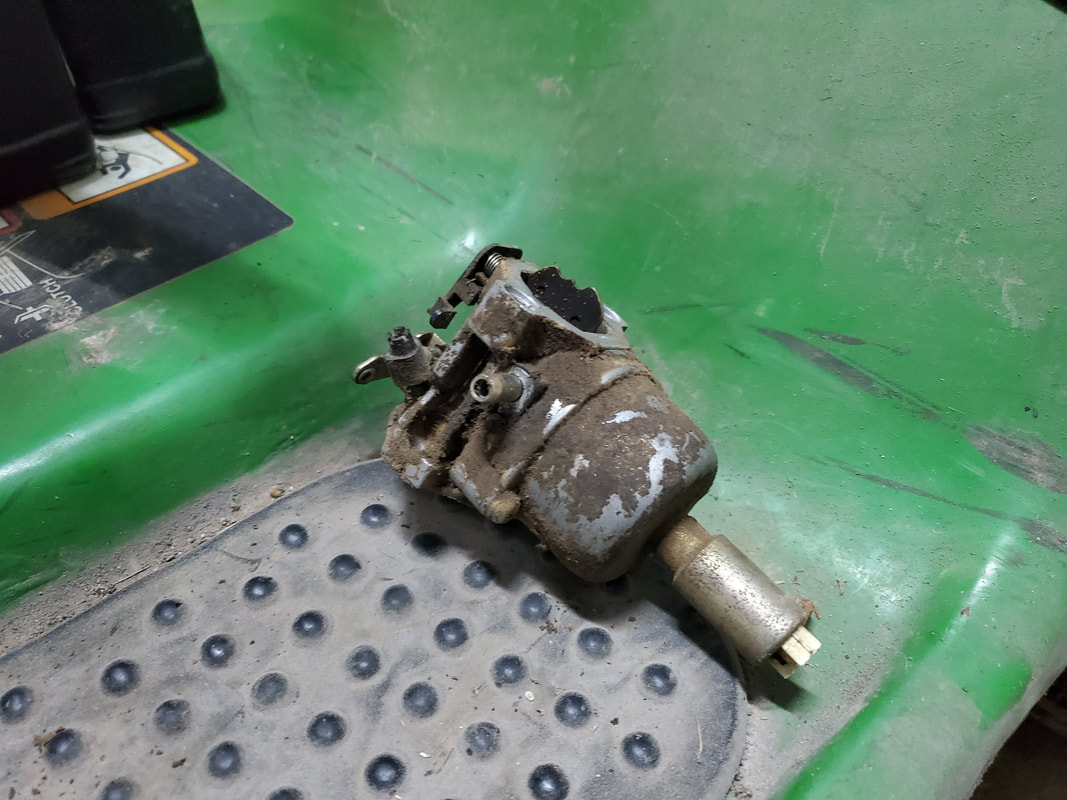 Old carburetor in its pitiful state sitting on the sidelines while we replace it with a fresh unit. 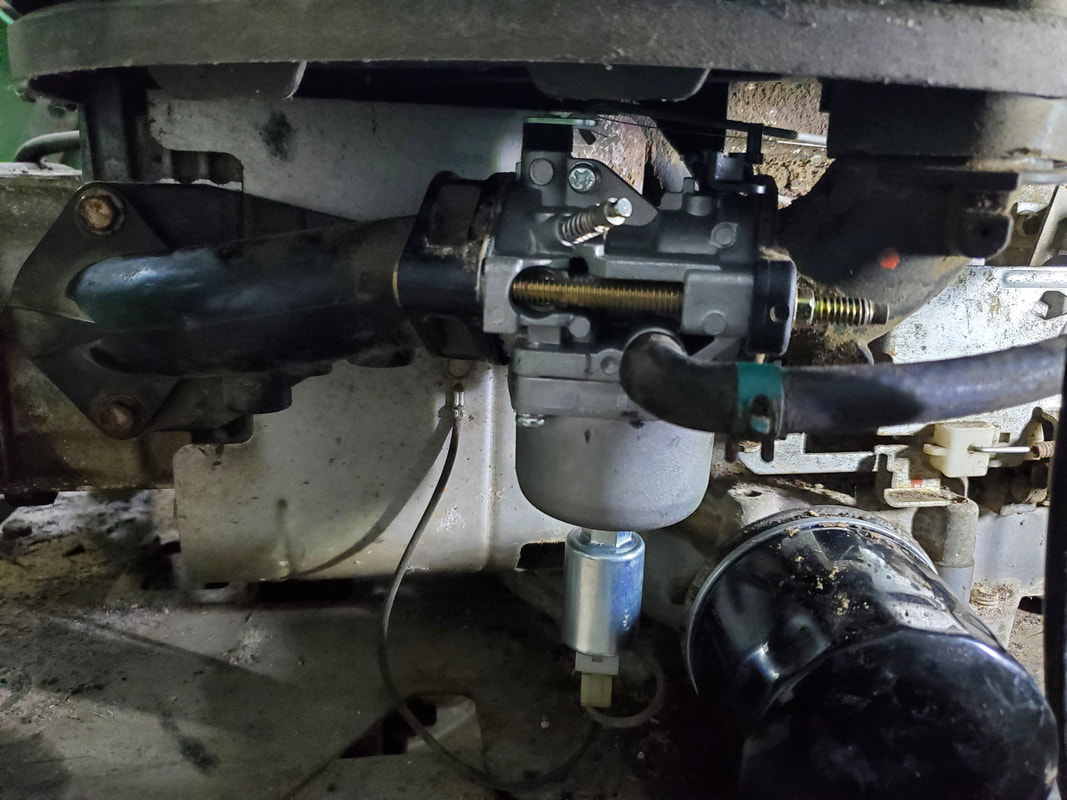 New carburetor installed and ready to go. Since we still need a battery I decided to do a more or less bootleg hookup using jumper cables and a spare car battery we had laying around on a trickle charger. After hooking the cables up to the battery cables on the tractor we attempted to crank the thing over. All we got was a click from the solenoid and a vain attempt at the starter trying to turn. After a couple of attempts I tried to and successfully turned the engine by hand from the top of the engine just to verify that the engine wasn't seized up. After trying to crank again unsuccessfully, I put the jumper cables right on the starter, trying to clamp on to the starter's lug to make it fire right off the battery. Still no luck. On the exhaust stroke of the engine the thing would turn a little until it hit the compression stroke then stop dead in its tracks. I removed the starter to see how it acted under no load conditions. When I hooked the cables to the starter the thing turned in a weak state like the battery was low, despite the battery being pretty hot, and a car battery which is probably 5x as powerful as the puny battery that is normally in the tractor. So that tears it, the starter's shot. So now its back to the interwebs to order a new starter.
0 Comments
In keeping up with my quest to clean up the grounds around the compound I turned my attention to an area that has long since gotten overgrown due to the idea that there was never any need for us to move over this area. That area is a small patch of ground where I kept collected pallets that we salvaged from various spots over the years. In the past we did utilize some of these pallets, with the last time being when I staged firewood over in the area where we currently have a more permanent firewood staging area. Only problem was since the pallets were right on the ground they soaked up moisture quickly and rotted away to useless piles of punk wood that were good for nothing but starting a brush fire. This is the same case with the small stack of pallets in this long since forgotten area of the greater yard. Well I decided to kill three birds with one shot here. After having several trees brought down in the back of the compound area, what I've coined the term the Fallen Trees as they are all stacked pitifully at the back of the clearing of the greater yard, I now have several stumps remaining that for all intents are in the way. While they aren't a problem right now, in the future I may end up setting up more outbuildings in this unused section of the compound and these stumps will need to go. Also since I would like to clear the greater yard that will be outside of the compound, one of the areas that will need to be cleared to make it easier to run over with the zero turn lawn tractor is the area with the old pallets. And to dispose of approximately 20 pallets of various sizes, this will involve fire, lots of fire. And why waste this wood just burning it all up uselessly? I decided to start breaking the pallets up and stacking the wood up around the stumps to make little teepee fire piles that I'll fire later on once all of the wood dries more. Some of the stumps have already been drilled and filled with stump remover powder so along with the pallet wood and some diesel fuel, hopefully these stumps will burn down nicely. First things first though, I had to cut a path to the spot where the pallets were staged at so I can get to them safely without the risk of stumbling on a snake or wasp bed or what not. With the help of the weed eater and some shears I slowly made my way in to the pallets. 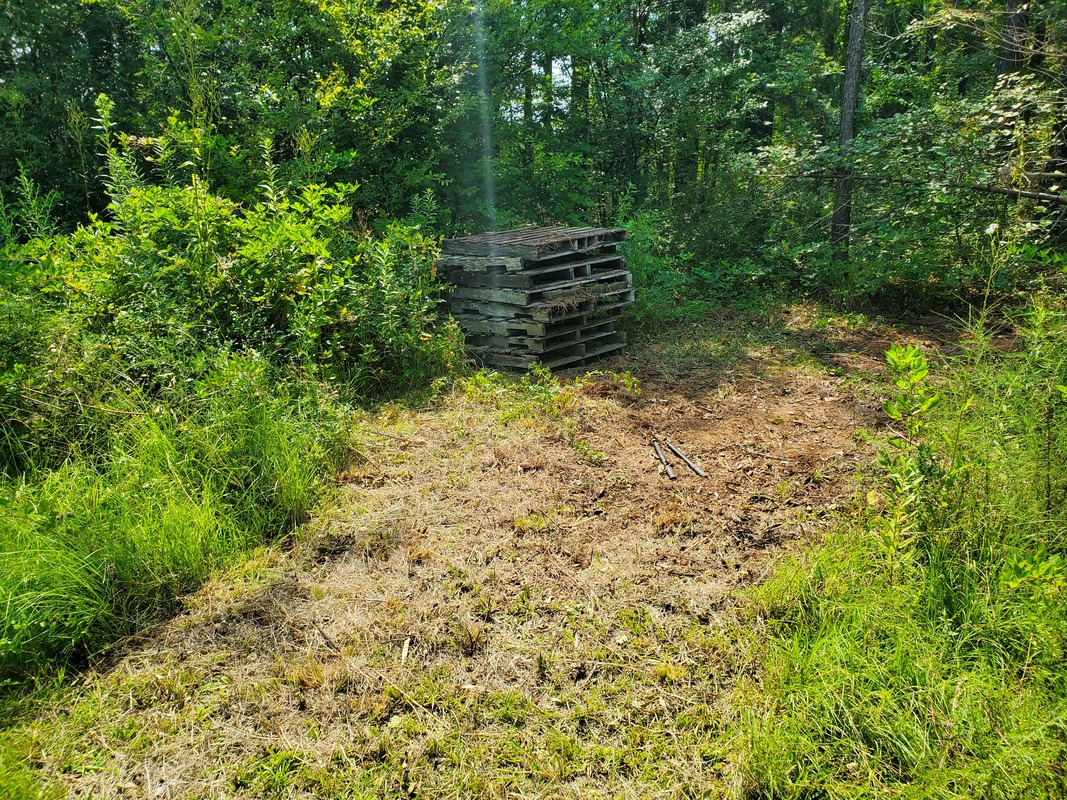 Path cut to where pallets were staged at. Some pallets on the ground have already been cleared from the area. Some of the first pallets I reached were pallets that were already falling apart to the point that they had to be removed in pieces as they weren't really full pallets anymore. These pieces are what started the pyres around the stumps as I advanced into the pallet pile. As I managed to fish out larger sections of pallet, I started a new pallet pile near the stumps where I will slowly cut up these larger sections of pallets into more useable pieces of wood that will be stacked around the stumps, most likely after the first burn is done. Plus this will give the wood that was on the ground time to dry in the summer sun enough to be able to burn better. 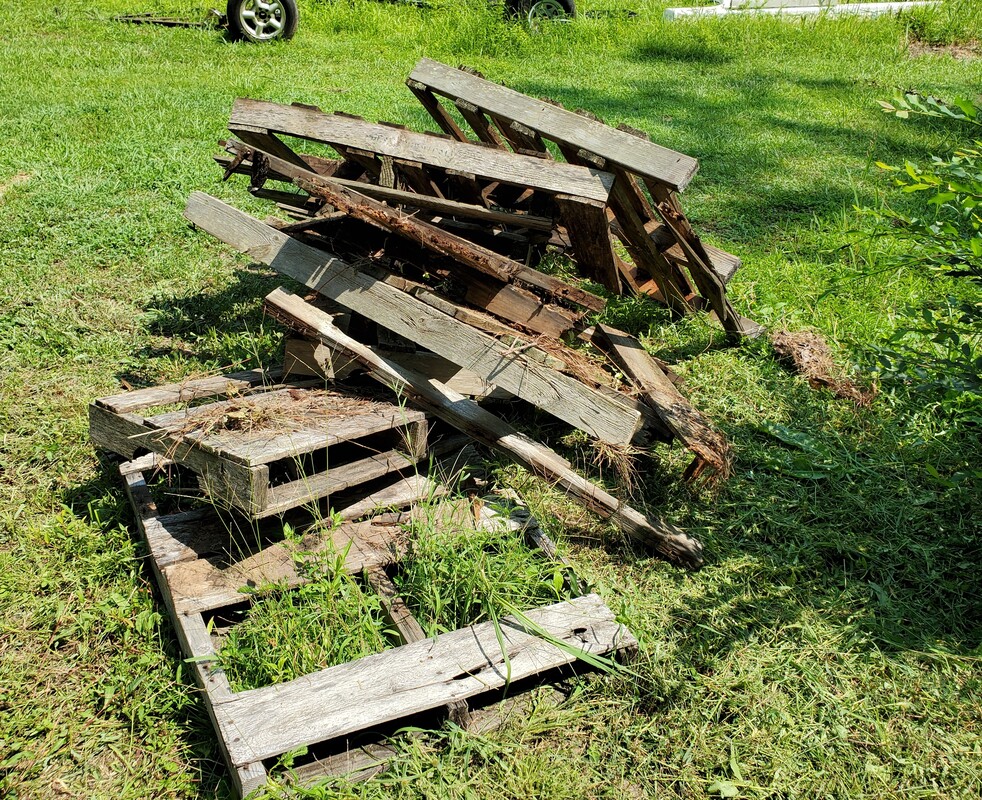 New pile of broken pallets staged near stump pyres, awaiting further cutting up for use as firewood in future burns on the stumps. I took time to pile up a sizeable amount of scrap wood around a single stump before moving on to the next one. I wanted to make sure to have a fair enough amount of wood around these stumps, especially the ones treated with the stump remover. I'll probably soak the piles with some diesel and oil mix before actually coming back to them and soaking them again to fire the piles to ensure there's enough "fuel" soaked into the fuel to ensure a good burn. 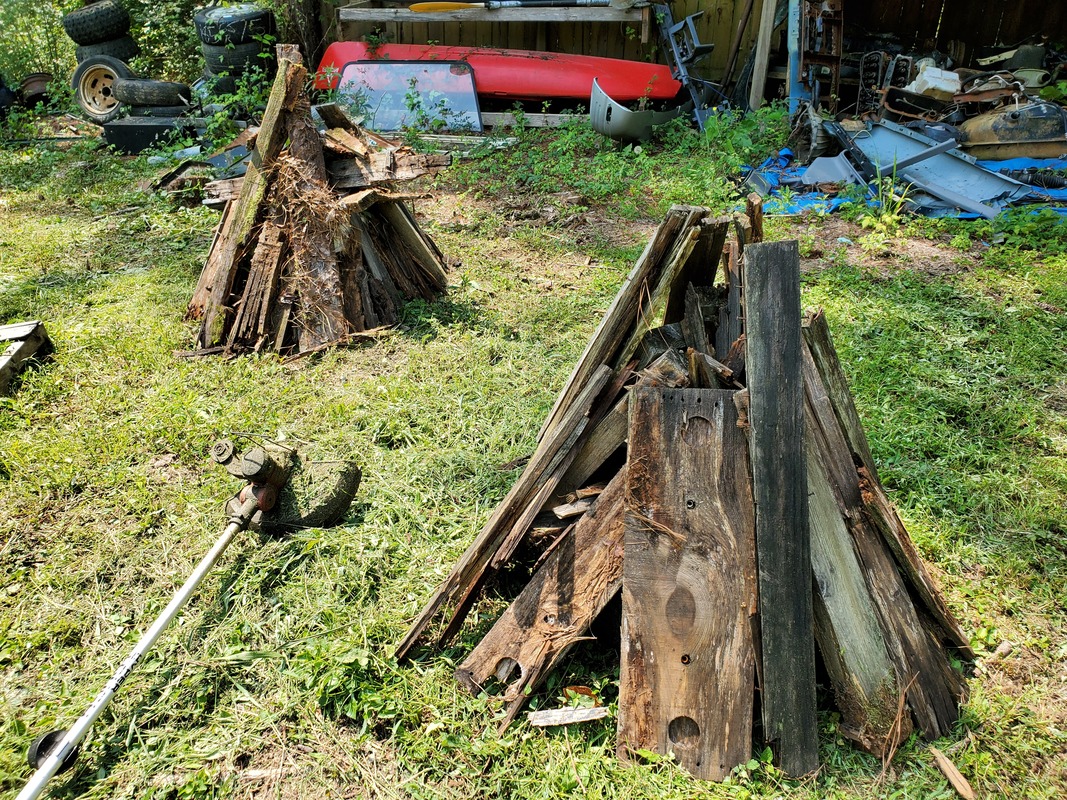 Pallet wood teepee pyres set up over tree stumps. Note weed trimmer in left foreground used to clear high grass from around the area. 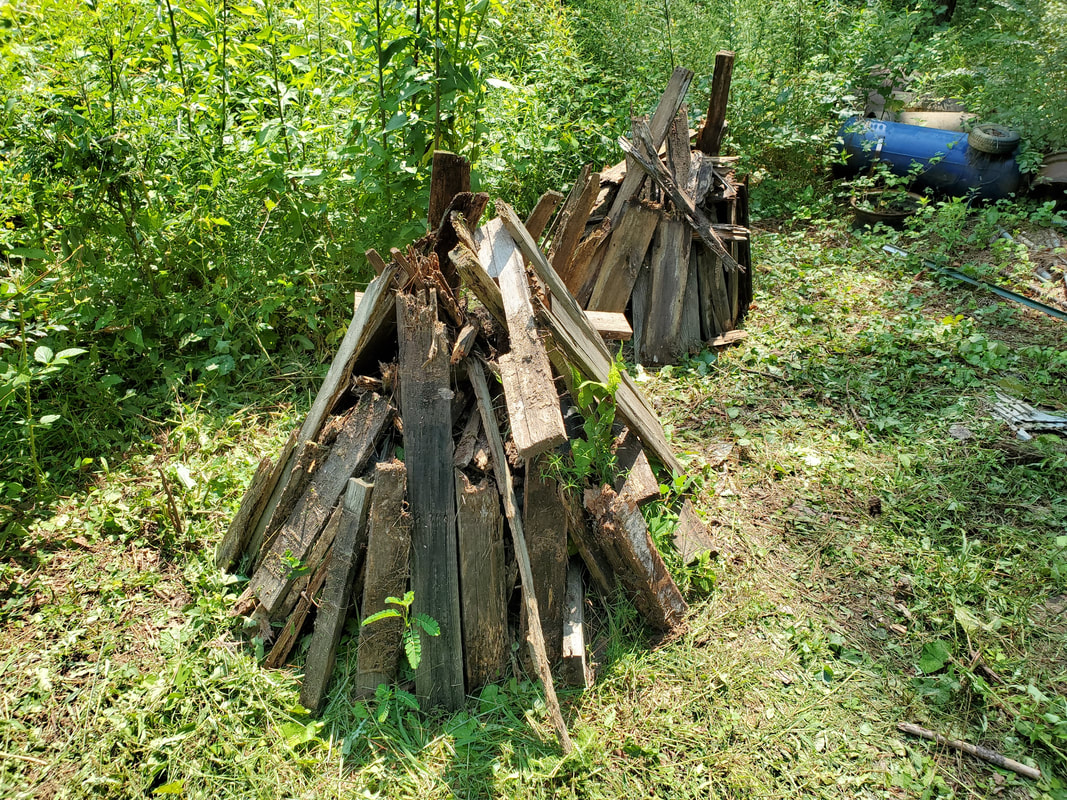 More stump/pallet wood pyres set up near grass line. As we burn these stumps I'll clear more high grass to expose more stumps and open this area up some more. Because of how I have to dig up pieces of pallets and further cut grass from around stumps as I finish covering one then moving to another, this little job will take a little while to complete. But after I clear the pallets from their old spot, I'll have to take some time cutting the wood up into pieces then still staging the wood away enough that the wood won't spontaneously ignite when burning a stump. Once the area's cleared I can focus on burning stumps and further disposing of the pallet wood, along with any other scrap wood I may dig up from around the area, such as fallen branches or project refuse. After the pallet area is cleared and the stumps have been burned away I'm going to turn my attention to another long since abandoned area, the old pig yard. That area has been unused for over 5 years. It's fully overgrown but still has a camper shell and some fencing around what was the pig yard. I'd like to recover the camper shell just to sell it and clear the fencing and posts from the area so along with the old pallet staging area, this area will be better set up to just drive over with the zero turn for a quicker cut versus trying to cut around it with hand held equipment. My goal is to expand the size of the open area outside of the compound for when we have to do things like turn trailers around or pull the F250 or other large truck through with a trailer going through the east gate. Having that area opened up more will allow for more maneuverability with vehicles and equipment. The work continues.
A good while ago I had assembled a micro irrigation system to water several drum planters and raised beds that we had established last year. While this system worked perfectly, I wasn't ending there. We were and are still expanding the garden, adding raised beds where there was just raw ground and old tire planters. Either way it goes, we're gonna need more irrigation to handle the expanded load.
I started setting up a plumbing system consisting of a bunch of scrap PVC pipe that I had on the shelf. Since this pipe was of various lengths, I used a number of couplings to be able to cover the span of distance from the solenoid all the way over to where the Dog Kennel Greenhouse is located. I also had to use several tees for the four way junctions that will feed the 1/4" rubber hose that'll feed the sprinklers to be used later on. I got as much of this done as I could with the available materials I had before stopping. With that when I ran out of resources this project went on the back burner. Fast forward to today and with the Dog Kennel Greenhouse going into its advanced stages and the addition of more and more bucket beds, I needed to get this expanded system completed since we had to water the newer beds by hand for a while. I made my lists and started getting supplies to get this system done. Some of the stuff needed would also include more pipe since I had to be able to reach around the greenhouse to the east side to be better able to get the spigots situated for the newly added drum beds as well as the spigots for the greenhouse itself. 
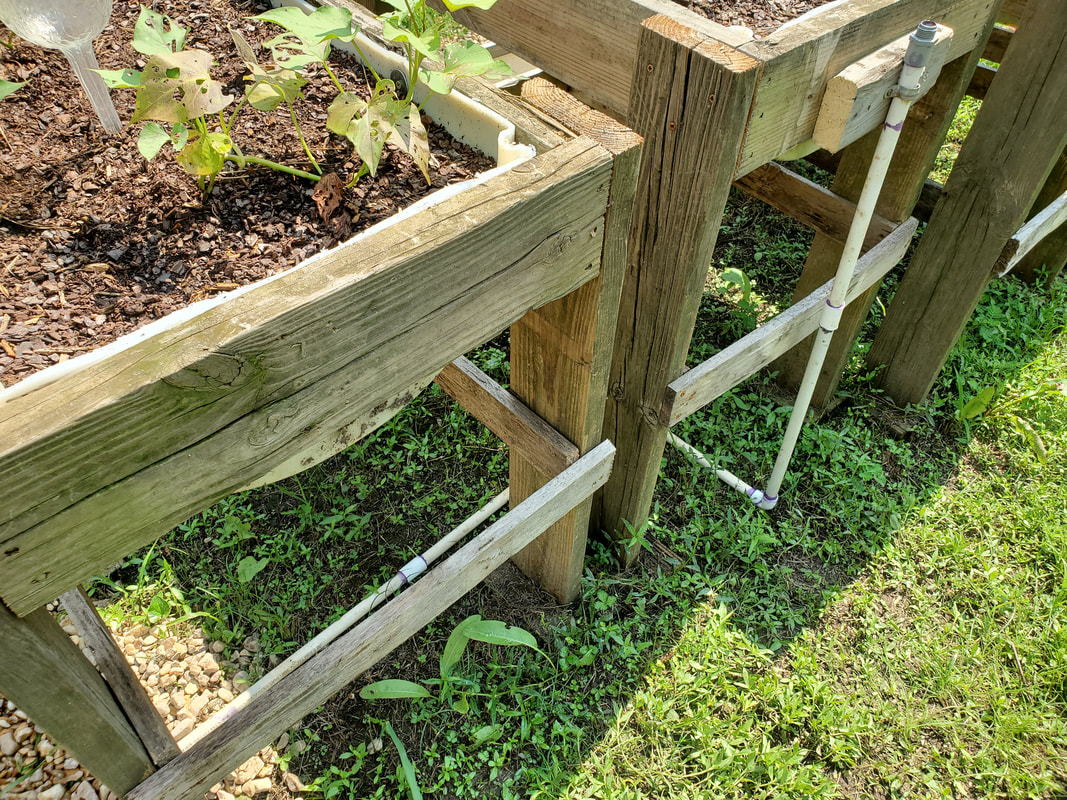
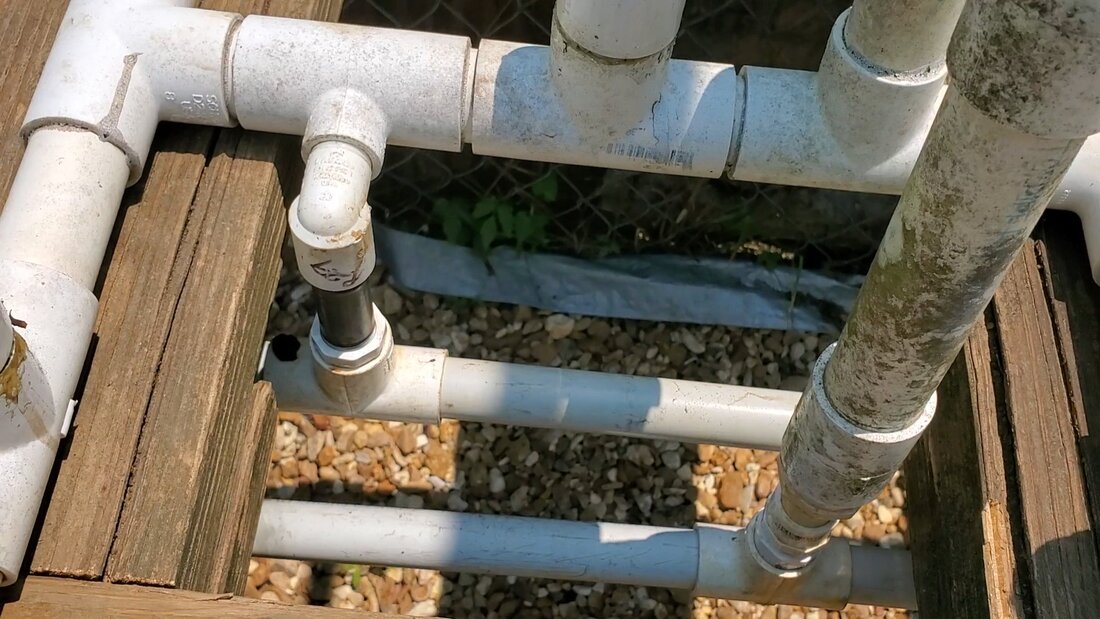
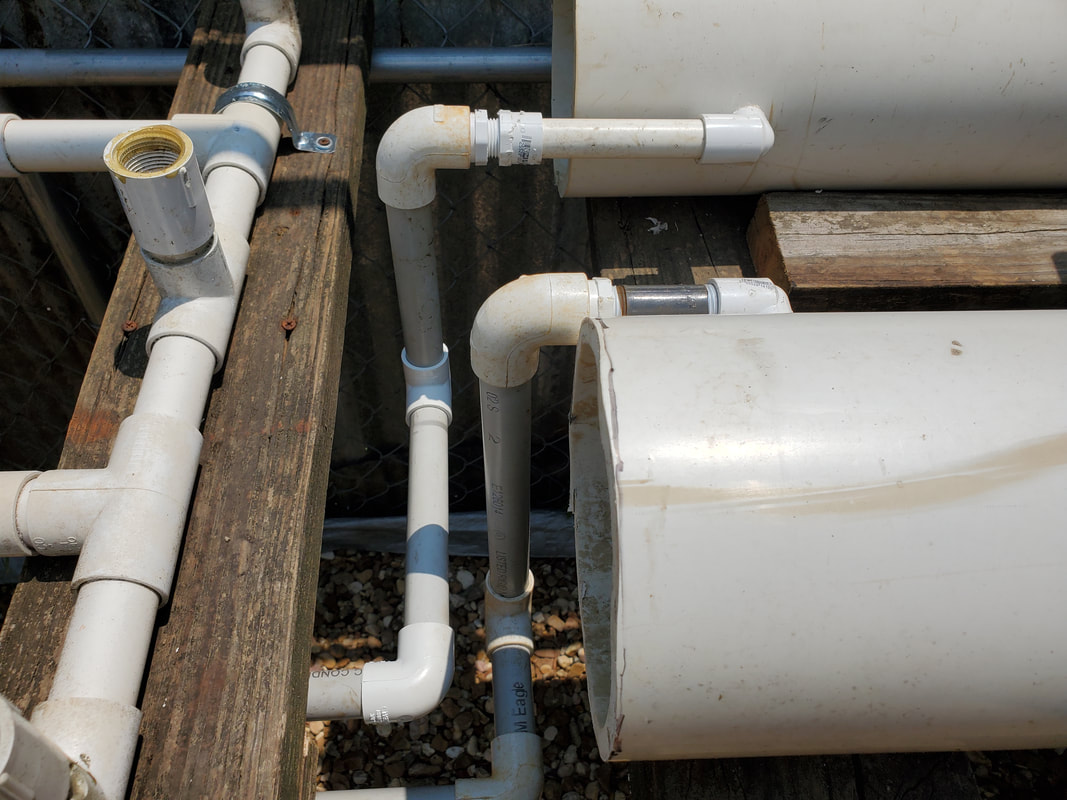
Completing the pipe run going around the greenhouse. Conduit straps were used to hang the pipe on the corrugated sheet metal of the greenhouse using self tapping screws.
PVC pipe line running around the east side of the greenhouse, again, using conduit straps to hang the pipe against the greenhouse walls.
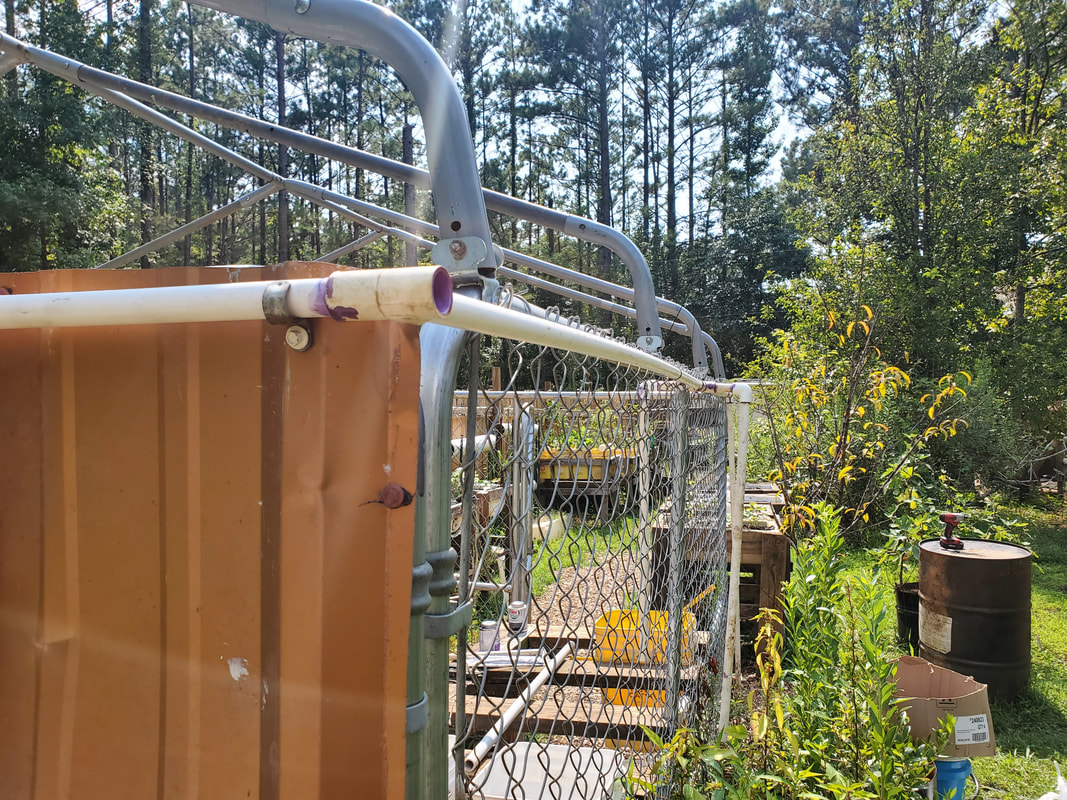
PVC pipe going around the north side of the greenhouse with fittings to allow for future expansion. Note conduit strap holding pipe in place.
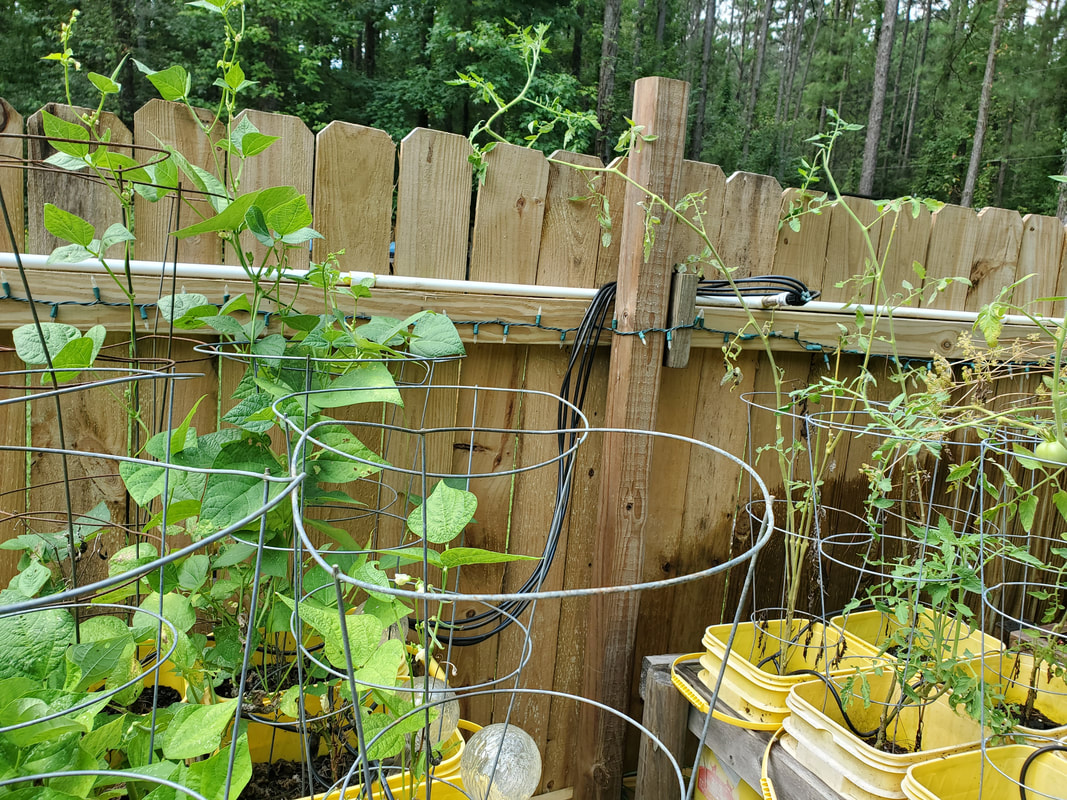
With the rest of the main irrigation pipe set up around the greenhouse I started adding the fittings that include the four way splitters for the sprinkler hoses. I added a spur line at the beginning to go into the greenhouse through a hole drilled through the sheet metal wall and added a four way fitting there. On the North side of the greenhouse I added two tees that terminate with four ways for the five drum planters outside of the greenhouse as well as going through the not yet covered north wall of the greenhouse to terminate over the shelf that will contain a bunch of bucket beds. I also added a four way fitting at the end of the pipe that hovers over the two strawberry beds on the west side of the greenhouse. 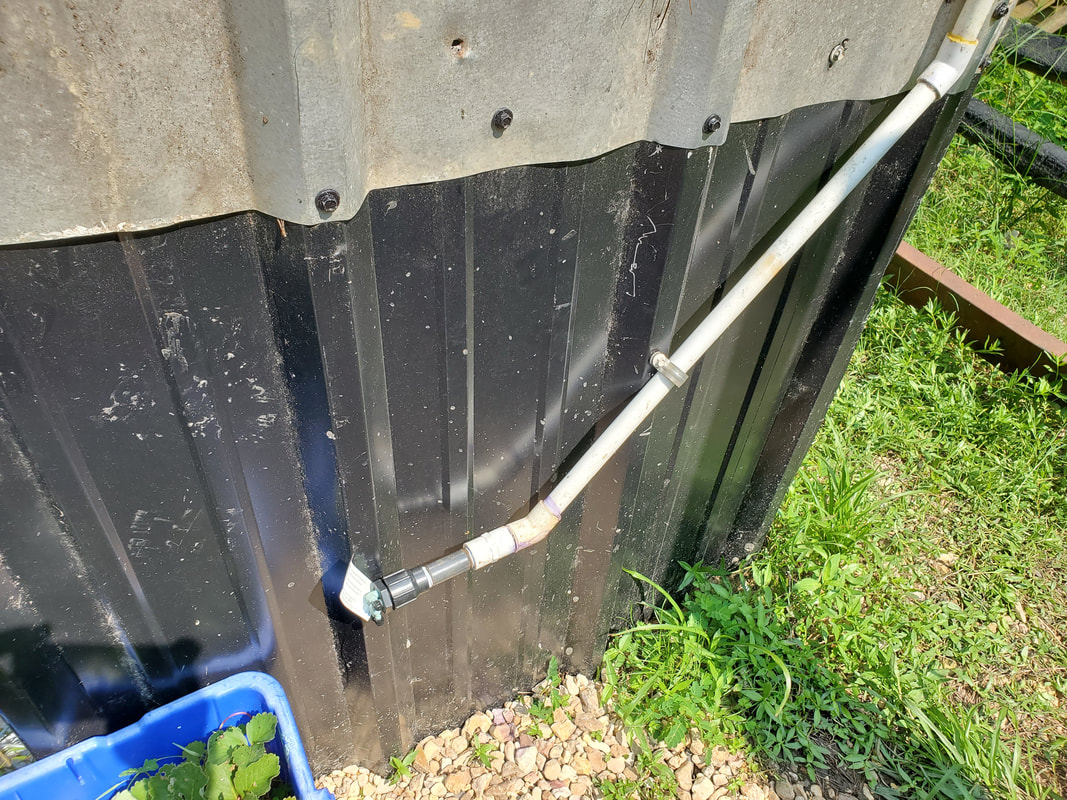
Spur line and fitting to accommodate strawberry beds. Note conduit strap holding pipe to wall.
Another thing that I had to consider was being able to get a water line to the set of drum beds that are in the "middle" of the garden, not against the fence. This set of beds is a few feet from the greenhouse and close to the pipe line that runs along the north wall of the greenhouse. To take care of this I added an elbow and ran the pipe down the corner of the greenhouse to the ground then ran a pipe along the ground, taking time to dig a shallow trench in the gravel to set the pipe in and running the line over to the set of beds. More elbows bring the pipe up the side of one of the beds in the middle where it stops at the top where I terminated the deal with a four way fitting. 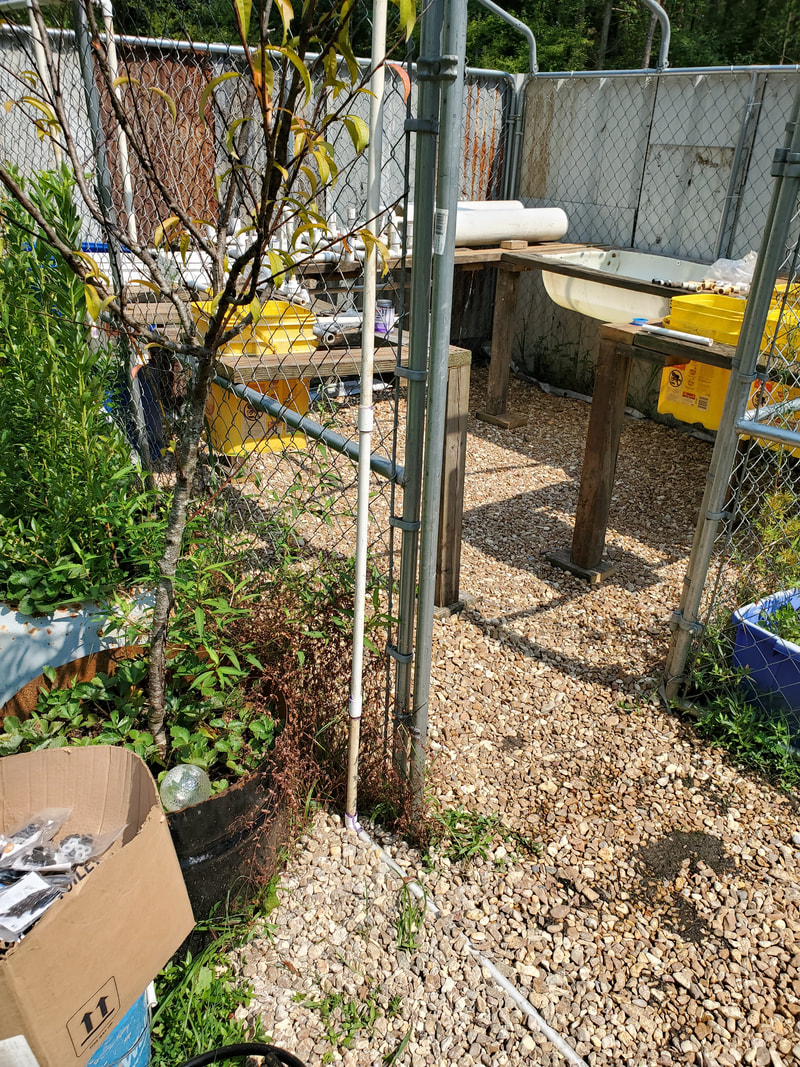
Water line going down to the ground along the corner of greenhouse.
Pipe line partially buried in shallow trench in gravel bed as it goes to set of drum beds.
Pipe line running under drum beds and angling back up to top of drum beds to terminate with a fitting.
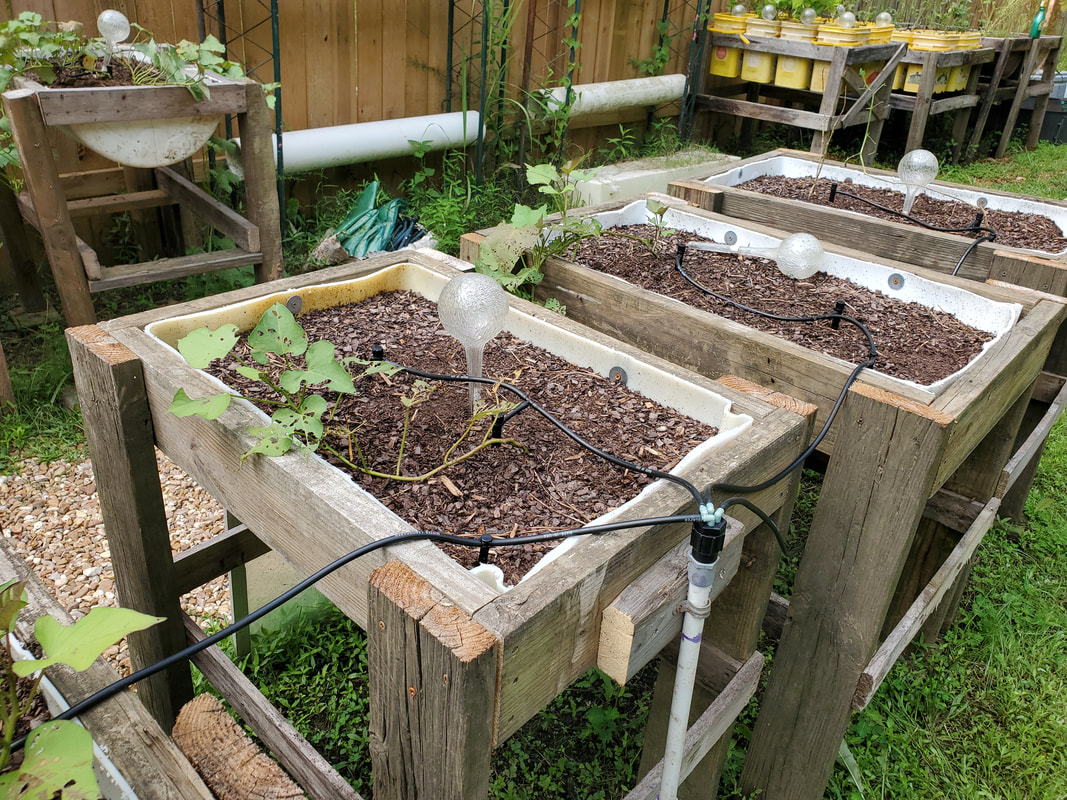
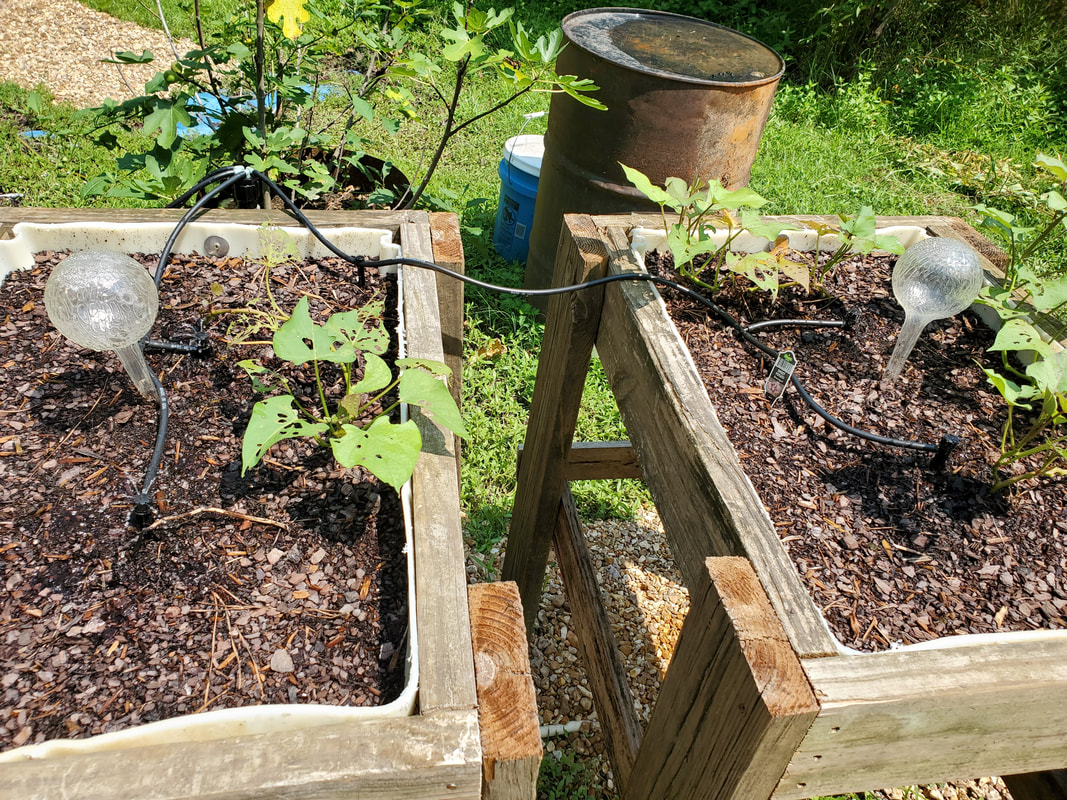
Four pack of drum beds with sprinklers in place and hoses hooked up to four way junction.
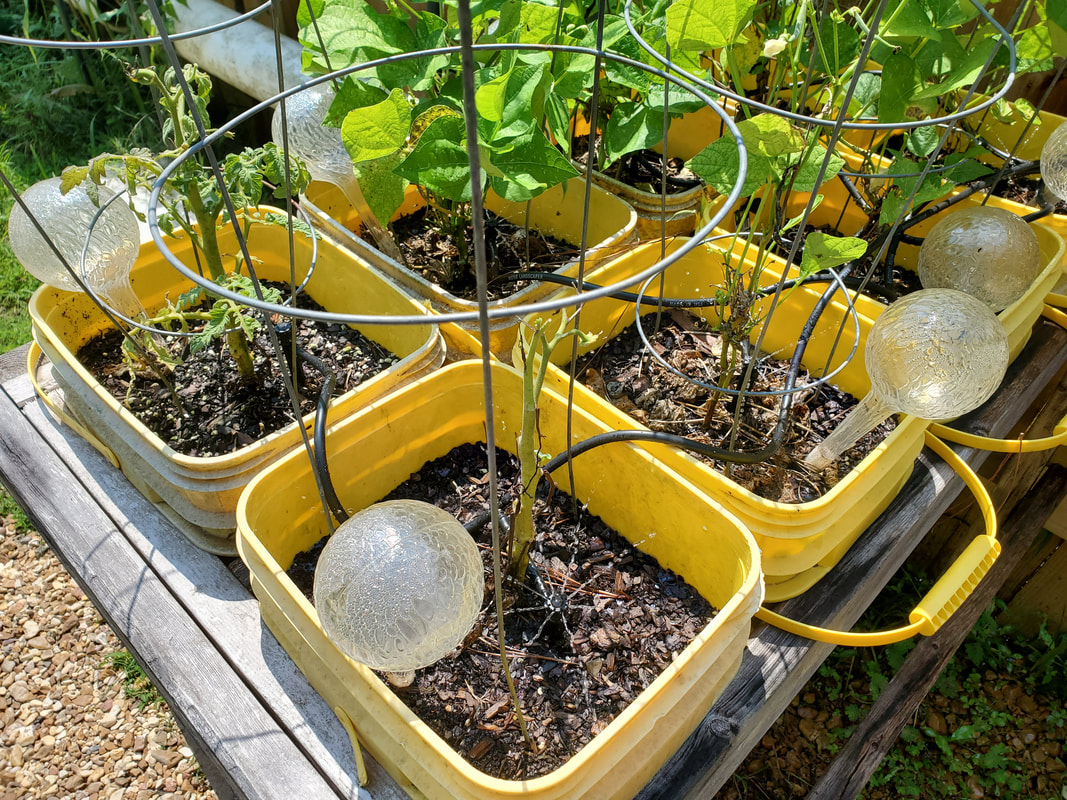
Of course at this point the next move is hooking up the sprinklers and hoses for the four way fittings. I still had a fair amount of micro irrigation stuff so I was able to get some sprinklers and hoses hooked up in some of the beds. I had to make a trip to the store to get some more hose and extra sprinklers to take care of the other beds so with that I was able to get all of the beds hooked up to the expanded irrigation system. Most of the sprinklers used are the smaller 360 degree units that spray six small streams of water out for a slow release of water versus the larger micro spinning sprinklers that spray a rather large amount of water out in short order. 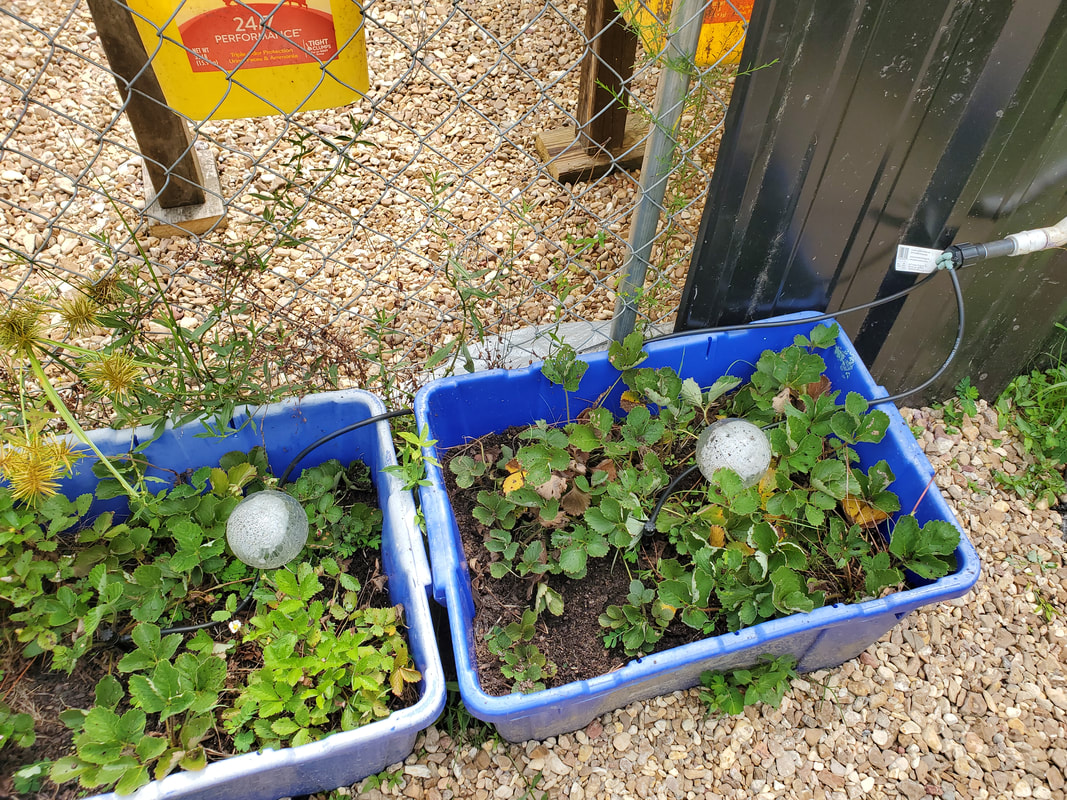
Strawberry beds with hoses running to small sprinklers within each bed.
Trio of drum beds with hoses running from four way junction to two larger sprayers on the left two beds and to two smaller sprinklers on the right most bed.
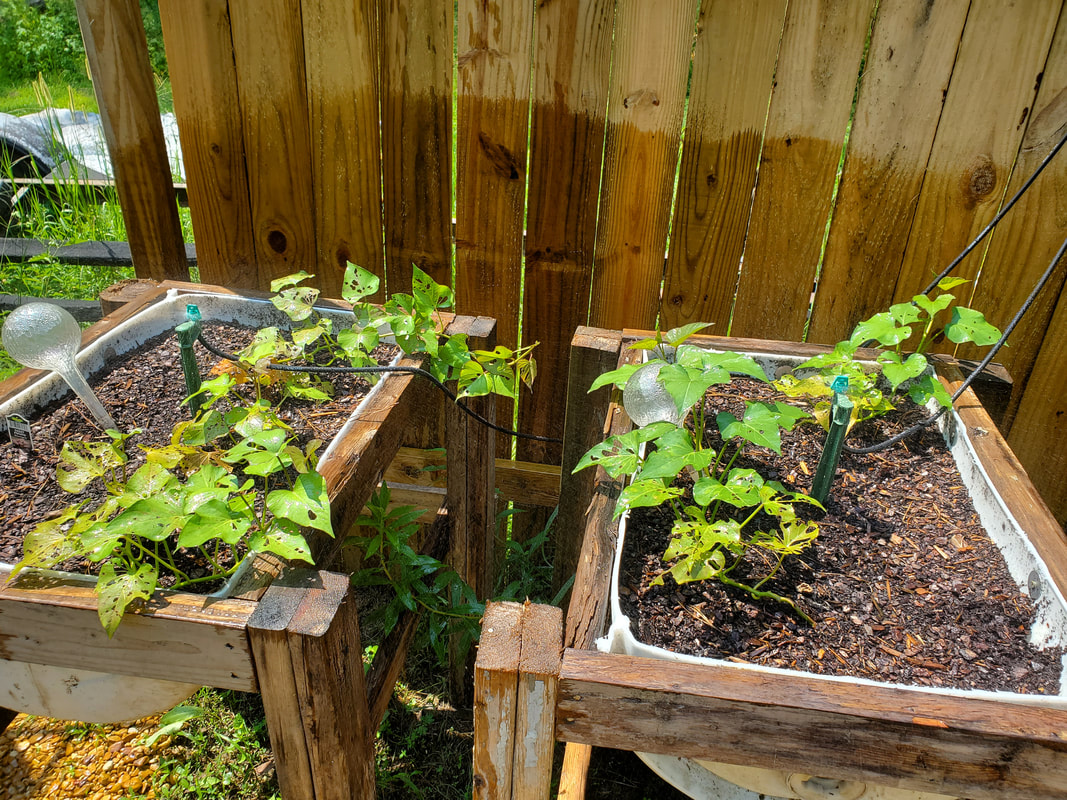
Four hoses coming from another four way junction going to bucket bed of eight buckets. Each hose feeds two buckets, each with a smaller sprinkler within.
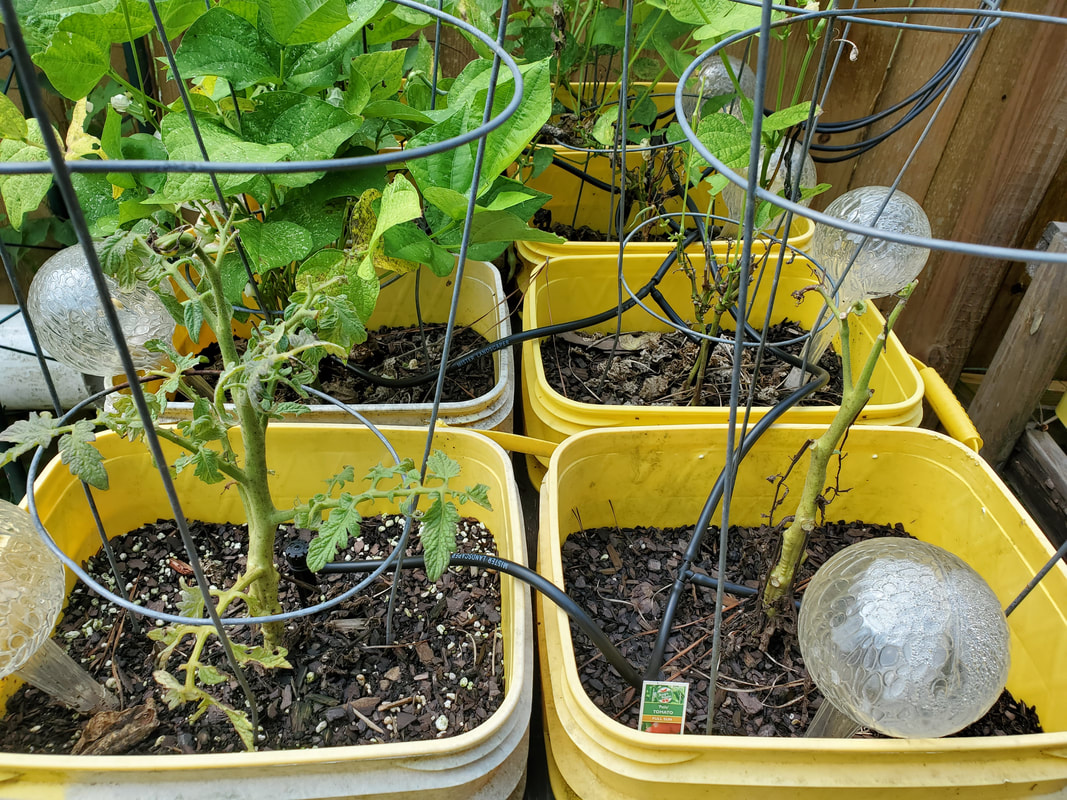
Bucket raised beds with plumbing hooked up to link eight sprinklers to four outputs.
Another little thing I wanted to do before I hooked up all the lines for the five drum planters along the north side of the greenhouse was lay down some plastic on the ground butting up to the greenhouse wall. This was to set things up for weed control after I lay some gravel down and by having plastic on the ground it'll make it a lot easier to control an errant weed that does pop up between the drum planters. I still had some of the tarp left over that I used for laying the floor in the greenhouse so I cut a strip that was long enough and wide enough to cover the 10 ft of the greenhouse wall and the 3ft of width that would allow me to put the drum planters on. After moving the planters out and pulling up the weeds that were on the ground up to the greenhouse wall I laid the plastic down and moved the drum planters back on. Just a little something towards making care of the garden a little easier. 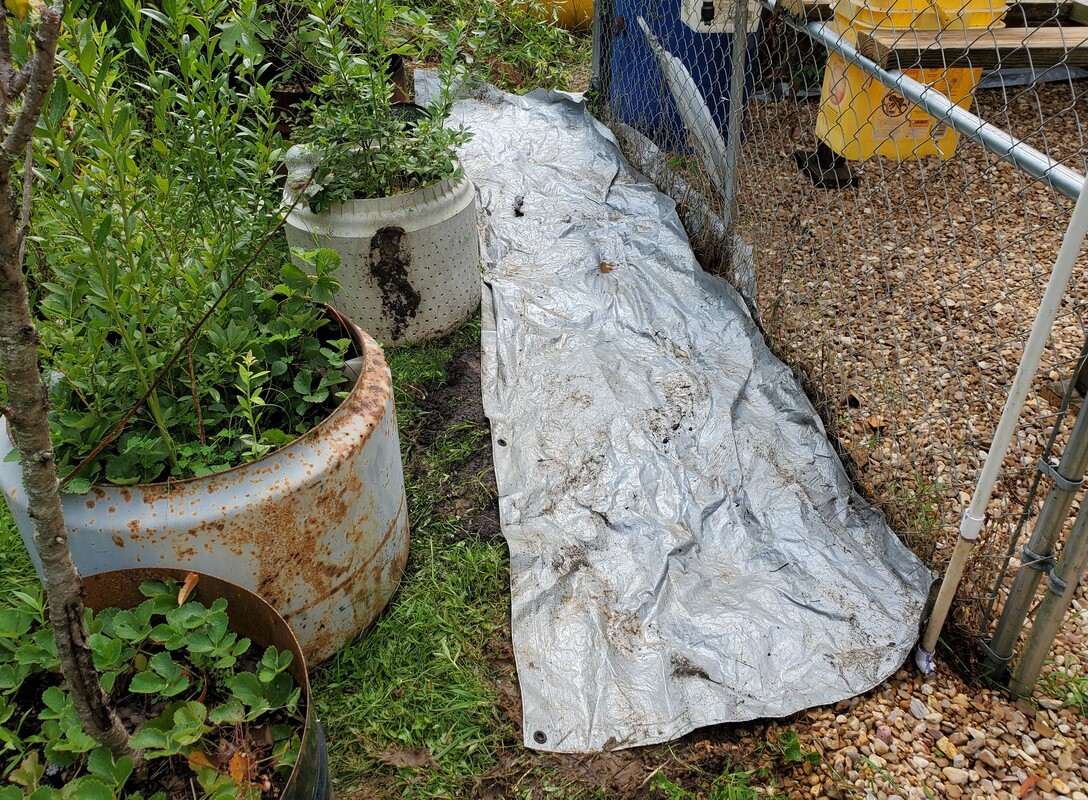
Piece of tarp laid down after pulling drum planters away from wall of greenhouse, a step towards better weed control later on.
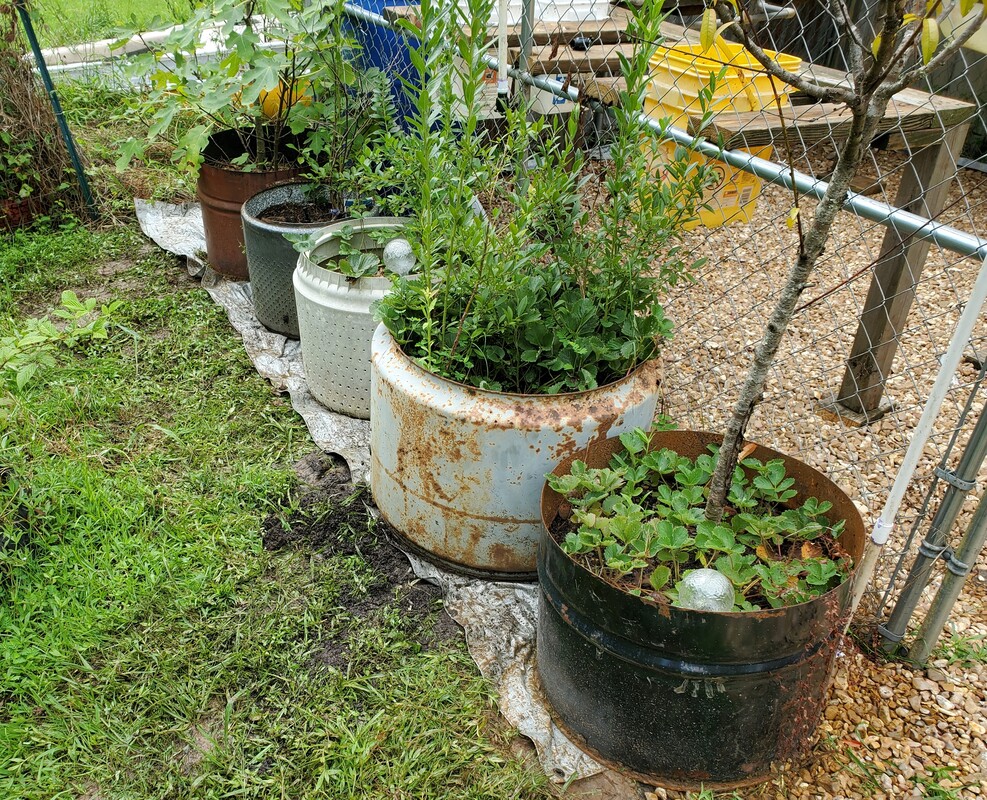
Drum planters resting on plastic afterward, just need gravel to go around the drums.
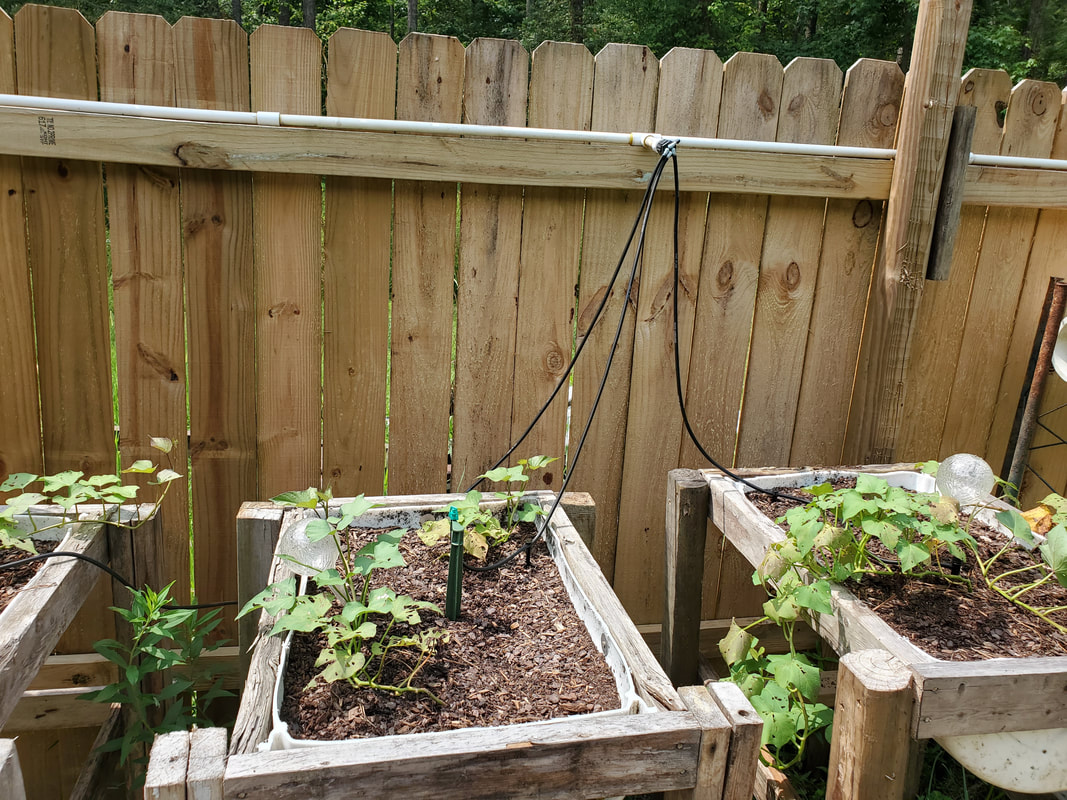
With the drum planters arranged the way I wanted them I continued with the running of the hoses and sprinklers for those planters. Once all the planters were set up with their respective sprinklers and hoses run where they needed to be I capped off the ends of the PVC pipe I ran since I will be further expanding the lines to cover more sprinklers later on. From there I assembled a tee with some fittings to allow me to connect the expansion section to the sprinkler valve and be able to reconnect the current four way junction to the system to feed the original planters. With that I had the whole system hooked up, ready to rock and roll. I manually opened the sprinkler valve to let the system get water. From there I had to adjust the sprinklers to get a reasonable spraying of water and to purge air and dirt from the pipes so they can spray properly. After making all tweaks, the system was humming along, wetting everything up as intended. 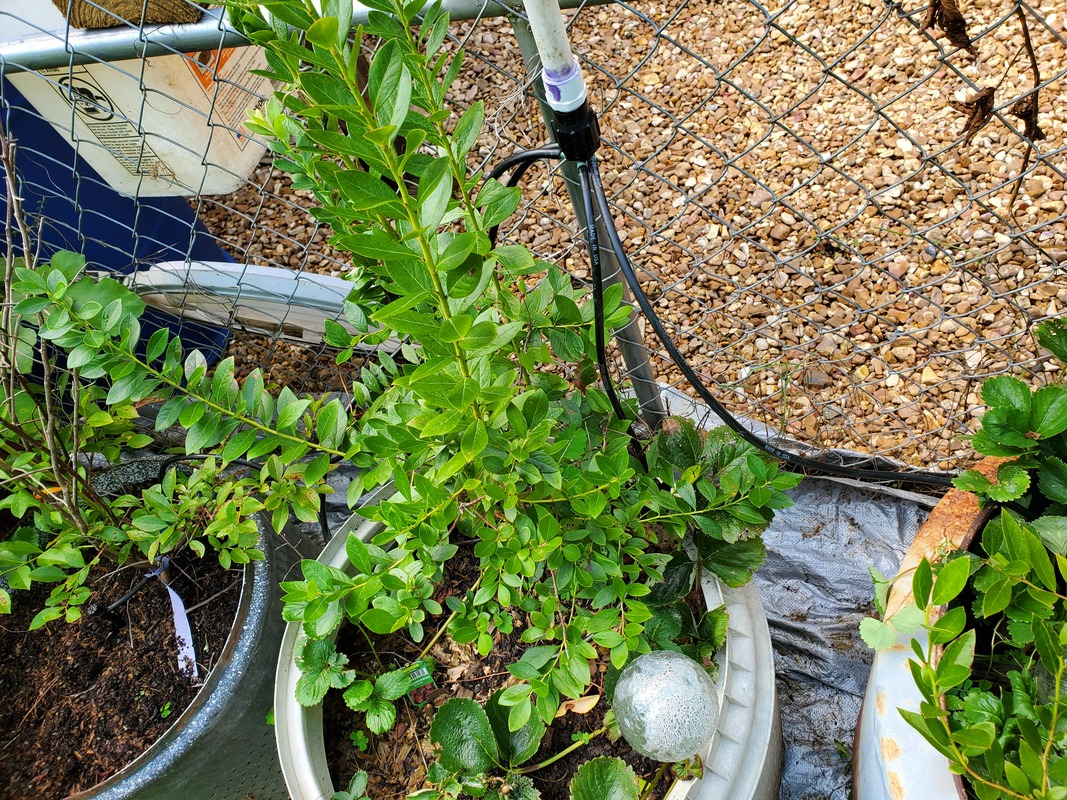
Sprinklers and hoses run down to drums along greenhouse.
Bucket raised bed with sprinklers spraying.
Two larger sprayers spraying in newer drum raised beds.
Drum planters with active sprinklers.
Sprinklers active in the four pack of drum raised beds.
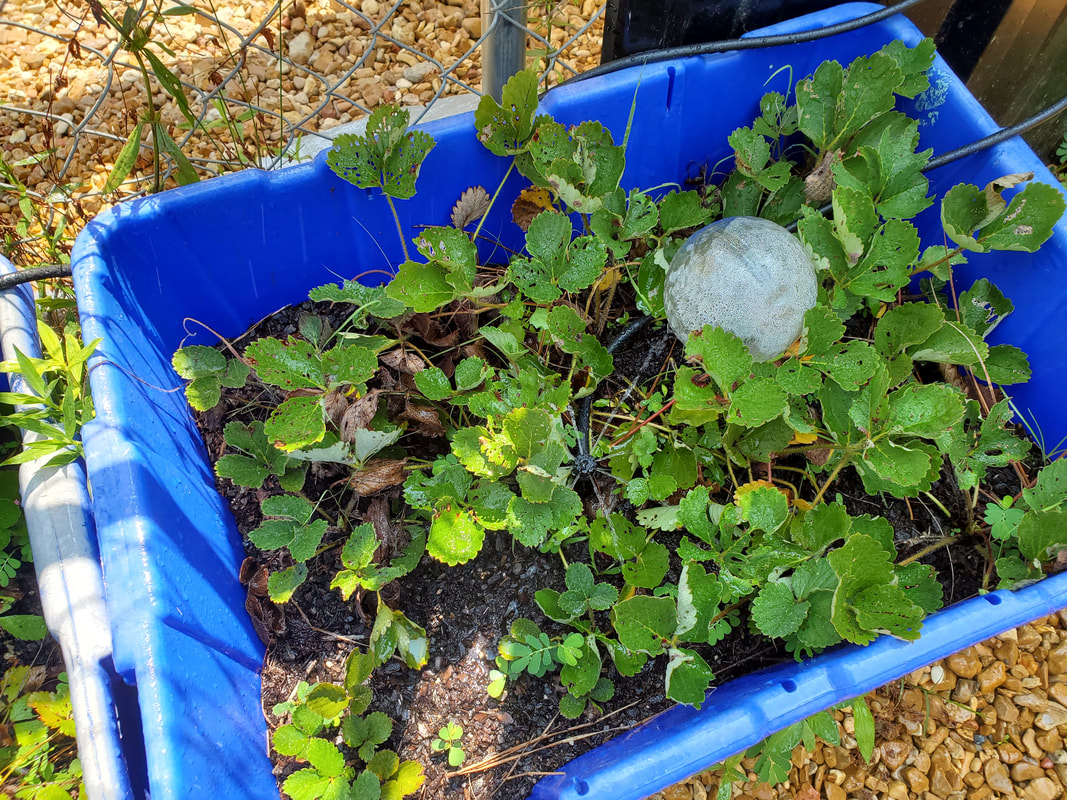
Sprinklers active in strawberry beds.
Some improvements I will have to make in this irrigation system is changing over from the larger output sprayers that I used in a couple of the drum raised beds and many of the other beds from the first round of hooking up this hardware and downgrade to the lighter sprinklers that I used more heavily in this round. Reason being is for the size of the planters the amount of water output is overkill and quickly saturates the beds, resulting in a large waste of water. Also I will need to add timers for the different systems as I currently have just one timer hooked up to fire both sprinkler valves and the double barrel hydroponic garden, running everything for a minimum of 30 minutes, which with the high output sprayers, a shitload of water is being wasted. Now for the micro irrigation system, especially with the change to the smaller sprinklers, I can use a digital timer that can be programmed for a low interval run like 10 minutes, which seems to be all that's required to soak the beds. The current timer is a mechanical timer with little lugs that are placed at the specific time spot on the rotary dial and these lugs hit a rotary switch that turns the solenoids on and off. This simple system can be used for the hydroponic garden for all intents but more than likely I'll probably go away from this setup and use all digital timers as even the hydroponics need to be fed steadily through the day at probably two hour intervals for 15 minutes. Since water isn't wasted in the system it really doesn't matter how long the system runs as the water is constantly recirculated. The only losses are due to evaporation. Maybe after making these changes the pressure drop in the system will be minimal enough that I can expand even further without seeing any substantial losses of pressure in the sprinklers downrange in the system. We'll see.
With the tables/shelves completed and all areas established as far as the bucket beds, drum beds and hydroponics, the next thing on the list was hooking up the plumbing for the hydroponics, all of which centers around the blue drum I situated in the corner of the greenhouse. The first place I started was with the 6" PVC pipes that are going to be used as pipe gardens, like the prototype setup we've been using for the last couple seasons. The only difference here is, instead of hose nipples being plugged up and having the smaller 1/2" hose hooked up, this setup is going to have 1/2" NPT pvc pipe fittings hooked up into the pipes to feed and return feed water through the system.
First order of business was drilling holes in the pipe to accommodate the pipe fittings. Since the pipe is pretty thick, I would have to thread the holes for a couple of the fittings I had in my stash. The other fittings I have, since I didn't have taps to fit them, I would just get the holes set close enough to push the fittings into the holes then hot glue the fittings into the holes. 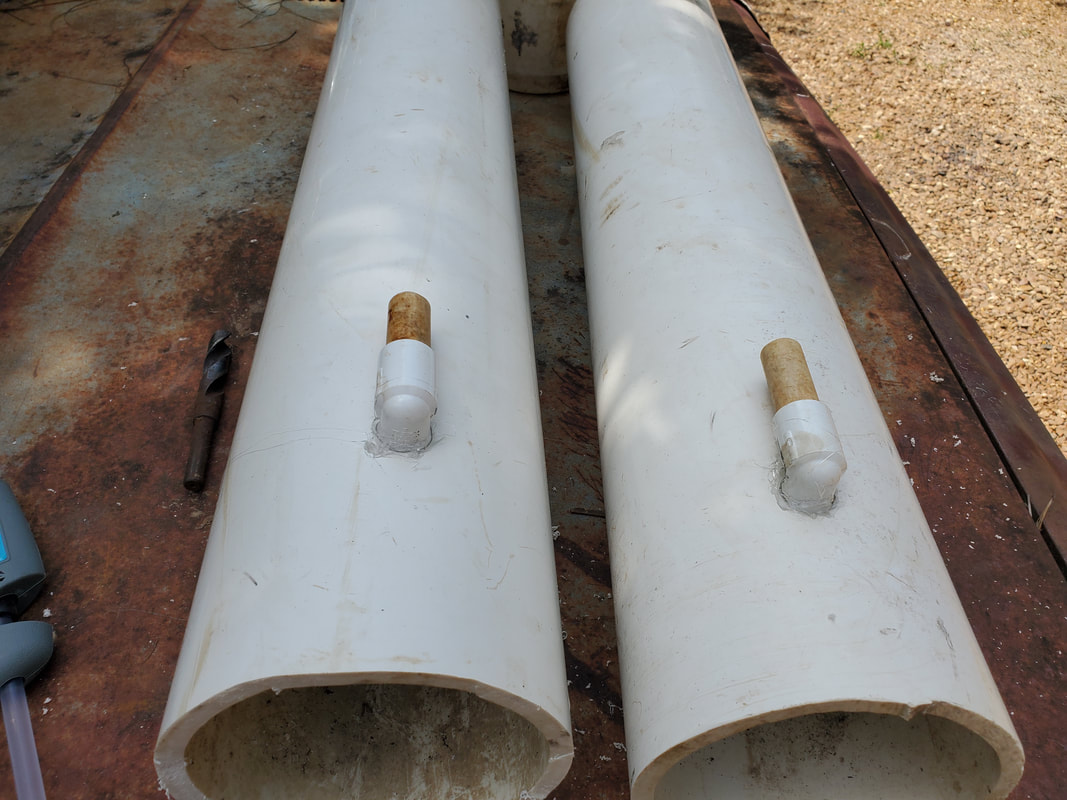
90 degree street elbows in place in holes, hot glued in place. Note short pieces of pipe in elbows.
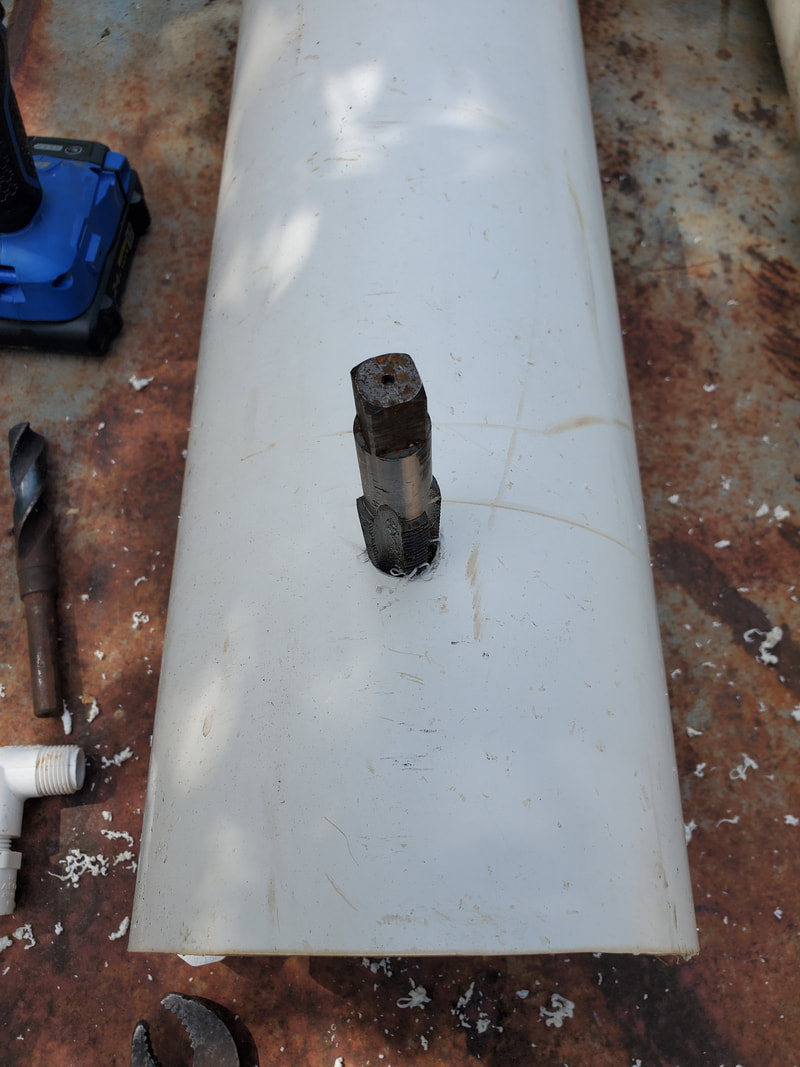
Tapping the threads in pipe for 1/2" street elbow.
After getting the fittings glued in place on one end of each pipe and the holes tapped on the other ends, I moved the pipes to their new home in the greenhouse, setting them up and getting the spacing where I wanted them to be at so I can cut and place the pipe fittings together between the two glued in fittings. I cut the short pieces of 1/2" pipe and used a couple of regular elbows to complete the ensemble linking the two pipes together. Now for the threaded ends. 
Since I sourced my fittings from my current stock, some of the stuff required extra adapter fittings to have them set up to accept the straight pipe that would be connecting them to the rest of the plumbing circuit. I threaded the street elbows into the holes then pressed in the short pieces of pipe and put the other adapters and fittings in place to get these two feeds set up and ready for further hooking up. 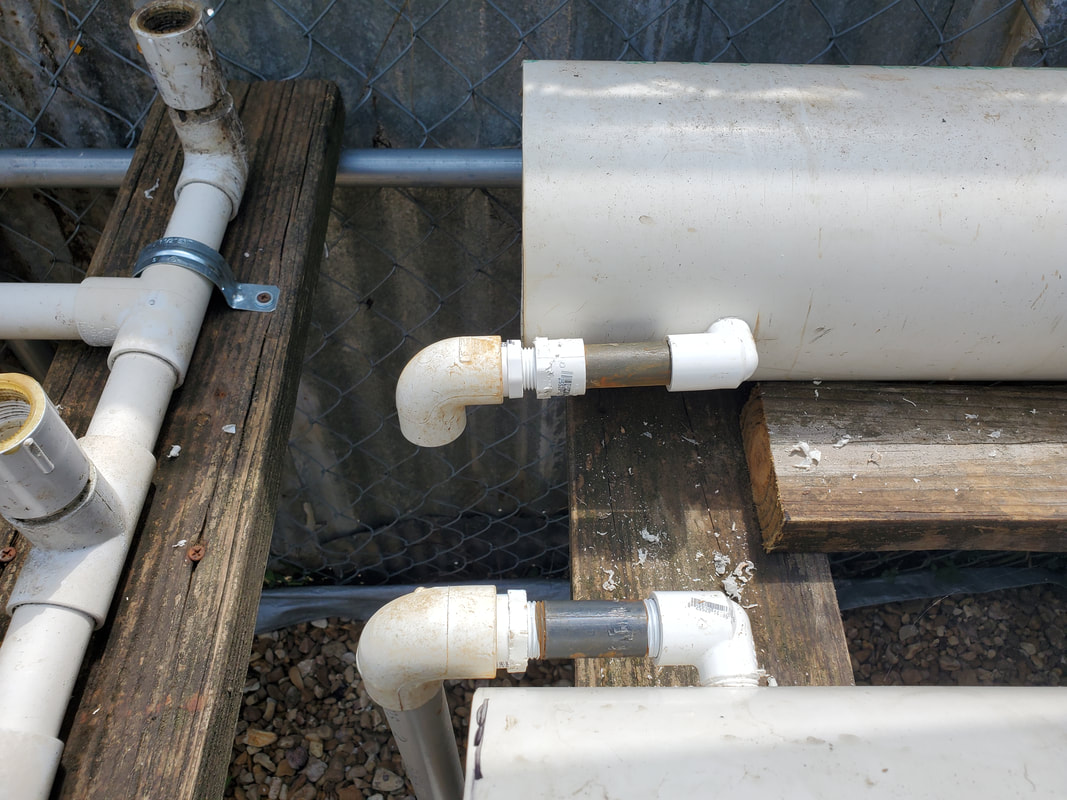
Inlet and outlet pipe assemblies in place with their mix of fittings to get things how I wanted it.
Again, since my current stock had a mix up of PVC parts, everything wasn't as "clean" as it could've been with a planned out assembly of parts to minimize the amount of "clutter" that would be present when assembling anything with PVC. In the end it still turned out pretty good so I continued on with getting other areas of the circuit hooked up, in this case the two older hydroponic garden assemblies. On these two assemblies, the drain side is a 1" pipe going down, which made things easy as I had some fittings already that allowed me to put reducer bushings in place that allowed me to connect to the 3/4" pipe and fittings that I used for the main circuit going to the drum. Once I made the connections to the drain lines the rest of the circuit was a series of tees with short pieces of pipe connecting together then going to elbows to eventually connect to the outlet pipe from one 6" pipe and on the other side connecting to more elbows to make it to the drum, more on the drum in a bit. 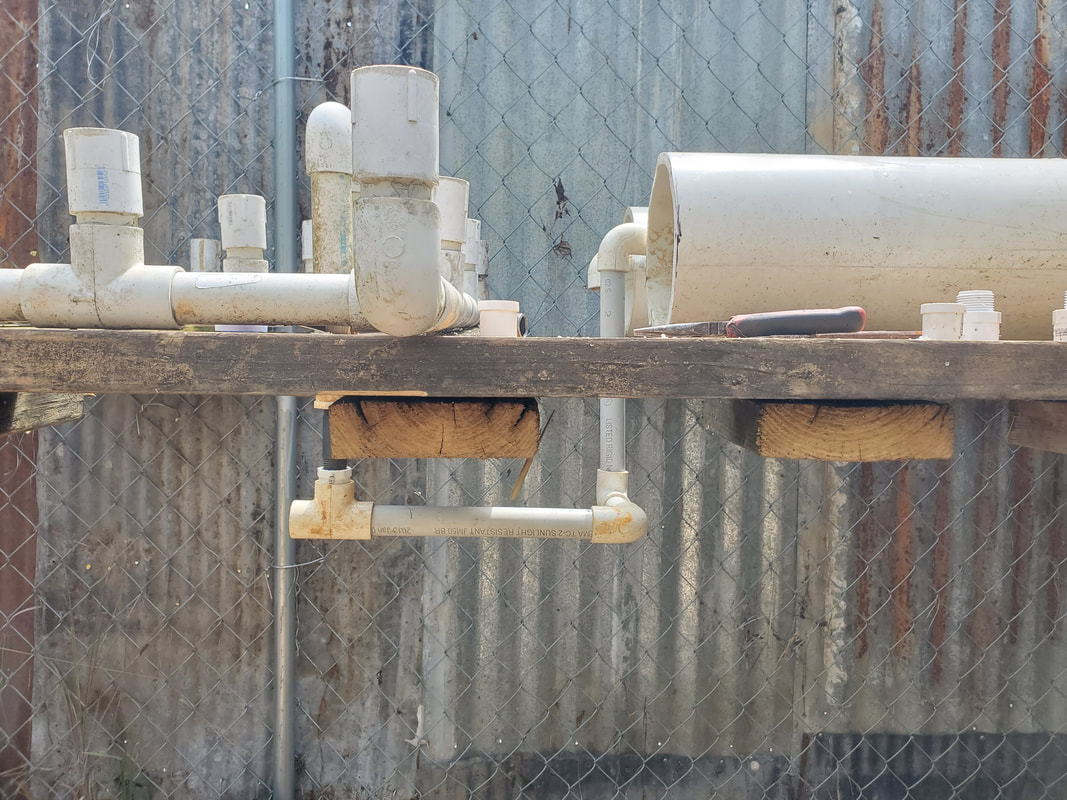
Pipe connecting to outlet pipe going down to tee connecting to fittings that connect to drain pipe on one HPG
Drain pipes connected together along with inlet pipes.
Before we get to the drum I want to touch on the inlet side of the plumbing. Just like with the drain side, the circuit consisted of a series of tees with elbows and some adapters along with several short pieces of pipe to connect the whole works together between the two older HPG's then terminating at the inlet pipe going into the 6" pipe for the newer HPG's. 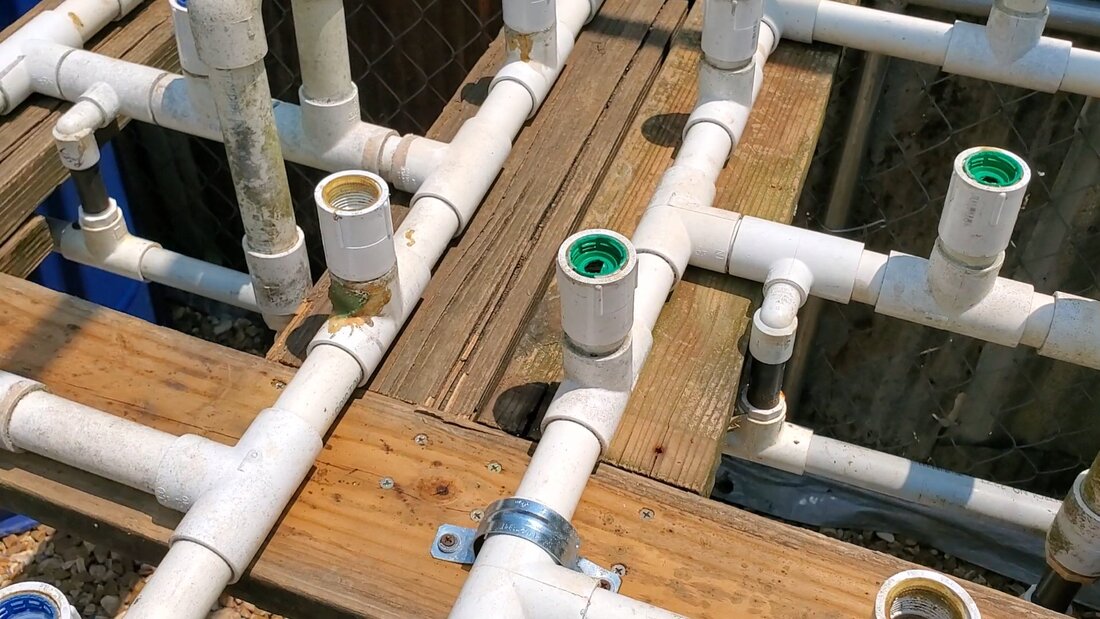
Inlet pipes on the older HPG's, consisting of a horizontal tee with street elbow feeding down into fittings connecting to the main line running parallel to the drain line.
Inlet pipes turning to feed into the inlet pipe going into the 6" pipes of the newer HPG setup.
Now about the drum. The way the output side and return sides are set up are different here. Unlike the pipes going to the HPG's directly, I had to do things differently at the drum for a couple of reasons. First the drain side. This was a simple setup where I took a 3/4" male thread to 3/4" female smooth adapter and after drilling a hole in the side of the drum and threading the adapter in place, I connected the end of the pipe line to that piece to finish the whole drain line. This will obviously just be a return where overflow from the HPG's runs back and empties into the drum. 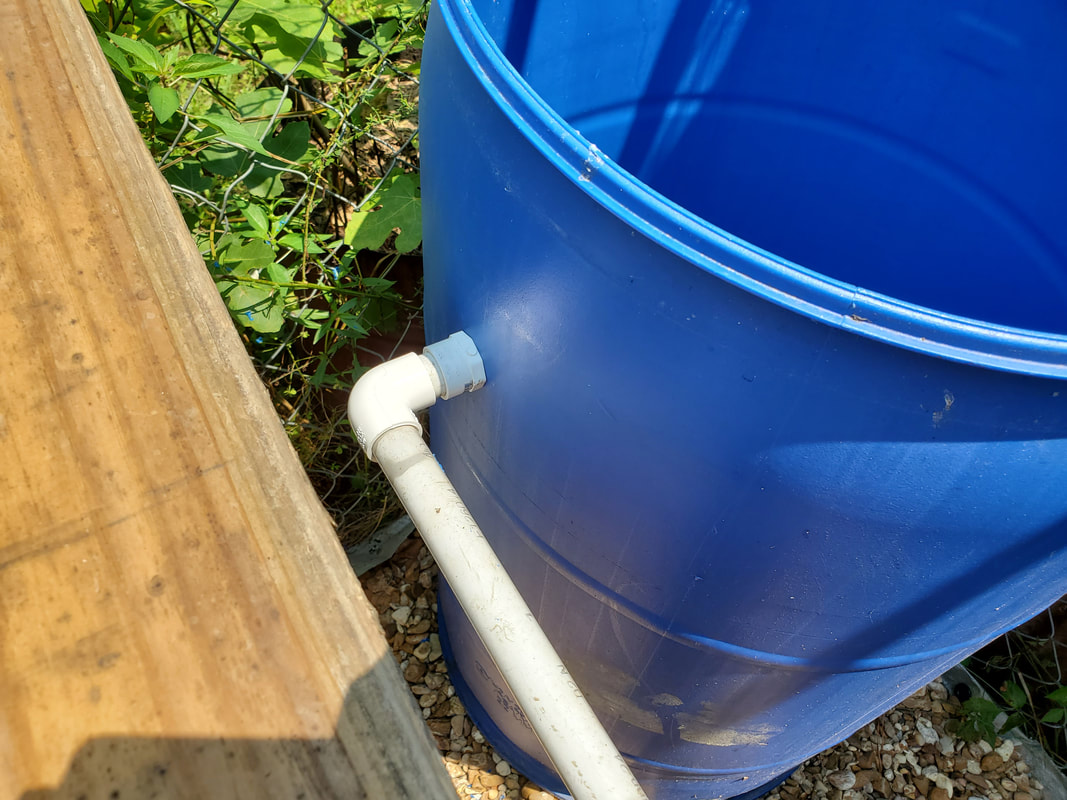
As for the feed line going to the HPG's, this was slightly different in the sense that an adapter was not used or threaded into the hole in the side of the drum. First the hole had to be large enough to allow for the 3/4" PVC pipe to freely pass through, not to accept the threaded adapter. From there a length of pipe was connected to the feed line then passed through the hole in the side of the drum to about the center of the inside of the drum. Another elbow and a long length of pipe brought the "end" of the line to a few inches shy of the bottom of the drum in the center. Reason for this is so I can hook the pump up to this pipe, where it will rest at the bottom of the drum and push water up through the pipes to their respective destinations. Pretty simple. Since I don't have a pump yet, there is just the pipe in the drum. 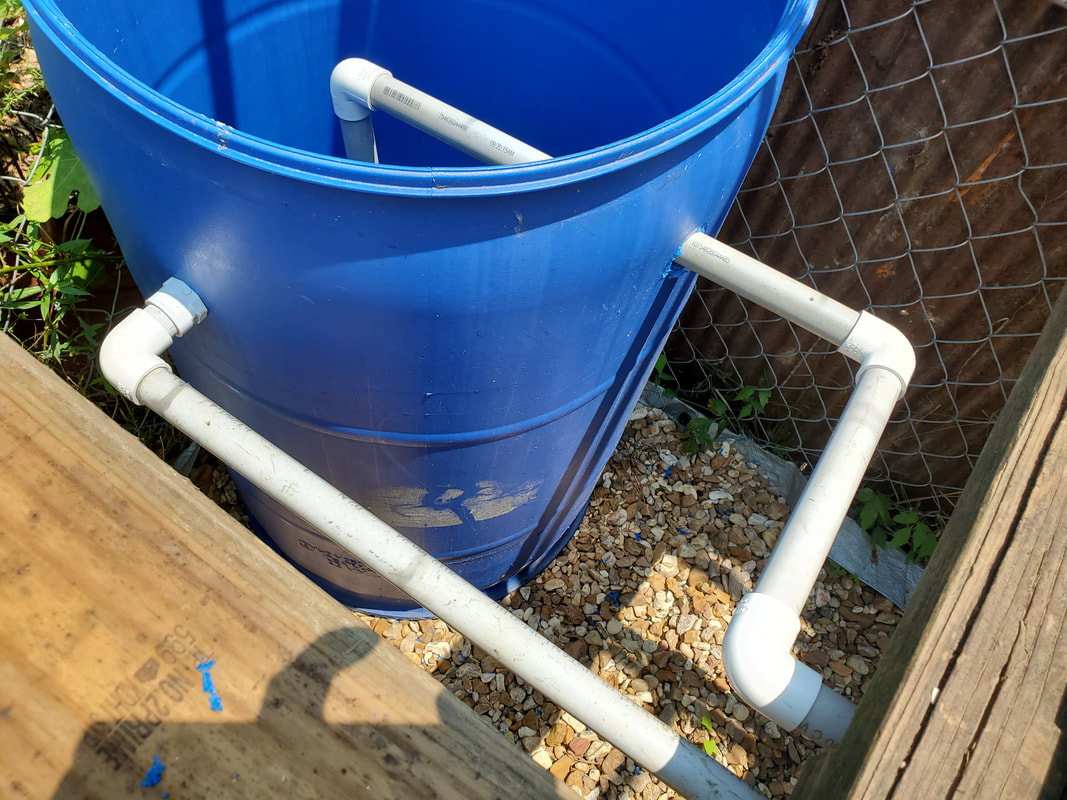
Outgoing water line hooked up showing how pipe just passes through hole in side of drum to connect to pipes going to the HPG's. Both outgoing and return lines run parallel to one another under the shelf.

Shot inside drum showing how outgoing water line is situated. Bottom left shows drain return protruding inside wall of drum.
Other than the pump the whole system for the hydroponic gardens is complete. From here I still have to cut the holes in the 6" pipes for that garden assembly then I still have to make the planters out of the adapters and PVC pipe that will replace the bottle caps that are currently in the ports of the older HPG's. Other than power for the pump, the HPG system can then be brought online.
The time has finally come to drop in the freshly rebuilt 318 engine into the Dodge. But as with any big job, there's always some little things to take care of prior to the big event. A couple of those things in this case are installing the alternator and the front seal on the transmission. Now originally I wanted to leave out the alternator due to believing that it was dead but I wanted to go ahead and try to do some troubleshooting again since I don't recall whether I checked the regulator or any other point in the circuit to confirm the functionality of the alternator. Besides, it doesn't take much effort to swap out an alternator so why not put the thing back in. As for the tranny seal, since the engine is out and the transmission had a leak that I really hadn't had a chance to fully troubleshoot, I figured I'd swap seals since its a quick fix when the engine is out versus finding out the seal is bad after the engine's back in only to have to pull it out to change a $7 part. Another little thing that I had to do was swap the motor mounts from the old engine to this engine too. I did take the time to clean up the metal brackets and paint them prior to installing the rubber mounts.  Transmission showing the obvious ease of replacing the seal, just the torque converter and starter are in the way here. With everything on the engine I was able to put the carb plate on to hook the crane up to for our install. Getting the crane into position we hooked up and hoisted the engine high enough to allow it to clear the car in its transition to the engine bay. I didn't want to scuff the paint on the oil pan in the process.  Engine swinging from the crane prior to lifting higher. 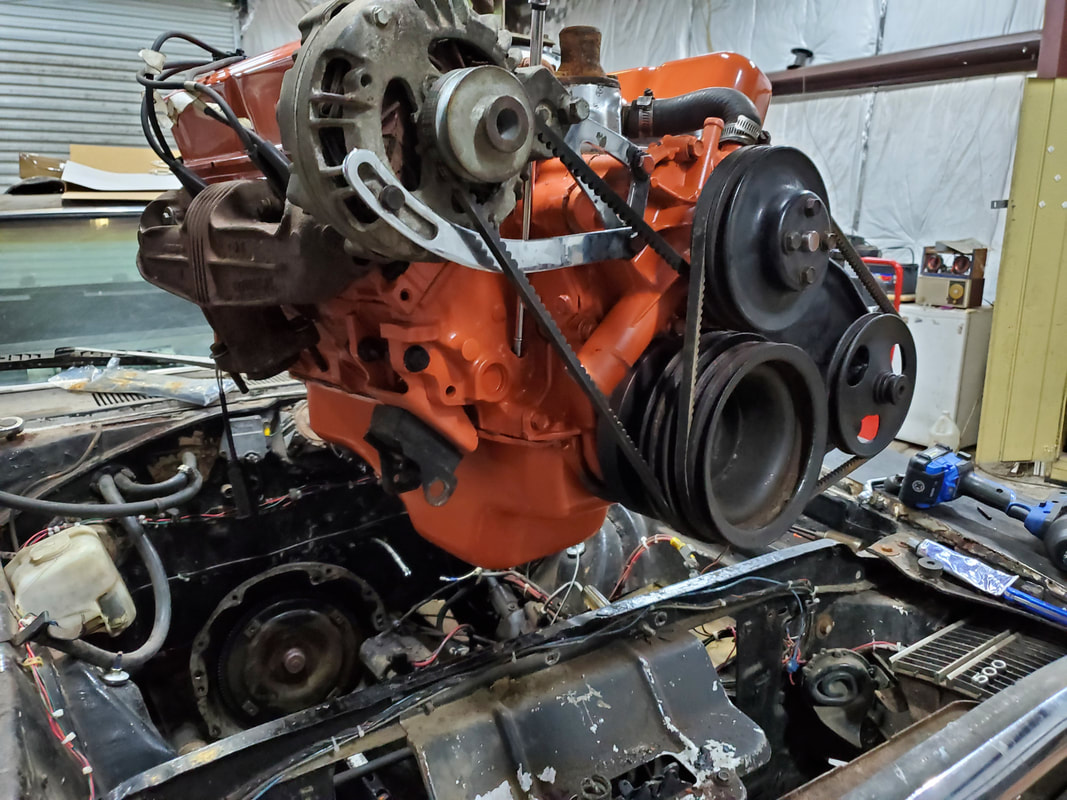 Engine staging over engine bay of car. 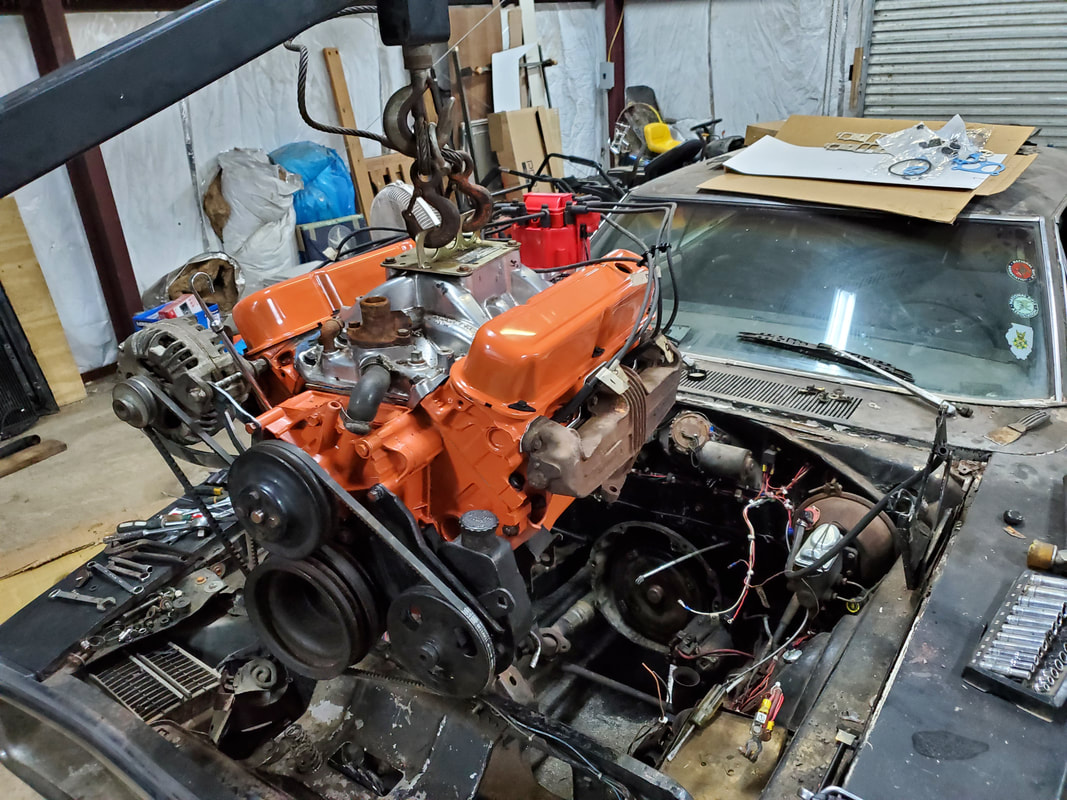 Preparing to lower the engine into the engine bay. After lowering the engine down enough I had to line up the motor mounts, while at the same time trying to get the rear of the engine lined up with the bellhousing of the transmission. Now luckily there are pegs on the engine that assist in getting the two lined up so its not too bad. I had to really get the bellhousing taken care of enough so to get some bolts in then lower the engine the rest of the way onto the mounting points on the K-member to get things straight. I did have to lift and lower the engine several times while checking to make sure things are lined up properly but eventually I got everything straight. I got the engine mated to the bellhousing then dropped the engine right onto the mounts straight enough that the bolts went right in without resistance. Now the first thing I did after getting the bellhousing and motor mount bolts secured was get the torque converter secured to the flywheel. There's four bolts holding the two pieces together but to get to them I had to rotate the engine over, which meant the breaker bar and the big socket on the crank bolt. 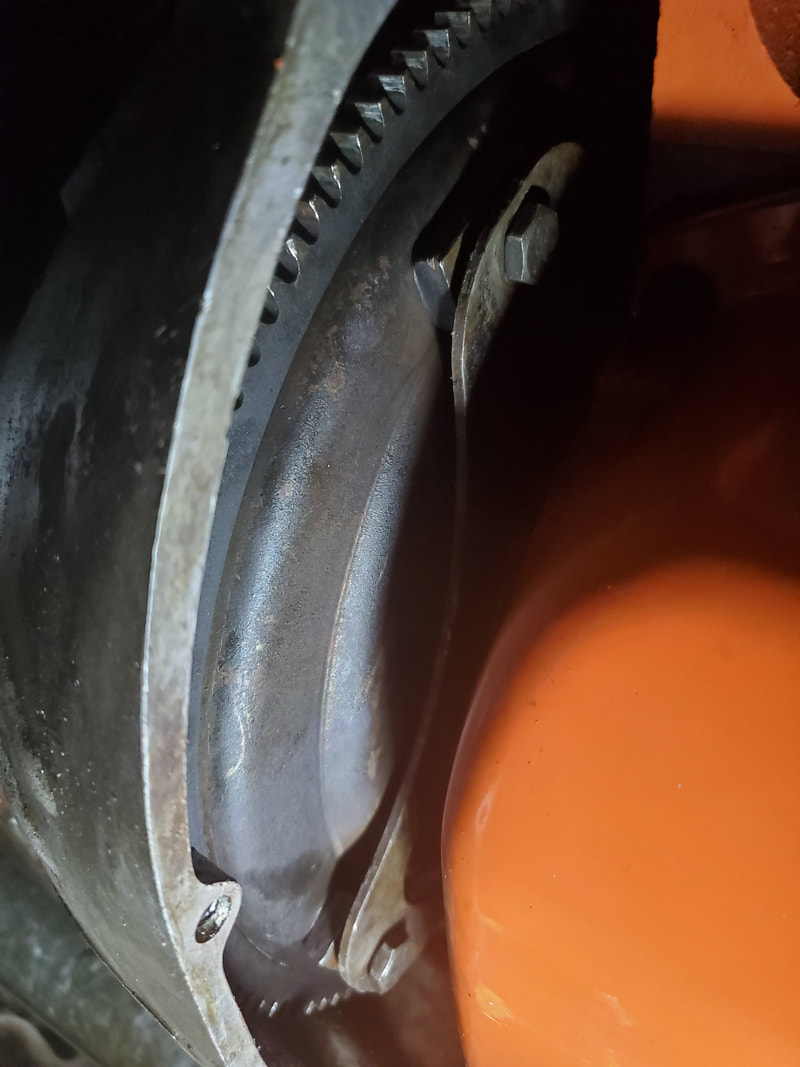 Shot of torque converter and flywheel bolted together from underneath car. With the torque converter being bolted up the next big thing was the exhaust manifolds. These tended to be a PITA since I had to get a wrench and a socket/ratchet with extension into these tight quarters to get the two bolts secured for each flange. After a little contorting and cussing I did manage to get the pairs of bolts secured for the exhaust manifolds. 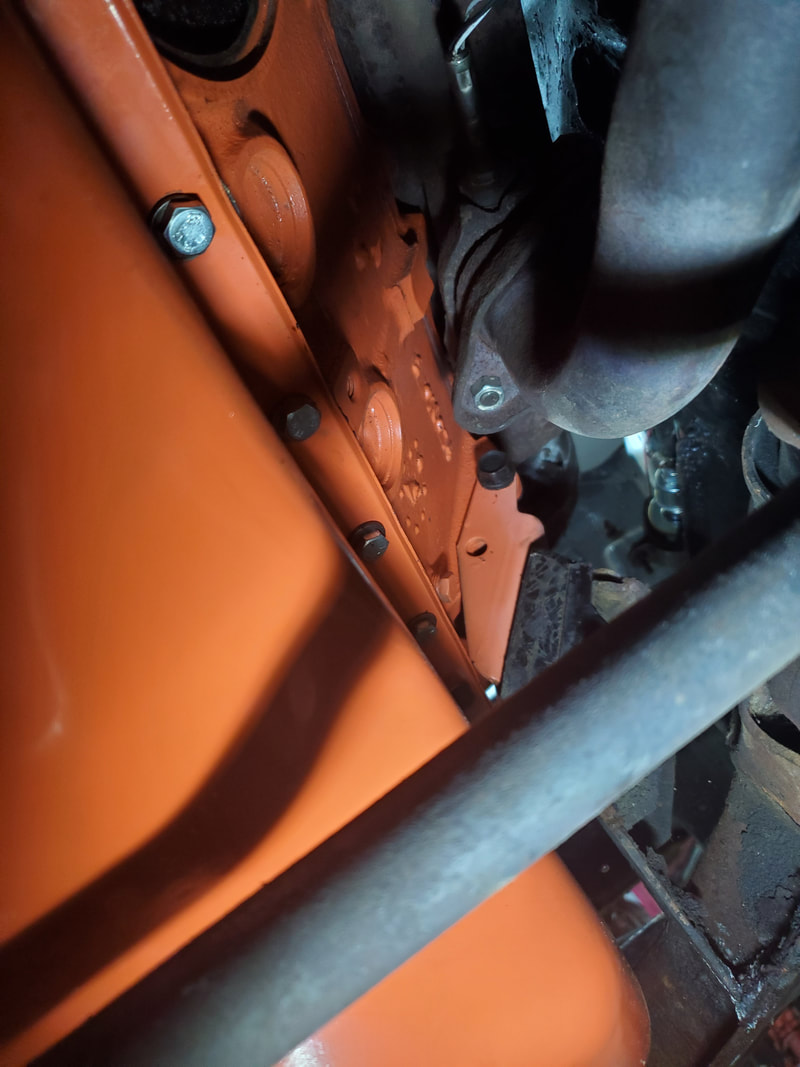 Right exhaust manifold flange secured. 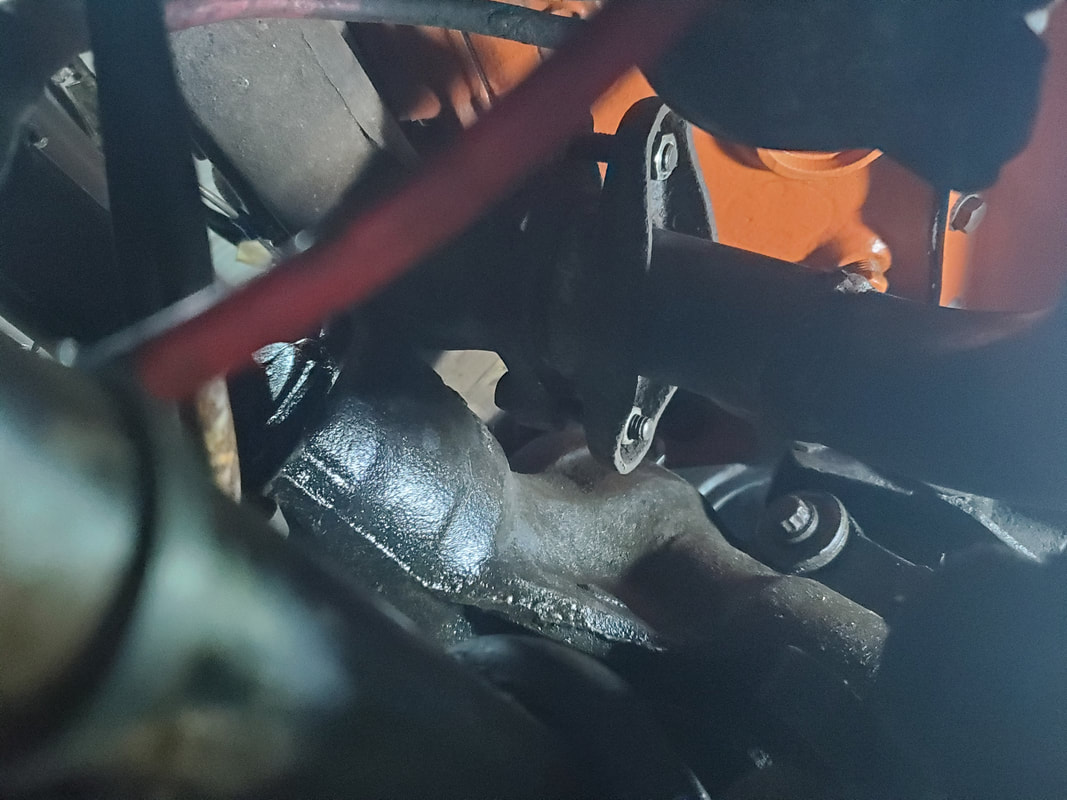 Left exhaust manifold flange showing just how tight it is on this side. With the exhaust flanges and torque converter done, I was done having to go under the car. The rest of the work would all be on top. All wires, hoses, tubing, linkages, etc were hooked up rather fast since there isn't much to this engine since it is an older machine compared to say, the Tracker or Scion. Even the radiator went back in along with the carburetor. Essentially everything was hooked up in short order. The HEI distributor just needed one power wire from the switched line, which was present but because I wasn't using the old distributor and external coil, I had an extra power wire that wasn't needed. I cut this wire off so there was just the one power wire present. I did run the wire for the tach/ground from the dizzy to the firewall and inside the car since I do plan on installing a tach later on so this was a preemptive move. 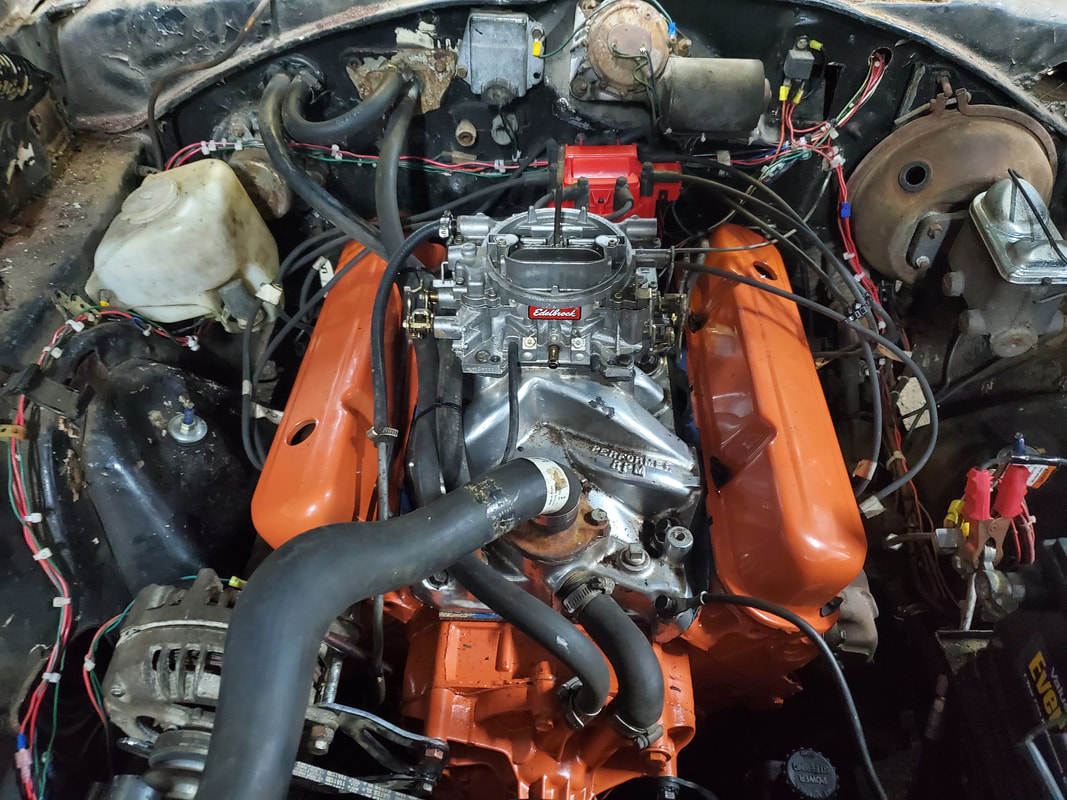 Engine seated in its new home, hooked up and ready to go. With everything hooked up the last thing we did was put the hood back on since there was no need to have it off at this point. Of course since this isn't the Tracker or Scion, this hood needed all of the both of us to get it installed since it's heavy as hell. We got the huge piece of old metal bolted up and surprisingly lined up the first shot so with that everything was hooked up and ready to go. 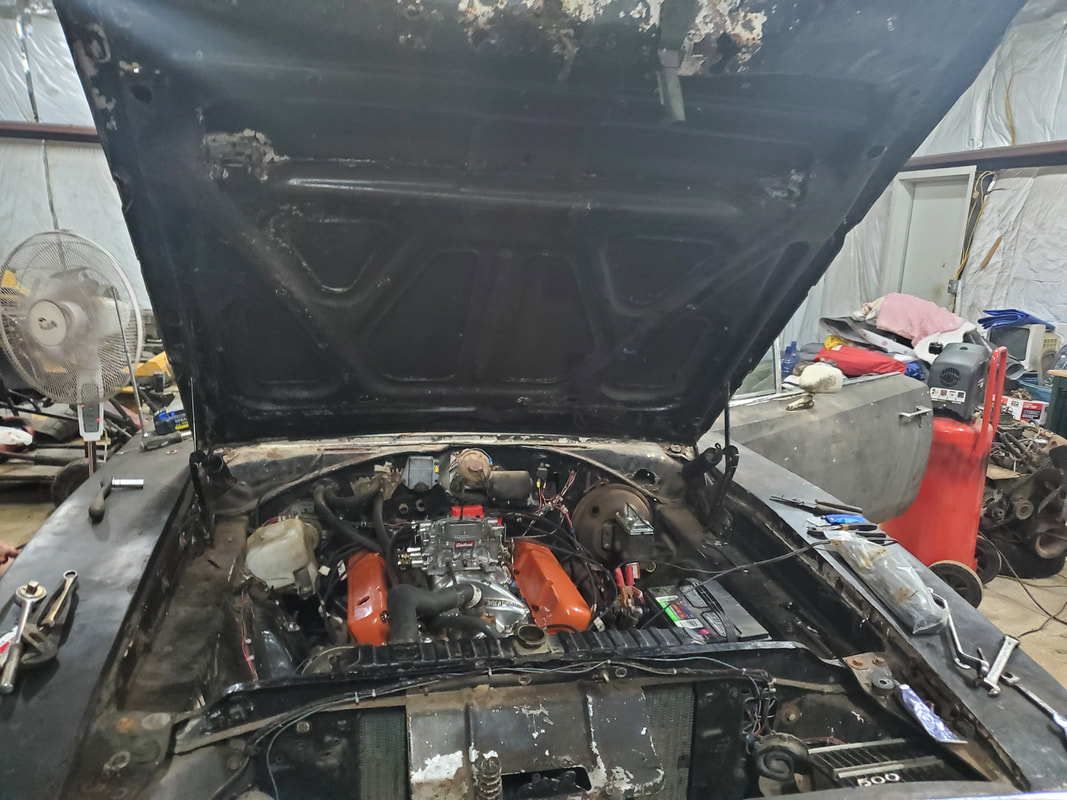 Hood installed back on car, almost there! All that's left at this point is putting in fluids and the oil filter along with the battery. All told, just small stuff remaining before we can attempt to crank this thing over. At that point the old Dodge is getting closer to the road.
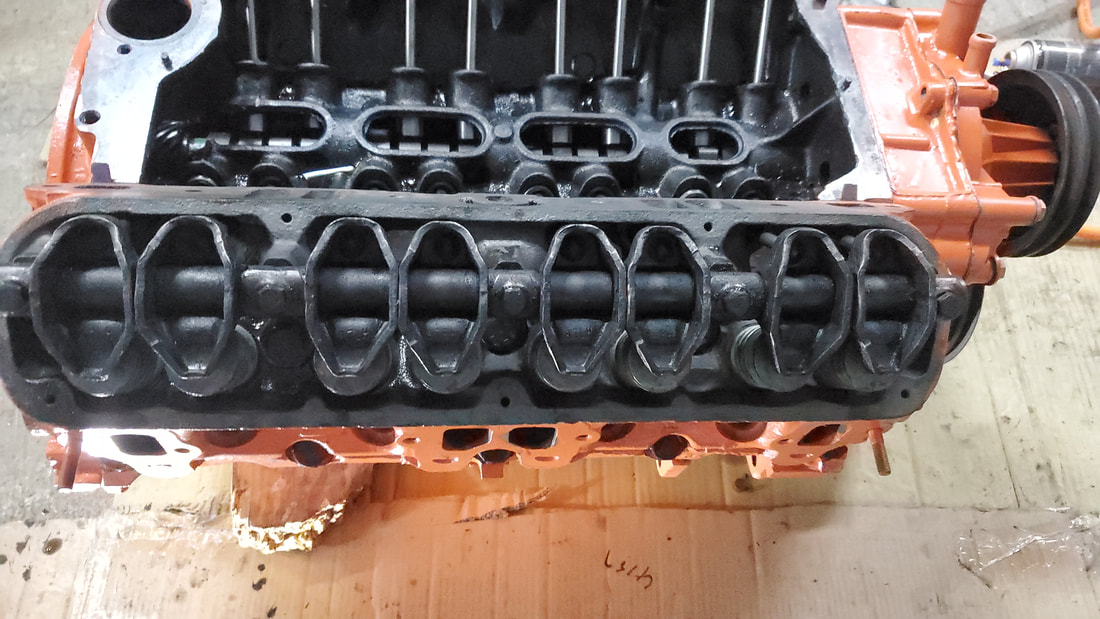
After getting the pistons and crank and everything on the bottom end put together to essentially create what's known as a short block, the time has finally come to put the cylinder heads on, which is the home stretch to getting the engine complete. Now there were some parts I needed to get since this engine was being put together from scratch and as one can imagine, there can be some issues with sourcing the right parts, much less any parts for this type of build.
Another thing that I wanted to do at this point was get the short block off the engine stand since I wasn't too comfortable with adding the amount of weight that would be added to the four grade 5 5/16" bolts that were holding this block to the stand. We went ahead and laid a piece of cardboard down and put the block on the ground, using some old rags and a block of wood to keep the engine upright on the ground. At least now I can comfortably add the 200+ lbs of weight without the worry of a major disaster. 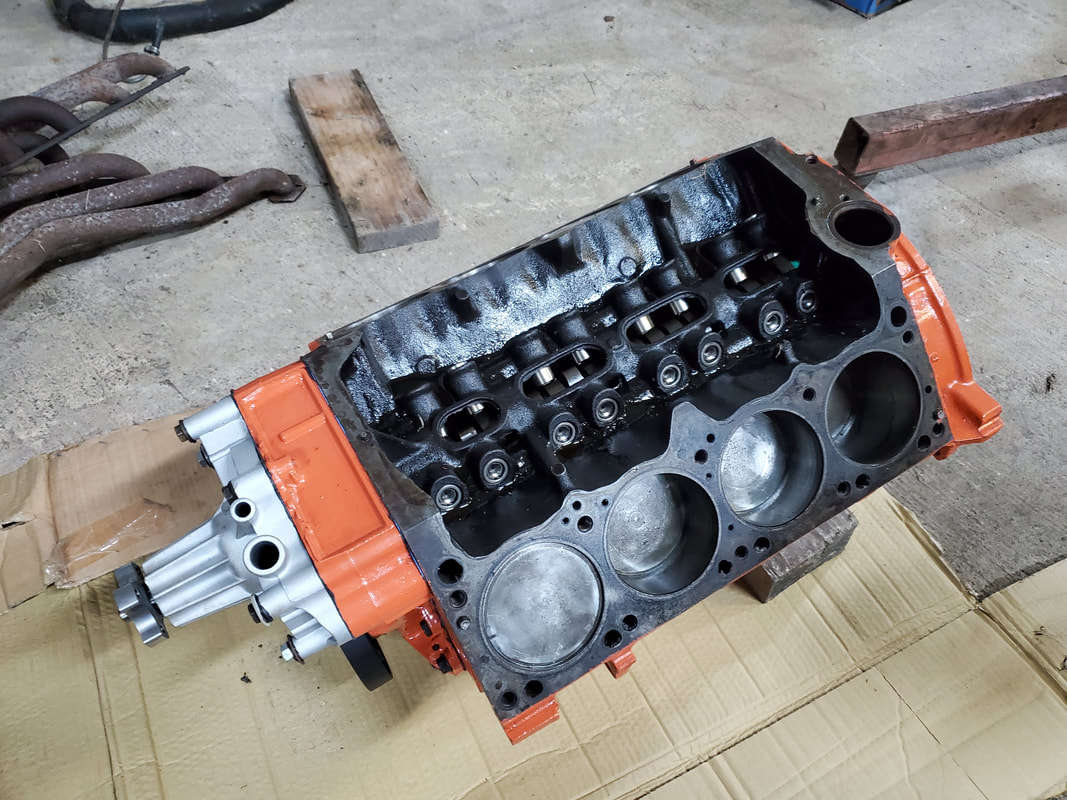
The first thing to do prior to putting the heads on was well, to paint them. After doing a fast mask up to keep as much paint off the rocker arms and the insides of the heads, I sprayed the pieces down with several coats, ensuring that I got all the areas that would be exposed to daylight. While they were curing I placed the head gaskets down on the block, which was the easiest thing to happen in this session, along with the crank pulley. Now back to the parts issue. Since we're putting on cylinder heads, we needed new head bolts. After sourcing some bolts that stated they were for a small block Chrysler, when we went to test the bolts out after setting the heads down on the gaskets on top of the block, it turned out the bolts were too long. I pulled a couple of old head bolts from the old engine to compare and sure enough they were a half inch and an inch too long between the short and long bolts. Well we can't do anything with this so going against what I intended for this whole build, I ended up snatching even more parts from the old engine, in this case, the head bolts. My guess is these aftermarket head bolts were geared for aftermarket heads that had a thicker body for these bolts versus the stock heads that are clearly "thinner". 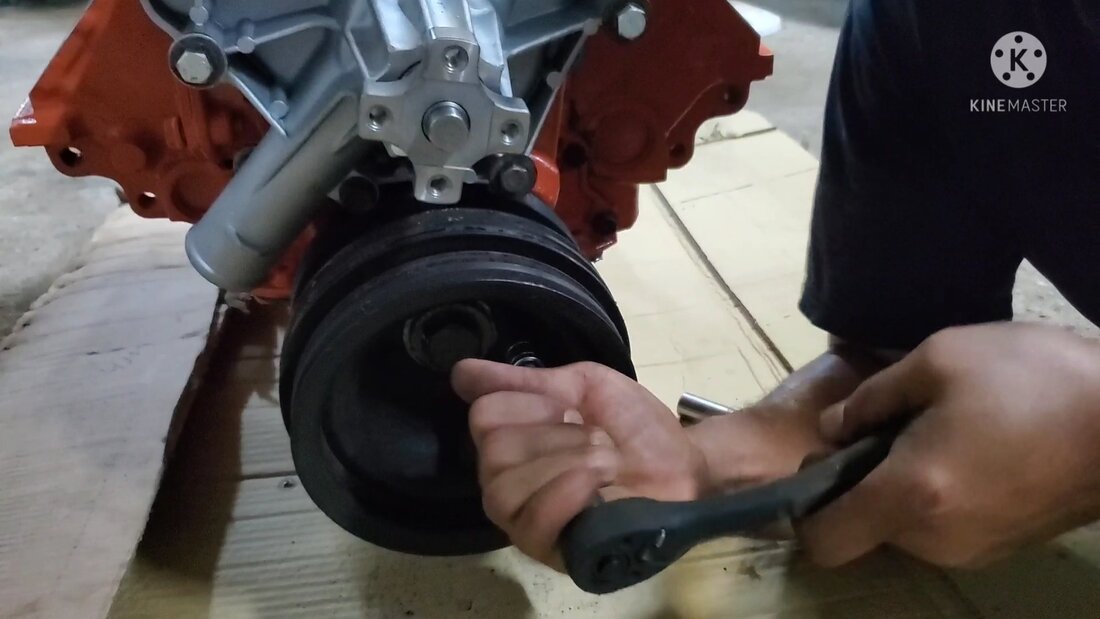
Installing the crank pulley.
Cylinder heads masked off and painted up.
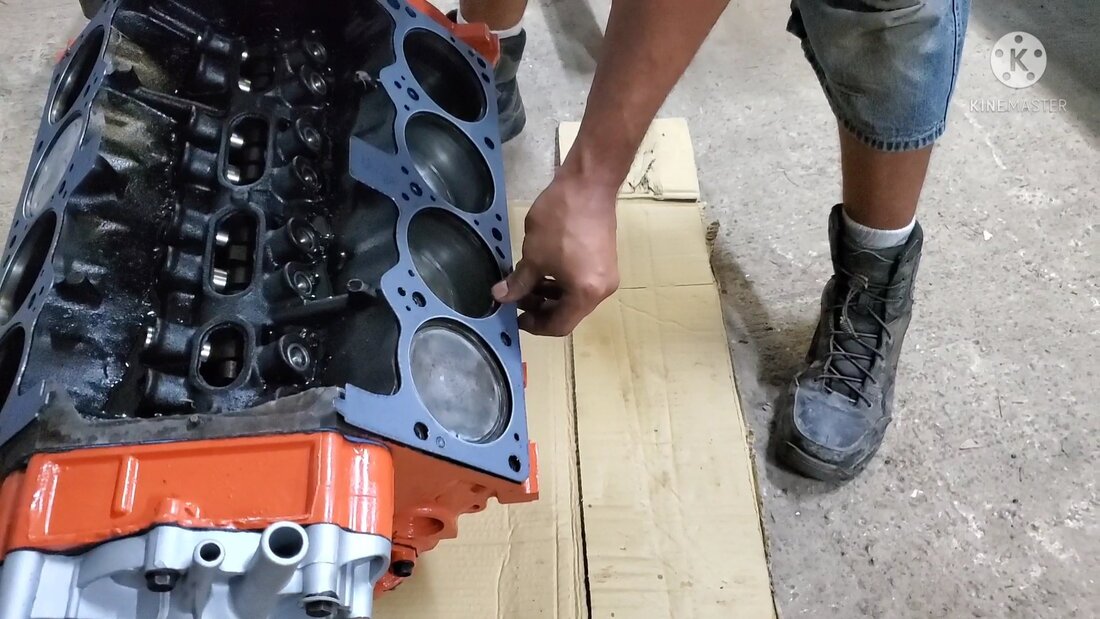
Laying head gaskets down.
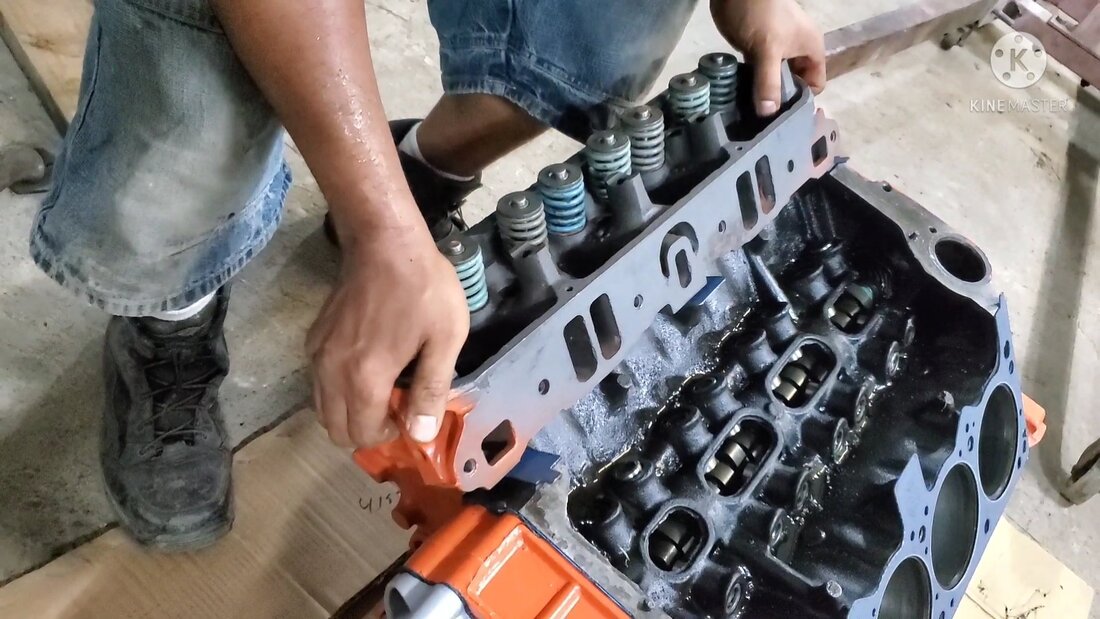
Putting the cylinder head on the block.
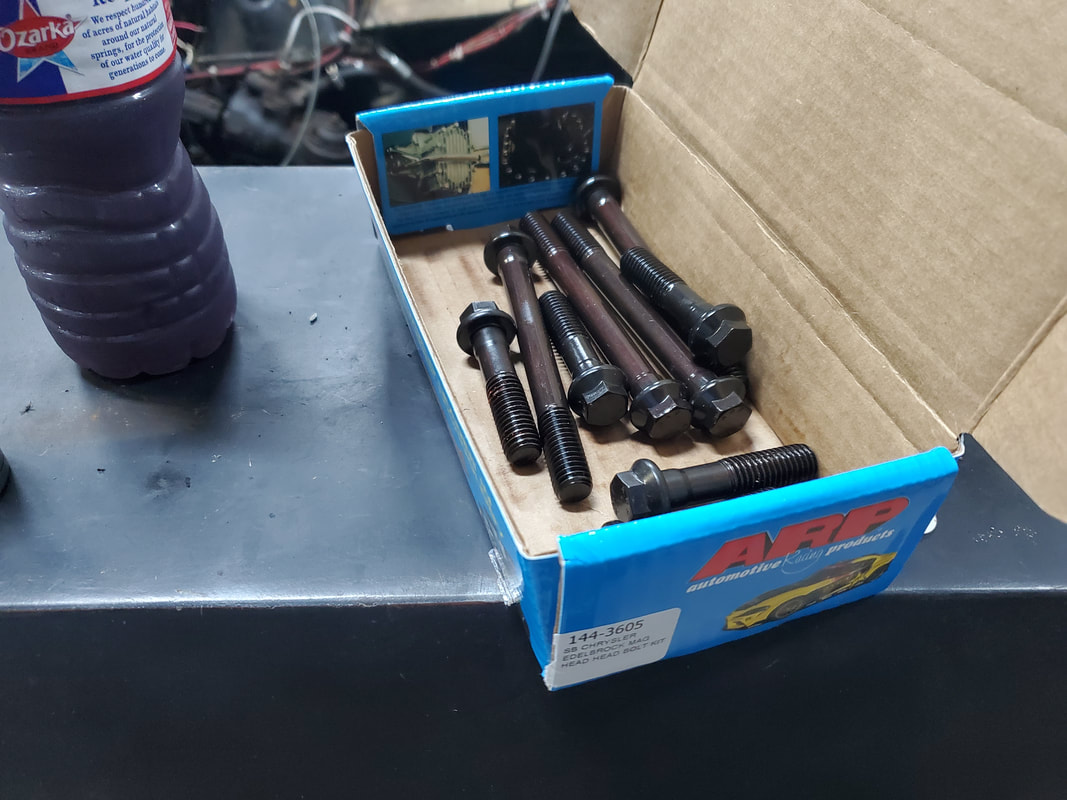
Aftermarket ARP head bolts.
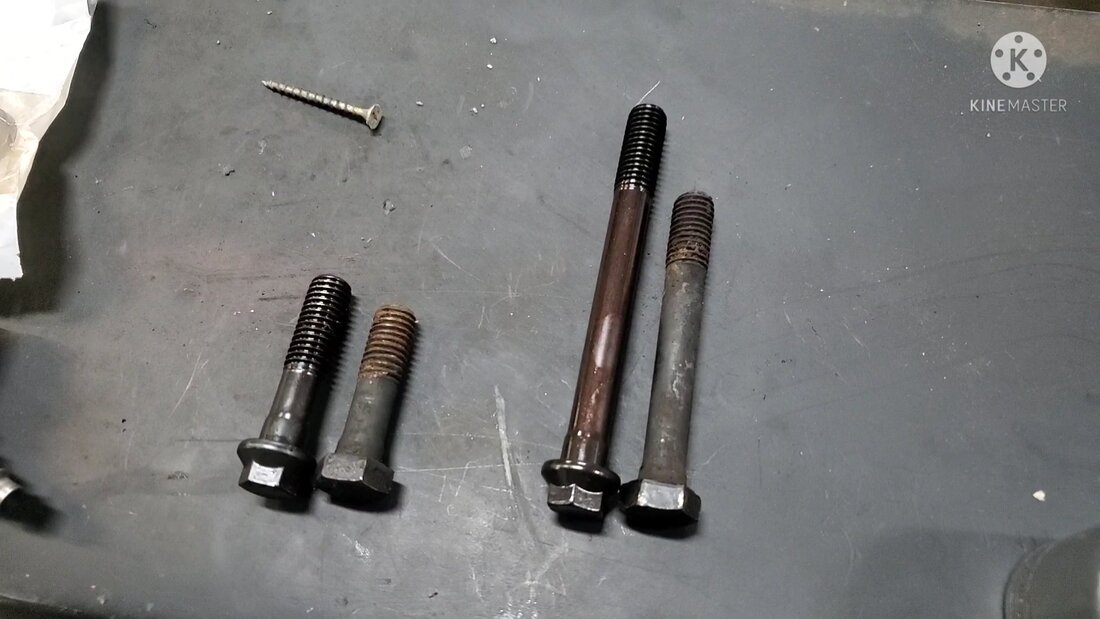
Comparison of old and new head bolts, note the difference.
After pulling the old cylinder head bolts from the other engine, I was able to get the heads bolted and torqued down per specs. With that I moved on to the other parts issue that I had, which was sourcing a rocker arm assembly. On Chrysler engines the rocker arms come on a bar that all bolts down as one unit. There is no adjusting or valve lash concerns like with other engines. One of our cylinder heads had rockers and the other didn't. I wanted to wait to order a replacement set of rockers but rather than postpone the completion of the engine I said piss on it and snatched the rockers from one of the old engine's cylinder heads, bolting them down to the bare head. Of course at the same time I put down the new push rods before bolting the rockers completely down. I had to remove the other head's rockers prior to putting the rods down but after all that, the valve train is done. 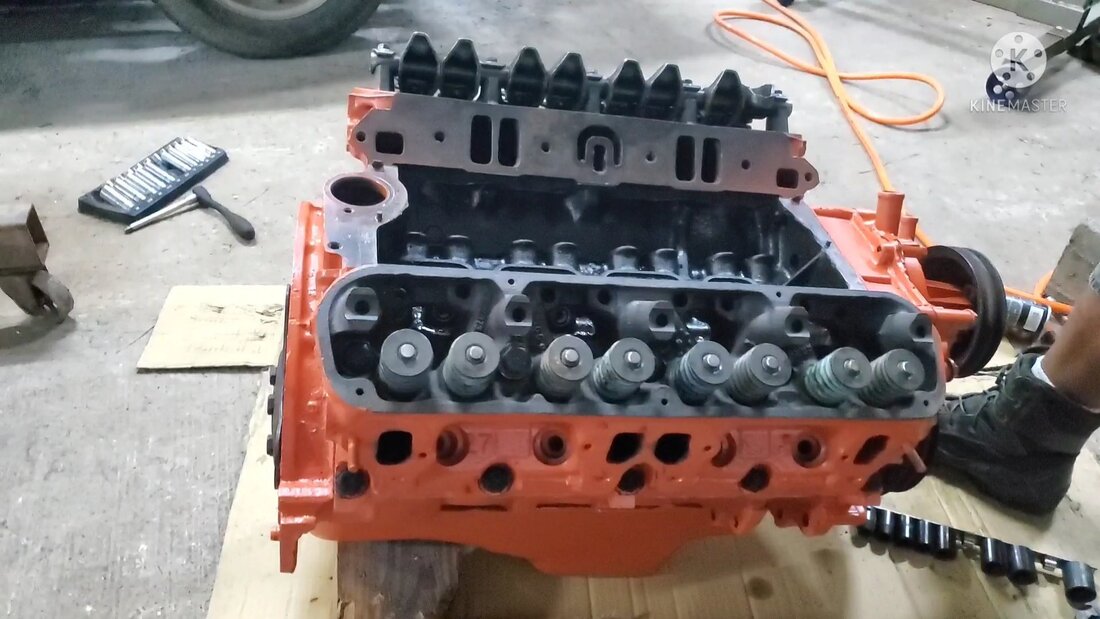
Cylinder heads bolted down, note this head has no rocker arms.
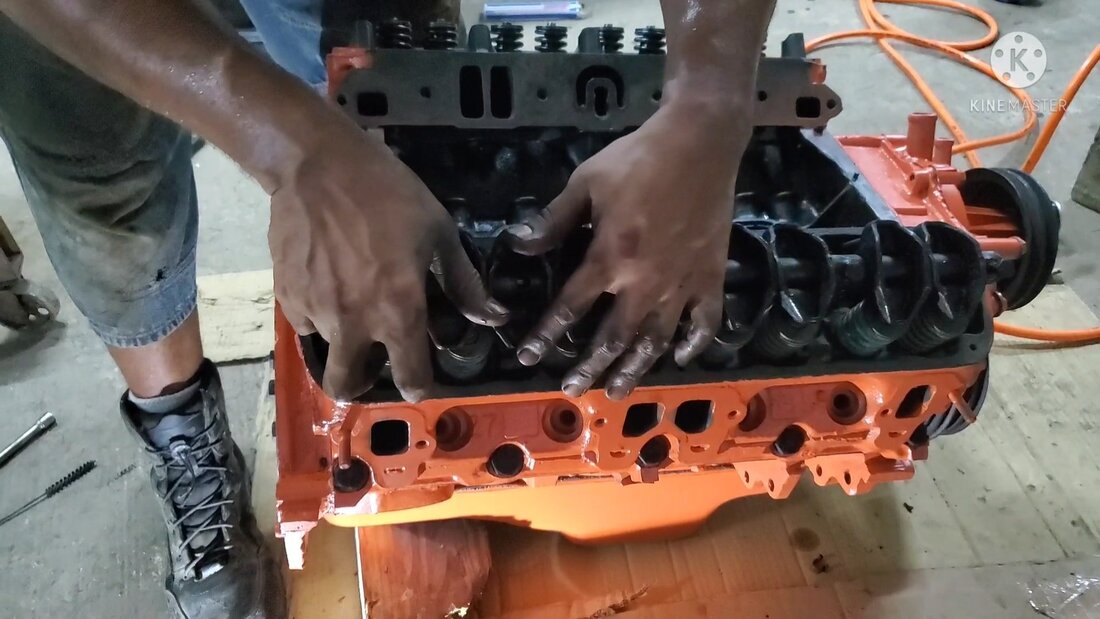
Getting the rocker arms seated in their home on the head.
Rocker arms secured to heads on right side.
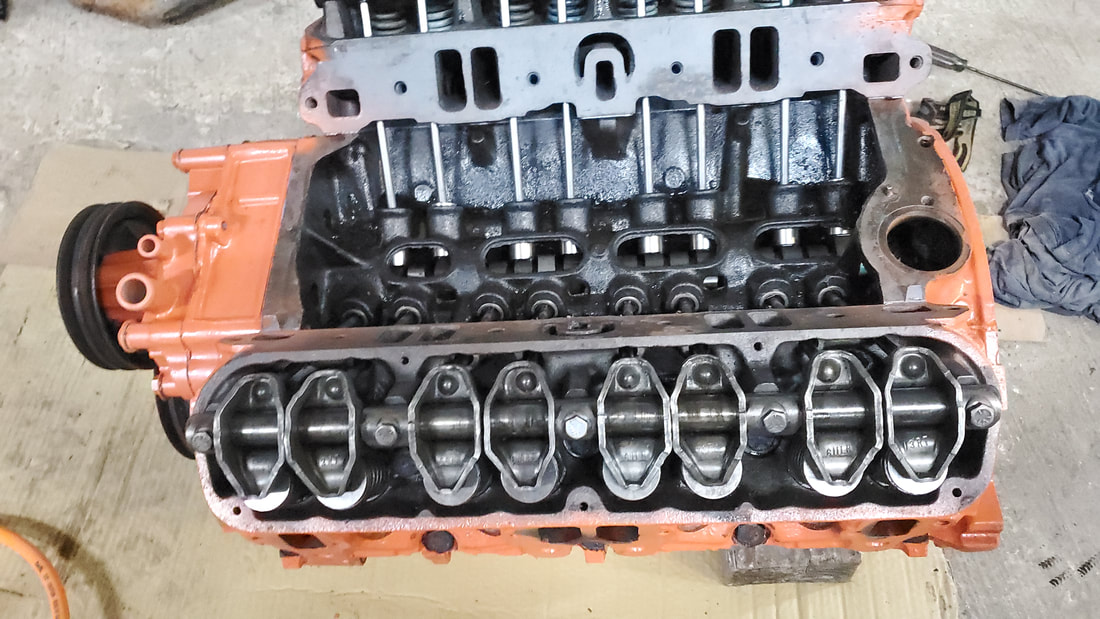
....And on the left side...
With the heads down it was time for the intake manifold. First I had to put down the four piece gasket set, which includes two cork gaskets for the front and back and the actual gaskets for the ports. Of course liberal amounts of gasket maker were used to ensure that this part will seal properly. Once everything was ready I put the intake down and installed the bolts, tightening them down at random to ensure that the intake gets drawn down home evenly. 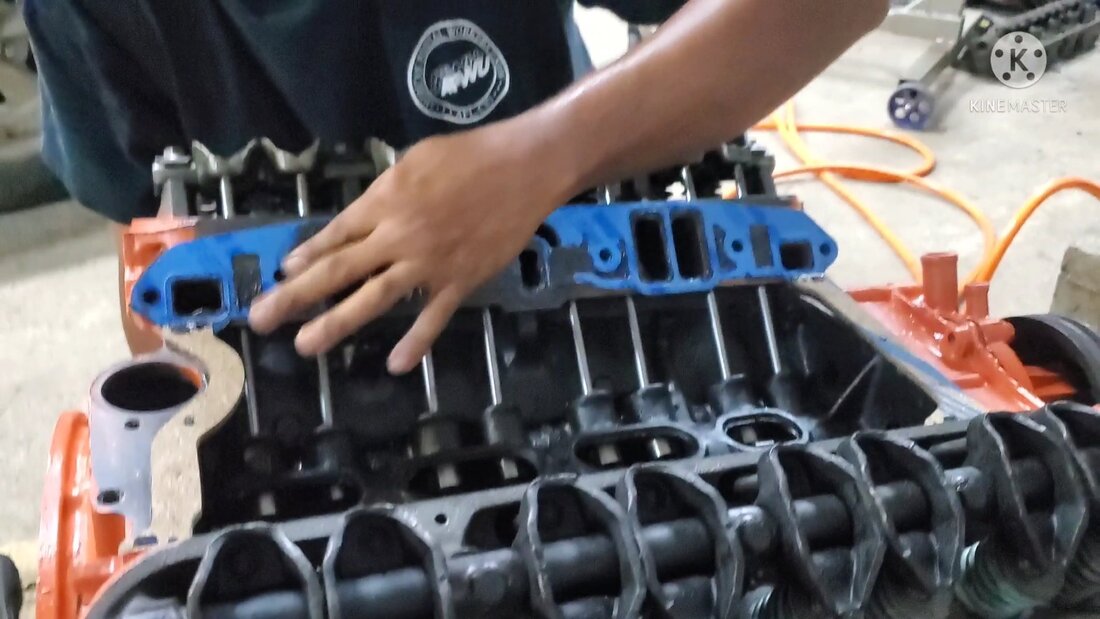
Applying gasket maker to gaskets after setting them down on initial spread of gasket maker.
Setting intake manifold onto engine.
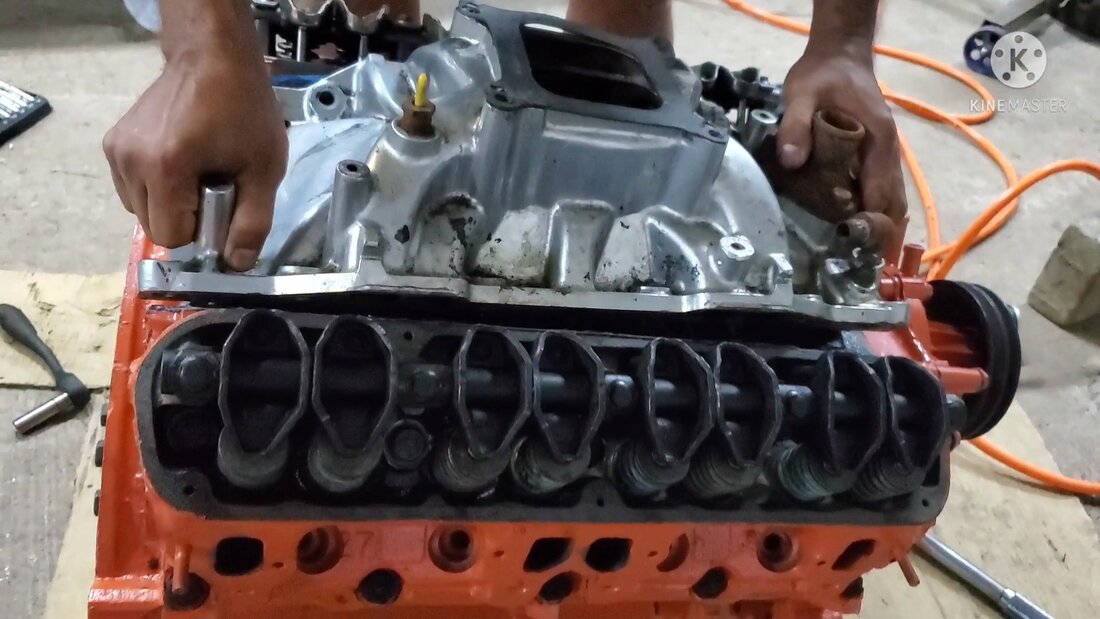
Next was the valve covers and the distributor. To do the valve covers, which were already painted, I applied a light layer of gasket maker on the inside lip of the valve covers since the gaskets included with the rebuild kit were of a decent quality. The gaskets appear to be cork that was coated with a layer of some type of tarry like gasket maker substance that will probably get tacky under engine heat. After gluing down the gaskets, I placed the valve covers onto the heads and used the same bolts that held the valve covers on the old engine. These bolts use triangular washers that fit into the crevices of the cover to help hold the lip of the valve cover down evenly. These bolts did not get torqued down hard as we don't want to distort or damage the lip. 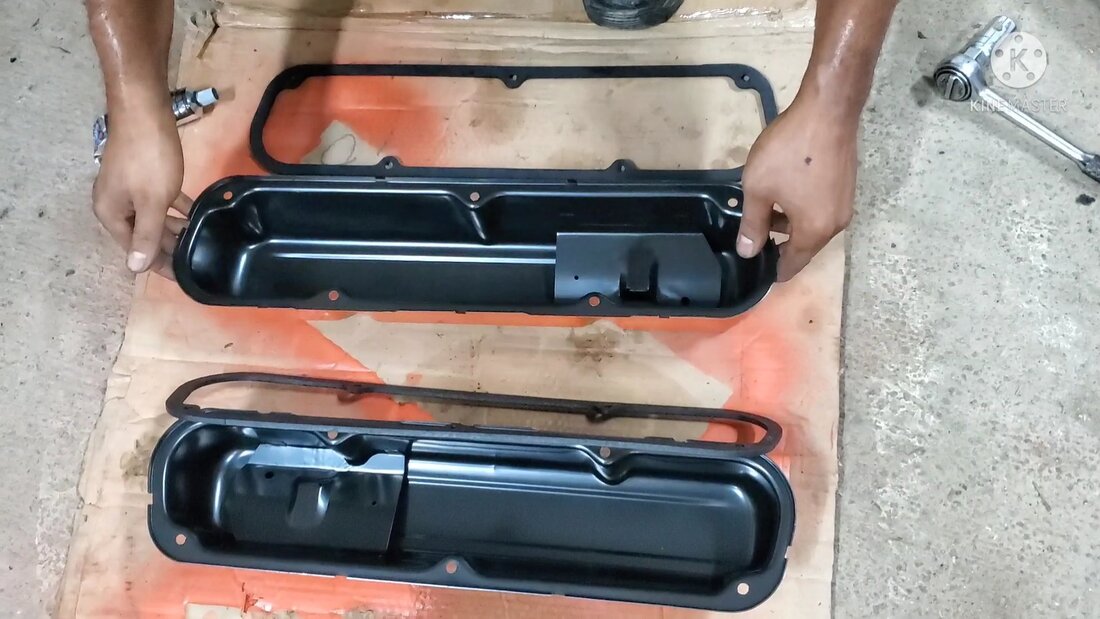
Gluing down gaskets onto lip of valve covers.
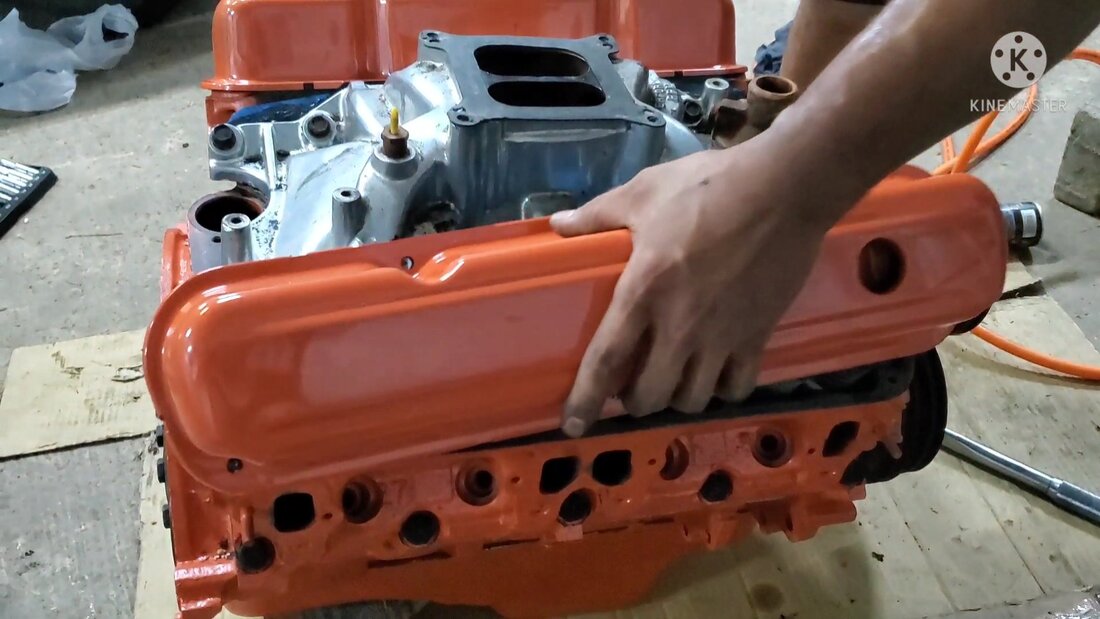
Installing valve covers onto heads.
Now for the distributor. This distributor is another one of the hybrid HEI distributors made for other makes of engines, with the added bonus of actually using the GM cap with the coil mounted on top. This is a step up from the other HEI distributor that was used on the other engine where it just utilized the onboard module. I wanted to try to keep to the same routine when installing this dizzy by trying to get the #1 cylinder in the same spot that is typically used on a SBC engine. I was off by one plug but may be close still depending on the timing adjustments when I do get the engine running. I locked down the dizzy with the retaining bracket, taking care to not tighten it but have it snug so I can still move the dizzy but not have it walk on its own while the engine's running. Once the timing is set I can tighten it down. 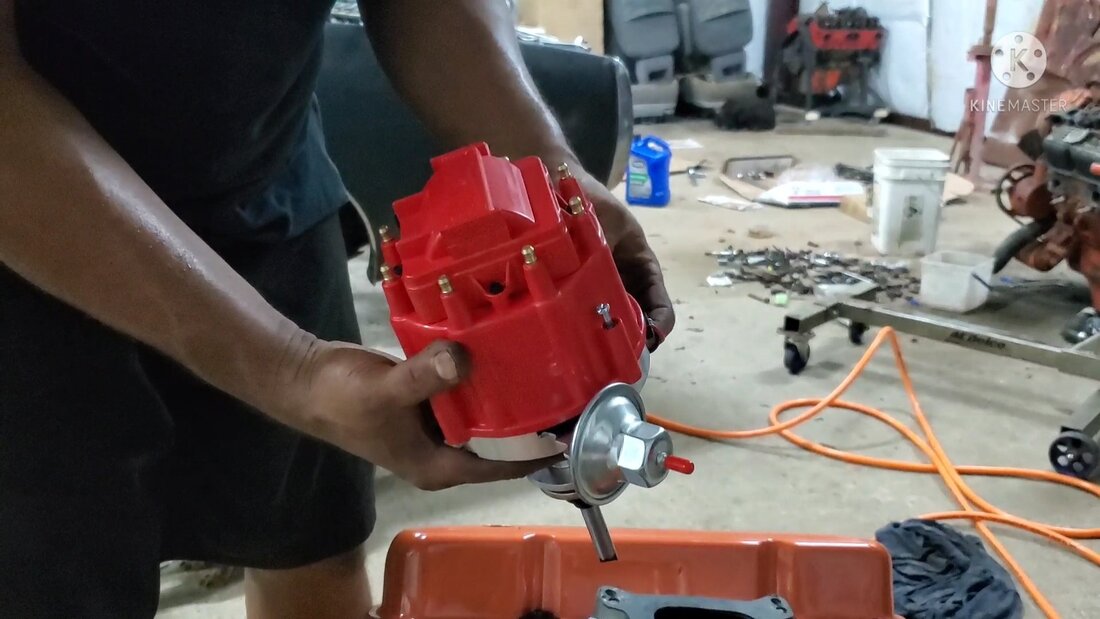
The GM HEI hybrid distributor for the small block Mopar.
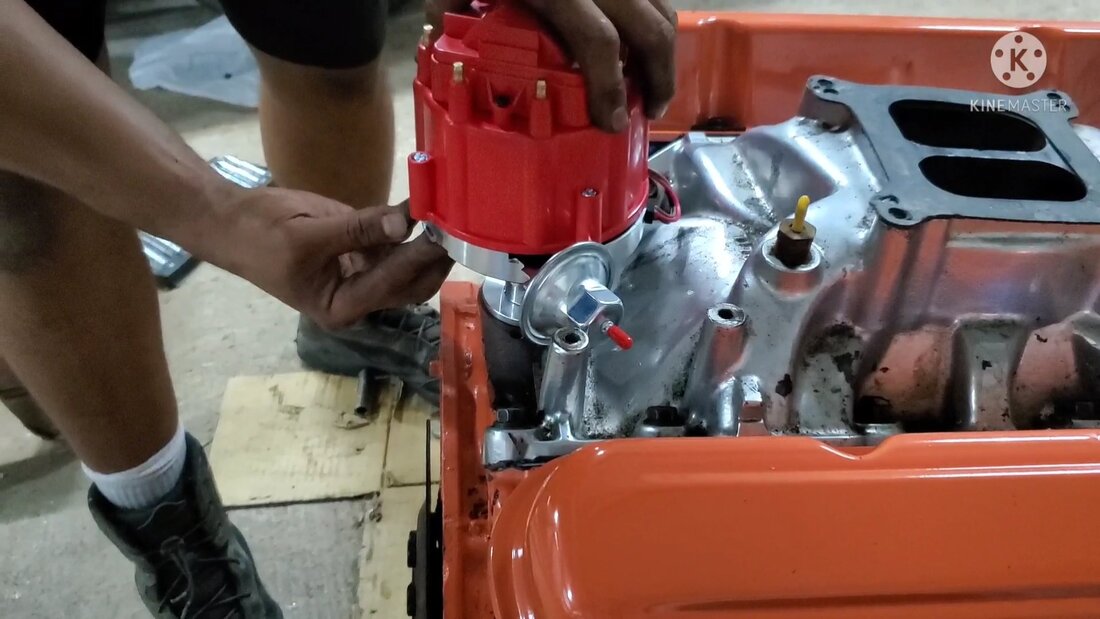
Installing the distributor.
From here the the plugs and wires went on. Of course I reused the plugs and wires from the old engine since these parts were still new and it didn't make sense to get new parts when I already had some on hand right there. After installing the plugs and wires I took time to do an improvised wire connector setup with zip ties, learned off of the Motortrend show "Roadkill". 
Installing the spark plugs.
...And the wires...
...And the zip tie plug wire connector setup.
The next set of components to go on were the power steering pump and its associated bracket and the alternator bracket. Both of these required me to pull bolts out from the water pump that went through the water jacket and required me to apply more gasket maker to ensure they seal later on. With the power steering pump on I put the belt on just to get it out of the way and on the engine, even though I'll still have to install the alternator and its associated belt behind the PS pump belt. 
Installing the power steering pump and its associated bracket onto the front of the engine.

Alternator mounting brackets installed on engine.
A couple of small yet still very important parts that needed to go on were the oil pressure sending unit and the oil dip stick. The sender unit was just a simple screw on piece, made easy by the idea that the engine was out of the car. Trying to get a wrench in there from the front and around the distributor might be a PITA, calling for pulling the dizzy just to gain some open space. As for the dipstick, I had to file down the part of the tube that would insert into the block to knock off enough material to make it somewhat easy to press the piece in place. I then carefully tapped the tube in to get it seated enough that it will be able to read properly. I would rather have the dipstick not fully seated because breaking the part of the dipstick that goes in the block would be a major disaster calling for me to pull the oil pan in order for me to drill out the damaged piece without getting shavings in the oil pan. 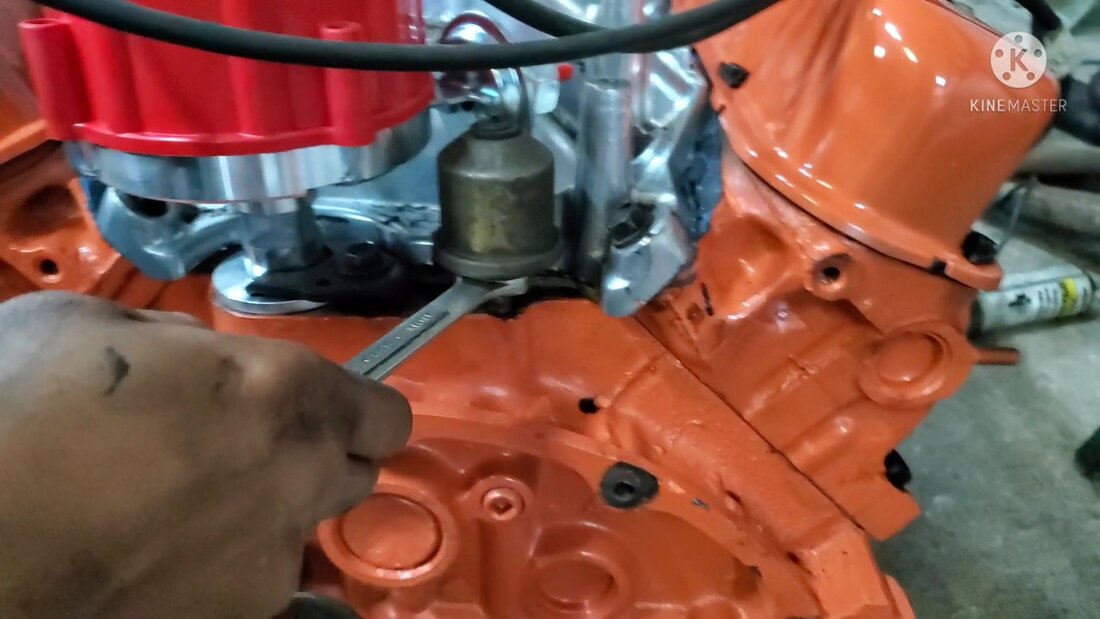
Tightening down the oil pressure sending unit.
Oil dipstick in place in the block.
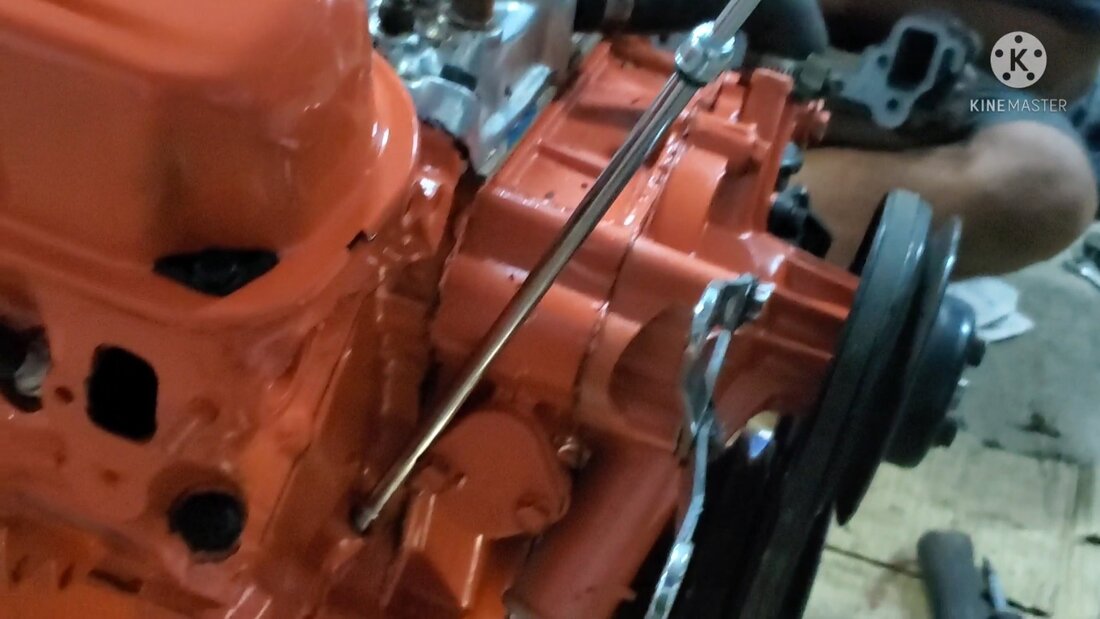
Lastly I installed the exhaust manifolds. These heavy things required six bolts each, and one side actually had studs on the ends instead to help in mounting the piece easily. After lining the gaskets up I took my time getting bolts in on the one side without the studs, getting the manifold bolted up, but not tightening the piece too tight because a broken bolt in the head would be a major disaster. The other side was easy, again because of the studs, which held the weight of the manifold and lined up the gasket properly so I could put the bolts in easily. 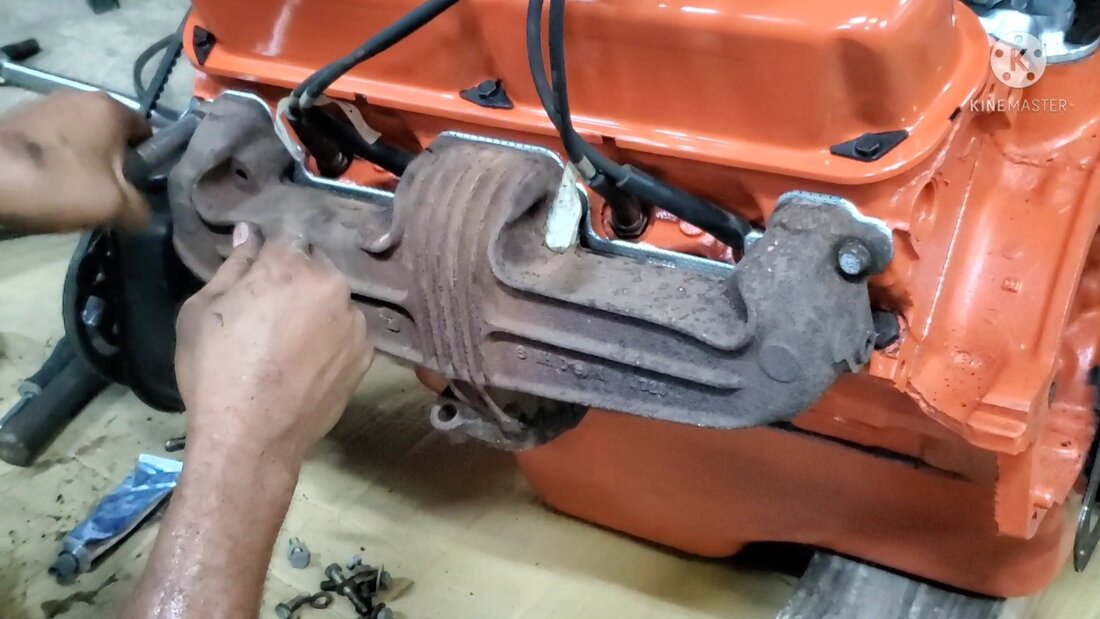
Installing left exhaust manifold on engine.

Installing right side exhaust manifold, note nut on stud on left side of manifold.
With the engine officially together, it's ready to go into the car. One of the things that I will do prior to installing the engine is to replace the transmission front seal since its a quick simple fix that can save a world of hurt if it did go bad. Since the engine had been run a good amount and even driven a couple of times, it wouldn't hurt to replace this sub $10 part prior to bolting the engine up to the transmission.
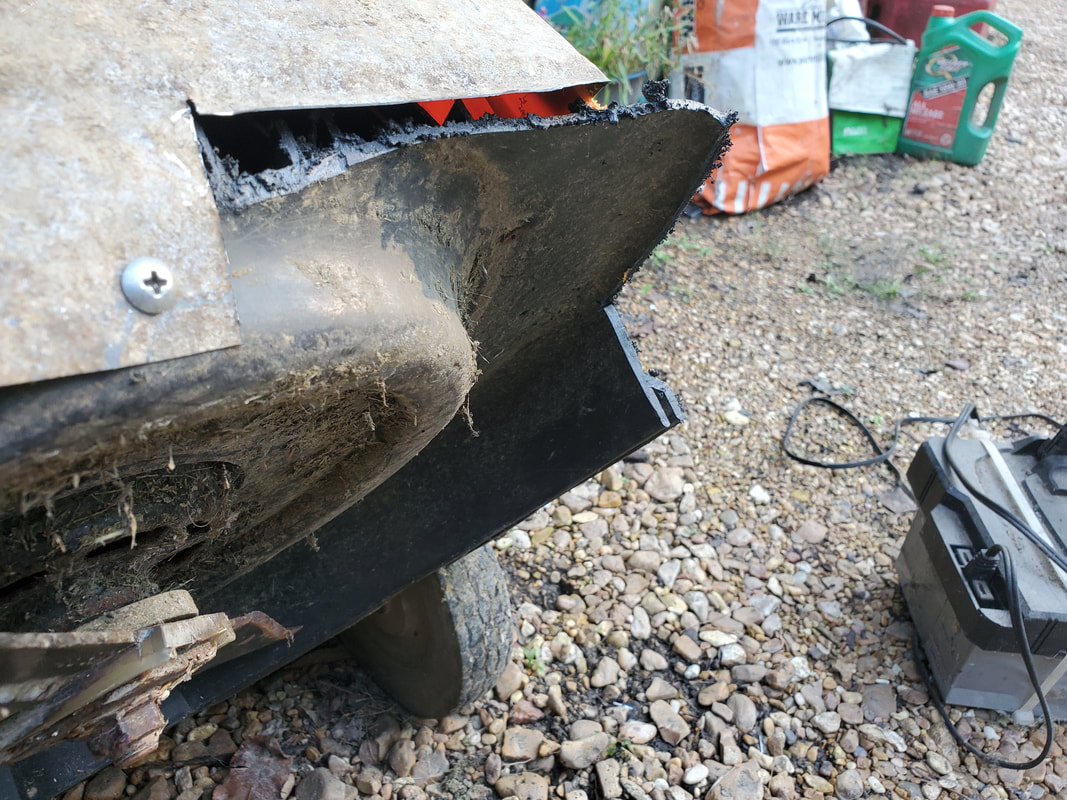
If you remember from our last encounter with our Coleman Go Kart, we had replaced the engine clutch and drive belt on the torque converter assembly due to the idea these components were trashed. After taking the machine for a test drive after replacing these components, I did have a bit of a disappointment. While the test drive was successful in the case of proving the functionality of the driveline parts, it was a failure in the sense that the go kart still had a problem.
Most of the time when a small engine has troubles the issue is the carburetor. As we all know the carb on a small engine can get gummed up easily due to gas going bad while in storage or from internal failures due to the ethanol infused gas we typically use. Whatever the case was with this carb, it needed to be replaced. I removed the unit for starters so I could cross reference it with a replacement to ensure I order the right component. 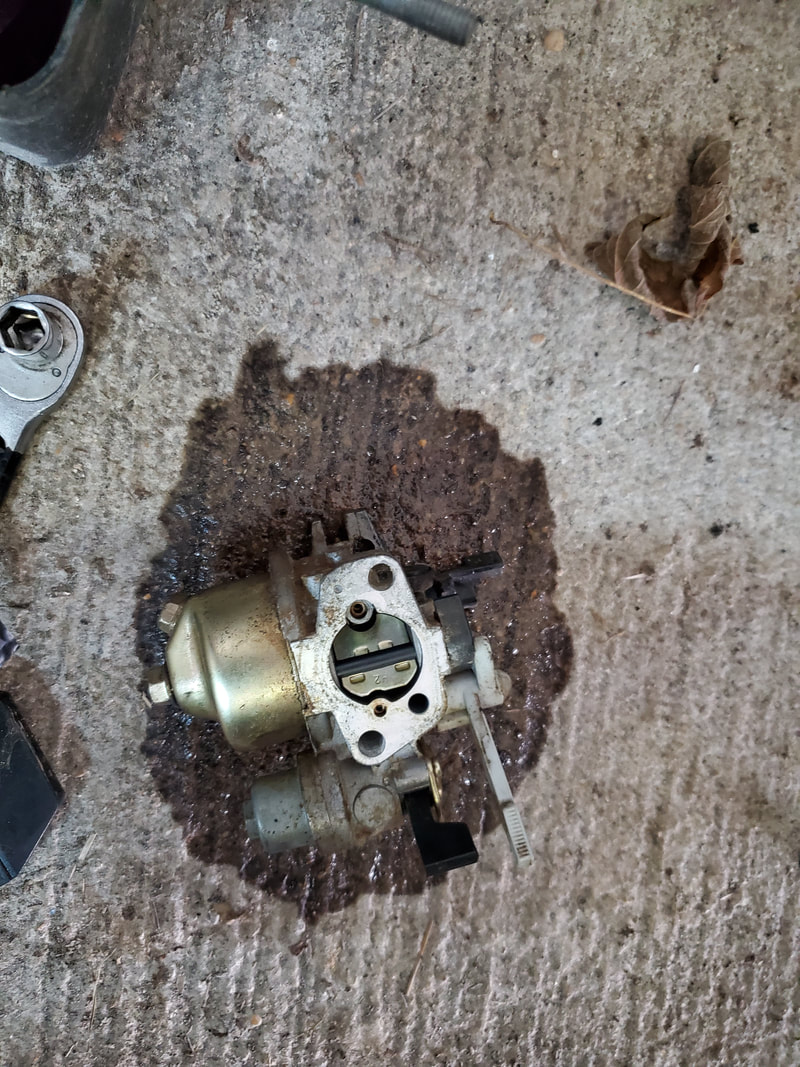
Old carb removed from go kart's engine.
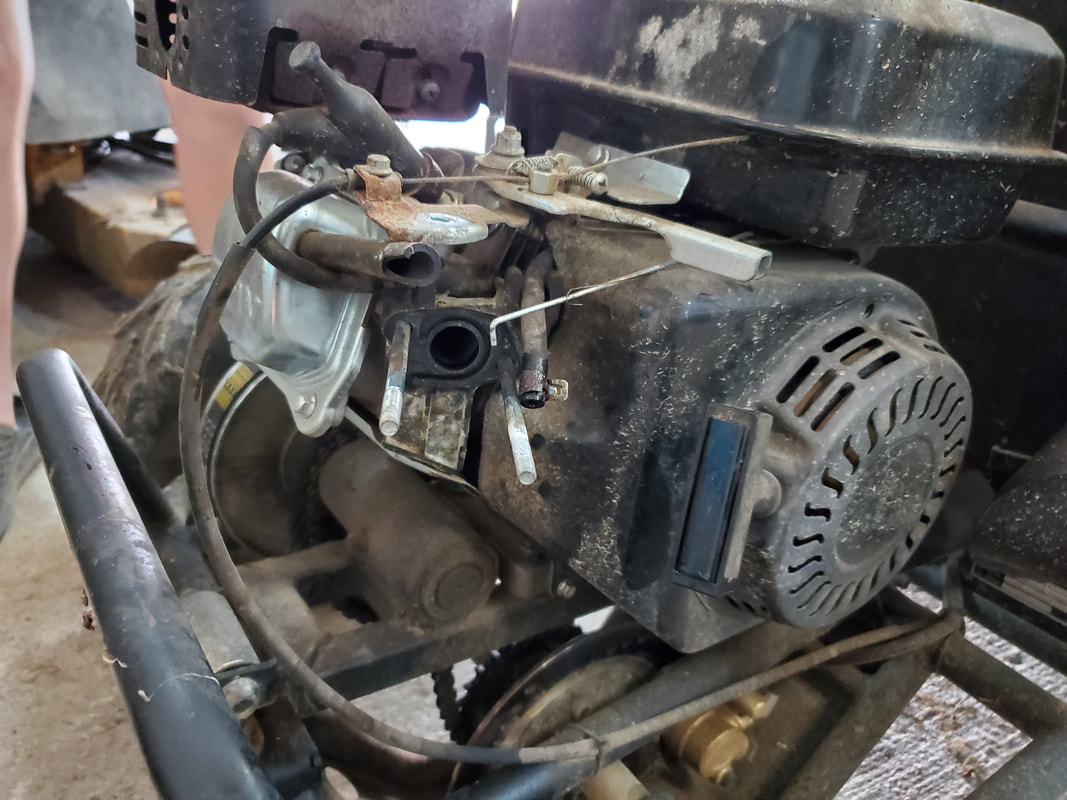
Engine sans carb, showing the simplicity of the setup.
After getting the replacement carburetor in the mail, I got to work installing the piece. As can be seen in the previous pics, this engine setup is pretty simple. There's two long studs that hold the carb in place against the intake port of the engine. There's a spacer that goes between the carb and the intake with a couple of paper gaskets that go between all of the pieces. These pieces were assembled first then the carb was slid onto the studs. From here before sliding the carb completely home I hooked the linkages to the throttle of the piece. 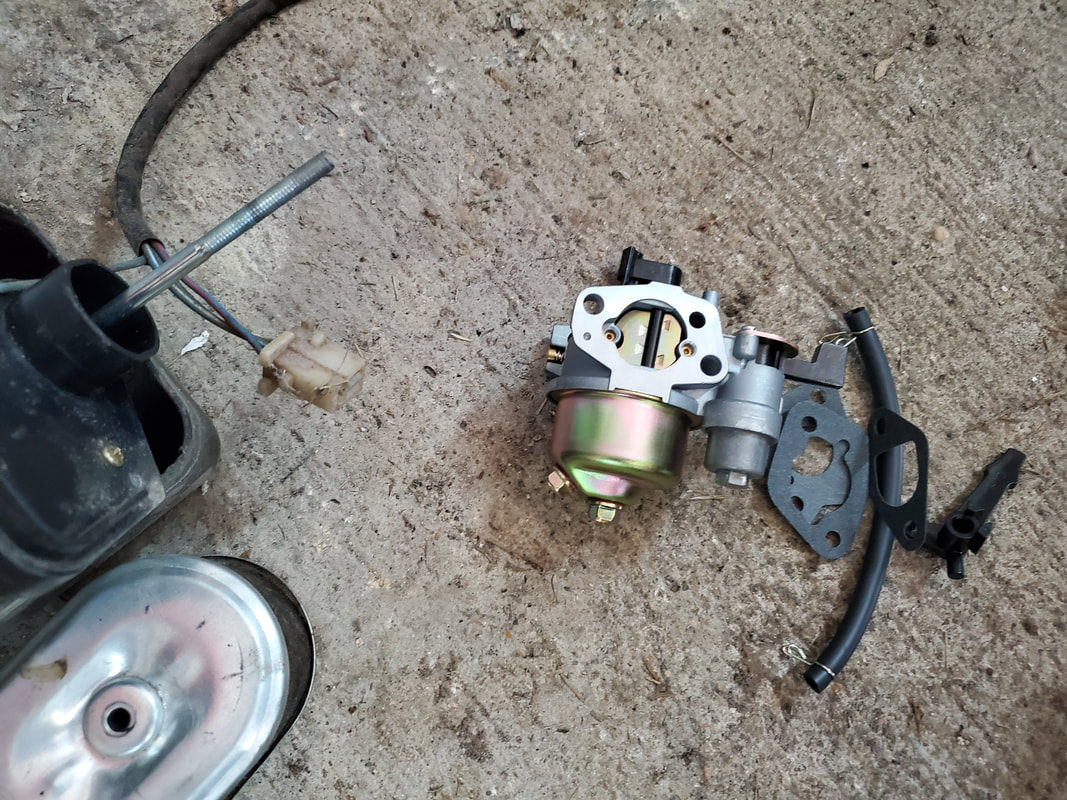
Replacement carburetor ready for install with gaskets.
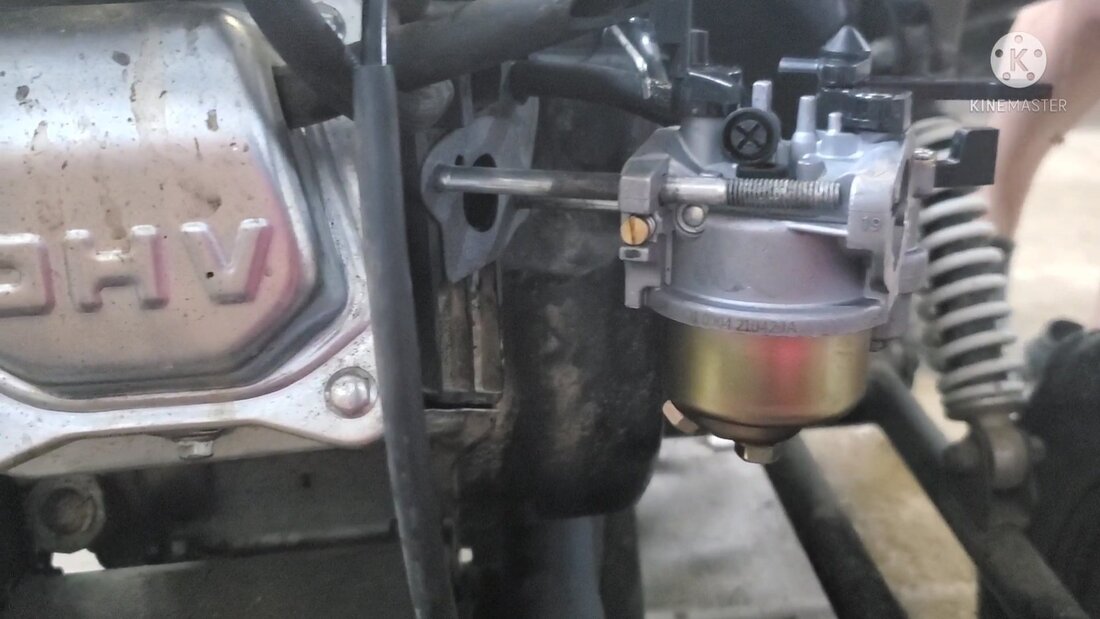
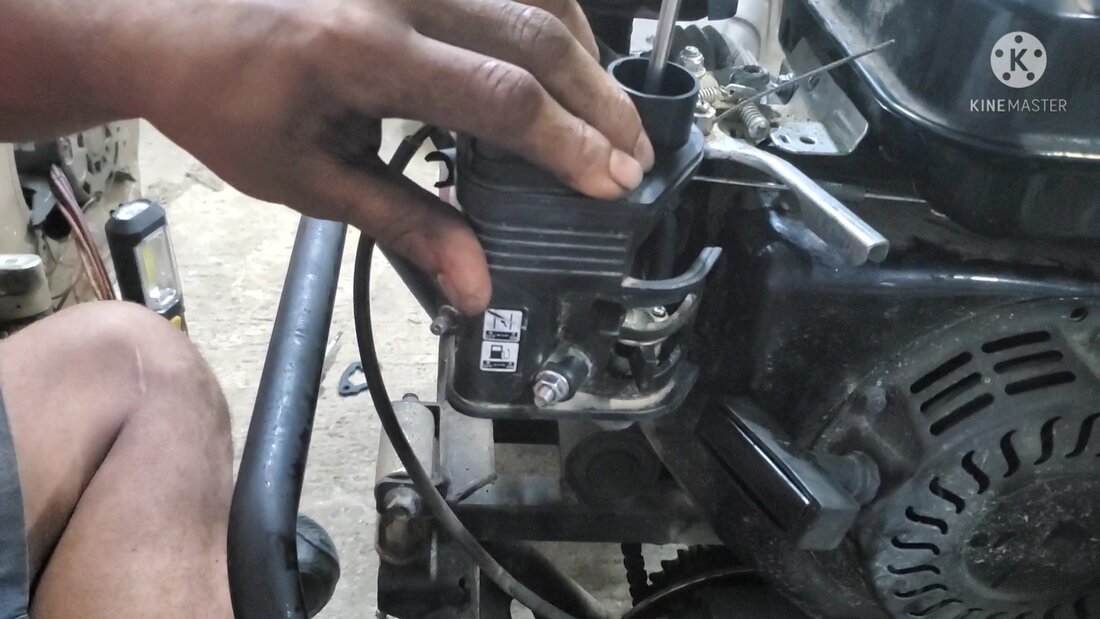
Sliding carburetor onto studs to seat in place on engine.
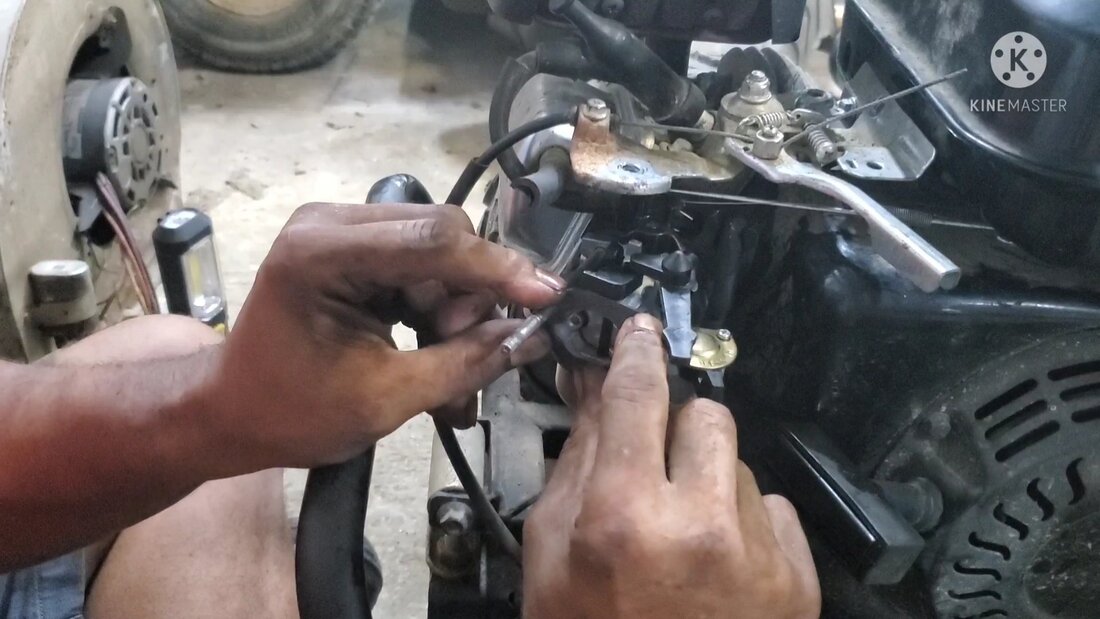
Hooking up carburetor after sliding it in place on studs.
With the linkages hooked up and the fuel line plugged up I placed the air cleaner base onto the studs and attached the two nuts and one bolt that hold the plastic piece in place. With everything hooked up to this degree the engine was ready to start as it doesn't need the air cleaner in place to run. Since the fuel system is a simple gravity feed system allowing fuel to flow from the tank down into a valve that can be shut off to kill fuel to the engine then into the carburetor's float bowl, it shouldn't have taken much to start the engine after allowing fuel to go into the carb. 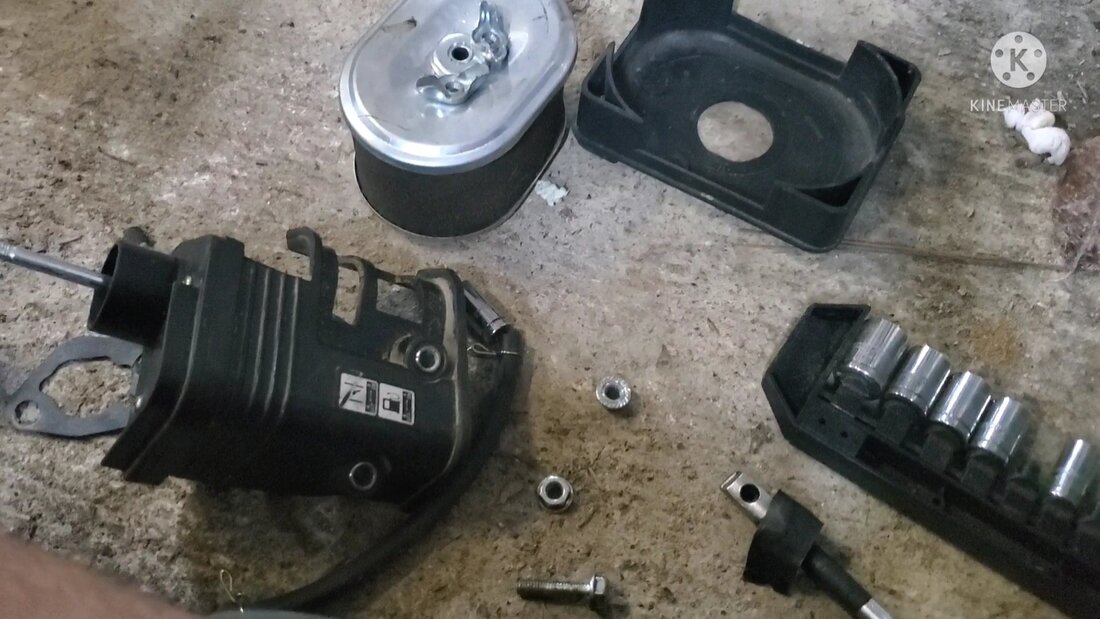
Air cleaner assembly pieces.
Installing air cleaner base onto studs over carburetor.
After setting the choke and having had the fuel valve open, I pulled the cord with a good yank and the engine shot to life. Opening the choke made the go kart want to jerk forward so I kept the choke halfway open. With the machine showing that it ran strong, I went ahead and installed the air cleaner element and cover to complete the whole ensemble prior to doing a test drive. 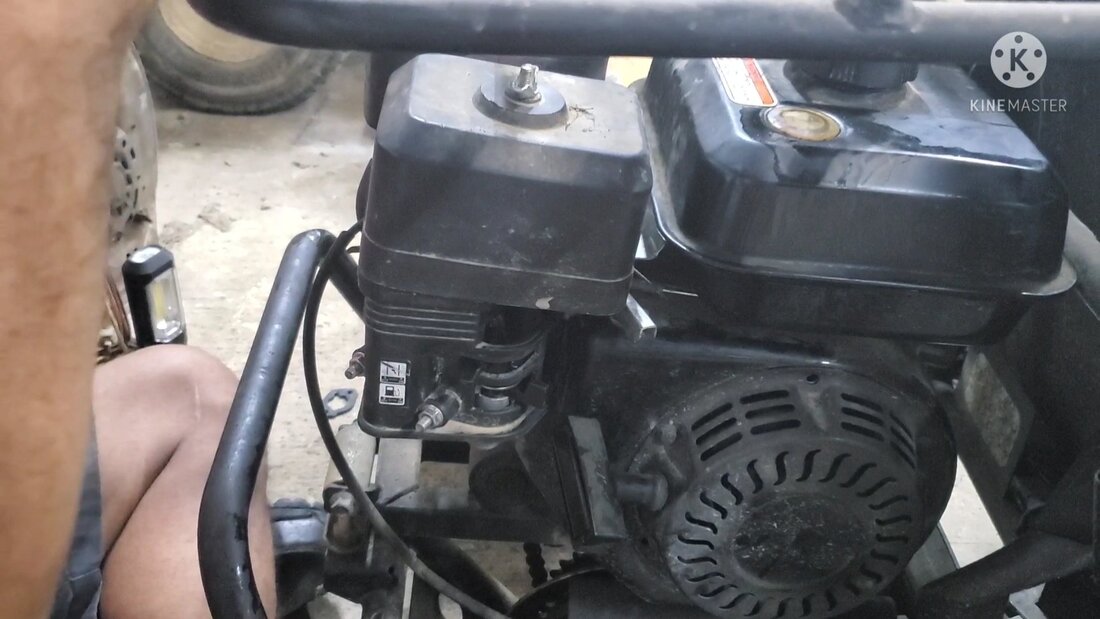
Engine with air cleaner element and cover installed.
Of course the ole lady had to snatch the opportunity for me to test drive the go kart so I went ahead and started the engine and opened the choke up so she could take off. After a couple of minutes of riding all over the yard I motioned her to return to the garage so I can try the thing out. After getting in she pulled the cord and opened the choke and I took off running. I drove around the yard and down the driveway, sliding over the gravel as I powered into a hard turn to return back to the garage myself. 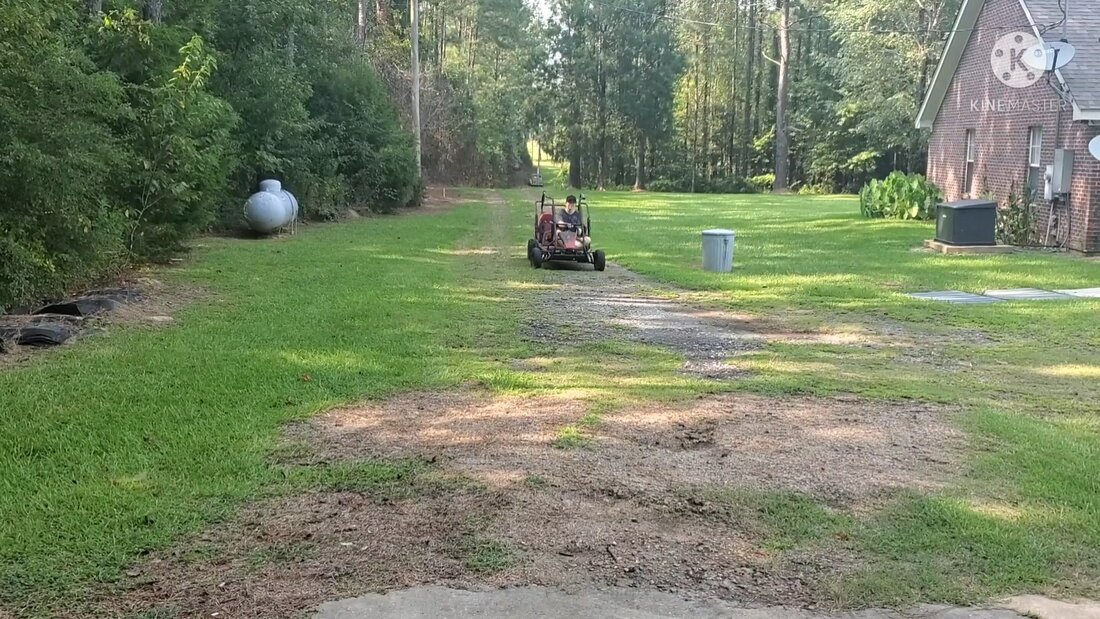
Ole lady driving the go kart around the yard.
Riding down the driveway in the go kart.
While the test drive was a success due to the carburetor running the engine hard all the way through the testing for both of us, one thing I did note was the idea that I will have to make some adjustments to the throttle since the throttle for all intents was more wide open, not dropping down to an idle when first starting or when removing pressure from the pedal. I'm sure that this problem is nothing more than some trivial adjustments to the governor and the linkages going between the carburetor and the mechanical throttle linkage and the governor linkage on top of the engine block. If I can get the throttle and its associated connections straightened out then the engine should be able to change between idle and WOT with no issues, restoring the go kart to full operational abilities.
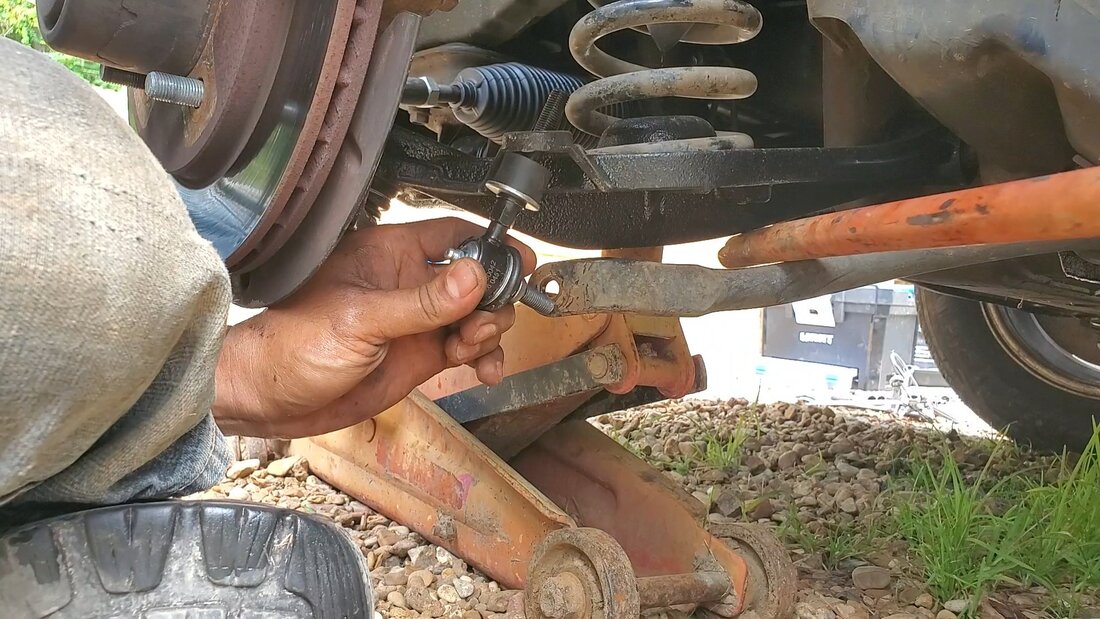
After recently replacing a bunch of hardware on the Tracker's front suspension (essentially rebuilding the front end), I had just the sway bar links left. The kit that had all the other hardware didn't include these and after pulling things apart underneath I found that I really did need to get these just the same as any other parts.
Of course it wasn't critical to have these components in place as their whole purpose is to help in the sway that occurs when a vehicle goes over various terrain and the control arms flex up and down independent of one another. The sway bar lessens those extremes in movement and the links/bushings help hold the sway bar to the control arms. In the case of our vehicle, one side was pretty much gone, snapped apart and the other one had excessive wear. After ordering the replacement link bushings, they finally came and I was able to get to work. This whole job was rather small as it only included replacing these two small parts. Of course to get things started here I had to pick a side and pull the tire off. I chose the side with the missing link. 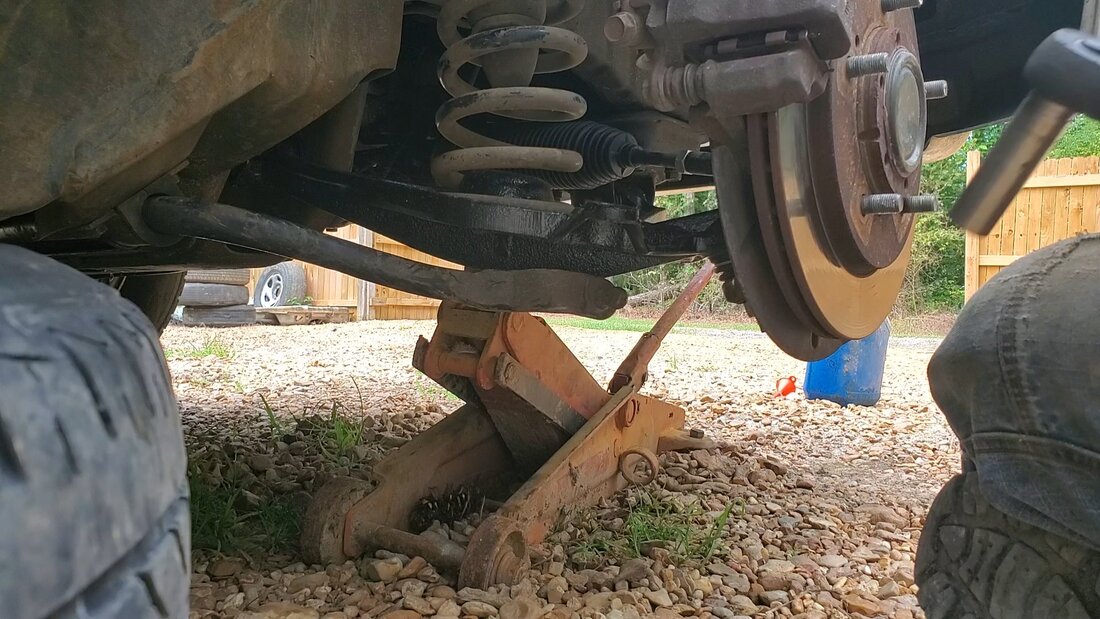
Right side control arm and end of sway bar showing missing link bushing set.
To put this piece in there was a matter of removing the stud that remained from the old link set, still in the sway bar. After finding the right size wrench and pulling the stud free, I disassembled the new link and installed it in the control arm. From there I had to use the jack handle as a form of leverage to raise the control arm up some to get it a little bit higher than the sway bar so the link would go on. 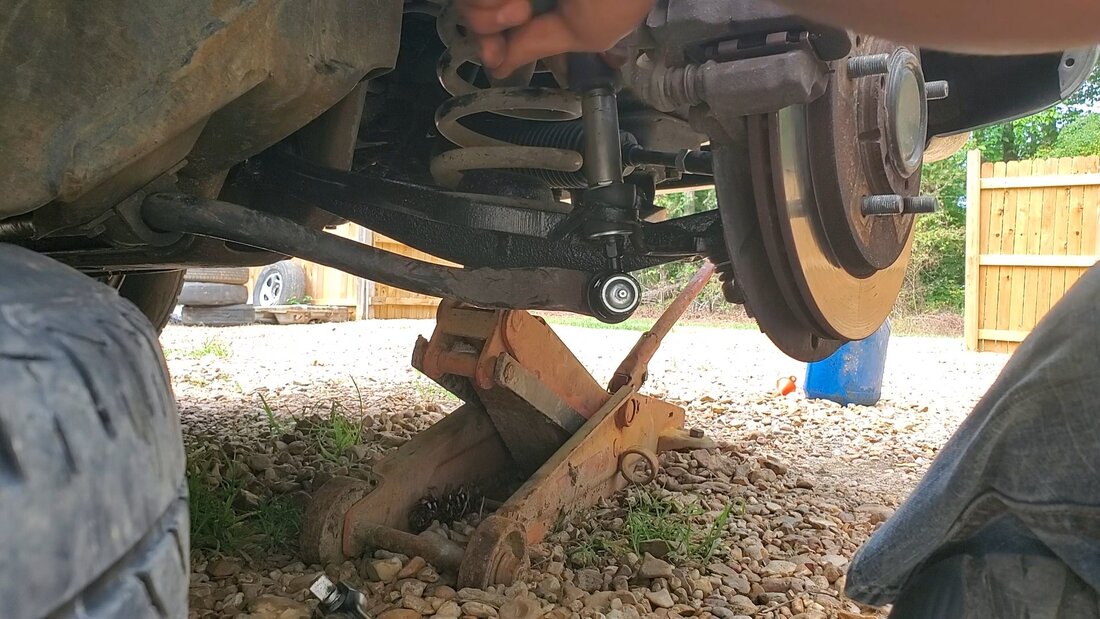
New sway bar link in place on right side.
With the link on I installed the nuts and tightened everything down. As is the case with these no name brand parts, the nuts are never the same as the original part's fasteners so I had to find the wrenches/sockets to fit the new parts' fasteners. With this side's sway bar link installed I put the tire back on and moved to the other side. Moving to the other side, I repeated the same routine, pulling the tire off except this time I had to actually remove the whole link since it was still present. After removing the old sway bar link I prepped and installed the new sway bar link the same as with the other side. 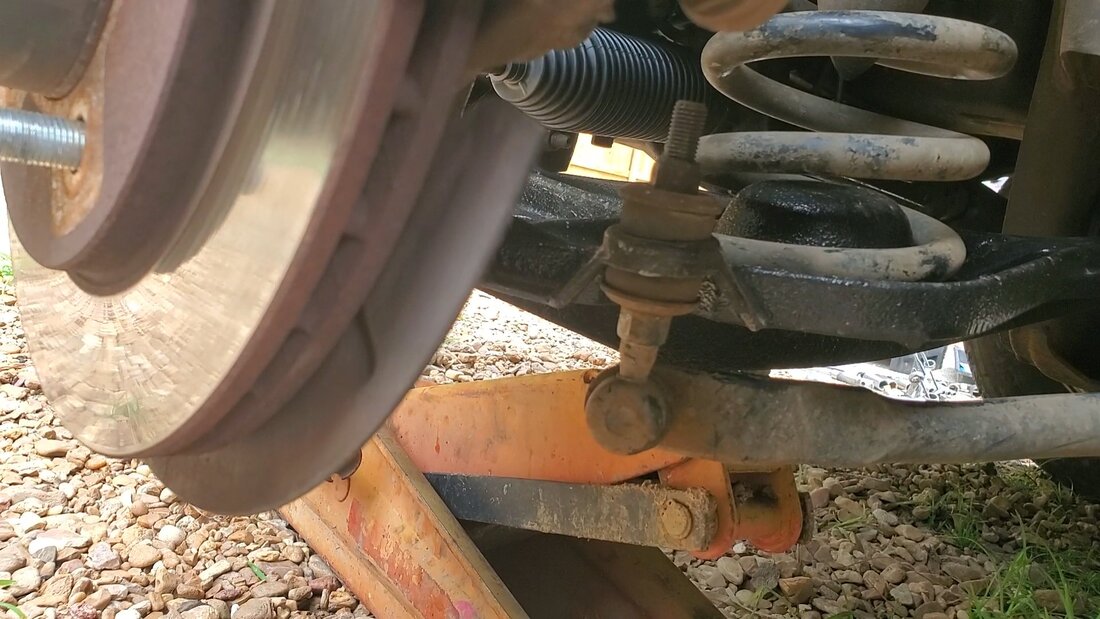
Old sway bar link in place, needs to be removed.
Installing the new sway bar link in place.
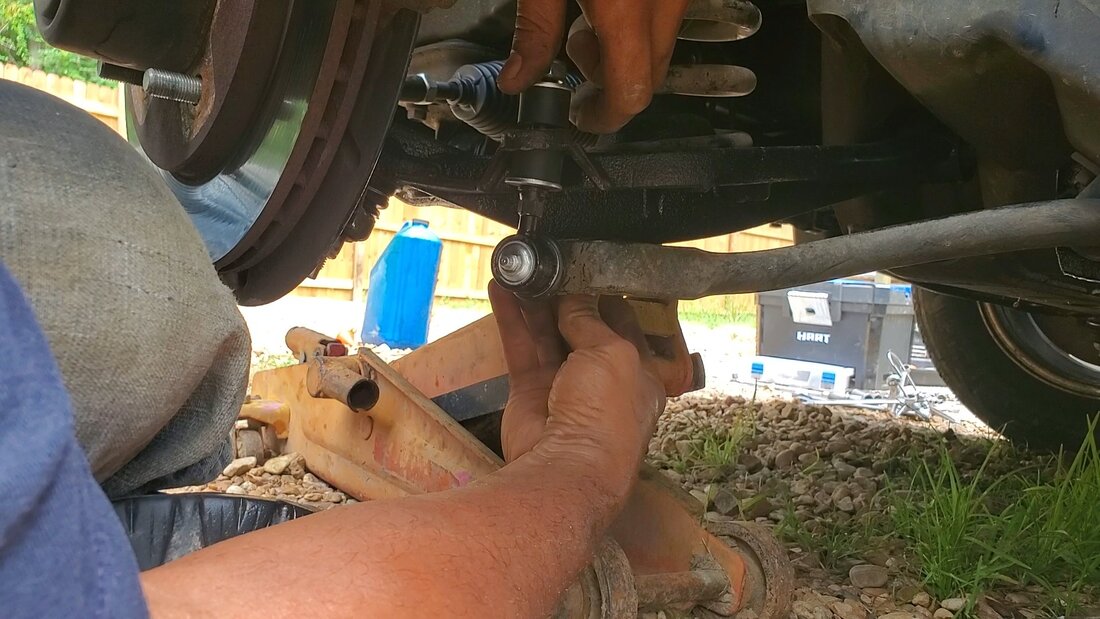
Finishing the installation of the new sway bar link
With the new sway bar link installed on the left side, I put the tire back on, happy that the job was complete. Later on after taking the vehicle on the road under routine circumstances, I was able to drive without hearing the clunking from the sway bar bouncing around hitting the control arm due to the missing link, even more so not having the level of sway that was present due to the bad/missing links. Of course there is still a matter of getting the front end alignment on the vehicle but for right now the vehicle drives and rides pretty good with the new components in place.
In the process of trying to clean things up and downsize the amount of random crap we have around the compound and garage, we run across a lot of things that either haven't been used in a while, or are unable to be used or are outright garbage. Those things that are garbage either get scrapped, thrown out for regular garbage, or burned in a brush pile. Those things that are still good or otherwise usable either get sold on the 2nd hand market or get taken to the 2nd hand store for donations. Point is, we don't want stuff laying around that either isn't being immediately used or isn't on standby for later use in the very near future, or in the case of preparedness stuff, emergency use.
One of the things that we have that was still usable but not to us was an old battery electric lawnmower. This was our first foray into larger battery powered equipment and actually did a fairly decent job when it came to being able to cut grass within reason. The machine was a 36v system that used a battery pack that consisted of three sealed lead acid batteries. I had to remake the initial battery pack after the batteries died but after we got our hands on the Kobalt 80v lithium battery powered mower, this mower ended up pushed aside in a corner of the garage. Because even the new battery pack eventually died and with this mower being outdated, we couldn't even sell the thing 2nd hand for dirt cheap. So rather than scrap it, I decided to do a project with this thing, that is to turn it into an electric bush hog. What's a bush hog? Its like a bastard hybrid union between a push mower and a weed eater. The thing looks like a mower with the front half chopped off and the head of a weed eater attached to the front for the sake of being able to be pushed into thick brush on rough terrain where a regular 4 wheel push mower would not be able to be used and too heavy for a standard weed eater to be used. My idea was to just like I said the commercial bush hogs look like: chop the front portion of the mower off but instead of somehow attaching a weed eater head to the thing I just figured that if I cut enough of the front of the mower off, it will expose more than enough of the death blade to allow me to push the machine into brush for the blade to chop it down. 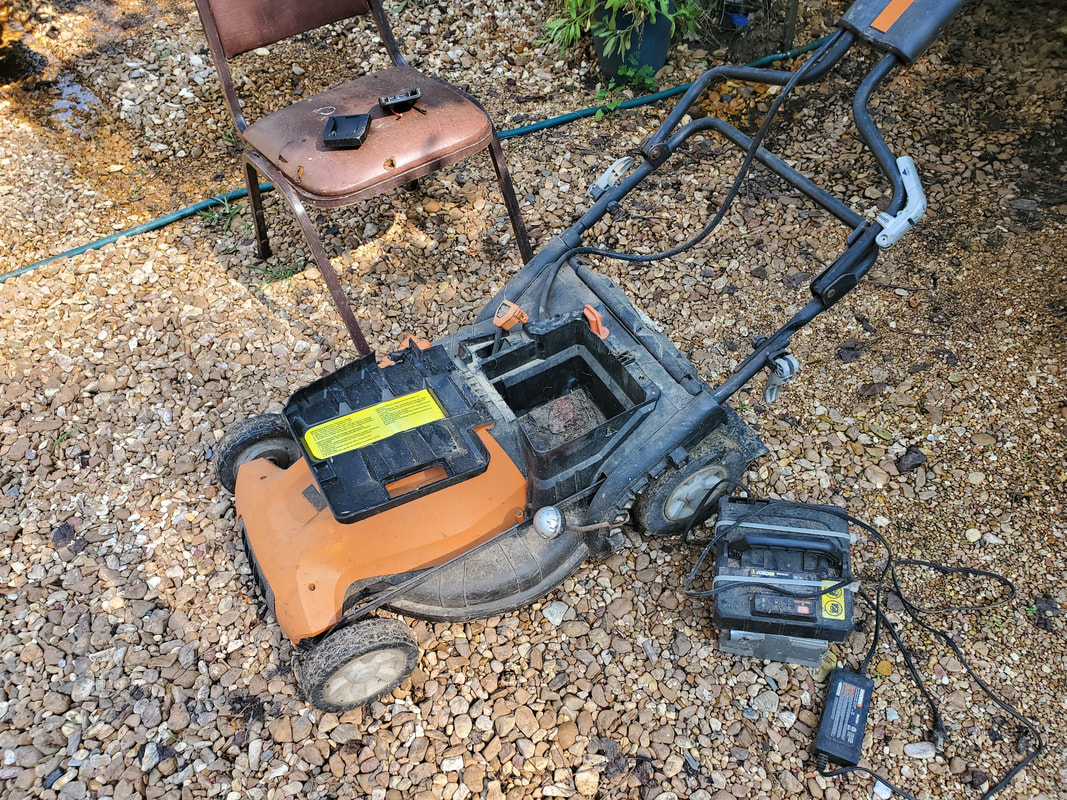
The 36v battery electric push mower with old battery and charger.
First thing was to remove the front wheels from the machine. The height adjustment lever of this mower is set up where a bar attaches to the front wheels from the rear wheels so when the lever is moved it works both sets of wheels simultaneously. I would have to remove this bar just as well since it won't be needed, obviously. The front axle was held on with some simple retaining bars held in place with simple sheet metal screws. The bar was attached with a simple lock washer and cotter pin. The other thing I did was remove the grass exhaust chute from the side, which involved cutting since the screws were too rusted to take the tip of the screwdriver. 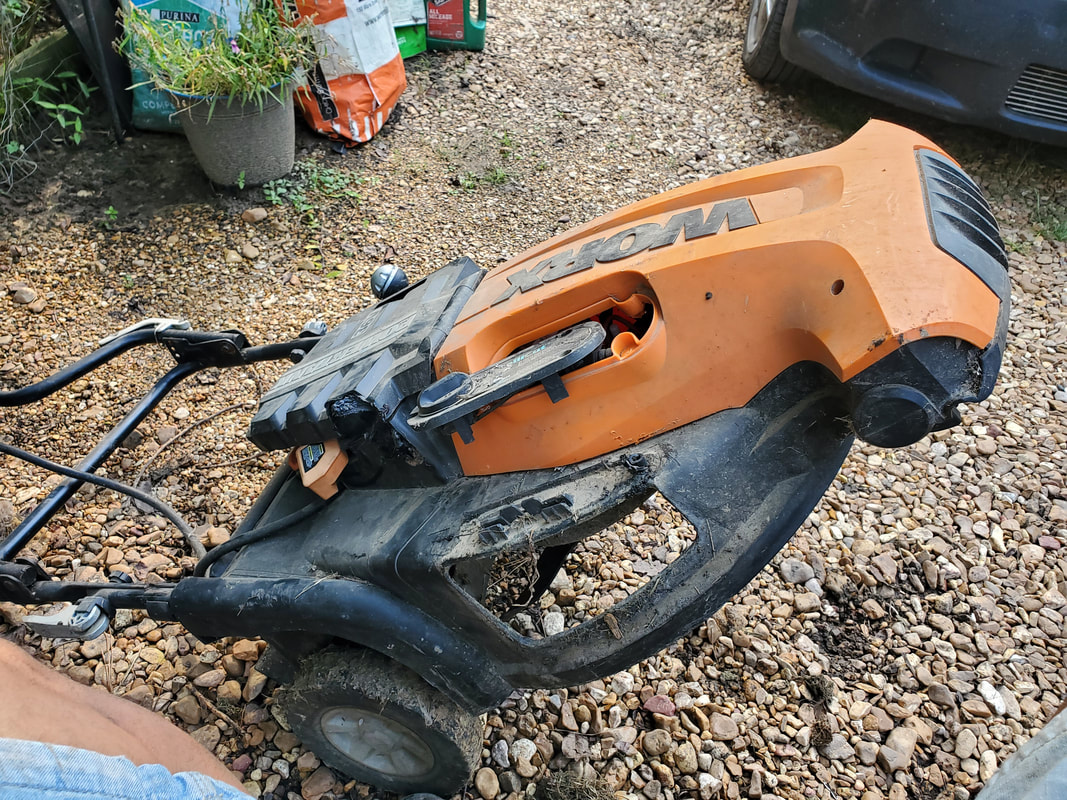
Removing the front wheels/axle from the mower. Also not the missing grass exhaust chute.
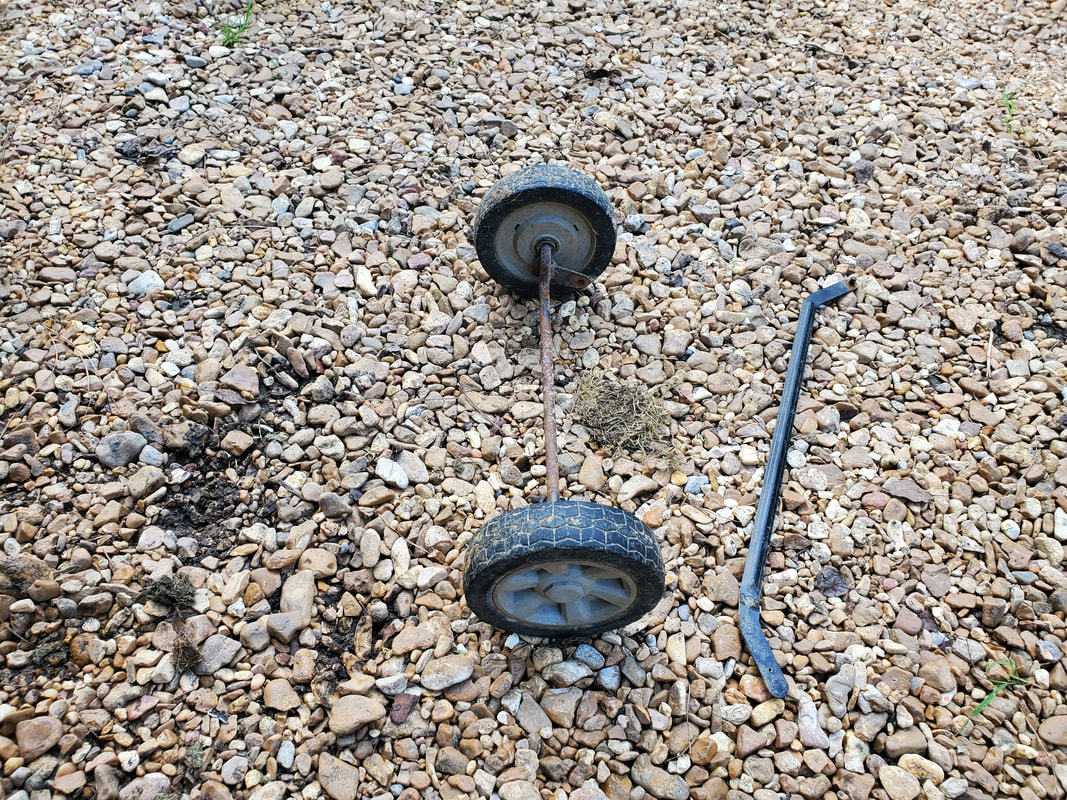
Front axle/wheels with height adjustment bar also removed.
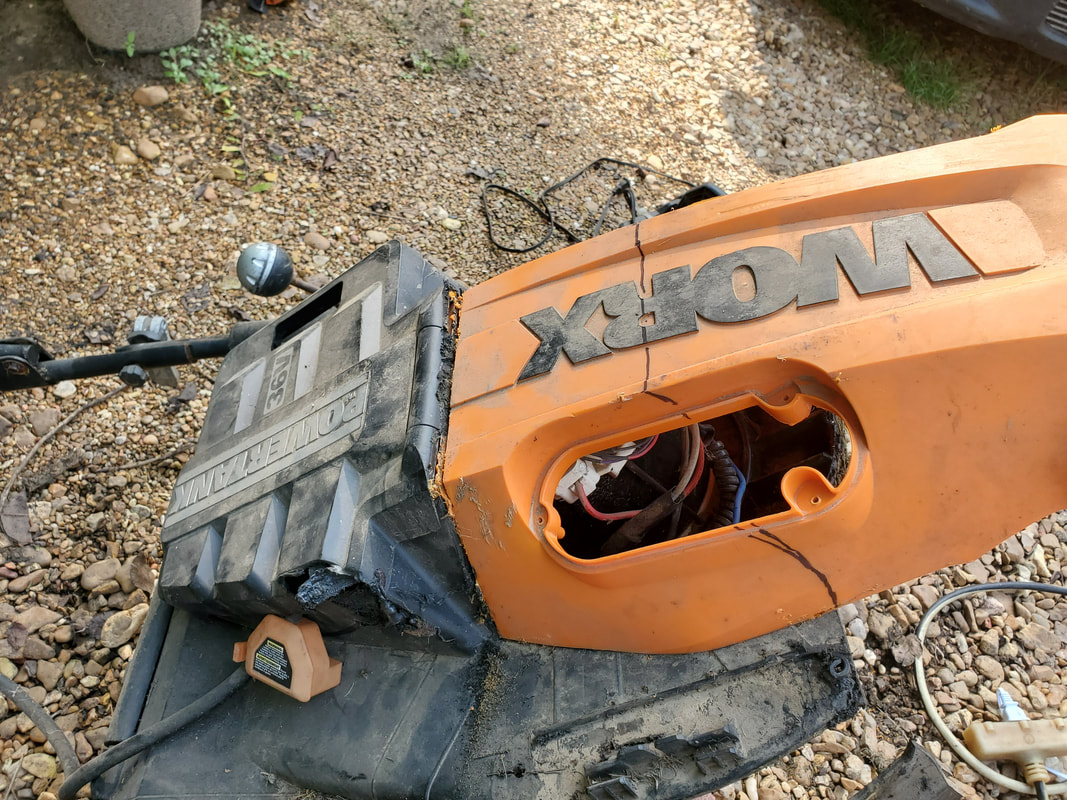
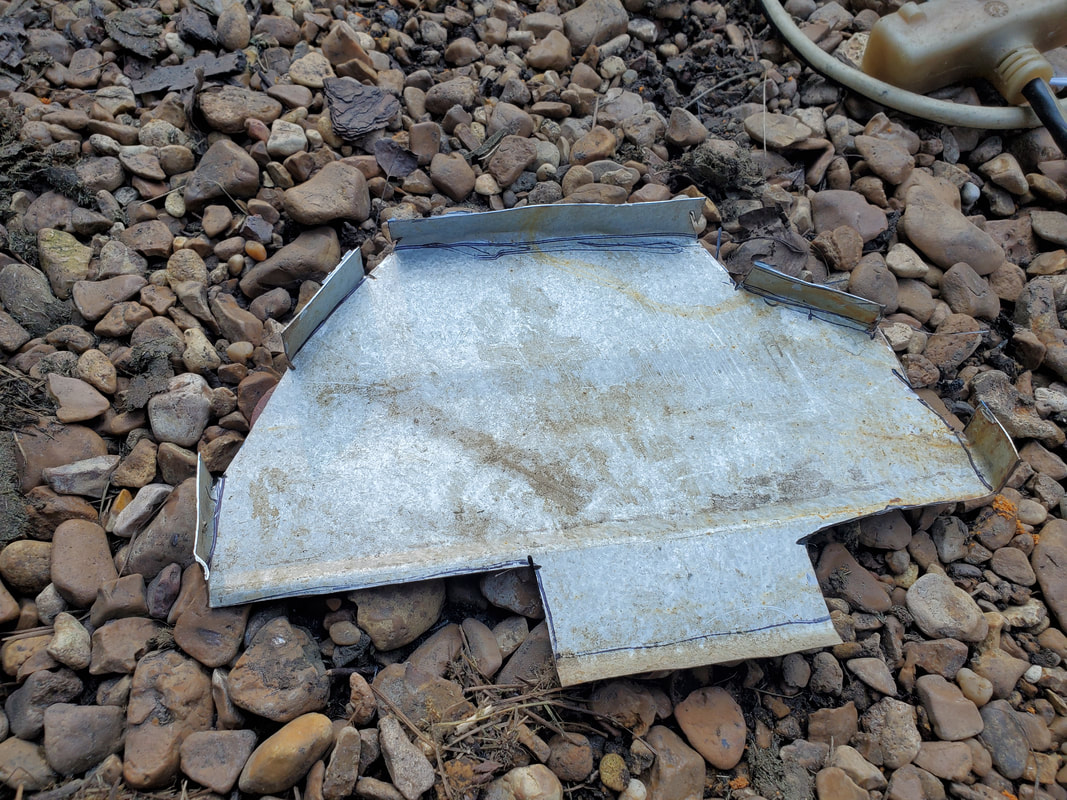
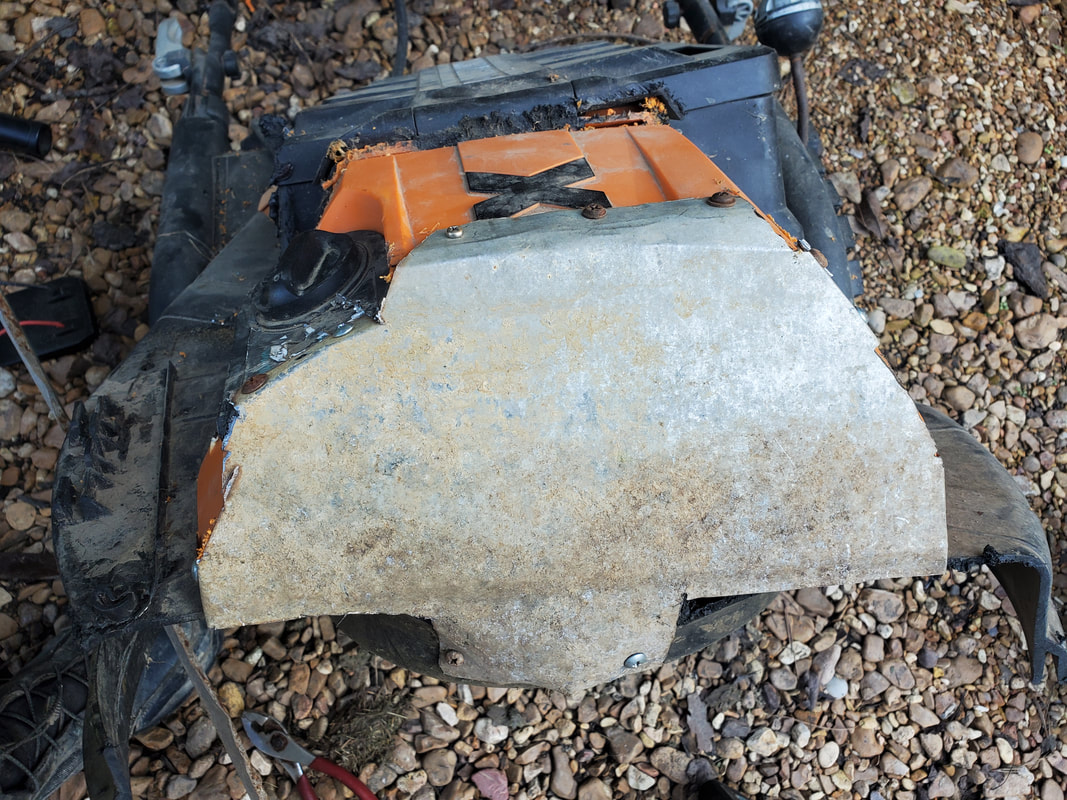
The next move was to remove the cover from the top of the mower in order to gain access to the electronics and see where I would be able to cut across the mower body. From what I could see I would have to relocate some stuff within a little farther back. The way the body looked the screws were in some odd spots with only one being reachable from the top. The others were underneath and were rusted badly enough to not be able to be removed. I ended up cutting the shell free from the point where the orange shell met the front of the battery compartment shell and cut across the front of the shell just over where the front axle was. 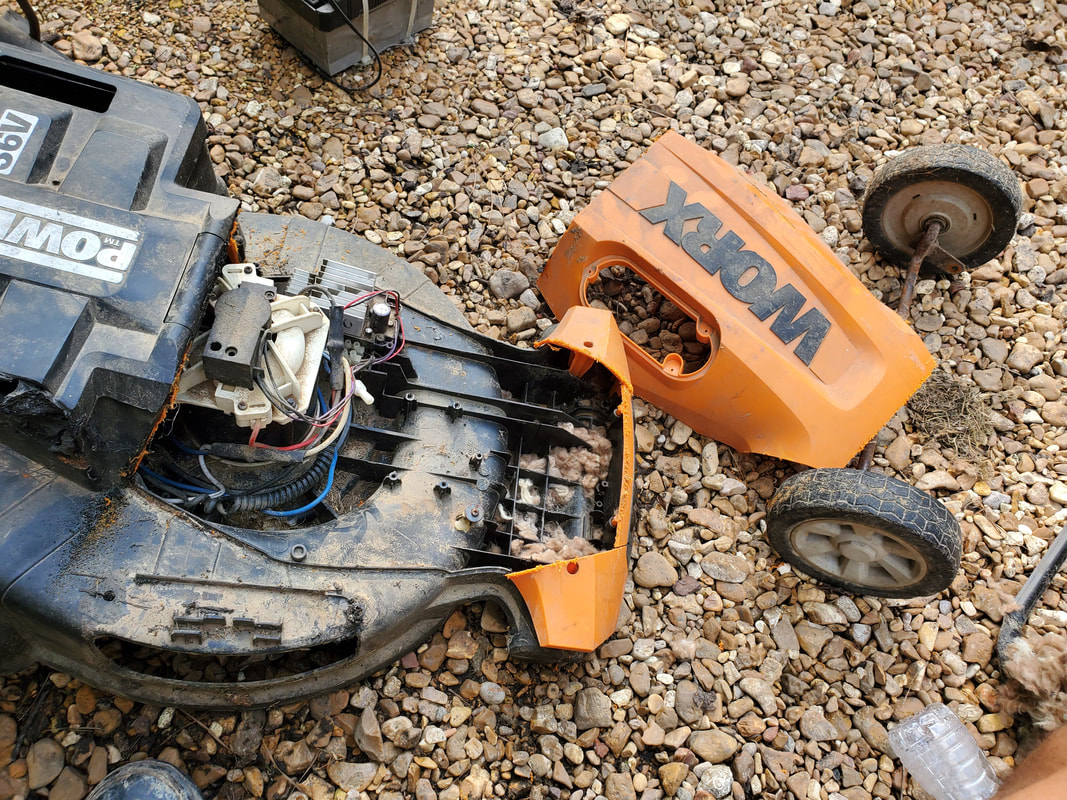
Orange body cut from machine and set aside prior to cutting front of mower off. note electronics that were relocated to the rear.
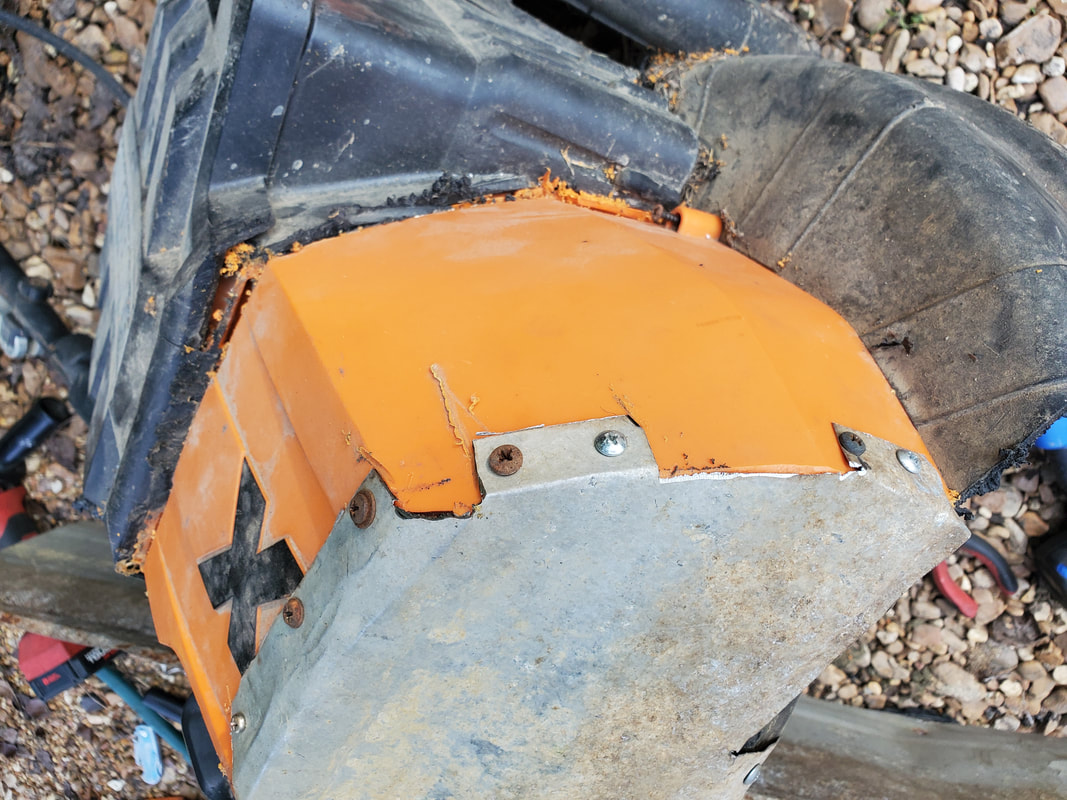
Next was the actual chopping of the mower body. As stated before, I would have to move some stuff back to get it all out of the way since their original mounting points were in the sections of the body that would be cut free. The controller of the machine had to be removed from its original mounting point and mounted to a spot right next to the motor, more to the rear. With the wiring and controller out of the way, I marked a line along the very front of the motor going all the way across and put the saw to the mower body, which was all plastic anyway. From there I put the shell I previously cut free back on the top of the remaining mower then marked it so I can trim the excess from that shell piece to remake the cover for the smaller machine. 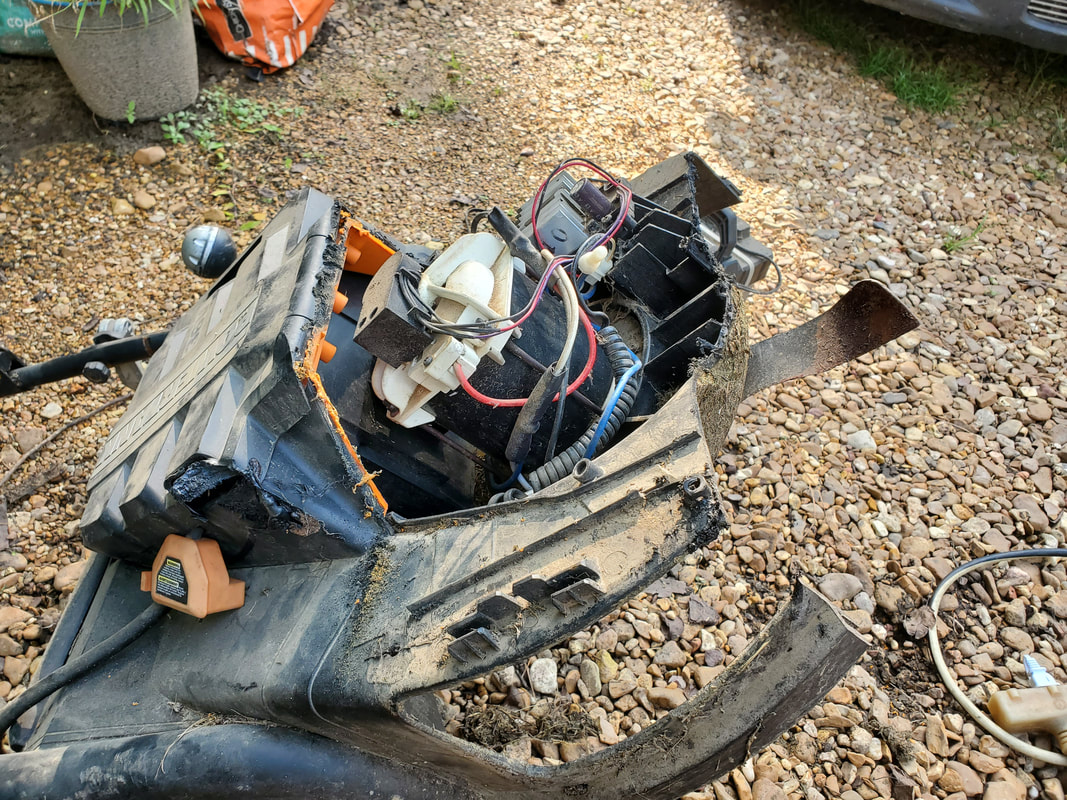
Mower after cutting the front third of the body free, note how the cut is right at the mounting area of the motor. Also note how the blade extends out by several inches, perfect for chopping brush, or an errant foot....
Marking the shell for cutting down to match up to the cut down mower body.
With the shell marked, I chopped off the excess from the piece then laid the piece back on top of the mower body. Now since the piece of plastic I cut from the shell was unable to be used I had to come up with something to cover the opening on the front of the cut down shell. The answer: sheet metal. I dug out a piece of thin sheet metal from the scrap pile and cut a piece that was the width of the opening on the shell. From there I drew a rough line following the contours of the front of the shell, then drew what amounted to tabs that I would later bend down to serve as anchor points for screws. I carefully cut the piece from the sheet metal then bent the tabs down then test fitted the piece. 
Tracing out the pattern for the front cover to the shell in the piece of sheet metal.
Cover piece cut from sheet metal with tabs bent up.
Another little thing I did on the body was where a switch cover was mounted. Since the cover extended past the point where I cut the cover down, I just mounted the switch cover back in place then trimmed the excess from it as well, making sure the edges matched up with the rest of the body. From there I was able to start mounting the sheet metal shell to the front of the shell. I drilled some pilot holes in the tabs and through the plastic shell then drove the screws through the tabs and the shell to secure the panel in place. I didn't want to use the impact in the soft plastic as it would've quickly spun out and wallowed out the holes made by driving the screws through. I would rather just drill small pilot holes then work them through manually with a regular screwdriver to ensure that the mounts are not compromised in any way. 
Switch cover mounted and trimmed down to match up to the cut surface of the shell.
Sheet metal cover attached to the front of the shell, note two screws in tab at front bottom and at the top of the metal piece holding the piece in place.
Mounting tabs on sides of sheet metal panel holding it to the plastic shell.
After attaching the sheet metal cover to the front of the shell I also found that there were a couple of points on the mower body where the shell sat that were perfect for new screw points. While these points were solid plastic, after drilling a small hole through the point it allowed me to put a screw through the mower and into the mounting point of the plastic shell, securing the shell to the mower body at the front, along with the one mounting point that I mentioned in the beginning at the back of the shell. With the shell fully mounted to the mower, I took time to use the hot glue gun to further glue the switch cover to the shell to help in sealing the inside of the machine from the elements. The last thing I did was trim the bottom piece of remaining plastic from the grass exhaust chute then cut an equal piece of plastic from the other side so both sides of the mower body would match one another. The purpose of this was to open up the area around the front and the immediate sides so when the machine is pushed into a patch of brush, even if something gets close enough to the sides, its getting chopped up. 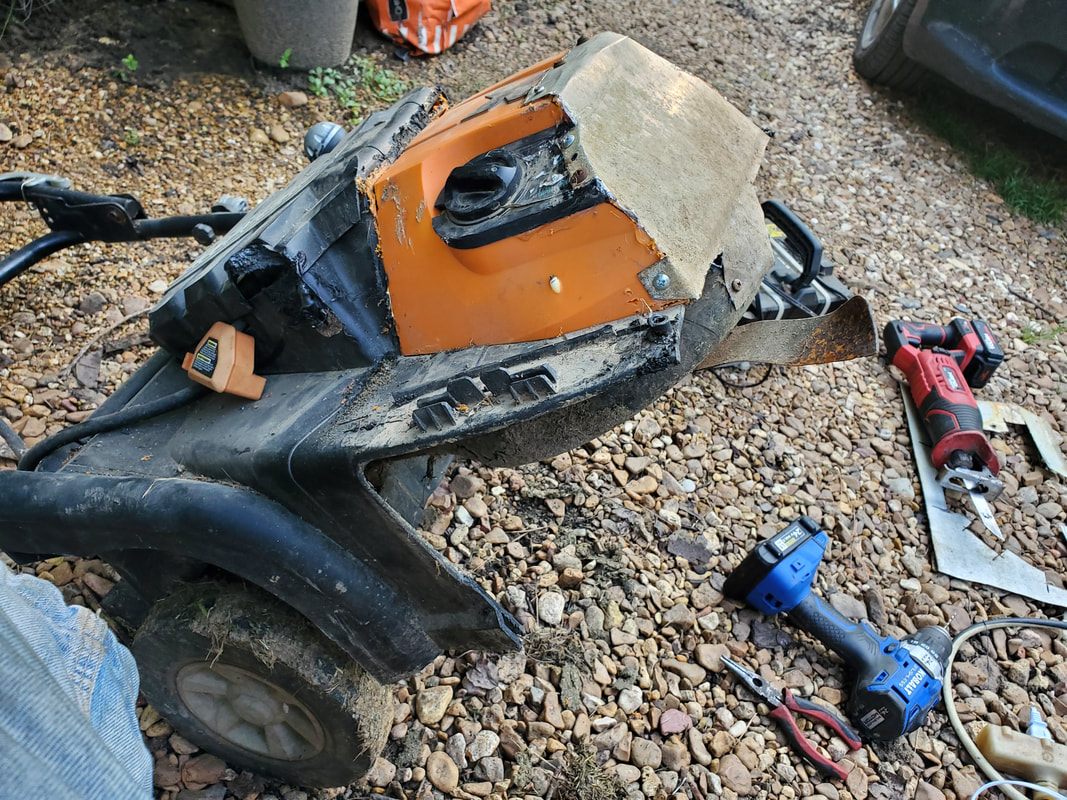
Extra plastic cut free from bottom of mower body to open the side up more.
Equal amount of plastic cut from opposite side of old grass exhaust chute to match up.
Now for the disappointment. Well not immediately, but still one nonetheless. This is regarding the power source for the machine. I managed to acquire some aftermarket battery clips that accommodate the Hyper Tough batteries that our battery tools use. My plan was going to be to use these clips in series with two batteries to make a pack that would hopefully supply 40v to the mower. At least in theory. The weed eater and baby chainsaw work this way, so why shouldn't it work? Read on. First I took time to disassemble the battery plug on the mower that used to go to the original battery pack. The wires from the plug were then rerouted through a hole I drilled in the bottom side of the battery compartment to allow me to route enough cable through so I could attach the ends to the wire ends on the battery clips. I connected one of the positive and negatives of the two clips together to make the series connection then connected the other positive and negatives to the power wires going to the mower electronics and motor. Rather than permanently mount the battery clips in some way, I had to test the system first. 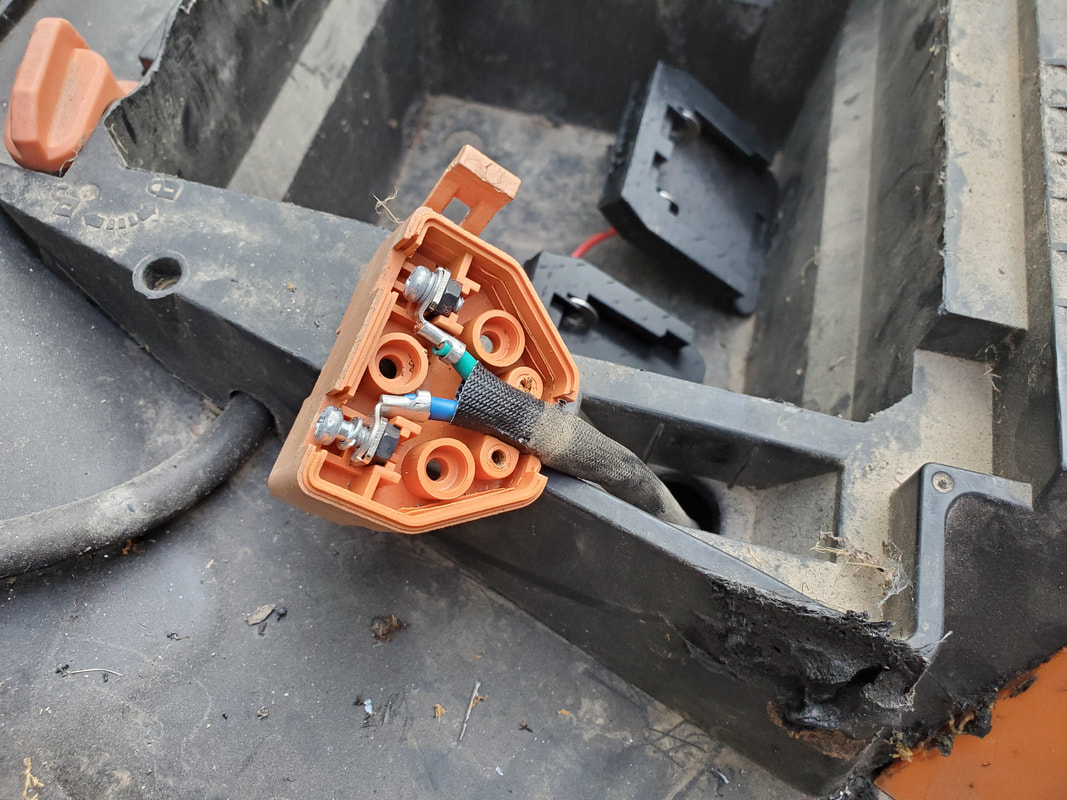
Old battery plug disassembled prior to wiring to aftermarket clips.

Aftermarket power tool battery clips wired together with terminals to secure them to mower's power wires.
The disappointment was when I plugged the batteries up. Upon hitting the switch, I got nothing. I immediately put the meter to the battery "pack" to test the voltage, and I got only 20v. WTF??? I hit the switch with the meter in place and the 20v went to 0v. WTF??? But then I thought about it. These batteries in these types of tools have internal electronics that regulate charging power coming in, and apparently outgoing power to the tool. Also from what I surmise the tool also has some internal electronics that feedback signals to the batteries to "amp" up the power output for differing loads in order to preserve power for light duty use. Since our outdated lead acid battery powered mower cum bush hog has no such thing for this type of power supply, the newer batteries have no way to really know what to even output. SOB. Now one of two things can happen here. I can research what these batteries or similar batteries would need to put out that burst of juice to put out the full 20v each, and hopefully not blow up any of these pricy batteries in the process of experimenting, OR, just like with a couple of past projects that were remakes of long dead devices, just buy a dedicated lithium battery pack that is made to put out a set voltage with no regulation, in this case 36v, at around the same amp hours as the old battery pack so at least I can be confident that the machine should last as long as the old battery used to hold the machine. Now if I go this route, I would have to wire the battery pack in permanently just like I did with the portable power supply and LED lantern and just hot glue the charging port somewhere on the body to allow me to plug the charger up to the machine easily during charging. More than likely this will be the route I'll go rather than try to work with the power tool batteries and end up messing up some batteries.
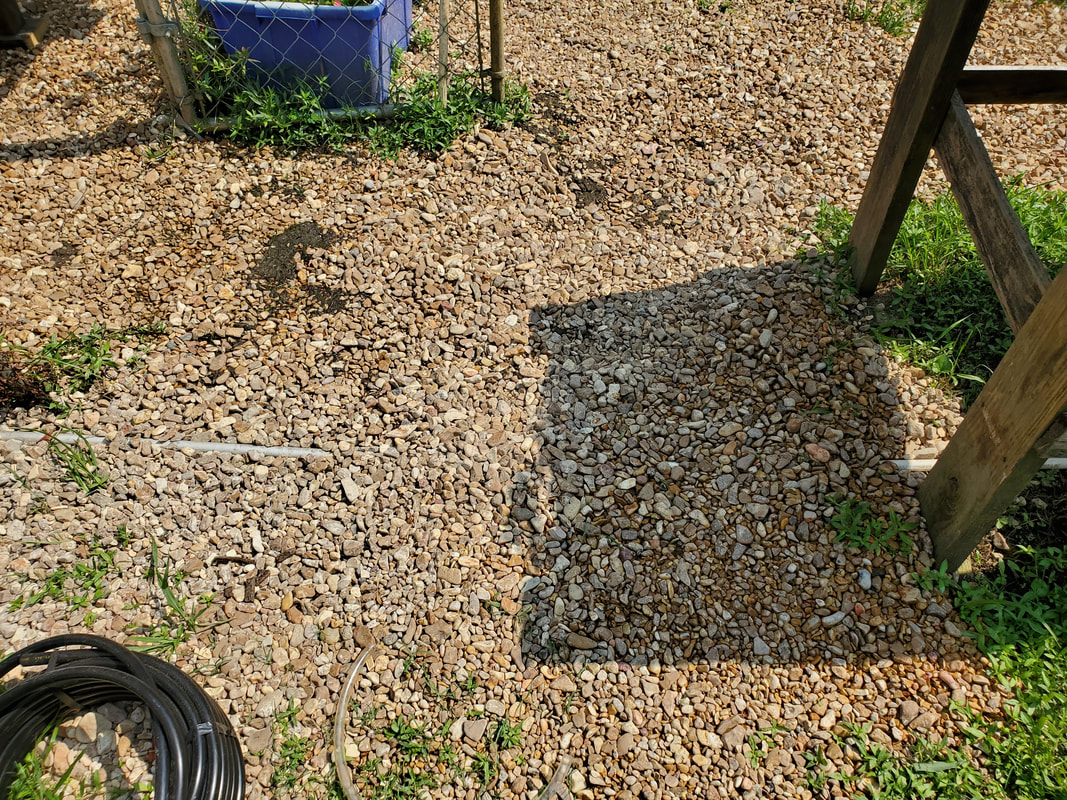
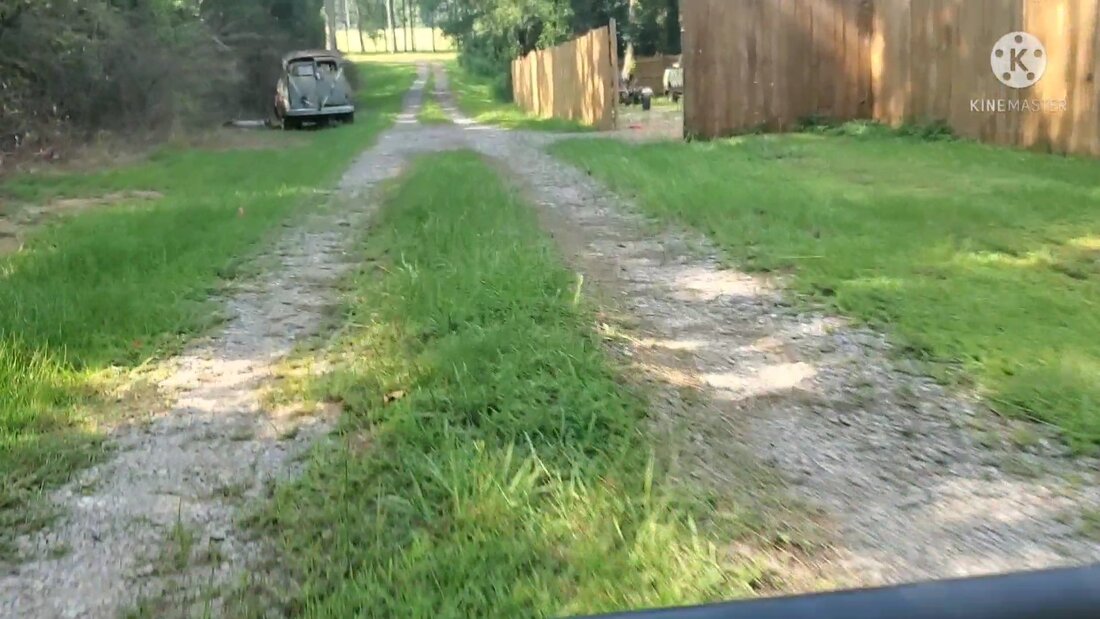
For a while now our main focus on the laying of gravel has been a repetitive laying of gravel in the driveways around the compound, with the most recent being the side path that goes between the storage trailer and garden fence. After having built the greenhouse I did have to dump a load of gravel within the walls of the greenhouse after laying a base layer with an old tarp in order to create the floor within the greenhouse. With the constant traffic going between the driveway and the greenhouse, even in areas once covered with some gravel, the signs of wear are apparent. Never mind the grass and weeds that have popped up through the thin layer of gravel in the few covered spots in the garden but now that gravel is getting pushed into the soft ground enough that its starting to "blend" with the ground to where it too will need a fresh covering. But these areas aren't the biggest concern at this time. Its the areas that have not seen any gravel that are the problem. After past rains and the irrigation system's normal operation, the ground has absorbed a large amount of water to the point that the ground in these areas has turned into a mud pit and double it with my feet always going over these areas, the ground is a hot mess. These areas really needed help. The first area I targeted was the area right in front of the greenhouse gate. This area had especially turned into crap due to my repeated traffic over the area. I concentrated a large amount of gravel over this ground before spreading out on either side of this area.  Gravel laid in front of the greenhouse gate and past it into the main garden area. A little more gravel was spread to extend this initial patch over to the rear opening that hasn't been capped off yet. Even though this opening will be covered with fencing in the future, I still wanted to get some gravel on the ground as I will still use this opening as I continue work on the greenhouse. To not lay any gravel down in this small area will just add to the mud that will be generated by my feet mashing in the soft ground before walking on the gravel that's laid down.  Spread gravel over area leading up to rear opening between drum beds and greenhouse wall. I also laid gravel down in the path that went between the recently built drum raised beds that sit straight in front of the gate of the greenhouse and along the rear fence line. This ground had some gravel laid about half way between the west fence line and the greenhouse. The area afterward started getting mushy with my repeated traffic over the ground during my work on the greenhouse. I laid a path from the first patch in front of the greenhouse and out to meet up with the old path, making it as wide as the space between the drum raised beds. I wanted it to be wide enough that even with the use of a wheelbarrow I would be on gravel. 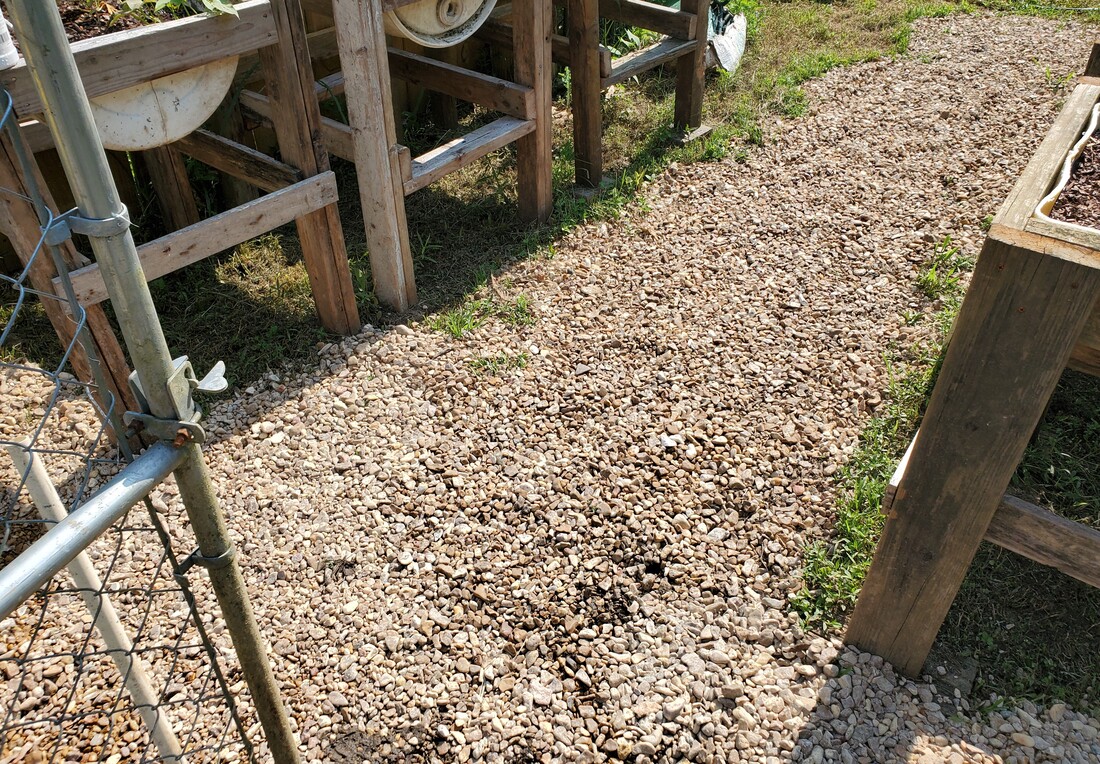 Gravel path laid between drum raised beds leading up to greenhouse gate, seen in the left foreground. From this area I jumped over to an area that has been a thorn in my side since I started rearranging things in the garden. This is the very center of the garden. For some reason this area has allowed all water to collect here and stay here enough to cause the ground to turn into a constant mud pit, never to dry up. Walking through here has our feet sink down to our ankles, making for a mess every time we walk through here. This area needed beau coup gravel and will continue to need gravel until our feet manage to work the rock into the mud enough to settle the ground and hopefully allow the water to soak into the rock up to the surface and evaporate, allowing the ground to become more established. 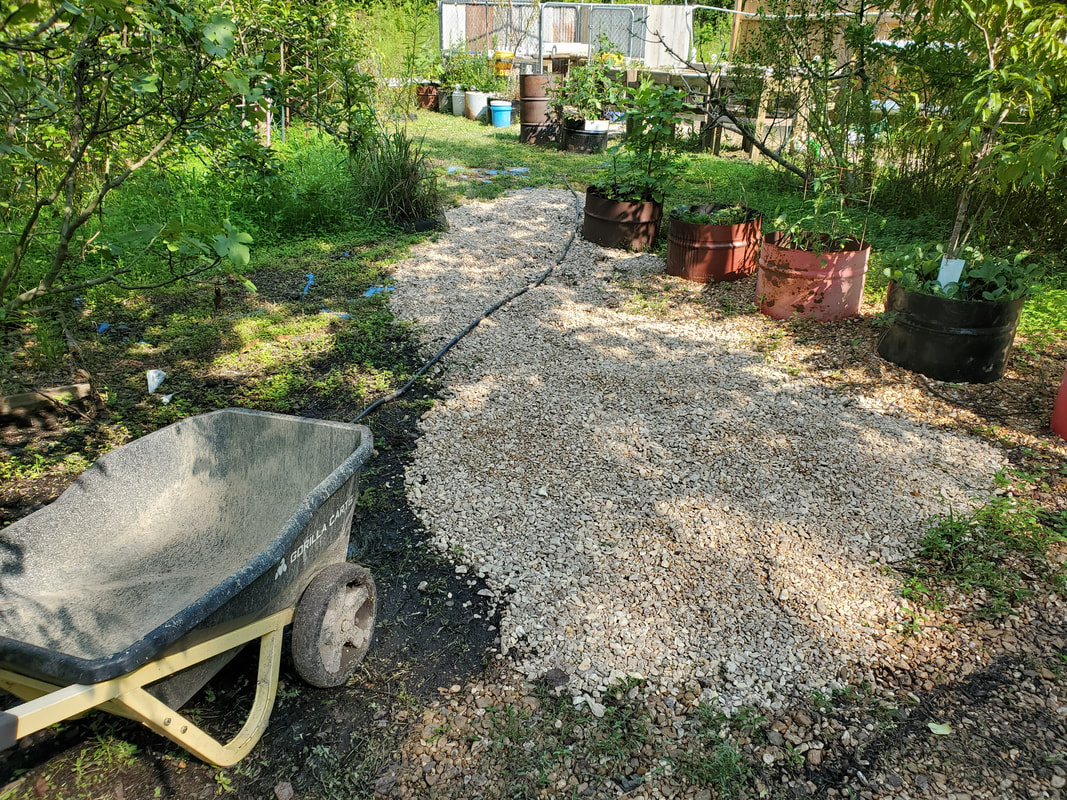 The garden center with a fresh layer of gravel, note muddy spots around edges. Due to the size of the garden and the level of soaked up ground, this area is going to be the new chicken yard in that it will need lots of gravel to get a base layer started then successive coverings of new gravel to make a more solid surface of gravel that will allow us to walk over the surface without distorting the ground and/or sinking our feet into mud. Even with the rearranging of things like raised beds and container gardens, I will still lay the gravel everywhere and will just set the raised beds or container gardens right on top of the gravel, which is just fine as it will lessen the likelihood of weeds popping up between the edge of the containers or beds and the gravel walkways. |
