|
With the acquisition of the junkyard clockspring and some other parts from the junkyard, I wanted to address the clockspring first. Because of this bad piece, the car no longer has a working airbag, horn, cruise control, and radio control. While this would be a minor inconvenience for some, for others its an annoying inconvenience since being unable to control the radio while driving or blow the horn can be somewhat dangerous. Well, as seen at the junkyard, replacing the clockspring would be rather easy. There are some things that have to be noted in the replacement of the clockspring, which we'll get to in a moment, but first we have to remove the airbag. Before doing this I did disconnect the battery since messing with the clockspring, which is connected to the airbag, does not need to be done while energized. Having an airbag become a claymore is not my idea of a good time.
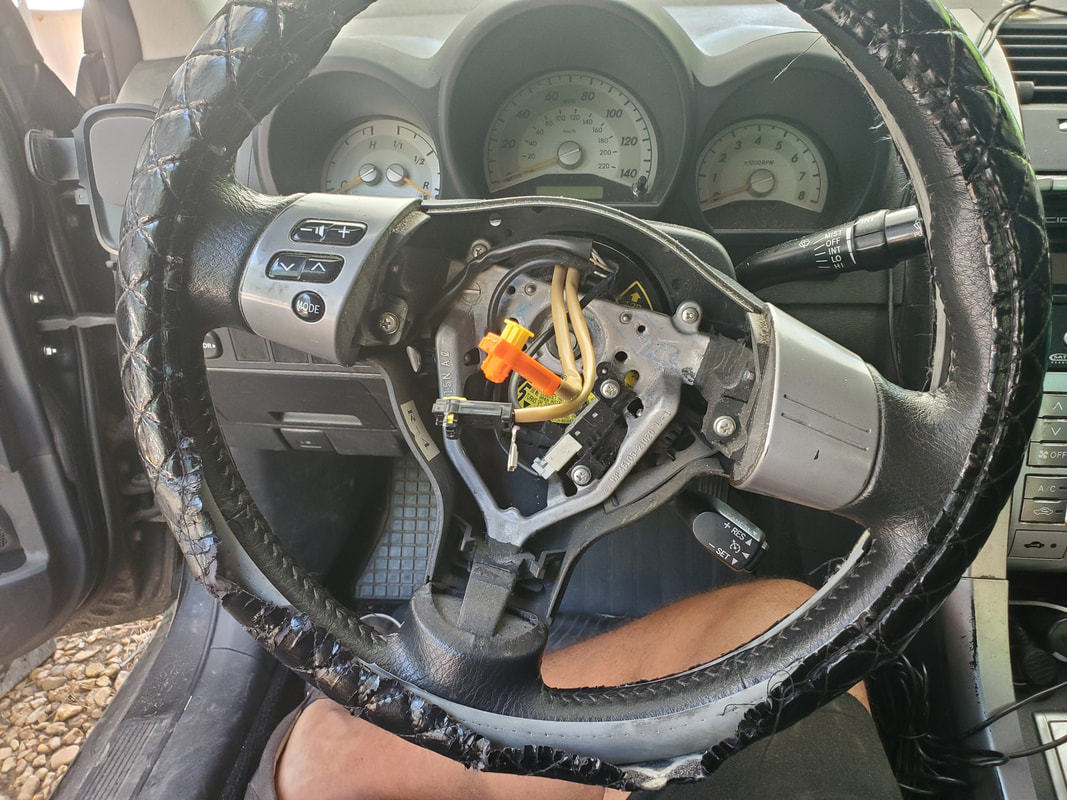
The steering wheel after removing the airbag.
Two T27 star bit bolts hold the airbag in place. After loosening these, there were two multi-conductor plugs and one single wire that had to be unplugged from the airbag to facilitate its removal. With that out of the way, the next thing was removing the steering wheel. This involved removing the large nut holding the wheel to the steering shaft and unplugging the couple plugs on the wheel. I attached the steering wheel removal tool and popped the wheel free, exposing the clockspring. 
The airbag and the steering wheel off to the side after removal.
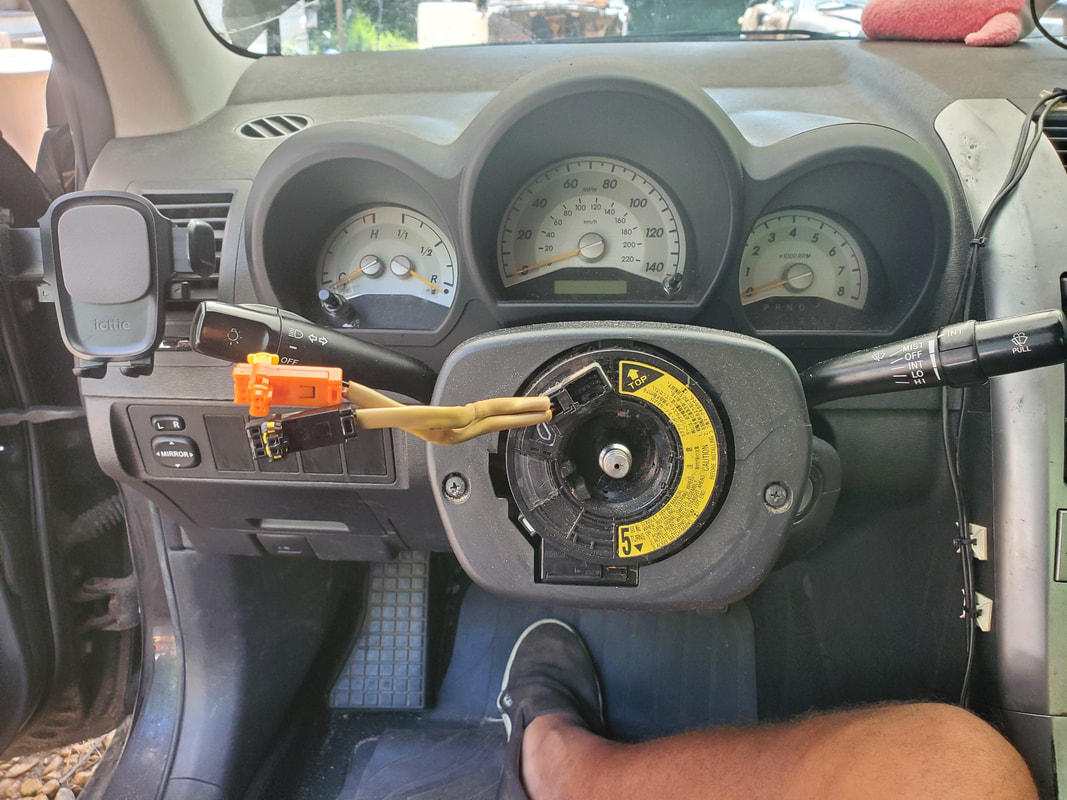
The clockspring is now exposed, with just the plastic molding left to remove to completely expose the unit for removal.
Just like with the junkyard unit, the clockspring is held in place by three tabs in a triangular formation. Releasing these allowed the unit to be slid free from the shaft. A couple plugs completed the removal of the old unit. Now as a side note. Before starting this project, I had to make sure the car's steering wheel and front wheels were straight. The reason for this is the idea that the clockspring is only able to make five full turns before bottoming out on either end. In order to properly install the new unit, there are alignment arrows that have to be lined up, and the plugs at the top have to be perfectly lined up at 12 o'clock. When these parameters are met, the clockspring is at 2.5 turns, putting it dead center. I installed the new unit, plugged up the plugs to the unit. 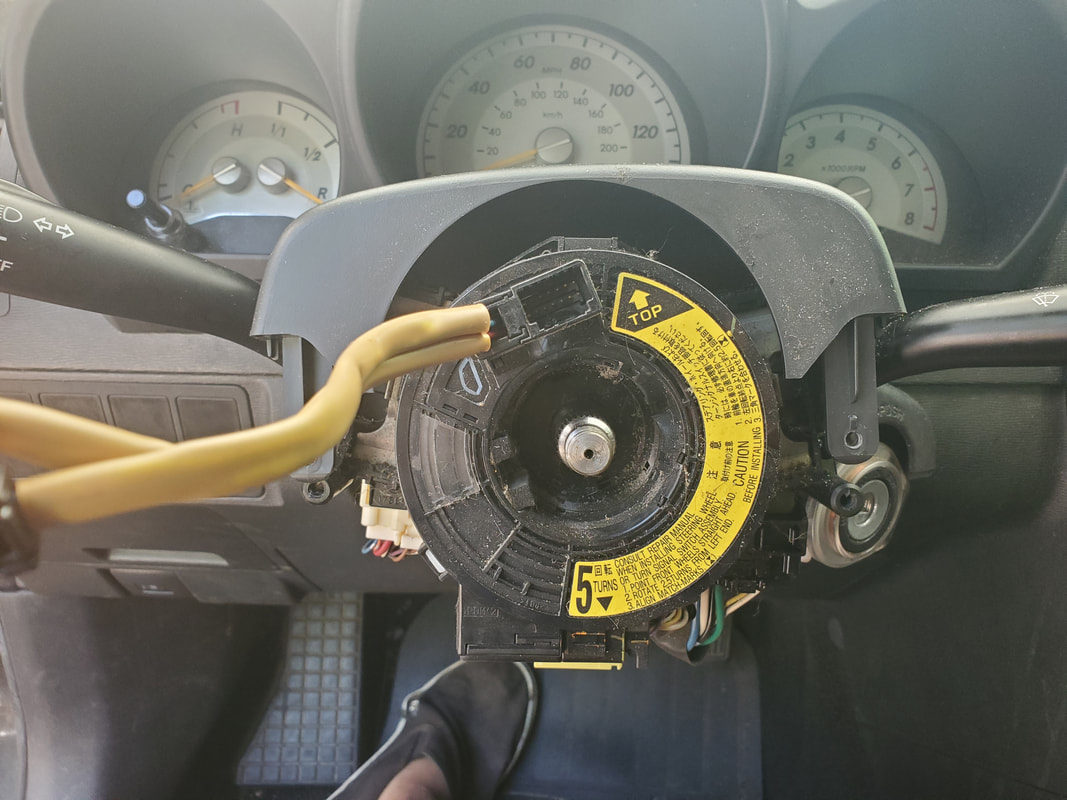
The new used junkyard clockspring is installed, everything is ready to go back together.
On another side note, there is a plug on the bottom of the clockspring that had a special method of removal. A tab inside had to be pulled out instead of pushed like the other tabs. I had to use a pick to be able to pull the tab enough to remove it. Without knowing this, one may damage the plug which may present a future problem. Finding this out helped in our clockspring replacement. With the replacement of the steering wheel and airbag, I reconnected the battery. Of course, when I put the key in to turn everything on, I sat in the passenger seat, just in case. Again, the last thing I need is for an airbag to go off, soon as I turned everything on. Nothing like that happened, everything worked as designed. 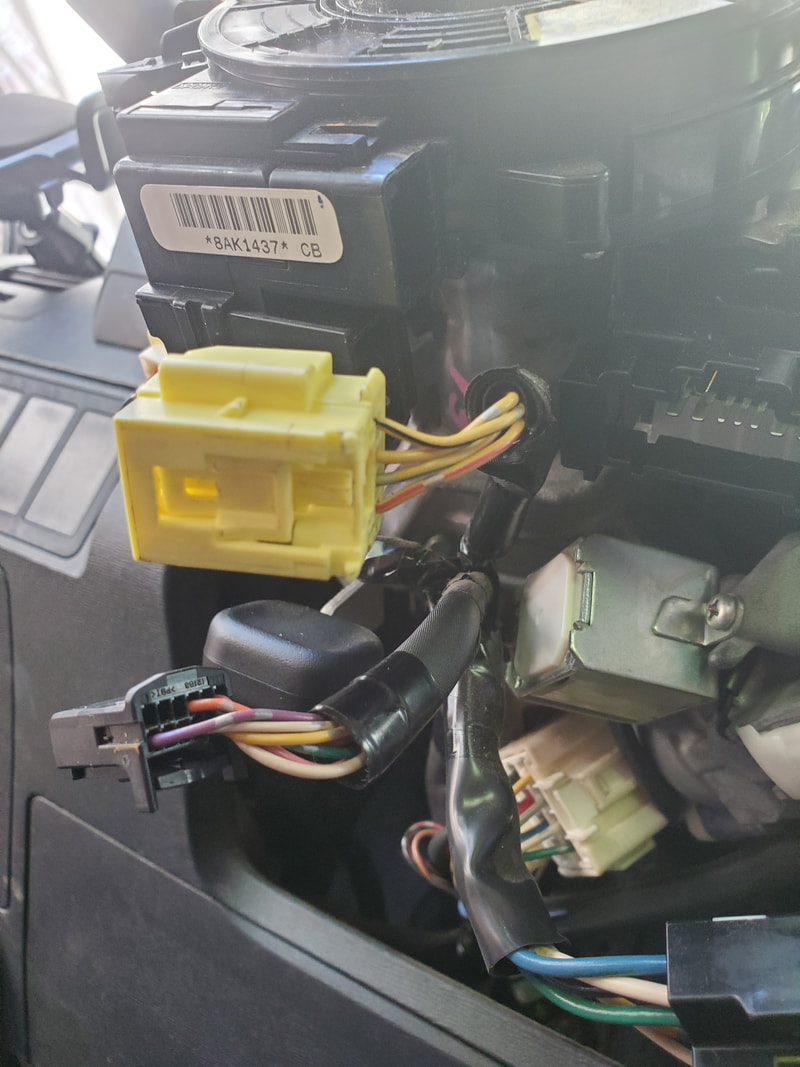
The special plug that has the pull tab that troubled me for a minute as to how its to be removed.
After testing everything to confirm functionality, I was able to walk away happy that I managed to easily resurrect something that many people would've probably not even bothered due to what is at stake and what is typically involved. Many people don't bother to have things like steering wheel pullers to help in removing steering wheels so something like this that can be otherwise easy would never be addressed. But now I can move on to some lesser tasks that need to be performed on the car.
0 Comments
Well today was a rather interesting day. First of all, there was our typical junkyard run, nothing unusual. Everything went pretty routine, other than the idea that the AC wasn't cooperating, whether the actual cool air moving or the switching valve for the vents working properly. I'll have to dig into this mess again at a later point as it wasn't really a significant thing to worry about. About 5 minutes away from the house, the truck started making noise and before we could really pinpoint the noise, the right rear tire blew. Only thing that sucked about this whole situation, was well, everything. First of all, the "spare" tire was hardly a viable spare as it was dry rotted and out of air. Second, there wasn't a viable jack on hand as we never use this truck enough to justify purchasing a dedicated truck jack. Of course, after today, this may need to be reconsidered. Thirdly, even if we did try to go the route of getting any help, with the 2000 lbs of gravel in the truck, one would have to have a super jack to jack the damn truck up, much less having to use a heavier truck to tow the thing back. It's a lose/lose. But in the end, it would've been lesser to just ride the wheel back to the house, which of course resulted in the tire and rim being shredded. We had shit to do anyway and couldn't wait for extraction, especially close to the house, when its like 100 degrees outside. Ride the rim we did.
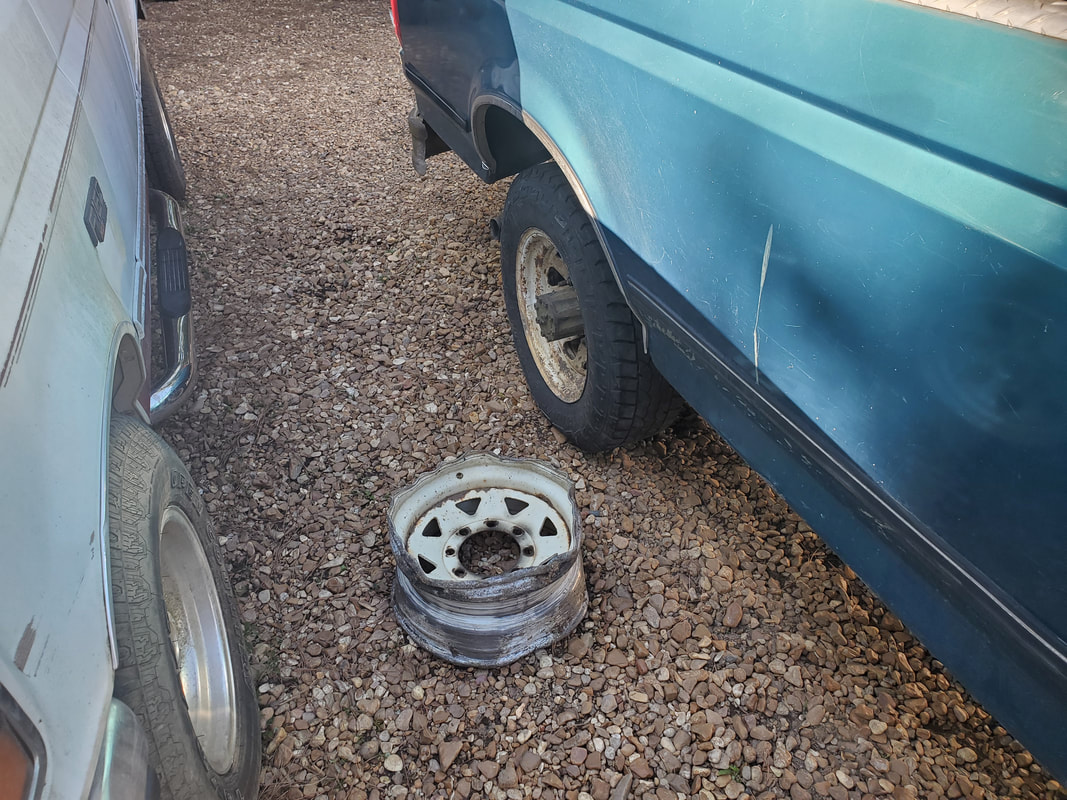
The shredded rim, along with the replaced tire which we got from the junkyard.
One of the things that I was going to do was head to the junkyard anyway in order to get parts for the Scion. With that mission already in the works, adding the purchase of a rim was not too big a deal. After getting the truck back, we had to head back to town to take care of one more order of business, as well as a newly added task, which was to take the "spare" tire to a local tire shop and get a May-pop tire on it so I can at least get the truck back on all fours. After we took care of that business, it was off to the junkyard I went, to sweat my ass off. I planned on getting a couple spindles for the front end on the Scion, in order to replace the wheel bearings in them since the front end is making some loud hums that are indicative of bad wheel bearings. Along with that, I needed to get a replacement female belt buckle for the driver's seat since the old unit is hard to latch at times. I also needed to get a replacement rotor since the right front rotor was ground into some when the last set of brake pads wore down. Lastly, I needed to grab the clockspring from the steering column since I accidentally fucked it up when I tried to reseat the steering column on the rack and pinion in order to get the full swing back and forth. And of course there's the rim. I had to get a set of 12 point impact sockets to use for the CV axle nuts since the last time I checked, the cars at the yard had 12pt nuts on them. With those sockets and the impact wrench, everything came loose nice and easy. The seat was just a matter of pulling the bolts and tipping the seat upside down to disconnect the buckle and the wiring harness attached to it. From there I attacked the clockspring. I thought it was going to be difficult but in the end it turned out to actually be rather easy to remove. 
The steering shaft nut and clockspring underneath the steering wheel after removing the airbag.
First a couple of star bit bolts had to come out to pull the airbag. A couple plugs were disconnected, and the airbag was out of the way. From there two more small plugs were removed then the large nut was removed from the steering shaft. My steering wheel puller tool, which uses two bolts along with the tool itself, were attached and the steering wheel came off super fast. Once the wheel was off, I just had to unplug a couple more plugs were pulled and I just had to carefully work the clockspring off the shaft, taking care not to rotate the unit any. The clockspring is only able to make five full turns before it bottoms out on either end of the turn. This is how the old unit was damaged. When the steering shaft was disconnected, my dumbass happened to rotate the wheel too many times and ended up snapping the damn thing internally. With the clockspring off and my body starting to suffer from minor dehydration, I hunted for a replacement rim. 
The clockspring, pulled from the steering column of the donor car.

Wheelbarrow of tools and parts pulled from the Scion.
I tried to grab a stock rim but unfortunately, the truck was not on jack stands properly so it was resting slightly on the tire/rim that made up the actual jackstand. I wasn't about to try and rock the tire and hence the whole truck, trying to free that tire. I don't want the highlight of my day being a 5000lb truck falling on me. I found a van with a more decorative rim, similar to one of the rims on the F250, except this one was chrome plated. I grabbed it, using the impact wrench to pull the lugs off. Once the wheel was in hand, I slowly made my way to the front to pay for all this shit and ride back in the AC of the car, despite being soaked to the bone with sweat. At least I got to drink a shitload of water all the way back, never having to piss once. Once back at the house, I had to shovel some of the gravel out of the F250 and wheelbarrow each load across the yard to dump it on the new spot where I'm laying gravel, at the end of the side path going into the backyard area. After I got about half the load out of the truck, I was able to use my truck jack to jack the truck up and change the tire. With the replacement tire in play, I pulled the F250 to the backyard area and finished the laying of the rest of the gravel. 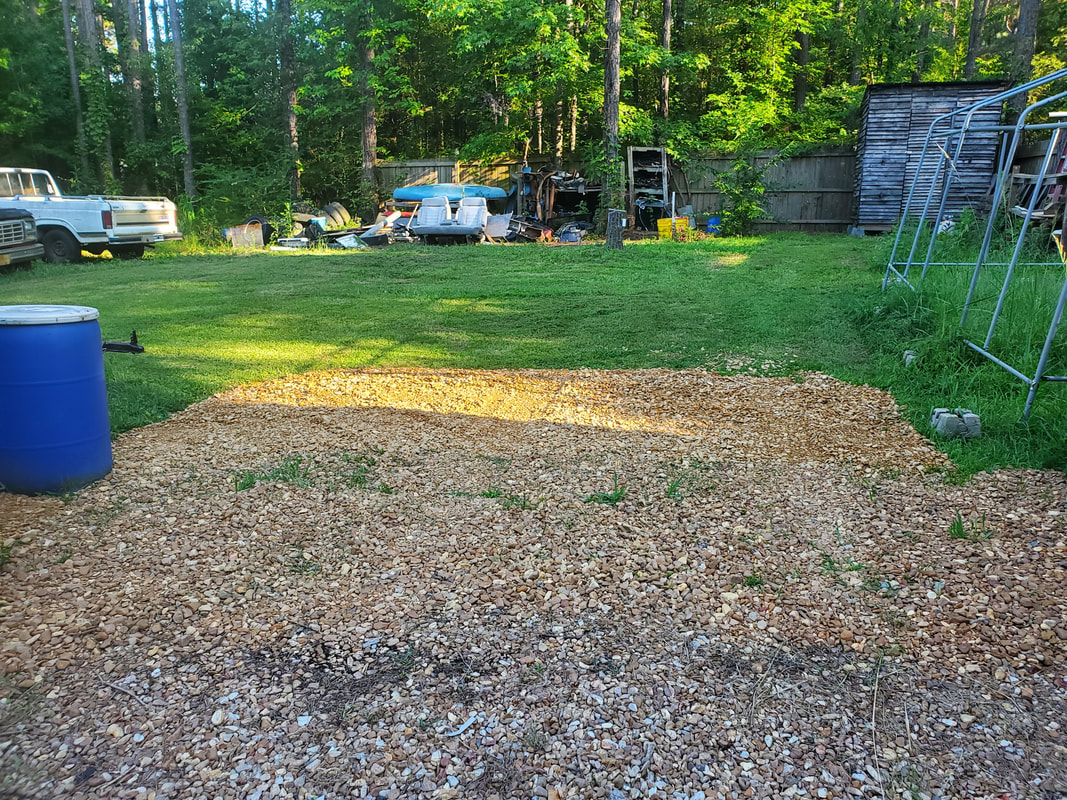
New patch of gravel laid at the end of the side path going into the backyard.
The events of today just emphasize how we have to focus more on our "daily drivers", taking time to ensure that all the maintenance is up to par; tires, suspension, etc, so that these vehicles won't give us the kinds of problems we had today. With the Scion and the spare spindles, a wheel bearing replacement, which typically consists of pressing old bearings out and new ones in, will be as simple as swapping spindles. Getting fresh tires on the F250 will ensure that blowouts from old tires will not be an issue. It is my fault for not having replaced these tires after 10 years. Of course, with the gravel, I'll be laying a path that I predict will take me a couple months to reach the South fence, by the fuel shed. From there I can start laying a path due East to cover the area heading to the East fence line. A lot of work still has to be done...
With my renewed interest in busting up the Fallen Trees and trying to clean up the back yard area around what will be the Southeast corner of the compound perimeter fence, there are a large number of tools that had to be pressed into service to accomplish this goal. Besides the log splitter and chainsaw, there's the weed and hedge trimmers that help render errant brush and weeds in the area down to mulch and even the push mower that further deliver a crew cut to the ground to level things off. The log splitter is the main star in this show though. Since 2020, the log splitter has done its job nicely in rendering the huge logs that were cut from the trunks, courtesy of the 18" chainsaw, into small manageable chunks of useable firewood that kept us warm over the last few winters. But even the main star has to have some supporting actors in the show.  The powered log splitter that has done its job rather well the last few years, splitting countless logs into useable firewood. As I cut into some of these larger trunks, the chainsaw really has to put the work in to cut through these huge heavy wet unseasoned logs to get through them. As a result, the log splitter, as good as it is, is unable to split through these humongous logs. Only in some instances could I get the splitter to actually manage to finally split these huge logs. I would have to rotate the log several times, putting stress on the log at different points until I find a weak spot that would allow the splitter to bust through. This sucks though. What this means is even with the powered equipment, there is still a place for manual tools. In comes the diamond wedge, AKA the Wood Grenade. This thing, in unison with a sledgehammer, will make relatively fast work of these huge logs. It is a workout but after several whacks, even the biggest logs get split in half. Afterward the powered splitter can continue to make fast work of the smaller pieces of "pre-split" logs. 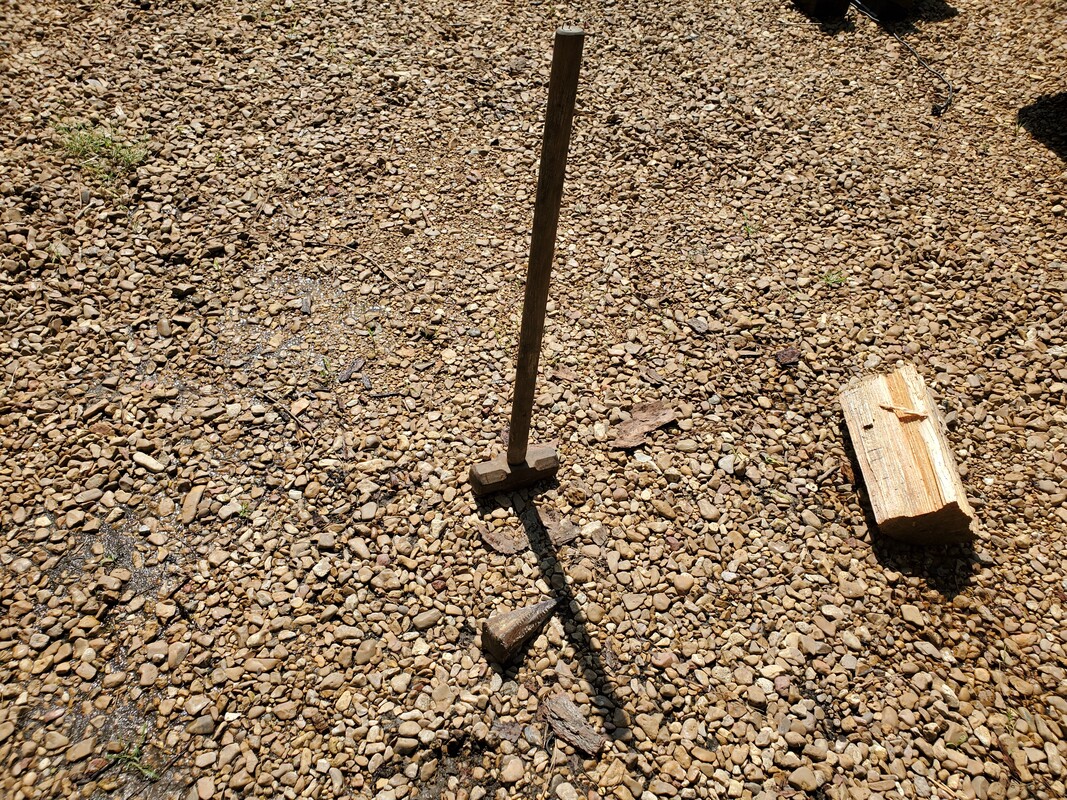 The good ole' diamond wedge/Wood Grenade and sledgehammer for splitting the largest logs that the log splitter can't handle. As usual, I'm still going to make it a routine to cut some wood with the chainsaw first so I can have a good supply of logs available to split, as well as continue to render down the trunks, eliminating the stock of wood that needs to be processed. However long it takes to finally finish splitting all the wood after its been cut, with each day, the pile gets smaller and smaller as its turned from long huge trunks into a scattered pile of small logs. Once the pile is turned into logs, I can then take my time splitting the wood into firewood and stacking everything for seasoning. 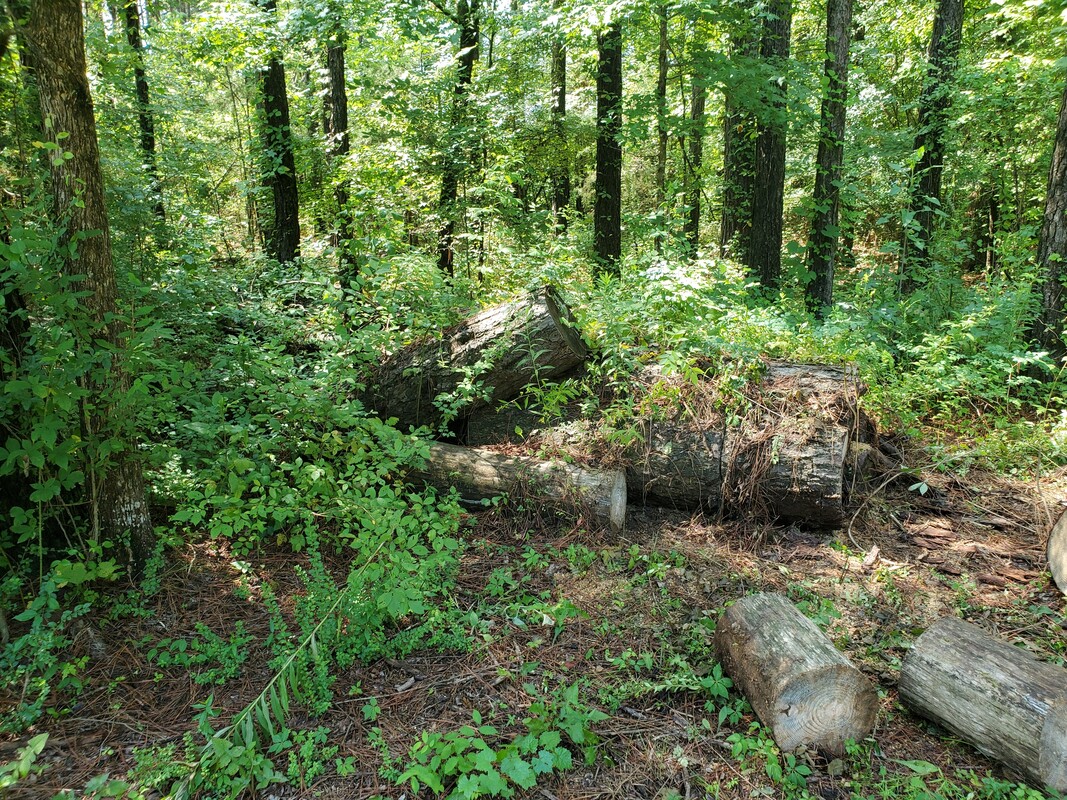 The most current stack of trunks to be cut up to clear the area for our fence line to be staged. 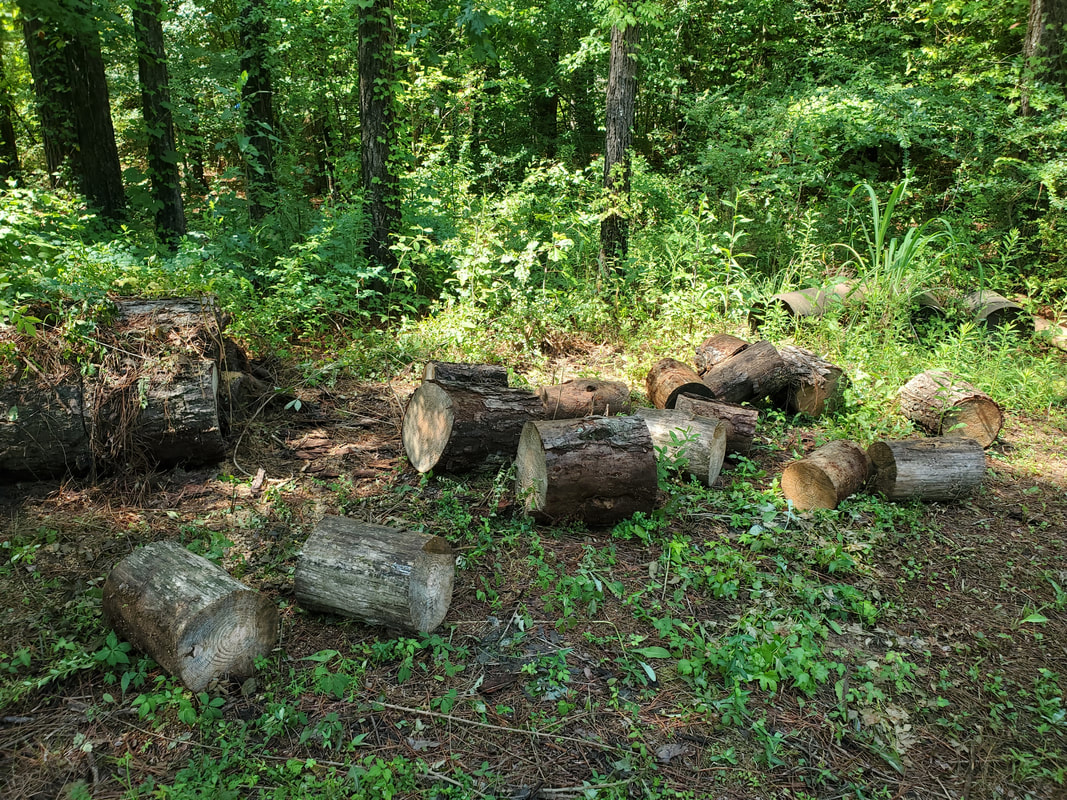 Short logs cut from the large trunks in this stack of wood. At the rate I'm going I will refill the area that I used up in firewood back to the beginning levels when I first started setting up the firewood staging area. Of course, as I continue to cut into the rest of the stacks of trunks, I'll be able to further stack onto the pallets that are more at the front of the staging area, further filling up the gap in the yard and building up our pile of firewood to the point that as I stated before, will give us enough firewood to last us for many, many seasons to come. 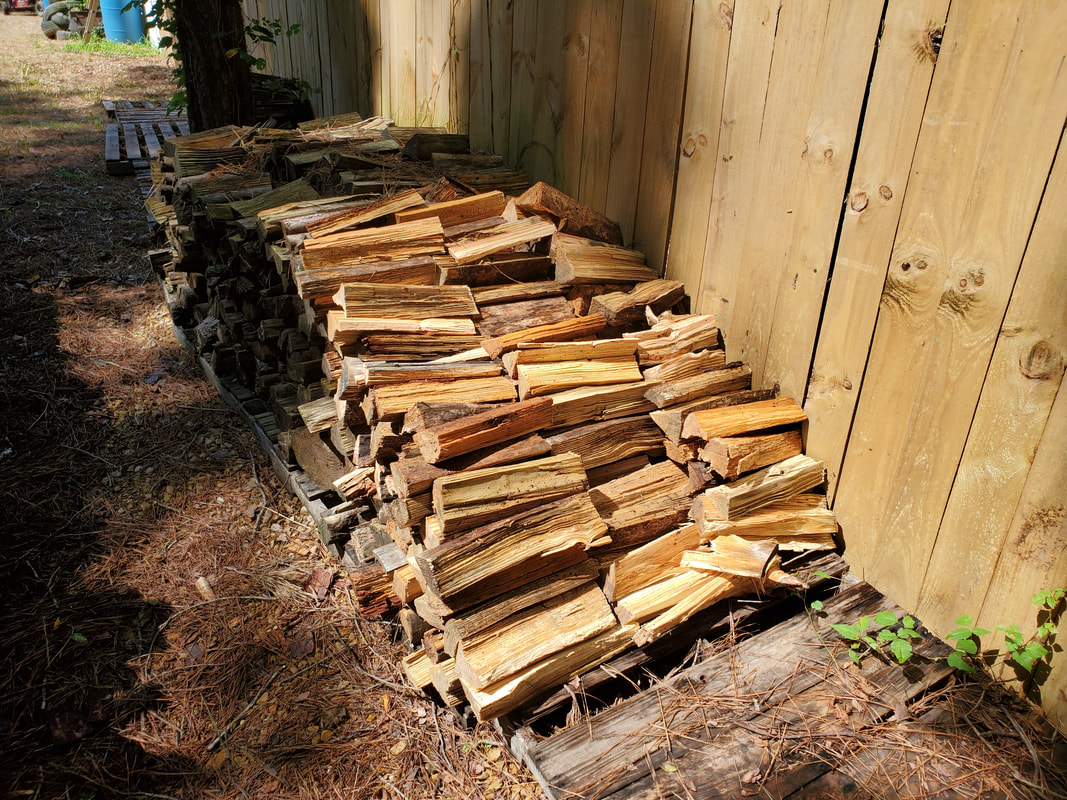 Replenishing the stacks of firewood used up in past winters with fresh splits. Of course as time progresses, even after I do manage to clear all of the Fallen Trees from this area, there will still be plenty more wood to split. There are trunks in areas of the property that I plan on cutting up just to clean up certain areas. There's also the matter of other areas I plan on cutting through to create some trails for future development, like a go kart path/track and even a fabled miniature railroad idea I've been pondering. All these ideas will require me to cut into the woods, clearing brush and inevitably, cutting up logs that are on the ground. Then of course there is the matter of bringing down trees that are in danger of coming down... As part of a greater plan to further clean things up around the compound by actually taking time to complete some projects that incorporate some components that have been laying around the yard, I decided to start the work of installing a winch on our car hauler. We had this winch for some time and rather than let it continue to sit, the time has come to mount this thing. The first thing I had to do though was prepare some angle iron to serve as mounts for the winch. I made a template for the mount of the winch so I could line up the bolt holes on the angle iron. After drilling the holes in the two pieces of angle iron, I then had to move on to the next step, which was moving the trailer jack to a point further back on the A-frame so the space where I want to put the winch can be opened up.  Trailer with trailer jack relocated further back on the A-frame to open up the space on the front for the angle iron bars that will hold the winch later on. With the frame opened up I lined up the template along with the angle iron pieces, trying to get a good placement for the two metal pieces. The intent was to cut notches on the angle iron to sit them on the A-frame so they would be sturdier, even after welding them in place. One piece of angle iron, the rear one, would actually have the bolt holes bored through the A-frame just as well, which would further add to the strength of the mounting of the winch. 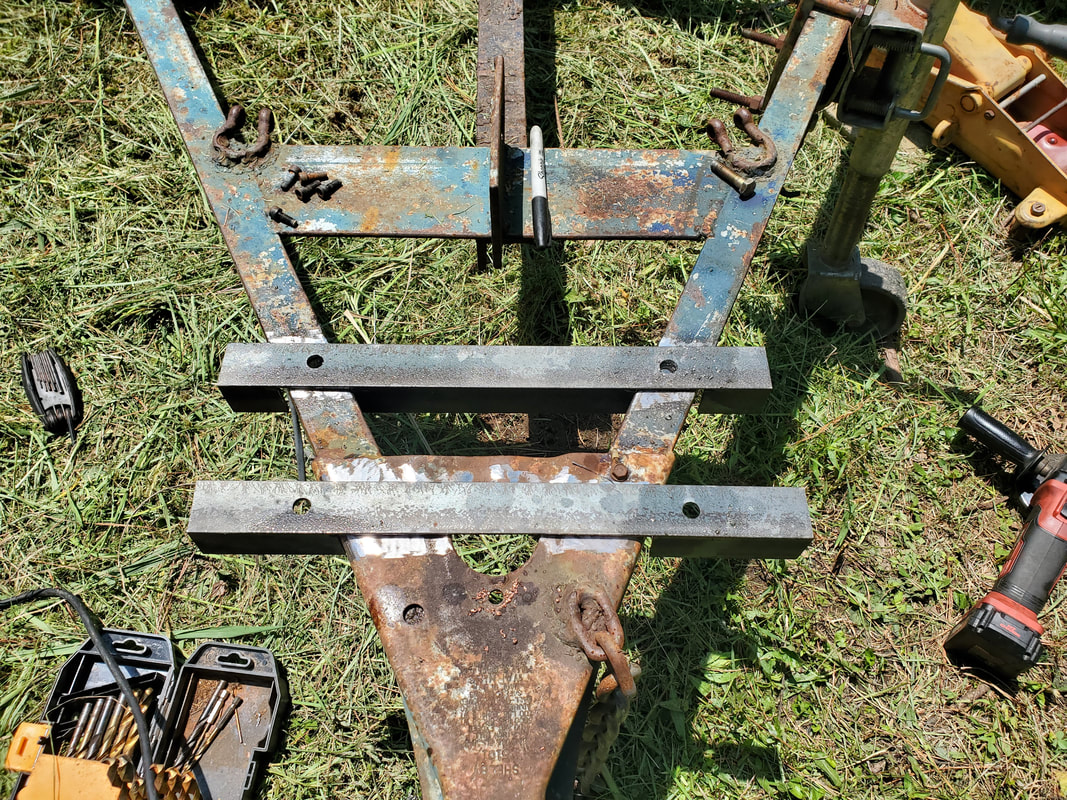 Angle iron bars with notches cut out for fitment on the A-frame. Note the bolt holes drilled through A-frame for the rear bar. The notches allow the angle iron to sit flush on the top of the A-frame so the winch can sit nicely on top. When I weld in the rear angle iron, using bolts to keep the metal lined up with the bolt holes I drilled into the A-frame, I would then use the template to get the alignment for the 2nd angle iron right prior to welding it down just as well. Doing this would allow me to properly mount the winch in place afterward. But before I did weld the two angle iron pieces down the question came up as to whether I even knew the winch worked. After thinking about it, I had to hook the thing up to a battery to see. I borrowed the battery from the FMT and after hooking the winch up, hit the button and got just a click from one of the solenoids. I pulled the cover off the winch and metered everything. After seeing that I wasn't getting power to different terminals on the solenoids I started off by pulling the terminals off on the one solenoid that was clicking and wire brushing everything off. After reassembly I was able to get the winch to reel out some, but unfortunately not reel back in. The other solenoid was not activating. Even after jumping the terminals out on the other solenoid, I still got no action so my conclusion was the solenoid was shot. A search online sourced a replacement solenoid close enough to the original that I'll have to order to make the repairs to get this winch back in full working condition. 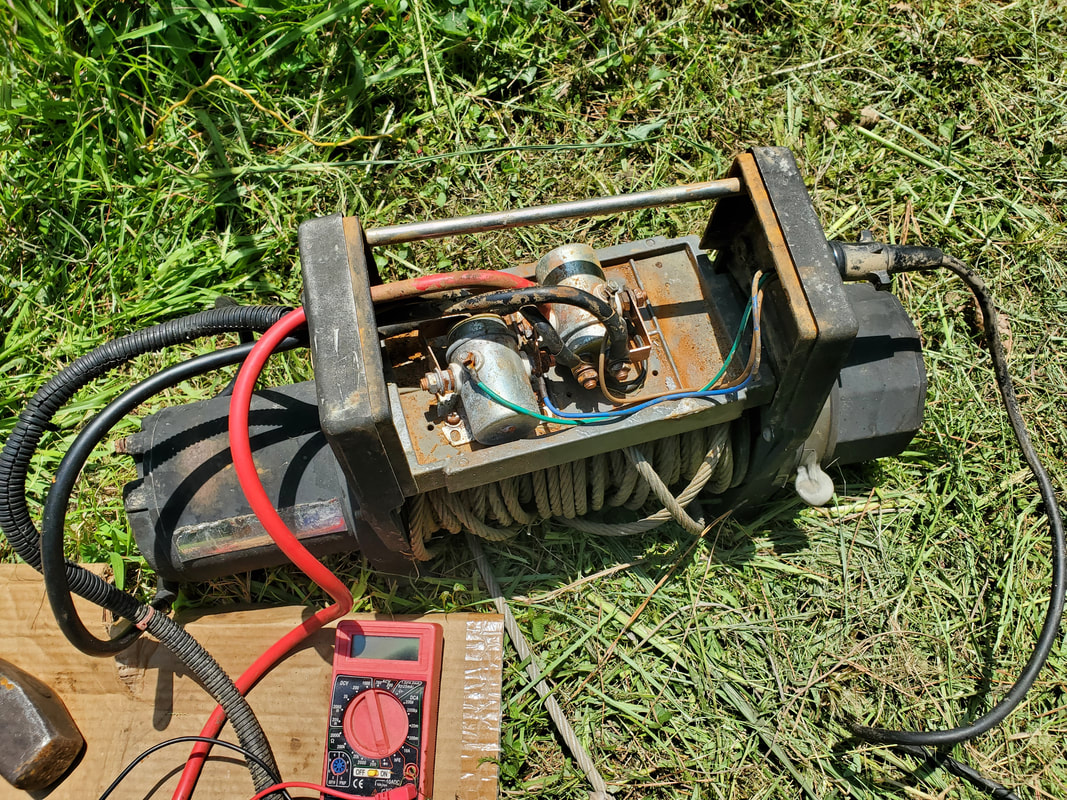 Cover removed from winch after separating the winch body to allow for the cover's removal. One of the solenoids shown will need replacing. With the winch pretty much out of commission before I could even test the thing, I moved on to welding on the angle iron bars so I can at least have that ready to go. As stated before, I used bolts to hold the 1st bar in place then used the template to line up the 2nd bar so I could get the spacing right when I welded the bar down. With both bars welded down, the next move will be to weld mounts for the battery box. 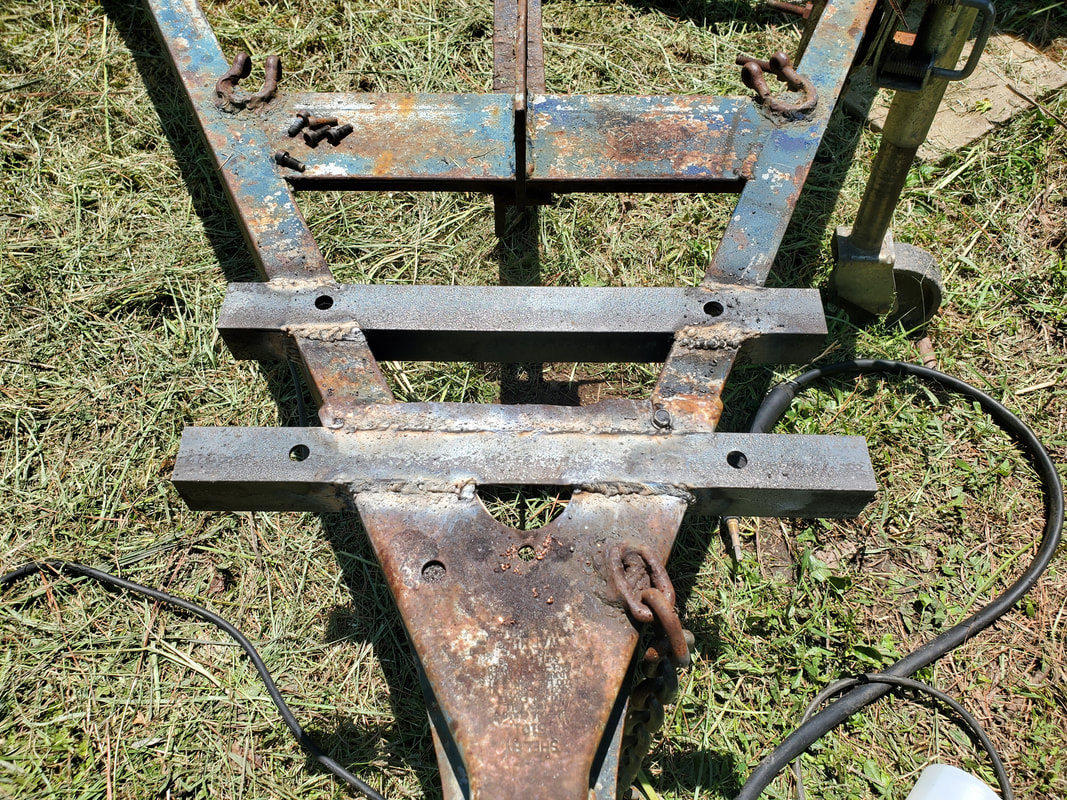 Angle iron bars welded in place on A-frame of trailer. I'll have to have a test fit with the winch so I can see just how I want to mount the battery box then dig up some more scrap metal with which to use to make the mount. At least with that all done, once I do get the new solenoid for the winch, all I have to do is install the part and mount the winch. Now, I could mount the winch early and just cover the unit up with a garbage bag or something to keep the thing protected since I had to trim the cover down by 1/4" to allow me to put the cover back on without separating the whole winch again. I don't want any more water to get into the internals from rain (which is what messed this thing up in the first place). At least with this vital piece of hardware added, the car trailer will be way more convenient to use in the future. The next thing I may feel compelled to add is dedicated trailer lights as well as some kind of mount for a spare tire so I can have everything contained on the trailer. It does get tiring every time I want to use the trailer when I have to load up spare tires and a jack separately along with the magnetic trailer lights. The time has been long overdue to have equipment around here brought to a higher state of readiness and quality.
With the chicken yard covered back up with gravel to a degree that I was satisfied with, I decided to move on to another area of the yard for gravel coverage. I moved back on to the side path just where it enters the back yard area. Granted, this is the "final frontier" in our gravel saga since every other area is covered in gravel. I will end up having to come back over some areas to touch up some gravel settlement but for all intents, the backyard area is a large area that will require a lot of coverage of gravel and will probably be my area of operations for quite a while. For right now, I got started in covering the remainder of the side path with a good layer of gravel. My plan at this point is to lay a path that will lead up to the fuel shed, then slowly cover the area around the scrap yard and along the back of the garden fence. I plan to just bounce around the backyard area with continued coverage, moving around only to facilitate construction of new stuff, like the storage building or anything else.
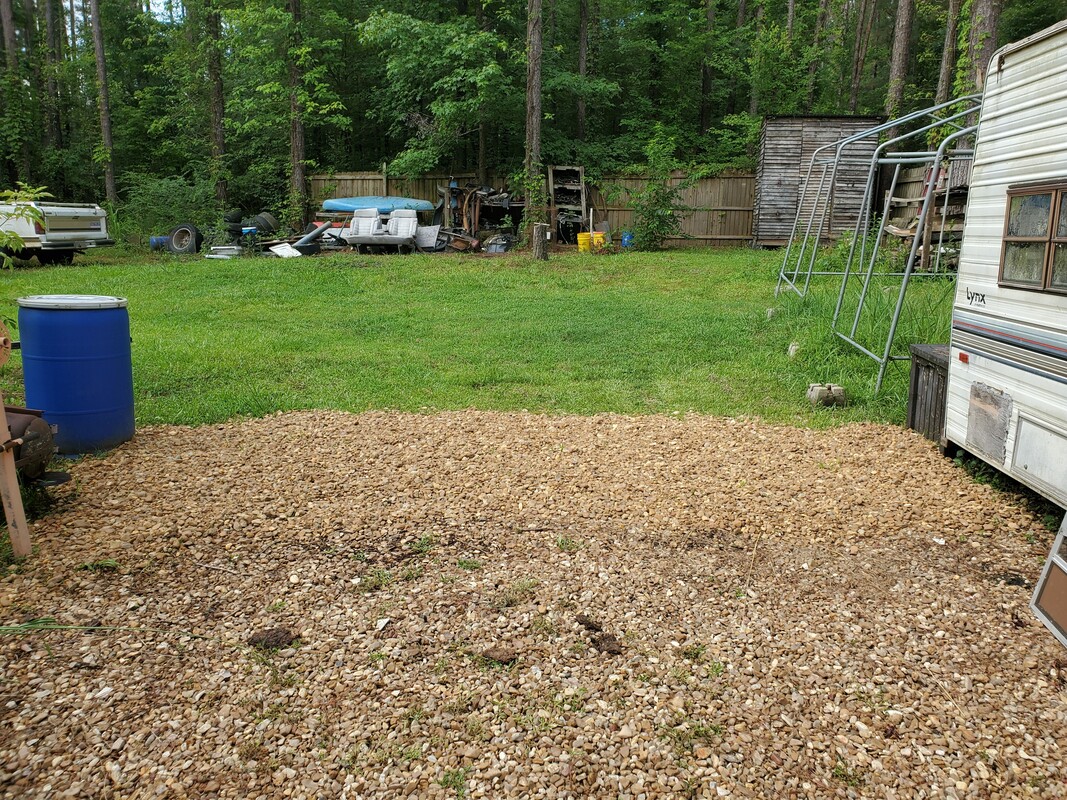
A new patch of gravel laid in the side path entering the back yard area, kickstarting the final leg of our gravel journey.
I do look forward to getting this area covered once and for all so I can move on from cutting grass within the fenced in area, especially since I plan on trying to get the perimeter fencing completed more sooner than later. Getting this area covered will also make transit across this area a little more convenient as I won't have to worry about getting stuck on soft spots on the ground when driving over the area. Another area I decided to come back to, especially since I want to be able to continue with the fence building is the Fallen Trees. These trees have been on the ground for the last couple years, with me whittling away at them slowly when I'm bored and have nothing else to do. Well that time has come again for me to get back to cutting this wood. After the past winter using up a lot of the wood stash, I need to replenish what was used up and then some so its time to start cutting up this mess once again. Some of the wood is in the way of me sinking fence posts so I'm targeting one particular pile of wood for the time being. These trunks are from the lower portions of some trees so they're wider and more dense than the smaller sections. Because of this it takes a lot more effort to cut through them, making me only able to cut so much wood on a single saw battery. With the three batteries I can cut a fair number of logs to keep me occupied for a good sitting with the log splitter. 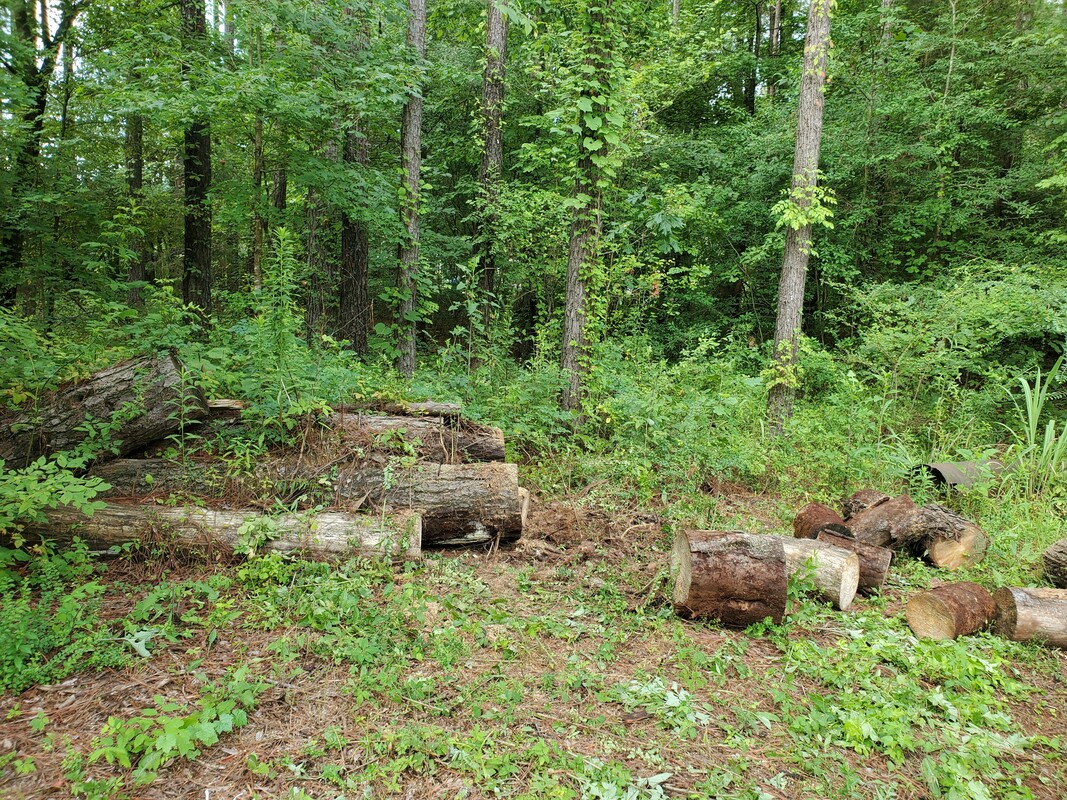
The first batch of Fallen Trees that are being cut into logs for splitting to clear the area for the sinking of fence posts to further complete the perimeter fence.
Along with cutting up the tree trunks there's also the matter of clearing brush and weeds over the ground in the area. All of this will need to be done before I can sink more posts as I'll need a clear shot across the yard and over to the trees that will serve as perimeter fence posts. As for the other tree trunks, once I get the initial batch of trunks cleared, I can slowly chip away at the batch, replenishing and growing our firewood pile as I go along. 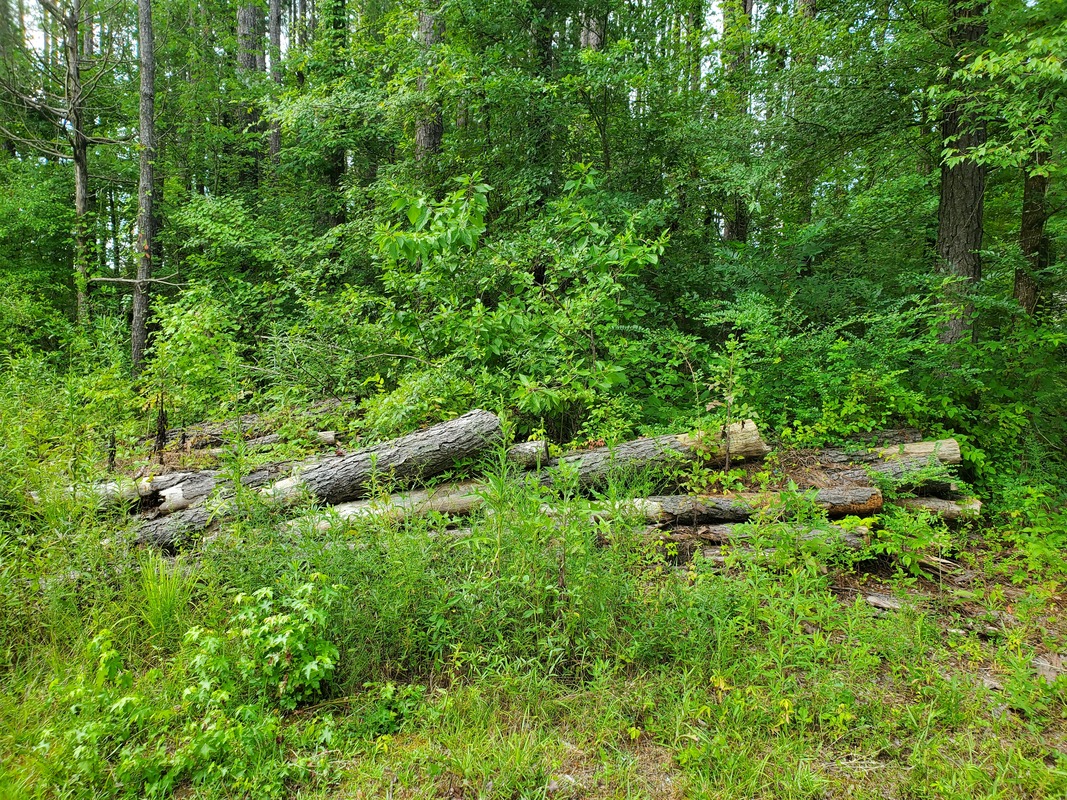
The larger batch of Fallen Trees, note how the flora have overtaken these trunks, all of this will be cleared away when it's all said and done.
Since I'm off to a good start with cutting up logs, starting with the logs over the area where the 51 Chevy was parked at then continuing with the Fallen Trees, having used three batteries netted me a large portion of logs to split. Before I even got to splitting this batch, I took the time to use two batteries to cut up more logs to have some ready to go when I do finish splitting the first batch of logs. My plan will be to use up two batteries on any given day to keep chipping away at the first batch of tree trunks until I eliminate that batch. At that point I will move on to clearing the ground completely, in order to prepare the area for fence posts, then move back onto the rest of the trunks until I get bored or something else comes up that takes precedence. 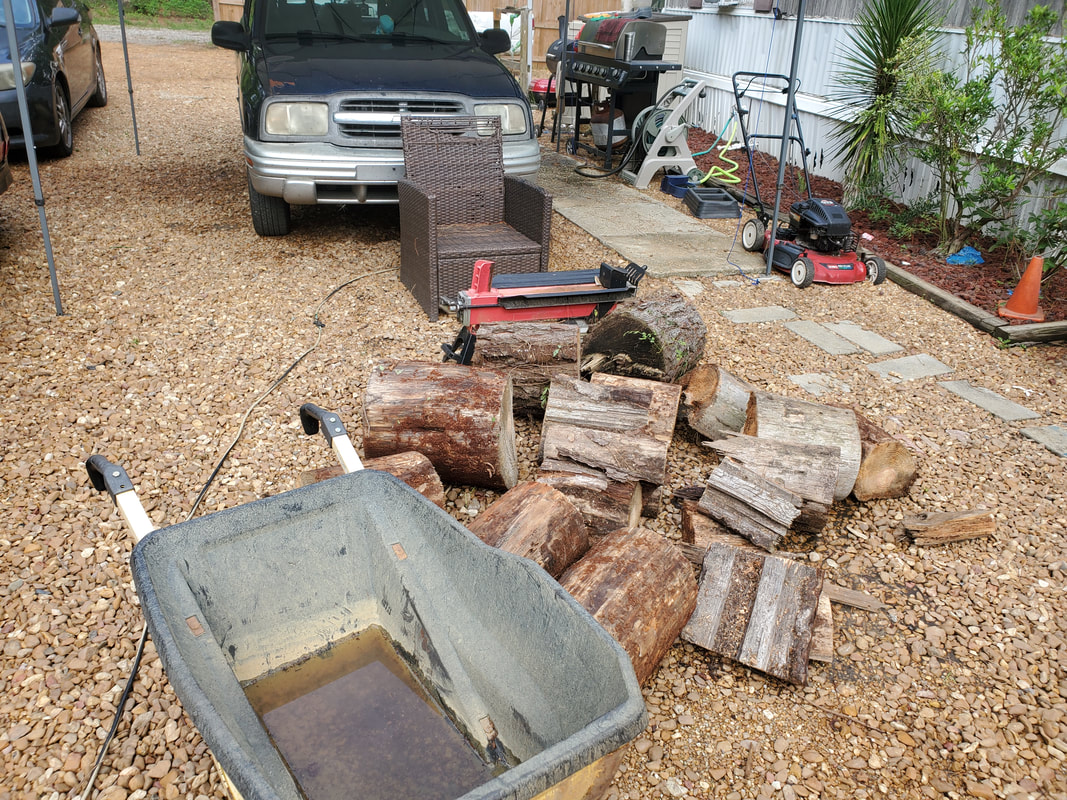
The log splitter operation moved under the canopy that once served as my makeshift garage for the Scion engine swap.
Another job this allows me to complete is the landscaping of the area, especially along the Southern fence line, as my grounds clearing through the Fallen Trees area will take me to that fence line, where I'll clear a wide path along that line, just like I did with the North fence line. Reason for this is I want to create a path that can be used for moving around to the other side of the compound without having to go through the compound. If it's possible, I would try to clear a path wide enough for vehicular traffic to pass along the fence to the other side. Worst case, this path will at least allow for us to drive the lawn tractor around the compound and over to the clearing to cut the grass without having to drive through the compound to do so. This will then render it moot having to worry about the placement of vehicles within the compound as I won't have to worry about moving between the main driveway to the clearing. Either way, the work continues.
When we first bought our car hauling trailer somewhere around five years ago, I immediately found that the need for a powered winch was paramount if we are to be able to easily move cars onto and off the trailer during our car hauling adventures. For the time being we've used everything from come along manual winches to pulling a vehicle with another vehicle parallel to the trailer to get it up on the trailer. Recently we've used our neighbor's battery handheld winch along with extra chains to pull the car onto the trailer. This is cool but we don't always want to have to borrow stuff, much less have to use external devices to do a job that could've been done with a dedicated device.
With that, we did pick up a winch from another party but never got around to installing it on the trailer. Part of what I need would be some heavy duty flat steel to use for holding the winch body to the frame of the trailer, along with some grade 8 bolts. Looking at the body of the trailer, I will have to relocate the trailer stand to a point further back to open up the area on the A frame to mount the support metal for the winch. It's just as well anyway since I wanted to replace this stand with a heavy duty unit that can hold two tons, unlike the current unit that is really only geared for something light like a boat trailer. 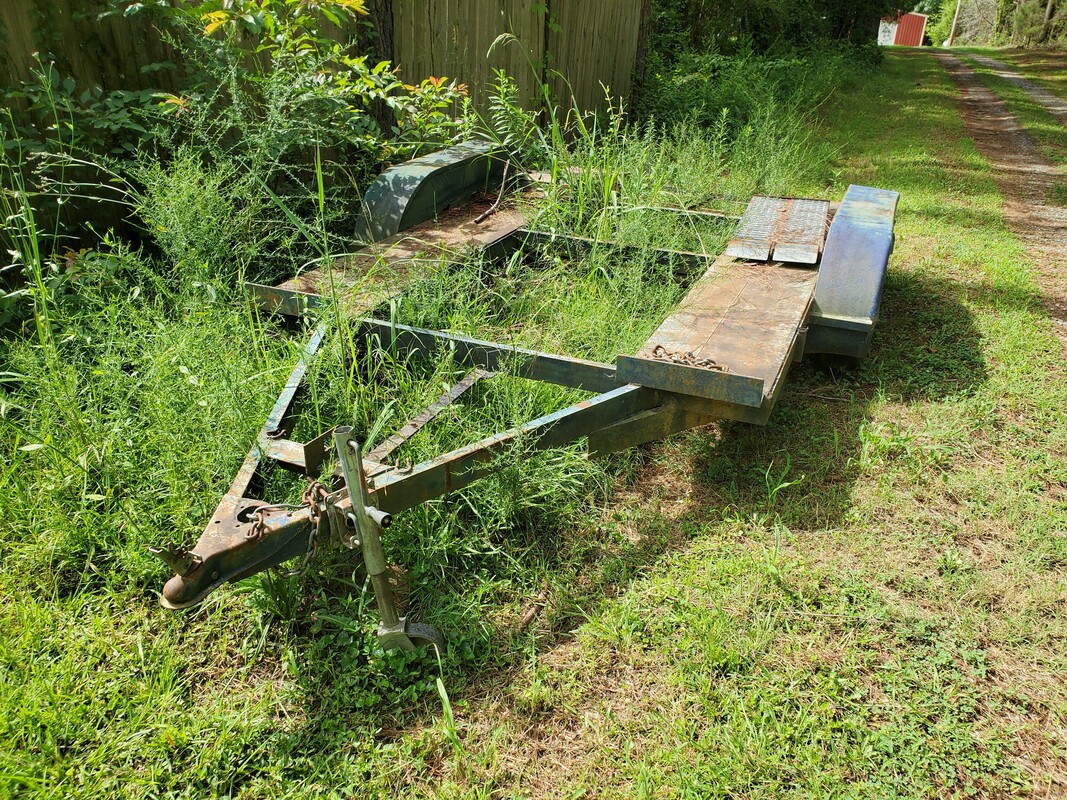
The car trailer, parked off to the side, awaiting its next job of pulling a vehicle.
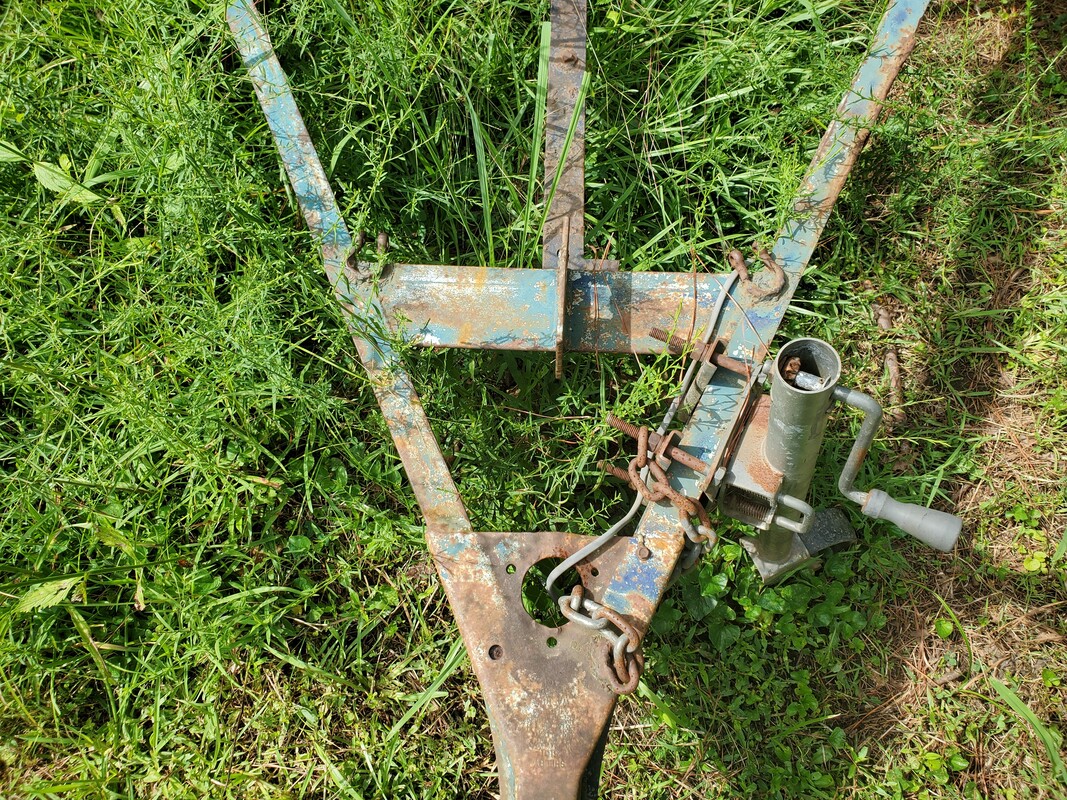
Closeup of the A frame of the trailer where I plan on mounting the winch, along with the crank stand that will need to be relocated before mounting the winch.
The point on the trailer I plan to mount the winch is on the A frame portion at the front of the trailer. There is an anchor point a little further back that I've used to hook the ratchet tie downs when locking down a car, I want to keep this in place as this is a useful feature. I'll end up having to drill a couple holes on the trailer frame but all in all I'll just have to weld the flat steel in place and bolt everything to the flat steel after the holes are all drilled. I did make a template from some cardboard with which to use for lining up the holes that I need to drill, along with having a good idea of the size of flat steel that I'll need to source. 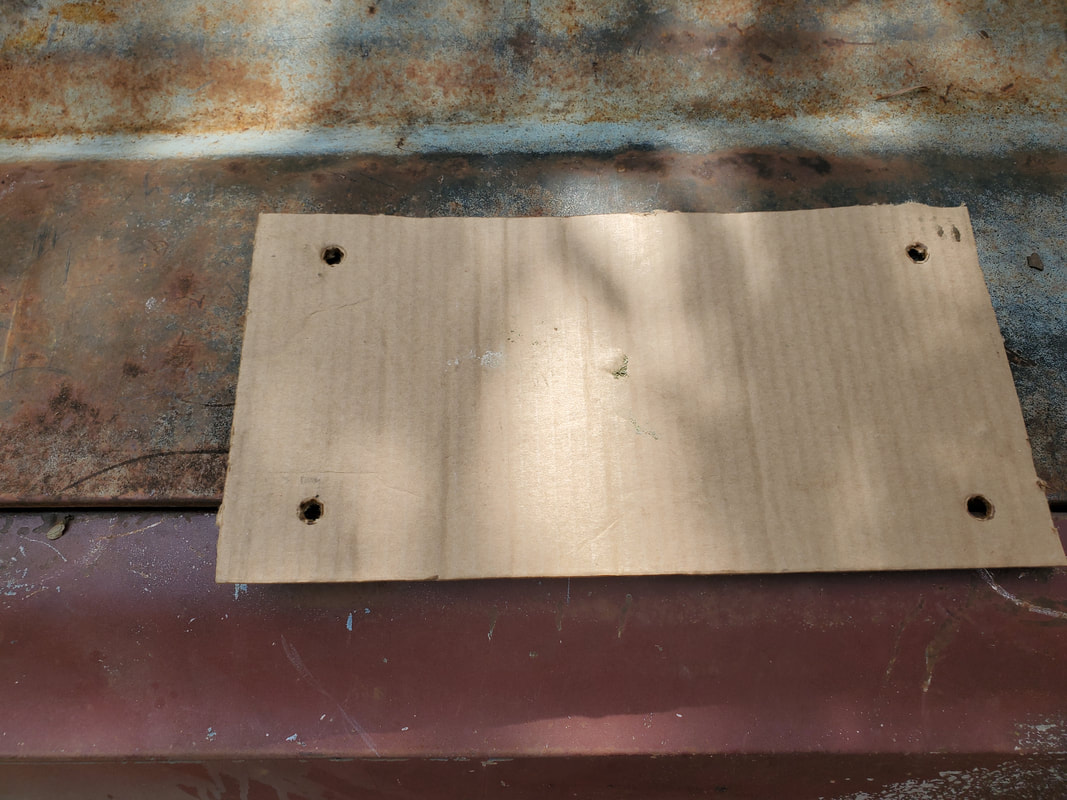
The cardboard template made to aid in making the metal base to mount the winch.
The winch is made where a nut needs to be recessed in a cavity where the mounting point is at, then a bolt inserted from the bottom through the mounting base and the winch body then into the recessed nut. This is fine, but will choose to use lock nuts so as to prevent these bolts from walking out during the vibrations of the trailer in tow. I also have a large battery box that is capable of containing a class 29 deep cycle battery, which would have more than enough capacity for working the winch all the way out and back in under load. The winch also has a wired remote control that plugs up to the winch for simple operation. Other than adding a hook to the cable end, this winch will be a Godsend on this trailer the next time we need to pull a car, especially a dead car. 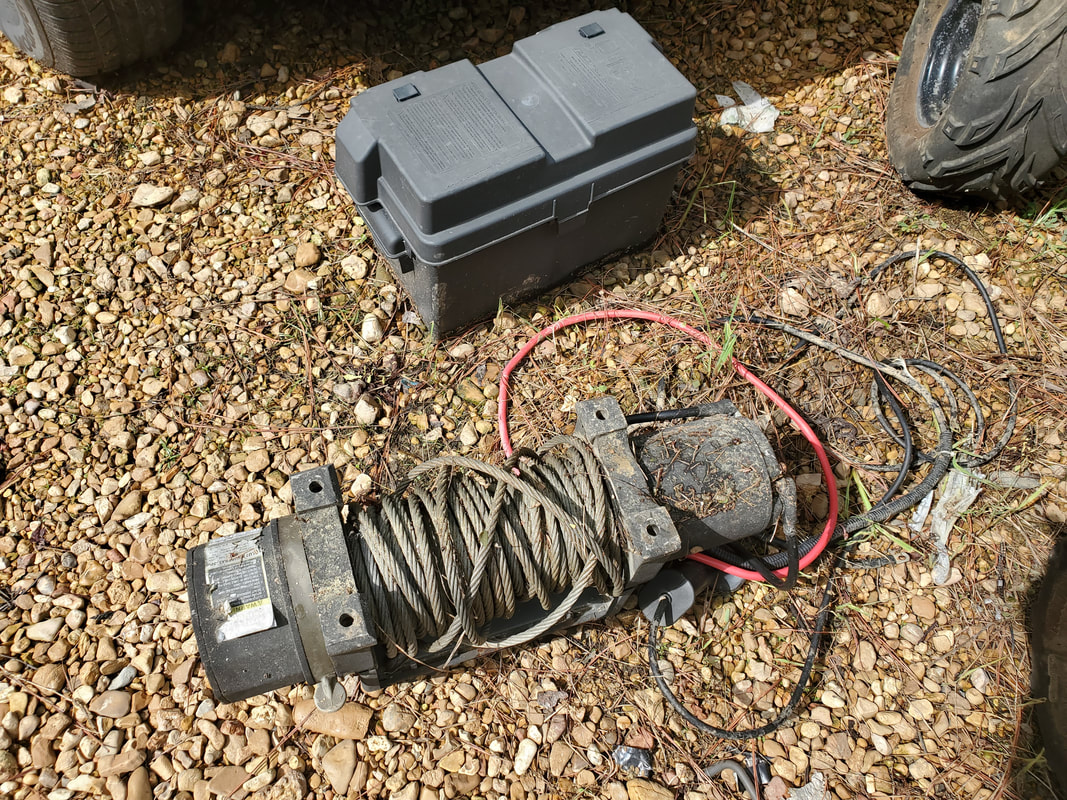
The winch with cables, remote control, along with battery box.
Once I do get this winch mounted on the trailer, this will eliminate another batch of items laying on the ground within the compound. This has been one of my biggest pet peeves, eliminating the clutter around the compound that comes from parts and items that were intended to be used in future projects. For every project that gets completed it will lessen the footprint of random crap that is laying around. And of course it will put me on a better footing for being able to perform future duties that utilize these tools as I will no longer have to work extra hard to perform said duties.
With all of the rearranging of the vehicles within the confines of the compound fences, it was long overdue to get the 51 Chevy moved inside just as well. This truck has been sitting outside, alongside the main driveway, against the power pole, ever since we brought the truck home a year ago. I did manage to get some tires and rims on the truck and break the brakes free so the truck can free roll so I know that moving it wouldn't be a problem. It would just be a matter of actually moving it. This would involve several maneuvers since the location where I want to move the truck and the position will call for many moves to pull it off. Plus, we're not going to be using the tractor for this op. 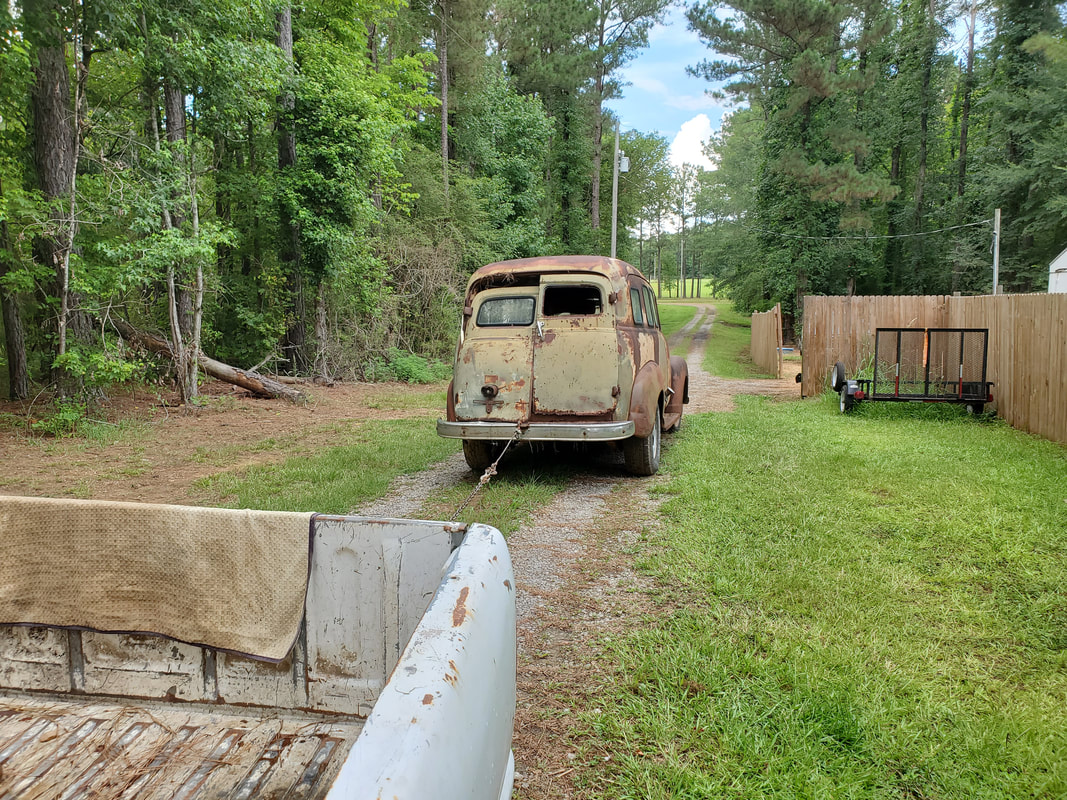 Pulling the 51 Chevy from its old parking spot into the main driveway using the S10. I used the S10 in the beginning to pull the truck free from its old resting place into the main driveway. I pulled it past the entrance to the compound with the intent of letting the grade of the ground help me in pushing the truck into the entrance. I had to angle the nose of the truck in, missing a ditch on one side of the entrance. Once inside, I had pushed the truck all the way over to one of the parking spots in the Midway. This was rather easy, in part because of the slight grade of the ground, letting gravity help with some of the work. 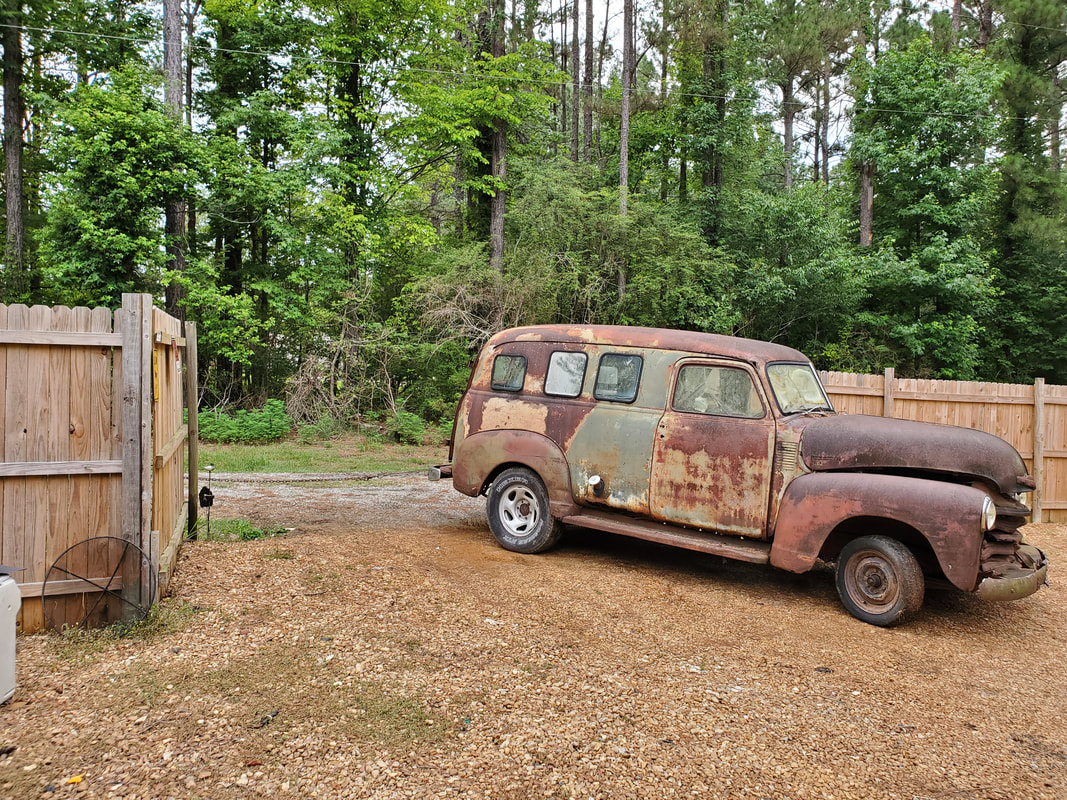 Pushing the 51 Chevy into the entry way, parking it in the Midway before backing it up for the final approach to the NW corner. Once staged in one of the regular parking spots, I wanted to move the truck backwards to the Northwest corner of the yard. Thing is, I wanted the truck staged with the nose pointing out, so when I do extract the old powertrain, it will be a lot easier to do so, versus if the nose was pointing towards the fence. I had to hook the chain to the front leaf spring on the truck to help pull the truck back out, but with the truck turning ass end towards the opening leading to the Northwest corner of the yard. I pulled the truck back, letting it steer NW as much as I could, using the S10 to pull back out, until the 51 was almost ass to the FMT's nose. At this point I disconnected the S10, its job was done, now the F250 was up. 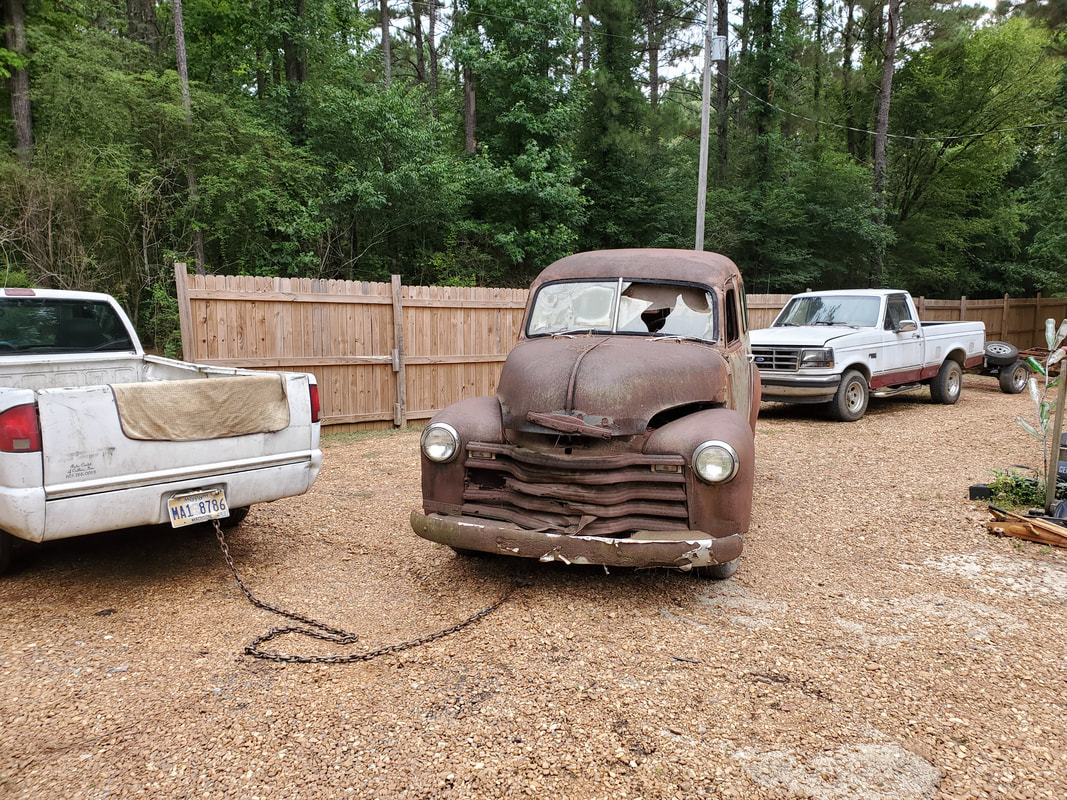 Pulling the 51 Chevy back into a new position to get it staged for the final approach into the Northwest corner of the compound. The S10's job is done. The F250 was parked in the side path going to the backyard when I was spreading gravel over some more of the path leading into the backyard. I moved the F250 in place, hooking the chain nose to nose with the 51. At this point I pulled the 51 back to the side path nose first, staging the ass end of the truck with the opening leading straight back past the FMT and past the chicken yard gate. Once the ass end was staged nicely enough, I was able to just guide the truck back, using the F250 more or less as an anchor so the 51 wouldn't run away from me down the grade and run through the North fence. I used a 4x4 board to chock the wheel while pushing it back. 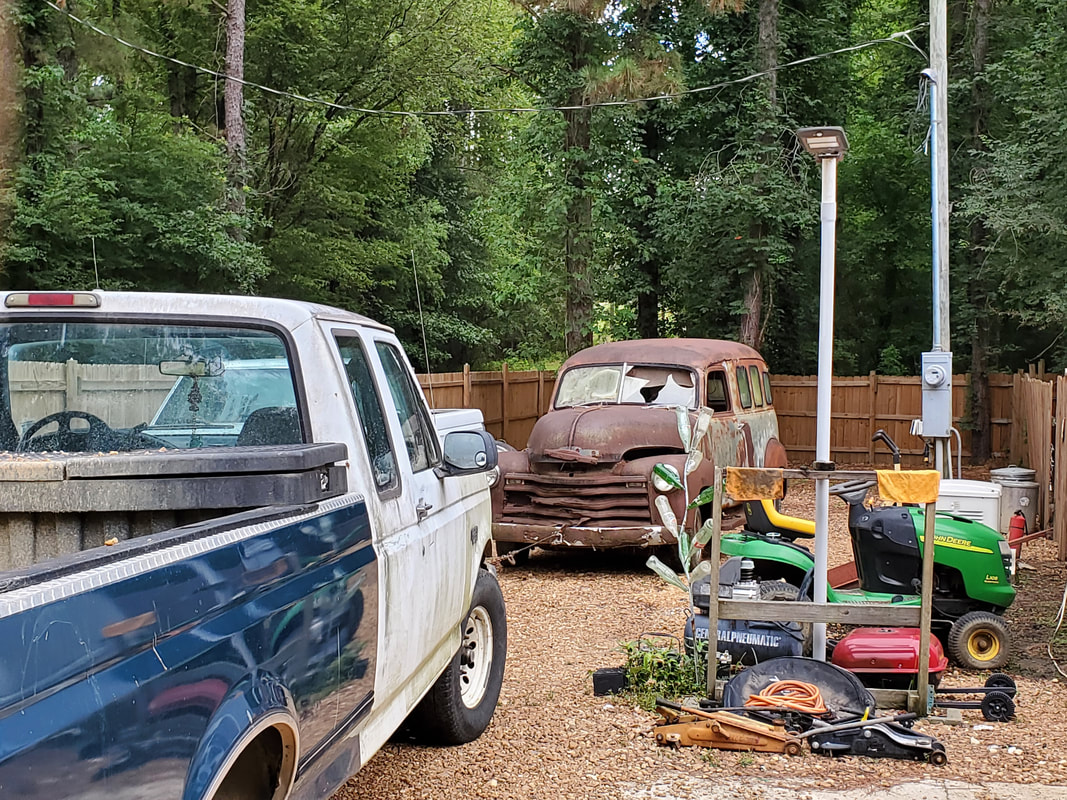 The 51 Chevy on its final approach to the parking spot with its tether to the F250. Once I got the truck well past the chicken yard gate, I made my landing at a point just before one of the pine trees in the yard. I didn't want to go fully past the tree and close to the fence because when I do go to extract the engine, I will need some room to be able to pull the truck back while pulling the engine and transmission out. In the process of doing this will I move the truck further back into its final resting spot, next to the tree. At this point this would allow me to erect a tarp over the area, connecting to the trees and the fence posts to set up a makeshift garage that would allow me to work under cover, rain or shine. I predict that I will probably start working on this thing in the late fall when I will have to worry about rain. Plus, with a tarp wall/covering, I could even set up some form of heating to make life a little more pleasant if I so desire. 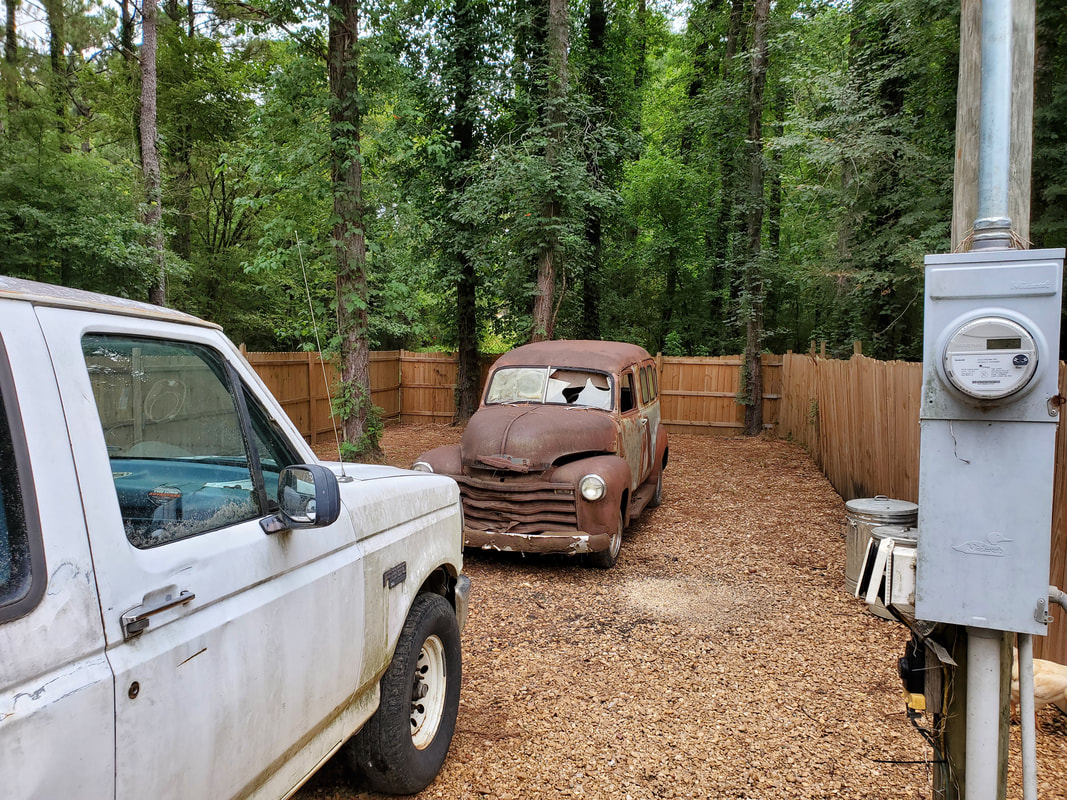 The 51 Chevy in its new parking spot in the Northwest corner of the compound. If things work out the way I hope they do, this area might actually end up being a new makeshift garage area that I can have temporarily set up with a tarp and maybe even some other hardware to make a semi-permanent covered work space that I can use for working on the 51 or any other vehicle for that matter, especially as things continue with the other projects around here and I may need to work under cover when the weather can be questionable. Maybe with some extra hardware I could get a covering setup that covers the whole of the Northwest corner where this area could become some kind of redneck garage/canopy setup. Of course I'd have to be able to move the tarps at a moment's notice when the weather gets really bipolar, but regular rain would be easily taken care of with this ideal. I did try this with another large tarp over the scrap yard area to keep a lot of the auto parts covered and it worked for a while until the tarp started getting torn up from winds here and there. I would have to do something like hang some cables from different points at the trees and fence posts to create a "framework" for the tarps. We'll see.
When you have so many projects and gadgets and stuff around your homestead, you tend to want to make sure everything stays in optimum condition. It sucks to build something or bring something back to life at some point, then set it aside for a while, then when you decide to want to use the item once again, find that something is wrong with the thing because of some failing component that at the beginning was working but was probably already failing. Such is the case with the Coleman go kart. This go kart has given us some blues in the past when I ended up having to replace the carburetor, both clutches and the drive belt, and not in that order. Trying to use the go kart before, I shredded the belt, then when trying to replace the belt, found the one of the clutches were bad, so I changed both just to be sure. Then at that point the carb was acting stupid so that had to come off too. Now it's the throttle cable.
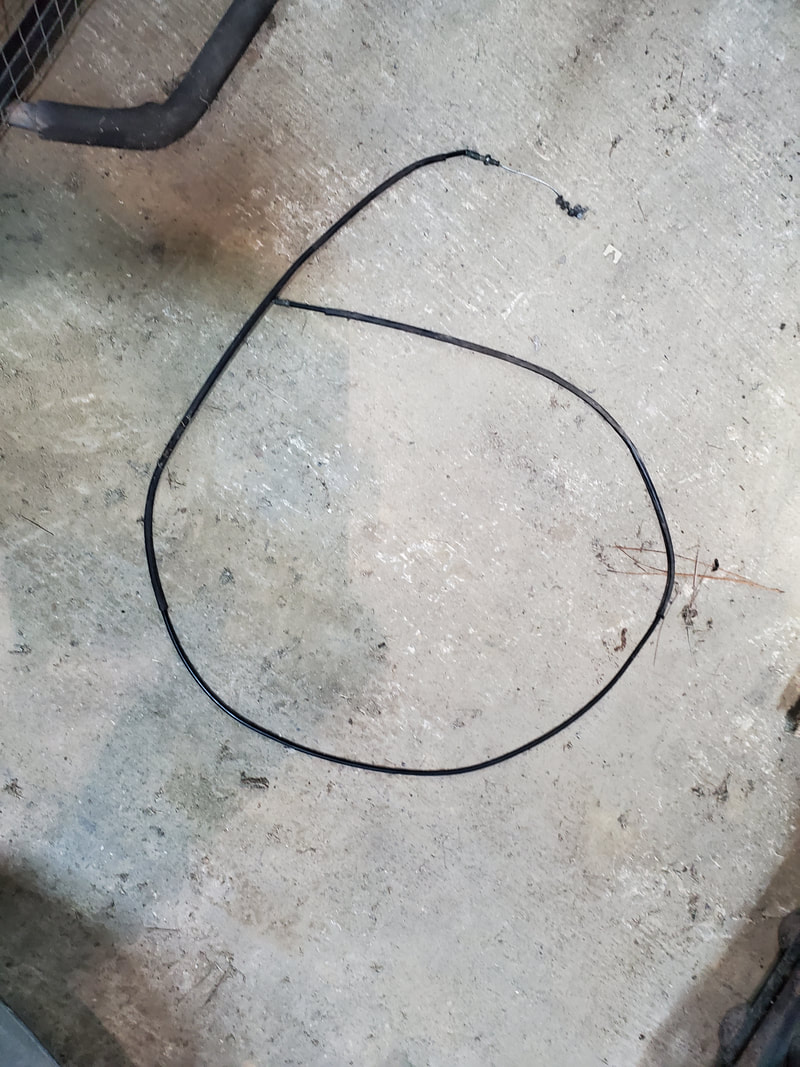
Old throttle cable pulled from go kart.
After removing the cover that contains the throttle and brake cables and the ground wire to kill the engine, I was able to get the cable out in the open. Moving the end off the coupling on the pedal and loosening the screw on the throttle lever on the engine I was able to get the old cable free. Of course the replacement was all of this in reverse. 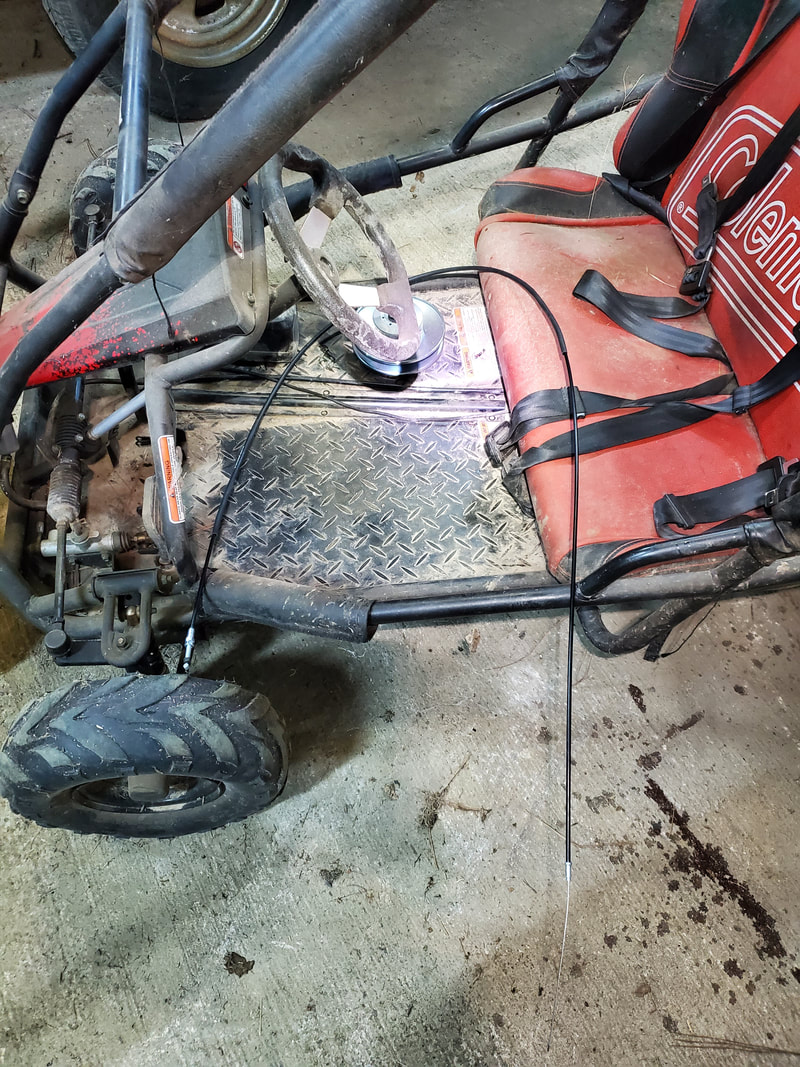
New throttle cable laid out after removing old cable.
I got the pedal end of the cable hooked up, along with the threaded lockdown shaft and nuts to hold that end securely. I routed the cable around through the channel where the containment panel is mounted, getting all the cables together, before replacing the cover to lock down that part of everything. After routing the cable around the same path of the old cable, around the pull cord side of the engine, I got the other end up to the throttle linkage on the top of the engine. I replaced the retaining clip to hold the cable end down. 
Accelerator pedal with new throttle cable hooked up and locked to mount.
Cable containment panel bolted in place on go kart floor after hooking up cable to pedal.
I had to play with the adjustment of the wire end to get the right adjustment where the cable will pull the throttle to wide open when the pedal is depressed all the way while holding what would amount to a decent idle. Tightening down the screw on the throttle secured everything, and the pedal operated as intended with the throttle, opening it up all the way. With that, our throttle cable is in and the go kart, minus installing the air cleaner, is ready to go. 
Throttle cable routed up around underside of engine and secured to throttle lever.
I'll have to test the thing out to make sure everything is good as far as the idle adjustment but even the carburetor. I replaced the POS earlier and had a problem getting the damned thing started when I found that the throttle cable was bad. It would be just like it that the carb for some reason ends up being bad, which is not too uncommon when these small engines are able to sit. Its these kinds of issues that make people like me just say screw it and convert these machines to all electric and cut all the shit. We'll give it a chance again, and worst case, I'll have to spend another $25 for another carburetor to get this damned thing back in good standing once again.
With things moving along pretty fast around here, the planning continues to spread around. After moving the minivan body into the chicken yard and moving the DOB and the 84 F150 to the back yard area, I made plans to move the 51 Chevy to within the compound fence, for one, to have it inside where I can better work on it, and secondly because I plan on starting to set up the main entry gate for the compound. In order to do this, I plan on expanding the width of the main driveway to allow us to be better able to swing a vehicle, especially one like the F250, into the main gate without coming close to either side, especially since I will more than likely have to add a post to narrow the width of the entry way by a couple feet.  The 51 Chevy, where it currently sits after we brought it home a year ago, right in the area where I will expand the width of the driveway to make it easier to turn into the entry way. The area that I planned on moving the 51 Chevy to is the area that I was going to move the minivan to when I was going to build it out as a doghouse. This area is in the Northwest corner of the yard. After moving the 65 Mustang out of the way to its new spot and cleaning up the surrounding area, I looked it over and it made perfect sense to move the truck to this area. Since the truck won't have to be moved, much less be able to be moved, this spot is perfect. The area is level and covered with gravel and shaded so it would actually be a nice, comfortable spot. In fact, with the couple trees in the area, I could even erect a tarp canopy over the area to make an impromptu garage over the truck to better work on it. 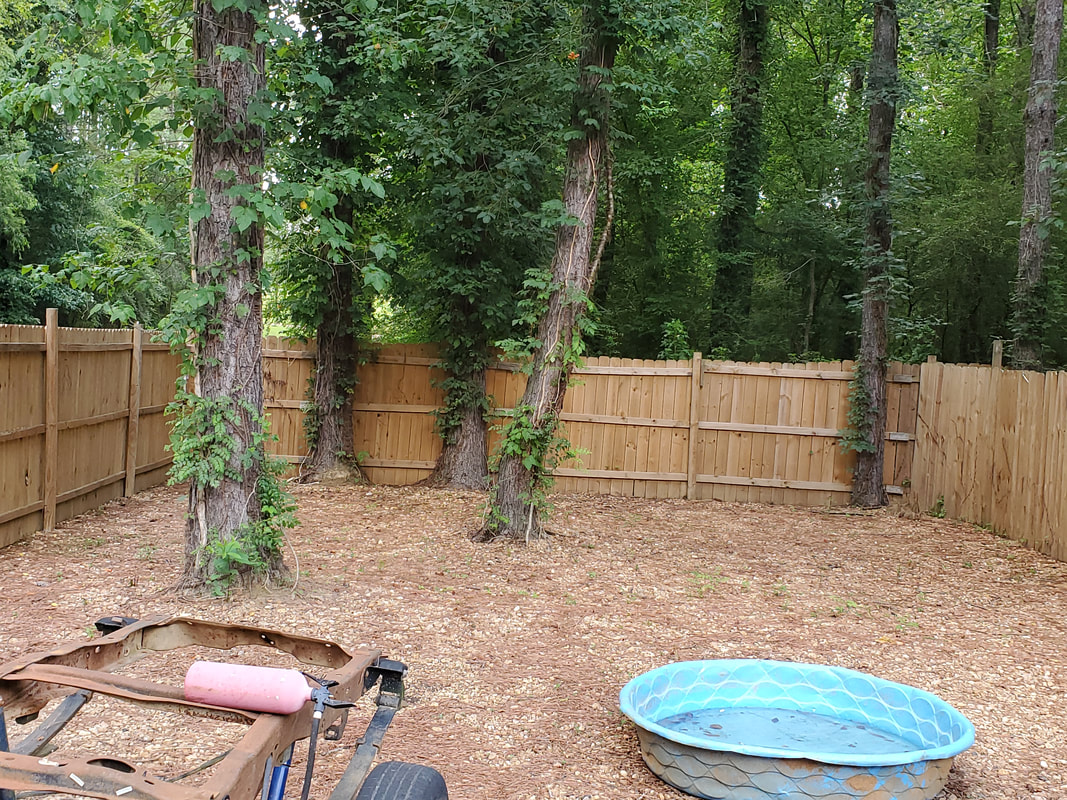 The Northwest corner of the yard, opened up and ready for movement of the 51 Chevy to this spot. Other than that kiddie pool, this area is clean. As stated before, I moved the DOB to the back yard area where I staged the 84 F150, having both trucks out of the way, since I currently have the truck up for sale and I hope to get the DOB done more sooner than later and back to our friend. Hopefully if both of these goals are met, then both trucks will be out of my way completely, opening up the back yard area for further development in the future. I had to cut the grass over the area first so when I staged the trucks there, it won't be an inconvenient area to work around. Now, I also parked the trucks off to the side in a way where the gap is plenty big enough to move any vehicle around with ease. 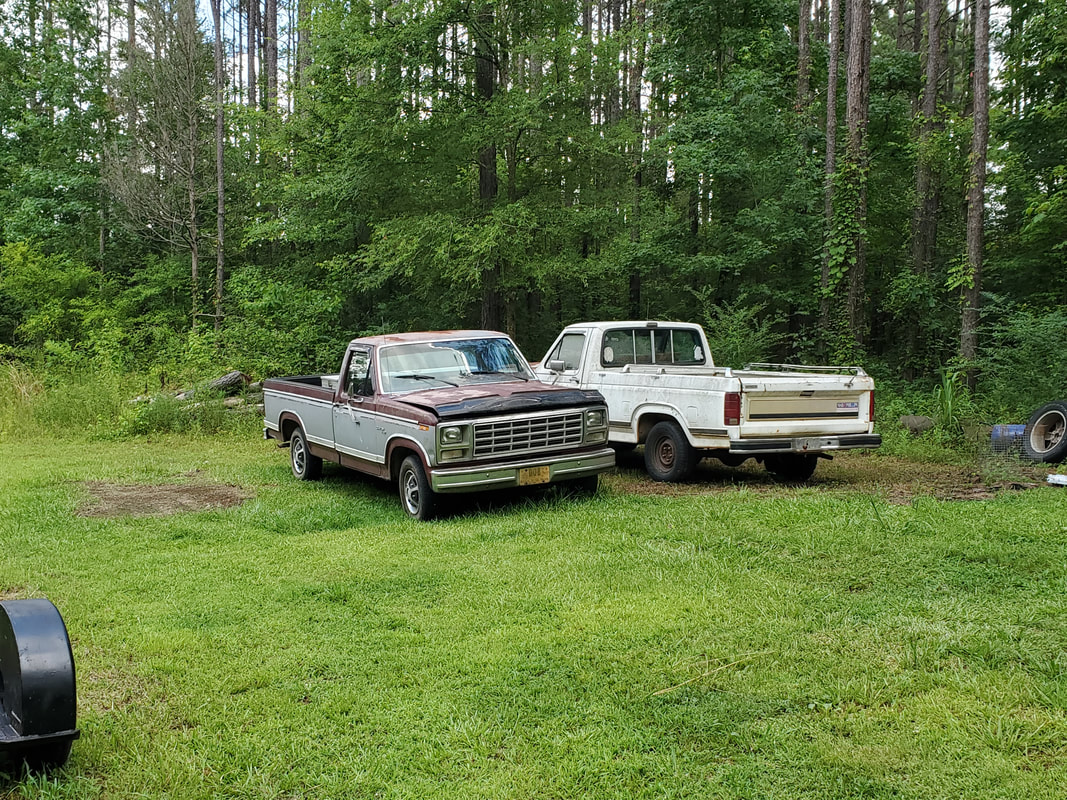 The DOB and 84 F150 moved over to the backyard area off to the side for final staging before hopefully selling the one and finishing and returning the other. Moving along in the compound, right across from the two trucks is the scrap parts area. This area is a mix of random scrap sheet metal and other metal pieces, and next to that, a mix/match of random auto parts that were salvaged from different cars over the years. Some of the parts are for our current vehicles, but a lot of the stuff is from vehicles that I scrapped with the intent of selling the parts. While some parts were sold, others have been slowly scrapped completely due to their not being sold. As part of trying to clean up the compound, I will probably end up scrapping a lot more of these parts, keeping only the parts that are immediately useful for building any of the older vehicles we're working on. Things like oil pans, a transmission, fuel tanks, intake manifolds, and the like that were pulled from older vehicles will more than likely be kept but a lot of the other parts pulled from the newer vehicles, especially those we no longer have, will be scrapped. My hope is to downsize the size of the scrap pile to where it takes up a smaller footprint, even to the degree that this stuff could be placed on shelves within the garage or my storage building, whenever I do complete it. 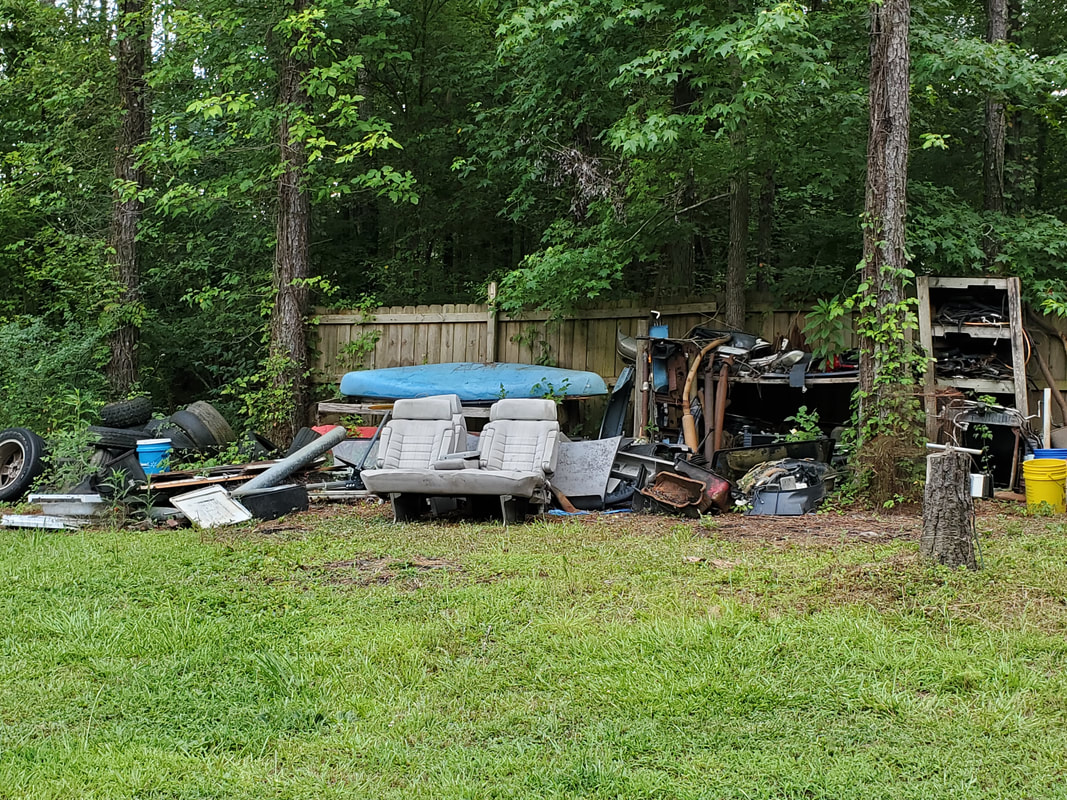 The scrapyard, consisting of miscellaneous scrap metal pieces and auto parts, including the newly added minivan parts which are being staged here temporarily while trying to sell the stuff. I hope to get this whole area cleared up to where it's almost unnoticeable. The last area we're visiting is the area on the side path across from the Storage Trailer. This area is where the 46 Ford is sitting at, along with all the parts to finish the body and some of the mechanical components I planned to install in that build. Reason for focusing on this area is the idea that when I do start working on that project and getting things put together, the large area that is currently covered in miscellaneous auto parts will be cleared up, leaving a more complete car in its place. Even with the car sitting in its current spot, the rest of the area will be opened up for future use in other ways. And frankly, it'll just look a lot better when the clutter is cut down. 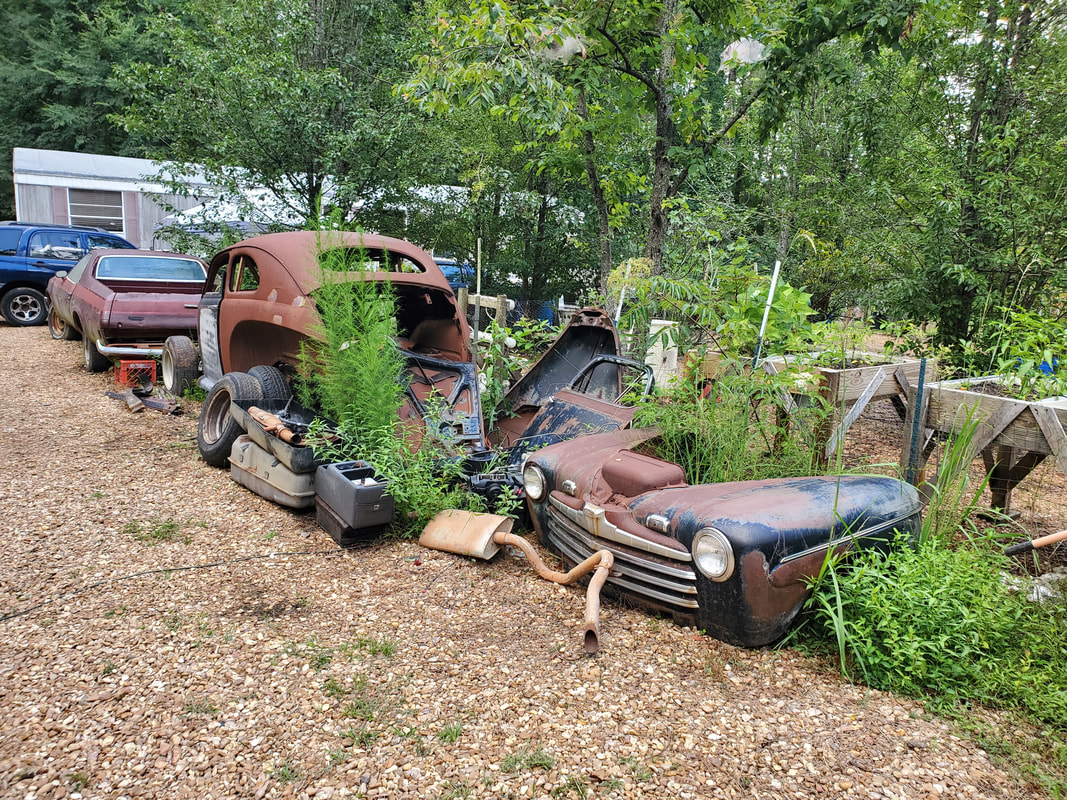 The 46 Ford, parked behind the Elco, along with the train of parts laid out behind the body. One can see the amount of space taken up by all these parts. Its these cleanup goals that will help me bring the compound to a better state that will make it easier for me to continue with the development of the grounds as well as the completion of current construction such as the fences and the outbuildings that are still in the works. Even the completion of the laying of gravel over every square inch of ground depends on me getting the grounds cleared up as much as possible. With nothing big to do for the moment, I decided to get some cleanup work taken care of. The area in question is on the eastern end of the house right by the eastern fence. At the time I had a bunch of car parts or more accurately van parts, as most of the body parts and some other stuff pulled from the minivan were staged over here. I also had a bunch of old tires stashed over here that I still had to dispose of. Some of them could still be useable in a pinch so until I can dispose of them, this is where they sit, a bunch of may-pop tires. Unfortunately, some of the parts in question are going to be scrapped since this stuff isn't selling and frankly, I'm tired of some of this shit laying around. 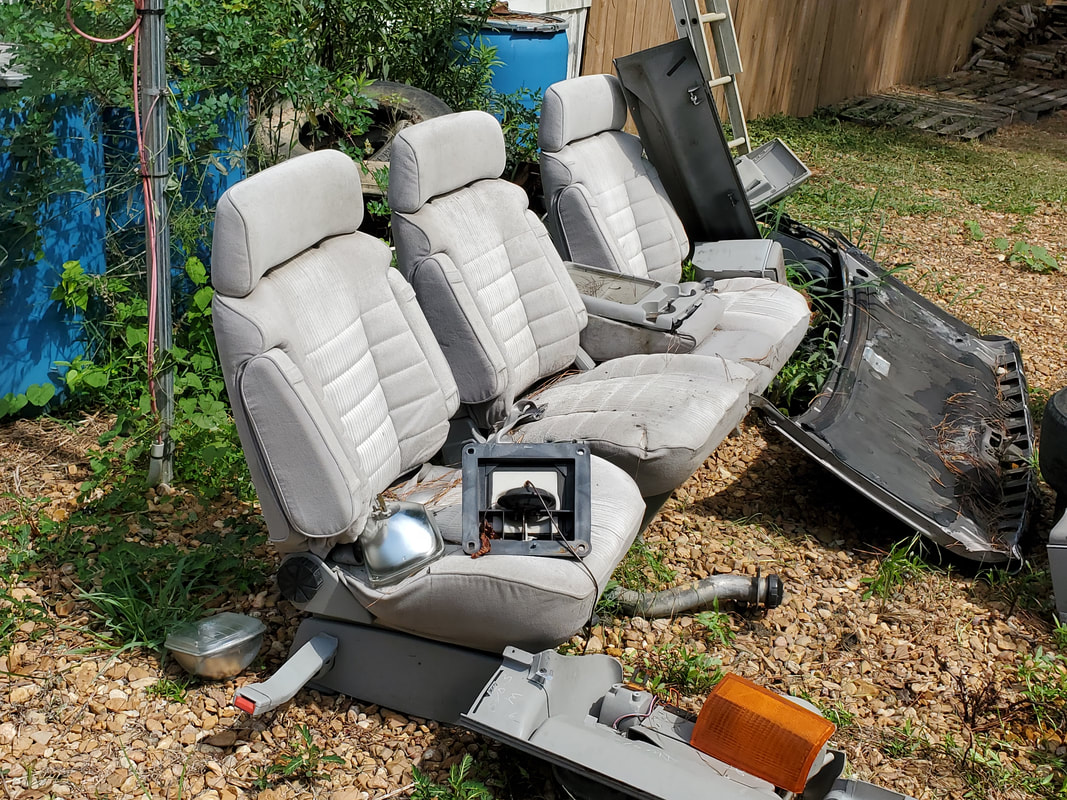 The batch of minivan parts that I have to photograph and move over to the scrap area, along with the old satellite internet dish pole and a bunch of overgrown weeds with a stack of tires behind it all. A lot of these parts are still good body and interior parts, so I decided to photograph these parts to list on Craigslist since fakebook marketplace sucks. So with that I spent the time moving parts and taking pics of the stuff, then moving the parts to the back area of the compound where I staged other auto parts that were either for sale or just being saved for use on any vehicles they may fit in the future. Even this area at some point is going to be trimmed down some as I start scrapping parts from that area just as well. At the same time I had to blast wasps that decided to take residence in some of the parts so slowly but surely I took care of the parts, moving them from the east side of the house over to the junkyard. 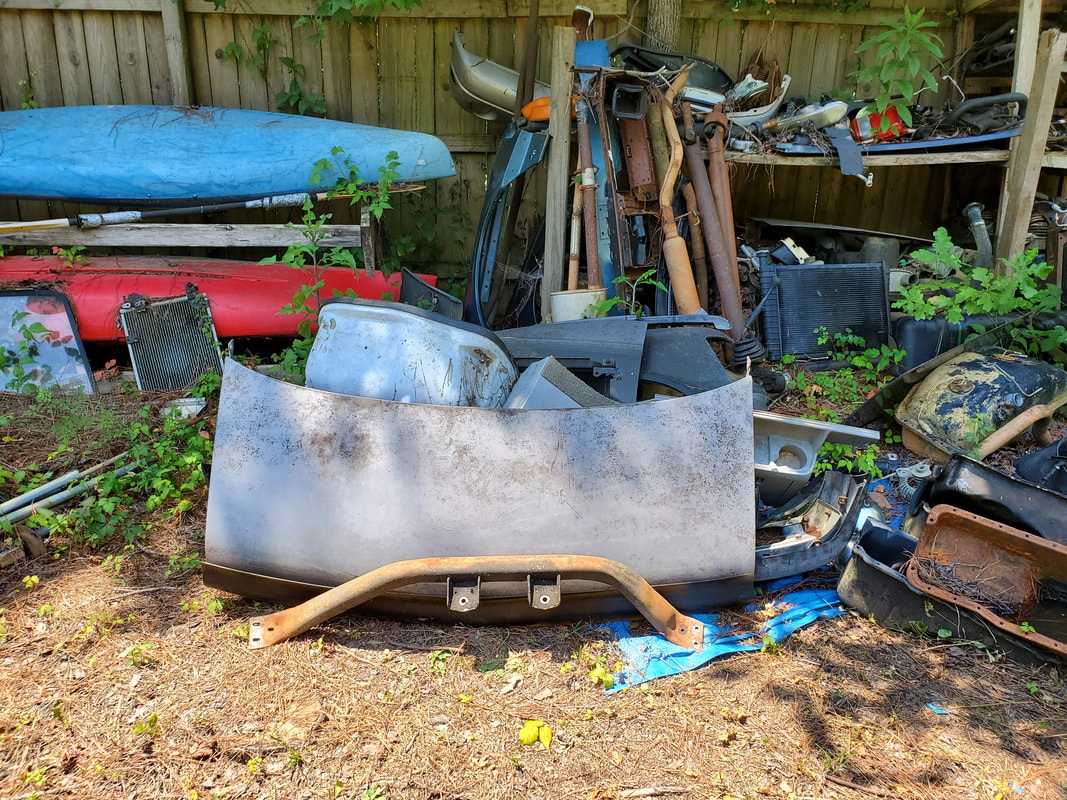 Batch of minivan parts stacked in the auto parts staging area at the back of the yard along the southern fence line. With most of the parts taken care of, all I was left with were the rear seats from the van. More than likely I might end up trashing these seats, maybe saving the bases for use on some other seats, who knows. One thing I do know, these seats aren't exactly optimized for use since they're either squished down or otherwise distorted. Also with them being fabric, these things sitting outside aren't exactly good for the integrity of the fabric, much less the odor retention. So again, these seats will more than likely get trashed, unless I throw together some automotive monstrosity that needs some quick seats that don't warrant spending money on seats. On a lighter note, the last thing I had to take care of was some weed/grass trimming over the area to get a start at further cleaning up the area, then removing the old Viasat dish and pole. After trimming the flora, I pulled up the cable from the dish then hacked the pole just below ground level with the reciprocating saw. 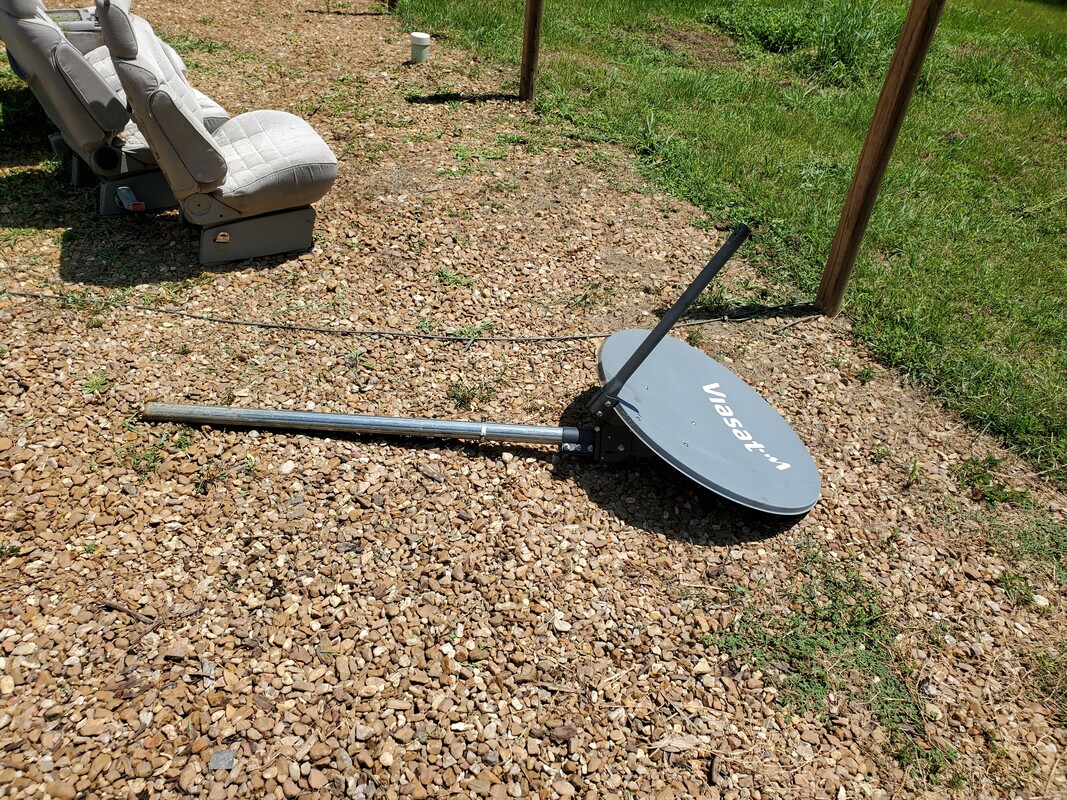 The old Viasat dish chopped down from its mount in the ground. I hauled the dish over to the scrap area just as well, parked next to the pile of van parts. Only reason for hanging on to this assembly is for one, the pole is a good enough length to still be useable for something, plus, I've wanted to try and experiment with using an old dish for making an internet/cell phone booster antenna that might help with amplifying the super weak cell signal we get out here. More than likely I won't get to that project on the count of me finding a viable booster commercially and I'll just salvage the pole then scrap the dish. But in the meantime, this dish assembly is in the scrap pile. 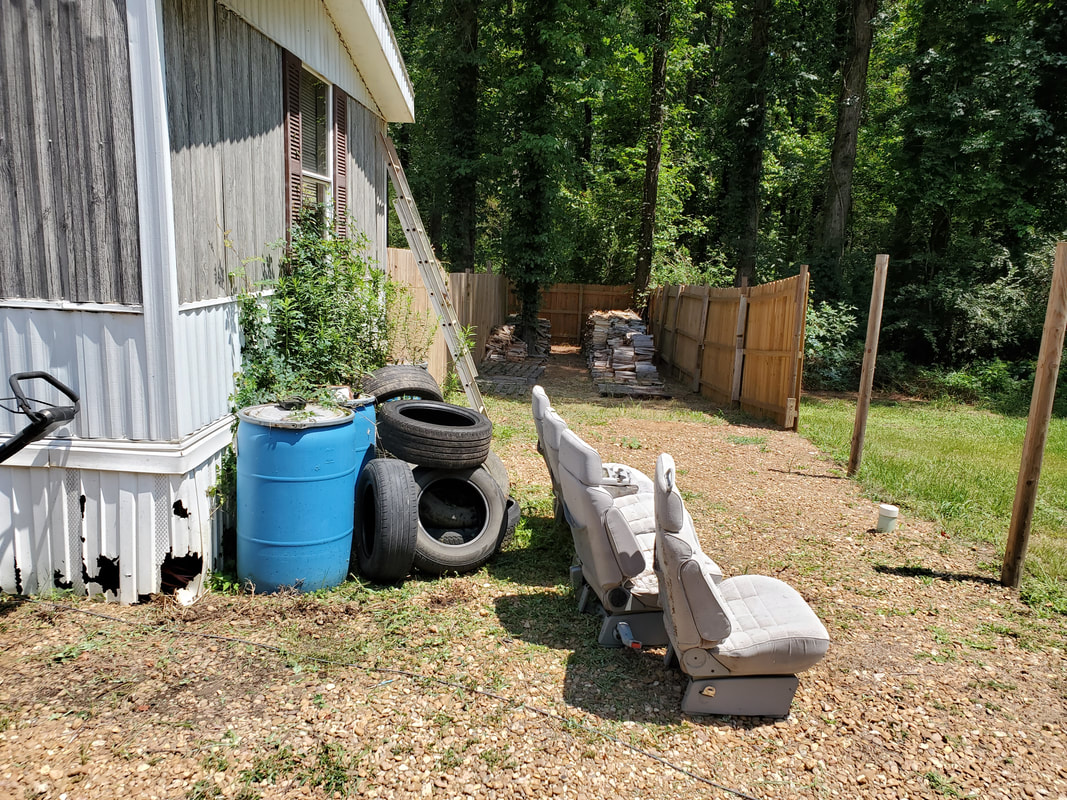 The area after trimming a lot of the weeds and removing the dish pole along with the auto parts. The work continues. At this point I will probably end up moving the seats over to the junkyard area just as well, just to keep these parts all together, and clear the area on the side of the house up in order to further trim the weeds and grass over this area. The tires will probably end up over there just as well, keeping all automotive salvage in one spot, and cleaning this area up completely. The water barrels will need to be emptied and refilled for our backup water and more than likely also staged in a better area of the compound that I have yet to determine where. More than likely what's going to happen is when I fill up my aluminum scrap drum with cans, any of the van parts that didn't sell will end up going out with that load of scrap just as well, since I don't want to keep hanging on to parts that I can't use with the hope that somebody out there will one day want this crap, especially when I'm not really making much on the stuff anyway. The plans I have for the compound don't involve me having piles of shit all over the place but having some real infrastructure set up to be able to further work on unique projects. Until then, the cleanup and beautification of the compound will continue. |
