|
With the Scion's old engine on the ground after the all day affair trying to get the chunk of metal pulled, there was still the matter of pulling parts from the old engine in order to facilitate the completion of the new engine that we have en route. The new engine is a JDM engine with low miles, but its not complete. Since this engine was more than likely used in a multitude of vehicles, the accessory and other components that were used on one car would differ from the next car and the next. Because of that, the engines are sold missing some components that may be vehicle specific, with the buyer having to supplement those parts based on the car that they plan on putting the engine in. This is where we stand right now. 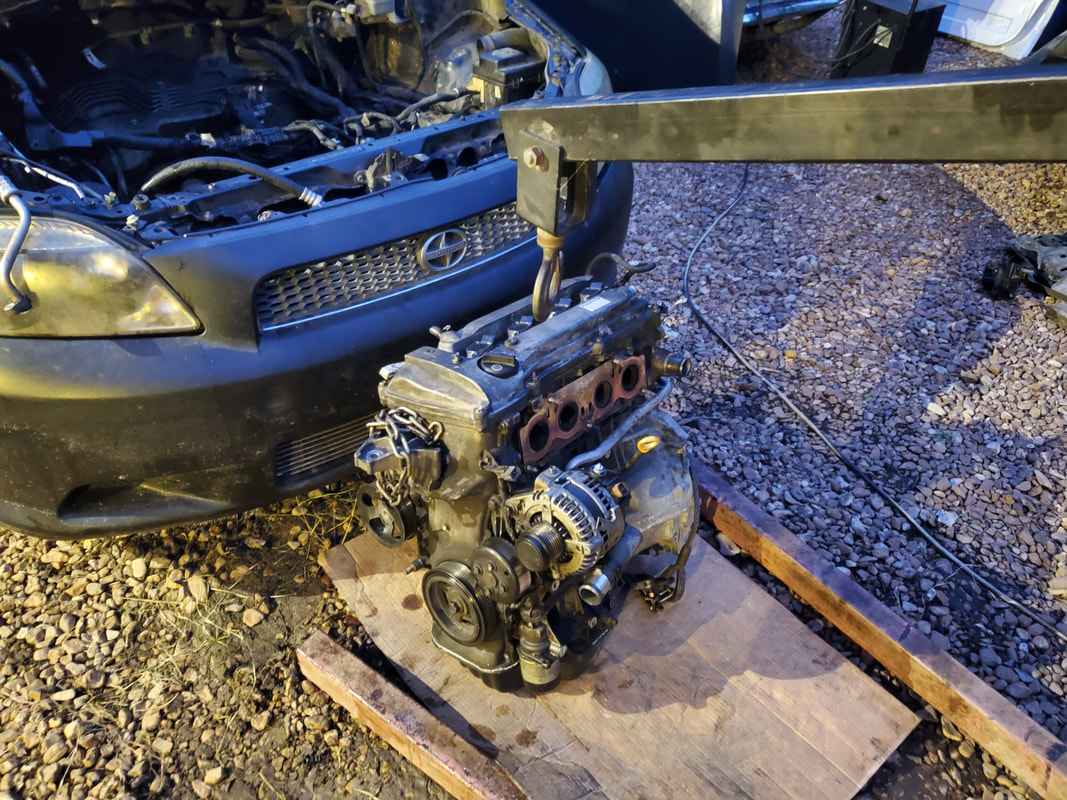 The 2AZ-FE 4 cylinder engine removed from the Scion after an all day affair. Among the parts in question that need to be removed, we have the power steering pump, the timing cover, and the motor mount bracket on the "front" of the engine. I'm not 100% sure, but we might need to use the alternator, water pump tube, and maybe the intake manifold. Either way, all these parts would have to come off the front of the engine in order to pull the timing cover. If some of these components aren't needed, then they'll just be set aside to be used later if we do manage to get around to rebuilding the engine. Obviously with the rebuilding of this old engine, we'll need to replace those components with parts pulled from another Scion, so I would only hope that we don't need many parts from this engine. Unlike pulling the engine, pulling the individual parts was nowhere near as hard. 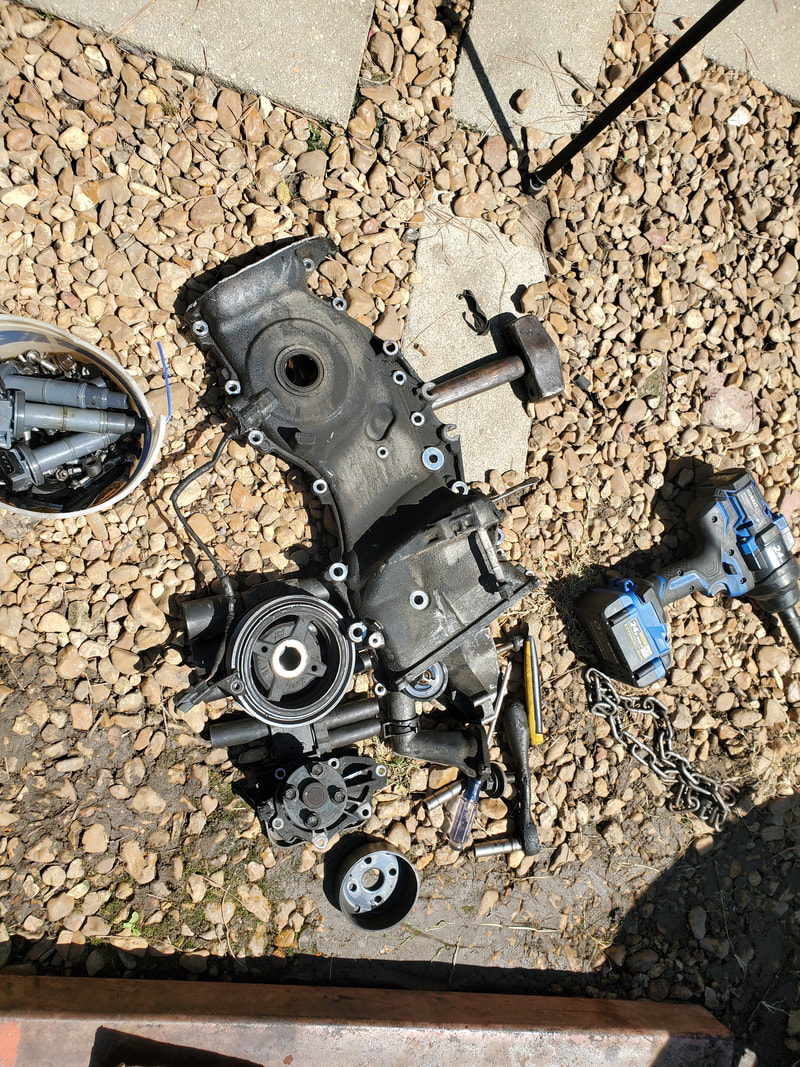 Timing cover, coils, water pump and other multiple components removed from the engine. A lot of the parts were stored in the back of the Monte Carlo since that car is parked next to the Scion to keep things safe and out of the weather. Even though most of the parts are aluminum or plastic, letting these parts get dirtied up by the elements or the occasional shitting chicken, would not be conducive to having the parts ready for reinstallation on the new engine. Of course, some of these parts may just be replaced outright, such as the water pump, since we never replaced this component in the whole time we had this car in service. Other parts such as the coils, alternator and spark plugs or fuel injectors are always available as replacements in case the parts on the new engine happen to fail at some point after the fact.  Multiple components stashed in the back of the Monte Carlo to keep things out of the weather until we can reinstall these parts on the new engine. With the parts stripped from the engine and stored away in the Monte, there was just one more thing to take care of. I had to get the engine up to the garage to put it on ice. I didn't want to just leave the engine sitting in the elements because even though most of the engine is aluminum, certain parts of the engine are not and will rust out if left outside. Now, because I removed most of the components that helped me hang chains to lift the engine (engine mount, etc), I had to figure out another way to move this engine. Since trying to lift the engine with the crane would be difficult, especially on the graveled ground, and a lot of weight was removed from the engine, I did the next best thing one could do, take the two wheel dolly and walked the engine all the way up to the garage. Slowly but surely, I managed to get the weight up to the garage and tucked away in the corner with another 305 V8 that too needs to be rebuilt. 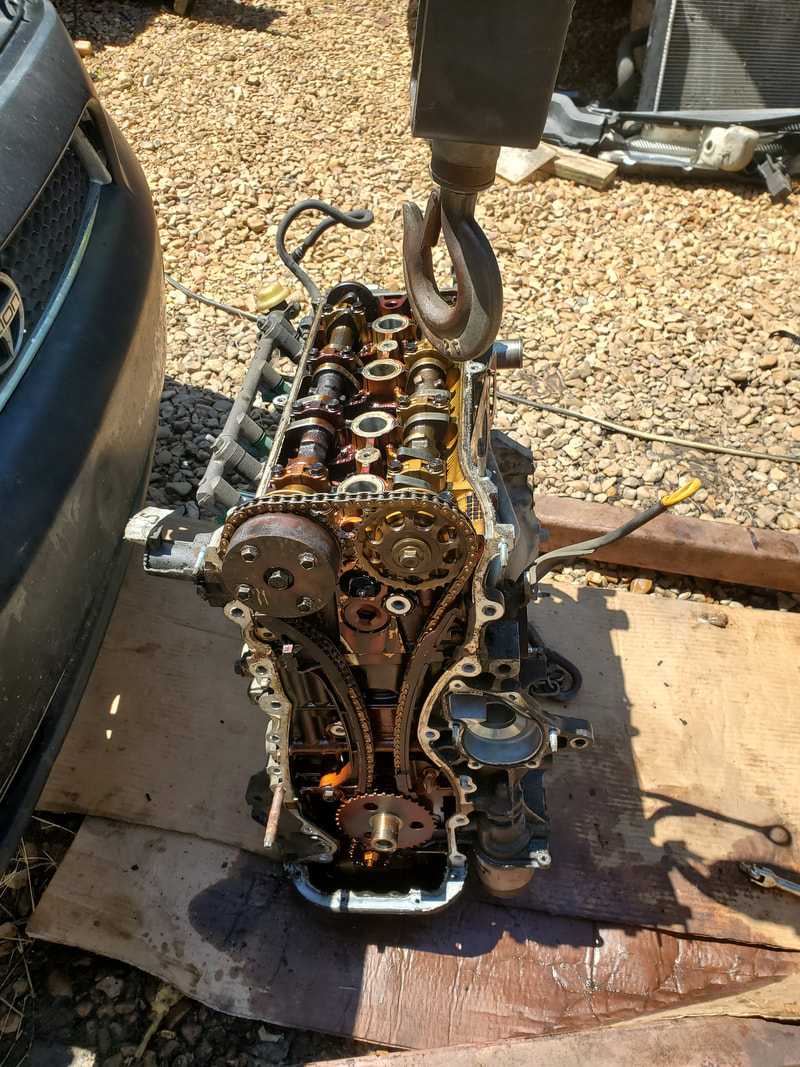 The Scion's engine with the timing cover removed, showing the dual overhead cam and timing chain arrangement. Replacing the timing chain and its associated components on this engine would require all this hardware to be removed, and that's with the engine still in the car mounted sideways. At this point we can go no further on the Scion. We have to await the arrival of the new engine before we can even take one step forward on the engine job. At least now I can address other things on the car, like getting motor mounts en route and install the new junkyard trailer hitch I picked up from the junkyard a little while back. Of course since the engine crane is still down by the Scion, I'll be getting it set up for the next extraction job - pulling the 351 V8 and C6 transmission from the 84 F150. At least that engine pull will be less stressful and difficult compared to the Scion.
0 Comments
With the engine giving death rattles (literally), the Scion's engine will need replacing. We managed to find a JDM replacement engine of this class, another 2AZ-FE engine. Other than swapping a few components from our old engine to the new engine, Of course, the first thing is going to be to remove this old engine. This shall be fun... Of course things start off simple, with the removal of things like the radiator, valve cover shield, and hoses. Even the exhaust manifold cover came off relatively easy. As I advanced into the disassembly, things like plugs to sensors and other points needed to be tagged in order to match them up when I reassemble the new engine. I used masking tape to tag the plugs with a number and a matching number to the component the plug was removed from. When we get the new engine, any components that are already on the new engine will be marked with the same tag number so the respective plug can be matched up to it. 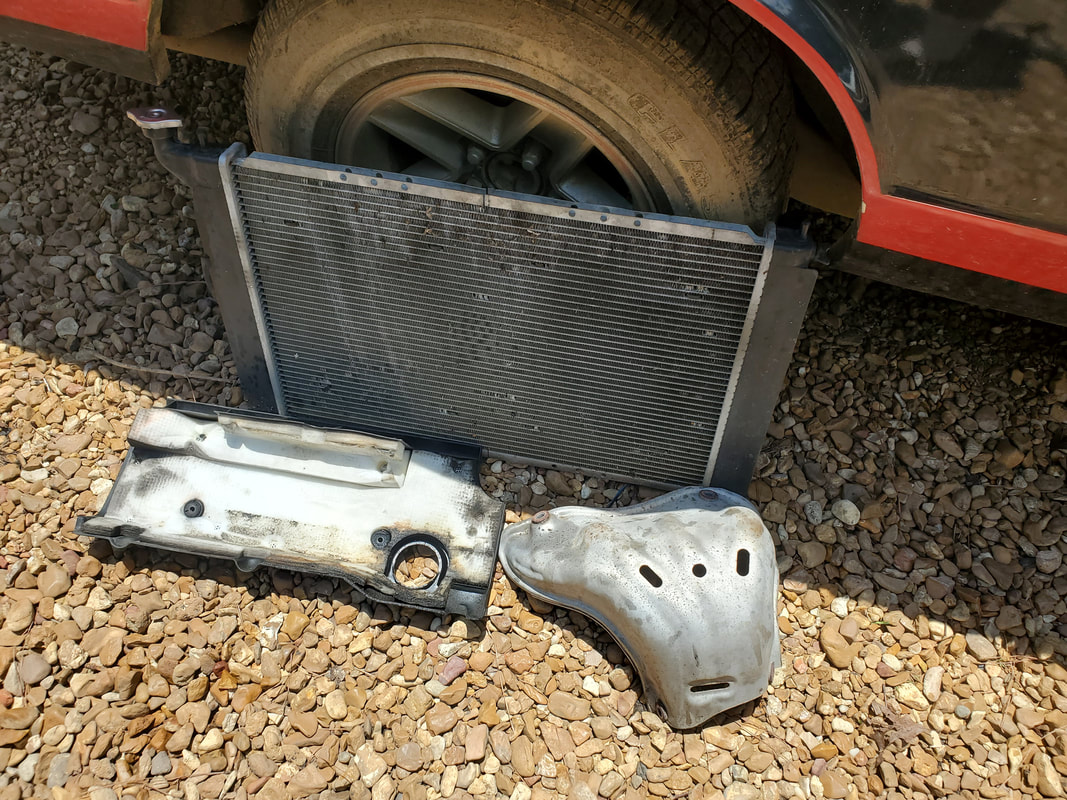 Radiator, valve cover shield and exhaust manifold cover removed from engine. 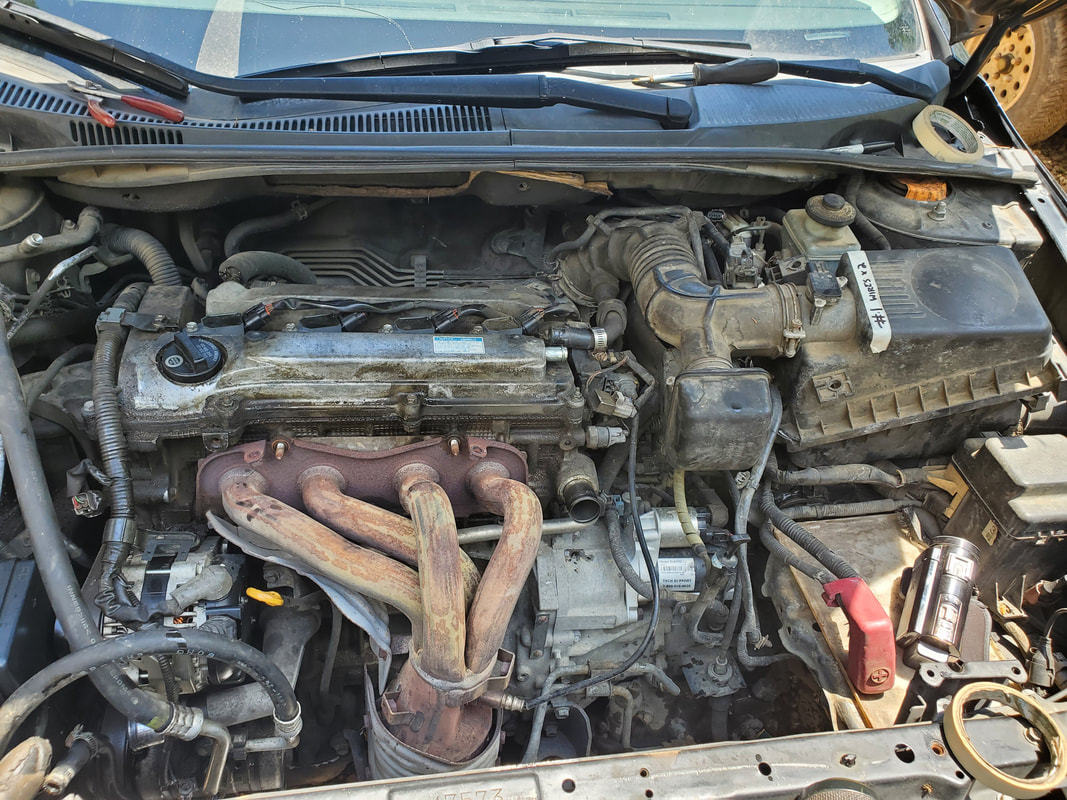 As I continue with the disassembly, I got the intake air tube assembly removed, and the plugs tagged. Now one thing that I found was that the wire harness that connects all the devices on the engine is routed in the shittiest way possible. The wire harness goes from the fuse box on the driver's side over to the left side of the engine where several plugs are, then is routed under/behind/through the intake manifold and out the right side, where the harness splits into some more plugs going to loads on the passenger side and a large bundle of the harness going into the cab of the car. No part of this wire harness can be unplugged or otherwise separated in a way to allow for the removal of the engine without removing the intake manifold. Stupid fucking design. 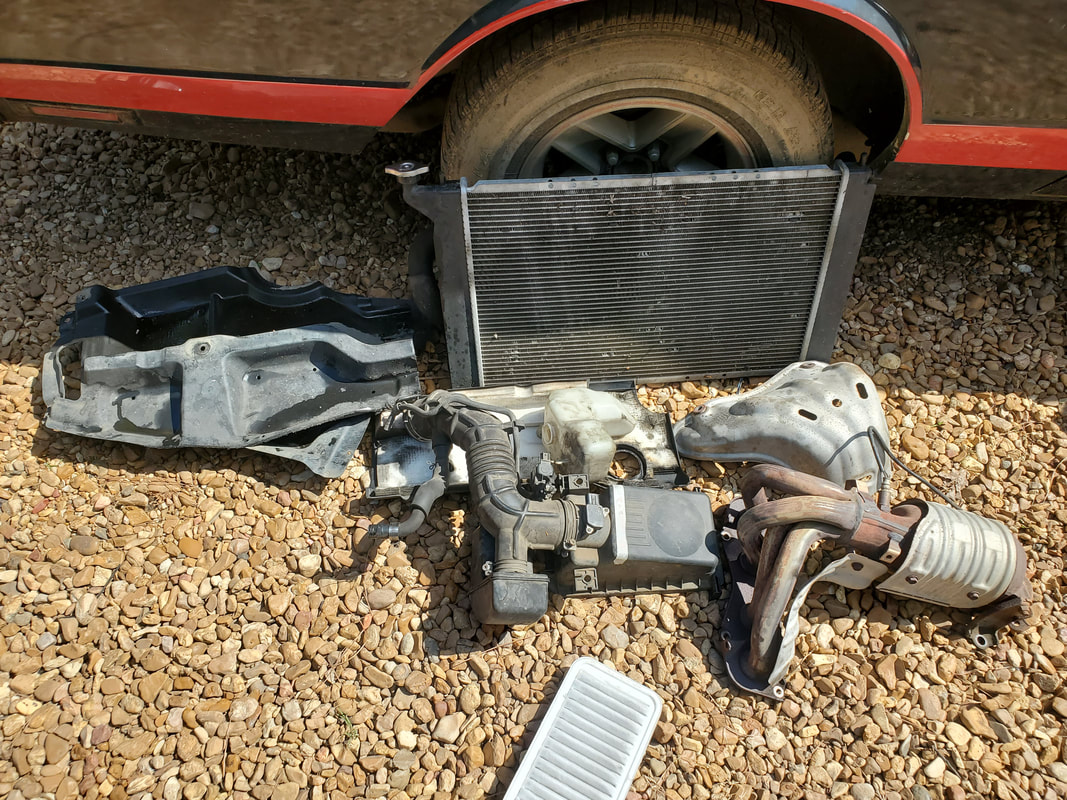 Exhaust manifold, air intake tube assembly, and splash pans removed from car. 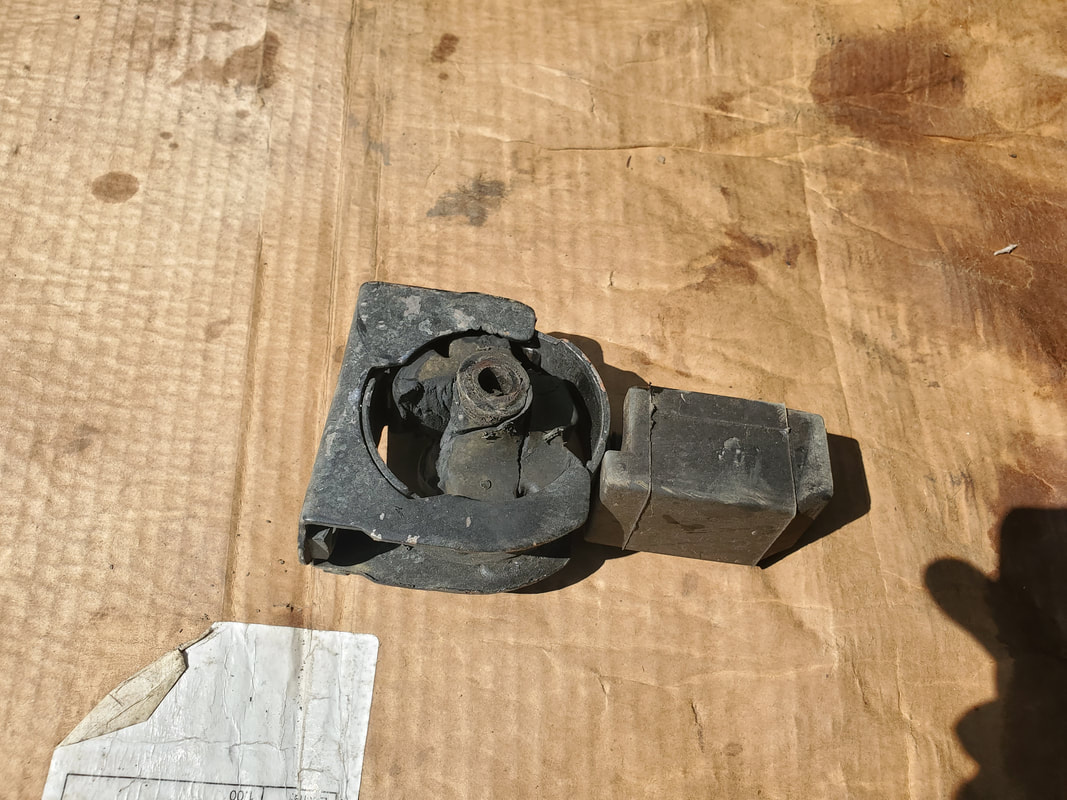 Front motor/transmission mount removed from assembly, this mount is actually bad again, short time has passed since its replacement and its bad... 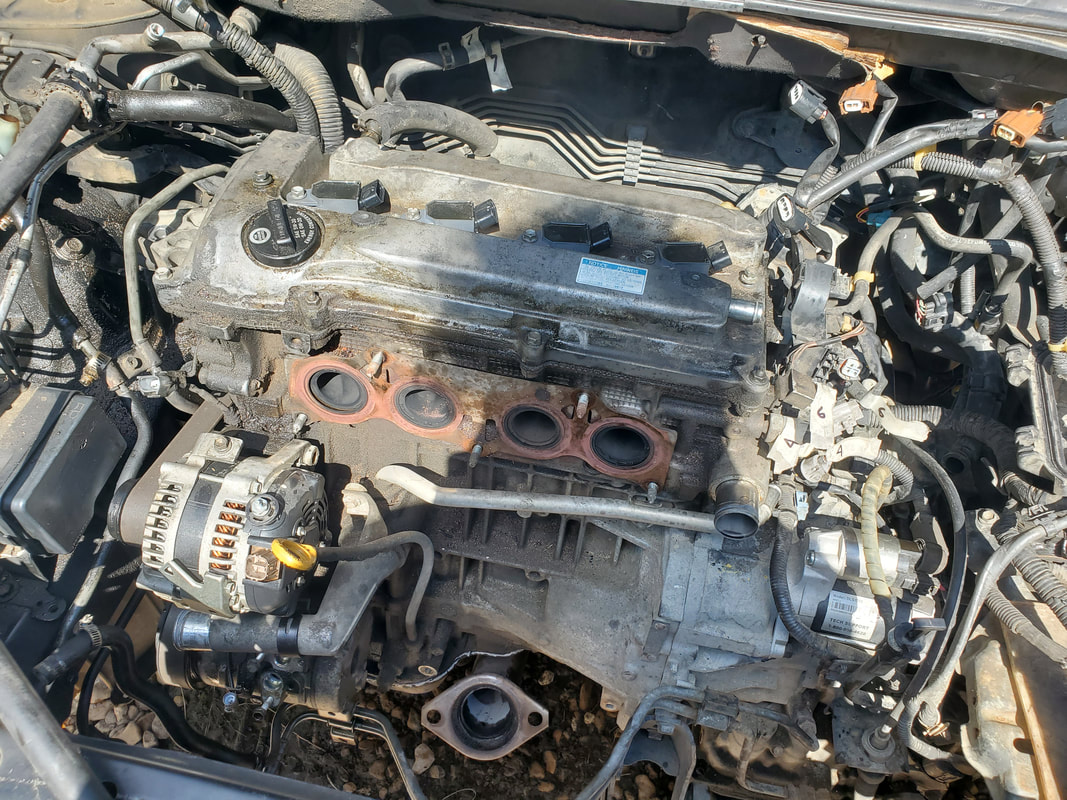 Engine with exhaust manifold and some other components removed. It's coming together by coming apart. With more parts having come off, I managed to get the motor mounts removed, one of them confirmed bad and the other one appearing like it's probably going to be bad just as well. More tubes and plugs were tagged and removed as well. I had to pull a crossmember from under the engine in order to access a hole at the bottom by the flywheel flexplate so I could remove the torque converter bolts. Lastly I pulled the bellhousing bolts to separate the engine from the transmission. With that I was supposedly ready for the engine extraction. We got the crane down and set up. I had to figure out a way to hook the chains up as there was no attachment point anywhere on the engine for chains. I had to take a couple shorter chains and route them under the engine, cradling one end of the engine and hooking the ends of the chains up to the crane hook. Another piece of chain was looped under the right side motor mount, forming a triangular suspension arrangement to lift the engine out. 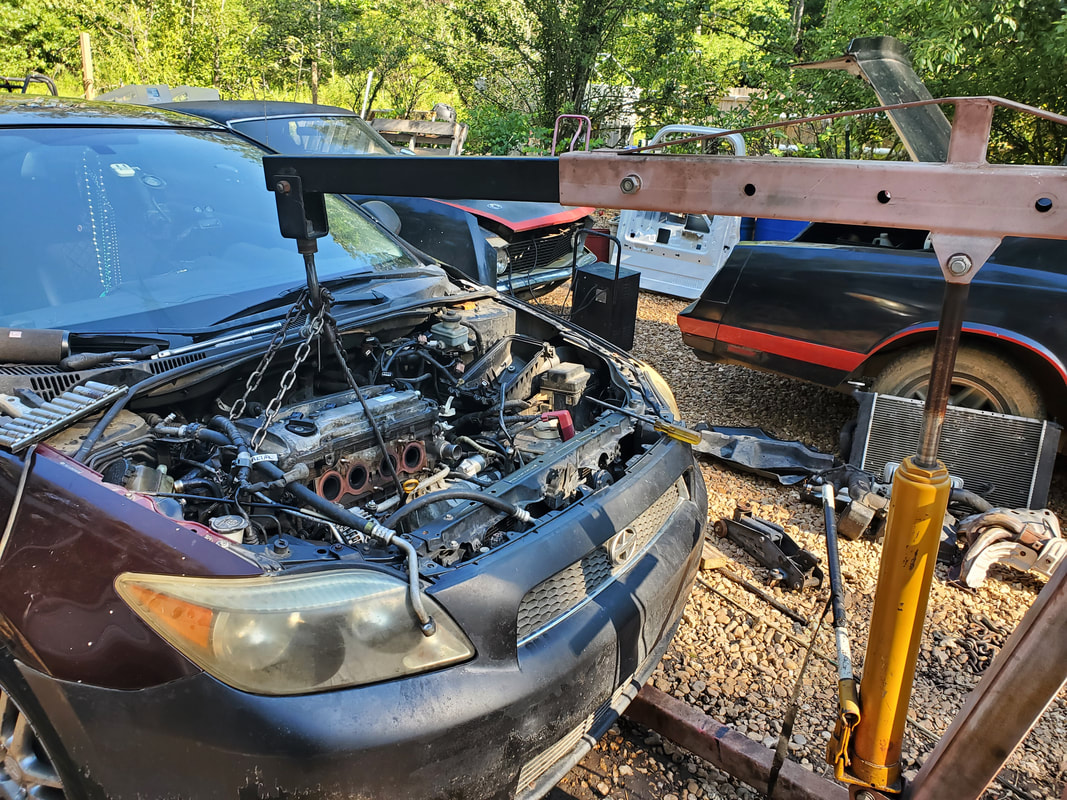 The engine crane staged over the engine bay and hooked up to the engine using a simple arrangement of chains to ensure proper suspension of the engine despite the absence of hook points on the engine itself. This is where the real meat and potatoes came in. Extraction was nothing short of a clusterfuck. The first obstacle was getting the engine separated from the transmission. The torque converter decided to slide out a notch, making things more of a chore as I couldn't get the spacing necessary to get the flexplate to fully clear the torque converter. I ended up having to remove the AC compressor as it was hitting the frame rail, keeping me from moving the engine any more to the right to get that desired spacing. The ABS module had to come loose for the same reason. I ended up having to remove the left side motor/tranny mount to allow me to get the tranny to move opposite the direction of the engine, to the left to get the desired spacing. In the meantime I had to separate a few more hoses, with the power steering being a couple of them. These hoses were a pain as they've never been removed from the power steering pump and were hard to access. It required me getting the engine in a position where I could get the tools on the fasteners to get things separated. It was at this time I also had to remove the intake manifold so I could get the wire harness pulled away from the engine to finish up getting the engine completely free from everything on the car. I ended up breaking one hose fitting and a plug on the power steering pump. I also had to remove an intermediate block that held the right CV axle from the engine block. Once all this horseshit was done, I was finally able to get the block lifted clear of the engine bay. I then had to use a manual winch to pull the car body back, using the 84 F150 as an anchor point to pull against. Once the car was clear from under the engine, I lowered the engine onto a piece of cardboard. The old engine free from the car and on the ground. With this apparent hard part done, I can move onto the phase where I pull more components from the old engine to have them ready for installation on the new engine. Once these components are free we'll lift the engine into the S10 and haul it to the garage for storage until I decide to get to work trying to rebuild this chunk of shit. Of course the next hardest part will be the installation of the new engine because all of the same headaches I dealt with I'll have to deal with again in reverse as I try to get the engine back in and reinstall the hoses and wires and intake and all that shit without damaging anything, and hopefully not miss anything. With the complexity of this engine, it takes just one thing not connected to either have this engine run like pure shit or not run at all. The fun continues.... As the hot summer commences the work picks up. As is usually the case, once spring transitions to summer the rains slow down enough so that much work can be done without the worry of constant drenching and the resultant mess of said drenching. Such is the case with spreading gravel. It's interesting how the ground reacts when gravel is laid on dry ground versus soupy muddy ground. The gravel will act as a conduit to wick water up and away, usually keeping the ground from turning into porridge versus when gravel is laid on soupy mud. When gravel is laid on mud, the ground seems to absorb large amounts of rock before getting to the point that the larger amount of gravel trumps the mud. But even then, the mud will keep the gravel from really settling, having the issue where any weight, such as our feet, will cause the gravel to push out with the mud, needing to be resettled and leveled off. The gravel will then have to sit long enough to allow the heat and dryness of the air wick away the excess moisture and allow the mud to bind with the gravel like concrete and paving gravel. This brings us to the chicken yard. This area is always in a constant state of getting wet, whether from rains, or from the birds splashing in the kiddie pool, or causing the automatic water dish to keep running long enough to soak the ground, or even just the simple idea that the chicken yard is at a lower grade than the rest of the ground. This lower grade causes typical runoff from the garden and any leakage from the water hoses we use to run down and collect in the chicken yard. The gravel will help cancel this out as it will help evaporate any collected water much faster than usual.  Gravel added around corner of chicken yard near base of house. Note the bags of concrete being used as part of our anti-erosion measures. Erosion from the higher levels of the land have caused uneven wear of the ground, especially under the house, and this becomes more apparent in the chicken yard with the ruts that have worn in the ground at the base of the house. I dumped gravel all around these areas at the skirting on the house to help in curtailing any further erosion. Eventually the use of concrete and masonry along with the laying of gravel should hopefully stop the erosion all together. Only then can I address the damage done under the house with the adding of concrete and gravel and other rocky stuff to fill in the areas that have worn away.  Area around where the old set of stairs used to be at the back door. Anti-erosion measures were already taken with the masonry blocks and concrete, but now the gravel is being added as a redundant measure. Another little thing I took care of was the disposal of an old gas can. After a while the plastic on the can started to delaminate, shedding outer layers and cracking in spots, enough so that this can became a hazard to use. Between the already existing cracks and the possibility of cracks happening at lower points on the can during use, this can was removed from service. I had to come up with a suitable use for this can before I just toss it on the burn pile for future disposal. One such use was of the same nature as with the small drum, cutting the bottom out to use as an oil/catch pan for fluids. 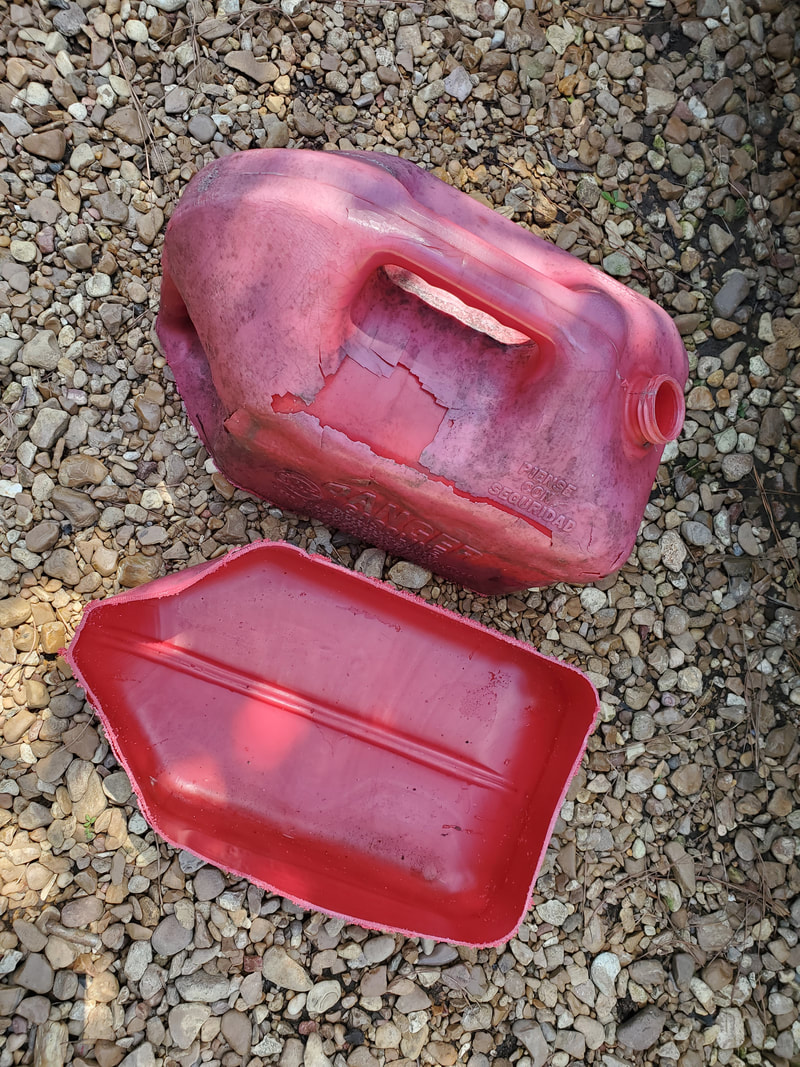 Old gas can with bottom cut out for use as an oil/catch pan for fluids, better than just flat out throwing the whole can out. With these little tasks taken care of around the compound I set out for a little excursion in the junkyard once again. The original plan was to pick up the clutch and flywheel from the S10 that we pulled the 5 spd transmission from. Unfortunately, when I went in, the truck in question was already scrapped. Fuckers appeared to send the damn truck to the crusher right after I pulled the tranny. Guess I have to take that as a win because it could've happened before that and this grand prize would've been lost forever. Anyway I looked around for some other parts, and did manage to find another Scion Tc. While there really wasn't anything I could use on the car, one thing that it did happen to have was a frame mount trailer hitch. This was a helluva find as a hitch for any car is typically well over $100. Well for me, $30 later I had my hands on a bumper hitch for the Scion. At least then, after I get the engine replaced we'll be able to use this car to haul a small trailer around when the need arises. 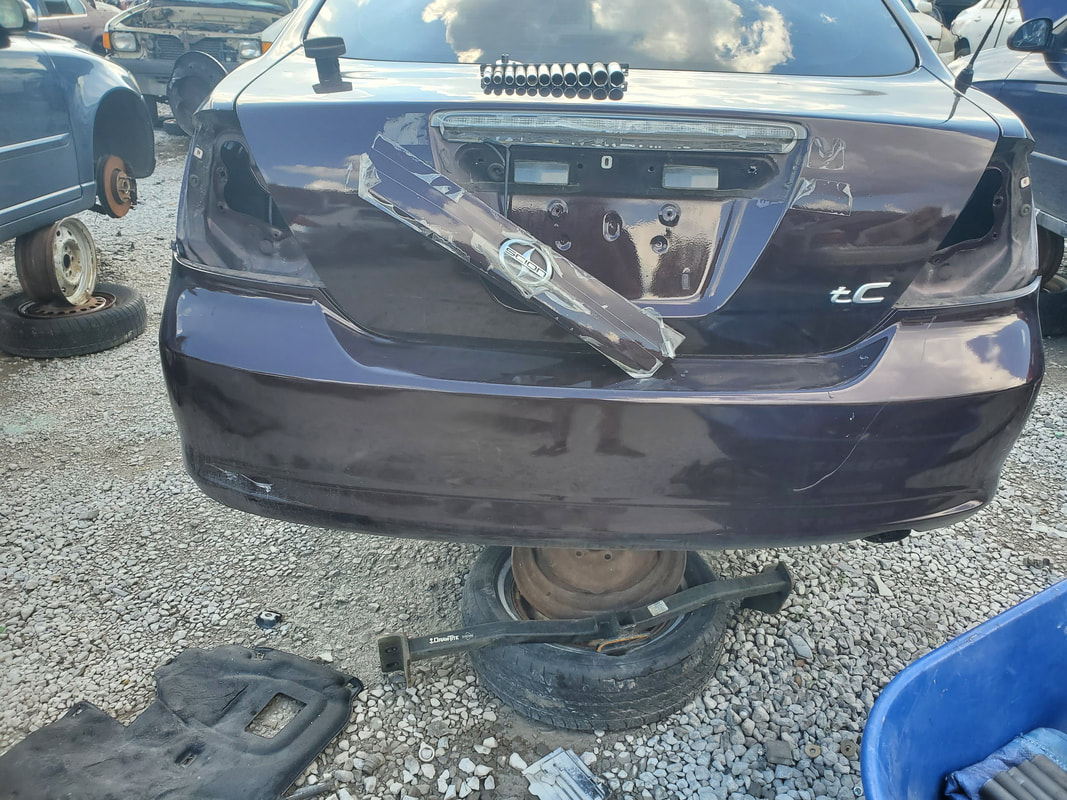 Junkyard Scion Tc with trailer hitch on the ground after removal. Well with this day coming to a close, the next fun day will be with me starting the extraction of the engine from the Scion. This shall really be fun, because, besides this being a FWD car, there is a lot of shit to pull loose and the quarters are extra tight so I'll probably be in store for a day of fun and profanity.
With the success of the Storage Trailer LED area light, which utilized one of the five 12v/10w LED spotlights I had laying around, I decided to work up a walkway light array using the remaining LED lamps to illuminate the walkway from the main driveway up to the door. Since these lamps are 12vdc lamps, I would have to setup a power supply to power all of the lamps from a single point. As with the trailer light, the dusk/dawn sensor would power an outlet that powers the power supply for the LEDs. To make things easy, I decided to tap off the electrical box that is feeding power for one of the security cameras. This one outlet is an actual outdoor box versus a panel mounted in the wall, as I did with the first outlet that powers the other security camera by the door.
To do this setup, I would install a second outdoor box, using a piece of PVC pipe screwed into both boxes to connect the two. Another outlet would be installed in the new box, along with the dusk/dawn sensor. An outlet cover will also be installed, which will allow for the power supply to be plugged in while the outlet is covered. The new outlet and sensor will be wired into the old outlet, with no effect on the operation of the old outlet. The security camera will continue to stay powered up regardless of operation of the LEDs. 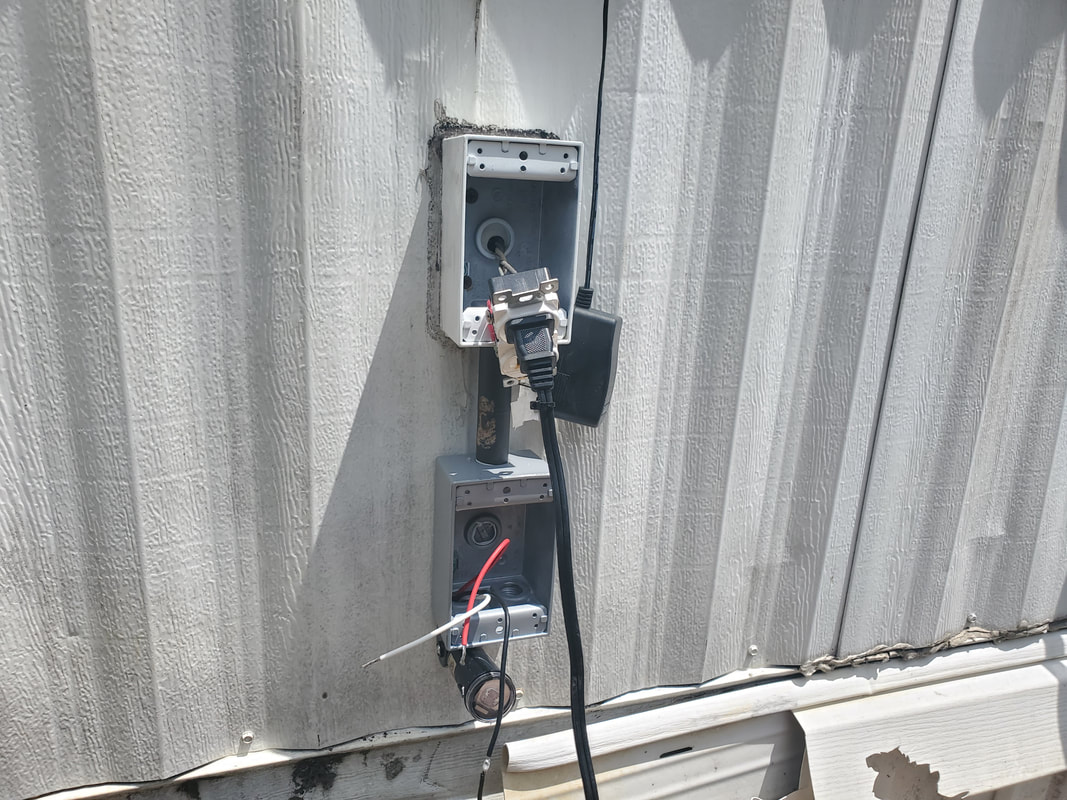
New outlet box linked to old box with PVC threaded pipe. Sensor is screwed in place and old outlet is pulled out to allow for the old box to be pulled from the wall enough to allow for clearance while twisting the new box in place. Soldering iron is plugged into outlet to solder wire to the sensor's hot wire to reach the outlet.
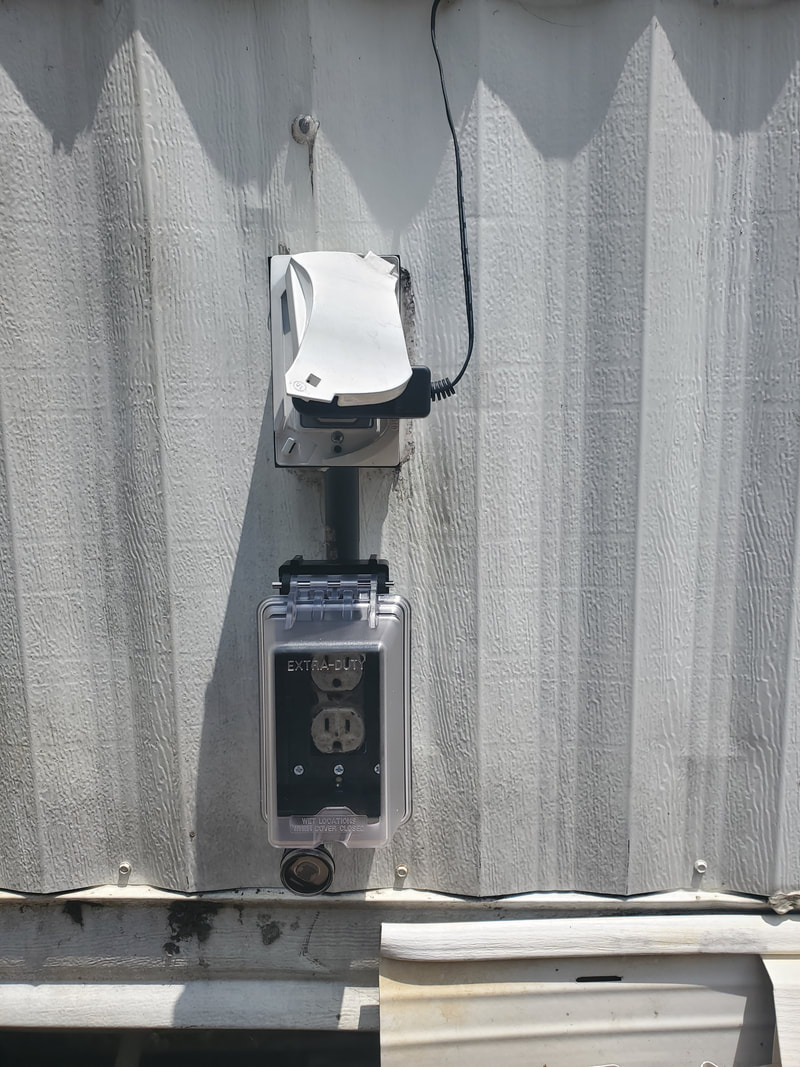
New outlet box completely set up with outlet and cover. Old outlet box has cover put back on and camera plugged back in.
With the new outlet box set up, the hard part is done. Well hard in the sense that the work with high voltage is done, as the high voltage ends here. With the outlets done, its time to move on to the low voltage side of the array, the LEDs. What this will consist of is first mounting the brackets for the LEDs to the wall at the point where there is a frame board running along the length of the wall, at floor level. With the brackets in place I can then secure the LEDs and move on to the wiring. 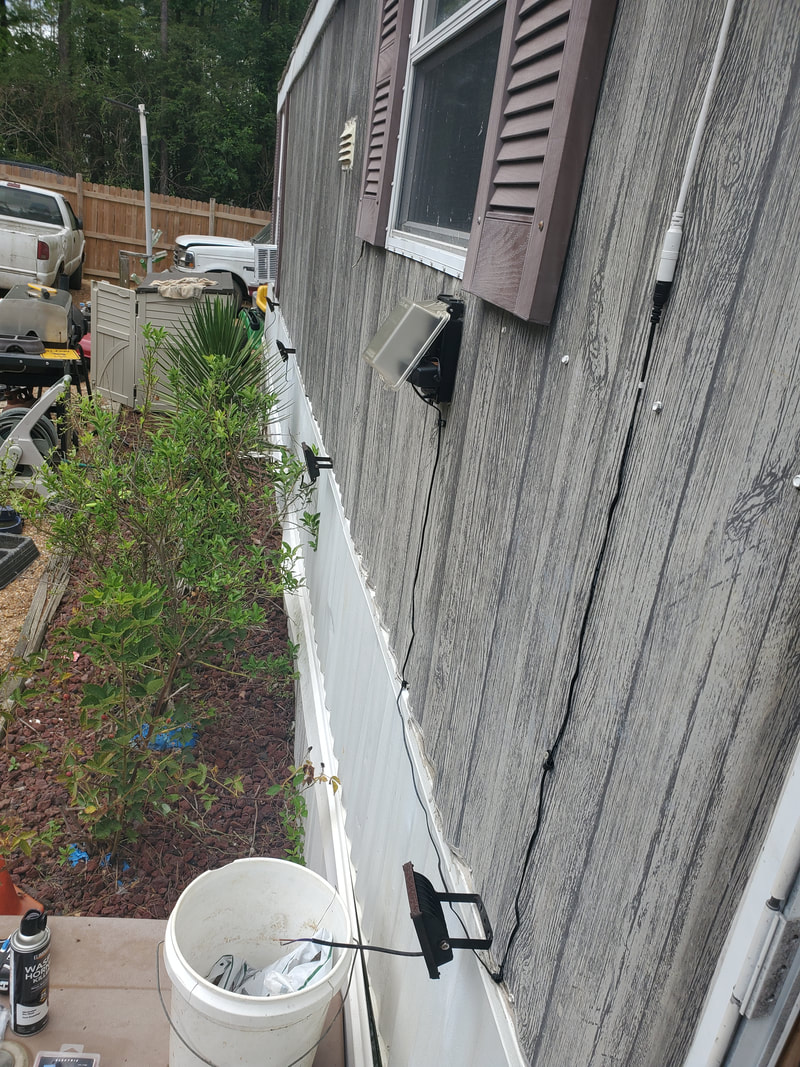
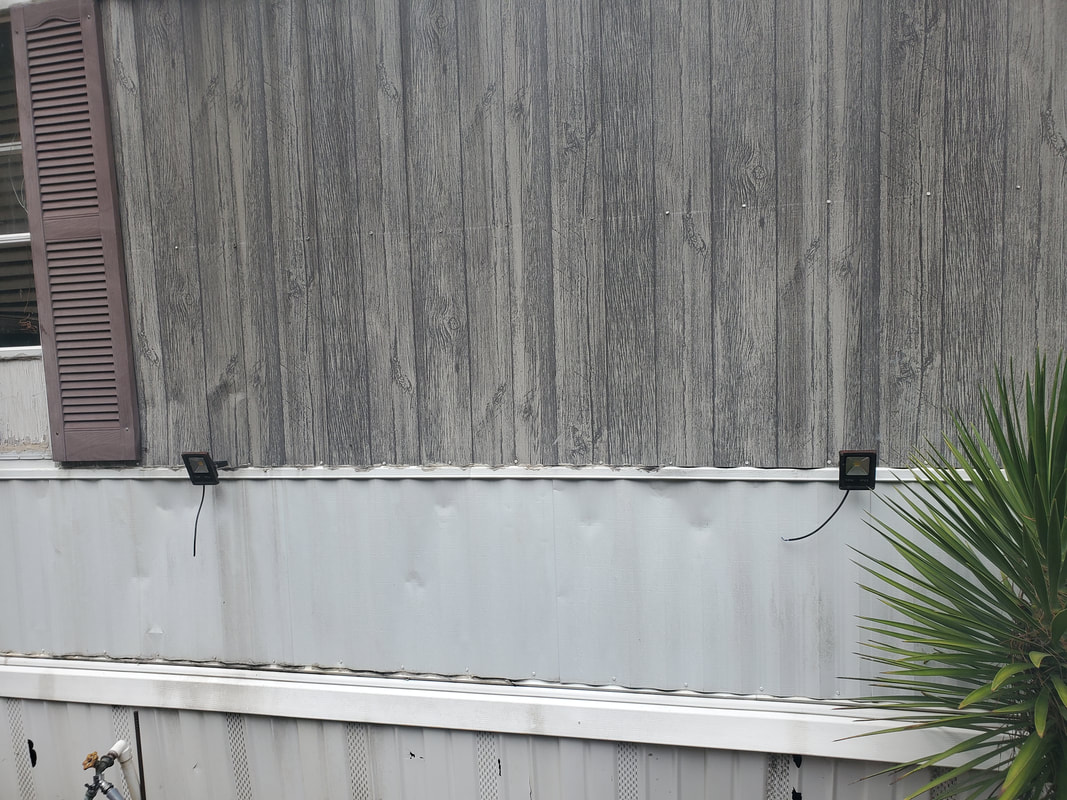
Linear shot of house wall showing LED spotlights mounted to wall via mounting brackets. All four LEDs are spaced almost evenly apart to ensure even coverage of light along the walkway.
Farthest pair of LEDs mounted on the wall, note the short pigtail hanging from the two units. These will be soldered to the main bus wire running along the length of the wall.
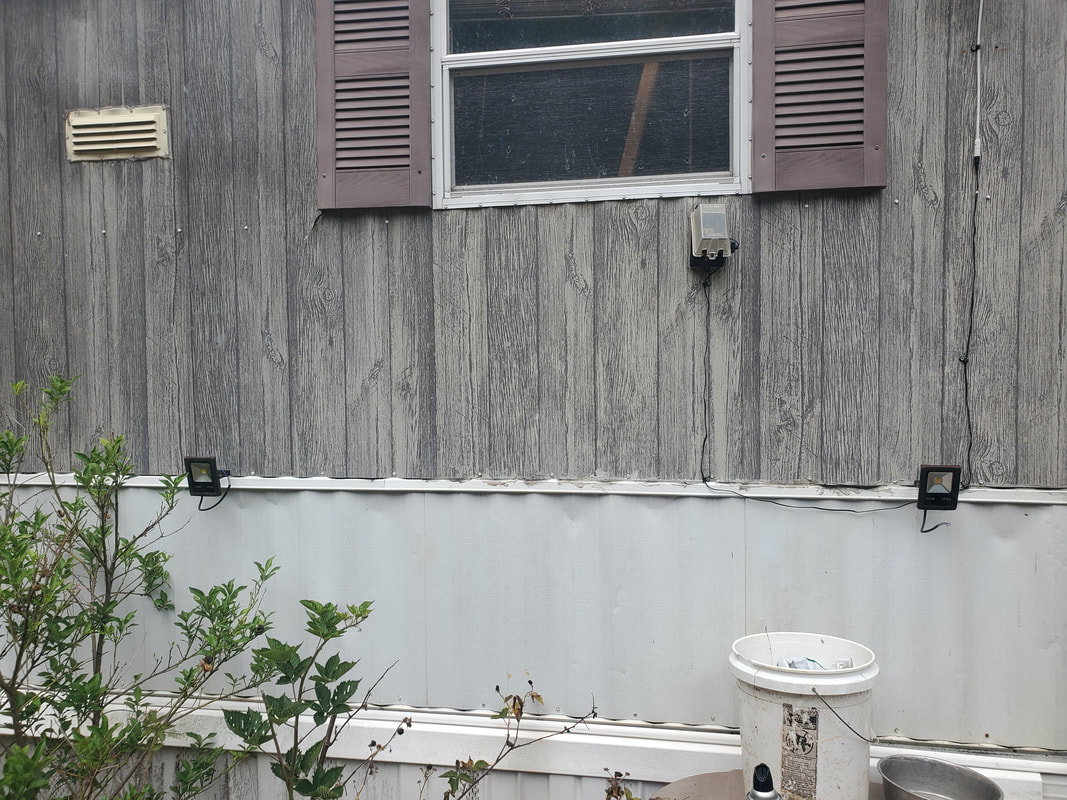
The other pair of LEDs on the wall before wiring, the right most LED is right next to the door.
I had some twisted pair wiring in the wire pile that is red/yellow, sufficient for low voltage applications. I started at the farthest LED, soldering the wires from the LED to the ends of the wire pair. After heat shrinking the solder joints, I used wire brackets to secure the wire to the house wall along the same point as the LED brackets using wood screws. When I reached the next LED, I cut the wire and soldered another length of twisted pair wiring to the cut end along with the wires from the 2nd LED, head shrinking those solder joints. More wire brackets continue to hold the twisted pair wiring along the wall up to the 3rd LED. With the same thing done at the 3rd LED, we moved on to the 4th LED. At this point I ran out of the short lengths of twisted pair so I used some thinner gauge Romex cable to connect to the last LED. The Romex was then secured to the wall along the door frame, running down to the bottom most point of the house wall, then over, past the steps over to a spot under the outlet boxes. 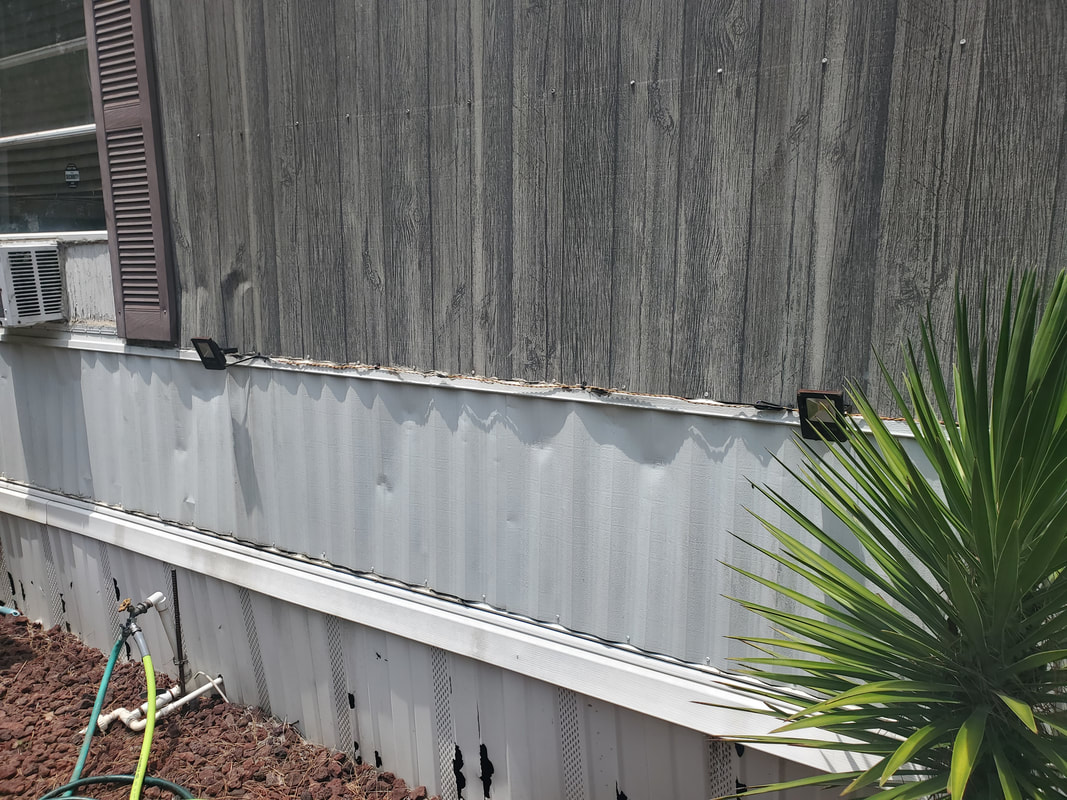
While its barely visible from this position, the red/yellow twisted pair wiring is connected to the LEDs and secured to the wall with wire brackets.
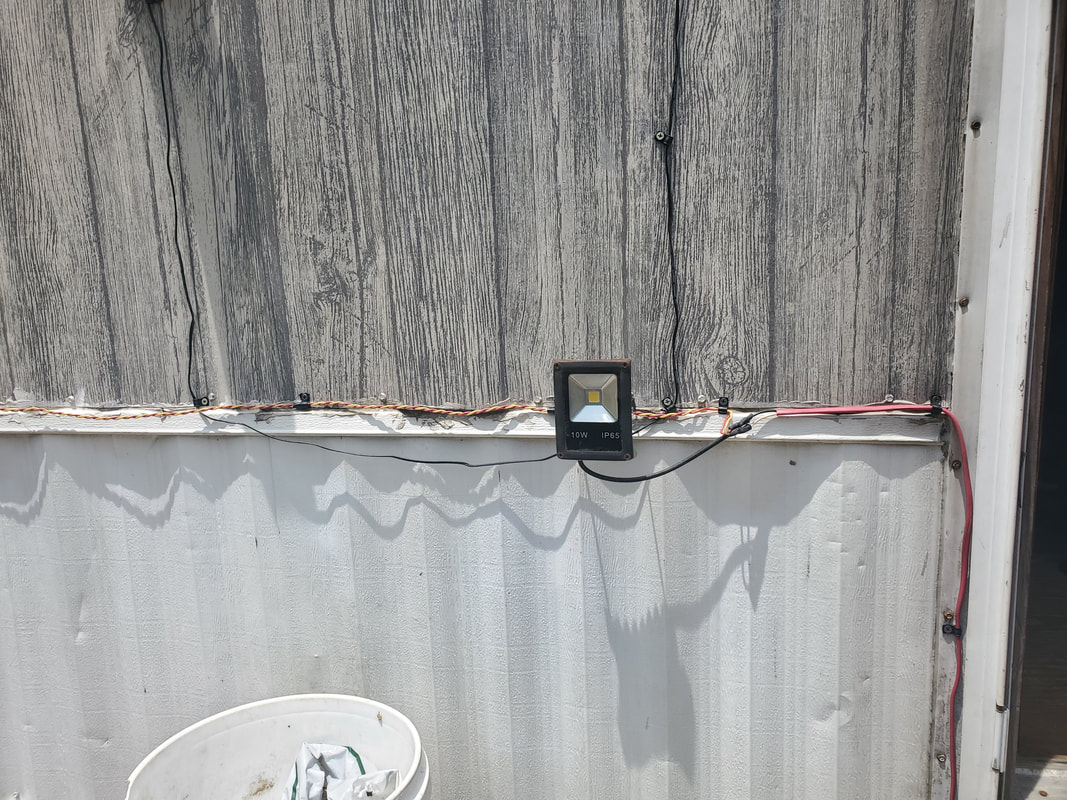
A closeup view of the wiring going to the last LED and changing over to the Romex to go under the house and to where the power supply will be located. Note the brackets used to secure the wiring to the wall and along the door frame.
The power supply is a unit that is similar to a computer or game console power supply, with two lengths of cable extending from the actual power supply box. Since this power supply is not exactly an outdoor unit, my plan was to mount the power supply under the house where it would be out of the weather. I used an angle brace to hold the power supply box to the closest floor joist then routed the 120 cable over to the outlet box, plugging it up. I zip tied the excess cable to keep things neat. I trimmed the Romex cable and connected the ends of the wire to the terminal block on the end of the power supply output cable. I used one more cable bracket to hold the cable to the floor joist to further keep things neat. 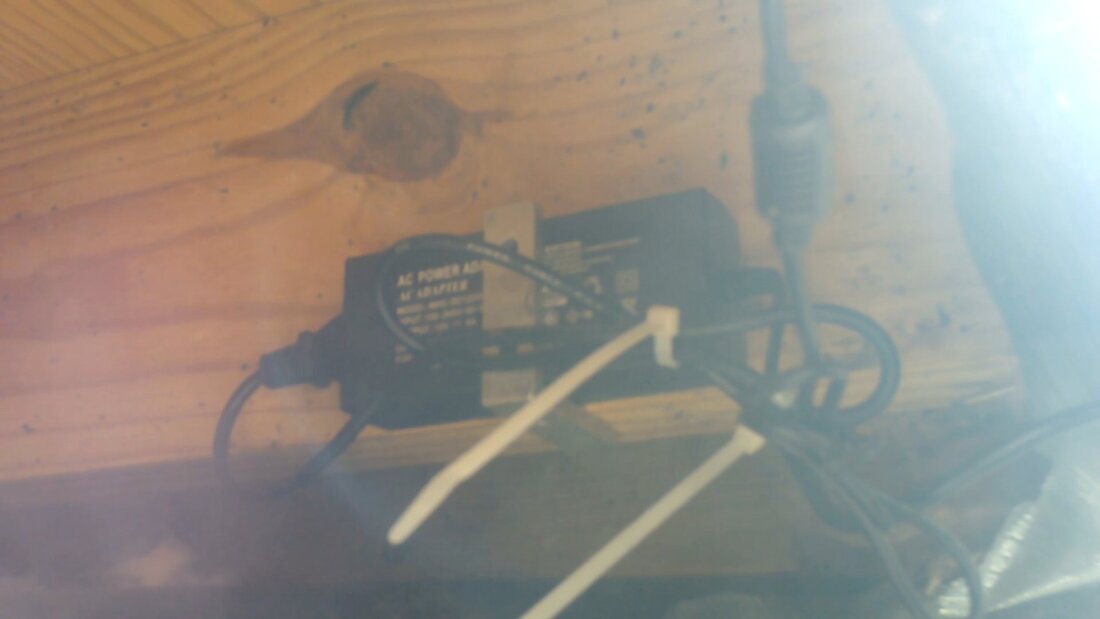
The 12v power supply mounted under the floor of the house to keep it out of the weather, using an angle brace. Excess cable is zip tied to keep things neat.
With everything hooked up, I covered the sensor, and as before, in a couple minutes the sensor activated the outlet which activated the power supply which activated the LEDs. After uncovering the sensor, a minute later the sensor cycled power off from the outlet, killing the LEDs. Once night fell, we were pleasantly surprised at the amount of illumination the four LEDs supplied to the walkway area, more than enough light to eliminate the need to use a flashlight or headlamp to light our way from the driveway to the door. 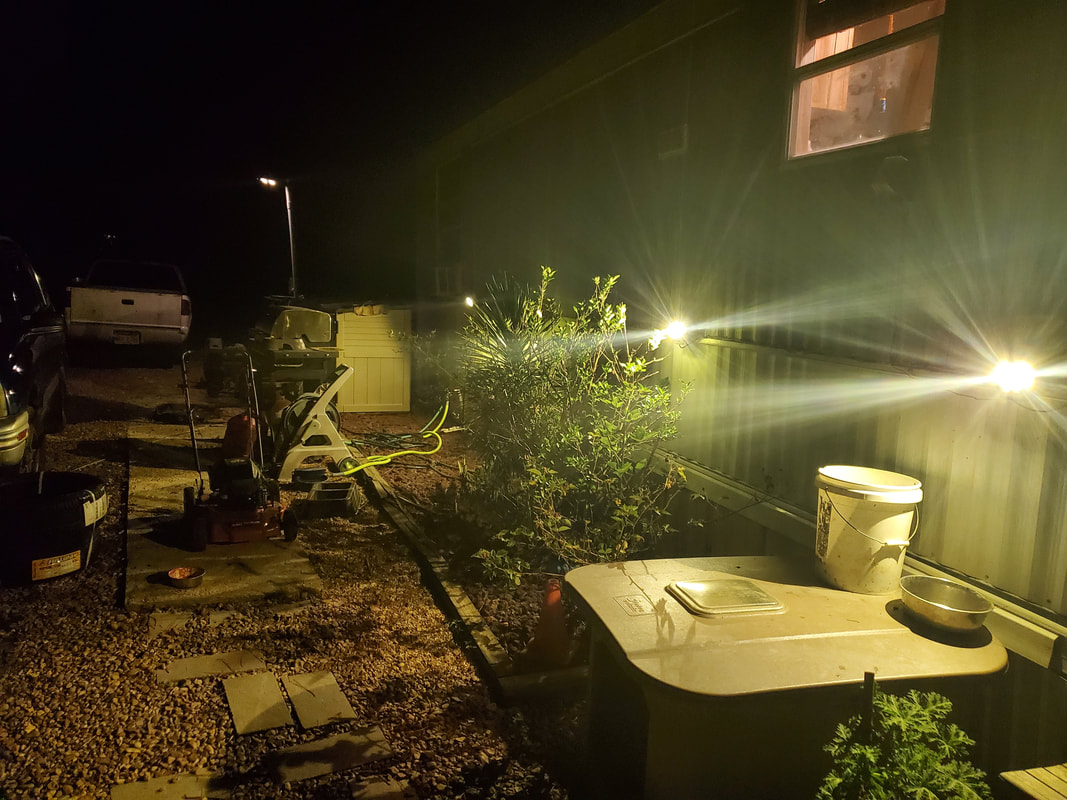
The walkway area illuminated by the LEDs at night. This level of illumination is without the other LED security light that is mounted over the door. Note the area light in the background on the pole. Plenty of light to cover the driveway and walkway to the house.
With the overall success of the LEDs, now I can start working on the greater plan to further illuminate the rest of the compound. I will probably start with the chicken yard, due to the idea that the cheap string lights I've used did not last long enough and really didn't throw out near as much light as I would've cared for anyway. The chicken yard would be a good place to start as well, given the fact that I have power already routed to the yard for the string lights. Other than installing an outlet box for the sensor, I will probably try to do a string light setup using something a little stronger for the wire connections, since I will probably use 110vac LEDs instead of the 12v units, to eliminate the need for an external power supply. Other areas, like the section of yard going to the firewood staging area will probably be set up with an LED array cycled on from a motion sensor, since the firewood area would only see sporadic use when we go through the area to fetch wood. Other areas frequented, such as the garden, or the area going past the Storage Trailer, among other areas, will probably see more strings of LEDs, lighting the area up even more.
With the bad news regarding the Scion and the pending plans also revolving around the Scion, along with the resurrection of the S10, we had to do some rearranging of the vehicles parked on the Midway within the compound. Based on what I have planned, I came up with an arrangement for the vehicles that would allow me to further implement my plans. What I have in store is the removal of the Scion's engine, pending the arrival of a replacement JDM engine that is pretty low miles. Removing this engine will also involve me removing components to transfer to the JDM engine to make it ready for the Scion, then of course removing the old engine to the garage for future rebuilding. I do plan on rebuilding the old engine since its still a running engine, albeit one with rod knocks, and if the known flaws are correct, piston slap due to faulty piston rings. Because the components to make the engine ready for the Scion would be transferred to the JDM, I'll have to source replacement parts to make the rebuilt engine immediately ready for transplant, if/when the need arises to reinstall this engine in the Scion as time progresses and more miles are logged on the car. All of this parts switching work will of course be done on the ground, and with the lightweight engine a few pounds lighter after removing the parts in question, I will be able to move the engine with the dolly from the work site to a staging area to be lifted into the truck to go up to the garage. 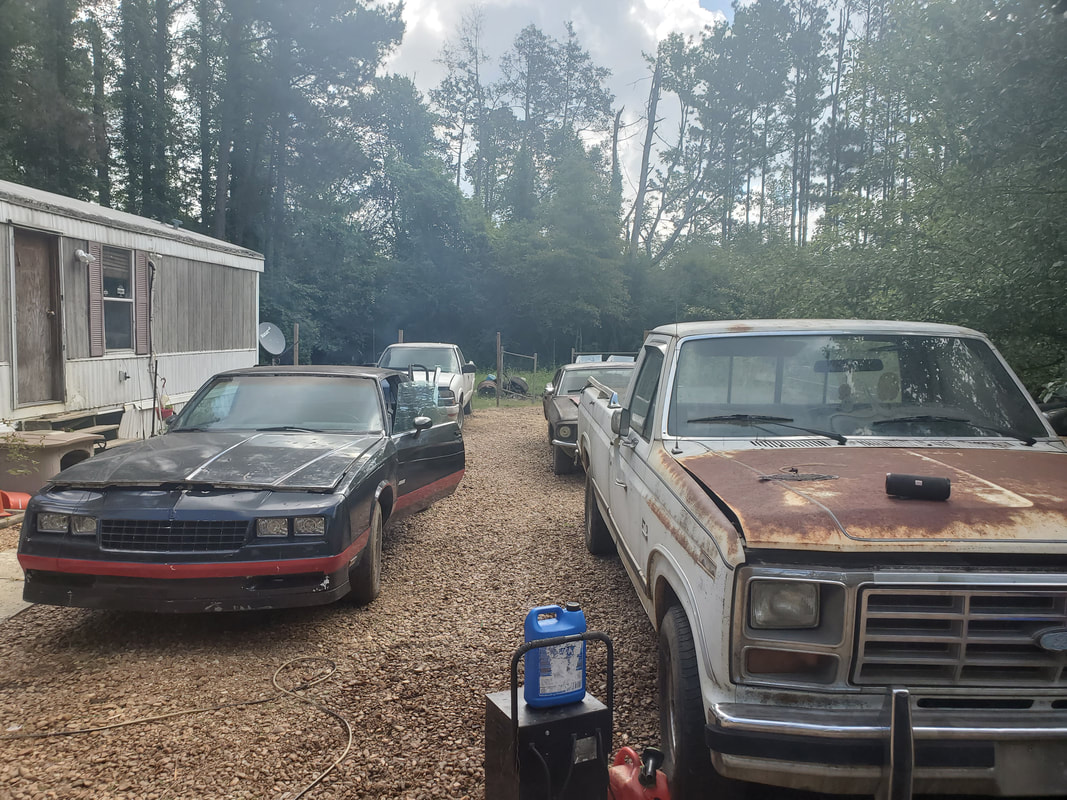 The vehicle arrangement prior to our bad news on the Scion, things will be completely rearranged here. Another thing that has to be done is the removal of the engine and transmission from the 84 F150 so I can further advance on that plan, which was to separate the engine and transmission to more than likely replace the flywheel, as well as check other parts of the engine, like the valve train to see if anything is faulty, more than likely removing the intake to replace lifters, maybe even replacing the oil pump to replace it with a high volume unit, with the hope of buying more time on the engine before I have to fully rebuild the thing. This work also will be done on the ground after removing the engine from the truck, before attempting to move the engine and transmission separately over to the Mustang, which by then will have its old engine pulled and relocated. The biggest reason to get the engine pulled from the truck is to ready the truck for selling as a ready to use body that just needs an engine and transmission (since I'll have the originals). 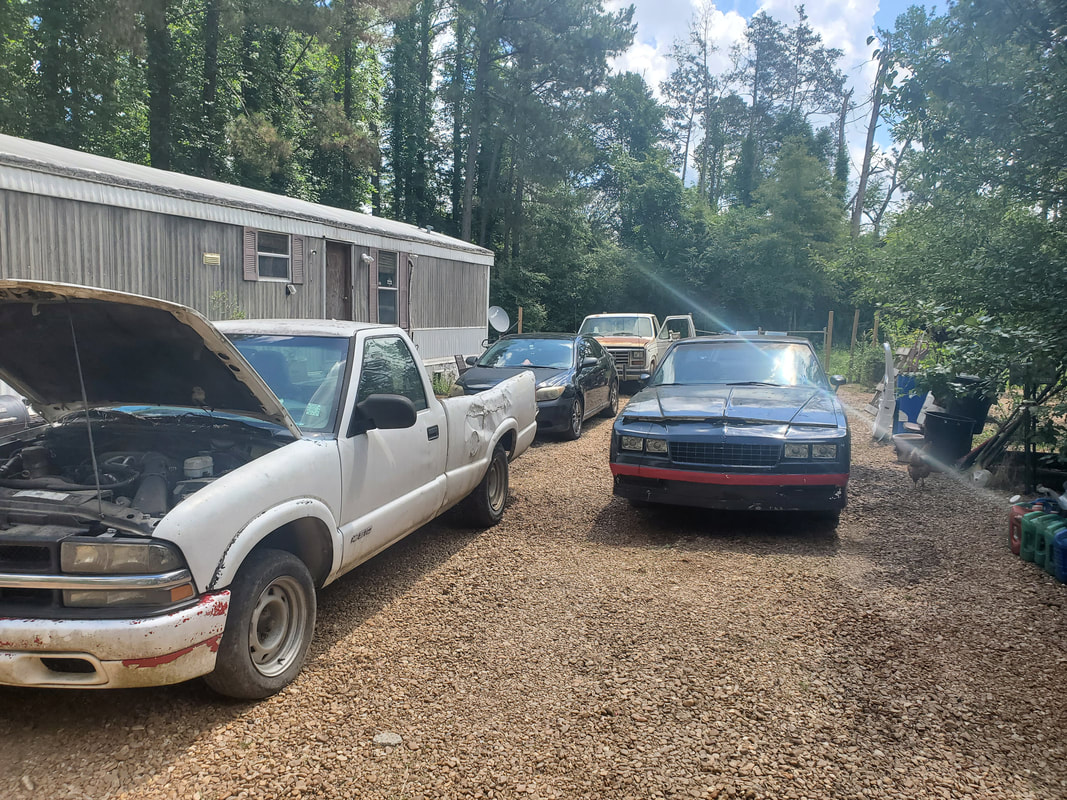 The new vehicle arrangement, everything is right where I want it to be so I can continue with the work. The planned arrangement I had was to first move the Tracker and Scion out of the way. Then I moved the Monte and the S10 out of the way from the side closest to the house. From there I used the F250 to pull the 84 F150 out then pushed the truck with the F250 while steering it to guide it back to the S10's old parking spot. With the 84 F150 parked at the rear most point in the Midway, I then moved the Scion in front of the F150. I left enough space between the F150 and the rear of the Scion to allow me to pull the engine from the truck when the time comes. From there I parked the S10 in front of the Scion, where it would be parked like the Scion and Tracker normally are parked. I then moved the Monte into the spot where the F150 was parked, in front of the Rustang. Lastly the Tracker was parked back in the front row spot, next to the S10, with both vehicles ready to be used any time. With everything staged the way I want it, I did take a minute to remove the battery from the Scion and install it in the FMT so I can run that truck whenever I need to in order to further test that vehicle and get it closer to being fully ready for use. The last thing I did take time to do which would work towards getting things done was to reinstall the AC compressor in the DOB. This is the last thing that I really need to do before I can really say the truck is done. Other than test driving, the truck is already done. I just need to test drive it in order to fully satisfy my skepticism about the truck's ability to make a long distance trip. 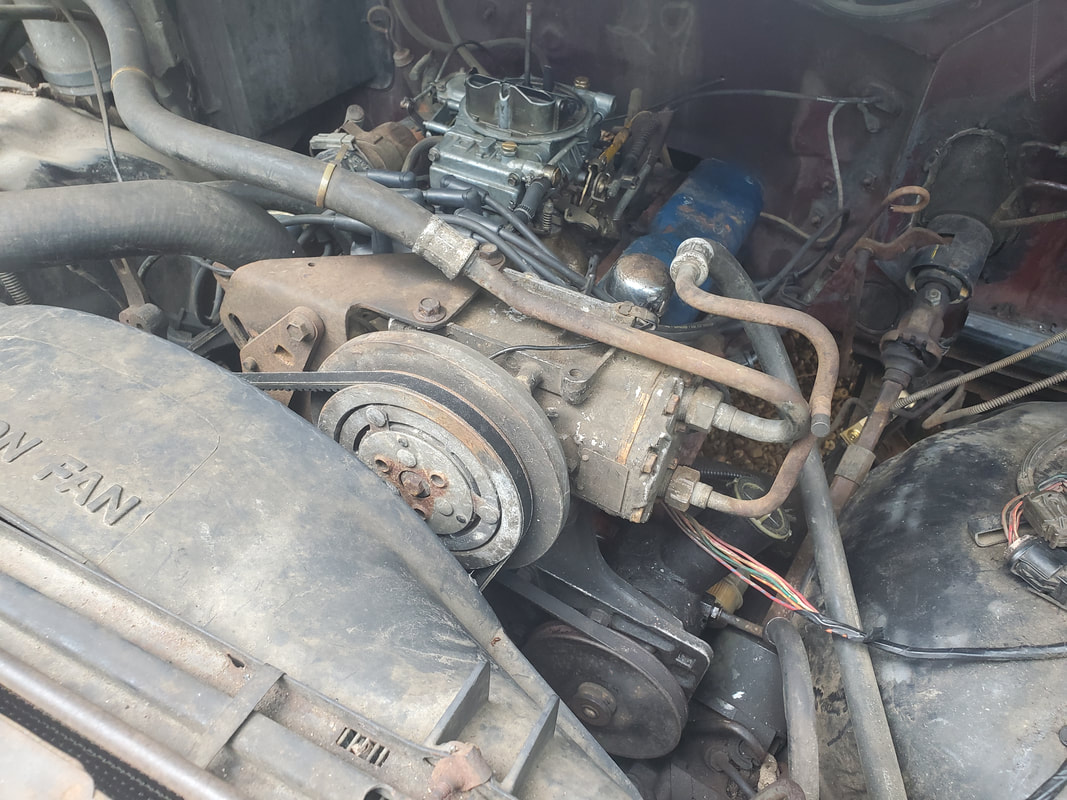 The AC compressor and hoses hooked back up on the DOB to complete the work on the truck before testing it out one last time. Our next order of business will be to start disconnecting things on the Scion's engine. Hoses, wires, etc will need to be disconnected, but marked in order to make sure things are put back where they belong when the new engine is installed. I plan on using masking tape to mark the wires and hoses and their respective points, 1 to 1, 2 to 2, and so forth, so I can have everything ready to plug back up without any guesswork. Things are moving fast and will continue to move fast around here. After having to bring back the old Chevy S10 since we found that the Scion's engine was on its deathbed I had to do a few things to get the old truck ready to be able to roll during this hot summer. One of the most obvious things is making sure the HVAC system is operational, with an emphasis on the AC part. Now, this truck has always had super cold AC, cold enough to hang meat in this thing. Even during the hottest summer days you would have the AC running only half way after a while. I never had a car with this cold an AC system. Anyway, since this truck sat so long, I ended up having to replace the blower motor. The brushes were either worn or corroded enough that its operation was sporadic. We can't have that in a unit that is not easily accessible to give it that spin up start to get it working. So, what this meant was another trip to the junkyard, yay! While at the yard, we ran across a GMC Sonoma almost immediately. After pulling the fender splash pan out to access the lower bolts, an attempt to spin the motor shown that the bearings were bad. On to the next truck. After finding another S10, a 94 model, I pulled that motor out and it spun pretty smoothly. I cut the plug pigtail off in order to be able to test the motor on one of their batteries that they sell at the counter. It would be nice to know this motor is good going out the door as I don't want to have to go through the hassle of swapping a motor out only to have to do it again due to a DOA unit. In the meantime some extra searching on the 94 S10 turned up something, a 5spd manual bolted up to the 4.3L engine within. Know what this means right? Needle in the haystack. Just the thing I was looking for to use in the 46 Ford build instead of the auto tranny. Only thing the tranny was missing was the shift handle, which is a short shifter, similar to what would be in a car. After some serious fighting to get the crossmember out, which required a yard forklift to lift the truck off the rim jack stands, I fought the exhaust system trying to get the clearance needed to get the freed tranny clear from under the truck. Just when I was about to ask for forklift help again, I noted real carefully where the tranny was binding at, and a small corner was binding on the edge of the clutch. Turning the flywheel/clutch a little bit got me to the right spot where I was able to pull the tranny free from under the truck. About a couple hours of fighting and cussing finally netted me this prized transmission, which has been so elusive for all this time, especially at the price this yard charges for transmissions. Feeling victorious, we were able to ride home, ready to tackle the S10 and its AC issues. 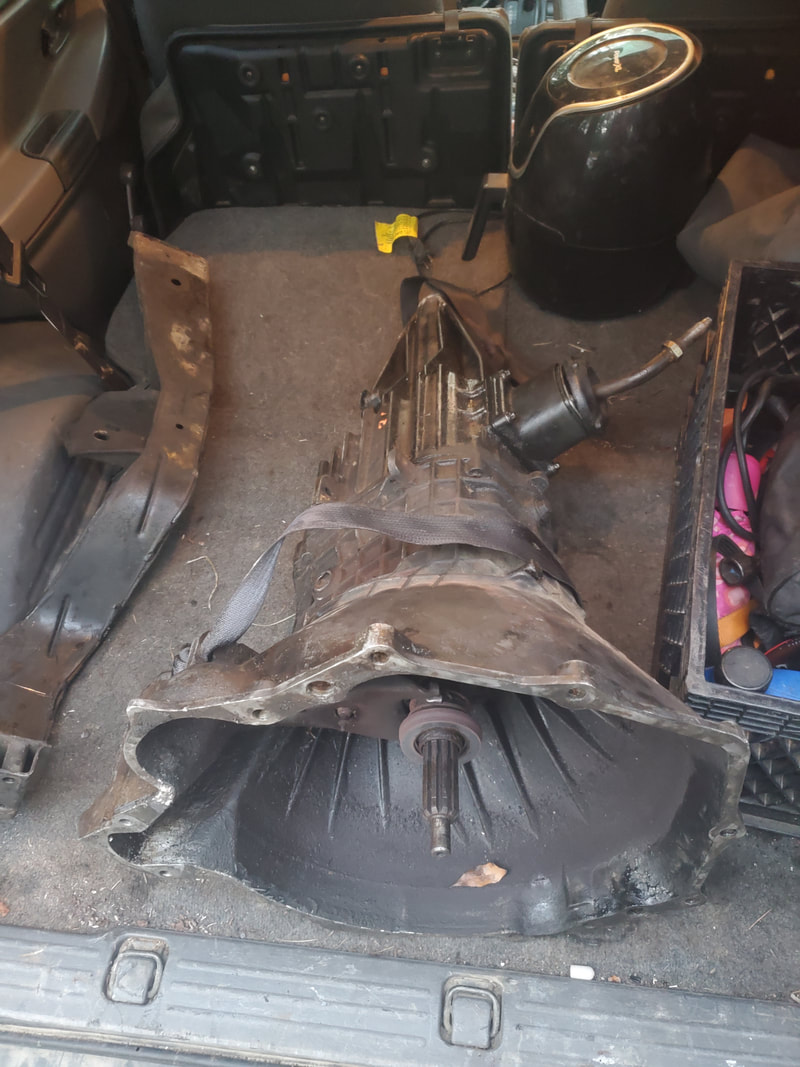 The 5 spd manual transmission and crossmember pulled from the 94 S10 at the junkyard, both components will be needed to help complete the drivetrain assembly on the 46 Ford build. Another little side note: As we were packing up and getting ready to head out we caught wind of someone who does windshields, supposedly for a good price. Since down here gravel flies around like mosquitoes, putting pock marks in windshields everywhere, its always good to have contacts for replacing windshields for a good price. With that, I had to get a shot of this guys info on his van for future reference, especially since we have several cars/trucks that need windshields.  Had to get this guy's info for some future work replacing glass in our vehicles. Networking is always a good thing... Back at the compound, I removed the splash pan on the S10 to access everything to get the old motor out and the new one in. After getting the new unit in, I cranked the truck up, which had been sitting on the 10 amp charge setting on the battery charger for the greater part of the day so it was plenty charged. The blower worked like a charm but as expected, the AC did not. I had to hook up the hose with a can of refrigerant to charge the thing. When I didn't get any action I manually cycled the thing on with a jumper on the dryer pressure switch to get some of the refrigerant running through the system so it can drink the contents from the can. This truck has always taken a lot of refrigerant so I ended up having to empty another larger can in the system before I could get the thing running at a steady clip. Once it was running it was back to blowing snowballs in the cab. During all this time running the temp held at around 200 and oil pressure was around 40psi at idle, excellent for the idea it was probably in the high 80s to near 90. As it goes, mechanically, the S10 is ready to rock and roll. I just have to do some more detailed cleaning to it will be more pleasant to sit in, much less look at....  The trusty dusty S10's powerplant, a 4.3L V6, the slightly newer version of the one going in the 46 Ford, along with that 5spd we pulled from the other truck. With the S10 ready to go also, this means we're going to have to rearrange some vehicles on the lot. In the Midway the S10 is at the back of the stretch, along with the Rustang. While the Rustang will stay where its at, I'll have to move the S10 and the Monte, which is in front of the S10, then move the 84 F150, which is in front of the Rustang to the spot next to the Rustang, where the S10 is currently sitting. Following this shit? Good. The Rustang and the 84 F150 will be at the back of the bus, while the Monte will go in front of the Rustang and the Scion will go in front of the 84 F150. Reason for this is while the 84 F150 and Scion sit at their respective spots, I can work on disassembling everything on both vehicles to get them ready for powerplant removal. With the 84 F150 I can dock a truck behind it to pull the truck back as I pull the engine out and get it on the ground in front of the truck. Before that though I will disassemble the Scion's engine and get it out and on the ground, using the 84 F150 as an anchor point to pull the Scion back to get the body clear of the engine as it swings in the air via the engine crane. I propose having the Scion gutted first anyway, then I can focus on the 84 F150 so even as I'm moving into the advanced stages of the engine swap on the Scion, I can have the 84 F150's engine and tranny on the ground and by the time I get to where I want to move the 84 F150's powerplant to the garage, the Scion will hopefully be done and able to be moved out of the way to facilitate that job. As stated in the last post, we still had a little work to do on the DOB, regarding the headlight and turn signal circuits. I had already pulled the headlight switch trying to do some basic troubleshooting but those tests were inconclusive. I dug back in, and where I was at was the parking lights and taillights lit up (except for driver's side front) but the actual headlights did not light up. I probed the dimmer switch to see if that could be the problem and when that didn't turn up anything (no power to the switch) I worked the switch on and off a couple times then started getting connectivity to the contacts inside. A few more cycles and I got the headlights to work as they were designed to do. Next thing was the turn signals. Since the turn signals kind of go through the headlight circuit, I left the switch in while turning on the turn signals. The right side worked fine but not the left. The rear light on the left came on solid. I went to replace the bulb on the left front since it wasn't on and ended up finding that instead of the bulb being dead the contacts on the socket were rusty. An attempt to clean said contacts was unsuccessful so I went about replacing the socket with one I luckily had in the Storage Trailer. After replacing the socket and installing the bulb, I got the left turn signal working just as the right side. With that those two problem areas were resolved, thank God.  Old parking/turn signal light socket cut free to make way for new replacement unit. I also took a moment to reattach the battery holder for the truck's battery since the unit is brand new and there will be no reason to remove it for a long time. With that out of the way all that's left is finding an air cleaner element for the aftermarket air cleaner so I can completely button everything up and test drive this truck enough to feel comfortable driving it 30 miles back to the owner. In the meantime, it appears that the Scion is pretty sick.  Battery holder bolted back down to hold new battery in place on the DOB. The odd noises that were being heard morphed from what could've been misconstrued as bad exhaust leaks to what almost amounted to full blown rod knock sounds. After pulling the oil pan (which was rather easy, all things considered), and finding nothing obvious, I did some research. After noting something that I was already aware of, which is the Toyota 2AZ-FE VVTi 4 cyl engine used in the Scion as well as many other cars from the early 2000's were known to drink oil like a lush on a Saturday night, and as a result can put the bottom end of the engine in a condition where it can go dry long enough to trigger rod knocks. Also the engine was known to have faulty piston rings, which helped contribute to the oil consumption. These problems became manifest well after the warrantees expired for the original owners of these cars, so they either paid dearly to fix them (engine replacement or rebuild) or just said fuck it and scrapped the cars. This is where we're at now. The engine will start up and run, but initial startup sounds shitty and after a few moments of running it sounds like a bolt is being bounced around in the crankcase, rattling against shit. At idle its not even tapping at any frequency, its just random. Acceleration makes it go away slightly but during deceleration it rattles even more. Basically this engine is on its way to being fucked. It also means that we're going to have to source a replacement engine for this thing more sooner than later since the ole lady's means of work falls on the proper operation of a car and with the Scion out of commission, she'll have to fall back on the Tracker for the time being. 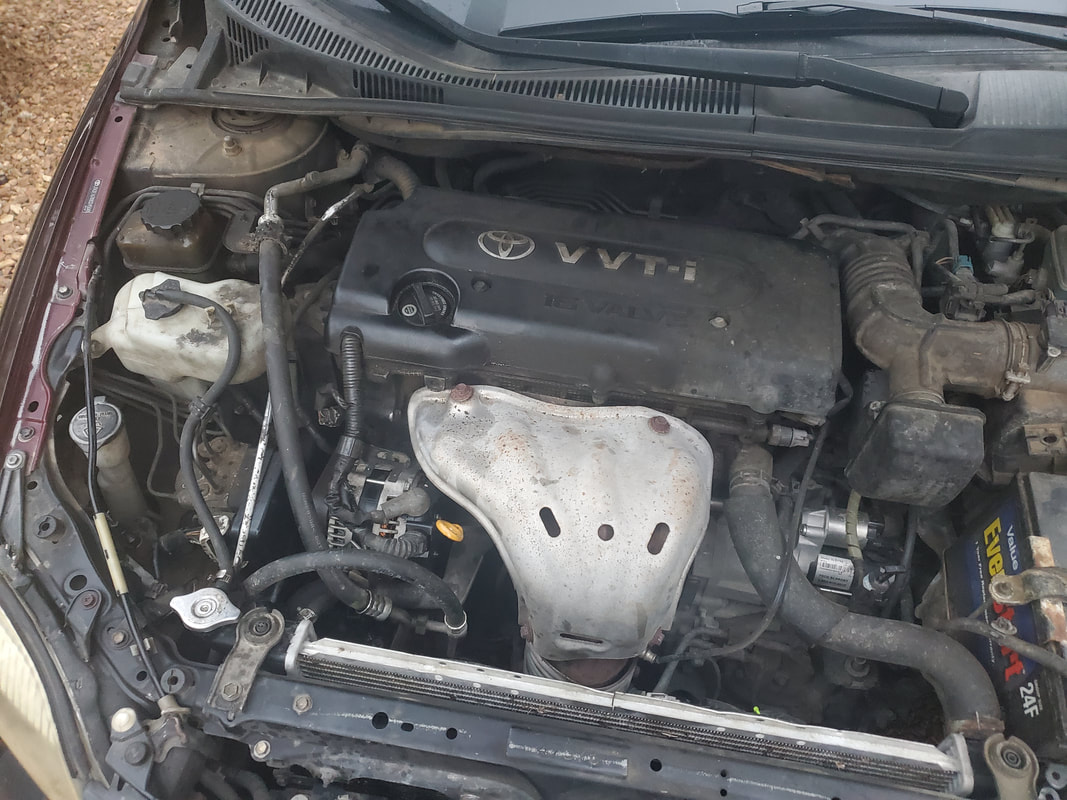 The infamous early gen 2AZ-FE VVTi Toyota engine, known for its problems, the bastard stepchild of the Yota family. What this also means is while she's using the Tracker, I will have to find an alternative means of conveyance for my commutes. Since its going into the hot season, using one of the oldies will mean many days or weeks of suffering in the intense heat, magnified by the hot engine and transmission of any of the oldies, not to mention how the bodies seem to act as heat sinks during the summer. This leaves only one alternative, the old Chevy S10. The last time we visited this truck it had a big fucking tree across its bed and the camper shell was splintered. This was back in 2020, and even after making a vain attempt to try and patch the bed, the truck sat parked for almost two years, only having been run a short spell a few times since then. Until now. I put the battery charger on the truck's three year old battery and topped off the rad, and after a little time with the battery on the jump start setting to try and recondition the battery, the truck started right up like nothing was wrong. After some time idling, the temp and oil pressure held just as good as it always had, running in a way that doesn't reflect the fact it has almost 300k miles on it. The transmission is spotty however and will sometimes slip in and out of the torque converter lock up and during initial transmission engagement will sometimes take a second to move enough oil to make the thing engage. Even though oil is topped off, again, the truck has almost 300k miles on it so having a tranny start to go bad is almost expected. We do have a spare unit in the garage, but we're going to have to just hold out hope that this old tranny will keep going long enough to resurrect the Scion so I can take time to swap it out.  The old S10 as its been sitting for the last couple years, ready to be pressed back into service, no matter how ugly it looks. 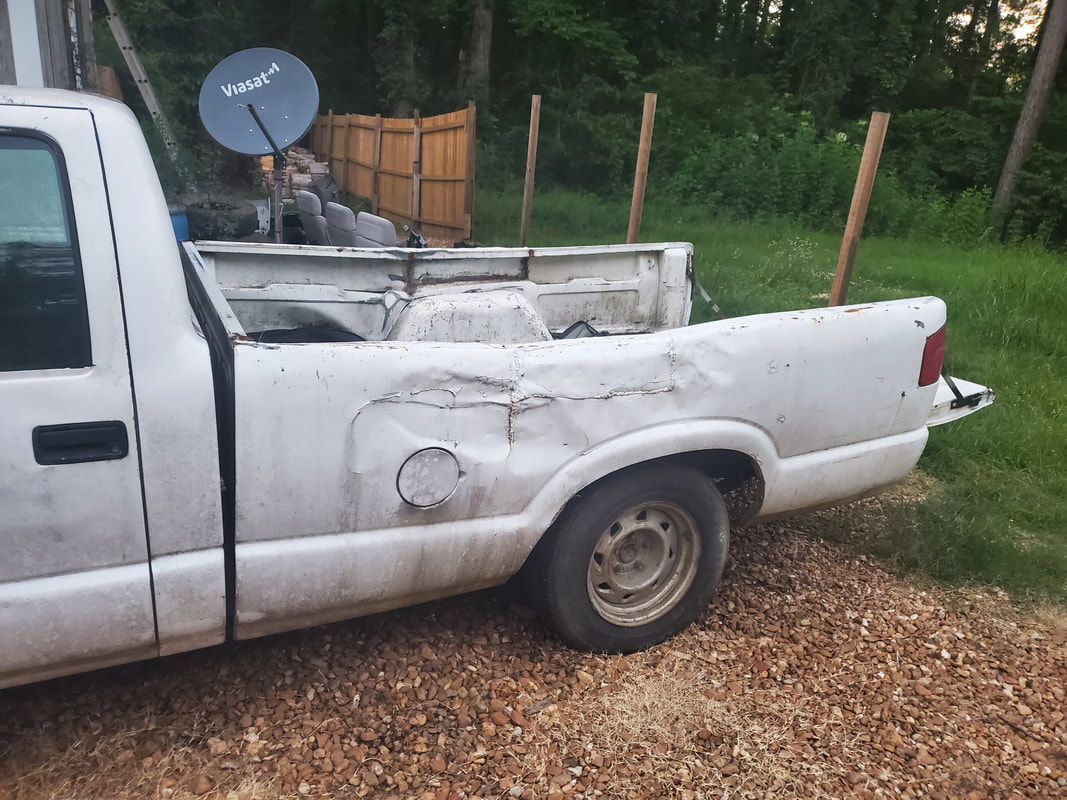 Again, no matter how ugly it looks, as noted from the shitty patch job on the once crushed bed. I will need to address a couple things on the S10. One is the simple act of cleaning the truck up inside and out, removing shit from the bed as well as the cab. I also need to do a thorough search for wasp nests above and beyond what I already targeted prior to getting the truck running again. The last thing is getting the AC working, as it needs a replacement blower motor and will most likely need a recharging since it sat for two years and probably bled off all the refrigerant since then. So with that, expect to see more action with the S10 in the coming days/weeks while we work on getting the Scion taken care of. As this car advances in its age, things tend to need a lot of attention. In this case on the Scion, it was time for a new ball joint as the feeling in the suspension started getting more pronounced that something wasn't quite right. We felt one wheel have a hop to it during initial acceleration, which indicated something was loose, either something was up with the strut or the control arm. At least so I thought until I jacked the car up and tried to move the tire around enough times to discover that the left ball joint was bad enough to have that hop to it in the actual ball. After getting a replacement ball joint I pulled everything apart to remove the old unit.  There's only one ball joint for each side, along with one control arm, this ball joint is held in with two nuts and a bolt to the control arm, along with a single large nut to the joint shaft in the steering knuckle. After removing the large nut and the two smaller nuts and single bolt to separate the ball joint from the control arm, I used the jack handle for the jack holding up the car to pry the control arm to completely free the ball joint from the control arm. From there I used the baby sledgehammer to hit the steering knuckle until the ball joint shaft popped free. With the ball joint fully removed I was able to pop in the new unit and lock everything down, having to use the jack handle once again to pry the control arm down to get the new ball joint locked back in place. With the ball joint replaced I decided to move on to the next thing that I noticed needed attention, the brake pads. 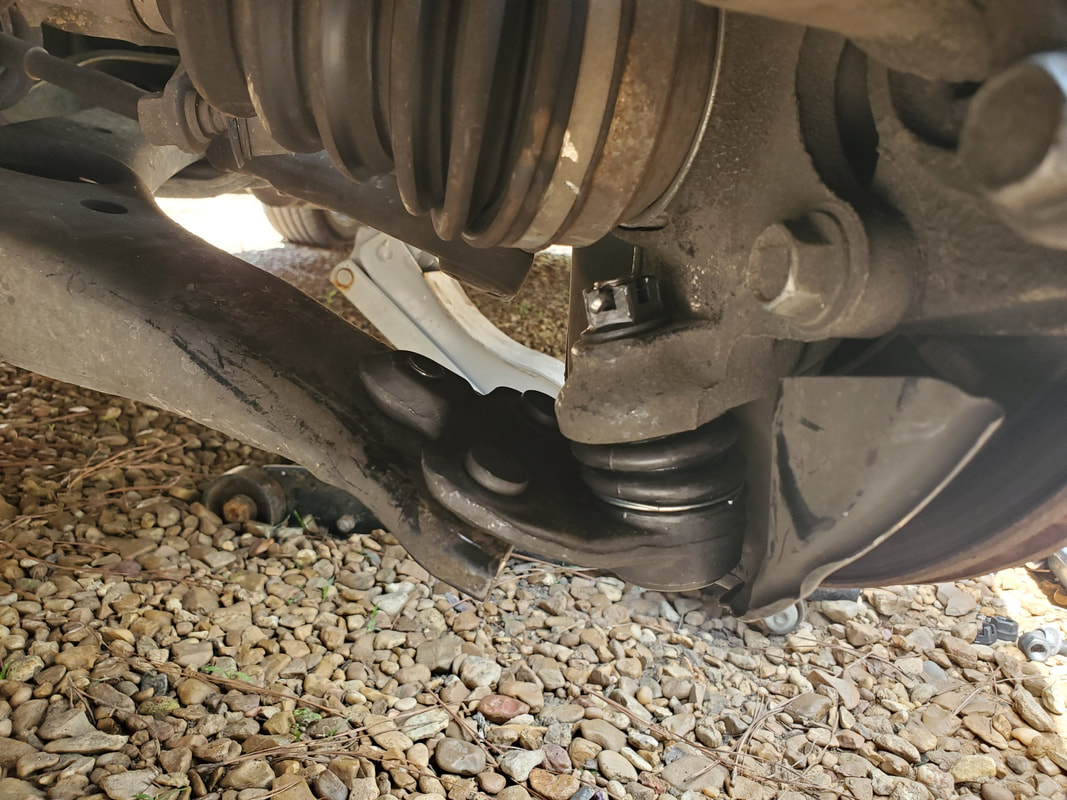 The new ball joint installed on the left side. The right side wasn't done due to its still being viable. The brake pads on the left side were pretty well worn with one of the pads having around 1/8" of material left and the other having about 1/4" material left. These were clearly worn to the danger level so after greasing everything up I replaced the pads with a fresh set that luckily I had a spare of in the storage trailer. On the passenger side the situation was much worse as one of the pads were completely worn down to bare metal and the pad base was digging into the rotor. The other pad had about 1/8" material left on it. Eventually I'll probably end up replacing the rotor but for right now will just have to roll with the grooved rotor and a new set of pads. With those things buttoned up I did one last thing. 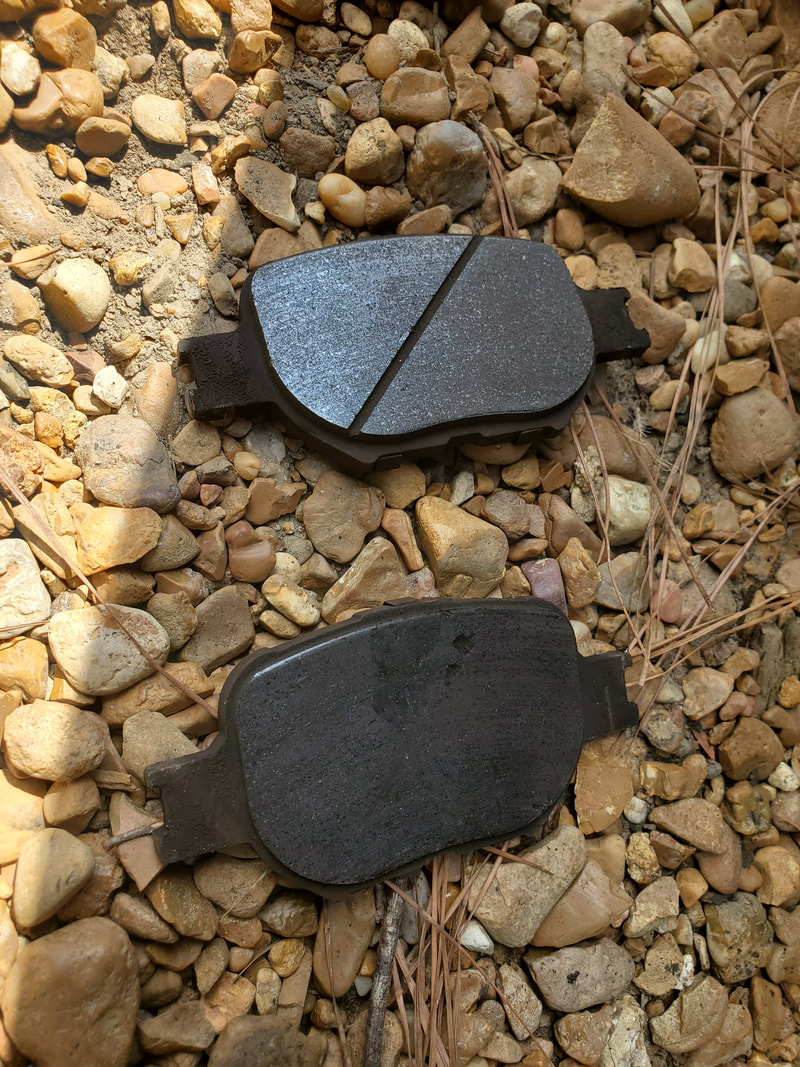 Left side brake pads that were removed, note how worn they are... 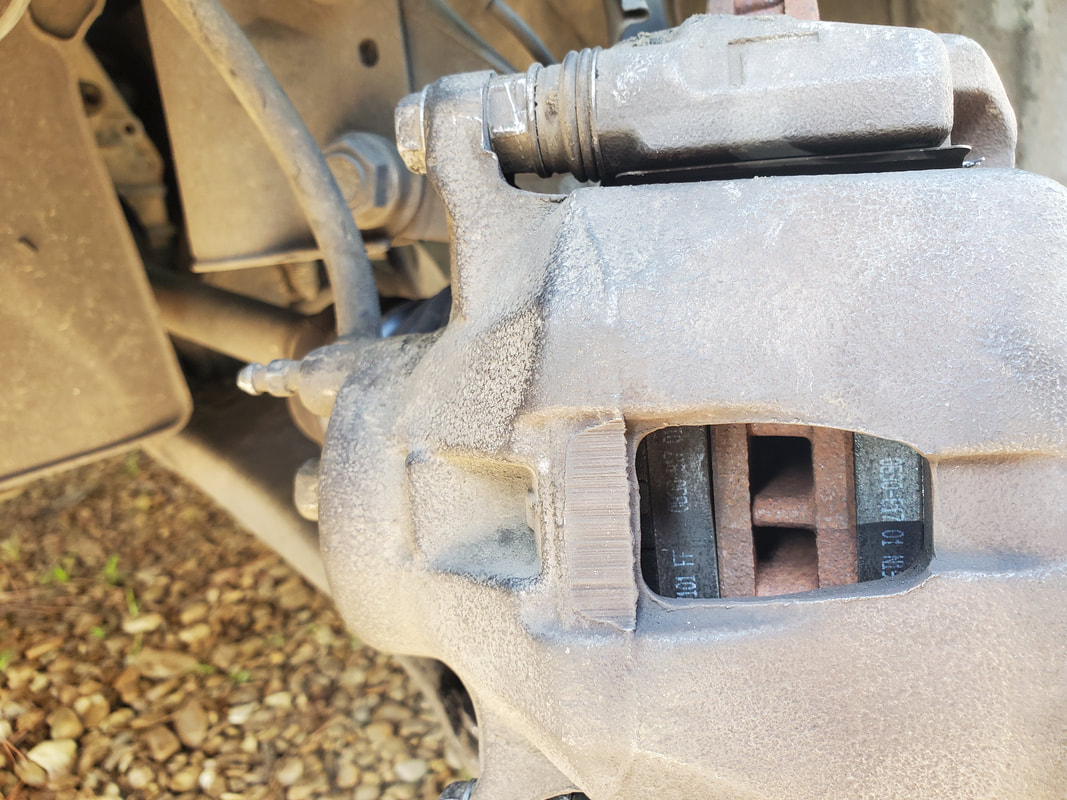 New brake pads installed on driver's side, note the thickness of the new pieces. Trying to address some odd noises that we were hearing on the car, I figured that the exhaust manifold flange gasket was probably worn. I got a replacement piece and pulled the two spring loaded bolts free to replace the old unit, which needed to be pried out. The spring loaded bolts put pressure on the flange to hold the exhaust pipe against the gasket and the exhaust manifold port while allowing the exhaust pipe some movement during normal operation. The gasket is a composite metal donut piece that is shaped to the flared pipe end that's pressed against the manifold port. In time the gasket, being pressed as it is, can develop leaks, resulting in a louder exhaust. 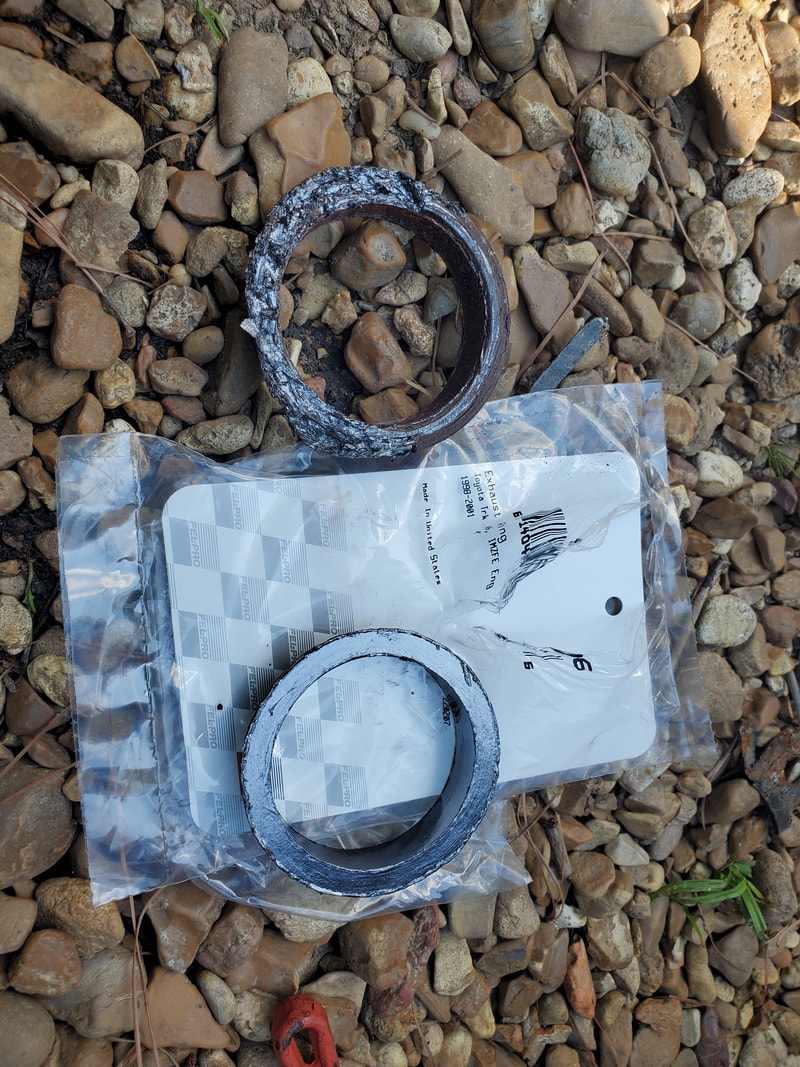 The exhaust flange gaskets, old and new. Note how the pieces are made. The old unit was chewed up trying to pry it free from the exhaust manifold port. 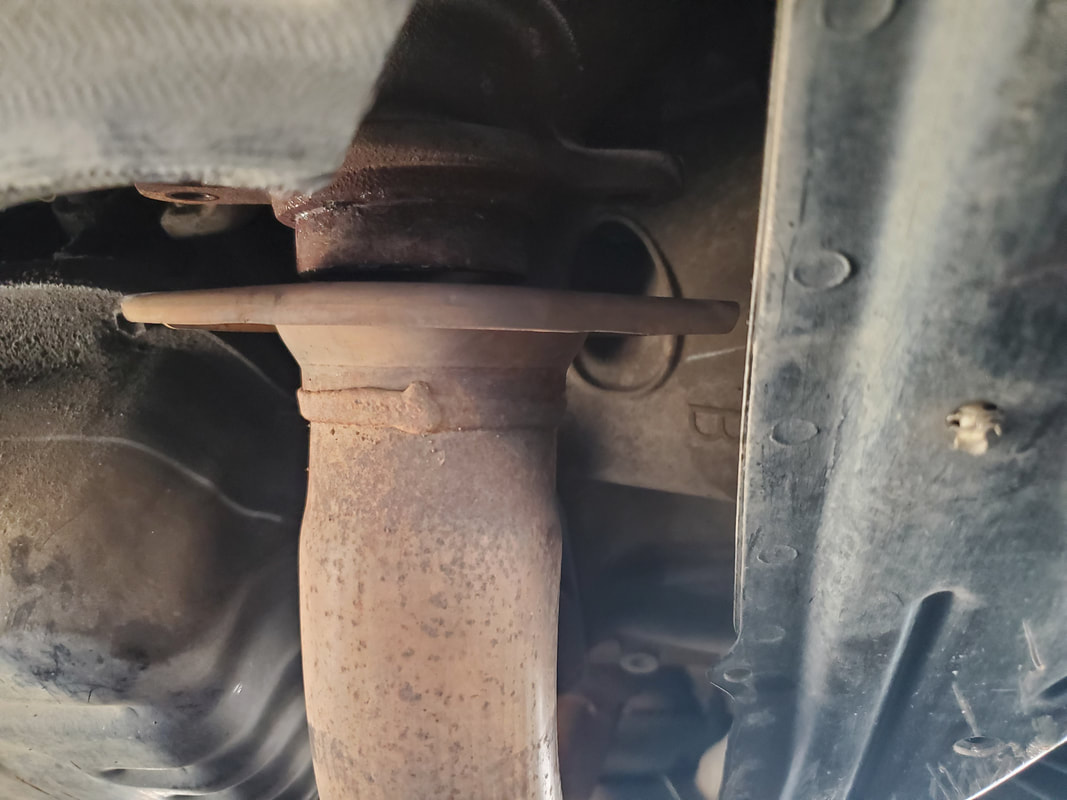 The manifold port and flange and flared pipe end that the gasket seals up so the exhaust can remain quiet. With the work done on the Scion I turned my attention back to another vehicle that I'm trying to wrap things up on, the FMT. Since we managed to get the truck running and even did some low level test driving, I decided to take care of some other things on the truck, namely cleaning the interior out and fixing the broken window on the sliding back window assembly. A while back an errant rock launched from my weed trimmer made quick work of this section of glass so for the longest time the cab was open to the elements and chickens. They would use the floor as a nesting area so if I want to be able to reverse the smell of chickens nesting (luckily they didn't shit everywhere), I would have to button up the cab to keep them and the elements out. I bought a piece of tinted plexiglass from a local glass supplier and after having made a template for the glass, cut out the piece needed. I had to trim the piece to make it just big enough that I could still slide it into the frame and still have it seal up. I had to pry the outside of the frame out to make it easier to work the piece of plexiglass in, but eventually I got the piece in, and surprisingly it fit in the frame pretty snug. I replaced one piece of molding and even used a little hot glue along the bottom of the glass piece in the frame to help seal the piece in. The tint was pretty close to the rest of the window so things worked out rather well. The glass is replaced, unorthodox but functional. And best part, no more chickens nesting in the cab. 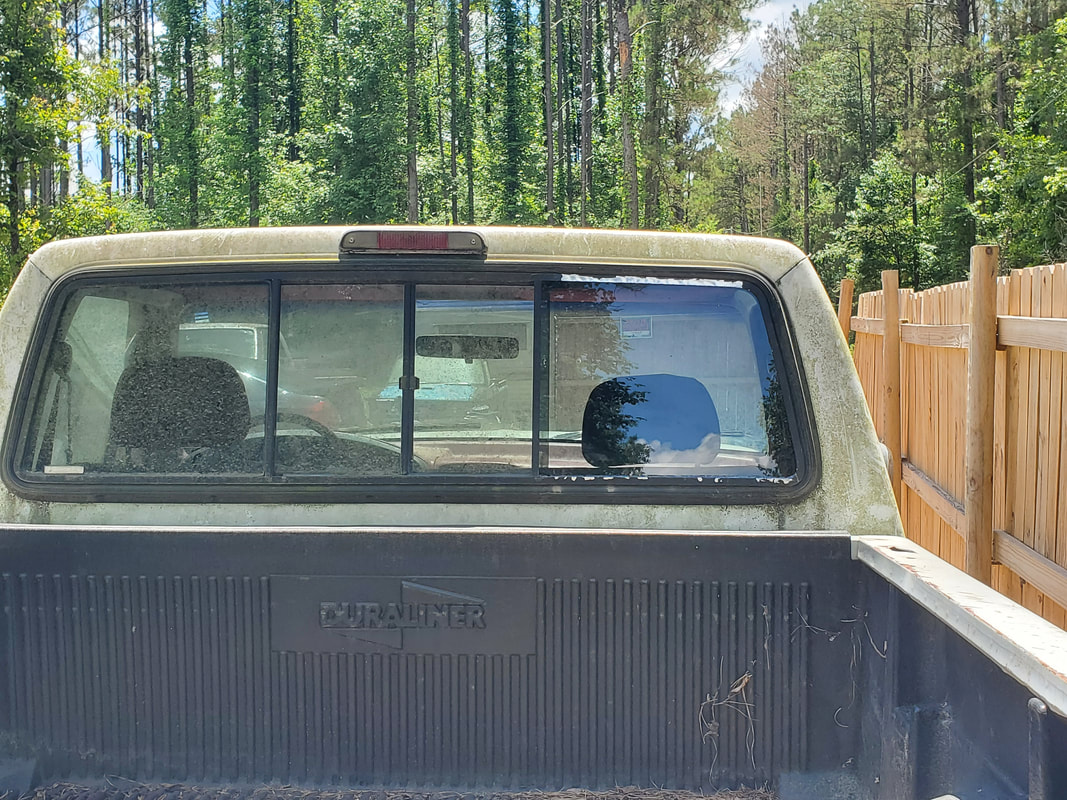 Barring the dirt on the rest of the window, the replacement plexiglass piece matches up pretty good to the rest of the window. I will need to touch up the frame where the black paint chipped away. With the FMT taken care of, I'll be turning my attention back to the DOB to finish things up with it. I have to do some troubleshooting on the headlight and turn signal circuits to see why they weren't working. I had already dug in a little bit but there were still a few things I didn't fully check out. I'll be trying to take care of that stuff so hopefully I can wrap things up on the old truck. Once that's done I can start looking at the next project I want to tackle.
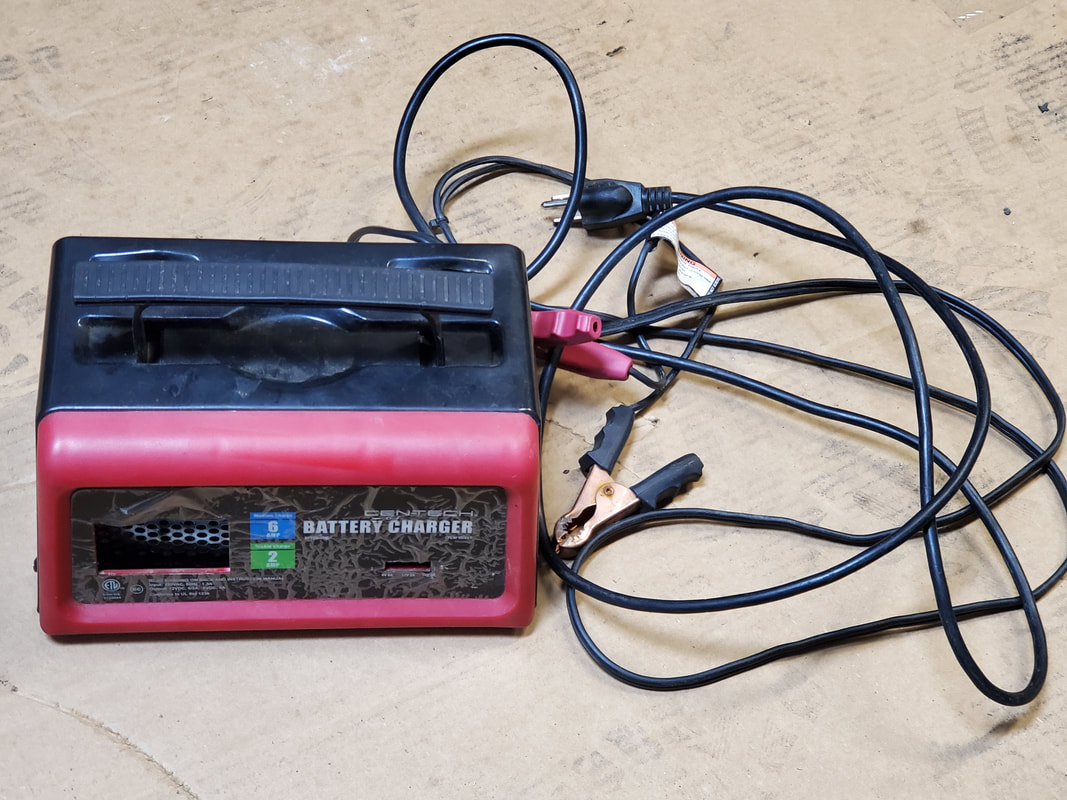
Recently I reconstructed a small battery charger using an aftermarket 12v power supply as the basis of the unit. I had an old battery charger body that I had gutted a long time ago due to the electronics having failed, with the intent of using the body to make a battery charger. That unit turned out fine, using a 3 amp power supply, that charger would work as a low level charger for keeping batteries topped off. Right now we're working at building a charger that's able to deliver a little more kick. As before, I ended up with another charger body, the electronics having been damaged, the transformer burned out. After gutting these components I was able to start off on a clean slate. The 12v power supply that I grabbed this time was a 10 amp unit, more than able to deliver a nice enough jolt to charge most weak batteries up in a few hours.
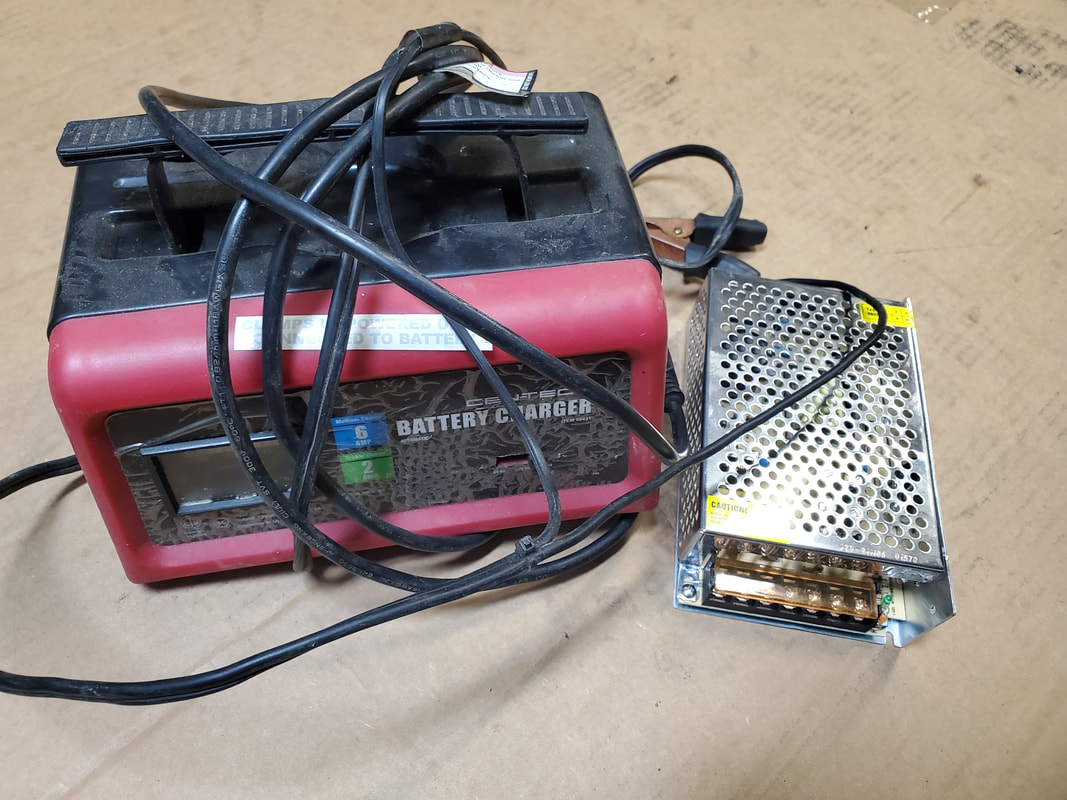
The old charger body along with the aftermarket 12v power supply.
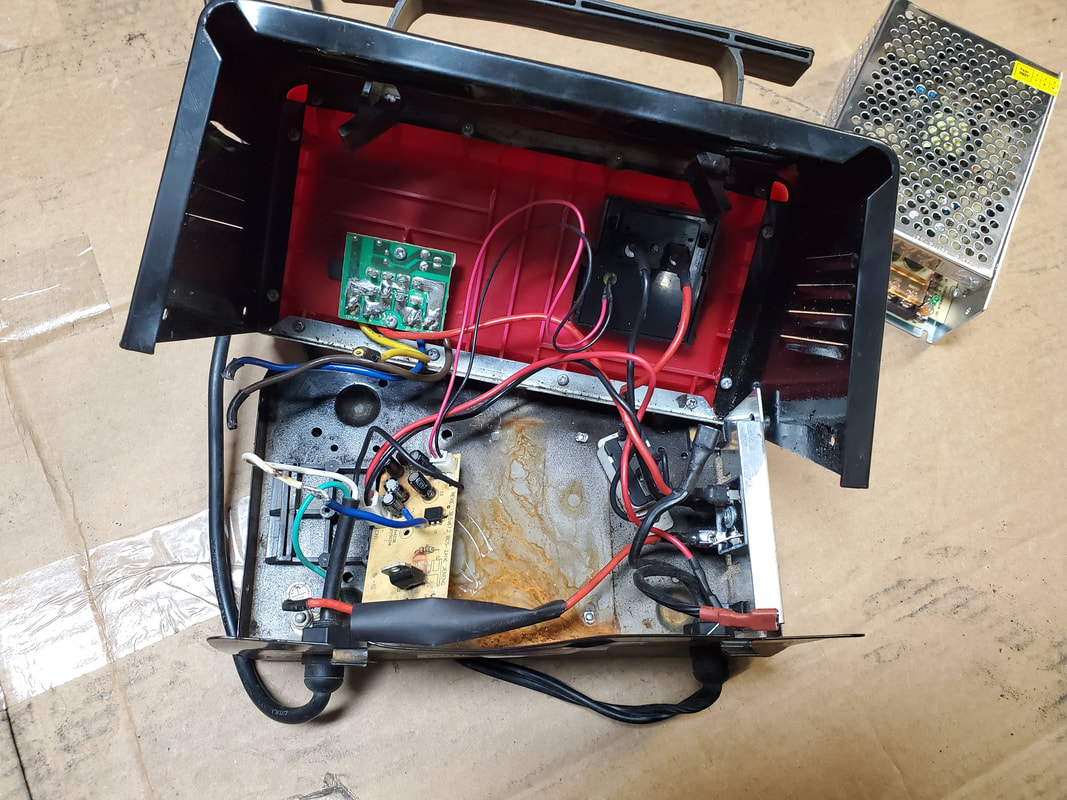
The electronics in the charger body, just before their removal to make way for the installation of the power supply.
Of the components removed from the old charger, I will be keeping the old selector switch that used to select between 6v and 12v 2/6 amp settings. We won't be worrying about charging 6v batteries nor selecting different amperages. This is a straightforward 12v/10a charger we're building here. I'll also be keeping the bridge rectifier since this component, especially with the heat sink body, can be used in other projects where AC power is being regulated. With the electronics gone, the first move in the reconstruction was the connecting of the AC lines to the power supply, quick and simple. 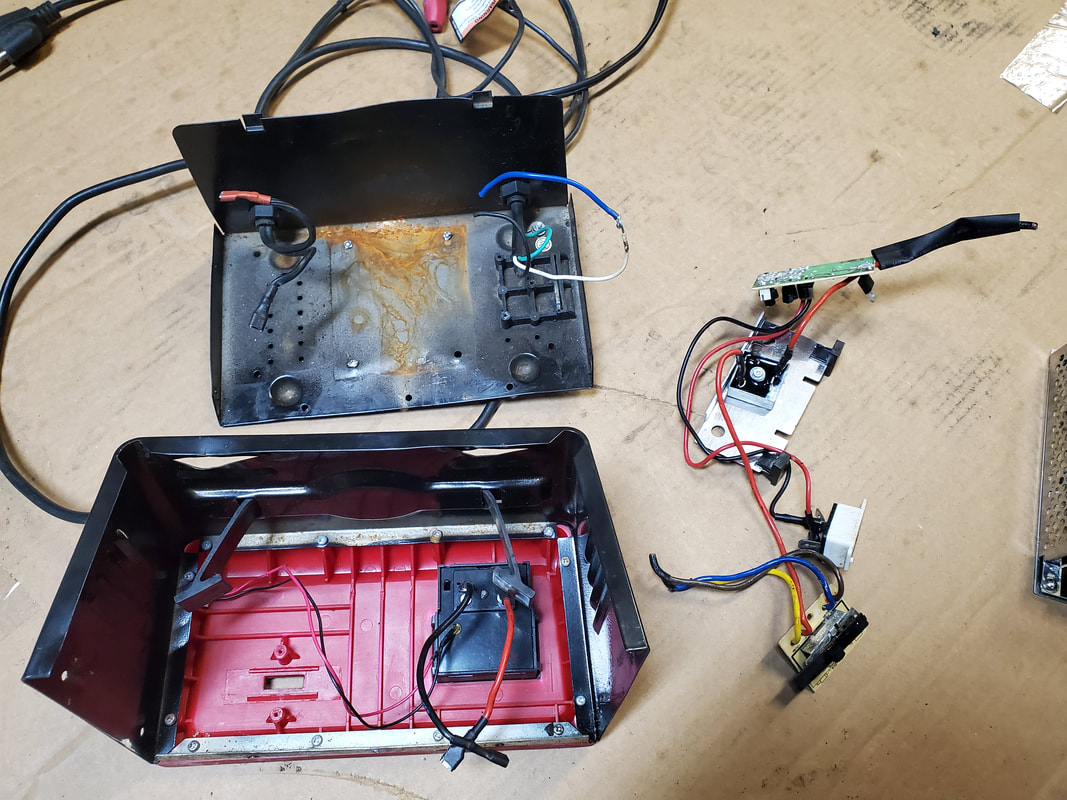
The charger body after removing all the remaining electronics and other components.
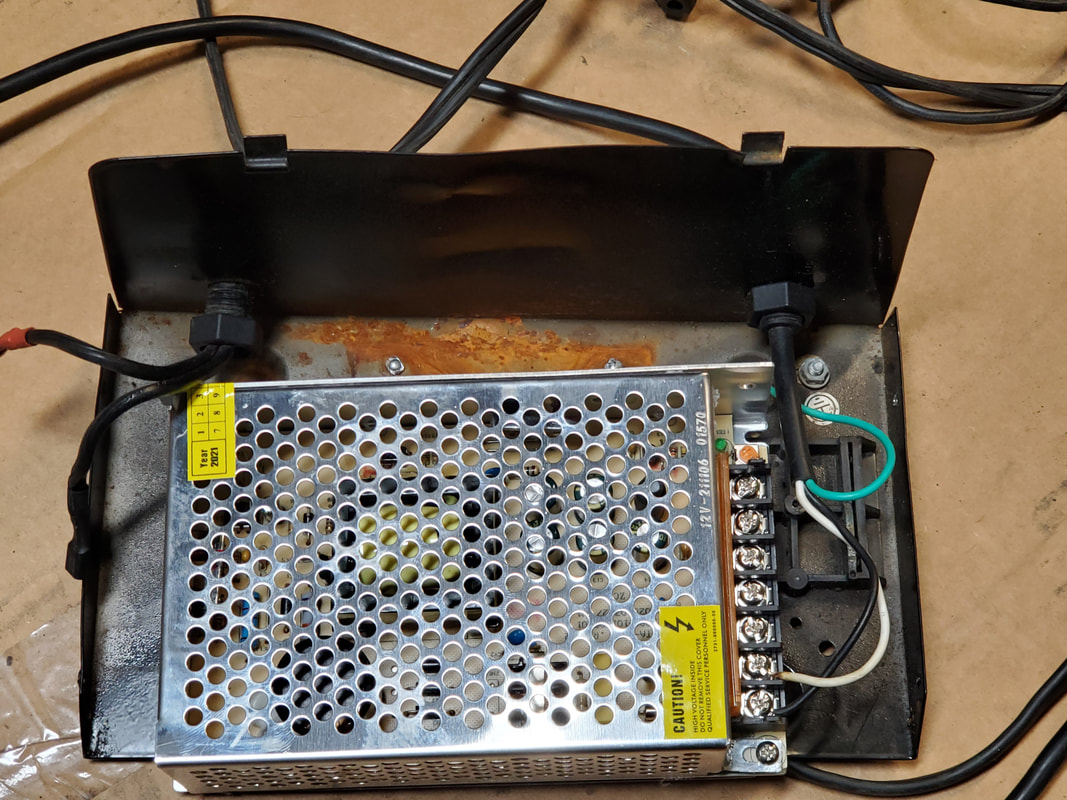
The power supply with the AC lines hooked up to the terminals. The power supply is barely able to fit.
One of the problems that I ran across in the placement of the power supply was the idea that the output wires for the alligator clamps were mounted low enough on the back of the charger body that the wires actually got in the way of me being able to set the power supply against the back of the body where it would fit properly. The only solution to this problem was to relocate the output cables to a higher point on the back of the body, preferably on the side where the terminals are on the power supply. This meant drilling a hole just above the AC cable on the opposite side of the body and remounting the cable in this new hole. With the output cable remounted above the AC cable, I was able to connect the output lines to the terminals on the power supply with ease. 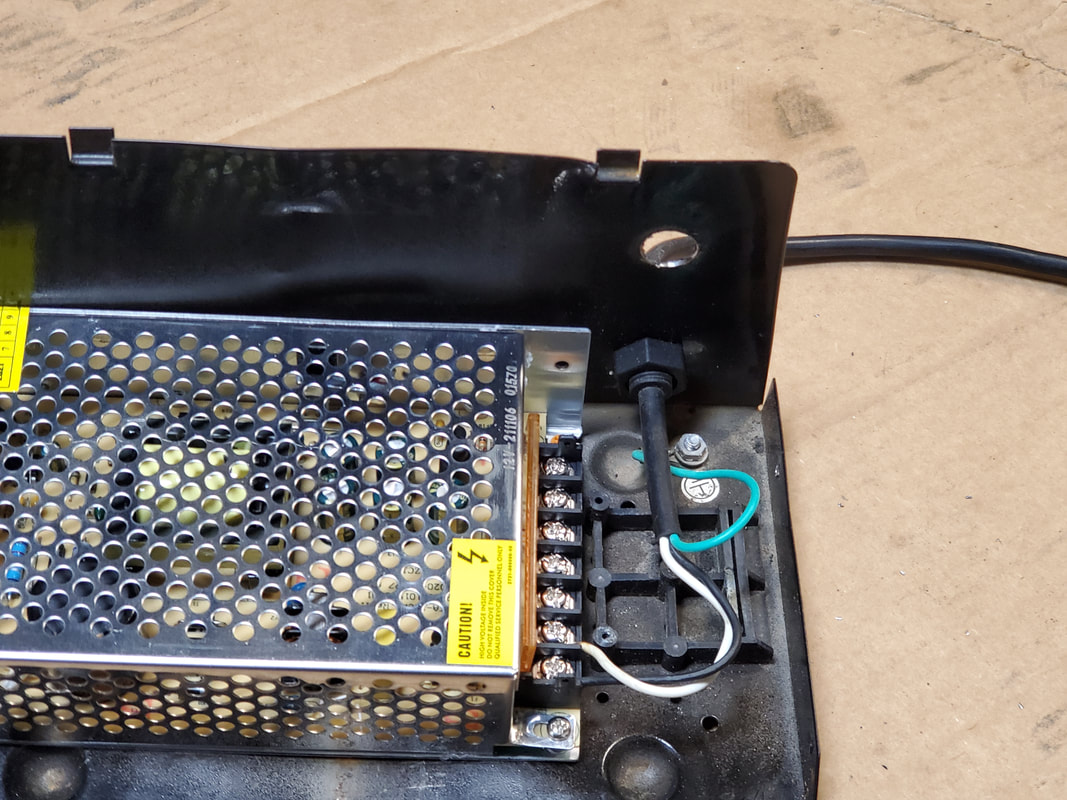
With the power supply placed against the back of the charger body, I was able to drill a new hole above the AC cable on the right side as seen in the picture.
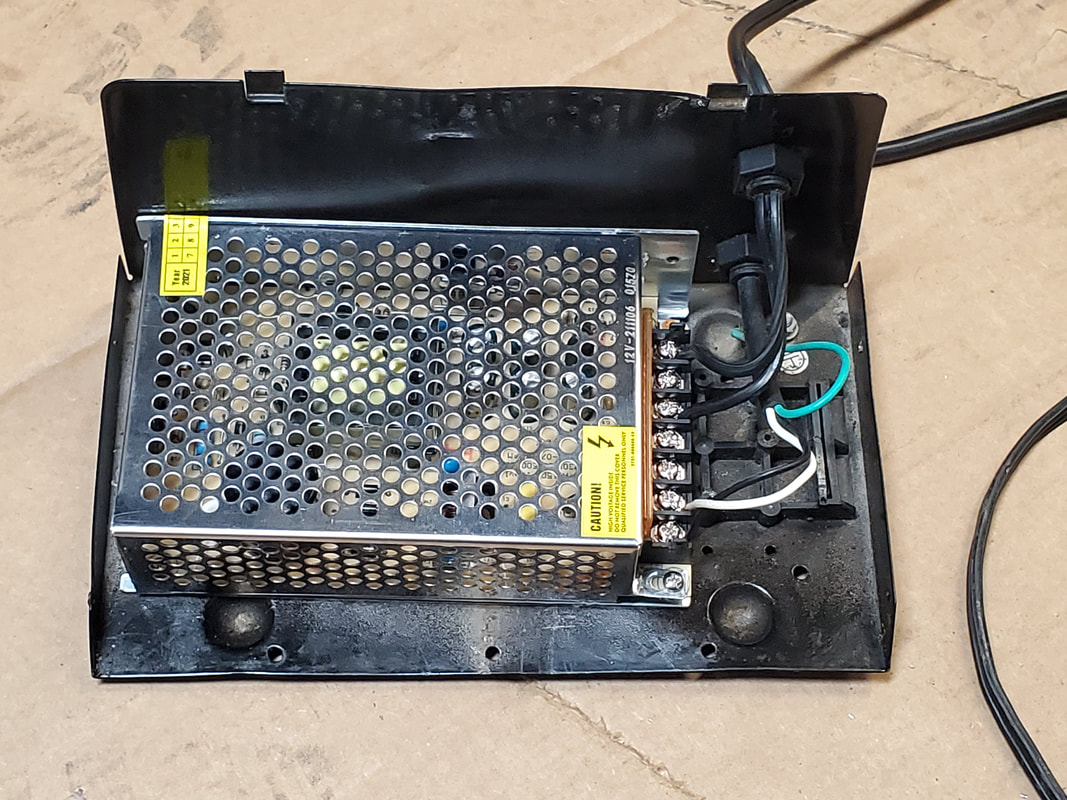
The 12v output cable is secured in the new hole above the AC cable, and hooked to the terminals on the power supply.
With the wires secured and connected to the power supply for the 12v out, I moved on to securing the power supply itself to the charger body. This is where the hot glue came in. I applied glue around the bottom of the power supply, taking care to get glue past the wires and down into the area along the bottom of the power supply so the glue could melt over the edges to hold the power supply body to the charger body. A little glue was also applied around the top of the power supply body to hold it to the back of the charger body. Enough glue was used to ensure this thing wouldn't be bouncing around within the charger body once everything is closed up. 
The power supply is hot glued to the charger body, as seen by the bead around the base of the power supply.
With the power supply glued down I plugged the charger up and connected the alligator clamps to the multimeter to measure the output voltage. Power out was 12.08v, enough to ensure a battery would be brought up to a good voltage to be able to perform work. I wanted to see if the charge meter on the front of the charger body would work but it turned out to be bad so I just pulled the dead charge meter from the front of the charger body. My intent now will be to find a meter of some sort to place in the hole of this charger, along with a 12v LED to use as an indicator to let the user know that the charger is operational. For right now the charger is able to be used but there will be no way to tell what the state of charge is on the battery that's hooked up to this unit. I'll probably be able to find a charge meter that I can hook up online, but until then, I can press this charger into service as it stands. 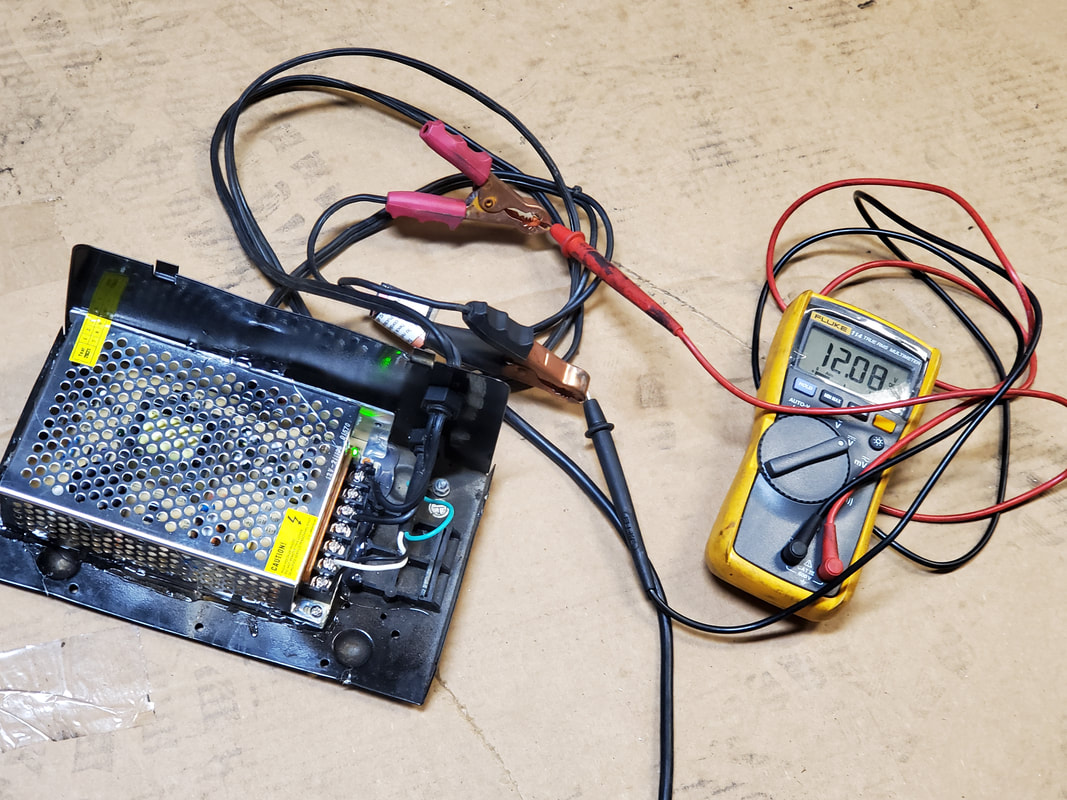
The new battery charger hooked up to the meter, reading 12.08v.
The battery charger all buttoned up, sans the charge meter on the front.
As was the case before with the other chargers, this charger will not be like its former self where it requires some level of charge in the battery to activate the charger. This setup is not "smart" or automatic in any way. When its plugged up, it puts out 12v, no matter what. When it's hooked up to a battery, that battery will take in 12v at 10 amps potential all the way until its charged, and then some. The battery will have to be checked to keep it from overcharging, but when we talk about a situation where a dead battery needs to be juiced up in a few hours, this charger will work just fine to deliver the power needed to ensure a startup. If a battery is to be left on a charge overnight, the other homemade charger that only puts out 3 amps would be used. At least now, we have two more chargers added to our stock, at the cost of a couple cheap power supplies.
With the FMT being an success, I turned my attention to other matters around the homestead. I had several bags of dirt from Walmart that I had to remove and spread out in the garden, filling up one more raised bed in the Kennel Greenhouse, and if any dirt was left over, start filling one of the beds in the new raised bed assembly I recently built. It took four bags to fill up the half drum, with the final bag going in the new raised bed. I can now get some plants to put in the greenhouse, probably peppers since I don't have any planted yet. I'll probably try to get more dirt to finish filling the new raised bed just to say its out of the way later on. I do still have to get some micro irrigation hardware to get the greenhouse planters all hooked up for automatic watering with everything else just as well. 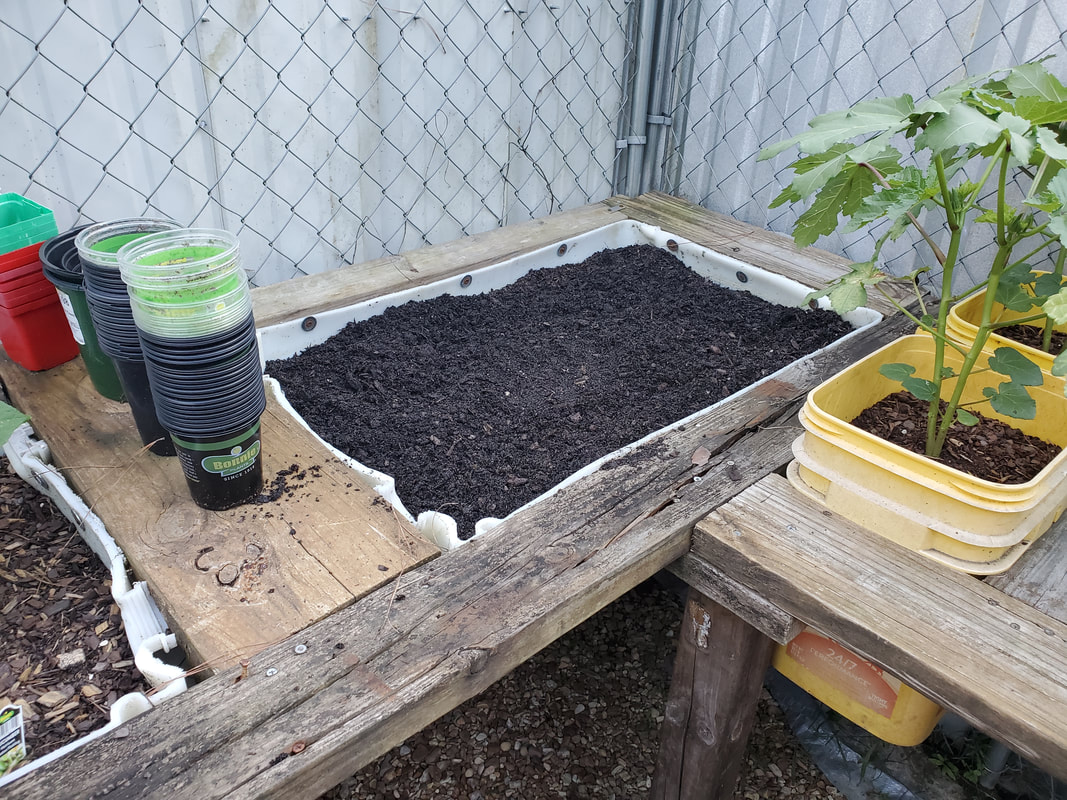 The last raised bed in the greenhouse that needed to be filled with dirt, now ready for planting. Of course there was also another load of gravel for the chicken yard. I had to fill in some new depressions that formed, even in the areas that I recently spread gravel over. I did manage to cover up more of the moist areas in the middle of the yard so there will be that much less area we have to worry about dodging due to being soupy. I won't stop until the chicken yard is fully covered with gravel so this area will be more "user friendly" when it comes to working in the area servicing the chicken coops. The last thing I want to have to deal with is cleaning shoes due to slopping around in mud, especially since most of the other high traffic areas in the compound no longer have this problem due to being well covered with gravel. 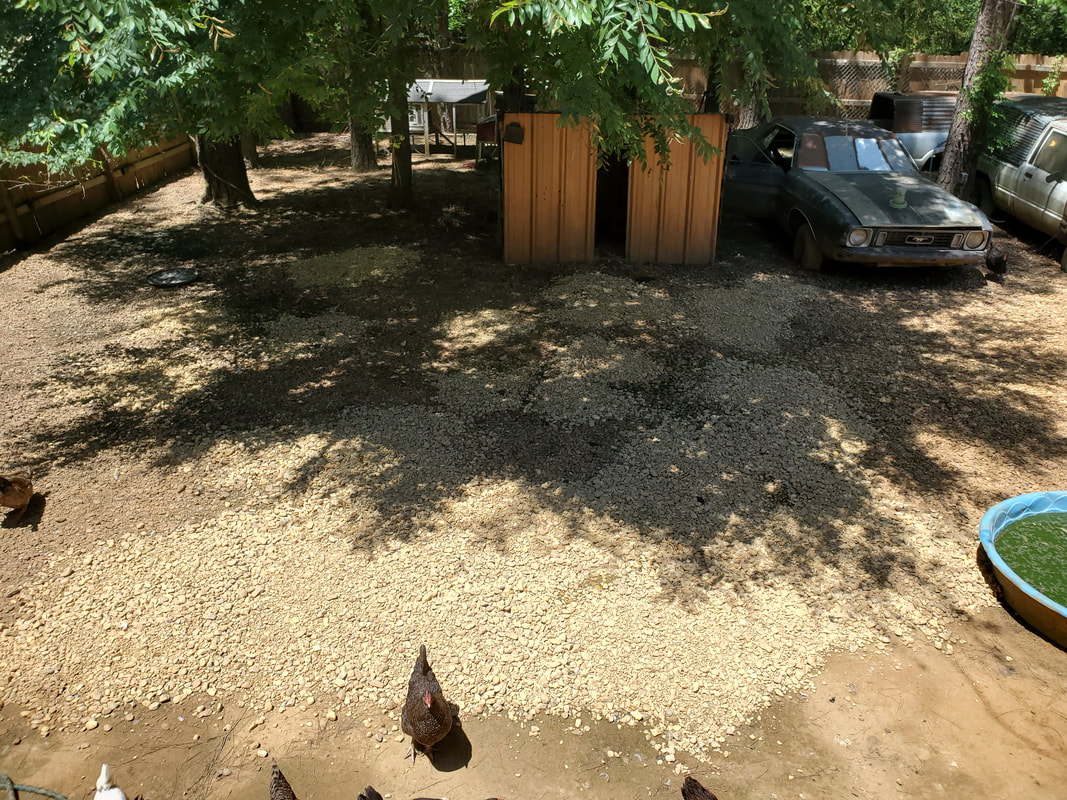 The laid gravel in the chicken yard, with the light areas indicating the freshly laid rock. One more thing that I wanted to take care of was the old hood from the Rustang. After hauling the scrap, I saved the hood on the notion that I could salvage some sheet metal from the hood for use in future projects. I went ahead and pulled out the power tools and cut two large patches of sheet metal from the top of the hood, leaving the middle hump section. These two sheet metal panels can come in handy in any number of ways. Being long pieces also gives me the ability to more cleanly cover larger areas with sheet metal without having to butt pieces together to weld up. 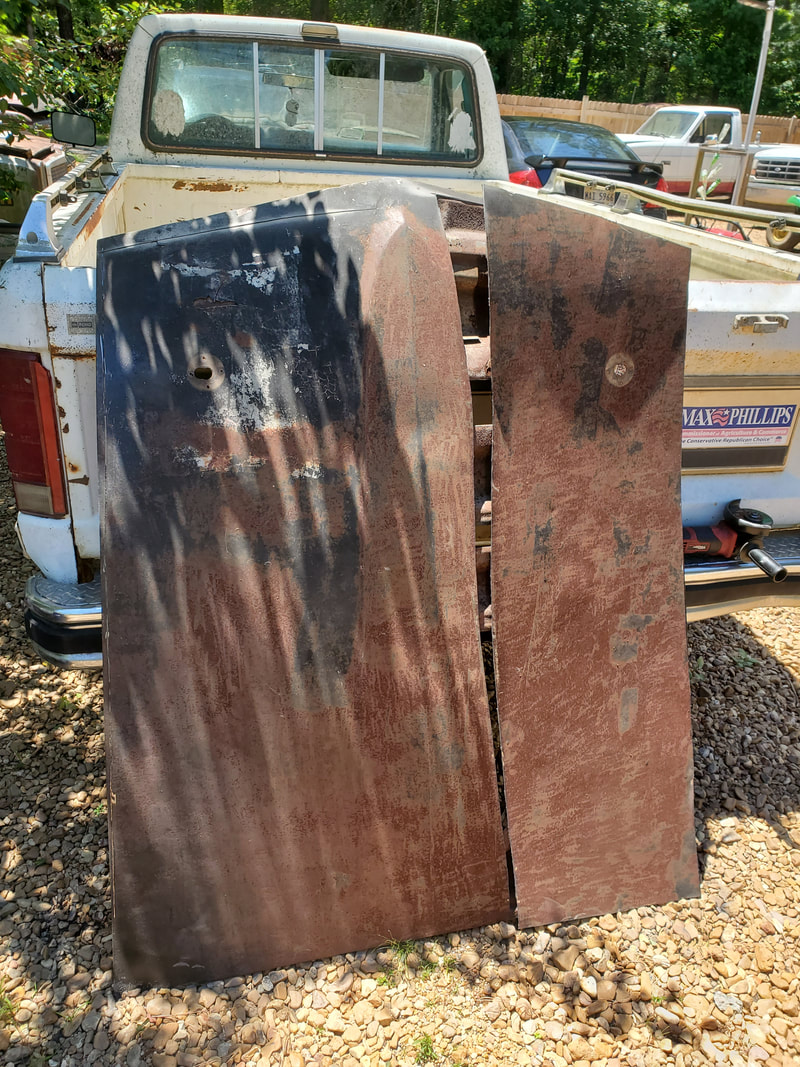 Cutting the first section of sheet metal from the old hood. 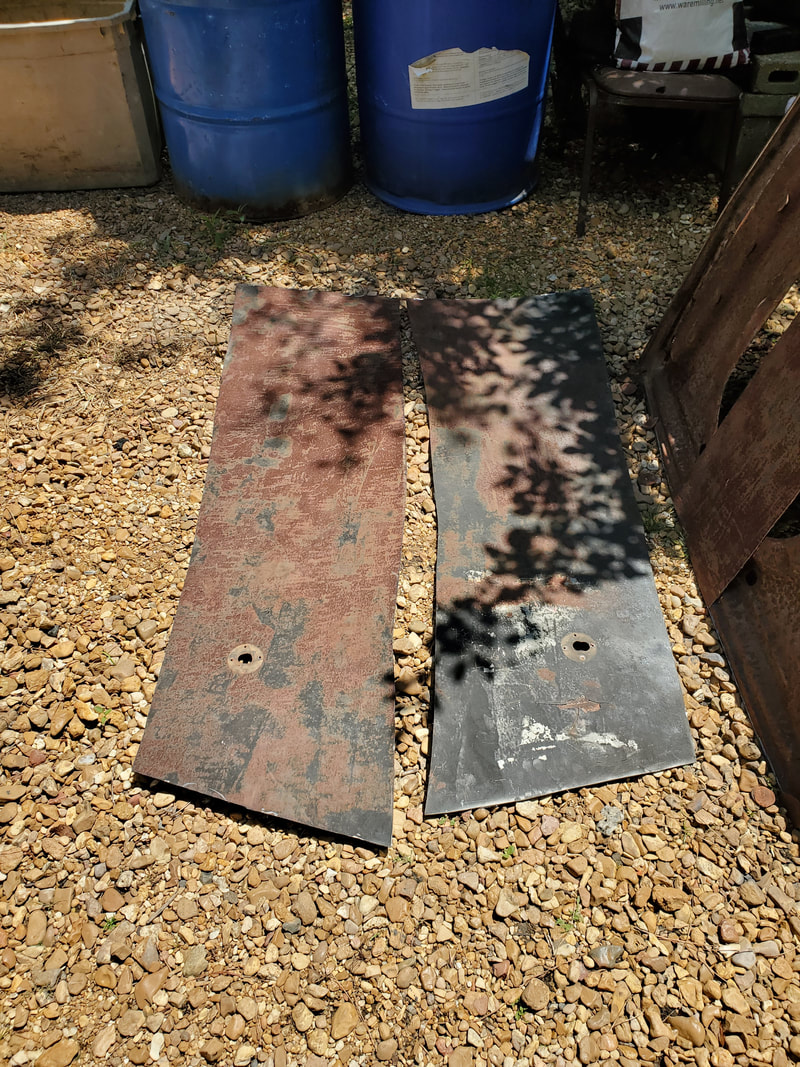 With the two pieces of sheet metal cut free, I was left with the substructure of the hood, which was useless to me. This metal was weak in many spots, resulting in the hood bending near the hinges, prompting me to replace the body panel when I got the chance after obtaining a fresh replacement hood. As for this piece, all that was left to do was hack it up into small enough pieces that I was able to toss everything in the 55 gallon drum that I use for miscellaneous scrap metal. With that taken care of, this large panel yielded some useful material for our future projects and was rendered down into something more manageable so I won't have to worry about having a large unsightly piece of scrap metal laying around for months on end until the next scrap run. 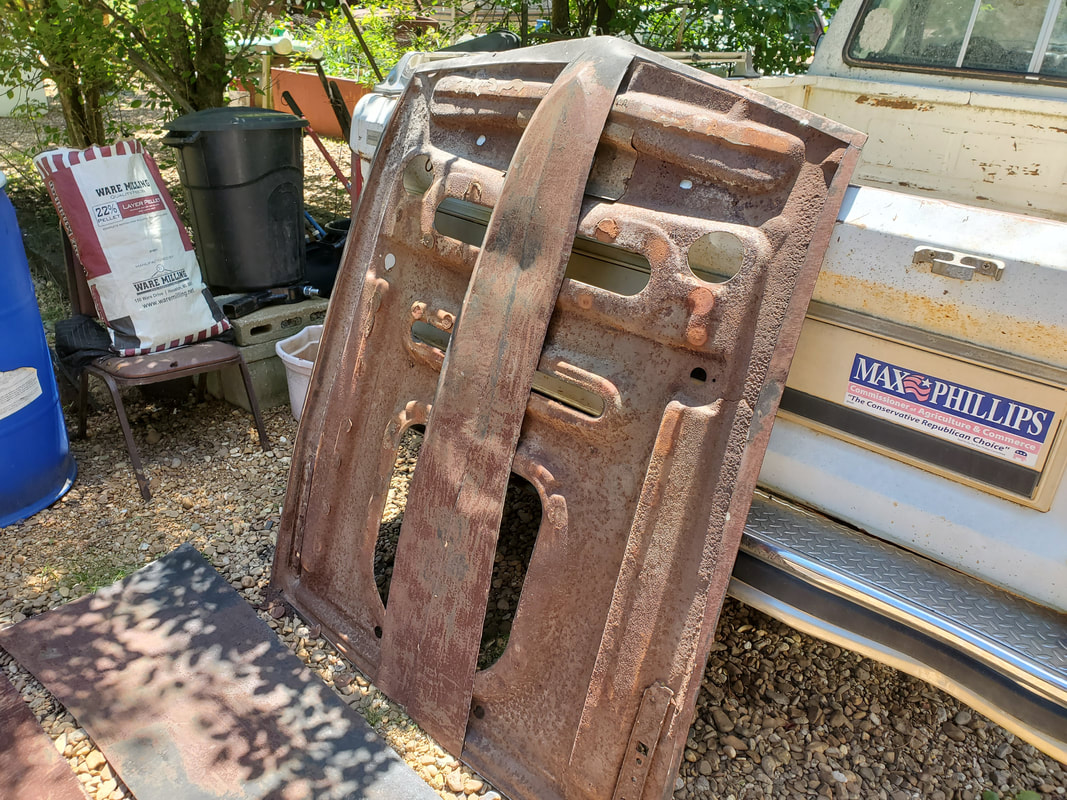 The remaining substructure of the hood after cutting the sheet metal from the outer surface of the hood. 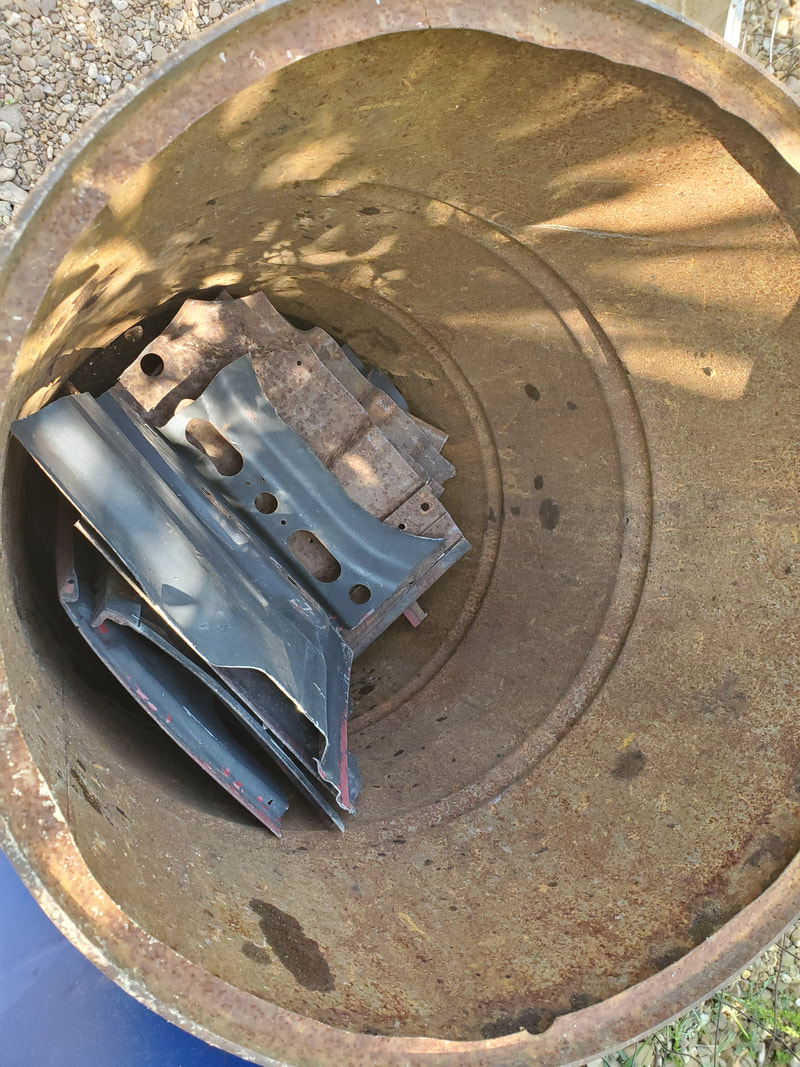 The substructure after cutting down into smaller pieces to fit in the 55 gallon scrap drum. With some more cleanup done around the homestead/compound, I can turn my attention to some other matters, like checking out some issues with our daily driver vehicles, as well as try to get things wrapped up on the DOB so I can put the truck through some more testing and try to get it moved out of the way. I will most likely have to run a parallel circuit for the headlights as troubleshooting turned up an inconclusive diagnosis as to why only the headlights themselves don't work. I also have to troubleshoot the turn signals and hopefully not have to dig into the wiring to rework those either, as that will be a pain in the ass. We'll see. |
