|
Well there is good news, and bad news. The good news is the FMT's engine runs. Bad news is it runs like shit. That was obvious for those who've been following this saga, especially on the Tubes. My conclusion was that there was some kind of issue with the valve train, due to the noise that would periodically emanate from near the top of the engine, as well as the changes in engine RPM and performance. These noises coincided with the behavior of the engine, along with the lack of real performance and inability to even hold what would pass as an idle. My final conclusion is that I'll have to pull the top of the engine apart and check out the heads to see if the valves are damaged in some way, or if there's a bent push rod or even a shitty lifter or two. Even though this is another daunting job, the sooner I get started the sooner I'll get it done and move on to the next phase, which is hopefully getting this pile running and driving. 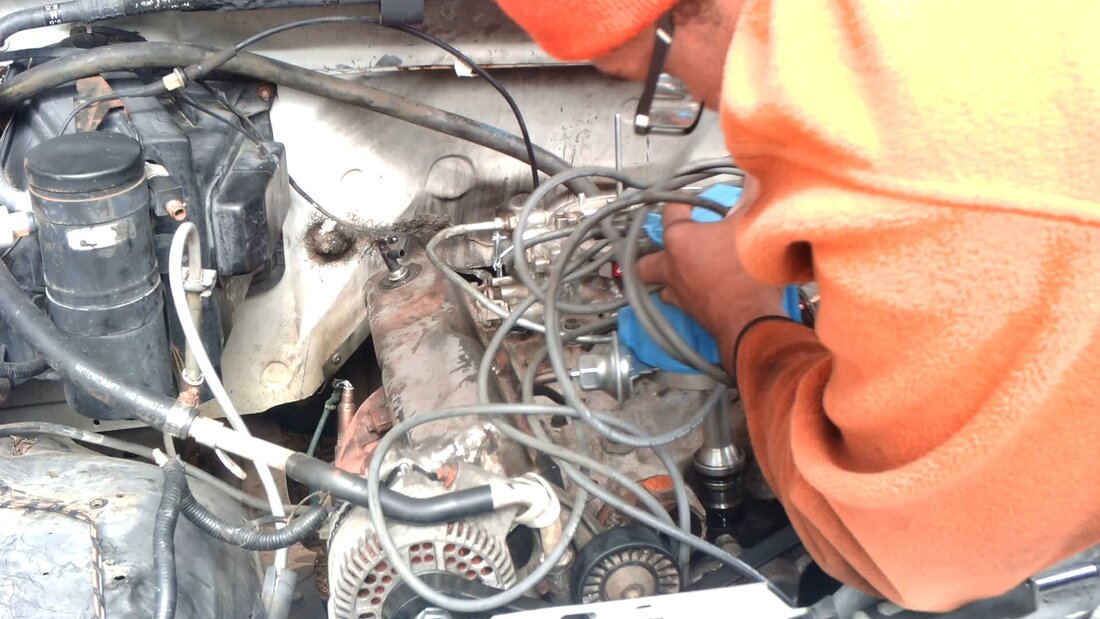 Pulling the distributor out after disconnecting the wires and removing the retaining block. Things started off with the draining of the radiator and the removal of the top hose. From here I popped off the plug wires and removed the distributor, getting it out of the way. Next was the carburetor. After disconnecting the throttle and choke cables and getting the bolts and fuel lines loose, the carb was out. 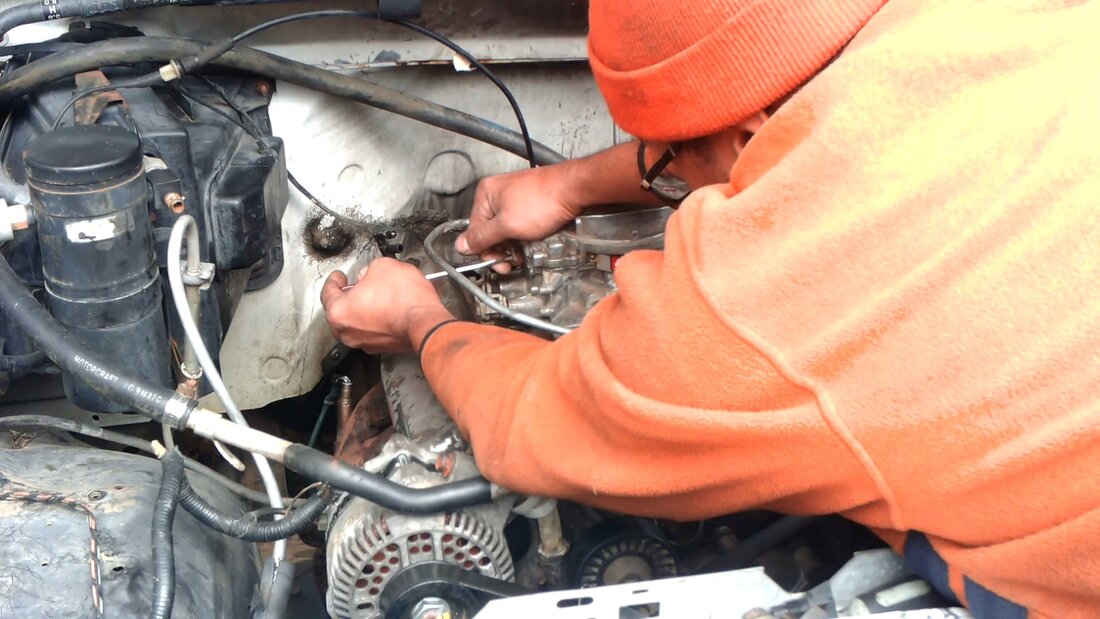 Removing the carburetor. With the carb off, I had to pull the valve covers off as well as the intake. It sucks since I took all that time gluing the gaskets to the valve covers to make them seal like they're supposed to. It's just as well, crying over some cheap cork gaskets while I'm trying to resurrect an entire V8 engine is pretty dumb. So off all this stuff came. With the valve covers off I checked the rocker arms and push rods to see if I seen anything out of place. Unfortunately I didn't, which sucked, it would've been nice to find a couple bent push rods or a rocker that was out of place that would've let me know this is where the whole project ended since that would've been the cause of the engine problem. But alas, that wasn't the case. So off came the rocker arms and out came the pushrods, then off came the intake manifold. 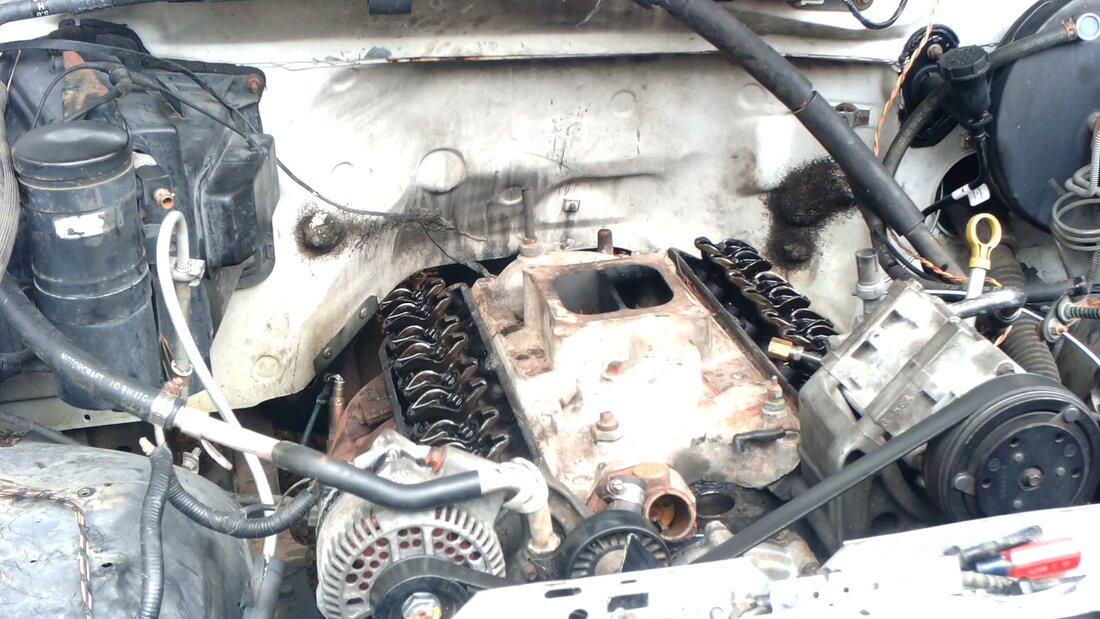 Valve covers off.... Another thing I would have to do before I can pull the heads was remove the exhaust manifolds as well. While I did remove the bolts holding the pieces to the heads, I still had to slide up under the truck to remove the flange bolts so I could pull the exhaust manifolds completely free of their resting places. With the exhaust out of the way, it was time to pull the accessory brackets. 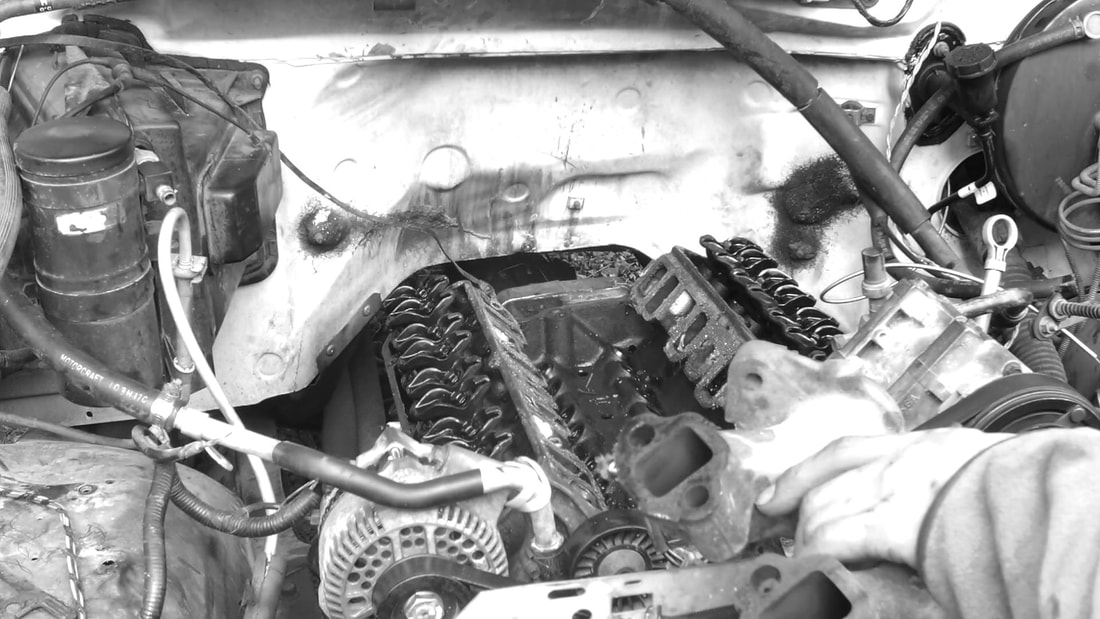 Removing the exhaust manifold after getting everything disconnected. The accessory brackets were pretty simple. After disconnecting the hoses from the power steering pump and AC compressor, and the alternator (which I forgot to disconnect until when I was actually removing the bracket), I just had a few bolts on each bracket to remove before both units were pulled free. With those out of the way, now it was time for the heads to come out. 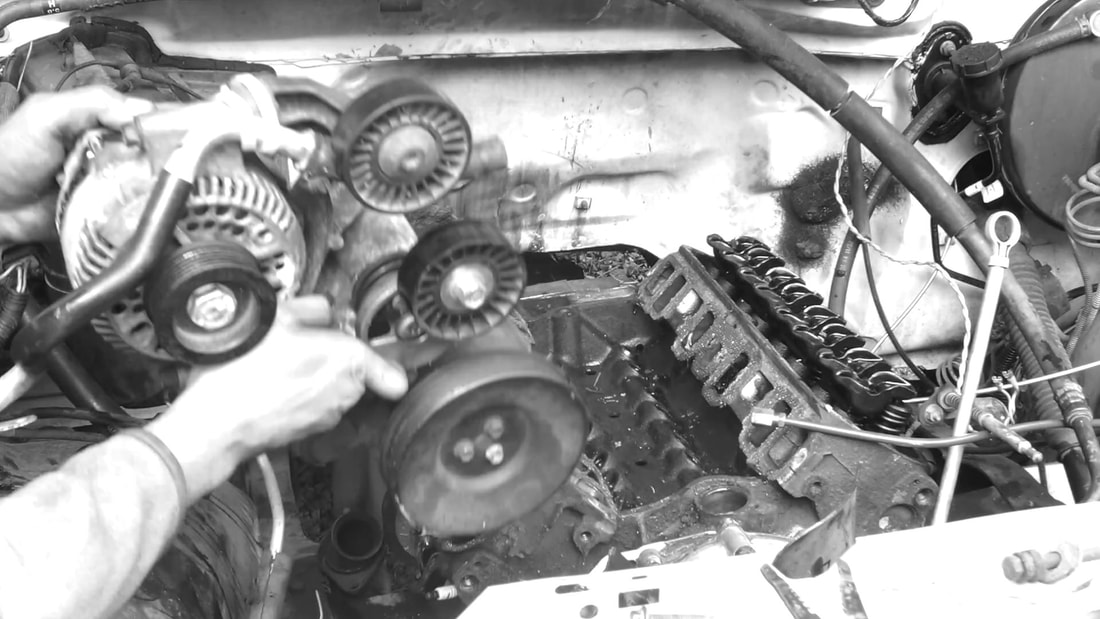 Removing the accessory bracket prior to the removal of the heads. I was able to use the impact wrench on a few bolts before I got to a spot where the thing was just in the way. At that point I had to go full manual with the breaker bar and ratchet to get these bolts out. It almost appeared like someone put fucking loc-tite on these bolts because besides the difficulty in breaking them free, there was a layer of light shit on each bolt. There was also some other particulate matter in the water jackets when I pulled the bolts free, which tells me that this thing will have to run quite a bit and have a flush done to purge the coolant system of all that trash later on. 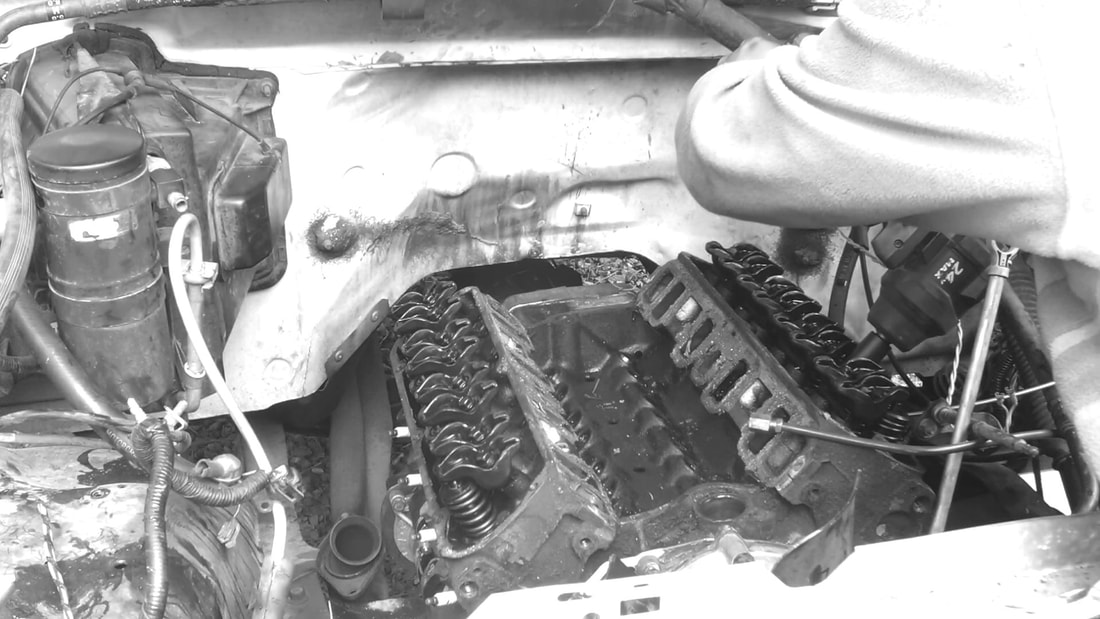 Using the impact wrench on the head bolts to speed things up some.  Pulling left head off.... 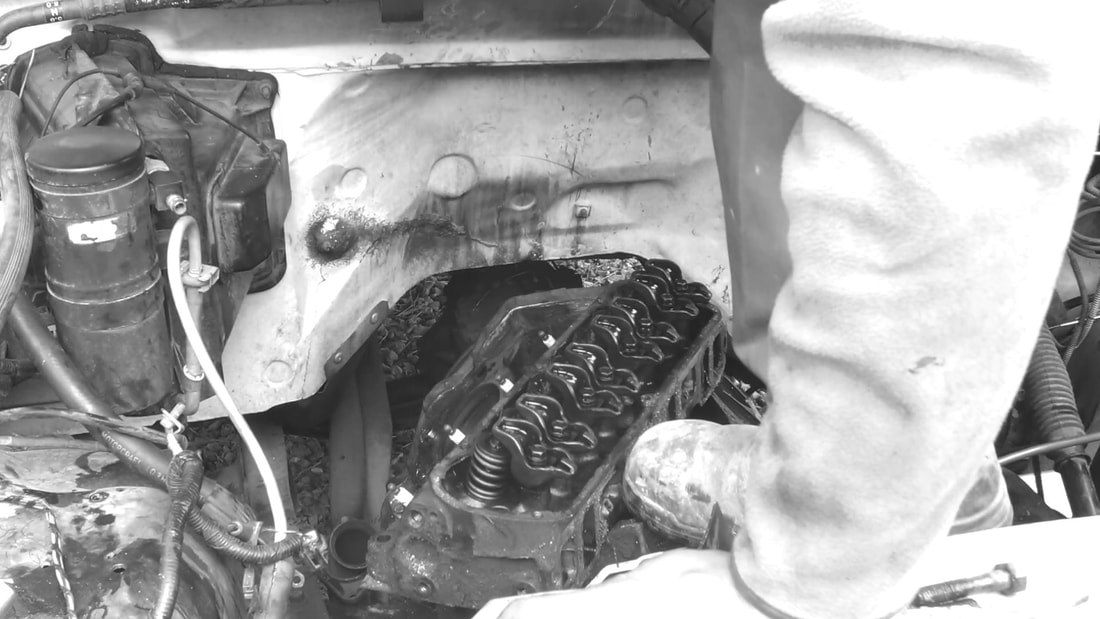 Removing the right head... 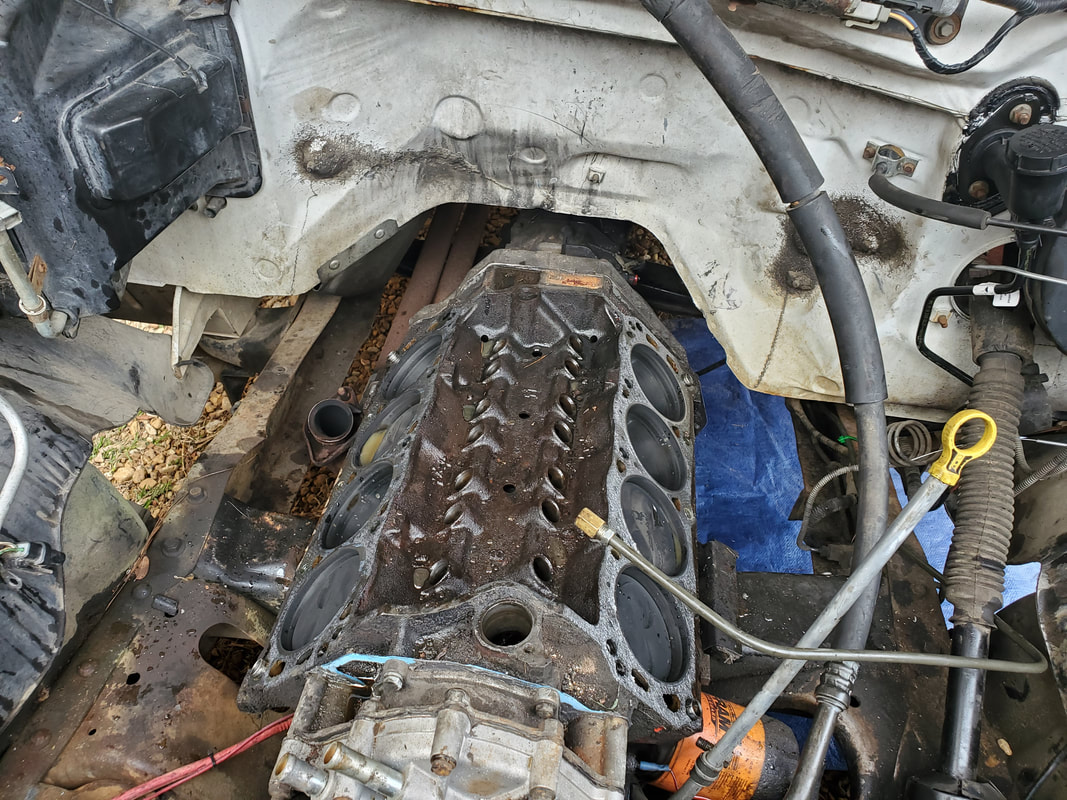 The short block after removing the heads, everything looks pretty good in there. There are no scratches on the cylinder walls or cracked/damaged pistons. Now the last thing that I had to check out was the lifters. After looking at the heads, I did not see anything out of place on either one. There was a light layer of carbon on the combustion chambers, nothing too serious and all the valves were closed as they should be, so it was fair enough to say that the heads were fine. I'll still replace them anyway with the fresh set that I have, just to play it safe. As for the lifters, as I started pulling them out there was one thing that I noticed on several pieces. That was the cores of each lifter. They did not fully spring back against the retaining clips in the lifter bodies. This would tell me that there's a high probability that the lifter cores are collapsing on occasion, or not fully moving back and forth during normal operation, resulting in the incomplete opening of each valve.  The batch of bad lifters, if you look closely you can see how the core of the lifter is not against the retaining clip on these pieces. I can almost remove the retaining clip on these lifters. 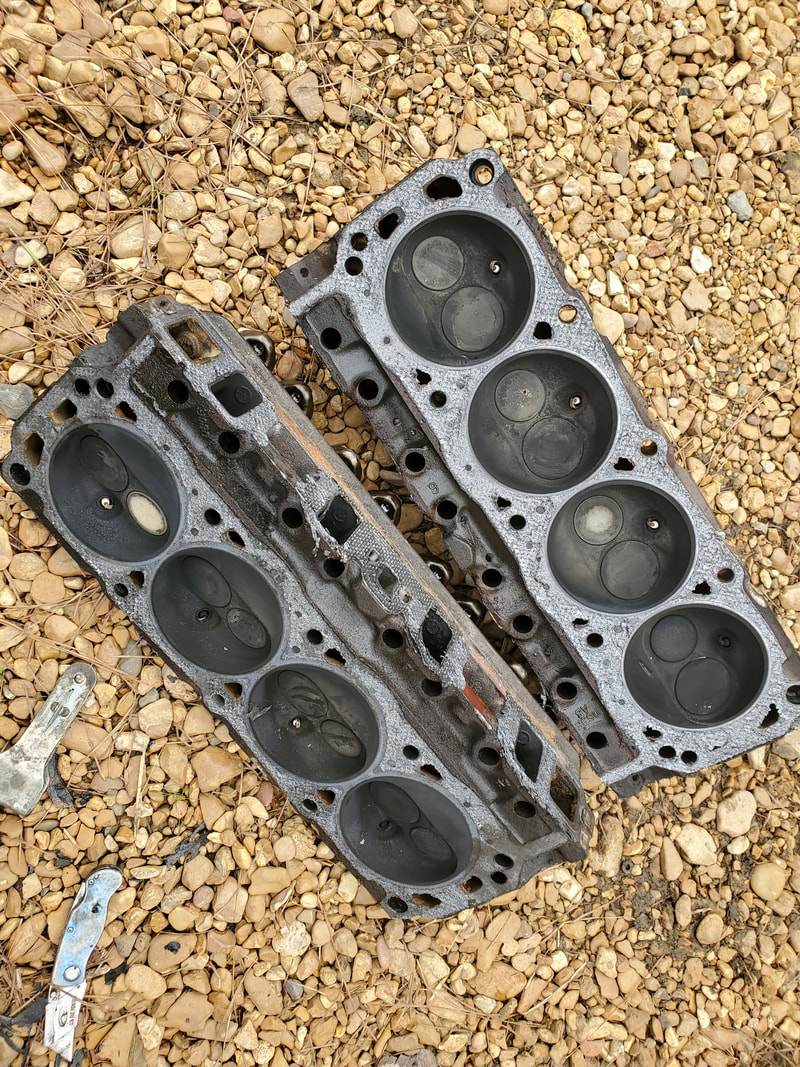 Cylinder heads after removal, showing how the combustion chambers aren't really that bad off as far as carbon deposits are concerned. So now along with a set of head gaskets, intake and valve cover gaskets, add a set of lifters to the mix. At least I don't need push rods. But that's fine, it just tells me that more parts in this engine will be fresh. In the meantime, I went ahead and cleaned the block of the old head gasket material as well as the old gaskets from the valve covers. I just wanted to get everything that I can prepped up so when I do get the parts all I have to do is just throw everything together just as fast as I pulled everything apart. Hopefully with all this shit that I had to and still have to do, this damned engine will be up and running A-1.
0 Comments
With the DOB parked in a new and more convenient spot, the next order of business is cleaning the thing out. The bed especially, is just nasty with all the trash that managed to accumulate within while the truck was parked. The interior had some trash that was never removed. I need to get rid of the trash from in and out so I can pu tthe things such as the fuel tank, within the bed, and get the cab cleaned out better so it doesn't smell like the basement of a 100 year old house. I will still need to clean the body real good, especially the windows, so one, the truck will look better and two, I can see all around when I do put the truck on the road. Another area I had to target is the engine bay. Accumulated rat shit and little nuts from the neighborhood trees, deposited from whatever rats and varmints who probably took up residence in the engine bay also needs to be cleaned out. Like I said, this is a revival, maybe not a full blown restoration, but this is about bringing this truck back up to a level of former glory that would at least make it more of a pleasure to drive. 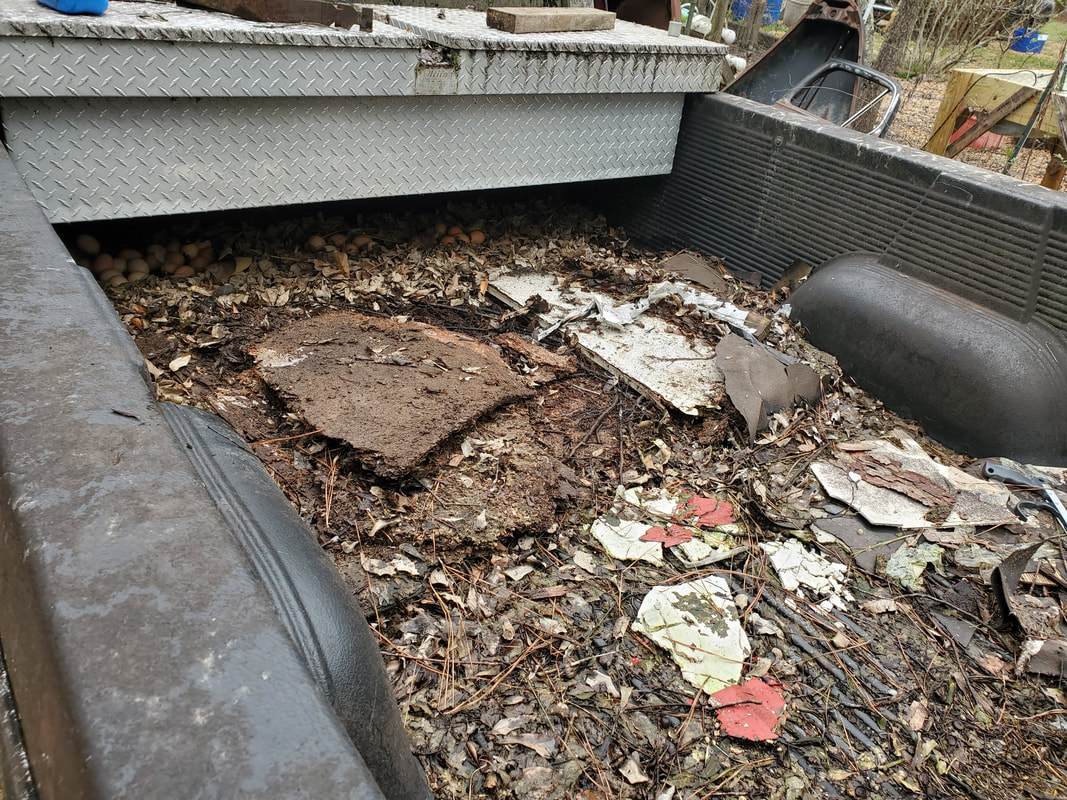 The bed of the truck, full of trash that will be cleared out. 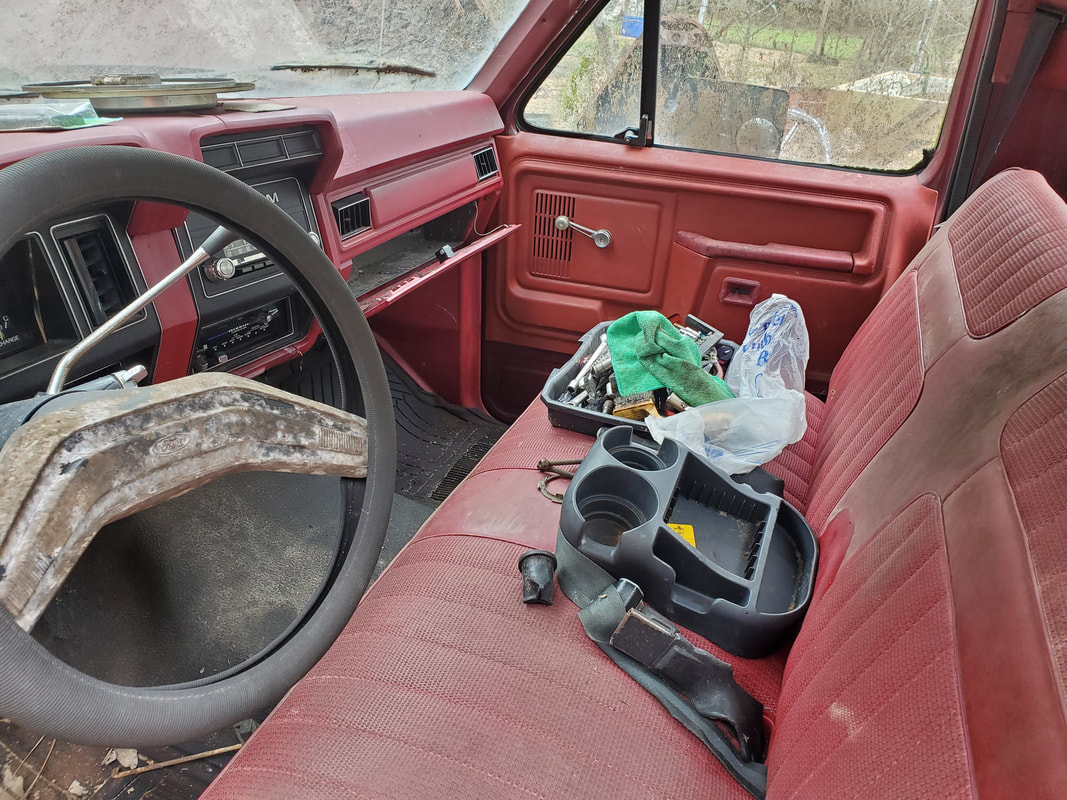 The cab, with generic cup holder that has some trash in it, along with some other miscellaneous trash all about the cab. 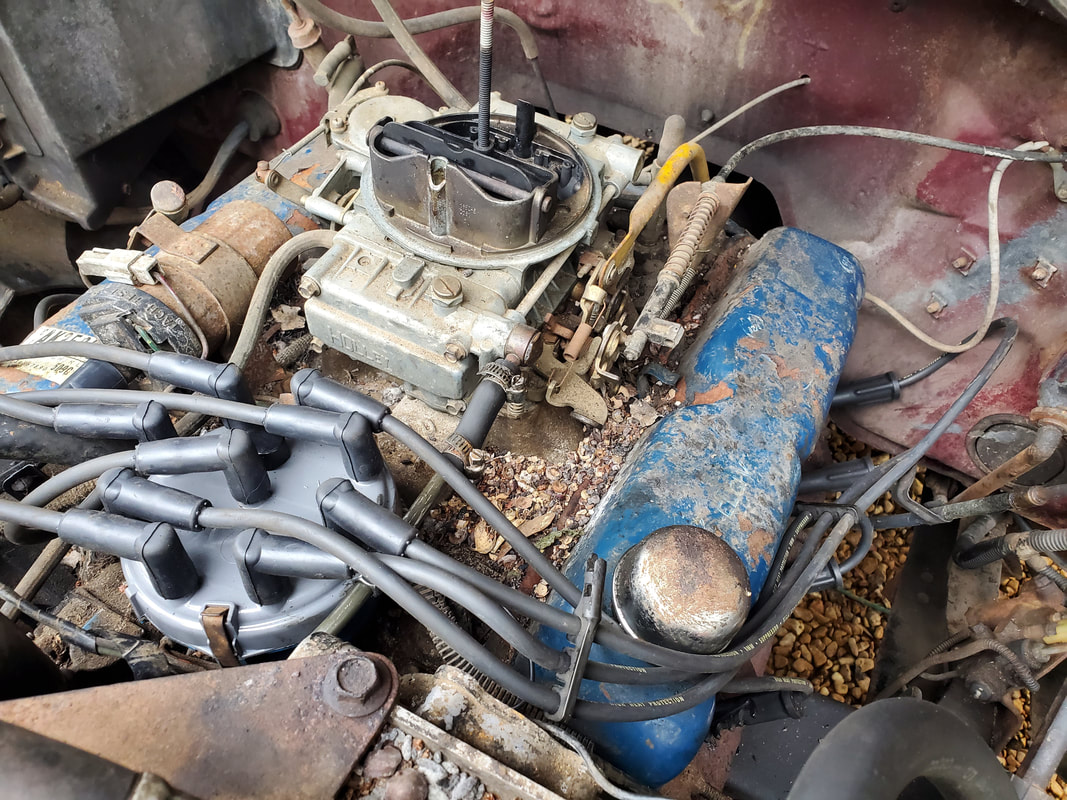 Engine bay around carburetor, showing the built up rat shit and other trash that collected over the years. 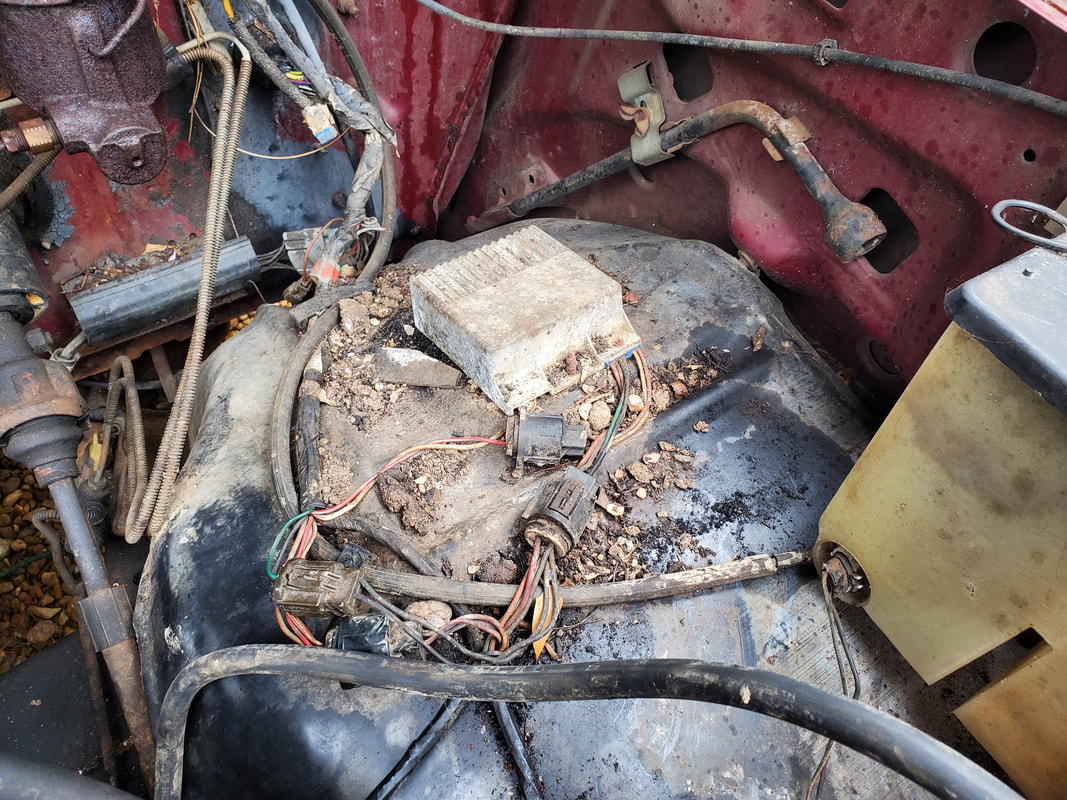 More rat shit around the ignition module. Luckily no wires were damaged. It took a good while to get the bed cleared. First I had to remove some of the larger trash from the pile. Stuff that was burnable went onto the burn pile. Other large stuff that couldn't be burned was staged by the outgoing trash can to be tossed on the next trash day. The rest, the humus and other brittle stuff, was hosed out then at the same time was raked out while being hosed out. Eventually we managed to get the bed fully cleared enough so that we can at least be able to use the bed without laying items in trash. As for the cab, after clearing the cup holder I also cleared the glove box of some stuff that I don't know if our friend may still want or not. Other small items were tossed as well. Other than the general dirt on the floor, the cab was cleared out. I put the vacuum to the engine bay as well, clearing all the rat shit and nut shells and other small detritus from around the ignition module and carb and other engine bay components so now everything looks nice and clean. I may spray some anti-rodent spray around the engine bay to deter future varmints from taking up residence.  The bed, nice and clean after the work put in. The bed liner still looks in good shape too. 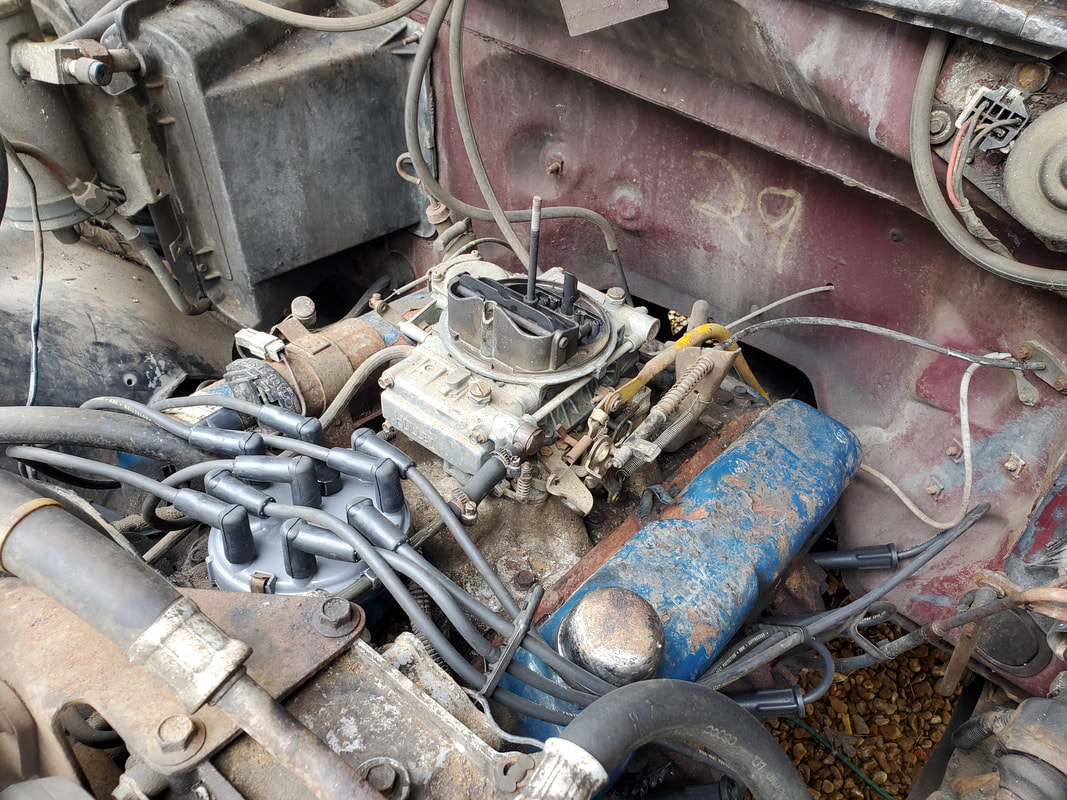 The engine bay around the intake and carb, cleaned out from all the trash that sat there for some time.  Area around the vacuum canister also vacuumed clean from accumulated trash. 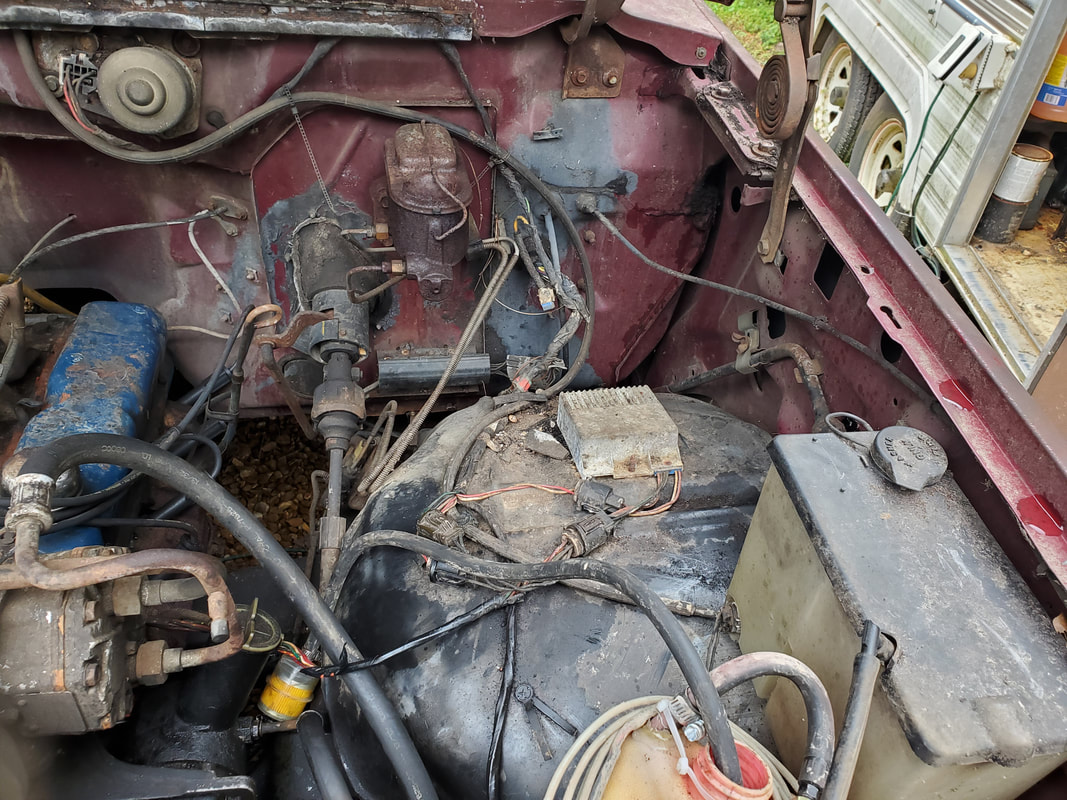 Area around ignition module cleaned up as well. With the truck cleaned out good, the next move, at least while I'm waiting to get the next batch of parts, will be cleaning the windows and the body. I may even feel compelled to take the buffer and some rubbing compound and try to put a shine on the paint and see if there's any chance of cleaning up the paint finish to make the truck look even better. I will try to continue to periodically run the truck, one gallon at a time with the Portable Fuel System, to try and get the engine broken in again, if possible, to see if it would slow down the smoking condition that is present on the engine. I hate to think that more extensive work will need to be done in the engine up to and including pulling the head and sending them out to be reworked. We'll see.
With everything else taken care of on the DOB, I'm now ready to start the truck up. Since the truck's fuel tank is on the ground, I had to rig up a temporary fuel system. I used the Portable Fuel System with a rubber hose inserted in the filler port and connected to the input line on the fuel filter. The electric pump on the device wasn't needed since the engine has a mechanical fuel pump on it. I got a battery hooked up and topped off the fuel can in an attempt to start up. After some cranks and verification that the pump was drawing fuel into the filter, I ended up putting a good shot of starting fluid in the carb to get the engine started.

Portable fuel system rigged up to serve as a temporary fuel tank to feed the fuel pump and run the engine.
Once the engine was running, I let the thing warm up then started making tweaks to the air/fuel screws and the idle screw to try and get to a point where the engine would idle pretty good and take the throttle even when in gear. I was able to put the transmission in gear and attempt to accelerate, just a little, just to verify that the carb was in tune enough that I didn't have to keep playing with it. Now, as to the slight acceleration, with the truck sitting in a mire, I already figured that any movement would just accelerate the inevitable. Even with that, I tried to drive forward only to dig the right rear tire deeper into the mud. At least I was able to accelerate without hesitation after the tuning, even while doing a mud burnout. What this also meant was the fact that it was time for the tractor once again. 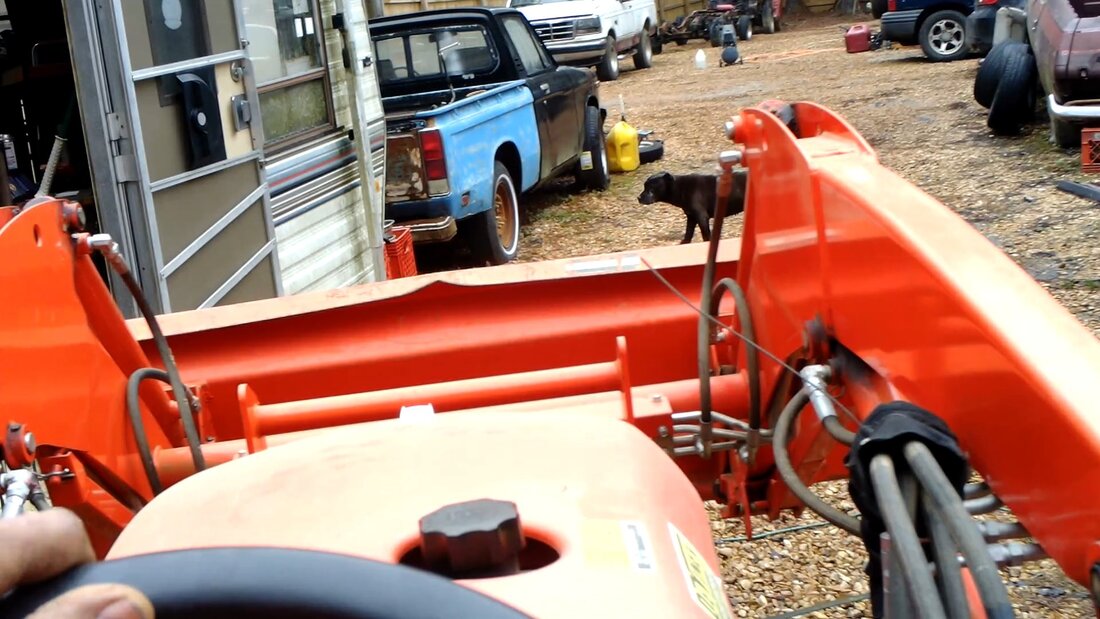
We had to pull out the trusty tractor from our neighbor again to rescue the stranded DOB.
Truck hitched with a tow chain under the bumper and being dragged off its bear trap of a muddy spot and onto solid graveled ground.
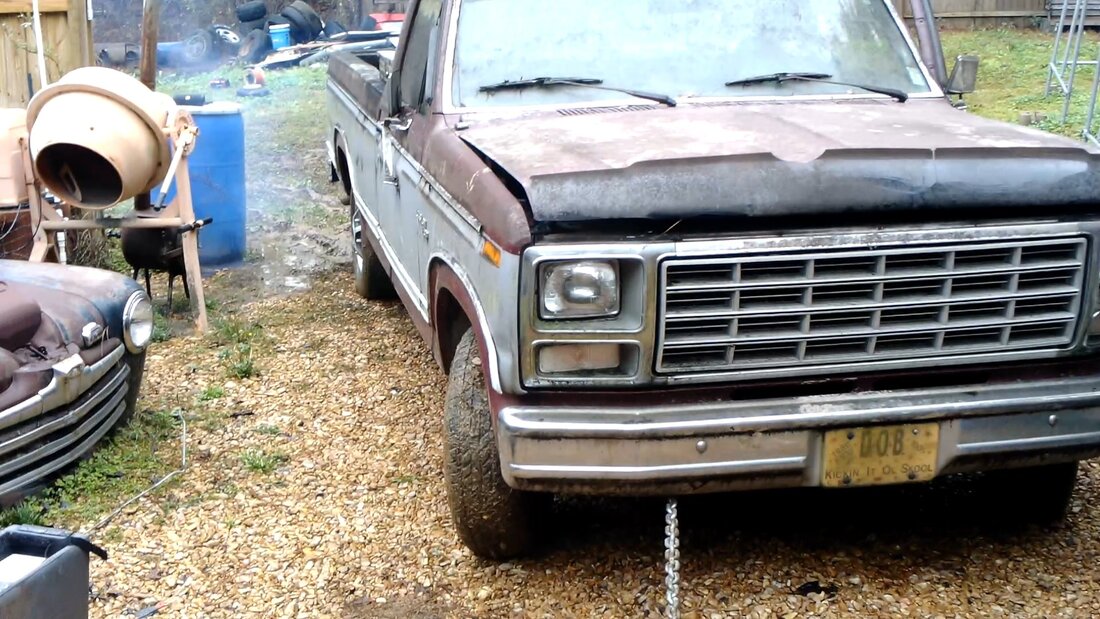
With the truck on solid graveled ground, I can now more comfortably work on the thing without having to worry about sinking in the slop, even with the use of a tarp. I still have to reinstall the fuel tank after I get a replacement sending unit. We still have to clean out the bed of the truck of all the trash that accumulated from the years of sitting parked. I moved the truck on the gravel enough that the tailgate is just outside of the line of gravel so when we rake and hose out the trash, it'll all be deposited on the grass, only to be covered up later on when I lay gravel down over this area. 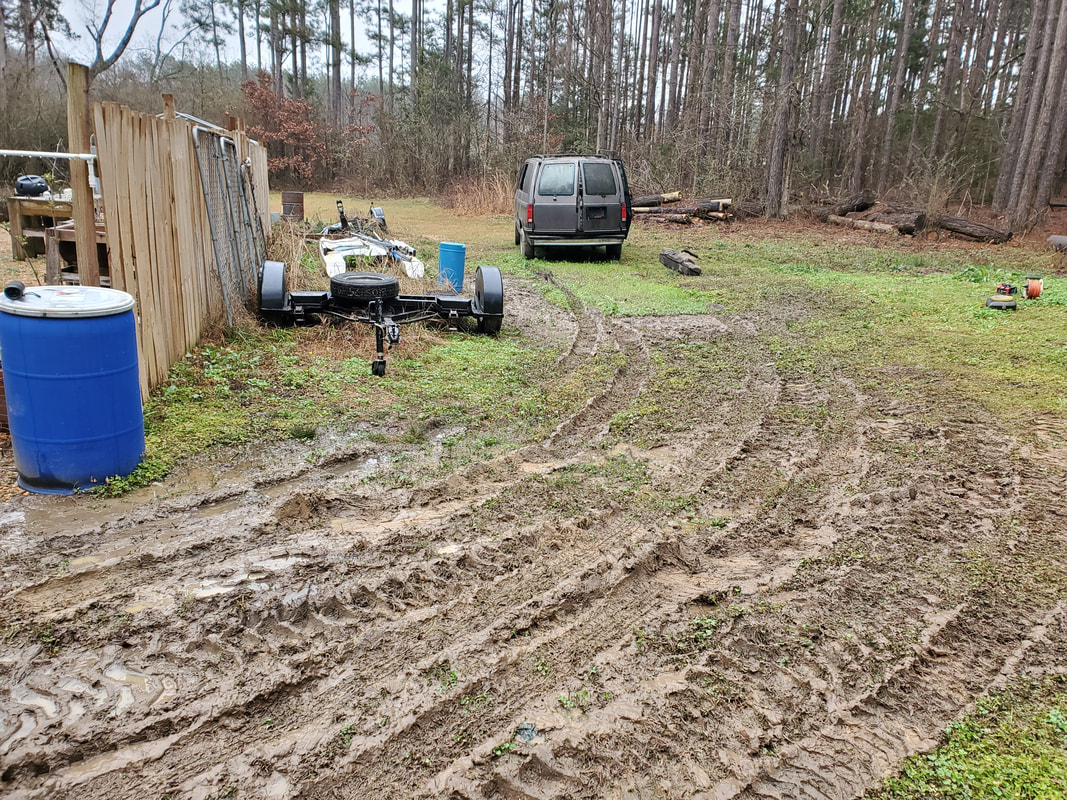
The muddy area that was cleared after moving the truck with the tractor. This area is a hot mess and in serious need of gravel, lots of it.
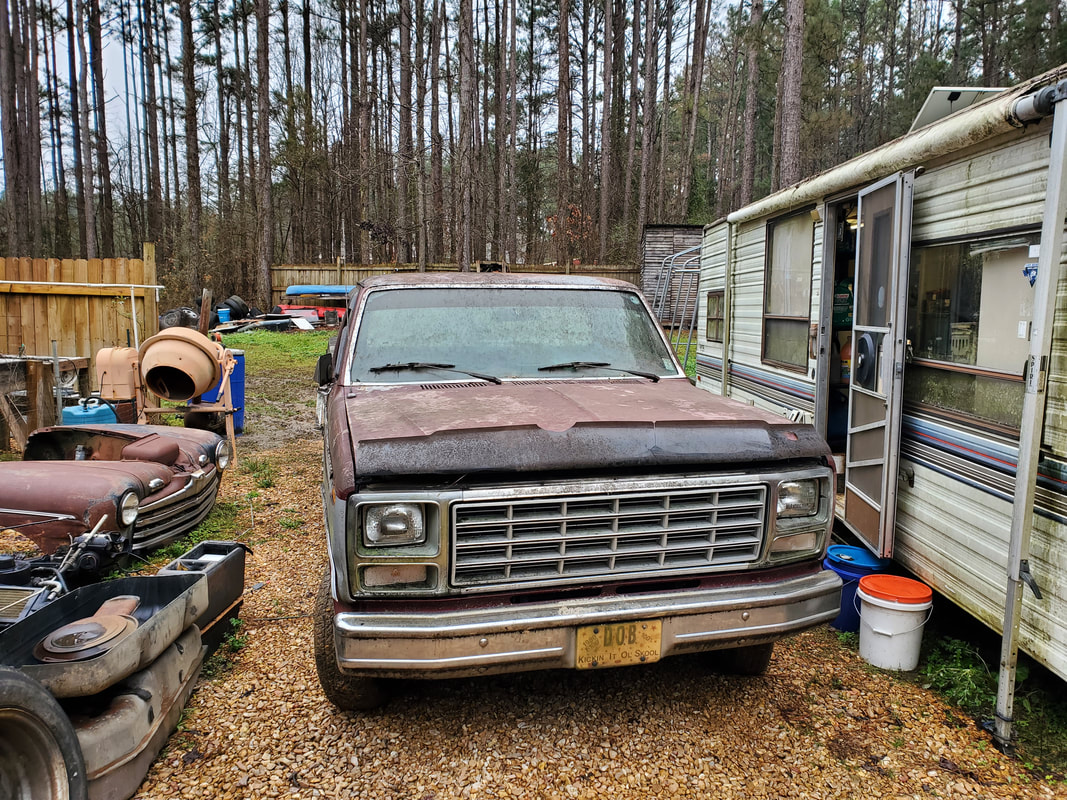
The DOB parked in its new spot on the gravel next to the Storage Trailer.
After grabbing a couple belts to replace the missing belts on the DOB, I was ready to get back to work, even with a limited bit of time. There was a reason for the limit in time. This has to do with the Scion. After getting a set of tires installed on the car, we come to find out that the tires used were slightly larger than the tires that we had on the car before. The tires that were in stock at the tire place were these slightly larger pieces, and couple that with a bad set of rear struts, whenever the car hits a bump and bounces, the quarter panel edge scraps the top of the right rear tire. Now, this problem only occurs on the right side. This side already had some minor metal crinkling from a long distant accident this car went through some time before we got it. I was able to beat the metal out enough to sorta kinda straighten it out to at least make it look a little decent and keep the metal from hitting the tire, even then. Fast forward to now, and another minor fender bender pushed the metal in some more, making it definitely be in the path of the tire when the car bounces. It was time to pull the hammers out again to try and straighten things out. 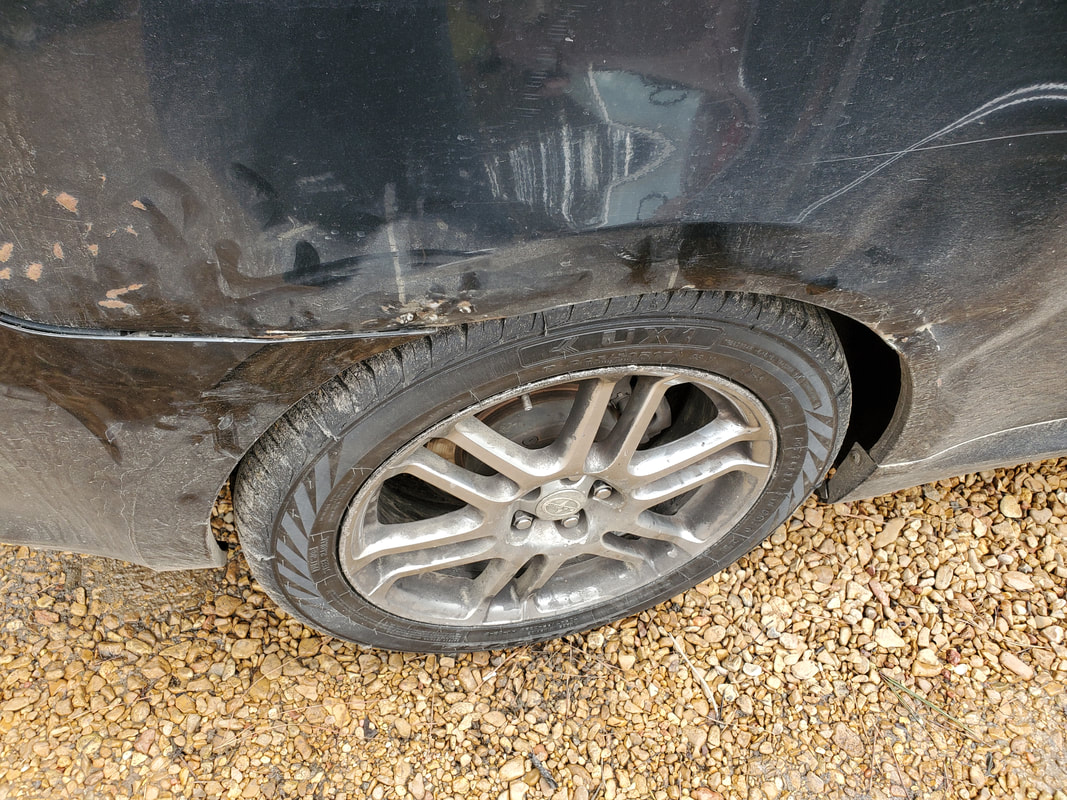 Rear tire in place after beating quarter panel metal out some to move the lip out from the tire. 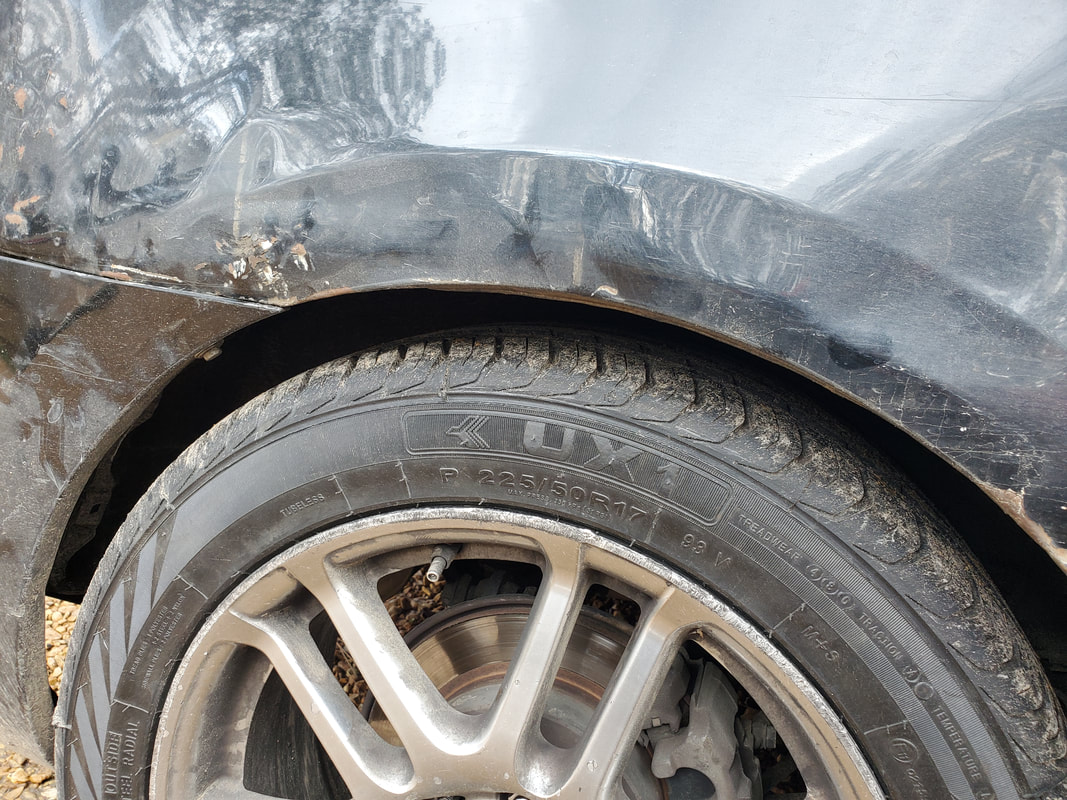 Closeup of the quarter panel metal showing the past damage. With the Scion's minor issue resolved, at least until we get the replacement set of rear struts in the mail, I moved on back to the DOB to install the remaining belts. The first belt I had to put on was the belt for the alternator. This belt had to go on first, then the AC compressor belt behind it. Since the alternator was already loosened up, all I had to do was slide the new belt on over the pulleys and tension the alternator, using a jack handle. With the belt tensioned, I moved on to the AC compressor belt. And as always, things don't go 100% right. The belt that we got for the compressor was the wrong one. This was my mistake for listening to the dude at the auto parts store when he was trying to measure up the old belt to the new belts to verify which belt would fit. I looked at the computer at the belt that was specified as for the AC compressor and didn't just tell the dude to give me that belt regardless, giving him the benefit of a doubt that his eyes were accurate. My bad. Now we have to return a belt yet again and get the right one that indicated itself as being for the AC compressor. At least this belt isn't really needed for the engine to run since the alternator and water pump are covered as far as the other belts are concerned. 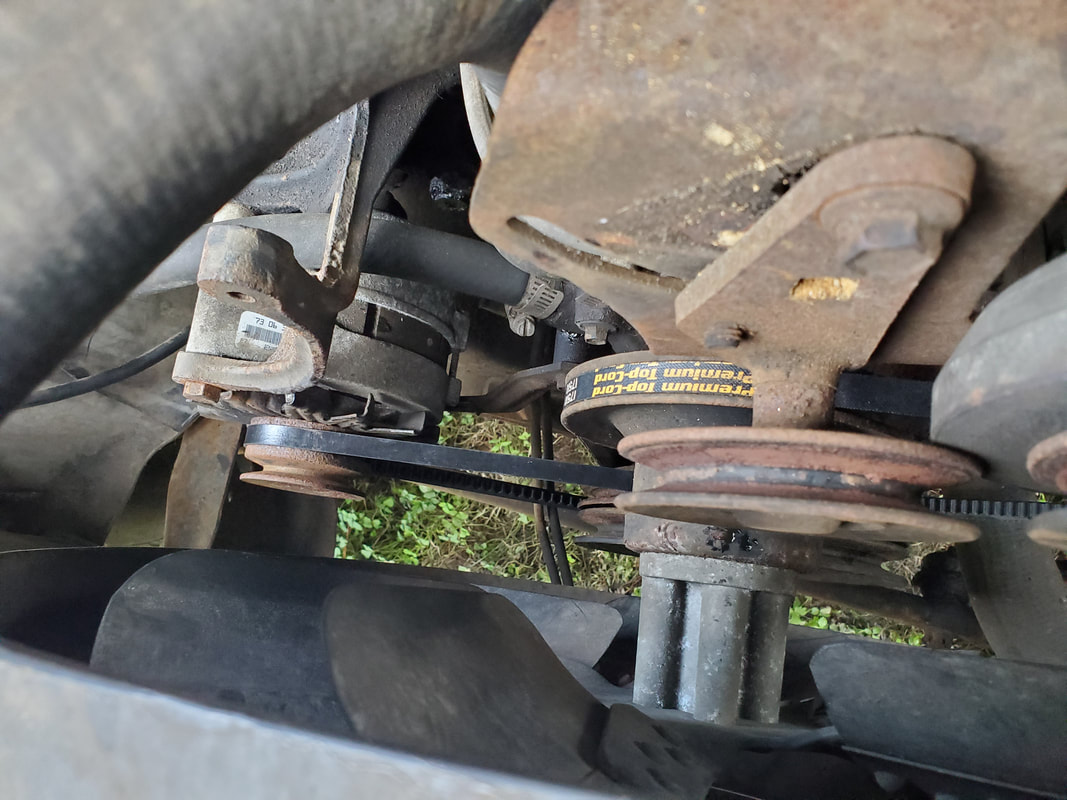 Belt installed over pulleys for alternator. Water pump is also covered so I can start the engine up without fear of engine damage. I slid back under the truck again in order to remove the fuel tank all the way. In order to do this, I had to remove the filler tube hose from the filler tube port where the gas cap goes. This just involved removing a couple worm clamps. After removing these, I was able to work the tank all the way down to the ground, working the filler hose around the frame and disconnecting the vent hose from the top of the tank. The two retention straps also popped free from the frame as well. Conveniently this allowed me to pull everything from under the truck for full removal. The retention straps went in the bed of the truck, while the tank remains outside on the ground. There's still what appears to be a couple gallons of fuel still in the tank that I need to remove. I could probably leave that fuel in there as this small amount wouldn't really hurt anything but removing the fuel would make the reinstallation of the tank easier if this extra weight is gone. Once the fuel is removed, I'll put the tank in the bed just as well for safe keeping until I can get the replacement sending unit. Now I can get the temporary fuel system set up so we can get this thing started. I want to move the truck from its current spot to the open area next to the storage trailer since there's gravel over this area. The area the truck is sitting on now is bare grass and sloppy mud, which is hardly a comfortable environment for trying to install a fuel tank or anything under the truck. By moving onto the gravel, it will make my life 100% easier when I go to reinstall the fuel tank. It will also put the truck closer to the garden hose where it will reach, allowing me to be able to spray clean the bed. There's a layer of trash in the bed that needs to come out, if for no other reason than the fact that it's disgusting. 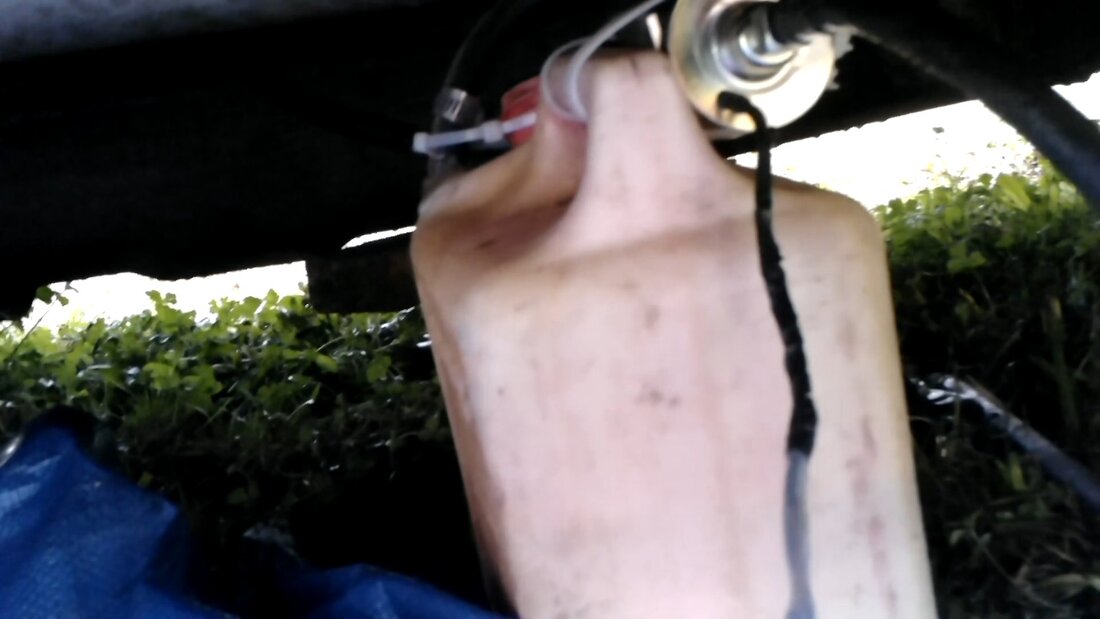 Using the Portable Fuel System's pump by itself to draw old fuel from the tank with an added hose. Output is emptying into a fuel can. 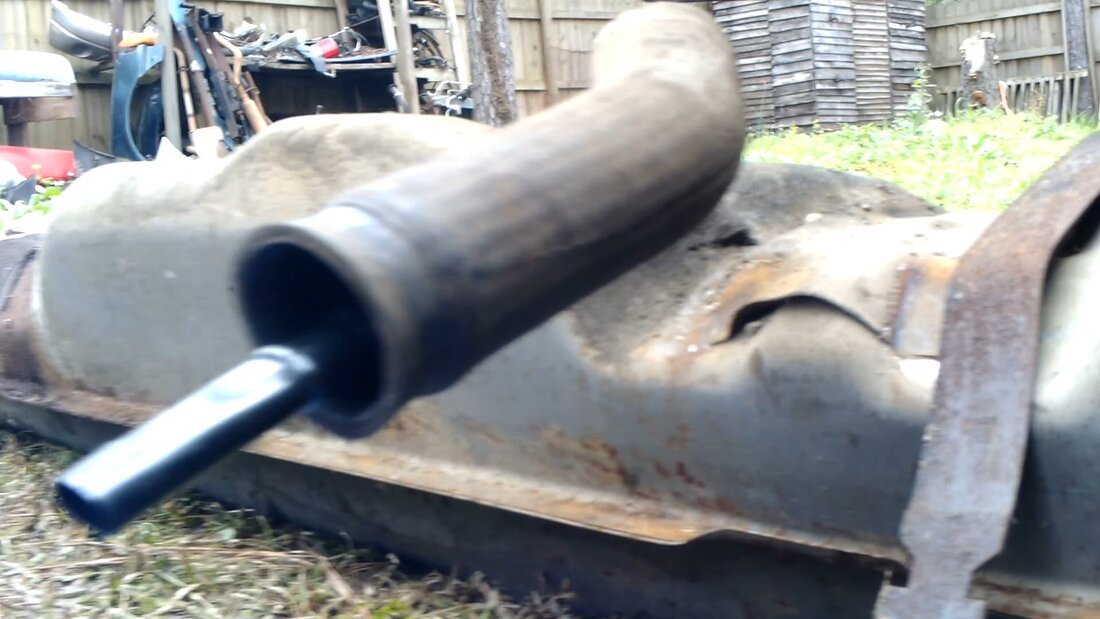 Fuel tank just after removing from under the truck. The next installment - getting a temporary fuel system set up to run the engine. I'll probably end up using the Portable Fuel System yet again since it's the most convenient device to use. I'll just use a piece of hose inserted in the filler port of the can and connect it to the input port on the fuel filter so the mechanical fuel pump can draw from the can. Things are coming along well. With the tune up side taken care of on the DOB, I moved on deeper, with the changing of the belts as well as work on the fuel system. I had to replace the fuel pump, which I had already pulled during the last session but because I destroyed the metal tube coming from the old pump, I had to put off finishing the pump installation until I could get a replacement metal tube to make that repair. In order to help that along, I used the propane torch to heat the metal tube to make it easier to bend, along with bending it along the curved surface of the 46 Ford's front fender clip. At first I thought I would have to route the metal tube around the outside of the accessories and up to the carburetor. After getting some bends in, I found that I was able to route the tube through the accessory bracket and up to the carburetor the same way as the old metal tube was routed.  Replacement fuel pump ready for installation. After getting the metal line in place after doing the bends, I installed the replacement plastic fuel filter at the junction where the frame mounted fuel line was, along with fresh rubber hose to replace those hoses that were on the lines. With the fuel lines all taken care of, I moved on to install the belts. Unfortunately, the only belt I had that was correct was the power steering pump belt. After reinstalling the power steering pump, I installed that belt and tensioned everything. The other belt I had was too short for use on the alternator, and I didn't have the belt for the AC compressor, not like it would be needed immediately to get the engine running. That's one of the perks of the V-belt system. AC compressors, alternators, even power steering pumps can be omitted from the system, as long as the water pump still has function. With the PS pump belt on, I moved on to dropping the fuel tank since it was full of old fuel. 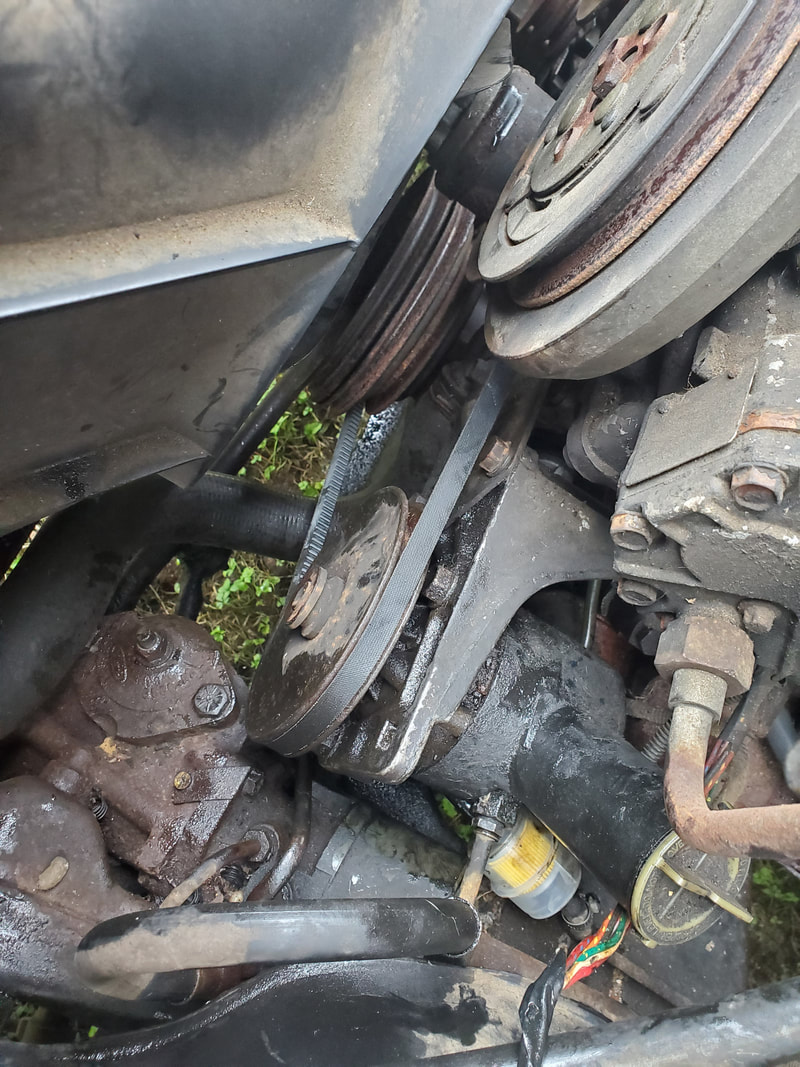 Power steering pump belt and fuel filter installed.  Olive green metal fuel line routed past distributor cap to carburetor. Note short piece of fuel line connecting metal line to carburetor. At first I wanted to try and see if I could just pump the fuel from the tank without having to drop the tank. I connected the pump motor from our Portable Fuel System can to the fuel line and tried to draw the fuel out. No luck. I then removed the rubber line from the frame section of fuel line and hooked it up to the electric pump to try and draw it out directly from the fuel tank. Again, no luck. From the way it appeared, the sending unit was clogged. I ended up having to drop the tank anyway. But in my quest to be lazy I only dropped the tank part way, enough to get to the sending unit. After popping the lock ring and removing the sending unit, I got my confirmation that the piece was clogged. I pulled it out and inserted a rubber line, hooking it up to the pump to pump out most of the old fuel.  Old sending unit removed from fuel tank. This unit is clearly shot, no good for anything. 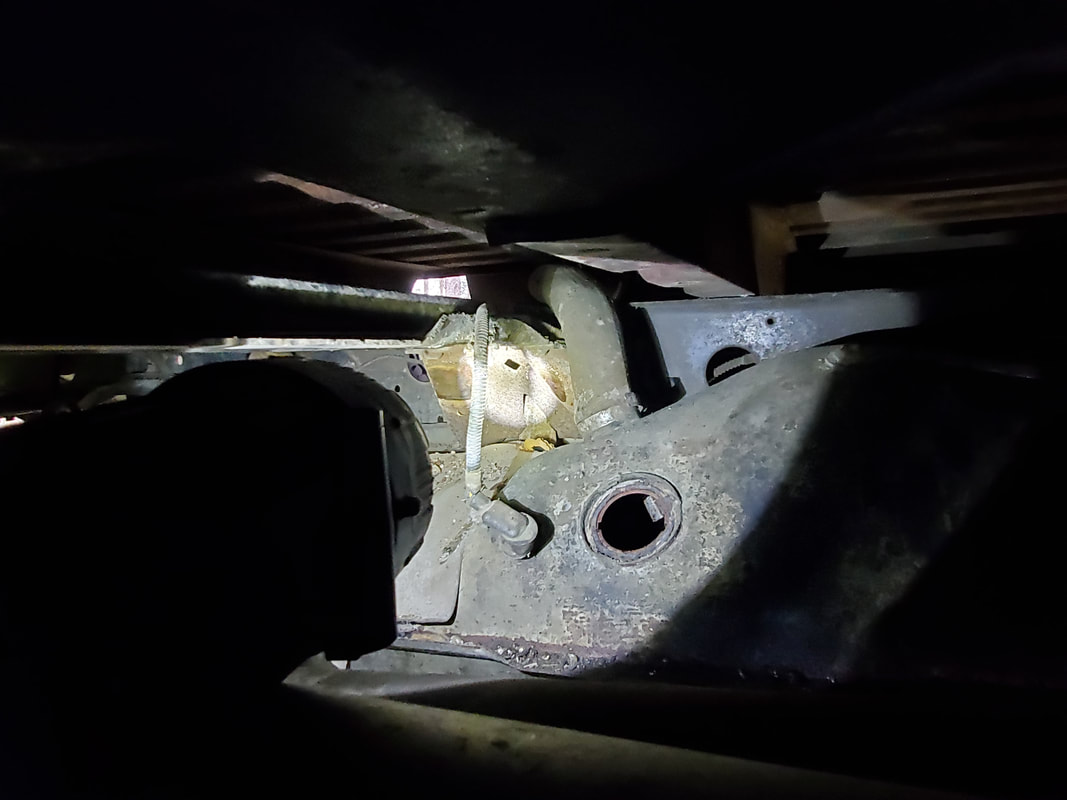 Fuel tank part way down, exposing the top to allow for the removal of the sending unit, shown by the open hole. At this point my time had come short, not to mention I wanted to be able to hit the auto parts store to get the right belts to finish up the engine in order to prepare it for starting. I do plan on fully removing the fuel tank in the next session because until I get a replacement sending unit, the fuel tank is useless. What it also means is I won't be able to attach the fuel line to the fuel tank in a normal manner. I'll have to rig up a temporary fuel system in the engine bay, most likely consisting of a fuel can with a length of rubber hose that would go from the fuel can to the input line on the fuel pump. Even though I removed the power steering pump to access the fuel pump, I did notice that I could slide under the truck to access the fuel pump so I would be able to do the same to install a fuel line that would go to the can. Of course, I could just disconnect the rubber hose from the frame mounted section of fuel rail and just use a short piece of metal hose like a coupling to couple the two sections of fuel line. I could just connect to the input side of the fuel filter as well. Whatever I decide to do, it will involve an external fuel can until I can get the sending unit replaced and the fuel tank reinstalled under the truck. With the resurrection of the F250, I was able to make my weekly gravel run, getting a pretty decent haul of gravel this time. Depending on who runs the front end loader I can get a normal load or sometimes get a super load. Anyway, we were able to get the remaining patch in the firewood staging area covered up with a couple wheelbarrow loads, putting an end to yet another section of yard within the compound fence. 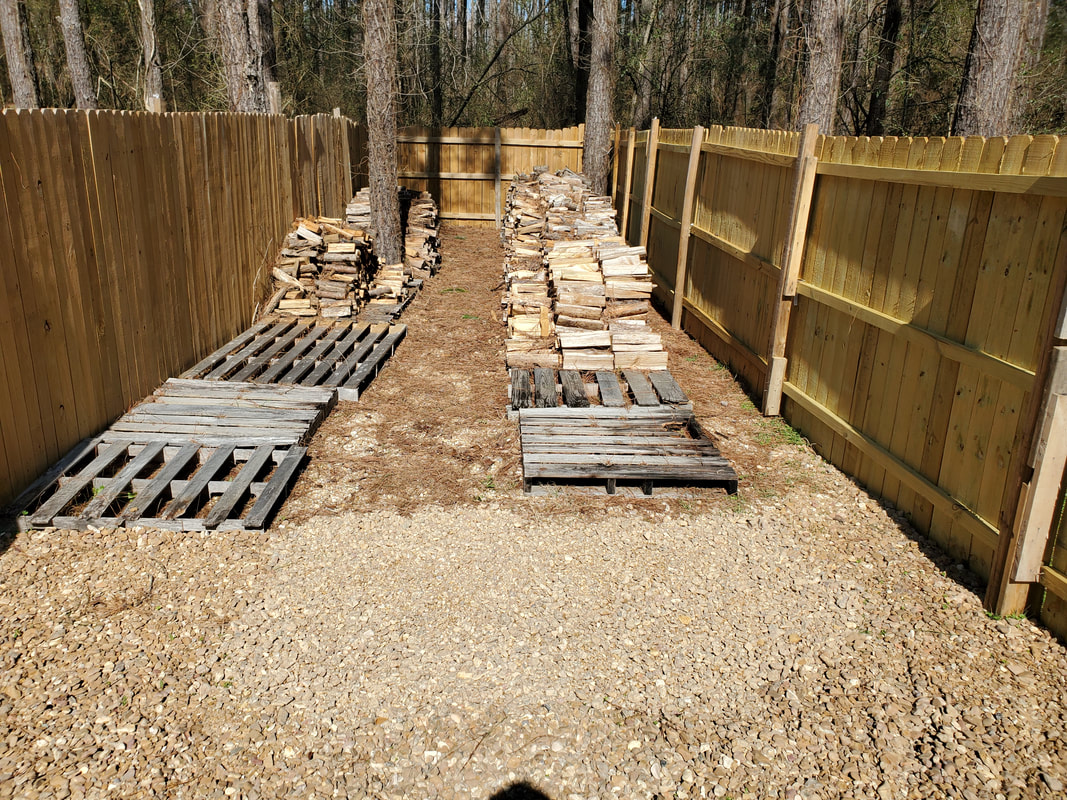 Firewood staging area fully covered with gravel, closing another chapter in the book of graveling up the yard. Now, the next area or targeted gravel strikes is going to be the area where the FMT was parked at, right on the other side of the western chicken yard fence. The main reason behind this decision is because this is going to be the area where the Minivan Doghouse will be stationed. Rather than have the vehicle sitting on mud and pine straw, I'd rather set it on gravel, that way water drainage will be good and the lesser moisture under the van will slow down any potential rusting as well as smells from decaying materials under the van. Now this first load of gravel had to be spread out using the wheelbarrow since the FMT was still sitting in its spot, as it had been for quite some time. I managed to get the areas around the truck covered with gravel, along with getting a good start to the area behind the truck and along the chicken yard fence.  Area between the FMT and chicken yard fence that was kind of muddy, now covered with gravel, making this area be another new area to be more pleasant to travel over. 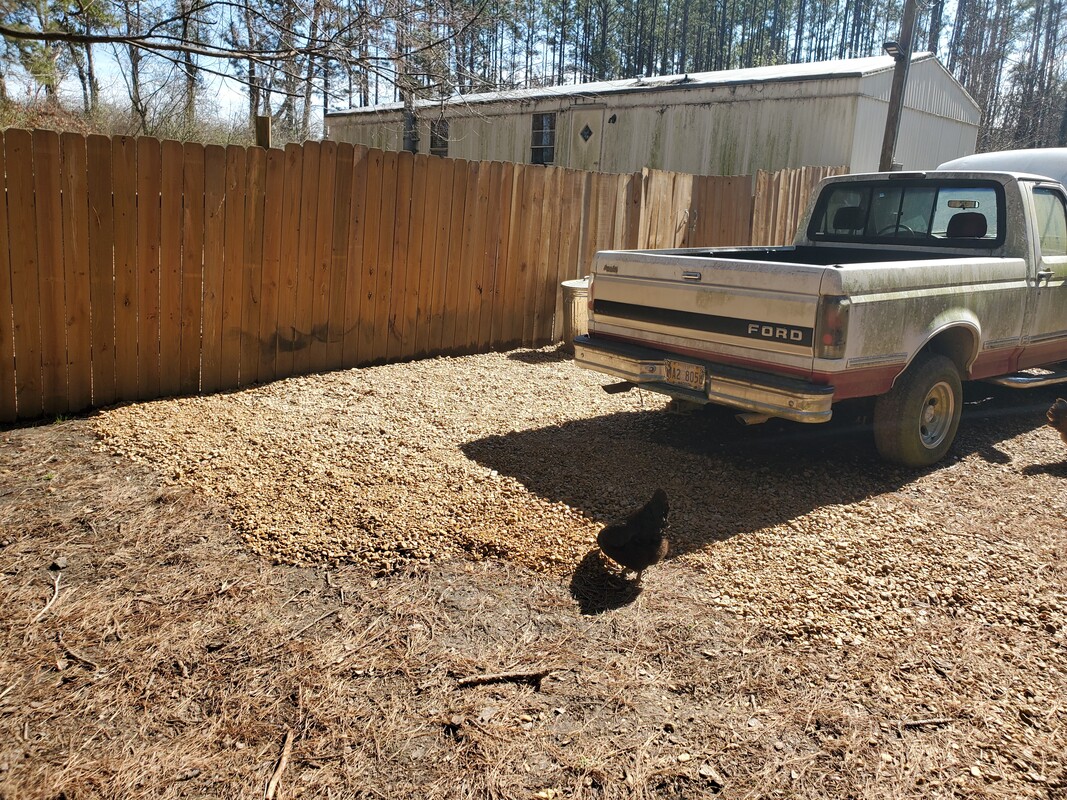 Now speaking of the FMT, the next order of business will be getting a few things taken care of on the truck before attempting to start up again and even attempting a test drive. The first thing I had to do was address the valve covers since they were leaking some. Since all I had on hand were some cheapo cork gaskets, I would have to glue them to the lip of each valve cover with gasket maker and let them sit overnight. Afterward I'd apply a light smearing of gasket maker to the outside of the gasket to seat the valve covers on the heads before bolting them down. I did take some time to tap out the indentations on the parts of the lip where the bolts went and distorted the metal in order to help the lip seal better. With the gaskets prepped, I was able to get the two down and secured with some fresh flared headed bolts to make the application of said bolts quick and easy. 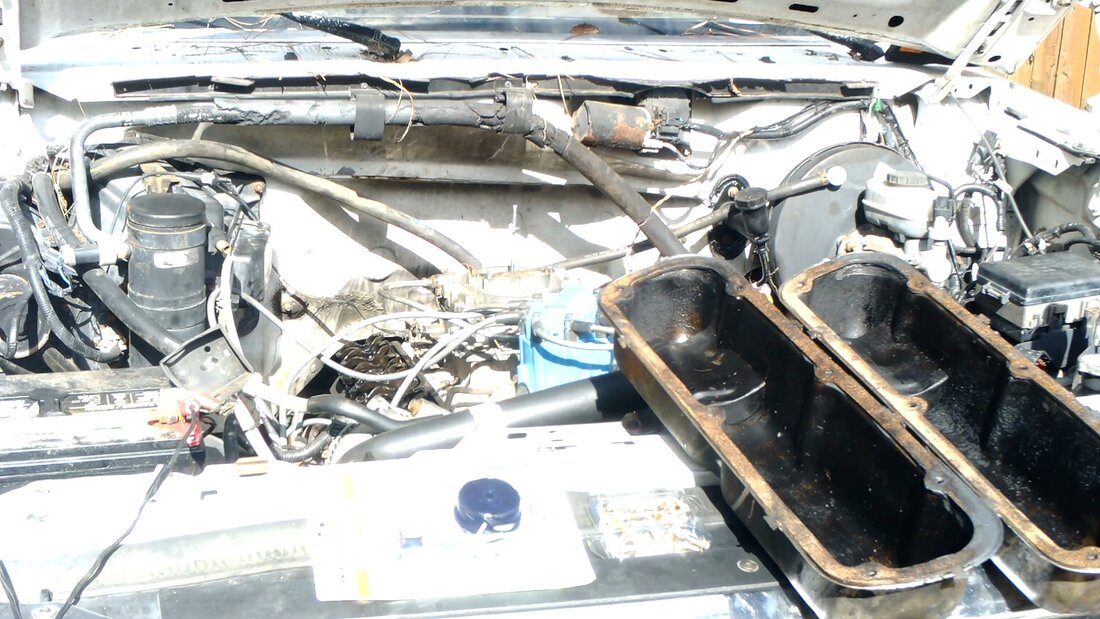 Pair of valve covers with cork gaskets glued in place. Note choke kit in foreground to left of valve covers, more on that in a bit. 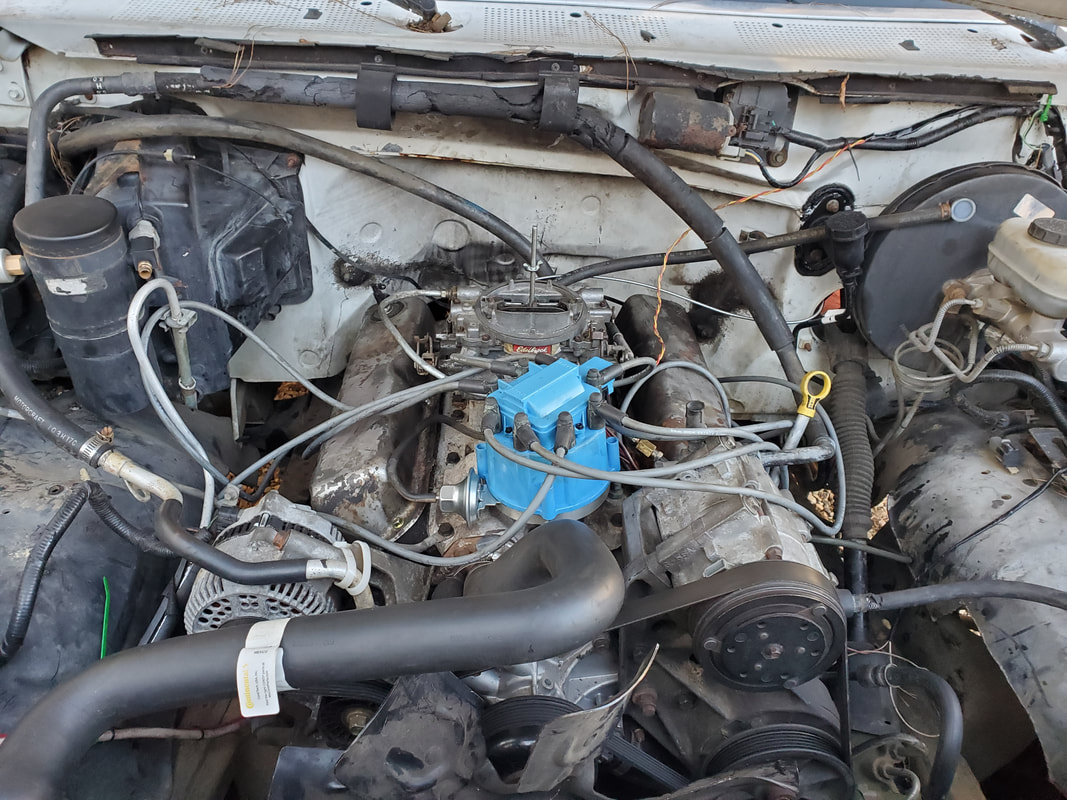 Valve covers installed on engine, now for the choke. The next thing, as mentioned, is the installation of a choke cable. Since the carb that is currently installed on the engine doesn't have an electric choke, I would have to install a cable to allow me to control the thing in order to allow me to be able to regulate the engine and keep it running while trying to tweak and tune the thing. I picked up a universal kit from Auto Zone, which includes some brackets and screws, along with the cable itself. The first thing I had to do was install one of the brackets on the knob end of the cable so I can secure the unit under the dash. I then decided to route the cable through the hole in the firewall where the steering column passes through. Since the choke cable is really a temporary thing, I chose to go this route than to drill another hole in the firewall. 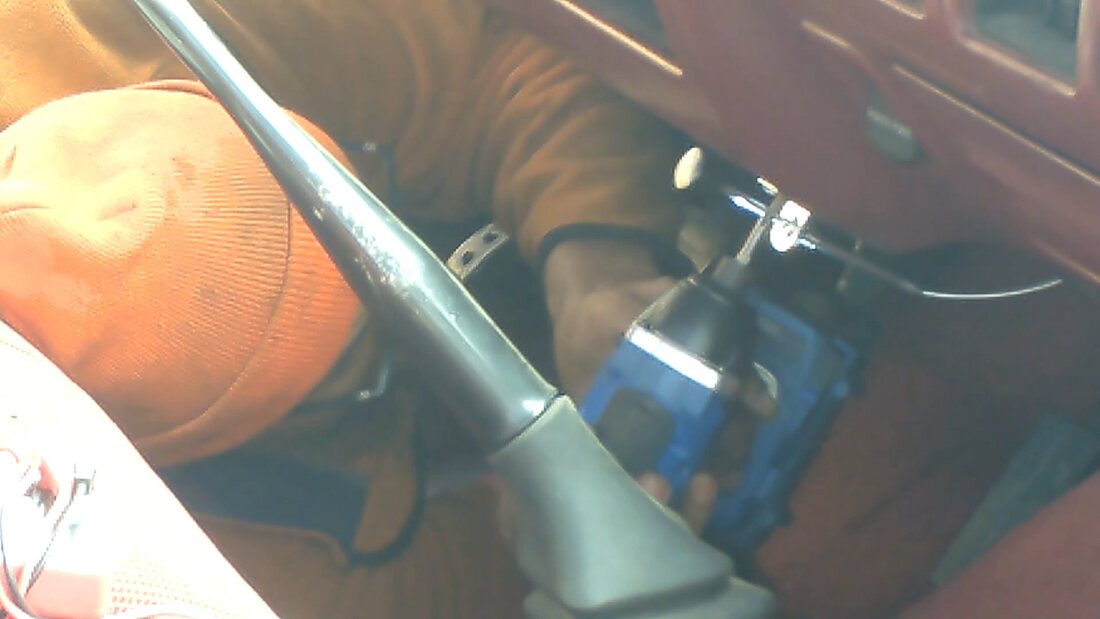 Installing the choke cable under the dash. On the outside I attached another bracket to one of the intake bolts just behind the carb. Another small bracket piece attached to the larger bracket to be tightened against the outer shell of the cable to hold it stationary. A fitting was already on the choke linkage on the carb to hold the wire of the choke cable. This wire is what's pulled with the knob from inside the cab to move the carb linkage. The installation was rather easy and painless, all things considered, and I had a working choke setup in no time. 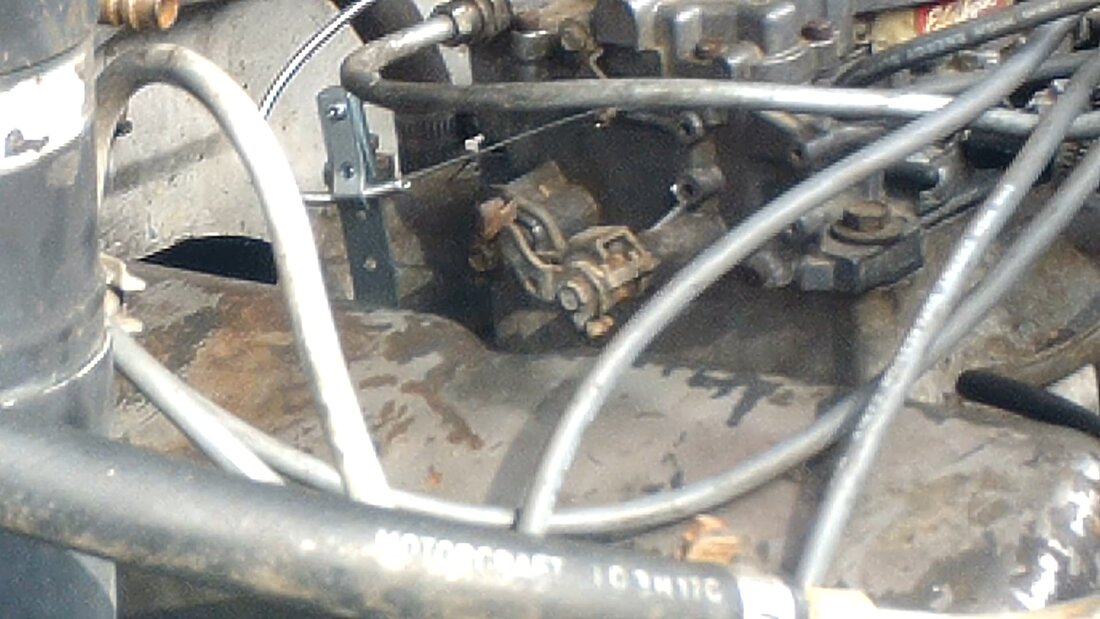 Larger bracket holding the choke cable stationary. Note the wire of the choke cable attached to the choke lever on the carb. With the choke done and the valve covers done it was time to fire the engine up. As predicted, the choke allowed me to get the engine started rather fast. I did have to do some tweaking of the timing and the carb adjustments to try and get the engine to a state where it would stay running, much less idling. Once I got the engine to stay running with a super high idle, I verified the transmission will go into gear. I did do a last-minute bleed check of the clutch system before I did more testing on the transmission. After finding the thing going into 1st gear and reverse, we attempted a test drive down the driveway and back. Under load the engine constantly wanted to stall out, require a little extra juice to keep it running while letting up on the clutch. While accelerating the engine backfired several times as well. I was able to get the truck in 2nd gear before running out of driveway and turning around. 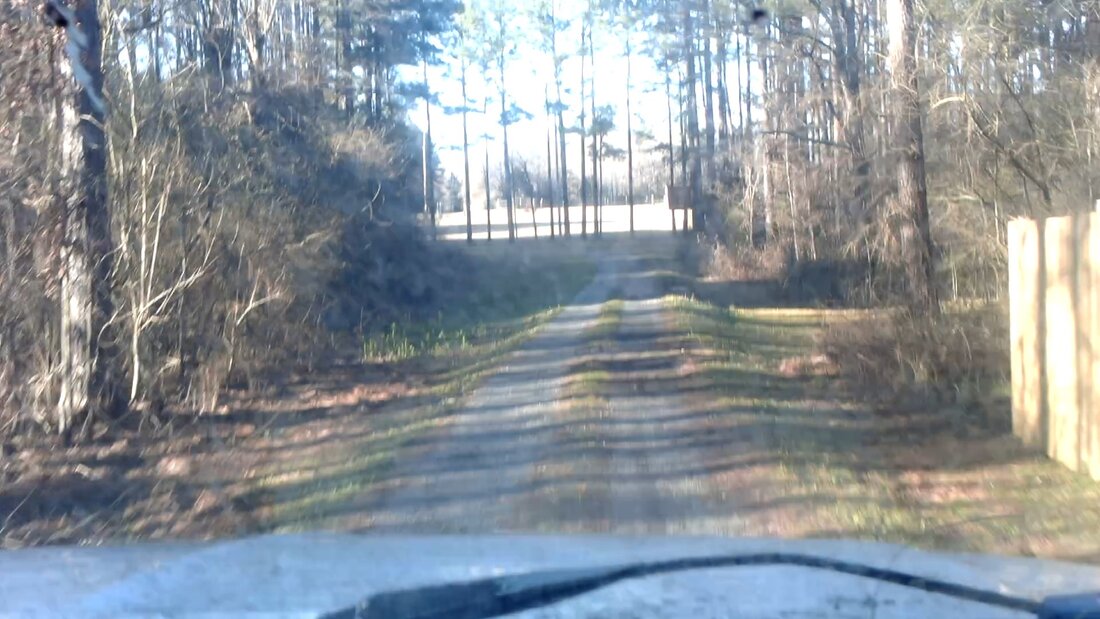 Running down the driveway in the FMT during its first test. With the backfiring, I turned the distributor both ways quite a bit, with no real noticeable difference. I will still check the plugs and double check the firing order to make sure the plugs aren't carboned up or that I have a couple wires crossed. I verified there were no air lines that were open so I know its not sucking excess air from anywhere. The exhaust reeks of unburned gas so the next target area will be the carb. Even though the carb was rebuilt, I couldn't run the body through the type of cleaning that gets into all the different fuel and air passages to ensure there's no dirt anywhere in the unit that can cause poor operation of the carburetor. I pulled a spare carb from stock that I'll try if need be. If this and the ignition checks don't net any positive results, I'll have to bite the bullet and get a new carb. Ebay does happen to have some generic versions of the Edelbrock carburetor that are $100 less so I'll most likely get one of those if it comes to the carburetor. 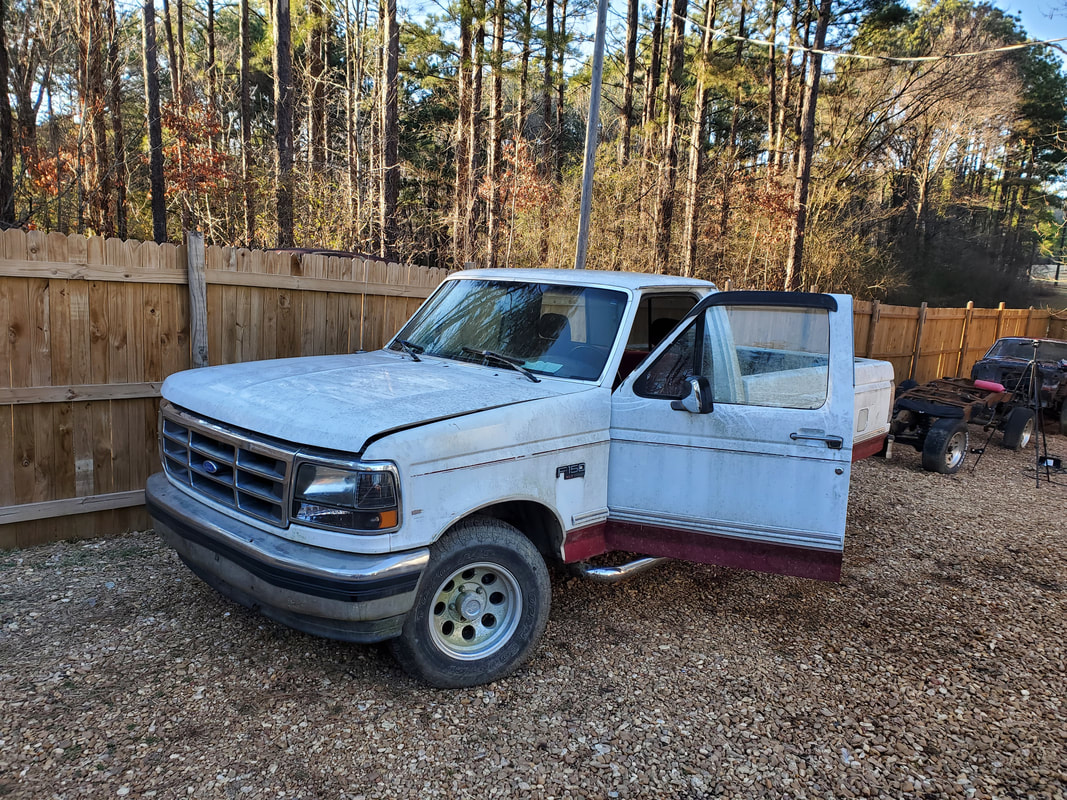 As for right now, the FMT is parked in a new location, closer to the Midway where I can more easily reach utilities as well as reach the main driveway. Also, I'm in a prime position to move the truck if need be, in order to move the F250 into position to spread the gravel when I do get another load again. Despite the poor operation of the engine in its first run, at least its a definite step forward. I have it made up in my mind that I'll be ready to buy a new carb if need be, and even be ready to install the old Duraspark ignition system if the problem turns out to be the hybrid HEI system. One more thing I will check if the power coming from the ECU to feed the ignition system isn't too low due to internal resistance for the older ignition system. I plan on running a straight line to the battery to feed raw 12-13v power to the distributor. This will further let me know what is going on and will obviously control what the next move will be. Main thing is, we're definitely making progress! |
