|
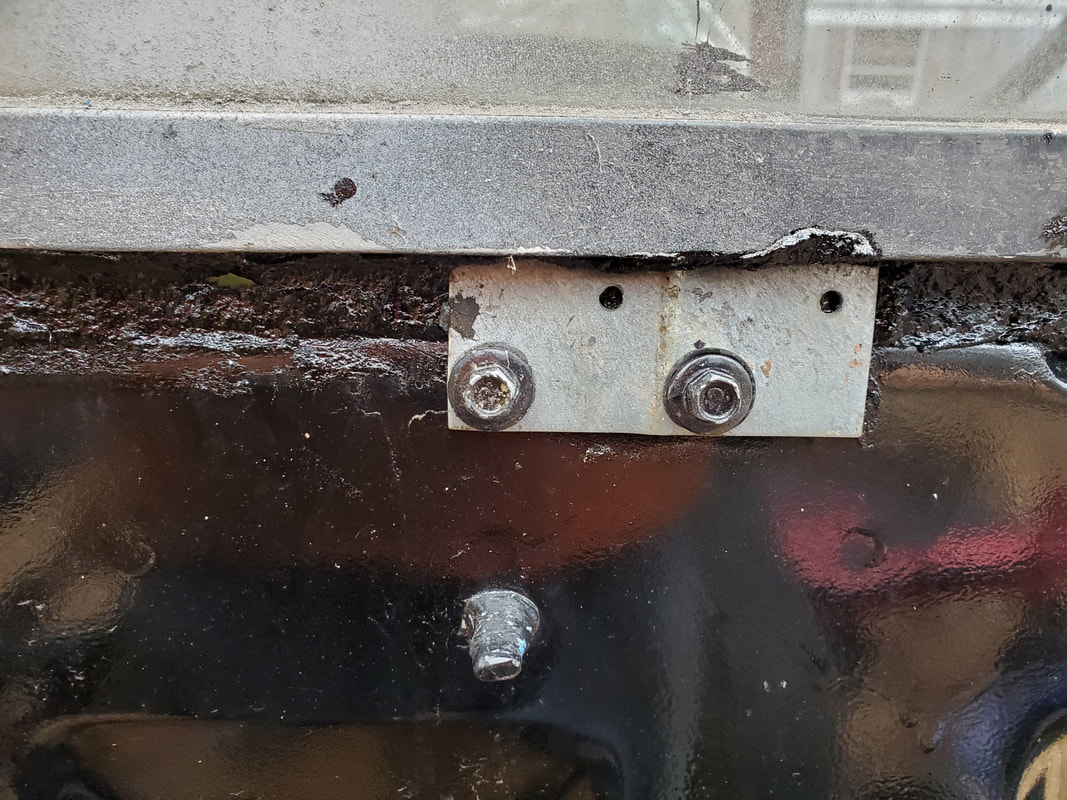
After working with the gravel and the baby birds I moved back to the LUV. This time it was about installing the tailgate and the associated hardware along with the bumper. After getting the bed on this was the last bit of hardware to install before I can say I'm done with the exterior of the truck. I will have to finish up the body work that I initially started on the bed and tailgate when I had the truck in the garage a couple years ago. There's still bondo patches on the tailgate and I started stripping the paint from the bed in order to patch spots on the bed prior to painting these components. I started off with installing the tailgate. This just took me bolting the hinges in place at the back of the bed and installing the fold up hangers that keep the tailgate from hanging down farther than 90 degrees. The hangers bolt to the tailgate and slide around lugs on the sides of the opening of the tailgate. The latches also bolted up with a couple of bolts to either side of the top of the tailgate. With these in place, the tailgate was able to be latched shut as well as left open without any issues. 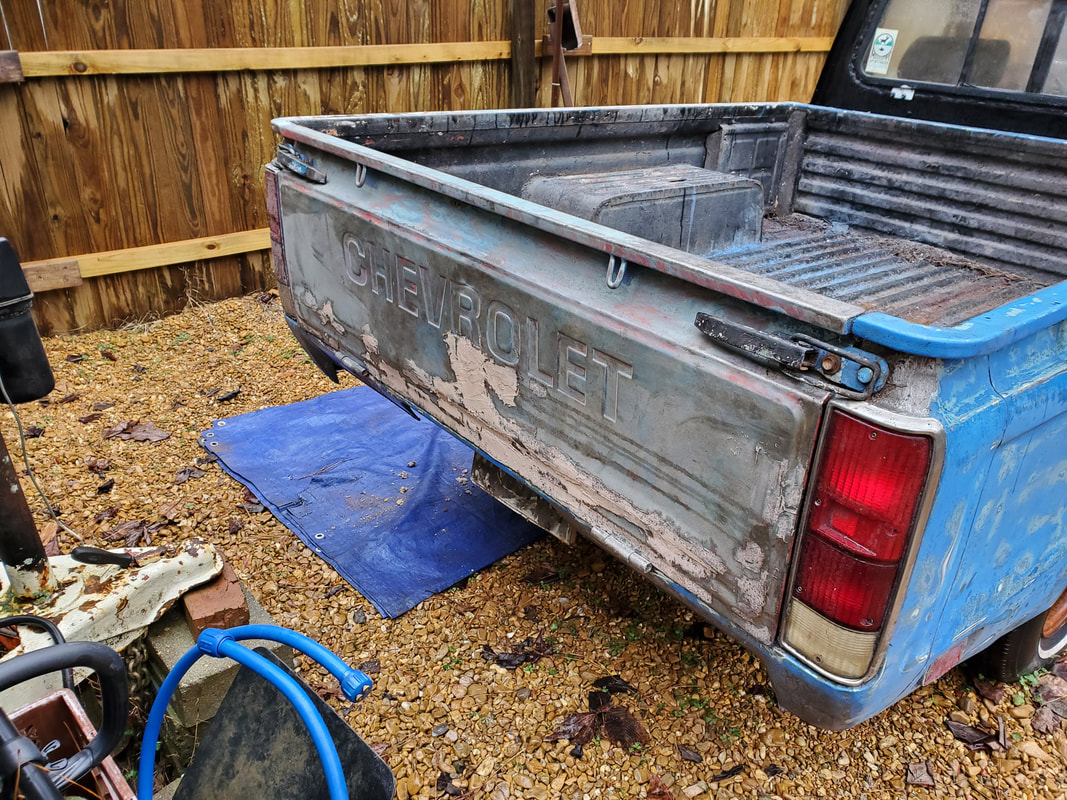 Tailgate installed on truck with latches in place holding the tailgate shut. Note bondo on tailgate. The bumper was another animal. To install this I had to first install the two brackets that hold the bumper to the frame. This involved digging out six large bolts and washers that would be used for holding a heavy thing like a bumper bracket in place on the frame. After fishing through the bucket of bolts that I had in the LUV, I ended up having to dig a few extra pieces of hardware from the storage trailer to get everything I needed to get the brackets secured. With the brackets in place I was able to hang the bumper up with a few more large nuts and bolts and washers. With that the bumper was solid and the outside of the truck was done. 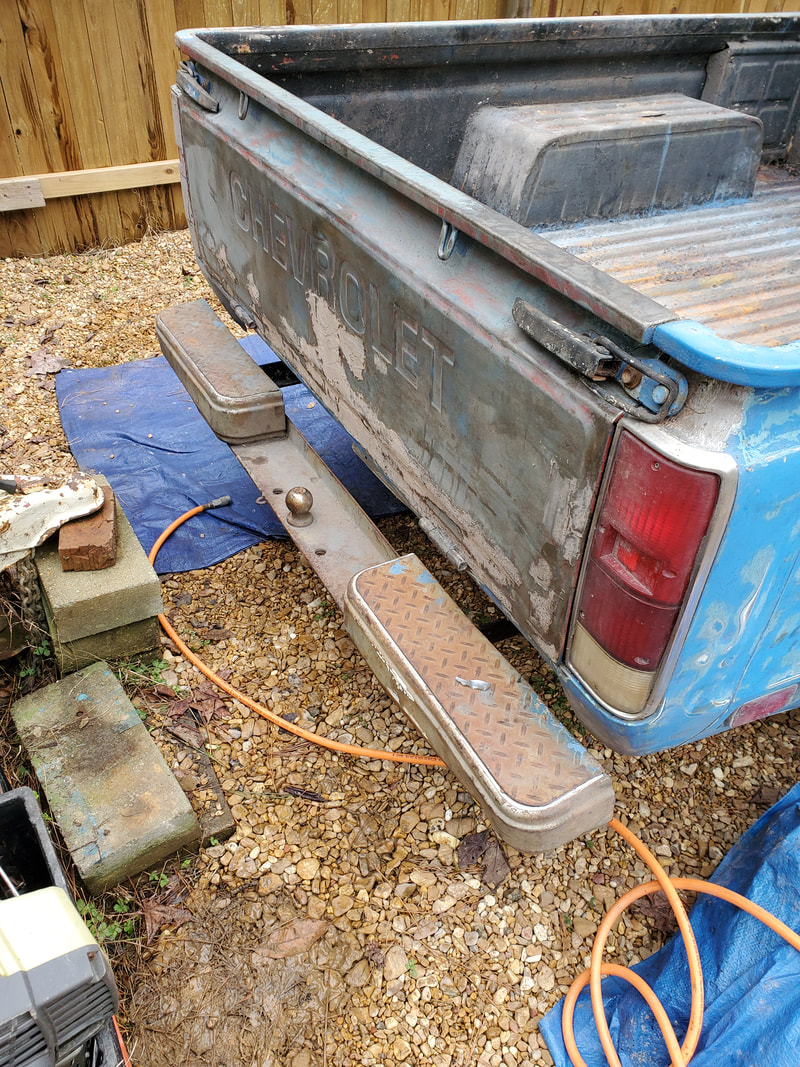 Bumper with brackets secured in place to frame at back of truck. Lastly there was a small interior panel that I had to hang back up. This panel goes under the dash on the passenger side right under the glove box area and acts as a shelf for storing other items outside of the glove box. While the glove box has plenty of room for stuff that you'd typically find in glove boxes, this shelf nearly doubles the capacity of the truck when it comes to storing stuff inside. To secure this thing I had to use a couple of self tapping screws to mount the panel on the right side against the panel where the door hinges are at. The old bolts were broken off so those holes were useless. I moved the panel a short ways up to get to a spot just above the old broken screw studs where I could get the self tapping screws through the thin metal. The other mounting point on the inside (left side) of the panel was taken care of with a regular nut and bolt. 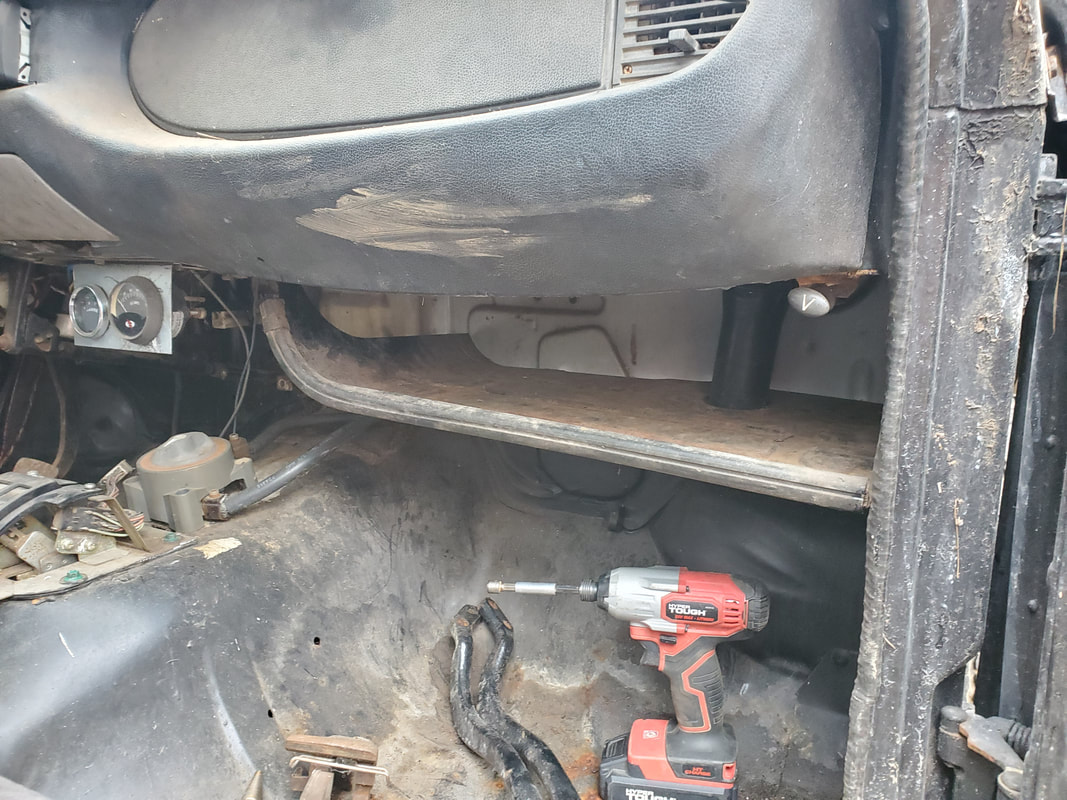 Under dash storage shelf mounted in place under dash on passenger side. With that all of the exterior and the interior is done on the truck. The cosmetics will be taken care of at a later date as this is not really significant. I'm mainly focusing on getting the truck running again. I will need to restore the braking system on the truck as it needs calipers and lines. I may even need a master cylinder but that will be one of those smaller projects under the overall project. I will also need to check one of the tires as it always goes flat and was found to be leaking from the rim. Another smaller issue but still something that needs to be addressed. The main thing is getting the batteries I need to get the truck online. I still need to see if any of the electrical components (relays, contactors, battery cables, etc) will need to be cleaned or otherwise addressed since all of this sat for years even when the hardware was in another vehicle. I might be looking at cleaning terminals on contactors and possibly replacing a couple of components that aren't working. Either way, I've gotten as far as I can on the LUV before I need to buy anything. This was the ultimate goal, doing everything I can do on the truck I can before I had to buy stuff to continue with the project. At some point in the future I'll be getting back to the LUV. Stay tuned.
0 Comments
In this session we have three things going on. As usual, I'm still hauling in gravel for spreading in the chicken yard since these birds are scratching up everything, turning the area into a dirt pit and when it gets wet, a mud pit. I will try to put some sod down in the spring time to see if I can get some form of turf down that will help hold the ground together as well as provide a habitat for bugs and other critters that the birds will help themselves to. But for the majority of the area, its going to be gravel. Around the fence line, gravel. Around the car coops, gravel. Around the gate and the house, gravel. I don't want to have to ever worry about bringing in any lawn equipment short of maybe a weed eater to trim errant blades of grass that may pop up along the fence line or along the house. Hopefully the birds will make fast work of this as I won't be spraying any weed killers in this area, obviously. But for right now, this load of gravel managed to cover an area at the back along the North section of fence, working its way to the middle of the North fence.
Another area I managed to cover was the section of yard next to the house and on the other side of the main entry gate. The southwest corner of the yard, where there is a decline of the ground where it levels off at the gate is an area that I decided to go ahead and cover up since this ground could further erode as more water runs over it. I was able to get a good spread from the house and the SW corner along a straight line parallel to the west fence line to where it met with the gravel line on the north side of the gate. This effectively covered up all of the area I wanted to cover at the SW and West sides of the chicken yard. 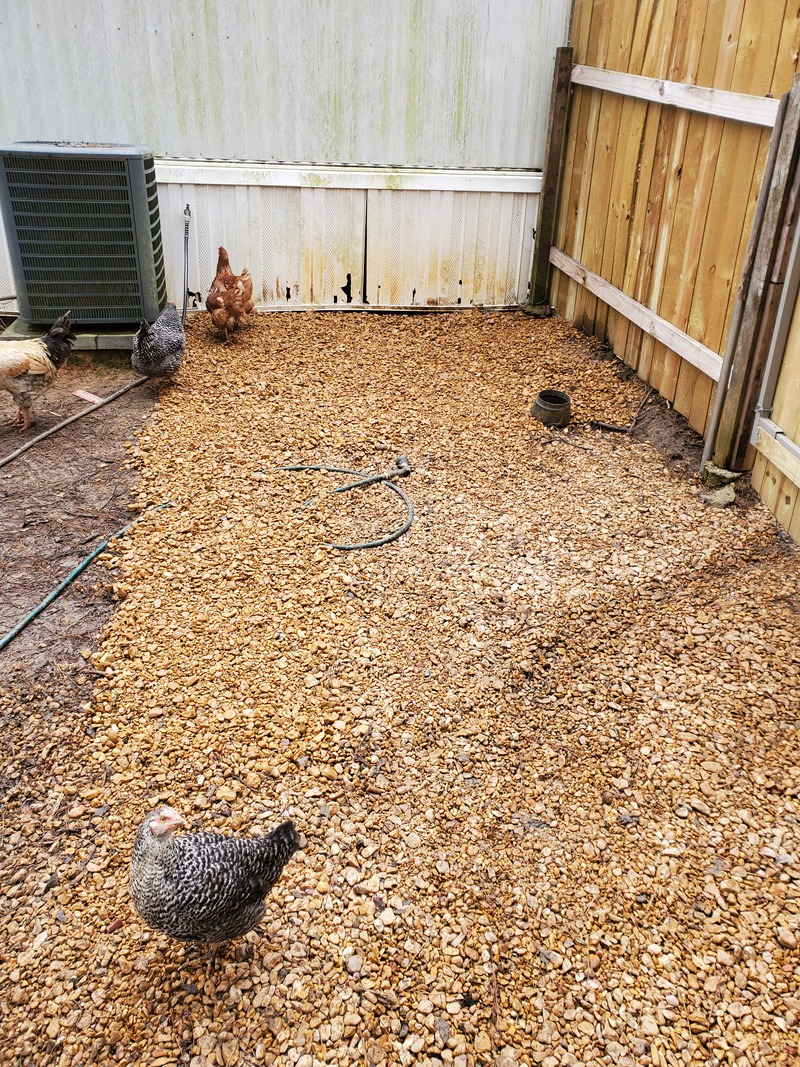
Gravel line from the SW along the West fence line going past the main entry gate.
At this same time we also got a shipment of baby birds, mostly ducks but with a few chickens mixed in. This was a 2nd shipment after the first shipment arrived with all but 2 birds dead. Those two birds are currently in the Mustang Chicken Coupe's brooder section with an infrared heat lamp serving as a heater in the section. We went ahead and got the baby birds in place in the brooder section for the time being. I also routed an extension cord over to the Mustang to bypass the dusk/dawn power line that the car coop was plugged into so I can keep the heat lamp on 24/7 since we have been having some night time lows dip down enough to be hazardous to the bird's health. 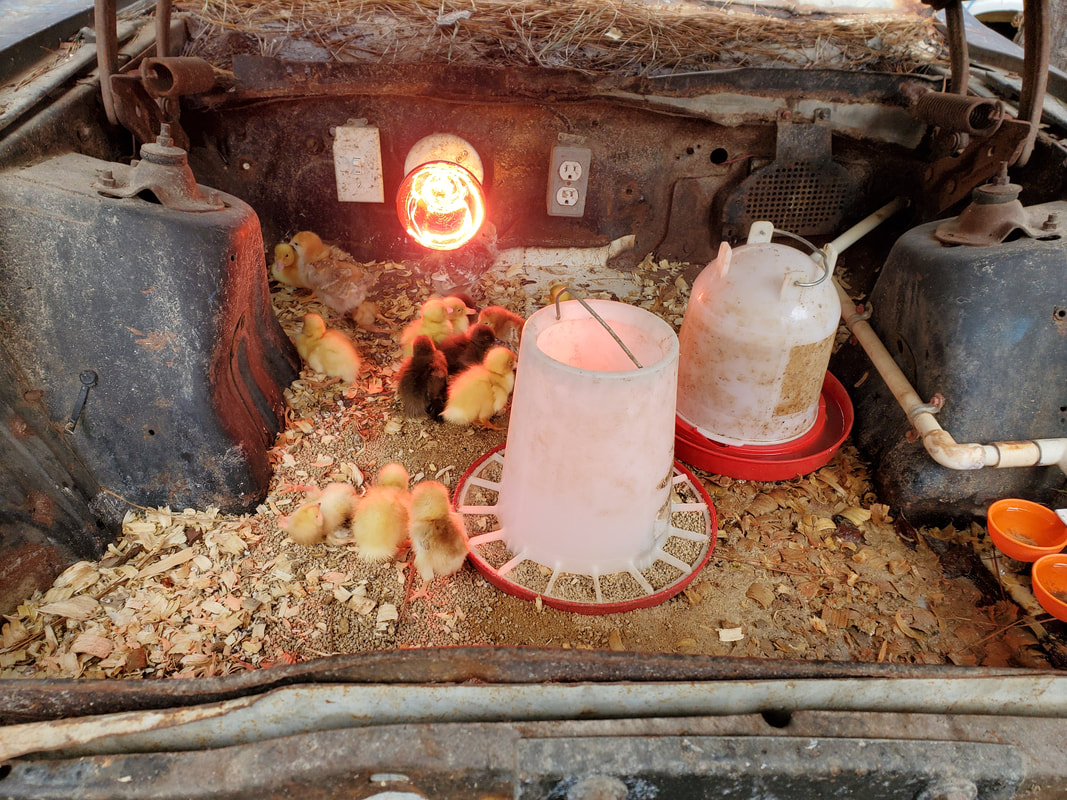
Baby birds in brooder section of Mustang Chicken Coupe.
I ended up also having to put a regular watering dish/bottle and feeder in place since the baby ducks were still too small in height to reach the drinker cups and I didn't want to just throw loose food in the brooder since ducks are rather messy birds and they would end up getting any loose food mushed up with water in no time. There will be a probability that I will end up having to move these new birds into a temporary brooder box in the house while these night time temps continue to stay low like they are. I would like for the birds to start growing some feathers first as well as try to wait out the temps in order to see if they'll go up. Once the temps go up and the birds get a little older, I can move them back outside to the car coop where they will have a better chance of survival. Of course the whole car coop brooder section really wasn't intended to house baby birds in the dead of winter when night time temps dip below freezing. Even with an electric lamp or heater in place, unless the area is heavily insulated, the temps will never get to the 90 degrees + that are required to keep the baby birds comfortably warm. Moral of the story, never buy or arrange for shipment of baby birds until spring time when its not as cold. The last thing on the agenda is processing some scrap wire that I had laying in front of the LUV truck. This was wiring that was pulled from the Toyota in the stripping process as well as the remaining wiring that was in the Ranger cab during its stripping process. All of this wiring would be sorted through for good lengths of wire that I can salvage for future projects while the remainder will be burned over my grate on the half drum burn can to get the insulation and other plastic off the copper. I had to take my time unwrapping tape and other coverings from the wiring bundles to expose the individual wires. After that I had to isolate the runs of wire, cutting where wires were fused together or where they terminated at plugs or other points. Most of what I wanted was just single long runs of wire. After spending a good amount of time sorting through the wires and cutting the lengths I wanted to save, I rolled up the individual lengths into rolls, securing them with electrical tape. There were a few runs of wire that were a single wire fused to another wire to make a branch off for two separate circuits or lengths with plugs on them and other specialty runs of wire that could be put to use in wiring up some new machine or what not. I saved a good amount of wiring to the point that my large box of salvaged wires was overflowing with rolls of the stuff. 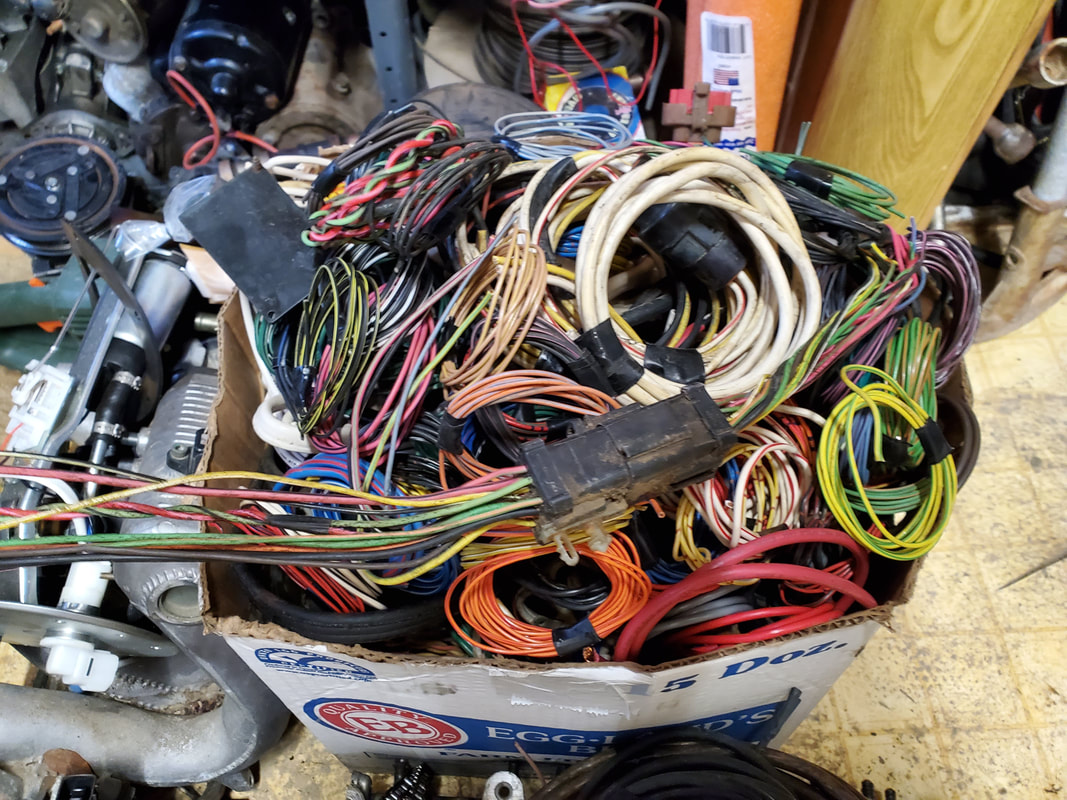
Bundles of salvaged wire rolls in box, note multi-conductor plug setup also salvaged from wiring.
As for the remaining wiring and crap, it was all piled up on the fan grate I used the last time I burned old wiring. I already had a fire going in the half drum since it was still cold outside so there was no need to get a large fire started just to burn wires. Other than stoking the fire to get it blazing good, I just had to take the grate full of wire scrap and set it on top of the can and let it burn. I had to work errant strands of wire on the edges over to the center as the wire burned so I can make sure all of the wire is completely burned free of insulation. Once the wiring was done, I let everything cool down before I put the copper into a five gallon bucket to hold the stuff until I can either fill the bucket some more or just haul this off with my other scrap to the scrap yard. 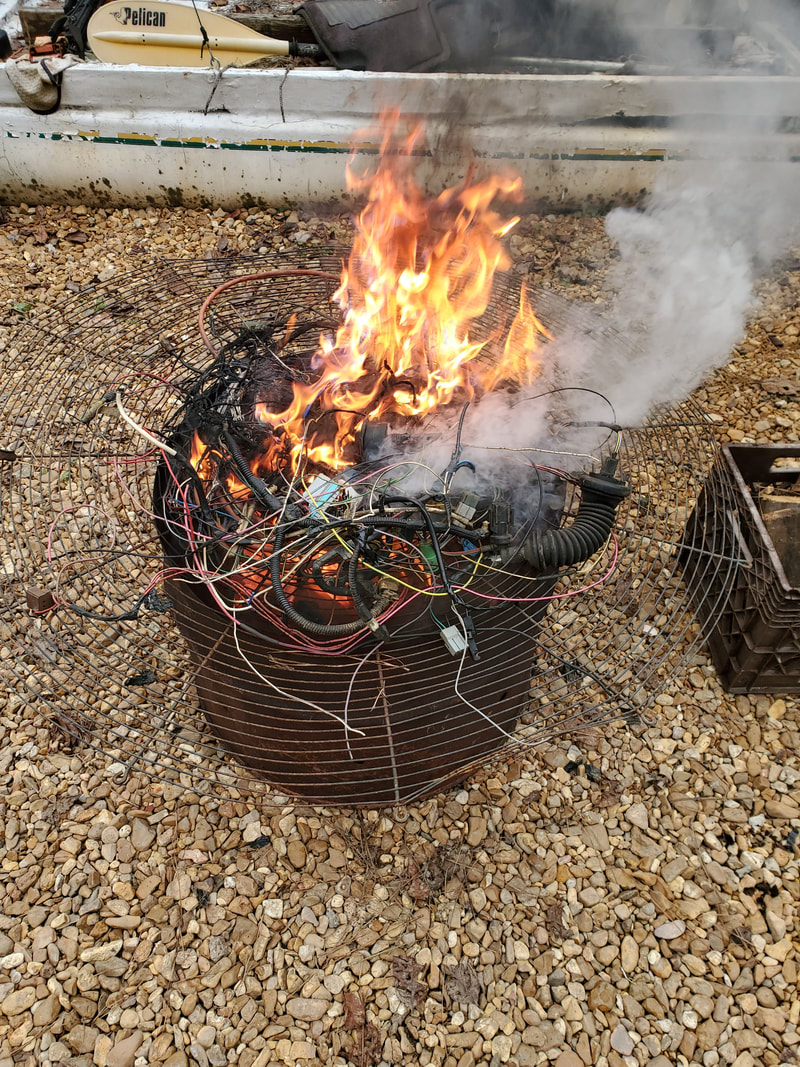
With that I managed to clean up some more crap laying around the yard as well as generate some more revenue in the form of scrap and usable raw materials. We have more baby birds that will add to the flock's egg production and we have more ground covered with gravel, working towards the goal of full coverage of the grounds. Of course there's a lot more to do around here, with the next batch of work being on the LUV as I have to install the tailgate and its associated hardware and the rear bumper. Even in 2021, the work will continue, the ship will keep sailing full steam ahead, God willing, with nothing standing in the way.
Back in 2006 we moved to MS to be able to have access to open land and country where the worries of the suburban life would not be a problem. Not having to worry about the relative lack of space, the nosy neighbors and BS rules and regulations the city had governing how we do things on our own property, it made this move all the more worthwhile. One of the main reasons for moving out here from the Chicagoland area was because of the weather. Winters in the north seriously suck. Subzero nighttime temps that last into March at times, snowfall measured in feet vs inches, and the potential of ice made winter weather in Chicago suck. Its something we don't have to worry about in MS, or so one thinks. Every now and then during the winter here, we will get a little snow. Nothing like what is in Chicago but still an inconvenience nonetheless. Sometimes ice will be a problem as well when it rains during the day and the nighttime temps drop low enough to freeze the newly fallen rain. When it does snow, sometimes it will accumulate enough to make for a winter wonderland, for a day maybe. Driving conditions tend to suffer to a degree as well. But usually the daytime temps end up getting high enough that the accumulated snow ends up melting and after a day or two its all gone. Well we ended up getting another snowfall again today. It was part of a larger storm system that covered several states that got hammered a lot more than we did. The funny thing is though, as part of their proactive behavior, the authorities cancelled schools and closed some roads and bridges prior to the snow's falling. The snow started the night before so it had plenty of time to fall and accumulate. When we awoke in the morning, we had a fair covering of white over everything. 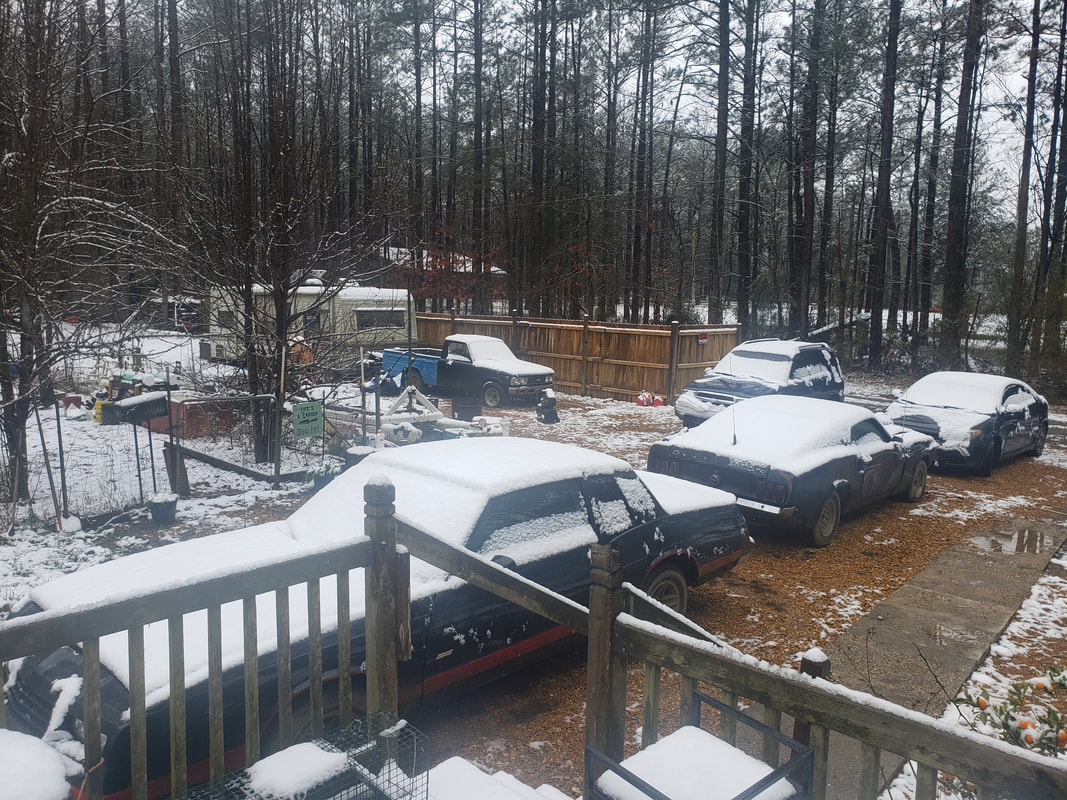 Yard covered with snow. Snow already started melting from walkways and gravel. In the earlier part of the morning there was more snow on the gravel and walkways and other hard areas of the ground but the sun had already started melting snow from these spots. The grass held its snow as well as most of the other areas, as can be seen in the first pic.  Main driveway with snow between tire tracks, snow covering everything else on either side. Of course since snow is indeed frozen rain, when it settled on the ground in what would be synonymous to a heavy rain, the sun's melting of the snow on the ground turned everything that wasn't covered in gravel into a sloppy mess. Grass was holding water and bare areas turned into mud pits. Accumulated water of course made walking over these areas a wet experience for anything but rain boots. Snow ends up being like a time release downpour. Instead of the rain just dumping on the ground in one shot and soaking everything within a few minutes, it just sits there and slowly melts, soaking the ground over a longer period of time. 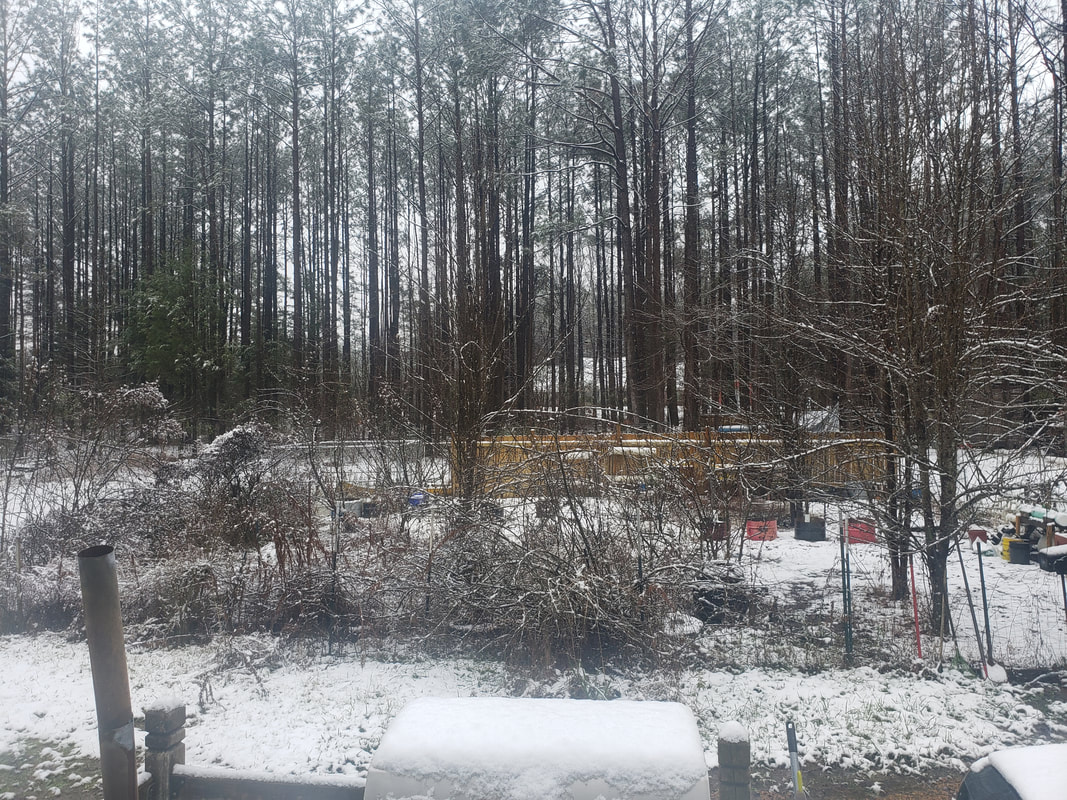 Garden area covered with snow. This shot was taken from the porch. Of course this kind of weather makes you not want to do anything outside since the conditions are sloppy. Its bad enough trying to work in muddy sloppy conditions when its warm much less when its freezing outside. Of course I ended up not doing anything short of gathering more firewood to keep the stove going through the day since the ole lady stayed home due to possibly shitty road conditions. One of the things that was done though was something that many newer generation people probably don't know anything about, making snow ice cream. 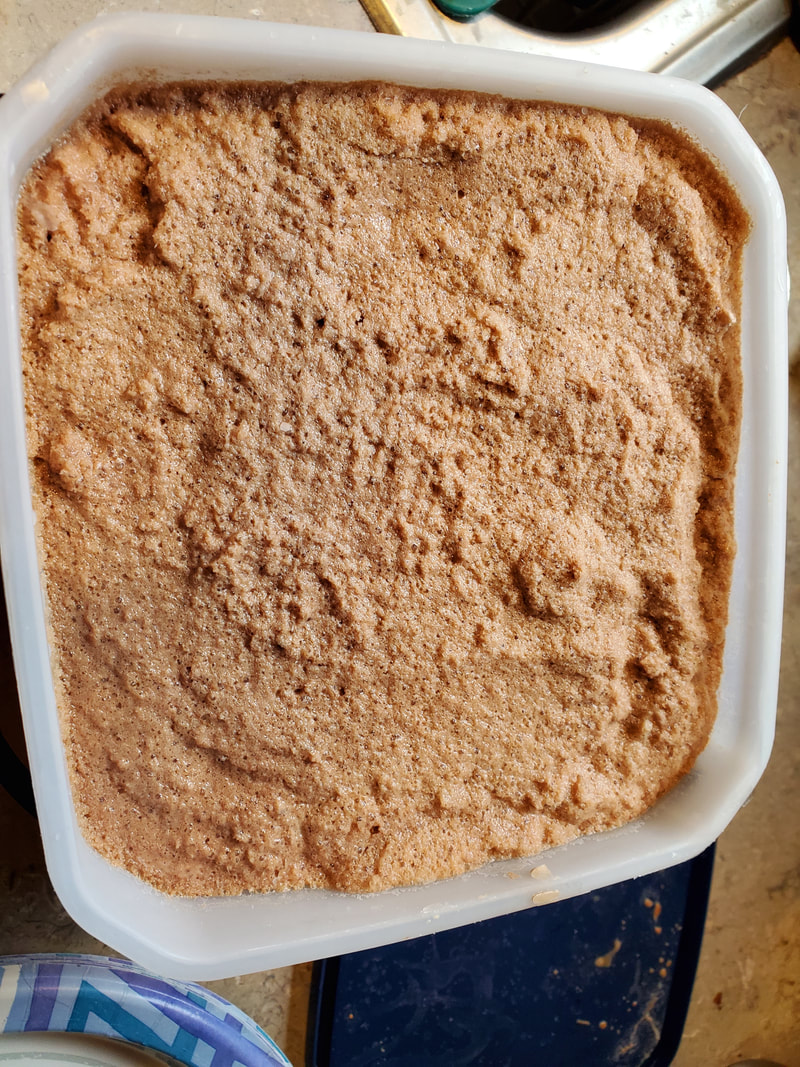 Bucket of chocolate/cocoa flavored snow ice cream, ready for freezing. This simple recipe was made with very few ingredients and without the use of an ice cream machine. The ole lady just scraped a good amount of snow from the top inch or two of snow that was on top of the cars so as to not get any surface dirt from the car bodies. Mixing the ingredients together long enough, she ended up with an evenly mixed batch of ice cream. Of course she deviated from the recipe by adding cocoa powder to make chocolate ice cream. My mother did the same thing except she did her version using sweetened condensed milk which made for a thicker ice cream with the right amount of sweetness to it. The condensed milk has the concentration of milk equivalent to 2x the amount of milk by volume without the extra water. Both recipes came out good enough that we both now have plenty of a good winter treat to last us for a while, even after every trace of snow is long gone.  Base recipe before deviations. As with any recipe, its up to the cook to make adjustments to suit their taste. Even though I wasn't able to get anything done during this "snow day" like I would've on any other day, we did make lemonade from those cold lemons with the ice cream. Of course I'm not going to let the conditions completely stop me from continuing my work outside as there is plenty more that needs to get done to further my pursuits on the homestead. There will definitely be more to come... With the door panels ready to install that was my next move. As noted before, the holes that I drilled in the cardboard panels to accommodate the few clips I did have on the old panels may or may not line up with the holes in the door. But at the same time there were holes in the skin from screws that were used to hold the panels to the door outside of the clips that were originally used to hold the panels on. With that I went ahead to mount the panels. As predicted the holes didn't line up so of course I said fuck it and didn't even bother to put the clips back in or try to make new holes. I went straight to the screws and washers to help hold the screws on without punching through the skin or the cardboard. I did only use four screws to hold each panel in place so the panel wouldn't have several screws contrasting against the rest of the black skin of the panel. With both panels hung up I was able to move on and put the window crank handles on. 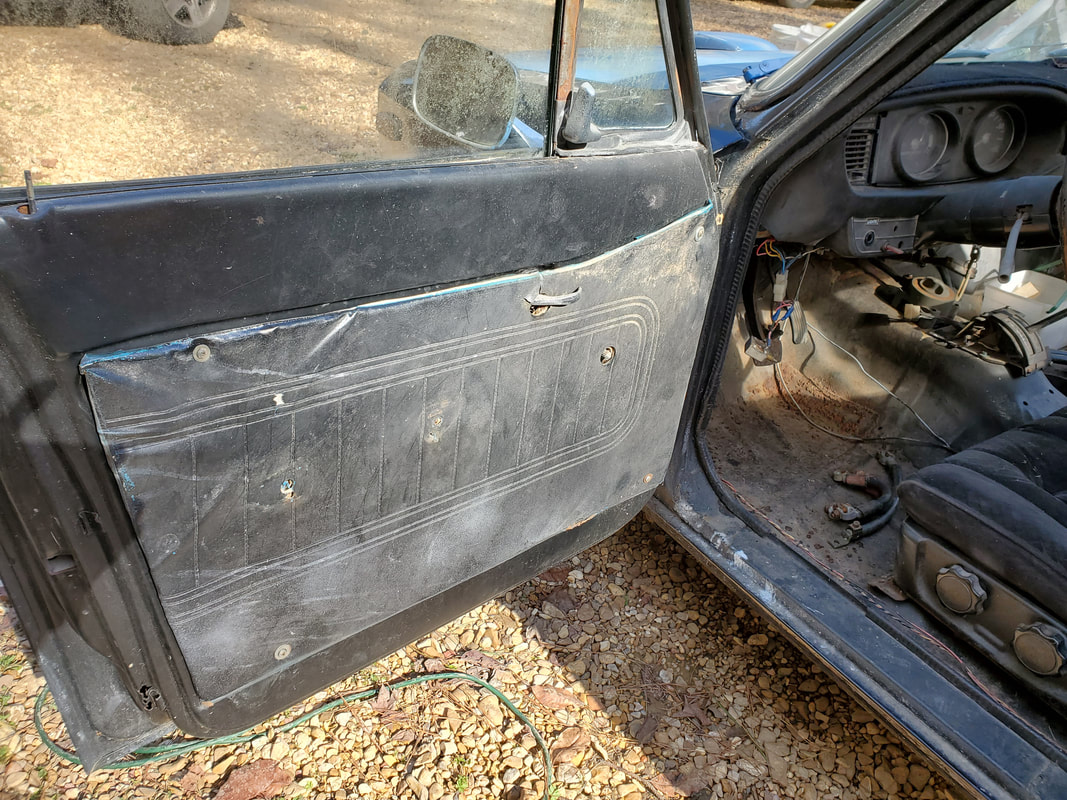 Driver's side door panel hung up on door. Note four screws holding panel up. 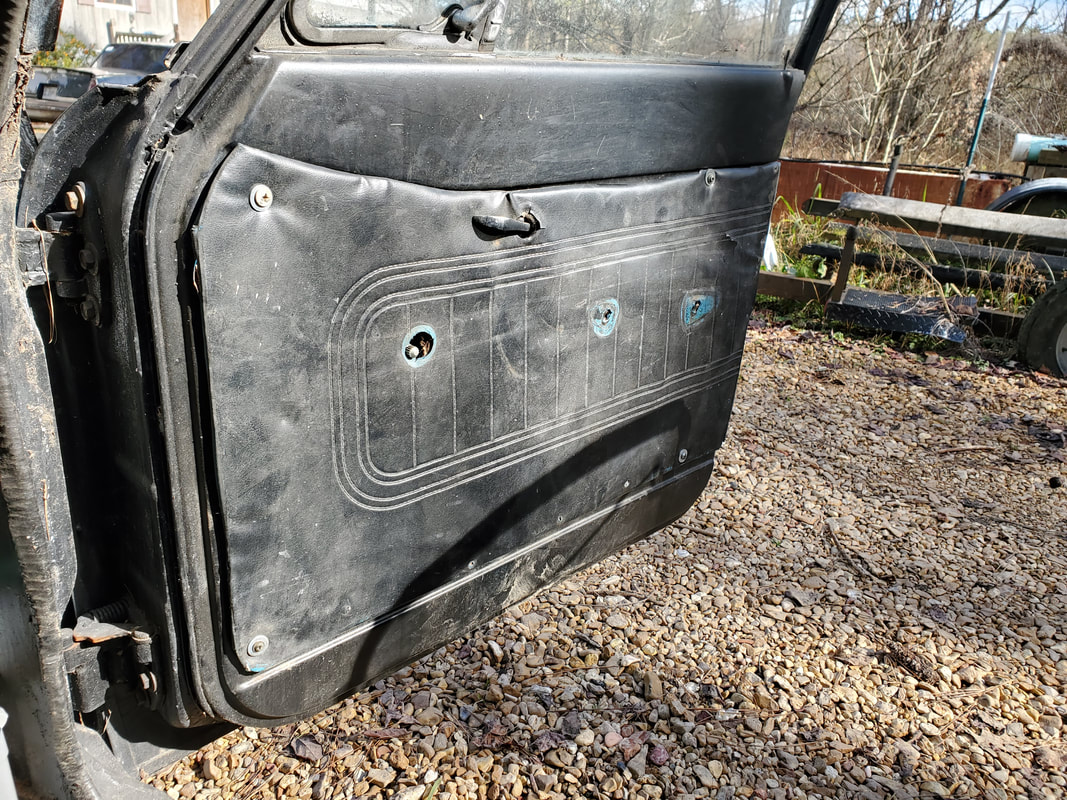 Passenger side door panel hung, note four screws holding panel on this side as well. On these doors there was only the window cranks, arm rests and a small trim piece that goes around the door lever that is supposed to snap in place. Outside of that there was nothing else to put on the doors. With the door panels on and the other hardware put on I moved on to the bigger part of this day, the bed. 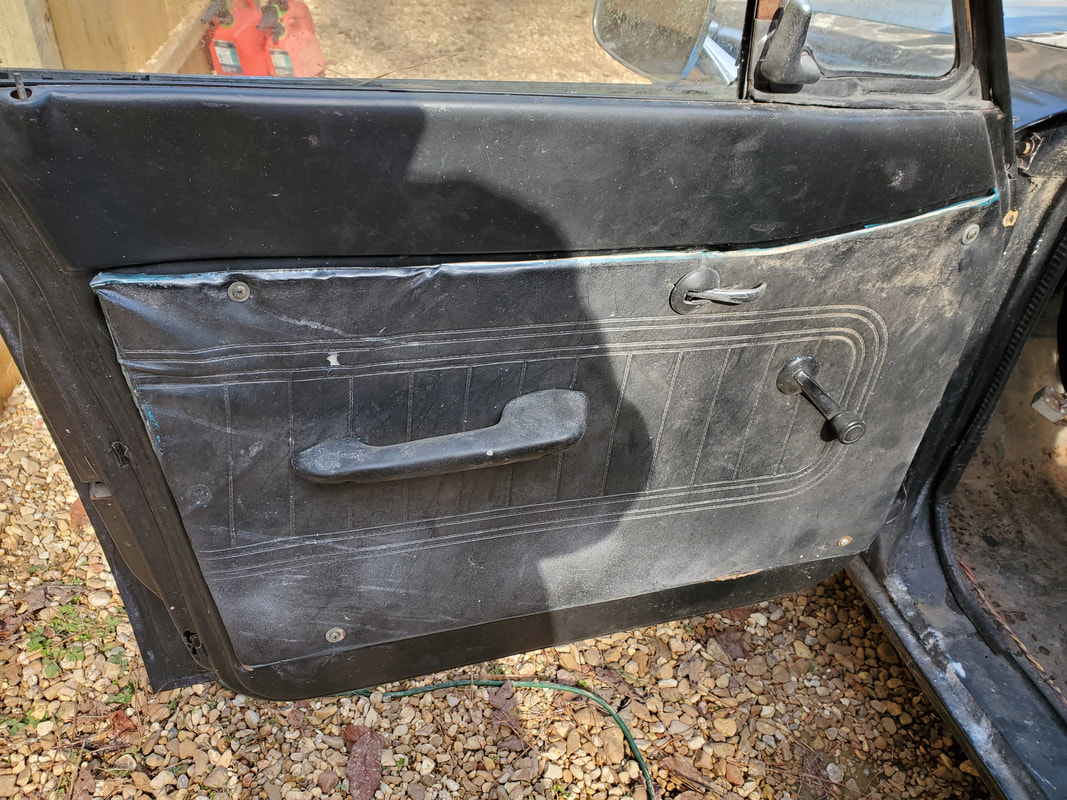 Driver's door panel with arm rests, window crank and lever trim installed. 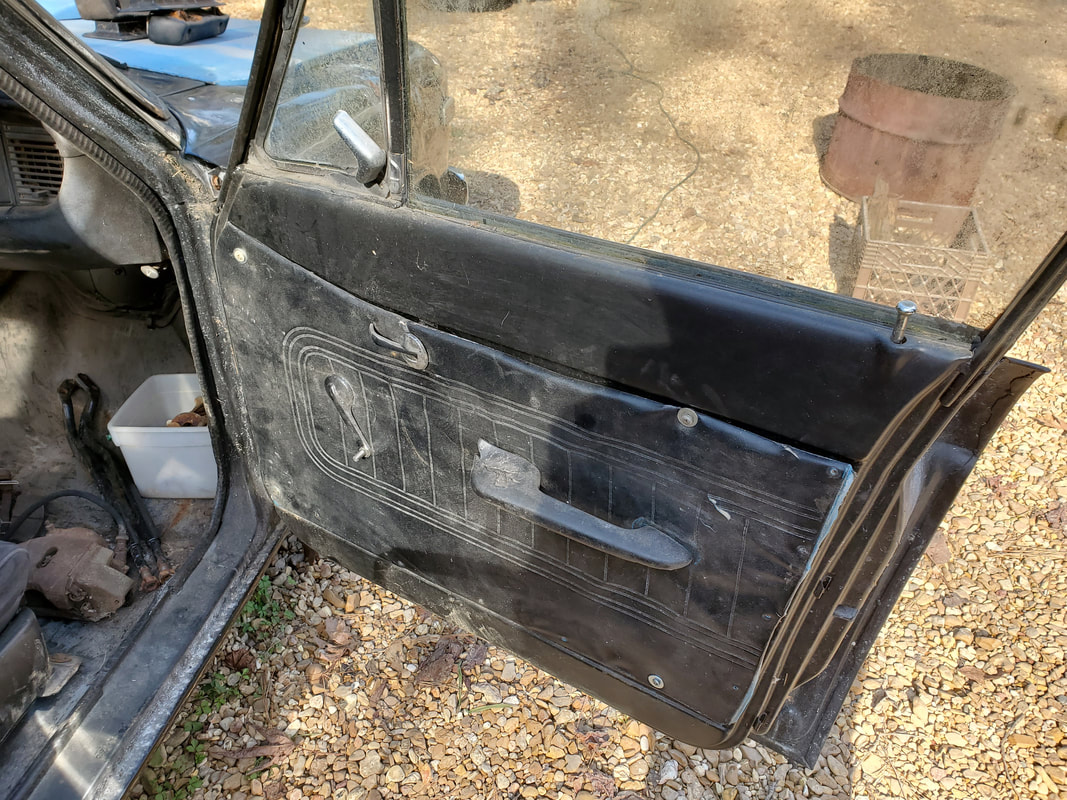 Passenger side door panel with hardware installed. The start of the hood sub-project was getting the thing back down to the work site from the garage up the driveway. This was about a 100 yard span that had to be covered. I ended up putting the thing on the two wheel dolly and just slowly rolled my way down. The bed was rather light despite its size, its more bulky than heavy. Because it wasn't heavy I was able to get the thing down to the work site without losing my breath and still had plenty of energy to get ready to work the thing onto the truck's frame. 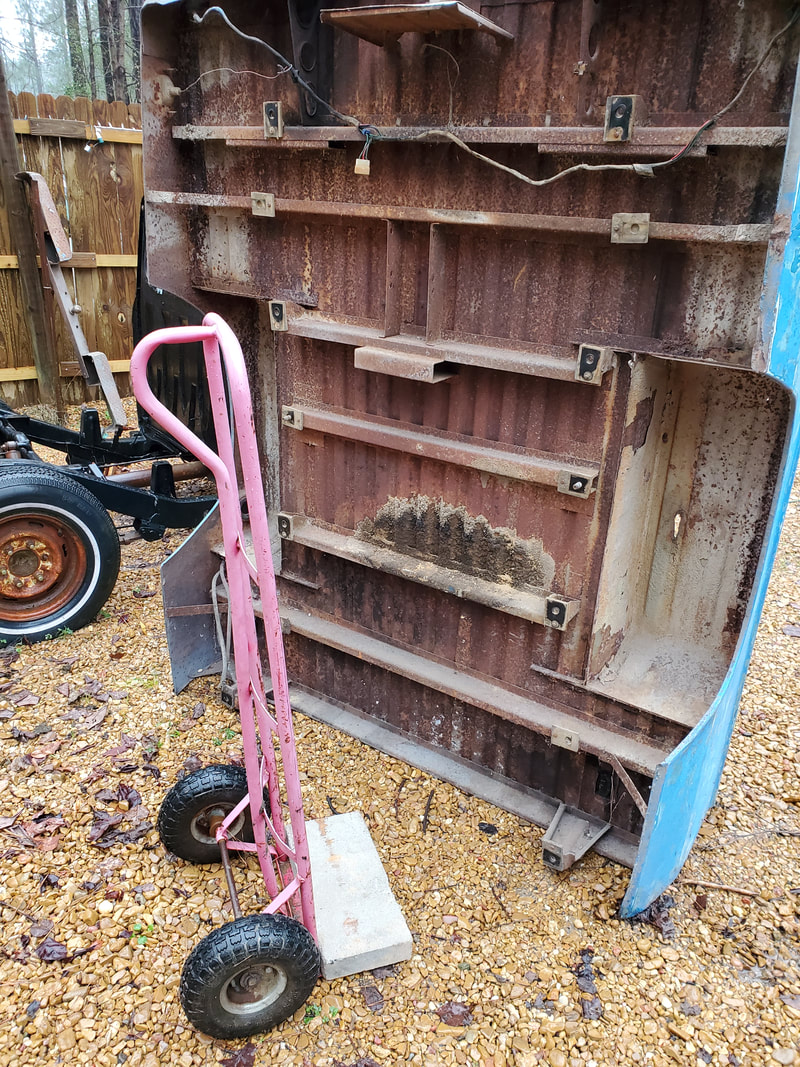 Bed staged near truck after bringing it down to the work site via the 2 wheel dolly. I had to enlist the help of the ole lady to help me in moving the bed into position then lifting it up carefully over the rear wheels and getting the thing settled on the frame on its mounts. This actually wasn't that bad of a job as with two people moving the bed the whole thing was pretty easy to move. We got the thing settled on the mounts on the frame pretty fast. Even though there's probably twelve mounting points on this bed I will end up probably only doing eight mounts as I don't have the large bolts necessary to fill all those spots. 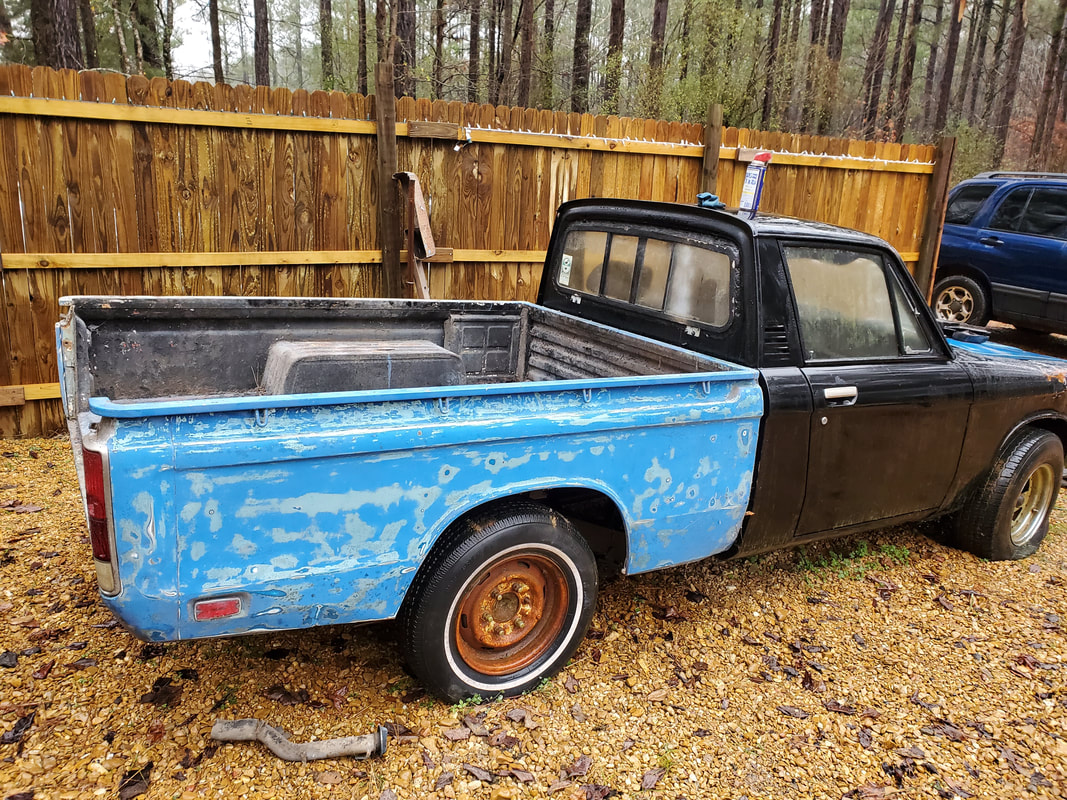 Bed situated on frame of LUV, ready to be bolted down. After getting the bed secured I will go ahead and get the tailgate on as well as the bumper. There's a couple of other little odds and ends on the truck that need to be addressed but after that I will be at the point where I need to start buying stuff to continue working on the vehicle. Of course at this point I will end up moving on to another car project or other homestead project based on what I have available or need to do for any given project. Even though I wanted to hang the door panels on the LUV there was some other stuff on the roster that was in line to get done before I work on the door panels. I had gotten another load of gravel from the cement place that I needed to spread out plus I had the driveshaft for the LUV that I had to re-install. I also had a couple of generic amber signal lights that I wanted to install as front turn signal lights on the truck. I spread the gravel in the NW corner of the chicken yard, covering a large area up to the rear entry gate in the yard. In the chicken yard there's only a few more spots to cover before I can sign off on the chicken yard being properly covered. And not a moment too soon as I would like to continue covering other high traffic areas around the compound. But with the gravel done, its back to the LUV.  NW corner of the chicken yard covered with fresh gravel. As for the driveshaft, I actually did a shadetree job on this thing. The original shaft was a few inches too long for the current configuration. I ended up cutting the rear U joint off from the tube and grinding it smooth first. I then took a piece of tubing that had an outer diameter that was almost the same as the inner diameter of the driveshaft tube. I had to hammer this piece of metal into the driveshaft tube, leaving about 1/2" of tube sticking out. I ground the edge at an angle all around the metal so when I weld the driveshaft end to the tube it would allow me to put a good amount of welding slag into the gap. I welded the U joint cap back on real good, hopefully putting more than enough metal in place to fill the gap. Of course I know the diehards are going to say, "what about balancing the driveshaft?" Well for starters, since this is going to be an EV (electric vehicle), the amount of power that the electric powertrain will deliver is not as high as the gas engine that would've been in the truck. Yes, electric motors deliver full torque from zero RPM but the horsepower isn't the same as that of a gas engine. So barring the power differences between electric motors and gas engines, there is an old school technique for shadetrees to balance a driveshaft. I've read about how mechanics back then would take a couple of large worm clamps and clamp them to the driveshaft and put the car on jack stands with the rear wheels off the ground. They'd "drive" the car, making note of the amount of vibration the driveshaft makes, then they would move the worm clamps around the driveshaft in small amounts, using the screw portion of the clamp as a weight. Moving the clamps and testing the car again they would keep moving the clamps until they can "drive" the car with minimal to no vibration. They may even mark the driveshaft where the clamps go so if they manage to work themselves out of balance the clamps can be moved back in place to restore balance to the driveshaft. If even at the slow speeds the EV LUV may be driving it still needs balancing on the driveshaft, I will attempt this method to balance the driveshaft. 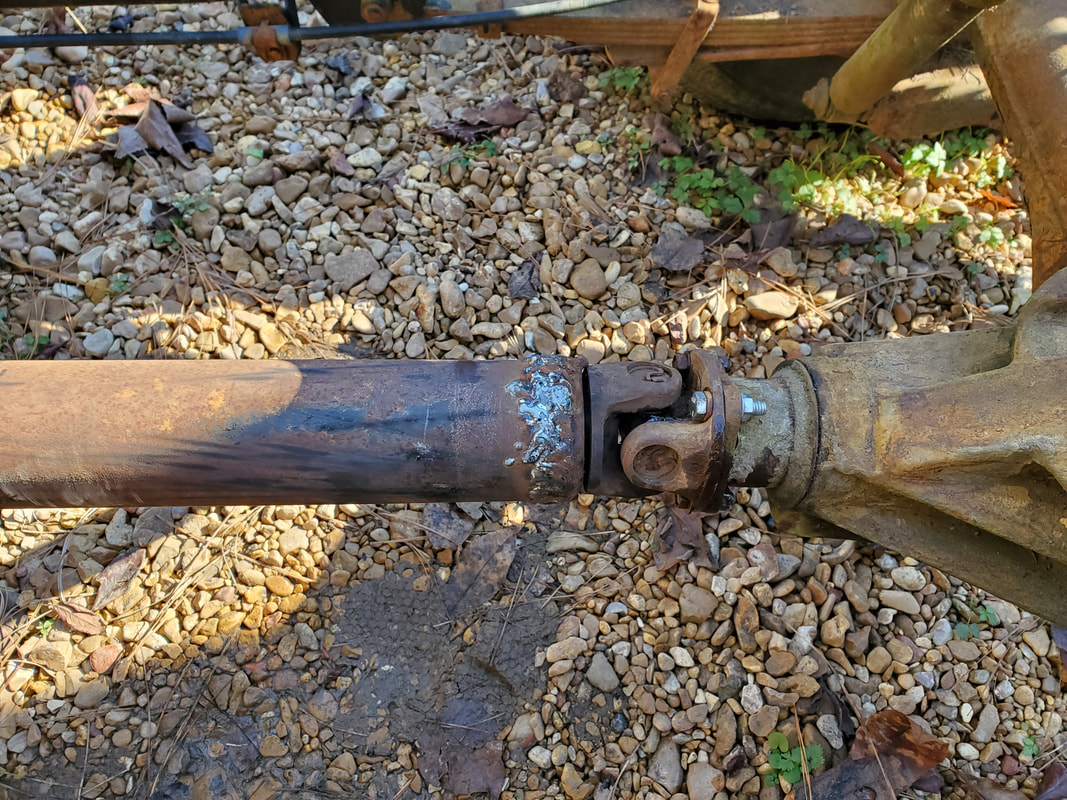 Welded up driveshaft bolted back to LUV rear end. I got the measurements just right that the driveshaft fit nicely in place. I got the thing bolted up and had plenty of yoke in the transmission so barring the balancing and the possibility of the weld not holding, the driveshaft is ready for use. The next thing is the front signal lights. When I ran the LUV's new electrical system, I ran the single wires to the spots at the front behind the bumper for the signal lights. Since I can use the chassis for a ground, I only needed the power wires from the turn signal switch to be run over to the front bumper. With that the only thing I had to do was attach an angle brace to each signal light. These amber lights are the same generic trailer lights one can pick up in most auto parts stores. I used a sheet metal screw to secure the angle braces to the plastic body of the signal light. With that I used crimp couplings to get the power wires connected to the power wires on the light fixtures. The ground wires were connected with crimp eye terminals to the same sheet metal screws holding the angle braces to the lights. Since the angle braces will be directly bolted to the chassis, this method of grounding should be just fine. At the bumper holes for the factory signal lights there was a mounting hole that I was able to take advantage of to mount these lights via the angle braces. With the lights mounted in place and wired up I can write off that part of the project.  Front signal lights on LUV hooked up at bumper. 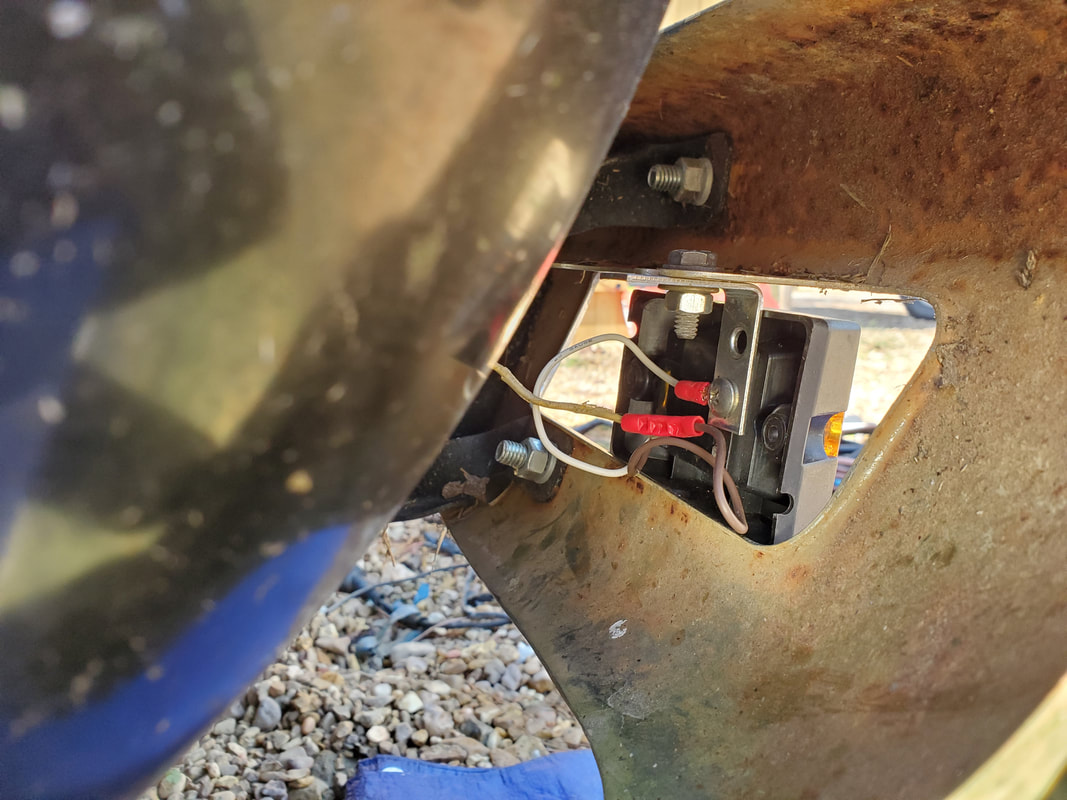 Shot behind bumper showing angle brace and back of light fixture and how everything is hooked up and mounted. After mounting the lights the next thing will be the mounting of the interior door panels. After getting the door panels mounted I will be getting ready to move the LUV's bed down to the work site and mounting it back on the truck as well. This will also include the tailgate and associated hardware and the rear bumper and associated hardware. I will also grab the seatbelts from up in the garage and install those too. As stated before I'm trying to get as much done on the truck as I can without spending a dime. Once I reach that point I can then pause on the LUV project once again and move on to one of the other projects, doing as much as I can on it with what I have available. That is going to be a theme for me this year, channeling my low attention span on projects and taking time to get as much shit done as possible on multiple projects. I will probably document a lot of the work above what I'm doing here just so I can have notes on what I've done on all the projects and what I need to do next on any given project that way I can more efficiently work on multiple things. We will get a lot more done this year just like we did in 2020. One of the littler things that I wanted to do for the LUV was to make new door panels for the interior. The truck still had the old door panels but they were in very bad shape as far as the boards were concerned. Most of the skin was still in pretty fair shape so I figured that the best way to remedy this problem is to peel the old skin from the old panels and make new boards with which to put the old skin back on. I had to find something suitable to do this though. 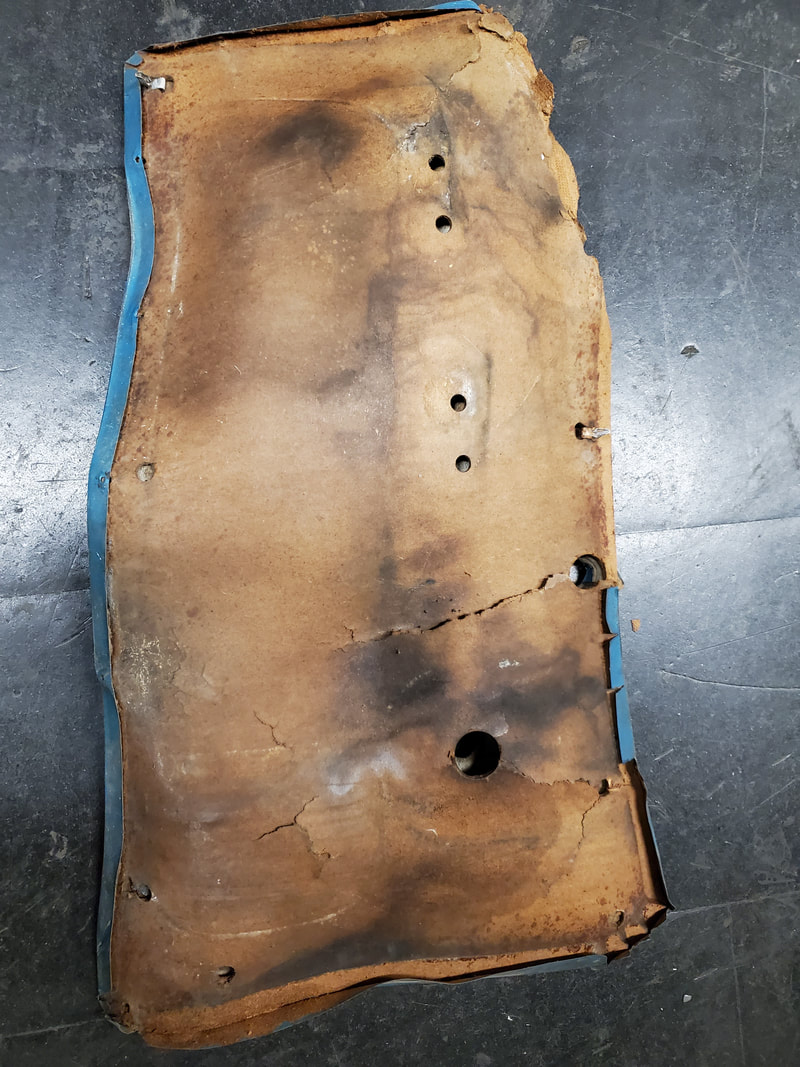 Old door panel from LUV, board in very bad shape. 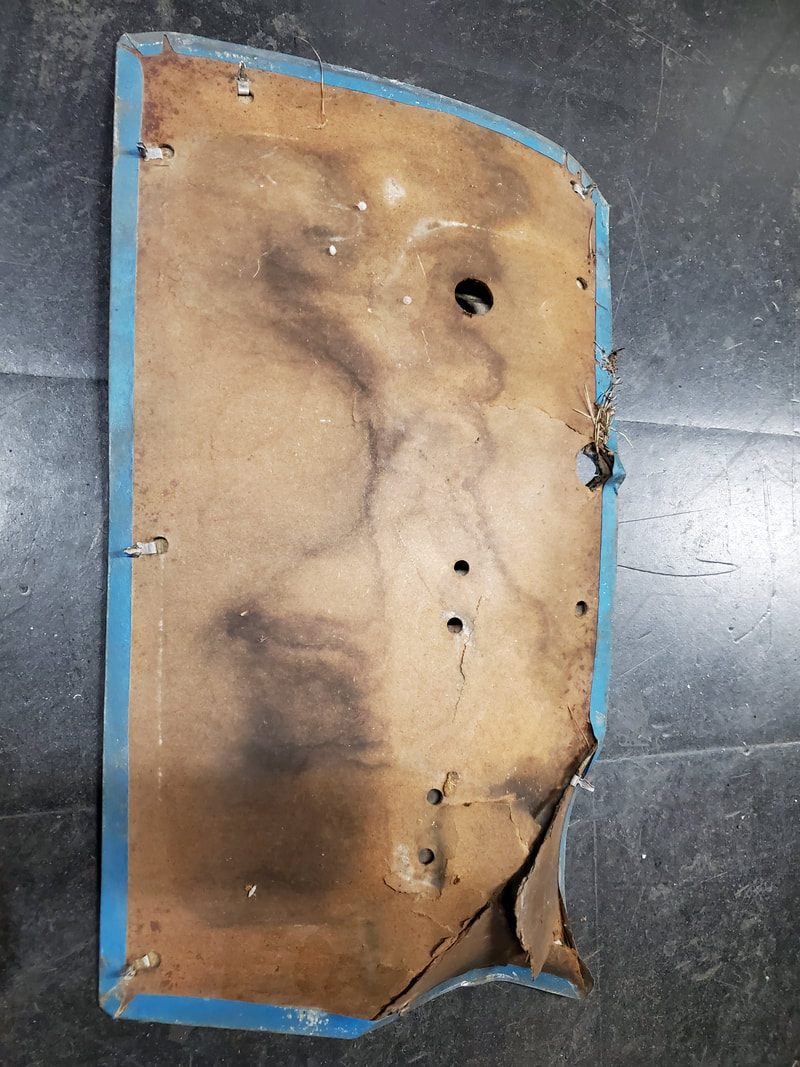 This panel isn't much better.... 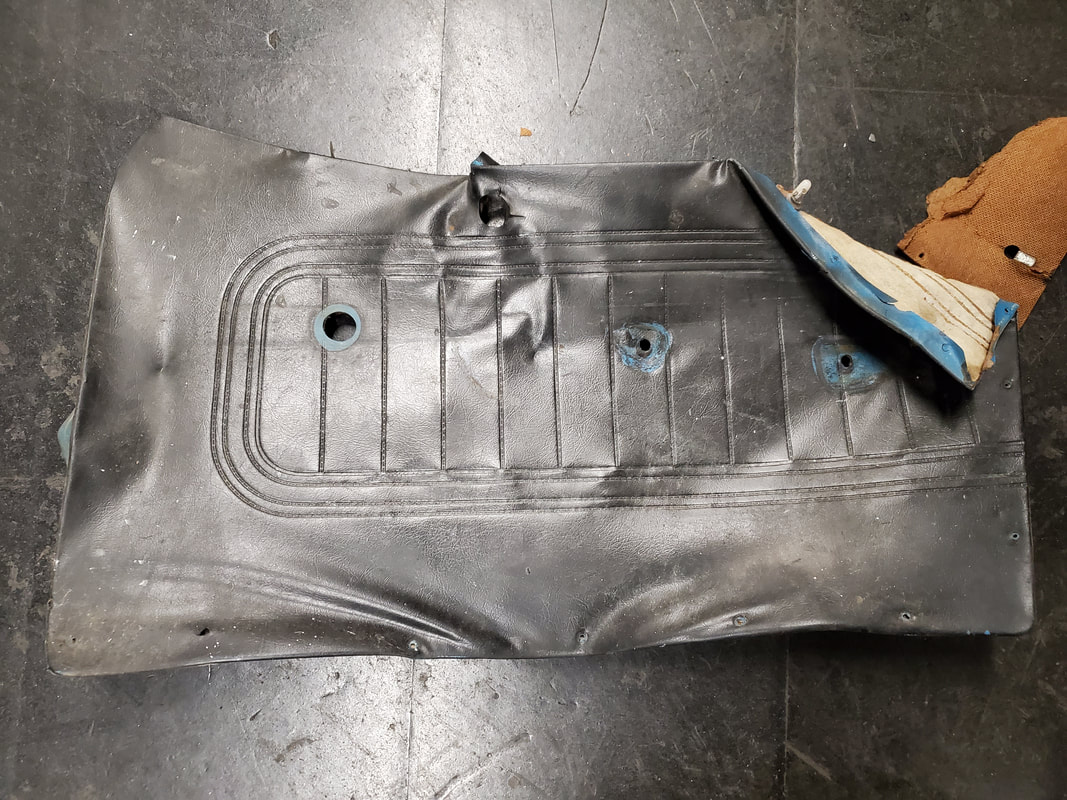 Despite poor condition of the boards the skin is surprisingly well preserved. 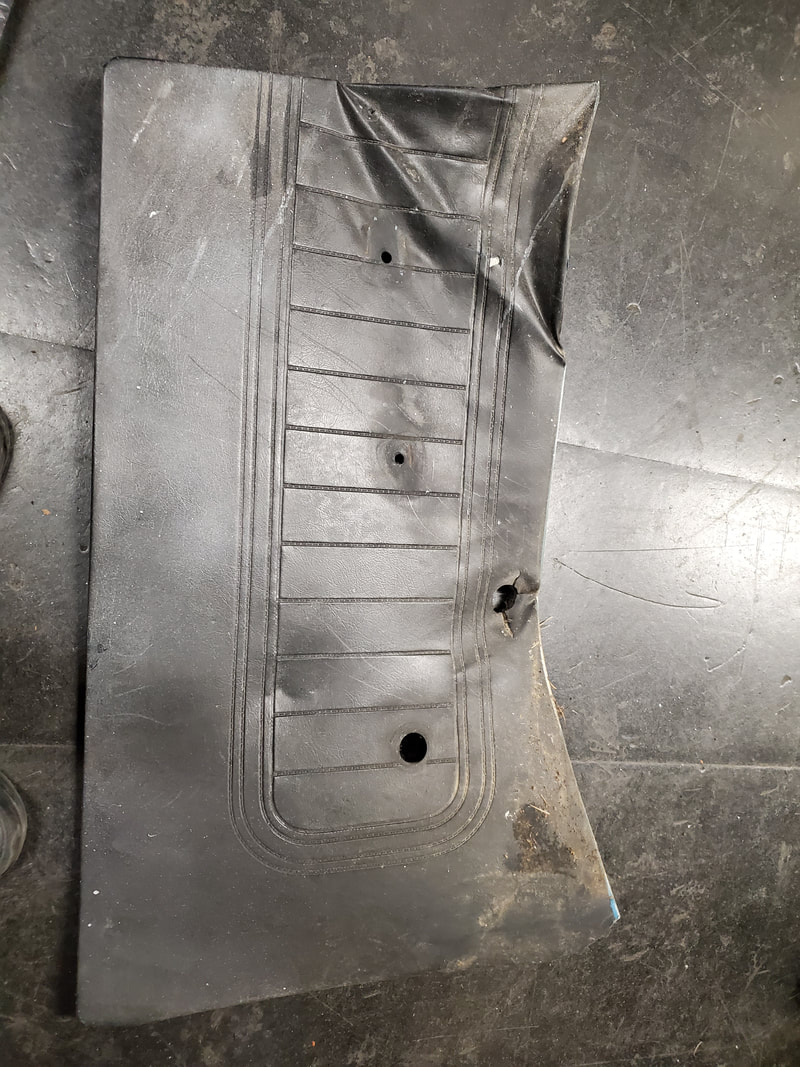 Same with this panel, good skin. After looking at my options I ended up settling on using some heavy duty cardboard for the bases of the panels. I took each old panel and removed the skins from both first. I then took the bases and laid them out on the cardboard, pressing down to get the whole panel flush against the cardboard before tracing out the outline with a permanent marker. After getting the outline I then traced out the different holes that were present on the old panels. These holes were for the window cranks and door levers as well as the clips that hold the panels to the door. I cut out the panels and used a drill for the smaller holes while using a razor to cut the larger holes out. Now I'm not going to worry too much about the little holes for the clips since the skins actually had holes in the skin around different points on the edges for screws to hole the panels to the door. Most of the clips were missing and because the old panels were so fucked up the old clips wouldn't hold the panels to the doors anyway. With the screw holes, that meant I would still be able to secure the panels to the door by just putting sheet metal screws with washers through these holes. The larger holes were the ones I was focused with since the window crank and lever had to match up. Luckily the skin also had holes to match up to these holes. 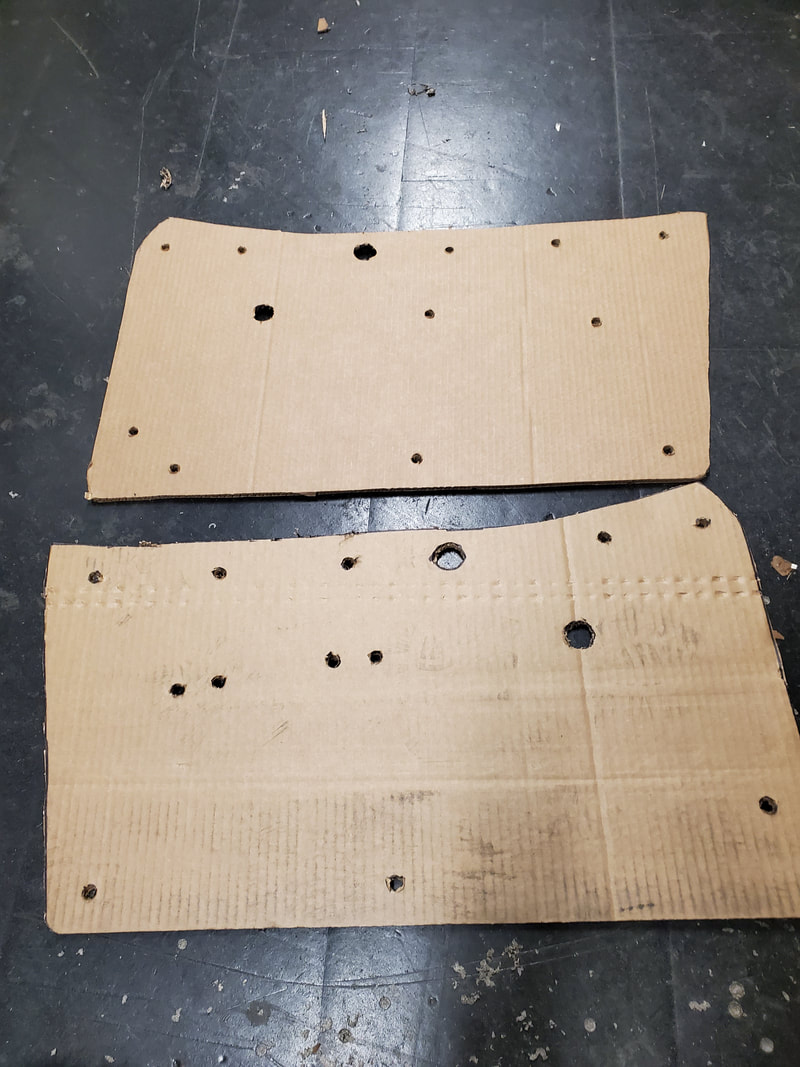 Door panels cut from cardboard with holes cut out to match up to old panels. I started putting the new skin on each panel, using a hot glue gun to glue the edges to the cardboard. I had to carefully glue small spots then stretch the skin and glue it in other spots in order to ensure that the two larger holes match up to the holes on the panel. I also had to make sure that the overall outline of the skin matched up as closely as possible to that of the panel. I eventually got the whole panel glued down to each panel good enough to keep the holes matched up and not have any bulges. I couldn't do anything about any of the old creases as that might've required more in depth treatment to get the material to flatten out. It isn't that serious with these panels as they're more or less flawed anyway. 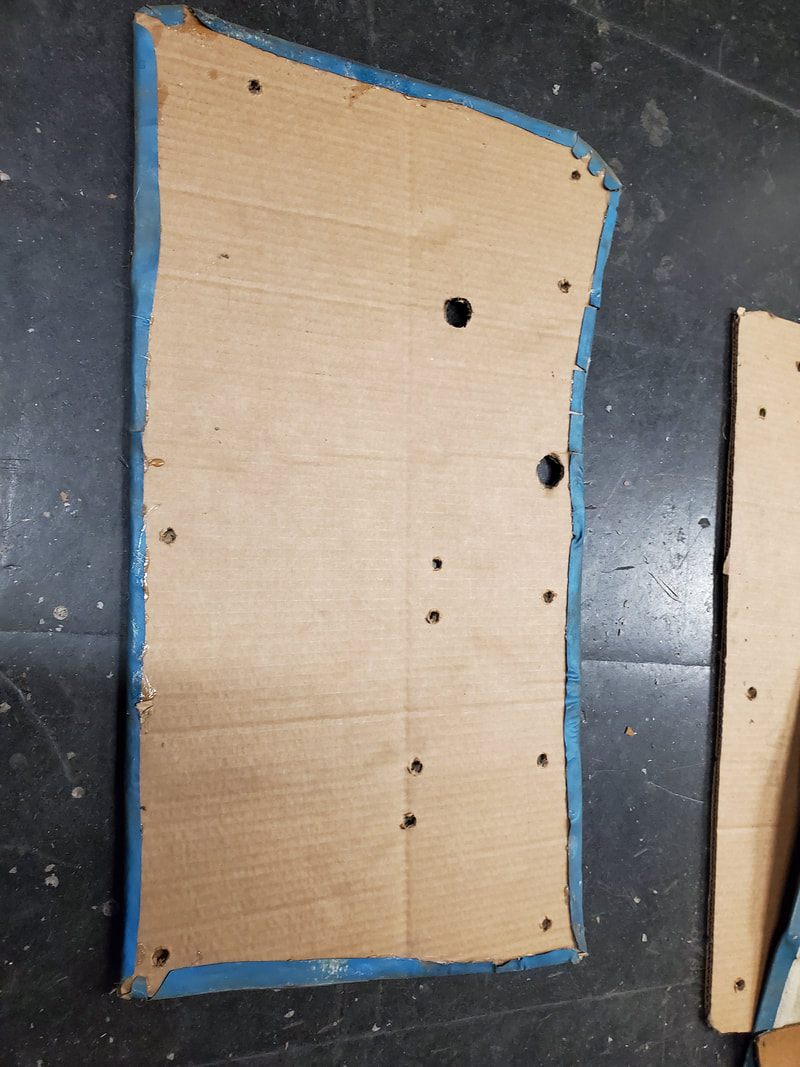 Skin with edges glued to cardboard all around. 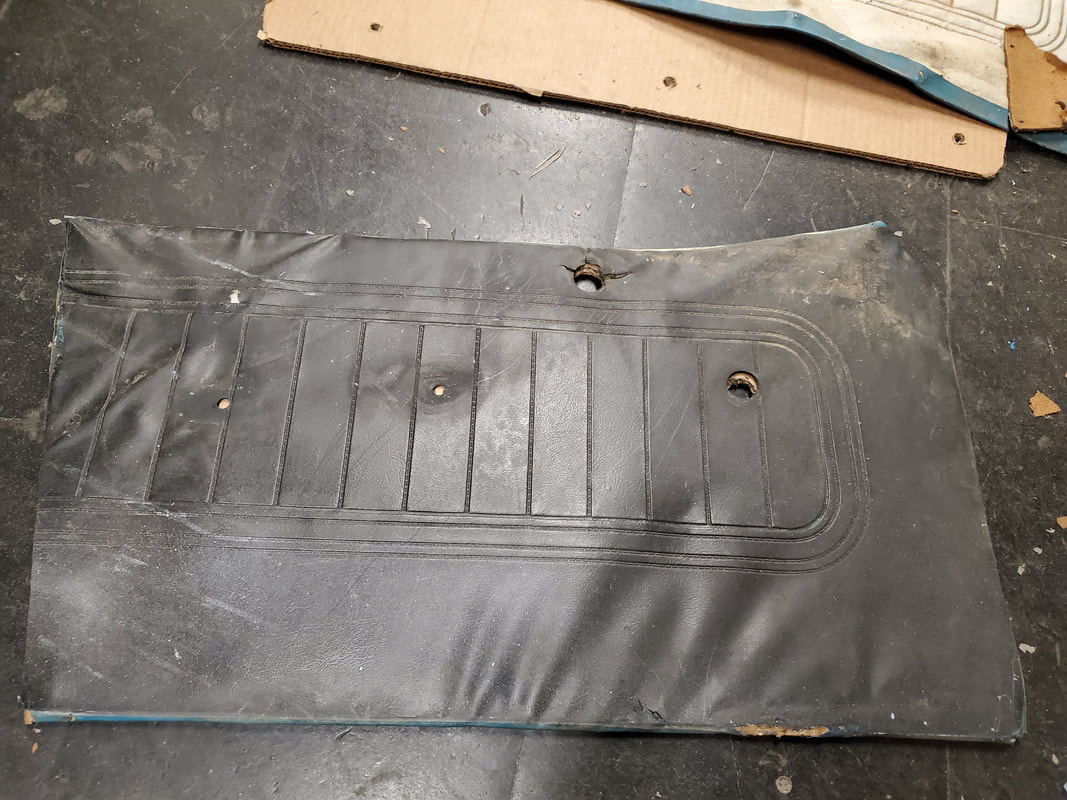 Skin laid down nicely on cardboard panel, main holes matching up. 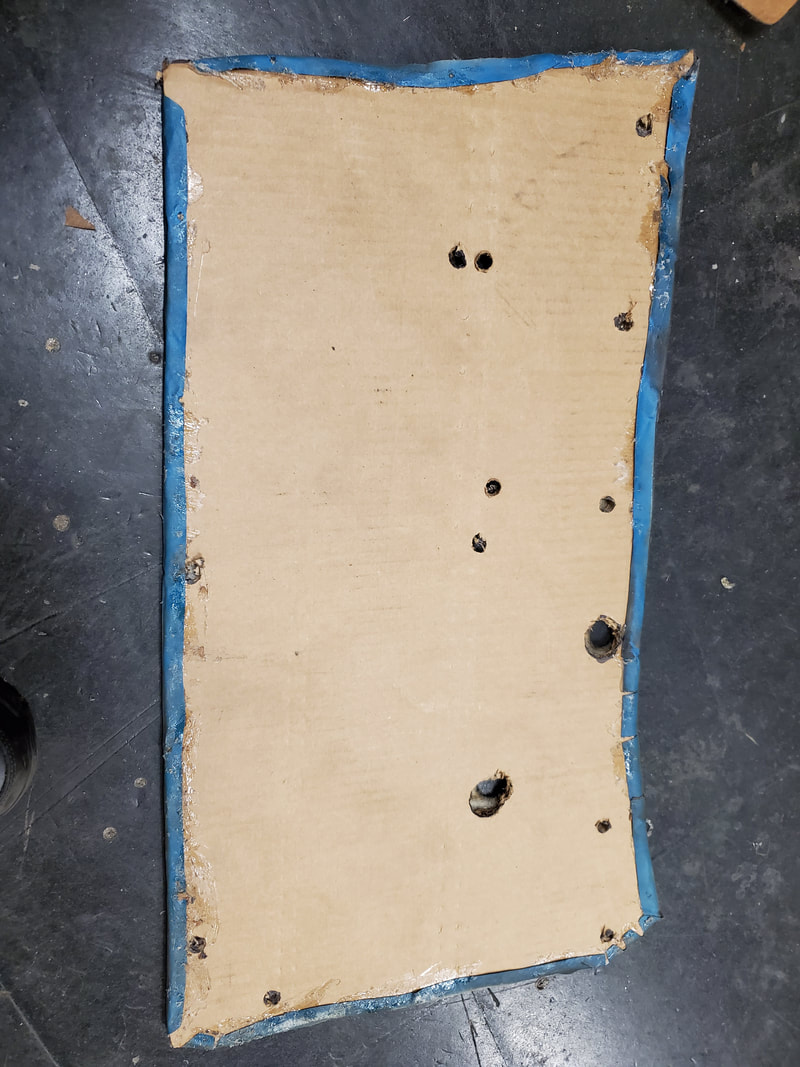 2nd door panel with skin glued in place. 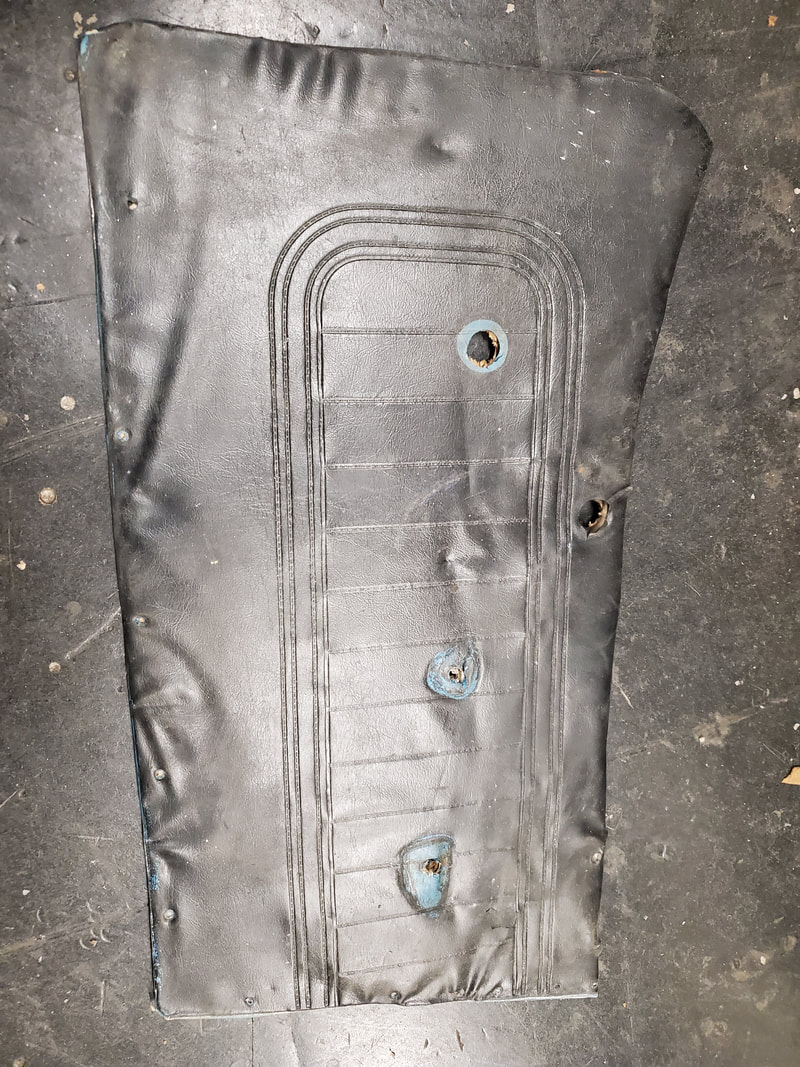 Skin stretched over 2nd panel, ready to go. With these door panels done I did find that most if not all of the small clip holes did not line up. At least the two main holes did, which was all that mattered in the end. The glue set hard holding the panels nicely as well so these things were ready to secure to the doors during my next work session. Like I said before, I will use the screw holes in the skin as pilot holes to drill through the cardboard and through the door metal since these holes wouldn't line up with any of the old holes in the door. Still no big deal though as I won't be making new holes in the panel skin. Once these panels are hung on the doors I can get the armrests and window cranks back on and get this part of the LUV's reassembly completed.
After having installed the heater in the doghouse I still had to install an outdoor outlet with which to plug the doghouse to. The easiest way I figured I could do this was to remove one of the outlets in the kitchen and poke a hole through the outside wall with which to run a cable through to the outside. I'd tap into the kitchen outlet and use this cable to feed into the outlet that'll be mounted outside of the wall. I had to start off with removing the outlet in the kitchen. Once the outlet was removed I drilled a hole through the siding to the outside.
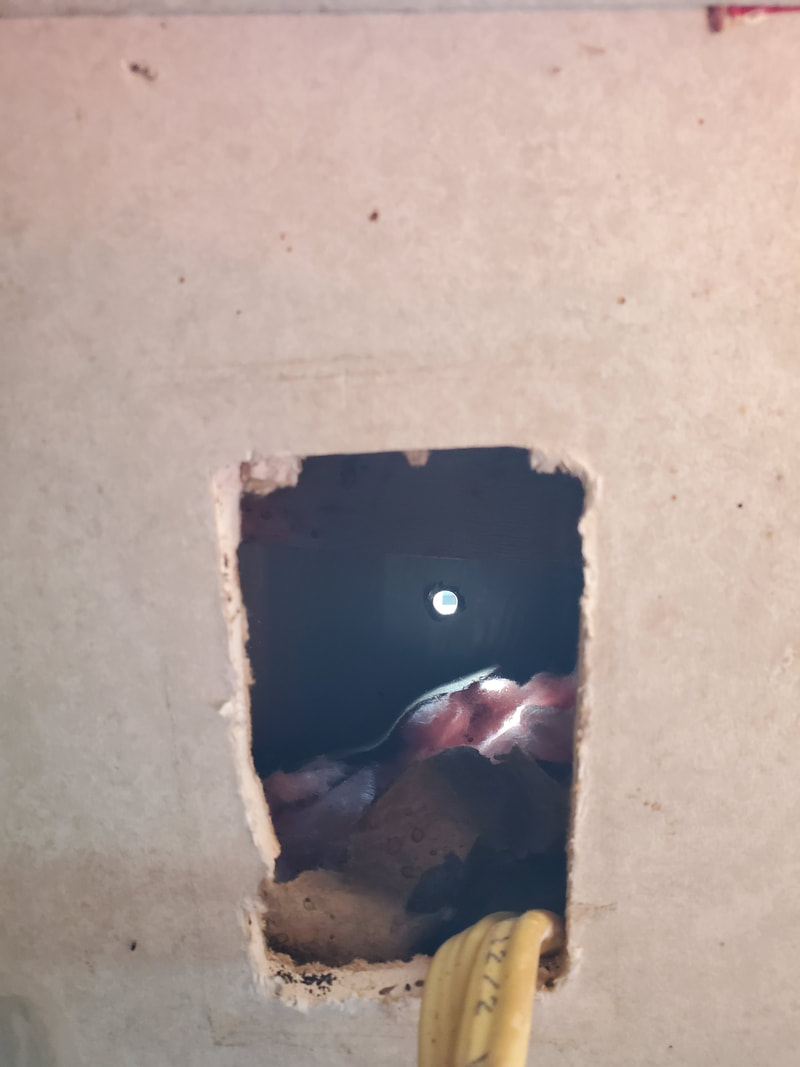
Opening in wall from outlet and hole in siding to the outside.
With the hole drilled through the wall I went ahead and traced an outline for the outdoor outlet box. From there I cut the rectangle out from the wall to open up the spot for the outlet. Reason for doing things like this instead of trying to cut the hole by a wall stud was because I picked up a plastic gang box/outlet box that has retention tabs on the sides that extend out when the screw is turned to tighten the tabs. This box allows me to install an outlet at any point on the wall as I only have to tighten the tabs and the box is secured in place in the hole. 
Spot traced on outside wall to cut out to accommodate outlet box.
After installing the outlet box I punched out one of the plastic knockouts in the back of the box to accommodate the cable that will extend to the outside from the kitchen outlet. I routed the cable through and hooked up the outside end to the outlet to be used in the outdoor box while disassembling the kitchen outlet box in order to tap into the cable feeding that outlet. 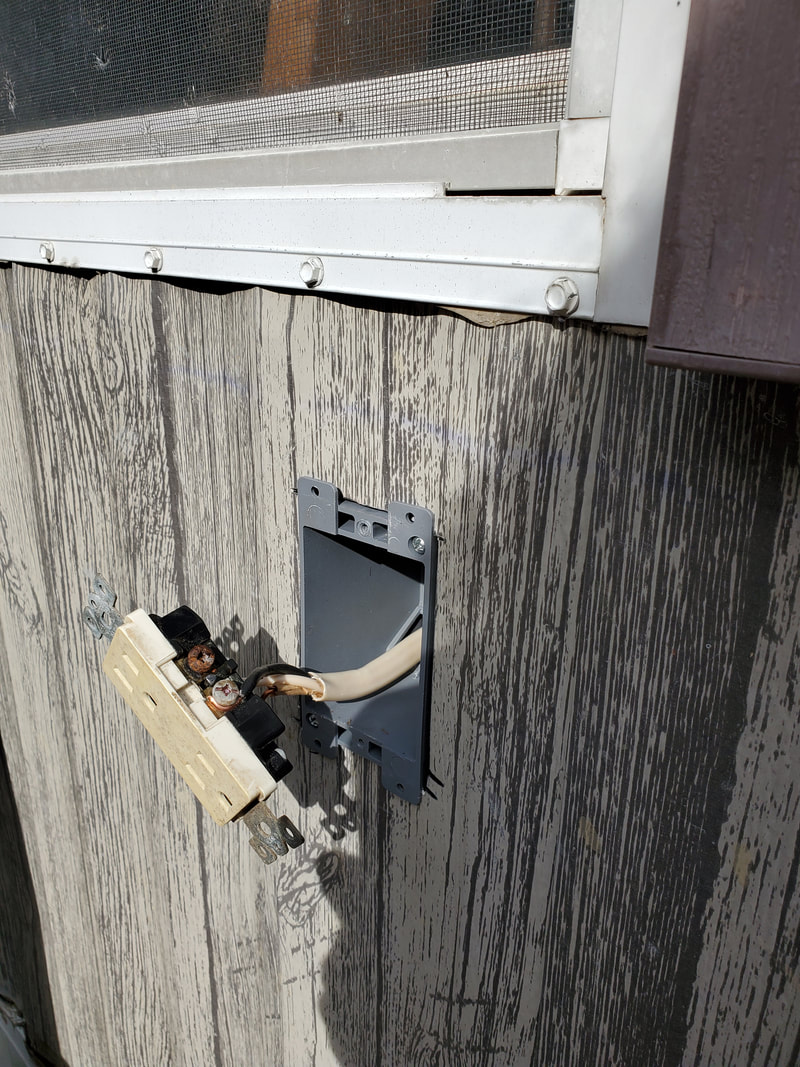
Plastic outlet box installed in wall with outlet and cable protruding from box.
With the outlet box in place the next thing was the outdoor cover. This component is really just an extension to the outlet box where instead of a plastic or metal cover that acts as a skin over the outlet, this thing has a clear plastic box that goes over the outlet to keep plugs covered and dry while routing the cable from the plug through a slot in the clear box. The clear box is hinged to allow for easy access when plugging something up. This outdoor outlet cover screws right to the outlet box with the cover screwing to the outlet itself. A foam gasket goes between the outlet box and the outdoor outlet cover to help seal the thing up. 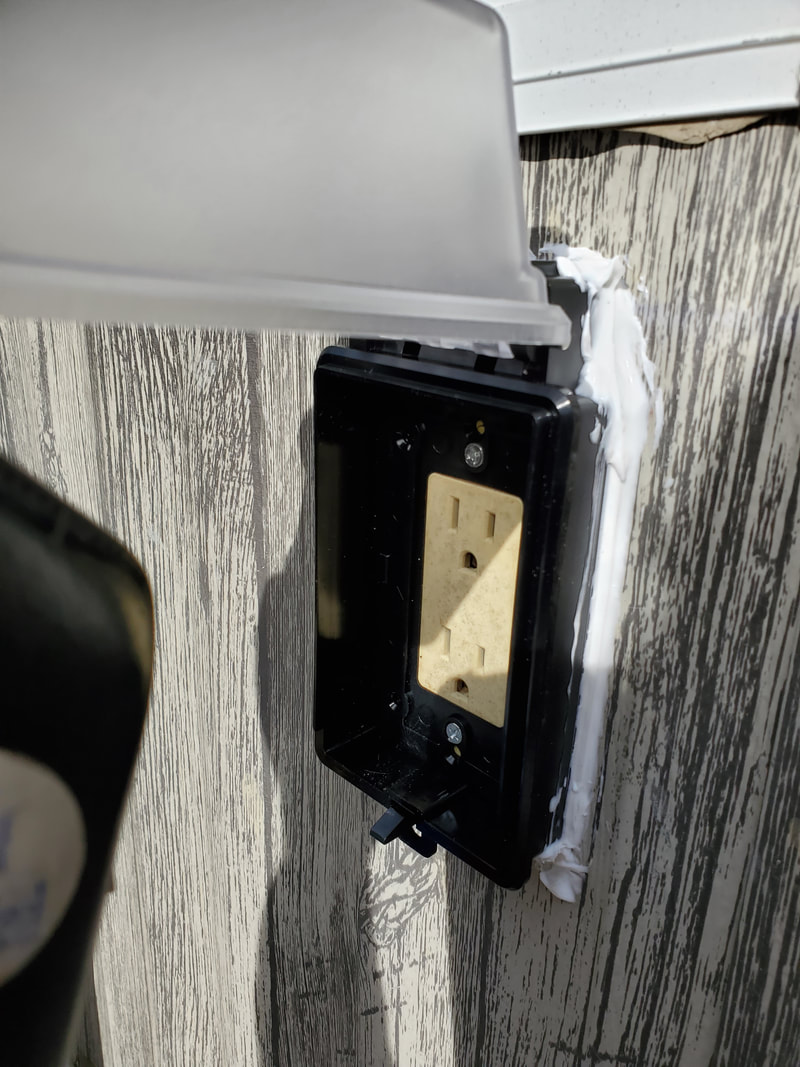
Outdoor outlet cover in place over outlet and box.
As noted in the last pic, I put caulk around the outlet cover and the wall to further protect the outlet from water intrusion. Even though the outlet had a gasket, I wanted to be doubly sure that no water would manage to make it into the outlet and more importantly, make it into the wall of the house where pooled water at the bottom of the wall will eventually rot the wood away causing future problems. With the box completely installed and sealed I went ahead and added the timer module and plugged up the doghouse. 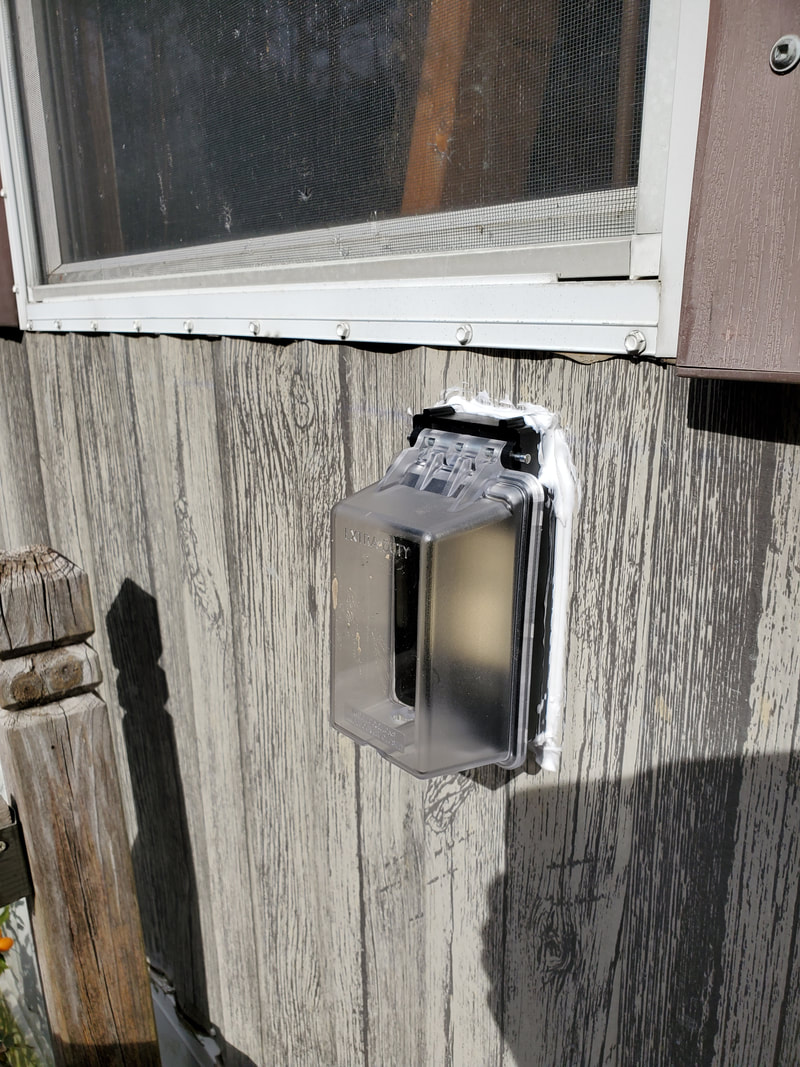
Outlet box closed up, note caulk around box.
I originally wanted to have a dusk/dawn module but didn't pay attention to the box I grabbed, not noting that the unit was a timer vs a dusk/dawn/timer module. After looking at the unit and seeing that it had the capability to have 24 different timing cycles, I figured that this thing was actually better as it would allow me to set up on/off cycles that would allow the heater to come on long enough to take the chill out of the doghouse without causing it to be uncomfortable inside. Plus, the timer allowed me to set the unit up to come on for a short span of time in the late evening before we come home, then go off during the time that we hang out and have the dog inside with us. The timer will come back on around the time we go to bed since the dog will go back outside at said time. The heater will stay on through the rest of the night until dawn where it'll go off for the whole day until late evening, repeating the cycle. 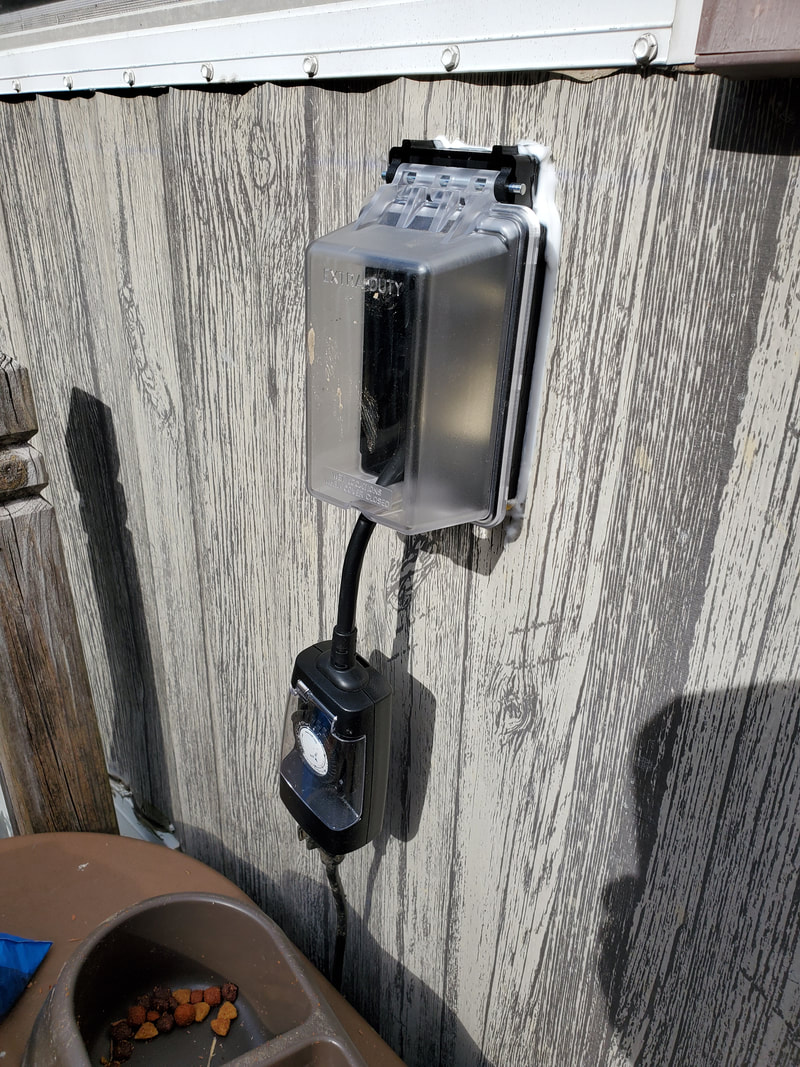
Timer module plugged up to outlet with doghouse plug hooked up to timer. Note how clear box covers timer plug and outlet to keep it sealed.
With the timer hooked up and the outlet in place, the doghouse is now online ready to keep the dog comfortable in the cooler weather. At the same time this outlet will also serve double duty as another outside source of power for anything going on around the porch. Eventually I'll have to rebuild the porch due to its continued deterioration and part of a new construction might be building up an ensemble that includes some amenities outside that would require power. With the outlet in place, that power is there for the taking.
One of the bigger things on the list for putting the LUV back together was re-installing the back window. The unique thing about this window is the idea that it requires this rubber gasket that has two grooves, one for the window frame and one for the window opening on the cab. One would have to work this whole thing together all around, not really knowing how tough the rubber is or if there's any kind of procedure to installing this type of window gasket. Either way, it sounds like its probably going to be a pain in the ass, provided I could even find said gasket. Or I could just use some adhesive or other sealer and some fasteners to hold the window in place and seal the unit from leakage. I ended up going with the latter.
Since I needed to dry in the cab I needed to get this window in more sooner than later as the cab was constantly being bombarded by rain as well as any critters that felt compelled to go inside the cab. I ended up using some roofing tar in a caulker size tube to serve as a sealer. I also got some angle braces and bent them straight to use them as fasteners at the top and bottom of the window to hold it in place. I started off with a rough bead of tar around the window frame before setting the window in place. I then took a couple of braces and propped them along the bottom, using self tapping screws to hold the bottom of the window in place against the tar. I still had to apply a lot more tar around the window to ensure complete coverage but before I did that I had to put the top braces in place. 
Angle brace bent straight and propped against the window frame, secured in place with self tapping screws.
Angle brace on opposite side set up in the same way as the first one.
For the top I took two more angle braces and bent them just enough that one leg of the brace would be propped against the window frame and the other leg would be in the right position against the window frame metal where it would sit relatively flush with the metal and be secured by one self tapping screw each. With the angle braces secured in place and the window pretty much held pretty snug against the window frame I opened up with the tar all around the window frame, filling the gap between the window frame and the window itself, working the goo neatly around the surrounding area. Eventually I made my way all around the window, having a nice even layer that was free of lumps and unevenness. I even managed to cover up the top angle braces enough so that one couldn't even see that the braces were there unless they knew where to look. 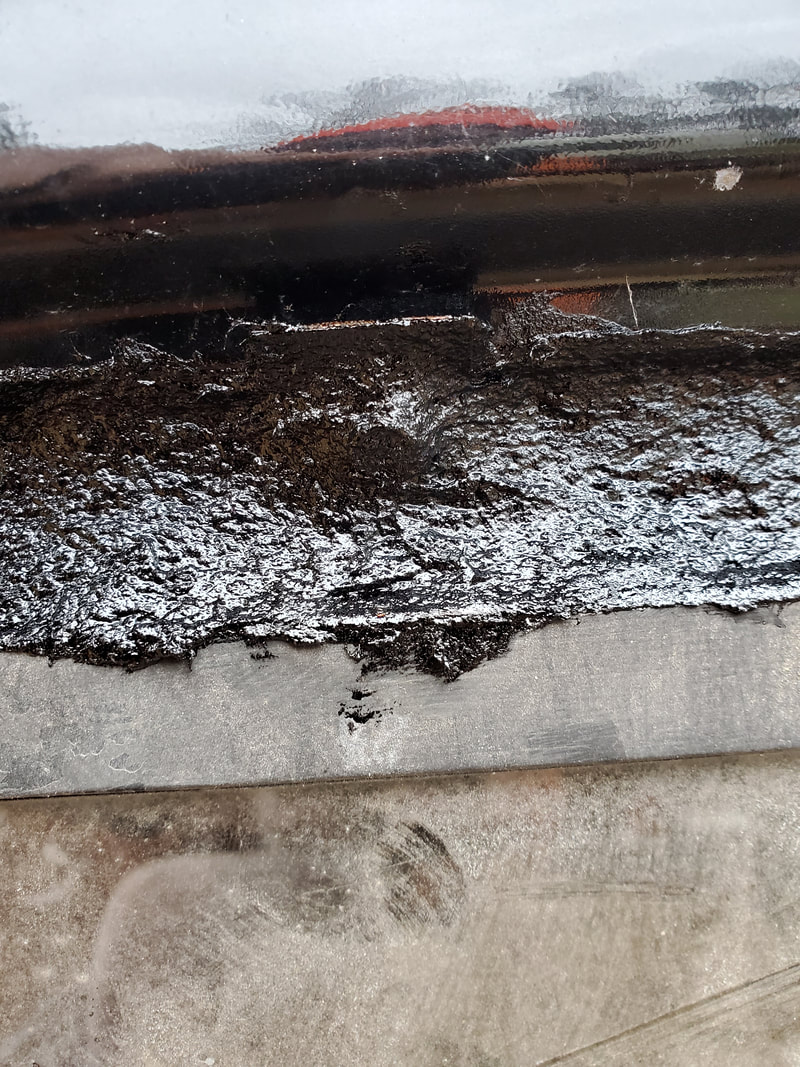
Bulge in middle of tarry pic is angle brace that was covered by said tar.

Only the very edge of angle brace is visible on top of the layer of tar that's in place around the window frame.
With the window mounted in place and the roofing tar spread all around the window I took the time to go inside and smooth out some of the overflow of tar that made it past the window and to the inside. This allowed me to get even more sealing as there's a thin layer of tar around the window frame from the inside. With all this sealing the window should not give me any trouble as far as leakage from rain. Hopefully over time the tar will cure enough to harden up and reinforce the holding of the window in place on the back of the cab. 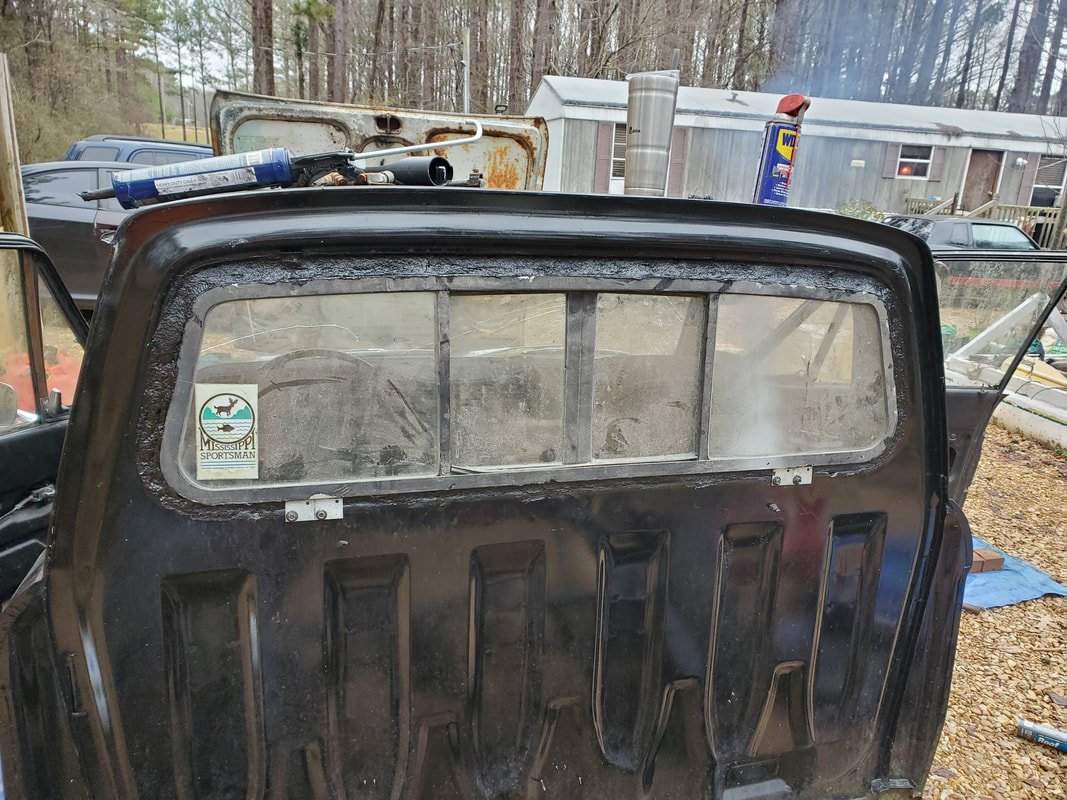
Rear window all sealed in and mounted in place in the cab's window frame/opening.
Another couple of tasks that had to be done on the LUV after getting the body panels straightened out was to adjust the torsion bar suspension. At first I didn't know if I reassembled the hardware that is used to put tension on the bars but after inspecting the undercarriage I found out that everything was in place, just not adjusted. Torsion bar suspension works by turning a stud with a socket and breaker bar and this stud pushes up on a lever attached to the torsion bar. This pushing against this lever twists the torsion bar putting it under tension and acting as a spring. Downward force on the body is absorbed by the further twisting of the torsion bar, which will spring back to return the truck to its normal ride height. The cool thing about torsion bar suspensions is the idea that one can adjust the ride height of a vehicle through the adjustment of the bars. To do this I had to start off by jacking up one side to take all weight off the wheel. To twist these adjusters is a pain in the ass, with weight on it it would be very difficult to achieve the twist necessary to get the truck to ride higher and be under tension so as to have the springiness of the front suspension. So with the wheel off the ground I was able to keep twisting the stud and lowering the truck and raising it up again to twist it some more, repeating until the ride height was where I wanted it.  Left side after adjusting torsion bar and lowering truck back down to put weight on suspension, note gap between top of tire and bottom of fender. Before making the adjustments, the top of the tire scrubbed against the bottom of the fender and made turning the wheels difficult. With the tension on the torsion bar, the ride height was raised to where the "rest" position on the truck's front suspension puts the truck at a position where the wheel has free clearance under the fender. Even when I push down on the truck it will spring right back up to its rest position. I repeated the same on the right side. 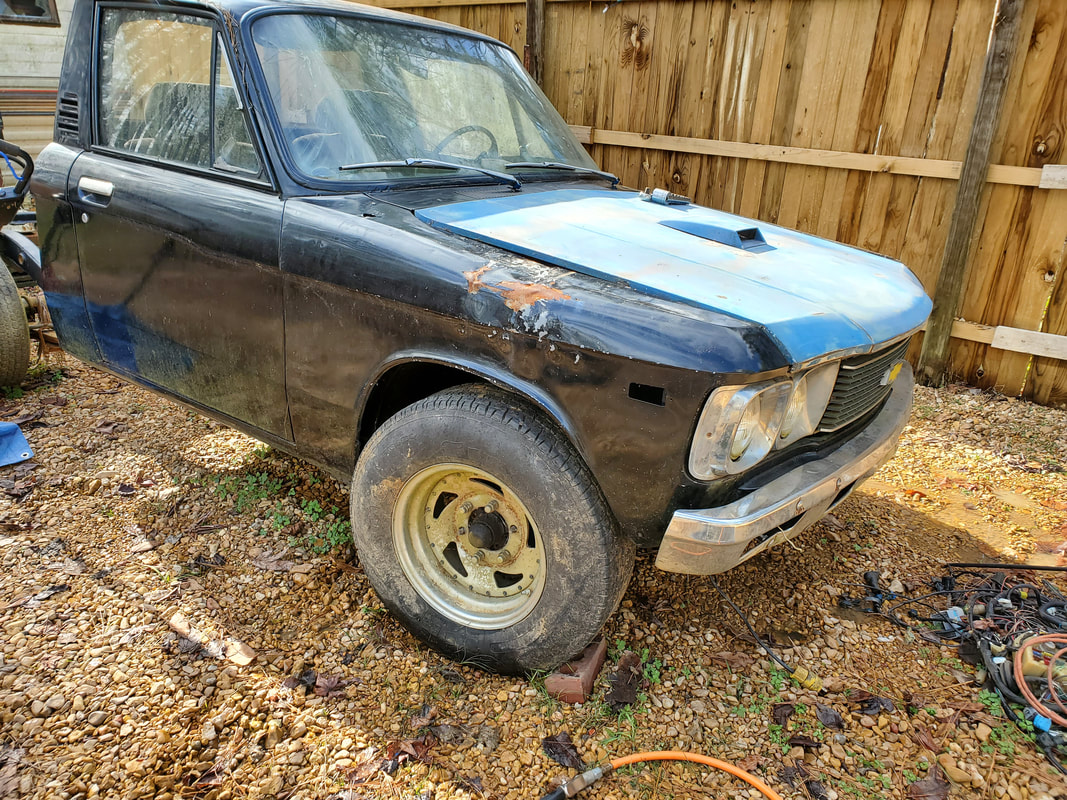 Right side after adjusting torsion bar, note gap between tire and fender. With both torsion bars adjusted and tested to verify that the truck won't spring too much to where the fender may scrape again I was able to get ready to move on to the next little task on the truck, that was installing the shifter and hooking it up to the transmission. 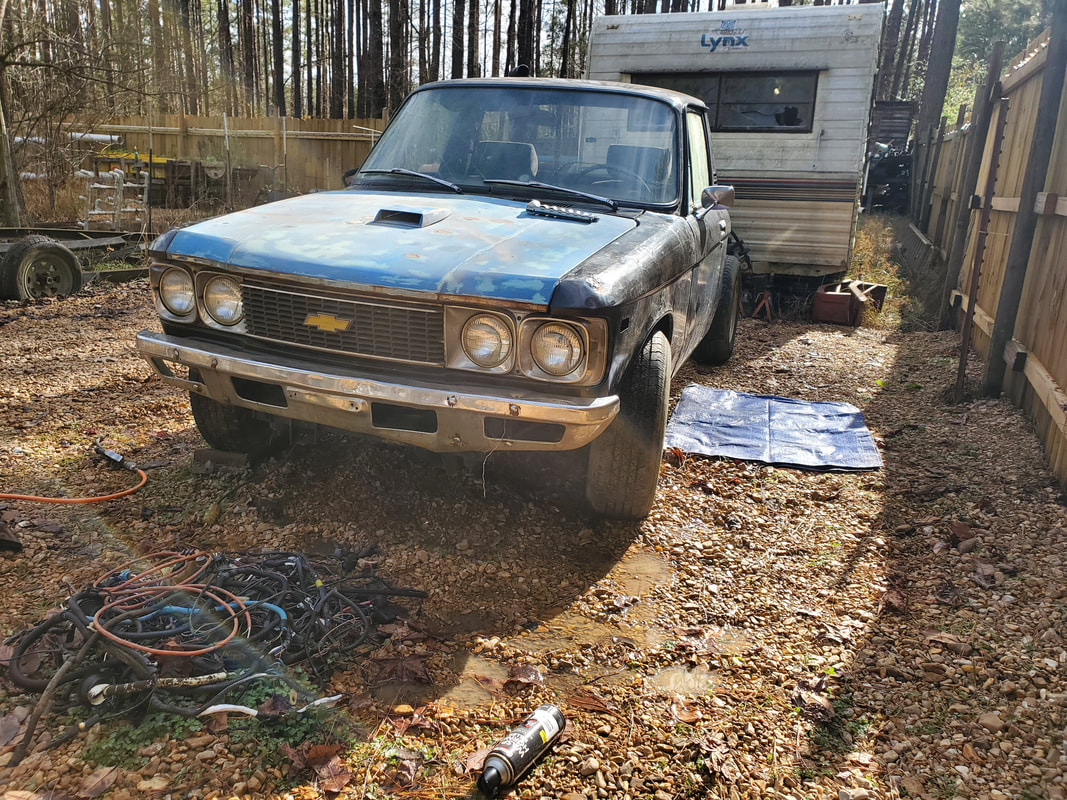 Truck back on all fours with torsion bar suspension adjusted to get ride height set around where I'd want it at. I had to dig out four bolts that fit the retaining holes for the shifter on the floor of the truck's cab. After finding these I secured the shifter to the floor then slid underneath to get things hooked up and verified working. I already had a linkage on the shifter plug and a modified mount on the shift lever on the transmission. All I had to do was adjust the mounting stud using the two nuts on the shifter linkage and get things lined up with the shifter lever on the transmission. After getting the mounting stud lined up I was able to connect the linkage with the transmission then held things together with a retaining pin. After testing the shifter to verify that it shifted through all the selections on the transmission I was able to write off that task on the LUV.  Shifter installed on floor of truck's cab. Green bolts are bolts I fished out from a bucket of metric bolts to screw in place to hold the shifter down. 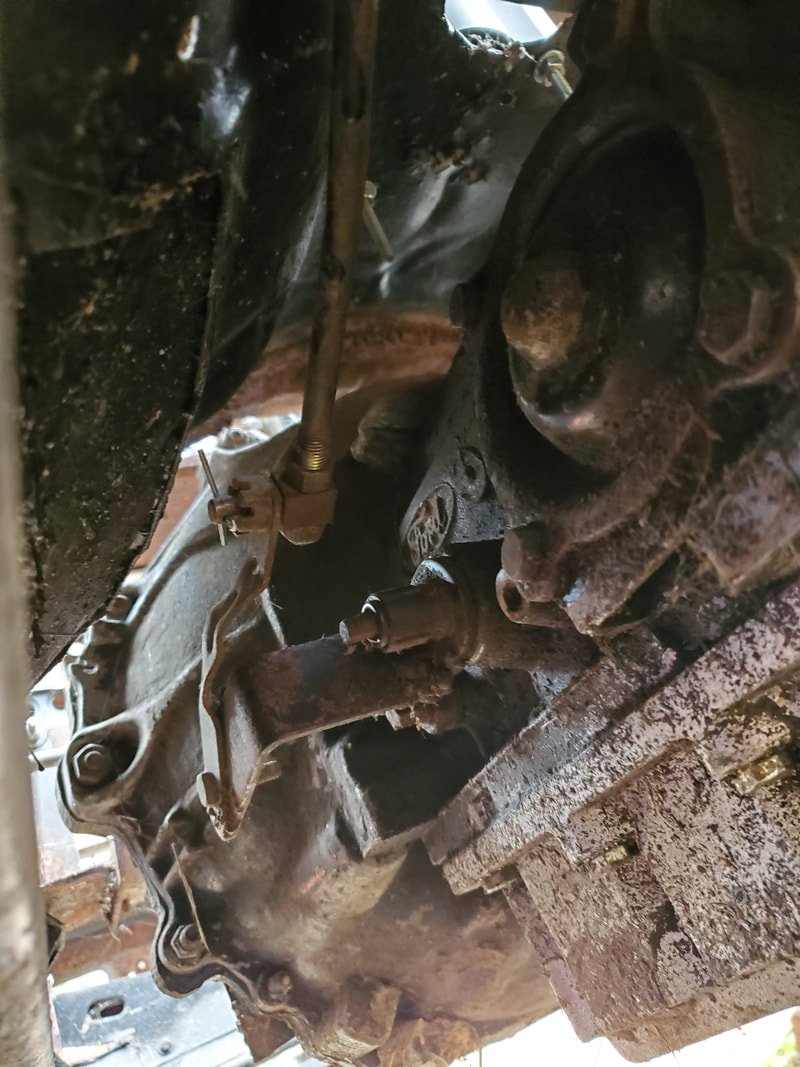 Closeup of linkages between the transmission and shifter. Note the mounting stud held in place by two nuts on the shifter linkage. Mounting stud inserts into the end of the shifter on the transmission. There are many things I still have to do on the LUV to get the truck more complete. My whole goal at this time is to get the truck as assembled as possible without having to buy anything. By doing this I will have the truck closer to done while ridding the garage of LUV parts. I still have to mount the front turn signal lights, driveshaft and door panels along with the back window. There will be plenty more to come. After removing the messed up hood and pulling the fenders off it was time to go to work on the straightening out of the body. I had already put the new old hood back on and got it somewhat straight so now it was time to start pounding out the serious dents in the fenders. Since the severity of the dents was enough so that I couldn't expect to actually get them to anywhere near perfect I just focused on getting the panels as straight as possible. I will end up coming back over them with body filler and later on paint in the future. Right now I just wanted the body lines to be as straight as possible again. This is where the baby sledgehammer came into play. I pounded around the dented areas carefully, taking time to knock out the major dents dead center while trying to finish up around the edges of the distressed areas until I got the overall lines straight enough despite the ripples and crinkles in the sheet metal. I started work on the left fender since it was the lesser damaged of the two. After getting the dents pounded out fairly well I remounted the panel. 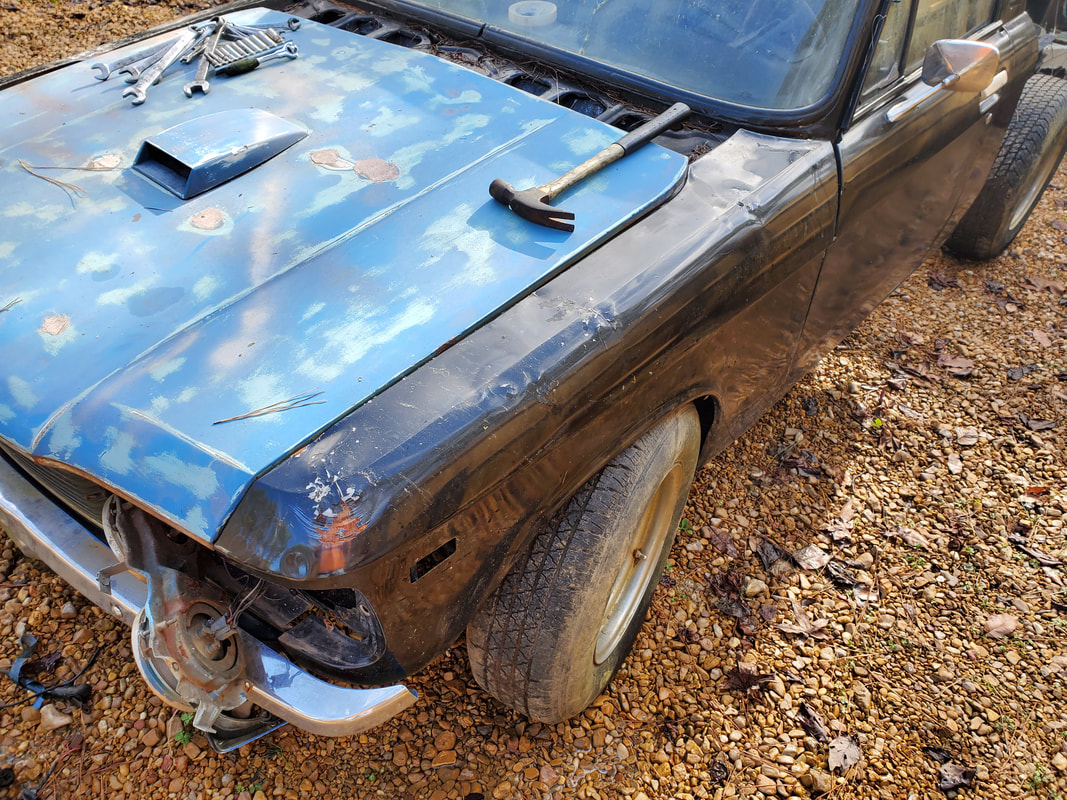 Left fender remounted after having dents pounded out. After remounting the fender I went ahead and remounted the headlight bucket and the molding to get that side complete. From there I moved on to the right fender. The right side is the one that took the brunt of the tree so it was really dented up. That fender took some extra pounding all around, carefully pounding in different spots to get the overall denting knocked out as best as I could. Even with the pounding I still didn't really get the lines perfect but I will be able to cover this up with body filler in the future. Even with the remaining dents and flawed sheet metal everything still looks a helluva lot better than it did prior. 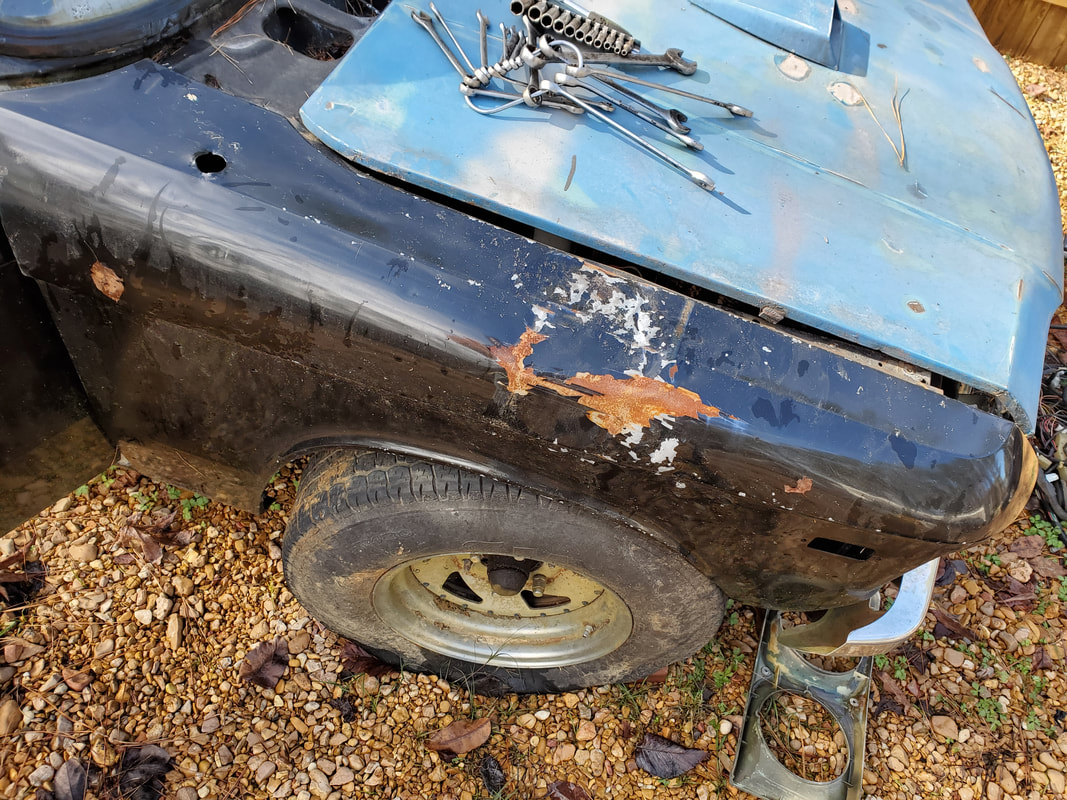 Right fender after pounding out dents. Note how lines aren't perfect but still a lot better than the panel was beforehand. Another reason I will have to consider coming back over these panels with body filler and paint is due to the fact that when I pounded out the dents I knocked out a large amount of paint from the metal, exposing surface rust that if left unchecked will eventually grow to become rust holes then we'll be in real trouble when it comes to trying to save these panels. More than likely I will just get some filler and do some crude mud work and hit everything with the sander then put some spray can primer over all of this just to keep the metal safe. It really won't be too bad of a job, will probably take me a weekend to get everything patched up. Anyway, after remounting the fender the headlight hardware came behind it. 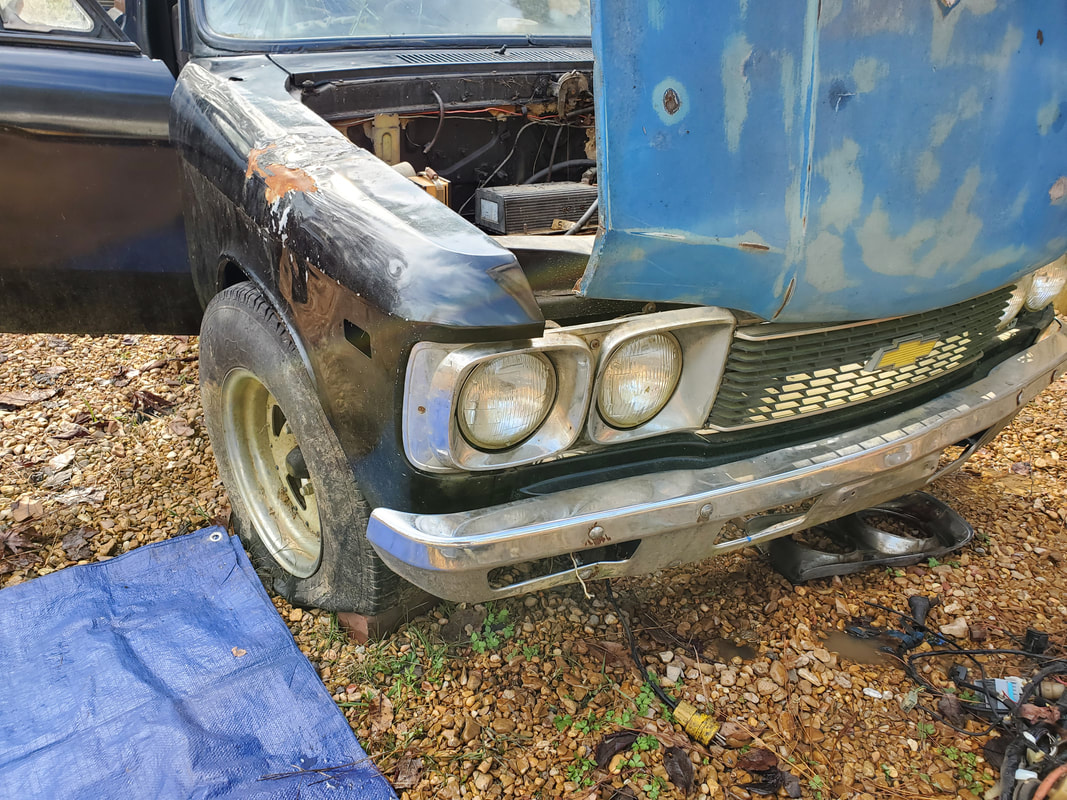 Another angle of the re-installed right fender and headlight hardware. This angle shows a little better how the lines aren't perfectly straight compared to the hood. This is where body filler comes in. With both fenders' dents pounded out and everything remounted, I can at least say the truck looks way better. The crushed hood will end up going to scrap as there's no use for the unit in any capacity. More than likely I will make an attempt to re-install the bed on the truck so then I can start visiting the idea of doing body work on this part of the truck as well and possibly attempting another paint job again in the future. In the meantime I still need to get other areas addressed on the truck so it will be able to drive once again, and drive under electric power. 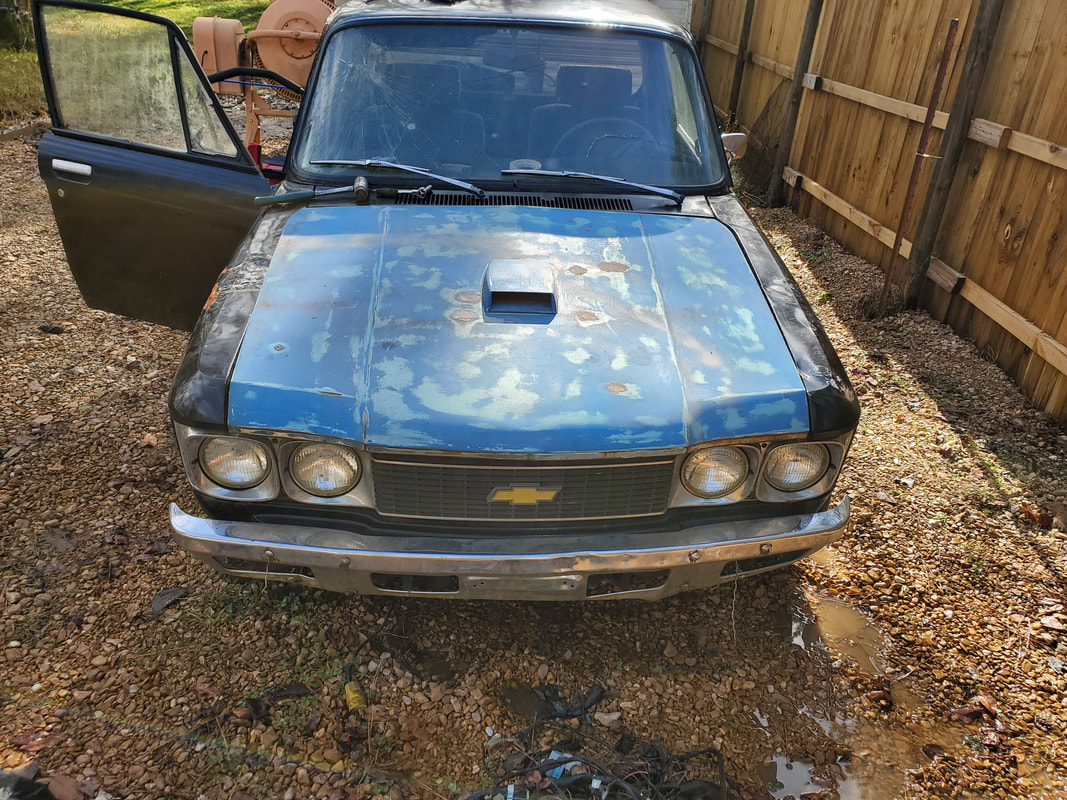 Frontal shot of truck with fenders back on and hood closed to show line comparison between panels to show how straight the fenders are despite pounding out the dents. |
